

Page 1

HIFI MICRO SYSTEM
Ovation
CDS 6680
fr esen ptde it
Page 2

CONTENTS
_____________________________________________________________
28 SET-UP AND SAFETY
28 Magic Fidelity
The sound concept from Ovation
29 OVERVIEW
29 The hi-fi system controls
32 The hi-fi system displays
33 The remote control
35 CONNECTION AND PREPARATION
35 Connecting the antenna
35 Connecting an external device
35 Connecting an MP3 player or USB memory
stick
35 Inserting a memory card
36 Connecting the headphones
36 Connecting the power cord
36 Inserting batteries in the remote control
37 Additional information for units sold in the UK.
38 SETTINGS
38 Setting and storing radio stations
38 Initial station search
39 Setting the time
39 Resetting the hi-fi system
40 GENERAL FUNCTIONS
40 Switching the hi-fi system on and off
40 Adjusting the brightness of the display
40 Changing the colour of the display lighting
40 Selecting the input source
40 Adjusting the volume
40 Muting
40 Selecting sound effects
40 Setting the equaliser
41 Switching the Ultra Bass System on and off
41 Switching the display
41 TUNER MODE
41 Selecting the Tuner input source
41 Selecting a preset position
41 Stereo/mono reception
41 Selecting favourites
42 RDS station service
43 CD MODE
43 Selecting the CD input source
43 Inserting a CD
43 Playing back a CD
44 Repeating the current file or track
44 Selecting another file or track
44 Searching for a passage within a file or track
44 Selecting albums and files (MP3/WMA only)
44 Calling up track information (MP3/WMA only)
45 Repeating a file or a title (Repeat One)
45 Repeating all the files on an album (MP3/
WMA only)
45 Repeating all files or tracks (Repeat All)
45 Playing back files or tracks in random order
(Random)
45 Playing the introductions of files or tracks (Intro)
46 Creating a track memory
47 USB AND SD/SDHC/MMC MODE
47 Playing the contents of an MP3 player or a
USB memory stick
47 Pausing and resuming playback
47 Repeating the current track
47 Selecting another track
47 Searching for a passage within a file or track
47 Playing the contents of an SD/SDHC/MMC
memory card
47 Pausing and resuming playback
47 Repeating the current track
48 Selecting another track
48 Searching for a passage within a file or track
49 TIMER MODE
49 Switch-on timer
50 Reminder timer
50 Sleep timer
50 Setting the sleep timer
50 Ending the sleep timer prematurely
51 INFORMATION
51 Cleaning the CD unit
51 Environmental note
51 General information on laser devices
51 Technical data
52 Troubleshooting
ENGLISH
27
Page 3
SET-UP AND SAFETY
______________________________________________
Please note the following information when setting
up the system:
7
The hi-fi system is designed for the playback of audio signals. Any other use is expressly prohibited.
7
If you want to set up the hi-fi system on wall shelves or in cupboards, please ensure that it is adequately ventilated. There must be at least 10 cm
of space at the side, above and behind the hi-fi
system. Do not place objects on the ventilation
slots. Do not cover the hi-fi system with newspapers, table cloths, curtains, etc.
7
Please note when setting up the hi-fi system that
furniture surfaces are coated with various types
of paint and plastic, which often contain chemical
additives. These additives may cause corrosion to
the feet of the unit. This may leave stains on the
surface of the furniture which can be difficult or
impossible to remove.
7
Do not use any cleaning agents as they may damage the housing. Clean the hi-fi system with a
clean, dry cloth.
7
If the hi-fi system is exposed to sudden changes
in temperature, for example when taken from the
cold into a warm room, wait at least two hours
before using it.
7
The hi-fi system is designed for use in dry rooms. If
you do use it outside, please ensure that it is protected from moisture, such as rain or water splashes.
7
Only use the hi-fi system in a moderate climate.
7
Do not place the hi-fi system close to heating units
or in direct sunlight, as this will impair cooling.
7
Do not place any vessels containing liquids (for
example, vases) on the hi-fi system. Do not place
any naked flames such as candles on the hi-fi system. Do not insert any foreign bodies in the CD
compartment.
7
Do not open the hi-fi system casing under any
circumstances. Warranty claims are excluded for
damage resulting from improper handling.
7
Thunderstorms are a danger to all electrical devices. Even if the hi-fi system is switched off, it can
be damaged by a lightning strike to the mains or
the antenna cable. Always disconnect the mains
and antenna plugs during a storm.
7
Make sure the power plug is freely accessible.
Magic Fidelity
The sound concept from Ovation
Magic Fidelity is a new, three-channel active
loudspeaker system developed and patented by
Grundig, which produces powerful and brilliant
sound.
A bass speaker as well as two medium and treble
speakers, each in their own casing, create an outstanding sound experience.
28
ENGLISH
Page 4
OVERVIEW
____________________________________________________________
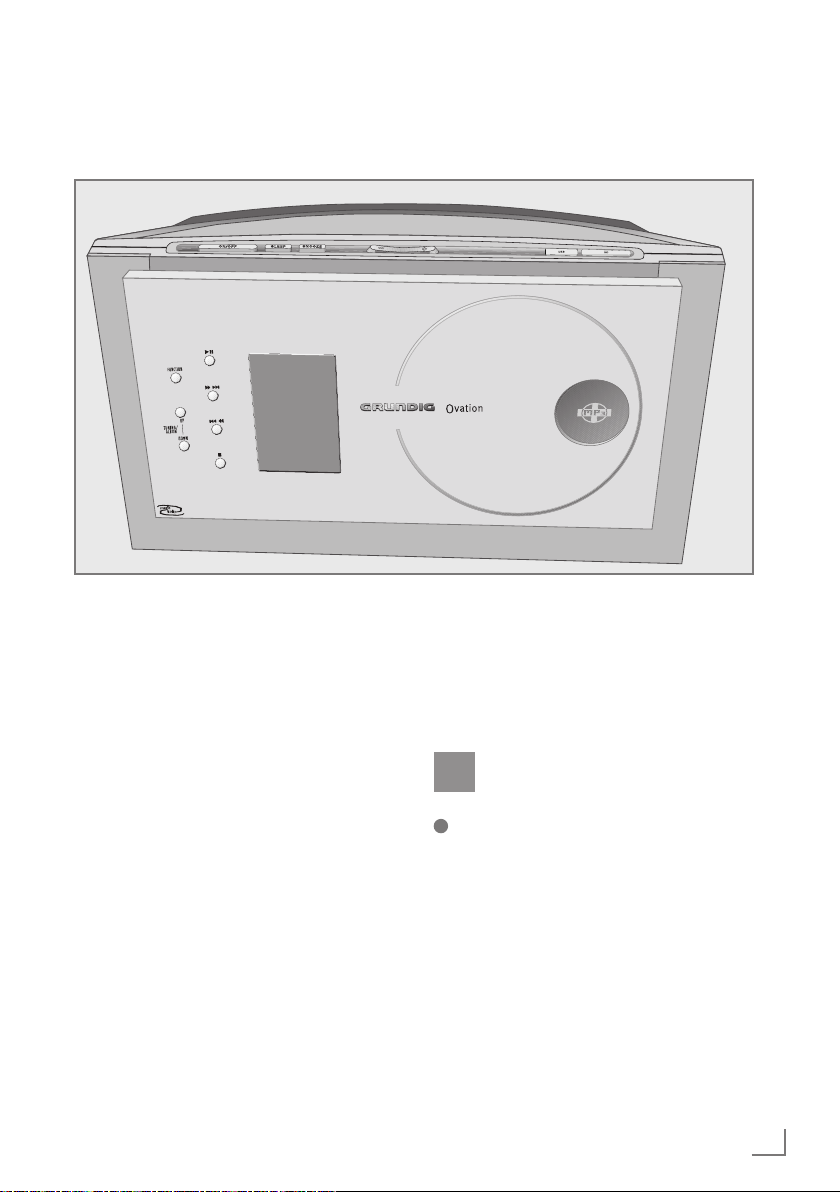
The hi-fi system controls
Controls on the front
FUNCTION Selects the different audio
sources »FM TUNER«, »MW
TUNER«, »CD«, »SD CARD«,
»USB« and »AUX«.
TUNING/ALBUM In tuner mode: Press and
UP – DOWN hold down to start the station
search;
press briefly to change the frequency in small steps.
In CD/USB/SD mode: Selects
the next or previous album.
$ s6 In Tuner mode: Selects stored
5a aa
radio stations forwards or
backwards.
In CD, USB or SD mode: Press
briefly to selects files or tracks.
Press and hold down to
search for a certain passage
forwards/backwards.
Front panel Fold to the front to open the
CD compartment.
II In CD/USB/SD mode: Starts
e
7 In CD/USB/SD mode: Stops
Display of the hi-fi system, for
Infrared sensor for remote con-
and pauses playback.
the playback.
more details, please see “The
hi-fi system displays” section.
trol signals.
ENGLISH
29
Page 5

OVERVIEW
____________________________________________________________
Controls on the top
ON/OFF Switches the device to and
from standby mode.
The device is only fully discon-
nected from the mains after the
plug has been pulled out.
SLEEP For setting the sleep timer.
SNOOZE Interrupts the alarm function.
– VOLUME + Adjusts the volume.
USB USB socket for connecting
MP3 player, a USB memory
stick or a card-reading device.
SD Card slot for inserting a memo-
ry card (SD or SDHC).
DIMMER SENSOR Automatically adjusts the
back light of the display to the
brightness of the room.
30
ENGLISH
Page 6
OVERVIEW
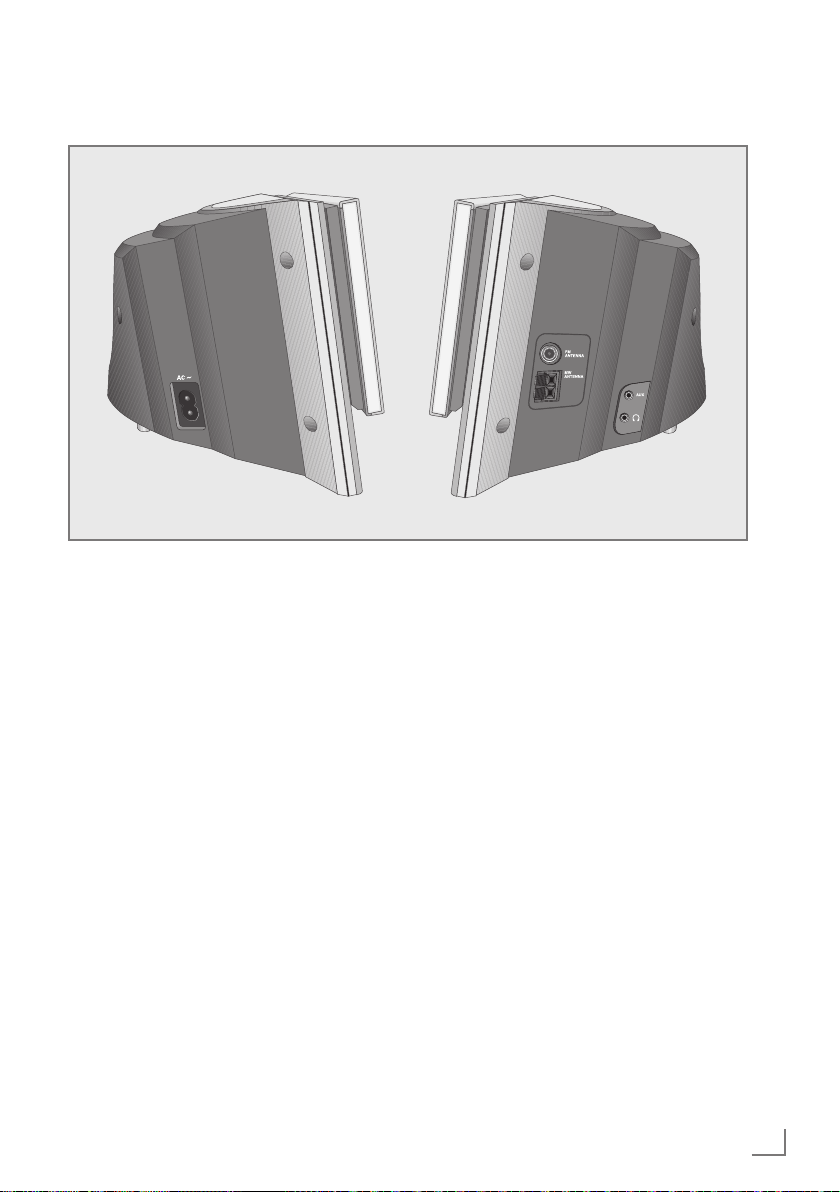
Controls on the sides
____________________________________________________________
AC~ Socket for mains cable (left
side of the device).
The only way to isolate the hi-fi
system from the mains supply is
to pull the plug out.
AUX Audio signal input for an exter-
nal device on the right hand
side.
U Headphone socket for connect-
ing a stereo headphone set
with a jack plug (ø 3.5 mm) on
the right side of the device.
The speakers of the hi-fi system
are automatically switched off.
FM ANTENNA Antenna socket for the rooftop
antenna or the wire antenna
supplied.
MW ANTENNA Aerial terminals for connecting
the MW frame antenna supplied.
Controls on the bottom
RESET Resets the hi-fi system in case
of malfunction.
Press »RESET« to reset, using
an implement such as a paper
clip. Clock and alarm time are
deleted.
ENGLISH
31
Page 7
OVERVIEW
____________________________________________________________
The hi-fi system displays
N
N
X C V Y B
USER
CLASSIC POP JAZZ ROCK
ALBUM FILE
PM
UBS
w
000:000
1
ALL
M
R
ALBUM
II
INTRO
)
RANDOM PROG
kHz
MHz
000000.00
f
000:000 In standby mode: displays the time.
000000.00 In standby mode: displays the day of the
PTY
e
§
In tuner mode: displays the preset station.
In MP3/WMA mode: displays the
total number of albums and files, and the
elapsed playing time of the current file.
In CD-DA mode: displays the total
playing time, and the elapsed
playing time of the current track.
week.
In tuner mode: displays the wavelength and
the frequency or the station name.
In MP3/WMA mode: displays the disc
format and the number of the current file.
In CD-DA mode: displays the disc format,
the total number of tracks and the number
of the current track.
V Displays the selected sound setting,
for example »JAZZ«.
B The Ultra Bass System is activated.
ALBUM In MP3/WMA mode: displays the total
number of albums or the number of an
album.
PM Displays the second half of the day in 12-
hour format.
FILE In MP3/WMA mode: displays the total
number of files or the number of an file.
32
ENGLISH
TEXT NAP
WEC
≤
w In tuner mode: flashes when awaiting an
RDS time signal; lights up when RDS time
synchronisation is complete.
1
M
In MP3/WMA and CD-DA mode: a file
or a track is repeated.
ALL
M
In MP3/WMA and CD-DA mode: all files
or tracks of a CD are repeated.
ALBUM
M
INTRO In MP3/WMA and CD-DA mode: the
RANDOM In MP3/WMA and CD-DA mode:
PROG In tuner mode: a stored radio station is
In MP3/WMA mode: all files on an
album are repeated.
first ten seconds of each file or track are
played.
all files or tracks are played back in
random order.
selected or played.
In MP3/WMA and CD-DA mode: a
track memory is created or played back.
) In tuner mode: an FM stereo station is
being received.
kHZ In tuner mode: in combination with the
MW frequency indicator.
MHz In tuner mode: in combination with the
FM frequency indicator.
R In MP3/WMA and CD-DA mode: a track
is played back.
II In MP3/WMA and CD-DA mode: a track
playback is interrupted (pause).
f In tuner mode: an RDS station is being
received.
PTY In tuner mode: the PTY (station type) func-
tion is activated.
TEXT In tuner mode: the radio text function is
activated.
NAP The reminder timer is activated.
e In timer mode: the signal alarm function is
activated.
In timer mode: the radio or CD alarm
§
WEC
O The sleep timer is activated.
function is activated.
In timer mode: the alarm function is deac-
tivated at the weekend.
Page 8

OVERVIEW
____________________________________________________________
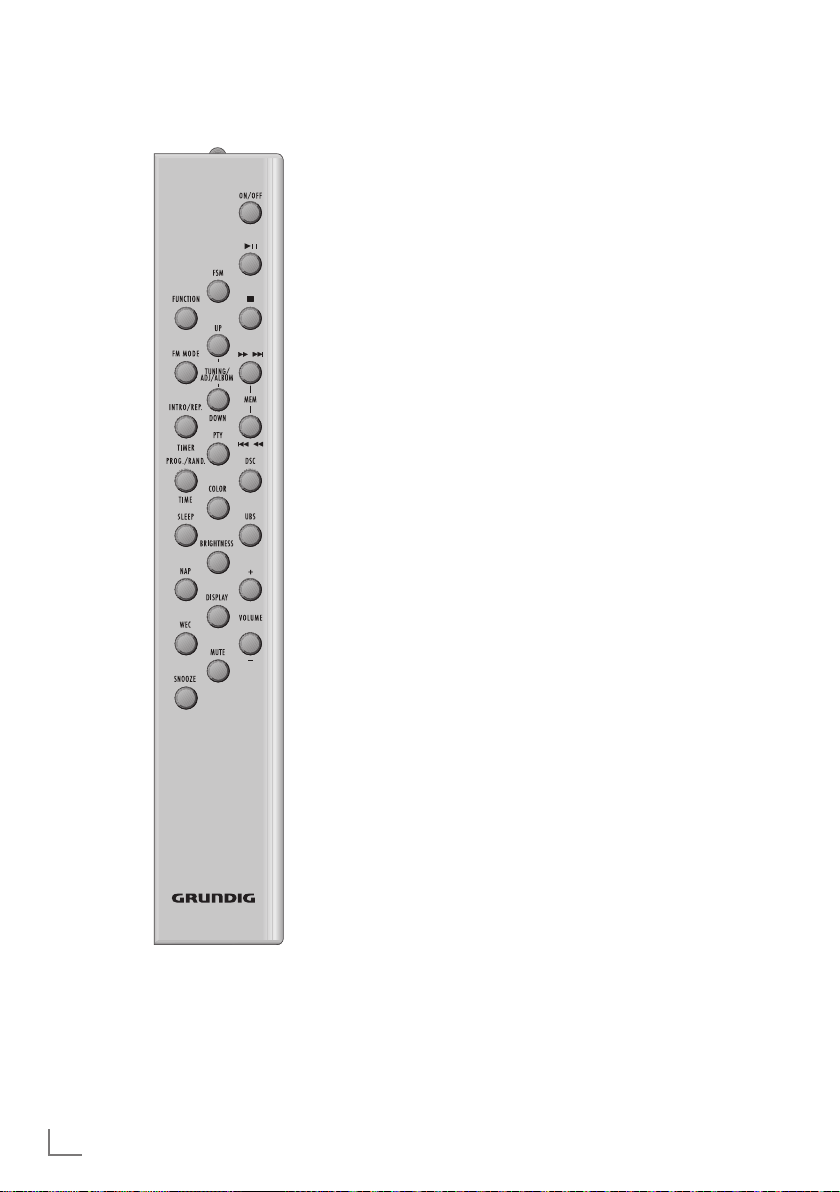
The remote control
ON/OFF Switches the hi-fi system to standby
mode and from standby mode to the
last signal source selected.
II In CD, USB or SD mode: Plays and
e
7 In CD, USB or SD mode: Stops the
$s6
MEM stations forwards or backwards
5a aa
DSC Selects the sound settings USER,
UBS Switches the Ultra Bass System on and
+
VOLUME – Adjust the volume.
FSM Favourite station memory.
UP TUNING/ In tuner mode: Holding and
ADJ/ALBUM pressing down starts the station
DOWN search;
briefly pressing changes the frequen-
PTY In tuner mode: calls up the current sta-
COLOR Selects the colour of the display back
BRIGHTNESS Changes the brightness of the display
pauses the playback.
playback.
In tuner mode: Selects stored radio
stations.
In CD, USB or SD mode: Selects files
or tracks. Searches forwards or backwards for a particular passage in a file
or track.
CLASSIC, POP, JAZZ and ROCK;
adjusts the equaliser (BASS or
TREBLE).
off.
cy forwards or backwards in steps.
In CD/USB/SD mode: Selects
albums forwards or backwards in
steps.
tion type (PTY); selects the station type
(PTY) for PTY search.
light (8 colours).
to one of three levels (bright, medium,
off).
ENGLISH
33
Page 9
OVERVIEW
____________________________________________________________
DISPLAY In tuner mode: switches the display
between frequency, station name, station type, radio text and time/day.
In CD-DA mode: switches the display
between elapsed playing time and
time/day.
In MP3/WMA mode: switches the
display between file number/elapsed
playing time, file name/ID3 tag information (ticker text) and time/day.
MUTE Switches the hi-fi speakers to and from
mute mode.
FUNCTION Selects the FM Tuner, MW Tuner, CD,
SD CARD, USB and Auxiliary input
sources.
FM MODE In tuner mode: switches between
mono and stereo reception.
INTRO/REP. In CD/USB/SD mode:
TIMER Plays the introduction to the files or
tracks on the data medium; repeats
a file or track, all files or tracks of a
CD/USB/SD or all files of an album.
In stand-by mode: Sets the switch-on
time and the alarm clock.
PROG./ In tuner mode: stores radio stations.
RAND. /TIME In CD/USB/SD mode: Saves files or
tracks for track memory;
plays back files or tracks in random
order.
In stand-by mode: For setting the time
and day manually.
SLEEP For setting the sleep timer.
NAP In standby mode: for setting the
reminder timer.
WEC Interrupts or reactivates the alarm
function for the weekend.
SNOOZE Interrupts the alarm function for about
5 minutes;
interrupts the reminder timer.
34
ENGLISH
Page 10

CONNECTION AND PREPARATION
_____________________
Connecting the antenna
1 Plug the rooftop antenna cable into the »FM AN-
TENNA« socket of the hi-fi system.
Note:
7
If no rooftop antenna is available, use the auxiliary antenna supplied. This antenna provides
reasonably good reception of local FM (VHF) stations. Do not shorten the auxiliary antenna.
2 Insert the wire frame antenna cable into the »MW
ANTENNA« terminals on the hi-fi system. Adjust the
position of the wire frame antenna until you get the
best reception.
Connecting an external device
1 Connect the audio input sockets of the external de-
vice to the »AUX« socket on the right side of the hi-fi
system with a stereo jack plug (ø 3,5 mm).
Note:
7
Switch the hi-fi system off before you connect
external devices.
Connecting an MP3 player or USB
memory stick
The hi-fi system supports most MP3 players and USB
memory sticks.
Note:
7
The hi-fi system must be switched off while the USB
connection is being made. If it is not switched off,
data can be lost.
1 Switch off the hi-fi system by pressing »ON/OFF«.
2 Connect the USB interface of the MP3 player to the
»USB« socket on the hi-fi system (on the top), using
a standard USB cable;
or
insert the USB plug of the USB memory stick in the
»USB« socket on the hi-fi system (on the top).
Notes:
7
To remove the MP3 player or the USB memory
stick, switch off the hi-fi system and pull out the cable for the data medium.
7
The USB socket on the hi-fi system does not support a connection for a USB extension cable and
is not designed for directly connecting to a computer.
Inserting a memory card
The hi-fi system supports SD/SDHC and MMC memory cards.
Note:
7
The hi-fi system must be switched off while the memory card is being inserted. If it is not switched off,
data can be lost.
1 Switch off the hi-fi system by pressing »ON/OFF«.
2 Insert the card carefully into the »SD« card slot (on
the top) until it latches into place.
Note:
7
Do not use excessive force when inserting the memory card. Only apply slight pressure.
7
The memory cards are resistant to dirt and moisture, but may only be inserted into the hi-fi system in
a dry and clean condition.
7
Never remove memory cards during operation.
This can damage the memory card. This type of
damage will invalidate your warranty.
ENGLISH
35
Page 11

CONNECTION AND PREPARATION
_____________________
Connecting the headphones
1 Insert the headphone plug (ø 3,5 mm) into the »U«
socket on the right side of the hi-fi.
– The loudspeakers of the hi-fi system are switched
off.
Note:
7
Excessive sound pressure from the earphones or
headphones can cause hearing loss.
Connecting the power cord
Note:
7
Check that the mains voltage on the type plate (on
the bottom of the hi-fi system) corresponds to your
local mains supply.
1 Plug the mains cable supplied into the »AC ~« soc-
ket on the hi-fi system.
2 Plug the power cord into the wall socket.
Inserting batteries in the remote
control
1 Open the battery compartment by pushing down its
lid.
2 When inserting the batteries (2 x 1.5 V, R 6/UM 3/
AA), observe the polarity marked on the base of the
battery compartment.
Note:
7
Do not expose the batteries to extreme heat, caused for example by direct sunlight, heaters or fire.
7
If your hi-fi system no longer reacts properly to remote control commands, the batteries may be flat.
Always remove used batteries. The manufacturer
accepts no liability for damage resulting from leaking batteries.
Caution:
7
The hi-fi system is connected to the mains with the
power cord. Pull out the power cord when you
want to completely disconnect the hi-fi system
from the mains.
7
Unplug the mains plug to disconnect the hi-fi system from the mains. Make sure the power plug is
easily accessible during operation and not hindered by other objects.
36
ENGLISH
Environmental note:
7
Batteries, including those which contain no heavy
metal, should not be disposed of with household
waste. Please dispose of used batteries in an environmentally responsible manner. Find out about
the legal regulations which apply in your area.
Page 12

CONNECTION AND PREPARATION
_____________________
Additional information for units sold
in the UK.
Units sold in the UK are suitable for operation from a
240V ac, 50Hz mains supply.
The range of multi-system receivers is built to work in
most European countries. However, the mains plug and
socket system for the UK differs from many European
countries.
This appliance has been supplied with a fitted, non-removable, approved converter plug for use in the UK.
This converter plug is fitted with a 5A rated fuse.
In case this appliance is supplied with a moulded 2-pin
Euro plug only, which is unsuitable for UK operation,
this must be cut off and immediately disposed of. An
approved 13A, 3-pin UK plug should then be fitted by
a qualified electrician.
Note:
The severed Euro plug must be destroyed to avoid
a possible shock hazard should it be inserted into a
socket elsewhere.
If a non-rewireable 3-pin plug or a rewireable 13A
(BS1363) 3-pin plug is used, it must be fitted with
a 5A ASTA or BSI approved BS1362 fuse. If any
other type of plug is used it must be protected by a
5A fuse either in the plug, or at the distribution board. If this type of plug becomes defective, ensure
that the fuse is removed before disposal, to eliminate
potential shock hazard.
If it is necessary to change the fuse in the non-rewireable plug, the correct type and rating (5A ASTA or
BSI approved BS1362) must be used and the fuse
cover must be refitted. If the fuse cover is lost or damaged, the lead and plug must not be used until a
replacement is obtained. Replacement fuse covers
should be obtained from your dealer.
Important:
The wires in the mains lead are colour coded in accordance with the following code:
BLUE – NEUTRAL
BROWN – LIVE
As the colours of the wires in the mains lead of your
appliance may not correspond with the coloured
marking identifying terminals in your plug, proceed
as follows:
Connect the BLUE coloured wire to plug terminal
marked with the letter “N” or coloured black.
Connect the BROWN coloured wire to the plug ter-
minal marked with the letter “L” or coloured red.
In no circumstance must any of the wires be connec-
ted to the terminal marked with the letter “E”, earth
symbol “V”, coloured green, or green & yellow.
Replacement mains lead sets can be obtained from
your local dealer, or by contacting Grundig Consu-
mer Relations (01788 570088)
Moulded 3-pin lead set, suitable for UK use:
Ref: Leadset UK 8290-991-224
Moulded 2-pin Euro lead set, not suitable for UK
use:
Ref: Leadset Euro 8290-991-316
ENGLISH
37
Page 13

SETTINGS
_______________________________________________________________
Setting and storing radio stations
Initial station search
1 After the hi-fi system has been connected to the
mains for the first time, the device searches for the
40 stations with the best reception and stores them.
– Display: »FM«, the frequency in rapid run-through
and »P 00«.
P00
FM 97.55
2 After this initial search, the device activate a demo
programme.
3 To end the demo programme switch the hi-fi system
on by pressing »ON/OFF« briefly.
Notes:
7
The initial station search can be interrupted by
briefly pressing »7«.
7
The initial station search can be repeated any
time by pressing and holding down »PROG./
RAND./TIME« until the frequency display
switches to rapid run-through. The stations stored
previously will be deleted.
Automatic station search
1 Switch on the hi-fi system by pressing »ON/OFF«.
– Display: »FM TUNER«, then the wave band and fre-
quency or station name.
PI6
FM TUNER
f
2 Press »FUNCTION« to select the frequency band
(FM or MW).
– Display: »FM« or »MW«.
3 Activate the station search by pressing »UP TUN-
ING/ADJ/ALBUM DOWN« until the frequency
display changes to rapid run-through.
– The search stops when a station is found.
PI6
ENERGY
f
!
PROG
Manual station search
1 To move the frequency forward in steps, briefly press
»UP TUNING/ADJ/ALBUM DOWN« several
times.
– The frequency changes in 50 kHz steps (FM) or 9
kHz steps (MW).
MHz
FM 87.65
Storing stations on station positions
1 Press »UP TUNING/ADJ/ALBUM DOWN« to
select the station you want to store.
2 Press »PROG./RAND./TIME« to activate the
memory function.
– Display: Both the station position »P0I« and
»PROG« flash.
P0I
FANTASY
f
3 Select desired station position with »$s6MEM
5a aa
Note:
7
4 Press »PROG./RAND./TIME« again to store the
station.
– Display: »PROG« and, for example, »P02«.
«.
If stations are already stored on the preset positions, they are overwritten when new stations are
stored.
!
38
ENGLISH
P02
FANTASY
f
!
Page 14

SETTINGS
_______________________________________________________________
5 To store more stations, repeat steps 1 to 4.
Note:
7
If the hi-fi is disconnected from the mains for a long
time, all the preset stations are deleted.
Setting the time
The following settings may only be performed in standby mode.
1 To set the 12-hour format, briefly press »PROG./
RAND./ TIME«.
– Display: briefly »I2HR«, then the current time, for
example »PM MON I2:02« (»PM« for the second
half of the day).
PM
I2
MON
2 To set the 24-hour format, press »PROG./RAND./
TIME« again.
– Display: briefly »24HR«, then the current time, for
example »MON 0:03«.
3 To set the time, press and hold down »PROG./
RAND./ TIME«.
– Display: the hours flash.
0
MON
:
02
:
03
6 Set the day of the week using »UP TUNING/
ADJ/ALBUM DOWN« and press »PROG./
RAND./TIME« to confirm.
– Display: »CT ON« flashes.
I2
:
24
CT ON
7 Set the RDS time synchronisation with
»UP TUNING/ADJ/ALBUM DOWN« and
confirm with »PROG./RAND./ TIME«.
Notes:
7
You must reset the time after a power failure or
when the mains plug is pulled out.
7
Some RDS stations transmit an RDS time signal. If
the selected RDS programme transmits this time information, the time on the system is automatically
updated. This takes about five minutes.
Resetting the hi-fi system
This function enables you to reset the hi-fi in the event
of a mal function. Stored radio stations are retained but
the clock and alarm time are deleted.
1 With the device on, press the »RESET« button on the
bottom of the hi-fi system using an implement such as
a paper clip.
4 Set the hours using »UP TUNING/ADJ/ALBUM
DOWN« and press »PROG./RAND./TIME« to
confirm.
– Display: the minutes flash.
I2
:
03
MON
5 Set the minutes using »UP TUNING/ADJ/
ALBUM DOWN« and press »PROG./RAND./
TIME« to confirm.
– Display: the day of the week flashes.
ENGLISH
39
Page 15

GENERAL FUNCTIONS
__________________________________________
Switching the hi-fi system on and off
1 Switch the hi-fi system on from standby mode by
pressing »ON/OFF«.
– The last input source used is automatically se-
lected.
2 Press »ON/OFF« to switch the hi-fi system to stand-by.
– Display: »GOOD BYE« briefly, then the current time
and day of the week.
I2
:
24
GOOD BYE
Note:
7
The only way to disconnect the hi-fi system from
the mains supply is to pull the plug.
Adjusting the brightness of the
display
1 Change the overall brightness of the display back
light using »BRIGHTNESS« on the remote control
in three levels (bright, medium, off).
– The auto dimmer adapts the brightness of the dis-
play to the brightness of the surroundings.
Note
7
Minimum power consumption in standby mode is
only achieved if the backlighting in the display is
switched off.
Changing the colour of the display
lighting
1 Change the colour of the display back light by press-
ing »COLOR« on the remote control. There are
eight options.
Selecting the input source
1 Select the input source by pressing »FUNCTION«.
– Display: »FM TUNER«, »MW TUNER«, »CD«, »SD
CARD«, »USB« or »AUX«.
I2
CD
:
24
Adjusting the volume
1 Adjust the volume with »– VOLUME +«.
– Display: briefly »VOL« (»MIN«, »I« to »39«, and
above this »MAX«).
Muting
With this function you can switch the hi-fi speakers to
and from mute mode.
1 Press »MUTE« on the remote control to switch the
sound on and off.
– Display: »MUTE« when mute is on.
MUTE
Selecting sound effects
You can select from the sound settings USER, CLASSIC,
POP, JAZZ and ROCK. The basic setting is USER.
1 Select the sound setting by pressing »DSC«.
– Display: »
N
N
«, » X«, » C«, » V« or »Y«.
V
P02
FANTASY
f
JAZZ
!
PROG
Setting the equaliser
The USER sound setting allows you to make your own
personal equaliser settings.
1 When the device is on, press »DSC« until »
appears in the display.
2 Press »DSC« again for approximately 2 seconds.
– Display: »BASS 0«.
N
N
USER
3 Press »DSC« to choose the setting (BASS or TREBLE).
– Display: »BASS 0« or »TRE 0«.
Note:
7
If you do not press any button within five seconds,
the hi-fi system will automatically quit this mode.
BASS 0
N
N
«
40
ENGLISH
Page 16

GENERAL FUNCTIONS
__________________________________________
4 Set the values by pressing »– VOLUME +« (maxi-
mum »+6«, minimum »-6«).
– The equaliser display disappears after 5 seconds.
Switching the Ultra Bass System on
and off
1 Press »UBS« to switch the Ultra Bass System on and
off.
– Display: »UBS B«.
B
P02
FANTASY
f
!
TUNER MODE
________________________________________________________
UBS
Selecting the Tuner input source
1 Press »FUNCTION« to select the input source.
– The most recently selected station is activated (Last
Station Memory).
– Display: e.g. »FM I00.60« or »ENERGY«.
PI5
ENERGY
f
PROG
!
Selecting a preset position
1 Press »FUNCTION« to select the frequency band
(FM or MW).
2 Select the preset position in steps by pressing
»$s6MEM
– Display: »PROG« and, for example, »P02« and
the frequency or the station name.
P02
VILRADIO
f
5aaa
!
«.
PROG
Switching the display
In Tuner , CD- USB- and SD-mode you can switch the
display to show the time and day.
1 Press »DISPLAY« repeatedly on the remote control
until time and day appear in the display.
I2
:
24
TUE
Stereo/mono reception
When the hi-fi system receives FM stereo stations, »)«
appears in the display. If the signal from the FM stereo
station is weak, you can improve the sound quality by
switching to mono reception.
1 Press »FM MODE« on the remote control to switch
to mono reception.
– Display: »)« disappears.
2 To switch back to FM stereo, press »FM MODE« on
the remote control.
– Display: »)«.
P02
FANTASY
f
!
Note:
7
The mono or stereo setting is saved when you
store a station as a preset.
Selecting favourites
1 You can save a favourite station on preset 1, which
can be selected directly on the remote control using
»FSM«.
ENGLISH
41
Page 17

TUNER MODE
________________________________________________________
RDS station service
RDS (Radio Data System) is an information system
which is trans mitted additionally by most FM stations.
When the hi-fi system is receiving an RDS station, the station name, for example »FANTASY«, and »f«
appear in the display.
Note:
7
It may take some time before all the RDS information is available.
Searching for RDS stations
1 To search for an RDS station, press »UP TUN-
ING/ADJ/ALBUM DOWN« repeatedly until
»f« appears in the display indicating that
an RDS station is being received.
– After a short time the station name appears if the
reception strength is sufficient.
P02
FANTASY
f
RDS time synchronisation
Some RDS stations transmit an RDS time signal. If reception is good, this time information will update the time if
you have selected the »CT ON« option.
Time synchronisation can take several minutes, and
even with good reception the accuracy depends on the
time signal being transmitted. The automatic time setting
is always activated when the hi-fi system is switched
from standby mode into tuner mode and receives a suitable RDS station (when the system is waiting for an RDS
time signal, »¥« flashes. »¥« stays lit once RDS time
synchronisation is complete).
Calling up RDS information
When an RDS station is being received, the frequency
is displayed briefly and then the station name appears
continuously.
1 Press »DISPLAY« on the remote control.
– The station type appears in the display (PTY).
2 Press »DISPLAY« on the remote control again.
– The radio text (TEXT) appears in the display as
ticker text.
PROG
!
3 Press »DISPLAY« on the remote control again.
– The current time and day of the week appear in
the display.
4 Press »DISPLAY« on the remote control again.
– The wavelength and the frequency appear in the
display.
P02
FM I00.60
f
PROG
!
MHz
5 Press »DISPLAY« on the remote control one last
time.
– The station name is displayed continuously once
again.
Station types (PTY)
1 To call up the current station type, press »PTY« on
the remote control.
– Display: the current station type, e.g. »NEWS«, and
»PTY«.
– If no station type code is transmitted, »NO PTY«
appears in the display.
P02
NEWS
f
PTY
PROG
!
2 Press »PTY« repeatedly on the remote control to se-
lect another station type.
3 Press »UP TUNING/ADJ/ALBUM DOWN« to
start the PTY search.
– Display: »FM«, the frequency in rapid run-through,
and »PTY« flashes.
– The search stops once a station of the desired sta-
tion type is found, and the selected station type,
for example »POP M«, and the current time appear
in the display.
I3
:
20
FM 90.05
42
P02
INTERNET:WWW.RADIO-FAN
f
ENGLISH
PROG
!
4 Press »PTY« briefly to stop the search.
Page 18

CD MODE
_______________________________________________________________
The hi-fi system is suitable for
music CDs bearing the logo
shown here (CD-DA), and
for CD-Rs and CD-RWs with
audio data or MP3/WMA
formats.
In MP3/WMA mode, the
terms “album” and “file” are
very important. “Album” corresponds to a folder on a PC, “file” to a file on a PC or
a CD-DA track. An MP3/WMA CD may not contain
more than 200 albums and 500 files in total.
The hi-fi displays the albums or files in the order you
stored them on the data medium. Depending on the
copying program or multi session CDs, this can mean
that the albums and files are not displayed or played
back in alphabetical order. If required, the albums/files
need to be put in the right order before you copy them.
You can do this by numbering them.
When burning CD-R and CD-RWs with audio files, various problems may arise which could lead to interference in playback. This can be caused by faulty software or hardware settings or by the CD being used.
Should such problems arise, contact the customer
services of your CD burner or software manufacturer
or look for relevant information, for example on the Internet. When you are making audio CDs, observe all
legal guidelines and ensure that the copyright of third
parties is not infringed.
Always keep the CD compartment closed to prevent
dust from collecting on the laser optics. Do not attach
adhesive labels to CDs. Keep the surfaces of CDs
clean. You can play standard 12 cm CDs as well as 8
cm CDs on your device. An adapter is not necessary.
Selecting the CD input source
1 Press »FUNCTION« to select CD as the input
source.
– If there is no CD in the compartment, the message
»NO DISC« appears in the display.
NO DISC
Playback starts automatically with the first file of
the first album.
– In CD-DA mode if a CD is already inserted: the
device scans the content of the CD. Playback starts
automatically with the first track.
Inserting a CD
1 Open the CD tray on the hi-fi by lifting up the front
panel.
– Display: »OPEN«.
OPEN
2 Place the CD in the compartment with the printed
side facing outwards.
3 Close the CD compartment and return the front pan-
el to its original position.
– Display: »CD READ« flashes.
– In MP3/WMA mode: the hi-fi system scans the
contents of the CD. The display shows the total
number of albums and files, and the format
»MP3 WMA«.
ALBUM FILE
009 087
MP3 WMA
– In CD-DA mode: the hi-fi system scans the contents
of the CD. The display shows the total playing
time, the total number of tracks and the format
»CD«.
Playing back a CD
1 Press »
– Playback always starts with the first file of the first
– Display in MP3/WMA mode: the number of the
– Display in CD-DA mode: »R«, the number of the
« to start playback.
R
II
album (MP3/WMA) or with the first track (CDDA).
current file, followed by the file name and the
elapsed playing time of the file.
current track, the elapsed playing time of the track.
– In MP3/WMA mode if there is a CD already
inserted: the device scans the content of the CD.
0:26
e
00I 00I
ENGLISH
43
Page 19

CD MODE
_______________________________________________________________
2 Use »
3 Press »
4 End playback with »7« (press twice).
« to switch to playback pause.
e II
– Display: »II«, the elapsed playing time of the file
or track flashes.
3
EROS RAMAZ0
« to resume playback.
e II
:
26
II
Pausing and resuming playback
1 Interrupt playback by pressing »7« once.
2 Press »eII« to resume playback at the beginning of
the same file or track.
Note:
7
Playback also resumes at beginning of the same
file or track if you switch from CD mode to another
input source and then back to CD mode.
Repeating the current file or track
1 Press »
– The file or track is repeated from the beginning.
« briefly during playback.
5a aa
Selecting another file or track
1 During playback, keep pressing »
»$s6« until you see the number of the file or
track you want in the display.
– Playback of the selected file or track starts auto-
matically.
0
:
0I
e
5a aa
00I 0I2
« or
Selecting albums and files (MP3/
WMA only)
1 During playback, select the desired album by press-
ing »UP TUNING/ADJ/ALBUM DOWN«.
0
:
00
e
006 077
2 Select the file you want by pressing »
»$s6«.
– Playback of the selected file starts automatically
after a short time.
Notes:
7
You can also select albums and files in the stop
position.
7
However, an album can only be counted and
selected if it actually contains MP3/WMA files.
5a aa
« or
Calling up track information (MP3/
WMA only)
You can call up track information (ID3 tag and ticker
text) with this function.
1 During playback the display switches to displaying
the file name.
2 Press »DISPLAY«.
– You are provided with information on the track,
the artist and the album if such information is
stored on the CD.
3 To return to the file name display, press »DISPLAY«
repeatedly until the file name is displayed again.
Note:
7
You can also select files/tracks in stop mode.
Searching for a passage within a file
or track
1 During playback, press »
and hold it down until you find the passage you
want to hear.
– If »
back starts.
Note:
7
During the search the volume is reduced.
44
ENGLISH
« or »$s6« are released, play-
5a aa
5a aa
« or »$s6«
e
TITLE WHISKEY IN THE JAR
Page 20

CD MODE
_______________________________________________________________
Repeating a file or a title (Repeat
One)
1 Press »
2 Press »
track.
3 Select the repeat function by pressing »INTRO/
REP./TIMER« until »M1« appears in the display.
– The file or track is played back repeatedly.
4 To quit the function, press »INTRO/REP./TIMER«
repeatedly until the repeat symbol »M« disappears from the display.
« to start playback.
e II
« or »$s6« to select the file or
5a aa
1
:
M
I
I5
e
00I 006
Repeating all the files on an album
(MP3/WMA only)
1 Press »
2 Select the repeat function by pressing »INTRO/
REP./TIMER« repeatedly until the display shows:
»MALBUM«.
– All the files on the current album are played back
3 To quit the function, press »INTRO/REP./TIMER«
repeatedly until the repeat symbol »M« disappears from the display.
« to start playback.
e II
2
006 024
repeatedly.
M
ALBUM
:
55
e
Repeating all files or tracks (Repeat
All)
1 Press »
2 Select the repeat function by pressing »INTRO/
REP./TIMER« until »MALL« appears in the dis-
play.
– The CD is repeated from the beginning.
« to start playback.
e II
3 To quit the function, press »INTRO/REP./TIMER«
repeatedly until the repeat symbol »M« disappears from the display.
Note:
7
If a track memory is stored (see below), all the
tracks of the CD inserted are repeated when the
Repeat All function is called up.
Playing back files or tracks in
random order (Random)
1 Press »
2 Press »PROG./RAND./TIME« to select the func-
tion.
– Display: »RANDOM«.
– The files or tracks on the CD are played back in
3 To end this function, press »PROG./RAND./
TIME«.
– Display: »RANDOM« disappears.
– The tracks are played back in numerical order.
« to start playback.
e II
random order.
2
008 034
RANDOM
:
I6
e
Playing the introductions of files or
tracks (Intro)
1 Press »INTRO/REP./TIMER« when in stop mode.
– Display: »INTRO«.
– Playback starts automatically. The first ten seconds
of each file or track are played.
0
00I 00I
2 To quit the function, press »INTRO/REP./TIMER«
until »INTRO« disappears from the display.
– The current track and subsequent tracks are
played to the end.
:
06
e
INTRO
MALL
:
24
e
3
008 003
ENGLISH
45
Page 21

CD MODE
_______________________________________________________________
Creating a track memory
You can create a track memory of up to 60 files on
different albums (MP3/WMA) or up to 60 tracks (CDDA) for the current CD in any order you choose and
then play them back in that sequence. A file or track
may be stored more than once. Programming is only
possible in stop mode.
Selecting and storing files (MP3/WMA
only)
1 Press »PROG./RAND./TIME« to call up the func-
tion.
– Display: the album and file display »000 000«,
»PROG« blinks.
000 000
MP3 P-0I
2 Select the album with »UP TUNING/ADJ/AL-
BUM DOWN«, select the file with »5a aa« or
»$s6« and press »PROG./RAND./TIME« to
store.
– Display: the album and file display »000 000« ap-
pears again, »PROG« blinks.
3 To store more files, repeat step 2.
Selecting and storing tracks (CD-DA only)
1 Press »PROG./RAND./TIME« to call up the func-
tion.
– Display: track display »00« and »P-0I«, »PROG«
flashes.
P-0I
CD TK 00
PROG
Playing back a track memory
1 Start the track memory by pressing »
– Display: »PROG«.
– Playback begins with the first programmed file or
track.
!
:
05
PROG
e II
«.
005 003
2 Press »7« to end playback.
– Display: »PROG« flashes.
3 To play the track memory again, press »
e II
«.
Checking the track memory
1 Press »PROG./RAND./TIME« repeatedly when in
stop mode.
– The sequence of the stored files or tracks is dis-
played.
0I0 004
MP3 P-04
Adding files or tracks
1 In the stop position, select the file or track with
»
« or »$s6« and press »PROG./
5aaa
RAND./TIME« to store.
Deleting the track memory
1 Open the CD compartment on the hi-fi system;
or
press »7« when the CD is in the Stop position
(»PROG« mode).
2 Select a track with »5a aa « or »$s6« and
press »PROG./RANDOM/TIME« to save it.
– Display: track display »00« and »P-02«, »PROG«
flashes.
3 To store more tracks, repeat step 2.
46
ENGLISH
Page 22

USB AND SD/SDHC/MMC MODE
________________________
For MP3/WMA mode with MP3 player, USB memory stick or SD/SDHC/MMC memory card, the same
playback and search functions are available as for
CD mode (see CD Mode section).
Playing the contents of an MP3
player or a USB memory stick
1 Switch off the hi-fi system with »ON/OFF«.
2 Connect the USB interface of the MP3 player to the
»USB« socket on the top of the hi-fi system, using a
standard USB cable;
or
insert the USB plug of the USB memory stick in the
»USB« socket on the top of the hi-fi system.
3 Switch on the hi-fi system with »ON/OFF«.
4 Press repeatedly on »FUNCTION« to select »USB«
on the display.
– Display: »USB READ«; the hi-fi system scans the
contents of the USB,
– Total number of files and albums appear on the
display.
– If there is no USB memory stick inserted, »NO DEV«
appears on the display after a short time.
5 Press »
first album.
– Display: Elapsed playing time and information of
6 Press »7« to stop the playback.
« to start playback with the first file of the
e II
the file appears in the display.
Pausing and resuming playback
1 Press »
– Display: »II«, playing time stops, track or file in-
2 Continue playback by pressing »
« during playback to pause.
e II
formation remains in the display.
e II
«.
Repeating the current track
1 During playback, press »
– Display: »0:00«, the track is played again from
the start.
5a aa
«.
Selecting another track
1 During playback, press »
repeatedly until the desired track or file is reached.
– Playback of the selected track starts automati-
cally.
5a aa
« or »
$s6
«
Searching for a passage within a file
or track
1 During playback, press and hold »
»
2 Stop pressing »
passage has been found.
– Playback continues.
Note:
7
«.
$s6
« or »
5a aa
Further functions like Repeat, Random and Intro
you will find in the CD Mode section.
$s6
5a aa
« when the
« or
Playing the contents of an SD/
SDHC/MMC memory card
1 Switch off the hi-fi system with »ON/OFF«.
2 Insert the card carefully into the »SD« card slot on
the hi-fi system (on the top) until it latches into place.
3 Switch on the hi-fi system with »ON/OFF«.
4 Press repeatedly on »FUNCTION« to select »SD
CARD« on the display.
– Display: »SD READ«; the hi-fi system scans the
contents of the SD,
– Total number of files and albums appear on the
display.
– If there is no SD memory card is inserted, »NO
SD« appears on the display after a short time.
5 Press »
first album.
– Display: Elapsed playing time and information of
6 Press »7« to stop the playback.
« to start playback with the first file of the
e II
the file appears on the display.
Pausing and resuming playback
1 Press »
– Display: »II«, playing time stops, track or file infor-
2 Continue playback by pressing »eII«.
« during playback to pause.
e II
mation remains in the display.
Repeating the current track
1 During playback, press »5a aa«.
– Display: »0:00«, the track is played again from
the start.
ENGLISH
47
Page 23

USB AND SD/SDHC/MMC MODE
________________________
Selecting another track
1 During playback, press »
repeatedly until the desired track or file is reached.
– Playback of the selected track starts automati-
cally.
5a aa
« or »
$s6
«
Searching for a passage within a file
or track
1 During playback, press and hold »
»
2 Stop pressing »
$s6
«.
5a aa
« or »
$s6
passage has been found.
– Playback continues.
5a aa
« when the
« or
Notes:
7
Further functions like Repeat, Random and Intro
you will find in the CD Mode section.
7
The USB socket on the device does not support
a connection for a USB extension cable and is
not designed for direct connection to a computer.
7
The USB socket of this device is a standard socket.
Due to rapid advances in technology and new
manufacturers appearing every day, the compatibility of USB memory sticks can only be partially guaranteed.
7
If USB operation is impaired or is not possible, this
does not indicate a device malfunction.
7
Bi-directional data transfer as defined for ITE devices in EN 55022/EN 555024 is not possible.
7
USB transfer is not in itself an operating mode. It is
only an additional function.
7
Never remove USB devices or the memory card
during operation. This could damage the USB device, the memory card and the device. Any such
damage will invalidate your warranty.
48
ENGLISH
Page 24

TIMER MODE
_________________________________________________________
Your hi-fi system has three timer modes:
– The switch-on timer, which switches the hi-fi system on
at the set time and wakes you with an alarm or music.
– The reminder timer, reminding you by sounding the
signal tone at a preset time.
– The sleep timer, which switches the hi-fi system off at
a preset time.
Switch-on timer
Setting the switch-on timer
The time must be set on the hi-fi system. When this setting is being made, if no button is pushed for more than
10 seconds, the hi-fi system will end the process automatically. You then have to start again.
1 With the device switched off, press and hold down
»INTRO/REP./TIMER«.
– Display: »§« and the hour display flashes.
0
CD
2 Set the hours for switching on using »UP TUNING/
ADJ/ALBUM DOWN«.
3 Confirm with »INTRO/REP./TIMER«.
– Display: »§« and the minutes display flashes.
6
CD
4 Set the minutes for switching on using »UP TU-
NING/ADJ/ALBUM DOWN«.
5 Confirm with »INTRO/REP./TIMER«.
– Display: »BUZZER e«, »TUNER §«, »USB«, »SD
CARD« or »CD §« flashes.
6
CD
:
00
§
:
00
§
:
30
§
Notes:
7
If you select CD, USB, SD make sure that a CD,
USB, SD has been inserted.
7
If you select tuner, select the radio station with
»$s6MEM
7 Confirm with »INTRO/REP./TIMER«.
8 Set the volume using »– VOLUME +«.
6
VOL 20
9 Press »INTRO/REP./TIMER« to finish the settings.
– Display: »e« or »§«, the day and time.
– The hi-fi system switches on at the set time with the
selected signal source (maximum alarm duration
90 minutes).
I4
MON
Note:
7
The volume of the alarm types signal, radio station and CD, USB, SD increases continually from
zero onwards until an individually set maximum
volume is reached.
5a aa
:
30
§
:
45
§
«.
Interrupting the alarm
1 During the alarm, press »SNOOZE« on the remote
control.
– The alarm signal (signal tone, radio station or CD,
USB, SD) stops.
– The alarm goes off again at 5-minute intervals
(alarm duration – 60 minutes).
Cancelling the alarm for the day
1 Switch the hi-fi system off by pressing »ON/OFF«
when the alarm is sounding.
– The switch-on timer remains activated for the next
day.
6 Set the input source (signal, radio station or CD,
USB, SD) using »UP TUNING/ADJ/ALBUM
DOWN«.
ENGLISH
49
Page 25

TIMER MODE
_________________________________________________________
Switching off alarm for the weekend
You can switch off the alarm function over the weekend. The entered alarm times are saved.
1 Switch off the alarm function with »WEC«.
– Display: »
2 Press »WEC« to reactivate the alarm function.
– Display: »
I8
FRI
WEC
WEC
«.
« disappears.
:
49
WEC
§
Activating and deactivating switch-on
timer
1 To deactivate the switch-on timer, press »INTRO/
REP./ TIMER« briefly in standby mode.
– Display: »e« or »§« disappear.
– The switch-on timer is deactivated, the set alarm
time is stored.
2 To activate the switch-on timer, press »INTRO/
REP./TIMER« briefly in standby mode.
– Display: »e« or »§«.
23:I6
TUE
§
Reminder timer
1 Press »NAP« to call up the function.
– Display: »NAP I0« (minimum time setting), »NAP«
flashes.
:
:
34
34
NAP
09
NAP I0
2 Enter the reminder time (in 10 minute intervals from
10 to 120 minutes) with »NAP«.
– Display: »NAP«.
09
NAP 00
– After the set time has expired, a signal tone sounds
(for max. 90 minutes).
– The display shows the currently remaining time, for
example »NAP 25«, if you press »NAP« briefly.
3 Switch off the signal tone with »ON/OFF«;
or
interrupt the reminder timer early by setting the timer
to »NAP 00« with »NAP«.
Sleep timer
Setting the sleep timer
1 Switch on the hi-fi system by pressing »ON/OFF«
and select the input source you require.
2 Press »SLEEP« to call up the function.
– Display: »90 MIN«, »O« flashes.
23
90 MIN
3 Enter the required switch-off time (in 10 minute inte-
rvals from 90 to 10 minutes) by pressing »SLEEP«.
– Display: »O«.
P 02
FANTASY
f
– The hi-fi system switches off after the selected time
has elapsed.
:
59
O
PROG
!
O
Ending the sleep timer prematurely
1 To deactivate the sleep timer, press »ON/OFF« to
switch off the hi-fi;
or
keep pressing »SLEEP« until »00 MIN« appears in
the display and »O« flashes.
– The hi-fi system remains switched on.
00
00 MIN
:
I2
O
50
ENGLISH
Page 26

INFORMATION
_____________________________________________________
Cleaning the CD unit
If the device is unable to scan CDs
perfectly, use a
standard, commercially available
cleaning CD to
clean the laser op-
tics. Other cleaning methods may damage the laser optics.
To clean CDs use a lint-free cloth and wipe them in a
straight line from the centre of the disc outwards. Do not
use cleaning fluid for vinyl records or other solvents or
scouring agents.
Environmental note
This product has been made from
high-quality parts and materials
which can be re-used and recycled.
Therefore, do not throw the product
at the end of its life. Take it to a collection point for recycling electrical and electronic devices. This is indicated
by this symbol on the product, in the operating manual
and on the packaging.
Please find out about collection points operated by
your local authority.
Help protect the environment by recycling used products.
away with normal household waste
General information on laser devices
Your system is a CLASS 1 LA-
CLASS 1
LASER PRODUCT
sible emission value cannot be exceeded under any
circumstances.
Caution:
Because of the danger of eye injuries, the unit may only
be opened or serviced by trained personnel.
If settings other than those specified here are employed
or other procedures are carried out, this may lead to
dangerous radiation exposure.
SER PRODUCT. This means
that the laser is designed
in such a way as to ensure
that the maximum permis-
If operating devices or methods
other than those specified here are
employed, it may lead to dangerous exposure to emissions.
This device emits laser radiation.
Technical data
This device is noise-suppressed according to the applicable EU directives.
This product fulfils the European directives
2004/108/EC , 2005/32/EC and 2006/95/EC.
Do not open the hi-fi casing under any circumstances.
No warranty claims are accepted for damage caused
by incorrect handling.
System
Power supply:
Operating voltage: 230 V
Mains frequency: 50/60 Hz
Max. power consumption: 35 W
Power consumption in standby: ≤ 2 W, display backlighting switched off
Amplifier unit
Output:
Sine wave power: 2 x 3 W, 1 x 6 W
Music signal power: 2 x 5 W, 1 x 10 W
Receiver unit
Reception range:
FM 87.5 ...108.0 MHz
MW 522 ... 1620 kHz
CD unit
Frequency response:
20 Hz ... 20 kHz
Noise-voltage ratio:
(wtd.) ≥ 70 dB
MP3/WMA features
Albums and files:
Max. 512 albums and files per CD
File system/file management:
ISO 9660 Level 1 compatible
USB
USB 2.0 compatible FAT 32/16
Dimensions and weight
Device dimensions:
W x H x D 310 x 180 x 190 mm
Device weight: 3.3 kg
Technical and design modifications reserved.
~
ENGLISH
51
Page 27

INFORMATION
_____________________________________________________
Troubleshooting
Not every kind of sound interference is caused by a defect in your hi-fi system. Defects can also be caused by
leads having been accidentally pulled out, damaged
CDs and worn out batteries in the remote control. If the
following measures do not do not rectify the problem,
consult an authorised dealer.
Fault
No sound.
The hi-fi system does not react
when the buttons are pressed.
The remote control does not
work.
Poor radio reception.
Tracks on a CD are skipped.
CD-Rs or CD-RWs are not
played back, or are played
back incorrectly.
Possible cause/remedy
The volume setting is too low – increase the volume.
The headphones are plugged in – disconnect the headphones.
The power cord is incorrectly connected. Connect it properly.
Mute is activated, deactivate Mute.
Static electrical discharge. Switch off the hi-fi system, disconnect the power
cable and plug it in again after a few seconds or press »RESET«.
The batteries are flat. Replace the batteries.
The remote control is out of range of the stereo.
Weak antenna signal, check the antenna.
Weak FM-stereo signal, switch to Mono.
Interference from electrical devices such as televisions, video recorders, computers, neon lamps, thermostats or motors. Keep the hi-fi system away from
such devices.
The CD is damaged or dirty – replace the CD or clean it.
The PROGRAM (track memory) or RANDOM functions are active. Deactivate
the functions.
Faulty software or hardware settings during burning or the CD itself. Check
the components of your CD burner/software or change the CD being used.
52
ENGLISH
Page 28

www.grundig.com
52/10 72011 411 1000
 Loading...