

Page 1
Music Station with Universal
Dock for iPod
CDS2500IP
CDS2500IPW
The Gold Technical Support Line:1902 215 259
Personal Product Support
(Charges will apply at $2.95 per minute)
Page 2

INTRODUCTION
Thank you for buying this Grundig product, which is designed to give you many years of trouble-free service.
You may already be familiar with using a similar unit, but please take time to read these instructions. They are
designed to familiarize you with the unit’s many features and to ensure you get the very best from your
purchase.
Safety is important
Your safety and the safety of others is important.
Please therefore, ensure you read the “Safety Instructions” before you operate this unit.
Warranty
In the unlikely event that your product fails to work normally, please call the below Grundig warranty number
for support.
Australia
Grundig Warranty: 1800 509 394
New Zealand
Grundig Warranty: 0800 450 259
Page 3

CONTENTS
SAFETY PRECAUTIONS 1-2
ENGLISH
LOCATION OF CONTROLS
CLOCK TIMER & SLEEP
RADIO
iPOD PLAYER
CD PLAYER
SOUND CONTROL
USING THE USB AND SD/MMC CARD
MAINTENANCE 15
TROUBLESHOOTING
SPECIFICATION
3-4
5
6
7-8
9-12
13
14
16
17
Page 4
ENGLISH
SAFETY PRECAUTIONS
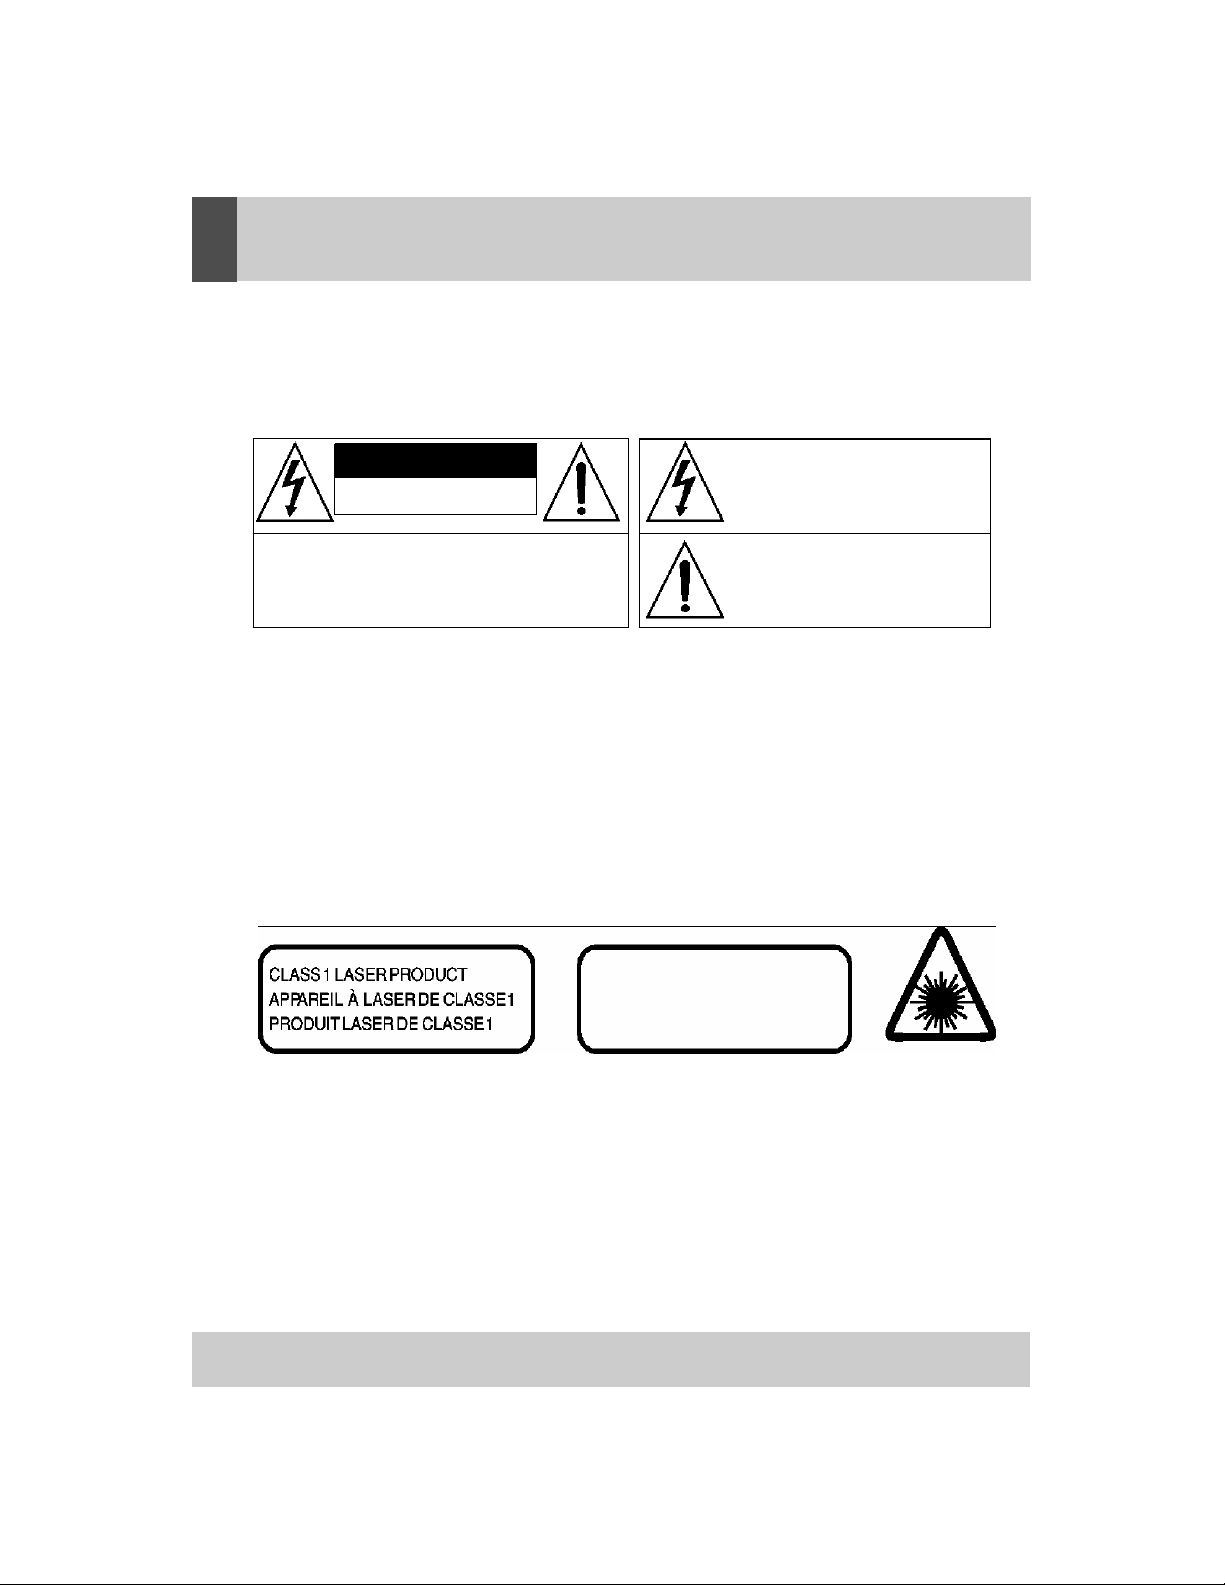
WARNINGS
To reduce the risk of fire or electric shock, do
EXPLANATION OF GRAPHIC SYMBOLS
not expose this appliance to rain or moisture
CAUTION
RISK OF ELECTRIC SHOCK
DO NOT OPEN
WARNING: TO REDUCE THE RISK OF ELECTRIC SHOCK.
DO NOT REMOVE COVER. NO USER SERVICEABLE
PARTS INSIDE. REFER SERVICING TO QUALIFIED
SERVICE PERSONNEL.
The lightning flash with arrowhead symbol, with in
an equilateral triangle, is intended to alert user to
the presence of uninsulated “ dangerous voltage
within the product enclosure that may be of
sufficient magnitude to constitute a risk of electric
shock to persons.
The exclamation point within an equilateral
triangle is intended to alert the user to the
presence of important operating and
vaintenance ( servicing) instruction in the
lliterature accompanying the appliance.
HAZARD WARNING: TO REDUCE THE RISK OF FIRE OR ELECTRIC SHOCK,
DO NOT EXPOSE THIS PRODUCT TO RAIN OR M
OISTURE.
ESD Remark:
In case of malfunction due to electrostatic discharge just reset the product (reconnect of power
source may be required) to resume normal operation
CLASS 1 LASER PRODUCT
CAUTION
INVISIBLE LASER RADIATION WHEN
OPEN AND INTERLOCK FAILED OR
DEFEATED. AVOID DIRECT IXPOSURE TO
LASER BEAM
”
This product contains a low-power laser emitter
1
Page 5

SAFETY PRECAUTIONS
ENGLISH
PRECAUTIONS FOR USE
To ensure safe, appropriate use of your personal
CD player, please follow the advice below:
LOCATION
• Do not use the product in extremely hot, cold,
dusty or damp conditions.
• Place the product on a smooth, flat surface.
• Ensure that air is free to circulate through the
product. Do not use it in a poorly ventilated
place, cover it with a cloth or place it on carpet.
POWER SUPPLY
x Before using the product, check that its rated
voltage is suitable for your mains supply.
SAFETY PRECAUTIONS
• When you plug in or unplug the power cord,
always hold the plug rather than the cable.
Pulling the cord could damage it and create a
hazard.
• Always unplug the product from the mains if
you do not intend to use it for an extended
period.
• The STANDBY button does not disconnect the
product from the mains power supply. To
disconnect the product from the power supply,
you must unplug the power cord.
• This product should only be used in a horizon
tal position.
x
The rating label is located at the bottom of
the cabinet.
CONDENSATION
• Water droplets or condensation may form
inside the CD player if it is left in a warm,
damp atmosphere.
• The product may not operate correctly if
condensation forms inside it.
• Leave the product in a warm, dry room for 1 to
2 hours to allow the condensation to evaporate.
In the event of a problem, unplug the power cord
and contact Grundig Helpline: 1800 509 394
Australia. Grundig Helpline: 0800 450 259 New
Zealan
d
WARNING: VENTILTION
Your personal CD player has ventilation holes,
which should never be obstructed.
LIQUID WARNING
Never allow liquids to splash or drip onto the
product. Never place a liquid-filled container
(e.g. vase, jar, etc.) above it.
• The apparatus shall not be exposed to dripping
or splashing liquids, no objects filled with
liquids, such as vases, shall be placed on
the apparatus
• The mains plug is used as the disconnect
device and it shall remain readily operable.
To be completely disconnect the power input,
the mains plug of apparatus shall be
disconnected from the mains.
• The apparatus will be use in open area
• The ventilation should not be impeded by
-
covering the ventilation openings with items
such as newspaper, table-cloths, curtains etc
• No open flame sources such as lighted candles
should be placed on the apparatus;
• Attention should be drawn to the environmental
aspects of battery disposal;
• Only use the apparatus in moderate climates.
2
Page 6
ENGLISH
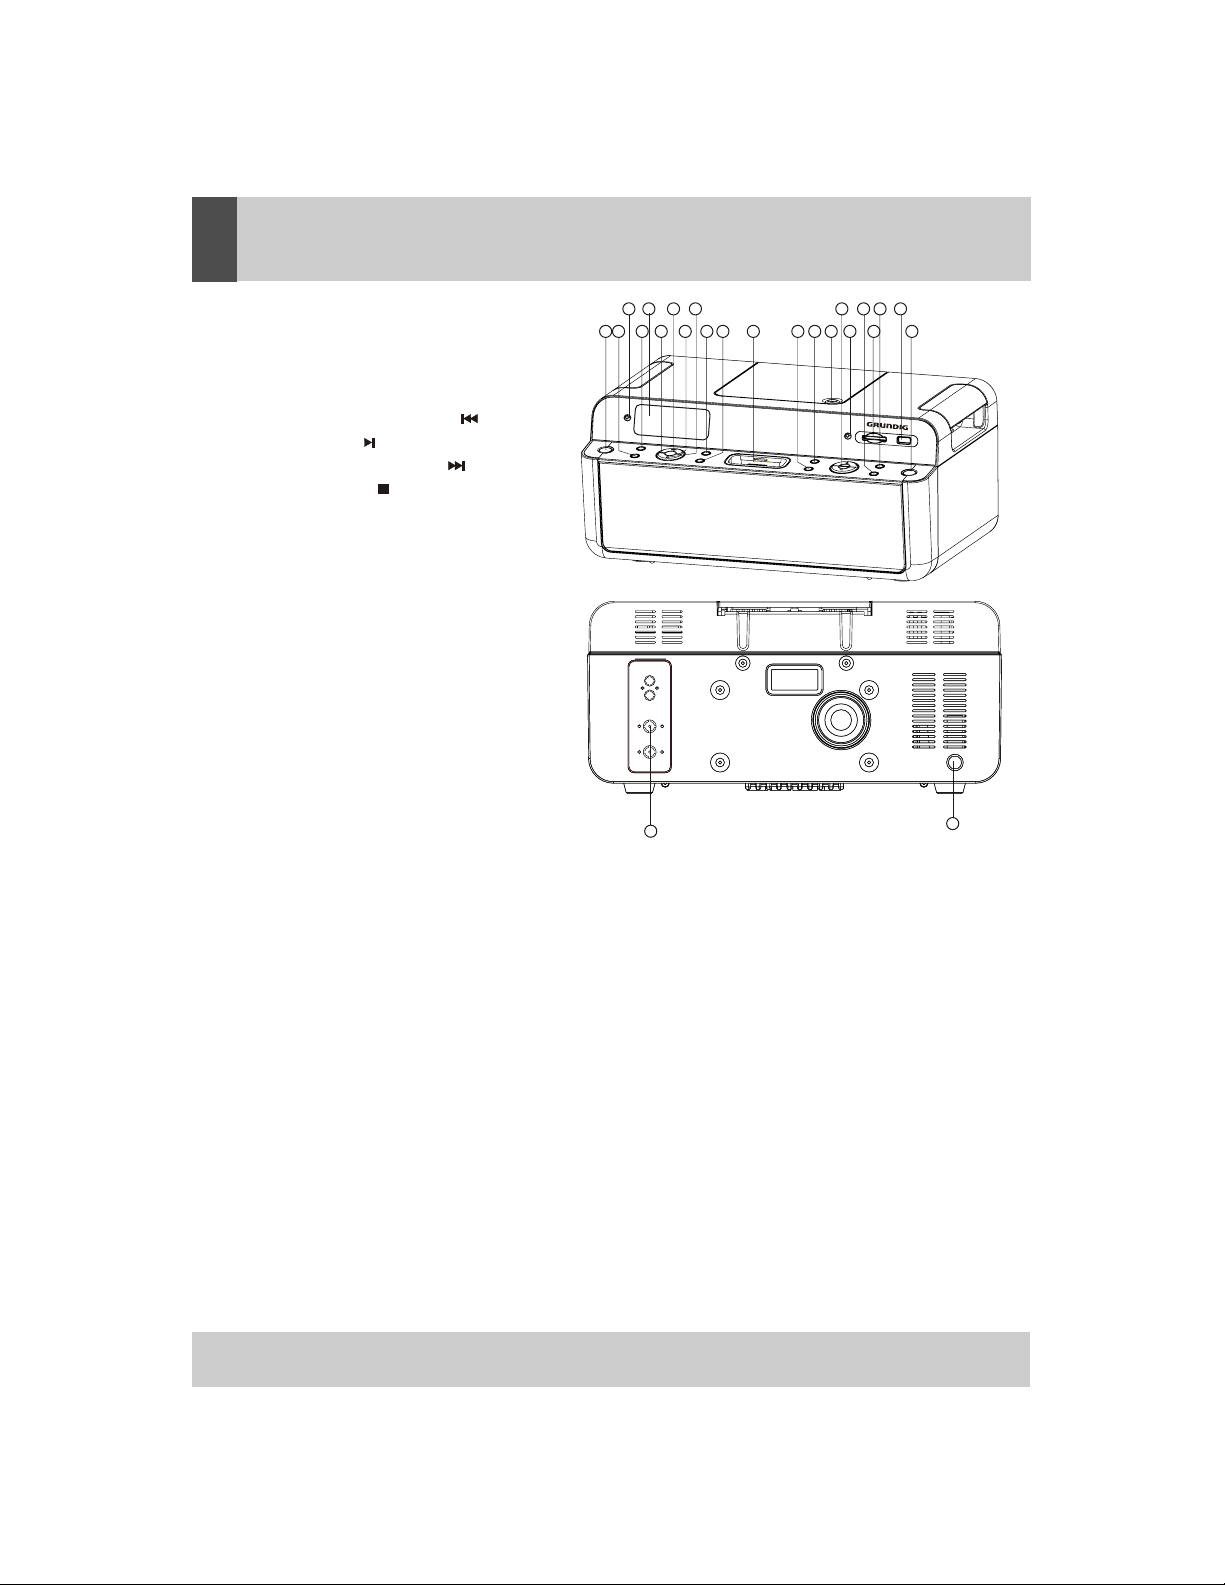
LOCATION OF CONTROLS
1. STANDBY BUTTON
2. EQ BUTTON
3. REMOTE SENSOR
4. TIMER BUTTON
5. LCD DISPLAY
6. SKIP/SEARCH BACKWORD
7. PLAY/PAUSE
8. SKIP/SEARCH FORWARD
9. STOP BUTTON
10. REPEAT BUTTON
11. MEMORY BUTTON
12. 30PINS i-Pod DOCKING STATION
13. PRE -DOWN BUTTON
14. PRE -UP BUTTON
15. CD DOOR
16. VOLUME UP/DOWN
17. STEREO HEADPHONE JACK
18. FIND/ESP BUTTON
19. SD/MMC MEMORY SLOT
20. BAND SELECTOR
21. USB SOCKET
22. FUNCTION BUTTON
23. AC MAINS
24. FM ANTENNA
1 2
5
3
7 9
4
10
11
6
8
FM ANT.
24
12
161718
20 21
13
19
15
14
22
23
CAUTION
Usage of controls, adjustments, performance or procedures other than those specified herein may result
in hazardous radiation exposure. This unit should not be adjusted or repaired by anyone except a qualified
service person.
IMPORTANT
Since movement of the CD mechanism and the sensitive circuitry may cause interference to the radio
tuner nearby, switch this unit off while operating other radio devices.
PRECAUTIONS FOR USE
INSTALLATION
Unpack all parts and remove protective material. Do not connect the unit to the power outlet before
checking the voltage and before all other connections have been made. Do not cover any vents and
make sure that there is a space of several inches/centimeters around the unit for ventilation.
CONNECTION
1. Connect the power cord to AC outlet.
2. When you first plug the unit into the power outlet, the unit will go into standby mode, the display
will blink the un-set clock.
3. Turn on the power and select CD function. If the LCD display is on with backlighting, it means the
power supply is normal and your system is ready to play music.
3
Page 7
LOCATION OF CONTROLS
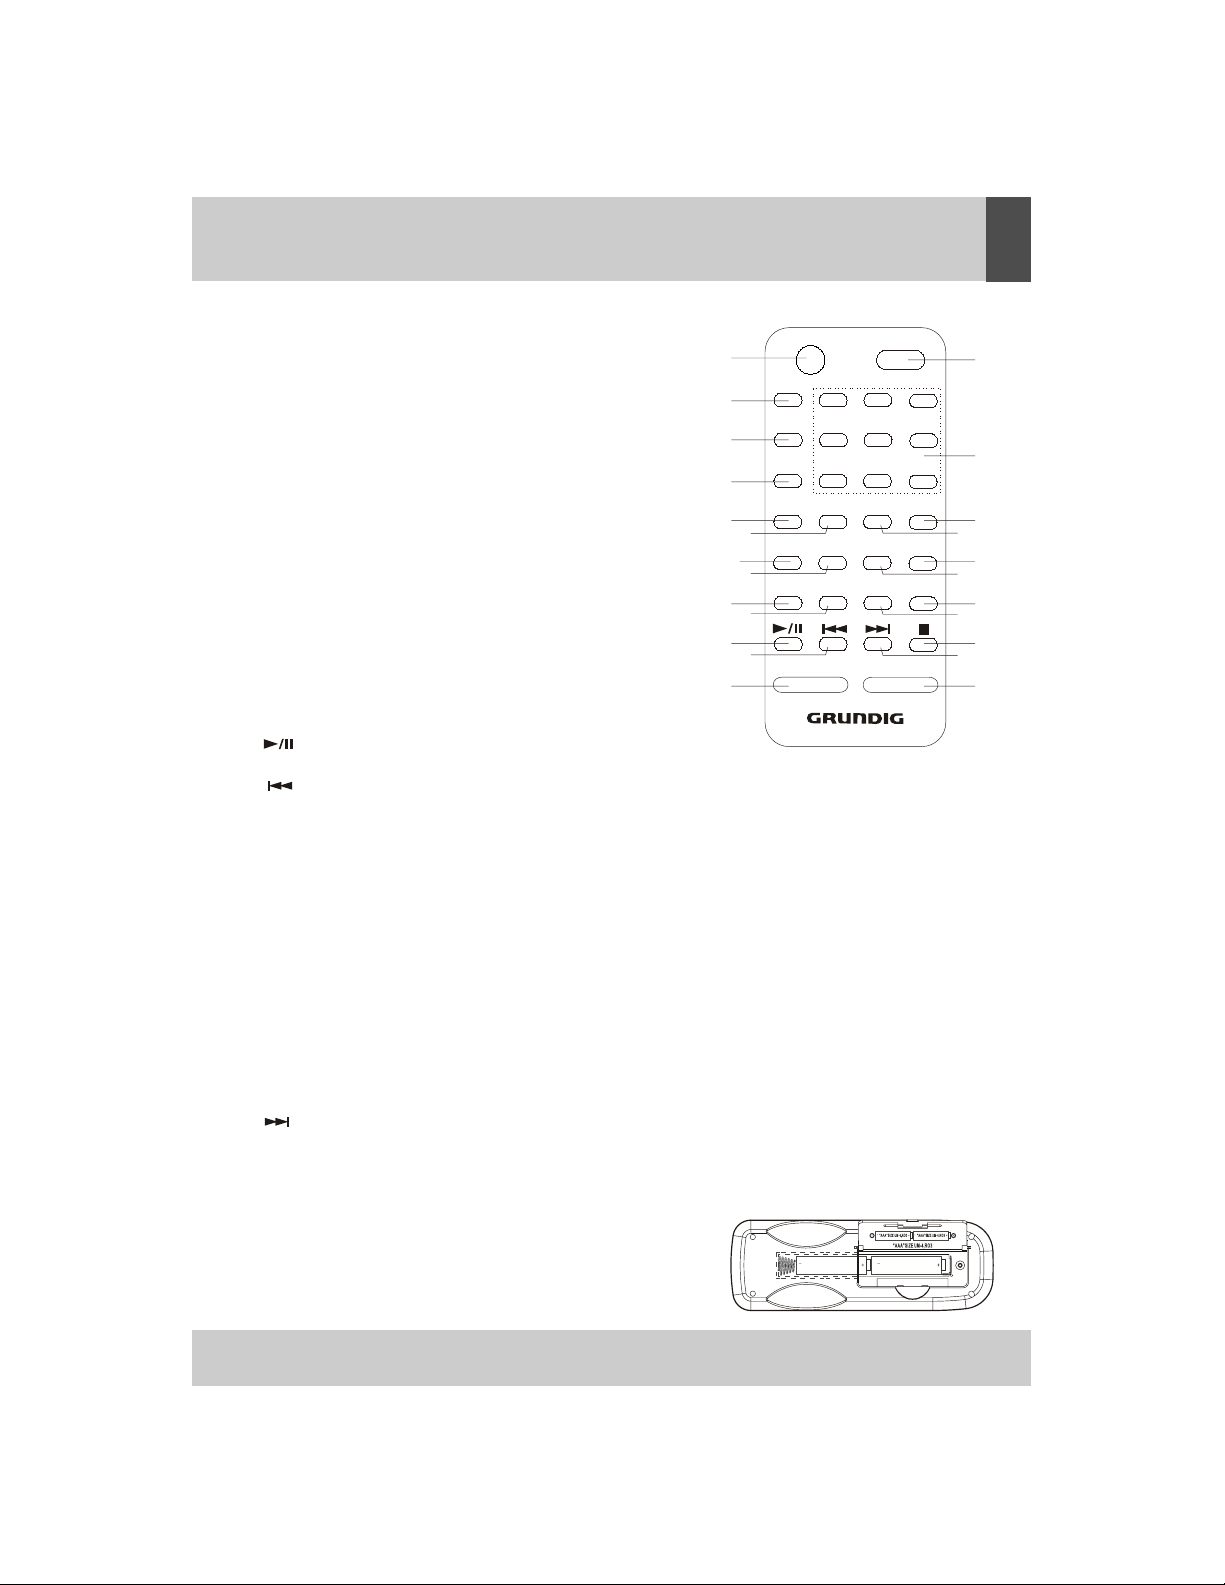
REMOTE CONTROL HANDSET
1. MUTE: Press to activate/de-activate MUTE function.
2. STANDARD: Press to turn power On or Off.
1
3. FUNCTION: Press to select the system for CD/TUNER
/iPod or CARD-USB.
3
4. BAND: Press to select TUNER mode or to select
BAND (FM or MW).
5. MONO/ ST / ESP/ F
IND: In MP3 mode, press this button
twice, ALBUM search mode change. If FIND button is
pressed long time, ID3 TAG is displayed. ln Tuner mode,
press to switch between FM MONO & FM STEREO
6. MEMORY / CLOCK : Press to set CD/Radio or Clock
memories.
7. 0
: Numeric buttons.
8. TIMER:Activates or de-activates the timer function.
9. SLEEP: Press to activate the sleep function. This turns either
the CD or the Radio off automatically for between 90 to 10
minutes at 10 minute intervals.
10. MENU: Press to access the menu in iPod mode.
4
5
6
8
10
14
12
13
11
11. VOL- : Press to reduce volume.
12. :: In CD/iPod mode, press once to start playback.
Press again to stop the disc play temporarily.
13. : In CD/iPod mode, press once to skip to previous tack,
press & hold for search forward. In tuner mode, press to
change the station.
14. ENTER/ INTRO:
Enter the selected MENU in iPod mode. In CD mode, press to play the first 10 seconds of music
of each track..
15. 1-9 NUMERIC: Selects particular track number directly.
16. PRE + :
In Mp3 mode, step up the album number. In tuner mode, step up the preset station. In iPod mode, scroll
up the menu.
17. PRE- :
In MP3 mode, step down the album number. In tuner mode, step down the preset station. In iPod mode,
scroll down the menu.
18. DBBS: Press the DBBS button, the sound changes to bass boost.
19. EQ: Press to select the presets EQ mode.
20. RANDOM: Press to start the random playback for CD mode.
21. REPEAT: Press to activate the repeat function.
22. STOP: In CD/iPod mode, press to terminate CD playback.
23. : In CD/iPod mode, press once to skip to the next track. Press & hold for search forward. In
Tuner mode, press to change the station.
24. VOLUME+ : Press to increase volume.
FUNCTION
7
TIMER
9
ENTER
BAND
MONO/ST.
ESP/FIND
MEM/ CLOCK
MENU
MUTE STANDBY
12
5
4
789
PRE -
0
EQ
SLEEP
RANDOM
REPEAT
/INTRO
VOL - VOL +
3
6
PRE +
DBBS
ENGLISH
2
15
16
17
18
19
2
0
21
22
23
24
FITTING THE REMOTE CONTROL BATTERIES
Open the battery compartment door and place two AAA size batteries in
the compartment following to the battery polarity (+ and -) symbol
marked on the door. Close the door until "click" shut.
4
Page 8

ENGLISH
CLOCK TIMER & SLEEP
CLOCK SETTING
1. Swith the unit to standby mode.
2. Press and hold the MEMORY/CLOCK button more than 1 second. Press or button to
HOUR or 12 HOUR.Press MEMORY/CLOCK button to store.
ENGLISH
set 24
3. Press or to set the hours. Press MEMORY/CLOCK button to store.
4. Press or to set the minutes. Press MEMORY/CLOCK button to store.
TIMER SETTING
1. When the unit is powered on or the timer
TIMER button more than 1 Second, ON (timer on) will be shown on the display.
2. Press or button to set the hours. Press
store.
3. Press or button to set the minutes. Press TIMER button to
store. OFF (timer off) will be shown on the display.
4. Repeat the step 2 and 3 to set hours and minutes to set timer OFF.
5. Press or button to select desired source TUNER,iPOD or CD.
Press TIMER button to store.
6. Press or button to set the volume level. Press TIMER
button to store.
7. Switch the system to standby mode. When reaching the preset time, the selected source will play
and switch off at the preset timer off time.
Active timer is indicated by showing on the display.
NOTE
Make absolutely sure that the clock is set to the correct time before setting the timer
•
• The timer setting will automatically cancelled if no button is being pressed for more
than 10 Se
•
If the selected source CD is not available when activated by timer, TUNER will be
selected automati
DEACTIVATE THE TIMER
• Press
timer again with the preset time, press the TIME button again.
• To cancel active timer until next day, press the
conds.
cally instead.
TIMER button to deactivate this function, will disappear from the display. To activate the
on is deactived, press and hold the
TIMER button to
STANDBY button.
SLEEP FUNCTION
SLEEP mode will be activated once
a time the SLEEP timer will change to 90, 80, 70, 60, 50, 40, 30, 20, 10 minutes and OFF.
SLEEP button is pressed on the remote handset. By pressing one at
5
Page 9

LISTENING TO THE RADIO
MANUAL TUNING
1. Press BAND button to select desired BAND (MW or FM).
2. Tune to the required station by pressing the or button.
3. Adujst volume control to the desired volume level.
AUTO TUNING
1. Press BAND button to select desired
2. Press and hold the or button more than 1 second and then release.
3. The unit will start scanning automatically and stops when a radio station is reached.
4. Repeat steps 2 & 3 until a desired radio station is reached.
5. Adjust volume control to a desired volume level.
PRESET STATIONS
You can store up to a total of 40 radio stations in the memory (30-FM / 10-MW).
1. Set to TUNER mode.
2. Tune to the desired radio station by "MANUAL" or "AUTO" tuning methods.
3. Press
4. Press the PRE+/PRE- buttons to select the desired preset memory
5. Press MEMORY/CLOCK button again to confirm .
6. Repeat steps 2 to 5 to store other stations.
7. Press the PRE+/PRE- buttons to recall
8. The unit will return to normal tuner mode do not press any button for 5 seconds.
MEMORY/CLOCK button , a preset memory blinking on the display.
band (MW or FM).
the preset stations in order.
RADIO
ENGLISH
FM & FM-STEREO RECEPTION
/ST.
Press the
reception mode.
HINTS FOR BEST RECEPTION
MW: The receiver has a built-in MW ferrite antenna. If the MW reception is weak, rotate or reposition the
FM: Attached FM wire antenna plugged in at the rear of the unit should be fully unwind and extended
MONO
unit. This usually improves the MW reception.
its full length for best reception.
on remote handset to select MONO or STEREO
6
Page 10

iPod PLAYER
TO USE THE DOCK WITH YOUR IPOD
1. Remove the iPod cover from the unit.
2. Install the iPod Dock Adapter into Dock, then put your iPod in the Dock on the unit.
(Use proper adapter for your particular iPod model. Some adapters are included with
iPods at time of purchase they will fit properly into the docking station of this system.)
1) After placing the iPod in the Dock,
iPod functions can be operated by remote control,please don’t try to use
the iPod controls because the iPod connector may be
damaged while the dock is connected with your iPod.
2) The iPod battery is still charging when the unit is in
standby mode.
player can support following iPods
3) This
A.Third Generation iPod
B.Fourth Generation iPod
C.Fifth Generation iPod Video
D.iPod Photo
E.iPod Mini
F .iPod Nano (First Generation)
G.iPod Nano (Second Generaton)
H.iPod video
3. Playing music
1) Place iPod in the Dock.as show
2) Use the remote controller to play iPod with following steps.
on the right.
Dock adapter
Connector well
You can remove the Dock adapter
with your fingernail by using this slot
Enter main menu
The top and bottom choose
To choose an item
Play or pause a song.
Change the volume
Skip to the next song.
Start a song over or play the
previous song.
To go back to the previous
menu
7
Press the MENU button on remote control.
Press the PRE-/PRE+ button on remote control
Press the ENTER button on remote control
Press the play/pause ( ) button on remote control or main unit.
Press the “VOL+” or “VOL- “ button on remote control or main unit.
Press the next/fast-forward ( ) button on remote control or main unit.
the previous/rewind ( ) button once to start a song over,
Press
press it twice to play the previous song. on remote control or main unit.
Press the MENU button on remote control.
or main unit.
Page 11

iPod PLAYER
Use provided iPod dock adapters if iPod dock adapter not included with your iPod at the time of purchase.
FINDING THE CORRECT IPOD ADAPTOR
There are 8 iPod dock adapters included, refer to below list for corresponding iPods. Please the correct
iPod dock adapter in the dock on the unit gently as described in page 7.
NOTE:If you connect an iPod without fitting the correct adaptor, you may damage the
iPod and your
LIST OF COMPATIBLE IPOD MODELS
iiPod nano (first generation)
Use adaptor No.11.
iPod nano (second generation)
Use adaptor No.8.
iPod mini(4GB or 6GB)
Use adaptor No.3.
iPod vid
Use adaptor No.9.
iPod video (60GB or 80GB)
Use adaptor No.10.
iPod photo, with a colour display(40GB or 60GB)
Use adaptor No.7.
with a B&W display and clickwheel with legends on wheel (20GB)
iPod,
Use adaptor No.4
iPod, with a B&W display and clickwh
Use adaptor No.5.
Music System.
eo (30GB)
eel with legends on wheel (40GB)
TO CHARGE THE BATTERY
When the iPod is connected to this unit, the battery will start charging.
Fig.1:this icon will show whow when the battery is charging.
Fig.2:this icon will show whow when the battery is full charged.
Fig 1
Fig 2
8
Page 12

WARNING! THIS PRODUCT USES A CLASS 1 LASER.
AVOID ANY DIRECT EXPOSURE TO THE LASER BEAM.
USE OF CONTROLS, ADJUSTMENTS OR PROCEDURES NOT
EXPOS
URE.
HANDLING COMPACT DISCS
To remove a CD from its storage case,
press down on the centre of the case
CD PLAYER
LISTED IN THIS GUIDE MAY RESULT IN HAZARDOUS
and lift the disc out.
Hold the disc by the edges. Avoid
Compatible Compact Discs
Only compact discs identified with the
your CD player.
LOADING AND PLAYING CD DISCS
1. Please the FUNCTION button until CD appears on the LCD display.
2. To open the CD lid press the . The
3. Place the CD in the compartment with the label
4. Close the CD lid
5. Press the PLAY button to start playback, the LCD display will show the
and time played.
REMOVING CDS
1. Press the button, the CD will stop playing. The
and play time of the CD.
2.
Wait until the CD stops spinning then press
close the CD lid.
CAUTION! Do not put anything other than a CD into
CD mechanism. Do not force the lid to open further than
use to prevent dirt and dust from entering the mechanism.
scratched or too dirty, it may not play.
. The LCD shows CD READ then total number of tracks.
touching the recorded side of the disc.
mark shown opposite can be used with
LCD display shows Open.
side facing upwards.
LCD will display Stop and the number of tracks
open the CD lid. Remove the disc then
to
the compartment. Other objects may damage the
the mechanism allows. Keep the lid closed when not in
Never insert more than one CD at a time. If a CD is deeply
track number playing
PAUSE
1. To stop a track temporarily, press the button
The played time will
2. To resume play, press the button on the
flash on the display.
9
The CD will pause at the
remote control.
current play position.
8
Page 13

SKIP FORWARDS OR BACKWARDS THROUGH TRACKS
CD PLAYER
1. To select the next track, press the button. If
will return to track 1.
2. To go back to the previous track press
the player will go to the last track on the CD.
3. To play a particular track press either or
LCD display.
PROGRAMMDE TRACK SELECTION
You can set your CD Player to play a preset selection of
TO PROGRAM SPECIFIC TRACKS
1. Press the so the CD is not playing then press
The first two dig
which
will increment after
2. Press either or until the required track
the program counter
3. Press the
entered.
4. Repeat steps 2 and 3 above until all the tracks
5. To clear a program so the program counter is
6. To play the programmed tracks press
7. When playing a program you can skip through
8. After all the programmed tracks have been
programmed
its 00 are where the
P--01.
MEMORY
button again, the LCD will
selection is cleared.
selected track number is entered, P--01 is the
a track is entered.
the button.
Note: There can be up to a maximum of 64tracks stored,
REPEAT DISC PLAY
You can set your CD player to repeat a single track, the
TO REPEAT A SINGLE TRACK DURING PLAY MODE
1. Press either or buttons to select the track
selected
2. Press the
continuously
3. To cancel the repeat function and to continue
track and the track will play.
REPEAT
button until the LCD display
until you press the button.
you are on the last track of the CD, the player
the button. If you are on the track 1 of the CD,
until the track number required is shown on the
tracks.
the
number is shown. The LCD displays the
now display 00 P-02 and is ready for another
are stored.
reset to 00 P--01 press the
the programmed selection using
played, the CD player stops automatically and
the same track can be stored more than once.
whole CD or your programmed selection of tracks.
you wish to repeat. The LCD display shows the
shows ‘Repeat ’ The selected track will
playing the CD press the
MEMORY
button. The LCD display will show 00
REPEAT
program counter
selected track and
track to be
button.
the and buttons.
your
play
twice.
P--01
TO REPEAT A SINGLE TRACK DURING STOP MODE
1. Press either or buttons to select the track
selected track.
2. Press the
3. Press the button to start repeat single play.
REPEAT
button until the LCD display
you wish to repeat. The LCD display shows the
shows Repeat .
8
10
Page 14

CD PLAYER
TO REPEAT THE ENTIRE CD DURING PLAY MODE
1. Press the
continuously
2. To cancel the repeat function and to continue
TO REPEAT THE ENTIRE CD DURING STOP MODE
1. Press the
2. Press the button to start repeat entire play.
TO REPEAT A PROGRAMMDE SELECTION
Select your programmed tracks as described previously.
1. Whilst the programmed selection is playing
shows Repeat All.
2. To cancel the repeat function and to continue
TO SET RANDOM PLAY DURING PLAY MODE
In this mode the CD player will play tracks once in a random
1. Press the
tinue to play, then tracks are played in
2. To cancel the random function and to continue
TO SET RANDOM PLAY DURING STOP MODE
1. Press the
2. Press the button to start random play. Tracks
the button.
TO SET INTRO PLAY DURING PLAY OR STOP MODE
In this mode the CD player will play the first 10 seconds of
1. Press the
2. To cancel the intro function before the end of the
INTRO
LOADING AND PLAYING MP3 DISCS
1. Press the FUNCTION button until CD is
2. To open the CD lid press the on the CD lid. The LCD display shows Open.
3. Place the MP3 disc in the compartment with the
4. To close the CD lid the CD player starts to spin the disc, the LCD will display CD READ.
5. The total number of files will be show.
FIND A FILE IN MP3 DISC
1. Press
be display.
2. Press and buttons to scroll through characters and numbers. Once the desired character
or number selected the first found file will appears.
3 To find other files has same leading character or number,
character flash on the display then use the and buttons to scroll through files.
4.
Once the desired track is displayed, pres
REPEAT
button until the LCD display
until you press the button.
REPEAT
button until the LCD display
The programmed
RANDOM
RANDOM
INTRO
button again.
ESP/FIND button once, files having
button until the LCD display
button until the LCD display
button until the LCD display
tracks will play
shows ‘Repeat All ’. The entire disc will play
playing the CD press the
shows ‘Repeat All ’.
REPEAT
press the
continuously until you press the
playing the CD press the
order.
shows ‘Random ’. The track playing will con-
random
order until you press the button.
playing the CD press the
shows ‘Random’.
are played in random order until you press
each track on the CD, then stop playing .
shows ‘INTO’. The first 10 seconds of
CD is reached and to continue to play the CD
show on the display.
label side facing upwards.
same leading character in the file name will
press and hold the or buttons until the leading
the
button to begin playback.
s
button until the LCD display
REPEAT
REPEAT
RANDOM
button again.
button.
button twice.
button again.
each track will then play.
press the
11
Page 15

CD PLAYER
FIND A FOLDER IN MP3 DISC
1. Press
2. Press and buttons to scroll
3.
REMARK
MP3 ID3 TAG DISPLAY
1. To display ID3 Tag information press and hold the ESP
ESP FUNCTION
ESP (ANTI-SHOCK) function will be activated
Press
section.
SKIP FPRWARDSPR BACKWARDS THROUGH TRACKS (MP3)
Please follow as previously described on page11.
PROGRAMMDE TRACK SELECTION ( MP3)
Please follow as previously described on page11.
REPEAT DISC PLAY (MP3)
With the exception of repeat an MP3 folder, please follow as
ESP/FIND button twice .
through the folders on the CD.
Once the desired folder is displayed, press
folder.
MP3 playing performance will vary in quality depending on
played, and how it was recorded.
due
to the difference in the way it is formatted.
MP3 music
ESP/FIND button to disable or enable the ESP
playback.
Reading time for a MP3 - CD is longer than normal CD's
the
button to start playback the first file
automatically during playback of CD or MP3 disc.
function Move this section to the end of CD/MP3
previously described on page11.
the condition of the disc being
button more than 1 second during
in the selected
REPEAT AN MP3 FOLDER
You can set your MP3 player to repeat a folder, this will
To repeat the currently playing folder:
1.
Press the REPEAT button until the LCD display shows
playing will
now be repeated continuously.
2. To cancel the repeat folder function and to continue playing the CD press the
TO SELECT A FOLDER FOR REPEAT IN STOP MODE
1. Press the
2. Press the PRE+/PRE- buttons until the folder for repeat is shown on the LCD display.
3. Press the button to start play.
continuously.
4. To cancel the repeat folder function and to continue playing the CD press the
REPEAT
button until the LCD display shows ‘ALBUM REPEAT’.
All tracks within the folder currently playing will
repeatedly play all the tracks within the folder.
‘ALBUM REPEAT’. All tracks within the folder currently
REPEAT
now be repeated
REPEAT
button again.
button again.
12
Page 16

SOUND CONTROL
MUTE FUNCTION
To mute the sound, press the MUTE button, "MUTE" will flash on the LCD display. Press the MUTE
button again to restore the sound.
PRESET EQ FUNCTION
The unit has 5 preset equalizer. The presets are PASS, CLASIC, ROCK, POP and JAZZ. The equalizers
enhance certain frequency groups to suit the type of audio output.
To select a preset press the EQ button until desired preset appears on the LCD
PASS CLASSIC ROCK POP JAZZ
display
13
Page 17

USING THE USB AND SD/MMC CARD
S
U
C
.
S
C
C
.
USB PORT
USB Devices such as USB (memory sticks) Flash Drives and
the
USB PORT
INSTALLING A USB DEVICE
Ensure the USB device is switched on, before connecting.
1.
2. Press the S
3. To select the U
■
■
REMOVING A USB DEVICE
To remove a USB device, press the button, and switch the unit to STANDBY , or select one of the other
functions (Tuner/CD). Pull the USB device directly out from the USB Port.
SD/MMC CARD
SD/MMC (Multi Media Cards) Cards containing MP3 files
.
Remove SD/MMC card from the card slot then
Note: Installing a USB device incorrectly
TANDBY button to turn on the
SB mode, repeatedly press the
on the LCD display.
After the unit has read the USB device , the
If no MP3 files are present on the USB device, ‘
could damage the product.
product.
total number of tracks will appear on the LCD display.
NO
MP3 players containing MP3 files can be connected to
connect the USB device to the USB PORT.
FUNCTION button until ‘C
FILES
’ will appear on the LCD display.
can be inserted into the unit.
ARD - USB’ appears
INSTALLING A SD/MMC CARD
Remove USB device if plugged, push the card into the CARD SLOT gently with the label side facing
1.
upwards until you
When inserting a card.
Note: Installing a card incorrectly could damage the product.
2. Press the S
3. To select the C
the
■
After the unit has reed the Card , the total
■
If no MP3 files are present on the card, ‘
REMOVING A SD/MMC CARD
To remove a card, either switch the unit to STANDBY mode, or select one of the other functions (Tuner
/CD). Push the card inwards to release from the Card Slot.
The operation and play modes are as previously described for MP3 discs.
Note: This unit has been designed where possible to be compatibles with most makes of USB device and
SD/MMC card. Due to the many varied types available, we cannot guarantee that all makes and models are able to be used.
TANDBY button to turn on the
ARD mode, repeatedly press the
LCD display.
unit.
FUNCTION button until ‘C
number of tracks will appear on the LCD display .
NO FILES
’
will appear on the LCD display.
ARD-USB’ appears on
14
Page 18

MAINTENANCE
CARE OF THE COMPACT DISC
x To remove a disc from its storage case, press down on the center of the case and lift the disc out, holding
it carefully by the
x Fingerprints and dust should be carefully wiped off the disc’s recorded surface with a soft cloth. Unlike
conventional records, compact discs have no grooves to collect dust and microscopic debris. Wiping
with a soft cloth should remove most particles. Wipe in a straight line from the inside to the outside
of the disc. Small dust particles and light stains will have absolutely no effect on reproduction quality.
edges.
• Clean the disc periodically with a soft, lint-free, dry cloth. Never use detergents or abrasive cleaners
to clean the disc. If necessary, use a CD cleaning kit.
• Never write on or affix labels to the surface of compact discs.
CARE OF THE CABINET
If the cabinet becomes dusty wipe it with a soft dry dust cloth. Do not use any wax,polish sprays, or
abrasive cleaners on the cabinet.
CAUTION
Never allow any water or other liquids to get inside the unit while cleaning.
15
Page 19

TROUBLESHOOTING
If a fault occurs, first check the points listed below before taking the set for repair. Do not open the
set as there is a risk of electric shock.
If you are unable to remedy the problem by following these hints, call Grundig Helpline: 1800 509
394 Australia Grundig Helpline: 0800 450 259 New Zealand.
Warning: Under no circumstances should you try to repair the set yourself, as this will invalidate
the warranty
Problem
No sound / power
Display does not function
properly / No reaction to
operation of any of the
controls
The CD skips tracks
No disc indication
CD Playback does not work
Cause
Volume not adjusted
Power cord not securely
connected
Electrostatic discharge
CD damaged or dirty
Program is
No CD inserted
CD badly scratched or dirty
Laser lens has steamed up
CD-R is blank or the disc is not
finalized
CD badly scratched or dirty
Laser lens steamed up
USB / Memoy Card connecting
error
active
Solution
Adjust the Volume
Connect the AC
Switch off and unplug the set.
Reconnect after a few seconds
Replace or clean CD
Quit program mode
Insert a CD, CD-R or CD-RW
Replace or clean CD
Wait until lens has cleared
Use a finalized CD-R
Replace or clean CD
Wait until lens has adjusted to
room temperature
Unplug
card or USB stick
and reinsert memory
cord properly
USB / Memory card failure
USB / Memory Card does not
contain playable files
Use a USB / Memory Card c
ontaining MP3 or WMA files
16
Page 20

SPECIFICATIONS
GENERAL
Power Supply: AC230V~50Hz ,240V~60Hz
Power consumption: 65 W
Dimensions of unit: 400(w) x 185(h) x 240(d) mm
Frequency range: MW 522 - 1620 kHz
FM 87,5 - 108 MHz
Antenna: FM: PIGTAIL ANTE NNA
MW: FERRI TE BAR A NTENNA
Remote Control: Battery 1* 1.5V Type AAA / Micro (not included)
COMPACT DISC
Disc Drive Top Loading CD Drive, 8cm & 12cm compatible
Laser Type CLASS 1 LASER
Disc Compatibility CD-R / CD-RW
Laser output 0.6mW(Continuous wave max.)
Wave length 790 nm
SPEAKER SYSTEM
Speaker 2.1 ch Speaker System
MP3 PLAYER
Format: ISO9660/ JOLIET
Bitrate: 8 - 320 kBit/s CBR/VBR
Sampling Rate: 32, 44 & 48 kHz
17
SPECIFICATIONS SUBJECT TO CHANGE WITHOUT NOTICE
Page 21

WARRANTY
Please keep your receipt as proof of purchase. This product is warranted for any defect in materials or
workmanship for one year after the original date of purchase. This product is for normal domestic and office
use only. This warranty does not cover damage from misuse or neglect , accidental damage, vermin
infestation, excessive voltages such us lightning or power surges or any alternation that affects the
performance or reliability of the product.
In the unlikely event that your product fails to work normally, please contact Grundig Warranty on 1800 509
394 (Australia) or 0800 450 259 (New Zealand) and have your receipt of purchase on hand.
This warranty is subject to the following provisions:
Ɣ It is only valid within boundaries of the country of purchase;
Ɣ The product must be correctly assembled and operated in accordance
with the instructions contained in the manual;
Ɣ This product must be used solely for domestic purposes;
Ɣ The warranty does not cover accidental damage;
Ɣ The warranty will be rendered invalid if the product is resold or has been damaged by inexpert repair;
Ɣ The manufacturer disclaims any liability for incidental or consequential damaged.
This warranty is in addition to, and does not diminish, your statutory or legal rights.
PO BOX 6287
Silverwater NSW 1811
www.grundig.net.au
Grundig Warranty: 1800 509 394 Australia
Grundig Warranty: 0800 450 259 New Zealand
Page 22

PO BOX 6287
Silverwater NSW 1811
www.grundig.net.au
rev.1 21-Dec-2007
 Loading...