

Page 1
PORTABLE CD-PLAYER
CDP 410/440
Page 2
P
CLASS 1
LASER PRODUCT
X
6. O
Y
E
M
I C
A
N
T
O
(H
ea
r M
y V
o
ic
e)
7
. D
O
N
'T
W
A
N
N
A
L
O
S
E
Y
O
U
8. G
E
T
O
N
Y
O
U
R
F
E
E
T
9
. Y
O
U
R
L
O
V
E
IS
B
E
D
F
O
R
M
E
1
0. C
U
T
S
B
O
T
H
W
A
Y
S
1
1. O
Y
E
M
I C
A
N
T
O
(S
p
an
ish
V
ers
io
n
)
12. S
I V
O
Y
A
P
E
R
D
E
R
T
E
E
P
C
46
5
145
2
B
IE
M
/S
T
E
M
R
A
S
TE
R
E
O
All rights of the producer and of the owner of the recorded work reserved. Unauthorised copying,
public performance, broadcasting, hiring or rental of this recording prohibited. Made in Austria
1. A
Y
, A
Y
, I
2
. H
E
R
E
W
E
A
R
E
3. S
A
Y
4. T
H
IN
K
A
B
O
U
T
Y
O
U
N
O
W
5
. N
O
T
H
IN
' N
E
W
C
O
M
P
A
C
T
D
IG
IT
A
L
A
U
D
IO
1
2
GB
10
CDP 410/440 page 10
GENERAL CONTROLS
CD handling
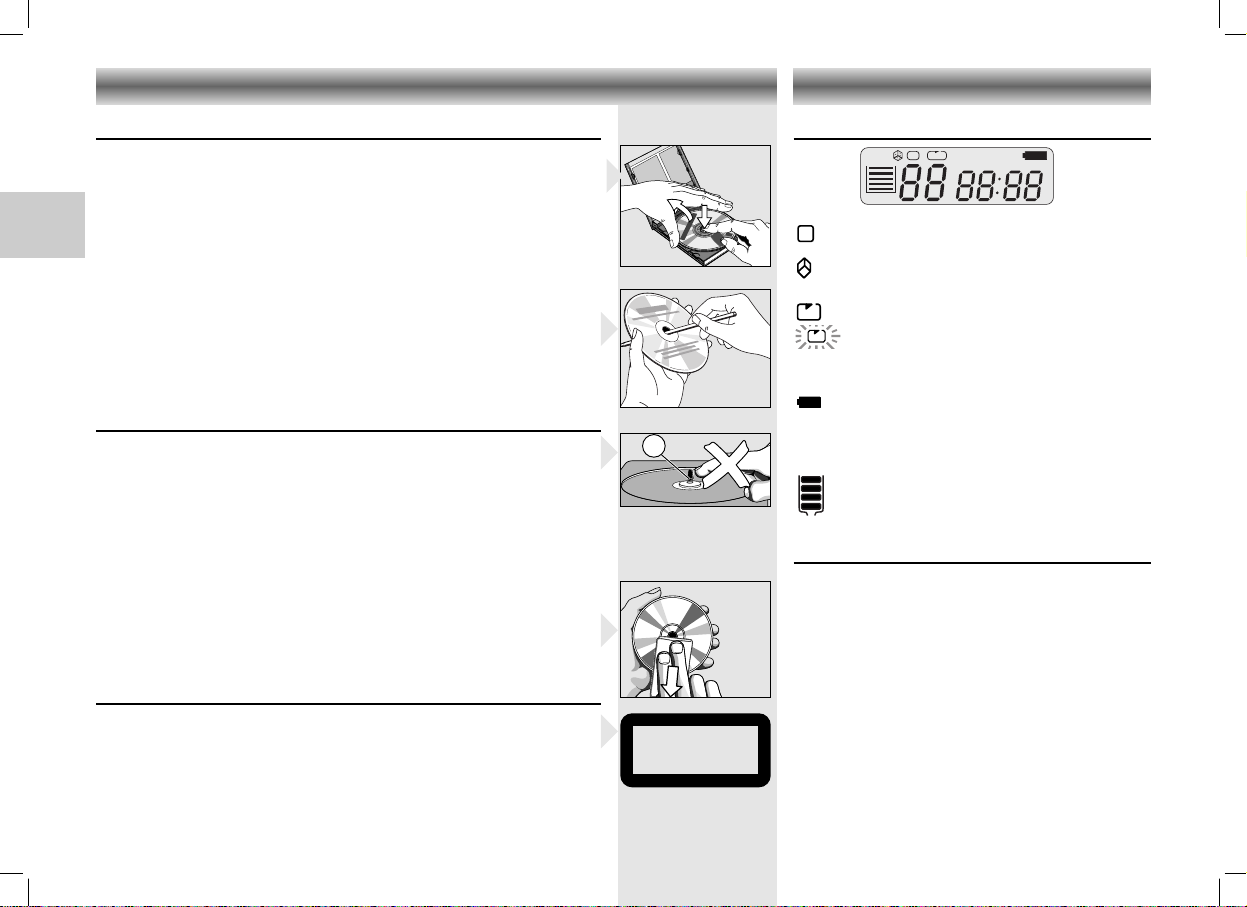
• Never write on a CD or attach any sticker to the CD.
• To take the CD out of its box easily, press the centre spindle while lifting
the CD.
•
Always hold the CD at the edge and always store
with the label facing up.
•
Do not expose the CD player, batteries or CDs to
(e.g. dripping or splashing), sand and dust or to excessive heat caused
by heating equipment, or to direct sunlight, for example inside a car
parked in the sun.
• When a newly purchased CD does not stay on the hub, this is caused
by small burrs around the center hole of the CD.
• Remove the burrs by rubbing the edge of the center hole with a pen or
other such instrument.
Maintenance
• The lens of the CD player should never be touched!
• The mechanical parts of the CD player contain self-lubricating bearings
and must not be oiled or lubricated.
• You can clean the CD player cabinet with a soft and slightly dampened
chamois leather.
Do not use any cleaning agents as they may have a corrosive effect.
• The lens may cloud over when the set is suddenly moved from cold to
warm surroundings. Playing a CD is then not possible.
Leave the CD player in a warm environment until the moisture evaporates.
• To remove dust and dirt from the CD, breathe on the CD and wipe it
with a soft, lint-free cloth in a straight line from the center towards the
edge. Cleaning agents may damage the CD.
Warning
CLASS 1 LASER PRODUCT means that the laser´s construction makes it
inherently safe so that the legally prescribed maximum permissible radiation
values can never be exceeded.
CAUTION: Using any equipment or devices other than those described and
specified in these operating instructions, or tampering with the unit in any
way, can result in dangerous exposure to radiation.
it in its box after use
rain and dampness
The display indicates:
P1
ALLINT LOCK
ANTI-SHOCK
DAS TRACK MIN SEC
: during programming or programme
playback
: during the RANDOM function
INTRO: during the INTRO function
: during the REPEAT function (repeat all)
ALL
flashing: repeat one title
1
LOCK: when LOCK is activated and any button is
pressed.
: flashing: the batteries are weak;
continuously: the battery voltage is too low
88: track number
88:88: playing time
: when DAS is activated
Earphone control jack (PHONE)
• Connect the supplied earphones (3.5 mm jack
plug) to the PHONE jack.
USING EARPHONES – Caution...
Do not play your earphones at a high volume.
Operation at high volume can endanger yourself and
others in traffic. You should therefore always
the volume so that you can still notice ambient noises
(e.g. horns, rescue vehicles, police cars, etc.)
Note: This CD portable/headphone set complies
with the requirements of article LL44.5 and 6 of the
Public Health Code.
The performances of this product guarantee optimal
listening at medium volume. Continuous use at high
volume can damage the user’s hearing.
adjust
Page 3
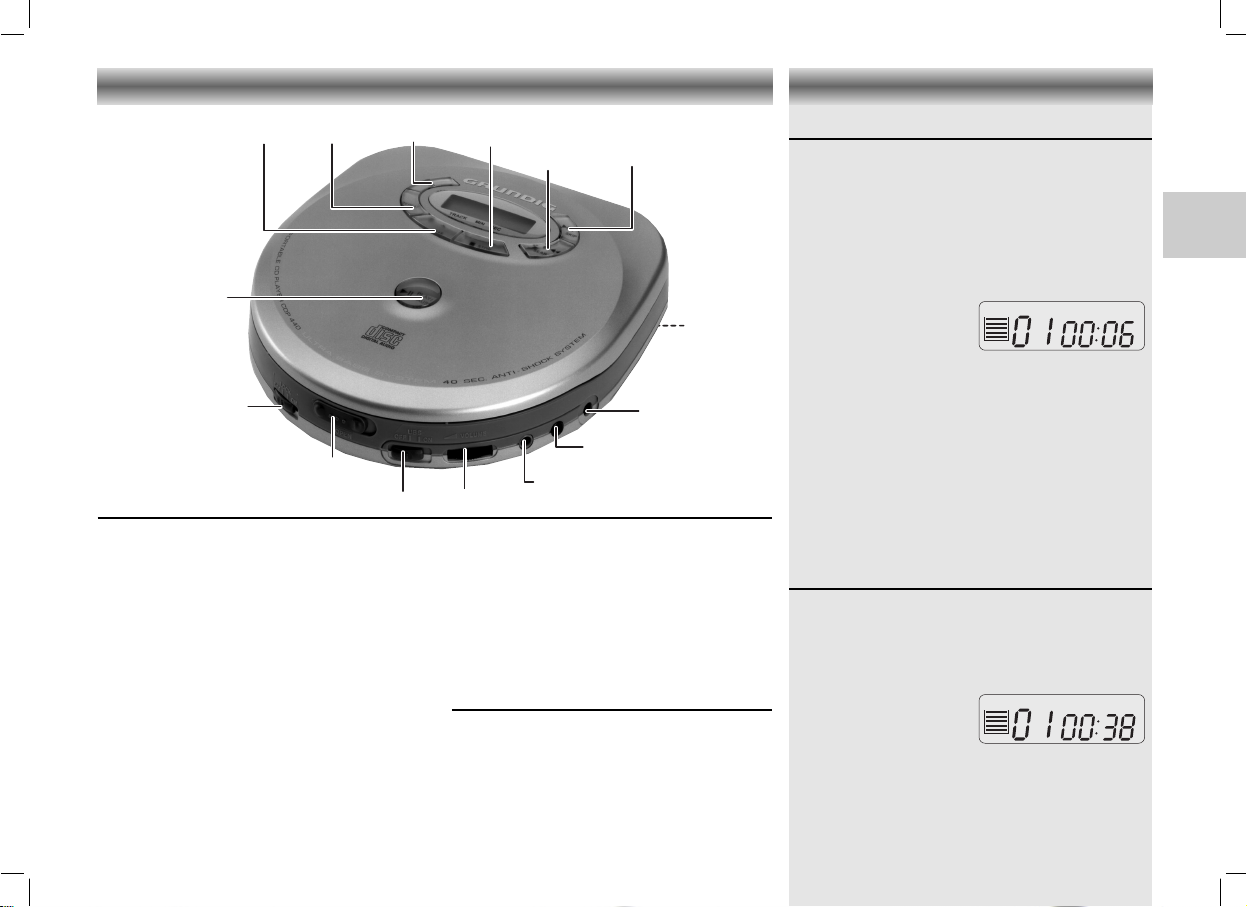
2; PLAY/ – to start and interrupt playback
ANTI-SHOCK
DAS TRACK MIN SEC
LOCK
ANTI-SHOCK
DAS TRACK MIN SEC
LINE OUT
S
T
2;
9
PROG
SEARCH
PLAY/
PAUSE
SKIP
STOP
DAS
PHONE
VOLUME
UBS
DC 6.0V
+>-
OPEN
Batteries
MODE
LOCK
PAUSE
PROG – to select the program function
MODE – to select the play functions
DAS – to switch the DAS function on
STOP – to stop playback
SEARCH S
SKIP T – to skip and search forward
DC 6.0 V
+>- – jack for external power supply
PHONE – earphone jack (3.5 mm)
– to store musical pieces in a
program using activated
programming mode
and off
– to skip and search backward
CDP 410/440 page 11
CONTROLS DAS / LOCK
DAS – Digital Anti shock System
The DAS memory of the model CDP 440 stores the
CD data (music) for 40 seconds in advance in order
to prevent interruption during play caused by shock
and vibration.
The DAS memory of the model CDP 410 stores the
CD data for 10 seconds in advance.
• Activate the DAS memory by pressing the DAS
button once.
–
The Anti Shock symbol
in the display starts
filling, the display shows
for example:
– The state of the DAS symbol in the display changes
according to the state of the DAS memory.
• To disable this function, press the DAS button once
more.
Note:
When switching the DAS feature on and off,
CD play will be delayed or interrupted for a short time.
•
LINE OUT – jack for connection to a HiFi
VOLUME – to adjust the volume
UBS – (Ultra Bass System) to boost the
OPEN – to open the lid of the CD player
LOCK – to lock all button functions
Bottom of the set:
Batteries – for inserting 2 LR 6 (AA) alkaline
system.
bass response
batteries or rechargeable
batteries.
As the Digital Anti shock System requires more energy,
it is advisable to switch it off when the playing
conditions are good, in order to save battery life.
Lock function
The ‘LOCK’ function locks the button function to
prevent accidental activation (for example while
travelling).
• Set LOCK to ON position.
– Now, the CD player buttons will not operate.
The 'LOCK' indication
lights up on the display.
• To deactivate this
function, reset LOCK to
OFF.
• The device cannot be switched on in LOCK ON
position.
GB
11
Page 4

LINE
OUT
CD IN
(AUX, LINE IN)
LINE OUT
DC IN
-<+
6.0 V
LINE OUT
DAS TRACK MIN SEC
3 mm
min
GB
CDP 410/440 page 12
Batteries
• Open the battery compartment and insert as
indicated two alkaline batteries type LR6, AM3,
AA or insert two rechargeable Nickel-Cadmium
batteries .
• Remove the batteries if they are empty or if the
CD player is not to be used for a long time.
The display indicates when the battery voltage is
too low:
• When the indicator flashes, the batteries
are getting too weak.
• When appears continuously, the battery
voltage is too low and the CD player will soon
shut down.
Note:
The battery supply is switched off when the
DC IN 6.0 V socket is in use.
When changing over to battery supply, pull out the
plug from the DC IN 6.0 V socket.
Mains adapter (supplied)
1 Make sure that the local voltage corresponds to
the voltage of the adapter.
2
Connect the supplied mains adapter (6.0 V/450 mA
Direct Current plus-pole to the centre pin) to the
player's DC IN 6.0 V jack and to the wall outlet.
• Always disconnect the adapter if you are not
using it.
Note:
The CD-player remains connected to the
mains even when it is switched off.
The unit is only fully isolated from the mains if the
mains adapter is removed from the wall socket.
POWER SUPPLY
Note on Environmental Protection
Do not throw exhausted batteries in
the household refuse.
Hand over the old batteries to your
dealer or
buying new ones.
public collecting points when
Recharging Nickel-Cadmium batteries
(size AA)
Your mains adapter also works as a charger.
This is only possible with Ni-Cd batteries (size AA)
1.2 V/600mAh.
Note: As a quick reference when buying the Ni-Cd
batteries, be sure that the metal cap on the negative pole is exposed more than 3 mm as illustrated.
• Charge the batteries prior to first use and also if
the batteries have not been used for a long
period.
• Install the rechargeable batteries in the battery
compartment as described before.
• Connect the AC adapter to the CD-player and
then to the wall outlet.
• The batteries should be allowed to recharge for
8 hours for full capacity.
• The ambient temperature for recharging should
be between 5˚C and 40˚C.
• The player can be operated while the batteries
are being recharged.
Line out
Reproduction through a stereo system
• Turn down the volume of your stereo system.
• Connect a signal lead to the LINE OUT jack of
the CD player and to the input jacks CD IN,
AUX(iliary) or LINE IN of the other set (amplifier,
receiver, radio cassette recorder etc.).
• Adjust the sound with the controls of the stereo
system.
12
Page 5

DAS TRACK MIN SEC
DAS TRACK MIN SEC
DAS TRACK MIN SEC
DAS TRACK MIN SEC
CD PLAYER
Inserting a CD
• Open the lid by sliding the OPEN button and lifting the lid gently.
• Insert an audio CD, printed side up.
• Push gently on the CD center so that it fits onto the hub.
• In addition to standard 12 cm CD's, you can also play 8 cm CD singles
without an adapter.
• Close the lid by pushing it gently on its right-hand side.
– The CD-player scans the contents list of the CD.
The total playing time and the total number of tracks appear on the
display.
• Press 2; PLAY/PAUSE to start playback.
Removing the CD:
• Open the CD door only if the CD player is in position STOP.
• To take out the CD, open the CD lid by
lifting the lid gently.
• Hold the CD by its edge and press the hub gently.
Playing a CD
• Press 2; PLAY/PAUSE to start playback.
– The display shows the current track number and its elapsed playing time.
• Adjust the sound using the VOLUME and UBS controls.
• For brief interruptions, press 2; PLAY/PAUSE.
– The playing time indication starts flashing.
• To resume playback, press 2; PLAY/PAUSE again.
• To stop playback, press STOP.
– The total playing time and number of tracks will then appear on the
display.
• If you press the STOP button again, you will switch off the set.
– If no button is pressed for 30 seconds, the set will switch off
automatically.
– The CD player also goes to position STOP:
– by opening the CD lid;
– when the end of the CD is reached;
– if the batteries run down or if the power supply is interrupted.
sliding the OPEN switch and
CDP 410/440 page 13
Automatic Power-Off
This CD-player is equipped with an automatic
power-off function.
• In STOP mode, the player automatically shuts
down approximately 30 seconds after the last
operation.
• If you press STOP while the set is in STOP
mode, the player also shuts down.
• To reactivate the player, press 2;
PLAY/PAUSE.
SEARCH / SKIP
Selecting another track during play
• Press SEARCH S or SKIP T until the
required track number appears in the display.
– The selected track begins to play.
Starting with a particular track
• Press SEARCH S or SKIP T until the
required track number appears in the display.
• Press PLAY/PAUSE.
– Play starts from the selected track.
Searching for a passage during play
• Hold SEARCH S down to search
backwards to the beginning.
• Hold SKIP T down to search forwards to
the end.
Note:
This function can be described as
'audibly' searching for a title.
During the search, volume is reduced and returns
to its adjusted level as soon as the button is
released.
GB
13
Page 6

P
P
P
P
DAS TRACK MIN SEC
P
1
ALL
INT
DAS TRACK MIN SEC
CDP 410/440 page 14
Selecting a different playback mode
The MODE button enables you to choose among five
different play modes.
• Press the MODE button repeatedly until the desired
GB
1 REPEAT 1: repeats only the chosen title.
2 REPEAT ALL: repeats all titles on the CD.
3 INTRO: plays the first 10 seconds of each title
4 RANDOM: plays titles in random order until all titles
5 No entry: normal play.
• The RANDOM function cannot be activated while
• To return to normal play mode, press the MODE
• To shut down the CD player, press the STOP 9 button
Programming
By programming the player you can play up to 20
tracks in any desired order. If you exceed the
maximum of 20 tracks, the programme function will
start again from the beginning. You may store each
track more than once.
Storing a programme
• Insert a CD and close the compartment.
• Press the PLAY·PAUSE 2; button to read the CD.
• Press the PROG button
•
– The display shows e.g.:
• Store this number by pressing the PROG button.
– The display shows:
• Select and store in this way all desired titles.
14
play format appears on the display indicator.
on
the CD; the CD player
stops play after the last title.
have been played once; the CD player then stops.
another program is in operation.
button until the display indicator is blank.
twice.
and the display will flash
the letters .
Select the first desired track using SKIP·SEARCH S
or T.
CD PLAYER
1
2
3
4
5
Note:
While playing a programme, it
is possible to use SEARCH S
or SKIP T to select the
desired programmed tracks.
Playing the programme
• Press PLAY·PAUSE 2;.
– Playback starts with the first track of the programme.
– The display shows .
– After the last track playback stops.
The total playing time and number of tracks appear
on the display.
Note:
While playing a programme, it is possible to use
SKIP·SEARCH S or T to select the desired
programmed tracks.
Checking the programme
• Press the PROG button repeatedly until flashes on
the display.
– Each press of the PROG button will now show each
stored number in the order entered.
– Then, '00' appears again.
• You can now add tracks to the sequence as
described above (up to 20).
Erasing the programme
The contents of the memory will be erased:
– when you switch off the player;
– if the batteries become exhausted or if the power
supply is interrupted in another way.
– when the CD compartment is opened.
Page 7

TECHNICAL DATA TROUBLESHOOTING
CDP 410/440 page 15
Power Supply
AC power adapter .......DC 6.0 V +>- external
Battery operation ..........2 x 1.5 V (LR6, AM3, AA)
Output power DIN 45324, 10% THD
Earphone output...............................2 x 15 mW
Line output................................0.6 V +/-1.5 dB
Connections
Line Out...................................3.5 mm ø stereo
DC connector...........................3.5 mm ø
Earphones: ..............................3.5 mm ø, stereo
CD Player
Frequency range:.......................20 Hz – 20 kHz
S/N ratio, weighted .............................> 80 dB
Channel separation ...............................> 52 dB
D/A conversion .................1 bit linear digital filter
Dimensions (w x h x d)....133 mm x 31.5 mm x 137 mm
Weight (without batteries) ..............approx. 0.3 kg
Supplied accessories
.....................AC power adapter/battery charger
..............................................Stereo earphones
...............................................Guarantee sheet
.............................................Instructions for Use
This unit meets the CEE regulations concerning
interference radiation.
This product fulfills European directives
89/336/EEC, 73/23/EEC and 93/68/EEC.
This unit complies with the safety regulations
according to VDE 0860 / BS 415 and thus with the
international safety regulation according to IEC 65.
The type plate is located on the bottom of the set.
Subject to technical alterations and alterations in
styling E. and O.E.
(6.0 V)
If a fault occurs, first check the points listed below before taking the set for repair.
If you are unable to remedy a problem by following these hints, consult your dealer or service centre.
WARNING:
the guarantee.
Under no circumstances should you try to repair the set yourself, as this would invalidate
Problem Possible Cause Remedy
No power or no Batteries/rech. batt.
CD play start Batteries incorrectly inserted Insert the batteries correctly
Display: no indication Batteries are empty Change/recharge the
CD play does not start CD lid is not securely closed Close the lid securely
or interrupts Moisture condensation Leave the player in a warm place
Display: no indication or until the moisture evaporates
dlSC CD is not or incorrectly inserted Insert a CD, label facing up
Play does not start RANDOM or PROGRAM Switch off RANDOM or
from the first track is activated PROGRAM
No sound or bad PAUSE is activated Press 2; PLAY/PAUSE
sound quality Loose or wrong connections Check connections
The LOCK switch is in rechargeable batteries
the ON position LOCK switch in position OFF
Contact pins are dirty Clean them with a cloth
AC power adapter
Loose connection Connect the adapter securely
CD is badly scratched Use another CD
CD is dirty Clean the CD
Volume is not turned up Adjust the volume
Earphones worn the wrong Pay attention to the L (left) and
way round R (right) indications
Earphone plug is dirty Clean the earphone plug
Strong magnetic fields near the Change the player's position or
CD player connections
Electrostatic discharge from Press SEARCH S or SKIP T
the user via the CD player
The earphone is plugged into Plug earphone into PHONE socket
the LINE OUT socket.
once or press 2; PLAY/PAUSE twice
GB
15
Page 8

GRUNDIG AG • D 90762 FÜRTH • DEUTSCHLAND
0123456789
72010-761.3000
 Loading...