

Page 1

PORTABLE CD-PLAYER
Squixx
CDP 4100
CDP 4101 AS10
CDP 4102 AS40
ǵ
Page 2

2
4 Sicherheit 10 Zusatz-Funktionen
5 Auf einen Blick 11 Musikprogramm erstellen
7 Stromversorgung 12 Informationen
8 Vorbereiten 107 Service
9 Grundfunktionen
14 Safety 20 Additional functions
15 Overview 21 Creating a track memory
17 Power supply 22 Information
18 Preparation 107 Service
19 Basic functions
24 Sécurité 30 Fonctions supplémentaires
25 Vue d’ensemble 31 Création d’un programme
27 Alimentation en courant musical
28 Préparatifs 32 Informations
29 Fonctions de base 107 Service après-vente
34 Sicurezza 40 Funzioni supplementari
35 In breve 41 Creazione del programma
37 Alimentazione elettrica di musica
38 Preparazione 42 Informazioni
39 Funzioni di base 107 Assistenza
44 Segurança 50 Funções adicionais
45 Vista geral 51 Criar um programa de
47 Alimentação de corrente música
48 Preparação 52 Informações
49 Funções básicas 107 Assistência a clientes
___________________________________________________________________
DEUTSCH
ENGLISH
FRANÇAIS
ITALIANO
PORTUGUÊS
Page 3

54 Seguridad 60 Funciones adicionales
55 Vista general 61 Crear un programa
57 Alimentación de corriente musical
58 Preprativos 62 Información
59 Funciones básicas 107 Servicio
64 Veiligheid 70 Extra functies
65 In een oogopslag 71 Muziekprogramma
67 Stroomtoevoer 72 Informatie
68 Voorbereiden 107 Service
69 Basisfuncties
74 Sikkerhed 80 Ekstra funktioner
75 Kort oversigt 81 Oprettelse af
77 Strømforsyning musikprogram
78 Forberedelse 82 Informationer
79 Grundfunktioner 107 Service
84 Säkerhet 90 Extrafunktioner
85 En överblick 91 Skapa musikprogram
87 Strömförsörjning 92 Information
88 Förberedelser 107 Service
89 Grundfunktioner
94 Turvallisuus 100 Lisätoiminnot
95 Yleiskatsaus 101 Musiikkiohjelman
97 Virransyöttö laatiminen
98 Valmistelu 102 Tietoja
99 Perustoiminnot 107 Service
DEUTSCH
3
__________________________________________________________________
ESPAÑOL
NEDERLANDS
DANSK
SVENSKA
SUOMI
Page 4
14
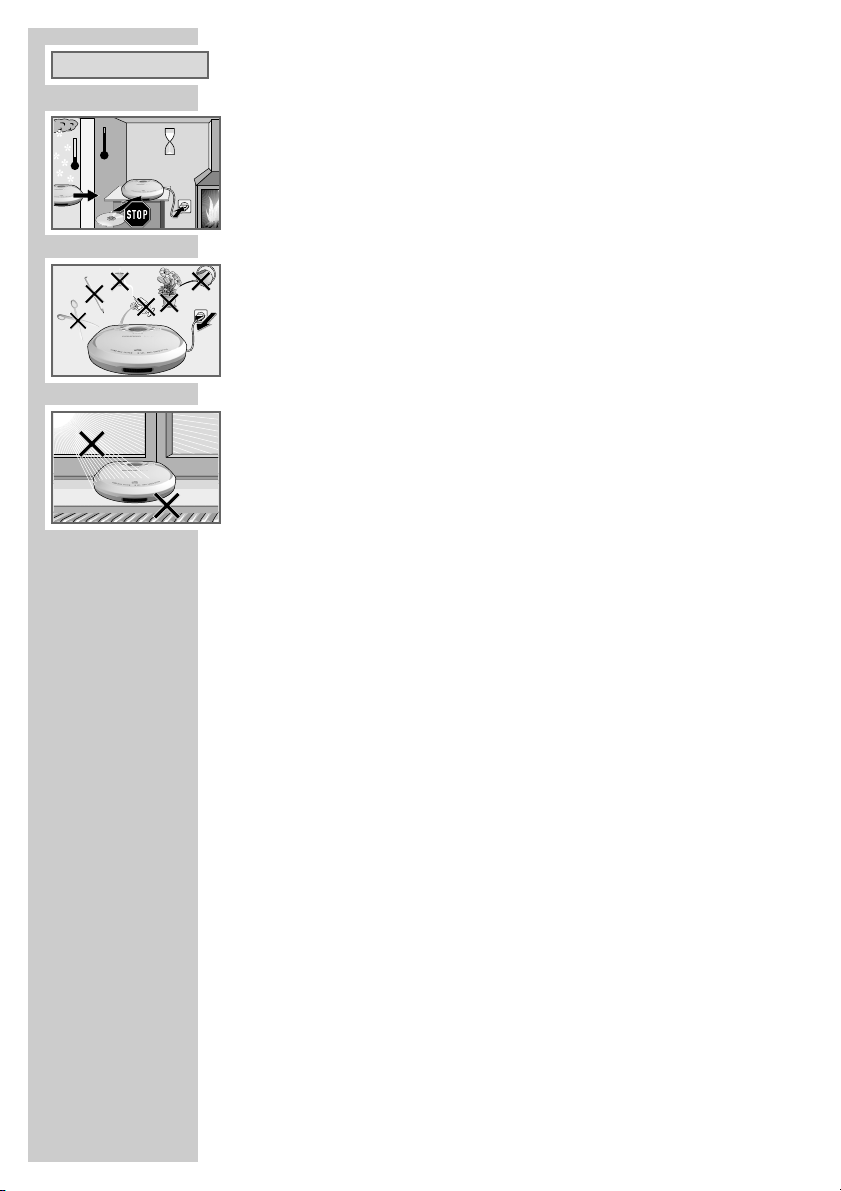
Safety
To ensure that this device provides you with long-term satisfaction and
enjoyment, please observe the following instructions:
This device is designed for the playback of audio signals.
Any other use is expressly prohibited.
You must make sure that the device is protected from moisture such as rain
or water splashes.
When deciding where to place the device, please note that furniture surfaces
are covered by various types of varnish and plastic, most of which contain
chemical additives. These additives can corrode the device supports, leaving
residues on the furniture surfaces which can be difficult or impossible to
remove.
Never touch the lens on the device.
The device contains self-lubricating bearings, which must not be oiled or
greased.
Condensation may form on the lens if the device is taken into a warm room
from the cold. This prevents it from playing a CD.
Always keep the disc compartment closed to prevent dust from collecting on
the lens.
Never open the device casing. The manufacturer accepts no liability for
damage resulting from improper handling.
Maintenance
If the device is unable to scan CDs perfectly, use a standard commercially
available cleaning CD to clean the laser optics. Other cleaning methods may
damage the laser optics.
To clean a CD, breathe on it and wipe it with a soft, lint-free cloth from the
middle towards the edge.
Clean the device with a clean, moist leather cloth. Do not use cleaning
agents, as these may damage the casing or the CD.
Environmental note
As little material as possible was used for packaging your device.
It can be divided into two separate materials: cardboard (box) and polyethylene (bag).
Please observe the local regulations for disposing of the packing material.
Batteries, including those which are heavy metal-free, may not be disposed of
with household waste. Please dispose of used batteries in an environmentally
sound manner. Find out about the legal regulations which apply in your area.
SAFETY
___________________________________________________
2h
°C
°C
! SERVICE !! SERVICE !! SERVICE !
ENGLISH
Page 5
ENGLISH
15
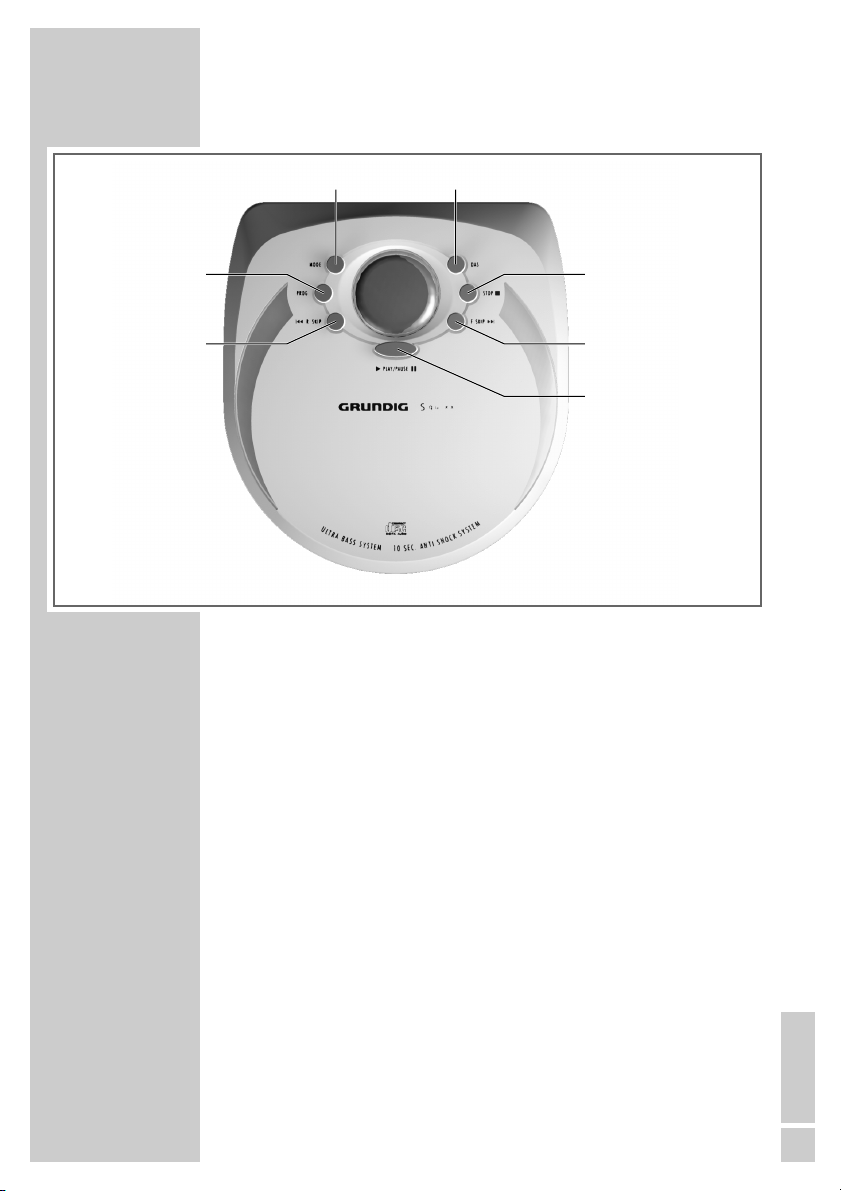
Operating controls on the top of the device
DAS Switches the digital anti-shock system on and off
(no function on the CDP 4100).
STOP
5
Press once to end CD playback
Press twice to switch off the device
sss6
F.SKIP Press briefly to select the next track
Hold down to search for a particular passage
ı PLAY/PAUSE II Switches the device on and starts CD playback;
Switches to pause.
5aaa
R.SKIP Press briefly to select the previous track
Hold down to search for a particular passage
PROG. Calls up the track memory creation function
MODE Call up the Repeat 1, Repeat All, Intro and Ran-
dom functions in succession
OVERVIEW
___________________________________________
MODE DAS
PROG
8 R SKIP
STOP 5
F SKIP 9
R PLAY/PAUSE $
Page 6

16
Controls and connections on the side
DC IN 4.5 V +>- External power supply socket (4.5 V)
LINE OUT Audio signal output for CD playback via a
HiFi system
VOLUME g Adjusts the volume
PHONES Socket for the earphones supplied
(3.5 mm-jack)
ON UBS OFF Bass booster
OPEN Opens the CD compartment
OFF HOLD ON Disables and enables the buttons
The display
t 1: Repeating a single track
t ALL: Repeating all tracks on the CD
HOLD: The buttons are disabled
i: Flashing means the batteries are becoming low
PROG: Creating or playing a track memory
RAND: The Random function has been selected
INTRO: The Intro function has been selected
u
: The anti-shock system in on (no display on the CDP 4100).
»01«: Track number
»00:02«: Track playing time
OVERVIEW
____________________________________________
t1 ALL HOLD i
PROG RAND INTRO
u
88 88
88
:
ON OFF
UBS IIIIIIIR OPEN
LOCK
OFF ON
PHONES
VOLUME ß
LINE OUT
DC IN 4.5V
Page 7

ENGLISH
17
Mains operation (with mains adapter)
Note:
Check if the mains voltage on the mains adapter type plate corresponds
to your local mains supply.
The only way to disconnect the device from the mains supply is to
unplug the adapter. Only unplug the mains adapter from the socket
when you are not using the device.
1 Plug the mains adapter cable into the »DC IN 4.5V« socket on the
device.
2 Plug the mains adapter into the mains socket.
Battery operation
1 Pull out the mains adapter cable, open the cover of the battery compart-
ment on the bottom of the device.
2 Insert two batteries, observing the polarity on the bottom of the battery
compartment (Mignon type, e.g. 2x1.5V, LR6, AM3; AA).
Note:
The device display tells you about the state of the batteries.
If » i« flashes in the display, the batteries are getting low.
Remove the batteries when they are flat or when you know that the
device will not be used for a long period of time. No liability is accepted
for damage resulting from leaking batteries.
The batteries are switched off during mains operation.
Using Nickel-Cadmium batteries
When using Nickel-Cadmium batteries (NiCd, size AA 1.2 V/600mAh) use
the mains adapter as a charger.
1 Open the cover of the battery compartment on the bottom of the device.
2 Insert two batteries, observing the polarity marked on the bottom of the
battery compartment.
3 Plug the mains adapter into the »DC IN 4.5V« socket on the device
and plug the mains adapter into the mains socket.
Note:
When buying NiCd batteries, always make sure that approximately 3
mm of the metal end at the negative pole is visible (see illustration). If
necessary, use a knife to remove the insulation.
Completely charge up the batteries before you first use them or if you
have not used them for a long time.
The charging time is approximately 12 hours.
Using the device while the batteries are charging increases the charging
time.
POWER SUPPLY
___________________________________
DC IN 4.5V
3 mm
min
Page 8

18
Connecting the earphones.
1 Connect the earphones to the »PHONES« socket (ø 3.5 mm).
Note:
Excessive volume can be dangerous to yourself and other road users.
Listen at a volume which still allows you to hear outside noises such as
horns, emergency vehicles and police cars.
This portable CD player with headphones meets the requirements set out
in Articles LL44.5 and 6 of the German safety regulations.
The output of the device guarantees the best possible sound at medium
volume. Prolonged listening at loud volumes can damage your hearing.
Adjusting the volume
1 Adjust the volume using »VOLUME g «.
Ultra Bass System
1 Press »UBS« on the device to switch the Ultra Bass system on and off.
Inserting a CD
The device is suitable for music CDs displaying the logo shown here or for
CD-Rs with audio data.
As well as standard 12 cm CDs, it can also play
8 cm CDs without an
adapter.
Do not attach adhesive labels to CDs.
Keep the surfaces of CDs clean.
1 Push the »OPEN« slider to the right and open the CD compartment.
2 Insert the CD with the label facing upwards and gently push the centre
of the CD to latch it into place.
3 Close the CD compartment.
Removing the CD
Note:
Press »STOP ■ « before you open the CD compartment.
1 Push the »OPEN« slider to the right and open the CD compartment.
2 Remove the CD.
3 Close the CD compartment.
PREPARATION
______________________________________
Page 9

ENGLISH
19
Digital anti-shock system (DAS) (no function on the CDP 4100)
The anti-shock system reads the data on the CD several seconds in advance
(10 seconds with CDP 4101 AS10, 40 seconds with CDP 4102 AS40). This
prevents interruptions to playback due to shocks and vibrations.
1 Press »DAS« to switch on the anti-shock system.
– Display: »z« and shortly afterwards »u«.
Note:
When you switch the anti-shock system on or off, playback is delayed or
briefly interrupted.
Since the anti-shock system requires more power, it is advisable to
switch off the function as long as there are no problems with playback,
in order to prolong the life of the batteries.
2 Press »DAS« to switch off the anti-shock system.
CD playback
1 Press »ıPLAY/PAUSE II« to start playback.
– Display: »10 SEC« (or »40 SEC«), then the number of tracks and
total CD playing time (for example »15 57:i5«) followed by the first
track and the playing time of that track.
– Playback begins with the first track.
2 To pause playback, press »
ı PLAY/PAUSE II«.
– The track playing time flashes.
Press »
ı
PLAY/PAUSE II« to resume playback.
3 Press »STOP ■ « to end playback.
Note:
Playback stops automatically when the end of the CD is reached, if the
CD compartment is opened or if the batteries run out.
4 To switch off the device, press » STOP ■ « again.
Note:
The device switches off automatically after the end of playback if you do
not press a button within 30 seconds.
Selecting a different track
1 During playback, keep pressing »5a R.SKIP « or »F.SKIPs6 « until
the number of the track you want to hear appears in the display.
– Playback of the selected track starts automatically.
Searching for a passage within a track
1 During playback, press »5a R.SKIP« or »F.SKIPs6 « and hold it
down until you find the passage you want to hear.
– The volume is turned down during the search.
BASIC FUNCTIONS
______________________________
z
SEC
40
00 I 5
0I
:
u
00 0 I
0I
:
u
00 00
02
:
u
0I35
02
:
z
57 I5
I5
:
Page 10

20
Repeating a track
1 Press »MODE« once during playback.
– Display: »t 1« and the track is repeated.
2 To quit this function, press »STOP ■ «.
Repeating the whole CD (
REPEAT
)
1 Press »MODE« twice during playback.
– Display: »t ALL«, and the CD is repeated from the beginning.
2 To quit this function, press »STOP ■ «.
Playing the introductions of tracks on the CD
1 Press »MODE« three times during playback.
– Display: »INTRO« flashes.
2 Press »
ı
PLAY/PAUSE II« to start the function.
– Display: »INTRO« and the first ten seconds of each track are played.
3 To play back the whole of the current track, press »
ı
PLAY/
PAUSE II«.
– »INTRO« disappears from the display.
Playing back tracks in random order
1 Press »MODE« four times during playback.
– Display: »RAND« flashes.
2 Press »
ı
PLAY/PAUSE II« to start the function.
– Display: »RAND« and the titles on the CD are played back in random
order.
3 Press »STOP ■ « to quit the function.
– »RAND« disappears from the display
Note:
You cannot select this function if the tracks are being played back in a
set sequence from the memory.
Disabling the buttons on the device
You can use this function to prevent the buttons from being accidentally
pressed (for example when travelling).
1 Push the »HOLD« slider to the »ON« position.
– Display: »HOLD«, all the buttons are disabled.
Note:
The device cannot be switched on. Display: »HOLD«.
2 Push the »HOLD« slider to the »OFF« position to enable the buttons.
– Display: »HOLD« disappears.
ADDITIONAL FUNCTIONS
_________________
t 1
u
00 0 I
0I
:
t ALL
u
00 0 I
0I
:
INTRO
u
00 0 I
0I
:
RAND
u
00 0 I
0I
:
HOLD
u
00 I 5
03
:
Page 11

ENGLISH
21
This function enables you to save up to 20 tracks on the current CD in a certain order and then play them back in that sequence. The same track may be
saved more than once.
Selecting and saving tracks
1 Insert the CD and press »ıPLAY/PAUSE II« to start playback.
2 Press » PROG.« to select the function.
– Display: »00
01«, »PROG« flashes (the first two digits indicate the
track number, and the last two indicate the position in the memory).
3 Press »
5a R.SKIP « or »F.SKIPs6 « to select the track.
– Display: for example »02 01«.
4 Press » PROG.« to save the track.
– Display: for example »00
02«.
Note:
Repeat steps 3 and 4 to save more tracks.
If you try to store more than 20 tracks, the first track you saved is dis-
played.
Playing back the track memory
1 Press »ıPLAY/PAUSE II« to play back the track memory.
– Display: »PROG« and playback begins with the first programmed
track.
2 Press » STOP ■ « to end playback of the track memory.
3 To play the music program again, press »PROG.« and afterwards
»
ı
PLAY/PAUSE II«.
Deleting the track memory
1 With the CD stopped, press » STOP ■ « or open the CD compartment.
Note:
The track memory is also deleted if
– you pull out the mains cable or
– remove the batteries from the device.
CREATING A TRACK MEMORY
_________
PROG
u
0I
00
PROG
u
0I
02
PROG
u
00 00
04
:
Page 12

Playback via a HiFi system
1 Turn down the volume on the HiFi.
2 Plug a standard cinch cable into the »LINE OUT« socket on the device
and the audio input on the HiFi system.
Note:
You can set the volume and tone on the HiFi system.
Information
This device is noise-suppressed according to the applicable EC directives.
This product fulfils the European directives 89/336/EEC, 73/23/EEC and
93/68/EEC.
This device conforms to the safety regulation DIN EN 60065 (VDE 0860)
and therefore the international safety regulation IEC 60065.
The type plate is located on the bottom of the device.
You will find a symbol similar to the one shown here on the bottom of the
device.
CLASS 1 LASER PRODUCT means that the laser is designed in such a way
as to ensure that the maximum permissible emission value cannot be
exceeded under any circumstances.
If operating devices or methods other than those specified here are
employed, it may lead to dangerous exposure to emissions.
Invisible laser radiation is emitted if the CD compartment is opened and the
safety locking mechanism is shorted. Do not expose yourself to this radiation.
Technical data
Technical and optical modifications reserved!
22
INFORMATION
_____________________________________
Power supply
AC mains adapter:
DC 4.5V, 400 mA +>- external
Battery operation:
2 x 1.5 Volt (LR6, AM3, AA)
Output
Earphones: 2 x 15 mW
Line out: 0,7V ±1,5dB
CD player
Frequency response: 20 Hz ... 20 kHz
Noise voltage ratio: ≥ 80 dB
Channel cross-talk: ≥ 55 dB
D/A conversion: 1 bit linear filter
Dimensions and weight
W x H x D 130 x 30 x 141 mm
Weight (without batteries) ~ 0.3kg
CLASS 1
LASER PRODUCT
Page 13

ENGLISH
23
Troubleshooting
If a problem occurs, first refer to this information before you take the device
for repair.
If you are unable to rectify the fault using the information given here, contact
your local dealer or service specialist.
Under no circumstances should you attempt to repair the device yourself, as
this would invalidate the guarantee.
INFORMATION
_______________________________________
PROBLEM
The device will not
switch on
Playback will not start
No display
Playback will not start
Playback is interrupted
No display
Playback does not
begin with the first
track.
No sound, poor
sound quality
POSSIBLE CAUSE
The batteries are incorrectly
inserted. The batteries are flat.
The »HOLD« switch is in the
»ON« position.
The mains adapter is not properly connected.
The CD compartment is not
properly closed.
Moisture has collected on the
lens.
The CD has not been inserted
correctly.
The CD is damaged or dirty.
The PROGRAM or RANDOM
function is activated.
The volume is turned right
down.
The earphones plug is loose or
not plugged in.
The earphone plug is connected
to the »LINE OUT« socket.
REMEDY
Insert the batteries correctly. Insert new batteries or
recharge them.
Push the »HOLD« switch
to the »OFF« position.
Check the mains adapter.
Close the CD compartment.
Let the device stand for a
while in a warm room.
Insert the CD with the label
facing upwards.
Replace or clean the CD.
Switch off the PROGRAM
or RANDOM function.
Use »VOLUME g«to
adjust the volume.
Check the connection.
Plug the earphones plug
into the »PHONES« socket.
Page 14

107
GRUNDIG Kundenberatungszentrum
Haben Sie Fragen?
Unser Kundenberatungszentrum steht Ihnen werktags
stets von 8.00 – 19.00 Uhr zur Verfügung.
Haben Sie Fragen zur Umweltverträglichkeit unserer
Geräte, wenden Sie sich an die GRUNDIG
Öko-Technologie, Fax: 0911/703-9213.
GRUNDIG Europa
GRUNDIG
Kundendienst Nord
Kolumbusstraße 14
D-22113 Hamburg
+49/40-7 33 31-0
GRUNDIG
Kundendienst West
Horbeller Straße 19
D-50858 Köln
+49/22 34-95 81-2 51
GRUNDIG
Kundendienst Mitte
Dudenstraße 45-53
D-68167 Mannheim
+49/6 21-33-76-70
GRUNDIG BELUX N.V.
Deltapark, Weihoek 3, Unit 3G
B-1930 Zaventem
+32/2-7 16 04 00
GRUNDIG UK LTD.
Elstree Way, Borehamwood,
Herts, WD6 1RX
GB Great Britain
+44/1 81-3 24 94 00
Technical Service
Unit 35, Woodside Park,
Wood Street
Rugby, Warwickshire, CV21 2NP
GB Great Britain
+44/1 78-8 57 00 88
GRUNDIG IRELAND LTD.
2 Waverley Office Park,
Old Naas Road
EIR Dublin 12
+3 53/1-4 50 97 17
GRUNDIG FRANCE S.A.
5 Boulevard Marcel Pourtout
F-92563 Rueil
Malmaison Cedex
+33/1-41 39 26 26
GRUNDIG
Kundendienst Süd
Beuthener Straße 65
D-90471 Nürnberg
+49/9 11-7 03-0
GRUNDIG SCHWEIZ AG
Steinacker Straße 28
CH-8302 Kloten
+41/1-8 15 81 11
GRUNDIG PORTUGUESA
Comércio de Artigos
Electrónicos, Lda.
Rua Bento de Jesus Caraça 17
P-1495 Cruz Quebrada,
Lisboa
+3 51/1-4 19 75 70
GRUNDIG ESPAÑA S.A.
Solsonés, 2 planta baja B3
Edificio Muntadas (Mas Blau)
E-08820 El Prat De
Llobregat (Barcelona)
+34/93-4 79 92 00
GRUNDIG NORGE A.S.
Glynitveien 25, Postboks 234
N-1401 Ski
+47/64 87 82 00
GRUNDIG DANMARK A/S
Lejrvej 19
DK-3500 Værløse
+45/44 48 68 22
GRUNDIG
Kundendienst Ost
Wittestraße 30e
D-13509 Berlin
+49/30-4 38 03-21
GRUNDIG OY
Luoteisrinne 5
SF-02271 Espoo
+3 58/9-8 04 39 00
GRUNDIG SVENSKA AB
Albygatan 109 d, Box 4050
S-17104 Solna
+46/8-6 29 85 30
GRUNDIG POLSKA SP.Z.O.O.
Ul. Czéstochowska 140
PL-62800 Kalisz
+48/62-7 66 77 70
GRUNDIG AUSTRIA
Ges.m.b.H.
Breitenfurter Straße 43-45
A-1120 Wien
+43/1-81 11 70
GRUNDIG NEDERLAND B.V.
Gebouw Amstelveste
Joan Muyskenweg 22
NL-1096 CJ Amsterdam
+31/20-5 68 15 68
GRUNDIG ITALIANA S.P.A.
Via G.B. Trener, 8
I-38100 Trento
+39/4 61-89 31 11
SERVICE
____________________________________________
Grundig Kundenberatungszentrum
Montags bis Freitags
von 8.00 bis 19.00 Uhr
Deutschland: 0180 / 530 21 22*
Österreich: 0800 / 700 600*
*gebührenpflichtig
Page 15

Grundig AG • Beuthener Str. 41 • D-90471 Nürnberg • http://www.grundig.com 72011 400 8000
 Loading...