

Page 1

COLOUR
TELEVISION
AMIRA26HDBLK
ENGLISH
Page 2

Contents
Important considerations to follow:...................................4
The features of your new television: .................................5
Safety warnings: ..................................................................6
Start:......................................................................................7
Connecting the antenna ........................................................7
Powering on your set and the initial use ................................7
Batteries.................................................................................7
Your new television: ............................................................8
Front and Rear panel.............................................................8
Remote Control ....................................................................9
Initial power on and settings performance: ....................10
Setting up the television.......................................................11
Automatic search .................................................................11
Manual search ................................................................12-13
Lining up the program positions, naming the programs, changing
their locations, removing and skipping ................................14
The settings on your new television:...............................15
Sound Menu ........................................................................15
Setting up the sound features..............................................15
Picture menu........................................................................16
Features menu.....................................................................17
Using the PIP, PAP, PAT features ........................................18
Teletext features: ..........................................................19-20
External equipment connections:...............................21-26
Help and tips: .....................................................................27
Technical specifications chart:.........................................28
ENGLISH -3-
Page 3

Important Information
The LCD display panels are manufactured using an extremely high level of precision technology,
however sometimes some parts of the screen may be missing picture elements or have luminous
spots. This is not a sign of a malfunction.
Cleaning the screen and the cabinet...
After turning off the power, clean the screen and the cabinet with a soft, dry cloth. We recommend
that you do not use any proprietary polishes or solvents on the screen or cabinet as this may cause
damage.
Disposal...
The cold cathode fluorescent lamp in the LCD panel contains a small amount of mercury, when the
set reaches the end of its useful life please dispose of it in accordance with Local Government
Regulations or at a recycling centre.
ENGLISH -4-
Page 4

Your Television
We would like this product, which has been manufactured in modern facilities in accordance with
total quality principles, to offer you the best performance.
Therefore, we would like you to read this entire manual carefully before you use your product and
keep it for future reference.
Special Features
• 26” TFT-LCD WXGA Panel
• Available for cable broadcasts
• 2x7 W Stereo sound
• 12 pages of teletext Feature
• PIP (Picture in Picture) Feature from AV
• Wide angle of vision
• Scart socket, AV Socket and external sound system connection
• S-VHS and Cinch inputs for S-Video connection
• PC connection
• Low energy consumption
•AVL
•ATS
• Programmable power off
• Graphic equalizer
• The feature of sharpness in Colour Transitions (CTI)
• Sharpness feature and picture resolution (LTI) in the black-white transitions
• A clear Picture made possible by the Digital Comb Filter
• On screen viewing of all settings, program numbers and all the processes
• Manual Fine Tuning
• 100 Program memory
• Infrared Remote Control equipped all the functions
• Child Lock
• Feature of viewing the NTSC broadcast to be entered via Scart
Easy performance of the processes via the advanced menu system. Ability to choose 26 different
menu languages.
• HDMI feature
• HDCP feature
ENGLISH -5-
Page 5

For your security
This device was designed and manufactured in line with international standards of security. However,
it is required to be careful for obtaining the best results and ensuring security as in every electrical
appliance. Hence, please read the following information for your own security. This information is
for general purposes, it has been prepared to provide you with assistance concerning all the electrical
products and some of them might not be related to the products you have purchased.
Air Circulation…
To ensure adequate ventilation, please leave a
clearance area of at least 10 cm. around the television.
This clearance prevents the TV from being overheated
and consequently incurring damage. Using the device
in dusty environments should also be avoided.
Heat Damage…
Your TV might be subjected to damage under direct
sunshine or when you leave it beside a heater. Please
abstain from using the product in very hot or humid
settings or in the places where there is the possibility
for the temperature to decrease to the degrees that
are lower than 5°C (41°F).
Network Supply…
The required network supply for this device is 230V~50
Hz AC. Your television set was manufactured to operate
with the power cable provided in the accompaniment.
Never ever connect it to a DC source or to another
source of power. MAKE SURE that the electric cable
is not clamped under the TV. DO NOT DISCONNECT
the network connection plug of this device; since this
plug is fitted with a special Radio Interference Filter,
the product performance might decline when there is
no plug. IF YOU SUSPECT ANYTHING, PLEASE
REFER TO A SPECIALIZED ELECTRICIAN.
Things to be Done...
Please READ the operation instructions before
attempting to use the device.
MAKE SURE that all the power connections (network
communication, extension cables and the connections
among the device components) have been made
properly and in connection with the manufacturer's
instructions. Before making or changing the
connections, firstly power off the device and take off
the power network connection plug.
If you have any doubts as regards the installation,
operation or safety of the device, please REFER to
the vendor.
BE CAREFUL about the glass panels and covers on
the device.
Things not to be Done...
Since that will expose the components loaded with
dangerous voltage, DO NOT REMOVE any fixed
covers.
ENGLISH -6-
DO NOT COVER the ventilation openings of the device
with items such as newspapers, table-clothes, curtains,
etc. Overheating causes damage and shortens then
physical life of the device.
DO NOT ALLOW any dripping, sprinkling of fluids or
placing of any objects filled with water such as vases
on the electrical devices.
DO NOT PLACE on or near the device any hot objects
or items with exposed fire such as candles or any night
lamps. The high temperature might melt plastic parts
and cause fire.
DO NOT USE makeshift stands and NEVER EVER
attach the legs using wooden screws. To ensure full
security, always set up the stands or stand legs
approved by the manufacturer, using the connection
elements supplied by the manufacturer in accordance
with the instructios.
Since that might lead to enduring loss of hearing, DO
NOT USE the headphones at very high rates of volume.
DO NOT LEAVE the device powered on when there
is no one around if it is not clearly indicated that it can
be used with no one in presence or if does not have
a standby mode.
Power off the device using the switch on it and make
sure that the other people in your family are also aware
of this. It might be necessary to make special
arrangements for the weak and disabled people in the
family.
If you have any doubts as to whether the operation of
the device is normal or not or if the device has been
damaged in any way, DO NOT RESUME THE
OPERATION. Power off the device, pull the plug and
refer to the vendor.
MOST IMPORTANT OF ALL – NEVER EVER allow
anybody, especially the children to insert anything
into the holes on the case or into any other
openings. In such cases, deadly electric shocks
might occur.
NEVER EVER make any estimations concerning
any electrical device and do not take risks. It is
better to be on the safe side rather than falling in
sadness in the aftermath.
AFTER TURNING OFF THE POWER SWITCH TO
TURN OFF THE TELEVISION COMPLETELY,
DISCONNECT THE POWER CABLE FROM THE
PLUG.
Page 6
Start
Remove your television carefully out of its box.
You can keep the package of your television to
use it later on.
Contents of the box
• Accessory box
• Power cable
• Remote Control
• 2 batteries
Note: The Scart, , HDMI, VGA and RCA cables
are not supplied with the device.
Antenna connection
If you use a coaxial cable (round cable) of 75
Ohms as an antenna cable, connect the antenna
plug directly to the antenna input located on the
TV.
The motorized vehicles, energy and
telecommunication lines affect your antenna.
Therefore, be careful about installing your
antenna away from these and metal surface in
such a way that it shall not swing.
Do not have your antenna cable longer than
required and do not shape it in a roll. Make sure
that it is not cramped while passing through a
window or door.
Your antenna and cable might be affected by
natural phenomena such as rain, wind, smoke
and humidity over time. Check periodically your
antenna and equipment.
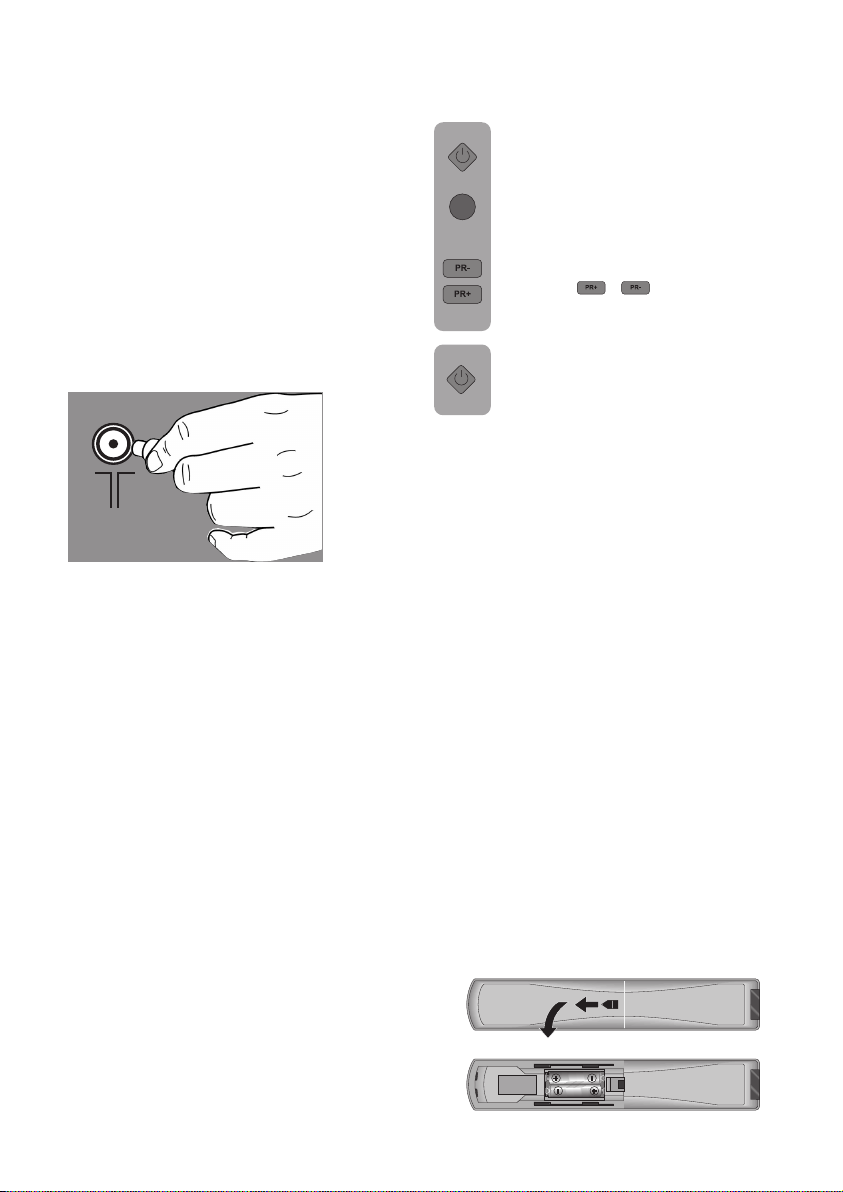
3.Press the Network power on/off button
located on the LCD TV. The Stand-by
display of your TV will be blue. The
brightness of the stand-by display is
7
increased in the Stand-by mode, it is
decreased while your TV is on.
4. To power on your television, press
any numerical key on the remote control
or the key “
you can also use the “MENU” or “P+“/”P“ buttons found on the front panel of your
television. The STAND-BY status
indicator will become brighter and the
picture will be visualized on the screen
after a while.
Note: If you are not going to use your television
for a long period of time, make sure to switch it
off from the power on/off button.
Initial power on and settings performance
To set up your television, read the parts on the
TV controls and performance of the broadcast
settings.
“/” “. For this process,
Batteries
Open the lid of the battery compartment and
make sure you have placed the batteries in the
correct direction.
For this remote control, the battery types UM-4,
IEC R03 or AAA 1.5 V are suitable.
Do not throw your old batteries into the fire,
discard then in the waste areas dedicated to this
purpose.
Do not use the used, old batteries with new ones
and different types of batteries together.
Powering on your set and the
initial use
1. Insert the power cable plug supplied with the
device into the socket.
2. Insert the power cable into the power supply
input located on the back panel of the LCD TV.
Note1: In cases where there is no broadcast,
your television will switch automatically to the
STAND-BY mode in five minutes.
Note2: In cases such as the remote controller
being lost or its batteries being flat, you may use
the control buttons located on the front panel of
your television.
ENGLISH -7-
The performance of the remote control will be
reduced at a distance of 8 meters from or at an
angle of 30 degrees beyond the centre of the
TV.
Page 7
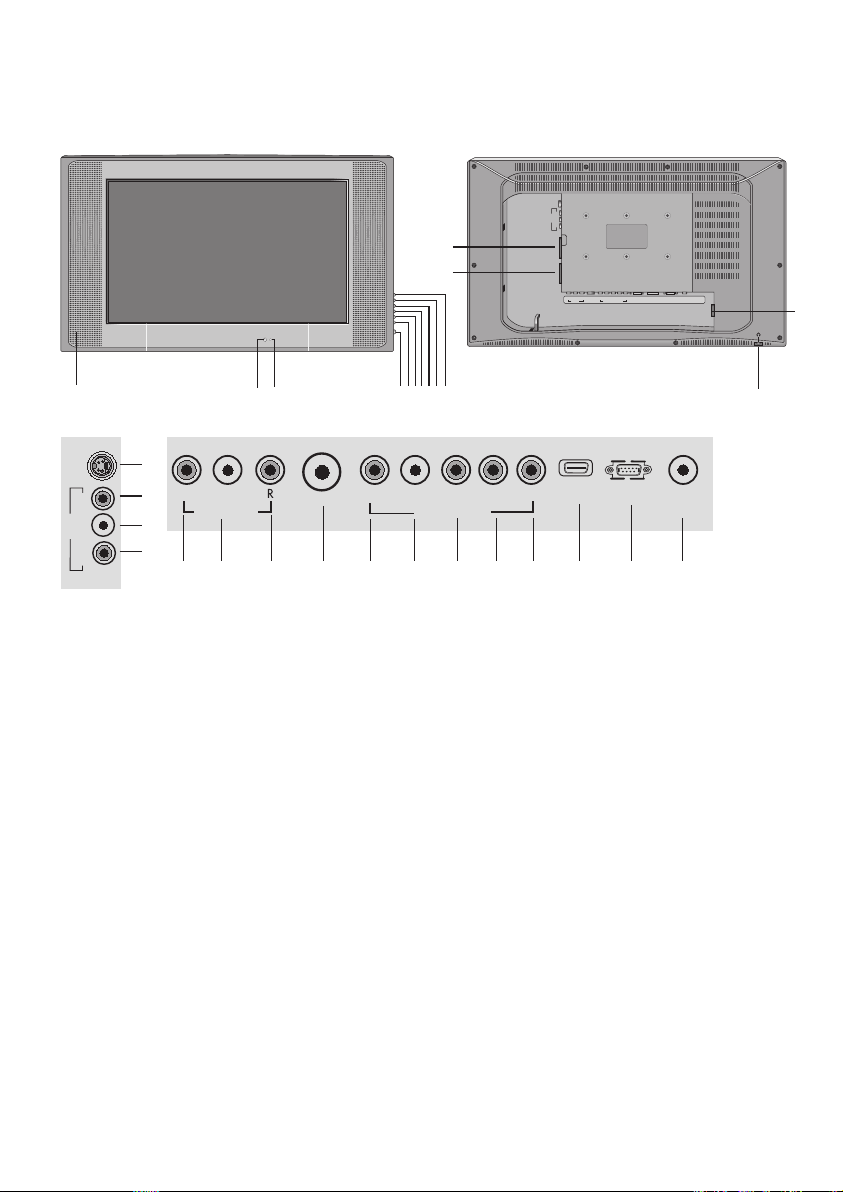
Your Television
S-VHS
AV-3
11
12
SCART1SCART 2RLV
AUDIO
DVI-D
LRYPbPr
HDMI
PC-
R
LV
ANT IN
COMPONENT
AV-OUT
VIDEO INPUT
PC-DVI
IN
AUDIO-IN
13
10
S-VHS
AV3
V L R
15
16
17
18
SPDIF L
1
2
AUDIO-OUT
20 22 25 28 29 3019 21 23 24 26 27
1. Remote control receiver
2. Standby status indicator
3. Network power on/off button
4. Volume turn-down button
5. Volume enhancement button
6. Menu Button
7. Source selection
8. Program decrease button
9. Program increase button
10. Speaker
11. Scart 1
12. Scart 2
13. Power supply input
14. Headphones output
15. S-VHS connector
ANT IN
3 7645 89
AUDIO
L PC-INR Y Pb Pr
COMPONENT
VIDEO INPUT
HDMI
AUDIO-IN
16. Video input CINCH connector
17. Sound input CINCH connector (Left/L)
18. Sound input CINCH connector (Right/R)
19. SPDIF Digital audio output
20. Sound output (Left/L)
21. Sound output (Right/R)
22. Antenna input
23. Component sound input (L)
24. Component sound input (R)
25. Component video input (Y)
26. Component video input (Pb)
27. Component video input (Pr)
28. HDMI
29. VGA (PC connection input)
30. PC sound input
14
PC
Note:
• Please do not use the video RCA and S-Video connection simultaneously, in that case, these
two devices might influence the picture quality of one another.
• RGB offers the best picture quality over the Scart.
ENGLISH -8-
Page 8

Remote Control
1
2
3
4
5
6
7
8
9
10
11
12
13
14
15
16
17
18
19
20
21
22
PIP SEL.
AV
123
456
789
ZOOM
PR- PR+
VOL-
i
PIP POS.
PC
0
OK/
FREEZE
?
TEXT/
MIX
PAT
PIP SIZE
TV
SWAP
VOL+
MENU
1. Picture Format selection button ( )
2. Temporary sound mute (Mute) button (
3. Equalizer selection button (
23
24
25
26
27
28
4. PIP Position selection button
5. PIP/PAP On-Off button
6. AV modes selection menu button
7. Numeric buttons
8. ZOOM mode selection button
9. Program down button (
10. Upward movement button(
11. Volume turn-down button (
12. Left movement button (
)
)
) (Menus)
)
) (Menu)
)
13. Confirmation(OK) and Temporary picture
freeze button (Freeze) ( )
29
30
14. Info / Txt index page button (
15. Downward movement button (
16. Txt Question/Answer button (Reveal) (
17. Red teletext button (
31
32
33
34
35
18. Teletext page enlarge button (Double) (
19. Blue Teletext button (
)
20. Teletext / Mix selection buttons (
21. UPDATE Button/Teletext time (
22. Yellow teletext button (
23. Stand-by On/Off button (
24. Picture Mode selection button (
25. PAT (Picture and Teletext) Mode
Power On-Off button
)
) (Menus)
)
)
)
)
)
)
)
)
26. PIP size selection button
36
27. PC mode access button
28. PC mode access button
29. Final program selection button (SWAP)
)
(
30. Program forward selection button (
31. Audio turn up button (
32. Right movement button (
)
) (Menus)
)
33. MENU button
34. Txt Stop button (Hold) ( )
35. Green teletext button (
36. Sub page button (SUB PAGE) (
)
)
ENGLISH -9-
Page 9
Performing the initial power-on settings
TV controls:
Temporary On-Off (STAND-BY)
When you press the red (
) stand-by
button (Temporary power on-off function)
located on the upper right hand side of
your remote control of your television
PR+
when it is switched on; the sound and
the picture will go off. In the stand-by
PR-
function, the power indicator of your
television will glow more. To switch your
television back on, either press the same button,
any of the digital buttons or the (
)/( )
buttons.
Caution!
If you are not going to use your television for a
long period of time, make sure to switch it off
from the main power button.
Program selection
PR+
You may enter whichever program
PR-
number you would like by pressing the
buttons (
)/( ) located on your
television and your remote control. To
select the programs that are over 9, you
can use the Numerical buttons. You may
enter the number of the program you
would like to select using the numerical
buttons. For example, to switch to the
program number 12, press relatively the
buttons number 1 and 2 found on your
remote control.
Temporary sound mute (MUTE)
To temporarily mute the sound of your
television, press the (
case, the sign (
) button. In that
) will appear on the
screen. When you press the same button
for the second time, the sound will be
on again. If you press the button (
) while in
the Mute mode, the sound level is increased and
the Mute position is aborted.
Return to Selected Button Program (SWAP)
If you would like to return to the program
you watch by pressing a single button
while in any program, press the button
). When you press the button ( )
(
while in any program or AV, it directly
switches to the program you selected. If you
press the same button again, it switches to the
program you last viewed. If you press the button
(
) while the PIP window is open, the main
screen and the PIP screen swap places.
PR 01
PR 11
PR 01
PROGRAM TABLE
P 00
P 05 TRT1
P 01
P 06 SHOW
P02 TRT1
P 07
P03 TRT1
P 08
P04 TRT1
P 09
SKIP
MOVE
OK
SELECT
MENU
NAME
DELETE
P 10
P 11
P 12
P 13
P 14
BACK
ENGLISH -10-
Page 10

Main Menu
Press the ( ) button. The Menu including
all the setting menus will be visualized
on the screen. Navigating through the
Menu titles with the up / down movement direction
buttons (
direction button (
)/( ) and pressing the up / down
)/( ), you may select the
menu you would like.
In the event that you wish to exit the application
at any given stage, simply press the (
) button.
Tuning and storing the programs on
your television
You can either tune the programs
automatically or manually storing them in
your television.
Note:
If your television does not receive any
broadcast for a period of 5 minutes, it
automatically switches to the stand-by
position.
ODS is displayed on the screen.
Automatic tuning and storing in the
memory the TV channels via Autoprogram
The channels located via the
autoprogram (Automatic Tuning System)
feature of your television are
automatically lined up.
is done as the selected country channels
with teletext and transmitting the channel
name information ranking the first,
followed by all the channels not
transmitting the name information with
teletext and the ones without teletext
and finally the foreign channels that do
not transmit the name information in the
teletext.
The channels will automatically be scanned and
the channels that have broadcast shall started
to be entered into memory as of the program
that is selected on the channel settings menu.
At the same moment, the Auto-program prompt
menu will be displayed and the mark indicating
the position in which the Automatic Setting
function is found will appear. To stop the process
at any given time, please press the (
) button.
The Program table will appear on the screen
after the automatic search is over.
You can assign any channel to any program
number you would like from among program
numbers that have been stored in the memory
as described in the part Program Table.
SETUP
SYSTEM
CHANNEL
FINE TUNE
SEARCH
PROGRAM NO
STORE
AUTOPROGRAM
COUNTRY SELECTION
BELGIUM
CZECH REP.
DANMARK
DEUTSCHLAND
ELLADA
ESPA
Ñ
A
FRANCE
OK
BG
C - 0
P 01
MENU
SELECT
HUNGARY
IRELAND
ITALIA
NETHERLANDS
NORGE
ÖSTERREICH
POLSKA
START AUTOPROGRAMMING
MENU
EXIT
PORTUGAL
SCHWEIZ
SUOMI
SVERIGE
TÜRK‹YE
U. K.
. . . . .
BACK
Press the (
) button. Move onto the
channel settings menu by pressing the down
movement button (
). When you select the
autoprogram tab by pressing the Up/down
direction (
), the autoprogram menu will be visualized on
(
)/( ) buttons and pres the button
the screen. In the country tab, select the country
of which you would like to watch the broadcast
in priority by pressing the right/left direction
buttons (
operation by pressing the (
)/( ). Then, start the autoprogram
) or ( ) button.
ENGLISH -11-
AUTOPROGRAM
SEARCHING
MENU
STOP
2%
Page 11

Manual tuning and storing of the
television channels:
If you already know the Channel
number:
Press the ( ) button. Move onto the
channel settings menu by pressing
the down movement button. Go onto the
menu with the (
system in which you would like to make
the search from among the system tabs.
) button. Select the
If the broadcast viewed on the screen is of your
desired quality, firstly come onto the storing tab
via the downward movement (
) button to store
in the memory the process you have made and
select it with the (
) button. The prompt ‘stored’
shall be briefly displayed.
The channel will be stored according to the
program number of your choice. You can tune
and store in the memory the other channels in
the same way. In the event that you wish to exit
the channel settings menu for any reason, simply
press the (
) button.
Enter the Channel tab by pressing the
movement button (
the right-left movement buttons (
) on your remote control, select
or (
) below. Pressing
)/( )
the “S” for cable channels and “C” for
broadcasts received via the antenna.
Move onto the program no. tab and
select the program in which you would
like to have the Setup made via the
numerical buttons.
SETUP
SYSTEM
CHANNEL
FINE TUNE
SEARCH
PROGRAM NO
STORE
AUTOPROGRAM
SELECT
BG
C - 0
P 01
MENU
EXIT
ENGLISH -12-
Page 12

If you do not know the channel
number
Press the MENU button. Move onto the
channel settings menu by pressing the
down movement button. Select the
program in which you would like to
perform an Installation using the rightleft movement (
buttons. Select the system in which you
would like to make the search from
among the system tabs. Enter the
System tab by pressing the direction
button (
) below. Here, your television
can be set to a single system and you
can also select from among more than
one systems via the (
(option) Move from here to the channel
tab via the downward movement button
(
). Pressing the ( ) keys on your
remote control, select 'S' for cable channels and
'C' for broadcast received from the antenna;
select the search tab with the downward
movement button (
in ascending order with the Right direction button
(
) and in descending order with the left direction
(
) button. If the channel that is found is of your
desired quality, select the storing tab. Then store
it in the memory pressing the button (
Repeat the same procedure also for the other
channels by selecting the program number of
your choice from among the program no. tab.
)/( ) or numerical
)/( ) buttons.
) and scan the channels
Fine Tuning
If the current channel requires Fine
Tuning, then select the fine tuning tab
by using the downward movement button
) in the Channel Settings menu.
(
Using the right-left movement (
buttons on your remote control, adjust
the broadcast displayed on the screen
to your desired quality. Under normal
circumstances, you will not feel the need
to use the Fine Tuning function. The
AFC values of your television will
automatically adjust and lock themselves
need it in case the television transmitters do not
operate according to the standards. To store in
the memory the settings you have made, select
the Store option and press the right button (
).
to the channel. However, you might
SETUP
SYSTEM
CHANNEL
FINE TUNE
SEARCH
PROGRAM NO
STORE
AUTOPROGRAM
SELECT
BG
C - 0
P 01
MENU
EXIT
)/( )
).
If there is need to perform Manual Fine Tuning
on the current channel or to name the current
channel, refer to the related parts.
ENGLISH -13-
Page 13

Program Table
Press the
Program Menu by pressing the downward
movement button. When you press the
button
on the screen.
( )
button. Move onto the
( ), the program table will appear
Switching the locations of the program
channels that have already been
stored:
Select the program you would like to
relocate by pressing the upwardsdownwards
buttons
( )/( ) or Right-left direction
( )/( ). Press the “GREEN”
colored button. The cursor on the selected
program will blink.
the other program to which you would like
to relocate it with the Upwards-downwards
( )/( ) or Right-left direction buttons
( )/( ). Finish the relocation process by
pressing the “GREEN” colored button. The
channel in the first program number you
selected has been moved to your second
selected program number and the
channels between both program numbers
have been shifted to the initially selected
program number.
Deleting a program that has been
stored:
Select the program you would like to delete
by pressing the upwards-downwards
( )/( ) or Right-left direction buttons
( )/( ). Press the “blue” colored button.
The blue buton on the menu will blink for
approval. You may perform the deletion
process by pressing the “Blue” button or
you may abort the deletion process by
pressing the button
Once you pres the “Blue” button, the
selected program has been deleted and
all the following channels have been
transferred to the previous program
number.
PROGRAM TABLE
P 00
P 01
P02 TRT1
P03 TRT1
P04 TRT1
SKIP
MOVE
OK
( )
P 05 TRT1
P 06 SHOW
P 07
P 08
P 09
SELECT
.
P 10
P 11
P 12
P 13
P 14
NAME
DELETE
MENU
BACK
Changing the order of a program that
has been stored in memory:
In the event that you do not wish to come
across certain programs while navigating
through the channels using the
( )/( ) buttons, then you can use
that function. Select the program to be
hidden by pressing the upwardsdownwards
buttons
( )/( ) or Right-left direction
( )/( ). Press the “Red”colored
button. The information name of the
program to be skipped shall appear in red.
You may perform this procedure for more
than one programs. To see the skipped
program, directly enter the program
number via the numbering buttons. To
cancel the program skipping process, press
once again the “Red” colored button.
To name the programs
The channels names might be
automatically displayed on the programs
in the table via ATS, yet the channel
number might also be displayed instead
of the channel name.
You can assign your program or
programs of choice the names that have
a maximum of five characters.
the program you are about to name by
pressing the Upwards-downwards
( )/( ) or Right-left direction buttons
( )/( ). Press the “Yellow” button. An
empty space appears beside the
channel for which you would like to
specify name information. Here, choose
the letter, number or sign that you would
like using the Up-down direction
)/( ) buttons. For the second
(
character, press the Right-left button (
select the letter, number or sign you would like
again by the Upwards-downwards (
buttons. After entering all the characters, store
the name you have written in the memory by
pressing the button “Yellow”.
To write names for any of the other programs,
simply repeat the above procedure. In the event
that you wish to exit the application, simply press
) button.
the (
If the program is not renamed, then the channel
number of that program shall be automatically
displayed.
Select
)/( ) and
)/( )
ENGLISH -14-
Page 14

The settings on your new television:
Setting up the Sound Menu
You may perform the sound setting using the “
VOL+” or “VOL-“ buttons on your television or
), ( ) buttons on your remote control.
the (
You can perform the other sound settings by
entering the Sound menu. For this purpose,
press the MENU (
control. Select the sound menu tab (
the direction button. You can select in this menu
whichever you would like for performing a process
from among the titles.
Balance: To adjust the sound balance between
the right and left loudspeakers to the desired
level, select the balance tab by using the
downward direction (
right/left direction (
balance.
Sound type: The program you watch might be
stereo or in two different languages. Using the
Right/left direction buttons (
you can select Mono/Stereo or Dual-I/Dual-II
language.
Sound mode: If you would like to add some
depth to the sound of the broadcast you are
watching, select Spatial effect option with the
) button. For products with the Dolby virtual
(
specification, you may select the Dolby Virtual
option.
AVL :Television transmitters have different sound
levels. This can be noticed from the different
volume levels that can be heard while switching
from one program to another. Using the right/left
direction (
)/( ) buttons, switch it to On. The
AVL (Automatic Volume Limiting) function
maintains the same sound level as you switch
from program to program. Select the option Off
to cancel it.
) button on your remote
SOUND
VOLUME
BALANCE
SOUND TYPE
SOUND MODE
AVL
EQUALIZER
HEADPHONE
SELECT
MONO
NORMAL
OFF
MENU
EXIT
) button. Using the
)/( ) buttons, adjust the
)/( ) in this menu,
) using
Headphones: By connecting the headphone
unit to your television you can listen to the
program sounds independently from your
television. To turn up and down the headphone
sound level, you can adjust the sound level by
using the Right-left movement (
)/( ) buttons
in the Sound tab. When you want to hear the
sound from the headphone only, just press the
) button on your remote control.
(
Equalizer: Selecting the Equalizer tab in the
Sound menu, press the right movement (
button. The equalizer setting function will be
displayed. Using the right/left movement, up/down
direction buttons, you may select one of the
options which enhance the sound effect
depending on the feature of the program you
watch, which are exclusively pre-programmed
and unchangeable for Music, Sports, Movies
and Speech and in which you can totally adjust
the personal option.
To adjust the user option, select the personal
option and press the right arrow button. You
can adjust the frequency levels with the (
) buttons. You can select 120Hz, 500Hz,
(
)and
1.5KHz, 5KHz and 10KHz frequency bands with
) and ( ) buttons. Storing the adjustment levels
(
in memory press the (
) button to exit the user
option.
You may exit the equalizer menu by pressing
again the (
) button.
Note: You can choose the equalizer options
directly using the (
) button on your remote
control.
You can exit the Equalizer display by pressing
) button at any given time.
the (
EQUALIZER
MUSIC
SPORTS
CINEMA
SPEECH
USER
CHANGE
SELECT
120
500Hz1.5
Hz
kHz5kHz10kHz
MENU
BACK
)
ENGLISH -15-
Page 15

Picture Set up:
PICTURE
BRIGHTNESS
CONTRAST
COLOUR
SHARPNESS
COLOUR TEMPERATURE
Enter the Image menu by pressing the
MENU
button (
) on your remote control. Using
the upwards/downwards direction
buttons (
whichever setting title you would like
and adjust their levels with the Right/left
direction (
The picture brightness, contrast, color
intensity and Sharpness levels can all
be adjusted according to your desire.
The changes you have made in the
image settings shall be stored in the
memory with no need for further
operation. DNR: You may reduce the
interference and noise formed in the
image by using this feature. Set it to
On to activate the feature.
Smart picture: You can select one of the non-
adjustable default settings in the
memory (Picture Mode) by pressing the
“
“ button on your remote control. Soft,
Natural and Rich are default values; the
user, however represents the values
you saved in memory.
Picture Format: You can visualize the broadcast
picture you watch in this option in a
format of your choice. You can visualize
them in the Automatic, 16:9 14:9,
Subtitle, Letterbox and 4:3 formats. The
picture format or 16:9 or 4:3 formats
can be selected in the COMP/HDMI/PC
modes. Besides, the picture will appear in the
16:9 format when the PIP is on or while in the
positions TXT-TXT/MIX. You can perform the
same process via the ”
found on your remote control without entering
the picture menu. In that case, the prompt 16:9
or 4:3 appears in the centre of the screen.
Tint: When NTSC video is entered via Scart,
you may make the Colour Tone setting. The tint
option is not seen in the menu when you have
not entered such type of a video. When a NTSC
video is connected via the Scart, this option
becomes active and it is viewed in the menu.
NORMAL
MENU
SELECT
EXIT
)/( ), you can select
)/( ) buttons.
“ format selection button
Wide Screen Display
The TV can be visualized in different formats
according to the broadcast made. Pressing
button, selecet the features Letterbox, Subtitle,
Automatic,16:9 ,14:9 and 4:3.
Attention Please: When the MENU button is
pressed, the menu will change as it is visualized
on the screen. This condition ensures that the
menus do not extend beyond the borders of the
visualized parts of the screen.
14:9
This is the movie format.
Letterbox
While watching a ‘’Letter box
formatted’’ film / video cassette,
this setting will eliminate or
minimize the black stripes on
the background by zooming in
the picture and without diffusing
it.
Subtitle
If the subtitles are transmitted
in the ‘’letterbox formatted’’
broadcast, then this setting will
push the picture upwards in
order to ensure the entire written
text to be visualized.
Automatic
Some movie channels might
broadcast in the 16:9 format. If
you would like to see this format
automatically, then select
AUTOMATIC. In that case, the
mark AUTO 16:9 appears on
your screen.
( )
16:9
Please use this setting for
watching the broadcasts in wide
screen DVD, wide screen
picture video cassette or 16:9
format. Since various screen
formats such as 16:9, 14:9, 20:9
etc. are used, black stripes
might be formed on the lower
and upper parts of the screen.
4:3
Use this setting to watch the
broadcasts in the 4:3 format.
Since the use of certain functions in order to change
the picture sizes for collective display or commercial
purposes (modifying the height and width etc.) will be
deemed an infringement of the picture copyrights, penal
procedure can be carried out as required by the relevant
laws.
ENGLISH -16-
Page 16

Features
Press the button
MENU
control. Select the features menu tab
using the direction button
select from among the titles in this menu
for which you would like to perform a
process using the Upwards/Downwards
direction
FEATURES
LANGUAGE
TIMER
CHILD LOCK
( )/( )
ENGLISH
OFF
MENU
SELECT
( )
on your remote
buttons.
EXIT
( )
. You can
Timer: Your television deploys the feature of
being able to be turned off at the end of a period
of time that you detected and to be turned on
again after a time you designated. To ensure
that your television turn off at the end of your
desired time period, select the timer tab. Select
your desired period of time with the numerical
buttons. Determine the time for turning on in the
same way. Enter in the program no. tab the
channel from which you would like the TV to be
turned on. At the end of the time you specified,
your television will automatically switch to standby. It switches to the selected program at the
end of that time while the TV is on.
TIMER
CLOCK
ON TIME
OFF TIME
PROGRAM NO
13:47
- - : --
- - : -P 01
Menu language: Selecting the Menu
OK/
language tab, press the right movement
FREEZE
( )
button. The menu languages shall
appear in the menu in order, select your
desired language using the Right-left
movement buttons
button. All the setting displays of your
television will be visualized in the
language that you selected.
Child lock : If this feature is turned On,
the program that is found is locked, the
image and sound is off, the locked
program is skipped while zapping
programs with the (
( )/( ).
Press the
)/( ) buttons.
0-9
MENU
ZOOM: To activate this option, press the button
(
ZOOM
) on your remote control while
watching a program picture. During the
zooming process, the image is zoomed
out in three stages in a centre-oriented
way. To move up/down (
( )
right/left (
position, press the (
)/( ) on the picture in this
remote control. Then, press the key for
the direction in which you would like to
move. In the event that you wish to exit
the Zoom mode for any reason, simply
press the (
(
) button, you may return to the normal
mode after the three stages.
OK/
FREEZE
MENU
) button. By pressing the
Note: The Zoom mode does not operate while
there is a PIP picture in the screen and in the
COMP/HDMI/PC inputs. The Zoom mode is
aborted once the program has been switched,
Teletext is entered or PIP is activated.
BACK
)/( ) or
) button on your
ENGLISH -17-
Page 17

FREEZE: You may freeze the program picture
Note: The Freeze feature also freezes PIP screen
while there is a PIP picture on the screen.
you are watching thanks to this feature.
For this purpose, press the (
OK/
on your remote control while there are
FREEZE
no menus on the screen. The program
picture will freeze until the same button
is pressed for the second time.
) button
Using the PIP (Picture in Picture) feature;
Press the (
control. The PIP screen appears on the
PIP SEL.
screen. According to the selected source,
a window will be opened inside the main
picture and a sub-screen will be
displayed.
You can return to PAP mode by pressing the
button (
mode by pressing the (
mode.
) again. You can return to the normal
) button on your remote
) button in the PAP
To change the source on the PIP screen in the
PIP or PAP mode, you may use the up/down
)/( ) direction buttons.
(
Note1: All the sources can be selected in the
PIP while there is TV or AV on the screen.
However, only TV/AV can be watched while there
is COMP/HDMI/PC on the main screen.
Note2: The PIP source information available in
the TV/AV mode and the PIP source information
available in the COMP/HDMI/PC mode are the
same. Hence, the PIP source also changes once
the main screen has been switched from TV/AV
to COMP/HDMI/PC.
PIP Position:
With this option, you can change the
position in which the PIP window is
PIP POS.
visualized on the screen. For this
purpose, you may change the PIP
Position by pressing the Right/Left
direction (
the
button while there is a PIP picture on
)/( ) buttons after pressing
the screen.
PIP Dimension:
With this option, you may zoom in and
zoom out the PIP window size. For this
PIP SIZE
purpose, you may change the PIP size
by pressing the (
is a PIP picture on the screen.
) button while there
PAT Mode:
While watching a broadcast on your
television, you can enter the PAT (Picture
PAT
and teletext) mode pressing the (
button on your remote control. Thanks
to this feature, you can also follow the
teletext broadcast if there is also a teletext
broadcast in the program that is being watched.
To abort this mode, press again the (
) button
found on your remote control.
Flickering of the picture can occur in PIP, PAP
and PAT modes.
)
ENGLISH -18-
Page 18

Teletext
Being one of the most prominent services of
broadcasting today, Teletext renders using the
TV more fruitful.
Teletexts means in short the transmission of
various updated information along with the TV
broadcast in the form of texts and graphics.
To be able to receive a quality teletext broadcast,
a good antenna system and a broadcast that is
not weak, with no reflections and interference
from other channels are required. Even in a very
clear reception, it is normal for some characters
or tabs to be lost. Such conditions will
automatically be improved in a short time under
normal circumstances.
Accession to the Teletext mode
on the screen.
In order to switch your television to the teletext
broadcast, please press the (
program that has teletext broadcast. To switch
back to the television broadcast, press the same
button.
Once you have switched to the teletext broadcast,
the index page will initially be visualized (Page
100). In this page, the titles of the topics in that
teletext broadcast and the initial page numbers
do appear.
In a channel that does not have the
Teletext feature, if you are to press the
TEXT/
MIX
) button, the message “NO
(
TELETEXT UNAVAILABLE” will appear
) button in a
Teletext viewing button (MIX) in the TV
picture
By pressing this button, you can watch
the teletext information and the TV
TEXT/
MIX
broadcast on top of one another and
together. In this way, the channel’s
teletext information service can be
viewed while the channel’s regular
TEXT/
MIX
broadcast is carried on. To return to the
Teletext broadcast, press the key (
to return to the TV broadcast, pres the
).
key (
Page enlargement button (DOUBLE)
Using this button, you can watch the top
half of the teletext page in the enlarged
format. To be able to view the bottom
half of the page as enlarged, press again
the same button. Once you press the (
) button
for the third time, the page will be restored to its
normal size.
),
Page selection
To be able to view the page you would
0
like on the screen, type in the number
of that page using the numerical keys.
9
You can see the number you have
entered on the left side of the upper title
tab.
When you would like to skip the pages
one by one, you can go to the next page
pressing the (
page pressing the (
i
To return to the Index page, press the
button (
) key and to the previous
) key.
).
ENGLISH -19-
Page 19

Stop Button (HOLD)
Question - answer button (REVEAL)
Some information is laid out by the
broadcasting agency in multiple pages
and it is broadcast in the automatic cycle
mode. For example, on a text of four
pages, the pages are indicated with the
figures 01, 02,03 and 04 on the bottom of the
page. To view one of these pages longer, press
the (
) button. When you press the same button
again, the cycle continues.
Sub page button (SUB)
If any agency that performs teletext
broadcasting broadcasts the sub pages
of any teletext page, the page numbers
starting with 01 appear on the bottom
of the screen. Using the (
5
can switch to the sub pages. In that
) button, you
case, the tab 'sub page’ is visualized
inside "red -" and "green +" frames. You
can select the sub pages pressing the "RED"
and "GREEN" buttons. You can abort the same
page by pressing again the same button.
UPDATE Button
This button is designed so that you do
not wait for searching the page and
switch to the television picture while
looking for your desired page in the
teletext broadcast. You may switch to the
television picture by pressing the (
) button
while Teletext is looking for your desired page.
Once the page you would like has been found,
the number of that page appears on the screen.
Sometimes, a teletext page contains a
hidden answer such as a game or a
?
riddle. To disclose the hidden answer,
press the button (
).
Clock
The Clock function of the ( ) button;
when you would like to find out the time
while watching any television channels,
pres the button (
). In that case, a clock
will appear on the up right corner of the screen.
You can erase the time information off the screen
by pressing the same button.
Fastext
The colored buttons on the remote control device
are for the fastext feature.
When you select any page, the titles on various
subjects might be visualized on the screen in
four different colors or inside colored frames
(red, green, yellow and blue).
By pressing the button pertaining to the relevant
color on the remote control, you can access the
subject of your choice without waiting.
Note: The fastext feature is not available for all
the teletexts broadcasts. It is determined by the
broadcasting agency whether it is to be broadcast
or not.
ENGLISH -20-
Page 20

External equipment connection
You can connect to your television many compatible sound and picture devices.
Connecting a Video Recorder
AV inputs:
Press the AV button on the UK repeatedly. You
may see the options through which you can
enter.
Device
Via the SCART socket
AV1: Select this option for watching the picture
of the broadcast device connected to the Scart
1. (You can watch via this Scart if there is a RGB
output from the device with which you made a
connection).
AV2: Select this option for watching the picture
of the broadcast device connected to the Scart
2. (You can watch via this Scart if there is a RGB
output from the device with which you made a
connection).
AV2S: sVHS support from Scart 2.
AV3: Select this option for watching the picture
of the broadcast device connected to the Chinch.
AV3S: Select this option for watching the picture
of the device connected when using an S-Video
input.
COMP: Select this option when a component
input is used.
HDMI: Select this option to be able to watch
pictures in the HDMI mode. Pressing the “
button, you may visualize the resolution of the
broadcast in the COMP and HDMI modes.
i
Before making the connections, make sure first
that your television and the video recorder device
are turned off.
Connect one end of the Scart socket cable (not
supplied with the television) to the suitable
connection terminal of the video recorder device
and the other end to the Scart connection point
behind your television.
Turn on your television and video recorder device.
By pressing the (
AV
remote control, select the input AV1,
AV2 to which you connected your device.
) button on your
Note:
To connect a RGB-supported external device to
your television, it is necessary that you use a
RGB supported Scart cable. If your external
device is supported in that case, you can set the
output as RGB.
Via the RCA or S-Video socket
”
Before making the connections, make sure first
that your television and the video recorder device
are turned off.
Connect one end of the Scart socket cable (not
supplied with the television) to the suitable
connection terminal of the video recorder device
and the other end to the Scart connection point
behind your television.
Turn on your television and video recorder device.
If the sound is mono, use the Left Audio (L) input
and select MONO from the sound settings menu.
If you would like to use your VCR by connecting
it to your television at the modulator outlet with
an antenna cable, select the program ‘0’ which
is set for this type of connection.
ENGLISH -21-
Page 21

Via the antenna input
Via the RCA or S-Video socket
1. Connect the RF out socket of the video
device to the antenna input located behind
the television.
2. Connect the connection cable to the RF
socket of the video device.
3. Store the video channel in the memory under
any program.
4. Press stored video program number.
5. Press the PLAY key of the video.
6. You may connect the antenna cable to the
antenna input of your video. In that case, it
is necessary for your video to be turned on
so that you can watch your TV.
Note: If you would like to use your video with
the RF socket, select the program 0.
PC
AUDIO-IN
HDMI
VIDEO INPUT
COMPONENT
AUDIO
L PC-INR Y Pb Pr
Sound Input (R)
ANT IN
Sound Input (L)
AV3
Video Input
V L R
L
AUDIO-OUT
S-VHS
SPDIF
You can also connect your device to your
television by means of the S-Video socket. For
this;
For this purpose; connect the S-Video cable to
the S-Video socket and the audio cables to the
audio sockets.
S-VHS
AV-3
SCART1SCART 2RLV
AUDIO
DVI-D
LRYPbPr
HDMI
PC-
R
LV
ANT IN
COMPONENT
AV-OUT
VIDEO INPUT
PC-DVI
IN
AUDIO-IN
PC
AUDIO-IN
HDMI
COMPONENT
AUDIO
L PC-INR Y Pb Pr
ANT IN
L
AUDIO-OUT
SPDIF
VIDEO INPUT
Sound Input (R)
Sound Input (L)
AV3
V L R
S-Video input
S-VHS
Antenna
SCART cable
ENGLISH -22-
Page 22

Connecting a DVD Player
Via the SCART socket
Before making the connections, make sure first
that your television and the DVD player device
are turned off.
Connect one end of the Scart socket cable (not
supplied with the television) to the suitable
connection terminal of the DVD player device
and the other end to the Scart connection point
behind your television.
Turn on your television and the DVD player
device.
PC
AUDIO-IN
HDMI
VIDEO INPUT
COMPONENT
AUDIO
L PC-INR Y Pb Pr
AUDIO-OUT
Sound Input (R)
Sound Input (L)
AV3
Video Input
V L R
S-VHS
ANT IN
L
SPDIF
Via the RCA socket
Before making the connections, make sure first
that your television and the DVD player device
are turned off.
Connect one end of the Scart socket cable (not
supplied with the television) to the suitable
connection terminal of the DVD player device
and the other end to the Scart connection point
behind your television.
Via the RCA or S-Video socket
You can also connect your device to your
television by means of the S-Video socket. For
this;
For this purpose; connect the S-Video cable to
the S-Video socket and the audio cables to the
audio sockets.
S-VHS
AV-3
SCART1SCART 2RLV
AUDIO
DVI-D
LRYPbPr
HDMI
PC-
R
LV
ANT IN
COMPONENT
AV-OUT
VIDEO INPUT
PC-DVI
IN
AUDIO-IN
PC
AUDIO-IN
HDMI
COMPONENT
AUDIO
L PC-INR Y Pb Pr
ANT IN
L
AUDIO-OUT
SPDIF
VIDEO INPUT
Sound Input (R)
Sound Input (L)
AV3
V L R
S-Video input
S-VHS
SCART cable
ENGLISH -23-
Page 23

Connecting a Decoder
Via the SCART socket
Before making the connections, make sure first
that your television and the decoder device are
turned off.
Connect one end of the Scart socket cable (not
supplied with the television) to the suitable
connection terminal of the decoder device and
the other end to the Scart connection point behind
your television.
Turn on your television and the decoder device.
To select AV1, press the (
your remote control.
PC
AUDIO-IN
HDMI
VIDEO INPUT
COMPONENT
AUDIO
L PC-INR Y Pb Pr
Sound Input (R)
ANT IN
Sound Input (L)
AV3
Video Input
V L R
L
AUDIO-OUT
S-VHS
SPDIF
) button on
Via the RCA socket
Before making the connections, make sure first
that your television and the decoder device are
turned off.
Connect one end of the Scart socket cable (not
supplied with the television) to the suitable
connection terminal of the decoder device and
the other end to the Scart connection point behind
your television.
Note: It is necessary that the decoder device
be equipped with a tuner so that you can connect
a decoder through a RCA connection.
S-VHS
AV-3
SCART1SCART 2RLV
AUDIO
DVI-D
LRYPbPr
HDMI
PC-
R
LV
ANT IN
COMPONENT
AV-OUT
VIDEO INPUT
PC-DVI
IN
AUDIO-IN
ENGLISH -24-
SCART cable
Page 24

INPUT
Your LCD television can also be used as a PC monitor since it also enables VGA inputs at the same
time.
Connecting PC:
Connect the D-Sub connector to the PC-IN input
behind your television using a suitable cable (not
supplied with your TV). Using again a suitable
cable, you can also listen to the sound from your
PC by connecting the sound output of your PC
to the PC AUDIO IN input behind your television.
Transition to the PC mode
For your LCD-TV to pass to the monitor (PC)
mode, press the (
switch back from the PC mode to the TV mode,
use the (
PC Accession Setting
Enter the channel settings menu by pressing the
) button while in the PC mode. In order to
(
make the necessary adjustments in this menu,
you can use the Right-left, Up-down direction
)/( ) ( )/( ) buttons on your remote control.
(
Here, you may make the following settings related
to the monitor.
H.position: Horizontal position setting
V.position: Vertical position setting
Frequency: This is the pixel clock frequency.
User can norrow down or enlarge the display by
selecting a desired value.
Phase: Using the right/left direction (
you can ensure that the colors and shapes are
exactly consolidated on the PC image.
) on your remote control. To
) button on your remote control.
)/( ) keys,
Automatic position: It ensures that the most
appropriate geometrical settings be made
according to the input mode. For this process,
simply select the Autoconfiguration tab and press
the button (
You can make the ZOOM and PIP processes in
the PC mode as described in the above parts.
You can adjust the sound of the source you have
connected to the Audio-In input behind yout TV
using the buttons (
Switching to the HDMI mode
Connect it to the HDMI input behind your TV
using connector located on your PC or your
digital video-transmission device and a suitable
cable (not supplied with the TV).
Note: To be able to watch an image in the HDMI
mode, it is necessary that your computer be
equipped with a HDMI supported screen card.
You may see on the screen the resolution
information by pressing the “
If a DVD source is connected to the HDMI input
via an appropriate cable connector, the sound
in the PC AUDIO IN is emitted out of the
loudspeaker.
HDCP support: Your set supports HDCP feature.
To use this feature, you must set up a connection
to your TV set’s HDMI video port and select
HDMI by pressing the AV key on your remote.
).
)/( ), you can make it ( ).
” button.
ENGLISH -25-
Page 25

Connecting a Video recorder device and a digital satellite receiver
Behind the television
Digital satellite receiver
Antenn
TV
a output
Scart socket
Antenn
a input
Video
Scart socket
Video recorder
Antenn
a output
Scart soket
Antenn
a input
Connecting a video camera
PC
AUDIO-IN
HDMI
VIDEO INPUT
COMPONENT
AUDIO
L PC-INR Y Pb Pr
Sound Input (R)
Sound Input (L)
Video Input
ANT IN
L
SPDIF
AUDIO-OUT
Sound Input (R)
Sound Input (L)
AV3
V L R
S-Video output
S-VHS
Video Camera
Connecting a Computer and Video games
Antenna
socket
Sound Input (R)
Sound Input (L)
Video Input
PC
AUDIO-IN
HDMI
VIDEO INPUT
COMPONENT
AUDIO
L PC-INR Y Pb Pr
ANT IN
L
AUDIO-OUT
SPDIF
ENGLISH -26-
Sound Input (R)
Sound Input (L)
AV3
V L R
S-Video output
S-VHS
Video game
Page 26

Help and tips
The television does not function
Make sure that the power cable of the television
is connected to the network and the power on
-off switch is turned on.
Low picture quality
• Is the antenna cable connected?
• If you are using a satellite antenna, has the
antenna been adjusted to receive broadcast
in the best way?
• Be careful that the antenna is far from devices
that emit electromagnetic waves. (Neon
lights, loudspeakers etc.)
• Try changing the direction of the external
antenna. High buildings and mountains might
lead to the appearance of a faded picture or
a double picture.
• The picture quality might be affected when
two external devices are connected. Try
disconnecting one of the devices.
• Try making a fine tuning.
No picture
• Is the antenna connected correctly?
• Is there any damage on the antenna cable?
• Are the plugs on the antenna cable
connected correctly?
• Are you sure that you have pressed the
correct key on the remote control?
n
tio
lu
o
S
the
n
o
rn
Symptoms
No picture and sound
No sound, picture available
No picture, sound available
Low quality picture
Foggy picture
Double picture
Line on the picture
Distorted picture
Distorted broadcast on some channels
Horizontal lines exist
Vertical fluttering in the picture
Weak color
No color
The remote control does not function
TV does not respond to the commands
Fluttering in the teletext
u
T
No sound
• Temporary sound mute might be on. Try
pressing the mute button.
• Is the sound turned down?
• A headphone might have been connected
to the television.
The remote control does not function
• Try replacing the batteries.
• Be careful that there are no obstructions
between the remote control and television.
If your device does not work despite all of
these
If your television does not work properly even
though you tried the above mentioned solutions,
try turning it on and off again.
If you cannot start your television even though
you have applied all the written methods, refer
to the dealer or authorized service from where
you purchased the product.
Never attempt to repair yourself a non-operating
device.
d
d
ire
u
ire
q
d
itch
/off sw
n
r o
e
w
o
p
Turn on another channel, the broadcast might be distorted
n
ction
ctio
e
n
ire
d
a
a con
n
n
n
n
te
n
nte
a
e a
e
th
e
g
ck th
n
e
a
h
h
There might be a break in the antenna cable
C
C
There might be a regional problem in the broadcast
u
d
q
re
ire
e
ire
re
u
e
t b
q
t b
re
igh
h
e
ig
m
g
m
ht b
ig
ttin
tting
m
g
in
ess se
st se
tn
tun
tra
h
e
on
rig
in
F
The channel might not be broadcasting in colors
C
B
e T
qu
re
e
d off th
s
t b
n
h
a
rie
ig
n
tte
o
m
a
g
g
b
e
ttin
erin
w
o
r se
eck th
lo
h
o
ry p
C
C
T
ENGLISH -27-
Page 27

Technical specifications chart
Picture tube
size/type
Sound outlet
power (10% THD)
Power
consumption
Stand-by Power
consumption
26” 16:9
active matrix TFT
2x7 W
120 W
1,5 W
General technical specifications
Power supply
AC: ............................................................................
Program memory: ...................................................100
RF Antenna input: ...................................................75 Ohm (Co-axial)
Loudspeaker impedance: ......................................8 Ohm
Sound systems:.......................................................Mono/Stereo/Nicam
Batteries:..................................................................2xUM - 4, IEC R03 or AAA 1.5V
Received channels:.................................................VHF (Band I channel 2-4)
..................................................................................VHF (Band III channel 5-12)
..................................................................................UHF (Channel 21-69)
..................................................................................Cable TV (S1-S20/S21-S41)
Received broadcasting systems............................PAL BG
230V~50 Hz
PAL SECAM BG
PAL SECAM BG DK/DK’
PAL SECAM BG LL’
PAL I
Note: Your television has been manufactured in accordance with your country by selecting from
among the above mentioned broadcasting systems and this system cannot be changed by the user
except the case described below: In countries where BG/DK and BG/LL’ broadcasts are done (BG
or DK / BG and LL’). For further information, see the settings part about your television.
Environmental note
This product has been made from high-quality parts and materials which can be re-used and recycled.
Therefore, do not throw the product away with normal household waste at the end of its life. Take it
to a collection point for devices. This is indicated by this symbol on the product, in the operating
manual and on the packaging.
Please find out about collection points operated by your local authority.
Help protect the environment by recycling used products.
ENGLISH -28-
Page 28

AUA.801
 Loading...