


COLLET CLOSER
MODEL G4026
INSTRUCTION MANUAL
FOR USE WITH METAL CUTTING LATHE MODEL G4002/G4003
COPYRIGHT © MAY, 2003 BY GRIZZLY INDUSTRIAL, INC.
WARNING: NO PORTION OF THIS MANUAL MAY BE REPRODUCED IN ANY SHAPE
OR FORM WITHOUT THE WRITTEN APPROVAL OF GRIZZLY INDUSTRIAL, INC.
PRINTED IN CHINA

WARNING
Some dust created by power sanding, sawing, grinding, drilling, and other construction activities contains
chemicals known to the State of California to cause
cancer, birth defects or other reproductive harm.
Some examples of these chemicals are:
• Lead from lead-based paints.
• Crystalline silica from bricks, cement, and
other masonry products.
• Arsenic and chromium from chemically treated
lumber.
Your risk from these exposures varies, depending on
how often you do this type of work. To reduce your
exposure to these chemicals: work in a well ventilated area, and work with approved safety equipment,
such as those dust masks that are specially
designed to filter out microscopic particles.

METALWORKING EQUIPMENT
SAFETY INSTRUCTIONS
For Your Own Safety Read Instruction
Manual Before Operating This Equipment
The purpose of safety symbols is to attract your attention to possible hazardous conditions.
This manual uses a series of symbols and signal words which are intended to convey the level
of importance of the safety messages. The progression of symbols is described below.
Remember that safety messages by themselves do not eliminate danger and are not a substitute
for proper accident prevention measures.
Indicates an imminently hazardous situation which, if not avoided,
WILL result in death or serious injury.
Indicates a potentially hazardous situation which, if not avoided,
COULD result in death or serious injury.
Indicates a potentially hazardous situation which, if not avoided,
MAY result in minor or moderate injury.
This symbol is used to alert the user to useful information about
NOTICE
proper operation of the equipment or property damage hazards.
Safety Instructions For Metalworking Machines
1. READ AND UNDERSTAND MACHINE
OWNERS MANUAL FOR YOUR LATHE.
2. REMOVE ADJUSTING KEYS AND
WRENCHES. Form a habit of checking to
see that keys and adjusting wrenches are
removed from tool before turning on.
3. KEEP WORK AREA CLEAN. Cluttered
areas and benches invite accidents.
4. DO NOT USE IN DANGEROUS
ENVIRONMENT. DO NOT use power
tools in damp or wet locations, or where
any flammable or noxious fumes may
exist. Keep work area well lighted.
5. KEEP CHILDREN AND VISITORS
AWAY. All children and visitors should be
kept at a safe distance from work area.
6. MAKE WORK SHOP CHILD PROOF with
padlocks, master switches, or by removing
starter keys.
7. DO NOT FORCE TOOL. It will do the job
better and safer at the rate for which it was
designed.
8. USE RIGHT TOOL. DO NOT force tool or
attachment to do a job for which it was not
designed.
G4026 Collet Closer

Safety Instructions For Metalworking Tools
9. USE PROPER EXTENSION CORD. Make
sure your extension cord is in good condition. Conductor size should be in accordance with the chart below. The amperage
rating should be listed on the motor or tool
nameplate. An undersized cord will cause
a drop in line voltage resulting in loss of
power and overheating. Your extension
cord must also contain a ground wire and
plug pin. Always repair or replace extension cords if they become damaged.
Minimum Gauge for Extension Cords
LENGTH
AMP RATING 25ft 50ft 100ft
0-6 16 16 16
7-10 16 16 14
11-12 16 16 14
13-16 14 12 12
17-20 12 12 10
21-30 10 10 No
10. WEAR PROPER APPAREL. DO NOT
wear loose clothing, gloves, neckties,
rings, bracelets, or other jewelry which
may get caught in moving parts. Non-slip
footwear is recommended. Wear protective hair covering to contain long hair.
11. ALWAYS USE SAFETY GLASSES.
Everyday eyeglasses only have impact resistant lenses, they are NOT safety glasses.
12. SECURE WORK. Use properly secured
clamps or vises to hold work while performing the machining operation
16. REDUCE THE RISK OF UNINTENTIONAL
STARTING. On machines with magnetic
contact starting switches there is a risk of
starting if the machine is bumped or jarred.
Always disconnect from power source
before adjusting or servicing. Make sure
switch is in OFF position before reconnecting.
17. CHECK DAMAGED PARTS. Before further
use of the tool, a guard or other part that is
damaged should be carefully checked to
determine that it will operate properly and
perform its intended function. Check for
alignment of moving parts, binding of moving parts, breakage of parts, mounting, and
any other conditions that may affect its
operation. A guard or other part that is damaged should be properly repaired or
replaced.
18. NEVER LEAVE MACHINE RUNNING
UNATTENDED. TURN POWER OFF.
DO NOT leave machine until it comes to a
complete stop.
19. SOME COOLANTS USED FOR MACHINING
MAY CONTAIN HAZARDOUS CHEMICALS.
Read and understand all user information
on the coolant container and protect yourself accordingly.
20. NEVER OPERATE A MACHINE WHEN
TIRED, OR UNDER THE INFLUENCE OF
DRUGS OR ALCOHOL. Full mental alert-
ness is required at all times when running a
machine.
13. DO NOT OVER-REACH. Keep proper
footing and balance at all times.
14. MAINTAIN TOOLS AND MACHINERY
WITH CARE. Keep tools sharp and clean
for best and safest performance. Follow
instructions for lubricating and changing
accessories.
15. USE RECOMMENDED ACCESSORIES.
Consult the owner’s manual for recommended accessories. The use of improper
accessories may cause risk of injury.
No list of safety guidelines can be complete. Every shop environment is different.
Always consider safety first, as it applies to
your individual working conditions. Use
this and other machinery with caution and
respect. Failure to do so could result in
serious personal injury, damage to equipment or poor work results.
-2-

INTRODUCTION
Commentary
The Model G4026 Collet Closer allows you to
quickly interchange 5-C collets on your Model
G4002 or Model G4003 Metal-Cutting Lathe. The
positive-locking handle clamps standard 5-C collets safely and securely for precision turning.
Grizzly also offers an extensive line of precision-ground 5-C collets, ideal for use with the
Model G4026 Collet Closer. See the latest Grizzly
Catalog or visit our web site at www.grizzly.com
for price and ordering information.
Most importantly, we stand behind our tools. If
you have any service questions or parts requests,
please call or write us at the location listed below.
Grizzly Industrial, Inc.
1203 Lycoming Mall Circle
Muncy, PA 17756
Phone: (570) 546-9663
Fax: (800) 438-5901-Mail: support@grizzly.com
Site: http://www.grizzly.com
Cover Removal
Mounting the Model G4026 requires the use of a
few simple tools.
Tools Required:
— Adjustable wrench
— 3MM hex key
— 4MM hex key
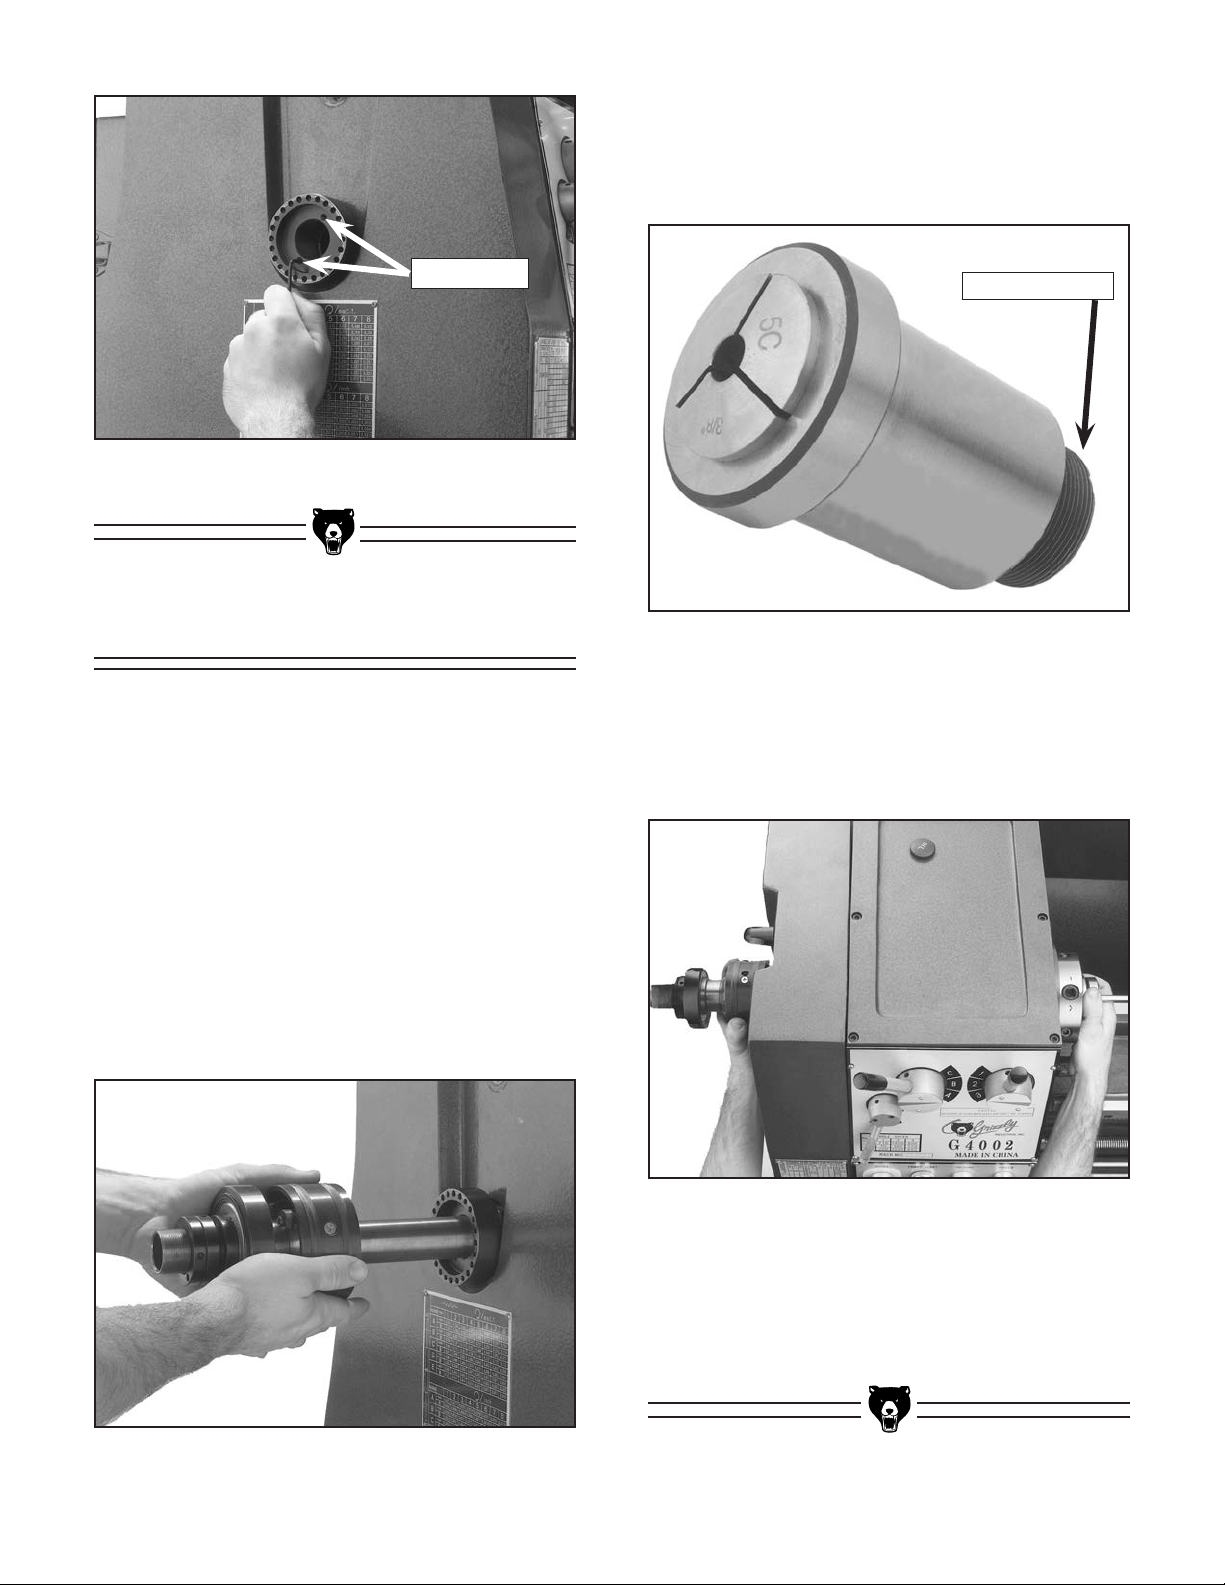
To remove the lathe cover and the mounting
studs:
Remove the end cover from the lathe by unscrewing the cover knobs on the left end of the lathe.
The top cover knob removal is shown in Figure 1.
Disconnect power to your lathe before
beginning installation of the Model
G4026 Collet Closer.
To begin assembly, follow these initial safety
instructions.
1. Disconnect the lathe from the power
source!
2. Remove the chuck or any other device that is
mounted to the spindle. (Refer to your owner’s manual.)
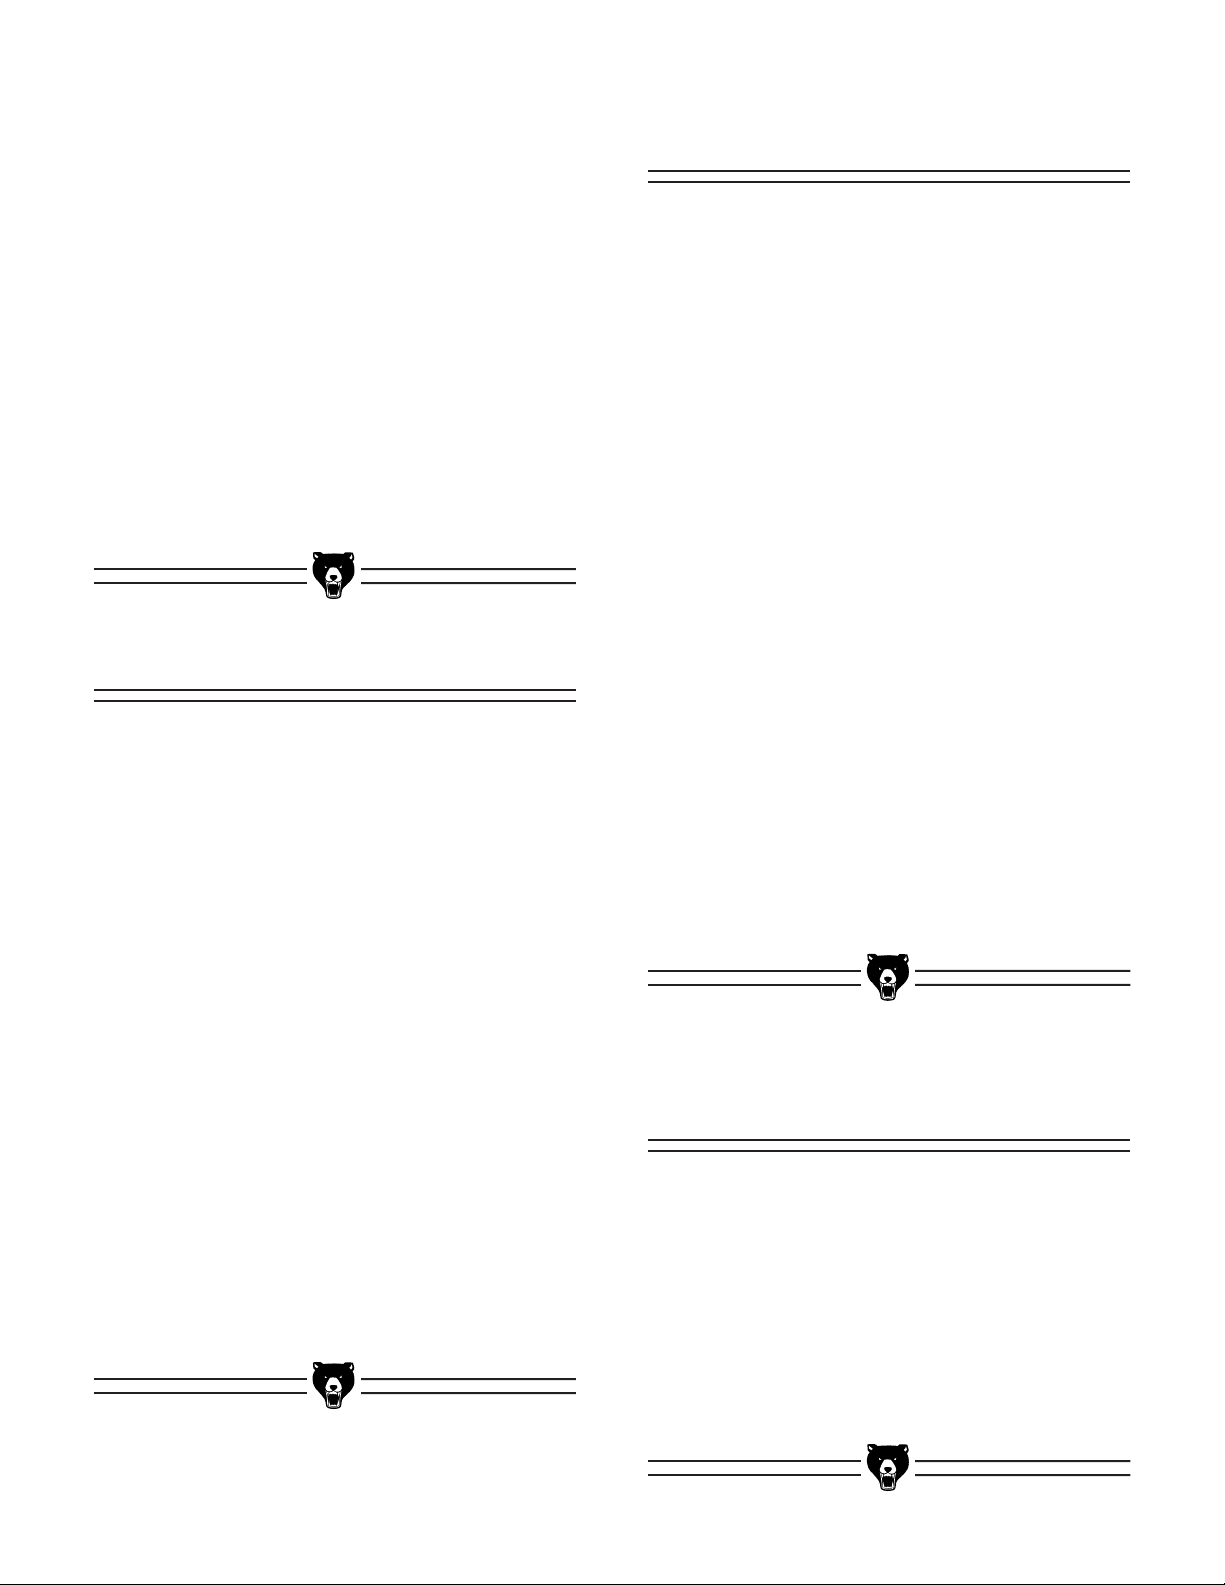
3. Make sure the 5-C Collet/Morse Taper
Adapter (included in the kit) and the spindle
opening are clean and free of oil. Use a soft
cloth or rag to wipe up any contaminant.
G4026 Collet Closer
Figure 1. Lathe cover removal.
G4026 Collet Closer

Mounting Studs
Pivot Connector
To remove the mounting stud and install the
replacement stud:
1. Remove the upper mounting stud as shown
in Figure 2.
Figure 2. Mounting stud removal.
2. Install the replacement mounting stud as
shown in Figure 3.
To install the pivot connector:
Remove the pivoting rod connector from the draw
tube assembly and thread it onto the replacement
stud as shown in Figure 4. Make sure you have
replaced the lathe cover!
Figure 4. Installing the pivot connector.
This pivot will allow the locking yoke to be
secured to the lathe while providing a range of
motion to engage and disengage the locking
mechanism. The pivot connector should be
secured tightly to the stud and the pivot pin
should be in a horizontal position, allowing the
pivot to move up and down.
Figure 3. Replacement mounting
stud installed.
3. Replace the lathe cover and secure the bottom knob.
Hub Adapter
To install the hub adapter to the outboard
spindle:
1. Remove the hub adapter from the draw tube
assembly and unscrew the setscrews until
the ends are flush with the outer edge of the
hub.
2. Thread the hub adapter completely into the
outboard end of the lathe spindle. Secure the
hub adapter to the spindle by tightening the
setscrews shown in Figure 5
-4-
.
2. Place the collet in the collet adapter, so the
collet threads are exposed out of the back
end of the collet adapter as shown in Figure
7.
Setscrews
Figure 5. Installing hub adapter.
Tube Assembly
The draw tube assembly comes attached to the
locking yoke and connecting rod. Remove the
locking yoke and connecting rod by unscrewing
the setscrews that connect the locking yoke to the
bearing housing.
Collet Threads
Figure 7. Collet in collet adapter.
3. Hold the adjusting hub with your left hand
and thread the collet and adapter into the
front spindle with your right hand to engage
the draw tube, as shown in Figure 8.
To install the draw tube assembly into your
lathe:
1. Insert the draw tube assembly into the out-
board spindle as shown in Figure 6. Slide
the draw tube assembly all the way into the
outboard spindle until it engages around the
hub adapter.
Figure 8. Rotating collet in spindle to
engage with adjusting hub.
4. Turn the collet 4 to 5 complete revolutions.
Additional fine adjustments will be covered
later.
Figure 6. Inserting draw tube assembly.
G4026 Collet Closer
G4026 Collet Closer

Locking Yoke
To secure the locking yoke to your lathe:
4. Make sure the locking yoke and the rod con-
nector are secured to the mounting stud and
the pivoting rod connecter.
1. Thread the connecting rod and locking yoke
onto the pivoting rod connector as shown in
Figure 9.
Connecting
rod
Locking
yoke
Figure 9. Connecting rod and locking yoke
installed on pivot connector.
2. Please note that the rod connector is supplied with jam nuts. It may be necessary to
remove these nuts to allow for the proper fit
of the assembly on some lathes.
3. Install the handle to the yoke. Note—If you
have trouble positioning the locking yoke so
it is aligned with the draw tube in the next two
steps, adjust the length of the connecting rod
by threading it more or less into the pivot
connectors and try again.
5. Position the locking yoke back inline with the
setscrew holes on the draw tube assembly,
then secure the setscrews and the jam nuts
as shown in Figure 10.
Figure 10. Tightening yoke setscrews.
6. Thread the setscrews on both sides of the
locking yoke into the holes on either side of
the bearing housing. Make sure the setscrews are completely and evenly engaged
into the holes, without being tight.
7. The yoke should have
side, but still pivot freely. Tighten the jam
nuts.
8. The ideal locked position for the collet closer
is shown in the completed assembly diagram
in Figure 11.
no play from side-to-
-6-

Locking Pawls
Figure 11. Completed collet closer assembly.
Make sure proper turning clearance exists
between the bearing casing and the locking
yoke before operation. Serious personal
injury or damage to the lathe and collet
closer can occur if there is contact. Rotate
draw tube and check for clearance. DO NOT
make adjustments, remove workpiece or
open back cover of lathe while the machine
is in motion.
Locking Stroke
Figure 12. Locking pawls in locked position
on the cam lobe.
2. Secure the 38mm spanner nut against the
outboard side of the bearing housing and
then secure the 30mm spanner nuts against
the 38mm spanner nut as shown in Figure
13. Note—Be sure that the 30mm spanner
with the setscrew is on the outside, with the
setscrew accessible.
3. The two 30mm spanners define the stroke
distance. Secure the setscrew in the outer
30mm spanner nut to lock the stroke distance.
38mm spanner
To adjust the locking stroke on your collet
closer:
1. Position the locking pawls so they are in the
correct position on the cam as shown in
Figure 12.
G4026 Collet Closer
30mm spanners
Figure 13. Spanner nut positioning for locking
stroke adjustment.
G4026 Collet Closer

The mechanism that controls the stroke is depicted in detail in Figure 14.
3. Rotate the draw tube counter-clockwise at
the end of the collet closer, as shown in
Figure 16, to unthread the collet.
E
Figure 14. Stroke adjustment assembly.
Removal of 5-C
Collet
The draw tube threads may be sharp. To
avoid cutting your hands, use a clean rag
to rotate the draw tube.
4. Remove the collet from the collet adapter
and insert the new 5-C collet.
5. Rotate the draw tube clockwise at the end of
the collet closer to engage the new collet
threads.6. Engage the hub locking pin back
into place as shown in Figure 16.
To remove or replace your 5-C collet in the
collet closer assembly:
1. Choose a 5-C collet that is suitable for the
intended stock size to be turned.
2. Disengage the hub locking pin so the flat is
turned toward the outer rim of the hub adapter as shown in Figure 15.
Pin Disengaged
Pin
Engaged
Figure 15. Locking pin positions.
Figure 16. Location to rotate draw tube to
remove or replace 5-C collets.
Installing 5-C Collet
To adjust your 5-C collet in the collet closer
assembly:
1. Choose a 5-C collet that is suitable for the
intended stock size to be turned.
2. Line up the collet keyway with collet adapter
pin and insert the collet until it stops, then
gently rotate it for final alignment.
-8-
3. Gently push on the end of the draw tube until
it engages the collet threads in the spindle,
and rotate the adjusting hub in a clockwise
fashion (as viewed from the outboard end of
the lathe in Figure 8).
— If the draw tube fails to touch the collet,
remove the collet and look into the spindle to
see if the draw tube is accessible for proper
engagement. If the collet cannot touch the
draw tube when inserted into the spindle, see
the following section on “Rough Adjustment.”
If the collet does reach, try again to thread
the collet and adapter into the spindle by following the guidelines in the “Tube Assembly”
sub-section of this manual.
Rough Adjustment
Maintenance
The Model G4026 Collet Closer is essentially a maintenance free tool; however, some
things to keep in mind are:
1. Make sure that all the components of your
collet closer are assembled correctly, according to this manual.
2. Once the replacement stud and hub adapter
are installed, they will not need to be removed.
3. Ensure that your locking mechanism is working properly before you start any projects on
your lathe.
4. Check the locking stroke for proper placement of locking pawls on the cams.
If rough adjustments need to be made to the
collet closer assembly:
1. In the event that the above adjustments fail
to allow the collet to lock onto the material or
the draw tube fails to touch the collet, adjust
the adapter hub in or out.
2. Loosen the setscrews and turn the hub
adapter in a clockwise direction if the draw
tube does not contact the back of the collet.
3. Turn the hub adapter counter-clockwise if the
work material cannot be locked by the collet.
4. Tighten the setscrews.
The Model G4026 Collet Closer is adjusted properly when the 3 collet locking pawls are tight on
the cam and the workpiece will not twist in the
collet. Again, Figure 12 on page 7 shows the
proper locked position of the collet locking pawls
around the cam.
5. The bearings are non-serviceable. If you
have problems with your bearings, you must
order a new bearing pack.
6. The hub adapter must be removed in order
to change gears occasionally.
Aftermarket
Accessories
5-C collets do not come with the Model G4026
Collet Closer. However, they are available in the
current Grizzly Catalog:
• Model G1238 15 piece collet set ranging in
diameters from
1
⁄8" to 1".
G4026 Collet Closer
• Collets are also sold separately in individual
sizes.
G4026 Collet Closer

1
47
38
32
35
44
5
45
43
41
40
31
30
24
46
23
26V2
18
23A
4
29
22
48
27
G4026 Collet Closer
G4026 COLLET CLOSER
9
8
10
11
12
-10-
7
17
34V2
33V2
21
G4026 Collet Closer

REF
1 P4026001 COLLET ADAPTER
4 P4026004 DRAW TUBE
5 P4026005 HUB ADAPTER
7 P4026007 LOCKING YOKE
8 PN03M HEX NUT M8-1.25
9 P4026009 DOGPOINT SETSCREW M8-1.25 X 38
10 PN09M HEX NUT M12-1.75
11 P4026011 HANDLE ROD
12 P4026012 HANDLE
17 P4026017 PIVOT PIN
18 P4026018 ROD CONNECTOR
19 P4026019 THREADED ROD
21 PSS01M SETSCREW M6-1.0 X 10
22 P4026022 SPANNER NUT M38-1.25
23 P4026023 BEARING SUPPORT
23A P6208 CARTRIDGE BALL BEARING 6208ZZ
24 P4026024 CAM
25 P4026025 SET SCREW M4 X 5
26V2 P4026026V2 LOCKING PIN V2 01.08
27 P4026027 KNURLED KNOB M4-0.7
29 P4026029 SPRING
30 P4026030 COLLET LOCKING PAWL
31 P4026031 PIN
32 PSS14M SETSCREW M8-1.25 X 12
33V2 P4026033V2 SPANNER NUT M40-1.5 W/ SS V2.03.12
34V2 P4026034V2 SPANNER NUT M40-1.5 V2.03.12
35 P4026035 ROD CONNECTOR
37 P4026037 STUD ADAPTER
38 P4026038 MOUNTING STUD
39 P4026039 COVER KNOB M12-1.75 X 18
40 P4026040 SLIDING HUB SLEEVE
41 P4026041 HUB SLEEVE
43 P4026043 BRASS SUPPORT PIN
44 PFH07M FLAT HD SCR M5-.8 X 10
45 PSS03M SETSCREW M6-1.0 X 8
46 P4026046 THREADED STUD 12-1.75 X2.5
47 P4026047 COLLET ADAPTER PIN 3 X 6
48 PSS08M SET SCREW M4-.7 X 5
PART #
DESCRIPTION
G4026 Collet Closer
-11-

WARRANTY AND RETURNS
Grizzly Imports, Inc. warrants every product it sells for a period of 1 year to the original purchaser from the
date of purchase. This warranty does not apply to defects due directly or indirectly to misuse, abuse, negligence, accidents, repairs or alterations or lack of maintenance. This is Grizzly’s sole written warranty and
any and all warranties that may be implied by law, including any merchantability or fitness, for any particular purpose, are hereby limited to the duration of this written warranty. We do not warrant or represent that
the merchandise complies with the provisions of any law or acts unless the manufacturer so warrants. In
no event shall Grizzly’s liability under this warranty exceed the purchase price paid for the product and any
legal actions brought against Grizzly shall be tried in the State of Washington, County of Whatcom.
We shall in no event be liable for death, injuries to persons or property or for incidental, contingent, special,
or consequential damages arising from the use of our products.
To take advantage of this warranty, contact us by mail or phone and give us all the details. We will then
issue you a “Return Number,’’ which must be clearly posted on the outside as well as the inside of the
carton. We will not accept any item back without this number. Proof of purchase must accompany the merchandise.
The manufacturers reserve the right to change specifications at any time because they constantly strive to
achieve better quality equipment. We make every effort to ensure that our products meet high quality and
durability standards and we hope you never need to use this warranty.
Please feel free to write or call us if you have any questions about the machine or the manual.
Thank you again for your business and continued support. We hope to serve you again soon.

WARRANTY CARD
NAME_______________________________________________ PHONE NUMBER___________________
STREET________________________________________________________________________________
CITY_______________________________STATE_________ZIP ___________________________________
MODEL#
The following information is given on a voluntary basis. This information will be used for marketing purposes to help
Grizzly develop better products. Your name will be included in our mailing list only. It will not be sold to other companies. of course, all information is strictly confidential.
1. How did you find out about us?
__Advertisement __Friend __Website
__Catalog __Card deck __Other____________________
2. Do you think your machine represents good value? __YES __NO
3. Would you allow us to use your name as a reference for Grizzly customers in your area? __YES __NO
(Note: Your name will be used a maximum of three times.)
4. To which of the following publications do you subscribe? Check all that apply.
__Home Shop Machinist __Rifle Magazine Other ________________
__Projects in Metal __Hand Loader Magazine
__Modeltec __Precision Shooter
__Live Steam __RC Modeler
__Shotgun News __Model Airplane News
G4026 Collet Closer SERIAL#________________ INVOICE#_________________
5. What is your annual household income?
__$20,000-$30,000 __$50,001-$60,000 __$80,000-$90,000
__$30,001-$40,000 __$60,001-$70,000 __+$90,000
__$40,001-$50,000 __$70,001-$80,000
6. To which age group do you belong?
__20-30 __41-50 __61-70
__31-40 __51-60 __+70
7. Which of the following machines or accessories do you own? Check all that apply.
CUT ALONG DOTTED LINE
__Engine Lathe __Abrasive Cutoff __Sheet Metal Machine
__Band Saw (Metal) __Arc Welder __Other _____________________________
__Band Saw (Wood) __Oxy/Ac. Outfit
__Milling Machine __Air Compressor
__Bench Grinder __Drill Press
8. How many of the machines you checked in Question 7 are Grizzly machines? ______________________
9. Which of the following tooling and accessories do you own? Check all that apply.
__Milling Vises __Collet Closer __Digital Readout
__Indexing Head __Taper Attachment __Tool Post Grinder
__Rotary Table __Boring Head __Other _________________________________________
10. In the space below, list three tools you would like Grizzly to carry.
11. Of all the mail order metalworking company’s you have purchased from, how do you rate Grizzly in terms of overall
customer satisfaction?
__The best __Above average __Average
__Below average __The worst
12. Comments_______________________________________________________________________________
_____________________________________________________________________________________________
_____________________________________________________________________________________________
________________________________________________________________________________________________

FOLD ALONG DOTTED LINE
Place
Stamp
Here
GRIZZLY INDUSTRIAL, INC.
P.O. BOX 2069
BELLINGHAM, WA 98227-2069
FOLD ALONG DOTTED LINE
Send a Grizzly Catalog to a friend:
Name_______________________________
Street_______________________________
City______________State______Zip______
TAPE ALONG EDGES--PLEASE DO NOT STAPLE
G4026 Collet Closer
 Loading...