


NAIL GUNS & STAPLERS
MODEL G1847 / G1852 / G1861 / G3811
INSTRUCTION MANUAL
COPYRIGHT © 1990 BY GRIZZLY INDUSTRIAL, INC. TX 3 176 561
WARNING: NO PORTION OF THIS MANUAL MAY BE REPRODUCED IN ANY SHAPE
OR FORM WITHOUT THE WRITTEN APPROVAL OF GRIZZLY INDUSTRIAL, INC.
REVISED MARCH, 1999 PRINTED IN USA
DISCONTINUED MACHINE MANUAL DISCLAIMER
THE INFORMATION IN THIS MANUAL REPRESENTS THE LAST CONFIGURATION OF THE MACHINE BEFORE IT WAS DISCONTINUED.
MACHINE CONFIGURATIONS MAY HAVE CHANGED AS PRODUCT IMPROVEMENTS WERE INCORPORATED. IF YOU OWN AN EARLIER VER-
SION OF THE MACHINE, THIS MANUAL MAY NOT EXACTLY DEPICT YOUR MACHINE . CONTACT CUSTOMER SERVICE IF YOU HAVE ANY
QUESTIONS ABOUT DIFFERENCES. PREVIOUS VERSIONS ARE NOT AVAILABLE ONLINE.
®

G1847 / G1852 / G 1861 / G3811 Air Nailers/Staplers -1-
Table Of Contents
PAGE
1. SAFETY ....................................................................................................................2
SAFETY RULES FOR ALL TOOLS ....................................................................2
ADDITIONAL SAFETY INSTRUCTIONS FOR NAILERS....................................3
2. INTRODUCTION ...................................................................................................... 4
3. OPERATIONS............................................................................................................5
UNPACKING ........................................................................................................5
CONNECTING TO AIR ........................................................................................5
LOADING BRADS................................................................................................6
LOADING STAPLES ............................................................................................7
TEST FIRE ..........................................................................................................8
AIR QUALITY ......................................................................................................8
4. MAINTENANCE ........................................................................................................9
GENERAL ............................................................................................................9
CLEANING & OILING ..........................................................................................9
JAMMING ..........................................................................................................10
ALIGNING NOSE PIECE ..................................................................................10
DRIVER REPLACEMENT..................................................................................11
O-RING ..............................................................................................................12
5. CLOSURE................................................................................................................13
G1847 PARTS DIAGRAM AND LIST ..........................................................14-15
G1852 PARTS DIAGRAM AND LIST ..........................................................16-17
G1861 PARTS DIAGRAM AND LIST ..........................................................18-19
G3811 PARTS DIAGRAM AND LIST ..........................................................20-21
MACHINE DATA ................................................................................................22
TROUBLESHOOTING GUIDE ..........................................................................23
WARRANTY AND RETURNS............................................................................24
-2- G1847 / G1852 / G 1861 / G3811 Air Nailers/Staplers
For Your Own Safety Read Instruction
Manual Before Operating Nailer
Safety Instructions For Power Tools
These safety rules cannot cover every situation in a work shop. Consider your conditions when setting
up or operating your nailer.
SECTION 1: SAFETY
DO NOT CONNECT nailer to the air hose until
you are in position and ready to operate the
nailer safely.
KEEP HANDS and other body parts away from
the nailer tip at all times.
NEVER MANUALLY DEPRESS the safety
nose and shoot fasteners for any reason.
DO NOT REST a pressurized nailer against
your body for any reason.
8. USE RIGHT TOOL. Don’t force tool or
attachment to do a job for which it was not
designed.
9. WEAR PROPER APPAREL Do not wear
loose clothing, gloves, neckties, rings,
bracelets, or other jewelry which may get
caught in moving parts. Non-slip footwear is
recommended. Wear protective hair covering to contain long hair.
10. ALWAYS USE SAFETY GLASSES. Also
use face or dust mask if tool operation is
dusty. Everyday eyeglasses only have
impact resistant lenses, they are NOT safety
glasses.
11. SECURE WORK. Use clamps or a vise to
hold work when practical. It’s safer than
using your hand and frees both hands to
operate tool.
12. DON’T OVERREACH. Keep proper footing
and balance at all times.
1. KEEP GUARDS IN PLACE and in working
order.
2. REMOVE ADJUSTING KEYS AND
WRENCHES. Form habit of checking to see
that keys and adjusting wrenches are
removed from tool before turning on.
3. KEEP WORK AREA CLEAN. Cluttered
areas and benches invite accidents.
4. DON’T USE IN DANGEROUS ENVIRONMENT. Don’t use power tools in damp or
wet locations, or expose them to rain. Keep
work area well lighted.
5. KEEP CHILDREN AND VISITORS AWAY.
All children and visitors should be kept a
safe distance from work area.
6. MAKE WORK SHOP CHILD PROOF with
padlocks, master switches, or by removing
starter keys.
7. DON’T FORCE TOOL. It will do the job bet-
ter and safer at the rate for which it was
designed.
G1847 / G1852 / G 1861 / G3811 Air Nailers/Staplers -3-
Safety Instructions for Nail Guns
17. CHECK DAMAGED PARTS. Before further
use of the tool, a guard or other part that is
damaged should be carefully checked to
determine that it will operate properly and
perform its intended function-check for
alignment of moving parts, binding of moving parts, breakage of parts, mounting, and
any other conditions that may affect its
operation. Damaged parts should be properly repaired or replaced immediately.
18. DIRECTION OF FEED. Feed work into a
blade or cutter against the direction of rotation of the blade or cutter only.
19. NEVER LEAVE TOOL RUNNING UNATTENDED. TURN POWER OFF. Don’t leave
tool until it comes to a complete stop.
7. Use only clean, dry, regulated, compressed
air. DO NOT connect this air tool to any pres-
surized gas other than compressed air.
8. Air compressors must comply with ANSI B
19.3 - 1981 (U.S.), “Safety Standard for
Compressors for Process Industries.”
9. DO NOT operate at a pressure higher than
90 PSI.
10. NEVER use this nailer for fastening alu-
minum, brass, metal, plastics, or any other
like material.
11. Air hose must be rated as having a minimum
working pressure of 150 p.s.i. or 150% of the
maximum pressure produced in the line,
whichever is greater. Inspect air hoses frequently.
12. All air tools exhaust compressed air. If work-
ing in an area where dust will become air-
borne due to exhausted air, WEAR RESPI-
RATORY PROTECTION.
1. Make sure the safety nose is functioning
properly before loading fasteners.
2. Make sure the magazine spring is set
before operating.
3. ALWAYS point nailer away from yourself
and others when loading or operating.
4. DO NOT carry nailer with your finger on
the trigger. Nailer will fire if safety nose is
accidentally depressed.
5. DO NOT place your free hand or feet near
the nailer tip to support the work. If you
cannot safely support the work without
placing body parts near the nailer tip, do
not use this nailer.
6. DO NOT operate the nailer if workpiece is
between you or someone else and the
nailer. Reposition yourself so you and others are behind the nailer.
13. MAINTAIN TOOLS WITH CARE. Keep
tools sharp and clean for best and safest
performance. Follow instructions for lubricating and changing accessories.
14. DISCONNECT TOOLS before servicing
and changing accessories, such as blades,
bits, cutters, and the like.
15. REDUCE THE RISK OF UNINTENTIONAL
STARTING. Make sure switch is in off posi-
tion before plugging in.
16. USE RECOMMENDED ACCESSORIES.
Consult the owner’s manual for recommended accessories. The use of improper
accessories may cause risk of injury.
Safety Instructions For Power Tools
-4- G1847 / G1852 / G 1861 / G3811 Air Nailers/Staplers
Grizzly Industrial, Inc. is proud to offer its Model
G1847, G1852, G1861 and G3811 Pneumatic
Nailers and Staplers. These professional-quality
tools are part of Grizzly’s growing family of fine
woodworking machinery. When used according
to the guidelines set forth in this manual, you can
expect years of trouble-free, enjoyable operation,
and proof of Grizzly’s commitment to customer
satisfaction.
These nailers comprise a large part of our complete line of nail nailers covering most applications. The G1847 will shoot 18 Ga. staples
between
1
/2" and 7⁄8" long. The G3811 will shoot
18 Ga. staples between
7
⁄8" and 1 3⁄16" long. The
G1852 will shoot 18 Ga. brad nails between
3
⁄8"
and 1
3
⁄16" long. The G1861 will shoot 18 Ga. brad
nails between
5
⁄8" and 19⁄16". Each will handle up
to 100 fasteners.
We are also pleased to provide this manual with
your pneumatic nailer/stapler. It was written to
guide you through general operating procedures
and safety considerations. It represents our latest effort to produce the best documentation possible. If you have any criticisms that you feel we
should address in our next printing, please write
to us at the Bellingham, WA address at the end of
this section.
Most important, we stand behind our machines.
We have excellent service departments at your
disposal should the need arise. If you have any
service questions or parts requests, please call or
write to us at the location listed below.
Grizzly Industrial, Inc.
1203 Lycoming Mall Circle
Muncy, PA 17756
Phone:(570) 546-9663
Fax:(800) 438-5901
E-Mail: techsupport@grizzly.com
Web Site: http://www.grizzly.com
To comment on this manual write to:
Grizzly Industrial, Inc.
C
⁄O Technical Documentation
P.O. Box 2069
Bellingham, WA 98227
To operate this, or any tool, safely and efficiently,
it is essential to become as familiar with its characteristics as possible. Take as much time as
necessary to become acquainted with your pneumatic nailer. The time you invest before you begin
to use your tool will be time well spent. Also, read
all of the safety procedures. If you do not under-
stand them, DO NOT operate your nailer.
SECTION 2: GENERAL INFORMATION
The nailers and staplers described in this
manual are powerful, professional-quality
tools, each designed and built to provide
outstanding results when used cautiously
and with respect. Like any tools of their
type, they can be inherently dangerous.
Careless use could result in serious injury.
Please do not attempt to use these tools
without familiarizing yourself with their
instructions for assembly, adjustment, and
safe operation. Failure to do so could result
in serious personal injury, as well as property damage and damage to the tool.
ALWAYS wear ANSI-approved goggles or
safety glasses when operating these or any
other woodworking tool. Wearing hearing
protection is also strongly recommended.
Failure to wear proper safety gear could
result in serious personal injury.

G1847 / G1852 / G 1861 / G3811 Air Nailers/Staplers -5-
SECTION 3: OPERATIONS
If the air fitting is not already screwed in, first be
sure the threads are wrapped with teflon tape and
then screw it in the back. Teflon tape is available
at most hardware stores.
To connect the air hose to the air nozzle at the
rear of the nailer:
1. Pull back on the female hose connector
sleeve.
2. Press the fitting onto the nailer air nozzle and
release the sleeve. The female fitting will
lock onto the male nailer fitting.
3. Listen for any air leaks. If no leaks are
detected, you are ready to test fire the nailer.
Air pressure should be set at the minimum
required to set the fastener and must not exceed
90 p.s.i.
Consistently operating at unnecessarily high
pressures will put excessive stress on internal
parts which will lead to premature nailer failure.
Connecting To Air
Unpacking
The pneumatic nailers/staplers are shipped from
the manufacturer in a carefully packed carton. If
you discover damaged after delivery, please call
Customer Service immediately for advice.
Save the containers and all packing materials for
possible inspection by the carrier or its agent.
Otherwise filing a claim can be difficult.
Carefully remove the items packed in the carton.
It may be a good idea to save the carton and
packing material in case it might be needed in the
future. Upon removal of all items from the package, you should have:
1. Nail Nailer
2. Allen Wrenches
3. Oil Bottle
4. Air Fitting
Be sure that your air compressor is properly grounded. If you are unsure of the quality
and condition of the circuit you intend to
use, have it inspected and repaired by a
qualified electrician. Failure to ensure proper grounding could result in serious injury
and/or equipment damage.
Please keep all packaging materials until
you are satisfied that the machine is in good
condition. Should you need to file a freight
claim, the carrier’s agent will require inspection of those materials. Settling a claim can
be difficult if packaging is not available.
NOTE
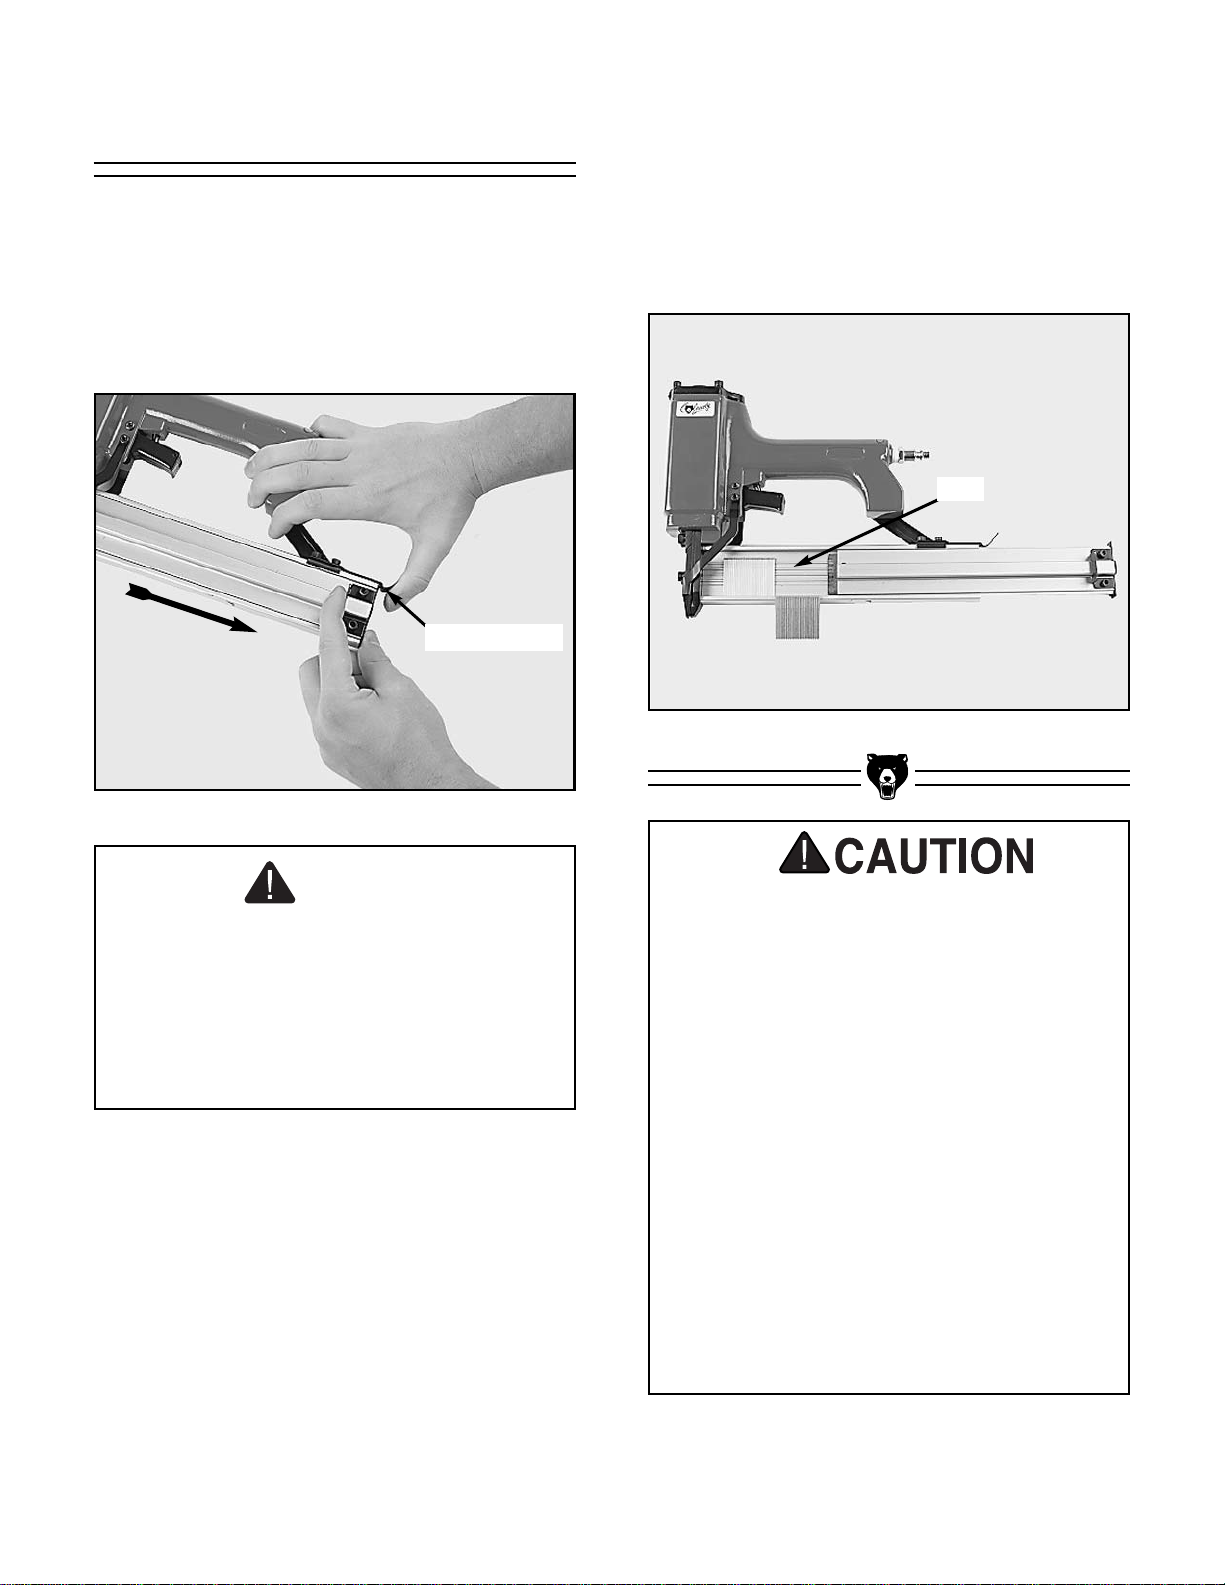
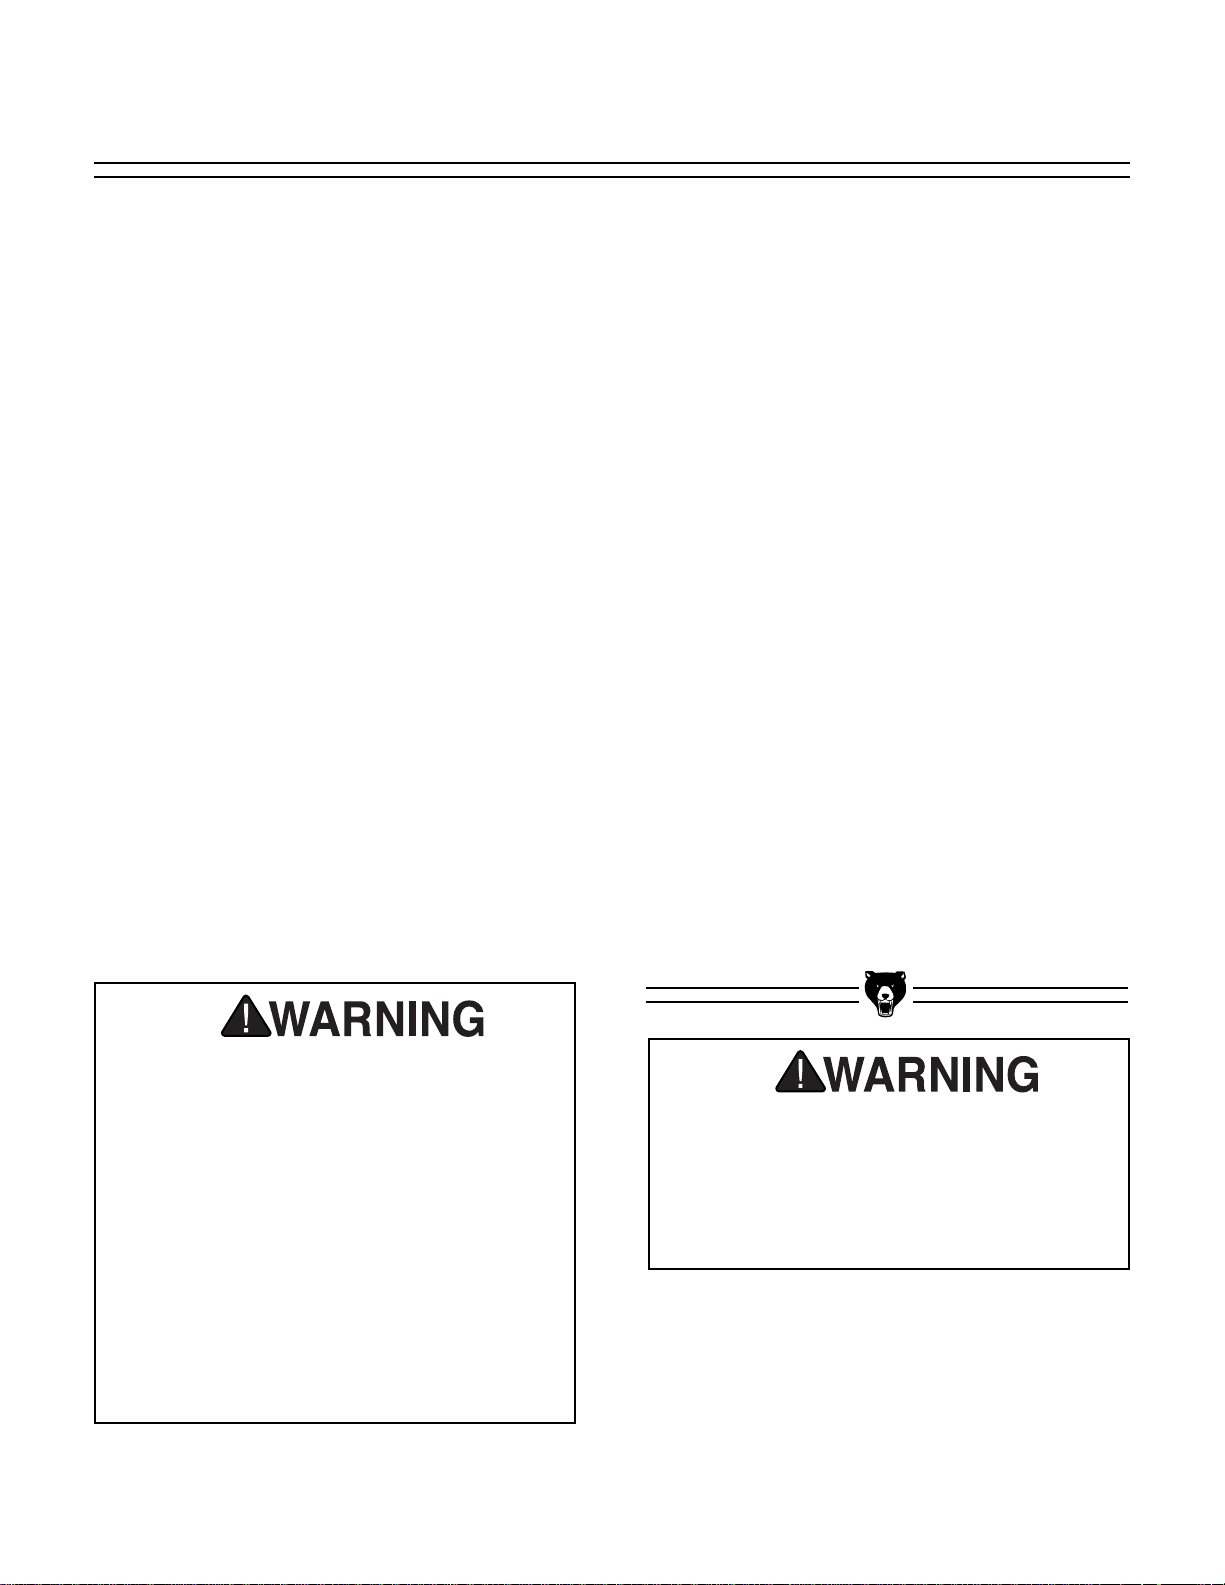
Figure 2. Inserting brads in magazine.
Figure 1. Releasing magazine latch.
-6- G1847 / G1852 / G 1861 / G3811 Air Nailers/Staplers
To load the nailer:
1. Disconnect the air hose if connected.
2. Lift the magazine latch that holds the maga-
zine in place. Figure 1.
3. Slide the magazine out and place the brads
into the nailer. Your nailer has slots in its
magazine to accommodate different size
brads. Figure 2.
4. Close the magazine. The latch will snap into
place if the brads are seated correctly.
Loading Brads
Magazine Latch
Slots
Be sure that brads are in good condition
before attempting to load them into the gun.
Rusty, corroded, bent, or damaged brads
should be discarded. Loading small, partial
bands of brads can also jam the gun. Also,
be sure that the brads you are using are the
correct size and style for the gun.
Do not force the magazine shut after loading. If the magazine seems stuck, or if it
requires more pressure than normal to slide
the magazine into it’s “firing” position, slide
it back out and remove the brads. Try sliding the magazine while empty. If the magazine slides easily, open again, reload, and
try to secure it.
If the magazine has difficulty closing when
empty, inspect for a loose brad or other foreign object that may be jammed between
the magazine slide and the frame of the gun.
CAUTION: Disconnect the gun from its air
source whenever you need to inspect or
service the gun. Failure to do so could
result in misfire and potential injury to the
operator or others in the work area.
NOTE
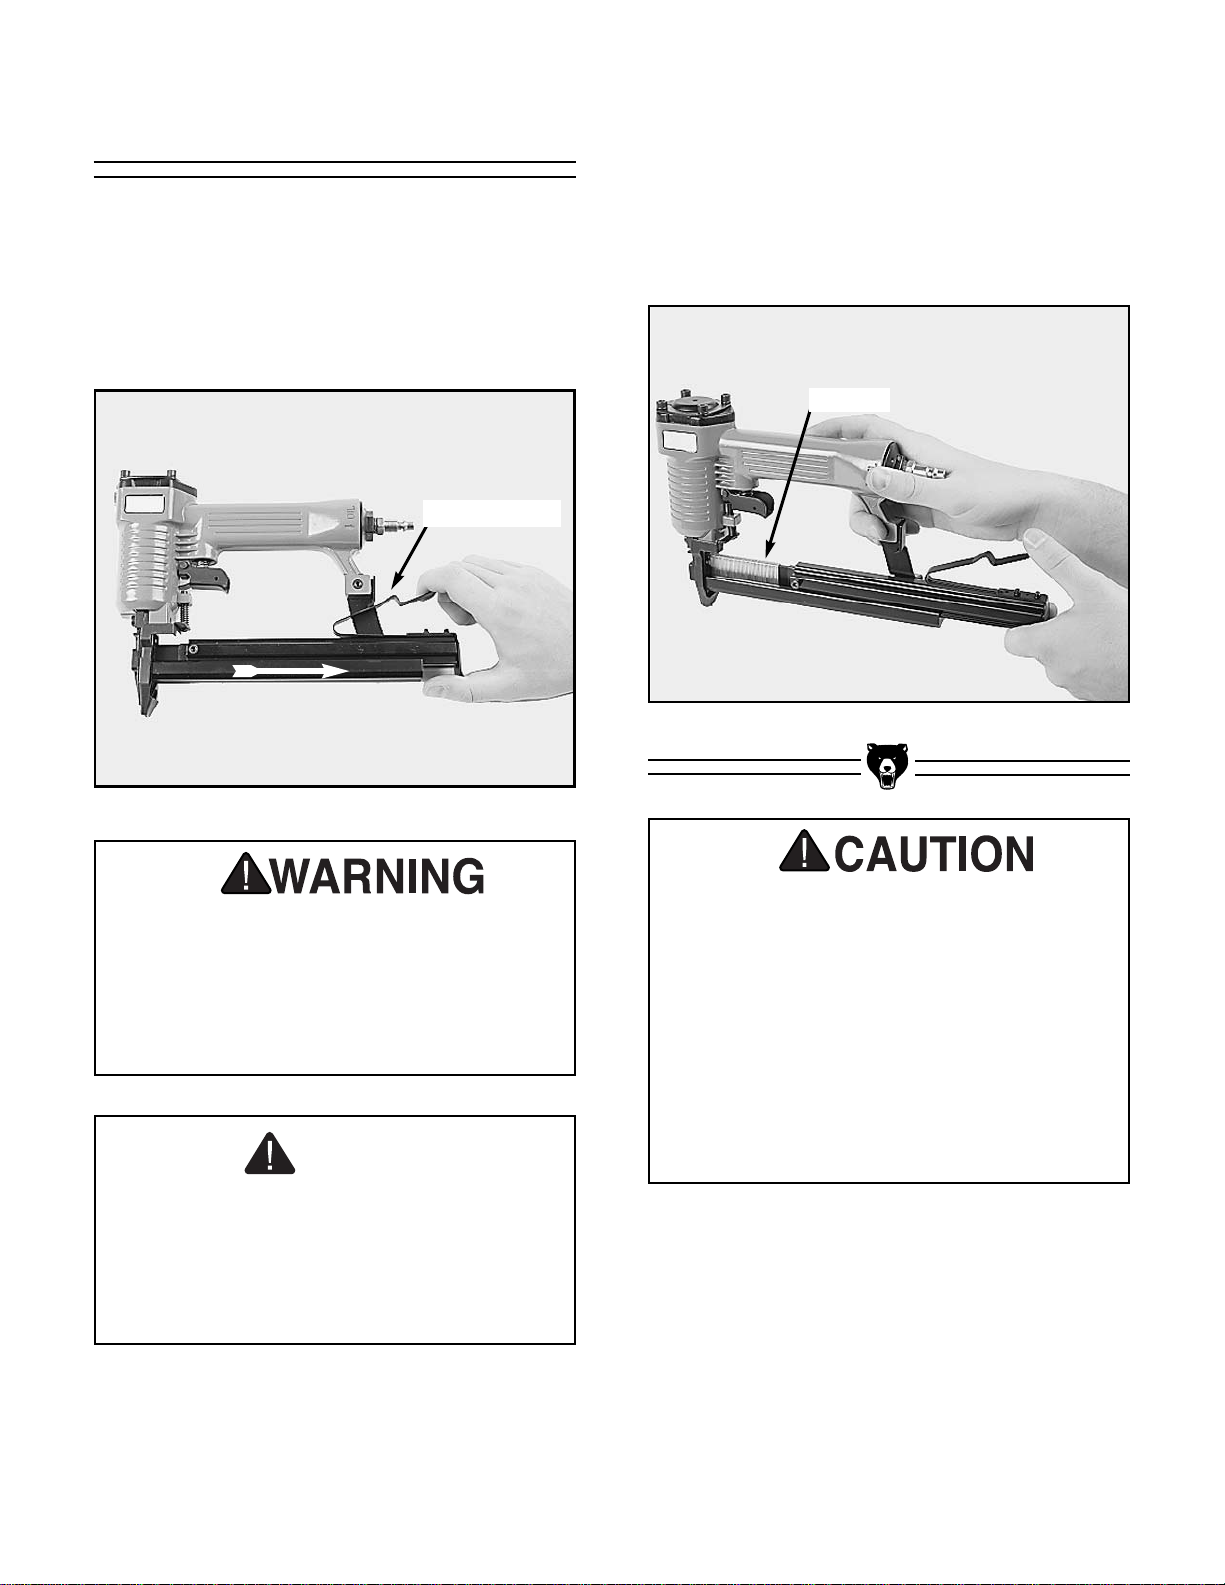
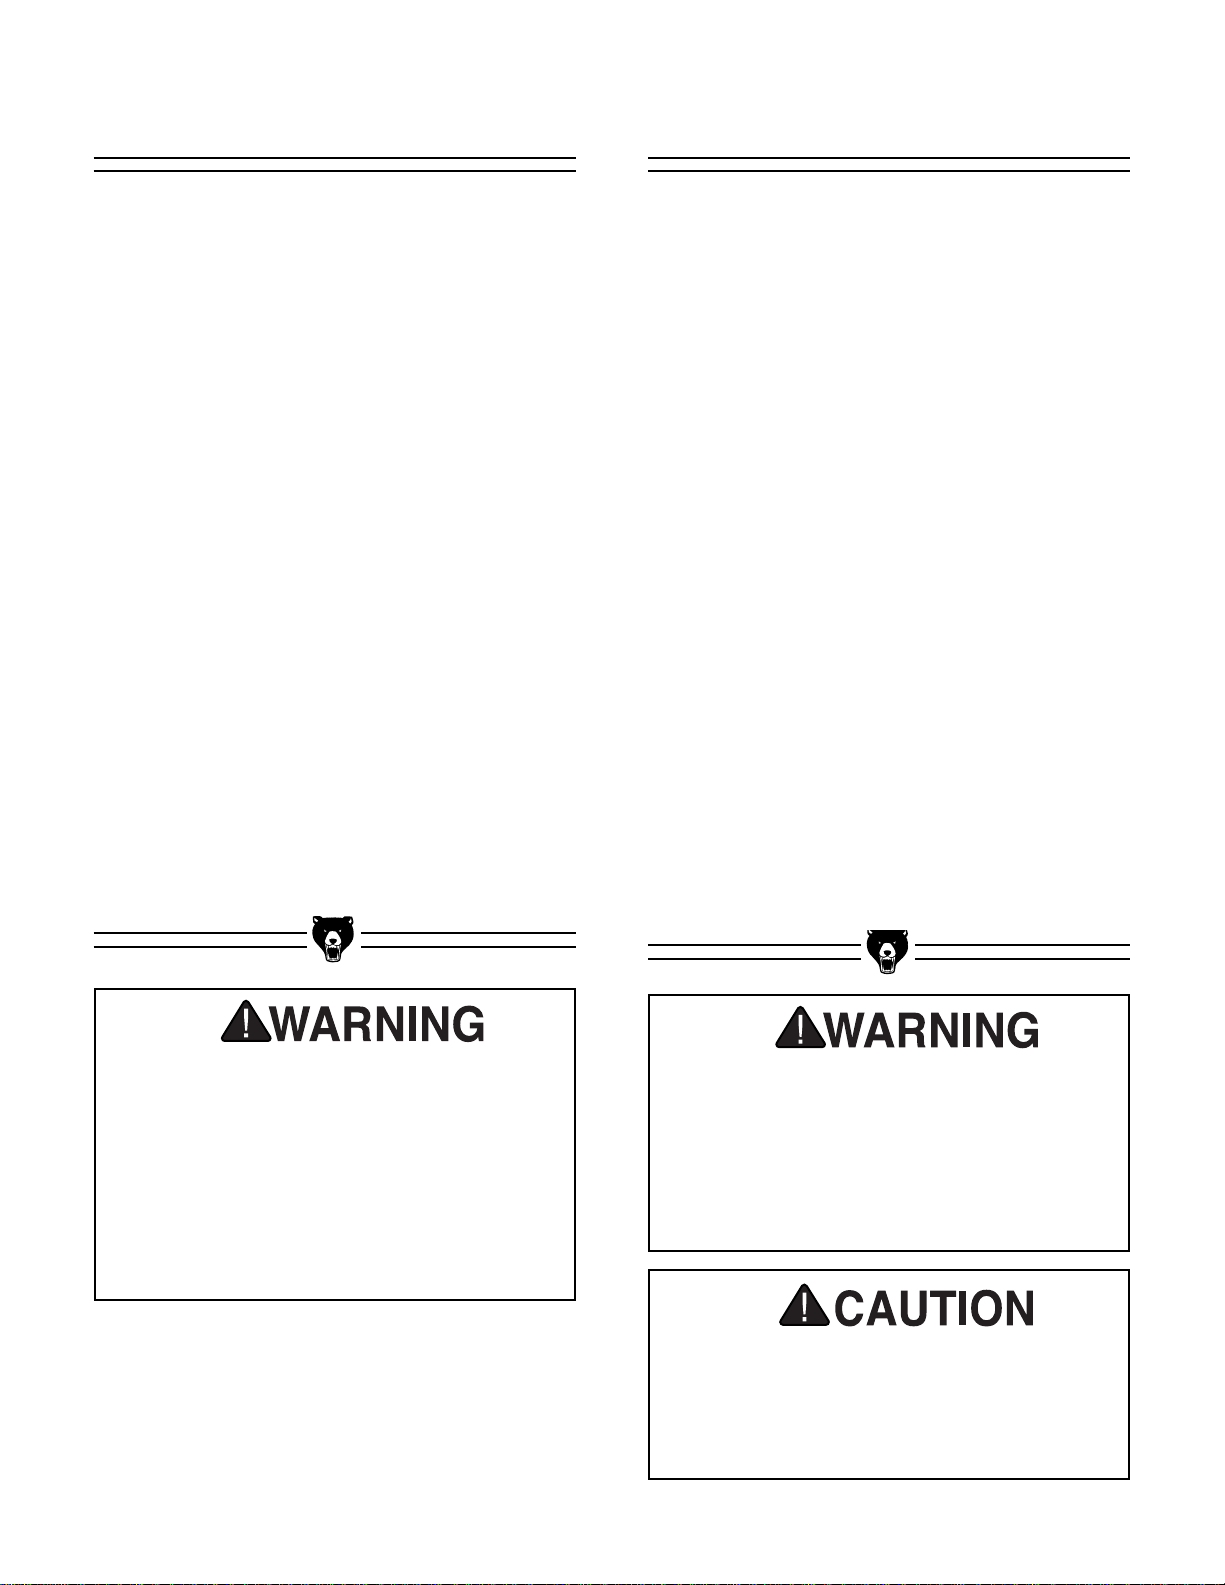
Figure 4. Staple placement.
Figure 3. Releasing the magazine.
G1847 / G1852 / G 1861 / G3811 Air Nailers/Staplers -7-
To load the stapler:
1. Disconnect the air hose if connected.
2. Press down on the magazine latch that holds
the magazine in place. Figure 3.
3. Slide the magazine out and place the staples
into the nailer. The staples will seat over the
guide in the magazine. Figure 4.
4. Close the magazine. The magazine latch will
click into place if the staples are loaded correctly.
Loading Staples
Staples
Magazine Latch
DO NOT load or service any pneumatic nailer or stapler without first disconnecting it
from its air source. Failure to do so could
result in a misfire and possible serious
injury to the operator or others in the work
area.
DO NOT operate these pneumatic guns
without wearing ANSI-approved goggles or
safety glasses. Be sure that you are not
wearing loose-fitting clothing or jewelry that
could become entangled with the trigger
and cause misfires. Serious personal injury
could result. Never attempt to disconnect
the safety mechanisms on any of these
guns. In addition to voiding their warranties,
doing so could result in serious injury to the
operator or others in the work area.
Be sure that staples are in good condition
before attempting to load them into the gun.
Rusty, corroded, damaged, or incorrectlysized staples should not be used. Loading
small, partial bands of staples can also jam
the gun.
NOTE
-8- G1847 / G1852 / G 1861 / G3811 Air Nailers/Staplers
Whenever changing fastener size or composition
of material being fastened, the nailer should be
tested to ensure that the air pressure is set correctly and the nailer is working properly. To test
fire the nailer:
1. Firmly press the safety nose down against
the sample piece.
2. Pull trigger.
3. Inspect your results. If the nail is set too far
into the workpiece, reduce the regulated air
pressure. If the nail is not set or protrudes
above the work surface, increase the air
pressure. However, do not exceed the maximum air pressure recommended for the nailer or the hose (90 p.s.i. for the nailer).
4. Disconnect the air hose from the nailer when
finished.
Do not hold the nailer so that exhausted air is
blown into your face or someone else’s face.
Exhausted air will cause any dust near the operating nailer to become airborne; use a respirator
if using the nailer in a dusty environment.
Test Fire
This air nailer or stapler must be regularly oiled
and operated with treated or clean air. It is a precision tool with close internal tolerances designed
for repetitious use. Wet and/or dirty air lowers
performance and prematurely destroys internal
parts.
To ensure that the best quality air enters your
nailer:
1. Use an in-line system to automatically oil, fil-
ter, and dry compressed air. Grizzly offers an
in-line regulator/filter/water-separator/lubricator (G2304). Please refer to our catalog for
price and ordering information.
2. Keep your air filter clean. Replace periodi-
cally.
3. Drain compressor’s air tank(s) frequently;
more often in high humidity. This prevents
corrosion in the tanks, as well as damage to
your nailer or stapler.
4. Keep air hoses as clean as possible inter-
nally. Inspect nipples and couplers for any
dirt and moisture. Blow out prior to connecting the nailer.
Air Quality
Under no circumstances should you exceed
the recommended pressure limits for the
pneumatic gun or the air hose. In addition to
endangering the safety of the operator and
others in the work area, over-pressurizing
can cause damage to the gun and the hose.
Evidence of operation at pressures exceeding maximum recommended levels could
also void the gun’s warranty.
DO NOT operate this gun without wearing
ANSI-approved goggles or safety glasses.
Quality hearing protection is also strongly
recommended. Failure to wear proper safety gear could result in serious personal
injury and long-term damage to your sight
and hearing.
Make your workshop child-safe. Ensure that
idle machines have their safety keys
removed, sharp blades are stored safely
out of reach, and that your shop is securely
locked when your shop is not in use.

G1847 / G1852 / G 1861 / G3811 Air Nailers/Staplers -9-
SECTION 4: MAINTENANCE
Maintenance requirements are minimal for these
nailers. The two most common problems with any
nailer are jamming and damaged drivers. In both
cases, the nailer will need to be partially disassembled to make the repairs.
The third most common problem is worn out Orings. Consult the Grizzly service staff for special
instructions if needed. Grizzly has replacement
parts and special O-ring rebuilding kits available
for these tools.
WARNING: All inspections and/or any maintenance is to be performed with the air supply
disconnected from the tool.
Inspect and maintain the following items
daily:
1. Check the air nailer for any loose bolts or air
leaks. Loose bolts should be retightened.
Make sure that all lock washers are in place.
Air leaks are an indication that internal seals
are worn or nicked and should be replaced.
2. Make sure the safety nose and trigger are
functioning properly. Repair as necessary.
Do not use the nailer with a broken or modified safety nose.
3. Inspect the automatic lubricating system if
applicable and fill as required. Inspect the inline air and water filters if applicable and
change or clean as necessary.
4. Inspect the compressor regulator and/or in-
line regulator to ensure that they are set correctly. Adjust accordingly.
General
CLEANING: Keep the nailer nose as clean as
possible. Dirt and debris have a tendency to work
their way into the nailer from the nose. Wipe off
any dirt that collects on the outside of the nailer
before connecting it to the air supply.
OILING: Keep the nailer oiled. Use special pneu-
matic tool oil to keep internal parts well lubricated. This tool oil is available through the Grizzly
Catalog (G2820).
If your air supply is not pre-lubricated, you must
add 2 drops of oil directly into the air nozzle at the
rear of the nailer each time the magazine is
loaded. NEVER USE any oil that will corrode the
rubber O-ring seals such as motor oil, detergent
oils, or oils that are used as solvents. Avoid overoiling.
IMPORTANT: When you first pick up an air activated nailer, ALWAYS ASSUME THAT IT IS
LOADED. Open the magazine and inspect for
any nails or staples before connecting it to the air
hose. Do not connect the air supply until you are
in position and ready to operate the nailer.
Cleaning & Oiling
DO NOT load or service any pneumatic nailer or stapler without first disconnecting it
from its air source. Failure to do so could
result in a misfire and possible injury.
Ensure that the safety mechanism is working properly each time you use this tool.
Under no circumstances should the safety
be modified or disabled. Serious injury
could occur.

-10- G1847 / G1852 / G 1861 / G3811 Air Nailers/Staplers
Aligning Nosepiece
The nosepiece may become misaligned if the
nailer has been dropped or otherwise mishandled. Misfiring and/or jamming will result if the
nosepiece is misaligned – but correcting the
problem is simple.
To align the nosepiece:
1. Remove the nosepiece cover.
2. Remove fasteners and visually inspect to
see if the nail slot in the nosepiece is aligned
with the nail slot in the magazine. If it is hard
to tell, put a nail in and see if it slides through
both slots easily.
3. If the nosepiece is misaligned, loosen the
cap screws that secure it to the magazine
and shift it until it lines up.
4. Re-assemble.
5. Do not put any fasteners into the magazine.
Connect the air hose.Check for any leaking
air. You will hear it hissing or feel it rushing
through the spaces.
6. If everything sounds normal, press the safe-
ty nose down on a piece of wood and pull the
trigger a couple of times. Air should be
exhausted normally each time.
Jamming
To repair a jam:
1. Remove any fasteners remaining in the gun.
2. Partially unscrew the cap screws that hold
the nosepiece cover in place. Slide the nose-
piece cover down and pull it off. Figure 5.
(G1861: Remove the safety tip before
removing the nosepiece cover.)
4. Remove any fasteners lodged in the nailer
nose.
5. Re-attach the nosepiece cover. Make sure it
lines up properly. G1861: Attach the safety
tip.
6. Load fasteners and connect the nailer to the
air supply.
7. Make sure the safety tip is functioning cor-
rectly and that it slides freely. Test fire into a
sample piece.
If jamming persists, make sure you are using fasteners within the size range of this nailer. If jamming is due to worn or broken parts, repair or
replace them before placing the nailer back into
service.
Jammed Brad
Nosepiece Cover
Cap Screw
Nosepiece
DO NOT attempt to repair or service this
gun without ensuring that all nails or staples have been removed and that the gun is
disconnected from its air source. Use
extreme care when testing after freeing
jams or after re-loading. Always wear
approved safety glasses or goggles and
quality hearing protection when operating
pneumatic guns or other woodworking
tools and machinery. Failure to do so could
result in serious personal injury.

Figure 6. Stapler driver assembly.
Figure 7. Brad driver assembly.
G1847 / G1852 / G 1861 / G3811 Air Nailers/Staplers -11-
Driver Replacement
To remove the driver:
1. Disconnect the nailer from the air supply and
remove any fasteners from the magazine.
2. Sequentially loosen the 4 cap screws secur-
ing the nailer cap to the nailer body.
3. G1847/52: Remove the 4 cap screws,
deflector, cap, spring, and HD valve piston.
Place them to one side. Figure 6. G1861:
Remove the 4 cap screws, deflector, cap,
gasket set, and spring. Figure 7.
4. G1861 only: Remove the cap insert by plac-
ing one of your small Allen wrenches into the
hole, wedging, and then pulling. The cap
insert will work its way out. Figure 9.
5. Reach into the air cylinder with a pair of nee-
dle nose pliers, grasp the tip of the main piston unit, and pull it out. The driver is connected to the main piston unit.
6. Inspect driver condition and repair or replace
as necessary.
7. Re-assemble the nailer.
8. Do not put any fasteners into the magazine.
Connect the air hose. Check for any leaking
air. You will hear it hissing or feel it rushing
through the spaces.
9. If everything sounds normal, press the safe-
ty nose down on a piece of wood and pull the
trigger a couple of times. Air should be
exhausted normally each time.
Cap Screws
Driver
HD Valve
Piston
Cap
Main Piston
Deflector
Cap Screws
Deflector
Cap
HD Valve
Piston
Gasket Set
Main Piston
Driver

-12- G1847 / G1852 / G 1861 / G3811 Air Nailers/Staplers
O-Rings
Since the nailer is disassembled, inspect the condition of the visible O-rings. If the O-rings show
signs of wear and tear, they should be replaced.
Inspect the surfaces where the O-rings seal for
any possible rough spots which will erode the
new O-rings. When replacing the O-rings, make
sure that there is no dirt or grit in the groove
where the O-rings seat. Do not stretch the Orings or nick them on any sharp edges or burrs. If
cleaning parts with a solvent, do not use a solvent
that may deteriorate the O-rings.
To re-assemble the nailer:
1. Before replacing O-rings, lubricate them with
a light grease that is non corrosive to rubber.
2. IMPORTANT: Carefully position the driver
tip into the plastic driver insert from the top of
the nailer. You may have to wiggle the driver
so the main piston seats into the cylinder.
G1861: the driver has a T-shaped cross sec-
tion and will only fit one way. If the driver is
not seating, do not force it. Remove the driver unit, rotate 180°, and try to reinstall it.
3. Replace the parts in the same order they
were removed. See the parts diagrams if
necessary. Tighten the cap screws sequen-
tially. If the cap screws are not tightened
evenly, the cap will not seat correctly, air
will leak, and the nailer will not function.
Ensure that the washers are installed
under the cap screw heads.
4. Check all bolts to make sure they are tight
and test the nailer to ensure that it works
properly.
5. Do not put any fasteners into the magazine.
Connect the air hose. Check for any leaking
air. You will hear it hissing or feel it rushing
through the spaces.
6. If everything sounds normal, press the safe-
ty nose down on a piece of wood and pull the
trigger a couple of times. Air should be
exhausted normally each time.
Failure to repair or replace damaged or
worn parts could result in poor performance
and additional damage to other components of the gun. Take the time to make
repairs immediately, rather than nursing
along a damaged gun. Doing so will ensure
maximum performance and dependability.
DO NOT attempt to repair or service this
gun without ensuring that all nails or staples have been removed and that the gun is
disconnected from its air source. Use
extreme care when testing after freeing
jams or after re-loading. Always wear
approved safety glasses or goggles and
quality hearing protection when operating
pneumatic guns or other woodworking
tools and machinery. Failure to do so could
result in serious personal injury.

G1847 / G1852 / G 1861 / G3811 Air Nailers/Staplers -13-
The following pages contain general specifications, a parts diagram and list, and index for your
Pneumatic Nailer.
If you need parts or help in assembling your nailer, or if you need operational information, we
encourage you to call our Service Department.
Our trained service technicians will be glad to
help you.
The specifications, drawings, and photographs
illustrated in this manual represent the Models
G1847 / G1852 / G1861 / G3811 as supplied
when the manual was prepared. But owing to
Grizzly’s policy of continuous improvement,
changes may occur at any time with no obligation
on the part of Grizzly. Should you receive a manual update, please insert it into the manual and
keep it for reference.
We have included some important safety measures that are essential to this tool’s operation.
While most safety measures are generally universal, Grizzly reminds you that each workshop is
different and safety rules should be considered
as they apply to your specific situation.
We recommend you keep a copy of our current
catalog for complete information regarding
Grizzly's warranty and return policy. If you need
additional technical information relating to this
machine, or if you need general assistance or
replacement parts, please contact the Service
Department listed in the General Information.
Additional information sources are necessary to
realize the full potential of of pneumatic nailers.
Trade journals, woodworking magazines, and
your local library are good places to start.
WARNING!
As with all power tools, there is danger associated with pneumatic nailers/staplers. Use the tool
with respect and caution to lessen the possibility
of mechanical damage or operator injury. If normal safety precautions are overlooked or ignored,
injury to the operator or others in the area is likely.
Your pneumatic nailer was specifically designed
for nailing or stapling operations. It must never be
modified and/or used for any application other
than that for which it was designed.
SECTION 5: CLOSURE
DO NOT MODIFY AND/OR USE THIS TOOL
FOR ANY OTHER PURPOSE. Modifications
or improper use of this tool will void the
warranty. If you are confused about any
aspect of this tool, DO NOT use it until you
have answered all your questions.
The nailers and staplers described in this
manual are powerful, professional-quality
tools, each designed and built to provide
outstanding results when used cautiously
and with respect. Like any tools of their
type, they can be inherently dangerous.
Careless use could result in serious injury.
Please do not attempt to use these tools
without familiarizing yourself with their
instructions for assembly, adjustment, and
safe operation. Failure to do so could result
in serious personal injury, as well as property damage and damage to the tool.

-14- G1847 / G1852 / G 1861 / G3811 Air Nailers/Staplers
G1847 PARTS DIAGRAM
416
304
303
302
419
427
214
423
215
207
208
422
209
421
424
425
201
202
203
417
204
205
418
206
415
414
408
413
411
210
410
409
406
120
121
112
122
113
301
116
117
216
217
118
218
429
119
123
403
407
402
401
405
404
101
102
103
104
105
106
107
108
109
110
111

G1847 / G1852 / G 1861 / G3811 Air Nailers/Staplers -15-
REF PART # DESCRIPTIONREF PART # DESCRIPTION
101 PSB15M CAP SCREW M5 - 0.8 x 20
102 PLW01M LOCK WASHER 5mm
103 P1847103 DEFLECTOR
104 P1847104 SPRING
105 P1847105 SEAL
106 P1847106 CAP
107 P1847107 O-RING
108 P1847108 O-RING
109 P1847109 HD VALVE PISTON
110 P1847110 O-RING
111 P1847111 O-RING
112 P1847112 COLLAR
113 P1847113 O-RING
116 P1847116 MAIN PISTON UNIT
117 P1847117 O-RING
118 P1847118 CYLINDER
119 P1847119 BUMPER
120 P1847120 O-RING
121 P1847121 TUBE
122 P1847122 O-RING
123 P1847123 JOINT GUIDE
201 P1847201 SEAL
202 P1847202 TRIGGER VALVE HEAD
203 P1847203 TRIGGER VALVE STEM
204 P1847204 O-RING
205 P1847205 O-RING
206 P1847206 TRIGGER VALVE GUIDE
207 PEC01M E-CLIP 3mm
208 P1847208 TRIGGER
209 P1847209 STEPPED PIN
210 P1847210 SPRING
214 PRP11M ROLL PIN 2.5 x 16mm
215 P1847215 SAFETY LEVER
216 P1847216 SHAFT
217 P1847217 SPRING
218 PEC02M E-CLIP 4mm
301 P1847301 NAILER BODY
302 P1847302 O-RING
303 P1847303 NIPPLE
304 G2308 AIR FITTING
401 PSB15M CAP SCREW M5 - 0.8 x 20
402 PLW01M LOCK WASHER 5mm
403 P1847403 DRIVER GUIDE COVER B
404 PSB17M CAP SCREW M4 - 0.7 x 10
405 P1847405 NOSEPIECE COVER
406 P1847406 NOSEPIECE
407 PSB41M CAP SCREW M4 - 0.7 x 14
408 P1847408 MAGAZINE UNIT A
409 P1847409 STOPPER
410 PSB18M CAP SCREW M4 - 0.7 x 8
411 P1847411 MAGAZINE UNIT B
413 PSB18M CAP SCREW M4 - 0.7 x 8
414 P1847414 PUSHER
415 P1847415 PUSHER PIN
416 P1847416 SPRING
417 P1847417 REAR PLATE
418 P1847418 MAGAZINE LATCH
419 PSB16M CAP SCREW M4 - 0.7 x 16
421 P1847421 STOPPER
422 P1847422 FIXED PLATE
423 PSB18M CAP SCREW M4 - 0.7 x 8
424 PLW02M LOCK WASHER 4mm
425 PSB17M CAP SCREW M4 - 0.7 x 10
427 PLN01M LOCK NUT M4 - 0.7
429 P1847429 SAFETY
430 P1847430 O-RING KIT

-16- G1847 / G1852 / G 1861 / G3811 Air Nailers/Staplers
G1852 PARTS DIAGRAM
421
414
416
415
304
120
303
121
302
423
122
424
419
427
214
420
215
207
422
208
209
201
202
203
204
216
205
217
206
218
210
409
425
413
412
411
410
408
418
417
426
404
301
405
403
119
110
106
117
107
108
118
109
112
101
113
102
103
116
104
105
123
111
402
401
407
406

G1847 / G1852 / G 1861 / G3811 Air Nailers/Staplers -17-
REF PART # DESCRIPTIONREF PART # DESCRIPTION
101 PSB15M CAP SCREW M5 - 0.8 x 20
102 PLW01M LOCK WASHER 5mm
103 P1847103 DEFLECTOR
104 P1847104 SPRING
105 P1847105 SEAL
106 P1847106 CAP
107 P1847107 O-RING
108 P1847108 O-RING
109 P1847109 HD VALVE PISTON
110 P1847110 O-RING
111 P1847111 O-RING
112 P1852112 COLLAR
113 P1847113 O-RING
116 P1852114 MAIN PISTON UNIT
117 P1847117 O-RING
118 P1847118 CYLINDER
119 P1847119 BUMPER
120 P1847120 O-RING
121 P1847121 TUBE
122 P1847122 O-RING
123 P1847123 JOINT GUIDE
201 P1847201 SEAL
202 P1847202 TRIGGER VALVE HEAD
203 P1847203 TRIGGER VALVE STEM
204 P1847204 O-RING
205 P1847205 O-RING
206 P1847206 TRIGGER VALVE GUIDE
207 PEC01M E-CLIP 3mm
208 P1847208 TRIGGER
209 P1847209 STEPPED PIN
210 P1847210 SPRING
214 PRP11M ROLL PIN 2.5 x 16mm
215 P1847215 SAFETY LEVER
216 P1847216 SHAFT
217 P1847217 SPRING
218 PEC02M E-CLIP 4mm
301 P1847301 NAILER BODY
302 P1847302 O-RING
303 P1847303 NIPPLE
304 G2308 AIR FITTING
401 PSB15M CAP SCREW M5 - 0.8 x 20
402 PLW01M LOCK WASHER 5mm
403 P1847403 DRIVER GUIDE COVER B
404 P1847404 NOSEPIECE
405 PSB41M CAP SCREW M4 - 0.7 x 14
406 PSB17M CAP SCREW M4 - 0.7 x 10
407 P1852407 NOSEPIECE COVER
408 P1852408 STOPPER
409 P1852409 MAGAZINE UNIT A
410 P1852410 STOPPER
411 PLW02M LOCK WASHER 4 mm
412 PSB17M CAP SCREW M4 - 0.7 x 10
413 P1852413 MAGAZINE UNIT B
414 P1852414 REAR PLATE
415 PLW02M LOCK WASHER 4mm
416 PSB18M CAP SCREW M4 - 0.7 x 8
417 P1852417 PUSHER
418 P1852418 SPRING
419 PSB18M CAP SCREW M4 - 0.7 x 8
420 P1852420 FIXED PLATE
421 P1852421 MAGAZINE LATCH
422 P1852422 STOPPER
423 PSB23M CAP SCREW M4 - 0.7 x 12
424 PLW02M LOCK WASHER 4mm
425 P1852425 SAFETY
426 P1852426 FLAT BAR
427 PLN01M LOCK NUT M4 - 0.7
428 P1847430 O-RING KIT

-18- G1847 / G1852 / G 1861 / G3811 Air Nailers/Staplers
A02
G1861 PARTS DIAGRAM
B54
B08
B53
B54
B07
B06
B52
B03
B05
A01
C52
A12
C57
A55
A11
A57
C02
C55
C01
A10
C03
C53
A57
C07
A09
A56
C54
B56
C06
B55
B02
B01
B51
C04
C56
C51
B09
B04
C05
C57
C52
A51
A59
A58
A16
A52
A13
A14
A54
A08
A03
A07
A55
A04
A54
A17
A06
A53
A05

REF PART # DESCRIPTIONREF PART # DESCRIPTION
G1847 / G1852 / G 1861 / G3811 Air Nailers/Staplers -19-
A01 P1861A01 NAILER BODY
A02 G2308 AIR FITTING
A03 P1861A03 CYLINDER
A04 P1861A04 BUMPER
A05 P1861A05 MAIN PISTON UNIT
A06 P1861A06 GASKET SET
A07 P1861A07 SPRING
A08 P1861A08 HD VALVE PISTON
A09 P1861A09 COPPER COVER
A10 P1861A10 SHAFT, VALVE
A11 P1861A11 SPRING
A12 P1861A12 COLLAR
A13 P1861A13 CAP
A14 P1861A14 INSERT OF CAP
A16 P1861A16 DEFLECTOR
A17 P1861A17 JOINT GUIDE
A51 P1861A51 O-RING
A52 P1861A52 O-RING
A53 P1861A53 O-RING
A54 P1861A54 O-RING
A55 P1861A55 O-RING
A56 P1861A56 O-RING
A57 P1861A57 O-RING
A58 PSB15M CAP SCREW M5 - 0.8 x 20
A59 PLW01M LOCK WASHER 5mm
A60 P1861A60 O-RING KIT
B01 P1861B01 NOSEPIECE
B02 P1861B02 MAGAZINE UNIT A
B03 P1861B03 MAGAZINE UNIT B
B04 P1861B04 PUSHER
B05 P1861B05 SPRING
B06 P1861B06 REAR PLATE
B07 P1861B07 FIXED PLATE
B08 P1861B08 MAGAZINE LATCH
B09 P1861B09 FLAT BAR
B51 PSB16M CAP SCREW M4 - 0.7 x 16
B52 PSB17M CAP SCREW M4 - 0.7 x 10
B53 PSB18M CAP SCREW M4 - 0.7 x 8
B54 PLW02M LOCK WASHER 4mm
B55 PSS22M SETSCREW M4 - 0.7 x 12
B56 P1861B56 SPECIAL BOLT
C01 P1861C01 TRIGGER
C02 P1861C02 SAFETY LEVER
C03 PRP02M ROLL PIN 3 x 16
C04 P1861C04 DRIVER GUIDE COVER B
C05 P1861C05 NOSEPIECE COVER
C06 P1861C06 SAFETY
C07 P1861C07 SPACER SLEEVE
C51 PSB07M CAP SCREW M6 - 1.0 x 30
C52 PSB20M CAP SCREW M5 - 0.8 x 14
C53 PSB21M CAP SCREW M4 - 0.7 x 30
C54 PSB22M CAP SCREW M4 - 0.7 x 35
C55 PLN01M LOCK NUT M4 - 0.7
C56 PLW03M LOCK WASHER 6mm
C57 PLW01M LOCK WASHER 5mm

-20- G1847 / G1852 / G 1861 / G3811 Air Nailers/Staplers
G3811 PARTS DIAGRAM
B51
A02
A01
C02
C01
B04
C03
C53
B03
B10
B53
C54
C06
B05
B08
B02
B09
B05
C57
B01
C61
B52
C08
C55
B51
C60
B07
C59
B06
C56
A53
A12
C07
A55
A55
A05
A11
A57
A57
A51
A10
A52
A57
A09
A03
A56
A56
C04
C58
A04
C05
C52
C51
A17
A59
A58
A16
A13
A14
A54
A08
A07
A55
A54
A54
A06

G1847 / G1852 / G 1861 / G3811 Air Nailers/Staplers -21-
REF PART # DESCRIPTION
B04 P3811B04 FIXED PIN
B05 P3811B05 SPRING STOPPER
B06 P3811B06 PUSHER
B07 P3811B07 FIXED PIN
B08 P3811B08 PUSHER SPRING
B09 P3811B09 FIXED PIN
B10 P3811B10 STOPPER
B51 P3811B51 E-CLIP
B52 PSB17M CAP SCREW M4 - 0.7 x 10
B53 P3811B53 HEX NUT
C01 P1861C01 TRIGGER
C02 P1861C02 SAFETY LEVER
C03 PRP02M ROLL PIN 3 x 16
C04 P3811C04 DRIVER GUIDE COVER B
C05 P3811C05 DRIVER GUIDE COVER A
C06 P3811C06 SAFETY
C07 P1861C07 SPACER SLEEVE
C08 P3811C08 ATTACHING PLATE
C51 PSB07M CAP SCREW M6 - 1.0 x 30
C52 PSB20M CAP SCREW M5 - 0.8 x 14
C53 PSB21M CAP SCREW M4 - 0.7 x 30
C54 PSB22M CAP SCREW M4 - 0.7 x 35
C55 P3811C55 CAP SCREW
C56 PLN01M LOCK NUT M4 - 0.7
C57 P3811C57 LOCK NUT
C58 PLW03M LOCK WASHER 6mm
C59 P3811C59 CAP SCREW
C60 P3811C60 LOCK WASHER
C61 P3811C61 LOCK WASHER
REF PART # DESCRIPTION
A01 P3811A01 NAILER BODY
A02 G2308 AIR FITTING
A03 P1861A03 CYLINDER
A04 P1861A04 BUMPER
A05 P3811A05 MAIN PISTON UNIT
A06 P1861A06 GASKET SET
A07 P1861A07 SPRING
A08 P1861A08 HD VALVE PISTON
A09 P1861A09 COPPER COVER
A10 P1861A10 SHAFT, VALVE
A11 P1861A11 SPRING
A12 P1861A12 COLLAR
A13 P1861A13 CAP
A14 P1861A14 INSERT OF CAP
A16 P1861A16 DEFLECTOR
A17 P3811A17 JOINT GUIDE
A51 P1861A51 O-RING
A52 P1861A52 O-RING
A53 P1861A53 O-RING
A54 P1861A54 O-RING
A55 P1861A55 O-RING
A56 P1861A56 O-RING
A57 P1861A57 O-RING
A58 PSB15M CAP SCREW M5 - 0.8 x 20
A59 PLW01M LOCK WASHER 5mm
A60 P1861A60 O-RING KIT
B01 P3811B01 DRIVER GUIDE
B02 P3811B02 COVER ASSEMBLY
B03 P3811B03 PLASTIC COVER

-22- G1847 / G1852 / G 1861 / G3811 Air Nailers/Staplers
MACHINE DATA
GRIZZLY MODEL G1847/G1852/G1861/G3811 PNEUMATIC NAILERS/STAPLERS
Operating Air Pressure: 65 to 90 P.S.I.
Fastener Length:
G1847 ........................................................................................................
1
⁄2" to 7⁄8" Crowned Staples
G1852........................................................................................................................
3
⁄8" to 13⁄16" Brads
G1861........................................................................................................................
5
⁄8" to 19⁄16" Brads
G3811......................................................................................................
7
⁄8" to 13⁄16" Crowned Staples
Gauge: ......................................................................................................................................18 Ga.
Magazine Capacity: ......................................................................................................................100
Construction: ............................................................................Cast Aluminum and Hardened Steel
Coupling System: ..................................................................................................................
1
⁄4" NPT
Recommended Lubricating Oil:..........................................................................Pneumatic Tool Oil
Nailer Weight:
G1847......................................................................................................................................3.10 lbs.
G1852......................................................................................................................................3.15 lbs.
G1861......................................................................................................................................4.20 lbs.
G3811......................................................................................................................................3.80 lbs.
Parts and Accessories:
A rebuilding kit is available from Grizzly and includes all O-rings. The rebuilding kit and other parts
can be individually ordered through our Service Department.
Grizzly also carries air hose,in-line regulator/filter/water-separator/lubricator, quick connect couplers
and a complete line of fasteners. Please refer to a current Grizzly catalog for price and ordering information.
Specifications, while accurate, are subject to change without notice.

G1847 / G1852 / G 1861 / G3811 Air Nailers/Staplers -23-
TROUBLESHOOTING GUIDE
Symptom Cause Solution
Air leaking at trigger valve area. O-Rings in trigger valve housing are Replace and/or re-lubricate trigger
damaged or dry. system O-Rings.
Air leaking between body and nose. 1. O-Rings are damaged or dry. 1. Replace and/or re-lubricate O-Rings.
2. Loose screws. 2. Loosen all screws first, and then tighten
sequentially using
1
/2 turns.
3. Bumper is damaged. 3. Replace bumper.
Air leaking between body and cap. 1. O-Rings are damaged or dry. 1. Replace and/or re-lubricate O-Rings.
2. Loose screws. 2. Loosen all screws first, and then tighten
sequentially using
1
/2 turns.
Nailer won’t shoot even when loaded 1. Bumper is damaged. 1. Replace bumper
and under pressure. 2. Nose piece is dirty. 2. Clean nose piece.
3. Dirt or damage prevents the 3. Clean and inspect for damage.
fasteners or driver from moving
freely.
4. Damaged HD valve spring. 4. Replace spring.
5. Inadequate air pressure. 5. Adjust air pressure.
6. O-Rings are damaged or dry. 6. Replace and/or re-lubricate O-Rings.
7. Trigger is damaged. 7. Inspect trigger. Replace if necessary.
8. Air leaks. 8. Replace and/or re-lubricate O-Rings and/or
check for loose screws.
9. Nosepiece is misaligned. 9. Align nosepiece.
Nails don’t set properly and/or nailer 1. Nailer is inadequately lubricated. 1. Disassemble and re-lubricate.
does not recover quickly. 2. HD valve spring is broken. 2. Replace spring.
3. Exhaust port is blocked. 3. Clean exhaust port.
Jamming. 1. Driver guide is worn. 1. Replace guide.
2. Fasteners are incorrect size. 2. Use recommended fasteners.
3. Fasteners are bent. 3. Use straight fasteners.
4. Magazine or nose screws are 4. Tighten screws sequentially.
loose.
5. Driver is damaged. 5. Replace or recondition driver.
6. Nosepiece misaligned. 6. Align nosepiece.
Brads or staples are driven too far. 1. Air pressure is set too high. 1. Check air pressure.
2. Bumper is worn or broken. 2. Replace bumper.
O-Rings have been replaced and/or 1. Screws were not tightened 1. Loosen all screws first, and then tighten
re-lubricated, but air still leaks out. sequentially. sequentially using
1
⁄2 turns.
2. Not enough grease was used on 2. Remove O-Rings and re-lubricate.
O-Rings.
3. Wrong type of grease was used 3. Remove O-Rings and replace with new ones
that damaged O-Rings. Use grease that is safe for rubber.
4. Nailer lubrication oil is not 4. Completely disassemble nailer and clean
rubber-safe. Replace all O-Rings. Use rubber-safe
grease for new O-Rings and only use
Pneumatic Tool Oil in the future.

-24- G1847 / G1852 / G 1861 / G3811 Air Nailers/Staplers
Grizzly Industrial, Inc. warrants every product it sells for a period of 1 year to the original purchaser from
the date of purchase. This warranty does not apply to defects due directly or indirectly to misuse, abuse,
negligence, accidents, repairs or alterations or lack of maintenance. This is Grizzly’s sole written warranty
and any and all warranties that may be implied by law, including any merchantability or fitness, for any particular purpose, are hereby limited to the duration of this written warranty. We do not warrant or represent
that the merchandise complies with the provisions of any law or acts unless the manufacturer so warrants.
In no event shall Grizzly’s liability under this warranty exceed the purchase price paid for the product and
any legal actions brought against Grizzly shall be tried in the State of Washington, County of Whatcom.
We shall in no event be liable for death, injuries to persons or property or for incidental, contingent, special, or consequential damages arising from the use of our products.
To take advantage of this warranty, contact us by mail or phone and give us all the details. We will then
issue you a “Return Number’’, which must be clearly posted on the outside as well as the inside of the carton. We will not accept any item back without this number. Proof of purchase must accompany the merchandise.
The manufacturers reserve the right to change specifications at any time because they constantly strive to
achieve better quality equipment. We make every effort to ensure that our products meet high quality and
durability standards and we hope you never need to use this warranty.
Please feel free to write or call us if you have any questions about the machine or the manual.
Thank you again for your business and continued support. We hope to serve you again soon.
WARRANTY AND RETURNS

10. Which benchtop tools do you own? Check all that apply.
___1" x 42" Belt Sander ___6" - 8" Grinder
___5" - 8" Drill Press ___Mini Lathe
___8" Table Saw ___10" - 12" Thickness Planer
___8" - 10" Bandsaw ___Scroll Saw
___Disc/Belt Sander ___Spindle/Belt Sander
___Mini Jointer
___Other__________________________________________________
11. How many of the machines checked above are Grizzly? ____________
12. Which portable/hand held power tools do you own? Check all that apply.
___Belt Sander ___Orbital Sander
___Biscuit Joiner ___Palm Sander
___Circular Saw ___Portable Planer
___Detail Sander ___Saber Saw
___Drill/Driver ___Reciprocating Saw
___Miter Saw ___Router
___Other__________________________________________________
13. What machines/supplies would you like Grizzly Industrial to carry?
___12" Table Saw ___Horizontal Boring Machine
___24" Planer ___Panel Saw
___Combination Planer/Jointer ___Radial Arm Saw
___Paint & Finishing Supplies ___Lumber
___Contractor’s Supplies ___Brass Hardware
___Other__________________________________________________
14. What new accessories would you like Grizzly Industrial to carry?
___Builders Hardware ___Hand Tools
___Fasteners ___Wood Components
___Other__________________________________________________
15. What other companies do you purchase your tools and supplies?
__________________________________________________________
__________________________________________________________
16. Do you think your purchase represents good value?
___Yes ___No
17. Would you recommend Grizzly Industrial to a friend?
___Yes ___No
18. Would you allow us to use your name as a reference for Grizzly customers
in your area? Note: We never use names more than three times.
___Yes ___No
19. Comments:_________________________________________________
__________________________________________________________
____________________________________________________________
____________________________________________________________
____________________________________________________________
____________________________________________________
1. How did you learn about us?
___Advertisement ___Friend
___Catalog ___Card Deck
___World Wide Web
___Other__________________________________________________
2. Which of the following magazines do you subscribe to.
___American Woodworker ___Practical Homeowner
___Cabinetmaker ___Shop Notes
___Family Handyman ___Today’s Homeowner
___Fine Homebuilding ___WOOD
___Fine Woodworking ___Wooden Boat
___Home Handyman ___Woodshop News
___Journal of Light Construction ___Woodsmith
___Old House Journal ___Woodwork
___Popular Mechanics ___Woodworker
___Popular Science ___Woodworker’s Journal
___Popular Woodworking ___Workbench
___Other__________________________________________________
3. Which of the following woodworking/remodeling shows do you watch?
___Backyard America ___The New Yankee Workshop
___Home Time ___This Old House
___The American Woodworker ___Woodwright’s Shop
___Other__________________________________________________
4. What is your annual household income?
___$20,000-$29,999 ___$60,000-$69,999
___$30,000-$39,999 ___$70,000-$79,999
___$40,000-$49,999 ___$80,000-$89,999
___$50,000-$59,999 ___$90,000 +
5. What is your age group?
___20-29 ___50-59
___30-39 ___60-69
___40-49 ___70 +
6. How long have you been a woodworker?
___0 - 2 Years ___8 - 20 Years
___2 - 8 Years ___20+ Years
7. How would you rank your woodworking skills?
___Simple ___Advanced
___Intermediate ___Master Craftsman
8. What stationary woodworking tools do you own? Check all that apply.
___Air Compressor ___Panel Saw
___Band Saw ___Planer
___Drill Press ___Power Feeder
___Drum Sander ___Radial Arm Saw
___Dust Collector ___Shaper
___Horizontal Boring Machine ___Spindle Sander
___Jointer ___Table Saw
___Lathe ___Vacuum Veneer Press
___Mortiser ___Wide Belt Sander
___Other__________________________________________________
9. How many of your woodworking machines are Grizzly? _____________
Name ________________________________________________________Phone Number_________________
Street ____________________________________________________________________________________
City ______________________________________________________________State________Zip_________
MODEL # ______________________________Order #______________________________________________
The following information is given on a voluntary basis. It will be used for marketing purposes to help us develop better products and services. Of
course, all information is strictly confidential.
WARRANTY CARD
Cut along dotted line

FOLD ALONG DOTTED LINE
FOLD ALONG DOTTED LINE
GRIZZLY INDUSTRIAL, INC.
P.O. BOX 2069
BELLINGHAM, WA 98227-2069
Place
Stamp
Here
TAPE ALONG EDGES--PLEASE DO NOT STAPLE
Name_______________________________
Street_______________________________
City______________State______Zip______
Send a Grizzly Catalog to a friend:
 Loading...