

Page 1
0307 Form # ES-351-08
Part #60236
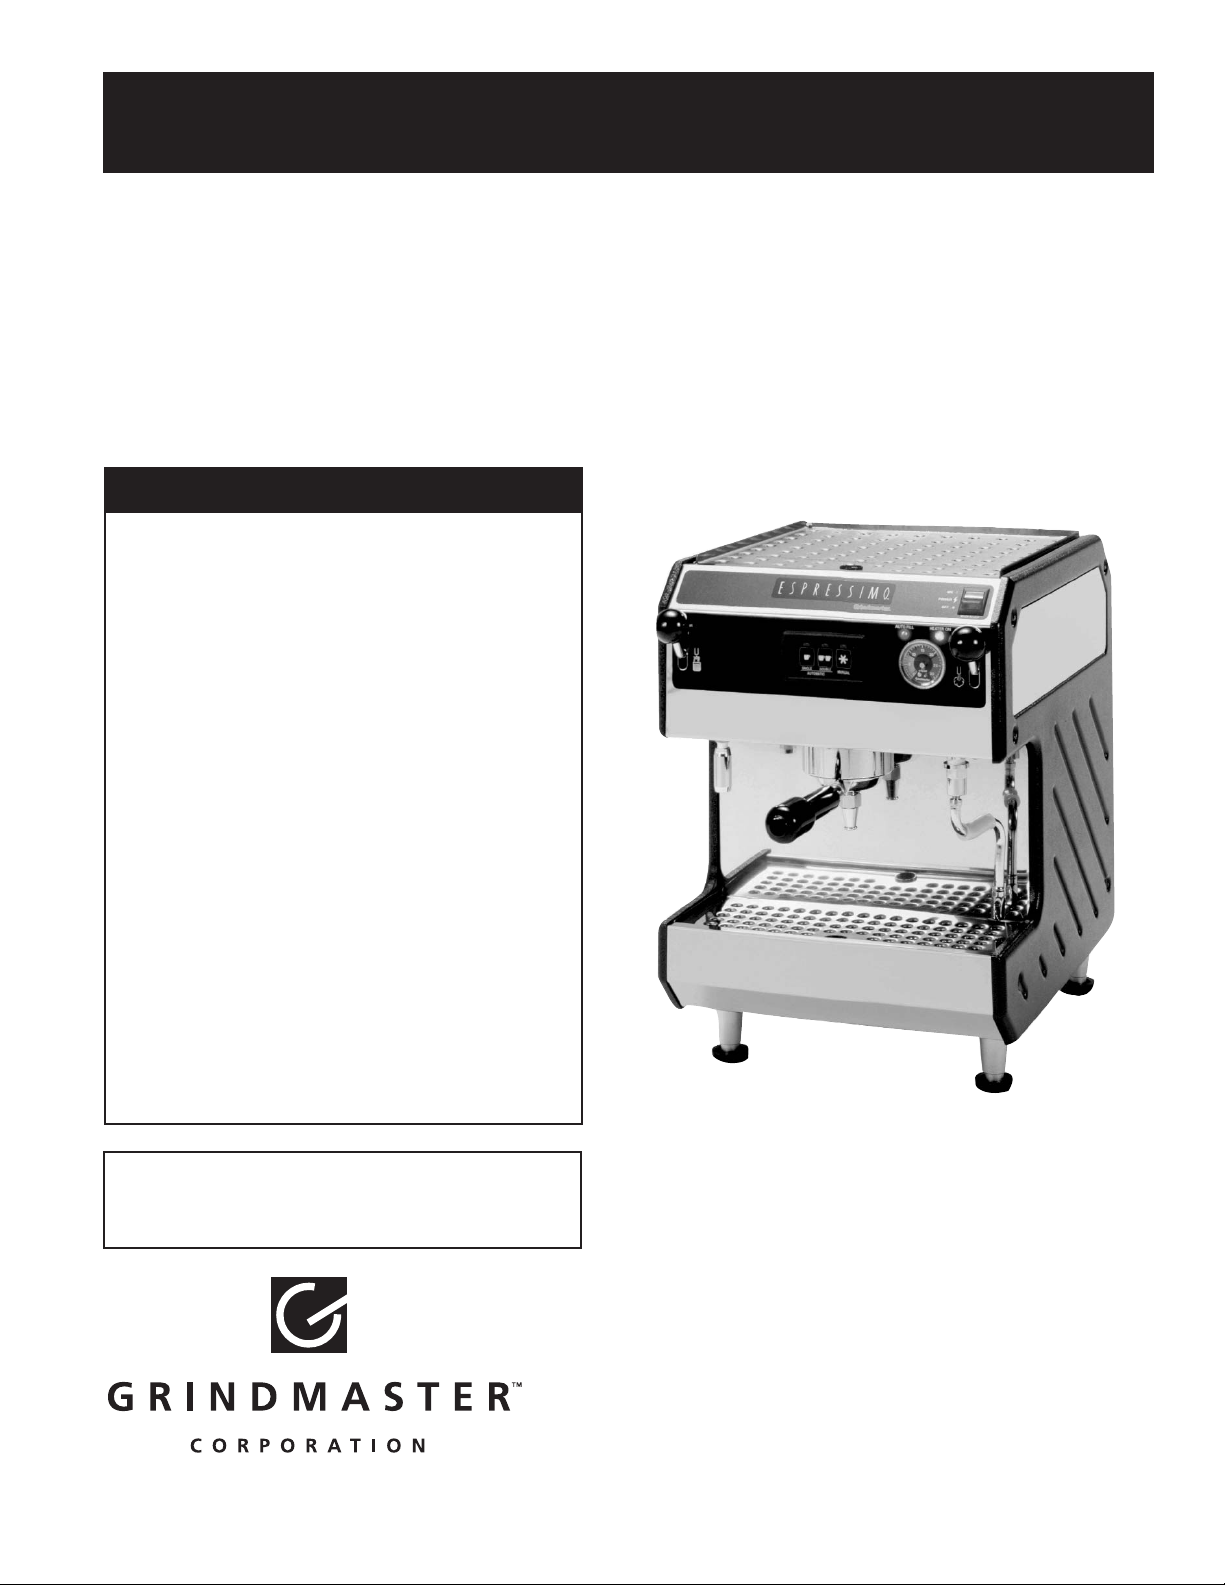
Espressimo
TM
Espresso Cappuccino Machines
Operation & Installation Manual
For
Models 2450 & 1750
*Also includes information & instructions for Q & E models.
Prior authorization must be obtained from
Grindmaster Corporation for all
warranty claims.
© Grindmaster Corporation™, 1994
PRINTED IN USA
Grindmaster Corporation™
4003 Collins Lane
Louisville, Kentucky 40245 USA
(502) 425-4776
(800) 695-4500 (USA and Canada only)
(800) 568-5715 (technical service only)
FAX: (502) 425-4664
www.grindmaster.com
TABLE OF CONTENTS
Warning Labels.......................................................2
Initial Preparation....................................................3
Understanding basic concepts about
brewing espresso......................................4
External machine parts 2450 & 1750......................5
Accessories............................................................6
Installation..............................................................6
Programming Instructions.......................................7
How to Brew Espresso............................................8
How to Froth Milk....................................................9
How to Steam Milk..................................................9
Care and Cleaning................................................10
Adjustments..........................................................12
Coffee Taste and Appearance Guide....................13
Troubleshooting Guide .........................................14
Plumbing Guide................................................17
Wiring Diagrams............................................18 - 19
Exploded Views 2450.....................................20 - 22
Exploded Views 1750......................................23 - 25
Page 2

Page 3
Espressimo 2450 & 1750 Espresso Cappuccino Machines Page 2
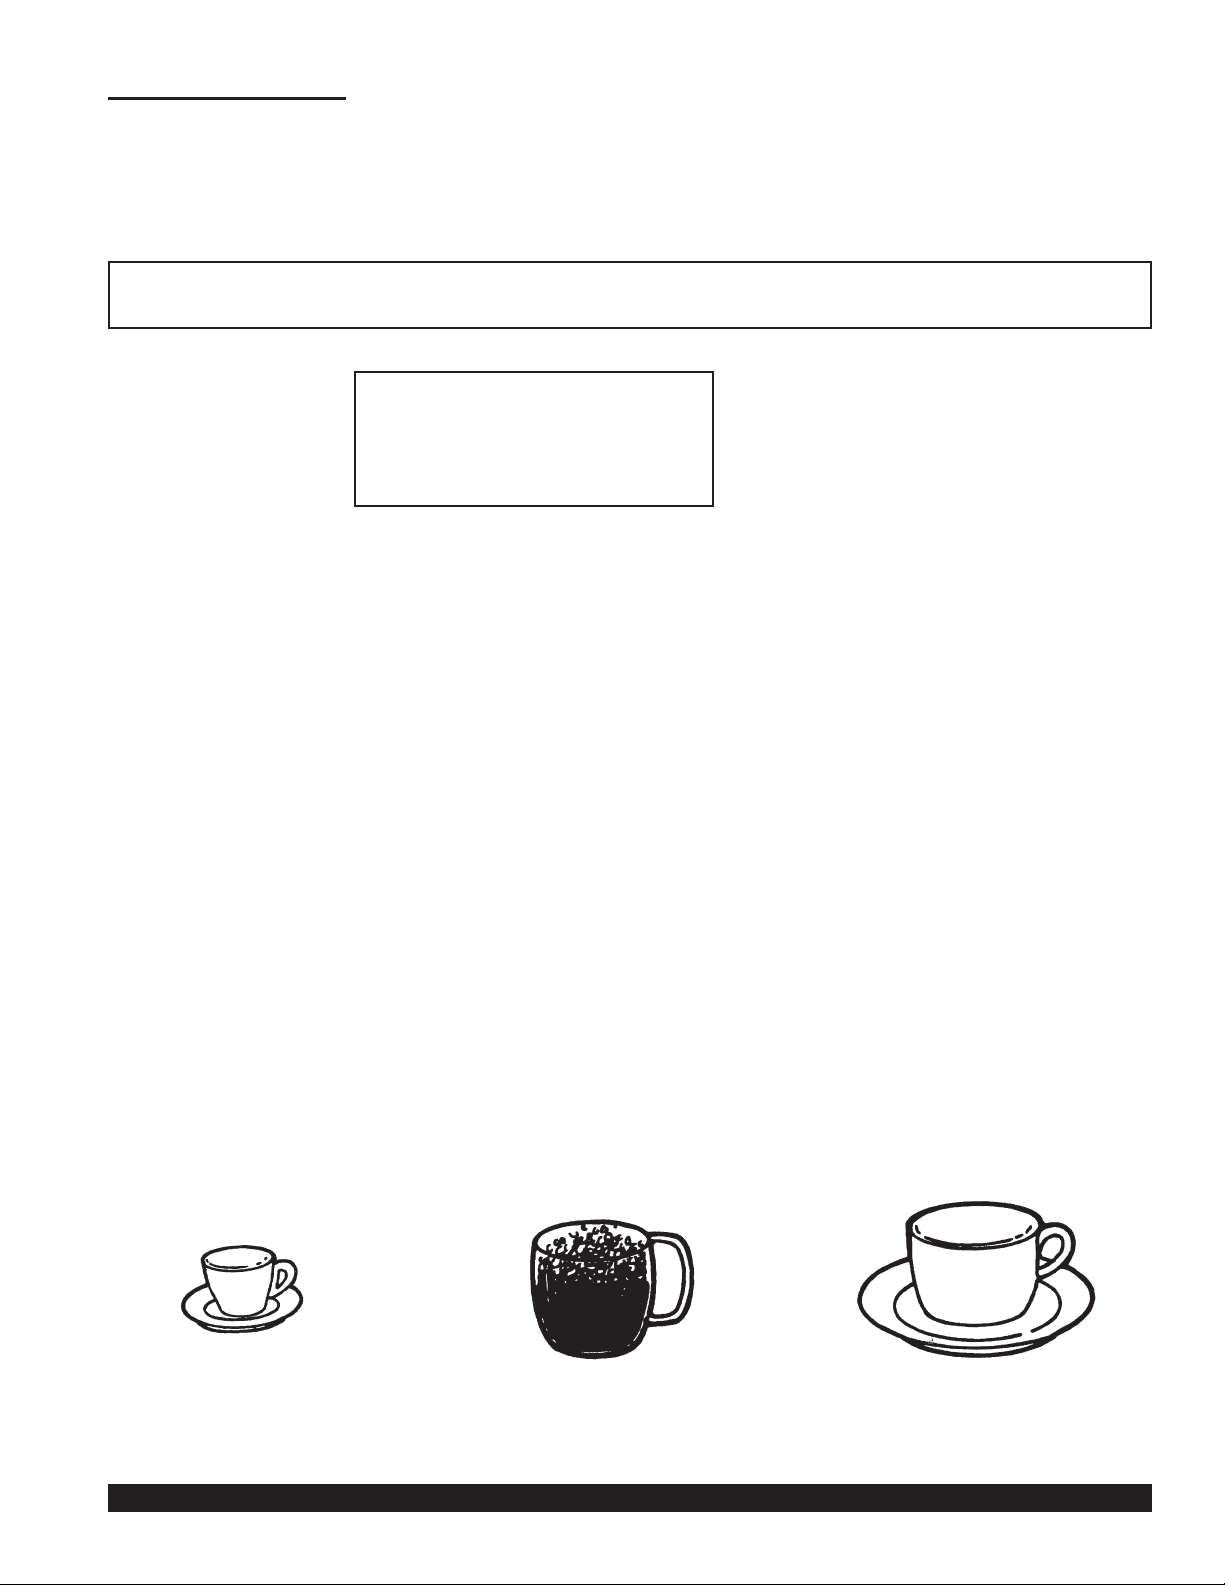
Espresso Cup Cafe Latte MugCappuccino in glass mug
Warning Labels
The following warning labels were on your espresso machine when it shipped from the factory. The labels should
remain on the machine in good, readable condition at all times. If one of your labels is missing or damaged, order
a replacement label immediately.
Overview: Espresso and espresso-based drinks
Espresso - A coffee beverage made by quickly extracting the heart of the coffee flavor under pressure in single
servings. A single portion of espresso, brewed for 18-23 seconds, produces about 11/2 to 2 ounces and is usually
served in a small 21/2 ounce, preheated espresso cup.
Crema -The fine, foamy, golden brown extraction that is on the surface of the cup of espresso. Crema is a sign
that all the elements were right in producing the perfect cup of espresso.
Cappuccino- Usually
1
/3 espresso to 2/3 frothed milk, in a preheated cappuccino mug. Some prefer to pour the
espresso into the frothed milk in a cappuccino mug, while others pour or spoon the frothed milk over espresso.
Cafe Latte (Italian) or Cafe au Lait (French) or Cafe con Leche (Spanish) - A single serving of espresso with
steamed milk, roughly
1
/4 espresso to 3/4 milk.
Frothed milk - The thick white foam created by placing the steam wand into a pitcher of cold milk.
Steamed milk - Milk that remains in liquid form, heated by the steam wand.
There are several other espresso based drinks, including the addition of flavorings and toppings. There are
several recipe booklets available on the market today.
CAUTION: HOT SURFACES
DISCONNECT FROM POWER AND ALLOW TO COOL
THOROUGHLY BEFORE SERVICING OR CLEANING
#60188
#60187
CAUTION: HOT SURFACES
ALL DISPENSER HEADS
CAN BE HOT
- CAN CAUSE BURNS -
Page 4

Initial Preparation
Warning: To prevent damage to machine, boiler must be filled with water before turning main power switch on.
1.
2.
3.
4.
5.
6.
*Required to validate warranty. (See warranty for details).
Before operating the machine, please read the operation and instruction manual.
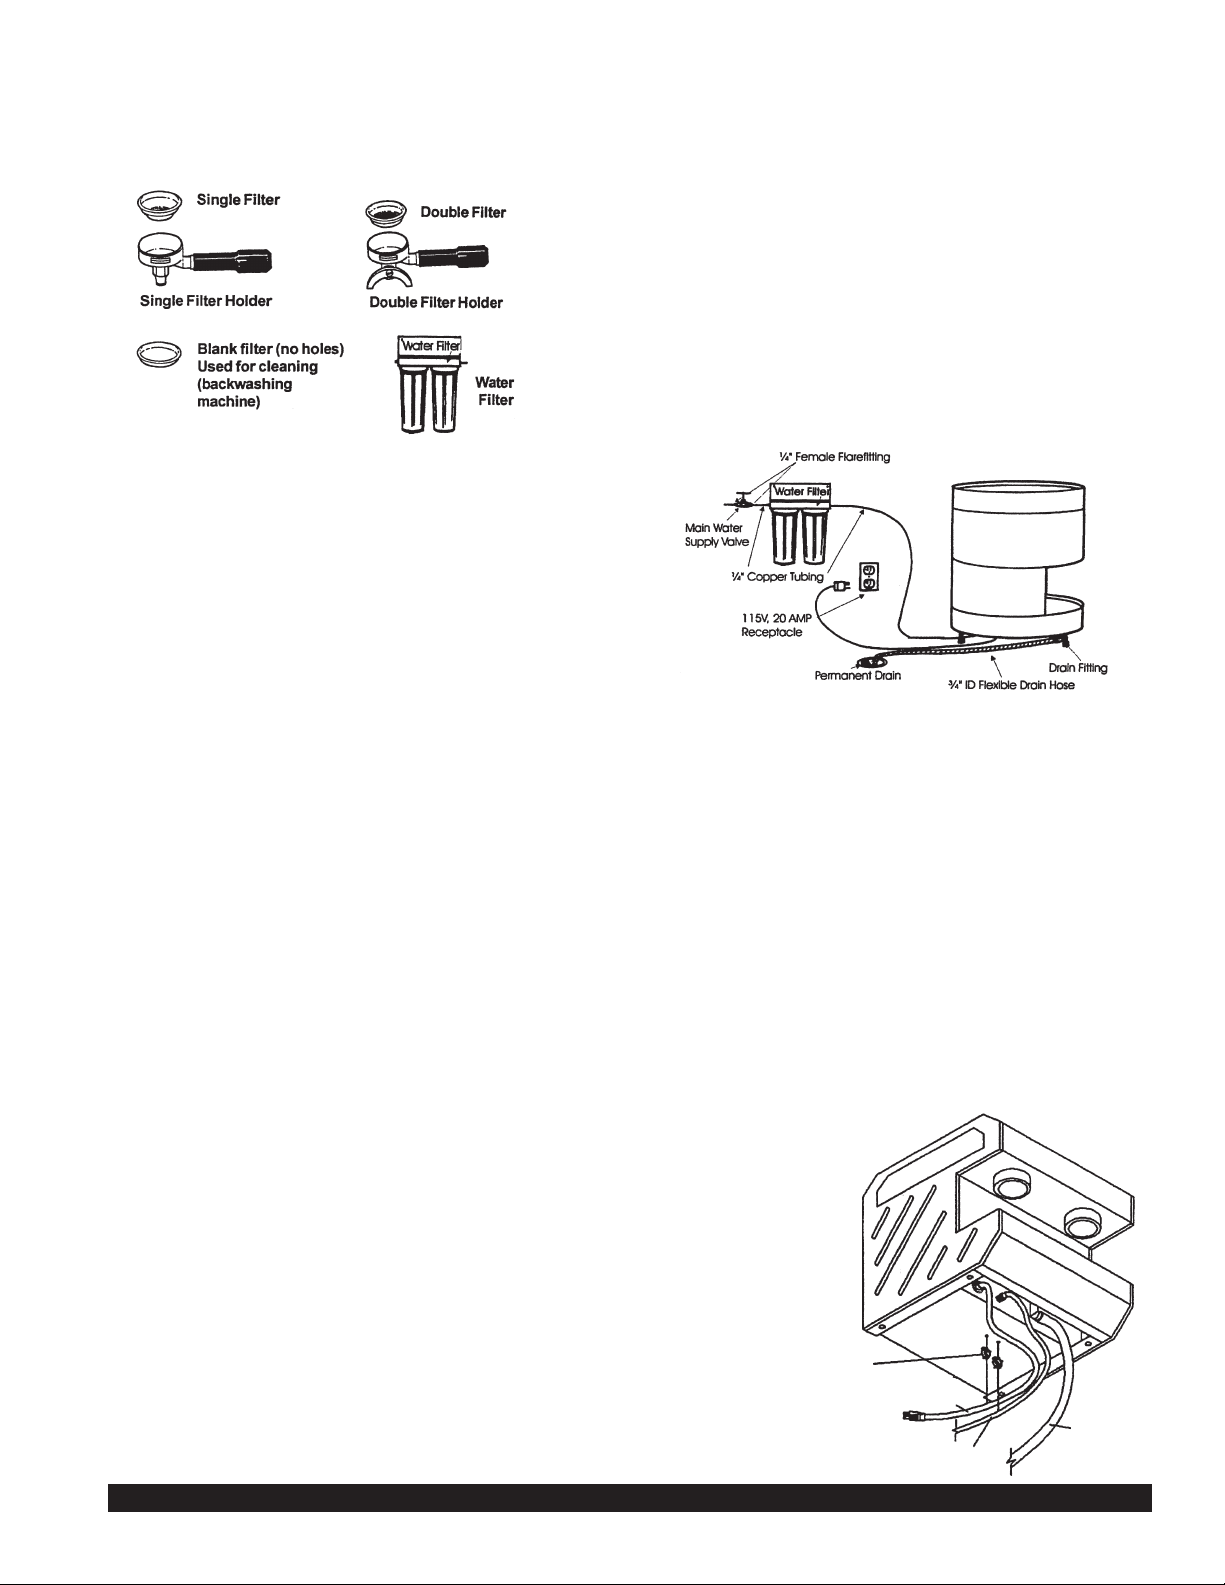
Needed for installation:
•
•
•
•
•
Remove machine from carton and position machine in operating location.
At this point, please refer to Installation Instructions on Page 6.
If there is a problem, consult the Troubleshooting Guide in this manual.
If you cannot correct a problem, call Grindmaster Corporation’s Hotline for help at 800-695-4500 or
+1-502-425-4776, Monday through Friday, 8 A.M. until 8 P.M., EST.
Access to cold water line with minimum of 30 P.S.I. pressure, drain, and heavy-duty grounded receptacle with its
own breaker. Models 2450 & 1750 use 115V, 20 AMP receptacle. Q models use 230V (3 wire plus ground), 20
AMP receptacle. E models use 230V, 15 AMP receptacles with proper plug installed by customer.
1
/4” copper tubing
(4)
1
/4” female flare fittings
In-line water filter system*
3
/4” ID flexible drain hose
IMPORTANT
Failure to use in-line water
filter voids warranty!
Page 3 Espressimo 2450 & 1750 Espresso Cappuccino Machines
Page 5
Espressimo 2450 & 1750 Espresso Cappuccino Machines Page 4
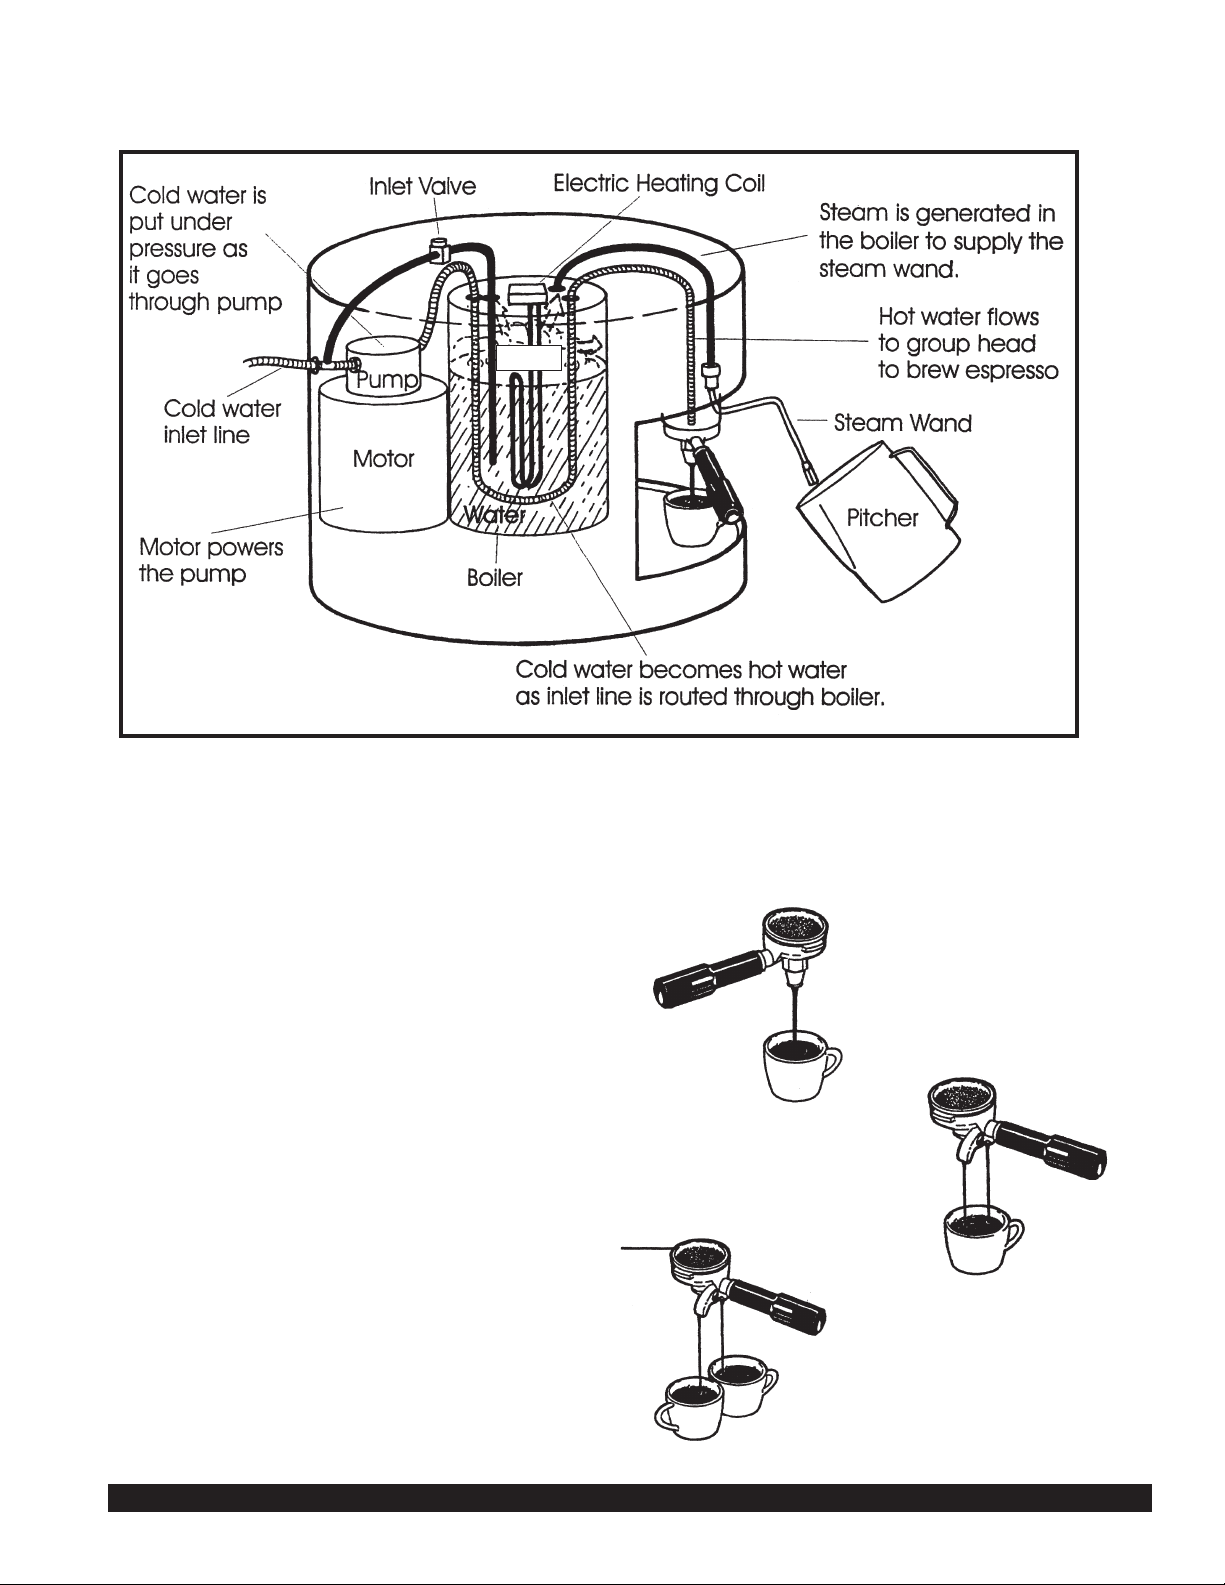
Understanding Basic Concepts about Brewing Espresso
How espresso is made differently from
regular brewed coffee.
Traditional coffee is brewed by hot water being poured
through loose coffee grounds. With espresso, water is
heated in an enclosed chamber, then the water is forced
quickly under pressure through fine, compacted coffee
grounds.
Espresso can be made in either single or double servings.
Correctly prepared espresso has a strong, potent coffee
flavor and crema on the surface of the espresso.
Finely ground coffee grounds
are tamped into the filter holder.
(See instructions on page 6.)
Double Filter Holder
Single Filter Holder
Double Filter Holder
with two cups
Steam
Page 6
Page 5 Espressimo 2450 & 1750 Espresso Cappuccino Machines
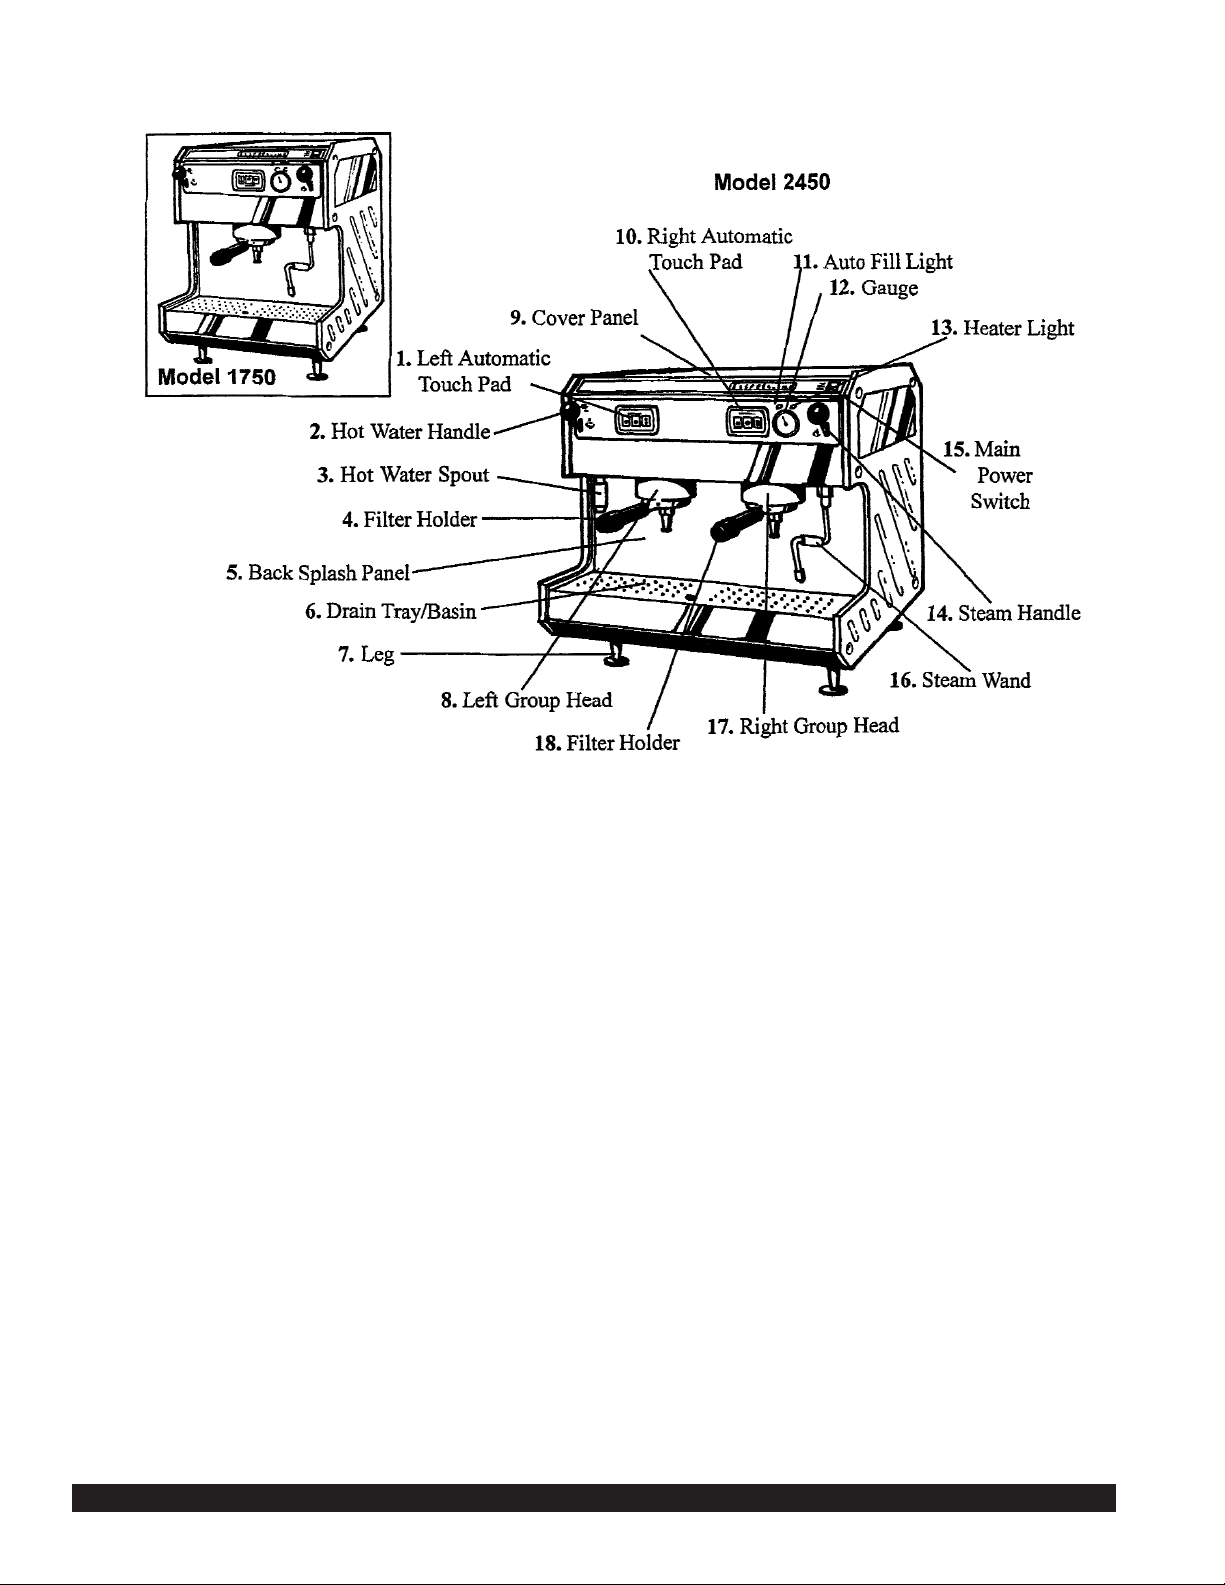
1750 & 2450 External Machine Parts
1.
2.
3.
4.
5.
6.
7.
8.
9.
Left Automatic Touch Pad - When button is
pressed, hot water is dispensed through the filter
holder and into the cup. (See programming instructions on page #22.) (Not included on Model 1750.)
Hot Water Handle - Pull down to dispense hot
water through hot water spout.
Hot Water Spout - Offers fresh, hot water by the
cup for Cafe Americana, hot tea and cocoa.
Filter Holder - Handle and filter holder assembly for
a single espresso serving. Filter holder is locked
into place under the group head (double filter holder
is also available).
Back Splash Panel
Drain Tray/Basin - Drain tray can be lifted for
cleaning drain basin below tray.
Leg - The machine rests on four legs.
Left Group Head - Where hot water is pressurized
before going through filter holder. (One group head
on Model 1750.)
Cover Panel - Slotted stainless steel lid, lifts off top
of machine. Slots release heat and are often used
to warm cups before use.
10.
11.
12.
13.
14.
15.
16.
17.
18.
Right Automatic Touch Pad - When pressed, hot water
is dispensed through the filter holder and into the cup.
Auto Fill Light - A red light. When lit, indicates that
machine needs water in boiler. The light will flicker on
and off as the boiler is filling with water.
Gauge - Indicates in P.S.I. (lbs. per square inch) steam
pressure in boiler.
Heater Light - An amber light. When lit, indicates heating element is heating water in boiler.
Steam Handle - Pull down handle to release steam
from steam wand.
Main Power Switch - Turns on power to machine.
(Except “Auto Fill”, which remains on at all times.)
Steam Wand - Upon pulling steam handle, steam is
released from the steam wand for steaming or
frothing milk.
Right Group Head - Where hot water is pressurized
before going through filter holder. (One group head on
Model 1700.)
Filter Holder - Handle and filter holder assembly for a
single espresso serving. Filter holder is locked into
place under the group head (double filter holders is also
available.)
Page 7
Accessories
The following accessories have been packed and shipped with
the Espresso maker.
Installation
Warning: To prevent damage to machine, boiler must be filled
with water before turning main power switch "ON".
1.
2.
3.
4.
5.
6.
7.
8.
9.
10.
11.
12.
13.
On models 2450 & 1750, screw on legs.
Connect drain hose to drain fitting located at bottom, on
front of machine.
Place flexible drain hose into a permanent drain. Make sure
there are no obstructions or kinks.
Install water filter supplied with unit. Failure to use in-line
water filter voids warranty.
Turn water “ON” and allow at least one gallon of water to
flow through the tubing on the outlet side of the filter. This
will flush out any foreign matter that may be present. When
water runs clear shut water “OFF.”
Connect copper tubing from filter to the flare inlet valve
located underneath the machine.
Turn main water supply valve “ON.” Check for leaks at
fittings and connection points.
Fully open machine valve on' " flare inlet by turning counterclockwise.
Flush heat exchanger by pulling the hot water handle down
and running water through the hot water spout. (Dispense
approximately
1
/2-1 gallon of water.)
Check to make sure main switch is “OFF” then plug
machine into a grounded receptacle. Models 2450 & 1750
use 115V, 20 AMP receptacle. Q Models use 230V (3 wire
plus ground) 20 AMP receptacle. E models use 230V, 15
AMP receptacles with proper plug installed.
Although the main switch is “OFF” when machine is
plugged in, the red light labeled "AUTOFILL" will light up.
Water will be heard filling the boiler for three to five minutes.
When the "AUTOFILL" light is no longer on, the boiler has
filled.
Flip the main power switch to the "ON" position. (Do not turn
on until machine has completely filled.)
14.
15.
16.
17.
Important Note about
Vacuum Breaker
The vacuum breaker, located
under the cup warming area
on the top of the machine,
will vent air and steam to
the cup warning area
upon start-up.
If the vacuum breaker
does not close, then
excessive steam will
vent to the cup
warming area. To
correct this,
remove the
cover from the
machine and tap
the top of the
vacuum breaker.
Flush the group heads by turning both brew switches on.
Let water run for approximately one minute.
When the main power switch is placed in the "ON" position,
the amber indicator light -the heater light-will also go on.
The amber light indicates that the heating element is on,
heating water in the boiler to produce steam pressure. The
amber light will go out when steam pressure increases to
approximately 20 P.S.I.
Steam pressure decreases as steam is released to froth or
steam milk, warm cups, etc. When steam pressure
decreases to approximately 17 P.S.I., the heater light again
becomes lit, indicating that the heating element is again
heating water to increase steam pressure to approximately
20 P.S.I.
It will take 30-40 minutes for water in machine to fully heat
upon initial installation, depending on
temperature of water source.
Cord retainers have been provided to enable power cord
and water line to be lifted off of the counter. To install, push
cord retainers into mounting holes on bottom panel as
shown. Snap cord and water line into cord retainer.
Cord
Retainer
Power Cord
(Supplied with unit)
Water Lines
(Supplied by installer)
Drain Hose
(Supplied
with unit)
Espressimo 2450 & 1750 Espresso Cappuccino Machines Page 6
Page 8
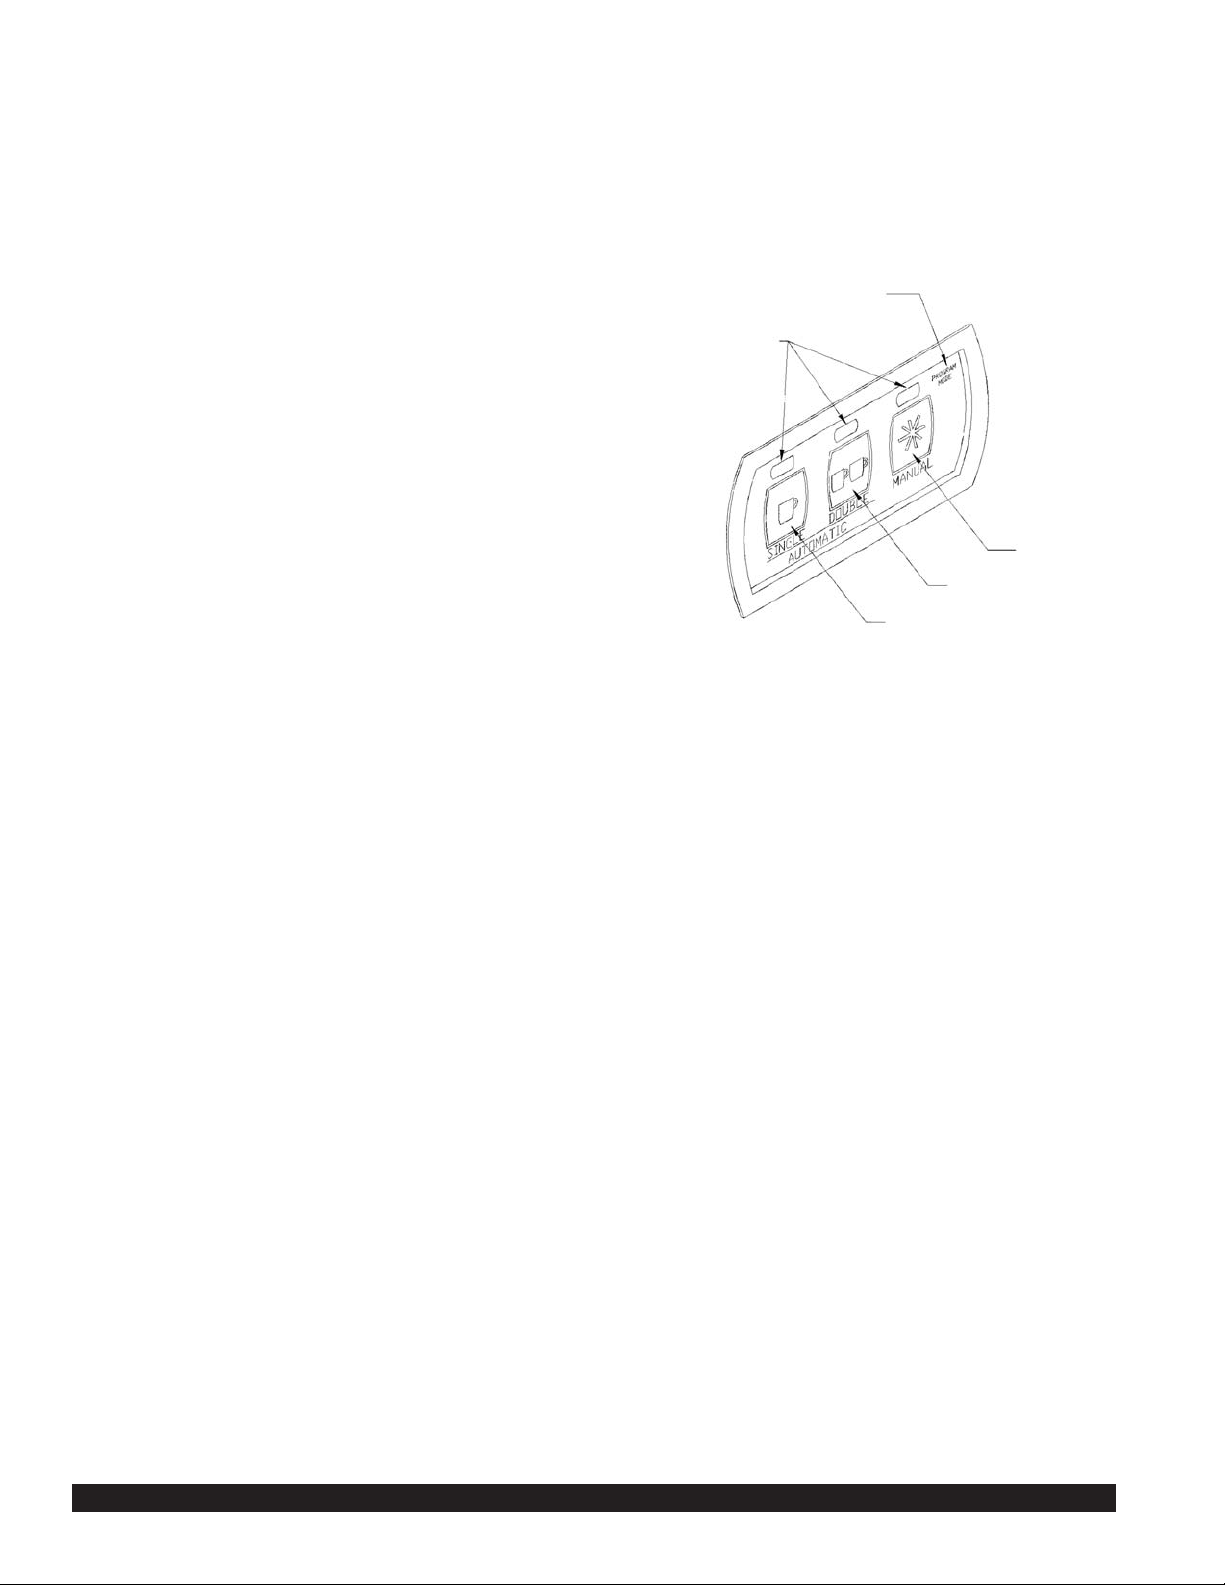
Programming the Portion Buttons
for 2450 Espressimo Machines
Follow the above installation instructions. When machine is up to operating temperature, indicated by the gauge being between 10
and 20 p.s.i., your machine can be programmed to release the same amount of coffee during each use.
1. Place a filter in filter holder and add approximately 7 grams of espresso grind coffee.
Insert filter holder into group head and place a cup or container to
be used for measuring under spout.
2. Press and hold single portion button. After
approximately 5 seconds, both the “program mode” and
position size red lights will flash on and off and the
machine will begin to brew espresso.
3. Continue to hold the single portion button until the
desired volume is dispensed. Release of the single
portion button will save the portion dispensed to
machine memory and brewing will be terminated.
4. Check portion size by reloading the single filter holder
for a single brew.
5. Press and release the single portion button to the brew
cycle. Once the button is pressed and released, a
pre-infusion cycle will occur for approximately 2 seconds
(this will soak the bed of coffee before the pump comes
on), after which the pump will be turned on and
brewing will begin.
6. The machine will dispense the pre-programmed amount
of Espresso and automatically shut itself off.
7. To program the double portion button, repeat the above steps using the double filter holder and using approximately 14grams
of espresso grind coffee.
8. The manual on/off (*) may be used for custom volume brewing espresso to the desired volume and also for daily backflush
cleaning of the group heads where toggling of the machine on and off is required.
NOTE: Brew cycle is started only when button is released. Failure to release the button within 5 seconds will activate the
“Programming Mode.” The brew cycle may be stopped at any time after the pre-infusion cycle by pressing the brew button again.
As a safeguard, the maximum brew time allowed for all brew cycles is 2 minutes, after which, the machine will terminate the brew
cycle.
Program Mode
Indicator Light
Automatic Touchpad Function Layout
Brew Indicator
Lights
Single Portion
Brew Button
Double Portion
Brew Button
On/Off Manual
Brew Button
Page 7 Espressimo 2450 & 1750 Espresso Cappuccino Machines
Page 9
Espressimo 2450 & 1750 Espresso Cappuccino Machines Page 8
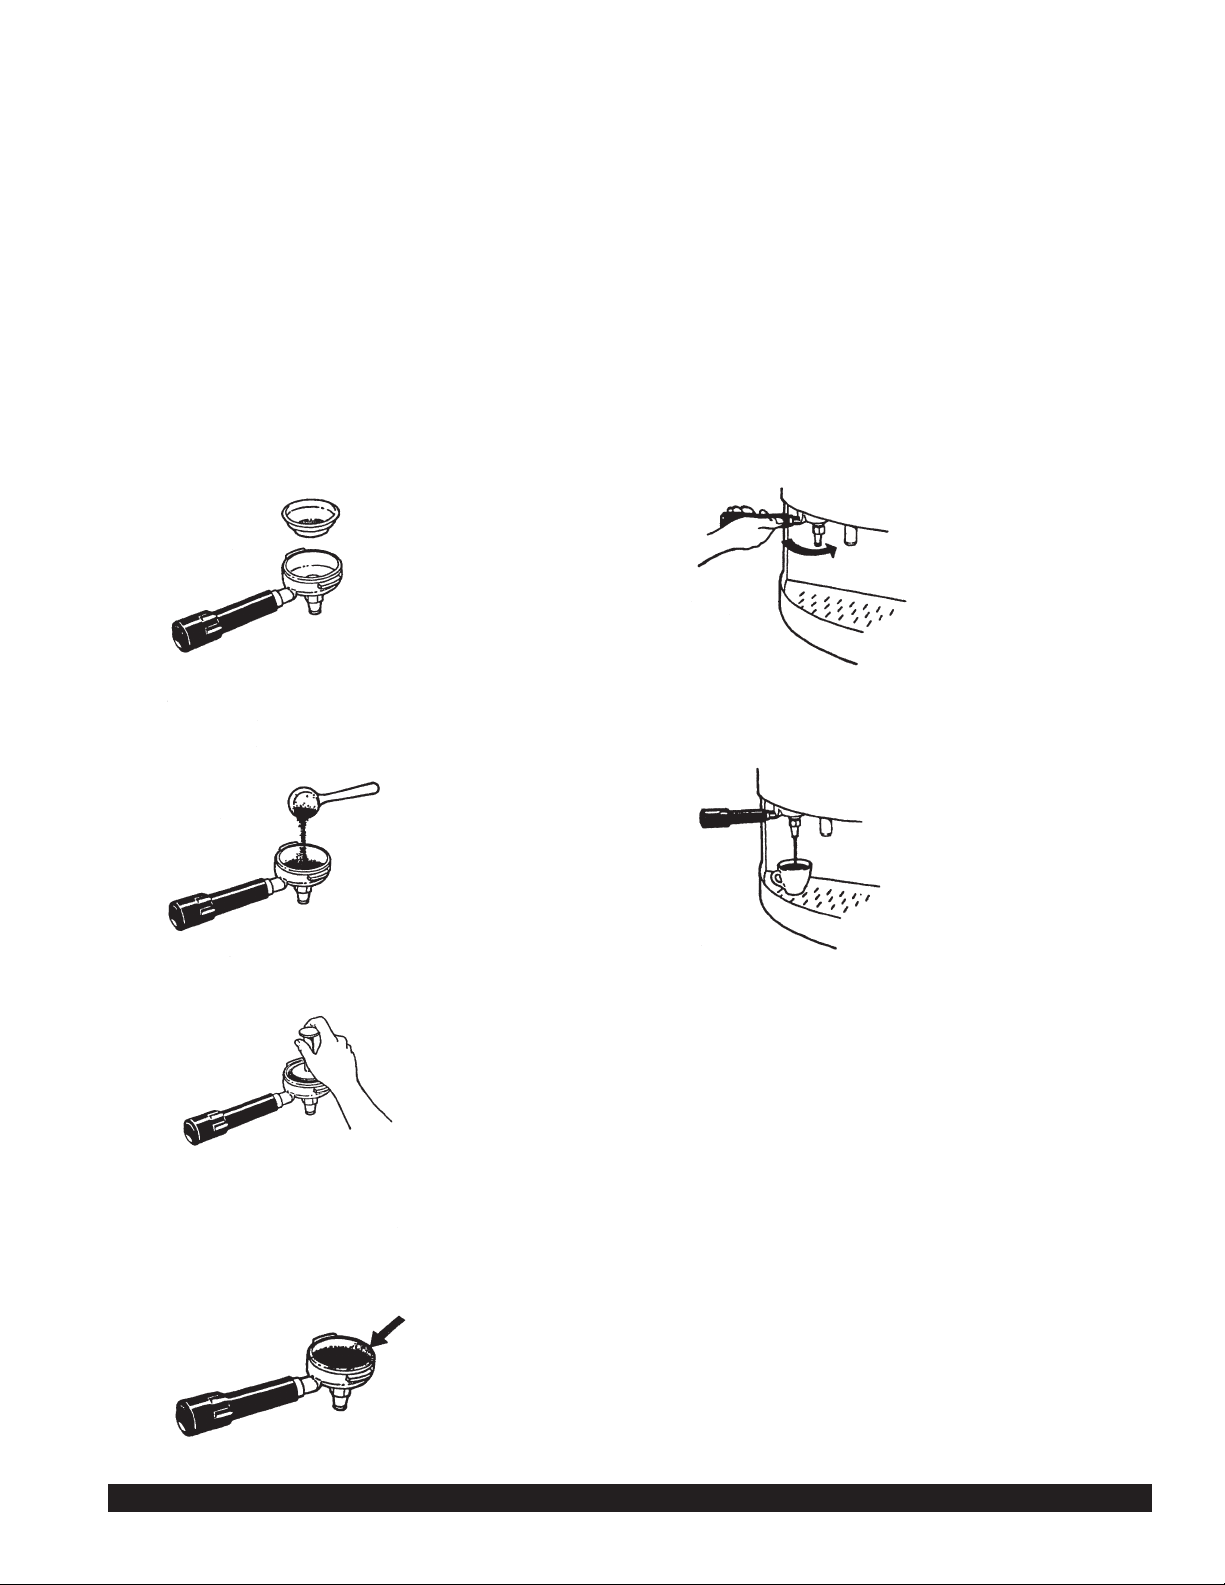
How to Brew Espresso
Before You Start:
Use fresh coffee beans. Select a roast made especially for espresso. The grind of the coffee is very important
in making a good cup of espresso. Proper espresso grind is a texture like fine grains of sand. A grind like a
powder is too fine.
Your espresso machine is "pod compatible." A "pod" is a small self-contained paper filter which contains one
serving of pre-ground, pre-measured espresso roast coffee. Check with your coffee vendor for availability.
This step-by-step example is for brewing a single cup of espresso.
1. Insert single filter into single
filter holder
2. Add approximately 7 grams
of coffee to the filter holder.
(Grinder/doser and
measuring spoons are
available from Grindmaster.)
3. Lightly tamp and level the
grounds with even pressure.
(Do not “pack” coffee into
the filter.)
4. Wipe or brush away any
excess grounds on the rim
of the filter holder.
5. Attach filter holder to the
group head by lining up tabs
on filter holder with slots in
group head. Push the filter
holder firmly into place and
lock in by rotating left to
right.
6. Place a preheated espresso
cup under the filter holder.
Turn "on" the
appropriate brew switch for
18 to 23 seconds, then turn
off the brew switch.
Espresso will flow out at a
slow, steady rate. Each 1
1
/2
to 2 oz. cup of properly
made espresso will have a
fine layer of crema on the
surface of the espresso.
7.
WARNING: Never open or
remove filter holder when
pressurized in group. head or
when brew switch is "ON”.
Wait a few seconds for
pressure to release. Then
unlock the filter holder by
rotating right to left, then
down and out. Dump the
used grounds out of the
filter holder.
Page 10

Page 9 Espressimo 2450 & 1750 Espresso Cappuccino Machines
How to Froth Milk:
Before You Start:
Froth milk in a stainless steel pitcher. In the process of
frothing, the milk will double or triple in volume, so be
sure to use a pitcher large enough to accommodate the
increased volume. Cold milk will froth more easily than
milk at room temperature.
1.
2.
3.
4.
5.
6.
Before frothing milk, point steam wand over drain pan
and pull steam handle all the way down. This releases
any moisture which may have collected inside the
steam wand.
Place half of the tip of the
steam wand into the milk.
Pull the steam handle 3/4
of the way down. Frothed
milk will start to form as
long as the tip of the steam
wand is half submerged in
the surface of the milk. (It
should take no longer than
10-15 seconds to froth one
cup of milk.)
Slowly move the pitcher up
and down while keeping
the tip of the steam wand
near the surface of the
frothed milk. The amount
of frothed milk will
continue to increase.
The remaining milk can be
steamed/heated by
submerging the wand into
the remaining milk. Turn
off steam while tip of steam
wand is still submerged.
Note: Be careful not to
scald milk. This may occur
if milk is steamed too long.
Important: After frothing milk and removing pitcher
from steam wand, point steam wand over drain pan
and pull steam handle all the way down. This expels
any milk which may be in the steam wand. Wipe
excess milk off steam wand, immediately after every
steaming.
How to Steam Milk:
1.
2.
3.
4.
5.
Before steaming milk, point steam wand over drain
pan and pull steam handle all the way down. This
releases any moisture which may have collected
inside the steam wand.
Submerge the tip of the steam
wand into the middle of the
pitcher of milk and pull the
steam handle all the way
down. Heat milk to the
desired temperature. Do not
scald milk by steaming too
long. Milk is scalded once it
reaches the boiling point. (It
should take no longer than
15-20 seconds to steam one
cup of milk.)
Slowly move the pitcher up
and down, but keep the tip
submerged.
Some cafe latte drinkers like
a slight amount of foam on
top of their steamed milk.
To do this, bring the top half
of the steam tip out of the
milk for a few seconds, then
submerge steam wand back
into the milk. This will create
froth. Turn off steam.
Remove steam wand from milk.
Important: After steaming milk and removing pitcher
from steam wand, point steam wand over drain pan
and pull steam handle all the way down. This expels
any milk which may be in the steam wand. Wipe
excess milk off steam wand, immediately after every
steaming.
Page 11

Espressimo 2450 & 1750 Espresso Cappuccino Machines Page 10
Care and Cleaning
Daily Cleaning
Backwashing Group Heads
1.
2.
3.
4.
5.
6.
7.
8.
9.
10.
Cleaning External Surfaces
Wipe all external surfaces clean with a damp cloth.
Never use abrasive cleaners. Rinse filters and filter
holders with hot water then wipe clean with a damp
cloth.
Cleaning the Steam Wand
Wipe the steam wand clean and let it soak in a glass of
water overnight, then wipe clean again. Never scrape
the steam wand.
Cleaning the Drain
Remove the drain tray. Turn on both brew switches for
15 seconds without filter holders in place. Replace
drain tray.
Remove filter holders from machine.
Turn on both brew switches. This will flush residual
grounds and impurities out of the group heads.
Remove the filter from the filter holder.
Insert a blank filter (no holes) into the filter holder.
Lock the filter holder into the group head.
Turn on the brew switch for 15 seconds.
After turning off the switch, look under the drain tray
for the water being expelled from the exhaust pipe.
Repeat steps 6 and 7, three times on each group
head. (Filter holders do not need to be removed
between repetitions.)
Remove filter holders and turn on brew switches to
flush water through.
Remove blank filter from the filter holder and replace
with single or double filter.
Weekly Cleaning
Backwashing with Espresso Cleaner
1.
2.
Cleaning the Steam Wand Tip
Unscrew the tip from the steam wand and clean
thoroughly inside. A wire can be used to clean the holes
in the steam wand tip. Replace tip when clean.
Cleaning Filter Holders with Espresso Cleaner
Remove the stainless steel filter from both filter holders.
Wash both filters and filter holders with espresso cleaner detergent, then rinse clean with water.
Cleaning the Drain Basin
Remove drain tray. Turn on both brew switches for 15
seconds without filter holders in place. Turn machine off
and allow to cool thoroughly (overnight). Wipe out the
drain basin with a damp cloth and espresso cleaner.
Replace drain tray.
Follow the daily backwash procedure, except after
step number 4, fill the blank filter with coffee cleaner,
urn cleaner or white vinegar.
After backwashing with the cleaner, make sure all
detergents are cleaned away as the following
procedures indicate:
A.
B.
C.
Remove filter holders and rinse clean.
With filter holders off, flush both group
heads by turning on brew switches for
15 seconds.
Backwash both group heads with clean
water. (See step numbers 5-8 under
"Backwashing group heads.")
Exhaust Pipe
Back Splash Panel
Tip of Steam Wand Holes in Steam Wand Tip
Page 12

Page 11 Espressimo 2450 & 1750 Espresso Cappuccino Machines
Care and Cleaning
Monthly Cleaning
Clean Group Head, Screen and Group
Head Gasket
1. Remove screw holding screen in place.
2. Remove and clean screen, shower, and group
head gasket.
3. Wipe and clean group head.
4. Reinstall gasket, shower, and screen, and then
tighten screen securely.
(Note: There are numbers molded onto one side of the
gasket. Insert gasket with numbers facing up.)
Make sure gasket is positioned in place.
Yearly Cleaning
Inspection, testing, and repair of this espresso
machine, including the following procedures should
only be performed by a qualified service technician.
•
•
•
•
•
•
•
•
•
Replace head gaskets annually.
Clean group strainer, replacing if necessary.
Flush heat exchanger by running water through the hot water
spout and check for proper flow.
Check steam pressure to be approximately 17-20 P.S.l.
Check group head pressure to be approximately 125 P.S.I.
Empty the Boiler
The following is proper procedure for emptying and
replacing water in the boiler.
1.
2.
3.
4.
5.
6.
7.
8.
9.
10.
Clean Pump Strainer
1.
2.
3.
4.
5.
6.
Plug in. Make sure boiler is filled ("AUTOFILL" light will be
OFF.) Turn machine “ON.”
Check for proper brew levels.
Turn “OFF” and unplug machine.
Turn pressure down to 0 P.S.I. by directing the steam wand
over the drain pan and pulling down the steam handle.
Take out main heater by removing four bolts and disconnect
the two wire terminals.
Check for buildup on heater. De-lime or replace heater if
necessary.
Siphon water out of the boiler and check for clarity. Refill
with water.
Cover the heater terminal wires with electrical tape.
With main power switch of machine “OFF,” plug in machine.
Boiler will begin to fill. Check for fill time of 3 to 5 minutes.
Look for proper water level to be about 3 inches from the
top of boiler.
Repeat as necessary.
If all is correct, unplug and reinstall heater using a new
heater gasket.
Turn “OFF” and unplug machine.
Turn “OFF” water supply.
Remove strainer bolt.
Remove strainer and clean.
Reinstall strainer.
Turn on water.
Page 13

How to Adjust the Pressure Control
1.
2.
3.
4.
5.
6.
7.
Turn “OFF” and unplug machine.
Remove cover panel. Locate pressure control at the
top front right side of the machine.
Lift off plastic cover from pressure control.
Locate the open hole with the screw slot in the top of
the pressure control.
With a flat screwdriver, carefully adjust the pressure
control by inserting screwdriver in slot and turning
clockwise to lower pressure or counterclockwise to
raise pressure. One turn equals approximately 1 PSI.
Reinstall and check machine for proper pressure as
follows:
a.
b.
c.
Repeat steps 3-6 if needed.
Espressimo 2450 & 1750 Espresso Cappuccino Machines Page 12
Adjustments
Inspection, testing, and repair of this espresso machine, including the following procedures should only be
performed by a qualified service technician.
Plug machine in. The yellow heater light will turn on.
Watch for the yellow heater light to turn off. This is
the high pressure setting (high pressure setting
should be set at approximately 20 PSI).
Open the steam wand. Watch for the yellow heater
light to turn on again. This is the low pressure setting. The low pressure setting will be within a 3 PSI
Range of the high pressure setting.
How to Adjust the Pump Pressure
1.
2.
3.
4.
5.
6.
7.
8.
9.
Turn “OFF” and unplug machine and shut off water
supply.
Locate small closed nut bolt on pump.
Loosen and remove bolt. Underneath it you will find
the adjustment screw.
To adjust, turn the screw clockwise to raise pressure
or counterclockwise to lower pressure. One half turn
equals approximately 10 PSI.
Reinstall bolt.
Turn on water.
Open hot water spout to flush out air in line.
Plug machine in and check for proper group head
pressure, using a pressure gauge on the filter holder.
Pressure should be approximately 125 PSI.
If the pressure rate is fluctuating erratically, check for
erratic water pressure coming to machine. Install a
water pressure regulator if needed.
Pressure Control
Front of machine
Front of machine
Front of machine
Page 14

Page 13 Espressimo 2450 & 1750 Espresso Cappuccino Machines
Coffee Taste and Appearance Guide
Several factors may affect the taste and appearance of a cup of espresso:
• Time - allow a single cup of espresso to brew approximately 18-23 seconds.
• Amount of coffee - use approximately 6 to 8 grams per serving.
• Grind texture - use an espresso fine grind.
• Tamp - coffee in filter holder should be lightly tamped/leveled.
• Freshness of coffee - use only fresh coffee.
• Water quality - an approved water filter should be used to improve water quality.
• Water temperature - Water should be at the correct brewing temperature.
If your results are less than satisfactory, check the following guide. Check each solution separately. Serving sizes in
the Trouble Shooting Guide are for a single serving (1
1
/2 oz. - 2 oz.) of espresso made with the single filter holder.
Problem Possible Cause Solution
Coffee brewing too slowly.
Coffee brewing too quickly.
Little or no crema.
Espresso not hot enough.
Coffee taste unsatisfactory.
• Coffee packed too tightly.
• Grind texture is too fine.
• Used too much coffee.
• Not enough coffee used.
• Grind texture is too coarse.
• Coffee tamp is too tight.
• Not enough coffee used.
• Grind texture is too coarse.
• Coffee tamp is too light.
• Diameter of cup is too wide.
• Coffee not fresh.
• Water did not reach correct
brewing temperature.
• Filter holder and/or cups were
not preheated.
• No water filter used or water
filter needs to be changed.
• Amount and/or texture of coffee
needs adjustment.
• Use a lighter tamp.
• Use a coarser grind.
• Use less coffee.
• Use more coffee.
• Use a finer grind.
• Use a firmer tamp.
• Use more coffee.
• Use a finer grind.
• Use a firmer tamp.
• Use a small diameter espresso
cup.
• Use freshly ground coffee from
fresh whole beans.
• Wait for machine to reach at
least 10 PSI on pressure gauge.
If machine does not reach 10
PSI within 30 minutes, refer to
mechanical guide in this
manual.
• Preheat filter holder and cups
with top cup warmer or hot
warmer tap.
• Install water filter or change
cartridge in existing filter.
• Adjust amount and/or grind
texture of coffee as needed.
Page 15

Espressimo 2450 & 1750 Espresso Cappuccino Machines Page 14
Troubleshooting Guide
Inspection, testing and repair of this espresso machine, including the following procedures should only be performed
by a qualified service technician.
Warning:
• Use extreme caution when working around hot surfaces when servicing electrical equipment.
• Disconnect espresso machine from power outlet when servicing, except when specified.
• Replace all protective panels, covers and warning labels.
Problem Possible Cause Solution
No steam from steam wand.
Machine is not reaching full
pressure and yellow heater light
is continuously on.
Machine is not reaching full
pressure and yellow heater light
is not on.
Too much pressure (Pressure
control is set for 17 to 20 PSI).
Steam is too watery.
• No power to machine.
• Steam wand clogged.
• No pressure on gauge.
• Check for steam leaks.
• Check for water leaking from
group heads or exhaust pipe in
drain basin.
• Check for accuracy of gauge.
• Pressure control needs
adjustment.
• Faulty pressure control.
• Float switch operating at
improper level.
• Check to make sure machine is
turned on and plugged in.
• Check outlet has power with
lamp or radio.
• Check main circuit breaker.
• Remove tip of steam wand and
clean thoroughly.
• See section on no pressure.
• Repair leaks.
• Refer to section on leaking
group heads.
• Replace gauge if faulty.
• Adjust pressure control or
replace if faulty.
• Check for dry steam. If steam is
dry, then replace pressure
control.
• Check steam - if watery, refer to
"steam too watery".
• Adjust level of float switch,
aligning the lines on the tube and
fitting. Tighten fitting. Reduce
water level by releasing steam
until red light comes on. Note:
disconnect machine from power
before replacing or adjusting.
Page 16

Page 15 Espressimo 2450 & 1750 Espresso Cappuccino Machines
Troubleshooting Guide (cont’d)
Problem Possible Cause Solution
Steam too watery.
(continued from previous page)
No pressure on gauge.
Machine will not operate.
Faulty float switch.
Leaking two-way inlet solenoid.
No power to machine.
Unplug machine then check for
loose wires on main switch,
pressure control and heaters.
If heater light is not on and there
is electricity to the pressure
control, control may be faulty.
If heater light is on and the
group heads are hot, heater may
be faulty.
If heater light is not on and there
is no electricity to pressure
control, main power switch may
be faulty.
No power to machine.
If float switch is at correct level
(lines are aligned on tube and
fitting) and red light stays on
continuously, then replace float
switch. Note: Disconnect machine
from power before replacing or
adjusting.
If red autofill light is off, check if
two-way solenoid is leaking. Note:
Machine must have 0 pressure
before disconnecting the fitting
past the two-way solenoid valve.
If fitting is leaking water, then
replace the two-way solenoid. It
should normally be closed.
Check to make sure machine is
turned on and plugged in.
Check outlet has power with lamp
or radio.
Check main circuit breaker.
Reconnect loose wires.
Replace pressure control if faulty
and check machine.
Replace main heater if faulty and
check for cause of heater failure.
Replace main power switch if
faulty and check machine.
Check to make sure machine is
turned on and plugged in.
Check to verify outlet has power
with lamp or radio.
Check main circuit breaker.
•
•
•
•
•
•
•
•
•
•
•
•
•
•
•
•
•
•
•
•
If you still need help, call an authorized dealer in your area or Grindmaster Corporation’s Technical Service Department. You can
reach Technical Service at (800) 695-4500 (USA & Canada only) or (502) 425-4776 Monday-Friday, 8:00 AM - 8:00 PM Eastern
Standard Time. Please have the model and serial number ready so that accurate information can be given. Prior authorization must
be obtained from Grindmaster Corporation’s Technical Service Department for all warranty claims.
Page 17

Espressimo 2450 & 1750 Espresso Cappuccino Machines Page 16
Troubleshooting Guide (cont’d)
Problem Possible Cause Solution
Brew cycle will not start or water
does not come out.
No water to machine (check by
opening hot water spout).
Red autofill light stays on
continuously.
Water leaks while brewing coffee.
Water leaking from group head or
exhaust pipe in drain basin.
Water leaking from opposite side
of group head in use.
• No water (check by opening hot
water spout).
• Flow restrictor/doser in group
head is clogged.
• Improper filter in filter holder or
clogged filter.
• Spray deflector or group
strainer is clogged.
• Switch or solenoid valve faulty.
• Water supply valve closed.
• Water filter may be clogged.
• Water is off.
• Water pressure too low
(minimum pressure should be
25 PSI).
• Faulty float switch.
• Group head gasket has
hardened or broken.
• Solenoid stuck open.
• Too much pressure.
• Weakened solenoid springs.
• See section on "no water to
machine".
• Clean or replace if needed.
• Check to be sure filter (with
holes) is being used and is not
clogged. Clean if needed.
• Check to verify spray deflector or
group strainer is not clogged.
Clean or replace if needed.
• If only one side is not working,
check to see if switch or solenoid
valve has failed. Replace if needed.
• Check to be sure all water valves
are open (Machine valve, water
filter valve, main supply valve).
• Shut off valve preceding filter.
Open filter housing. Open valve
to check if water comes out.
Replace filter if needed.
• See section on "no water to
machine".
• Open hot water spout. If water flow
is weak, slow or steamy, check for
closed valves or partially opened
valves. Check for clogged filter,
interruptions to water supply line or
other appliances using water that
may be reducing water pressure.
• Open steam wand. If steam is
watery, see section on "steam is too
watery".
• Replace gasket if needed by prying
out.
• Back wash with cleaner several
times. If problem continues,
replace solenoid.
• Adjust pump to 125 P.S.I.
• Replace solenoid valve if needed.
Page 18

Page 17 Espressimo 2450 & 1750 Espresso Cappuccino Machines
Plumbing Guide
Page 19

Espressimo 2450 & 1750 Espresso Cappuccino Machines Page 18
Models 1750 & 2450 Wiring Schematic
Page 20

Models 1750Q & 2450Q Wiring Diagram
Page 19 Espressimo 2450 & 1750 Espresso Cappuccino Machines
Page 21

Espressimo 2450 & 1750 Espresso Cappuccino Machines Page 20
Models 2450, 2450Q & 2450E Exploded View (Page 1 of 3)
Page 22

Models 2450, 2450Q & 2450E Exploded View (Page 2 of 3)
Page 21 Espressimo 2450 & 1750 Espresso Cappuccino Machines
Page 23

Espressimo 2450 & 1750 Espresso Cappuccino Machines Page 22
Models 2450, 2450Q & 2450E Exploded View (Page 3 of 3)
Page 24

Models 1750, 1750Q & 1750E Exploded View (Page 1 of 3)
Page 23 Espressimo 2450 & 1750 Espresso Cappuccino Machines
Page 25

Espressimo 2450 & 1750 Espresso Cappuccino Machines Page 24
Models 1750, 1750Q & 1750E Exploded View (Page 2 of 3)
Page 26

Models 1750, 1750Q & 1750E Exploded View (Page 3 of 3)
Page 25 Espressimo 2450 & 1750 Espresso Cappuccino Machines
Page 27

Page 28

Grindmaster® Coffee Grinders and Brewers • PrecisionBrew™ Brewing Systems • Espressimo® Espresso Machines
Crathco® Hot Beverage Dispensers • Crathco® Cold and Frozen Beverage Dispensers • AMW Coffee and Tea Systems
Tel (502) 425-4776 • Fax (502) 425-4664 • 1-800-695-4500 (USA & Canada only)
P.O. Box 35020 • Louisville, KY 40232 • USA
www.grindmaster.com • email: info@grindmaster.com
0307 Form # ES-351-08
Part #60236
© Grindmaster Corporation™, 1994
PRINTED IN USA
 Loading...