

Green Star GSE-5300, GSE-5000 User Manual
GSE-5000 & 5300
Juice Extractor
OPERATION MANUAL
SAVE THIS MANUAL
KEEP IT HANDY FOR
QUICK REFERENCE
AND PROPER CARE
1

Welcome
Congratulations! You are now the proud owner of a Green Star® Elite Juice Extractor
- the next generation of the revolutionary Green Star Juice Extractor. With Green Star
Elite, you can juice a wider variety of fruits and vegetables - from carrots and apples, to
wheatgrass and pine needles, all without having to stop and change any parts! You can
also use your Green Star Elite Juice Extractor to make other delicious foods such as baby
foods, breadsticks, nut butters, pâtés, frozen fruit sorbets, and much more!
The Green Star Elite Juice Extractor is the next generation of the revolutionary Green Star
line of Juice Extractors that unleashes the very best nutrition that nature has to offer.
Green Star Elite utilizes advanced Jumbo Twin Gears. The unique shape of Green Star
Elite’s Jumbo Twin Gears extracts more juice and provides greater performance than
other Twin Gear juicers. The new twin gears are coupled with other design improvements
that make Green Star Elite easier to set up, easier to use, and easier to clean than ever
before.
The Jumbo Twin Gears are an advanced impeller press system that rotates at a low 110
rpm and generates minimal heat while juicing. The Jumbo Twin Gears also have the
same magnetic and bioceramic technology that produces fresher juice that can be stored
longer, with minimal loss of the precious enzyme and vitamin content in the juice.
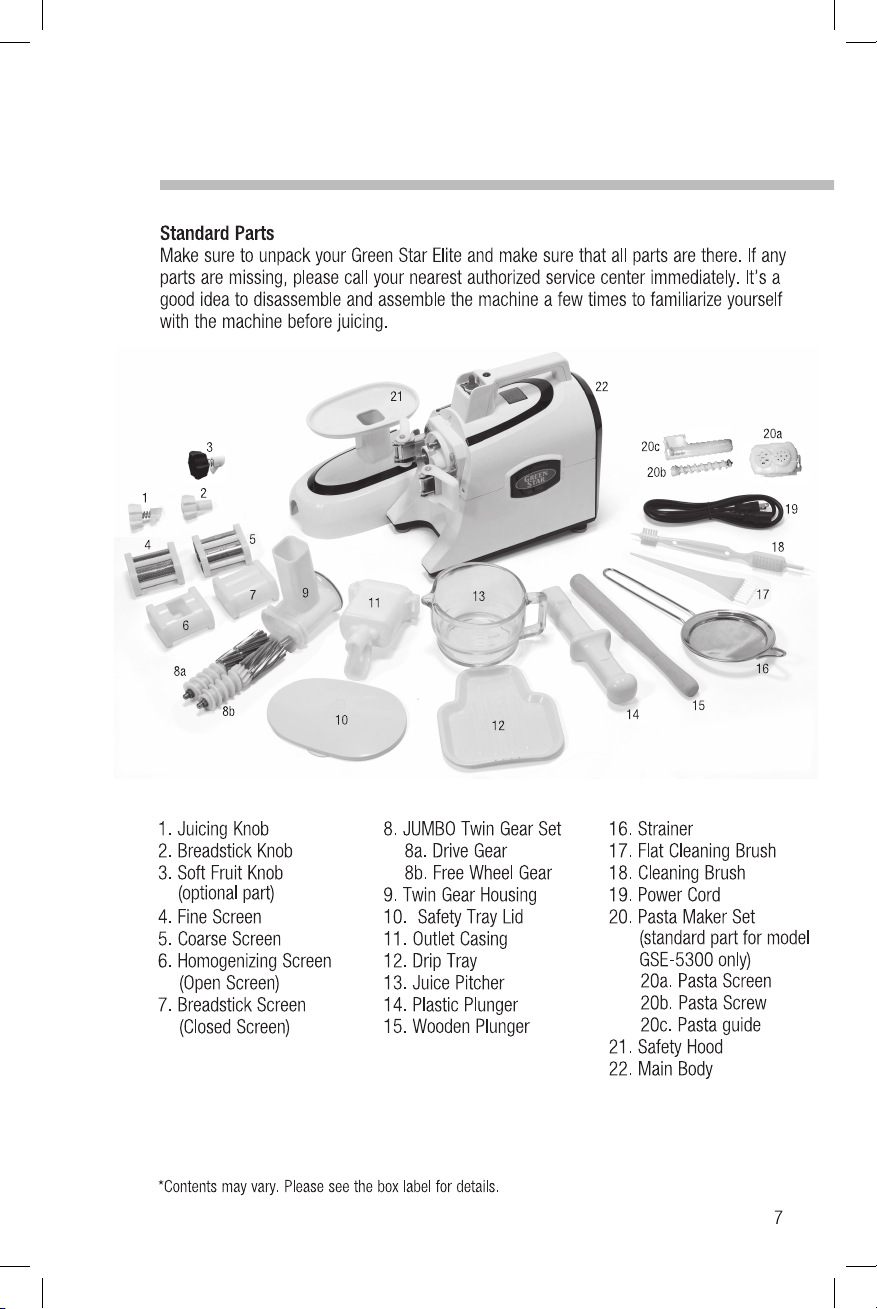
Be sure to carefully unpack your Green Star Elite and check that all of the parts are there.
Also take the time to become familiar with your new juicer before you start juicing. It is a
good idea to disassemble and reassemble your machine a few times to become familiar
with how all of the parts fit together properly. Many parts have been included as standard
parts to make your juicing experience easier and to enhance the versatility of the food
preparation capabilities.
We recommend that you wash all of the parts with warm water and a mild detergent
before you first use your Green Star Elite Juice Extractor. Now you are ready to begin
juicing with your Green Star Elite Juicer. We hope you enjoy your Green Star experience,
as it helps you embark on your journey to better nutrition and better health.
Please take the time to read through the entire operation manual for proper use and care
instructions. Following the instructions in this manual will ensure that your Green Star
Elite Juice Extractor serves you faithfully for many years.

Table of Contents
• Welcome....................................................................................................................2
• Important Safety Precautions.......................................................................................4
• Green Star Elite Juice Extractor Parts...........................................................................6
A. Juicer Diagram
B. Standard Parts
• Setting Up Your Green Star Elite..................................................................................8
A. Assembly
B. Disassembly
C. Using the Screens
D. Using the Knobs
E. Using the Plungers
F. Using the Drip Tray
• Using Your Green Star Elite.......................................................................................12
A. Making Juices
B. Homogenizing: Making Pâtés and Basic Food Processing
C. Making Raw Breadsticks, Mochi, Frozen Fruit Sorbets, etc.
D. Making Pasta (GSE-5300 Model)
• Cleaning and Maintenance........................................................................................16
A. Cleaning Your Green Star Elite
B. Helpful Hints for Easy Cleaning
• Troubleshooting........................................................................................................18
A. Noises
B. Movements
C. Symptoms and Solutions
• Warranty..................................................................................................................19
• When You Need Service............................................................................................20
• Warranty Registration Card........................................................................................21
• Notes.......................................................................................................................23
• Recipe Index.............................................................................................................24
• Product Information...................................................................................................33
3

Important Safety Precautions
When using electrical appliances, basic safety precautions should always be followed
including the following:
1. Read all instructions carefully before operating.
2. To protect against risk of electric shock, do not put the motor base in water or any
other liquid.
3. Only use an approved power cord included with your machine or supplied by the
manufacturer.
4. Only plug the machine into an electrical outlet that has a compatible electricity rating
as your machine. Failure to do so will damage the motor and void the warranty.
5. Close supervision is necessary when any appliance is used near children.
6. Unplug the appliance from the electrical outlet when not in use, before assembling or
disassembling and before cleaning.
7.
Always make sure that all juicing parts are properly fastened before the motor is turned on.
8. While the machine is in operation:
• do not touch its moving parts.
• do not attempt to disassemble it.
9. NEVER put your fingers or other foreign objects such as spoons, knives or any other
kitchen utensils into the feeding chute or any juicer openings while it is in operation. If
food becomes lodged in the feeding chute, use one of the enclosed plungers to push it
down. If this does not work, turn the motor off, unplug the machine and disassemble
the juicer to remove the remaining food.
10. Be sure to turn the switch to the “OFF” position after each use. Make sure the motor
stops completely and unplug the machine before disassembling.
11. Do not disassemble any parts other than those necessary for normal operation or
cleaning of your juice extractor (such as housing, twin gears, screen). Opening the
motor base will void your warranty.
12. Do not operate your Green Star Elite and have it serviced by a certified technician for
examination and possible repair to prevent electrical shock or injury if:
• it has a damaged cord or plug
• it malfunctions
• it is dropped or is damaged in any manner
13. Using attachments or accessories not recommended by the manufacturer may cause
fire, electrical shock or injury.
14. Your Green Star Elite must be electrically grounded for proper and safe operation. Use
only the power cord and plug provided and plug into a properly grounded electrical
outlet. Do not attempt to force the plug into your wall socket as this may cause fire,
electrical shock, or injury.
15. Do not use the power cord as a handle and never yank or pull on the cord to remove
the plug from the electrical outlet.
16. Do not let the cord hang over the edge of a table or counter or come in contact with
any hot surfaces such as the stove.
17. For indoor household use only.
18. Please refer to “When You Need Service” in case your juicer is functioning abnormally.
19. Do not use the appliance for other than its intended use.
SAVE THESE INSTRUCTIONS
4
Important Safety Precautions
Do
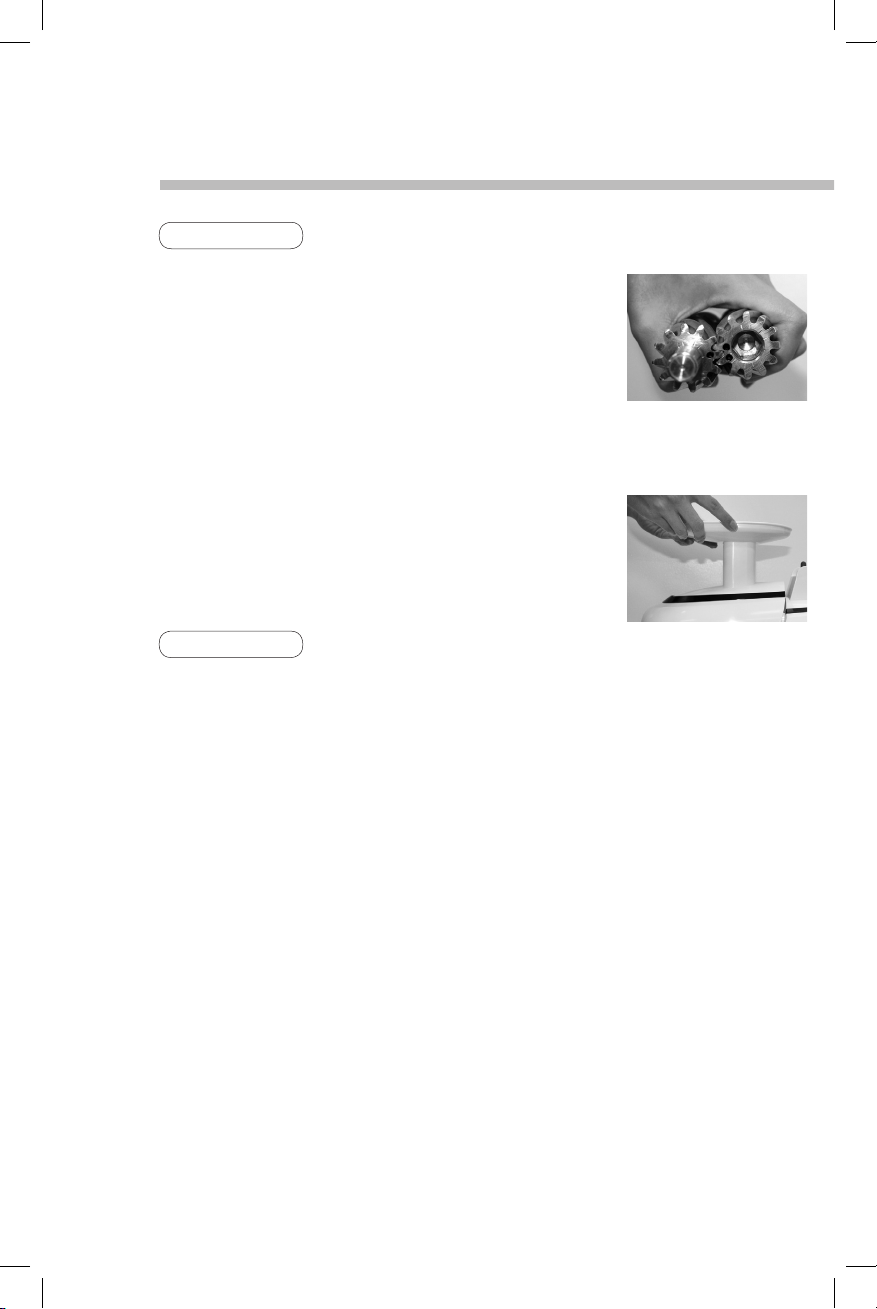
• Very important! When combining the Twin Gears for
assembly, make sure to align the locating dots marked on
the surface of the gears.
• Soak grains in water for 6 hours or more. Drain the grain and
put into the machine a little at a time, together with a small
amount of water.
• 10 minutes of rest after 30 minutes of operation! When operating your Green Star
Elite Juice Extractor continuously, stop operation for 10 minutes after each 30 minutes
of continuous use, and then resume operation.
• Always put the Safety Hood over the feeding chute before
using. The machine will not operate without the safety hood
in place.
Don’t
• Do not lift your Green Star Elite Juice Extractor with wet hands because it is heavy and
it may accidentally slip from your grip.
• Do not assemble or disassemble while the power cord is plugged in.
• Do not put fingers or hands into the Feeding Chute. Always use the Plunger.
• Do not disconnect the power plug from the electrical outlet with wet hands.
• Do not keep the juice extractor where children can reach it.
• Do not operate Green Star Juice Extractor on an unstable surface.
• Do not put any articles such as knives, spoons, or forks into the Feeding Chute.
• Do not forcibly operate the juice extractor or overload the Feeding Chute.
WARNING: NEVER REMOVE THE SAFETY HOOD WHILE THE MACHINE IS IN OPERATION.
5
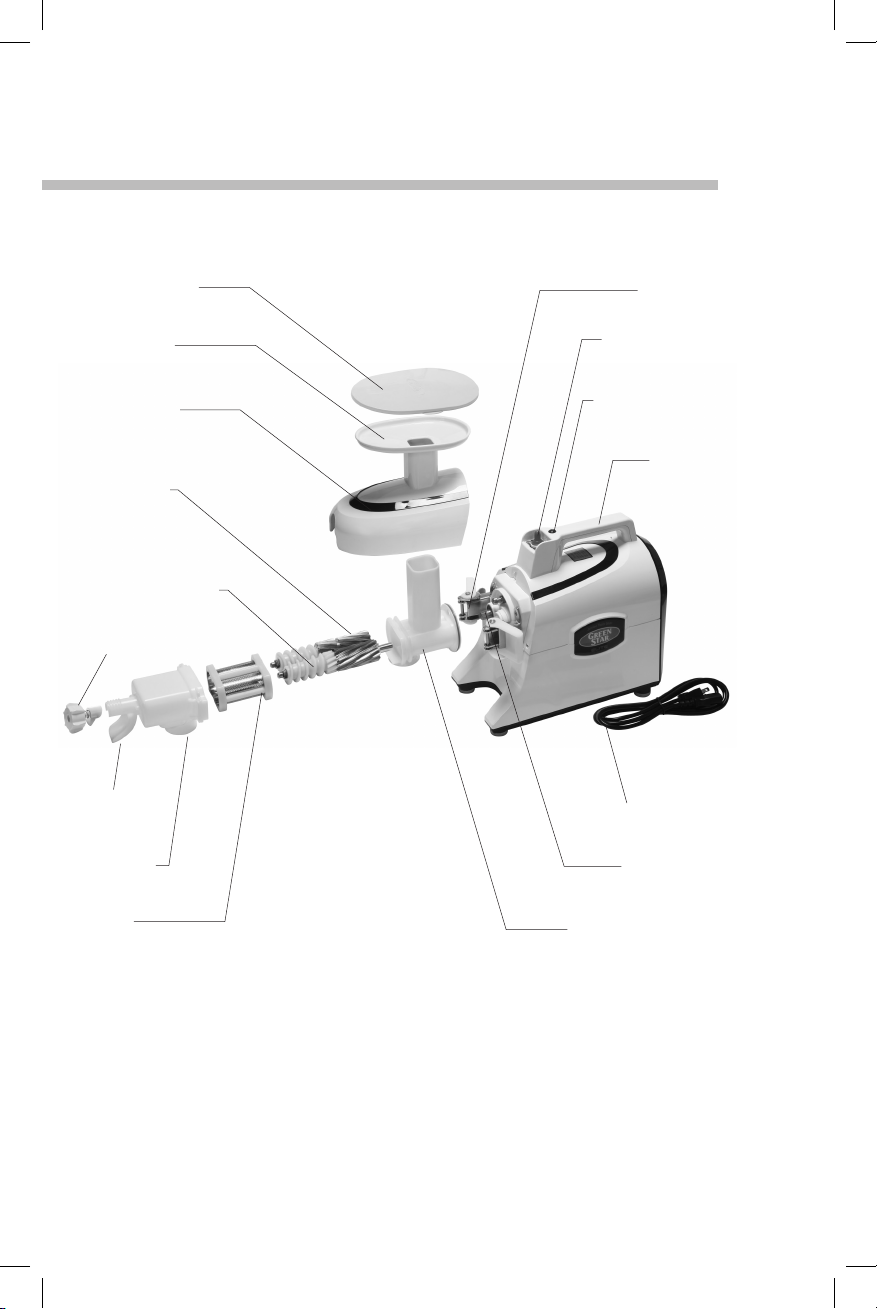
Green Star Elite Juice Extractor Parts
Juicer Diagram
Safety Tray Lid
Safety Tray
Safety Hood
Twin Gear:
Drive Gear
Twin Gear:
Free Wheel Gear
Juicing Knob
Pulp Outlet
Juice Outlet
Latches
Power Switch
Power Indicator
Light
Handle
Power Cord
Drive Shaft
Screen
6
Twin Gear Housing
with Feeding Chute
Setting Up Your Green Star Elite
A. Assembly
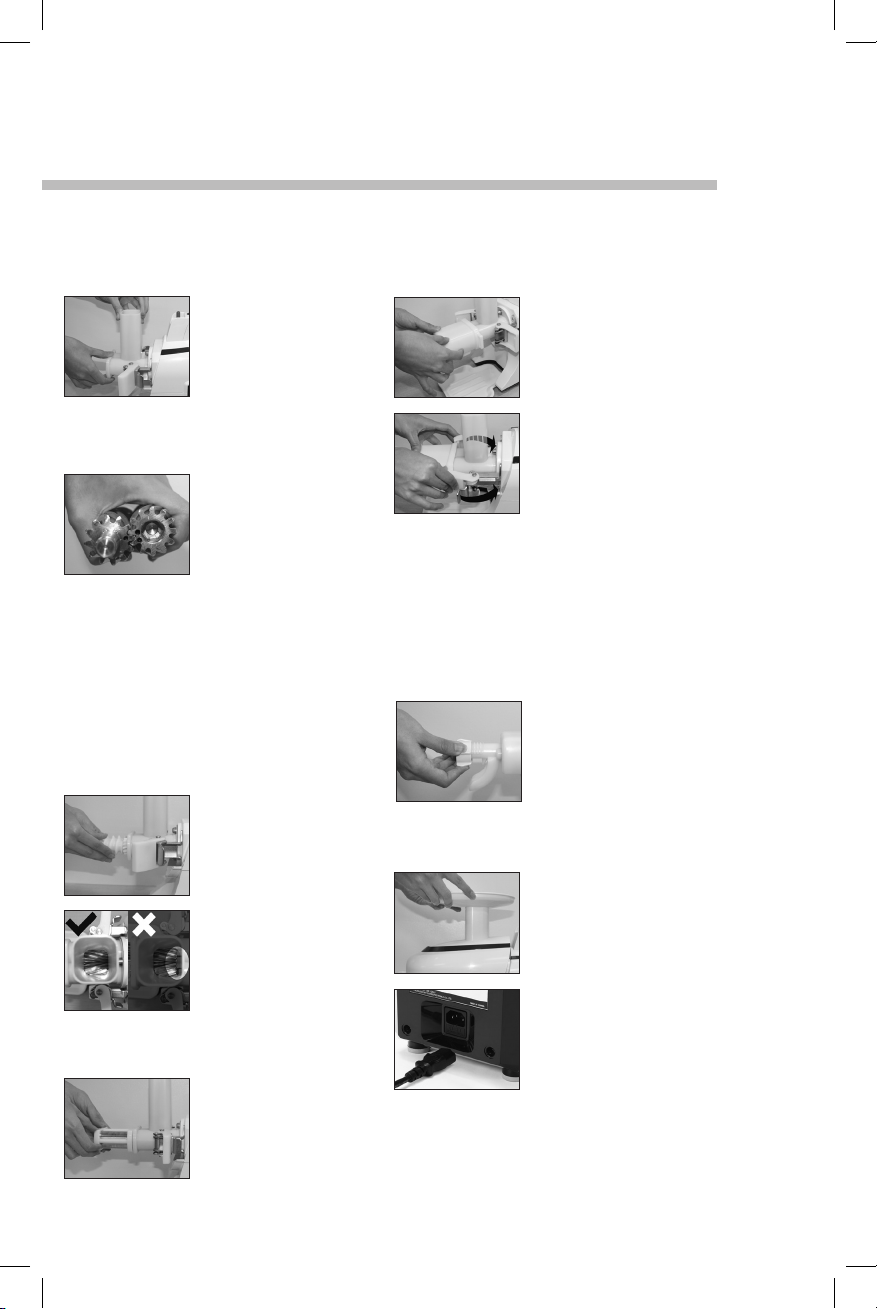
IMPORTANT: Make sure your Green Star Elite is unplugged from the electrical outlet before assembly.
1. Slide the Twin Gear
Housing onto the main body
and push it all the way back
onto the main body until it
fits snugly in place.
2. VERY IMPORTANT!
Assemble the Twin Gears
as follows:
• Find the Locating Dots
marked on the end surface
of each gear.
• Position the Locating Dots
so that the single dot on
the Free Wheel Gear is in
between the two dots on
the Drive Gear.
•
Holding the gears in this
position, slide them into the
Twin Gear Housing, steel
end first, so that the Free
Wheel Gear enters the right
slot, and the Drive Gear
enters the left slot. Push
back until they come to a
stop.
• Rotate the gears while
pushing them in until they
slide in completely and
lock into place. Look down
the feeding chute to see
that the gears are seated
properly. When seated
properly, you will NOT be
able to see any portion of
the drive shaft. If you see
any portion of the drive
shaft, keep rotating the
gears while pushing them
in, to lock them into place.
3. Slide the desired Screen
over the exposed portion of
the Twin Gears. See page
10 for more information on
which screen to select.
4. Slide the Outlet Casing
over the screen.
5. Close each Latch over
the ears of the Outlet Casing
and snap the latches shut by
pushing back on the metal
tabs.
Failure to properly seat the Twin Gears will
prevent the latches from shutting properly.
If this is the case, remove the Outlet Casing
and screen; rotate the gears while pushing
them in until they slide in completely and
lock into position; and reassemble. Damage
to the machine due to improper assembly is
not covered under your warranty.
6. Slide the Juicing Knob or
the Breadstick Knob (see
page 10 for details) into the
pulp outlet and turn clockwise to tighten. Tighten until
it comes to a comfortable
stop. Do not over tighten by
forcing it to turn.
7. Slide the Safety Hood
over the feeding chute.
8. Attach the Power Cord to
the rear of the machine and
plug the other end into an
electrical outlet.
8
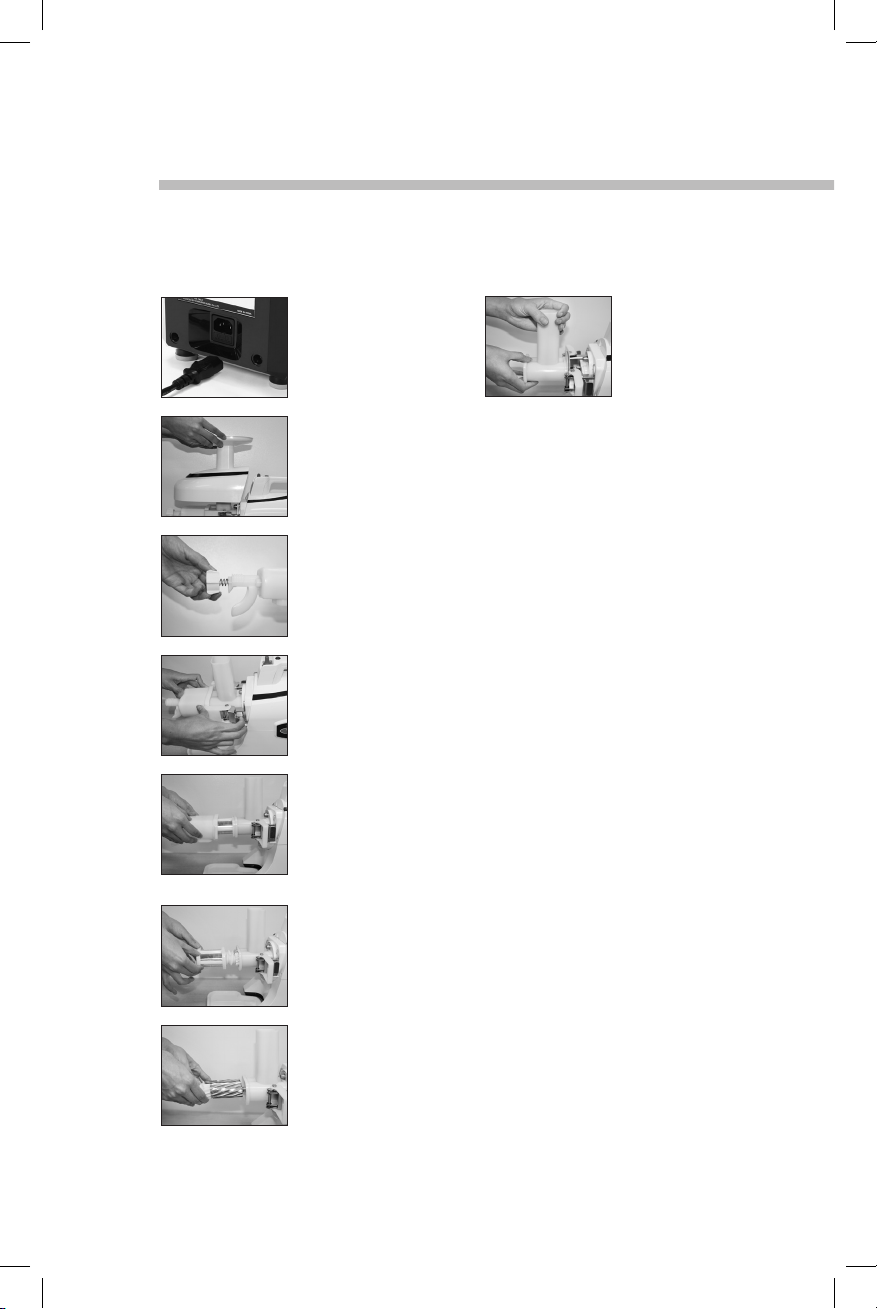
B. Disassembly
IMPORTANT: Make sure your juicer is switched off before disassembly
1. Unplug the Power Cord
from your electrical outlet,
and then remove the power
cord from the rear of the
machine.
2. Remove the Safety Hood
by lifting up the Safety Tray.
3. Turn the Juicing Knob
or Breadstick Knob counterclockwise to loosen it.
Remove it by sliding it out.
4. Unlock both Latches by
pulling on the metal tabs.
Open the latches away from
the Outlet Casing.
5. Remove the Outlet Casing
by sliding it away from the
main body. Note that the
Screen and/or the Twin
Gears may come out with
the Outlet Casing.
8. Remove the Twin Gear
Housing by holding the feeding chute and sliding it away
from the main body.
Note: The Twin Gears on your juicer never need
sharpening. They are not blades. They work by
‘biting’ off small bits of produce at a time, much
like your teeth. They do not grate or slice your
produce, allowing them to work at remarkably
low speeds and preserving fragile nutrients and
enzymes.
6. Remove the Screen.
7. Carefully slide the Twin
Gears out of the Twin Gear
Housing.
9

Setting Up Your Green Star Elite
C. Using the Screens
A few screens are provided to increase the versatility of your Green Star Elite.
1. Fine Screen: The fine screen is used to make vegetable and fruit
juices with as little pulp as possible in the juice. This screen is suitable for most types of vegetable and fruit juices, including carrots and
other root vegetables; crisp apples and other crisp fruits; spinach, kale
and other leafy greens, wheatgrass and other grasses, celery and other
fibrous stalks, and much more. Note that the pressure built up inside of
the screen may still push some finely ground pulp through the holes of
the screen.
2. Coarse Screen: The coarse screen is used to make vegetable and
fruit juices with some pulp mixed into the juice. This screen is suitable
for juices where a little pulp is desired inside the juice.
3. Homogenizing Screen (Open Screen): The homogenizing screen is
used for basic food processing. When using the Homogenizing Screen,
Green Star Elite processes your ingredients and releases them through
the juice outlet underneath. Use the Homogenizing Screen when
grinding nuts and seeds to make pâtés, baby foods, etc. When using
the Homogenizing Screen, slide it over the Twin Gears so that the
rectangular hole faces downward.
4. Breadstick Screen(Closed Screen): The Breadstick Screen is used
for food processing where an extra smooth consistency is required.
When using the Breadstick Screen, Green Star Elite processes your
ingredients and pushes them through the pulp outlet, adding increased
processing time. Use the Breadstick Screen with the Breadstick Knob
(see below) to make breadsticks, mochi, sorbets, nut butters, and other
recipes where a smoother consistency is desired.
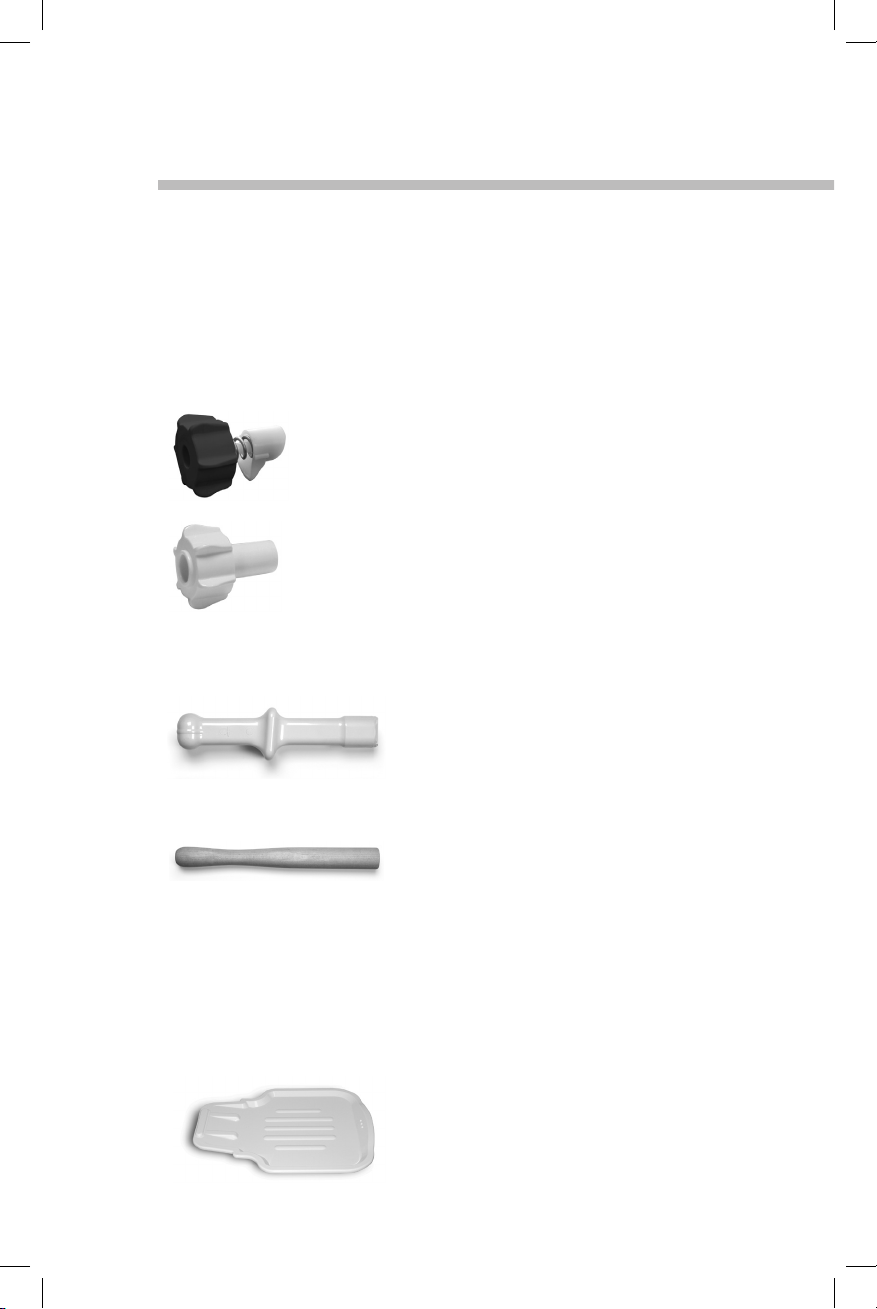
D. Using the Knobs
1. Juicing Knob:
a. With the Fine Screen or the Coarse Screen: Use the juicing
knob when juicing vegetables and fruits. The juicing knob adjusts
how much the pulp is squeezed before it is pushed out through the
pulp outlet. Tightening the knob increases the amount of pressure
that is applied to the vegetables and fruits while extracting juice.
Tightening the knob will get more juice from firmer vegetables like
carrots, crisp apples, celery, etc. However, a tightened knob may
also prevent the juicer from successfully ejecting the pulp of softer
produce such as wheatgrass, or leafy greens.
10
• TIGHTEN THE KNOB: to extract maximum juice from firmer
vegetables and fruits.
• LOOSEN THE KNOB: to extract juice from softer vegetables and
fruits.
b. With the Homogenizing Screen: Tighten the juicing knob all the way
when using the homogenizing screen to make sure the processed ingredients
do not get pushed out through the pulp outlet.
2. Soft Fruit Knob (optional accessory):
Use the Soft Fruit Knob the same way you would use the Juicing Knob
when juicing softer produce. The soft fruit knob has a softer spring,
allowing pulp to be ejected more easily while juicing softer produce.
3. Breadstick Knob:
With the Breadstick Screen: Use the breadstick knob with the breadstick screen to make breadsticks, mochi, sorbets, or other foods where a
smoother consistency is desired. The breadstick knob shapes your
ingredients into a tube as they are pushed through the pulp outlet.
E. Using the Plungers
1. Plastic Plunger: The plastic plunger is specially
designed to push your vegetables through without the
plunger touching the Twin Gears. Press firmly on the
plunger to push the food down through the feeding chute.
The plastic plunger will stop before it comes in contact
with the twin gears.
2. Wooden Plunger: The wooden plunger is made of
wood and can be used to push your ingredients all the
way down to the Twin Gears. The wooden plunger can
touch the Twin Gears without damaging them.
F. Using the Drip Tray
Simply slide the narrow end of the drip tray between the two feet of the Green Star Elite
and place the juice pitcher on top of the drip tray to prevent messy drips from staining
your counter.
11
 Loading...