

Page 1

TABLE OF CONTENTS
Warranty 4
Warranty Registration Card Insert
When You Need Service 5
Important Safety Instructions 6
Do’’s and Dont’’s 7
Green Star Juice Extractor Features
Standard Parts 8-9
Parts Order Form 10
Assembling and Disassembling 11-14
Machine Set-Ups(for different uses)
Screens and Plastic Plunger 15
To juice Wheat Grass 15
To make Pasta, Rice Cake(mochi),
Bread Sticks, Bagels, etc. 16
Cleaning and Maintenance 17
Trouble Shooting 18
Helpful Hints 19
Recipe Index 22
Juices and Drinks 23~26
Bread Sticks and Mochi(Rice Cakes) 27
Pasta and Noodles 28
Pate and Croquettes 29
Soup 30
Dessert 31
Page 2

4
We warrant to you, the end-user customer who has properly registered after purchasing the Green Star
Juice Extractor (hereinafter referred to as “G.S.”) for a valuable consideration, that the plastic parts, motor
and the Twin Gears of this G.S. will be free from defects in materials and workmanship for a period of five
(5) years from the date of purchase. All other parts, including but not limited to the Juice Pitcher, Cleaning
Brush, Wooden or Plastic Plunger and the Strainer are not subject to any warranty.
In order for you to receive the benefits of this warranty, you are required to complete and mail the warranty
registration card (next 2 pages) to us within ten (10) days following the purchase of your G.S.
1. No warranty will be provided until after we have actually received the enclosed warranty registration
card, containing all the requested information, within ten (10) days of the date of the original purchase.
The warranty is only good for the original purchaser for value. This warranty is non-transferable.
2. If the G.S. exhibits defects while in normal household use, we, upon our actual receipt of a written notice
of such defects from you during the warranty period, we will, at our option, either repair or replace the
G.S. which prove to be defective. However, we have no such obligation to repair or replace until after
you have, by insured mail and in protective packaging*, delivered the G.S. to the location of your
service center as set forth on page 5. Replacement G.S. may be either new or like-new. G.S. may
contain re-manufactured or re-conditioned parts, which are equivalent to new in performance or may
have been subject to incidental use.
3. We do not warrant that the operation of the G.S. will be uninterrupted or error free. In no event shall our
liability exceed the retail value of the G.S.
4. All warranty and repair services must be performed at a warranty service center, which is located within
the country where the Green Star was originally purchased. However, in the event that: [Ⅰ] the
machine must be serviced at a service center, which is not located within the country where the
machine was purchased; or [Ⅱ] there in no service center within the country where the machine is
located and must be shipped to a service center in another country, then thosc service centers are
responsible for the parts and service only, and any and all costs relating to the shipping, delivery and
handling of the machine to and from those service centers shall be the sole responsibility of the owner.
This Warranty does not cover defects resulting from: [a] failure to operate the G.S. in accordance with the
instructions; [b] use of parts or supplies not provided or authorized by us; [c] negligent, improper or
inadequate maintenance; [d] service performed or attempted by unauthorized service person; [e]
damages, accidental or otherwise to the G.S., which are not directly caused by us or the manufacturer; or
[f] damages resulting from abuse, tampering, misuse, commercial use, or unauthorized modification of the
G.S.
WE MAKE NO OTHER EXPRESS OR IMPLIED WARRANTY OR CONDITION WHETHER WRITTEN
OR ORAL. TO THE EXTENT ALLOWED BY LOCAL LAW, ANY IMPLIED WARRANTY OF FITNESS
FOR A PARTICULAR PURPOSE OR IMPLIED WARRANTY OR CONDITION OF MERCHANTABILITY
IS LIMITED TO ONE (1) YEAR. In the event that such limitation or exclusion on the duration of an implied
warranty is not allowed in the state or county wherein you reside, the above limitation or exclusion will not
apply. This warranty gives you specific legal rights and protection, and you might also have other rights
that vary from state to state, or county to county.
TO THE EXTENT ALLOWED BY LOCAL LAW, THE REMEDIES IN THIS WARRANTY STATEMENT
ARE YOUR SOLE AND EXCLUSIVE REMEDIES. EXCEPT AS INDICATED ABOVE, IN NO EVENT
WILL WE BE LIABLE FOR DIRECT, SPECIAL, INCIDENTAL, CONSEQUENTIAL (INCLUDING LOST
PROFIT), OR OTHER DAMAGE, WHETHER BASED IN CONTRACT, TORT, OR OTHERWISE. Some
states or counties may not allow the exclusion or limitation of incidental or consequential damages. If you
reside in such a state or county, the above limitation or exclusion may not be applicable.
Do not send your G.S. back to the service center without return
authorization.
UU
Save Original Shipping Box
WARRANTY
(Please read carefully)
Page 3

●
Do you have an Internet Service?
1. Yes 2. No
●
Have you ever purchased any products through Internet Stores?
1. Yes 2. No
●
Do you use e-mail in your business communication?
1. Yes 2. No E-mail Address
●
Do you use e-mail in your private communication?
1. Yes 2. No E-mail Address
●
Please check all that apply to your household
8. Have a VCR
9. Use a Personal Computer
10. Have a Dog
11. Have a Cat
Thanks for taking the time to fill out this questionnaire. Your answers will be used for market research studies
and reports and will help us better serve you in the future. They will also allow you to receive important mailings
and special offers from a number of fine companies whose products and services relate directly to the
information indicated above.
Please check here if, for some reason, you would prefer not to participate in this opportunity.
If you have comments or suggestions C/O Tribest Corp.
about our product, please write to: 12020 Woodruff Ave., #C
Green Star Customer Relations Downey, AC. 90241
Green Star Juicer Registration:
Place
Stamp
Here
4. Support Health Charities
5. Subscribe to Cable TV
6. Have a Microwave Oven
7. Have a CD Player
1. Regularly Purchase Items
Though the Mail
2. Military Veteran in Household
3. Member of Frequent Flyer Program
TRIBEST CORP.
DBA GREEN POWER INTL
14109 PONTLAVOY AVENUE, SANTA FE, SPRINGS,
CA 90670, USA
Page 4

PUT GLUE HERE TO SEAL
IMPORTANT!
GREEN STAR
TM
JUICER
REGISTRATION FORM
How did you first become aware of this Juicer?
(Please check only one.)
1. Received as Gift.
2. Magazine Advertisement
3. Newspaper Advertisement
4. TV Advertisement
5. Radio Advertisement
6. In-store Display/
Demonstration
7. Consumer Magazine
Article
8. Friend’s/Relative’s
Recommendation
9. Salesperson’s
Recommendation
10. Information Through
the Mail
11. Other
What factors most influenced your decision to
purchase this juicer?(Please check up to three.)
1. Green Star
Reputation
2. Style/Appearance
3. Value for the Price
4. Special Product
Features
5. Warranty
6. Rebate or Sale Price
7. Quality/Durability
8. Consumer Magazine
Article
10. Reputation of the
Dealer
11. Friend’s/Relative’s
Recommendation
12. Salesperson’s
Recommendation
13. Other
For your primary residence, do you:
1. -Own a House?
2. -Own a Townhouse or Condominium?
3. -Rent a House?
4. -Rent an Apartment, Townhoesr or Condominium?
Occupation:
1. Homemaker
2. Professional/Technical
3. Upper Management/
Executive
4. Middle Management
5. Sales/Marketing
6. Clerical or Service Worker
7. Tradesman/Machine Oper./
Laborer
8. Retired
9. Student
10. Self Employed/Busines
owner
Which group describes your annual family income?
1. Under US$15,000
2. US$15,000~US$19,999
3. US$20,000~US$24,999
4. US$25,000~US$29,999
5. US$30,000~US$34,999
6. US$35,000~US$39,999
7. US$40,000~US$44,999
8. US$45,000~US$49,999
9. US$50,000~US$59,999
10. US$60,000~US$74,999
11. US$75,000~US$99,999
12. US$100,000~US$over
Which credit cards do you use regularly?
1. American Express
3. Master Card.
5. Discover
7. Oil Company, etc.
8. Do not use credit cards
2. Diners Club
4. Visa.
6. Department Store
OPTIONAL SURVEY
PLEASE FILL OUT AND RETURN WITHIN THE NEXT IO DAYS
1. Mr
First Name Initial Last Name
1. Mrs 1. Mis 1. Miss
Street
Apt.No
City State Zip
Phone
(Area Code)
Month Day Year
Email Address
Date of purchase:
a. Model number: b. Color
c. Serial#
1.GS-1000 3.GS- 3000 1.White 3.Green
2.GS-2000 4.GP-E1503 2.Off-White 4.Ivory
Purchased form:
Dealer
Address
Phone
Page 5

In the unlikely event that you do need service on your GREEN STAR JUICE
EXTRACTOR, or if it fails to function properly while within the warranty period
(used in normal household operation only.) - PLEASE FOLLOW THE
INSTRUCTIONS BELOW :
Contact the nearest authorized Green Star Service Center.
SERVICE CENTERS
● Explain the problem you are experiencing. Call Customer Service(888-254-7336)to get a return
authorization number to send your unit to the service center.
● Pack your Green Star securely in the original shipping box. Make sure all parts are enclosed.
Fill out the service request form below, detach it and enclose it in the shipping box.
● Securely seal the shipping box with strapping tape.
● Address the box to the service center. Be sure to put your return address on the outside of
the package.
● It is always wise to insure the package against possible damages or loss in transit. Ship prepaid.
WHEN YOU NEED SERVICE
Detach Form on dotted Line
SERVICE REQUEST FORM
1. First Name Initial Last Name
Address: Street Apt #
City State Zip
Phone
2. Serial# Model #
3. Reason for service request
4. Date of Purchase 5. Place of Purchase
6. Name of parcel/post carrier (In case of damage during delivery)
5
GREEN POWER INTL. 14109 PONTLAVOY AVENUE, SANTA FE, SPRINGS, CA 90670, USA
TEL : 888-254-7336, FAX : 562-623-7160
EMAIL : [email protected] WEBSITE : www.greenstarjuicer.com
Page 6

6
1. Please read all instructions carefully.
2. To protect against risk of electric shock, do not put the motor base in water or other
liquid.
3. Close supervision is necessary when any appliance is used by or near children.
4. Unplug the appliance from the electrical outlet when not in use, before assembling or
disassembling and before cleaning.
5. While the machine is in operation, avoid contact with its moving parts.
6. Do not operate any appliance with a damaged cord or plug, after the appliance
malfunctions, is dropped,or is damaged in any manner. Return the appliance to the
nearest authorized service center for examination and possible repair to prevent
electrical shock or injury.
7. The use of attachments not recommended or sold by the manufacturer may cause
fire, electrical shock or injury.
8. Do not use outdoors.
9. Do not let the cord hang over the edge of a table or counter.
10. Do not let the cord contact any hot surfaces such as the stove.
11. Always make sure the two latching arm knobs are fastened securely in place before
the motor is turned on. Do not unfasten those knobs while the juicer is in operation.
12. Be sure to turn the switch to the off position after each use. Make sure the motor
stops completely before disassembling.
13. Do not put your fingers or other objects into the juicer opening while it is in operation.
If food becomes lodged in the feeding chute, use the wooden plunger or another piece
of fruit or vegetable to push it down. When this method is not possible, turn the motor
off and disassemble the juicer to remove the remnant of food.
14. Your juicer is for household use only.
15. Please refer to : “INSTRUCTIONS”before operating.
16. Please refer to”When You Need Service”in case your juicer is functioning abnormally.
17. Do not disassemble any parts other than those necessary for normal operation or
cleaning of your juice extractor(such as housing, twin gears, screen).
18. Your Green Star Juice Extractor must be grounded electrically for proper, safe
operation. Use only the 3-prong plug provided. Or use a proper plug or adapter
according to the electrical safety code in your country.
19. Do not use the appliance for other than its intended use.
IMPORTANT SAFETY INSTRUCTIONS
SAVE THESE INSTRUCTIONS
Page 7
7
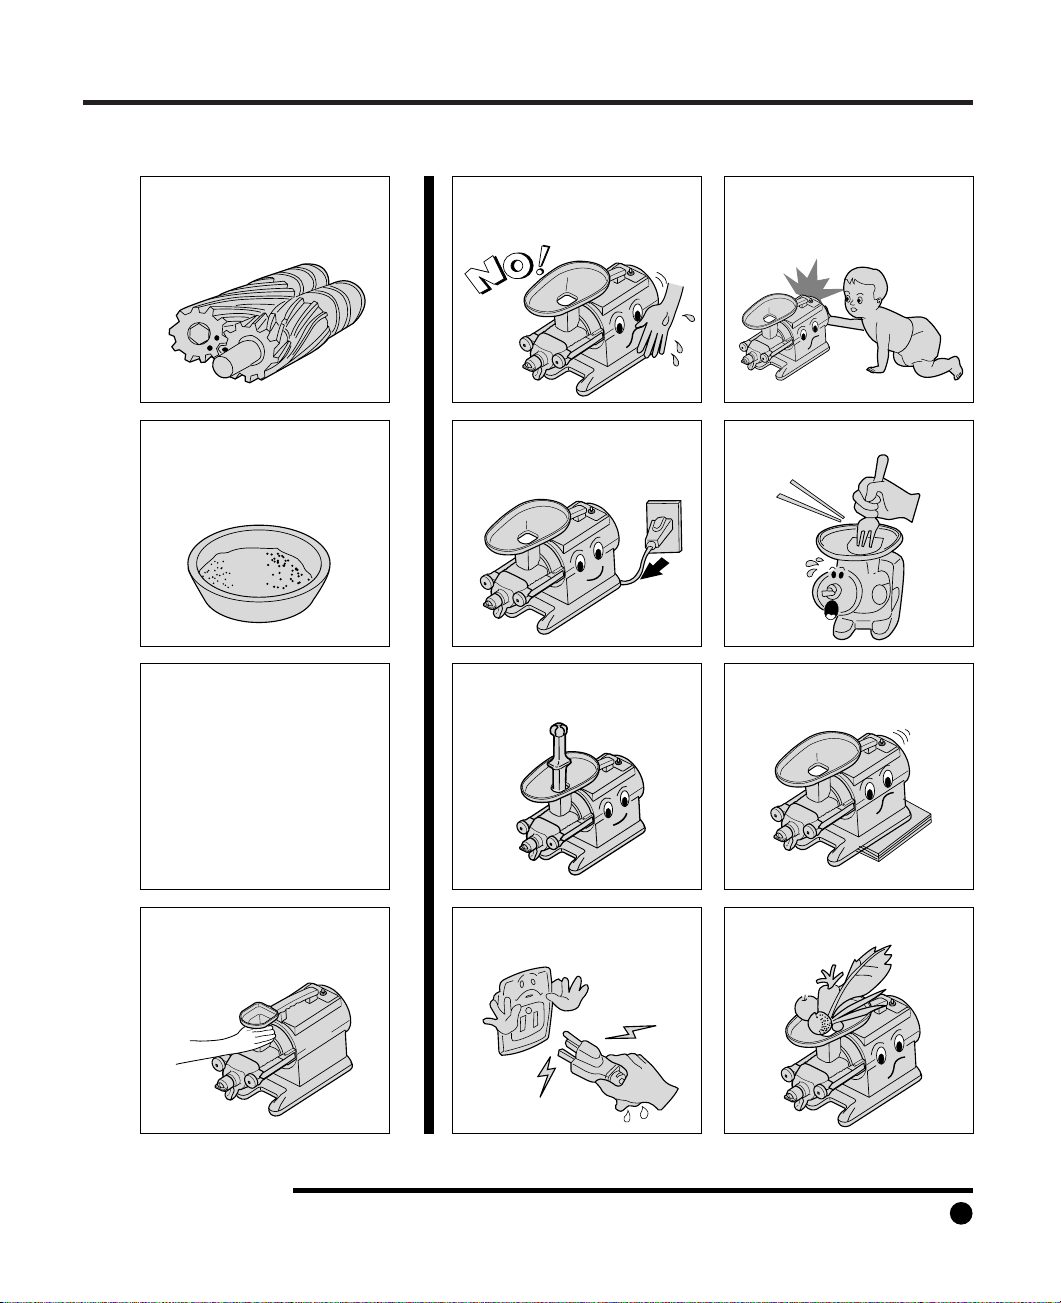
DO’S AND DON’TS
DO : DON’T :
● Very important! When combining
the Twin Gears for assemblymake sure to align the locating
dots marked on the surface of the
gears.
● Soak grains in water for 6 hours
or more. Drain the grain and put
into the machine a little at a time,
together with a small amount of
water.
● When you operate your Green
Star Juice Extractor continuously,
stop operation for 10 minutes after
each 30 minutes and then resume
operation.
30min/operation
10min/rest
● Please always put the Feeding
Chute into the Twin Gear Housing
before using. How to assemble
the Feeding Chute can be found
on page 11.
● Do not lift your Green Star Juice
Extractor with wet hands because
it is heavy and it may accidentally
slip from your grip.
● Do not assemble or disassemble
while the power cord is plugged
in.
● Do not put fingers or hands into
the Feeding Chute. Always use
the Plunger.
● Do not disconnect the power plug
from the electrical outlet with wet
hands.
● Do not keep the juice extractor
where children can reach it.
● Do not put any articles such as
Knives, spoons, or forks into the
Feeding Chute.
● Do not operate Green Star Juice
Extractor on an unstable surface.
● Do not forcibly operate the juice
extractor or overload the Feeding
Chute.
WARNING : NEVER REMOVE THE TOP SECTION OF THE FEEDING CHUTE WHILE THE JUICER IS IN USE
Page 8
8
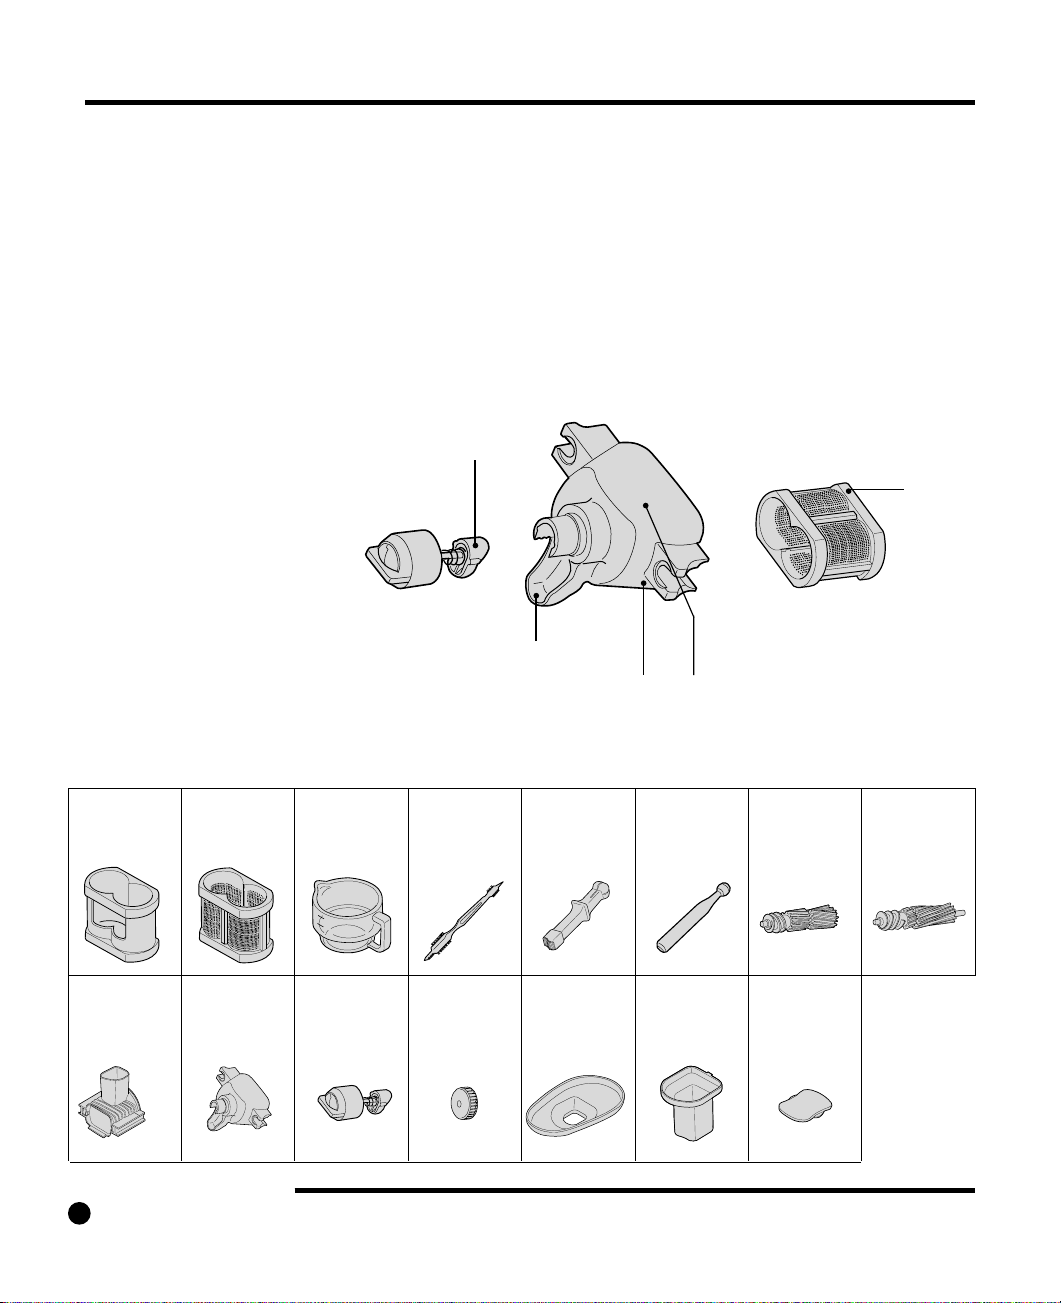
GREEN STAR JUICE EXTRACTOR
Juice Outlet Pulp Dischrge Casing
Pulp Dischrge Outlet
Screen
Outlet Adjusting Knob
Twin
Gear Housing
CJGS5-024A
Pulp
Discharge Casing
CJGS5-028A
Outlet
Adjusting Knob
CJGS5-026A
Latching
Arm Knob
CJGP5-006A
Safety Tray
CJGP5-037A
Feeding Chute
CJGP5-027A
Feeding
Chute Cover
CJGP5-029A
Homogenizing
Blank
(Open Blank)
CJST1-051A
Fine Screen
CJST1-034A
Juice Pitcher
CJST1-040A
Cleaning Brush
CJST1-039A
Plastic Plunger
CJGP5-036A
Wooden
Plunger
CJST1-038A
Free Wheel
Gear
CJST1-045A
Drive Gear
CJST1-044A
Green Star Parts(standard for GS-1000):
7
0
0
c
c
5
0
0
c
c
Page 9
9
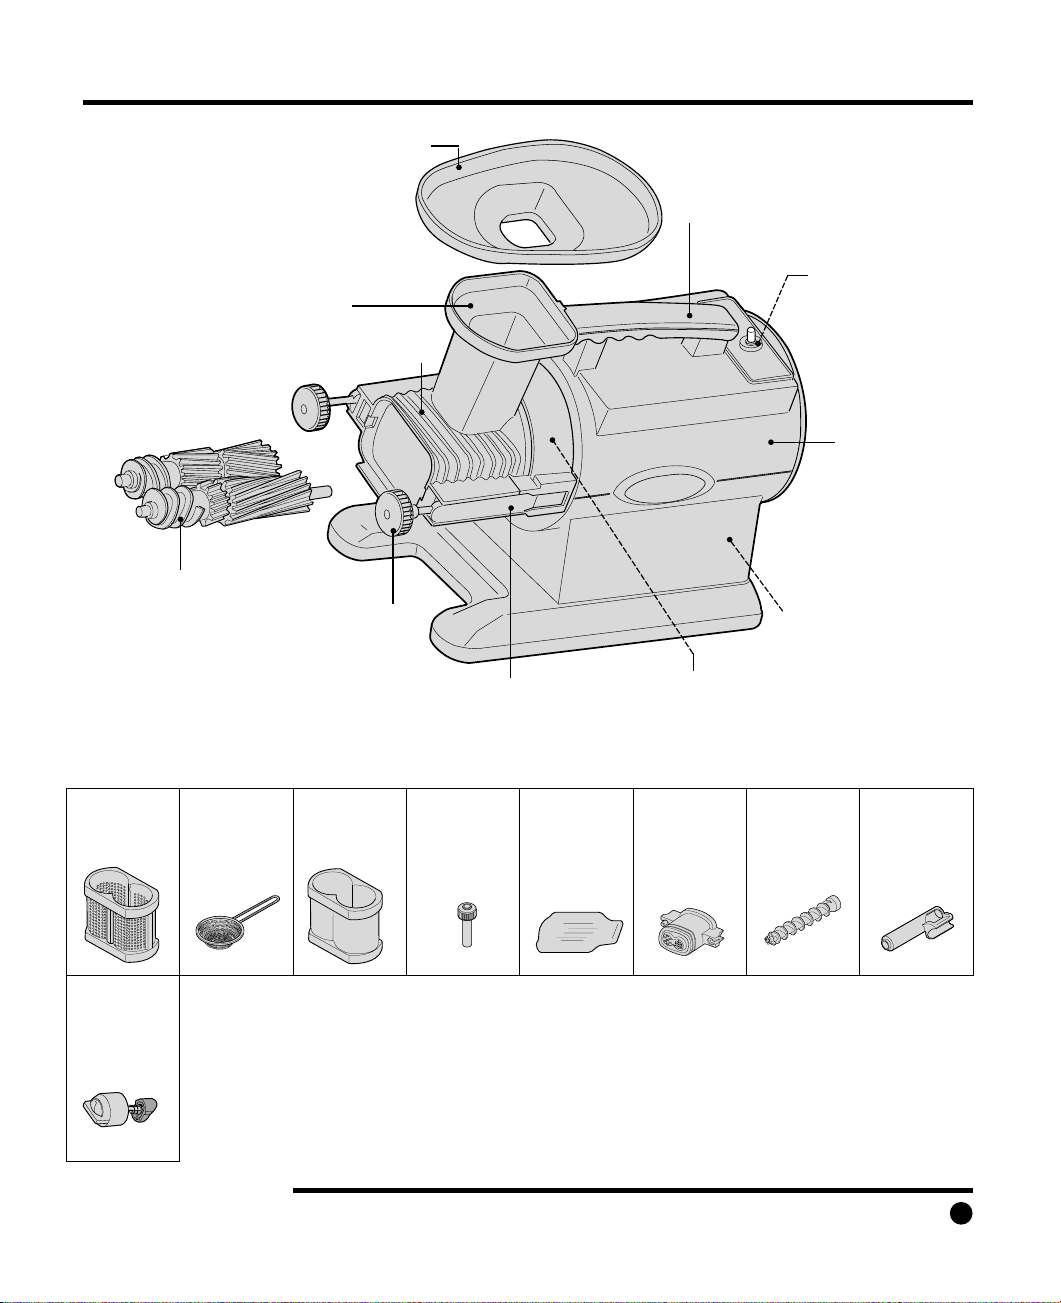
FEATURES AND PARTS
Twin Gear
Coarse Screen
CJST1-035A
Strainer
CJST1-042A
Bread Stick
Blank
(Closed Blank)
CJST1-033A
Bread Stick
Guide
CJGS5-042A
Drip Tray
CJGP5-038A
Pasta Screen
CJST1-032A
Pasta Screw
CJST1-030A
Pasta Guide
CJST1-031A
Green Star parts(optional parts available for upgrade):
Power Cord
Storage
Compartment
Latching Arm
Speed Reducer Cover
Feeding Chute
Convenience Handle
Main Body
(Motor Unit)
Power Switch
Latching Arm Knob
Safety Tray
TwinGearHousing
Outlet Adjusting
Knob-Soft
CJGS5-027A
Page 10

GREEN STAR PARTS:
Payment Method
Check/Money order payable to Tribest Corp. enclosed.
Visa or Master card shown below
Card Number Expire
Card Holder’s Name Authorized Signature Date
Your Business Name :
Billing Address :
Shipping Address :
(if different from billing)
Phone Number :
Buyer and Signaure :
Send this order form, along with your method of payment in a stamped envelope to the nearest Green Star Service
Center or to: Tribest Corp., P.O.Box 4089, Cerritos, CA 90703
10
GREEN STAR PARTS & Order Form
NO. Ordered
Part Number
CJGS5-024A
CJGS5-028A
CJGS5-026A
CJST1-044A
CJST1-045A
CJST1-034A
CJST1-051A
CJST1-040A
CJST1-038A
CJGP5-036A
CJST1-039A
CJGP5-037A
CJST1-035A
CJST1-042A
CJGP5-038A
CJST1-033A
CJGS5-042A
CJST1-032A
CJST1-030A
CJST1-031A
CJGS5-027A
Includes 1 Free Wheel Gear & 1 Drive Gear
Includes 1 Pasta Screen, 1 Pasta Screw & 1 Pasta
Includes 1 Bread Stick Blank & Bread Stick Guide
included
included
included
included
included
included
included
included
included
included
included
included
included
Optional
Optional
Optional
Optional
Optional
Optional
Optional
Optional
Optional
included
included
included
included
included
included
included
included
included
included
included
included
included
included
included
included
included
included
included
included
included
Optional
$195.00
$35.00
$20.00
$10.00
$50.00
$50.00
$22.00
$9.00
$12.00
$6.00
$9.00
$6.00
$9.00
$22.00
$8.50
$9.00
$9.00
$9.00
$25.00
$9.00
$9.00
$10.00
$95.00
$43.00
$18.00
Main Body With Motor
Twin Gear Housing
Pulp Discharge Casing
Outlet Adjusting Knob-Regular
Drive Gear
Free Wheel Gear
Fine Screen
Homogenizing Blank
Juice Pitcher
Wooden Plunger
Plastic Plunger
Cleaning Brush
Safety Tray
Coarse Screen
Strainer
Drip Tray
Bread Stick Blank
Bread Stick Guide
Pasta Screen
Pasta Screw
Pasta Guide
Outlet Adjusting Knob-Soft
Assorted Sets price
Twin Gear Set
Pasta Set
Bread Stick Maker Set
Subtotal
TAX
Shipping/Handling
Total Enclosed
Total
Quantity
Unit Price
GS-3000
GS-1000
Shipping & Handling Chart
(Via Surface)
Merchandise Shipping &
Subtotal Handling charge
Less than U$20.00 U$7.00
U$20.00 - U$30.00 U$8.00
Over U$30.00 U$8.00 plus 5% of Subtotal
included
included
included
included
included
included
included
included
included
included
included
included
included
included
included
included
Optional
Optional
Optional
Optional
Optional
Optional
GS-2000
Page 11
11
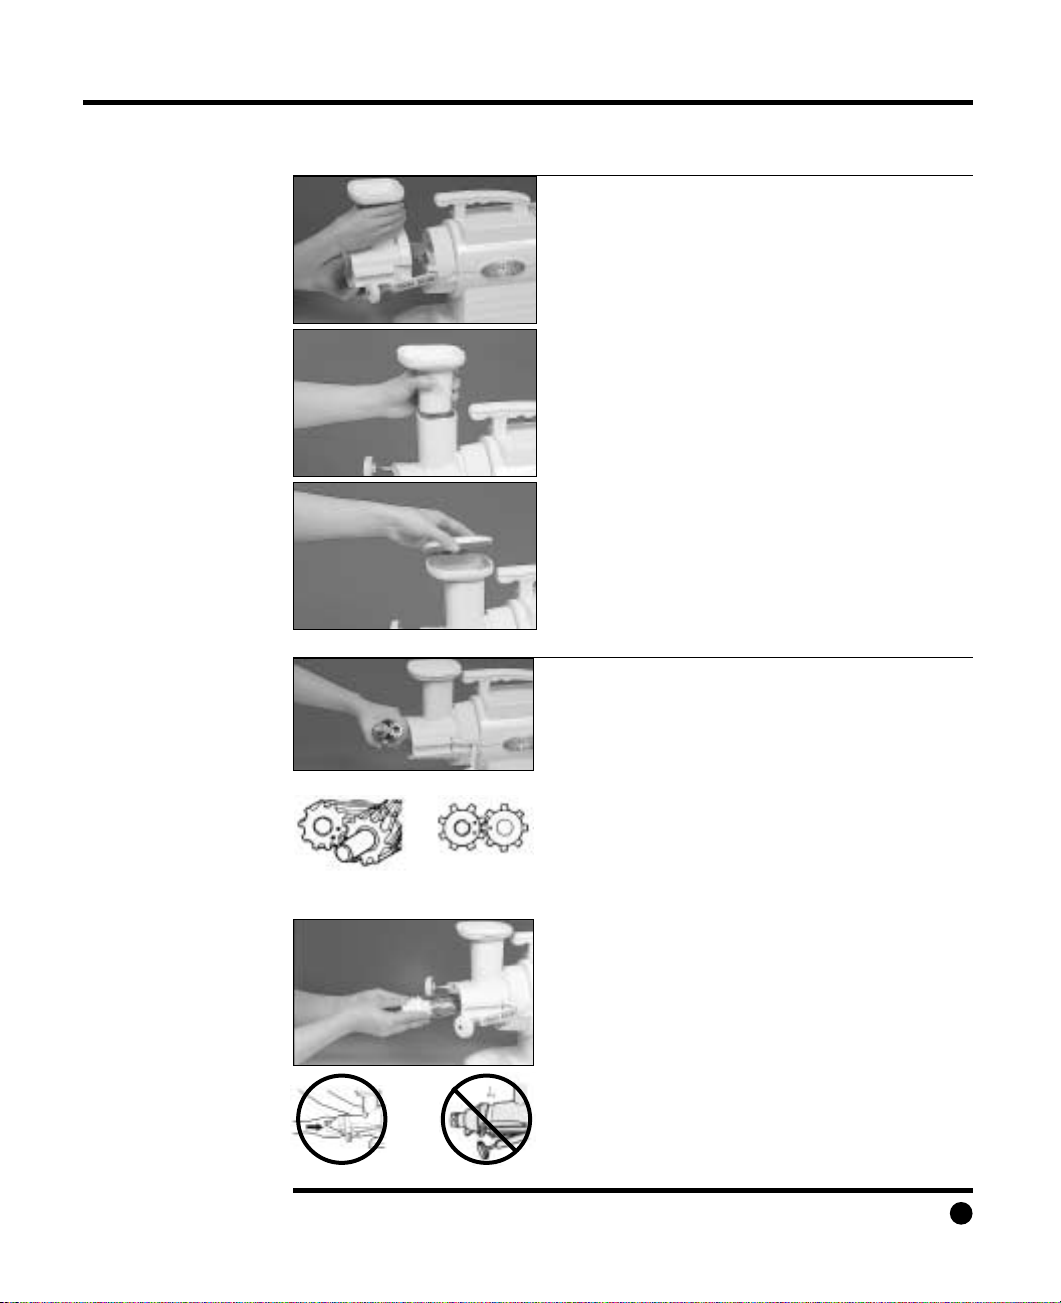
Safety Reminder: Make sure to unplug from the outlet before assembling.
GREEN STAR ASSEMBLY
1. Join the Twin Gear Housing to the body
with the Latching Arm Knobs loosened
and the Latching Arms open.
2. Very Important!
Assemble the Twin Gears as follows:
Find the ‘Locating Dots’ marked on the
end surface of each gear. Position the
‘Locating Dots’ so that the single dot is
betwewe en the two dots on the other gear.
Holding the Twin Gears in this position,
insert them into the Twin Gear Housing.
While assembling your juicer, if you want
to check whether the Twin Gears are
seated properly, look down the feeding
chute. If you see any part of the drive
shaft in front of the left hand side gear,
you need to jiggle/push the left hand side
gear a little more. If all you see is the
gear threads, the gears are fully seated
into position.
Failure to properly seat the Twin Gears
could result in damage to the Gears and
the Drive Shaft which may not be covered
under the warranty.
Note :
Before putting your machine away for future
use, once it has been cleaned and dried, cover the
Feeding Chute with its protective lid. Simply place
the Feeding Chute Lid on top of the Feeding Chute,
with the two “ears” pointing to the sides of the juicer
and the oval end of the lid toward the front of the
machine. Gently push it down into position. Remove
lid before using the juicer.
Insert the Feeding Chute into the Twin
Gear Housing “neck”, with the small
rectangular tab toward the rear of the
machine.
Drive Gear
↘
Position the 1 dot between the 2 dots and imsert
them in to the twin gear housing.
Free Gear
↙
↑
Drive Gear
Gap
↑
Free Gear
×
Page 12
12
GREEN STAR ASSEMBLY
(Cont’d)
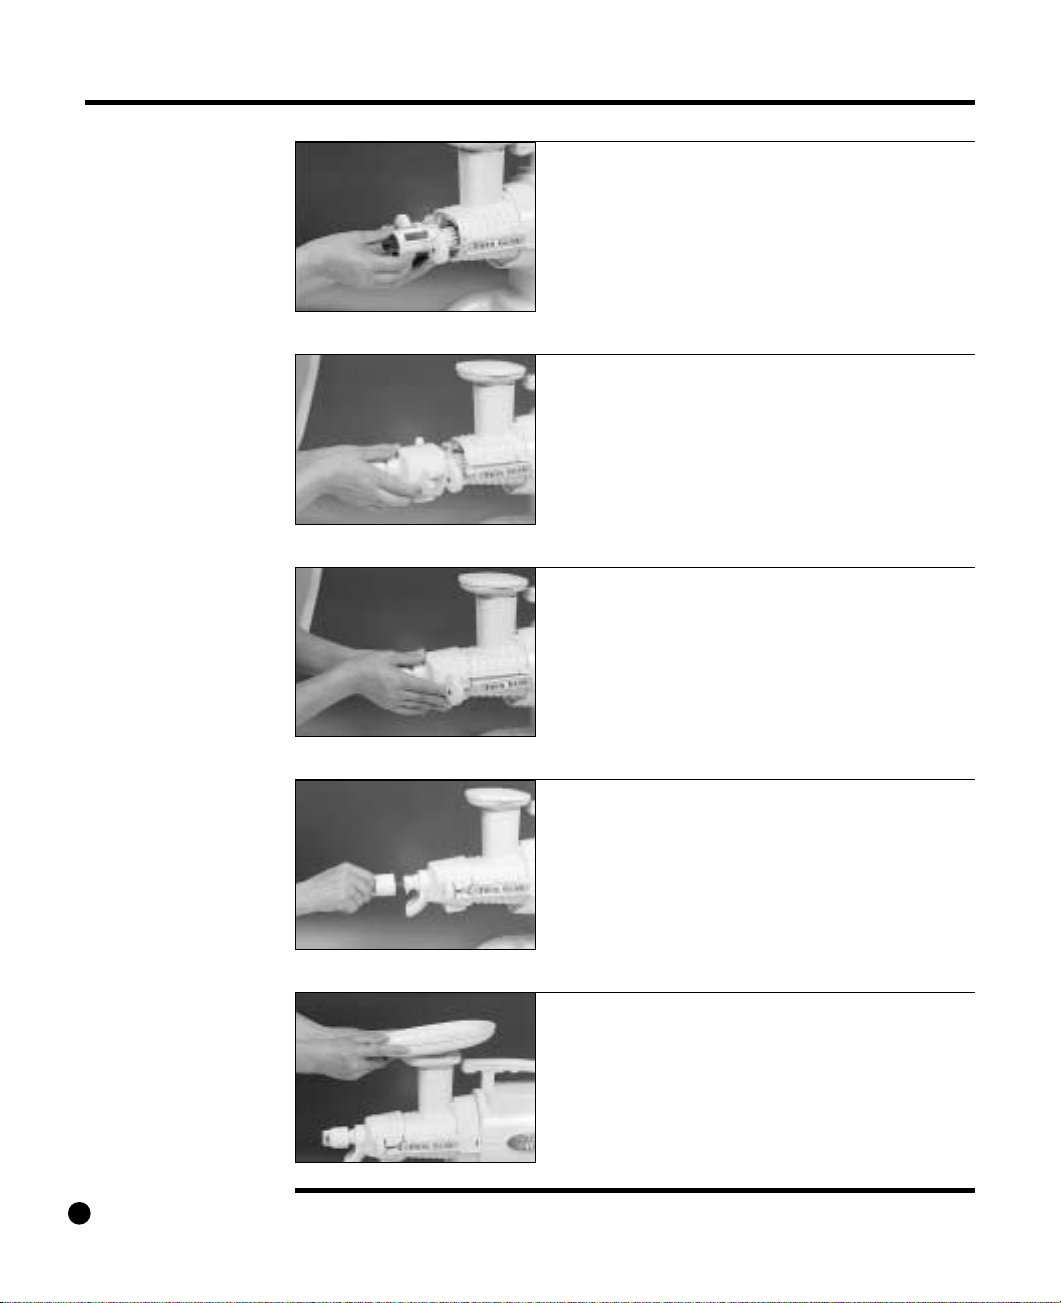
3. Slide the desired Screen or Blank over
the Twin Gears and into the Twin Gear
Housing.
4. Slide the Pulp Discharge Casing over
the Twin Gear Housing.
5. Place each Latching Arm into the
corresponding groove of the Twin Gear
Housing. Turn both Latching Arm
Knobs clockwise and tighten.
6. Assemble the Outlet Adjusting Knob.
When the Outlet Adjusting Knob comes
to a stop, it is considered ‘tight’. You may
be able to twist the knob to get it to go in
further, but, do not over-tighten.
7. Place the Safety Tray on the Feeding
Chute.
Page 13
13
Safety Reminder: Make sure to unplug from the outlet before disassembly
GREEN STAR DISASSEMBLY
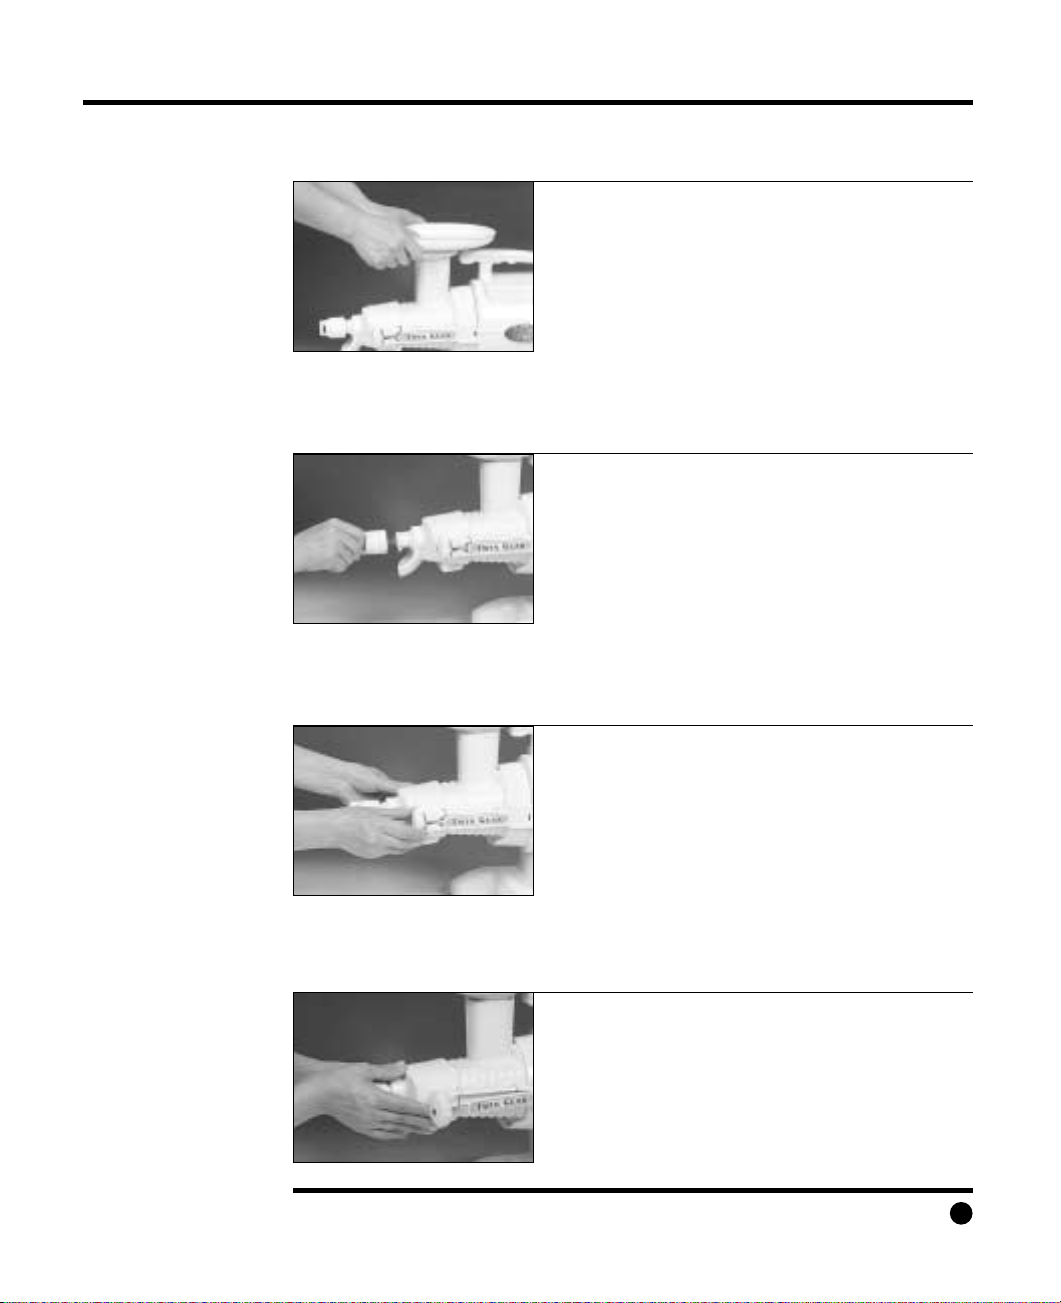
1. Remove the Safety Tray by lifting it
vertically from the Feeding Chute.
2. Turn the Outlet Adjusting Knob
counter clockwise until it separates from
its threads; then pull it out from its
grooves.
3. Turn the Latching Arm Knobs counter
clockwise to loosen. Open the Latching
Arms horizontally outward on their hinges.
4. Remove the Pulp Discharge Casing.
Page 14
14
GREEN STAR DISASSEMBLY
(Cont’d)
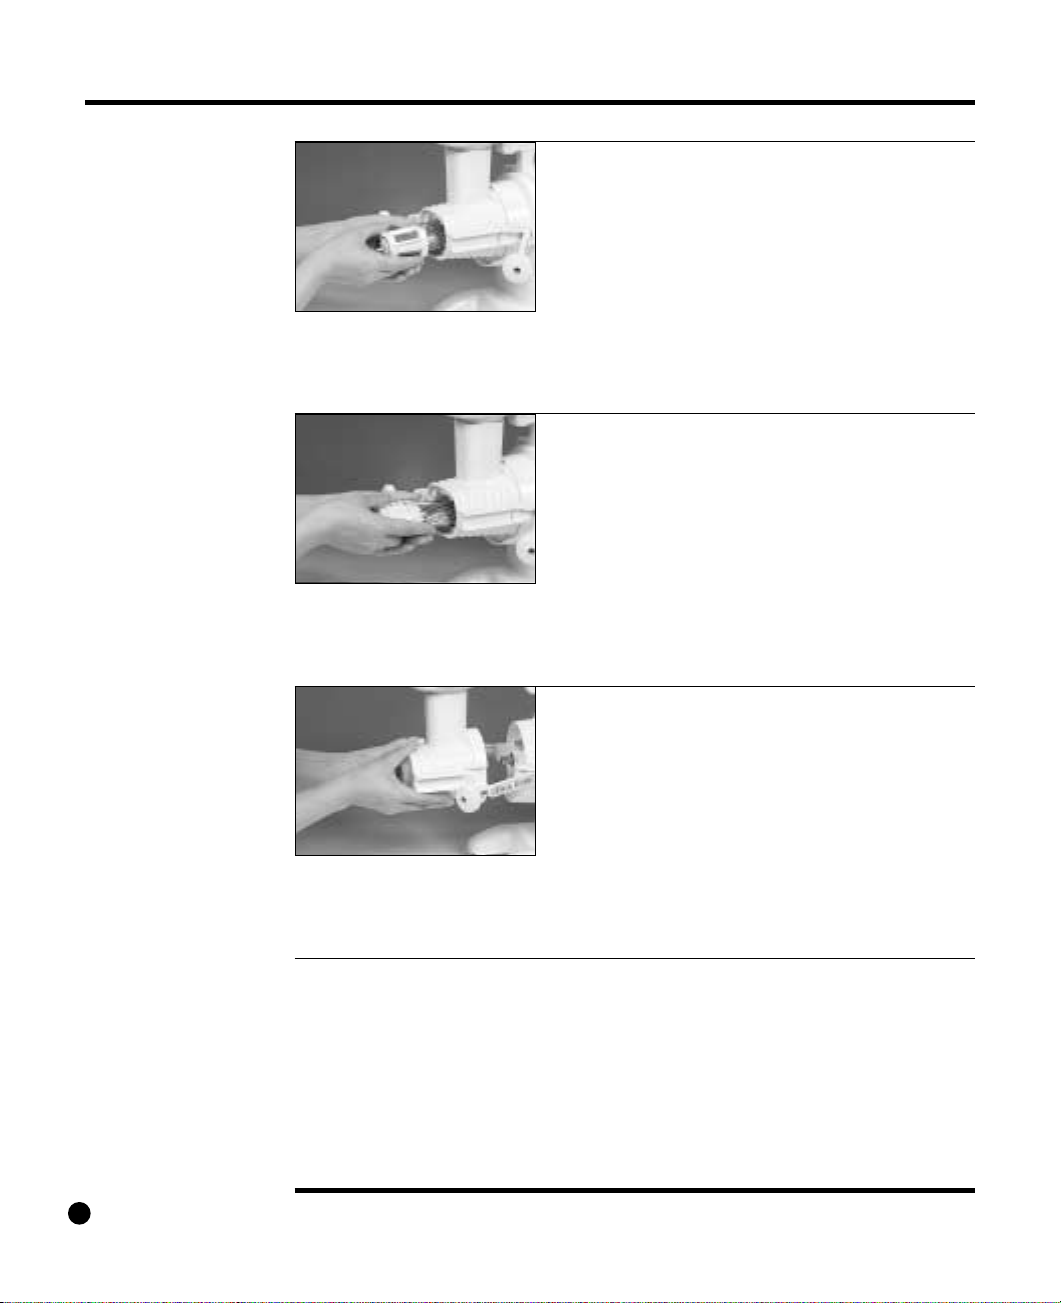
5. Remove the Screen. The Twin Gears may
come out with it. Be careful not to drop
the Twin Gears.
6. Slide the Twin Gears out.
7. Remove the Twin Gear Housing by
grasping the Feeding Chute. Then, gently
pull it away from the body of the machine.
Note : The Twin Gears on your juicer never need sharpening. They are not
blades. They work by “biting” off small bits of produce at a time-
much like your teeth. They do not cut, chip or tear the produce that
builds up heat which destroys enzymes.
Page 15
15
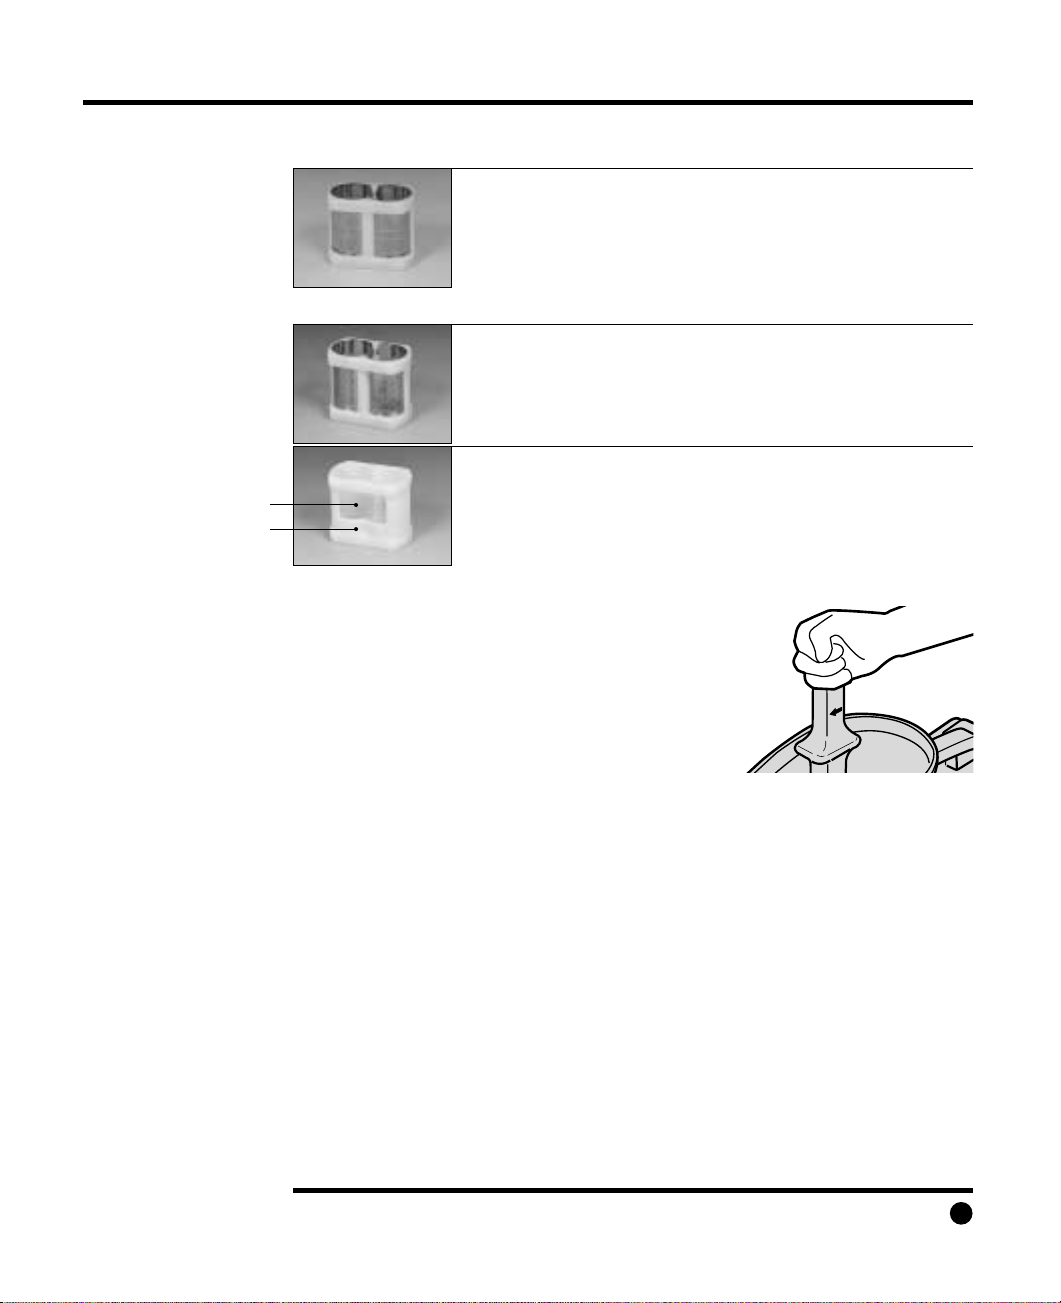
Screens ----- Which one to use
How to use Plastic Plunger
When you use the Plastic Plunger, please place
the Safety Tray on top of the Feeding
Chute, pointing the marked arrow(←)toward
the Outlet Adjusting Knob.
How to use Drip Tray
Position the bigger end of the Drip Tray underneath the front two legs of the
juicer under where the juice drips. Set the juice pitcher on top for collecting juice.
Using the Wooden Plunger?
Do not be timid about touching the Twin Gears with the wooden plunger while
juicing. It will not harm either the gears or the plunger. The plunger is made
from the same high quality wood as many fine chopping blocks, so any
accidental particles of cellulose scraped off by contact with the Twin Gears are
non-toxic and will pass through harmlessly with the pulp.
To juice wheat grass (Also barley grass, alfalfa & others)
1. Fit the juice extractor with the Fine Screen for maximum juice extraction and
pulp separation.
2. Close the Outlet Adjusting Knob completely.
3. With the power switch in the “on”position; place a bunch of wheat grass
(approx. 3/4 inch in diameter) tip down, into the Feeding Chute.
MACHINE SETUP
Toward Outlet
B
Toward Body
1. Fine Screen separates maximum pulp from the juice.
However, the pressure built up inside of the screen could
push some finely ground pulp through holes of the
screen. So, minimum pulp may be contained in the juice.
Use to juice: carrot, parsley, kale, angelica utilis,
wheatgrass, other green leafy vegetables and herbs.
2. Coarse Screen ; allows some pulp to mix with the juice.
Use to juice: Apples, Oranges, many other kinds of fruits
and vegetables.(This part is optional foor GS-1000)
3. Homogenizing Blank (Open Blank) ; to puree, frozen
desserts, baby foods, nut butters, apple sauce, pate,
relish, etc. use with: grains, garlic, banana, strawberry,
nuts, etc. To use the Homogenizing Blank, insert side
“A”first with hole “B”facing downwards, over the Twin
Gears and into the Twin Gear Housing.
A
Page 16
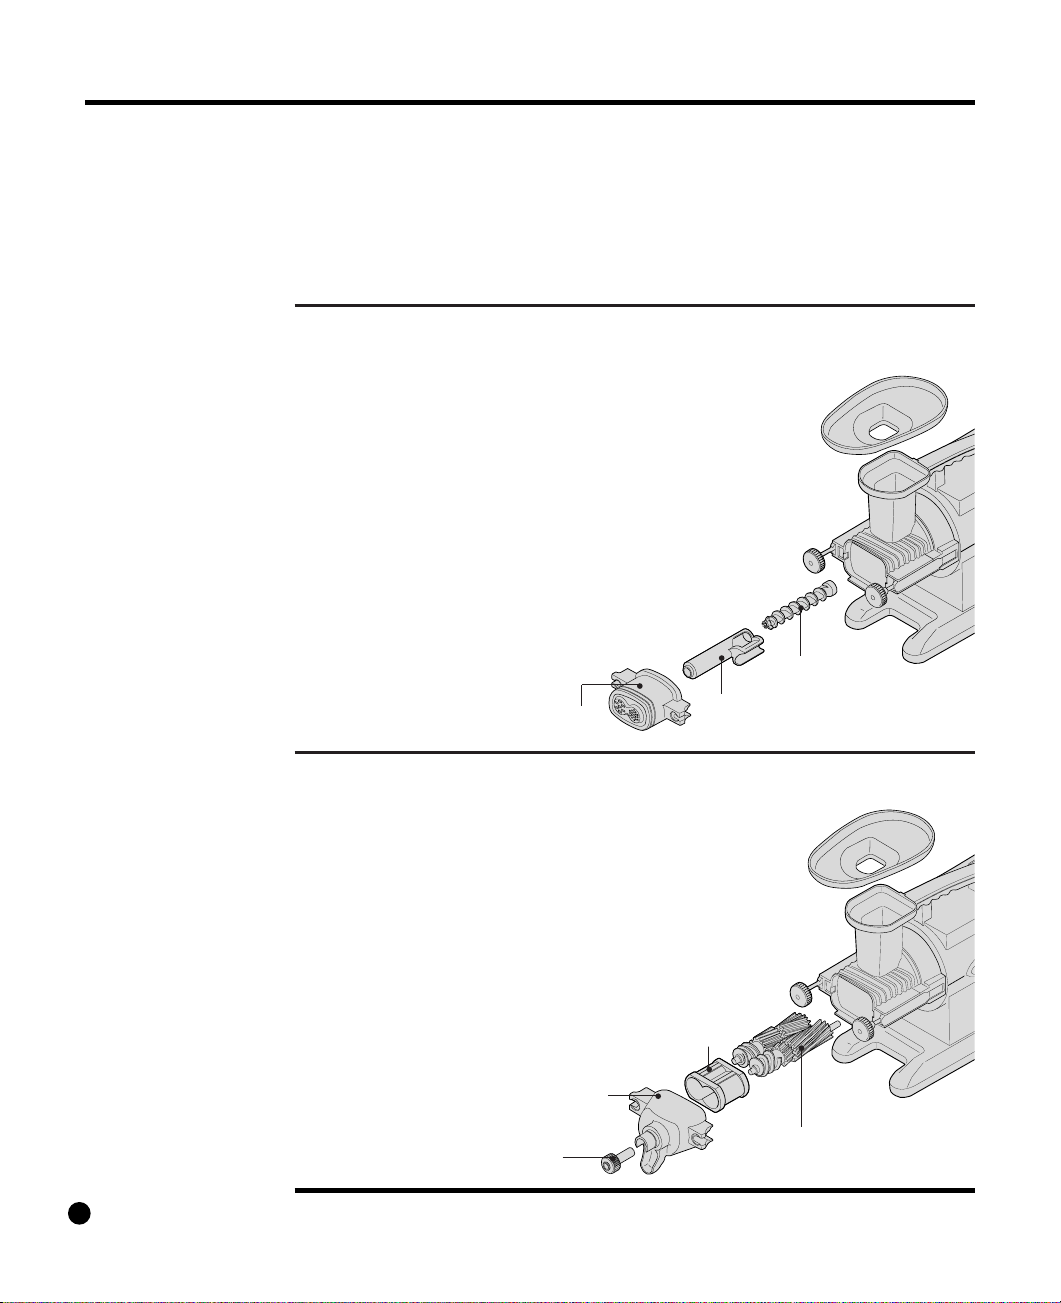
To make bread sticks, bagels,rice cake (mochi), etc.
1. Replace the juicing screen with the Bread Stick Blank.
2. Attach the Pulp Discharge Casing to the Twin Gear
Housing, thus locking the Bread Stick Blank
into position.
3. Unscrew the Outlet Adjusting Knob
(not shown here) from the Pulp Discharge
Casing and replace it with the Bread Stick Guide.
4. Place the Safety Tray into position.
5. Add materials to be used
into the Feeding Chute.
16
To make pasta
1. Attach the Twin Gear Housing to the juicer body.
2. Take out the Twin Gear and insert the Pasta Screw
onto the motor drive shaft (left side as you are looking
at the front of the body).
3. Put the Pasta Guide over the Pasta Screw,
making sure the long side of the Pasta Guide
faces to the left side.
4. Select the pasta type which is desired
from the two shapes provided on the
Pasta Screen and fit it onto the Pasta Guide.
5. Tighten the Latching Arm Knobs.
6. The machine is now ready to make pasta.
7. Be sure the dough is not too moist.
4. After a few drops of juice come out from the Pulp Discharge Outlet, loosen
the Outlet Adjusting Knob about half way.
5. Carrots, apples and other “more palatable”fruits and vegetables can be
added to create a milder tasting combination for those who have not yet
“acquired”a taste for pure wheat grass juice.
Note: Please refer to “Wheat Grass Delight”on page 22.
MACHINE SETUP
(Cont’d)
Pasta Screw
Pasta Guide
Pasta Screen
Twin Gear
Bread Stick Blank
Pulp Discharge Casing
Bread Stick Guide
Page 17

17
Proper Cleaning Lengthens the Life Span of the Juice Extractor
● Since Green Star extracts minerals, such as calcium, from the produce so well,
we recommend cleaning all of the juicer parts immediately after use to prevent
mineral build-up which can cause problems.
●Completely disassemble the Pulp Discharge Casing and Twin Gear Housing
sections. Immerse them in water and clean them with the Cleaning Brush, which
is provided for your convenience.
● After cleaning the juice extractor, let it dry thoroughly.
To Remove Calcium and Mineral Deposits from the Twin Gears
● After using the machine for some time, you may notice a calcium or mineral
deposit on the surfaces of the Twin Gear unit. This deposit needs to be removed
as follows: After juicing carrots, feed some of the carrot pulp back through the
machine and then add some granulated sugar(Ratio : one table-spoon of carrot
pulp to one or two tea-spoon of granulated sugar). Alternate pulp and sugar
several times and then run the machine.
Cleaning Procedure
● First - make sure the machine is switched off and, for added safety, remove the
plug from the wall and store it in the Cord Storage Compartment.
● Because your Green Star Juicer extracts calcium and other substances from
the produce as it goes through the machine, it is essential to wash up immediately
after use, otherwise the calcium may cake up on various parts and may cause
problems.
● Disassemble the juicer as shown on page 13-14 and immerse each component
in lukewarm water. Clean out all the pulp with the multipurpose Cleaning Brush
provided, using the thinner end to force out the pulp, which normally collects in
the Pulp Discharge Outlet.
● When using the Fine Screen, brush away from the corners, avoiding a build-up
of pulp, which will be difficult to remove later.
● Under no circumstances should you allow water to enter the main body of the
machine. Please refer to HELPFUL HINTS(page 20).
● Rinse the soapy water from the components, dry them thoroughly before they
are reassembled.
● You will find it difficult to prevent some of the inside surfaces from becoming
stained by harmless pigments contained in certain fruits and vegetables, but the
outside surfaces should always remain stain free.
● Do not use harsh chemicals, such as bleach to remove food stains from the jucer.
● Do not drop any of the components, particularly the Twin Gears which are very
expensive. Our warranty does not cover accidental damage.
● Do not put any parts into the dishwasher.
(The plastic part are not dishwasher safe).
CLEANING AND MAINTENANCE
Page 18
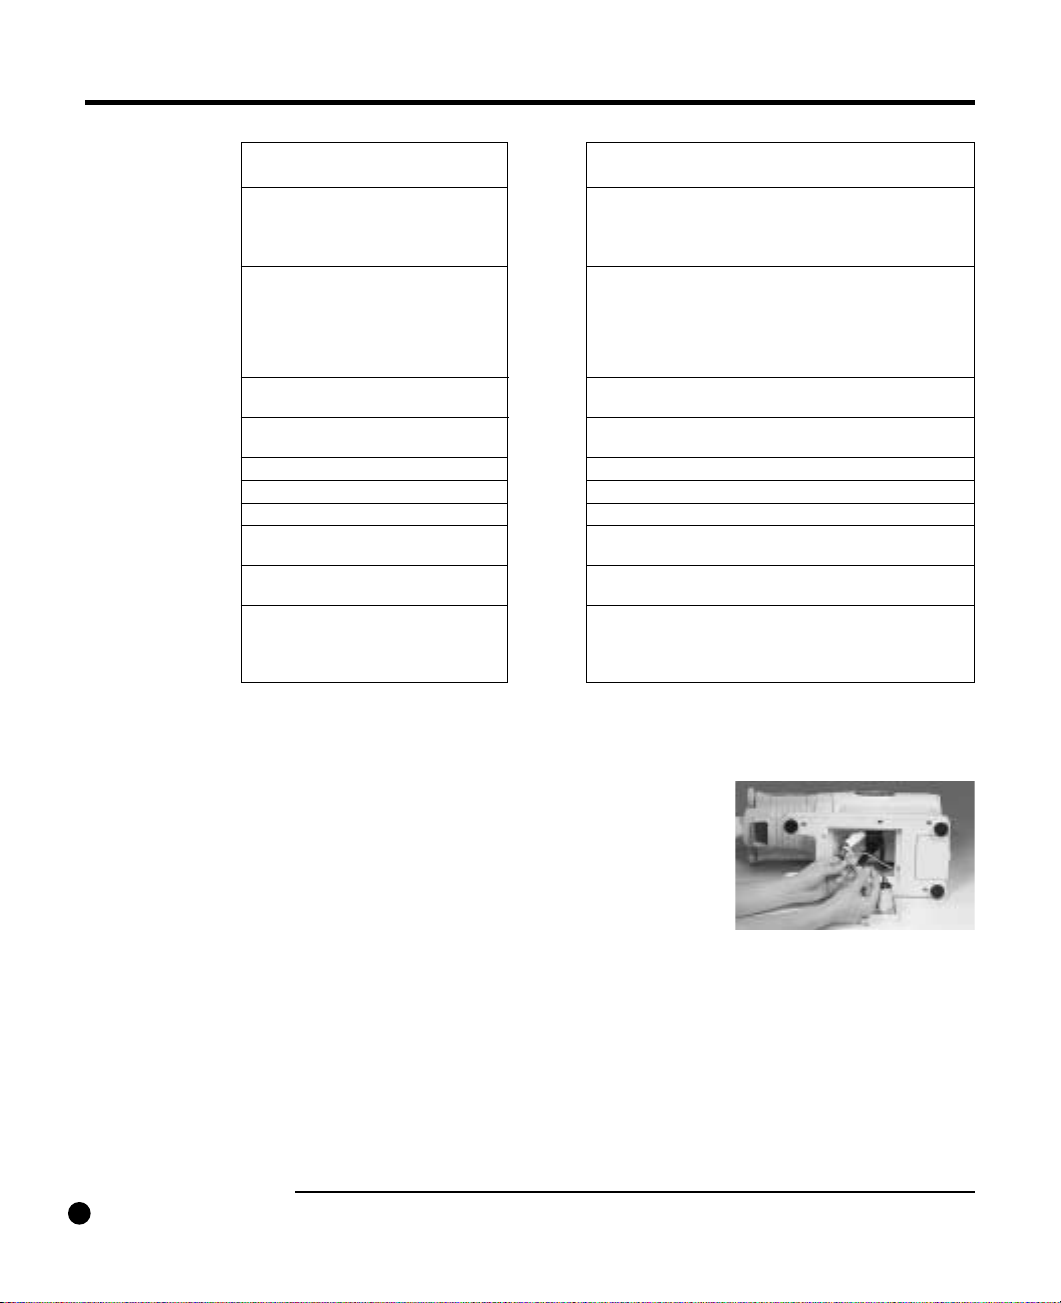
18
Fuse Location and How to Change the Fuse
1. Unplug the juicer from the wall socket and store the cord in the Cord Storage Compartment.
2. Locate the square plate on the bottom of the GS Juice Extractor. Using a small screwdriver (Philip’s head), remove the two
screws that hold the plate in position. Remove the square plate.
3. Find the round, capsule-shaped, milky-colored fuse casing inside of the machine.
There is a white wire extending from each end of the capsule.
4. Grasp one end of the fuse casing between the index finger and thumb of one
hand; and the other end of the fuse casing in the other hand. Push both ends
toward the center and twist to open the fuse holder. Release both ends.
5. Remove the old fuse from the casing and discard properly. Place a new fuse into
the casing. Close the fuse casing by reversing the procedure in Step 4, above.
6. Replace the square bottom plate and the two screws to secure to plate.
If your Green Star Juice Extractor still experiences a problem after using the suggestions given in the Trouble Shooting Section,
please contact your nearest authorized service center.
Green Star requires special repair procedures; therefore repairs beyond the scope of the Trouble Shooting Chart should never
be attempted by anyone other than an authorized service center.
Once the machine has stopped, please wait and try to turn it on again approximately 10 minutes later.
In the unlikely event that the Feeding Chute becomes clogged or jammed while juicing or processing any food item:
A. Switch the on / off lever to the reverse position to dislodge the food.
B. If A, above, did not dislodge the food TURN THE MACHINE OFF AND DISCONNECT IT FROM THE ELECTRICAL OUTLET
(FOR SAFETY). It is now safe to use a suitable, blunt tool to loosen whatever food is lodged in the Feeding Chute.
TROUBLE SHOOTING
Check to see if:
●
The power supply is active; the plug is
correctly positioned in the electrical outlet and
the machine is switched on.
●
The fuse is okay.
●
The machine is correctly assembled.
●
The machine is overloaded? If so, it will stop
automatically.
●
The material you are trying to process is cut
too large or is too hard.
●
The fuse is okay.
●
The Twin Gears are correctly aligned.
●
There is any hard material lodged in the gears.
●
Left-hand side Twin Gear is not seated correctly - give
it a twist while pushing in gently to seat it securely.
●
The Latching Arm Knobs are securely tightened
●
Loosen the Outlet Adjusting Knob
●
Tighten the Outlet Adjusting Knob
●
The Screen is in position
●
Tighten the Outlet Adjusting Knob
●
Outlet Adjusting Knob is in position, or needs
to be tightened.
●
Flick the power switch to the reverse position
once or twice.
●
If it doesn’tclear,machinemustbe dismantled
to clear the blockage.
Symptom -
What if:
Machine doesn’t turn on.
Machine stops
Noisy gears
Pulp discharge casing doesn’t
fit properly
Pulp discharge casing begins shaking
Pulp is not being ejected
Too much pulp
Pulp comes out with juice
Low amount of juice
Material jammed
Page 19

19
NOISES
Even though the Green Star juicer is very quiet, there may be some normal noises.
Please test your juicer as follows ;
1. Completely disassemble your Green Star and then turn on the motor. You will
hear a normal humming motor sound. If you hear any squeaking sound, your
juicer may need lubrication between the Drive Shaft and the rubber seals. Do not
be intimidated because of this noise. It is a very minor problem and does not
affect the juicer’s performance nor will it damage any other parts on your juicer.
Please call your service center for instructions on how to lubricate your juicer.
2. Fully assemble your juicer and turn it on without adding any produce. You will hear
the Twin Gear sound. You may hear a thumping sound which is normal. The Twin
Gears may have minor variations and the thumping sound is considered acceptable.
This minor variation will not affect the function nor will it damage any parts.
3. While you are juicing you may hear a squeaking or chirping sound-that noise
is also considered to be normal.
MOVEMENTS
Because of the pressure build up around the screen while you are juicing, the front
part of the Green Star may wiggle. The flexing is normal and will not cause damage
to any part involved because all the front parts are rubber cushioned.
JUICING
Remember that your juicer needs time-it is only revolving at 110 rpm. The most
nutritious juice is made slowly, allowing the produce to come into contact with the
magnetic field(focused only in the tiny space between the gears) for a maximum
length of time. Also, slow juicing is more gentle, creating less heat build up.
1. Carrot
The Twin Gears are not blades-you will need to firmly push carrots into slowly
rotating gears. Cut thicker carrots into lengthwise pieces for easier juicing. The
Plastic Plunger does not reach all the way to the gears-so try tapping that last
bit of carrot with the Wooden Plunger for complete juicing.
2. Wheat Grass
To minimize the amount of foam produced... refrigerate the gears and wheat grass
about 2 hours or even overnight before juicing. As you are juicing spray some
water on wheat grass.
Another way to reduce the amount of foam produced is to pour a 1/2 teaspoonful
of flaxseed oil(a good source of omega-3’s) into the feeding chute while the
machine is running, before juicing your wheat grass. If less oil is desired, you
may brush it lightly onto the Twin Gears before assembly.
If you do not mind wheat grass juice mixed with carrot juice, you will get maximum
yield on the wheat grass juice with minimum foam by alternating wheat grass
and carrot while juicing.
3. Leafy Vegetables
To juice leafy vegetables easily, simply roll the leaf into a cylindrical shape and
insert into the Feeding Chute.
HELPFUL HINTS
Page 20

20
CLEAN UP
Maintaining maximum cleanliness of your juicer is extremely important for both your
health and the peak performance of the machine. We recommend cleaning the juicer
immediately after each use, since cleaning the machine as quickly as possible is the
easiest way to remove food particles. However, if you want to juice throughout the day
without disassembling the machine, totally remove the Outlet Adjusting Knob, place a
large bowl under both the Juice Outlet and the Pulp Discharge Outlet, turn on the
machine and pour about 16 ounces of water through the machine.
1. Stains and Mineral Deposits
Colored stains and mineral deposits on parts are normal usage signs of a product.
But to remove color stains and mineral deposits.
1) Stains
- Do not use harsh chemicals such as bleach to remove food stains from the juicer.
- You can use a 25%-50% white vinegar/water solution and soak the parts overnight.
This may be repeated if necessary.
- Juicing green honeydew or cantaloupe melons may also lighten the stains.
- Stains from juicing carrots may be removed by gently rubbing the stains with olive oil
or canola cooking oil and a paper towel.
2) Mineral Deposits
- Using Baking soda
4 tablespoon of baking Soda
2 cups(16 oz) of lukewarm water
- Soak the parts in the solution of water and baking soda overnight to loosen the
mineral deposit and to remove the colored stains. Wash with soap and warer and
use a hard bristled brush to remove mineral deposit. Wipe with cloth to dry.
- Mineral Deposits may be removed from the tips of the Twin Gears by running soaked
almonds through the machine.
- Another excellent way to remove mineral scales is to soak those affected parts in a
pure vinegar bath overnight. This loosens the scaling and much of it can be brushed
off. This process may be repeated as necessary. The vinegar used for de-scaling
can be stored for reuse. Please label the storage bottle properly so that it is not
accidentally used in food preparation.
2. The Screen
- Hold the screen under running water while brushing the pulp residue from inside
the screen first, and then the outside of the screen.
- For pulp that has been imbedded firmly in the holes of the screen, try soaking the
screen for a couple of hours in water after brushing away as much pulp as possible.
- You may also try using the DULL side of a table knife to rub along the inner surface
of the screen and then brushing from the outside with the Cleaning Brush.
3. The Main Body(Motor Unit)
To clean the motor unit of your juicer, position the front two legs over the edge of
the sink. With either the sink top sprayer, a spray bottle filled with water, or an empty
detergent bottle filled with water and equipped with its squirt-top, spray water directly
onto the front plate of the juicer where the drive shaft, mounting peg and free wheel
gear seats to remove pulp residue. Wipe any other exterior surfaces with a damp
HELPFUL HINTS
Page 21

21
cloth. DO NOT SUBMERGE THE MOTOR UNIT INTO WATER AT ANY TIME.
4. Others
- Use the narrow, pointed end of the cleaning brush to push food through out through
the pulp discharge outlet.
- Dried fruits and nuts can be very sticky on the inside surfaces of the juicer. To
remove the residue more easily run a couple of stalks of celery through before
disassembling the machine.
- To help the Twin Gears retain their shine, alternate between running one tablespoon
of carrot pulp and one teaspoon of granulated white sugar through the machine
several times.
Page 22

RECIPE INDEX
JUICE AND DRINKS
Citrus Blend 23
Apple Lemonade 23
Wheat Grass Delight 23
Ambrosia Nectar 24
Watermelon Quench 24
Mellow Melon Punch 25
Snappy Apple 25
Dr. Wallker’s Choice(#61) 25
Green Tang 26
Oriental Express 26
RYE BREAD STICKS AND MOCHI(RICE CAKE)
27
PASTA AND NOODLES 28
PATE AND CROQUETTE
Cashew, Curry Croquettes 29
Pecan Pleasers 29
SOUP
Beef Borscht 30
DESSERTS
Cashew Poppy 31
Banana-Blueberry Ice Cream Pie (uncooked)
31
Page 23

23
JUICES AND DRINKS
MACHINE SET-UP FOR ALL JUICES AND DRINK RECIPES:
1. Place the Twin Gears in position
2. Use the Fine Screen
3. Tighten the Latching Arm Knobs snugly.
4. The Outlet Adjusting Knob closed.
5. Put glass Juice Pitcher under the Juice Outlet.
6. Put container under the Pulp Discharge Outlet to catch residue.
Notice: When juicing a combination of hard, fibrous vegetables such as carrots
or beets and leafy greens, such as herbs or grasses PLEASE BE SURE to
completely empty the Feeding Chute of all fibrous vegetables before introducing
any of the leafy greens.
Citrus Blend
2 SMALL GRAPEFRUIT (Peeled and cut into 4 to 6 pieces)
3 MEDIUM SIZE ORANGES (Peeled and cut into 4 pieces)
½ SMALL LEMON (Peeled and cut into 2 pieces)
½ SMALL LIME (Peeled and cut into 2 pieces)
Note : 1) For sweeter taste - use less lemon and lime
2) It is not necessary to peel the lemon or lime.
Wheat Grass Delight
4 HANDFULS WHEAT GRASS
4 CARROTS (Cut in 2 to 4 pieces)
1 FIRM APPLE (Cut into 6 pieces)
THIN SLICE GINGER
Apple Lemonade
3 FIRM APPLES (YELLOW DELICIOUS, PIPPIN, OR GRANNY
SMITH, Cut into 6 pieces)
3 MEDIUM SIZE ORANGES (Peeled and cut into 4 pieces)
½ LEMON (Peel is optional for sweeter flavor)
Page 24

24
JUICES AND DRINKS
(Cont’d) (See page 15 for machine set-up)
Ambrosia Nectar
2 BUNCHES GRAPES
3 APPLES (YELLOW DELICIOUS, GRANNY
SMITH,OR PIPPIN - Cut into 6 pieces)
1 KIWI (Peeled and cut into 2 pieces)
1 SLICE HONEYDEW (Cut into cubes)
1 SLICE PINEAPPLE (Cut into cubes)
1 WHOLE LEMON (Peeled and cut into 4 pieces)
½ CUP CRANBERRIES
Method:
1. Alternate juicing grapes, kiwi pieces, melon cubes, pineapple cubes, apple
pieces and cranberries
2. Juice lemon separately and add to taste
Note: Quantities of ingredients may be varied with good results
Do not be afraid to experiment according to your own taste
Watermelon Quench
1. Watermelon with seeds - If organically grown, add rind also
Method:
1. Slice watermelon into pieces that fit easily into the feeding chute of the juicer.
2. Juice & enjoy on a hot summer day
Page 25

25
JUICES AND DRINKS
(Cont’d) (See page 15 for machine set-up)
Mellow Melon Punch
¼ CANTALOUPE (cut into cubes)
¼ HONEY DEW (cut into cubes)
2
〃
SLICES WATERMELON (cut into cubes)
Juice all together and enjoy
Snappy Apple
7 APPLES (FUJI, GRANNY SMITH, YELLOW DELICIOUS - Cut into 4
to 6 pieces)
½ JALEPENO PEPPER
¼ LIME
1 KIWI (Peeled and cut into 2 pieces)
Method:
1. Juice Kiwi and Lime first
2. Next juice Jalepeno
3. Finish by juicing the Apples
Dr. Walker’s Choice (#61)
10 oz. CARROTS (Cut into 4 pieces)
6 oz. SPINACH (FRESH)
Method:
1. Juice spinach first
2. Juice carrots
Page 26

26
JUICES AND DRINKS
(Cont’d) (See page 15 for machine set-up)
Green Tang
2 PINEAPPLE WEDGES (Cut into smaller pieces)
1 SPRIG MINT
3 HANDFULS WHEAT GRASS
¼ LEMON
1 SLICE GINGER FOR FLAVOR
Method:
1. Juice wheat grass
2. Juice the mint
3. Juice lemon
4. Juice pineapple cubes
Note: Pineapple wedge is a 1〃round slice of whole pineapple cut into quarters (4
pieces). If pineapple is not organically grown, remove the outer skin before juicing
Oriental Express
3 LEAVES NAPA CABBAGE - Cut lengthwise
4 STALKS BOK CHOY WITH LEAVES - Cut lengthwise
2 STALKS ANISE (FENNEL) with GREEN STEM and LEAVES
6 MEDIUM CARROTS (Cut into 4 pieces)
2 APPLES (YELLOW DELICIOUS, FUJI, OR GRANNY)
- Cut into 4 to 6 pieces
Method:
1. Juice Napa, Bok Choy and fennel first
2. Juice Apples second
3. Juice Carrots into the rest of the juice
Page 27

27
BREAD STICKS AND MOCHI (RICE CAKE)
MACHINE SET-UP:
1. Place the Twin Gears in position
2. Use the Rice Cake Blank (Total Blank) instead of Screens
3. Put the Pulp Discharge Casing into position
4. Tighten the Latching Arm Knobs snugly
5. Remove the Outlet Adjusting Knob from the Pulp Discharge Outlet and
replace it with the Rice Cake Guide
6. Put a plate under the Rice Cake Guide
Rye Bread Sticks
2 CUPS RYE (SOAK OVERNIGHT)
½ CUP SUNFLOWER SEEDS (SOAK OVERNIGHT)
2 TBSP CARAWAY SEED
½ TSP SEA SALT
Method:
1. Mix all ingredients together in a bowl
2. Feed into machine a little at a time
3. Collect bread sticks as they emerge from the Pulp Discharge Outlet formed
into bread sticks by Rice Cake Guide
4. Before drying, these sticks can be shaped into pretzels, braided together,
etc. for a variety of shapes
5. Dry in the dehydrator until crisp. Can be served with dips, soups, etc.
Mochi (rice cake)
2 CUPS STEAMED RICE (Medium Grain Rice recommended)
1 TSP EXTRA VIRGIN OLIVE OIL
Method:
1. Prepare steamed rice
2. Add olive oil into the Feeding Chute while running the machine
3. Feed your steamed rice into Feeding Chute
4. Collect rice cake coming out of the Rice Cake Guide onto a plate
Note: Before processing, mix spices such as minced garlic or onion with the rice to
flavor your rice cake. Slice the rice cake into diagonal slices. Dehydrate them
and add to your soup.
Page 28

28
PASTA AND NOODLES
MACHINE SET-UP:
1. Remove the Pulp Discharge Casing from the Twin Gear Housing
2. Remove the Twin Gears and insert the Pasta Screw onto the motor drive
shaft (left side as you are looking into the body)
3. Place the Pasta Guide over the Pasta Screw, making sure the long side of
the Pasta Guide faces to the left side
4. Select the pasta shape desired from the two shapes available on the Pasta
Screen and fit it onto the Twin Gear Housing. (see diagram on page 16)
5. Tighten the Latching Arm Knobs snugly
6. Place a plate under Pasta Screen
Pasta
1 PACKAGE READY MIX PASTA DOUGH
1 TSP EXTRA VIRGIN OLIVE OIL
Method :
1. Prepare pasta dough according to the instructions on the package of the
pasta dough mix
2. Put a few drops of olive oil into the Feeding Chute while running the machine
3. Feed your pasta dough into Feeding Chute
4. Collect your pasta onto a plate
Variations :
If you use carrot juice when preparing the dough you will get red pasta. Use
kale juice for green pasta and water for plain pasta.
Note: A whistling sound will occur in the beginning; however, it will disappear later when
your pasta comes out.
Page 29

29
PATE AND CROQUETTES
MACHINE SET-UP:
1. Place the Twin Gears in position
2. Use the Homogenizing Blank
3. Tighten the Latching Arm Knobs snugly
4. Tighten the Outlet Adjusting Knob
5. Place a bowl under the Juice Outlet
Cashew-Curry Croquettes
2 CUPS CASHEWS
1 CUP SPROUTED WHEAT (Soak for 12 hours and let small tips
emerge by sprouting)
3 TBSP CURRY PASTE (Available from Gourmet Food Shops)
1 TSP VEGE-SALT TO TASTE
Method:
1. Put the cashews and sprouted wheat berries into the Feeding Chute.
2. Add curry paste and vege-salt a little at a time while texturizing
3. Collect the texturized mixtures from the Pulp Discharge Outlet
4. Mix together by hand or with a wooden spoon
5. Form into croquettes and garnish with tomatoes, radish and cucumber
Pecan Pleasers
2 CUPS PECANS
1 CUP SPROUTED WHEAT BERRIES (Soak 24 hours)
¼ CUP SPANISH ONION
1 TSP POULTRY SEASONING
½ TSP VEGE-SALT
Method:
1. Put pecans, wheat berries, and onion into the Feeding Chute
2. Collect mixture in a bowl
3. Add the poultry seasoning and vege-salt
4. Mix thoroughly by hand or with a wooden spoon
5. Shape into small wafers and serve on cucumber slices with tomato or
avocado on top
Page 30

30
SOUP
MACHINE SET-UP:
A. To Juice Carrots, Lemon, And Apple
1. Place the Twin Gears into position
2. Use the Fine Screen
3. Tighten the Latching Arm Knobs snugly
B. To Grind Beets And Scallions
1. Place the Twin Gears into position
2. Use the Homogenizing Blank
3. Tighten the Latching Arm Knobs snugly
Beet Borscht
JUICE- A 1 APPLE - Cut into 4 to 6 pieces
8 CARROTS - Cut into 4 lengthwise pieces if the carrot
is thick
1/2 LEMON - Cut into 2 pieces
GRIND - B 2 BEETS
2 GREEN SCALLIONS
1 CUP FINELY SHREDDED CABBAGE
AVOCADO-YOGURT
Method:
1. Juice carrots, lemon, and apple. Keep juice in a glass or the Juice Pitcher
2. Remove the Fine Screen and replace with the Homogenizing Blank to
grind beets and scallions into a separate bowl
3. Add ground beets and scallions to the carrot, lemon and apple juice and mix
4. Fold in the finely grated cabbage
5. In a blender- blend avocado and yogurt together
To serve:
Place borscht in a bowl. Top with a dollop of the avocado - yogurt combination
Page 31

31
DESSERT
MACHINE SET-UP:
1. Place the Twin Gears in position
2. Use the Homogenizing Blank
3. Put the Plup Discharge Casing into position
4. Tighten the Latching Arm Knobs snugly
5. Tighten the Outlet Adjusting Knob
6. Place a bowl under the Juice Outlet
Cashew Poppy
1 CUP SPROUTED WHEAT BERRIES - Soak for 12 hours and let small tips
emerge by sprouting
¼ CUP POPPY SEEDS
¼ CUP SUNFLOWER SEEDS -SOAKED
1 CUP CASHEWS
½ TSP VANILLA
4 TBSP HONEY
Method:
1. Mix wheat berries (soaked), sunflower seeds (soaked), cashew and poppy seeds
together then grind through the machine
2. Collect the ground mixture from the Juice Outlet into a bowl
3. Add vanilla and honey and mix
4. Roll into balls and place on a plate
Uncooked Banana- Blueberry Ice Cream Pie
1 CUP SOAKED ALMONDS
½ CUP SESAME SEEDS
1 CUP CASHEWS
½ CUP RAISINS
½ CUP PITTED DATES
½ CUP PECANS
1 TSP VANILLA
2 TBSP HONEY
7 FROZEN BANANAS (WITHOUT SKINS)
1
½ CUPS FROZEN BLUE BERRIES
1 KIWI (SLICED)
2 LARGE STRAWBERRIES (SLICED)
Method:
1. Grind almonds, cashews, sesame, pecans, dates and raisins together
2. Mix in the vanilla and honey; knead to form dough: then press into a 9
〃
pie dish to form
a crust. Let crust sit for 3 to 4 hours or place in a food dehydrator for about 3/4 hour.
3. Grind frozen bananas and frozen blueberries together to make ice cream.
4. Put ice cream into the crust, top with slices of strawberries and kiwi. Slice and serve.
 Loading...