

Page 1
KSP Graphical User
Interface
1-ME SOFT PANEL CONTROLLER
Instruction Manual
Software Version 1.0
071882900
JANUARY 2012
Page 2
CERTIFICATE
Certificate Number: 510040.001
The Quality System of:
Grass Valley USA, LLC and its Grass Valley Affiliates
Headquarters:
400 Providence Mine Road
Nevada City, CA 95945
United States
15655 SW Greystone Ct.
Beaverton, OR 97006
United States
Brunnenweg 9
D-64331 Weiterstadt
Germany
Kapittelweg 10
4827 HG Breda
The Nederlands
2300 So. Decker Lake Blvd.
Salt Lake City, UT 84119
United States
Including its implementation, meets the requirements of the standard:
ISO 9001:2008
Scope:
The design, manufacture and support of video and audio hardware and software products and related
systems.
This Certificate is valid until: June 14, 2012
This Certificate is valid as of: December 23, 2010
Certified for the first time: June 14, 2000
H. Pierre Sallé
President
KEMA-Registered Quality
The method of operation for quality certification is defined in the KEMA General Terms And Conditions For
Quality And Environmental Management Systems Certifications. Integral publication of this certificate is allowed.
KEMA-Registered Quality, Inc.
4377 County Line Road
Chalfont, PA 18914
Ph: (215)997-4519
Fax: (215)997-3809
CRT 001 042108
ccredited By:
ANAB
A
Page 3

KSP Graphical User
Interface
1-ME SOFT PANEL CONTROLLER
Instruction Manual
Software Version 1.0
071882900
JANUARY 2012
Page 4
Contacting Grass Valley
International
Support Centers
Local Support
Centers
(available
during normal
business hours)
France
24 x 7
Australia and New Zealand: +61 1300 721 495 Central/South America: +55 11 5509 3443
Middle East: +971 4 299 64 40 Near East and Africa: +800 8080 2020 or +33 1 48 25 20 20
Europe
+800 8080 2020 or +33 1 48 25 20 20
Hong Kong, Taiwan, Korea, Macau: +852 2531 3058 Indian Subcontinent: +91 22 24933476
Asia
Southeast Asia/Malaysia: +603 7805 3884 Southeast Asia/Singapore: +65 6379 1313
China: +861 0660 159 450 Japan: +81 3 5484 6868
Belarus, Russia, Tadzikistan, Ukraine, Uzbekistan: +7 095 2580924 225 Switzerland: +41 1 487 80 02
S. Europe/Italy-Roma: +39 06 87 20 35 28 -Milan: +39 02 48 41 46 58 S. Europe/Spain: +34 91 512 03 50
Benelux/Belgium: +32 (0) 2 334 90 30 Benelux/Netherlands: +31 (0) 35 62 38 42 1 N. Europe: +45 45 96 88 70
Germany, Austria, Eastern Europe: +49 6150 104 444 UK, Ireland, Israel: +44 118 923 0499
Copyright © Grass Valley USA, LLC. All rights reserved.
This product may be covered by one or more U.S. and foreign patents.
United States/Canada
24 x 7
+1 800 547 8949 or +1 530 478 4148
Grass Valley Web Site
The www.grassvalley.com web site offers the following:
Online User Documentation — Current versions of product catalogs, brochures,
data sheets, ordering guides, planning guides, manuals, and release notes
in .pdf format can be downloaded.
FAQ Database — Solutions to problems and troubleshooting efforts can be
found by searching our Frequently Asked Questions (FAQ) database.
Software Downloads — Download software updates, drivers, and patches.
4 KSP Graphical User Interface — Instruction Manual
Page 5

Contents
The 1-ME KSP . . . . . . . . . . . . . . . . . . . . . . . . . . . . . . . . . . . . . . . . . . . . . . . . . . . . . . . . . . . . . 7
Overview . . . . . . . . . . . . . . . . . . . . . . . . . . . . . . . . . . . . . . . . . . . . . . . . . . . . . . . . . . . . . 7
Features. . . . . . . . . . . . . . . . . . . . . . . . . . . . . . . . . . . . . . . . . . . . . . . . . . . . . . . . . . . . . . . 7
KSP Requirements. . . . . . . . . . . . . . . . . . . . . . . . . . . . . . . . . . . . . . . . . . . . . . . . . . . . . . 7
Specifications . . . . . . . . . . . . . . . . . . . . . . . . . . . . . . . . . . . . . . . . . . . . . . . . . . . . . . . . 8
KSP GUI . . . . . . . . . . . . . . . . . . . . . . . . . . . . . . . . . . . . . . . . . . . . . . . . . . . . . . . . . . . . . . 9
Preparing for Installation. . . . . . . . . . . . . . . . . . . . . . . . . . . . . . . . . . . . . . . . . . . . . . . 14
Software Requirements. . . . . . . . . . . . . . . . . . . . . . . . . . . . . . . . . . . . . . . . . . . . . . . 14
Connect the KSP Keyboard . . . . . . . . . . . . . . . . . . . . . . . . . . . . . . . . . . . . . . . . . . . 14
Power On and Configure the PC/Touchscreen PC . . . . . . . . . . . . . . . . . . . . . . . 14
Touchscreen PC . . . . . . . . . . . . . . . . . . . . . . . . . . . . . . . . . . . . . . . . . . . . . . . . . . . 14
Licensing. . . . . . . . . . . . . . . . . . . . . . . . . . . . . . . . . . . . . . . . . . . . . . . . . . . . . . . . . . . 14
Installation . . . . . . . . . . . . . . . . . . . . . . . . . . . . . . . . . . . . . . . . . . . . . . . . . . . . . . . . . . . 15
Installing KSP GUI (and GV Switcher Menu) . . . . . . . . . . . . . . . . . . . . . . . . . . . . 15
Operations . . . . . . . . . . . . . . . . . . . . . . . . . . . . . . . . . . . . . . . . . . . . . . . . . . . . . . . . . . . 17
Delegation. . . . . . . . . . . . . . . . . . . . . . . . . . . . . . . . . . . . . . . . . . . . . . . . . . . . . . . . . . 17
ME Delegation . . . . . . . . . . . . . . . . . . . . . . . . . . . . . . . . . . . . . . . . . . . . . . . . . . . . 18
Row Delegation . . . . . . . . . . . . . . . . . . . . . . . . . . . . . . . . . . . . . . . . . . . . . . . . . . . 18
Aux Bus Row Delegation . . . . . . . . . . . . . . . . . . . . . . . . . . . . . . . . . . . . . . . . . . . 19
Keyer Auto/Cut Transition . . . . . . . . . . . . . . . . . . . . . . . . . . . . . . . . . . . . . . . . . 19
Transitions . . . . . . . . . . . . . . . . . . . . . . . . . . . . . . . . . . . . . . . . . . . . . . . . . . . . . . . . . 19
Source Selection . . . . . . . . . . . . . . . . . . . . . . . . . . . . . . . . . . . . . . . . . . . . . . . . . . . 19
ME Transitions . . . . . . . . . . . . . . . . . . . . . . . . . . . . . . . . . . . . . . . . . . . . . . . . . . . . 20
Effects . . . . . . . . . . . . . . . . . . . . . . . . . . . . . . . . . . . . . . . . . . . . . . . . . . . . . . . . . . . . . 20
E-MEM. . . . . . . . . . . . . . . . . . . . . . . . . . . . . . . . . . . . . . . . . . . . . . . . . . . . . . . . . . . 20
Macros . . . . . . . . . . . . . . . . . . . . . . . . . . . . . . . . . . . . . . . . . . . . . . . . . . . . . . . . . . . 21
1-ME USB Keyboard. . . . . . . . . . . . . . . . . . . . . . . . . . . . . . . . . . . . . . . . . . . . . . . . . . . 22
Standard USB Keyboard. . . . . . . . . . . . . . . . . . . . . . . . . . . . . . . . . . . . . . . . . . . . . . 23
KSP Graphical User Interface — Instruction Manual 5
Page 6

Contents
6 KSP Graphical User Interface — Instruction Manual
Page 7

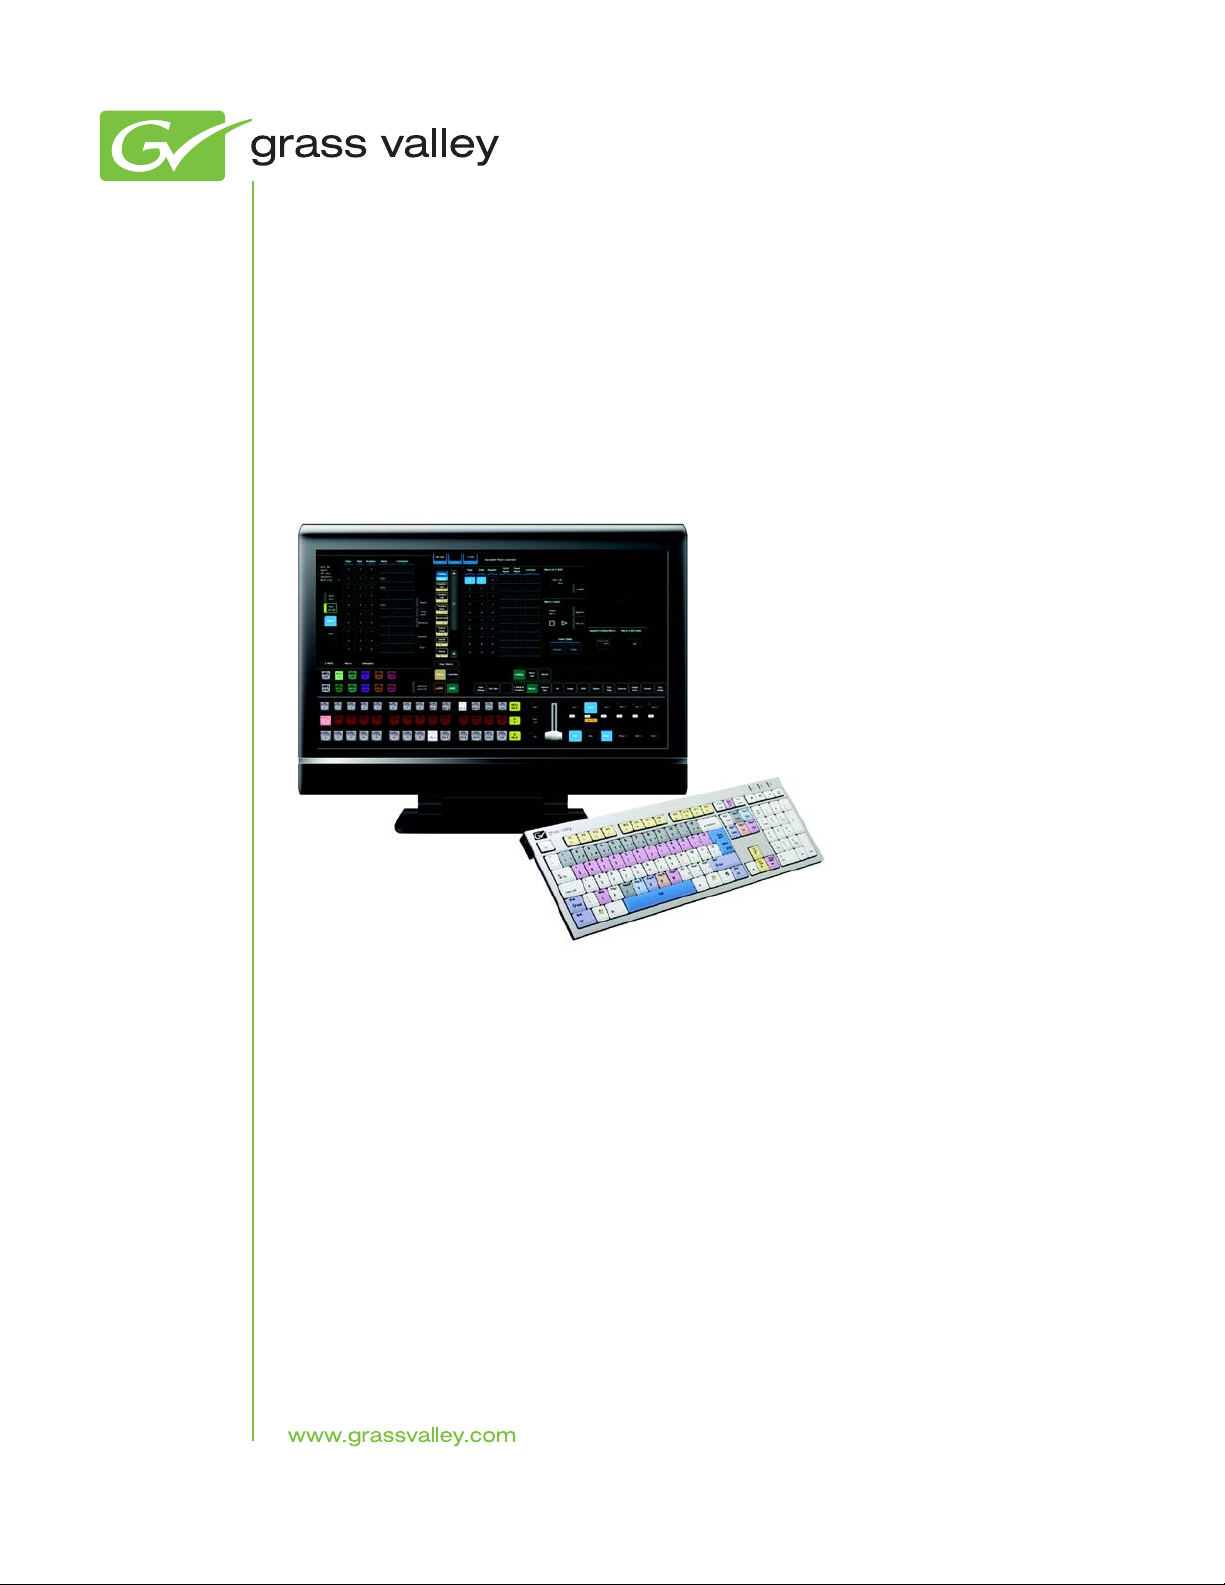
The 1-ME KSP
Overview
The KSP is an optional 1-ME Soft Panel GUI which provides direct control
of switching crosspoints and the ability to recall effects and macros
together, with an integrated version of the Grass Valley Switcher menu
application. A customized PC keyboard is included as an option for users
who like quick cut and mix action from a hard-button interface. The KSP
can be used as a standalone Control Panel, an adjunct to a main panel pro
viding a second seat (second control surface) in a Suite, or as the only
control surface for a second Suite.
Features
-
KSP Requirements
• Control any ME of an attached Switcher Frame, regardless of Frame
size,
• Suites mode allows KSP to control its own show or collaborate with the
main switcher on a single production,
• Easy transition from KSP to operation of full panel as menu and function remain the same,
• Custom keyboard provides desktop control of up to 36 sources and
instant access to primary video processing functions,
• Keyboard toggles between menu parameter entry and control modes,
• Configured for easy use with a touchscreen monitor, but touchscreen is
not required, and
• Software runs on a user-supplied touchscreen or standard PC.
The KSP GUI application is designed to run on a PC platform. The screen
must be 1920x1080 resolution or better (which is common in many profes
sional video environments). A touchscreen is not required but may
enhance the user experience.
-
KSP Graphical User Interface — Instruction Manual 7
Page 8

KSP Requirements
Specifications
The KSP software is included with the switcher application software. Purchasing the option provides a software license that enables the interface in
the Video Processor Frame, and includes a customized PC keyboard. The
license enables users to access an unlimited number of applications associ
ated with a video processor frame. Additional customized PC keyboards
are also available for purchase.
The KSP runs on a user-furnished Windows-based PC with a keyboard and
mouse. A touchscreen may be used as a replacement for a mouse but is not
required. To function correctly, the PC must meet or exceed the following
specifications:
• Operating system—MS Windows XP SP3 or MS Windows 7 (32 or 64 bit)
Processor—Intel Core 2 Duo processor
•
Memory (RAM)—2 GB
•
•
Graphics memory—512 MB
-
Network interface—10/100/1000 Mb/s (Ethernet)
•
Productivity Ports—USB 2.0
•
Keyboard and mouse—USB 2.0
•
Optical drive—not required
•
Monitor resolution—1920x1080 (touchscreen optional) KSP does not scale to
•
lower resolutions
8 KSP Graphical User Interface — Instruction Manual
Page 9

KSP GUI
GV Switcher
Menu Window
Delegation and
Effects Window
Operations
Window
KSP GUI
The KSP GUI is comprised of three windows: the GV Switcher menu, the
Delegation and Effects window, and the Operations window (Figure 1).
Figure 1. KSP GUI
The GV Switcher menu window (Figure 2) uses the standard menu application available for the GV video production switchers. This keeps the
menu structure the same regardless of the control surface, making it easy
for operators to quickly move between a primary switcher menu and the
KSP UI when it is used for secondary suite or sub-switching applications.
Refer to the Video Production Center User Manual for your Video Frame
model, about GV switcher menu operations.
KSP Graphical User Interface — Instruction Manual 9
Page 10

KSP GUI
The GV Switcher menu is “always on top” but can be minimized to a pulldown in the upper left corner of the GV Switcher menu. Minimizing the
KSP minimizes the entire GUI.
Figure 2. GV Switcher Application Window
Note The History and Favorites features of the GV Switcher menu are very handy
for navigating between menus quickly. See the Video Production Center User
Manual for your Video Frame model for more information.
The Delegation and Effects window E-MEM menu tab (Figure 3), is a simplified version of the same functionality that is in the E-MEM & Timeline,
10 KSP Graphical User Interface — Instruction Manual
Page 11

KSP GUI
Recall Run menu in the GV switcher menu. Selecting registers in this menu
will cause an immediate E-MEM recall.
Figure 3. Delegation Menu, E-MEM sub-menu
The Delegation and Effects window Macro menu tab (Figure 4), is a simplified version of the same functionality that is in the Macro, Catalog menu in
KSP Graphical User Interface — Instruction Manual 11
Page 12

KSP GUI
the GV switcher menu. Selecting registers in this menu will preset them;
selecting the
Figure 4. Delegation Menu, Macro sub-menu
Play button is required to run the macro.
12 KSP Graphical User Interface — Instruction Manual
Page 13

KSP GUI
Background (Bus
Row) Delegation
Pane
Feature (Bus
Row) Delegation
Pane
Row Delegation
Buttons
Keyer (Bus Row)
Delegation Pane
Background (Bus
Row) Delegation
Pane
Feature (Bus
Row) Delegation
Pane
Row Delegation
Buttons
Keyer (Bus Row)
Delegation Pane
The Delegates menu tab allows delegation of ME busses, Aux busses, and
macros to source select rows.
Figure 5. Delegation Menu, Delegates Menu Tab
The Operations window has three rows of Source Select buttons which are
delegated from the Delegates menu tab. Source Select buttons have
dynamic legends with source names and static legends with the keyboard
key that selects them. The operations window also contains the
Rate, and Cut transition buttons (Figure 6).
Auto, (Trans)
The Transition Area (Figure 6) in the Operations window is used to select
the transition components (Bgd, Key 1-Key 6) and the transition type (Mix,
Wipe 1 and Wipe 2, and User 1 and User 2 (
Figure 6)). These selections are
keyboard and/or mouse controlled with each button as an on/off toggle
for the transition components and a “radio button” group for the transition
type.
Figure 6. Operation Window
KSP Graphical User Interface — Instruction Manual 13
Page 14

Preparing for Installation
Preparing for Installation
Software Requirements
The KSP software requires Microsoft .NET 4.0 and vcredist_x86 (for Visual
Studio 2010) to be installed on the PC. These applications are available on
the GV Software USB Memory Stick shipped with your system, on our
website at grassvalley.com, or from the Microsoft download site.
Note .NET 4.0 and vcredist_x86 (VisualStudio2010 sub-folder) are
available in the Third-party Updates folder.
Connect the KSP Keyboard
The KSP Keyboard must be connected to a USB port on the PC prior to
power on of the touchscreen or PC monitor. The KSP only recognizes key
boards that are plugged in when the KSP application is started.
-
Power On and Configure the PC/Touchscreen PC
Once the keyboard is connected, power on the PC and set the resolution to
1920x1080.
Touchscreen PC
If you are using a touchscreen PC, you will need to turn off the multi-touch
feature (see the documentation that came with your system). The multitouch feature is actually a two step process; touch and remove. For
switching video you will want the touch of a button to trigger an effect.
Licensing
When you receive a new KSP system, the license is included. You can verify
that all of your options are installed in the Install Options menu (select
, Install Options in the GV Switcher menu).
Setup
If you are upgrading from a previous version of software, and want to
verify that your existing licenses remain and the new Soft Panel license is
added, perform the following before installing the new KSP system:
Eng
1. In the Eng Setup, Install Options menu, record the licenses in the
Enabled column of the Options list.
14 KSP Graphical User Interface — Instruction Manual
Page 15

Installation
Installing KSP GUI (and GV Switcher Menu)
Installation
2. Once you have installed the KSP system, verify that the existing
licenses remain and the Soft Panel option has a ‘Yes’ in the Enabled and
the New column.
3. You can add a Temporary or Permanent license by selecting one of the
buttons in the Option Group pane. For a permanent license select the
New Auth Code for Perm data pad and enter the Authorization code that
came with your system license, and select
Refer to the Video Production Center Installation & Service Manual for your
Video Frame model for more information.
1. Open the GV Switcher menu software from a USB device plugged into
the PC.
Install.
2. Double-click on GVSwitcherInstaller.exe.
3. Click on Menu to install the GV Switcher menu (Figure 7); follow the
prompts.
Note Always install the GV Switcher menu first.
Figure 7. GV Software Installer
KSP Graphical User Interface — Instruction Manual 15
Page 16

Installation
4. Run the GVSwitcherInstaller.exe again then click on Soft Panel
(
Figure 7) to install the KSP; follow the prompts.
5. With the GV Switcher menu open, navigate to the Frame Suite Nodes
& ID menu by selecting the
buttons.
6. Select the Frame IP Address data pad and enter the Frame IP in the Frame
IP pop-up keypad and select
Figure 8. Frame IP
Eng Setup, Node Settings, Frame Suite Nodes & ID
Enter (Figure 8).
7. Select the Associated Panel IP data pad.
8. When the Associated Panel IP pop-up keypad displays, clear the entry
so it is blank (select the
in the pop-up keypad or use the Delete, Backspace or Space Bar on the
keyboard).
9. Select Enter.
This sets the Control Panel IP to 0.0.0.0. which prevents missing connection error messages.
10. When prompted to restart the GV Switcher menu, select Cancel (there
will be a restart later in this procedure).
Delete, Backspace Arrow, or CE (Clear Entry) button
11. Navigate to the Control Surfaces menu by selecting Eng Setup, Node
Settings
16 KSP Graphical User Interface — Instruction Manual
, Control Surfaces.
Page 17

Operations
ME Delegation
Row Delegation
Delegation
Operations
12. Select a blank Node Name data pad and enter KSP (or an easily
identifiable Soft Panel name) and select
13. Select the adjacent IP Address data pad and enter the IP Address of the
PC/touchscreen used for the KSP application, and select
Note The IP Address of the PC can be the existing IP Address or you can change it
to one of the reserved switcher IP Addresses, for example 192.168.0.176.
14. When prompted, restart the GV Switcher menu.
15. Open the KSP GUI by double-clicking on the KSP.exe icon on the
desktop or open it from the Grass Valley folder in the Start menu.
Enter.
Enter.
Delegation from the KSP GUI is controlled in the Delegates menu tab in the
Delegation area. The Delegates menu tab is divided into ME Delegation
and Row Delegation (
Figure 9. Delegation Menu, Delegates Menu Tab
Figure 9).
KSP Graphical User Interface — Instruction Manual 17
Page 18

Operations
Background (Bus
Row) Delegation
Pane
Feature (Bus
Row) Delegation
Pane
Row Delegation
Buttons
Keyer (Bus Row)
Delegation Pane
ME Delegation
Press the desired ME button in the ME Delegation area of the Delegates
pane (
can toggle on/off Rules Hold by pressing the Rules Hold button (Figure 9). If
an ME is split (in the GV switcher menu), you can delegate the Primary or
Secondary partition by pressing the
the Video Production Center User Manual for your Video Frame model for
information about Rules and Split MEs.
PGM PST (Program Preset) is the default delegation upon KSP start up.
Note Upon restart, the KSP delegates to PGM PST (Program Preset) therefore if
Row Delegation
The default row delegation upon start up is:
• Row 1—Keyer 1,
Figure 9) to delegate an ME. If source rules have been created, you
Pri or Sec buttons (Figure 9). Refer to
you restart the KSP menu, and you want a different ME, you will have to press
the button for that ME in the Delegates menu tab.
Row 2—Bkgd A, and
•
Row 3—Bkgd B
•
You can use the default or delegate the rows to Keyers, Background, Macro,
E-MEM, or Aux bus by selecting a Row delegation button, then a Key, Back
ground, or Feature button, as demonstrated in Figure 10 with Row 1 dele-
gated to Macro.
Figure 10. ME Transition Area
-
18 KSP Graphical User Interface — Instruction Manual
Page 19

Note Pressing any Keyer, Background, or Feature button changes the row delega-
tion button label for that row.
Aux Bus Row Delegation
Delegating a row for Aux has special characteristics; the source select
buttons change display from “Aux” delegation to “source” delegation.
When a row selection button and then the
gated bus row source buttons display the available “Aux delegates”.
However once the row is delegated to Aux and a source select button is
pressed, the source select buttons change to display the available Aux
“sources”. Now Aux sources can be selected for the delegated bus row.
Keyer Auto/Cut Transition
Keyer Auto and Cut transitions can be performed from the Keyer Transition Area of the KSP GUI (Figure 11).
Note Touchscreen response time is deterministic and may not be immediate,
therefore cut transitions from a keyboard may be preferred (see 1-ME USB
Keyboard on page 22).
Operations
AUX button is pressed, the dele-
Transitions
Source Selection
Figure 11. Keyer Transition (Cut) Area
Selecting sources for transition from the KSP GUI is performed in the
Source Select area (
ground, Macro, E-MEM, or Aux using the Delegates pane (see Delegation on
page 17).
The source select button center labels change to match the current row delegation. The upper left button legends are static keyboard characters as a
guide when using a standard keyboard (not the GV 1-ME USB Keyboard)
Figure 12).
(
Figure 12). Rows 1-3 can be delegated as Keyer, Back-
KSP Graphical User Interface — Instruction Manual 19
Page 20

Operations
Figure 12. Source Select Area
ME Transitions
The ME Transition area (Figure 13) provides KSP GUI control of:
• Next transition,
•Key On status,
• Trans Rate,
• Primary and Secondary partition states,
Effects
• Mix or wipe types,
• ME transition Auto/Cut, and
• Lever arm transition (mouse click or touch and drag).
Figure 13. ME Transition Area
E-MEMs are created in the E-MEM & Timeline, Recall Run menu in the GV
Switcher menu. Refer to the Video Production Center User Manual for your
Video Frame model for information about creating effects with E-MEMs
and Macros.
E-MEM
E-MEMs can be ran from the KSP GUI in two ways; from the E-MEM menu
tab (
Figure 14) in the Delegation area or by delegating a bus row using the
20 KSP Graphical User Interface — Instruction Manual
Page 21

Operations
EMEM Feature button in the Delegates menu tab (see Row Delegation on
page 18).
Figure 14. Delegation Menu, E-MEM Menu Tab
Macros
The KSP E-MEM menu tab is a simplified version of the E-MEM and Timeline, Recall Run menu in the GV Switcher menu and one mirrors the other
when an E-MEM is selected for recall. For example if you choose Register
E001 in the GV Switcher menu, that selection would also be reflected in the
KSP E-MEM menu tab and vice versa. Names and Comments are displayed
in the E-MEM menu tab but can only be edited from the GV Switcher menu.
The Macro menu tab is a simplified version of the Macro Catalog menu in
the GV Switcher menu (
to press the button of the desired macro and then press the Play button to
execute the macro. Macros can also be run by delegating a bus row using
the
Macro Feature button in the Delegates menu tab (see Row Delegation on
page 18). Macros selected on bus rows run when selected.
Figure 14). When using the KSP GUI the process is
KSP Graphical User Interface — Instruction Manual 21
Page 22

1-ME USB Keyboard
Macro Play
Button
Figure 15. Delegation Menu, Macro Menu Tab
1-ME USB Keyboard
The 1-ME KSP GUI comes with a full-sized PC style keyboard with navigation and numeric keypads, two integrated USB ports, and uses a USB 2.0
host connection (Figure 16). For switcher control, the keyboard has special
keycap labels and colors with Program, Preset, and Keyer rows for up to 12
sources and three shift levels for a total of 36 keyboard-controllable sources.
Dedicated buttons are also provided on the keyboard for each of the ME’s
six keyers, along with twelve Macro Attachment buttons. The numeric
keypad provides E-MEM control. Also available are Cut, Auto transition,
and lever jog control at the touch of a button (
Figure 16).
22 KSP Graphical User Interface — Instruction Manual
Page 23

1-ME USB Keyboard
Row 2
(1 - 12)
Row 3
(1 - 12)
Next Transition
(Bkg, Key 1-6)
Row 1
(1 - 12)
Macros
(M1 - M12)
8829_01
Figure 16. KSP Full-sized Keyboard for Switcher Control
The keyboard has two modes: control and data entry. Turning on the Key-
board Shortcuts button (highlights red) in the Operations Window (Figure 17)
puts the keyboard in control mode, turning it off puts the keyboard in data
entry mode, to enable parameter or text entry.
CAUTION When the Keyboard Shortcuts button is red, the changes to the keyboard may
be On Air changes.
Figure 17. Keyboard Shortcuts Button
Standard USB Keyboard
You can use a standard USB keyboard for KSP operation. The buttons in the
Operations area have keyboard characters in the upper left-hand corner
that correlate to the keys on the keyboard.
KSP Graphical User Interface — Instruction Manual 23
Page 24

1-ME USB Keyboard
24 KSP Graphical User Interface — Instruction Manual
 Loading...