

Page 1

K2 Avid Plug-in
K2 & PROFILE XP AVID PLUG-IN DAT A
HANDLER MODULE SOFTWARE
Installation and User Guide and Release Notes
071-8551-02
2010-05-17
SOFTWARE release
7.0.0.99
2010-05-17 Page 1 of 69
Page 2
1.2
February 2010
Updated for K2 Summit v. 7.1
1.3
May 2010
Updated for K2 Summit v. 7.2
Copyright
Copyright © Grass Valley, Inc. A ll rights res erved. Printed i n the United Stat es of America. Portions of software © 2000
– 2009, Microsoft Corporation. All rights reserved. This document may not be copied in whole or in part, or otherwise
reproduced except as specifically permitted under U.S . copyright law, without the prior written c onsent of Grass Valley,
Inc., P.O. Box 59900, Nevada City, California 95959-7900. This product may be covered by one or more U. S. and
foreign patents.
Disclaimer
Product options and specifications subject to change without notice. The information in this manual is furnished for
informational use only, is subject to change without notice, and should not be construed as a commitment by Grass
Valley, Inc. Grass Valley, Inc. assumes no responsibility or li ability for any errors or inac c uracies that m ay appear in this
publication.
U.S. Government Restricted Rights Leg end
Use, duplication, or disclosure by the United Stat es Government is subject to restrictions as set forth in subparagraph
(c)(1)(ii) of the Rights in Tec hnical Data and Computer Software clause at DFARS 252.277-7013 or in s ubparagraph
c(1) and (2) of the Commercial Computer Software Restricted Rights clause at FAR 52.227-19, as applicable.
Manufacturer is Grass Valley, Inc., P.O. Box 59900, Nevada City, California 95959-7900 U.S.A.
Trademarks and Logos
Grass Valley, K2, Aurora, Summit, Dyno, S olo, Infinity, Turbo, Profile, Profile XP, NetCentral, NewsBrowse, NewsEdit,
NewsQ, NewsShare, NewsQ Pro, and Media Manager are either regist ered trademarks or trademarks of Grass Vall ey,
Inc. in the United States and/or other c ountries. Grass Valley, Inc. products are c overed by U.S. and foreign patents,
issued and pending. Additional inform ation regarding Grass V alley, Inc. tradem arks and other proprietary rights may be
found at www.grassvalley.com.
Other trademarks and logos used in this document are either regist ered trademarks or trademarks of the manuf acturers
or vendors of the associated products, such as Microsoft® Windows® operating system, Windows Media® player,
Internet Explorer® internet browser, and SQL Server™. QuickTime and the QuickTime logo are trademarks or
registered trademarks of Apple Computer, Inc., used under license therefrom.
Revision Status
Revision
Date Changes
Number
1.0 February 2007 First release
1.1 July 2009 Updated to include K2 Summit
2010-05-17 Page 2 of 69
Page 3

Table of Contents
Installation and User Guide and Release Notes ....................................................... 1
Introducing Grass Valley DHM for K2 Media Client, K2 Summit Production Client and
PVS1xxx ....................................................................................................................... 4
Streaming Workgroup Overview ................................................................................... 4
K2 Media Client and K2 Summit Production Client system requirements ...................... 6
PVS system requirements............................................................................................. 6
Avid system requirements ............................................................................................. 6
Setting up PVS fibre channel network for Avid connectivity ........................................... 8
Setting up the K2 system for Avid connectivity .............................................................. 8
Install overview ............................................................................................................. 9
Uninstall previous installed version ............................................................................... 9
Installing TServerSvc on the K2 Media Client & K2 Summit Production Client ............ 11
Prerequisite for Installing the TserverSvc on the K2 Summit Production Client ........... 11
Verify TserverSvc is installed correctly ........................................................................ 17
Installing TServer on Profile PVS Clients .................................................................... 18
Installing K2-AvidTM Software on Avid devices .......................................................... 22
Installing the K2AvidDHM software ............................................................................. 22
Verify K2AvidDHM is installed correctly ...................................................................... 27
Installing the K2AvidIngest software ........................................................................... 28
About K2-AvidTM software licensing ........................................................................... 34
Requesting a license ................................................................................................... 34
If you encounter difficulties when requesting a license ................................................ 38
Generating a unique id ................................................................................................ 38
Obtaining and maintaining licenses ............................................................................. 38
Adding a license ......................................................................................................... 38
Deleting licenses ......................................................................................................... 39
Archiving licenses ....................................................................................................... 39
Modifying / verifying the services file on the K2 / PVS ................................................. 40
Set up hosts files ........................................................................................................ 40
Modifying the Hosts file on the Avid Unity TransferManager or Avid Interplay system for
single send ................................................................................................................. 41
Modifying the Hosts file on the Avid Unity™ TransferManager or Avid Interplay system,
server for dual send .................................................................................................... 42
Modifying the Hosts file on K2 or PVS for single send to playback .............................. 44
M
odifying the Hosts file on K2 or PVS for dual send to playback ................................ 44
Configuring the Avid Transfer Manager / Interplay engine .......................................... 45
Configuring the Avid Editor for Transfer ...................................................................... 47
Configuring the Avid system to use other bins / folders for send to playback .............. 48
Verify the Send To Playback ....................................................................................... 50
Verify the Ingest to Avid from the K2 system ............................................................... 51
This section outlines the registry keys used by the receiver ........................................ 59
This section outlines the registry keys which can be used on the Avid Editor Clients .. 60
This section outlines the registry keys which can be used on the K2 Media Client ...... 60
What’s new in this release .......................................................................................... 61
Feature limitations in this release ................................................................................ 61
Changes in previous releases ..................................................................................... 61
Common install or configuration faults ........................................................................ 64
2010-05-17 Page 3 of 69
Page 4

DV25
16 & 24 bit
PVS11xx, K2 & K2 Summit
DV100
16 & 24 bit
K2 Summit
D10/IMX 50Mbit
16 & 24 bit
PVS11xx & K2
Chapter 1 Product Description
Introducing Grass Valley DHM for K2 Media Client, K2 Summit Production
Client and PVS1xxx
Grass Valley recommends that you read all the information in this document thoroughly
before installing or using any new software release.
This document describes the steps required to successfully connect an Avid
NewsCutter®, MediaComposer®, Avid Unity™ TransferManager or Avid Interplay
system for the Windows® 2000 or Windows XP operating system and a Grass Valley
video file server via a Fibre Channel switch or GigaBit Ethernet connection depending
on the videoserver used.
The Avid NewsCutter® or MediaComposer® system initiates transfers to the video file
server system through a local Avid TransferManager / Interplay Transfer Engine or in
case of a shared Avid system it done using a dedicated Avid TransferManager /
Interplay Transfer Engine. Send to Playback or Ingest are done using the Emulex IP
over Fibre Channel connection for the PVS videoservers and Gigabit Ethernet for the
K2 / Summit videoservers.
Transfers to and from PVS videoservers can also be via the UIM.
Both distributed and SAN based videoservers are supported by the Plug-in.
These installation instructions also provide information on making transfers between
these two systems and list all known bugs and limitations associated with the software
and hardware.
Supported compression formats
Compression format PCM Audio Media Client
DVCCAM 16 & 24 bit PVS11xx, K2 & K2 Summit
DV50 16 & 24 bit PVS11xx, K2 & K2 Summit
D10/IMX 30Mbit 16 & 24 bit PVS11xx & K2
D10/IMX 40Mbit 16 & 24 bit PVS11xx & K2
Streaming Workgroup Overview
The Streaming workgroup is a concept that combines an Avid NewsCutter® or
MediaComposer® with the Grass Valley video file server via Fibre Channel or Gigabit
Ethernet connection.
These elements are tightly integrated in an environment that enhances speed and
content quality in news editing and news production. The workgroup’s Fibre Channel /
Gigabit Ethernet and Ethernet connections encourage a streamlined workflow, from the
ingest of raw material from the Grass Valley Videoserver to the Avid NewsCutter® or
2010-05-17 Page 4 of 69
Page 5

MediaComposer®, to editing of the material on the Avid NewsCutter® or
MediaComposer®, to playout of the finished story on the Grass Valley Videoserver.
Playout of finished material (called “playback”) is initiated by the Avid Unity™
TransferManager or Avid Interplay system software installed on the Avid NewsCutter®
or MediaComposer® (in standalone workgroups) or by the Avid Unity™
TransferManager or Avid Interplay system server (in Avid Unity™workgroups).
This document contains instructions on how to configure the Avid Unity™
TransferManager or Avid Interplay system software in both standalone and Avid Unity
workgroups. In this document, the system running the Avid Unity™ TransferManager or
Avid Interplay system software is referred to as the “TransferManager platform” for both
types of workgroups.
The Avid NewsCutter® or MediaComposer® and the Grass Valley Videoserver store
digital media in a format that is known on both systems. As a result, ingest of the
material from the Grass Valley Videoserver to the Avid NewsCutter® or
MediaComposer®is possible via a Fibre Channel / Gigabit Ethernet connection. When
the material reaches the Avid NewsCutter® or MediaComposer®for editing, the Fibre
Channel / Gigabit Ethernet network allows the material to be edited and transferred
between Multiple Avid NewsCutter® or MediaComposer® systems. When the story is
ready for broadcast, it is transferred to the Profile for playback via the Fibre Channel /
Gigabit Ethernet connection and TransferManager software. In standalone mode, each
edit and playback system maintains its own storage space, while in a workgroup
configuration the editor’s share from a single pool of storage space making a physical
transfer of the material necessary.
To minimize on-air failures, an optional second Grass Valley Videoserver can be used
to ensure that a backup playback system is available. The Avid NewsCutter® or
MediaComposer® can make transfers using a dual-send configuration, sending media
to both a primary and secondary Grass Valley Videoserver.
Avid Generic MXF FTP.
One special case of the TM-DHM is the Generic FTP solution. This is a DHM
implementation created by Avid and available as an option to Interplay Transfer
provides an interface to import media from, or export media to, any standard FTP
server which supports media wrapped as MXF OP-1A. With the rapidly increasing
usage of MXF-supporting applications and file-based workflows, the Generic FTP
solution may well be of interest. One benefit of using this is the support for XDCAM HD.
2010-05-17 Page 5 of 69
Page 6

Avid NewsCutter Adrenaline
7.5.9
Avid Transfer manager
2.9.21
Avid MediaComposer
3.5.9
Chapter 2 System requirements
K2 Media Client and K2 Summit Production Client system requirements
K2-AvidTM Plug-in version 7.0.0.99 is supported on the K2 Media Client & K2 Summit
Production Client; both the standalone and SAN based systems are supported.
The K2-AvidT M Plug -in version 7.0.0.99 has been tested using the following:
Application Version Notes
Avid Transfer manager 2.9.21
Avid Interplay Transfer
Engine
Avid MediaComposer 3.5.9
K2 Media Client 3.2.74.1127 &
K2 Summit Production
Client
Microsoft has developed a software update to deal with thread handles and of event
handles in the Microsoft .NET Framework 2.0. This update needs to be installed on the
K2 client. For more information, refer to Microsoft knowledge base 968760.
1.6.2 Standalone Mode
3.3.1122
7.2.7.1319
PVS system requirements
K2-AvidTM Plug-in version 7.0.0.99 is supported on the PVS series of videoservers,
both Standalone and SAN systems are supported. The K2-AvidTM Plug-in version
7.0.0.99 has been tested using the following:
Application Version Notes
Avid Interplay Transfer
Engine
Avid NewsCutter Adrenaline 7.5.9
PVS11xx 5.4.9.1306
PDR 200, 300 and 400 series are not supported.
There are currently no plans to qualify the DHM with the PDR 200,300 and 400.
1.6.2 Standalone Mode
Avid system requirements
The DHM has been tested using the following:
Application Version Notes
Avid Transfer manager 2.9.21
Avid Interplay Transfer 1.6.2 Standalone Mode
2010-05-17 Page 6 of 69
Page 7

Avid NewsCutter Adrenaline
7.5
Engine
Emulex LP9000 FC card 5.0.2195.6717 Used for FC transfers.
2010-05-17 Page 7 of 69
Page 8

Chapter 3 hardware Installation
Setting up PVS fibre channel network for Avid connectivity
These instructions assume that a basic installation of the
Avid NewsCutter, MediaComposer, K2 o r Profile system has been completed. If you
have not yet installed these systems, complete this first and then return to these
installation instructions.
For information on installing and configuring Fibre Channel and the PVS series of
videoservers, refer to the Avid document profile.pdf. This document is located on the
Avid installation CD.
Before proceeding, verify you can ping the PVS and establish an FTP connection to the
PVS from the device running the TransferManager or Avid Interplay.
Setting up the K2 system for Avid connectivity
The Avid NewsCutter, MediaComposer, TransferManager, Avid Interplay, or K2
installation is described in the following sections:
Before proceeding, verify you can ping the K2 Media Client, K2 Summit Production
Client and establish an FTP connection to the K2 Media Client, K2 Summit Production
Client or K2 Media Server from the device running the TransferManager or Avid
Interplay.
2010-05-17 Page 8 of 69
Page 9

Chapter 4 Software Installation
Install overview
The installation is done in several steps and each step must be completed before you
can stream media between Avid and K2.
Note: Uninstall all previous versions prior to any upgrade.
When you have completed the setup process, see Known Bugs and Limitations.
Uninstall previous installed version
1. Uninstall the Tserver on the K2 clients.
o Do not do the following steps if there is no Tserver installed.
o Do the following steps if you are upgrading from a previous release.
a. Use the Windows Add/Remove Programs control panel and uninstall the
Tserver.
b. Make sure there in no trace of the previous installed Tserver on the K2 client.
Use regedt32.exe to search
HKEY_LOCAL_MACHINE\SYSTEM\CurrentControlSet\Services\ f o r "Tserver"
or "Grass Valley TServer Interplay".
c. Delete "Tserver" or "Grass Valley TServer Interplay" if this was not removed by
the un-install.
d. Check there is no tserversvc.exe in the C:\profile directory of the K2 client.
e. Reboot the K2 client.
2. Make a backup of the DHM license. (See Archiving licenses)
o Do not do the following steps if there is no DHM installed.
o Do the following steps if you are upgrading from a previous release.
a. Click the License Manager icon on the desktop.
b. Locate the K2-DHM license and drag this to the desktop. Doing this creates a
backup of the license file.
3. Uninstall the K2 DHM.
o Do not do the following step if there is no DHM installed.
o Do the following step if you are upgrading from a previous release.
2010-05-17 Page 9 of 69
Page 10

a. On the device running the Avid transfer manager / Interplay engine, use the
Windows Add/Remove Programs control panel to uninstall the DHM.
4. Uninstall the Profile software from Avid transfer manager Interplay engine.
o Do not do the following step if there is no DHM installed.
o Do the following step if you are upgrading from a previous release.
a. On the device running the Avid transfer manager / Interplay engine, use the
Windows Add/Remove Programs control panel to uninstall the ProfileXP
software.
5. Reboot the Avid transfer manager / Interplay engine device.
6. Uninstall the Grass Valley K2 Avid Ingest from the Avid Editor.
o Do not do the following step if there is no Ingest software installed.
o Do the following step if you are upgrading from a previous release.
a. On the device running the Avid Editor, use the Windows Add/Remove
Programs control panel to uninstall the Ingest software.
7. Uninstall the Profile software from the Avid Editor.
o Do not do the following steps if there was no Ingest software installed or
the Profile software was removed as part of the DHM uninstall on a
standalone Avid transfer manager / Interplay engine / editor system.
o Do the following steps if you are upgrading from a previous release and
this is an Editor connected to a shared Avid system.
a. Use the Windows Add/Remove Programs control panel to uninstall the
ProfileXP software.
b. Reboot the Avid Editor device.
8. Repeat step 6 and 7 for each editor installed with the Grass Valley K2 Avid Ingest
support software.
2010-05-17 Page 10 of 69
Page 11
Installing TServerSvc on the K2 Media Client & K2 Summit Production
Client
NOTE: The TServerSvc is always installed on the K2 client and must not be installed
on the K2 Media Servers when configuring systems with external (shared) storage.
If TserverSvc was previously installed, uninstall it prior to installing the new version.
Prerequisite for Installing the TserverSvc on the K2 Summit Production Client
Before you can install software on the K2 Summit Production Client, disable the Write
Protect utility.
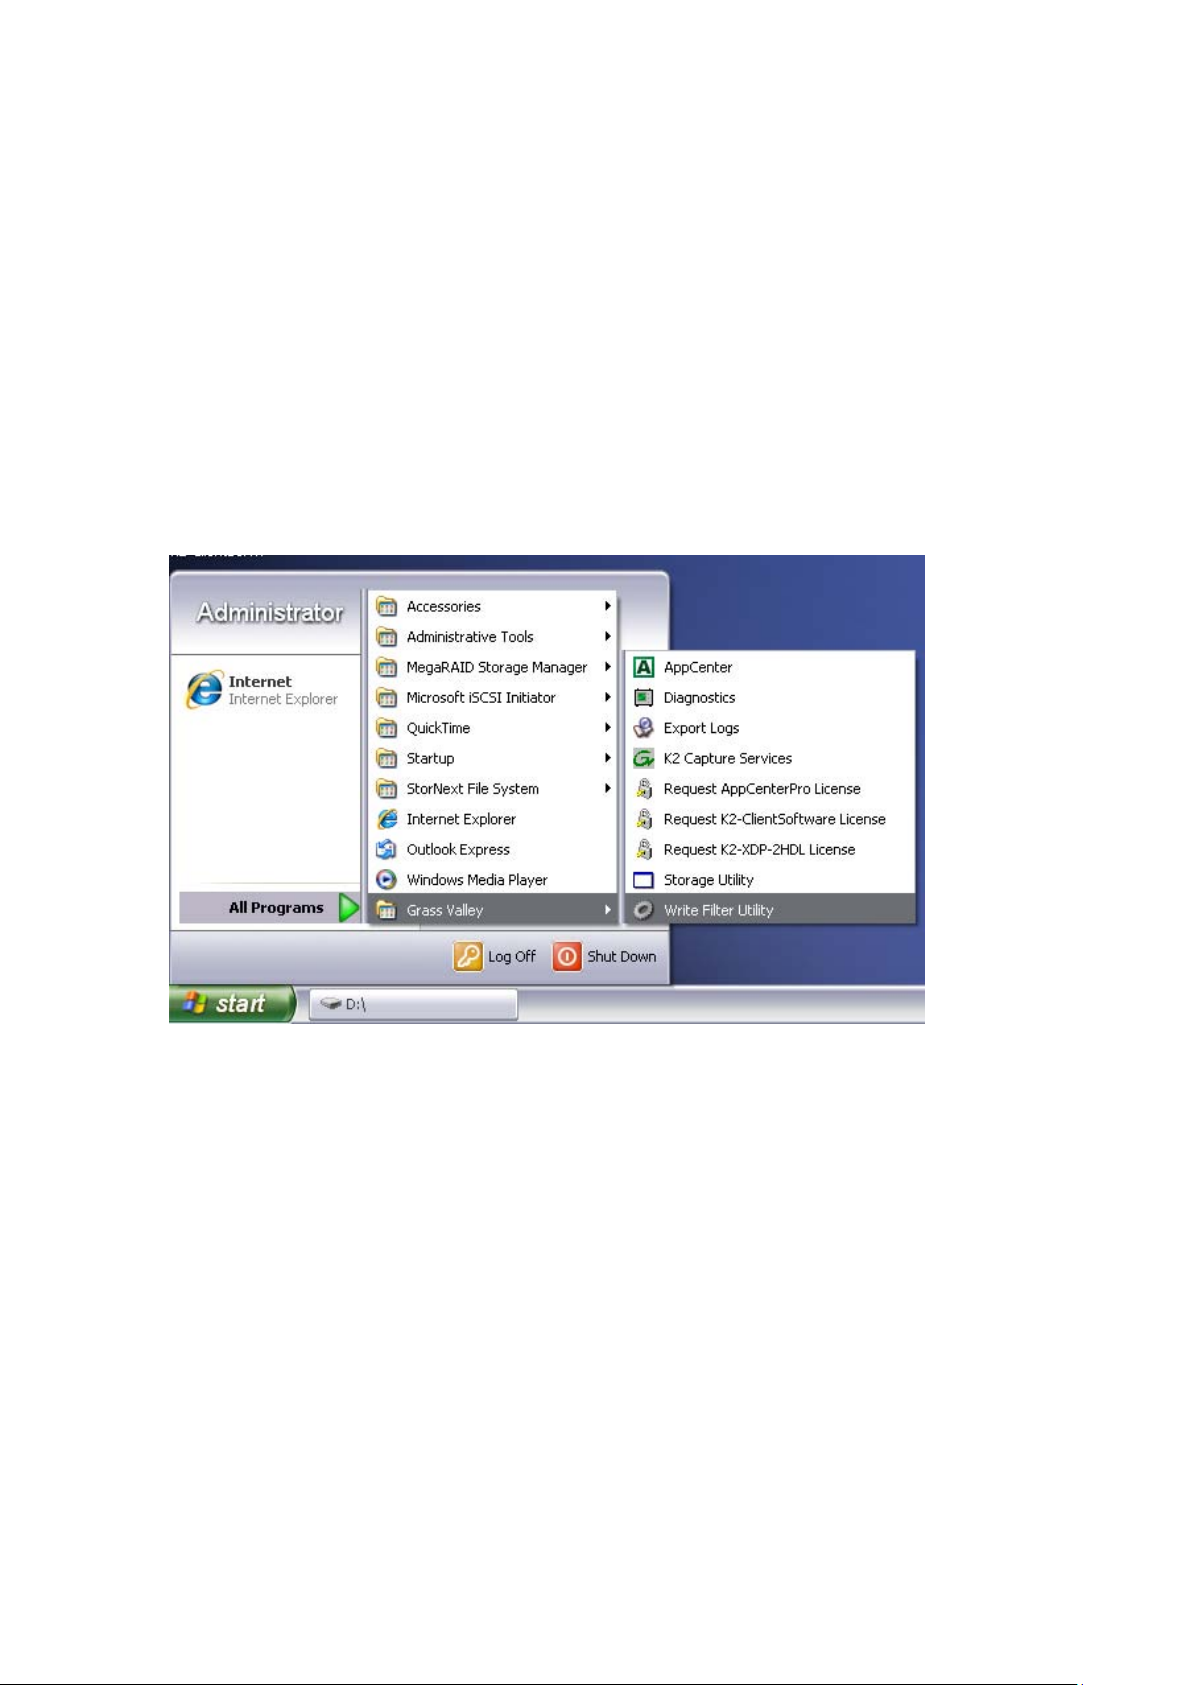
1. Navigate to the Write File Utility and launch the application.
2010-05-17 Page 11 of 69
Page 12
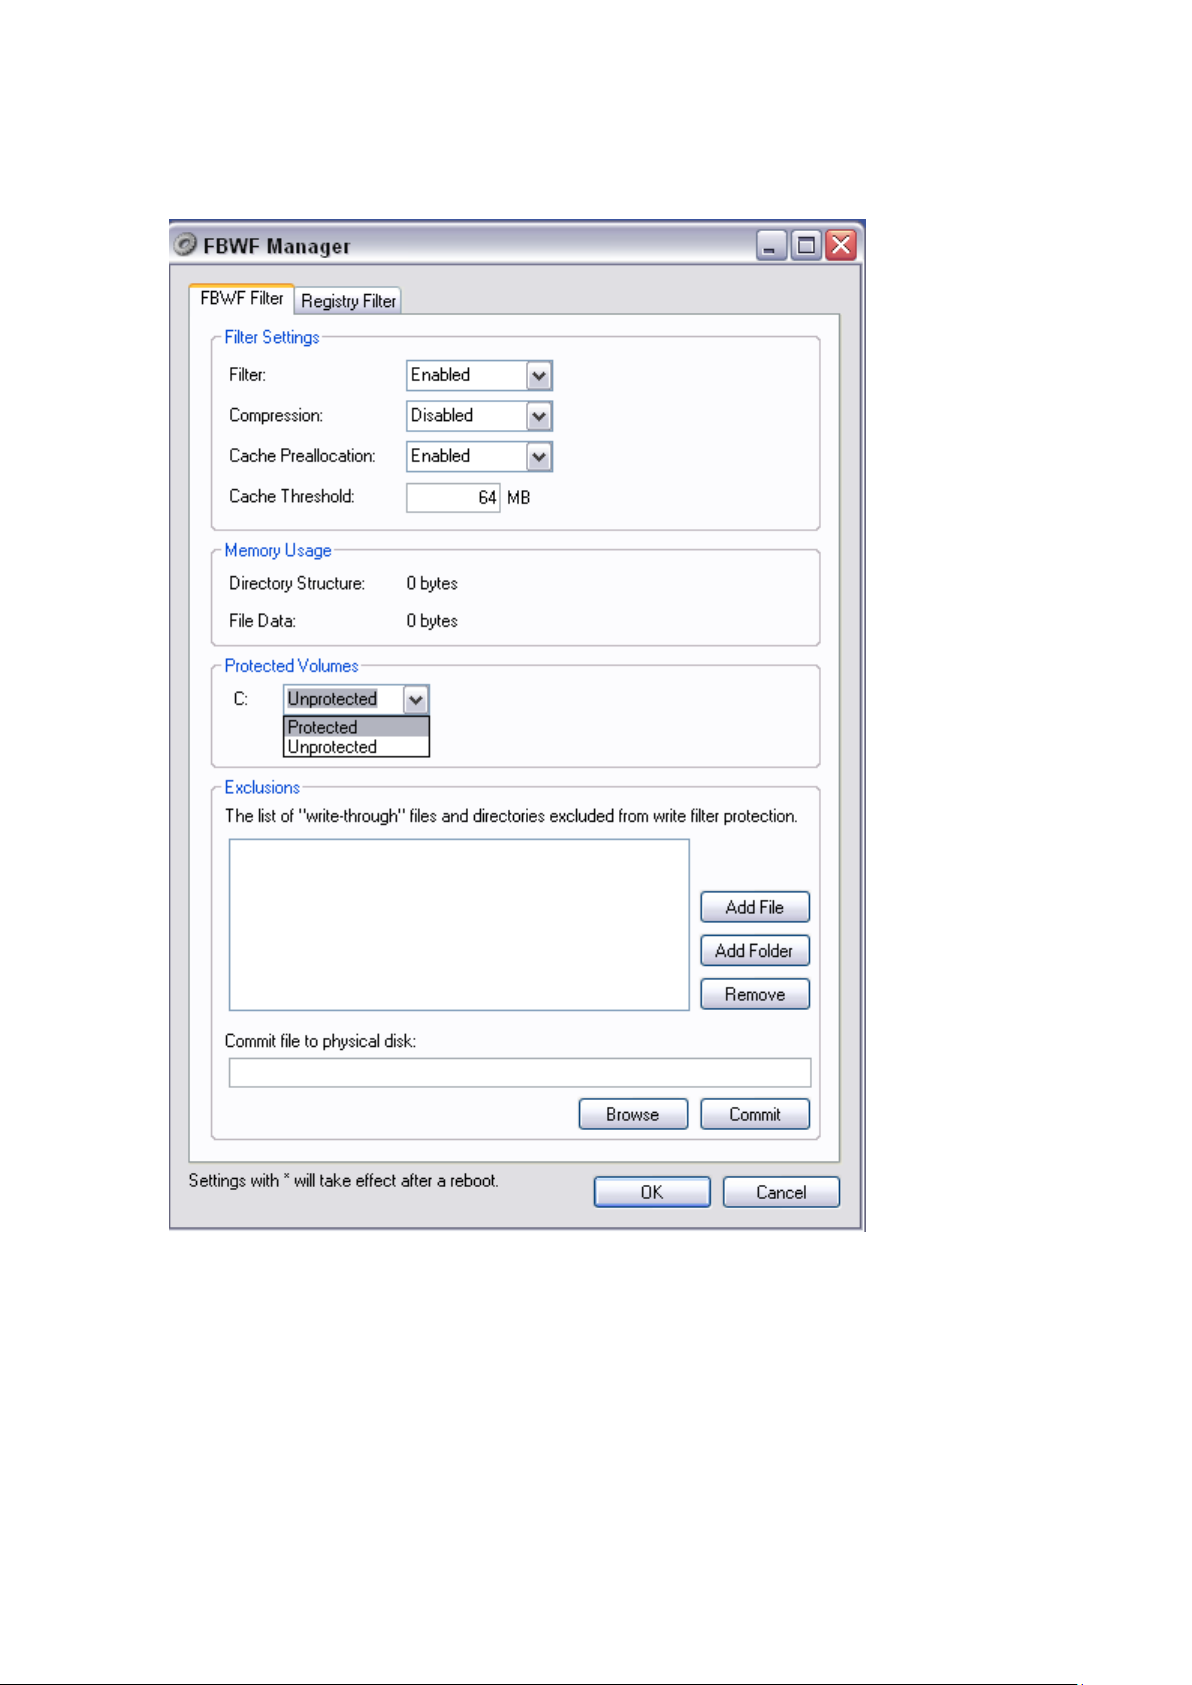
2. Under the Protected Volumes set this to Unprotected.
Reboot the K2 Summit Production Client and proceed with the TserverSvc
installation.
1. Browse the K2DHM folder and access the folder \TServerInstaller\.
2. Double-click Setup.exe.
2010-05-17 Page 12 of 69
Page 13
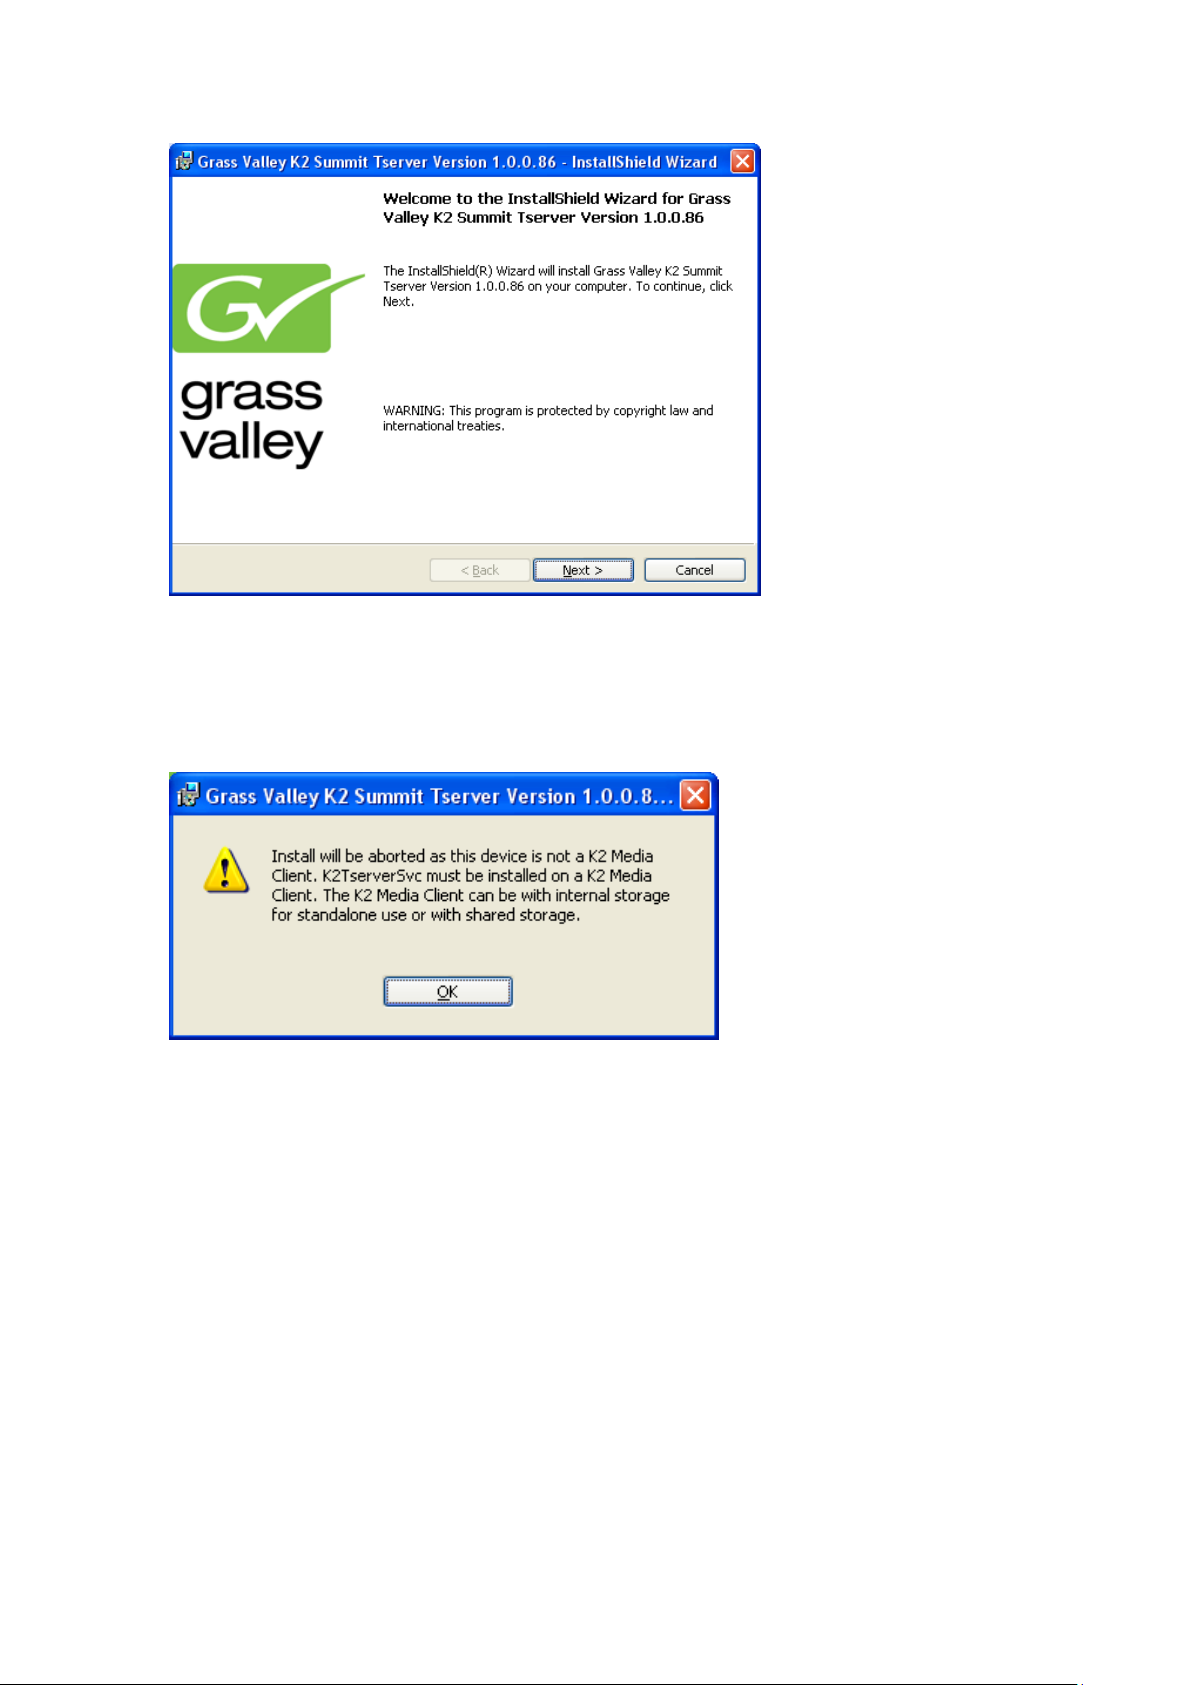
3. Click Next in the “Welcome to the InstallShield Wizard for Grass Valley K2 Summit
Tserver Version 1.0.0.86” dialog box.
Note: You might get the following message if the K2 client software has not yet
been installed on the K2 client.
2010-05-17 Page 13 of 69
Page 14
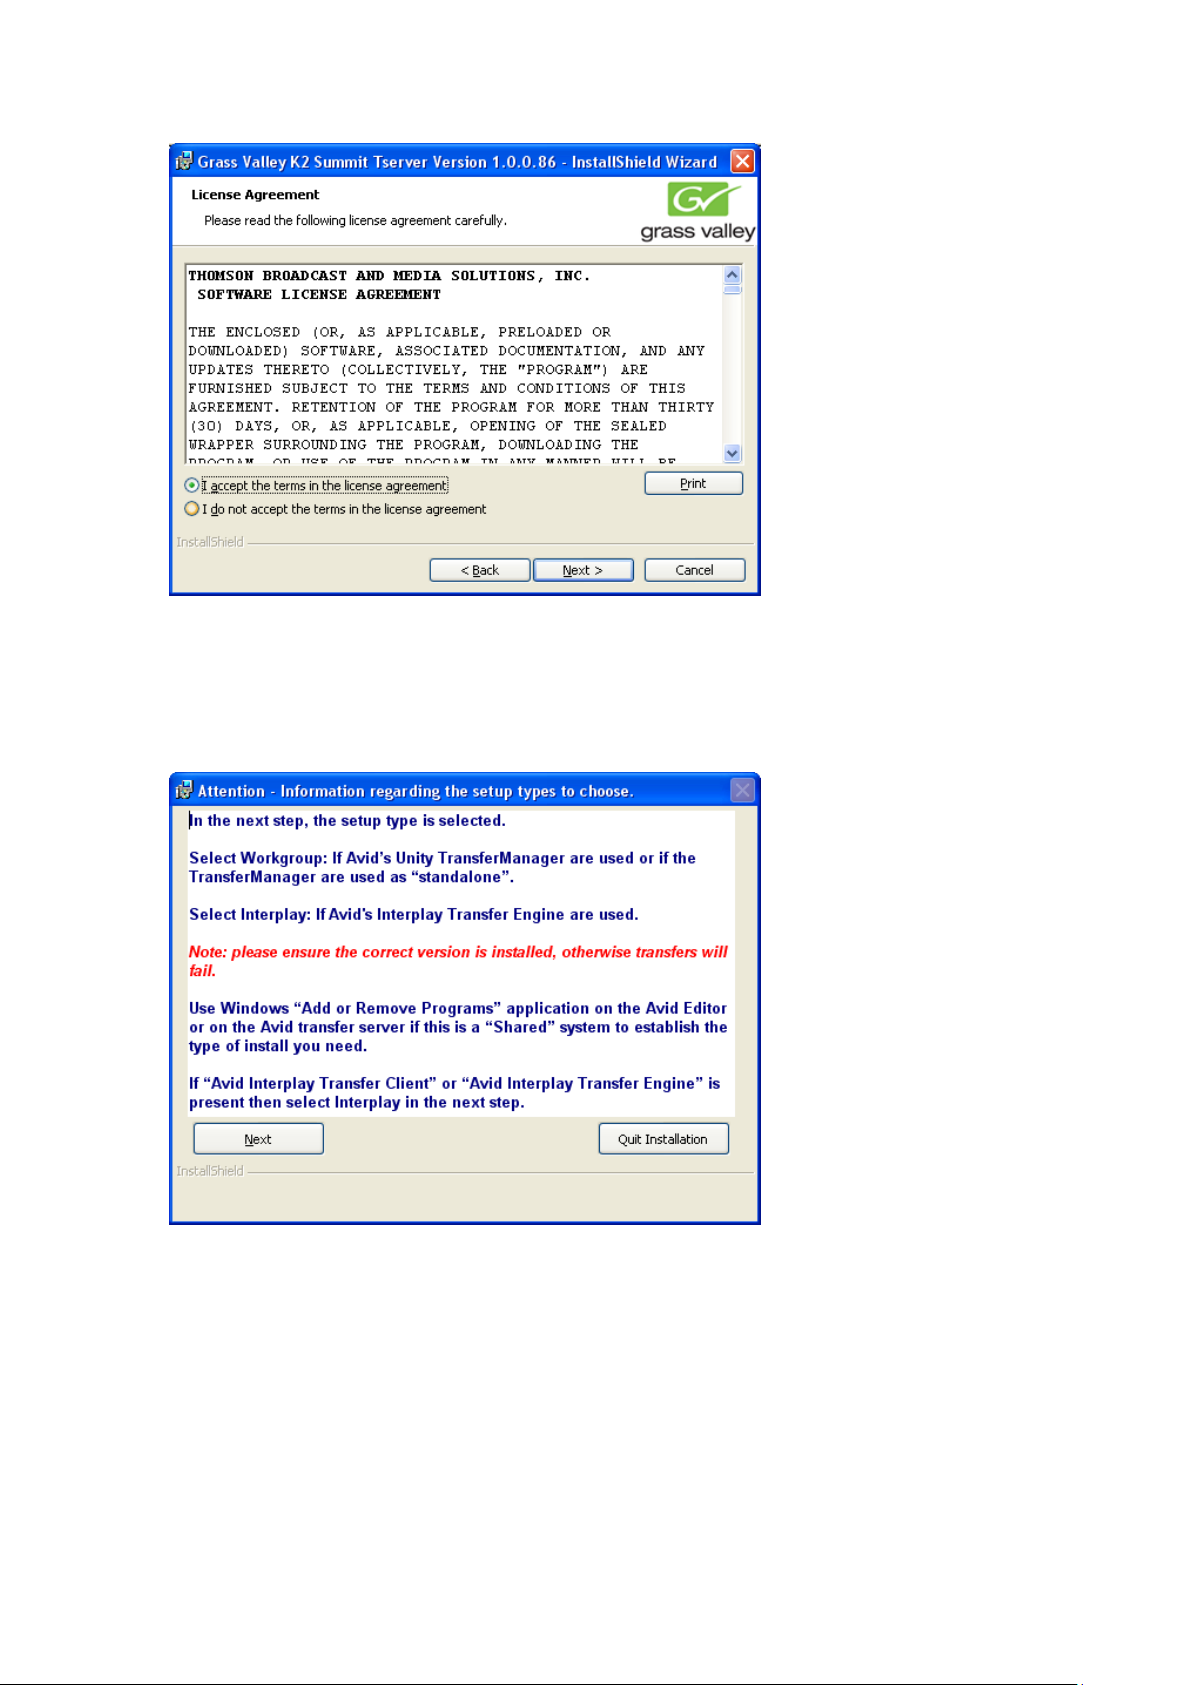
4. The License Agreement is displayed. Tick “I accept the terms in the License
agreement,” and click Next.
5. Determine the Avid version used, and click Next. Click Q uit Installation if unsure
what type to select.
6. Select the required Avid support.
Workgroup support is the default.
7. Click Next in the dialog box.
2010-05-17 Page 14 of 69
Page 15
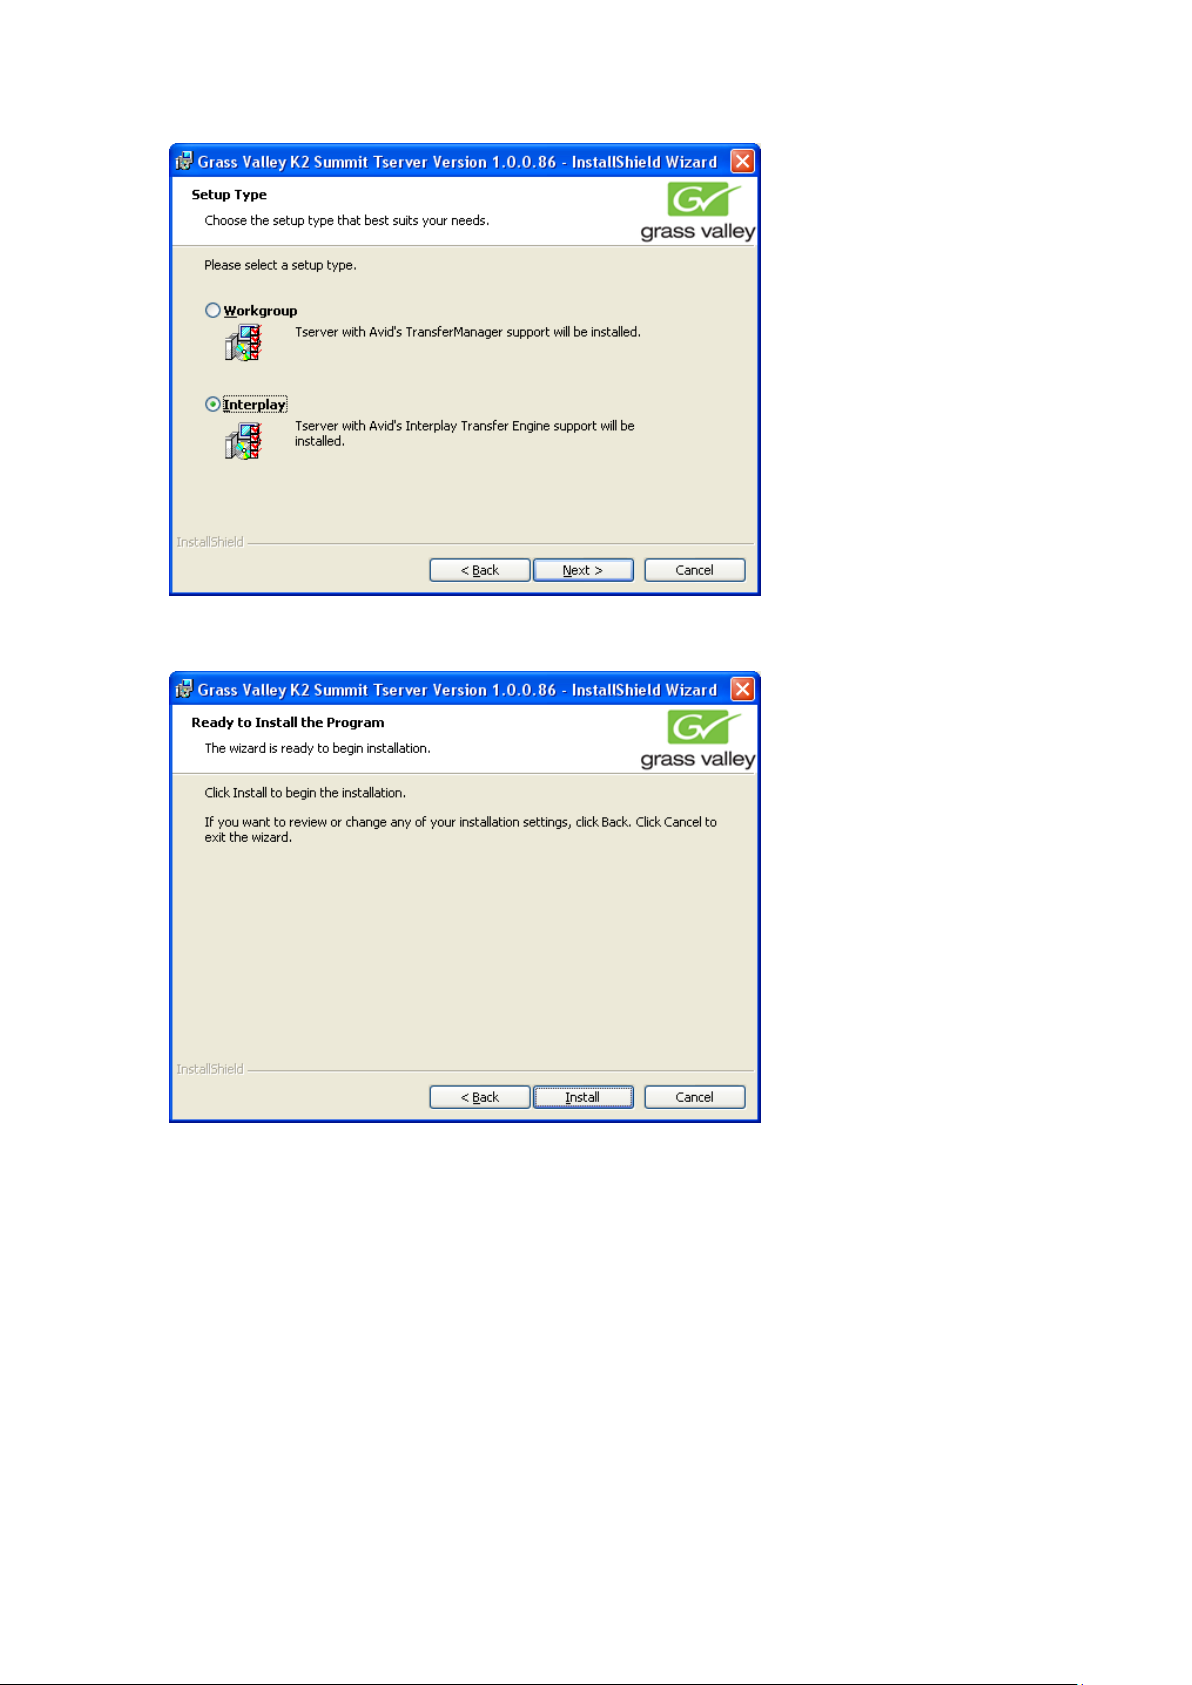
8. Click Install to start the inst a lla tion.
The status dialog box displays the progress of the installation.
2010-05-17 Page 15 of 69
Page 16
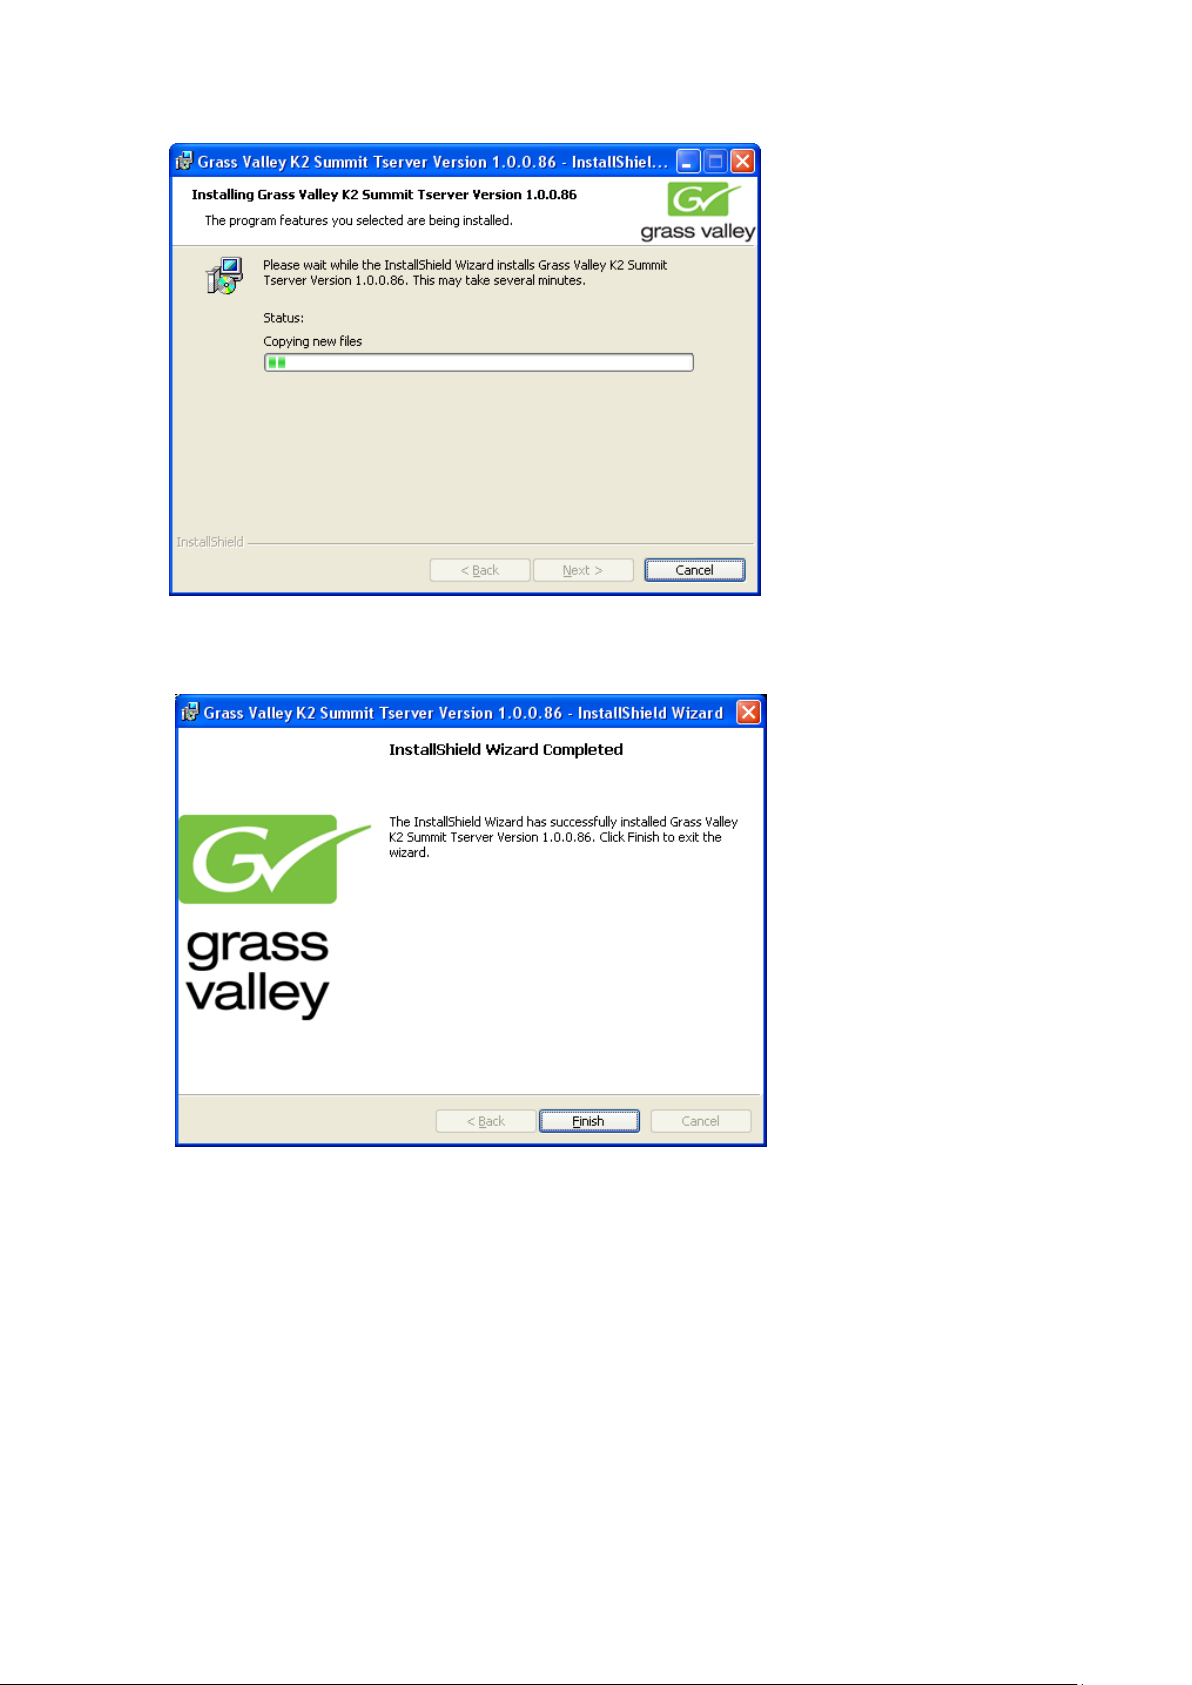
9. When installation completes, click Finish in the “InstallShield Wizard Completed”
dialog box.
2010-05-17 Page 16 of 69
Page 17
Verify TserverSvc is installed correctly
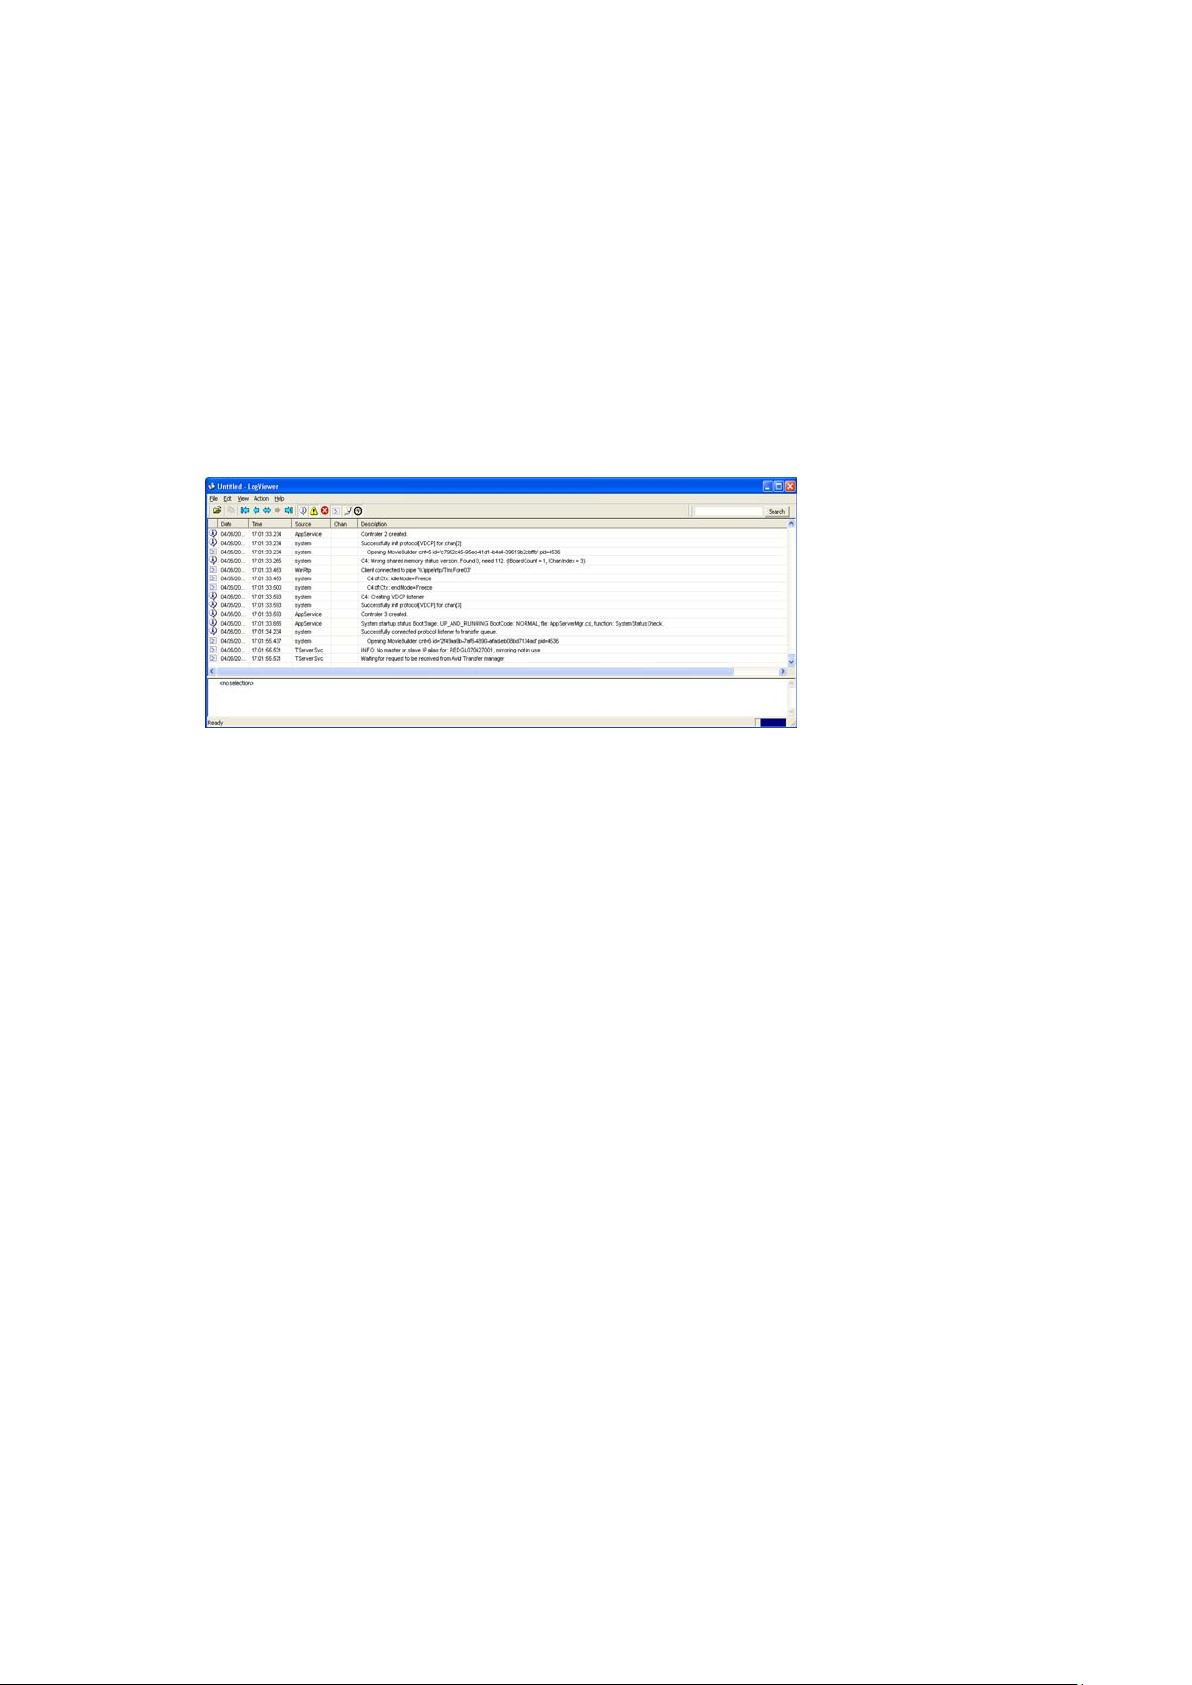
1. On the K2 client, open the Logviewer program (c:\profile\log.exe).
Make sure no filters are selected.
2. Look for the following TServerSvc messages.
o INFO: No master or slave IP alias for: DeviceHostName, mirroring not in
use.
o Waiting for request to be received from Avid Transfer manager.
This indicates the service is installed and running.
Repeat the above steps for each K2 Media Client or K2 Summit Production Client.
2010-05-17 Page 17 of 69
Page 18
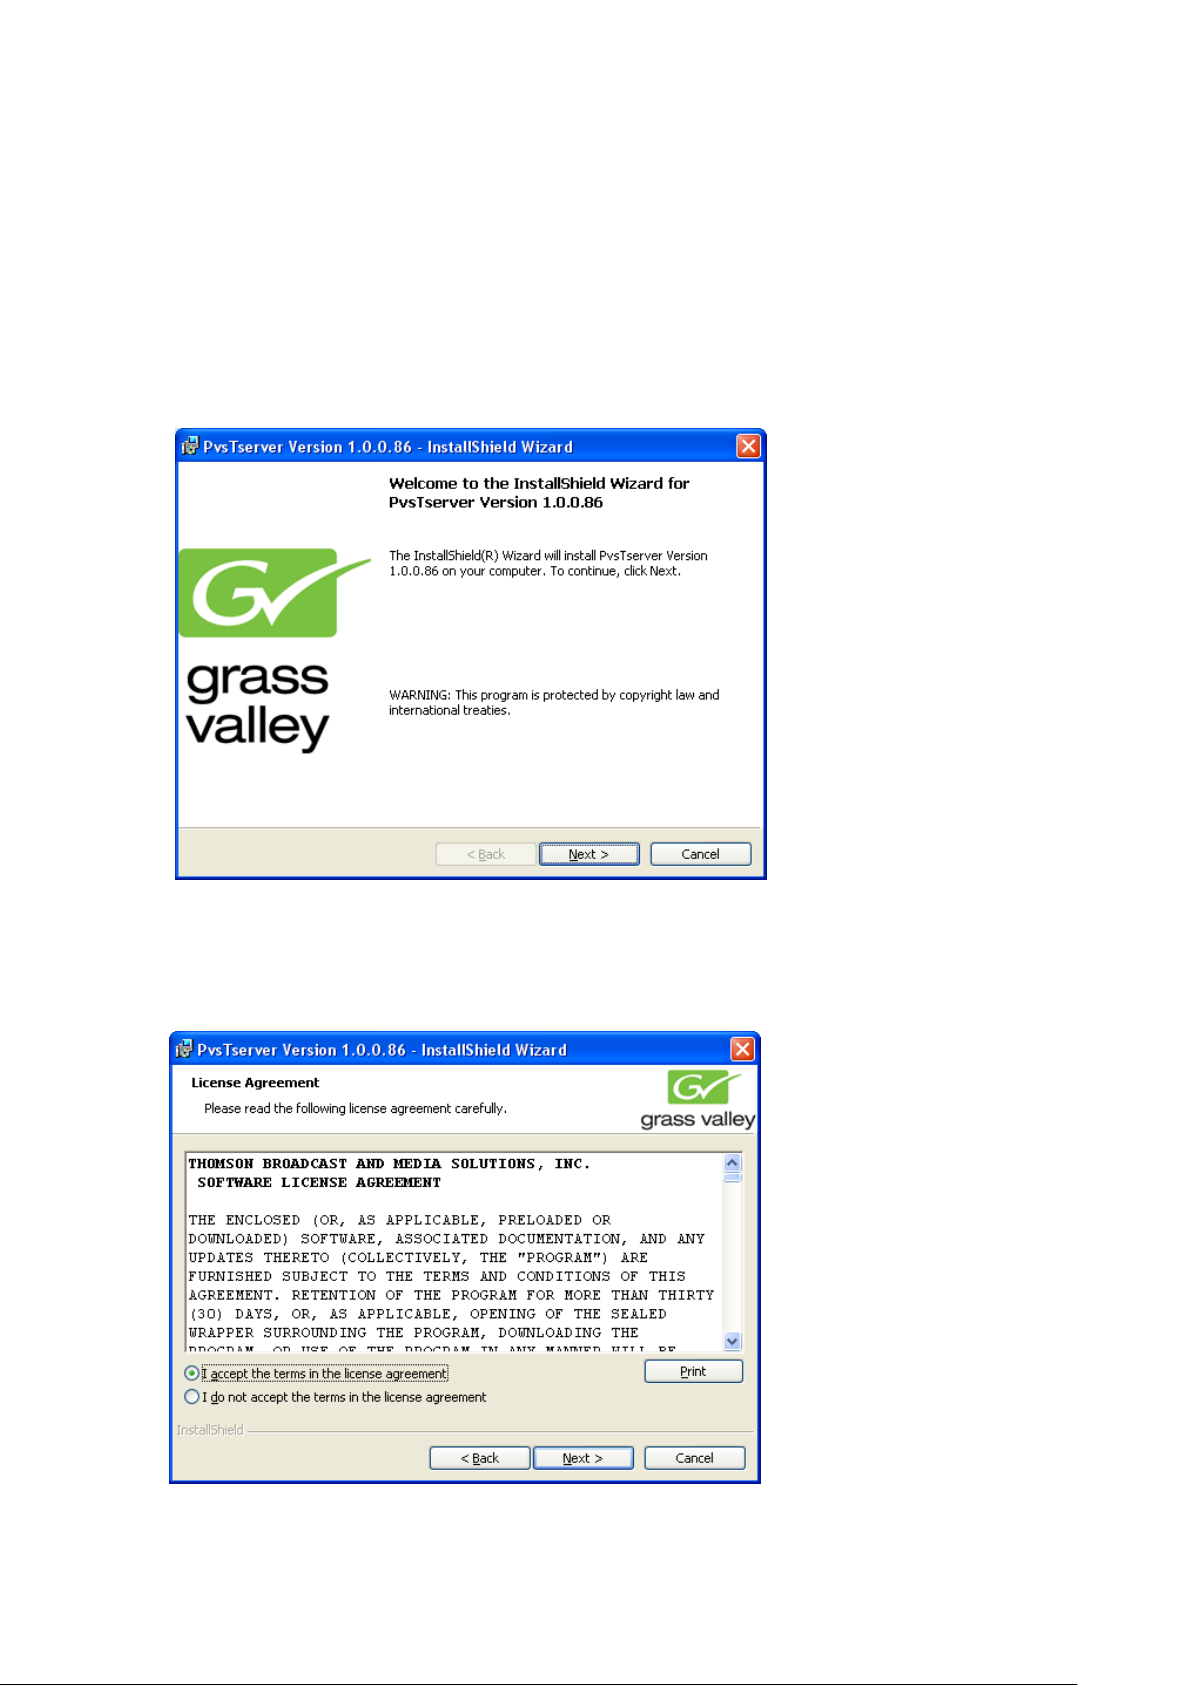
Installing TServer on Profile PVS Clients
1. Install the Grass Valley PVS TServer Version 1.0.0.86 on the Profile XP clients.
• Do not do the following steps if: K2-AvidTM is only used with a K2 client.
2. Browse the K2-AvidTM software folder and access the folder \PvsTserver\Disk1\.
3. Double-click Setup.exe.
4. In the “Welcome to the InstallShield Wizard for Grass Valley PVSTserver Version
1.0.0.86” dialog box, click Next
The License Agreement is displayed.
5. Tick “I accept the terms in the License agreement” and click Next.
2010-05-17 Page 18 of 69
Page 19
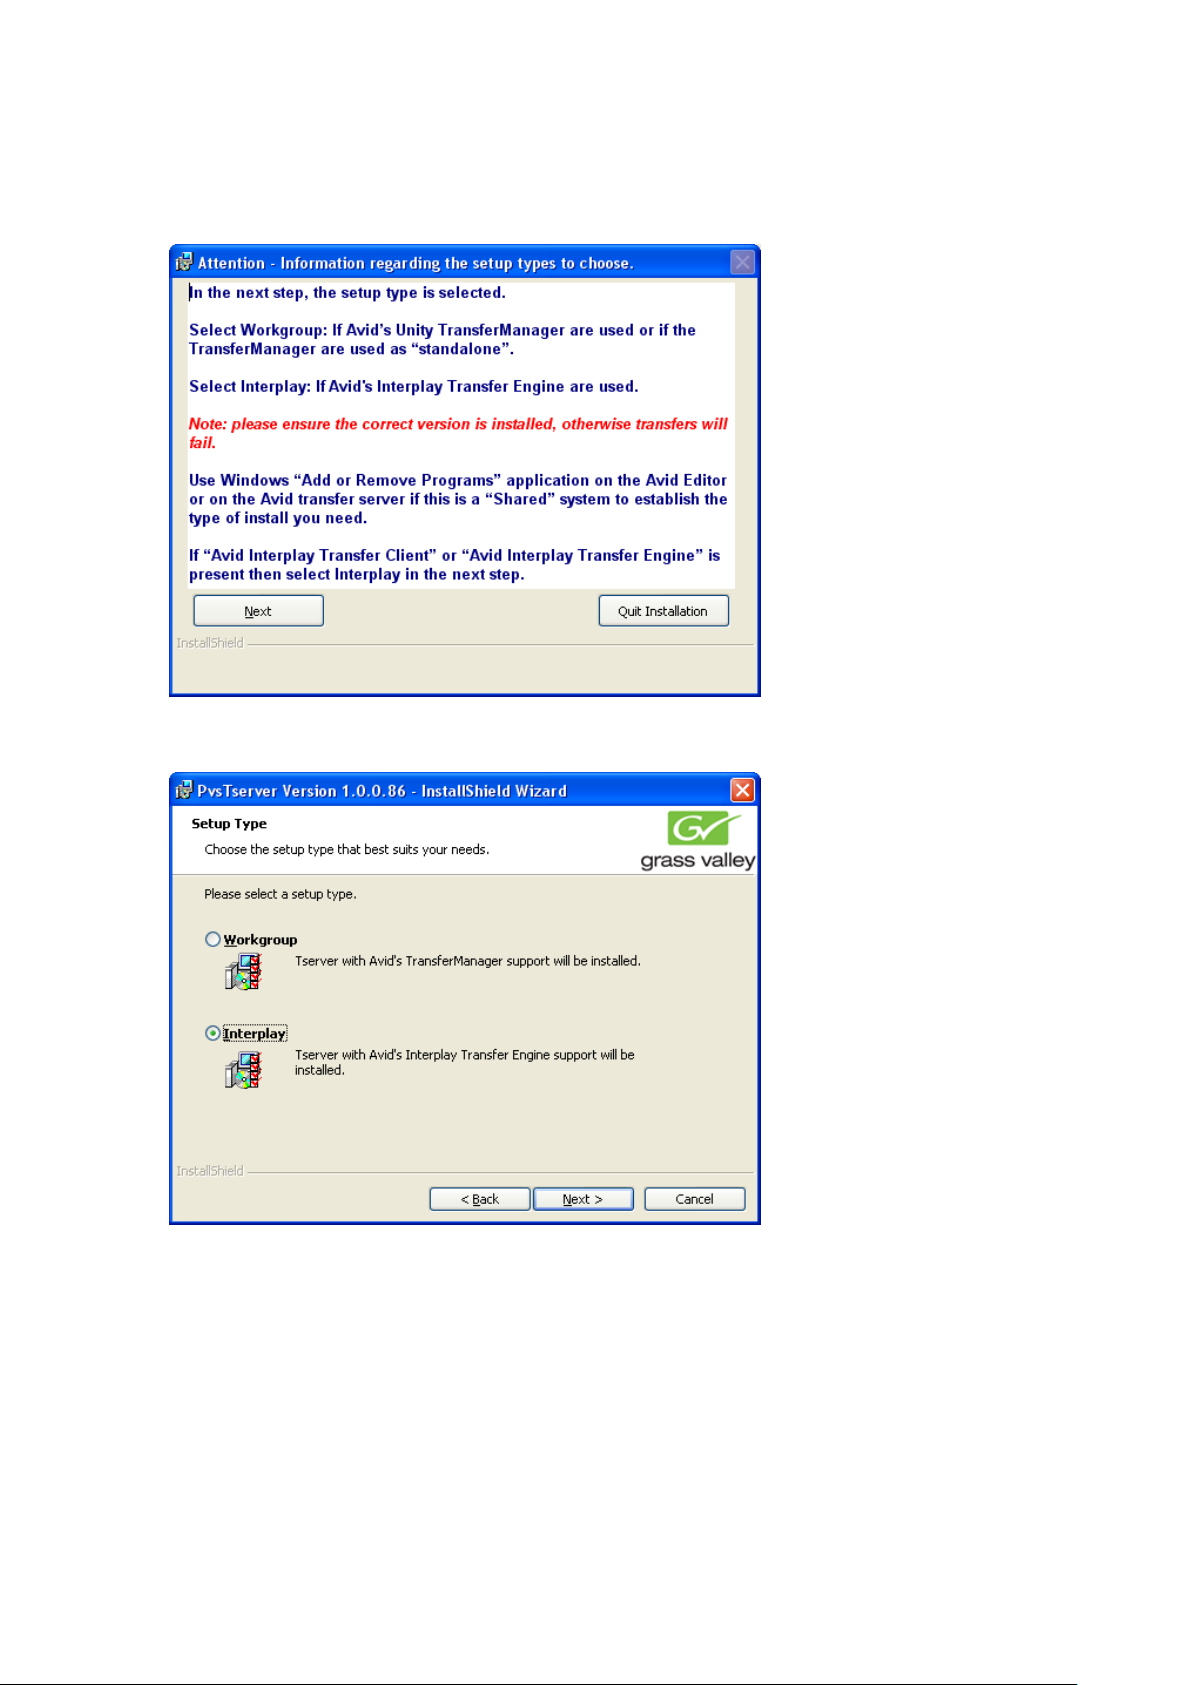
6. Determine the Avid version used and click Next . Click Quit Installation if unsure
what type to select.
7. Tick the appropriate Setup Type and click Next.
8. Click Install.
2010-05-17 Page 19 of 69
Page 20
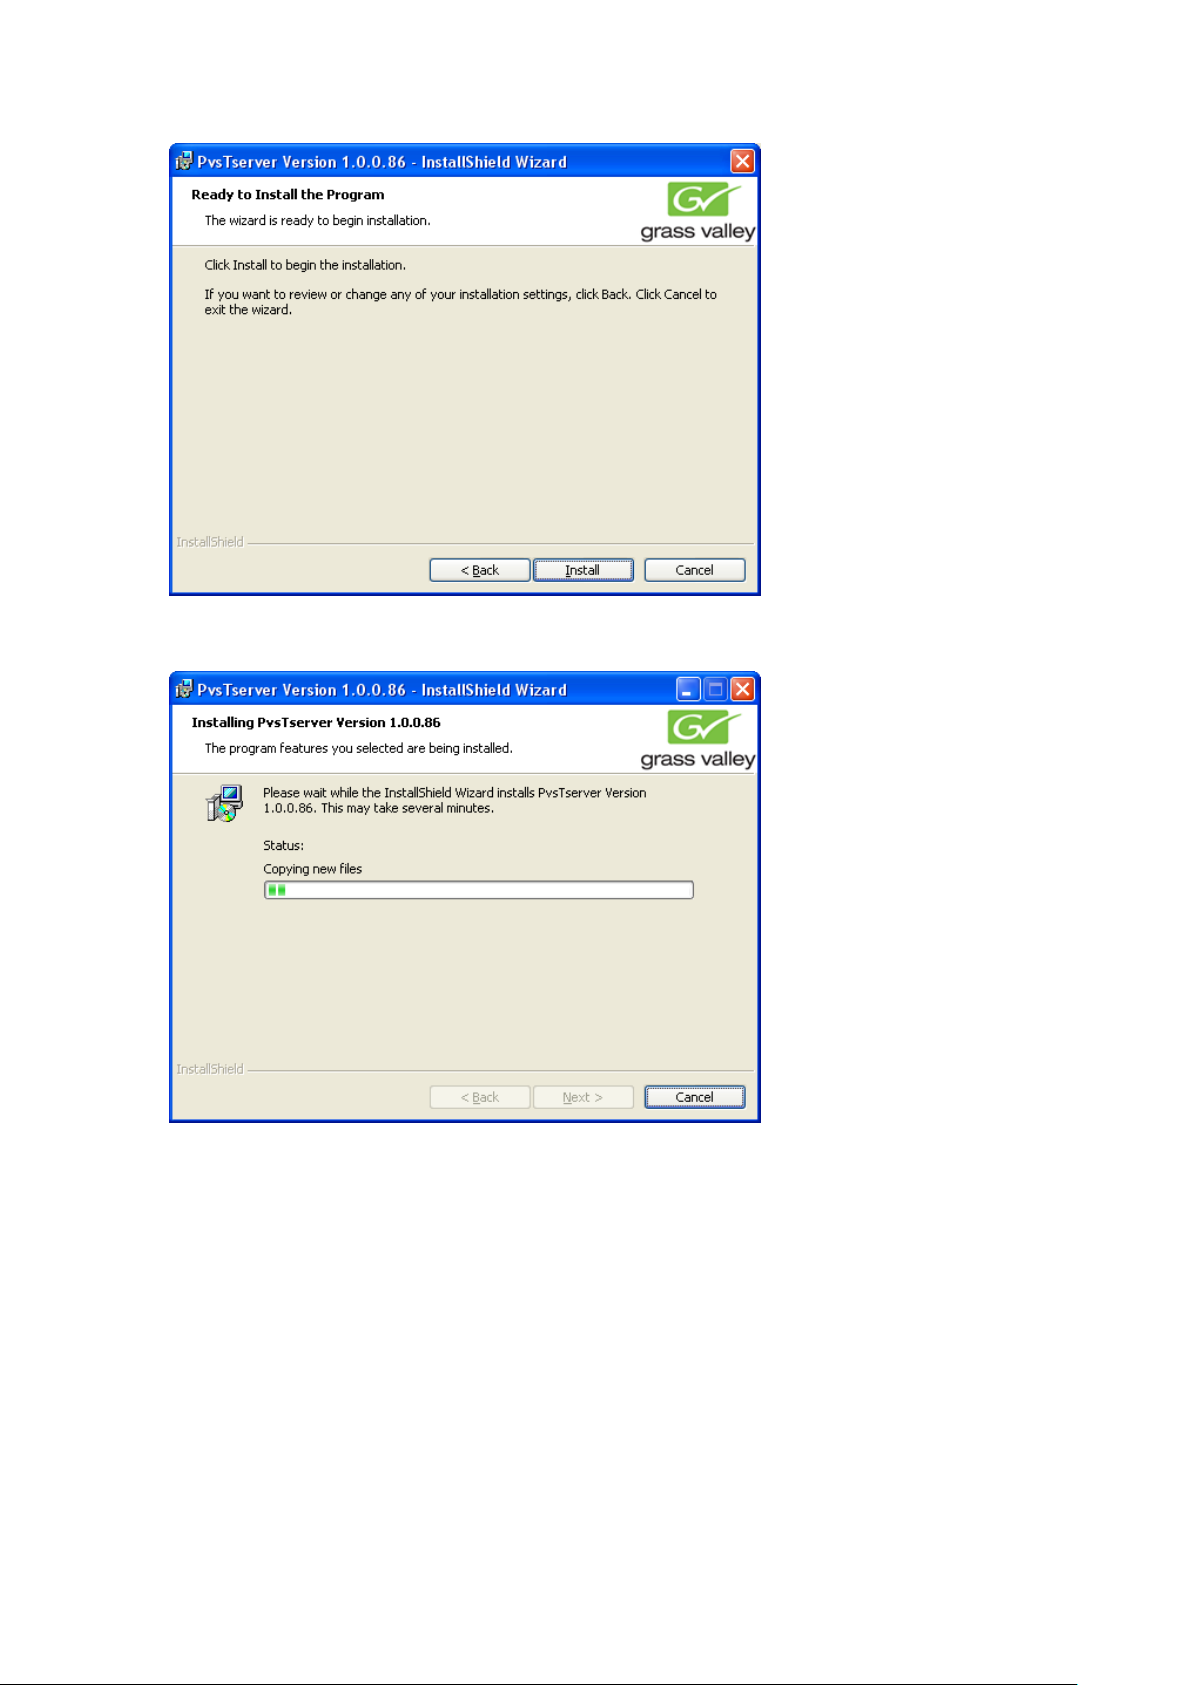
The status dialog displays the progress of the installation.
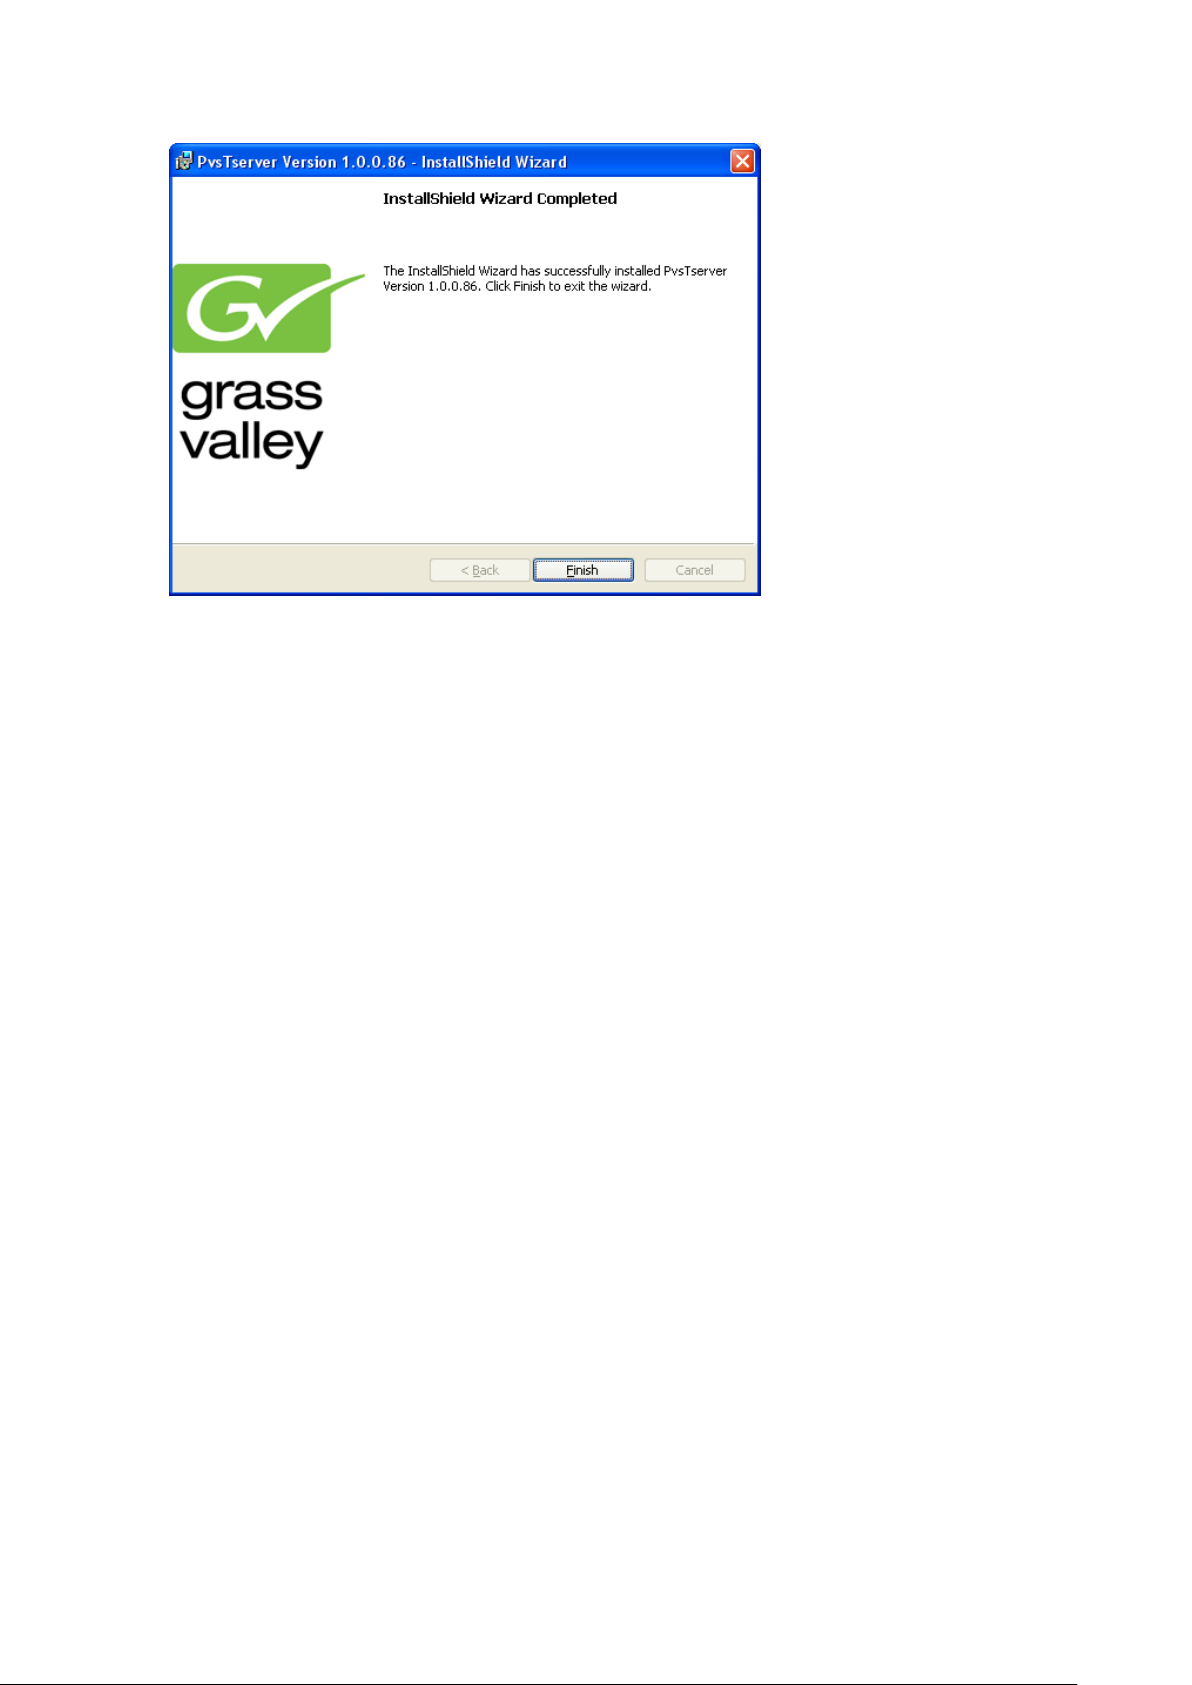
9. When the install is completed, click Finish.
2010-05-17 Page 20 of 69
Page 21
10. Repeat the above steps for each Profile XP.
Note: The Tserver.exe is located in C:\profile\Tserverex and must be started
manually.
2010-05-17 Page 21 of 69
Page 22

Installing K2-AvidTM Software on Avid devices
Prerequisites:
A. NewsCutter or MediaComposer software is installed on editor clients.
B. Avid Unity TransferManager server or Avid Interplay server software is installed.
C. Each editor client has Transf er Manager client or Avid Interplay client software
installed.
Installing the K2AvidDHM software
1. Browse the K2-AvidTM software folder and access the folder \K2AvidDhm\Disk1\.
2. Double-click Setup.exe.
3. In the “License Required for this version of software” dialog box, click Next.
Note: you might get the following message if you are attempting to install on a device
which do not have any Transfer Manager or Interplay Transfer engine installed.
2010-05-17 Page 22 of 69
Page 23

Note: A message is displayed if both Transfer Manager and Interplay Transfer engine
are installed.
4. In the “Welcome to the InstallShield Wizard for Grass Valley Avid DHM Support
Version 1.0.0.86” dialog box, click Next.
The License Agreement is displayed.
2010-05-17 Page 23 of 69
Page 24

5. Tick “I accept the terms in the License agreement” and click Next.
6. Determine the Avid version used and click Next. Click Quit Installation if unsure
what type to select.
2010-05-17 Page 24 of 69
Page 25

7. Tick the appropriate Setup Type and click Next.
8. To begin the installation, click Install.
2010-05-17 Page 25 of 69
Page 26
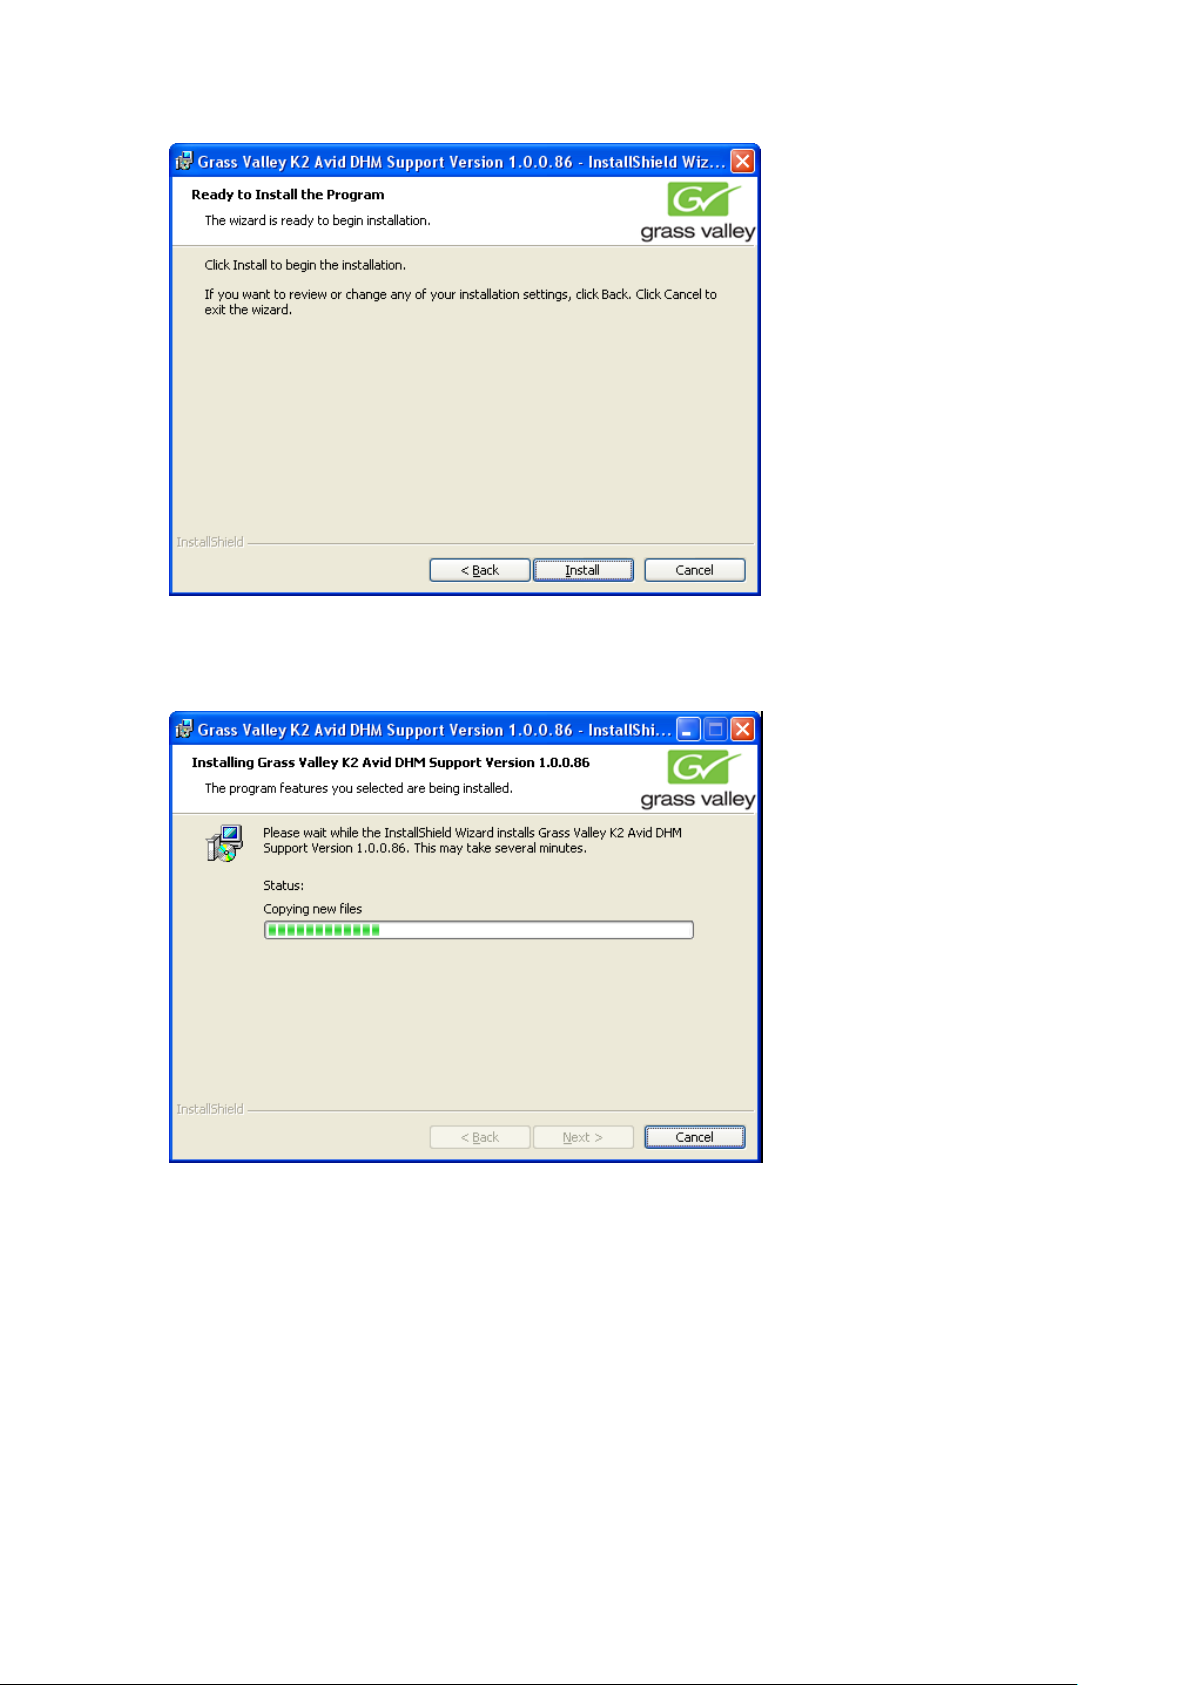
The status dialog box displays the progress of the installation.
9. When the install is completed, click Finish.
CCC
2010-05-17 Page 26 of 69
Page 27

10. Reboot the Avid Transfer manager / Interplay engine device to complete the DHM
installation.
Verify K2AvidDHM is installed correctly
1. Start the License Manager and verify licenses are installed.
2. On the Avid Transfer manager / Interplay engine device, double-click the License
manager icon on the desktop.
• Do the following step if: you are upgrading from a previous version and a
permanent license was previously installed.
a. Verify this is still present. Otherwise add the license which was backed up in
previously and verify it’s still valid.
• Do the following step if: you do not have a permanent license.
a. Check if a temporary license was installed during the setup. If not, you can add
a temporary license which can be found in C:\Program Files\Thomson Grass
Valley\SabreTooth\TemporaryLicense.txt.
Note: You need a permanent license to operate beyond the 30 day trial period. Details
on how to obtain permanent license can be found under Obtaining and maintaining
licenses on page 38.
2010-05-17 Page 27 of 69
Page 28

Installing the K2AvidIngest software
Install the Grass Valley K2 Avid Ingest Support Version 1.0.0.86 on the Avid Editor.
1. Browse the K2-AvidTM software folder and access the folder \K2ingest\Disk1\.
2. Double-click Setup.exe.
a. In the “Welcome to the InstallShield Wizard for Grass Valley K2 Avid Ingest
Support Version 1.0.086” dialog box, click Next.
You might get the following message if you are attempting to install on a
device which does not have an Avid editor installed.
You might get the following message if you are attempting to install on a
device which has both AvidNewsCutter and Avid MediaComposer
installed.
If there are no TransferManager Clients or Avid Interplay Transfer
Clients installed, you might see the following message.
2010-05-17 Page 28 of 69
Page 29

The License Agreement is displayed.
3. Tick “I accept the terms in the License agreement” and click Next.
2010-05-17 Page 29 of 69
Page 30

4. Determine the Avid version used and click Next. Click Quit Installation if unsure
what type to select.
5. Tick the appropriate Setup Type, and click Next.
2010-05-17 Page 30 of 69
Page 31

6. Locate the Avid editor executable.
The Install program attempts to locate the Avid editor executable and use the
path found. The next dialog box displays the path found.
7. Verify the path, and click Next. Otherwise, click Change… and browse to the
correct destination folder.
2010-05-17 Page 31 of 69
Page 32

8. To begin the installation, click Install.
The status dialog box displays the progress of the installation.
2010-05-17 Page 32 of 69
Page 33

9. When the install is completed, click Finish.
2010-05-17 Page 33 of 69
Page 34

Chapter 5 Licensing K2-AvidTM software
This section is divided into three topics:
About K2 software licensing
Requesting_a_license
Obtaining and maintaining licenses
About K2-AvidTM software licensing
K2-AvidTM software version requires a license from Grass Valley. Licensing is
enforced at the Avid Transfer manager / Interplay engine device, so every standalone
Avid Transfer manager / Interplay engine device must have a valid license in place. No
K2-AvidTM licenses are required on the K2 clients or K2 Media Server.
The K2-AvidTM software installs with a trial license in place. You must obtain a
permanent license from Grass Valley and install it on the Avid Transfer manager /
Interplay engine device before the trial period expires. For licensing procedures, see
Requesting a license.
Licenses are requested through the K2-AvidTM License Wizard and managed through
the SabreTooth License Manager, which is installed with K2-AvidTM software. The K2AvidTM License Wizard and SabreTooth License Manager must be located on the Avid
Transfer manager / Interplay engine device.
License information is stored in text files that you can manage just like any other file on
your system. Licenses are unique to the system for which they are requested and
cannot be used on any other machine.
Note: Licenses are based on your system’s unique identifier, which is partially derived
from your system’s Media Access Control (MAC) address. If you change your system’s
MAC address by performing operations such as changing the System Processor card,
or changing an Ethernet card, you must obtain a new license based on the new MAC
address.
After the temporary license expires, if you have not yet obtained a permanent license,
the following occurs:
• The K2-AvidTM soft ware temporary license expires. You will not be able to perform
any Ingest or Send to Playback transfers once the license has expired.
Requesting a license
Software licenses are unique to the system for which they are purchased. They cannot
be used on any other system. This requires that you provide a generated unique ID for
the desired system to Grass Valley, which is then used to create your unique license.
These instructions apply to all K2-AvidTM software versions.
To get a license number, follow these steps:
1. Log on to the Avid Transfer manager / Interplay engine device that you want to
license.
2010-05-17 Page 34 of 69
Page 35

NOTE: You m ust log in as an Administrator with a local account, not a domain
account.
2. On the Windows desktop of the computer where you want to install the license,
click the K2-AvidTM License Wizard icon.
The License Request Wizard then displays.
3. Read the on-screen instructions, then click Next to proceed to the customer
information screen. The Customer dialog box displays.
2010-05-17 Page 35 of 69
Page 36

4. Enter the information requested in red font on this page. You must provide a valid
email address to receive your license file.
5. Click Next to continue. The Sales Number dialog box displays.
2010-05-17 Page 36 of 69
Page 37

6. Enter the Sales Order Number in the field. The Sales Order Number can be found
on the Software License.
7. Click Next t o continue. The Summary dialog box displays.
8. Review the License Request information and click Finish. A License Request text
file, License_Request_<SalesNumber>.txt, is generated and saved to the Window s
Desktop.
9. Attach this text file to an email and send it to K2License@grassvalley.com. You can
also paste the text directly into an email message. You might want to keep a copy
of the message for your records.
2010-05-17 Page 37 of 69
Page 38

10. An email will be sent from Grass Valley to the return email address you specified;
your SabreTooth software license will be provided as a text file. (Save this email in
case you ever need to re-image this machine.)
Now that you have obtained a license, you need to add it to the SabreTooth License
Manager. For more information, see Adding a license.
If you encounter difficulties when requesting a license
If you encounter difficulties running the License wizard, try this alternate method:
Send an email to K2License@grassvalley.com and include the following information:
• Customer Name
• Customer Email
• Sales Order Number (this is sent with your purchase of Grass Valley software)
• Unique ID of the Avid Transfer manager / Interplay engine device where you will
install software. For more information, see Generating a unique id.
The SabreTooth license number will be emailed to the email address you specified.
Generating a unique id
To generate a unique id:
1. Click on the License Manager icon on the Windows Desktop. The SabreTooth
License Manager opens.
2. Choose File | Generate Unique Id the License Manager.
3. Click Copy to clipboard to copy the generated id, and OK to exit.
Obtaining and maintaining licenses
Use the SabreTooth License Manager for the following tasks:
• Adding a license
• Deleting licenses
• Archiving licenses
Adding a license
Your software license, Licenses_<SalesNumber>.txt, is provided as a text file. Use the
License Manager to add this file to your system and enable the desired feature.
To add a license:
1. Click on the License Manager icon on the Windows Desktop. The SabreTooth
License Manager opens. When K2-AvidTM is first installed, a temporary 30-day
license is automatically provided.
2. Choose File | Import License and navigate to the file location to open the text file,
or drag and drop the text file onto the License Manager. You will now see the
2010-05-17 Page 38 of 69
Page 39

permanent license in SabreTooth, as well as any other licenses, permanent or
temporary, that have been installed on this machine.
Once you have added the permanent license, you can delete the temporary license. If
the temporary license is still in SabreTooth you will continue to get temporary license
notifications, even with the permanent license installed, unless you delete the
temporary license. For more information, see “Deleting licenses”.
You might want to save the permanent license to a backup system, such as a thumb
drive. For more information, see “Archiving licenses”.
Deleting licenses
Deleting a license disables the feature that it enabled. You might want to delete a
temporary license prior to its expiry if you have decided not to purchase the feature.
You can delete a temporary license after the permanent license has been installed
without disabling
To delete a license:
1. Select the license in the SabreTooth License Manager.
2. Use the Delete key on your keyboard or right click with your mouse and select
Delete.
K2-AvidTM.
Archiving licenses
You can archive your licenses to a secure external location. This allows you to quickly
re-install a license should it be deleted or should you have to downgrade and then reinstall K2-AvidTM software. You can archive multiple licenses at the same time.
To archive a license:
1. In the SabreTooth License Manager, select the license or licenses.
2. Choose File | Export License to open the Save As dialog box.
3. Assign a meaningful name to the file, and save it to the desired location. Grass
Valley recommends saving the license file to a flash drive or other external location.
NOTE: If you want to downgrade to an earlier version of K2-AvidTM software,
make sure to archive the licenses before performing the downgrade.
2010-05-17 Page 39 of 69
Page 40

Chapter 6 System Configuration
Modifying / verifying the services file on the K2 / PVS
You must enable the Avid Unity TransferManager or Avid Interplay system platform’s
Playback Protocol in the Services file on the K2 or PVS.
NOTE: The Avid Unity TransferManager or Avid Interplay system software will not
transfer to the Profile without these changes.
Usually, the K2Tserver Installer automatically adds the necessary lines to the services
file, however the installers provided for the PVS does not add the necessary lines to
the services files, so this needs to be modified if necessary.
To configure the Services file:
1. Open Notepad on the Profile.
2. Open the Services file located in the following directory:
C:\Winnt\system32\drivers\etc\Services.
3. Add the following line to the Services file:
com.avid.pbp 6535/tcp
Set up hosts files
IP addresses for Control & FTP/streaming ports must have double name resolution.
FTP/streaming ports hostnames are appended with the “_he0_0” suffix for GigE and
“_fc0_0” for FC ports.
You can use host tables or another mechanism, such as DNS, to provide the name
resolution. This directs the streaming traffic to the correct port.
In most systems, network name resolution is provided by host tables.
The following procedure describes how to set up hosts tables to provide name
resolution for both the control network and the FTP/streaming network.
If you are using other mechanisms for name resolution, use the host table examples
here to guide you.
2010-05-17 Page 40 of 69
Page 41

Modifying the Hosts file on the Avid Unity TransferManager or Avid
Interplay system for single send
On each Avid Unity TransferManager or Avid Interplay system, set up the hosts file as
follows:
1. Open the following file using Notepad or some other editor.
C:\Winnt\system32\drivers\etc\Hosts
2. Enter text in two lines for each K2 or PVS system that is a transfer
source/destination to the Avid.
a. Type the IP address for the control network, then use the TAB key or Space
bar to insert a few spaces.
b. Type the machine name, such as GVMX-d54 . This sets up the host file for
resolving the machine name on the control network. The machine name
cannot have any spaces in it.
c. On the next line, type the IP address for the FTP/streaming network, and
then use the TAB key or Space bar to insert a few spaces.
d. Type the machine name followed by the characters “_he0_0”. Be sure to
use the zero character, not the letter “o”.
Refer to the following example:
192.165.100.20 gvmx-d54 # control network
10.14.129.13 gvmx-d54_he0 gvmx-d54_he0_0 # Streaming network
# Note the PVS does not have alias for the control port and uses _fc0_0.
192.165.100.21 pvs-d10 # control network for PVS client.
192.168.253.21 pvs-d10_fc0 pvs-d10_fc0_0 #Fibre channel network.
Please refer to the System diagrams and Sample hosts files for further
information on typical configurations and their hosts files.
2010-05-17 Page 41 of 69
Page 42

Modifying the Hosts file on the Avid Unity™ TransferManager or Avid
Interplay system, server for dual send
For a dual-send configuration, you must specify which K2 client or Profile is
master (primary) and which one is the slave (secondary).
NOTE: A dual configuration can’t consist of one K2 client and one PVS media client.
On each TransferManager or Interplay engine system, set up the hosts file as follows:
1. Open the following file using Notepad or some other editor.
C:\Winnt\system32\drivers\etc\Hosts
2. Enter text in two lines for each K2 or PVS system that is a transfer source/destination
to the Avid.
a. Type the IP address for the control network, then use the TAB key or Space bar
to insert a few spaces. Type the machine name, such as GVMX-d54, then use
the TAB key or Space bar to insert a few spaces. For the master device we
need a 2
and add the alias “dual”. This sets up the host file for resolving the machine
name on the control network. The machine name cannot have any spaces in it.
b. On the next line, type the IP address for the FTP/streaming network, and then
use the TAB key or Space bar to insert a few spaces. Type the machine name
followed by the characters “_he0_0”. Be sure to use the zero character, not the
letter ‘o’.
c. Repeat steps a and b for the slave device, but leave out the “dual” alias for the
Slave Control Port.
d. On the next two lines dual aliases are added.
This format allows for both single and dual transfers.
Refer to the following example:
nd
alias, again use the TAB key or Space bar to insert a few spaces
i. Type the IP address for the Master FTP/streaming network, then
use the TAB key or Space bar to insert a few spaces and add the
alias “dual_he0_0”.
ii. Type the IP address for the Slave FTP/streaming network, then
use the TAB key or Space bar to insert a few spaces and add the
alias “dual_he0_1”.
192.165.100.20 gvmx-d54 dual # control network
192.165.100.21 gvmx-d55 # control network
10.14.129.13 gvmx-d54_he0 gvmx-d54_he0_0 #Gigabit streaming network
10.14.129.14 gvmx-d55_he0 gvmx-d55_he0_0 #Gigabit streaming network
# For a alias name of “dual” the hosts entry is as following.
10.14.129.13 dual _he0_0 #Gigabit streaming network
2010-05-17 Page 42 of 69
Page 43

10.14.129.14 dual _he0_1 #Gigabit streaming network
Please refer to the System diagrams and Sample hosts files for further information
on typical configurations and their hosts files.
2010-05-17 Page 43 of 69
Page 44

Modifying the Hosts file on K2 or PVS for single send to playback
No changes are required for single send to playback.
Modifying the Hosts file on K2 or PVS for dual send to playback
The following is based on the previous examples used of “dual” alias.
1. Open the following file using Notepad or some other editor.
C:\Winnt\system32\drivers\etc\Hosts
2. Enter text in two lines for each K2 or PVS system that are part of dual-send
group.
a. Start with the Primary / Master device first. Type the IP address for the
control network, then use the TAB key or Space bar to insert a few
spaces. Type the machine name, such as GVMX-d54, then use the TAB
key or Space bar to insert a few spaces and add the alias “dual” with the
“_master” suffix for the master device.
b. On the next line the Secondary / Slave is added. Type the IP address for
the control network, then use the TAB key or Space bar to insert a few
spaces. Type the machine name, such as GVMX-d55, then use the TAB
key or Space bar to insert a few spaces and add the alias “dual” with the
“_slave” suffix for the slave device.
c. NOTE: there is no need to configure the Secondary / Slave device.
The entries should look similar to the following example, where the first line are
the address for the primary Profile named gvmx-d54, and the next line are the
address for the secondary K2 named gvmx-d55.
192.165.100.20 gvmx-d54 dual_master # control network
192.165.100.21 gvmx-d55 dual_slave # control network
Please refer to the System diagrams and Sample hosts files for further
information on typical configurations and their hosts files.
2010-05-17 Page 44 of 69
Page 45

Configuring the Avid Transfer Manager / Interplay engine
The following example is from a standalone Interplay engine.
1. Start the TmConfig or Avid Interplay Transfer Engine Configuration, usually a
icon on the desktop. Alternative you can find this in C:\Program
Files\Avid\TransferManager
Server\TRANSFERMANAGERCONFIG\tmconfig.exe or in case of interplay in
C:\Program Files\Avid\Avid Interplay Transfer
Engine\TRANSFERMGRSERVERCONFIG\tmconfig.exe
2. In the Standalone Settings:
a. Tick the Accept Incoming transfers after timeout.
b. Select OMF or AAF.
c. Select t he directory for incoming transfers.
3. In the System Settings:
a. Tick the Enable auto-cleanup of transfer queues.
b. Set the Storage Type to Standalone.
4. In the Workgroups:
a. Tick the Workgroup transfers enabled.
b. Tick the delete temporary composition files after transfer.
c. Click the Add… and add “WORKGROUP” to the Add Workgroup Name
field. And the Hostname of the Interplay engine device to the Maps To
server Name field as show below.
5. In the Playback
a. Tick the Playback transfers enabled.
b. Set the max simultaneous playback transfers to 4.
2010-05-17 Page 45 of 69
Page 46

c. Do not tick the Long GOP transfers enabled.
d. Click Add… to add the Playback devices.
6. In the Ingest:
a. Tick the Ingest transfers enabled.
b. Set the max simultaneous ingest transfers to 4.
c. Click Add… to add the Ingest devices.
7. In the Total Transfers (All Types):
a. Click Calculate to update the Max. Simultaneous Transfers.
8. Click Save to Exit configuration or click Cancel to discard the changes.
9. If the transfer manager / Interplay engine is running terminate and restart to use
the new configuration.
Refer to the following example:
2010-05-17 Page 46 of 69
Page 47

Configuring the Avid Editor for Transfer
The following example uses the Avid NewsCutter.
1. Start the Avid NewsCutter and wait for the application to start.
2. Click the Edit menu, and then select Preferences...
3. Select Transfer under the settings list.
4. In the Send To Playback locate the Output Audio Mix and select Direct channel
output or Stereo output.
5. Click on the TMClient.ini tab and click Add.
6. Add the host name of the device which is running the Transfer manager /
Interplay Engine, in this example “HP18063315301”, and set the Workgroup to
“WORKGROUP”.
NOTE: The names must match the names used to configure the Avid Transfer
Manager / Interplay engine.
7. Restart the Editor.
Configuration of the editor is complete.
2010-05-17 Page 47 of 69
Page 48

Configuring the Avid system to use other bins / folders for send to
playback
The K2AvidDHM installer saves a registry file, K2-AvidTM.reg, which can be used as a
template if you decide to change the PVS Media client’s volume name or if it’s required
to send to media to a different destination folder than the default folder.
The file is K2-AvidTM.reg.
The template uses the following as examples:
• gvmx-d54 as the name of the K2 Media Client or K2 Summit production Client path.
The name of the K2 client should be the Control port host name of the K2 used for
send to playback. It’s the same host name that was added to the Avid Transfer
Manager / Interplay engine Configuration.
• DestinationPath value is V:/transmission/ where V: is the Volume Name (disk array)
and “transmission” is the folder name where the media will be transferred to.
To edit and run the regedit file:
1. Open the K2-AvidTM.reg file using Notepad or some other editor. This file can be
found in C:\profile\AvidPlayback.
2. Change the registry file to use a different HostName while keeping the
DestinationPath.
From “gvmx-d54” to “K2-Summit”
[HKEY_LOCAL_MACHINE\SOFTWARE\ SOFTWARE\\Avid
Technology\\TransferManager Server\\DHM\\gvmx-d54]
"DestinationPath"="V:/transmission/"
[HKEY_LOCAL_MACHINE\SOFTWARE\ SOFTWARE\\Avid
Technology\\TransferManager Server\\DHM\\K2-Summit]
"DestinationPath"="V:/transmission/"
3. Change the value of the DestinationPath to match your configuration.
For example, change:
From “DestinationPath” = ”V:/transmission/”
To “DestinationPath” = ”V:/NewsAtTen/”.
[HKEY_LOCAL_MACHINE\SOFTWARE\ SOFTWARE\\Avid
Technology\\TransferManager Server\\DHM\\K2-Summit]
"DestinationPath"=" V:/NewsAtTen/"
Note: the DestinationPath is case sensitive.
In a mirrored configuration, the send to a mirror requires both the volume name and
destination folder to be identical for both media clients used in the dual set-up.
2010-05-17 Page 48 of 69
Page 49

4. Save the modified template file.
5. Double-click the K2-AvidTM.reg file to add the changes to the registry.
Note: If multiple send to folders are required for the same media client, then
you need to add an alias to the host file for each folder used and add the host
names to the Transfer manager / Interplay Engine configuration.
6. Add the alias to the hosts file.
2010-05-17 Page 49 of 69
Page 50

Chapter 7 Using the K2-AvidTM
Verify the Send To Playback
1. Make sure the Transfer Manager (XfrMgrServer) is running or, if Interplay is used,
check the Transfer Engine are running.
2. Verify the Editor is connected to the Transfer Manager / Transfer Engine by clicking
on Menu Transfer. It should then provide a submenu named “Reconnect to server”
This indicated the Editor is connected.
3. If the choice is Connect to Server, the editor is not connected. You need to select
Connect to Server.
4. Select an Edited Sequence.
5. Right-click the highlighted sequence and select Send to Playback.
A list of devices is displayed. Refer to the following illustration.
6. Select the device you want to transfer to, and hit Enter.
The Send to Playback dialog box is displayed.
NOTE: If the Transfer Manager (XfrMgrServer) / Transfer Engine is not running, no
devices are listed.
2010-05-17 Page 50 of 69
Page 51

7. Add TapeId. TapeId is the name which will appear on K2.
8. Tick Overwrite.
If the asset already exists on the K2 system, the asset is deleted before the
transfer starts.
9. Hit OK.
The transfer starts.
10. To monitor the transfer progress, select Transfer | Status.
The transfer history / transfer progress window displays.
Verify the Ingest to Avid from the K2 system
1. Make sure the Transfer Manager (XfrMgrServer) is running, or if Interplay is
used, check the Transfer Engine is running.
2. To verify the Editor is connected to the Transfer Manager / Transfer Engine,
click Menu Transfer.
a. If the Reconnect to server menu is displayed, the Editor is connected.
b. If the choice is Connect to Server, the editor is not connected. Select Connect
to Server.
2010-05-17 Page 51 of 69
Page 52

3. From the shortcut on the desktop, start the K2AvidExplorer or
PvsMediaManager.
4. Select a clip and drag and drop it to a bin on the Avid editor.
The Drop initiates the ingest action.
5. Would you like to transfer now or defer it to later?, select Now.
The transfer starts and the transfer history / transfer progress window updates
accordingly.
2010-05-17 Page 52 of 69
Page 53

192.165.100.10 AvidEditor # control network
192.165.100.10
192.165.100.20
Sample hosts file
Chapter 8 System Diagrams and Sample Hosts files
Single K2 and Avid Editor system diagram using only the
Control network
TServer is installed
on K2 Media Client
192.165.100.20 K2-MediaClient K2-MediaClien t_he 0 K2-Me diaC lient_he0_0 # control network
# NOTE do not add any alias to the Avid device.
Control network shown in blue
Streaming network shown in red
Fibre channel network shown in Green
<DD-MMM-YY>
Single K2 and Avid NewsCutter Adrenaline system diagram using only the Control
network.
53
2010-05-17 Page 53 of 69
Page 54

Control and Streaming ne tworks
Fibre channel network shown in Green
Sample hosts file
Single K2 and Avid Editor system diagram using both
TServer is installed on
K2 Media Client
192.165.100.10
10.14.129.10
192.165.100.10 AvidEditor # control network
192.165.100.20 K2-MediaClient # control network
10.14.129.20 K2-MediaClient_he0 K2-MediaClient _he0_0 # streaming network
# NOTE do not add any alias to the Avid device.
192.165.100.20
10.14.129.20
Control network shown in blue
Streaming network shown in red
<DD-MMM-YY>
Single K2 and Avid Editor system diagram using both the Control and Streaming
networks.
54
2010-05-17 Page 54 of 69
Page 55

SAN based K2 and Avid Editor system diagram using both
Control and Streaming ne tworks.
192.165.100.10
192.165.100.20
TServer is installed on
K2 Media Client
10.14.129.10
Sample hosts file
192.165.100.10 AvidEditor # control network
192.165.100.20 K2-MediaClient # control network
192.165.100.21 K2-MediaServer-1 # control network
10.14.129.20 K2-MediaServer-1_he0 K2-MediaServer-1_he0_0 # streaming network
# NOTE do not add any alias to the Avid device.
192.165.100.21
10.14.129.20
K2 server FTP
Streaming Engine
Control network shown in blue
Streaming network shown in red
Fibre channel network shown in Green
<DD-MMM-YY>
SAN-based K2 and Avid system diagram using Control and Streaming networks.
55
2010-05-17 Page 55 of 69
Page 56

Dual K2 and Avid Editor system diagram using only the
Control network
TServer is installed on
K2 Media Client
192.165.100.10
192.165.100.20
192.165.100.21
Sample hosts file
192.165.100.10 AvidEditor # control network
192.165.100.20 K2-MediaClient1 dual # control network
192.165.100.21 K2-MediaClient2 # control network
192.165.100.20 K2-MediaClient1_he0 K2-MediaClient1_he0_0 # control network
192.165.100.21 K2-MediaClient2_he0 K2-MediaClient2_he0_0 # control network
# For a alias name of “dual” the hosts entry is as following.
192.165.100.20 dual_he0_0 # control network
192.165.100.21 dual_he0_1 # control network
# NOTE do not add any alias to the Avid device.
Control network shown in blue
Streaming network shown in red
Fibre channel network shown in Green
Dual Send K2 and Avid system diagram using only the Control network.
TServer is installed on
K2 Media Client
<DD-MMM-YY>
56
2010-05-17 Page 56 of 69
Page 57

Control and Streaming ne tworks
Fibre channel network shown in Green
192.165.100.10
Dual K2 and Avid Editor system diagram using both
192.165.100.20
TServer is installed on
K2 Media Client
192.165.100.21
TServer is installed on
K2 Media Client
Sample hosts file
192.165.100.10 AvidEditor # control network
192.165.100.20 K2-MediaClient1 dual # control network
192.165.100.21 K2-MediaClient2 # control network
10.14.129.20 K2-MediaClient1_he0 K2-MediaClient1_he0_0 # Streaming network
10.14.129.21 K2-MediaClient2_he0 K2-MediaClient2_he0_0 # Streaming network
# For a alias name of “dual” the hosts entry is as following.
10.14.129.20 dual_he0_0 # Streaming network
10.14.129.21 dual_he0_1 # Streaming network
# NOTE do not add any alias to the Avid device.
Control network shown in blue
Streaming network shown in red
<DD-MMM-YY>
Dual Send K2 and Avid system diagram using Control and Streaming networks.
57
2010-05-17 Page 57 of 69
Page 58

mlog.log
Chapter 9 Registry settings
This section outlines all the various registry keys and settings used by the K2-AvidTM
software.
On Avid Unity TransferManager or Avid Interplay system device, K2-AvidTM uses the
following keys and values:
HKEY_LOCAL_MACHINE Software\\Grass Valley Group\\Applications\\K2AvidTM\\DHM
Name
Type
DataSockRecvBufSize REG_DWORD 0x0000c000
DataSockSendBufSize REG_DWORD 0x00080000
DumpPerf REG_DWORD 0 1 Enables Transfer rates to
FtpBufferSize REG_DWORD 0x00080000
Data (default values) Notes
be printed in the TM console
window.
FtpSocketTimeoutSec REG_DWORD 0x000000c3
LogLevel REG_DWORD 0 1 Enables trace log
LogName REG_SZ c:\profile\logs\dhmlo
g.log
NullStream REG_DWORD 0 1 Enables Null stream
transfers to Prof i le, no dates
are then saved on the Profile
disk array.
Used for testing transfers
rates.
NullToDhm REG_DWORD 0 1 enables Null stream
transfers to Prof i le, no dates
are then saved on the Profile
disk array.
Used for testing transfers
rates.
oldLogName REG_SZ c:\profile\logs\old_dh
QueueDepth REG_DWORD 2
Set16x9 REG_DWORD 0 1 Enables all Send to
playback transfers to be
flagged with 16x9 aspect.
StreamType REG_DWORD 0 1 Enables GXF stream is
dumped to c:\ on TM
TcOffset REG_DWORD 0 1 Enable Media Marks on
PVS/K2 to mat ch Sequence
Timecode
2010-05-17 Page 58 of 69
Page 59

printed in the TM console
Tracename REG_SZ c:\profile\logs\dhmtra
ce.log
One level down from:
HKEY_LOCAL_MACHINE Software\\Grass Valley Group\\Applications\\K2AvidTM\\DHM there is the SEQ Key.
HKEY_LOCAL_MACHINE Software\\Grass Valley Group\\Applications\\AvidTM
DHM\\SEQ.
This enables the generation of a file that contains the details of the sequence. A useful
feature for automation systems that need to know the mark in and mark out at the
beginning of the transfer.
Name
Type
Data (default values) Notes
SeqDump REG_DWORD 0 1 Enables the generation of
SeqDump files.
Path REG_SZ c:\\profile\\logs\\ Path to the location where
the SeqDump will be saved
on the TM.
Name REG_SZ User conf igurable
string
The file names used are created from:
STRING_YYMMDD_HHMMSS_ID.txt, with:
- STRING = Configurable text string as in the above “My User Configurable String”
- YYMMDD and HHMMSS = Date/Time of the start of the transfer.
- ID = Tape ID (variable number of characters).
The file itself contains the:
STRING TAPEID SOM EOM SequenceName
Example: User Configurable String TEST_0 01:00:00:00 01:01:08:14 RED
This section outlines the registry keys used by the receiver
The Registry keys and values can be found in:
HKEY_LOCAL_MACHINE\SOFTWARE\Grass Valley Group\Applications\K2-
AvidTM\RECV
Name Type Data (default values) Notes
DataSockRecvBufSize REG_DWORD 0x00010000
DataSockSendBufSize REG_DWORD 0x00080000
DumpPerf REG_DWORD 0 1 Enables Transfer rates are
2010-05-17 Page 59 of 69
Page 60

g.log
Name
Type
Data (default values)
Notes
FtpBufferSize REG_DWORD 0x00080000
FtpSocketTimeoutSec REG_DWORD 0x000000c3
FtpReadSize REG_DWORD 0x00010000
window.
LogLevel REG_SZ c:\profile\logs\dhmlo
FtpWindowSize REG_DWORD 0x00010000
This section outlines the registry keys which can be used on the Avid
Editor Clients
The Registry keys and values can be found in:
HKEY_LOCAL_MACHINE\SOFTWARE\\Grass Valley Group\\Applications\\K2AvidTM\\SETUP
LogLevel REG_DWORD 0 1 Enables tracelog to
c:\profile\logs
This section outlines the registry keys which can be used on the K2 Media
Client
The Registry keys and values can be found in HKEY_LOCAL_MACHINE
Software\\Grass Valley Group\\Applications\\TServer
Name Type Data (default values) Notes
LogLevel REG_DWORD 0 1 Enables DbgView support.
DeleteDelay REG_DWORD 5 Sets the delay in Seconds.
2010-05-17 Page 60 of 69
Page 61

Chapter 10 Release notes
What’s new in this release
This version of K2-AvidTM software plug-in includes new features, in addition to
correcting some problems that were present in earlier releases.
• DV100 compression compression format are now supported. Requires Avid
Interplay 1.6.2 or higher.
• New “K2 Avid Explorer” drag and drop interface
• Send to Playback transfers are now closed down currently, preventing
erroneous error messages to be printed in the K2 log.
• Removed the Striped TC Setting.
• When overwriting assets TServer now waits until asset are deleted. The delay
can be changed in the registry.
Feature limitations in this release
• Drag and Drop of multiple assets is not supported in K2 Avid Explorer.
• Bit rate are not displayed correctly in K2 Avid Explorer.
Changes in previous releases
The following sections describe the changes in past releases.
Version 7.0.0.98
• Fixed CR111833 Clips sent from AVID to Profile XP SAN do not overwrite existing
clips, allthough the overwrite option has been selected.
• Fixed memory corruption causing audio distortion in 525 line 24Bit ingests.
• Added support for Avid Interplay version 1.6.2
Version 7.0.0.97
• Fixed Ingest issue on assets with no audio tracks.
• Added compression format check to setup dll; if the user attem pts to ingest a
unsupported compression format, a dialog is displayed.
• Fixed Handle leak in Tserver occurring when event log reached max size.
• Changed Tserver installer to configure event to overwrite events as needed.
• Fixed Handle leak in Tserver occurring when event log reached max size.
2010-05-17 Page 61 of 69
Page 62

Version 1.0.0.86.
• First release supporting the K2 Summit.
Version 1.0.0.85.
• Installer now supports installation on Avid editors installed with
AvidMediaComposer.exe, AvidNewsCutter.exe, AvidNewsCutterXP.exe or
AvidNewsCutterAdrenaline.exe.
• To allow install on machines using Vista, the installer does not check which
version of NT is used. NOTE: 64Bit OS is not currently supported.
• GvgK2PvsSetUpVC7.dll and GvgK2PvsRecvVC7.dll changed to enforce
support for Frame Chase editing on Interplay systems.
• GvgK2PvsRecvVC7.dll changed to catch exceptions on ingest when filler
frames are requi re d.
Version 1.0.0.84
• Installer changed to support installation on systems connected to a domain.
Version 1.0.0.83.
• Added 24 bit audio support.
Version 1.0.0.82.
• Added Avid Frame chase editing support. (Edit while record a clip on K2.)
Note: This is only supported on Shared Interplay systems.
Version 1.0.0.81.
• Added registry Key to enforce 16 x 9 aspect ratio flag.
• Fixed an issue whereby PVS based systems would not work with Avid Interplay.
Version 1.0.0.80
• Installer changed to use Installshield.
• Added message in Tserver log to identify the DHM dll name used.
• Added PDR version to ProfileHost Core as D10 attributes did not work.
• Added correct paths to installers.
• Fixed exception when slave K2 are missing
• Removed 16 bit and 24bit support as it was broken.
• Added log output if we are out of disk space on PVS
• New PVS Tserver installer which adds support for new dll naming convention.
Version 1.0.0.7
• Fixes a Lip Sync issue when ingesting Trimmed K2 clips to the Avid.
Version 1.0.0.5
• Added code to handle filler frames and missing media in Sequences created on
Avid editors.
Version 1.0.0.4
• Fixed Audio to video lip-sync on clips with offset timecode.
• Dual send support added.
2010-05-17 Page 62 of 69
Page 63

Version 1.0.0.3
• Added support for Interplay.
Version 1.0.0.2
• Add support for to DHM for Sequence timecode to match media marks on K2.
• Fixed fault caused by long clip names.
• Added code to prevent use of illegal characters.
• Added code to prevent clip names longer than 32 characters.
• Added additional logging and exception handling.
• Added support for file generation of containing details of the sequence.
Version 1.0.0.1
• Added fix for TServerSvc failing to start after reboot of K2.
Version 1.0.0.0
• TServer.exe ported to support K2. Now runs as a service.
• GvgProfileSetup.dll ported to support K2 and Avid GenericHelperVC7.dll.
• GgvProfileRecv.dll & GvgProfileDhm ported to use Avid GenericHelperVC7.dll.
• Added support for D10 (IMX) metadata.
2010-05-17 Page 63 of 69
Page 64

Chapter 11 Troubleshooting hints
This section describes common installations mistakes and provides information
on how to troubleshoot the K2-AvidTM installation.
Common install or configuration faults
Installation
Description:
• Setup program fails to launch or fails partway through.
Workaround / hint:
• Run the setup again, but this time from the command line.
Use the following syntax: Setup /lv log.txt
This produces a log.txt that then can be forwarded to
Grass Valley for further analysis.
Description:
• K2-Avid-Explorer fails to start.
Workaround / hint:
• Make sure Microsoft .NET Framework 1.1, 2.0 and 3.0 are installed.
Description:
• K2-Avid-Explorer fails to connect to K2.
Workaround / hint:
• Verify the network connection by using ping. Ping both host name and
• IP address. That is: ping gvmx-d54 and ping 192.165.100.20.
Description:
• K2-Avid-Explorer fails to enumerate assets.
Workaround / hint:
• Check the K2 software versions are as are outlined in this document.
Description:
• Drag and drop an asset on a Avid bin, an exception is thrown.
Workaround / Troubleshooting hint:
2010-05-17 Page 64 of 69
Page 65

• Verify Ingest software is installed in the same location as the Avid Editor.
• Check the correct version was installed (workgroup versus interplay)
Description:
• Can’t connect to K2 or Ingest fails.
Workaround / Troubleshooting hint:
• Check the correct version was installed (workgroup versus interplay)
Description:
• Send to Playback fails.
Workaround / Troubleshooting hint:
• On PVS, Verify the TServer is running (Check the TServer log).
• On K2, Verify the TServersvc is running (Check the K2 log).
• Hosts file wrong, Avid can’t connect to K2, Verify the network connection by
using ping. Ping using both host name and ip address. That is: ping gvmx-d54
and ping 192.165.100.20.
• Check the correct version was installed (workgroup versus interplay).
• Check sequence you are trying to send, mixed format are not supported.
PVS Media Manager
Description:
• Fails to connect to the PVS Client.
Workaround / Troubleshooting hint:
• Make sure the PVS port server is running.
• Verify the network connection by using ping. Ping using both host name and ip
address. That is: ping gvmx-d54 and ping 192.165.100.20.
Ingest to Avid
Description:
• Ingest fails to start.
Workaround / hints:
• Verify the license is valid.
• Verify the network connection by using ping. Use both host name and
ip address. That is: ping gvmx-d54 and ping 192.165.100.20.
2010-05-17 Page 65 of 69
Page 66

• Verify the TransferManager is running.
• Verify the Editor is connected to the TransferManager.
• If no faults can be found then save the console output from the XferMgrserver
(TransferManager) which can then be forwarded to Grass Valley for further
Analysis.
Ingest to Avid fails
Description:
• Ingest fails with error message “Unable to transfer from the ingest device. The
server doesn’t have information for the specified device”.
•
Workaround / hints:
• The device used to ingest from has not been added to the Avid Interplay
Transfer Engine Configuration or the wrong name was added. Please check
hostname used and add if missing.
• The Avid Interplay Transfer Engine is not running. If the Avid Interplay Transfer
Engine are running then verify the editor are connected to the server. Click on
Transfer (on menu bar of the editor). The editor is not connected if it says
“Connect to server” in that case click to connect.
Description:
• Ingest fails with transfer status “error” and the Transfer Engine console window
displays “Unable to load dll: GvgK2PvsRecvVC7]
Workaround / hints:
• K2AvidDHM has not been installed. Check installation and install if missing.
Description:
• Ingest fails with error message “Cannot perform ingest operation”, “The
required dll for the ingest device could not be located.”
Workaround / hints:
• Check the location of the editor program, C:\Program Files\Avid\Avid
NewsCutter, verify GvgK2SetupVC7.dll and GvgProfileSetupVC7.dll are
present. Reinstall software and make sure the correct path is used during
install.
Description:
2010-05-17 Page 66 of 69
Page 67

• Ingest fails with Transfer status window reporting Track synchronization error
occurred.
Workaround / hints:
• This is caused by media files / tracks are not aligned. This can occur if the clip
was originally recorded with 2 audio tracks and then later on playout on a
channel with 4 audio tracks. In this case the PVS or K2 will create dummy
tracks which then causes the transfer to fail.
Description:
• Fails to ingest media to Avid.
Workaround / Troubleshooting hint:
• Check the tmClient.ini. Host names should be used not IP addresses.
Send To Playback
Description:
• When selecting “Send to playback” no devices are listed or the wrong device
names are listed.
Workaround / hints:
• The Avid Interplay Transfer Engine is not running. If the Avid Interplay Transfer
Engine are running, then verify the editor are connected to the server. Click on
Transfer (on menu bar of the editor). The editor is not connected if it says
“Connect to server” in that case click to connect.
• Use the Avid Interplay Transfer Engine Configuration tool to verify the device
names.
Description:
• Send to playback fails with transfer status “error” and the Transfer Engine
console window displays “Failed to connect to Playback service”
Workaround / hints:
• Tserver are not running on Profile or K2. Verify it’s running.
• Check the device name added in the Avid Interplay Transfer Engine
configuration.
• Check IP address and device name are correct in the hosts table on the Avid
Editor and Avid Interplay Transfer Engine.
Description:
2010-05-17 Page 67 of 69
Page 68

• Send to playback fails with a dialog box indicating TTMixDownAudioTracks did
not perform AudioMixDown due to current MediaCreation Tool MIXDOWN
setting.
Workaround / hints:
• Check the Audio Project settings, they may not compatible with the Transfer
settings … The most convenient is to set the Transfer settings for <Output
Audio Mix> to Direct Channel Output. This means, that whatever comes from
the Audio project (timeline), will be transferred without attempting to create a
Stereo output. If you are using 8 audio channels in the project, all 8 channels
will be transferred to K2.
Note: If the T ransfer setti ngs for <Output Audio Mix> are set to STEREO
OUTPUT, then verify that the output of the Audio Project is set to Stereo Mix.
Send To Playback
Description:
• Fails to send media to PVS or K2.
Workaround / Troubleshooting hint:
• If a firewall is enabled, disable it.
Description:
• Send to Play Back fails with Transfer Status reporting: Error: Internal error in the
DLL that sends media to the playback device and XfrMgrserver console window
displays: failed to connect to Playback device.
Workaround / Troubleshooting hint:
• Make sure the PVS port server is running.
• Check you can ping the K2 by host name and IP address. Verify the network
connection by using ping. Use both host name and IP address. That is: ping gvmxd54 and ping 192.165.100.20.
Debug logs can be enabled
Setup: HKEY_LOCAL_MACHINE\SOFTWARE\Grass Valley
Group\Applications\K2-AvidTM\SETUP
Set log level to 1.
Receiver: HKEY_LOCAL_MACHI NE \SOFTWARE\Grass Valley
Group\Applications\K2-AvidTM\RECV
Set log level to 1.
DHM: HKEY_LOCAL_MACHINE\SOFTWARE\Grass Valley Group\Applications\K2AvidTM\ DHM
Set log level to 1.
Can you manually FTP?
Is Tserver running?
2010-05-17 Page 68 of 69
Page 69

Are there any Tserver messages logged?
2010-05-17 Page 69 of 69
 Loading...