

Page 1
K2 ASI Media Client
Installation and Service Manual
SOFTWARE VERSION 5.4
071-8677-00
AUGUST 2008
Page 2

Copyright Copyright © 2008 Grass Valley, Inc. All rights reserved. Printed in the United States of America.
Portions of software © 2000 – 2008, Microsoft Corporation. All rights reserved. This document
may not be copied in whole or in part, or otherwise reproduced except as specifically permitted
under U.S. copyright law, without the prior written consent of Grass Valley, Inc., P.O. Box
59900, Nevada City, California 95959-7900. This product may be covered by one or more U.S.
and foreign patents.
Disclaimer Product options and specifications subject to change without notice. The information in this
manual is furnished for informational use only, is subject to change without notice, and should
not be construed as a commitment by Grass Valley, Inc. Grass Valley, Inc. assumes no
responsibility or liability for any errors or inacc uracies that may appear in this publication.
U.S. Government
Restricted Rights
Legend
Trademarks and
Logos
Revision Status
Use, duplication, or disclosure by the United States Government is subject to restrictions as set
forth in subparagraph (c)(1)(ii) of the Rights in Technical Data and Computer Software clause
at DFARS 252.277-7013 or in subparagraph c(1) and (2) of the Commercial Computer
Software Restricted Rights clause at FAR 52.227-19, as applicable. Manufacturer is Grass
Valley, Inc., P.O. Box 59900, Nevada City, California 95959-7900 U.S.A.
Grass Valley, K2, Aurora, Turbo, M-Series, Profile, Profile XP, NewsBrowse, NewsEdit,
NewsQ, NewsShare, NewsQ Pro, and Media Manager are either registered trademarks or
trademarks of Grass Valley, Inc. in the United States and/or other countries. Grass Valley, Inc.
products are covered by U.S. and foreign patents, issued and pending. Additional information
regarding Grass Valley, Inc. trademarks and other proprietary rights may be found at
www.thomsongrassvalley.com.
Other trademarks and logos used in this document are either registered trademarks or
trademarks of the manufacturers or vendors of the associated products, such as Microsoft®
Windows® operating system, Windows Media® play er, Internet Explorer® internet browser,
and SQL Server™. QuickTime and the QuickTime logo are trademarks or registered
trademarks of Apple Computer, Inc., used under license therefrom.
Rev Date Description
August 14, 2008 Release 071-8677-00 for software version 5.4
2 K2 ASI Media Client Installation and Service Manual August 14, 2008
Page 3

Contents
Finding Information...........................................................................................5
Grass Valley Product Support.................................................................................8
Safety Summaries..............................................................................................11
Chapter 1 Product Description
K2 ASI Media Client Features.................................................................................19
K2 ASI Media Client Technical Specifications.........................................................19
Server Characteristics........................................................................................19
Services..............................................................................................................20
K2 ASI Media Client Operating Limits.....................................................................20
Chapter 2 Installing the K2 ASI Media Client
Hardware Installation...............................................................................................22
Rack Mounting....................................................................................................22
Front Panel Removal............................... ...... ..... ...... ...... ................................. ...22
Connecting System I/O ports..............................................................................22
Supplying Power.................................................................................................24
System Installation............................ ...... ..... ...... ................................. ...... ...... ........25
System Requirements........................ ..... ...... ..... ...... .................................. ..... ...25
Adding a K2 ASI Appliance ................................................................................25
Identifying K2 ASI Media Client Software Versions............................................27
Modifying K2 ASI Media Client Control Network Settings..................................28
Modifying K2 ASI Media Client Media Network Settings....................................28
Installing K2 ASI Video Application ....................................................................28
Chapter 3 Servicing the K2 ASI Media Client
Installing/Removing the K2 ASI Card......................................................................29
Installing the K2 ASI Card Driver.............................................................................32
Installing/Removing the RS-422 Card.....................................................................33
Backup and Recovery Strategies............................................................................33
Glossary ...............................................................................................................35
Index......................................................................................................................39
August 14, 2008 K2 ASI Media Client Installation and Service Manual 3
Page 4

Contents
4 K2 ASI Media Client Installation and Service Manual August 14, 2008
Page 5

Finding Information
About this manual
This manual describes the K2 ASI Media Client and provides instructions for
installing the product in a variety of applications.
How this manual is organized
This manual is organi zed around the tasks requir ed to install and configure t he K2 ASI
Media Client. The following describes the chapters included in this manual:
Chapter 1, Product Description — Provides an introduction to the K2 ASI Media
Client product.
Chapter 2, Installing th e K2 ASI Med ia Client — Contai ns proce dures for c onnecting
and configuring the K2 ASI Media Client.
Chapter 3, Servicing the K2 ASI Media Client — Contains procedure for installing/
removing a K2 ASI card and the correspondi ng driver as well as backup and re covery
strategies.
August 14, 2008 K2 ASI Media Client Installation and Service Manual 5
Page 6
Finding Information
!
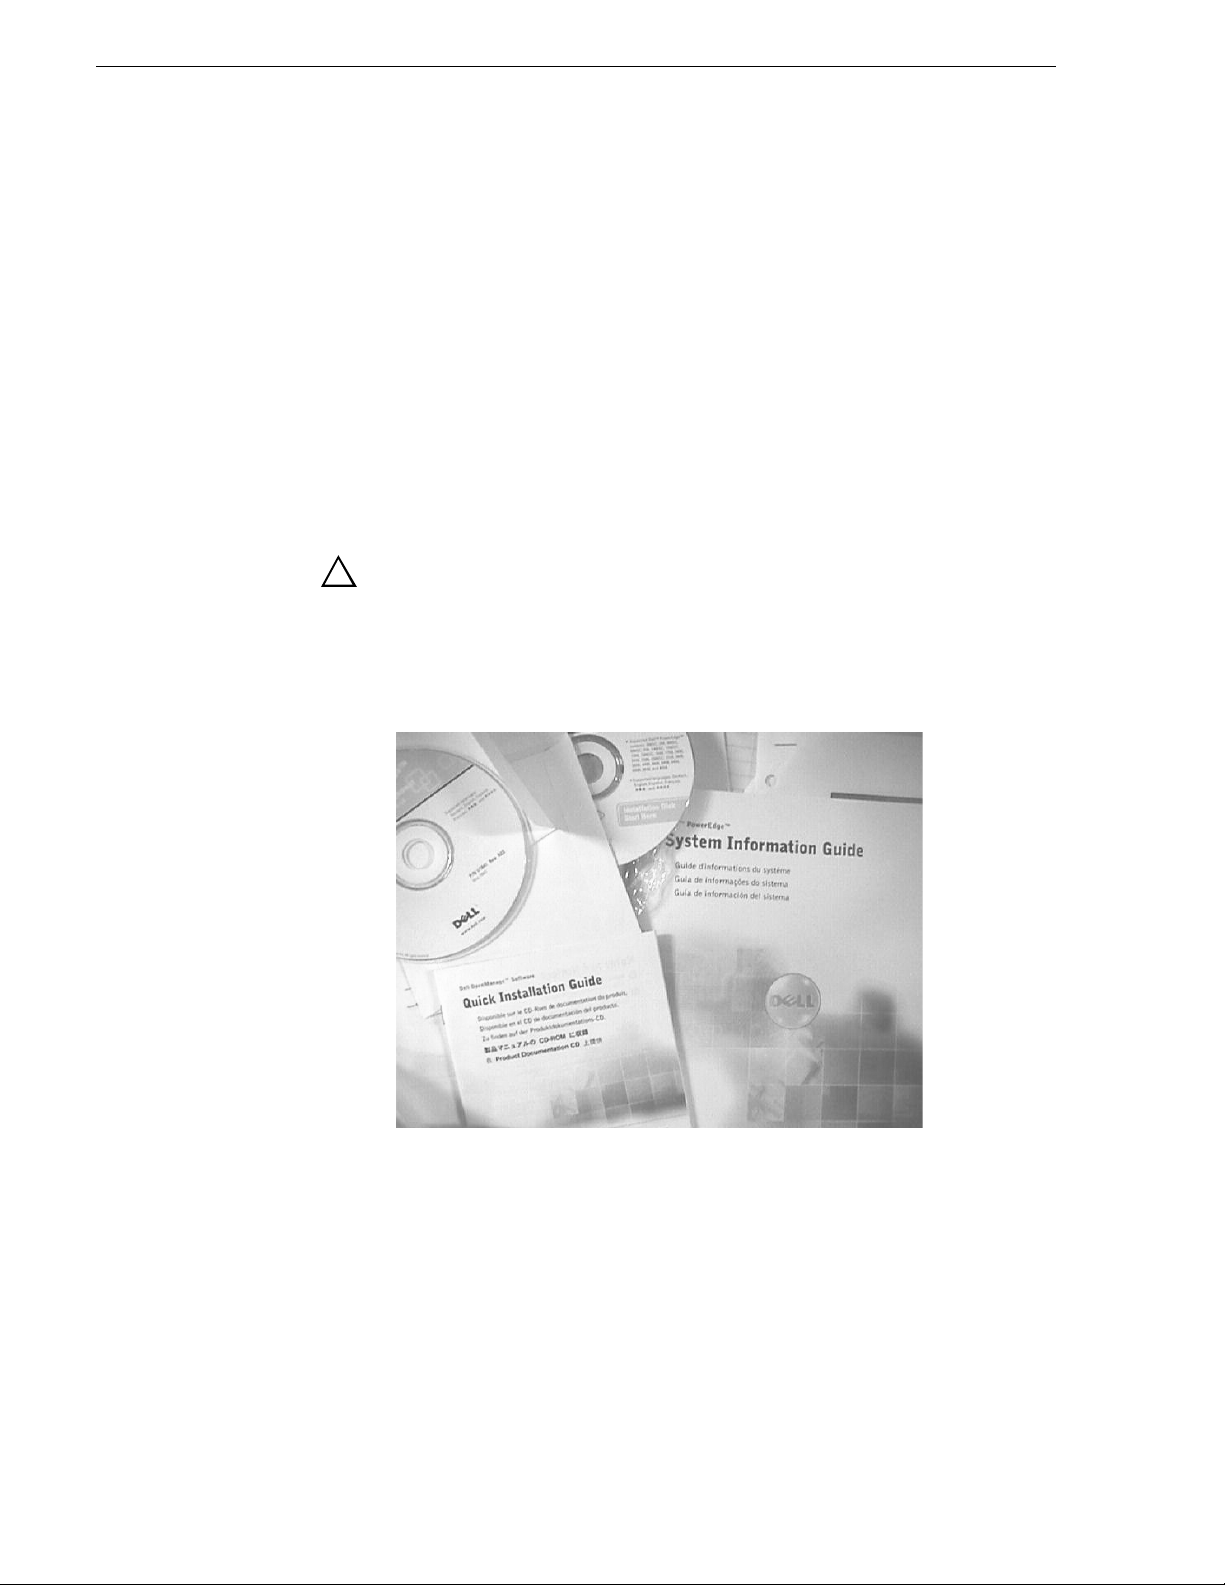
Using the Dell Server Documentation
This manua l contains all of the information you need to install the K2 ASI Media
Client, however, a full set of Dell ser ver documentation has been provi ded on the Dell
Product Documentation CD-ROM. Refer to the documents on this CD-ROM only as
required by procedures in this manual.
Information referenced on the Dell Product Documentation CD-ROM includes, but
is not limited to:
• Unpacking and rack-mounting the server
• Important safety and regulatory information
• Server Status indicators, messages, and error codes
• Troubleshooting help for the Dell server hardware.
CAUTION: Do not use the Dell Quick Instal lation Guide provided with
the Dell CD-ROM package. Thi s g u id e i ncl ude s i n st ruc ti ons fo r using
the OpenManage software CD-ROM to install an operating system.
The K2 ASI Media Client comes fully configured and is ready for
installation. To begin installation, refer to the installation chapter in
this manual.
6 K2 ASI Media Client Installation and Service Manual August 14, 2008
Page 7

Getting more information
In addition to this manual, information is available in the following locations.
Release Notes
The K2 ASI Media Client Release N otes are incl uded in the K2 Storage S ystem
Release Notes. The information in this document includes software upgrade
instructions, software specifications and requirements, feature changes from the
previous releases, and any known problems.
NetCentral Documentation
The NetCentral product has its own documentation set, described as follows:
•
NetCentral User Guide — This is a printed manual. It provides instructions for
installing, using, and administering the NetCentral monitoring system.
•
NetCentral Help — From the N etCentral interface access on-line help as follow s:
• For general help with NetCe ntral manag er, sel ect
This content is identical to that in the NetCentral User Guide.
• For help specific to monitoring K2 ASI Media Client devices, select
Device Providers
K2 ASI is monitored from NetCent ral a s a DELL PC devi ce. Erro r messag es may be
available from SNMP traps.
and then select the monitored device.
Thomson Grass Valley Web Site
This public Web site contains all the latest manuals and documentation, and
additional support information. Use the following URL.
http://www.thomsongrassvalley.com.
Dell Web Site
This public Web site contains all the latest manuals and documentation, and
additional support information for the Dell Server used to implement the K2 ASI
Media Client. Use the following URL.
http://www.dell.com
Help | NetCentral Help Topics.
Help |
August 14, 2008 K2 ASI Media Client Installation and Service Manual 7
Page 8

Finding Information
Grass Valley Product Support
T o get technica l assistance, che ck on the status of a ques tion, or to report new issue, contact
Grass Valley Product Support via e-mail, the Web, or by phone or fax.
Web Technical Support
To access support infor mation on the Web, v isit the pr oduct support Web page on the
Grass Valley Web site. Yo u ca n do wn loa d s oft war e or f ind sol utions to problems by
searching our Frequent ly Asked Questions (FAQ) database.
World Wide Web: http://www.thomsongrassvalley.com/support/
Technical Support E-mail Address: gvgtechsupport@thomson.net.
Phone Support
Use the following information to contact product support by phone during business
hours. Afterhours phone support is available for warranty and contract customers.
International
(France)
International
(United States,
Canada)
Hong Kong,
Taiwan, Korea,
Macau
Australia, New
Zealand
Central, South
America
China +861 066 0159 450 Netherlands +31 (0) 35 62 38 421
Belgium +32 (0) 2 334 90 30 Northern Europe +45 45 96 88 70
Japan +81 3 5484 6868 Singapore +65 6379 1313
Malaysia +603 7805 3884 Spain +41 487 80 02
Middle East +971 4 299 64 40 UK, Ireland, Israel +44 118 923 0499
+800 80 80 20 20
+33 1 48 25 20 20
+1 800 547 8949
+1 530 478 4148
+852 2531 3058 Indian
+61 1300 721 495 Germany, Austria,
+55 11 5509 3440 Near East, Africa +33 1 48 25 20 20
Authorized Support Representative
Italy +39 02 24 13 16 01
+39 06 87 20 35 42
Belarus, Russia,
Tadzikistan,
Ukraine,
Uzbekistan
Subcontinent
Eastern Europe
+7 095 258 09 20
+33 (0) 2 334 90 30
+91 11 515 282 502
+91 11 515 282 504
+49 6150 104 444
A local authoriz ed support repres entative may be av ailable in you r country. To locat e the
support represent ative for your c ountry, visit the product support Web p age on the Grass
Valley Web site.
8 K2 ASI Media Client Installation and Service Manual August 14, 2008
Page 9

Grass Valley Product Support
August 14, 2008 K2 ASI Media Client Installation and Service Manual 9
Page 10

Finding Information
10 K2 ASI Media Client Installation and Service Manual August 14, 2008
Page 11

Safety Summaries
Please observe the fo llowing saf ety preca utions to avoid inj ury and preve nt
damage to this product or any products connected to it.
These servicing instructions are for use by qualified personnel only.
Safety Precautions
Avoid electric overload
Do not apply a mains voltage that is outside the range specified in this
manual.
Circuit overloading
Considerations should be given to the connection of the equipment to the
supply circuit and the effect that overloading of the circuits might have on
overcurrent protection and supply wiring. Appropriate consideration of
equipment nameplate ratings should be used when addressing this concern.
Reliable earthing (required for UL)
Ensure that your device is properly grounded before power-up. Grounding
is through the power cords.
Mains power and circuit overloading (required for UL)
The connection panel should comply with the legislation in force in the
country of installation.
Connection panel position in the rack must ensure that plugs and power
cords are within easy reach for switching off purposes.
Use proper power cord
Use only the power cord specified for this product and certified for the
country of use.
Rack mounting instructions (required for UL)
Elevated operating ambient
If installed in a closed or multi-unit rack assembly, the operating air ambient
temperature of the rack environment may be greater than room ambient.
Provide proper ventilation. Ventilation to keep the equipment in an
environment compatible wit h the maximum ambien t temp eratu re speci fied
by the manufacturer (see section Specifications).
Reduced air flow
Installation of the equi pment in a r ack should b e such t hat the a mount of air
flow required for safe operation of the equip ment is not compromised.
August 14, 2008 K2 ASI Media Client Installation and Service Manual 11
Page 12

Safety Summaries
Mechanical loading
Reliable earthing (required for UL)
Power disconnecting
Injury Precautions
Do not operate without covers
Mounting of the equipment in the rack should be such that a hazardous
condition is not achieved due to uneven mechanical loading.
Reliable earthing of rack-mounted equipment should be maintained.
Particular att ention should be giv en to sup ply conne ction s ot her tha n dire ct
connections to the branch circuit (e.g. use of power strips).
Disconnect power before removin g protect ive panel , solderi ng or repl acing
components (these operations can be performed by qualified service
personnel only).
To avoid electric shock or fire hazard, do not operate this equipment with
cover or blank panels removed.
Do not service alone
Do not perform internal service or adjustments of this product unless
another person capable of rendering first aid and resuscitation is present.
Do not operate in explosive atmosphere
To avoid injury or fire hazard, do not operate this product in an explosive
environment (atmosphere and materials).
Do not operate in wet/damp conditions
To avoid electric shock, this product should only be operated in dry
conditions.
Avoid exposed circuitry
Do not touch exposed connections and components when power is present.
Use care when servicing with power on
Dangerous voltages o r currents may exist in this product. Disconnect power,
remove battery (if applicable), and disconnect test leads before removing
protective panels, soldering, or replacing components.
If the chassis has more than one power supply cord, disconnect all power
supply cords before servicing.
12 K2 ASI Media Client Installation and Service Manual August 14, 2008
Page 13

Handling precautions (Weight >18 kg)
!
!
When fully equipped, the chassis can be heavy (see section Specifications
for more details). To avoid injury, it is therefore advisable to take all th e
necessary precautions when installing the device in a rack (or removing it
from a rack).
Ask another person for help or use an adapted carry lift.
Replacement of lithium battery
The product includes a lithium battery which should never require
replacing. If for any reason replacement does prove necessary, please
observe the following conditions:
The operation must only be performed by qualified personnel.
CAUTION: Danger of explosion if battery is incorrectly replaced.
Replace only with the same or equivalent type recommended by the
manufacturer, dispose of used batteries according to the
manufacturer's instruction.
ATTENTION: Il y a danger d'explosion s 'il y a remplacement incorrect
de la batterie. Remplacer uniquement avec une batterie du même type
ou d'un type équivalent recommandé par le constructeur. Mettre au
rebut les batteries usagées conformément aux instructions du
fabricant.
Do not dispose of batteries with the general household waste.
Specific safety instructions for Fin land, Norway and Sweden
Finland: Laite on liitettävä suojamaadoituskoskettimilla varustettuun
pistorasiaan.
Norway: Apparatet må tilkoples jordet stikkontakt.
Sweden: Apparaten skall anslutas till jordat ut tag.
Product Damage Precautions
Fitting
Observe the installatio n instruction s in section “Rack Mounting”.
Dusty atmosphere
As the device features no air filter, it must be installed in a dust free
environment.
Provide proper ventilation
Provide proper ventilation to prevent product overheating. All empty slots
should be fitted with blank panels (mask plates) so as not to impair
ventilation.
August 14, 2008 K2 ASI Media Client Installation and Service Manual 13
Page 14

Safety Summaries
!
!
Do not operate with suspected failures
Replacing components
Retain original packaging
Use proper fuse
Do not operate without covers
If you suspect there is da mage to this product, have it in spected by q ualifie d
service personnel.
Only use components from or approved by Grass Valley.
If equipment is returned to the Customer Services Department, the faulty
device must be packed where possible in its original packaging (protective
corners and boxes).
Use only the fuse type and rating specified for this product.
Do not operate this product with covers or panels removed.
Keep product surfaces clean and dry
Safety Terms and Symbols
Terms in This Manual
These terms may appear in this manual:
WARNING: Warning statements identify conditions or pr actices that can
result in personal injury or loss of life.
CAUTION: Caution statements identify conditions or practices that may
result in damage to equipment or other property, or which may cause
equipment crucial to your business environment to become temporarily
non-operational.
Terms on the Product
These terms may appear on the product:
DANGER indicates a personal inj ury hazard immedi ately access ible as one
reads the ma rking.
WARNING indicates a personal injury hazard not immediately accessible
as you read the marking.
CAUTION indicates a hazard to property including the product.
Symbols on the Product
The following symbols may appear on the product:
14 K2 ASI Media Client Installation and Service Manual August 14, 2008
Page 15

DANGER high voltage
!
Protective ground (earth) terminal
ATTENTION – refer to manual
August 14, 2008 K2 ASI Media Client Installation and Service Manual 15
Page 16

Safety Summaries
16 K2 ASI Media Client Installation and Service Manual August 14, 2008
Page 17
Chapter 1
Product Description
The K2 ASI Media Client is an MPEG-2 transport stream capture device that uses the
K2 SAN for media storage. It receives a live Multiple Program Transport Stream from
an ASI input and provides advanced record capabilities of this stream (manual or
triggered captu res). Material re corded by K2 ASI Media Client then manifest s as a K2
clip on the SAN.
The K2 ASI Media Client comes with the following items:
• A 2-RU rackable device
• An ASI input card, limited to 84 Mb/s
• A dual port Gigabit Ethernet adapter for remote cont rol and iSCSI access to shared
storage
• An RS-422 card for remote control
• A Software Suite, which allows operating captures locally or remotely
August 14, 2008 K2 ASI Media Client Installation and Service Manual 17
Page 18

Chapter 1 Product Description
The K2 ASI Media Client product is further described in the following sections:
• “K2 ASI Media Client Features” on page 19
• “K2 ASI Media Client Technical Specifications” on page 19
• “K2 ASI Media Client Operating Limits” on page 20
18 K2 ASI Media Client Installation and Service Manual August 14, 2008
Page 19

K2 ASI Media Client Features
K2 ASI Media Client Features
Grass Valley K2 ASI Media Client components & features are:
• High performance ASI input scanning
• Real-time program de-multiplexing and analysis
• Support for MPEG-2 video with SD or HD contents
• Frame-accurate manual or automated capture capabilities
• Support for in-band (SCTE35) or out-band (GPI) commands
• Interfacing with most popular automation systems through VDCP
• Easy-to-Use Graphical User Interface, based on dynamic video thumbnails
• SNMP Monitoring
K2 ASI Media Client Technical Specifications
Server Characteristics
Item Description
PC server DELL-2850
OS Windows 2003 Server R2
CD-ROM Standard
MPEG-2 TS interface 1 dual I/O ASI card
Network interfaces Dual-port Gigabit Ethernet Controller (RJ-45
connectors).
RS422 interface Dual port RS422 serial board
Power supply Two redundant PSU
August 14, 2008 K2 ASI Media Client Installation and Service Manual 19
Page 20

Chapter 1 Product Description
Services
The following Windows services run during operation to allow specific K2 ASI
Media Client functionality.
Service Description
Video Service This service controls K2 ASI software engine
Grass Valley FTP Daemon This service supports transfers between K2 ASI and
start-up.
K2 appliance software that occur internally on the
K2 ASI Media Client.
SNMP Service
SNMP Trap Service
These services are standard Windows service that
has been adapted for the K2 Media Client. They are
required only for remote monitoring via a SNMP
manager.
K2 ASI Media Client Operating Limits
Feature Performances
ASI input 1 input from the two available connectors is
available at a time.
Input bit-rate 84 Mb/s maximum; 1 Mb/s minimum.
Record Up to 4 simultaneous record sessions.
20 K2 ASI Media Client Installation and Service Manual August 14, 2008
Page 21

Chapter 2
Installing the K2 ASI Media Client
The K2 ASI Media Client allows recording live MPEG-2 streams and makes them
available from the K2 storage system for play back purposes.
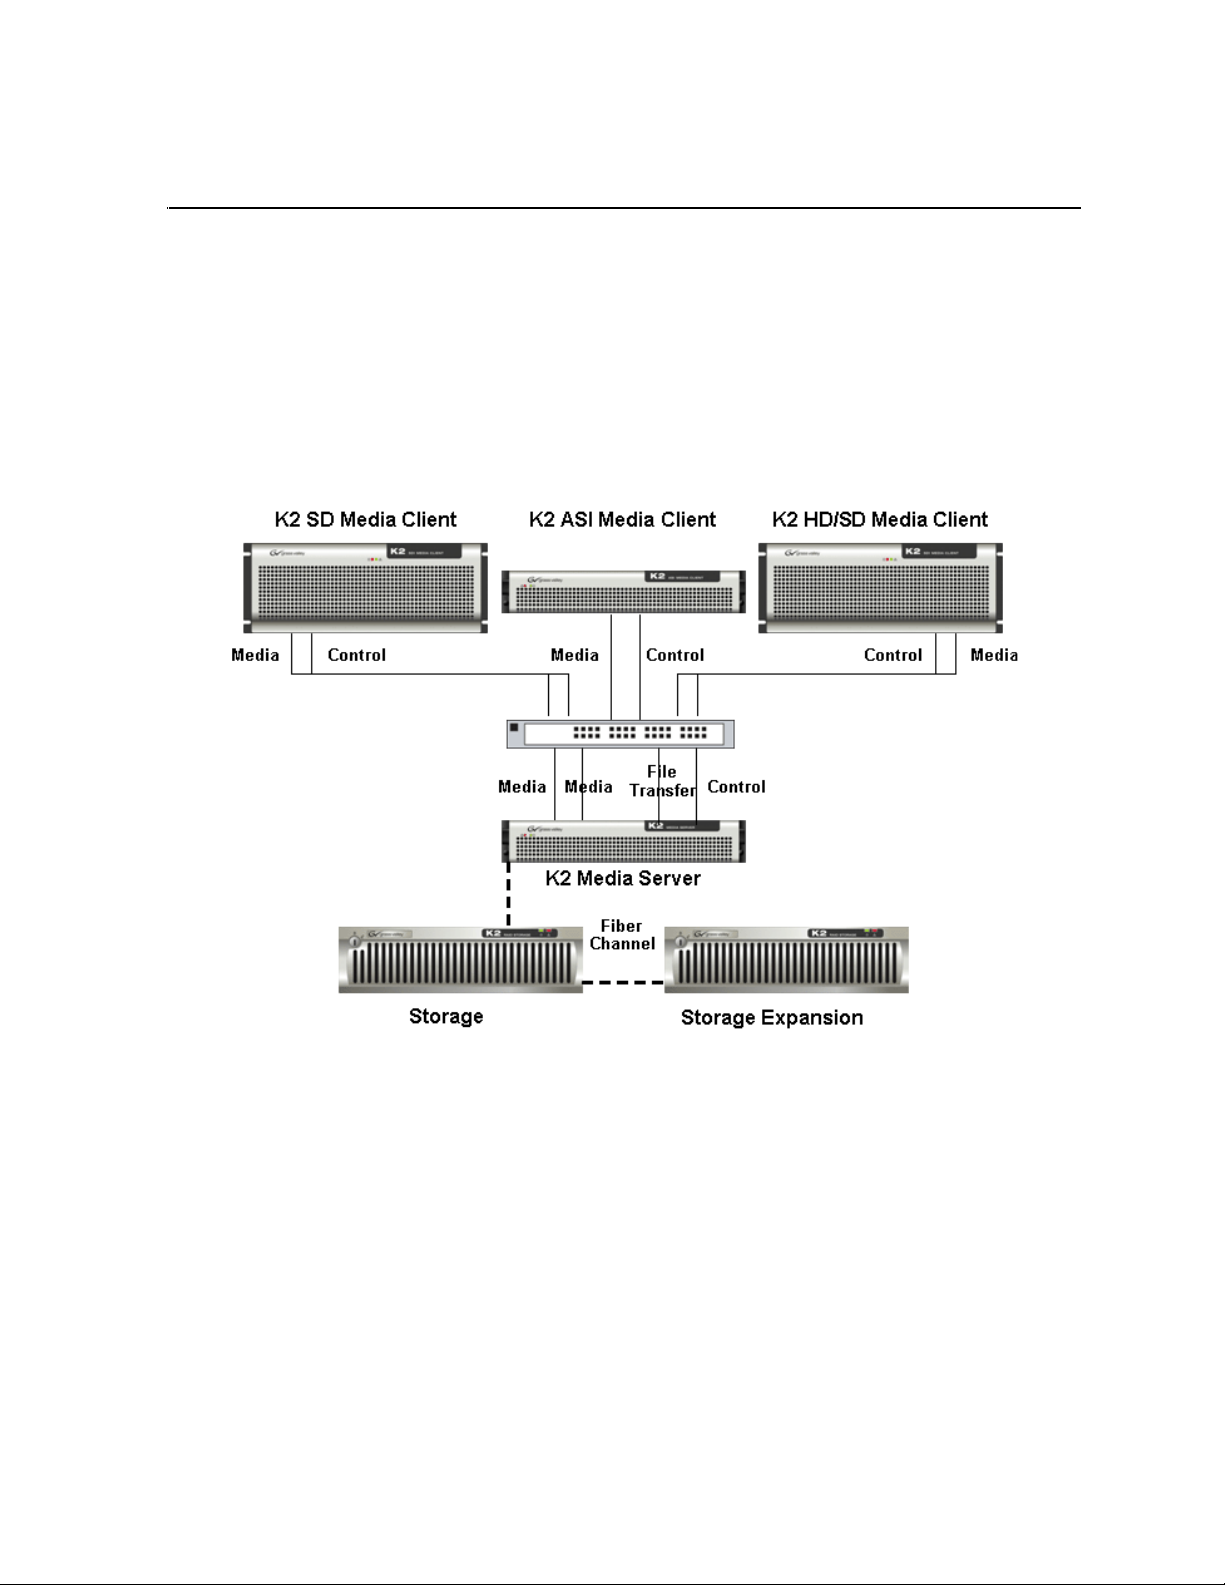
This section describes the procedure to install and configure a K2 ASI Media Client
unit in a typical K2 Level 2 Storage system. In such a system, K2 ASI Media Client
should be considered as an iSCSI Client, and integrated as a K2 Appliance.
This section contains the following topics:
• “Hardware Instal lation” on page 22
• “System Installation” on page 25
August 14, 2008 K2 ASI Media Client Installation and Service Manual 21
Page 22

Chapter 2 Installing the K2 ASI Media Client
Hardware Installation
Rack Mounting
The K2 ASI platform is based on a DELL Power-Edge 2850:
• Unit width: 482.6mm
• Unit depth: 756.8mm
• Unit height: 86.6mm
• Weight:
• of the server alone (in its most loaded configuration): 27kg
• of the rack mounting accessories: 5kg
NOTE: Use of a minimum 800mm depth rack is required.
When installing the K2 ASI client in a rack, product ventilation is a prime concern:
• Air taken in at the front
• Air ejected through the rear
The K2 ASI i s shipped with two rails and an articulated arm (for cables). For rack
mounting instructi ons, refer to the Dell
in the accessory pack.
Front Panel Removal
The front panel needs removing to gain access to the On/Off button.
Lightly press on the metal clips either side of the grey front panel.
Connecting System I/O ports
The K2 ASI Media Client is equipped with:
• An ASI input/output card, featuring two inputs and two outputs
• An RS-422 dual port card
TM
Systems - Rack Installa tion Guide inclu ded
22 K2 ASI Media Client Installation and Service Manual August 14, 2008
Page 23

Network Connections
The K2 ASI Media Client operates as a K2 Appliance component into a K2 Shared
Storage. It therefore requires:
• One connection to the K2 St orage System control network: Gig-E port 1 named
Control Connection #1
• One connection to the medi a (iSCSI) network: Gig-E port 2 named Media
Connection #1
ASI Connection
One ASI input/output card is located at the back of your system. It provides:
• Two input connectors (only one can be used at a time)
• Two output connectors (not used)
Its specifications are detailed in the table below .
Item Description
Frequency offset: accuracy ± 1.0 ppm.
Connecting System I/O ports
Frequency offset: drift, typical ± 0.5 ppm per year
Connector BNC, female
Transport stream rate per input 8 4 Mbps maximum; 1 Mbps mi nimum
Data format Supports both burst and packet mode of ASI
format
Packet length 188, 204 bytes
Signal amplit ud e 880 mV p-p maximum ; 20 0 mV p- p mi ni mum
Termination 75 Ohms
Return loss - 17 dB, 27 to 270 MHz
The incoming MPEG-2 transport stream should be therefore connec ted to ASI in 1 or
2.
August 14, 2008 K2 ASI Media Client Installation and Service Manual 23
Page 24

Chapter 2 Installing the K2 ASI Media Client
!
!
!
!
RS422 Connection
The RS-422 card allows connecting the K2 ASI Media Client to an Automation
System, using the VDCP protocol. Two serial ports are available and their pin
assignment is described in the figure below.
Supplying Power
Once you have inst alle d your syste m an d comple ted mak ing t he si gnal, net work, an d
peripheral connections:
• Plug the device end of power cable to the product's main connector(s)
• Ensure that the on/off switch is switched "off". If the product is not fitted with an
on/off swi tch ensure t he local main supply is switched of f
• Plug the power cable to the local main power supply
CAUTION: Supply power to the product wi th the ty pe of power source
indicated on the marking label.
Mains Voltage Range. You can power the system computer from mains without
setting a voltage selection switch (see section Specifications for more details on the
voltage).
Mains Frequency. The product operates on either 50 Hz or 60 Hz line frequencies.
CAUTION: Never plug a suppl y unit which is not connected to a server.
CAUTION: To prevent damage, protect the product from power
fluctuations and temporary interruptions with a regulating
non-interruptible power supply. This device protects the hardware from
damage caused by power surges and voltage spikes. In addition, it
allows the product to operate temporarily during a power failure.
NOTE: The power supply cord should comply with the legislation in force in the
country of installation.
CAUTION: Do not supply power to the product until all connections
have been made.
24 K2 ASI Media Client Installation and Service Manual August 14, 2008
Page 25

WARNING: The product is designed for connection to an
!
earth-grounded AC outlet and must be correctly earthed through the
main outlet end of cable.
System Installation
The K2 ASI Media Client allows recording live MPEG-2 streams and makes them
available from the K2 st orage system for play back purposes. This section describes
how to add a K2 ASI Media Client device to an existing K2 Storage System.
System Requirements
The requirements for adding a K2 ASI Media Client appliance to an existing K2
Storage System are as follows.
• The K2 ASI Media Client is co nnected to the K2 Stora ge Sy st em co ntr ol network
(NIC port 1) and iSCSI network (NIC port 2)
• IP address and other network properties ar e configured for the control network
• SNMP properties are configured so the trap destination points to the NetCentral
server PC
System Installation
• If using host files for network name resolution, the K2 ASI Media Client is in the
K2 Storage System host file and the host file is on the K2 ASI Media Client
• Adequate bandwidth is av ailable on the K2 Stor age Syste m to meet the bandwidth
needs of the K2 ASI Media Clie nt
• .Net and MSXML (refer to the K2 Storage System R elease Notes for the latest
version information)
Adding a K2 ASI Appliance
The procedure for adding a K2 ASI Media Client to a K2 Storage System is the
following.
1. Open the K2 System Configuration application and log in with permissions
equivalent to K2 Administrator or higher.
2. In the tree view, select the name of the K2 Storage System, which is the top node
of the storage system view.
3. Click
4. Select
5. Click
6. In the tree view, select the K2 A SI Media Client.
7. Click the
Add Device. The Add Device dialog box opens.
K2 Appliance.
OK. The new client device appears in the tree view.
Configure button. The Client Configuration wizard opens.
NOTE: If your server has a large number of K2 Media Client and othe r iSCSI clients ,
you are prompted to restar t the K2 Media Server when you conf igure clients and cross
the following thresholds: 64 clients; 80 clients; 96 clients.
8. Enter the hostname for the K2 Appliance, as currently configured on the K2 ASI
August 14, 2008 K2 ASI Media Client Installation and Service Manual 25
Page 26

Chapter 2 Installing the K2 ASI Media Client
Media Client.
If you have multiple K2 Appliance types, you should configure your highest
bandwidth K2 appliances first, as this ensures load balancing is correct. Refer to
the load balancing topic in the K2 Media Client System Guide.
9. For Storage Access, leave
10.For K2 Appliance Type, select
11.Click
Next. The Software Configuration page opens.
iSCSI selected.
K2 ASI.
This page checks the K2 ASI Media Client appliance for the required software:
•SNFS
• .NET 1.1
• Grass Vall ey K2 Appliance Software
12.Identify software installed on the K2 ASI Media Client and proceed as follows.
• If any software with Yes in the Required column reports as Not Installed, you
must install it on the K2 ASI Media Clien t. After installing the software, click
Check Software.
• If all software with Yes in the Required colum n reports as Insta lled, click Check
Software.
13.When all required software reports as
Configuration
page opens.
Installed, click Next. The Network
This page configures both control and media (iSCSI) network connections. The top
port is the port over which the K2 System Configuration application is
communicating wit h the K2 ASI Me dia Client. If correctly c onfigured, i t is alread y
assigned the control network IP address, which is displayed in the window.
14.Select the media (iSCSI) port and click
Modify. A network configura ti on dia log
box opens.
15.Enter the media network IP address and subnet mask and then click
16.Click
Next. The Database Client Configuration page opens.
OK.
This page connects the K2 ASI Media Client as a media dat aba se cl ie nt to the K2
Media Server taking the role of media database server. If ther e are redundant K2
Media Servers, both are listed on this page as database servers.
17.Verify that t he K2 ASI Me dia Cl ient is connecti ng to the corr ect K2 Med ia Server
or servers as follows:
• For non redundant K2 Storage Systems, the client connects to the only server.
• For iSCSI redundant K2 Storage Systems, the client connects to server A as
database server 1 and serve r B as da tabas e ser ver 2, so th at if the re is a probl em
with one server, the other server is available.
18.Click
19.When the wizard r eports that t he configurati on check is suc cessful, clic k
Check.
Next. The
File System Configuration page opens.
This page connects t he K2 ASI Media Cli ent as a media fi le system cli ent to the K2
26 K2 ASI Media Client Installation and Service Manual August 14, 2008
Page 27

Identifying K2 ASI Media Client Software Versions
Media Server taking the role of media file system server. If there are redundant K2
Media Servers, both are listed on this page as file system servers
20.Verify that the K2 ASI Media Client is connecting to the correct K2 Media Server
or servers as follows:
• For non redundant K2 Storage Systems, the client connects to the only server.
• For iSCSI redundant K2 Stora ge Systems , the client connects to serv er A as file
system server 1 and server B as file system server 2, so that if there is a problem
with one server, the other server is available.
21.Click
22.When the wizard repor ts that the configuration chec k is successfu l, click
Check.
Next. The
iSCSI Initiator Configuration page opens.
This page load balances the K2 appliance's iSCSI connection to the K2 Storage
System. The iSCSI adapt ers on you r K2 Media Ser ver or s er vers are li sted he re as
iSCSI targe ts.
The K2 System Configuration application determines the iSCSI target to which
each K2 appliance subscribes, based on the bandwidth values that you enter. This
enforces policies by which each K2 appliance has sufficient bandwidth for its
intended use and no individual iSCSI target is oversubscribed.
23.Click
Modify. The Bandwidth Input dialog box opens.
24.Enter 10 MB\sec as the bandwidth for the K2 ASI Media Client, unless specified
otherwise by Grass Valley.
25.Click
Assign TOE.
The K2 System Configur ation application automatically cho oses an iSCSI targ et to
assign the K2 ASI Medi a Client. A message appears that specifies the chosen
iSCSI target, but allow s you to choose a differ ent iSCSI target if a custom SAN
type.
26.Respond to the message as follows:
• In most cases you should accept the iSCSI target chosen by the K2 System
Configuration applicat ion . Click
Yes, and then OK to continue.
• If your system design specifies a different iSCSI target, click
the iSCSI target on the
27.Click
28.Click
Next. The Completing the Configuration Wizard page opens.
Finish. The K2 ASI Media Client re starts and the wizard c loses.
iSCSI Initiator Configuration page.
No, and then select
Identifying K2 ASI Media Client Software Versions
To identify K2 ASI Media Clie nt software versions, use the following procedure.
1. In the K2 System Configuration application tree view, open the node for the K2
ASI Media Client. This exposes the nodes for individual configuration pages.
2. Select the
3. To check for recent changes in software, click the
August 14, 2008 K2 ASI Media Client Installation and Service Manual 27
Software configuration page to view software version information.
Check button.
Page 28

Chapter 2 Installing the K2 ASI Media Client
Modifying K2 ASI Media Client Control Network Settings
To modify the hostname or IP address of a K2 ASI Media Client, use the following
procedure. Refer to procedures elsewhere in this chapter for the details of individual
steps.
1. Make sure you know the load balancing (bandwidth) parameters currently set for
the K2 ASI Media Client in the K2 System Configuration application. You must
reconfigure these parameters later in this procedure.
2. Remove the K2 appliance from the K2 Storage System.
3. Modify the hostname or IP address.
4. Edit hosts files or other name resolution mechanisms for all the devices of the K2
Storage System.
5. Add the K2 appliance as a new device to the K2 Storage System, load balancing
the K2 appliance just as it was previously. This is important, as you want the K2
System Configuration application to assign it to the same available bandwidth on
the same iSCSI target as previously.
Modifying K2 ASI Media Client Media Network Settings
To modify a media network IP address for a K2 ASI Media Client, use the following
procedure. Refer to procedures elsewhere in this document for the details of
individual steps.
1. Stop media access on the K2 ASI Media Client.
2. In the K2 System Configuration application, open the
for the K2 ASI Media Client.
3. Modify the IP address.
4. Restart the K2 ASI Media Client.
Installing K2 ASI Video Application
The K2 ASI Video Application allows you to operate the K2 ASI Media Client. To
install this software application on any Control P oint PC, proceed as follows.
1. Insert the K2 ASI Media Client CD-ROM on the Control Point PC.
2. Run the setup.exe application located on the K2 ASI Media Client CD-ROM
from the Control Point PC.
3. An install wizard appears: click
4. Select
5. Click
Client only and click Next.
Next and then Finish.
Next.
Network configuration page
NOTE: The remote Video Application uses the 4012 and 4751 TCP/IP ports to
connect to a K2 ASI device.
28 K2 ASI Media Client Installation and Service Manual August 14, 2008
Page 29

Chapter 3
!
Servicing the K2 ASI Media Client
The K2 ASI Media Client product co ntains two PCI cards tha t can be replaced in case
of hardware failure: the ASI board and the RS-422 board.
Before replacing any K2 ASI card, please first stop all media access on the K2 A SI
Media Client, and use the K2 System Configuration application to take the K2 ASI
Media Client offline.
This section contains the following topics:
• “Installing/Removing the K2 ASI Card” on page 29
• “Installing the K2 ASI Card Driver” on page 32
• “Installing/Removing the RS-422 Card” on page 33
• “Backup and Recovery Strategies” on page 33
Installing/Removing the K2 ASI Card
The K2 ASI Media Client ASI card is a PCI-X board that must be placed on slot
number 1.
CAUTION: Only trained service techni cians are authoriz ed to remove
the system cover and access any of the components inside the server.
To install the K2 ASI board, please follow the steps bel ow:
1. Turn off the server and any connected peripherals and unplug the server from the
mains.
2. Remove the front panel as indicated in section “Front Panel Removal”.
3. Remove the cover as follows:
a. Loosen the two thumbscrews that secure the cover to the chassis (se e the
following Figure).
August 14, 2008 K2 ASI Media Client Installation and Service Manual 29
Page 30

Chapter 3 Servicing the K2 ASI Media Client
b. Slide the top cover backward and grasp the cover at both sides.
c. Carefully lift the cover away from the system.
4. Disconnect all cables of already installed K2 ASI boards.
5. Remove the expansion-card cage as follows:
a. Rotate the expansion-card cage lever up to a 90-degree angle until the cage is
released from the chass is (see the following Figure).
30 K2 ASI Media Client Installation and Service Manual August 14, 2008
Page 31

Installing/Removing the K2 ASI Card
The expansion-car d cage le ver pa uses at a 45-degre e angle, b ut is not unlo cked.
Continue rotating the lever to a 90 -degree angle to unlock the cage.
b. Lift the cage straight up to clear th e chassis.
c. Disconnect the backplane cable(s) f rom the riser board.
NOTE: If two SCSI data cables are connected to the riser card, carefully note their
relative locations so that you can reinstall them correctly.
6. Position the expansion-card cage so that the riser board lies horizontally on your
work surface.
August 14, 2008 K2 ASI Media Client Installation and Service Manual 31
Page 32

Chapter 3 Servicing the K2 ASI Media Client
7. Open the expansion-card guide latch and remove the filler bracket.
8. Install the AS I expansion card as follows:
a. Align the front edge of the K2 ASI expansion card with the front card guide.
b. Position the expansion card so that the card-edge connector aligns with the
expansion-card connector on the expansion-card riser board.
c. Insert th e card-edge connector firmly into the exp ansion-card connector until the
card is fully seated.
d. When the card is seated in the connector, close the expansion-card latch.
9. Replace the expansion-card cage as follows:
a. Reconnect the backplane cable(s) to the riser board.
b. With the expansion-card cage leve r rotated to a 90-degr ee angle, align the guid es
on each end of the expansi on-card cag e with the guid es on the c hassis wall , and
lower the cag e.
c. Rotate the exp ansion -card ca ge lever down until the handl e is fl ush with the t op
of the cage to secure the cage in the chassis.
10.Reconnect all the cables.
11.Replace the cover, plug the system and its peripherals back in and switch them
back on.
Installing the K2 ASI Card Driver
Since the driver is alr eady installed on the K2 ASI Media Clien t, it is not nec essary to
install it when you replace the ASI card. Install the driver only if directed by Grass
Valley Support.
To install the K2 ASI card driver, proceed as follows.
32 K2 ASI Media Client Installation and Service Manual August 14, 2008
Page 33

Installing/Removing the RS-422 Card
!
1. Insert the K2 ASI Media Client CD-ROM.
2. Run UpdateDriver.exe (located into the .\Drivers\PassPro folder).
3. An install wizard opens; press
Y to all the questions.
Installing/Removing the RS-422 Card
The K2 ASI Media Client ASI card is a PCI-X board that must be placed on slot
number 3.
CAUTION: Only trained service techni cians are authoriz ed to remove
the system cover and access any of the components inside the server.
To install the K2 ASI board, please follow the steps described in the “Installing/
Removing the K2 ASI Card” section above.
Backup and Recovery Strategies
On the K2 ASI Media Client, there are three partitions on the system drive to support
backup and recovery strategies as follows:
• The C: drive is for the Windows operating system and applications
• The D: drive is for SNFS applications
• The E: drive is for storing a system image of the other partitions. From the E: drive
you can restore images to the C: drive.
When you receive a K2 ASI Media Client from th e factory, the machine has a generic
image on the E: drive. This image is not specific to the individual machine. It is
generic for all machines of that type.
The recommended recovery disk i mage process is described in the K2 St orage System
Instruction Manual.
August 14, 2008 K2 ASI Media Client Installation and Service Manual 33
Page 34

Chapter 3 Servicing the K2 ASI Media Client
34 K2 ASI Media Client Installation and Service Manual August 14, 2008
Page 35

Glossary
Ancillary Data
Digital data carried in the non-active video regions of a serial digital interface (SDI)
stream as defined by SMPTE 291M.
ASI
Asynchronous Serial Interface.
Channel
A set of resources that together have the ability to record or play media.
Clip
Portion of recorded stream corresponding to a useful asset.
Compression Layer
The compression lay er is the compr essed ele mentar y stream a nd associ ated metad ata
that describes the elementary stream. Usually this layer is org anized into v ariable
length packets with heade rs and payloads of data, in which cas e the bit stream is called
a packetized elementary stream, or PES.
See the appropriate MPEG-2, DVB, or ATSC standards for more information.
See also “System Layer”.
Configuration Manager
A tool in K2 Media Client that configures system settings.
Cue Tone
Also called trig ger tones. Sig nal that i s broadcast by the network f eed and inter cepted
by the video switch. Cue tones notify the systems of breaks in programming during
which events can be aired. Cue tones can be initiated by a tone from a network or by
contact closure. There are two types of cue tones: start tones trigger an insertion to
begin, and stop tones can stop an event that is being played.
Drop Frame
Drop frame is a timecode adjustment that applies to NTSC video only. Due to the
framerate of NTSC, a sy stem that normally outputs 30 frames per secon d must adjust
timecode by subtracting two frames every minute except every tenth minute to
achieve the effective framerate.
Drop Frame Timecode
Drop-frame time code yields precise running times, but frames are not all numbered
sequentially. A frame number must be dropped periodically to keep the clock right.
In non-drop time cod e, all frames ar e numbered sequentiall y, but the ending time code
of a program does not accurately give the program's length.
Ethernet
A local area network used with some remote protocol applications; it operates over
twisted wire and over coaxial cable.
August 14, 2008 K2 ASI Media Client 35
Page 36

Glossary
Event
An event is defined as a video list element: it is recorded or played from one time
during a certain period.
Fibre Channel
A general set of integrated standards developed by ANSI for flexible information
transfer over multiple physical inter face types.
GOP
Group Of Pictures: this represents the MPEG 2 group of pictures I, B and P. The
beginning of a GOP is always an I picture.
GPI
General Purpose Interface. GPI triggers are physical connections between two pieces
of equipment. Typically GPI triggers are based on a change of state on a monitored
pin of the serial po rt. For inst ance you could create a GPI t rigger that was operated by
a port on a piece of broadcast equipment.
HD
High Definition video.
iSCSI
Internet SCSI (small computer st orage in terface ) is a stor age access protocol t hat can
use a transport layer such as Gigabit Ethernet rather than be restricted to the short
distances determined by computer hardware buses. K2 Media Servers use iSCSI for
clients that need to deliver media assets with real-time performance. The tuning and
optimizing done by Grass Valley permits the use of iSCSI to deliver unparalleled,
high-throughput, and deterministic performance.
K2 Media Client
A Broadcast Enterprise S erver that incorporates IT server pl atform and st orage
technologies.
Non Drop Frame Timecode
In non-drop time code, all frames ar e numbered sequentially, but the ending time code
of a program does not accurately give the program's length. Drop-frame time code
yields precise running times, but fr ames are not all numbered sequentially. A frame
number must be dropped pe riodically to keep the clock right.
Protocol
A convention for data transmission that defines timing, control, format, and data
transmission.
RS-422
A standard interface, 9-pin serial port connector used with some remote protocol
applications; it supports multipoint connections.
SD
Standard Definition video.
36 K2 ASI Media Client Installation and Service Manual August 14, 2008
Page 37

SNMP
System and Network Management Protocol.
Status Bar
Displays status and error messages.
System Layer
The system layer is the transport stream with program data and associated metadata
that describes the composition and organization of the transport stream. MPEG-2
system layer information includes synchronization bytes, PID numbers, scrambling
information, and o ther indicators , i ncl udi ng the start of the transport packe t payload.
Transport packets can be PES packet, a PSI table, or other private data. ATSC and
DVB transport streams are MPEG-2 compatible because the required ATSC and
DVB system layer data are MPEG-2 private data structures.
See the appropriate MPEG-2, DVB, or ATSC standards for more information.
Widescreen Mode
An aspect ratio of 16:9, as opposed to an aspect ratio of 4:3.
August 14, 2008 K2 ASI Media Client Installation and Service Manual 37
Page 38

Glossary
38 K2 ASI Media Client Installation and Service Manual August 14, 2008
Page 39

Index
A
automation system 24
C
channel
definition 35
connections
ASI board connection 23
network connections 23
RS422 board connection 24
F
fibre channel, definition 36
G
GPI
definition 36
Grass Valley FTP Daemon 20
K
K2 ASI appliance 25
K2 ASI card
driver installation 32
installation 29
K2 ASI Media Client
control network settings modification 28
media network settings modification 28
software versions identification 27
K2 ASI video application
installation 28
requirements 25
W
web site, for Thomson Grass Valley 7
widescreen mode
definition 37
Windows
services 20
M
media storage 17
mode
widescreen, definition 37
S
safety terms and symbols 14
server
characteristics 19
services, W in dows 20
SNMP Service 20
system
installation 25
August 14, 2008 K2 ASI Media Client Installation and Service Manual 39
Page 40

Index
40 K2 ASI Media Client Installation and Service Manual August 14, 2008
 Loading...