

Page 1
K2 AppCenter
Application Software
User Manual
Software Version 7.2
071-8723-01
April 2010
Page 2

Affiliate with the N.V. KEMA in The Netherlands
CERTIFICATE
Certificate Number: 510040.001
The Quality System of:
Thomson Inc, and its worLdwide Grass Valley division affiliates DBA
GRASS VALLEY
Headquarters
400 Providence Mine Rd
Nevada City, CA 95959
United States
15655 SW Greystone Ct.
Beaverton, OR 97006
United States
10 Presidential Way
Suite 300
Woburn, MA 01801
United States
Kapittelweg 10
4827 HG Breda
The Nederlands
7140 Baymeadows Way
Ste 101
Jacksonville, FL 32256
United States
2300 So. Decker Lake Blvd.
Salt Lake City, UT 84119
United States
Rue du Clos Courtel
CS 31719
35517 Cesson-Sevigné Cedex
France
1 rue de l’Hautil
Z.I. des Boutries BP 150
78702 Conflans-Sainte
Honorine Cedex
France
Technopole Brest-Iroise
Site de la Pointe du Diable
CS 73808
29238 Brest Cedex 3
France
40 Rue de Bray
2 Rue des Landelles
35510 Cesson Sevigné
France
Spinnereistrasse 5
CH-5300 Turgi
Switzerland
Brunnenweg 9
D-64331 Weiterstadt
Germany
Carl-Benz-Strasse 6-8
67105 Schifferstadt
Germany
Including its implementation, meets the requirements of the standard:
ISO 9001:2008
Scope:
The design, manufacture and support of video and audio hardware and software products and
related systems
.
This Certificate is valid until: June 14, 2012
This Certificate is valid as of: June 14, 2009
Certified for the first time: June 14, 2000
H. Pierre Sallé
President
KEMA-Registered Quality
The method of operation for quality certification is defined in the KEMA General Terms
And Conditions For Quality And Environmental Management Systems Certifications.
Integral publication of this certificate is allowed.
KEMA-Registered Quality, Inc.
4377 County Line Road
Chalfont, PA 18914
Ph: (215)997-4519
Fax: (215)997-3809
CRT 001 073004
Accredited By:
ANAB
Page 3

K2 AppCenter
Application Software
User Manual
Software Version 7.2
071-8723-01
April 2010
Page 4

Copyright Copyright © Grass Valley, Inc. All rights reserved. Printed in the United States of America.
Portions of software © 2000 – 2010, Microsoft Corporation. All rights reserved. This document
may not be copied in whole or in part, or otherwise reproduced except as specifically permitted
under U.S. copyright law, without the prior written consent of Grass Valley, Inc., P.O. Box
59900, Nevada City, California 95959-7900. This product may be covered by one or more U.S.
and foreign patents.
Disclaimer Product options and specifications subject to change without notice. The information in this
manual is furnished for informational use only, is subject to change without notice, and should
not be construed as a commitment by Grass Valley, Inc. Grass Valley, Inc. assumes no
responsibility or liability for any errors or inacc uracies that may appear in this publication.
U.S. Government
Restricted Rights
Legend
Trademarks and
Logos
Revision Status
Use, duplication, or disclosure by the United States Government is subject to restrictions as set
forth in subparagraph (c)(1)(ii) of the Rights in Technical Data and Computer Software clause
at DFARS 252.277-7013 or in subparagraph c(1) and (2) of the Commercial Computer
Software Restricted Rights clause at FAR 52.227-19, as applicable. Manufacturer is Grass
Valley, Inc., P.O. Box 59900, Nevada City, California 95959-7900 U.S.A.
Grass Valley, K2, Aurora, Summit, Dyno, Solo, Infinity, Turbo, Profile, Profile XP, NetCentral,
NewsBrowse, NewsEdit, NewsQ, NewsShare, Ne wsQ Pro, and Media Manager are either
registered trademarks or trademarks of Grass Valley, Inc. in the United States and/or other
countries. Grass Valley, Inc. products are covered by U.S. and foreign patents, issued and
pending. Additional information regarding Grass Valley, Inc. trademarks and other proprietary
rights may be found at www.grassvalley.com. Other trademarks and logos used in this
document are either registered trademarks or trademarks of the manufactu rers or vendors of
the associated products, such as Microsoft® Windows® operating system, Windows Media®
player, Internet Explorer® internet browser, and SQL Server™. QuickTime and the QuickTime
logo are trademarks or registered trademarks of Apple Computer, Inc., used under license
therefrom.
Rev Date Description
November 23,
2005
Initial release of the K2 Media Client User Manual – 071-8459-00
August 15, 2006 Updates for 3.1 release – 071-8459-01
July 1, 2007 Updates for 3.2 release – 071-8459-02
July 30, 2008 Updates for 3.2.7 release – 071-8459-03
March 30, 2009 Initial release of K2 AppCenter User Manual for the K2 Summit
Production Client — 86231120. (Removed information specific to
K2 Media Client.)
October 30, 2009 K2 AppCenter User Manual updated to include K2 Solo Media
April 5, 2010 Added ChannelFlex Suite and other updates for Summit 7.2 release
Server and MPEG and AVC-I updates – 071-8723-00.
– 071-8723-01
4 K2 AppCenter User Manual 05 April 2010
Page 5

Contents
Finding Information...........................................................................................11
How this manual is organized .................................................................................11
Getting more information.........................................................................................12
Grass Valley Product Support.................................................................................13
Web Technical Support......................................................................................13
Telephone Support.............................................................................................14
Waste Electrical and Electronic Equipment Directive.........................................15
Chapter 1 Product Description
System Overview ................... ..... ...... ...... ..... .................................. ..... ...... ...... ..... ...17
About remote operation and monitoring..................................................................18
About K2 Summit client storage options .................................................................18
Licensing.................................................................................................................18
Software version licenses...................................................................................18
Licensable options..............................................................................................19
Chapter 2 Getting Started
Getting Started with AppCenter............................... ...... ...... ..... ...... .........................22
Starting AppCenter.............................................................................................22
Starting AppCenter for the first time with a Control Point PC.............................23
Starting AppCenter after creating a channel suite..............................................24
Locking AppCenter.............................................................................................25
Shutting down AppCenter ....................... ..... ...... ..... ...... ...... ..... ...............................25
Shutting down AppCenter................................... ...... ...... ..... ...............................25
Configuration Manager............................................................................................26
Opening and closing Configuration Manager .....................................................26
Saving and restoring configuration settings........................................................27
Monitoring applications............................................................................................28
Status bar...........................................................................................................28
Status pane ........................................................................................................28
Export Logs ........................................................................................................29
Storage Utility..........................................................................................................29
Accessing Storage Utility....................................................................................30
K2 System Configuration.........................................................................................30
SiteConfig................................................................................................................30
Chapter 3 Using AppCenter
About AppCenter................................................................. ..... ...............................32
AppCenter user interface overview.........................................................................32
Tools in AppCenter.............................................................................................34
Conventions used in the AppCenter interface....................................................36
Terms and concepts used in AppCenter............................................................37
Channels overview..................................................................................................38
Channel suites....................................................................................................38
Channels in AppCenter......................................................................................39
Channel applications overview................................................................................39
Selecting a channel application..........................................................................39
Available channel applicati ons........................................................................ ...39
Using on-screen transport controls.....................................................................39
Using remote protocols...........................................................................................40
About remote control and supported protocols...................................................40
Configuring a channel for remote control ...........................................................41
Chapter 4 Recording clips
About recording clips.......................................... ...... .................................. ..... ...44
April 2010 K2 AppCenter 5
Page 6

Contents
About continuous record mode................................................ ..........................44
Guide to using the Recorder/Player application: Control view...........................46
Guide to using the Recorder/Player application: Cue view................................48
Before you record: Recorder settings checklist.................................................. 50
To record a clip...................................................................................................51
Previewing a clip that is recording...................................................................... 53
Using cue points while recording........................................................................ 54
Changing the timecode source........................................................................... 55
Selecting widescreen mode ...............................................................................56
Changing the current bin....................................................................................56
Renaming a clip.................................................................................................. 57
Viewing clip properties....................................................................................... 57
Locating a clip ....................................................................................................58
Displaying available storage space....................................................................58
Chapter 5 Playing and editing clips
About playing clips .............................................................. ..... ..........................62
Selecting the Player application in AppCenter...................................................63
Guide to using Player: Control view...................................................................63
Guide to using Player: Cue view........................................................................66
Loading media for playout..................................................................................67
Playing a clip...................................................................................................... 68
Scheduling a clip to play..................................................................................... 68
Selecting loop play............................................................................................. 68
Jumping to a specific timecode.......................................................................... 69
Using cue points for playback ............................................................................70
Editing a clip....................................................................................................... 72
Creating Subclips...............................................................................................75
Viewing clip properties....................................................................................... 77
Viewing clip options............................................................................................78
Displaying Super Out information on output/monitor..........................................78
Chapter 6 Working with playlists
Introducing Playlist application...........................................................................82
Before using Playlist application......................................................................... 83
Selecting Playlist application..............................................................................85
Guide to using Playlist application...................................................................... 85
Selecting Text or Thumbnail view ...................................................................... 89
Selecting monitor information............................................................................. 89
Creating a simple playlist ...................................................................................89
Inserting media in a playlist................................................................................90
Combining events in a playlist............................................................................ 91
Splitting an event in a playlist............................................................................. 91
Playing a list....................................................................................................... 92
Editing and rearranging events in a playlist........................................................ 93
Managing sections in a list................................................................................. 95
Adding play effects.............................................................................................96
Adding GPI output triggers to playlists............................................................... 100
Managing playlists..............................................................................................101
Saving a list as a program..................................................................................103
Importing a text file as a playlist......................................................................... 104
Chapter 7 Managing clip media
Guide to using the Clips pane............................................................................108
Modifying the asset list view...............................................................................113
About naming assets and bins........................................................................... 114
Working with bins...............................................................................................115
6 K2 AppCenter User Manual April 2010
Page 7

Working with assets............................................................................................117
Working with the Recycled Bin ...........................................................................123
Locating assets...................................................................................................123
Working with asset metadata .............................................................................128
Viewing asset properties....................................................................................131
Chapter 8 Importing and Exporting Media
Importing and exporting assets...............................................................................133
Importing and exporting files ..............................................................................133
Importing and exporting streaming media..........................................................141
Monitoring media file transfers................................................................................143
Starting the Transfer Monitor..............................................................................143
Transfer Monitor pages and buttons...................................................................144
Viewing transfer jobs in Transfer Monitor...........................................................144
Viewing detailed transfer job properties .............................................................145
Removing transfer jobs from the completed list .................................................145
Chapter 9 Using Channel Suites
Using channel suites ...............................................................................................147
Managing channel suites....................................................................................148
Using channel suites with multiple K2 systems or storage locations..................149
Accessing a K2 system from multiple Control Point PCs...................................149
Sharing channels with other users .....................................................................149
Channel suites and channel configuration considerations.................................150
Chapter 10 Audio/Video Configuration
Using Configuration Manager..................................................................................152
About video scaling settings....................................................................................152
About aspect ratio conversion modes................................................................153
Applying AFD settings........................................................................................154
Video reference standard setup..............................................................................156
Record channel video setup....................................................................................156
Record channel audio setup....................................................................................158
AES/EBU audio setup ........................................................................................158
Embedded audio setup.......................................................................................159
Play channel video setup ........................................................................................159
Play channel audio setup............................. ...... ................................. ...... ..............161
Adjusting play speed options...................................................................................161
Data track setup......................................................................................................162
Timecode setup.................................................. ..... ...... .................................. ..... ...162
Other Configuration Manager settings ....................................................................163
Chapter 11 GPI and other configurations
Using GPI input and output triggers........................................................................165
Configuring GPI triggers.....................................................................................165
GPI triggers.............................................................................................................166
GPI Input ............................................................................................................167
GPI Output..........................................................................................................169
Adding a remote host..............................................................................................170
Setting security access permissions .......................................................................170
Other Configuration Manager settings ....................................................................171
Chapter 12 Channel Ganging and Track Mapping
Channel ganging.....................................................................................................173
About channel ganging................................................... ..... ...... .........................173
Configuring channel ganging..............................................................................173
Using channel ganging.......................................................................................175
April 2010 K2 AppCenter User Manual 7
Page 8

Contents
Track Mapping ........................................................................................................ 176
About track mapping ........................................................... ...............................176
Configuring track mapping .................................................................................180
Using track mapping...........................................................................................181
Other Configuration Manager settings.................................................................... 184
Chapter 13 ChannelFlex Suite
Super Slo-Mo............................................... ..... ...... ..... .................................. ...... ...185
About Super Slo-Mo...................................................... ...... ...............................185
Super Slo-Mo requirements and restricti ons....................................... ............... 186
Super Slo-Mo formats ............................. ..... ...... ..... .................................. ...... ...186
Configuring Super Slo-Mo..................................................................................186
Multi-Cam................................................................................................................ 187
About Multi-Cam...................................... ..... ...... ................................. ...... ...... ...188
Multi-Cam requirements and restrictions............................................................188
Multi-Cam formats.............................................................................................. 188
Configuring Multi-Cam........................................................................................189
3D/Video + Key....................................................................................................... 190
About 3D/Video + Key........................................................................................190
3D/Video + Key requirements and restrictions...................................................190
Configuring 3D/Video + Key............................................................................... 191
ChannelFlex Suite supported combinations............................................................ 192
Other Configuration Manager settings.................................................................... 196
Appendix A Keyboard Shortcuts
About keyboard operation................................................................... ..... ............... 198
Channel select ........................................................................................................ 198
Basic transport controls........................................................................................... 198
Off-speed play controls...........................................................................................199
Shuttle speed controls.............................................................................................199
Stop-Mode transport controls.................................................................................. 200
Mark-Point and Cue controls...................................................................................200
Miscellaneous controls............................................................................................200
List controls............................................................................................................. 200
Playlist controls....................................................................................................... 201
Appendix B Operational Specifications
Operational specifications....................................................................................... 204
Video codec description K2 Summit/Solo .......................................................... 205
Playout of multiple formats................................................................................. 206
Active Format Description (AFD) specifications................................................. 209
VBI/Ancillary/data track specifications................................................................ 216
Internationalization............................................................................................. 220
Naming specifications for assets and bins.........................................................220
Video network performance...............................................................................222
Supported file input/output formats on K2 Summit/Solo/SAN............................ 222
MXF export behavior on K2 Summit/Solo.......................................................... 224
Media file system performance on K2 systems.................................................. 224
Transition effects formats suppo rted............................. ...... ..... ...... .................... 225
Protocols supported........................................................................................... 226
Transfer compatibility with K2 Summit/Solo....................................................... 227
Control Point PC system requirements..............................................................230
MIB specifications................................................................................................... 231
K2 client MIBs .................................................................................................... 232
K2 Media Server MIBs....................................................................................... 233
K2 Appliance (Generic Windows computer based) MIBs...................................234
................................................................................................................................235
8 K2 AppCenter User Manual April 2010
Page 9

Appendix C Connector Pinouts
K2 Summit Production Client connector pinouts.....................................................238
AES Audio..........................................................................................................238
RS-422 connector pinouts..................................................................................239
LTC connectors pinouts......................................................................................240
GPI I/O connector pinouts ..................................................................................241
K2 Media Client connector pinouts..........................................................................242
RS-422 connector pinouts..................................................................................242
LTC connectors pinouts......................................................................................243
GPI I/O connector pinouts ..................................................................................244
K2 Media Server connector pinouts........................................................................245
Redundant server heartbeat cable.....................................................................245
Glossary ...............................................................................................................247
Index......................................................................................................................253
April 2010 K2 AppCenter User Manual 9
Page 10

Contents
10 K2 AppCenter User Manual April 2010
Page 11

Finding Information
This user manual describes the K2™ AppCenter user interface, which is supported on
K2 Summit™ Production Client, K2 Solo™ Media Server, and K2 Media Client
products. The manual contains information for all models and options, including
ChannFlex™ Suite. Refer to the sections that apply to your particular model and
options.
NOTE: The term “K2 client” is used for information that applies both to a K2 Summit
Production Client and a K2 Media Client.
How this manual is org anized
This manual is organized around the tasks required to configure and operate the K2
Summit Production Client. The following describes the chapters included in this
manual:
Chapter 1, Product Description — Provides the product functional description and an
overview of the key features.
Chapter 2, Getting Started — Provides an overview of getting AppCenter started and
describes applications that allow you to configure and operate the K2 Summit
Production Client.
Chapter 3, Using AppCenter — Describes how to operate the K2 Summit Production
Client using the AppCenter user interface.
Chapter 4, Recording clips — Describes how to operate the AppCenter Recorder
application.
Chapter 5, Playing and editing clips — Describes how to operate the AppCenter
Player application.
Chapter 6, Working with playlists — Describes how to operate the AppCenter Playlist
application.
Chapter 7, Managing clip media — Describes how to manipulate the AppCenter Clips
pane.
Chapter 8, Importing and Exporting Media — Describes how to import and export
media using AppCenter.
Chapter 9, Using Channel Suites — Describes how to manage the AppCenter channel
suites.
Chapter 10, Audio/Video Configuration— Describes how to modify the K2 Summit
Production Client configuration settings using the configuration tool provided in the
AppCenter application.
Chapter 11, GPI and other configurations — Describes how to modify the K2
Summit Production Client GPI configuration settings, as well as remote host and
security settings, using the configuration tool provided in the AppCenter application.
Chapter 12, Channel Ganging and Track Mapping — Describes how to modify the
K2 Summit Production Client Channel Ganging configuration settings using the
configuration tool provided in the AppCenter application. Also describes how to add,
modify, and route audio and video tracks to a clip.
05 April 2010 K2 AppCenter User Manual 11
Page 12

Finding Information
Chapter 13, ChannelFlex Suite — Describes the Super Slo-Mo, Multi-Cam, and 3D/
Video + Key features that are available with the AppCenter Elite license.
Appendix A, Keyboard Shortcuts — Describes how to operate the K2 Summit
Production Client using an external keyboard.
Appendix B, Operational Specifications — Provides environmental and operational
specifications for the K2 Summit Production Client.
Getting more information
The following illustration shows the recommended order in which to reference the
documentation.
Quick Start Guide
You receive this guide in the product packaging with your K2 product. The Quick
Start Guide provides step-by-step installation instructions for basic installation and
operation, including recording and playing clips.
Release Notes
The K2 Release Notes contain the latest information about the software shipped on
your system. The release notes include software upgrade instructions, software
specifications and requirements, feature changes from the previous releases, and any
known problems. Because release notes contain the latest information, they are
printed out and included in the K2 product shipping box, rather than included in the
Documentation CD-ROM. You should always check the Grass Valley Website to
determine if there is an updated version of release notes available.
Documentation CD
Except for the release notes, the full set of support documentation, including this
manual, is available on the K2 Documentation CD that you receive with your K2
product. You can find the Documentation CD packaged in K2 product shipping
boxes.
The Documentation CD includes the following:
•
K2 AppCenter User Manual — Provides instructions for configuring and operating
the media channels of product.
•
Quick Start Guides — The Quick Start Guide provides step-by-step installation
instructions for basic installation and operation of the K2 product.
•
K2 System Guide — Contains the product specifications and instructions for
modifying system settings.
•
Service Manuals — Contains information on servicing and maintaining the K2
product.
•
K2 SAN Installation and Service Manual — Contains installation, configuration, and
maintenance procedures for shared storage options.
•
K2 Storage Cabling Guide — Contains diagrams for cabling the devices of the K2
Summit Production Client.
12 K2 AppCenter User Manual 05 April 2010
Page 13

• RAID Instruction Manuals — There is an Instruction Manual for each type of RAID
storage device that can be a part of a K2 Summit Production Client. These manuals
contain procedures for configuring and servicing the device.
•
Fibre Channel Switch Installation Manual — Contains information on configuring
and servicing the Fibre Channel switch.
On-line Help Systems
K2 AppCenter Help — In the AppCenter user interface menu bar select Help, then
choose
SiteConfig Help — In the SiteConfig user interface menu bar select Help, then choose
SiteConfig Help Topics from the drop-down menu.
NetCentral Help — From the NetCentral interface select Help | NetCentral Help Topics.
AppCenter Help Topics from the drop-down menu.
NetCentral documentation
The NetCentral product has its own documentation set, described as follows:
•
NetCentral Quick Star t Guide — Provides an overview of the installation process to
quickly set up and run NetCentral.
Grass Valley Product Support
•
NetCentral Installation Guide — Identifies requirements and procedures to correctly
set up servers and devices, as well as provides detailed instructions to install and
configure NetCentral software.
•
NetCentral User Guide — Describes how to use the NetCentral Manager to monitor
devices.
•
NetCentral Help — From the NetCentral interface access on-line help. Select Help |
NetCentral Help Topics
.
Grass Valley Web Site
This public Web site contains all the latest manuals and documentation, and
additional support information. Use the following URL.
http://www.grassvalley.com.
Grass Valley Product Support
To get technical assistance, check on the status of a question, or to report a new issues,
contact Grass Valley Product Support via e-mail, the Web, or by phone or fax.
Web Technical Support
To access support information on the Web, visit the product support Web page on the
Grass Valley Web site. You can download software or find solutions to problems.
World Wide Web:http://www.grassvalley.com/support/
Technical Support E-mail Address:gvgtechsupport@grassvalley.com
05 April 2010 K2 AppCenter User Manual 13
Page 14
Finding Information
Telephone Support
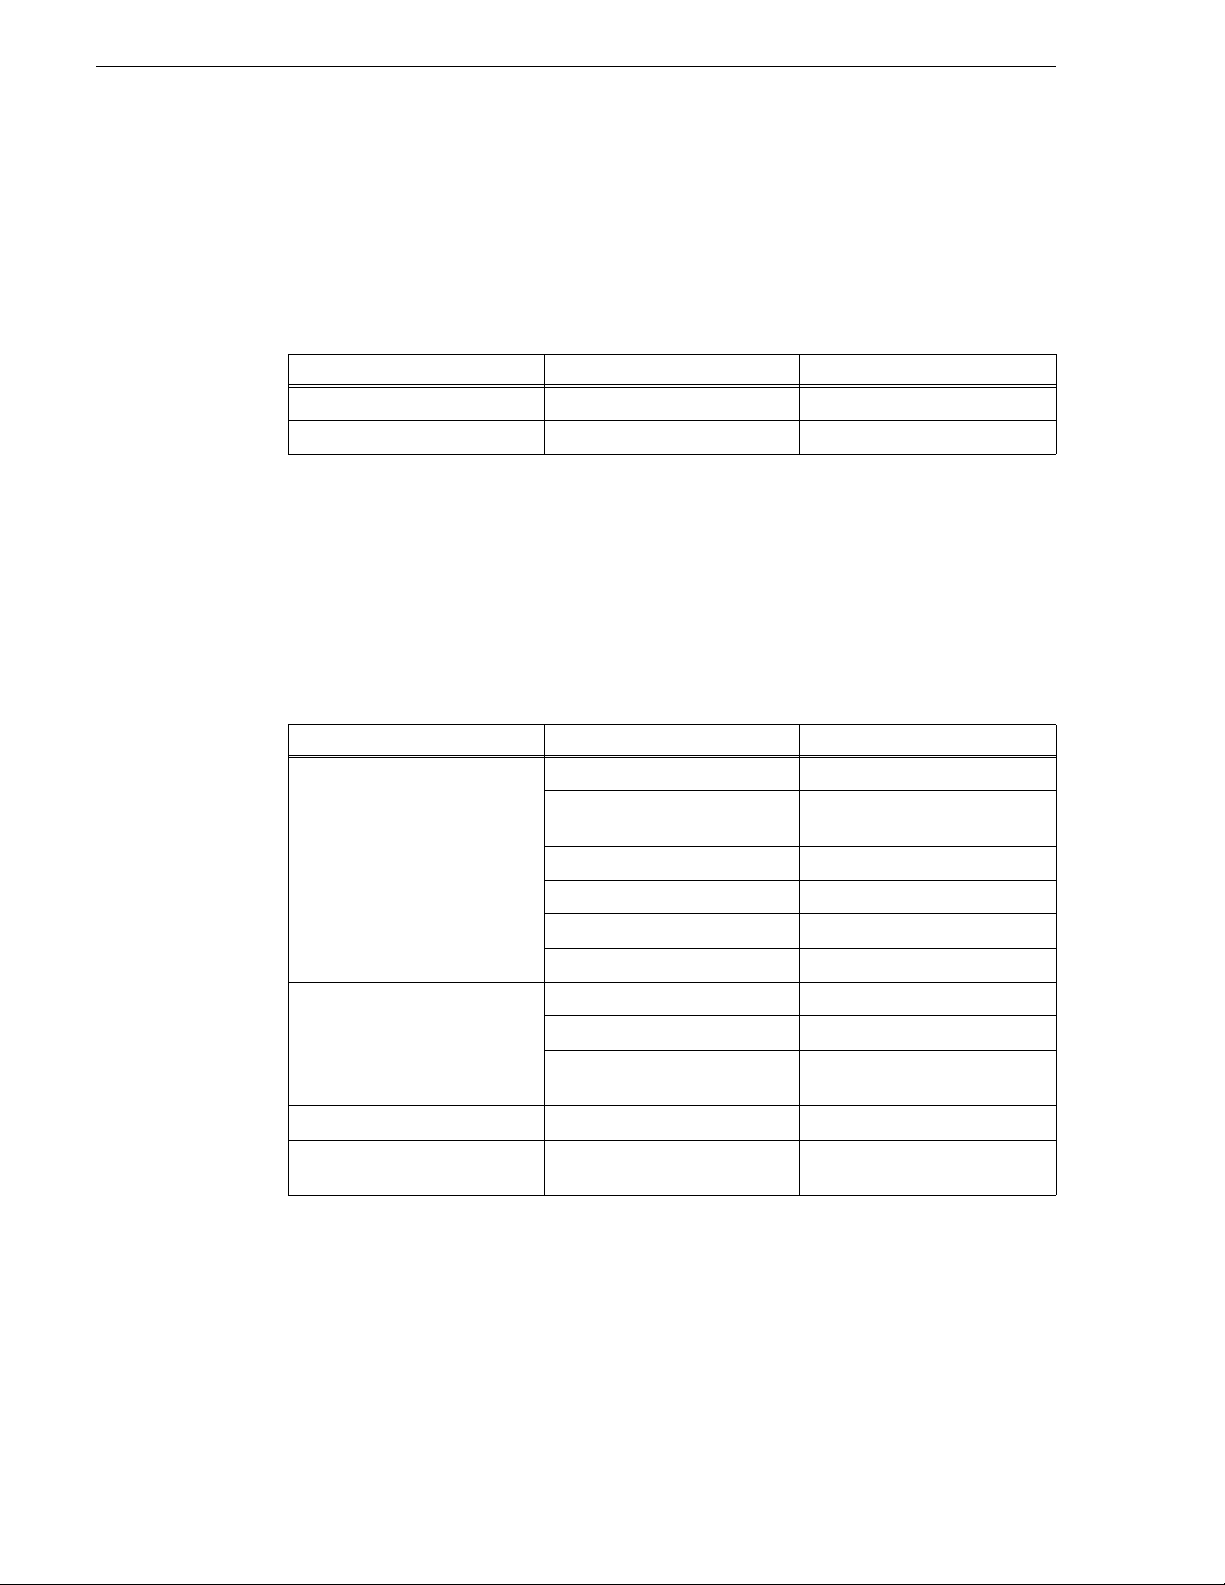
Use the following information to contact Product Support by phone.
International Support Centers
Our international support centers are available 24 hours a day, 7 days a week.
Support Center Toll free In country
France +800 80 80 20 20 +33 1 48 25 20 20
United States +1 800 547 8949 +1 530 478 4148
Authorized Local Support Representative
A local support representative may be available in your country. To locate a support
center during normal local business hours, refer to the following list. This list is
regularly updated on the website for Grass Valley Product Support
(http://www.grassvalley.com/support/contact/phone/)
After–hours local phone support is also available for warranty and contract
customers.
Region County Telephone
Asia China +86 10 5883 7575
Hong Kong, Taiwan, Korea,
Macau
Japan +81 3 6848 5561
Southeast Asia - Malaysia +603 7492 3303
Southeast Asia - Singapore +65 6379 1313
India +91 22 676 10300
Pacific Australia 1 300 721 495
New Zealand 0800 846 676
For callers outside Australia or
New Zealand
Central America, South America All +55 11 5509 3440
North America North America, Mexico,
Caribbean
+852 2531 3058
+61 3 8540 3650
+1 800 547 8949;
+1 530 478 4148
14 K2 AppCenter User Manual 05 April 2010
Page 15
Waste Electrical and Electronic Equipment Directive
Region County Telephone
Europe UK, Ireland, Israel +44 118 923 0499
Benelux – Netherlands +31 (0) 35 62 38 421
Benelux – Belgium +32 (0) 2 334 90 30
France +80 0 80 80 20 20;
+33 1 48 25 20 20
Germany, Austria,
Eastern Europe
Belarus, Russia, Tadzhikistan,
Ukraine, Uzbekistan
Nordics (Norway, Sweden,
Finland, Denmark, Iceland)
Southern Europe – Italy Rome: +39 06 87 20 35 28 ; +39
Southern Europe – Spain +34 91 512 03 50
Switzerland +41 56 299 36 32
Middle East, Near East, Africa Middle East +971 4 299 64 40
Near East and Africa +800 80 80 20 20;
+49 6150 104 444
+7 095 258 09 20;
+33 (0) 2 334 90 30
+45 40 47 22 37; +32 2 333 00 02
06 8720 35 42. Milan: +39 02 48
41 46 58
+33 1 48 25 20 20
Waste Electrical and Electronic Equipment Directive
05 April 2010 K2 AppCenter User Manual 15
Page 16

Finding Information
16 K2 AppCenter User Manual 05 April 2010
Page 17

Chapter 1
Product Description
The K2 system is a cost-effective media platform that incorporates IT and storage
technologies to deliver a networked solution to facilities for ingest, playout, and
media asset management. It is a comprehensive platform that provides a suite of user
applications, system tools, and the largest range of third-party interactivity in the
industry.
System Overview
The K2 Summit Production Client and K2 Solo Media Server offer both Standard
Definition (SD) and High Definition (HD) video format, and bidirectional channels.
The K2 Summit Production Client offers internal or external storage.
The list below describes the main attributes of the K2 Summit Production Client or
K2 Solo Media Server. Some features require special licensing:
• Two or four bidirectional channels (channel can be either an input channel or it can
be an output channel)
• Each channel has an on-air SDI output
• Support for DV record/play and MPEG play in HD and SD. MPEG record (K2
Summit Production Client and K2 Solo Media Server) or AVC-I record and play
(K2 Summit Production Client) is also available.
• Mixed DV format playback of SD or HD clips on the same timeline
• Up/down/cross HD/SD conversion (e.g. SD and HD clips ingested, then played
back as SD or HD clips) or as a different SD or HD format (e.g. 720p to 1080i).
• Any supported format can be played seamlessly back-to-back
• VGA monitoring capability
• Ability to create nested bins, i.e. sub-bins within bins
• Freeze mode can be frame or field
• Various video mix effects (e.g. dissolves between two video and audio tracks on
the same channel, or fade thru matte color)
• Super Slo-Mo, Multi-Cam, and 3D/Video + Key features are available as part of
the ChannelFlex Suite
• Internal, direct-connect, or shared storage
For a more detailed overview of available formats, see the K2 System Guide. For a
more detailed overview of the different types of shared storage available, see the K2
SAN Installation and Service Manual.
05 April 2010 K2 AppCenter User Manual 17
Page 18

Chapter 1 Product Description
About remote operation and monitoring
The K2 Summit Production Client or K2 Solo Media Server is designed as a
“headless” unit. This means that there is no need to connect a keyboard, monitor, and
mouse directly to the K2 system, as ongoing operation, configuration, and monitoring
can be accomplished from a PC on the network. You can lock the K2 Summit
Production Client or K2 Solo Media Server locally, as you would normally lock a
Windows computer, but still access it from a Control Point PC. From this Control
Point PC, you can use channels from different sources in one channel suite.
The software application that supports this headless functionality is called AppCenter.
It is included with the K2 system. For more information, refer to Chapter 3, Using
AppCenter.
Automation protocols and other optional applications can also be used to control K2
Summit client units remotely. For more information, refer to the K2 System Guide.
You can also use the Microsoft Windows Remote Desktop Connection application on
your PC to connect to the K2 system for configuration or administration. Do not use
the Remote Desktop Connection to access the PC running the Control Point software
or to access the AppCenter application; results can be unreliable.
NetCentral and the AppCenter status bar can be used to monitor the K2 system as it
ingests, outputs, or transfers media.
About K2 Summit client storage options
The K2 Summit Production Client can have internal storage for stand-alone use, or it
can have storage that directly connects the K2 Summit client. For multiple K2 Summit
Production Clients, however, Grass Valley recommends the K2 storage system.
The K2 storage system is Grass Valley’s shared storage solution that gives multiple
clients access to a common pool of media. Clients access the shared media storage via
a Gigabit Ethernet network and a Fibre Channel connection. Data is communicated
using the Small Computer System Interface (SCSI) data transfer interface and the
Internet SCSI (iSCSI) protocol. For more information on the K2 storage system, see
the K2 SAN Installation and Service Manual.
Licensing
Grass Valley continues to develop the K2 product family to better meet a wide range
of customer requirements. As these developments become available, you can add the
specific functionality you need with Grass Valley software licenses. Detailed
procedures for installing licenses come with option kits or are included in release
notes for K2 products. Contact your Grass Valley representative to learn more about
the licensing structure and for purchasing information.
Software version licenses
At major software releases, significant new features are added. If you are licensed for
the software release, you can upgrade your software and received the benefits of the
new features.
18 K2 AppCenter User Manual 05 April 2010
Page 19

Licensable options
Optional applications, bundles of advanced features, and enhanced functionality are
available as licensable options for K2 products. The following list describes some of
the options:
• AppCenter Pro, included with a trial license, is an optional application for use with
K2 systems.
• HD option (with the XDP license)
• TimeDelay is an optional application for use with K2 systems.
• K2 XML Import capture service
•K2 InSync
•Pathfire
• K2 FCP Connect
• AppCenter Elite, which enables ChannelFlex Suite features
This is not a complete list of all options. As development continues, new options
become available. Contact your Grass Valley representative to learn more about
current options.
Licensable options
05 April 2010 K2 AppCenter User Manual 19
Page 20

Chapter 1 Product Description
20 K2 AppCenter User Manual 05 April 2010
Page 21

Chapter 2
Getting Started
Topics in this chapter include:
• “Getting Started with AppCenter” on page 22
• “Shutting down AppCenter” on page 25
• “Configuration Manager” on page 26
• “Monitoring applications” on page 28
• “Storage Utility” on page 29
• “K2 System Configuration” on page 30
05 April 2010 K2 AppCenter User Manual 21
Page 22

Chapter 2 Getting Started
Getting Started with AppCenter
Types of K2 users
Anyone with ordinary network access privileges can view the AppCenter channels.
Before you can use AppCenter, you must log onto AppCenter using a user name and
password supplied by a Windows administrator.
NOTE: A K2 administrator controls AppCenter, the K2 Summit Production Client,K2
Solo Media Server and the K2 Media Server. A Windows administrator controls the
Control Point PC or the computer on which the K2 system runs.
The table below explains the four types of K2 user.
Type of user Access
Unknown user Can view AppCenter (locally or on a network-connected Control Point PC)
K2 user In addition to all the unknown user access privileges, the K2 user can create
K2 administrator In addition to all the K2 user access privileges, the K2 administrator can
Windows administrator In addition to all the K2 administrator access privileges, the Windows
and see the channels being used, the properties of the clips in the current bin,
and the Status pane; has access to online help. Can export logs.
channel suites and run all of the channel applications (such as the Player or
Recorder applications) on any K2 Summit Production Client on which the
user has an account. (If using a channel suite with channels on multiple K2
Summit Production Clients, the user needs access privileges on each K2
Summit Production Client.) Can view Configuration Manager.
make changes to Configuration Manager and use the Storage Utility and
K2Config applications.
administrator can create K2 users, enable or disable the USB drive
connectors on the administrator’s PC, and run AppCenter using the
Microsoft Windows Remote Desktop application.
For the K2User, the default password is K2user. (The password is case sensitive.)
For more information on K2 access privileges, see the K2 System Guide.
Starting AppCenter
Once you have installed AppCenter, you can start it by clicking on the AppCenter
shortcut on the Windows desktop.
If you are using AppCenter on a local K2 Summit Production Client, you can begin
using it immediately after you log on. The first time you run AppCenter remotely
through a network-connected Control Point PC, you need to set up a channel suite
before you can use AppCenter. For more information, refer to the next section
“Starting AppCenter for the first time with a Control Point PC”.
CAUTION: If the K2 Summit Production Client was shut down using
Windows XP Standby mode, AppCenter will not start up, even though
the K2 Summit Production Client machine itself boots up normally.
22 K2 AppCenter User Manual 05 April 2010
Page 23
Starting AppCenter for the first time with a Control Point PC
Starting AppCenter for the first time with a Control Point PC
Before you can run AppCenter from a network-connected PC running Control Point
software, you must perform two steps:
1. Log on to AppCenter (see the Windows administrator for domain, user name and
password).
2. Configure a channel suite.
This section describes these steps in detail.
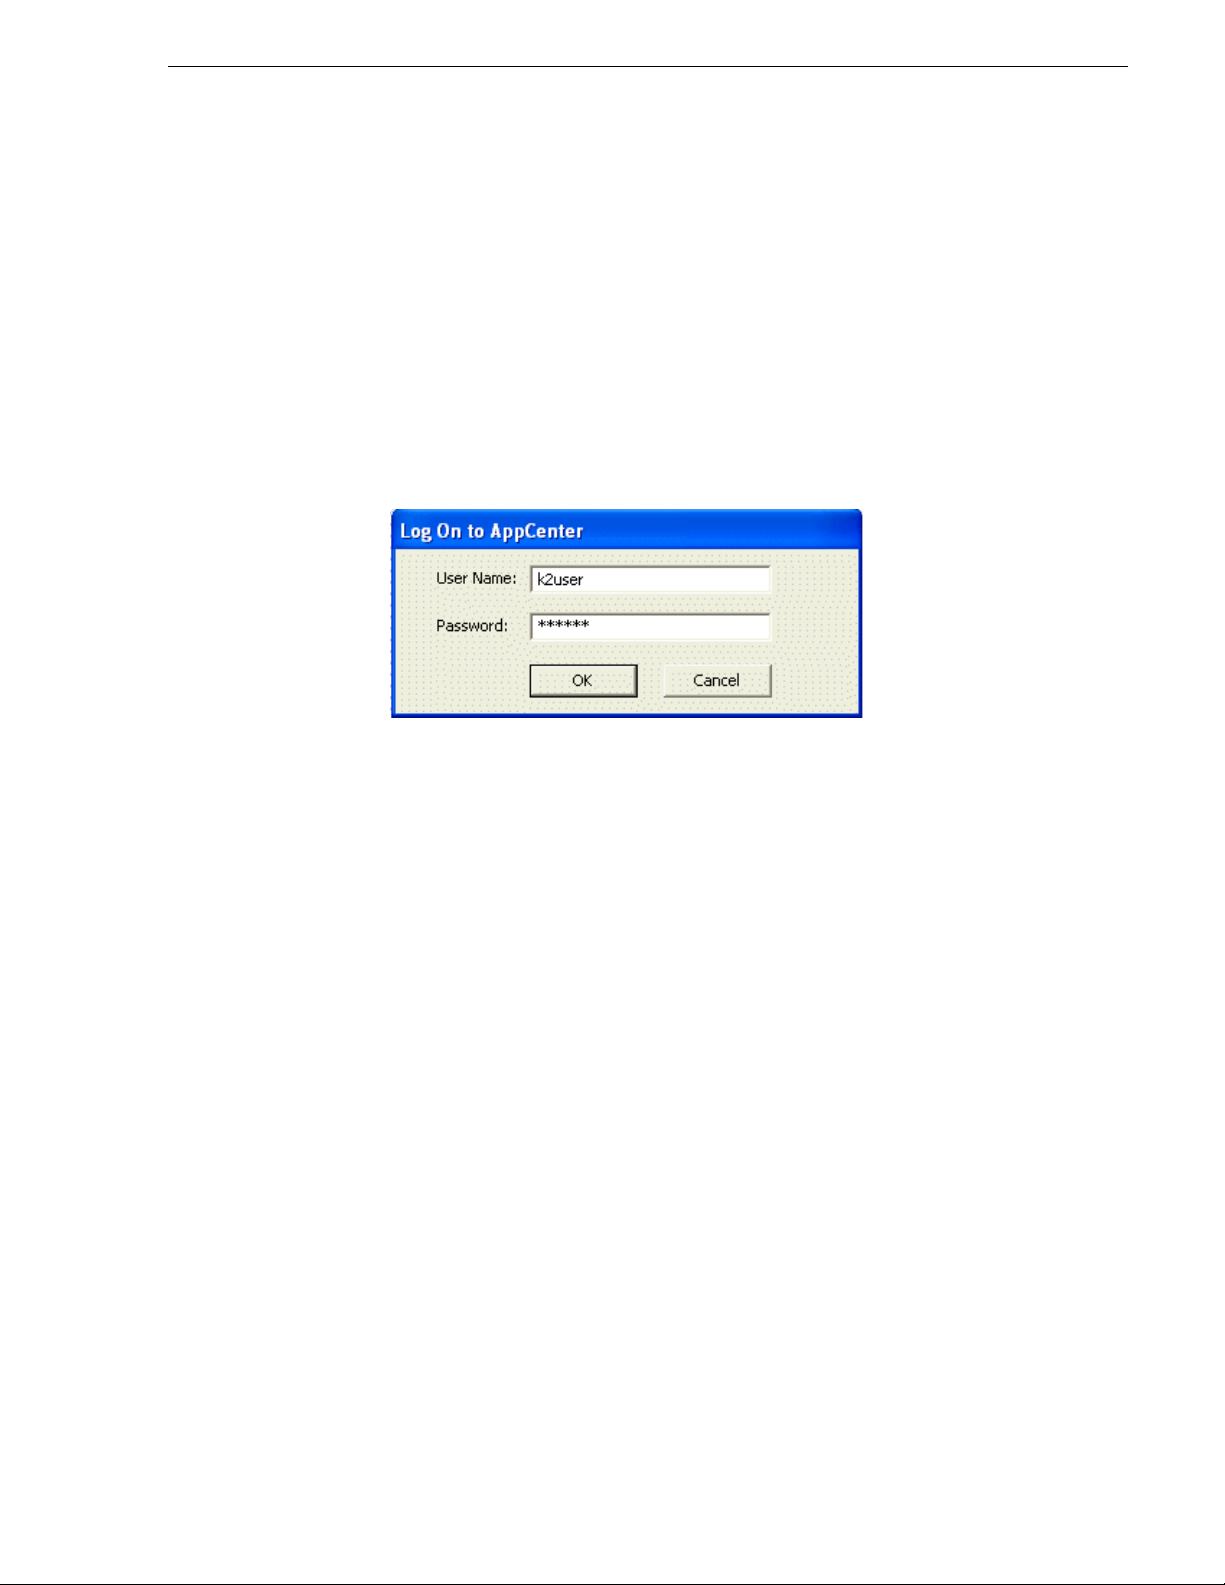
Logging on to AppCenter
The first time you start AppCenter, a Log on dialog box displays. Enter your user
name and password.
NOTE: Your domain configuration might require that you use the syntax of machine
name\user name. For example, if you have difficulty logging on to a K2 Summit
Production Client, try logging on as <K2 Summit Production Client>\K2User.
Once you have logged in, the Suite Properties dialog box displays.
Configuring a channel suite
You need to configure the channel suite before you can use it. To configure a channel
suite, specify the K2 source that you want to use and add its channels to a channel
suite. You can add channels from several sources to one channel suite, with a
maximum of 16 channels in one channel suite.
To configure the channel suite, follow these steps:
1. At the blank Suite Properties dialog box, click the
dialog box displays.
2. Enter the K2 Summit Production Client host name or IP address.
3. Click
OK. A second Add Channel dialog box displays, listing the channels on the
specified K2 Summit Production Client.
4. Select the channels you want in your channel suite and click
5. Review the changes you have made to the Suite Properties dialog box and click
Once you have saved the changes to the channel suite, you can modify the channel
suite’s name and location or rename or reorganize the channels. Descriptive channel
names are especially helpful when using a channel suite with channels from multiple
sources.
Add button. An Add Channel
OK.
OK.
05 April 2010 K2 AppCenter User Manual 23
Page 24

Chapter 2 Getting Started
For more information on managing channels, see “Managing channel suites” on
page 148.
Starting AppCenter after creating a channel suite
For subsequent AppCenter startups using a Control Point PC, AppCenter will attempt
to start by opening the last-used channel suite. If you have deleted or moved the
last-used channel suite, you need to create a new channel suite or cancel the Channel
Suite Properties dialog box and open the channel suite you want to use.
If you are running AppCenter with a Control Point PC, AppCenter opens with the
last-used channel suite. To change the channel suite, select
System | New Suite. To open one of the four last-used channel suites, select System |
Recent Suites
directory in XML format. For more information on managing channel suites, see
“Managing channel suites” on page 148.
If one of the channels is not available, the title bar for that channel will display its
state, for example: “In Use”, “Disconnected”, and so on. For information on different
channel states, see“Using channel suites” on page 147.
AppCenter startup errors
System | Open Suite or
. Channel suites are saved by default in the C:\Profile\ChannelSuites
If you start AppCenter and the K2 system is not running, or your login information is
not correct, you will see a Startup Error message.
The following table describes the two most common startup error messages.
Startup Error Description
Log on failed Your user name or password is not valid for this K2 system.
Remember that the password is case sensitive.
Ignore to view the AppCenter channels. If working
• Click
remotely, you will see the channels from the last-used channel
suite. Or,
Retry to enter the login information again. Or,
• Click
• Click
Abort. If you are accessing AppCenter through a
Abort lets you try to
<K2 Summit
Production
Client>: <error>
network-connected Control Point PC,
create a new channel suite. If you are accessing AppCenter
locally, it lets you exit to Windows.
For assistance with your user name or password, consult your
Windows administrator.
The K2 system might be offline or have had difficulty with the start
up checks. There are various reasons why AppCenter is having
difficulty connecting to the K2 system; for example, the error might
say there is no file system or that the K2 system has been taken
offline for maintenance.
• Verify that the host name or IP address is correct and see if you
can correct the problem.
• If working locally, reboot the K2 Summit Production Client.
• If working from a network-connected Control Point PC, select
System | Reconnect from the AppCenter System menu.
24 K2 AppCenter User Manual 05 April 2010
Page 25

Locking AppCenter
You can lock the AppCenter interface so that keyboard and mouse input is disabled.
You can do this on both local AppCenter running on a K2 system and remote
AppCenter running on a Control Point PC.
To lock AppCenter, do the following:
Locking AppCenter
1. Click
System | Lock AppCenter. The Lock AppCenter dialog box appears.
All keyboard and mouse input to AppCenter is now disabled. The Lock AppCenter
dialog box remains on the screen as an indicator that AppCenter is locked.
To unlock AppCenter, do the following:
1. On the Lock AppCenter dialog box, click
AppCenter?” click
Yes.
The Lock AppCenter dialog box closes. Keyboard and mouse input to AppCenter is
now enabled.
Shutting down AppCenter
To shut down AppCenter, do one of the following:
• Click the standard Windows
• Select
System | Shutdown. The Shutdown dialog box opens.
Shutting down AppCenter
When you shut down AppCenter, you have the following options.
Shutdown Mode Description
Exit to Windows Exit AppCenter and display the Windows desktop.
X button in the title bar, or
If shutting down AppCenter from a Control Point
PC, close the channel suite and display the
Windows desktop. If you select this option, a
second dialog box displays asking you to confirm
that you want to exit, since any applications that
are running (including remote protocols) will be
stopped.
Use the desktop shortcut to restart AppCenter.
Unlock and when prompted “…unlock
Suspend channel suite Exit AppCenter and display the Windows desktop.
Applications and remote protocols in suspended
channel suites keep running. Channels may be
commandeered by another user using another
Control Point PC. If all channels in a suspended
channel suite are taken over in this manner, the
channel suite is shut down. For more information,
see “Sharing channels with other users” on
page 149.
If you want to shut down the current channel suite
but keep AppCenter running, you can open or
create a channel suite in the System menu.
Use the desktop shortcut to restart AppCenter.
05 April 2010 K2 AppCenter User Manual 25
Page 26

Chapter 2 Getting Started
Shutdown Mode Description
Restart Exit AppCenter and restart the Windows operating
Shut Down Shut down the Windows operating system and
NOTE: If you shut AppCenter down locally, you must re-start it locally.
NOTE: If you shut down AppCenter from a network-connected Control Point PC, the
K2 system is still running and can be accessed locally or from another
network-connected Control Point PC.
Configuration Manager
Configuration Manager is the primary configuration tool for the K2 Summit
Production Client and K2 Solo Media Server. It allows you to make settings that apply
to the overall K2 Summit client as well as settings that apply to individual channels,
as summarized in the following table.
system.
power-off the K2 Summit Production Client or K2
Solo Media Server.
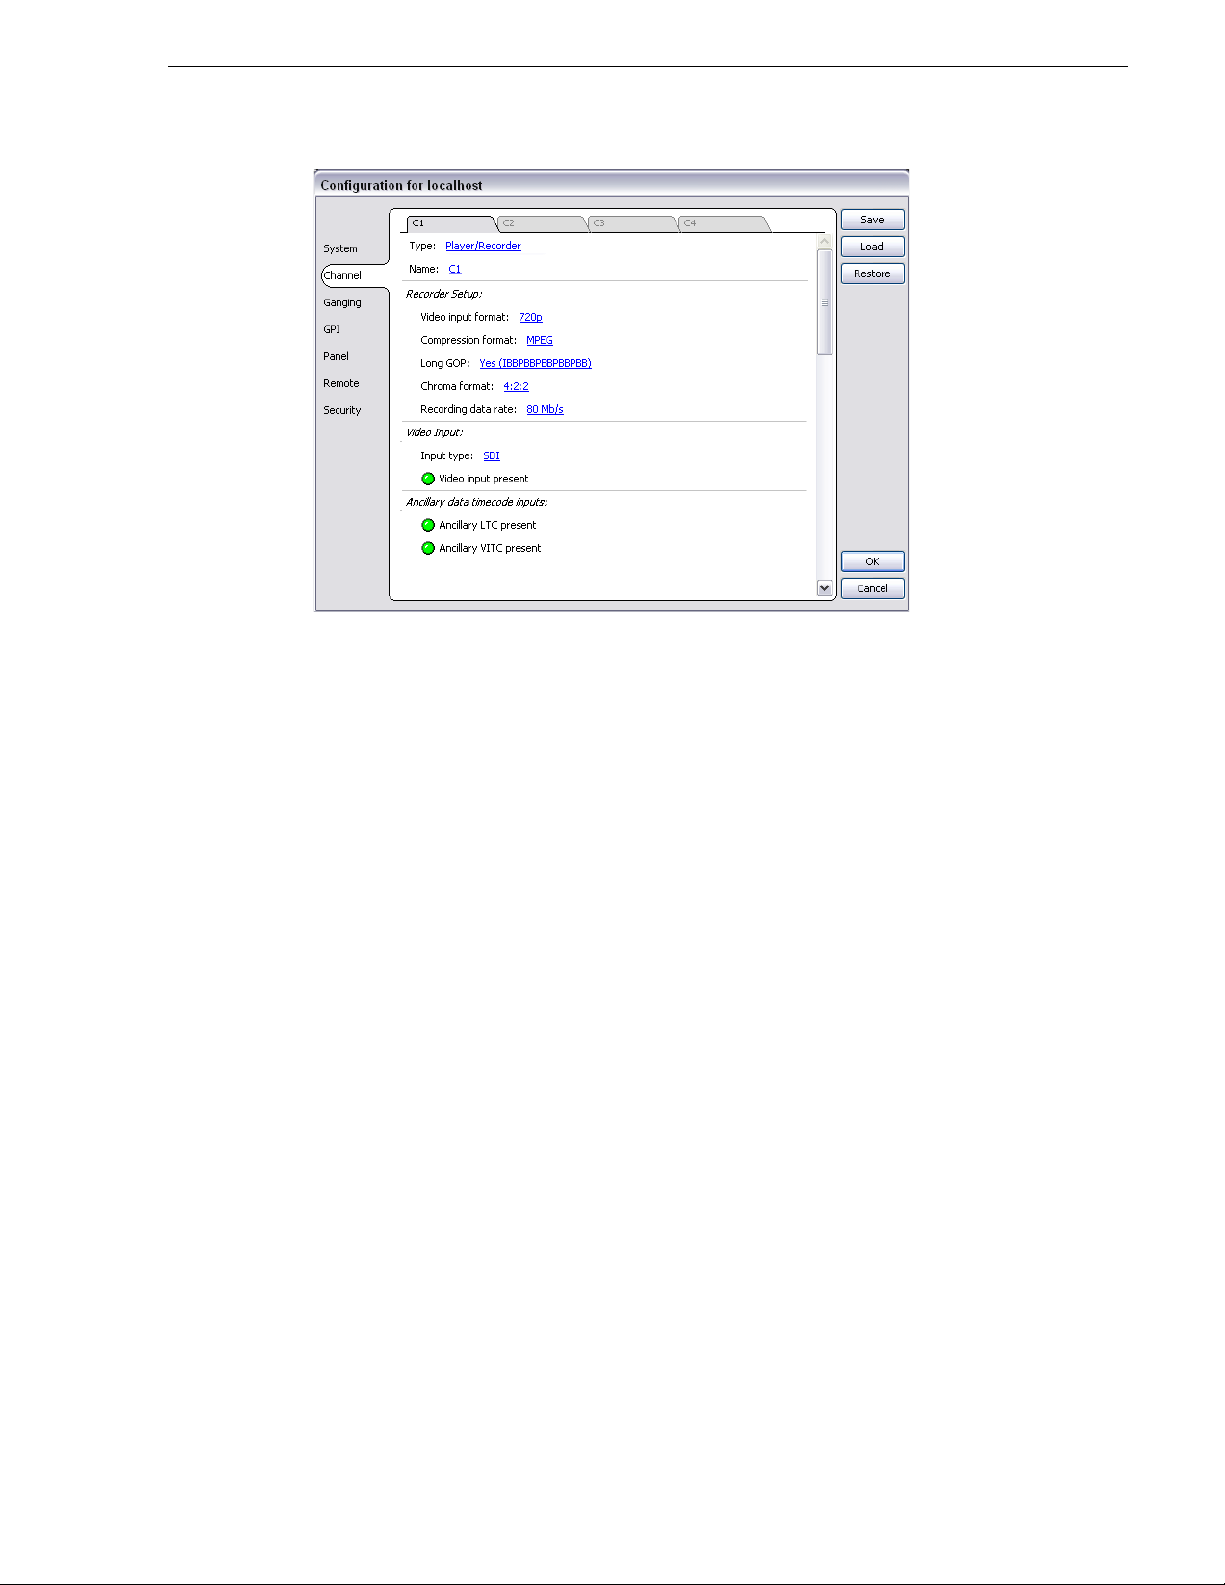
Configuration Tab Description
System Configure the video reference and the timecode input. Note that choices made
on this tab might affect options offered on other tabs. For example, if you
designate the video reference standard to be NTSC, you do not see any options
for PAL on the Channel tab.
Channel Configure the audio and video inputs and outputs on record and play channels.
Ganging Configure channels to play or record together. Refer to “Channel Ganging and
Track Mapping” on page 173.
GPI Make settings for your GPI triggers. Refer to “GPI and other configurations” on
page 165.
Panel Set play speed options.
Remote Manage other systems as remote hosts for importing or exporting media. Refer
to K2 System Guide.
Security Set permission levels for media access. Refer to K2 System Guide.
Opening and closing Configuration Manager
1. If you are accessing a K2 system from a Control Point PC with a channel suite that
has channels from multiple sources, select a channel from the K2 system that you
want to configure before opening Configuration Manager.
2. On the AppCenter menu bar, click
opens.
System | Configuration. Configuration Manager
NOTE: If the
System | Configuration menu option is grayed out, review your level of
user access. For more information, see “Types of K2 users” on page 22.
26 K2 AppCenter User Manual 05 April 2010
Page 27
Saving and restoring configuration settings
3. Select buttons, tabs, and links to find and make settings. Use the scroll button when
the list of settings extends below the area displayed.
4. Close Configuration Manager as follows:
• To apply changes, complete all your modifications on all Configuration
Manager screens, then select
• To discard changes, select
exit, select
Yes.
OK.
Cancel. When prompted to discard the changes and
• If desired, save settings as a file, as explained in the next section “Saving and
restoring configuration settings”.
Saving and restoring configuration settings
You can save settings as configuration files. Configuration files are generated by the
Configuration Manager application as stand-alone XML files. You can save settings
out of Configuration Manager into a configuration file. Likewise, you can load
settings into Configuration Manager from a configuration file.
You can use configuration files as a means to back up your settings. You can also use
configuration files to save several different groups of customized settings, each with
a unique name, so that you can quickly load settings for specialized applications.
You can also restore all the settings in Configuration Manager to their default settings,
which returns the K2 system to its initial factory configuration.
05 April 2010 K2 AppCenter User Manual 27
Page 28

Chapter 2 Getting Started
The following table summarizes these operations. Use these operations with care, as
each one affects all Configuration Manager settings with a single operation.
In Configuration
Manager, select
this item… To do the following…
Save
Load
Restore
Monitoring applications
Status bar
The status bar displays information about the state of the delegated channel as well as
low-level error messages. (High priority error messages are displayed in pop-up
windows.) The status bar is located just above the Start button.
This dialog box allows you to save a configuration XML file on the K2
Summit Production Client or the K2 Solo Media Server’s Windows file
system.
This dialog box allows you to restore configuration settings from an XML
file on the K2 Summit Production Client or K2 Solo Media Server’s
Windows file system.
Returns all configuration settings to their default values.
If you select a channel, a status message appears on the left-hand side of the status bar.
If a potential error arises while an application is running in a channel, a status message
flashes briefly on the left-hand side of the status bar, and an icon (such as the
triangular Alert icon) displays on the right-hand side. Double click on the icon to open
the status pane to view a more detailed message about the channel’s status.
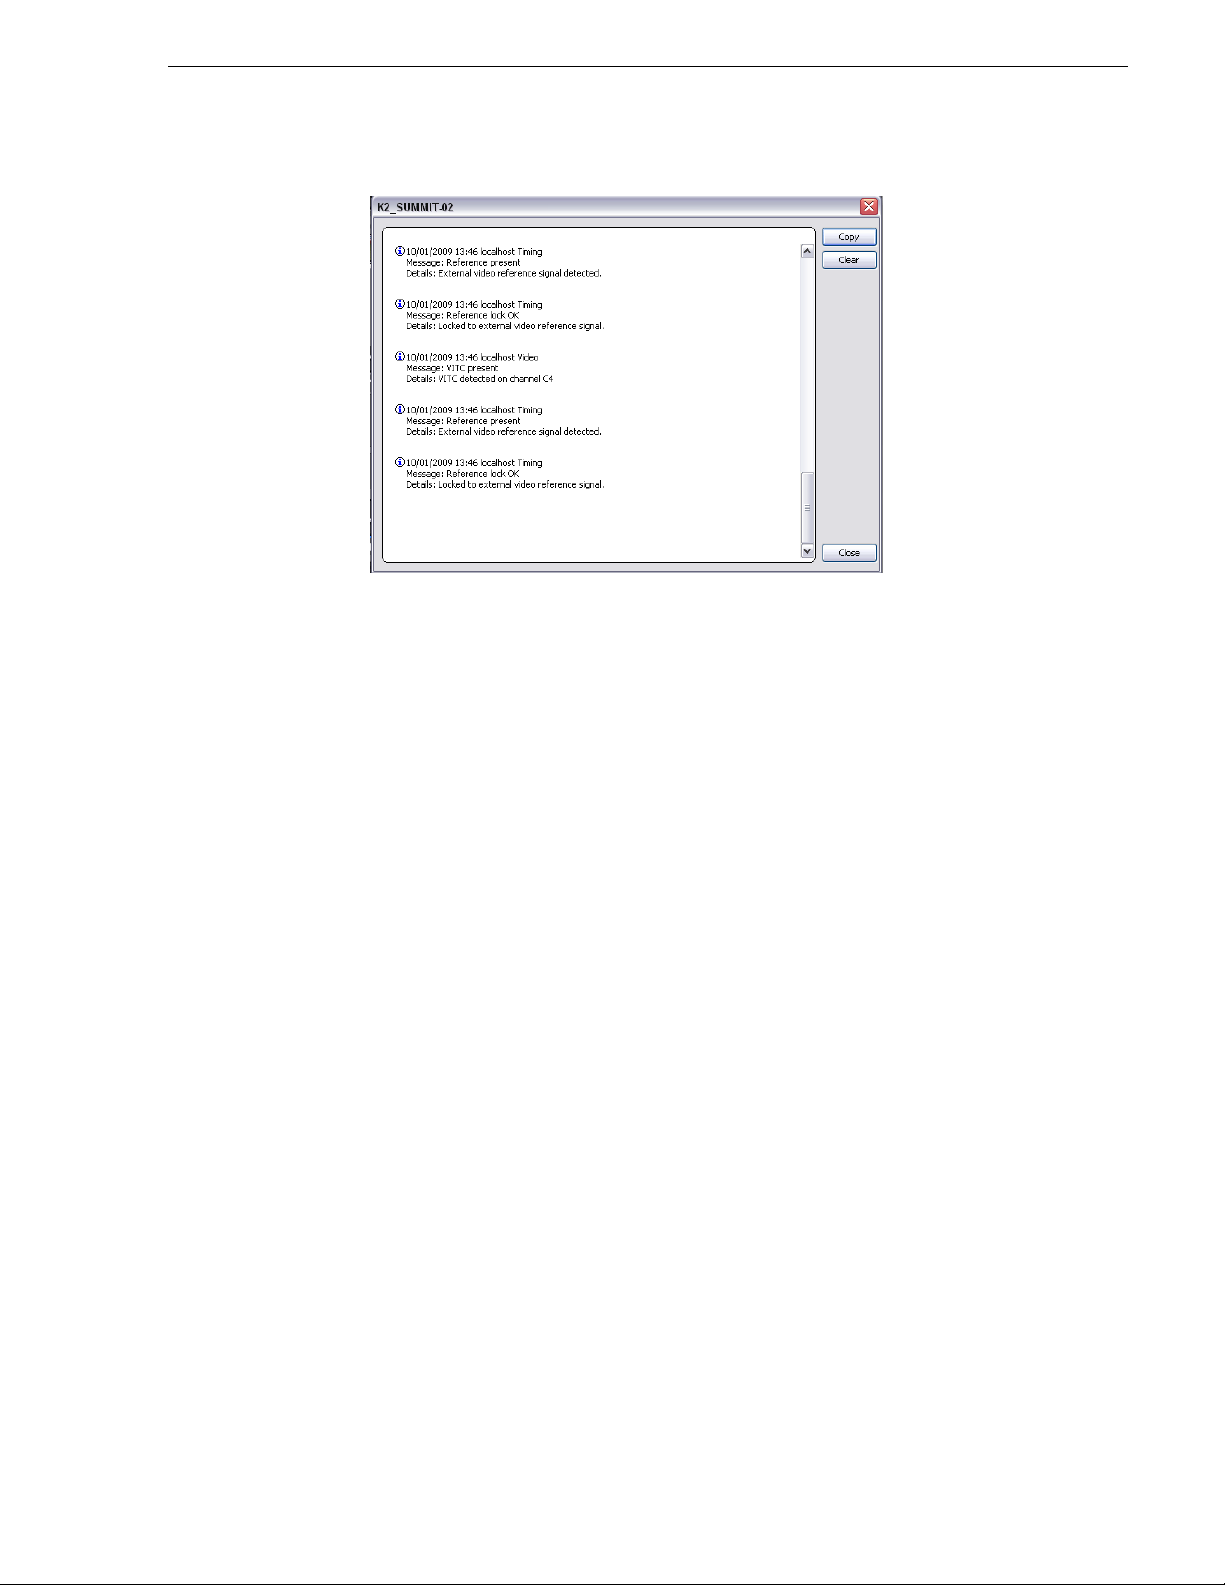
Status pane
The system status pane displays general information such as the video and audio
settings on the channels. To check the system status, select
system status pane displays. For help troubleshooting any potential error messages,
refer to the service manual for your K2 product.
Help | System Status. The
28 K2 AppCenter User Manual 05 April 2010
Page 29
Export Logs
NOTE: If the Clear button is grayed out, you do not have the necessary privileges to
perform this action. For more information on access privileges, see “Types of K2
users” on page 22.
Export Logs
The log files includes all applications messages, Status pane logs, and messages
related to managing the media file system. The exported log files can be sent to Grass
Valley product support, where they can be examined to analyze the operation of your
K2 System.
Exporting logs from AppCenter
To export a log while you are using AppCenter, select
destination where you want to export the log, and click the radio button next to
logs
.
Exporting logs from the Start menu
To export a log when you are not using AppCenter, click the
Programs list, select
All logs, and choose the destination where you want to export the log.
to
Programs | Grass Valley| Expo rt logs. Click the radio button next
Storage Utility
Storage Utility is your primary access to the media file system and media disks of the
K2 Summit Production Client for configuration, maintenance, and repair. There are
two versions of Storage Utility:
• Storage Utility for internal storage K2 Summit client or K2 Solo Media Server
System | Export Log, choose the
All
Start button. From the
• Storage Utility for the K2 SAN.
NOTE: If the
System | Storage Utility menu option is grayed out, or you are unable to
log in by clicking on the desktop icon, review your level of user access. For more
information, see “Types of K2 users” on page 22.
05 April 2010 K2 AppCenter User Manual 29
Page 30

Chapter 2 Getting Started
Accessing Storage Utility
Grass Valley strongly recommends that you access Storage Utility by selecting
System | Storage Utility in AppCenter. However, if you are unable to access
AppCenter, then open Storage Utility by clicking on the Storage Utility desktop icon.
For Storage Utility procedures for internal storage, refer to K2 System Guide. Refer to
the K2 SAN Installation and Service Manual to learn about Storage Utility for the K2
storage system.
K2 System Configuration
CAUTION: Use the Storage Utility only as directed by a documented
procedure or by Grass Valley Support. If used improperly, the Storage
Utility can render your K2 system inoperable or result in the loss of all
your media.
The K2 System Configuration application is the primary tool for configuring the K2
storage system. Once the devices of the storage system have the required software
installed, are cabled, and are communicating on the control network, a K2
administrator can do all the configuration required to create a working K2 storage
system using the K2 System Configuration application.
The K2 System Configuration application runs on a Control Point PC and accesses
the devices of the K2 storage system via the control network. For more information
on administering the K2 System Configuration application, see K2 SAN Installation
and Service Manual.
SiteConfig
ProductFrame is an integrated platform of tools and product distribution processes for
system installation and configuration. SiteConfig is a ProductFrame application and
it is the recommended tool for network configuration and software deployment.
You can use SiteConfig as a stand-alone tool for planning and system design, even
before you have any devices installed or cabled. You can define networks, IP
addresses, hostnames, interfaces, and other network parameters. You can add devices,
group devices, and modify device roles in the system. For more information on
SiteConfig, see the SiteConfig User Manual.
30 K2 AppCenter User Manual 05 April 2010
Page 31

Chapter 3
Using AppCenter
Topics in this section include:
• “About AppCenter” on page 32
• “AppCenter user interface overview” on page 32
• “Tools in AppCenter” on page 34
• “Conventions used in the AppCenter interface” on page 36
• “Channels overview” on page 38
• “Channel suites” on page 38
• “Using remote protocols” on page 40
05 April 2010 K2 AppCenter User Manual 31
Page 32

Chapter 3 Using AppCenter
About AppCenter
AppCenter is the built-in video disk recorder and player application that provides a
single interface for tasks such as channel control, configuration, clip management,
media transfers, channel monitoring, and system monitoring.
You can access AppCenter using a network-connected PC with Control Point
software or you can access it by connecting a VGA monitor, mouse, and keyboard to
the K2 Summit Production Client or K2 Solo Media Server. To support live video, the
VGA resolution must be 1024 x 768 x 32 or greater to support live (moving) video
monitoring. If the monitor resolution is not adequate, AppCenter might limit the
number of visible channels to three or less.
NOTE: If you are using the optional K2 TimeDelay application, see the K2
TimeDelay online help for information on using TimeDelay with AppCenter.
AppCenter user interface overv iew
32 K2 AppCenter User Manual 05 April 2010
Page 33

Main components in the AppCenter user interface
The following table describes the main components in the AppCenter window
AppCenter Component Description
Monitor pane Displays the current information for the channel. Displays a thumbnail of
the clip currently loaded in the channel and indicates the current control
application for the channel. Shows EE or playback video. Contains a drop
down menu for changing the channel’s application. For the currently
selected channel, the monitor pane has a white background.
Channel pane Displays each channel in its current application. Only one channel can be
selected at a time. The currently selected channel is displayed with a white
background.
Clips pane Displays media stored on the K2 system and provides controls for media
management.
Status Bar Displays status and error messages, and includes tool buttons for opening
Transfer Monitor, StatusPane, or the Protocol Monitor dialog box.
Playing channels in multi-view screen
Select View | Video Monitor to fill the entire screen with a view of all four channels’
monitor panes. This is useful when you want to monitor video from several different
channels simultaneously.
AppCenter user interface overview
The VGA resolution must be at least 1024 x 768 x 32 to support live video. The
multi-view video monitor option is only available on a local K2 Summit client; it is
not accessible from a PC running Control Point software. It requires the Grass Valley
AppCenter Pro application, which is separately licensed from the AppCenter
application. For more information, consult your Grass Valley representative. Also
refer to “Displaying Super Out information on output/monitor” on page 78.
05 April 2010 K2 AppCenter User Manual 33
Page 34

Chapter 3 Using AppCenter
Playing the channel pane in full screen
Select V iew | Full screen to fill the entire channel pane with only the selected channel.
This is useful when you need more room to display information, such as a long series
of clips in the text view of the player application.
To return to split screen, select
a scrollbar appears on the left side of the pane. Scrolling in the channel monitor pane
also applies to the control applications when viewed in Split Screen mode.
Tools in AppCenter
AppCenter includes the following tools for managing the K2 system and its assets.
Tools User Interface Essentials Tasks
Configuration
Manager
View | Split screen. If all channels cannot be displayed,
Configuring system
settings
34 K2 AppCenter User Manual 05 April 2010
Page 35

Tools in AppCenter
Tools User Interface Essentials Tasks
Transfer Monitor Monitoring media
transfers, including
network transfers and file
import/export
Online Help Complete documentation
of operational tasks
05 April 2010 K2 AppCenter User Manual 35
Page 36

Chapter 3 Using AppCenter
Drop-down List
1
View Tabs
3
Eject Button
4
5
Timecode
6
Text Entry Control
2
Context Menu
Meter bar Button
7
Assignable
Buttons
8
Entry Controls
Control Cue
Conventions used in the AppCenter interface
The following table describes the graphical conventions used for the user controls in
the AppCenter interface. These graphical elements are used throughout the interface
to indicate such items as drop-down lists and text entry controls.
Convention Graphical Description and User Action
1
Drop-down list A horizontal line and arrowhead. Select and choose from a list of items in the
drop-down list.
2
Context Menu This menu changes depending on the application of the selected channel:
player/recorder or playlist.
3
Text Entry Control A horizontal line and small dot. Select to open the text entry dialog box.
4
Eject Button Select to eject the current clip
5
View Tabs Select one tab or the other to toggle between different views in Player
application or in Playlist application.
36 K2 AppCenter User Manual 05 April 2010
Page 37

Convention Graphical Description and User Action
6
Timecode Entry
Control
7
Meter bar Button Select to toggle between the Meter bar and the application interface. The
8
Assignable Button
Groups
A horizontal line and small dot. Select to open the timecode entry dialog box.
Meter bar contains audio meters, and the audio level controls.
Some button groups are assignable. Holding down a button opens a pop-up
menu that lists the alternative button choices. This allows you to customize
the user interface to suit your workflow.
Terms and concepts used in AppCenter
Assignable buttons – Some buttons are assignable, meaning you can change the
order that buttons appear in some button groups to better suit your workflow. Holding
down the left mouse button on an assignable button causes a pop-menu to appear that
lists the alternative button choices for that button.
Terms and concepts used in AppCenter
Bin – A bin is a container used to organize assets like clips and lists in the same way
as directories or folders are used on a typical computer system. Bins can be nested
inside other bins. A bin is associated with a single disk volume.
Channel application – Channels in AppCenter are always in one application or
another. Each application has its own set of buttons, lists, controls, and other
characteristics, relative to the operations performed in that application. The name of
the application for the channel is displayed in the channel’s monitor pane, which is
also where you can change the application for the channel.
Clip thumbnail – Used for visual identification of a clip. By default, the thumbnail
is generated from the 16th frame of video. You can select a new thumbnail using
Player. If no thumbnail is available, an icon is displayed showing there is no
thumbnail.
Current Bin – The current bin functions as the target bin when recording clips or
creating playlists. It is also the source bin used to load clips and lists.
Selected channel – There is always one channel that is selected. When a channel is
selected, the channel is displayed with a blue outline around the channel pane. The
monitor pane has a red outline if recording and a green outline if playing a clip or
playlist; if selected while the channel is inactive, the monitor pane is also outlined in
blue. The keyboard is delegated to controlling the selected channel. To select the
channel either select a channel in the monitor pane or press a keyboard shortcut.
Changing the channel selection does not disrupt other channels, they continue to
operate in the background.
05 April 2010 K2 AppCenter User Manual 37
Page 38

Chapter 3 Using AppCenter
Storage – The term “Storage” is used to refer to external, shared storage. Storage that
is used with stand-alone K2 Summit Production Clients will be specifically
designated as “internal storage” or as “direct connect” storage, which is storage
directly attached to the stand-alone.
Timecode – Timecode is displayed in hours:minutes:seconds:frames. However, the
timecode syntax differs based on whether the video is drop frame or non-drop frame.
Non-drop frame
First Field Second Fi e ld
. (period) : (colon)
Drop frame
For example, in drop frame timecode, a clip could start on 01:15:00,04 and end on
01:15:00;09.
Volume – The set of media drives that functions as a single physical disk.
Channels overview
A channel is a set of resources that together have the capability to record or play
media. AppCenter channels have applications for performing tasks such as recording
or playing. When AppCenter starts, each channel comes up in an application. There
is always one channel selected in AppCenter. The title bar displays the selected
channel’s name and the control application running on it.
When a channel is selected, the control application that is using that channel is the
active control application. To select a channel, click on the channel monitor pane or
click the control application in the control applications pane. The selected channel can
receive input from the keyboard. Selecting a channel does not affect processing on
any of the other channels, which operate in the background.
In a channel suite, you can name a channel or change the order in which the channels
appear in the AppCenter window. For more information on renaming or rearranging
channels, see “Managing channel suites” on page 148.
Administrators can set user permissions for each channel. Depending on your security
settings, you could be denied permission to operate a channel. For more information,
see the K2 System Guide.
, (comma) ; (semicolon)
Channel suites
A channel suite is a collection of channels. If you are using AppCenter through a
network-connected PC with Control Point software, the channels are accessed
through a channel suite. Channel suites allow you to customize the channels to run
particular applications or save the clips to specific locations. You can add channels
from different sources to one channel suite. Each channel suite can have up to 16
channels. For more information on channel suites, see “Using channel suites” on
page 147.
NOTE: If you are running a K2 Summit Production Client or K2 Solo Media Server
locally, you cannot use channel suites. You can only use the channels on that K2
system.
38 K2 AppCenter User Manual 05 April 2010
Page 39

Channels in AppCenter
In AppCenter, the channels are labeled C1, C2, C3, C4 (for K2 Summit Production
Clients) or C1 and C2 (for K2 Solo Media Servers). Each channel is bi-directional,
that is, you can designate the channel to any application available on the system. Once
you designate a channel to run a specific application, the channel remains the
designated application until you change it. You can change the channel’s application
in the Channel monitor. ChannelFlex Suite functionality is configured in
Configuration Manager.
The K2 system is configured so that it can accept standard video input formats as well
as HD video input formats of 720p or 1080i.
Channel applications overview
AppCenter channels have applications for performing essential tasks. When
AppCenter starts, each channel comes up in its last used application. You can change
the channel application.
Selecting a channel application
To change channel applications, in the monitor pane, select the channel application
drop-down list for the channel, then choose an application.
Channels in AppCenter
The selected application replaces the current application and appears in the channel’s
space in the channel pane. The channel becomes the selected channel.
Available channel applications
AppCenter provides standard Playlist and Player/Recorder applications to run on a
channel without any special licensing. If licensed, TimeDelay and Event Monitor
applications are also available. ChannelFlex Suite functionality requires the
AppCenter Elite license and is configured in Configuration Manager.
Remote protocol applications are configured on each channel under
Standard remote protocol applications are AMP, BVW, VDCP. The Event Scheduler
license enables the Event Monitor application.
Related topics:
“Selecting a channel application” on page 39
“Guide to using the Recorder/Player application: Control view” on page 46
“Guide to using the Recorder/Player application: Cue view” on page 48
“Guide to using Player: Control view” on page 63
“Guide to using Player: Cue view” on page 66
“Guide to using Playlist application” on page 85
“Configuring a channel for remote control” on page 41
Control | Options.
Using on-screen transport controls
When a channel is selected, the on-screen transport controls appear. All standard
channel applications have on-screen transport controls.
05 April 2010 K2 AppCenter User Manual 39
Page 40

Chapter 3 Using AppCenter
Cue to mark-out
Frame Advance
(Single click to
advance one frame.)
Cue to mark-in
Frame Reverse
(Single click to
reverse one frame.)
Record
Fast
ForwardStop
Rewind
Play
Progress Bar
Using remote protocols
You can control AppCenter using remote control devices and applications software
developed for the K2 system that use industry-standard serial or Ethernet control
protocols. You can enable remote control mode from AppCenter.
This section is divided into the following topics:
• “About remote control and supported protocols” on page 40
• “Configuring a channel for remote control” on page 41
About remote control and supported protocols
The following table shows the remote control protocols supported:
Supported
Protocols
AMP Advanced Media Protocol (AMP) - AMP is an extension of the Odetics
BVW BVW Protocol - supports standard set of commands used for VTR machine
VDCP Video Disk Control Protocol
Event Scheduler Must have Event Scheduler (Sabretooth) license installed
This section is divided into the following topics:
• “About AMP protocol support” on page 40
• “About BVW protocol support” on page 41
• “About VDCP protocol support” on page 41
• “About Event Scheduler support” on page 41
About AMP protocol support
You can use Advanced Media Protocol (AMP) to control AppCenter record and play
channels. This protocol is an extension of the Odetics protocol. External control
devices can be connected via rear panel RS-422 serial connectors or an Ethernet
network connection. AMP player supports the use of a two-head model in that two
clips are loaded simultaneously. Refer to the K2 System Guide for details.
Comments
protocol.
control. BVW Insert Edit, used by most edit control panels, is not supported.
40 K2 AppCenter User Manual 05 April 2010
Page 41

About BVW protocol support
You can use BVW protocol to control AppCenter record and play channels. External
control devices can be connected via rear panel RS-422 serial connectors. (Ethernet
is not available for BVW.) The K2 system supports a standard set of BVW commands
used for VTR machine control. BVW Insert Edit, used by some edit control panels, is
not supported.
About VDCP protocol support
You can use the Video Disk Control Protocol (VDCP) to control AppCenter record
and play channels. External control devices can be connected via rear panel RS-422
serial port connectors. (Ethernet is not available for VDCP.) VDCP player supports
the use of a two-head model in that two clips are loaded simultaneously. Refer to the
K2 System Guide for details.
NOTE: If you use VDCP remote protocol to perform video network transfers, you
must set up the video network and the Controller ID as described in the K2 System
Guide.
About Event Scheduler support
When licensed for Event Scheduler, the Event Monitor application is available. This
application is a monitor-only application that displays the list of events scheduled in
Event Server for a channel. The events must be scheduled by another application.
Configuring a channel for remote control
Indicators and controls in Event Monitor are as follows:
black text For an event whose time has passed (above the time cursor), this event has
completed successfully. For an event in the future (below the time cursor), this
event is not yet scheduled or pending.
red text An error occurred when processing this event.
dashed red line This is displayed over the event that is in progress.
blue text This event is pending, on the timeline and ready to begin at the specified time.
expand/contract icon This icon is displayed beside absolute events in the list. Use it to hide or show
the events after it.
Configuring a channel for remote control
You can configure a channel for remote control either locally or through a
network-connected Control Point PC. Operating remote control from AppCenter
provides extended features that allow local and remote control at the same time.
You can select a remote protocol to use with individual channels.
To modify the remote protocol setting for a channel:
1. Click on the channel whose protocol you want to specify.
2. Select
Control | Options. The Options dialog box displays.
3. If it is not already displayed, select the
4. Select the desired protocol and remote settings, and click
05 April 2010 K2 AppCenter User Manual 41
Control tab.
OK. If using VDCP
Page 42

Chapter 3 Using AppCenter
protocol to perform video network transfers, you must set up the video network and
the Controller ID. Refer to the K2 System Guide.
NOTE: The protocol control port is pre-set and cannot be modified.
5. Test the system and recheck settings, if required.
Protocol Mode Description
Local only Allows you to monitor the record or play channel
Remote only Allows you to monitor the record or play channel
Local and Remote Allows you to control the record or play channel
operations and view clip information locally only.
There is no control from any external device.
operations and view clip information only using
remote protocol. All control comes from the
external device. The buttons, menu items, and
other interface controls are disabled. You can
select this mode by choosing the
option in the Options dialog box
locally as well as remotely. You can select this
mode by choosing
Options dialog box.
Remote and Local in the
Remote only
42 K2 AppCenter User Manual 05 April 2010
Page 43

Chapter 4
Recording clips
The Player/Recorder application records clips in AppCenter. You can play the clip
while it is still recording, or you can finish the recording, and then play the clip or add
it to a playlist. In addition to recording clips, you can add cue points to clips and create
new sub clips.
This chapter includes the following topics:
• “About recording clips” on page 44
• “About continuous record mode” on page 44
• “Guide to using the Recorder/Player application: Control view” on page 46
• “Guide to using the Recorder/Player application: Cue view” on page 48
• “Before you record: Recorder settings checklist” on page 50
• “To record a clip” on page 51
• “Previewing a clip that is recording” on page 53
• “Using cue points while recording” on page 54
• “Changing the timecode source” on page 55
• “Selecting widescreen mode” on page 56
• “Changing the current bin” on page 56
• “Renaming a clip” on page 57
• “Viewing clip properties” on page 57
• “Locating a clip” on page 58
• “Displaying available storage space” on page 58
05 April 2010 K2 AppCenter User Manual 43
Page 44

Chapter 4 Recording clips
About recording clips
The Player/Recorder application requires a player/recorder channel. The application
has two views— Control view and Cue view. The Control view allows you to record
clips. The Cue view is used to add, remove, or rename cue points within a clip and
create new subclips.
Select record channel signal inputs – Before you start recording, you might need to
select video, audio, and timecode inputs.
Missing or intermittent timecode
• If VITC, LTC or ANC is the selected timecode source and the signal is missing,
the current timecode display shows XX:XX:XX:XX while the clip is being
recorded. After the recording has finished, the clip is automatically re-striped
starting from 0. Also, clips recorded without timecode will show no mark-in/
mark-out timecode after recording.
• When VITC or LTC is detected, but the signal is intermittent, the display shows
XX:XX:XX:XX any time the signal disappears. Clips with missing or intermittent
timecode will show this behavior during playback in a play channel.
• If VITC or LTC is intermittent, try one of the following solutions:
• Use the internal timecode generator as the timecode source for recording.
• Stripe the timecode after the clip is recorded using the Recorder/Player
application.
Re-recording and appending clips is not supported through the AppCenter –
You cannot record over a previously recorded clip. To replace the unwanted clip,
delete it and record a new one. Also, appending to previously recorded clips is not
supported; once the recording is stopped, you cannot start the recording again using
the same clip. If a clip is currently loaded when record is selected, the clip is ejected,
and a new clip is created before recording begins.
NOTE: Appending to previously recorded clips is supported through AMP Serial
Control Protocol. Contact Grass Valley for more information on control devices
available.
No pre-roll time — Recording begins as soon as record is selected.
About continuous record mode
Continuous record allows you to specify a fixed-length recording that records
continuously. When the fixed length you specify is reached, AppCenter begins to
erase the oldest media in 3 minute segments to make room for new media. In this way,
new media is continuously recorded while the recording is kept to a fixed length. (For
very long continuous records, the segment size groups up to 15 minutes.)
The continuous recording is stored as a program. The program thumbnail is displayed
in the Clips pane immediately after the recording starts. While recording, you can load
the continuous record program in another Recorder/Player application for playout or
44 K2 AppCenter User Manual 05 April 2010
Page 45

to create subclips. The media referenced by the subclips that you create is saved
outside the continuous record program and does not subtract from the continuous
record length. The subclips can be inserted in a Playlist application as play events.
NOTE: A program, such as a playlist, cannot be saved in AVI format.
Continuous mode operational considerations
NOTE: For continuous record specifications, see “Operational Specifications” on
page 203.
Consider the following when planning for Continuous Record operation:
• Maximum continuous record length– Maximum record length is limited by the
amount of storage space and the compression settings used. If the fixed length you
enter exceeds the available disk space, the fixed length is automatically adjusted to
equal the available space.
• Modifying the continuous record name or length– You can modify the
continuous record name or length during record. If you reduce record length, the
oldest media outside the new record length is erased.
• Stopping continuous record– If the recording is stopped before the fixed length
is reached, the resulting program duration is the time elapsed since the recording
started. Like normal record mode, you cannot stop then start a continuous
recording. Once record is stopped, you must eject the program and create a new
continuous record.
About continuous record mode
• Transferring the continuous record program– The continuous record program
cannot be transferred to a file or networked device until record is stopped.
• Continuous record storage space is not reserved– Continuous record is allowed
to start as long as the record length you enter is less than the available storage;
however, the storage space is not reserved. For example, you could have enough
storage space to start the continuous record, but you are still allowed to transfer
media or otherwise fill disk space. Warning messages are displayed in the
AppCenter StatusBar when available storage reaches 10% total disk space. All
recording is halted when media storage reaches its full threshold.
• Pausing the continuous record program in Recorder/Player application– You
cannot pause the continuous record program in Recorder/Player application
indefinitely. Eventually, the record length is reached and the video at the current
position is erased. As this happens, the current position is advanced in 3 minute
increments as the oldest unused media is erased.
• Changing thumbnail image– Thumbnail images displayed in the Clips pane are
generated using the 16th frame of video. The thumbnail image for a continuous
record program appears as normal until the fixed length is reached. Then, the
thumbnail will update every 3 minutes as media is erased beginning with the oldest
unused media. As the media used to generate thumbnails is erased, new thumbnails
are generated.
• Erasing oldest media is suspended when creating a subclip– When creating
subclips in Player application, erasing oldest media is suspended when the first
mark is entered (mark-in or mark-out). This means that the continuous record
program length could grow larger than the length specified. Erasing media is
05 April 2010 K2 AppCenter User Manual 45
Page 46

Chapter 4 Recording clips
Timecode
Source
Meter Bar
Button
(Click to adjust
audio)
2
3
4
Clip Name &
Current Bin
(Click clip name
to rename clip.)
Length
(Click to enter
fixed length)
Time Dome
Assignable
Buttons
(Default buttons
are shown)
1
Loop
Thru
Mode
Current
Timecode
View
Tabs
5
8
Application
6
9
7
Channel
Flex
10
11
resumed and the oldest media outside the fixed length is purged when the second
mark is entered and you select the Accept button. You could inadvertently fill
storage space if you enter the subclip marks, but fail to click the Accept button.
NOTE: Erasing oldest media is also resumed when you exit subclip mode by
ejecting the subclip, or by clicking the Source Clip button.
• Use genlocked inputs for time delay– For error-free time delay operation, ensure
that the video input is genlocked to the video reference signal. This will eliminate
periodic picture shift.
Guide to using the Recorder/Player application: Control view
The following shows the basic controls in the Recorder/Player application found in
AppCenter, which uses the Player/Recorder application to record a clip. The Player/
Recorder channel is referred to as C1, C2, C3 or C4.
.
Control Description and User Operation
1
Assignable Buttons Assignable buttons allow you to modify the button assignments to
best suit your workflow. Hold down a button to open a pop-up menu
that lists the alternative button choices.
Load – Same as selecting Load on the Control menu.
New Clip– Same as selecting New Clip on the Control menu.
46 K2 AppCenter User Manual 05 April 2010
2
Current Timecode Indicates the current timecode of the timecode source selected for the
Properties – Same as selecting Properties on the Control menu.
Locate – Same as selecting Locate on the Control menu.
Options– Same as selecting Options on the Control menu.
channel. Text color is white during record, and dimmed at other
times. The timecode value of XX:XX:XX:XX is displayed when the
timecode source is not present or is invalid. See “Changing the
timecode source” on page 55.
Page 47

Guide to using the Recorder/Player application: Control view
Control Cue
Control Description and User Operation
3
Timecode Source The text displayed to the right of current timecode indicates the
timecode source. See “Changing the timecode source” on page 55.
4
Loop Thru Mode This text indicates if “E-to-E (LoopThru) mode” is selected. See
Record Menu below.
5
Clip Name Edit Control Displays the clip’s name and location in the media storage system. To
rename the clip, click and enter text. To change the current bin, i.e.
the target location for recording clips, refer to “Changing the current
bin” on page 56. You can use the Clips pane to manage and organize
clips.
6
View tabs These tabs toggle between Control view and Cue Points view.
7
ChannelFlex If the channel is configured to be a ChannelFlex type, it is displayed
in this area. ChannelFlex requires AppCenter Elite license.
8
Application A drop-down list allows you to select between none, Playlist, Player/
Recorder, or additional selections if licensed for AppCenter Elite. If
the Player/Recorder application is selected, you can play or record
using the pane controls.
9
Time Dome
Record
Progress
Available
Storage
Available
Storage and
Continuous
Record Mode
10
Length Select the Length control to enter the clip length, then choose record.
11
Meter bar button Displays the Meter bar, which contains the audio record level controls
This multi-function indicator displays either record progress only, or
available storage and record progress. The Time Dome also indicates
when the record channel is in Continuous Record mode.
Available storage is estimated using the amount of free disk space and
the video compression settings for the channel.
The record progress indicator makes one revolution every 10 seconds
in normal record, or one revolution during a fixed length recording.
To change the Time Dome function, right-click the Time Dome, then
choose an application from the pop-up menu.
Recording continues until you choose stop or the specified length is
reached.
and signal meters. Changes to the audio level are saved for the
channel.
05 April 2010 K2 AppCenter User Manual 47
Page 48

Chapter 4 Recording clips
Mark in /out
w
s
Control Description and User Operation
Recorder Control Menu Load Clip– Opens the Load Clip dialog box.
New Clip – Used to create and name clip prior to starting the
recording. If a clip is already loaded, selecting New Clip ejects the
current clip and creates a new one.
Schedule Start Time – Opens the Trigger At entry box so a start time
can be entered.
Locate – Locates the currently loaded clip in the Clips pane.
Properties – Opens the Properties dialog for the currently loaded
clip.
Auto Subclips– The auto subclip check box changes the way that the
subclip mode behaves. When it is NOT checked, clips have to be
accepted manually. When it is checked, a subclip will be created as
soon as you set a mark out.
Widescreen – Sets the channel for recording widescreen format.
(720p and 1080i clips are always recorded in widescreen, whether
this is selected or not.)
E-to-E (LoopThru) mode – When selected, the following occurs:
“EE” is displayed on the channel pane, next to the Timecode Source
indicator; when no clip is loaded, the signal that is currently present
at the channel input is passed through; when a record operation stops
the clip remains in the Recorder. The signal that is currently present
at the channel input passes through (video, audio, and timecode).
Guide to using the Recorder/Player application: Cue view
Assignab l e
1
Buttons
(Default buttons
are shown)
2
Current
Timecode
3
Cue List
Vie
4
Tab
48 K2 AppCenter User Manual 05 April 2010
Page 49

Guide to using the Recorder/Player application: Cue view
Control Cue
Control Description and User Operation
1
Assignable Buttons Assignable buttons allow you to modify the button assignments to
best suit your workflow. Hold down the left mouse button to open a
pop-up menu that lists the alternative button choices.
Add Cue – Used to add a cue to a recording:
1. In the Control view, start the recording.
2. Select the Cue tab.
3. At the desired timecode, select
Remove – Used to remove a cue.
Go To – Jumps to a selection, the next cue, or a specified timecode.
Rename – Used to rename a cue.
Create Clip – Creates a sub clip from highlighted cue points.
Create All – Creates sub clips from all cue points.
Cue selection - Jumps to the selection point and pauses.
2
Current Timecode Indicates the current timecode of the timecode source selected for the
channel. Text color is white during record, and dimmed at other
times. The timecode value of XX:XX:XX:XX is displayed when the
timecode source is not present or is invalid. See “Changing the
timecode source” on page 55.
3
Timecode Source Indicates the mark in, mark out, and cue points of the recording
session.
Control | Add Cue.
4
View tabs These tabs toggle between Control view and Cue Points view.
Recorder Cue View
Control Menu
In addition to commands described in the Assignable Buttons section,
the Control menu of the Cue view contains the following option:
E-to-E mode – When selected, the following occurs: “EE” is
displayed on the channel pane, next to the Timecode Source
indicator; when no clip is loaded, the signal that is currently present
at the channel input plays out; when a record operation stops the clip
remains in the Recorder. The signal that is currently present at the
channel input plays out.
05 April 2010 K2 AppCenter User Manual 49
Page 50

Chapter 4 Recording clips
Before you record: Recorder settings checklist
Before recording, check the following recorder channel settings.
Record Channel Setting Procedure
Verify video and audio input selection In the monitor pane, check the thumbnail and its
audio level indicators to verify the correct record
channel inputs are selected. If there is a problem,
correct the settings.
Verify video compression data rate
You can manage storage capacity and
video quality by adjusting the record
channel compression data rate. Generally
set as high as possible to obtain the storage
capacity needed.
Verify digital audio compression setting Under the System menu, click Configuration.
Verify the timecode source
Make sure to select a valid timecode
source. You can use the internal timecode
generator, VITC, or LTC.
Verify widescreen mode setting
This setting only applies to SD clips. If the
SD video source is in widescreen format,
select widescreen mode for the recorder.
This attribute is saved with the clip. (720p
and 1080i clips are always recorded in
widescreen, whether this is selected or
not.)
Adjust audio level (if needed)
You can use the audio leveling feature to
adjust the analog or digital audio input
levels, excluding dolby encoded digital
audio.
Under the System menu, click Configuration.
See “Changing the timecode source” on page 55.
In AppCenter main menu, select the desired Player/
Recorder channel, set the Control view tab, and select
Control | Options
widescreen mode.
NOTE: The clip aspect ratio cannot be changed
once the clip is recorded. If you want to change
the clip’s aspect ratio attribute you must
re-record the clip.
1. In the Recorder pane, select the
button.
| Widescreen 16:9 to toggle
Meter bar
2. Adjust audio level using the graphical faders.
Select the Meter bar button again to return to
Recorder view.
Verify audio monitor settings
You can select which audio channels to
monitor.
50 K2 AppCenter User Manual 05 April 2010
Control | Options and click the Audio tab.
Select
Page 51

Record Channel Setting Procedure
Verify working bin
The clip is recorded to the currently
configured working bin, regardless of the
bin currently displayed in the Clips pane.
Verify video compression settings
Choosing a video compression setting is a
trade-off between image quality and
storage capacity. Higher video quality
produces larger files which take up more
storage space and take longer to transfer to
external devices.
To record a clip
This section covers:
• “Using New Clip record mode” on page 51
• “Using Crash record mode” on page 51
• “Scheduling a recording” on page 52
To record a clip
Select Control | Options and click the Bin & AFD
tab.
System | Conf i guration to modify the video
Select
compression settings.
• “Using Fixed Length record mode” on page 52
• “Specify clip length after recording has begun” on page 52
• “Using continuous record” on page 53
Using New Clip record mode
To create and name a clip before recording starts:
1. Verify video, audio, widescreen, and other settings for your recording as explained
in “Before you record: Recorder settings checklist” on page 50.
2. Select
New Clip to create and load a clip.
3. To rename the clip, select the default clip name , then enter a new clip
name.
4. Select the record button on the onscreen transport controls .
The recording progresses until you select
Using Crash record mode
Crash record occurs when you start a recording without specifying a clip name. The
clip is given a default name, then the recording continues until you select stop.
To crash record:
Stop.
1. Verify video, audio, and other settings for your recording as explained in “Before
you record: Recorder settings checklist” on page 50.
2. Select the record button on the onscreen transport controls .
The recording progresses until you select
05 April 2010 K2 AppCenter User Manual 51
Stop.
Page 52

Chapter 4 Recording clips
Scheduling a recording
This feature is part of the licensable AppCenter Pro option.
You can schedule a recording to start at a specified time. Scheduled Start Time uses
Time of Day timecode source, which can be driven by either the system clock or LTC.
VITC or Anc VITC/LTC cannot be used to drive the Time of Day.
To schedule a start time for a clip to play, see “Scheduling a clip to play” on page 68.
1. Select
Control | Schedule Start Time. Trigger At entry box appears.
2. Enter the time when you want the recording to start and click
trigger time, and a countdown are displayed.
Using Fixed Length record mode
You can specify the clip length before recording, or during recording. As long as there
is sufficient storage space, a fixed length recording continues until the clip length is
reached or until you select stop.
1. Verify video, audio, and other settings for your recording as explained in “Before
you record: Recorder settings checklist” on page 50.
2. Select
Length in the Recorder pane.
OK. The time of day,
The Length dialog box appears.
3. Enter the clip length by typing only numbers, colons are added automatically.
4. Choose
OK in the dialog box, or press Enter.
5. Select the record button on the onscreen transport controls .
Recording continues until
Stop is selected or the desired length is reached. While
recording, the mark in and mark out update with the current status of the clip. The
Time Dome gives a visual indication of the percent complete as well as a
countdown from the specified length down to
00:00:00:00.
Specify clip length after recordi ng has begun
While a clip is recording you can enter the clip length as follows:
1. Select
Length in the Recorder pane.
The timecode dialog box appears.
2. Enter the desired length, then select
52 K2 AppCenter User Manual 05 April 2010
OK or Enter.
Page 53

If the entered length is valid, longer than the amount of material already recorded,
the clip continues to record until it reaches the specified length or until you select
Stop.
Using continuous record
You can configure Recorder for Continuous Record mode. Continuous record is
useful for applications that normally use Continuous Record, for example a manual
time delay. Refer to “About recording clips” on page 44.
1. Click the Time Dome .
The Time Dome pop-up menu appears.
Previewing a clip that is recording
2. Choose
Continuous Record in the pop-up menu.
The Time Dome changes to display continuous record. .
3. Click
Length.
The Length dialog box appears.
4. Enter the clip length by typing only numbers, colons are added automatically.
5. Click
OK in the dialog box, or press Enter.
6. Select the record button on the onscreen transport controls .
Recording continues until
Stop is selected. While recording, the mark in and mark
out update with the current status of the clip. The Time Dome gives a visual
indication record progress.
7. Load and play the clip in Player/Recorder application:
• Drag and drop from the recording monitor pane to the playing monitor pane.
The play channel becomes the selected channel, and the clip is cued and ready for
play.
Previewing a clip that is recording
Preview loads the currently recording clip into a play channel. The play channel
becomes the selected channel, and the clip is cued and ready for play.
05 April 2010 K2 AppCenter User Manual 53
Page 54

Chapter 4 Recording clips
To preview a clip:
1. Start the record process.
2. Preview the clip:
a. In the Monitor pane, use the drop-down list to select the Player application.
b. Drag the clip thumbnail from the channel running the Recorder application to
the channel running the Player application.
The play channel becomes the selected channel, and the clip is cued and ready for
play. If a play channel is already playing a clip, no warning message is displayed
in the status bar.
3. To play the clip, select the onscreen transport controls .
Using cue points while recording
Cue points enable you to move quickly from one frame to another in a clip. You can
use cue points to manage clip play out or create subclips. You can add, remove, or
rename cue points while a clip is being recording.
To add a cue to a clip while the clip is recording, you need to begin the recording while
in Control mode. Once the recording has begun, you can switch to Cue mode and
modify the clip with cue points
This section is divided into the following topics:
• “Adding a cue point while recording” on page 54
• “Removing a cue point” on page 55
• “Renaming a cue point” on page 55
Related topics:
• “About using cue points” on page 25.
• “Using cue points for playback” on page 24.
Adding a cue point while recording
NOTE: While the clip is record mode, do not use the transport controls.
1. Select Player/Recorder from the application drop-down list.
2. Begin recording, using one of the methods described in “To record a clip” on
page 51.
3. In the Record pane, click on the Cue tab. The Cue view displays.
4. Do one of the following:
•Click the
• Select
Add Cue button.
Control | Add Cue.
A cue point is added to the cue list using a unique name, e.g. Cue_1.
54 K2 AppCenter User Manual 05 April 2010
Page 55

Removing a cue point
1. While recording, click on the Cue tab.
2. Select a cue point in the list.
3. Do one of the following:
Changing the timecode source
•Click the
• Select
Remove button, or
Control | Remove.
Renaming a cue point
1. While recording, click on the Cue tab.
2. In Cue view, select a cue point in the list.
3. Select
Control | Rename.
4. Use the text entry dialog to enter a new cue name, then click OK or press Enter.
Changing the timecode source
Timecode
Display
Timecode
Source
To change the timecode source:
1. Click on the channel whose timecode you want to specify.
2. Select
3. Select the
4. Choose a timecode source, then click
Timecode Source Description
AncVITC Available on HD channels only. Timecode is read from ancillary VITC.
VITC Available on SD channels only. Timecode is read from the VITC input for the
LTC Available on HD/SD channels.Timecode is read from the LTC input for the
05 April 2010 K2 AppCenter User Manual 55
Control | Options. The Options dialog box displays.
Timecode tab.
OK.
channel.
channel.
Page 56

Chapter 4 Recording clips
Timecode Source Description
AncLTC Available on HD channels only. Timecode is read from ancillary LTC.
Time of Day If using SD, the record channel has an internal timecode generator. When Time
Start Time If using SD, the record channel has an internal timecode generator. When Start
Selecting widescreen mode
When recording SD video that is 16:9 aspect ratio, select the widescreen attribute. To
change the Widescreen attribute, select
The attribute is saved as part of the video media file. On up-conversion playout, the
attribute is used by the Player/Recorder channel to handle aspect ratio on playout
when the clip is played on K2 system. For more information on how AppCenter
handles aspect ratios, see “About aspect ratio conversion modes” on page 153.
of Day is selected, the generator is locked to the Time of Day Source as currently
configured.
Time is selected, you can specify the timecode to use when the recording starts.
The drop frame option is enabled when the system timing is set to the 525 line
standard (NTSC). Drop frame timecode allows the generator to operate as an
accurate clock.
Control | Widescreen.
NOTE: AppCenter always records 720p and 1080i video in the 16:9 ratio, whether
the widescreen attribute is selected or not.
Changing the current bin
On the K2 system, a fixed amount of disk space is reserved for storing media files—
the V:\ partition. Within the V:\ disk partition, your clips and playlists are stored in
bins, which function like directories in a file system. You can organize your media by
creating and removing bins in AppCenter. You can have channels from multiple
sources in one channel suite; the clips displayed are those on the source that has the
currently selected channel.
When recording starts, the new clip is stored in the current bin, which is also referred
to as a working bin. Each channel has its own working bin. You can change the
current bin to determine where you want the clip stored. The current bin name is
displayed under the clip name in the display.
Location of working bin for this channel
NOTE: If you rename the working bin, the bin automatically becomes the default bin.
To change the current bin:
56 K2 AppCenter User Manual 05 April 2010
Page 57

1. Make sure the record channel is selected.
2. Click the drop-down list showing the clip’s location, choose a bin.
-- or --
Renaming a clip
3. From the main menu, select
4. Click the Bin & AFD tab, then choose a bin from the list.
Control | Options.
You can also change the working bin by loading a clip into a channel (for example,
by using drag-and-drop) from a bin that is not the current working bin for that channel.
The bin from which you loaded the clip then becomes that channel’s working bin.
Renaming a clip
You can rename a clip during or after recording.
To rename a clip:
1. Select the clip name control in the Recorder application.
2. Enter the new clip name using the on-screen keyboard.
3. Click
OK, or press Enter.
If a clip with the new name already exists in the current bin, an error message is
displayed.
Viewing clip properties
To view the properties of a clip loaded in the Recorder application:
In the Record application, do one of the following:
05 April 2010 K2 AppCenter User Manual 57
Page 58

Chapter 4 Recording clips
•Click the Properties button.
- or -
• Select
Control | Properties.
The Properties dialog box opens.
Locating a clip
You can locate the currently loaded clip by displaying the contents of the current bin
in the Clips pane, as follows:
1. After or during recording, select
Control | Locate.
2. The Clips pane displays the contents of the bin where the clip is located.
Displaying available storage space
In the Recorder pane, you can display available storage using the Time Dome. The
available storage displayed is the storage on the K2 Summit Production Client, K2
Solo Media Server or the K2 storage system accessed by the currently selected
channel.
To display available storage:
1. Select the Time Dome. .
The Time Dome pop-up menu appears.
2. Choose
The Time Dome changes to display available storage. .
Available storage displayed is based on the channel recording compression setting
in the Configuration dialog box; an HD channel has less available storage than an
Available Storage in the pop-up menu.
58 K2 AppCenter User Manual 05 April 2010
Page 59

Displaying available storage space
SD channel. (To access the Configuration dialog box, select System |
Configuration
storage is also displayed numerically under the timedome.
The white line functions as a “sweep second hand” to show record progress. It
sweeps through a complete revolution every 10 seconds when crash recording or
makes a single revolution on a fixed length record.
.) A filled Time Dome represents no storage remaining. Available
05 April 2010 K2 AppCenter User Manual 59
Page 60

Chapter 4 Recording clips
60 K2 AppCenter User Manual 05 April 2010
Page 61

Chapter 5
Playing and editing clips
The information in this chapter describes how to play and edit clips recorded on K2
Summit Production Clients and K2 Solo Media Servers. You can play clips in a
variety of ways including off-speed play and triggered by GPI. In addition to editing
existing clips, you can create new clips using the subclip feature and add cue points
to clips.
This chapter is divided into the following sections:
• “About playing clips” on page 62
• “Selecting the Player application in AppCenter” on page 63
• “Guide to using Player: Control view” on page 63
• “Guide to using Player: Cue view” on page 66
• “Loading media for playout” on page 67
• “Playing a clip” on page 68
• “Scheduling a clip to play” on page 68
• “Selecting loop play” on page 68
• “Jumping to a specific timecode” on page 69
• “Using cue points for playback” on page 70
• “Editing a clip” on page 72
• “Creating Subclips” on page 75
• “Viewing clip properties” on page 77
• “Viewing clip options” on page 78
• “Displaying Super Out information on output/monitor” on page 78
05 April 2010 K2 AppCenter User Manual 61
Page 62

Chapter 5 Playing and editing clips
About playing clips
The Player/Recorder application allows you to play media stored on the K2 system,
including clips and programs. The application requires a play channel and has two
views— Control view and Cue view. The Control view allows you to play clips, trim
clips, and create new subclips. The Cue view is used to add cue points within a clip.
After adding cue points, you can use the cue list to start playback from any cue point
in the list.
About Live Play (Chase Play)
With AppCenter Pro, you can record an event in one channel, drag the thumbnail into
a play channel, and play the clip out while it is being recorded. This feature can also
be controlled by the K2 Dyno™ Replay Controller. You can control the Live Play
(Chase Play) as follows:
Control + L — The play channel plays live, playing the clip as it is recorded.
Spacebar — The play channel stops playing in Live Play mode.
For more information about Live Play, see “Operational specifications” on page 204.
Working with clips that are still recording
The following restrictions apply when working with a clip in the Player application
that is currently recording:
• You cannot rename the clip. (However, you can rename the clip in the recording
channel or from the Media pane.)
• The clip mark-in/mark-out points cannot be modified.
• Subclips created from a clip currently being recorded can only have a Mark Out
equal to the last frame that has been recorded when the subclip is created. You
cannot create a clip longer than has been recorded under the assumption that the
unrecorded frames will “fill it in.”
• The length of the record-to-play delay depends on if the clip is in local storage or
shared storage. Refer to the “Operational Specifications” on page 203 for media
file system performance specifications.
Otherwise, clips that are currently being recorded behave normally. As a reminder,
“Read-Only” is displayed in the Player application when the clip loaded or playing is
still being recorded.
Playing a playlist saved as a program
Playlists can be loaded and played in the Player or Playlist applications. You can also
save a playlist as a program and then play it in the Player application. A program
includes all the media in the playlist but does not include any event that breaks the
flow of playout, such as a pause or a transition. When a program is loaded in the
Player application, it is handled in the same way as a simple clip. For more
information on creating programs refer to “Saving a list as a program” on page 103.
62 K2 AppCenter User Manual 05 April 2010
Page 63

Selecting the Player application in AppCenter
Assignable
t
timecode)
Countdown
Selecting the Player application in AppCenter
The Player application requires a single play channel. If the play channel is currently
being used in another application, such as a Playlist application, you can use the
following steps to select the Player application. Selecting the Player application
causes the play channel operation to stop, then the Player application is started.
To start the Player application on a play channel:
1. In the monitor pane, select the control mode drop-down list for the play channel,
then choose
Player.
The channel switches to the Player application and becomes the selected channel.
Guide to using Player: Control view
The Control view allows you to play a clip, modify its name, adjust mark in and mark
out points, create sub-clips, and stripe timecode. Selecting the
the Control view. The following describes the essential controls in the Control view.
Control view tab shows
Channel
6
Flex
1
Buttons
(Default buttons
are shown)
7
Application
Control Description and User Operation
1
Assignable Buttons Assignable buttons allow you to modify the button assignments to
8
Thumbnail
(Click to change
thumbnail)
Clip
2
Timecode
Time Dome
9
(Click to select
loop-play mode)
Clip Name &
3
Current Bin
(Click clip name
to rename.)
Mark-In &
10
Mark-Out
(Click to set to
current frame
4
Timecode
Meter Bar
11
Button
(Click to adjus
audio level)
5
best suit your workflow. Hold down a button to open a pop-up menu
that lists the alternative button choices.
The Subclip button toggles between the Source Clip and Subclip
settings.
View
Tabs
05 April 2010 K2 AppCenter User Manual 63
Page 64

Chapter 5 Playing and editing clips
Control Cue
Control Description and User Operation
2
Clip Timecode Indicates the recorded timecode of the current frame being played.
3
Clip Name & Current Bin Displays the clip’s name and location in the video storage file
4
Countdown Timecode Displays the time remaining in the clip.
5
View tabs These tabs toggle between Control and Cue views. Control is used
6
ChannelFlex If the channel is configured to be a ChannelFlex type, it is displayed
7
Application A drop-down list allows you to select between none, Playlist,
8
Thumbnail Used to visually identify the clip. By default, the thumbnail is
The timecode value of XX:XX:XX:XX is displayed when there is no
recorded timecode.
Stop mode is indicated by TC (recorded timecode) or Gen
(zero-based, internal generated timecode).
system. To rename the clip, click the Clip Name, then enter a new
name.
for playing and editing of clips. During playback, you can use the
Cue view to add cue points so that you can quickly cue a clip to a
frame.
in this area. ChannelFlex requires AppCenter Elite license.
Player/Recorder, or additional selections if licensed for AppCenter
Elite. If the Player/Recorder application is selected, you can play or
record using the pane controls.
generated using the 16th frame of video. To change the thumbnail,
position the clip to the desired frame, then click the thumbnail.
9
Time Dome This multi-function control displays play progress, or play progress
Play Progress
with media marks which shows the relative position of mark-in/
mark-out points in the clip. The timecode underneath indicates play
time remaining. The Time Dome is also used to enable loop play.
Select the Time Dome, then use the pop-up menu to choose the
Media marks
display mode or to control loop play mode.
Loop playback
10
Set Mark-in and Set
Mark-out
These buttons are used to set new mark-in or mark-out points.
Position the clip to the desired frame, then click the In or Out
buttons. Unused media is not deleted. To clear a mark, click the
button, then choose yes in the pop-up dialog box. Marks are reset to
the beginning or end of available media.
64 K2 AppCenter User Manual 05 April 2010
Page 65

Guide to using Player: Control view
Control Description and User Operation
11
Meter bar Button Displays the Meter bar, which contains the audio play level controls
and signal meters. Click Save to save changes made to the clip
audio level. Click Unity to return the audio levels to the last saved
level. Click Mute to mute/unmute the audio.
Player Menu - Control
view
Load– Select to open the Load Clip dialog box, which displays the
contents of the current bin. Select a clip, then choose OK to load.
New Clip – Used to create and name a clip prior to starting the
recording. If a clip is already loaded, selecting New Clip ejects the
current clip and creates a new one.
Subclip– Opens the Subclip mode, which allows you to create
subclips from the currently loaded clip. A subclip is an entirely new
clip that references media in another clip
Goto– Used to jump to a specific timecode. Select Goto, to open the
Goto dialog box, then enter an absolute or relative timecode value,
or use the scrub bar to go to the desired position.
Schedule Start Time – Opens the Trigger At entry box so a start
time can be entered.
Stripe Timecode– Opens the Stripe Timecode dialog box, which
allows you to replace the existing timecode track for the loaded clip.
You can replace with time of day, or a specific start timecode.
Locate – Finds the location of the selected clip.
Properties– Opens the Properties dialog box for the currently
loaded clip.
Auto Subclips– The auto subclip check box changes the way that
the subclip mode behaves. When it is NOT checked, clips have to
be accepted manually. When it is checked, a subclip is created as
soon as the user sets a mark out.
E-to-E (LoopThru) mode – When selected, the following occurs:
“EE” is displayed on the channel pane, next to the Timecode Source
indicator; when no clip is loaded, the signal that is currently present
at the channel input plays out; when a record operation stops the
clip remains in the Recorder. The signal that is currently present at
the channel input plays out. Widescreen – Sets the channel for
recording widescreen format.
Options– Opens the Options dialog for the currently loaded clip.
05 April 2010 K2 AppCenter User Manual 65
Page 66

Chapter 5 Playing and editing clips
Current
Frame
Timecode
2
Customizable
Buttons
(Default buttons
are shown)
1
Cue List Countdown
Timecode
4
3
View
Tabs
5
Guide to using Player: Cue view
The Player application Cue view is used to add cue points to the clip. The Cue view
allows you to set, modify, and jump to cue points on the loaded clip. Clicking the
tab displays the Cue view. The following describes the basic controls in the Cue view.
Cue
Control Description and User Operation
1
Assignable Buttons Assignable buttons allow you to modify the button assignments to
best suit your workflow. Hold down a button to open a pop-up menu
that lists the alternative button choices.
Add Cue - same as selecting “Add Cue” from the Player menu.
Remove - removes the selected cue.
Goto – used to jump to the selected cue, the next cue, or to a specific
timecode.
Rename - opens text entry dialog box to rename the selected cue.
Create Clip - same as selecting “Create Clip” from the Player
menu.
Create All - same as selecting “Create All Clips” from the Player
menu.
Cue Selection - cues the first selected cue point for playback
showing a still frame of video for the cue point.
2
Current Frame Timecode Indicates the recorded timecode of the current frame being played.
The timecode value of XX:XX:XX:XX is displayed when there is no
3
Cue List Displays a list of cue points that are set for the loaded clip. Cue
recorded timecode.
points are listed in chronological order beginning with the mark-in
point and ending with the mark-out point.
66 K2 AppCenter User Manual 05 April 2010
Page 67

Loading media for playout
Control Cue
Control Description and User Operation
4
Countdown Timecode Displays the time remaining in the clip. To select the countdown
mode you want to monitor, open the Options dialog box by selecting
Options in the context menu.
5
View tabs These tabs toggle between Control view and Cue Points view.
Player Menu Add Cue – Used to add a cue to a clip:
1. In the Control view, start the clip playing.
2. Select the Cue tab.
3. At the desired timecode, select
Remove – Used to remove a cue.
Rename - Used to rename a cue.
Create Clip – Creates a sub clip from highlighted cue points.
Create All– Creates sub clips from all cue points.
Cue Selection – cues the first selected cue point for playback
showing a still frame of video for the cue point.
E-to-E (LoopThru) mode
“EE” is displayed on the channel pane, next to the Timecode Source
indicator; when no clip is loaded, the signal that is currently present
at the channel input plays out; when a record operation stops the clip
remains in the Recorder. The signal that is currently present at the
channel input plays out.
Control | Add Cue.
– When selected, the following occurs:
Loading media for playout
You can load clips or programs in the play display for playout.
NOTE: Loading
for that channel.
Loading clips from the clips pane
1. Select a play channel by clicking in the channel’s monitor pane.
2. Locate the clip in the clips pane. If necessary, change bins by clicking the current
bin control and selecting from the drop-down list.
3. Load the clip in one of the following ways:
• Drag the clip from the clips pane into the play channel.
• Choose the
• Double-click on the clip.
• Select the clip, then press
Loading a clip from the Player application
1. Select a play channel by clicking in the channel’s monitor pane.
a clip from a bin into a play channel changes the working bin
Load button in the clips pane, then select the clip.
Enter on the keyboard.
05 April 2010 K2 AppCenter User Manual 67
Page 68

Chapter 5 Playing and editing clips
2. Open the Load Clip dialog using one of the following:
•Click the
• Select
3. If needed, use the
4. Select a clip in the Load Clip dialog, then click
The clip is loaded in the player.
Related topics:
• “Playing a clip” on page 68
• “Using cue points for playback” on page 70
Playing a clip
Once a clip is loaded in the Player application, you can play the clip or search for a
specific frame of video using the transport controls. Use the links in the following
table to find information on playing clips.
If you are using… Refer to…
On-screen transport controls “Using on-screen transport controls” on page 39
Keyboard shortcuts Appendix A, Keyboard Shortcuts
GPI triggers “GPI and other configurations” on page 165
Load button in Player.
Control | Load.
Look in drop-down list to browse to the desired bin.
OK.
Scheduling a clip to play
This feature is part of the licensable AppCenter Pro option.
You can schedule a clip to start playing at a specified time. Scheduled Start Time uses
Time of Day driven by the system clock or LTC, but not VITC. To schedule a start
time for a clip to record, see “Scheduling a recording” on page 52.
1. Select
Control | Schedule Start Time. Trigger At entry box appears.
Enter the time when you want the recording to start and click
trigger time, and a countdown are displayed.
Selecting loop play
Loop play allows the clip to play in a continuous loop until Stop is pressed. The Time
Dome is used to enable/disable loop play.
•Click the
Time Dome , then choose Loop Mode in the pop-up menu.
OK. The time of day,
68 K2 AppCenter User Manual 05 April 2010
Page 69

Jumping to a specific timecode
Clear
(Select to clear entry)
Back Space
Relat i ve
(Select to enter a
re la tive tim eco d e)
Absolute
(Select to enter an
a b s o lute timeco d e)
S c r ub bar
(Click and drag to
cue the desired frame)
The Goto dialog box allows the player application to jump to the specific clip
timecode that you enter. You can enter an absolute timecode value based on recorded
timecode, or a relative timecode value, that is, cue the video to a point +/- some value
relative the current frame. If you don’t know the timecode value of the frame you
want, you can click and drag the scrub bar to shuttle to the desired frame.
To jump to a specific timecode:
1. With a clip loaded in the Player application, do one of the following:
Jumping to a specific timecode
•Click the
• Select
Goto button.
Control | Goto.
The Goto Timecode dialog box appears.
2. Perform one of the following:
• Enter a relative timecode value, select the ‘+’ or ‘-’ key, enter timecode, then
click
OK.
•Enter an absolute timecode value, select the ‘=’ key, enter timecode, then click
OK.
• Click and drag the scrub bar to cue the desired frame.
Related topics:
• “Loading clips from the clips pane” on page 67
• “Loading a clip from the Player application” on page 67
• “Playing a clip” on page 68
05 April 2010 K2 AppCenter User Manual 69
Page 70

Chapter 5 Playing and editing clips
Using cue points for playback
Cue view allows you to add cue points to a clip. You can use cue points to manage
clip play out or create subclips. The following sections describe how to work with cue
points.
Topics included here:
• “About using cue points” on page 70
• “Viewing the cue list” on page 71
• “Adding a cue point” on page 71
• “Removing a cue point” on page 71
• “Jump to the selected cue point” on page 71
• ““Jump to the next cue point” on page 71
• “Renaming a cue point” on page 71
About using cue points
When you select Cue view, a chronological list of cue points is displayed. The list
begins with the mark-in point and ends with the mark-out point. You can add
additional cue points to mark other frames within the clip. You can add cue points
while the clip is playing or in stop mode. When you add a cue point, it is listed by a
default name (such as “cue_1”) and timecode value.
Cue points cannot be moved; however, you can remove a cue point and use the
transport controls, or Goto Timecode dialog box to enter a new cue point at the current
position.
Cue points can be used to:
• Manage clip playout– jump to the selected cue or next cue.
• Create subclips– You can create a subclip from the selected cue point. The
selected cue point becomes the mark-in point, while the mark-out point is the same
as the source clip. If more than one cue point is selected, a subclip is created using
the first and last cue points. See “Creating subclips in Cue view” on page 60.
When working with cue points, keep these considerations in mind:
• Cue points are retained when a clip is copied or transferred (GXF or
Streams)– With using GXF or streams, cue points are stored with the clip. All the
cue points of the original clip are retained when the clip is copied or transferred to
another server. Cue points are not retained for other file transfers.
• Cue points and trimming– After you trim a clip by moving the mark-in or
mark-out points, the cue points outside the new mark-in and mark-out points are
cleared and must be reinserted.
• Cue points and subclips– Subclips created from a clip with cue points retain all
cue points that fall between the marks of the new subclip. The subclip has its own
mark in and mark out points. “Creating subclips in Cue view” on page 77.
• Cue points and programs– Cue points cannot be added to a program.
70 K2 AppCenter User Manual 05 April 2010
Page 71

Viewing the cue list
1. Select a play channel by clicking in the channel’s monitor pane.
2. Select the Cue tab.
The Cue view appears showing the cue list for the clip loaded in the Player
application. Initially, only the mark-in and mark-out cue points are listed.
Adding a cue point
NOTE: To add a cue point while Recording, see “Adding a cue point while
recording” on page 54.
While the clip is playing or in the stop mode, use the transport controls to find the
desired frame in the clip, then do one of the following:
Using cue points for playback
•Click the
• Select
Add Cue button.
Control | Add Cue.
A cue point is added to the cue list using a unique name, e.g. Cue_1. Using the
preview feature, you can play and add cue points to a clip while it is still being
recorded.
Removing a cue point
1. In Cue view, select a cue point in the list.
2. Do one of the following:
•Click the
• Select
Remove button, or
Control | Remove.
Jump to the selected cue point
Use the following steps to jump to the selected cue point.
1. In Cue view, select a cue point in the list.
•Click the
2. Press the
Goto button, then select Selection.
Play button on the onscreen transport controls
Playout starts from the cued frame.
Jump to the next cue point
Use the following steps to jump to the next cue point. Depending on the current play
position, the clip will cue to the next cue point in the clip.
1. In Cue view, click the
2. Press the
Play button on the onscreen transport controls.
Goto button, then select Next Cue.
Playout starts from the cued frame.
Renaming a cue point
1. In Cue view, select a cue point in the list.
05 April 2010 K2 AppCenter User Manual 71
Page 72

Chapter 5 Playing and editing clips
2. Select Control | Rename.
3. Use the text entry dialog to enter a new cue name, then click OK or press Enter.
Editing a clip
Topics in this section are as follows:
• “Moving clip mark-in/mark-out points” on page 72
• “Clearing mark-in/mark-out points” on page 73
• “Adjusting clip audio level” on page 73
• “Changing the clip thumbnail image” on page 74
• “Striping timecode (replacing the timecode track)” on page 74
• “Renaming a clip in the Player application” on page 75
Moving clip mark-in/mark-out points
Every clip has a mark-in point and a mark-out point that refer to the first and last
frames displayed when the clip is played. When first recorded, clip marks are set to
the beginning and end of available media. You can edit the clip marks in order to
reference only the desired media. When clip marks are moved, the unused media is
not deleted. Clearing the marks resets them to the first and last frames of the recorded
clip. (See also “Clearing mark-in/mark-out points” on page 73.)
NOTE: If the source media has been erased, the subclip retains 1 second of media on
each side of the mark-in and mark-out points. See “Moving clip mark-in/mark-out
points” on page 54.
The following restrictions apply when editing clip marks:
• Mark-in must precede the mark-out
• Marks cannot be set outside the recorded media
• Marks cannot be changed on a clip that is still being recorded.
NOTE: If more media exists after the current mark, a <<< or >>> symbol is
displayed beneath the In/Out timecode. To permanently remove media outside the
marks, refer to “Erasing a clip's unused media” under Managing Clip Media.
To move clip marks, load the clip in player, then use one of the following methods.
• “Moving clip marks: Using the In/Out buttons” on page 72
• “Moving clip marks: Using the timecode entry controls” on page 73
• “Moving clip marks: Using the clip length control” on page 73
Moving clip marks: Using the In/Out buttons
1. Use the transport controls to locate the desired frame.
2. In Control view, click
In to set mark-in point, or click Out to set mark-out
point.
72 K2 AppCenter User Manual 05 April 2010
Page 73

Editing a clip
3. In the Confirm Mark Change window, click Yes.
Moving clip marks: Using the timecode entry controls
1. In Control view, select the mark-in or mark-out timecode control to
open the timecode entry dialog box.
2. Enter a timecode value, then click
Alternatively: Use the current position scrub bar
dialog box to locate the desired frame, then select
Moving clip marks: Using the clip length control
Entering a new clip length moves the mark-out point.
1. Click the
Length timecode entry control.
2. Enter a new clip length and click
The clip length changes by moving the mark-out point.
Clearing mark-in/mark-out points
Clearing a mark point resets the mark to its default position— mark-in is set to the
beginning of available media; mark-out is set to the last frame of available media.
To clear a mark point, do one of the following:
• In Play view, click and hold the
pop-up menu.
• In Play view, select the mark-in or the mark-out timecode control and click
OK to clear the mark.
then
OK or press Enter.
in the timecode entry
OK.
OK.
In or Out button, then choose Clear Mark in the
Clear,
Adjusting clip audio level
The audio meter display provides audio level adjustment for clips loaded in the player
display. Saved audio levels are used every time the clip is loaded and played. Unsaved
changes are lost when the clip is ejected.
To adjust audio level:
1. In the Player application, click the Meter bar button.
2. Adjust the audio level in one of the following ways:
• Adjust the graphical faders individually or “ganged,” which ensures all channels
use the same gain.
•Click
05 April 2010 K2 AppCenter User Manual 73
Unity to set audio back to the last saved level.
Page 74

Chapter 5 Playing and editing clips
3. Click Save to save changes to the clip audio level.
4. Click
Mute to mute or unmute the clip audio level.
5. Click the Meter bar button again to return to the Player application.
Changing the clip thumbnail image
The clip thumbnail is displayed in AppCenter for visual identification of the clip. By
default, the 16th frame is used to generate the thumbnail image.
To change the clip thumbnail:
1. While monitoring the play channel output, use the onscreen transport controls to
position the clip to the desired video frame.
2. In Player, click on the thumbnail, then select
box.
NOTE: If clip marks are edited so that the video frame used to generate the thumbnail
is outside the new clip marks, the thumbnail is reset to a position near the mark-in of
the modified clip.
To reset the thumbnail:
• Select the thumbnail image, then choose
Reset in the pop-up menu.
This resets the clip thumbnail to the 16th frame in the clip.
Striping timecode (replacing the timecode track)
Yes in the Change Thumbnail dialog
The stripe timecode dialog allows you to overwrite the existing timecode track for the
loaded clip. You can replace the recorded timecode with time of day, or a specific start
timecode value.
1. Load the clip in the play channel.
2. In Control view, select
Control | Stripe Timecode. The Stripe Timecode dialog box
opens.
3. Specify the replacement timecode:
Time of Day – The new timecode track will start with the current time of day and
will contain continuous values ranging from the current time of day plus the length
of the clip.
Fixed Time – After choosing this option, select the timecode entry control, and enter
a start timecode value. The new timecode track will contain continuous values
ranging from the specified starting value to the starting value plus the length of the
clip.
74 K2 AppCenter User Manual 05 April 2010
Page 75

Drop frame – The drop frame option is available when system timing is set to 525
line standard (drop frame is a timecode adjustment that applies to NTSC video
only). Drop frame allows the timecode track to indicate the actual running time of
the clip. Drop-frame time code yields precise running times, but frames are not all
numbered sequentially. A frame number must be dropped periodically to keep the
clock right.
Renaming a clip in the Player application
1. In the Control view, select the clip name control .
2. Enter the new clip name.
Creating Subclips
3. Click
OK, or press Enter.
Creating Subclips
A subclip is a clip created by referencing a portion of media from another clip. For
example, if you recorded a two hour clip, you could create several short subclips to
use as previews or advertisements. Each subclip refers to a small portion of the
original clip and is listed along with all other clips in the clips pane. When working
with subclips, the original clip is sometimes called the source clip. After creating
subclips, you can delete the source clip.
Subclips created from a clip that is still recording can only have a mark-out equal to
the last frame that has been recorded when the subclip is created. You cannot create
a subclip longer than what has been recorded with the assumption the media will “fill
in”. You can create subclips from a clip being recorded in loop record mode. In loop
record mode, media referenced by the subclips is retained while unreferenced media
is discarded.
You can load subclips in the Control view and edit the mark-in/mark-out points the
same as a clip, provided the unreferenced source media has not been erased.
NOTE: If the source media has been erased, the subclip retains 1 second of media on
each side of the mark-in and mark-out points. See “Moving clip mark-in/mark-out
points” on page 54.
The following sections describe how to create subclips:
• “To create subclips” on page 75
• “About Auto Subclip mode” on page 76
• “Creating subclips in Cue view” on page 77
To create subclips
1. Load a clip in the player.
2. In the Player Control view, click the
05 April 2010 K2 AppCenter User Manual 75
Subclip button.
Page 76

Chapter 5 Playing and editing clips
The Subclip display appears with a new subclip loaded. The In and Out buttons are
flashing indicating no mark-in or mark-out points are defined. The default subclip
name follows the form <source clip name>-<number>, for example, if the source
clip name is PlayoffGame, the subclip name is PlayoffGame-1.
3. To rename the subclip, click the subclip name control , and
enter the new name in the Clip Name dialog, then click
Renaming the subclip creates a new seed name. For example, if you rename the
subclip PlayoffGame-1 to Highlight, subsequent subclips created are named
Highlight-1, Highlight-2, and so on.
OK, or press Enter.
4. Enter the subclip marks as follows:
a. Using the transport controls, position the clip to the desired frame for mark-in,
then click the
In button.
b. Using the transport controls, position the clip to the desired frame for mark-out,
then click the
Out button.
Alternatively: Select the mark-in or mark-out timecode entry controls and enter
a specific timecode value.
Alternatively: Select the
Length timecode entry control and enter a clip length,
then create either a mark-in or a mark-out point. If the source media has been
erased, the subclip retains 1 second of media on each side of the mark-in and
mark-out points. See “Moving clip mark-in/mark-out points” on page 54.
NOTE: Until you enter the subclip marks, the Accept button is grayed out.
5. In Subclip view, click
Accept.
The subclip is saved and ejected, then Player returns to Subclip view with a new
subclip name loaded.
NOTE: Clicking the Source Clip button or the
Accept button closes Subclip mode without creating a new clip. Both of these buttons
Eject button prior to pressing the
are used to exit Subclip mode.
About Auto Subclip mode
In Auto-Subclip mode, you simply set mark-in, then set mark-out. On setting
mark-out, the subclip is automatically generated and ejected, and a new subclip name
is loaded in the Subclip display.
76 K2 AppCenter User Manual 05 April 2010
Page 77

Viewing clip properties
Auto Subclip mode is useful when you want to create subclips while a source clip is
playing. You simply load a clip, press play, then create subclips by selecting In, Out,
In, Out, etc.
To enable Auto Subclip mode:
•In the Player application Control view, click
Creating subclips in Cue view
In Cue view, you can automatically create a subclip from a selected cue point. The
selected cue point becomes the mark-in point, while the mark-out point is the same as
the source clip. If more than one cue point is selected, a subclip is created using the
first and last cue points. This feature allows you to manage the media of interest as a
separate clip rather than media between cue points in a clip. For example, once you’ve
made a subclip, it can be added to a playlist.
By default, subclips generated from the cue list are given names of the format <clip
name>-<first cue name>. For example, a subclip generated from a cue point named
“cue_1” in a clip named “MyClip” is named “MyClip-cue_1”. If a clip already exists
with this name, you are prompted to enter a unique name.
To create a subclip from media between two selected cue points:
1. Select two cue points in the cue point list.
2. Click
Control | Create Clip.
To create a subclip using a selected cue point as mark-in:
1. Select the cue point to use as the mark-in for the new clip.
Control | Auto Subclips.
2. Click
Control | Create Clip.
The subclip is terminated by the source clip mark-out point.
To create a subclip for all cue points:
•Click
Control | Create All.
In some cases, a progress dialog is displayed as the clips are generated.
Each subclip is terminated using the mark-out of the source clip.
Viewing clip properties
To view the properties of a clip loaded in Player:
•Click the
- or -
• Select
Properties button.
Control | Properties.
05 April 2010 K2 AppCenter User Manual 77
Page 78

Chapter 5 Playing and editing clips
Viewing clip options
Clip options allow you to choose which audio channels to monitor.
To view the options of a clip loaded in Player:
• Select
Control | Options.
Displaying Super Out information on output/monitor
If licensed for AppCenter Pro or Elite, you can display information on a channel’s
SDI OUT2 signal and on the VGA video monitor.
1. Click
System | Monitor Options.
The Monitor Options dialog box opens.
2. Select the tab for the channel that plays the video with the information you are
displaying.
3. Do one or both of the following:
• To display information on the VGA video monitor for the channel, select the
checkbox above
Monitor.
• To display information on the channel’s SDI OUT2, select the checkbox above
SuperOut.
4. Select the checkbox for each type of information you are displaying.
5. From the drop-down list, select the location to display the information.
6. Configure other channels as follows:
78 K2 AppCenter User Manual 05 April 2010
Page 79

Displaying Super Out information on output/monitor
• To configure other channels with the same settings as the current channel, click
Copy to.
• To configure other channels with their own settings, repeat previous steps as
appropriate.
7. When fully configured, click
OK to apply settings and close.
05 April 2010 K2 AppCenter User Manual 79
Page 80

Chapter 5 Playing and editing clips
80 K2 AppCenter User Manual 05 April 2010
Page 81

Chapter 6
Working with playlists
Information in this chapter includes:
• “Introducing Playlist application” on page 82
• “Before using Playlist application” on page 83
• “Guide to using Playlist application” on page 85
• “Selecting Text or Thumbnail view” on page 89
• “Selecting monitor information” on page 89
• “Creating a simple playlist” on page 89
• “Inserting media in a playlist” on page 90
• “Combining events in a playlist” on page 91
• “Splitting an event in a playlist” on page 91
• “Playing a list” on page 92
• “Editing and rearranging events in a playlist” on page 93
• “Managing sections in a list” on page 95
• “Adding play effects” on page 96
• “Adding GPI output triggers to playlists” on page 100
• “Managing playlists” on page 101
• “Saving a list as a program” on page 103
• “Importing a text file as a playlist” on page 104
05 April 2010 K2 AppCenter User Manual 81
Page 82

Chapter 6 Working with playlists
Introducing Playlist application
In addition to playing a single clip, AppCenter play channels can also play lists that
contain clips and programs stored on the K2 system.
The following table summarizes the basic features supported in playlist application.
Basic Feature Description
Editing playlists
Editing ev ents in the list
Event transitions
Loop on a section
Loop on a list
Pause at the end of events
Pause at the end of sections
Saving a pl aylist as a program
GPI output triggers
GPI Input triggers
Events in a playlist can be rearranged or removed,
and new events added between existing ones.
Events can be renamed and trimmed. Trimming
an event moves the mark-in and mark-out points.
This only affects the event, not the source clip.
Transitions between all events in a list are made
by a cut, i.e. the last frame of an event is followed
by the first frame of the next event.
Sections are provided within the list to provide
flexibility during playout. A section can be set up
to loop indefinitely. The section can be taken out
of the loop by manual intervention.
Lists can be set up to loop indefinitely. The list
can be taken out of the loop by manual
intervention.
Events can pause playout at their end. At event
pauses, you can choose to show black, freeze on
last frame, or freeze on next event.
Sections can pause playout at their end. At section
pauses, you can choose to show black, freeze on
last frame, or freeze on next event.
Playlists can be saved as a program. This saves
the media and transitions, but nothing that breaks
the flow of playout, such as pauses. You can
insert a program into a playlist, or play a program
in the standard Player application.
AppCenter K2 Summit Production Client
provides 12 GPI output signals through a rear
panel connector for controlling external
equipment. You can configure events in a playlist
to trigger GPI outputs. A GPI trigger does not
disrupt playout of the play events. GPI triggers
can be set to occur at the beginning or end of an
event or section, or at these points with some
offset.
You can assign any of the 12 GPI inputs to control
one or more play channels and the action you
want the AppCenter channel(s) to take— play,
VAR play, cue next event, or cue next section,
etc. AppCenter includes more extensive GPI
output trigger features.
82 K2 AppCenter User Manual 05 April 2010
Page 83

Before using Playlist application
Read the following sections before using Playlist application.
• “Terms used in Playlist application” on page 83
• “Symbols used in Playlist application” on page 83
• “Working with programs” on page 84
• “Using mixed aspect ratios in a playlist” on page 84
• “Inserting a clip that is still recording” on page 85
• “Inserting a playlist in a playlist (workarounds)” on page 85
Terms used in Playlist application
The following terms are used in the Playlist application.
Term Definition
Playlist A list is a sequence of events.
Event Events are the components that make up a list. Events are created by adding a clip
or program to sections in a list.
Section Playlists created in AppCenter contain at least one section. All events in a playlist
are contained in sections. Sections have properties that include repeat and pause. A
playlist can have up to 100 sections. Each section can contain up to 1000 events.
Source Clip The clip inserted in a list to create a play event.
Before using Playlist application
Program Playlists can be saved as a program in the K2 system. Programs created from a
playlist include all the media and transitions in the playlist, but nothing that breaks
the flow of playout, such as a pause at the end of an event. Programs are also created
from the continuous record mode.
Symbols used in Playlist application
The following table describes the symbols used to describe the properties of items in
the list— play events, sections, and the list itself.
Symbol Description
Locked
The item is locked and cannot be edited.
Pause
At the end of playout, this item will cause playout to pause.
Loop
At the end of playout, the item will repeat.
GPI Output Trigger
This event or section triggers one or more GPI outputs.
05 April 2010 K2 AppCenter User Manual 83
Page 84

Chapter 6 Working with playlists
Working with programs
A program is a clip generated from a playlist using the
Playlist application. A program includes all the media in the playlist, but does not
include any event that breaks the flow of playout such as a pauses between events.
You can insert programs into other playlists as an event, or load and play them using
the standard Player application. You can also send a program to a file or a video
network stream. (For more information on which types of file types you can send a
program to, see “Importing and exporting streaming media” on page 141.)
Using mixed aspect ratios in a playlist
AppCenter can play clips with different aspect ratios in a single playlist.
The AppCenter supports playout of mixed format clips displayed with default or
selectable modes such as bars, crop, or stretch on both SD and HD outputs.
The following table describes how the system displays mixed aspect ratios
Event Aspect Ratio Output format
SD HD
SD (4:3) No conversion Bar
Save As Program feature in the
.
(Pillarbox)
Half Bar
(Half-Pillarbox)
SD (16:9)
(Widescreen
selected)
No conversion
Using mixed video resolutions in a single playlist
Playlists can contain events with different video resolutions. When the list is played,
the media is converted as needed to match the play channel video output type selected.
Crop (zoom)
Stretch
No stretching; video scales up to fill
the whole screen irrespective of the
aspect ratio setting.
84 K2 AppCenter User Manual 05 April 2010
Page 85

Inserting a clip that is still recording
Clips that are currently recording behave as other clips do in a list except for the
following restriction: the event-out timecode is set to the last recorded frame at the
time the clip is inserted. You can move the event-out timecode as needed while the
clip is still recording or after record is stopped.
Improving performance while modifying a playlist
If you are making multiple changes to a playlist, especially a long playlist, you can
improve response time by playing the list while editing it. This allows you to add/
remove/modify events without waiting for database updates, since changes to the
playlist are not saved until playout stops.
Inserting a playlist in a playlist (workarounds)
While AppCenter does not support a true “nested” playlist, you can retain some of the
functionality of inserting a playlist in a playlist in the following ways.
• Save the list as a program, then insert it into another playlist as an event.
• Use multi-item select and copy/paste.
• Copy/paste events or sections within the same list or from other lists.
Selecting Playlist application
• Copy the list in the Clips pane, then load and edit the list.
Selecting Playlist application
The Playlist application requires a single play channel. If a play channel is currently
being used by another application, you can select the Playlist application. Selecting
the Playlist application causes the current application to exit when Playlist application
is started.
To start Playlist application on a play channel, in the channel’s monitor pane, select
the application drop-down list and choose
application and becomes the selected channel.
Changing the channel application in AppCenter to Playlist switches the working bin
to the bin displayed in the Clips pane rather than the bin specified for that channel.
This behavior is also observed if you have the working bin set to one bin but load a
clip from another bin onto the channel.
Guide to using Playlist application
Playlist allows you to manage a list— insert, move, or modify events, and to control
playout of the list. You can select the type of display for the asset list– text view, or
thumbnail view. (See “Selecting Text or Thumbnail view” on page 89.) The
following describes the basic controls.
Playlist. The channel switches to Playlist
05 April 2010 K2 AppCenter User Manual 85
Page 86

Chapter 6 Working with playlists
Assignable
Buttons
(Default buttons
are shown)
5
6
Event List -- Thumbnail View
(Text view not shown)
Time Cursor
(Displays the current
play position)
Playlist
Timecode
Section
(A playlist has at
least one section)
1
2
3
Countdown
(Can display time
to next event, section,
or end of list)
4
4
List in thumbnail mode
Control Description and User Operation
1
List Timecode Though each play event contains the timecode information from its
2
Section (Text View)
Section (Thumbnail
View)
3
Countdown Timecode Displays the time to the next event, section or end of the list.
4
Assignable Buttons Assignable buttons allow you to modify the buttons located in the
source clip, the timecode for the list is generated internally. This
timecode can be an offset from a specific timecode (the default is
01:00:00;00).See “Setting the playlist timecode” on page 103.
A list has at least one section, but can have up to 100. All events
belong to a section, and each section can have up to 1000 events. In
Thumbnail View, the section is displayed as a Time Dome which
shows the amount of the section that has played. An empty Time
Dome indicates the section has not started to play.
Sections can be expanded or collapsed to reveal or hide the events
that belong to the section. Expanded sections are indicated by a '-'
symbol.
Playlist toolbar to best suit your workflow. Holding down a button
opens the button pop-up menu that lists the alternative button
choices.
86 K2 AppCenter User Manual 05 April 2010
Page 87

Guide to using Playlist application
Control Description and User Operation
5
Event List The Event List contains play events.
Play events are created from clips or programs that can be added to
the list in two ways: drag and drop from the Clips pane or using the
Insert button in the Clips pane. By default, play events added to a list
inherit the source clip’s name, but you can rename events.
Play events and sections can be configured to trigger GPI outputs.
GPI triggers can be set to occur when the event or section starts,
ends, or at these points plus or minus some offset. A GPI trigger does
not disrupt playout of the play events that follow it. See “Adding GPI
output triggers to playlists” on page 100.
You can view the Event List in either the text view or thumbnail
view. Thumbnail view displays clip thumbnails along with Time
Domes for the list play progress, and section play progress. To
change the view, select Options in the Playlist menu.
6
Time Cursor The time cursor indicates the current play position. The time cursor
is displayed over the event currently being played.
05 April 2010 K2 AppCenter User Manual 87
Page 88

Chapter 6 Working with playlists
Control Description and User Operation
Playlist Menu Insert Event– Opens the Insert Event dialog box, which allows you
to insert all event types. See “Inserting media in a playlist” on
page 90.
Add Section– Adds a section to the end of the list. Once you add the
section, you can move it. See “Managing sections in a list” on
page 95.
New List– Opens the New List dialog box where you can choose the
current bin and specify the new list name before creating it. When a
new list is created, the current list is ejected and the new list is
created containing one section and no events. See “Creating a simple
playlist” on page 89.
Open List– Closes the current list and allows you to open an
existing list. See “Playing a list” on page 92.
Eject List – Ejects the current list. See “Ejecting a playlist” on
page 93.
Import List—Imports a text file and saves it in a playlist format. See
“Importing a text file as a playlist” on page 104.
Rename List– Rename the list currently loaded in Playlist
application.
Save As Program– Saves the current list as a program. The new
program is listed in the Clips pane with other assets. Programs can
be played using the Player application, or inserted in a list in Playlist
application. See “Saving a list as a program” on page 103.
Set Event In– Used to change the in point of the event. Event In/Out
changes do not affect the source clip's mark in and out values, but
only the event's marks used by the Playlist.
Set Event Out– Used to change the out point of the event. Event In/
Out changes do not affect the source clip's mark in and out values,
but only the event's marks used by the Playlist.
Split event— Used to break one event into two events of the same
name.
Combine events—Used to combine two events into one in a
playlist. See “Combining events in a playlist” on page 91.
Locate– Locates the list or source clip for an event, depending on the
selection, in the Clips pane. See “Locating a playlist in the Clips
pane” on page 103 or “Locating the event source clip” on page 95.
Properties – Opens the properties dialog box for the selected item—
list, section, or play event. Properties dialog box includes pages for
setting up list timecode, adding metadata, and setting list attributes
that will occur when playback reaches the end of the list. Options
include repeat, or pause. See “Viewing playlist properties” on
page 103. Section properties and event properties dialog boxes
include options for setting the end behavior— repeat or pause, and
GPI output properties. See “Viewing playlist properties” on
page 103.
Move Up– Moves the selected event up in the list. See “Editing and
rearranging events in a playlist” on page 93.
Move Down– Moves the selected event down in the list. See
“Editing and rearranging events in a playlist” on page 93.
Goto– Opens the Goto pop-up menu which allows you to jump to
selection, next event, next section, or a timecode that you specify.
See “Playing a list” on page 92.
Options– Opens the Options dialog box which allows you to choose
the list monitoring information displayed in the Playlist application
and the monitor pane.
88 K2 AppCenter User Manual 05 April 2010
Page 89

Selecting Text or Thumbnail view
The event list has two viewing modes: Thumbnail view and Text view. Thumbnail
view displays events as thumbnails along with the section and the list time domes. The
text view lists events descriptions in text format. You can select which event attributes
are displayed in text view.
Use the following steps to select the view mode best for you:
Selecting Text or Thumbnail view
1. Select
Playlist | Options.
The Options dialog box appears with the View settings tab selected.
2. Select a view mode:
Text View - displays events in text form including an event icon, name and an
additional attribute selectable using the
Duration, Name only, Start time, or Start time and duration.
Thumbnail View - displays events in thumbnail form along with the event name.
3. Click
OK to save settings and close the Options dialog box.
Selecting monitor information
You can select the monitoring information displayed for the list. The selections you
make determine the list attributes that are displayed in the following locations:
• List information displayed in the monitor pane - List information is displayed
under the thumbnail in the monitor pane. You can select the list attributes displayed
in the monitor pane.
• Countdown timecode displayed in the Playlist toolbar - The countdown timer
can count down to the next section, the next event, or the end of list.
To select the monitor mode:
1. Select
Playlist | Options.
Show drop-down list. Show attributes are:
The Options dialog box appears.
2. Click the
Monitor tab.
The Monitor settings page appears.
3. Select one of the monitor information options.
4. Click
OK to save settings and close the Options dialog box.
Creating a simple playlist
When Playlist application is started, an empty channel pane displays “No List”. You
must create a new list. The first list is by default labeled “List”; new lists are named
“List_n”, where n is the first number that results in a unique file name. You cannot
eject a list. Instead, create a new list or open an existing playlist.
To create a new list:
1. Select
05 April 2010 K2 AppCenter User Manual 89
Playlist | New List.
The New List dialog box is displayed.
Page 90

Chapter 6 Working with playlists
-- or --
Click the Insert button and select an event
2. Select the bin where you want to store the list, edit the default name for the new
list, then click
NOTE: Names can contain spaces. The following characters are not allowed: \
(backward slash), / (forward slash), : (colon), *(asterisk), ? (question mark), < (less
than), >(greater than), % (percent sign) and | (pipe) as well as " (double quote) and
~(tilde) at the beginning of the name. For more information on naming, see
“Understanding asset and bin naming limits” on page 114.
The current list closes and the new list is created containing one section and no events.
Inserting media in a playlist
A new list contains one section and no events. Events are played in the order they are
inserted. You can move events in the list up or down, or insert new events between
existing ones by selecting the insertion point.
Selecting the insertion point in a playlist
OK.
• When using the
selected event.
• When using the drag and drop method, you see a drop cursor as you drag the event
over the list. The drop cursor indicates where the new event will be inserted.
NOTE: The time cursor only indicates the current play position, and cannot be
selected and moved. Selecting and dragging may inadvertently select and move the
event.
Inserting events
To insert a play event, do one of the following:
• Drag and drop assets from the Clips pane using the drop cursor to locate the
insertion point.
• Drag and drop from the monitor pane of a play channel. Select the thumbnail or
video image, then drag to the playlist channel. Use the drop cursor to locate the
insertion point.
• Double-click an asset in the Clips pane. The asset is inserted in the list after the
insertion point.
• Select an event in the list as the insert point, then select one or more assets in the
Clips pane. Click
• Select an event in the list as the insert point, then click
channel, and select one or more assets in the Insert Event dialog box. Click
to insert the events.
Insert button or menu item, the insertion point is after the currently
Insert in the Clips pane to insert the event after the insert point.
Insert in the Playlist
OK
• In the Insert Event dialog box you can click on the
Event Name text entry control
and type the name of a clip. This selects the clip for insertion into the playlist.
With this method it is no longer necessary to browse to the clip in order to select
90 K2 AppCenter User Manual 05 April 2010
Page 91

it.
• Press CTRL + N to open a text entry dialog in which you can type the name of
a clip. This selects the clip for insertion into the playlist.
Using copy and paste to insert play events
Any asset that can be selected can be placed on the clipboard and pasted into another
application that accepts that type of asset. For example, you can copy a play event
from the Playlist application on one play channel and paste it into the Playlist
application on another play channel. You can also copy a clip from the Clips pane and
paste it into the Playlist application.
The Cut, Copy, and Paste operations are performed by using the AppCenter's Edit
menu, by using the standard keyboard shortcuts (CTRL+C, CTRL+X, CTRL+V), or
by using the right-click menus of cut, copy and paste.
To insert an asset from the Clips pane using the clipboard:
1. In the Clips pane, select one or more assets.
2. Copy the assets to the clip board.
Combining events in a playlist
3. Select an insertion point in the list.
4. Paste the asset from the clipboard into the list.
To use the clipboard to move or copy events already in a play list:
1. Select the event(s) you wish to move or duplicate.
2. Copy or Cut the selection to the clipboard.
3. Select the new insertion point in the list.
4. Paste the event(s) from the clipboard into the list.
Combining events in a playlist
To combine two or more events in a playlist into one event, follow these steps:
1. Highlight all events. A blue line is visible around all the highlighted events.
2. From the file menu, select
under the name of the first event in the selection.
NOTE: The individual assets are not combined, merely the events in the playlist.
Playlist | Combine events. The events are now combined
Splitting an event in a playlist
To split an event into two events, follow these steps:
1. Highlight the event. A blue line is visible around the highlighted event.
2. Play the event to the point where you want to split it.
3. From the file menu, select
events of the same name. You can rename or delete one event without affecting the
other.
05 April 2010 K2 AppCenter User Manual 91
Playlist | Split events. The event is now split into two
Page 92

Chapter 6 Working with playlists
NOTE: The asset is not split and renamed, merely the event.
Playing a list
Once the list is complete, you can open it, play it, and eject it as described in the
following sections.
Opening a playlist
If you want to open the same playlist simultaneously on multiple channels, the
channels must be running on the same K2 Summit Production Client, otherwise, a
“Failed to open…” message is displayed.
To open a list, do the following:
1. Select
The Open List dialog box appears.
2. Locate and select the list you want to open, then click
Before the list is opened, the currently loaded list is closed. In Playlist application
there is no eject button, so you can open an existing list or create a new list without
manually closing the currently loaded list.
NOTE: If a playlist has been locked, you cannot open it.
Playing a playlist
You can perform the following operations to play a playlist using the AppCenter user
interface. You can also use the keyboard shortcuts for all transport controls.
To... Do this...
Begin playing at the top of the list Open the list, then press the Play button on the
Continue playout after a pause in the list Press the Play button on the onscreen transport
Play the specified timecode Select Goto, and then choose Timecode in the Goto
Play the next event Select Goto, and then choose Next Event in the
Playlist | Open List.
Open.
onscreen transport controls.
controls.
pop-up menu. Specify a timecode in the dialog box
and click OK.
Goto pop-up menu.
Play the next section Select Goto, and then choose Next Section in the
Goto pop-up menu.
Play an event or section First, select the event or section, then click Goto,
and choose Selection in the Goto pop-up menu.
Then press the Play button on the onscreen transport
controls.
Avoid delays when jumping to a new event or
section
First select the new event or section, then wait until
the diamond or standby icon is filled in before
jumping to the new event or section.
Playlists always play the default audio tracks, even when named mapping is in place.
92 K2 AppCenter User Manual 05 April 2010
Page 93

Ejecting a playlist
To eject a list, do the following:
Editing and rearranging events in a playlist
1. Select
Playlist | Eject List.
The list is ejected from the Playlist channel.
Editing and rearranging events in a playlist
The following topics explain how to work with events in a playlist:
• “Editing event marks” on page 93
• “Moving events” on page 94
• “Removing events” on page 94
• “Copying events” on page 94
• “Renaming events” on page 94
• “Locating the event source clip” on page 95
• “Viewing event properties” on page 95
Editing event marks
You cannot edit events while the list is playing. Every event has a event-in point and
an event-out point that refer to the first and last frames displayed when the event
plays. When first created, event marks are set to the mark-in and mark-out of the
source clip. You can edit the event marks in order to reference only the desired media.
The following restrictions apply when editing event marks:
• Event-in must precede the Event-out.
• Event marks cannot be set outside the recorded media of the source clip.
NOTE: If more media exists outside the current mark, a <<< or >>> symbol is
displayed beneath the current event mark timecode.
Setting the Event In/Out marks
To move clip marks:
1. Use the transport controls to locate the desired frame.
2. Select
Playlist | Set Event In to set mark-in point or Playlist | Set Event Out to set
mark-out point. The Confirm Marks dialog box opens.
3. Click
Modifying the Event In/Out marks
Yes to accept the edited mark.
To modify event marks:
1. Select the event you are modifying.
2. Open the properties dialog box by doing one of the following:
• Select
Playlist | Properties.
05 April 2010 K2 AppCenter User Manual 93
Page 94

Chapter 6 Working with playlists
•Click the Properties button.
3. Click the
4. Select the Event In, Event Out, or Length edit control and do one of the following:
• To modify marks, enter the timecode value to specify mark locations.
• To clear marks, click the
5. Click
Moving events
To the change the order of events in a list, perform one of the following:
• Drag and drop the event into another location in the list.
• Select an event, then choose
The event moves up or down one position in the list.
•Use the
inserted after the currently selected event.
NOTE: You can paste events that you copied from a list running on another playlist
channel.
Removing events
General tab.
Clear button or delete the timecode value.
OK.
Move Up or Move Down buttons on the Playlist menu.
Edit menu to Copy, Cut, or Paste the event. When you paste the event, it is
To remove an event, perform one of the following:
• Select the event, then press the Delete key on your keyboard.
• Select the event, right-click, then select
•Use the
removed from this playlist.)
• Right-click on the event and select
removed from this playlist.)
Copying events
To copy an event, perform one of the following:
•Use the
• Right-click on the event and select
Renaming events
To rename an event, perform the following:
• Select the event, then select
the Properties dialog box and use the on-screen keyboard to change the name; click
OK.
Remove.
Edit menu to Cut the event. (When you paste the event elsewhere, it is
Cut. (When you paste the event elsewhere, it is
Edit menu to Copy the event.
Copy.
Playlist | Properties. Click on the name of the event in
94 K2 AppCenter User Manual 05 April 2010
Page 95

NOTE: Names can contain spaces. The following characters are not allowed: \
(backward slash), / (forward slash), : (colon), *(asterisk), ? (question mark), < (less
than), >(greater than), % (percent sign) and | (pipe) as well as " (double quote) and
~(tilde) at the beginning of the name. For more information on naming, see
“Understanding asset and bin naming limits” on page 114.
Locating the event source clip
The Locate menu item is used to locate and select the source clip in the Clips pane
that generates an event.
To locate the source clip:
Managing sections in a list
• Select the event, then select
The source clip is selected in the Clips pane.
Viewing event properties
1. Select the event.
2. Open the properties dialog box by doing one of the following:
• Select
•Click the
Playlist | Properties.
Properties button.
• Right-click the event and select
Related topics
• “To pause at the end of an event” on page 97
Managing sections in a list
A list has at least one section; all events belong to a section. Sections management
tasks include the following:
• “Adding and removing sections”
• “Moving and copying sections”
• “Renaming sections”
Playlist | Locate.
Properties.
Adding and removing sections
A playlist has at least one section but can have up to 100 sections. All events belong
to a section, and each section can have up to 1000 events.
To add a section:
1. Select
2. Use the
Playlist | Add Section. The new section is inserted at the end of the list.
Edit menu to Cut, Copy, or Paste a section. When you paste the section, it
is inserted after the currently selected section.
NOTE: You can paste a section that you copied from a list running on another play
channel.
3. Right-click on the section and select
05 April 2010 K2 AppCenter User Manual 95
Cut, Copy, or Paste.
Page 96

Chapter 6 Working with playlists
To remove a section, perform one of the following:
• Select the section in the list, right-click and select
•Use the
Edit menu to Cut a section, or
• Select the section, then click the
screen viewing mode (unless you have customized your user interface to include
it as one of the assignable buttons).
Moving and copying sections
To the change the order of sections in a list, perform one of the following:
• Drag and drop the section into another location in the list Or,
• Select an section, then select
up or down one position in the list.) Or,
•Use the
Copy, or Paste the section. When you paste the section, it is inserted after the
Edit menu in the AppCenter toolbar or standard keyboard shortcuts to Cut,
currently selected section. Or, Right-click on the section and select
Paste.
NOTE: You can paste sections that you copied from a list running on another play
channel.
Renaming sections
To rename a section:
Remove, or
Remove button. This button only appears in full
Playlist | Move Up or Move Do wn. (The section moves
Cut, Copy, or
1. Select the section.
2. Open the properties dialog box by doing one of the following:
• Select
•Click the
Playlist | Properties. Or
Properties button. Or
• Right-click on the section and select
3. Select the section name, then enter a new name.
NOTE: Names can contain spaces. The following characters are not allowed: \
(backward slash), / (forward slash), : (colon), *(asterisk), ? (question mark), < (less
than), >(greater than), % (percent sign) and | (pipe) as well as " (double quote) and
~(tilde) at the beginning of the name. For more information on naming, see
“Understanding asset and bin naming limits” on page 114.
4. Click
OK.
Adding play effects
These settings determine what happens at the end of the list, section, or event when
the list is played.
Topics in this section include:
• “To repeat at the end of a playlist” on page 97
Properties.
96 K2 AppCenter User Manual 05 April 2010
Page 97

• “To pause at the end of a section” on page 97
• “To pause at the end of an event” on page 97
• “To add pauses or transitions to all events in a playlist, section, or event” on
page 99
• “To remove pause from all events in a section” on page 100
To repeat at the end of a playlist
You can loop on a list until you manually stop playing.
1. Open the list properties dialog box by doing one of the following:
Adding play effects
• Select the list icon in the event list, then click the
• Right-click on a list and select
2. Click
3. Click
End, then choose the Repeat option.
OK to close.
NOTE: If you leave a player channel in Loop mode, a remote protocol-controlled
playlist might either miss all of the events and stop or simply cue the clip and not play.
To pause at the end of a section
To pause at the end of a section:
1. Select the section.
2. Open the properties dialog box by doing one of the following:
• Select the section icon in the event list, then click the
• Right-click on a section and select
3. Click
4. Select the
5. Click
End.
Pause drop-down list. Use the drop-down list to choose whether to
Freeze on last frame, Freeze on next event, none, Show black or Show E-to-E.
OK.
Properties button.
Properties.
Properties button.
Properties.
Based on your selection, the section repeats when it comes to the end or each
event's properties are modified to include the specified pause type. During
playback, each event will remain paused at its end until you intervene. The pause
symbol appears in the corner of the event thumbnail.
To pause at the end of an event
1. Select the event.
2. Open the properties dialog box by doing one of the following:
• Select the list icon in the event list, then click the
• Right-click on a list and select
3. Click
05 April 2010 K2 AppCenter User Manual 97
End.
Properties.
Properties button.
Page 98

Chapter 6 Working with playlists
4. Use the Pause drop-down list to choose whether to Freeze o n l ast frame, Freeze on
next event, Show black
or Show E-to-E.
5. Click
Related topics
• “To add pauses or transitions to all events in a playlist, section, or event” on
• “To remove pause from all events in a section” on page 100
About transition effects
This feature is part of the licensable AppCenter Pro option on supported formats. For
more information about supported formats, see “Operational specifications” on
page 204.
In Summit, AppCenter Pro lets you make transitions to all events in a section or list.
There are two types of transitions: you can apply transitions to all the events in a
section or playlist, or you can apply transitions that only apply when you skip from
one event to another.
Transition effects applied to playlist, section, or event properties
OK.
The pause symbol
page 99
470 1030
appears in the corner of the event thumbnail.
Event
Event
A
100 1000 500 800
When you use the Properties| All Events feature to
apply a transition such as the “Dissolve” effect
to adjacent events, there is some overlap. In this example,
Event B starts at 500, but AppCenter Pro starts the fade
effect at 470. If there is no extra material at 470, a still
frame will be displayed until 500 is reached.
This effect can apply to an event, a section, or a whole playlist
depending on whether you have selected
playlist, section, or clip properties.
B
98 K2 AppCenter User Manual 05 April 2010
Page 99

Transition effects applied while skipping from one event to another
100 1000
A
C
When you apply a transition effect such as “Dissolve” and
skip from one event to another using Options | Go To ,
AppCenter Pro starts the effect at the indicated point on
event A and ends the effect at the indicated point on event C.
(There is no overlap.)
500 800
Effect starts
Effect ends
Event
Event
Adding play effects
To add pauses or transitions to all events in a playlist, section, or event
Properties for each event currently in this section of the playlist are modified to
include the specified pause or transition type. If you later add an event to this section
and you want it to have the same effect, you must manually modify its properties.
Properties of events added later are not automatically modified unless you select
Apply to new events.
If you have selected Pause, during playback each event will remain paused at its end
until you intervene. The pause symbol appears in the corner of the event
thumbnail.
For a description of how AppCenter Pro handles transitions in a playlist, refer to
“Transition effects applied to playlist, section, or event properties” on page 98.
NOTE: Apart from Freeze, all transition effects require AppCenter Pro licensing.
To add a pause or transition at the end of an event or all events in a playlist or section:
1. Select the event, section, or list.
2. Open the properties dialog box by doing one of the following:
•Click the
• Right-click on a section and select
3. Click
Properties button.
All Events.
Properties.
4. To add a pause, select the
on next event
05 April 2010 K2 AppCenter User Manual 99
, none, show black, or show E to E.
Pause drop-down list, select freeze on last frame, freeze
Page 100

Chapter 6 Working with playlists
5. To add a transition, select the Transition dropdown list, select none, dissolve, Fade
thru black, Fade thru white, Audio cros s-fa de
include audio.
click
6. If you are adding a transition, you can also enter a time for the length of the
transition:
7. To have the effect apply to events added from this point on, Apply to New Events
button.
.25, .50, .75, 1.00, 1.50, or 2.00 seconds.
, or Audio fade thru silence. If desired,
8. When finished, click the
Apply All button. (If you click OK, the dialog box closes
without saving any changes.)
To add transitions to all events in a playlist
For a description of how AppCenter Pro handles transitions made on the fly, refer to
“Transition effects applied while skipping from one event to another” on page 99.
NOTE: All transition effects require AppCenter Pro licensing.
To add an on-the-fly pause or transition to a playlist:
1. With the playlist open, select
Playlist| Options and select the Go To tab.
2. Select the desired transition, and click
The time for the length of the transition is limited to 0.5 seconds or less.
When you use the
Go To feature to skip from one event, the transition takes effect.
To remove pause from all events in a section
To remove pauses at the end of all section events:
1. Select the section.
2. Open the properties dialog box by doing one of the following:
•Click the
Properties button.
OK.
• Right-click on a section and select
3. Click
4. Select the
All Events.
Change event pauses check box, then choose the Remove all pauses
Properties.
option.
5. Click
OK.
Pauses are removed from all events in the section. The section now plays without
pausing between any events.
Adding GPI output triggers to playlists
You can assign GPI output triggers to events and sections in a playlist. The GPI
outputs can be used to trigger external equipment when the list plays. Before you can
use GPI output triggers in a list, you must use Configuration Manager to assign GPI
outputs to a channel that is running the Playlist application. If you want to play a list
that was created on another channel, you must ensure that GPI triggers assigned to all
100 K2 AppCenter User Manual 05 April 2010
 Loading...