

Page 1

ITX
System Administrator Guide
INTEGRATED PLAYOUT
iTX v2.6
2015-03-23
Page 2

Title
System Administrator Guide for iTX 2.6 (Piccadilly)
First Issues
16 March 2015
Copyright & Trademark Notice
Copyright © 2015 Grass Valley USA, LLC. All rights reserved.
Belden, Belden Sending All The Right Signals, and the Belden logo are trademarks or registered
trademarks of Belden Inc. or its affiliated companies in the United States and other jurisdictions.
Grass Valley and iTX are trademarks or registered trademarks of Grass Valley, a Belden Brand.
Belden Inc., Grass Valley and other parties may also have trademark rights in other terms used
herein.
Terms and Conditions
Please read the following terms and conditions carefully. By using iTX v2.6 documentation, you
agree to the following terms and conditions.
Grass Valley, a Belden Brand (“Grass Valley”) hereby grants permission and license to owners of iTX
to use their product manuals for their own internal business use. Manuals for Grass Valley products
may not be reproduced or transmitted in any form or by any means, electronic or mechanical,
including photocopying and recording, for any purpose unless specifically authorized in writing by
Grass Valley.
A Grass Valley manual may have been revised to reflect changes made to the product during its
manufacturing life. Thus, different versions of a manual may exist for any given product. Care
should be taken to ensure that one obtains the proper manual version for a specific product serial
number.
Information in this document is subject to change without notice and does not represent a
commitment on the part of Grass Valley.
Warranty information is available in the Support section of the Grass Valley Web site
(www.grassvalley.com).
Page 3

Contents
About this manual .......................................................................................................... 21
Software versions ................................................................................................................... 21
Assumptions ........................................................................................................................... 21
About the iTX system ...................................................................................................... 22
System architecture ............................................................................................................... 22
Service-connection model and system domains in iTX v1 ............................................................. 22
Service-connection models and system domains in iTX v2 ............................................................ 22
Merged services and new services ................................................................................................. 23
iTX software modules ............................................................................................................. 23
Drivers for SDI video cards ............................................................................................................. 24
Processing of multi-channel audio ................................................................................................. 24
iTX machines, their operating systems and other required software ................................... 24
Database Server – one per system ................................................................................................. 24
Media Store – one or more per system ......................................................................................... 25
Output Server – one per playout channel (SD or HD) .................................................................... 25
Desktop Client workstation – one per operating position. ............................................................ 27
Encode Server – number dependent on the required capacity for simultaneous recordings ....... 27
iTX system design ................................................................................................................... 28
System time source ................................................................................................................ 28
Back-up protection ................................................................................................................. 28
System options ....................................................................................................................... 28
Preparing a system for iTX software .............................................................................. 30
Network connection............................................................................................................... 30
Using a DHCP server to allocate an IP address for a Locator Service machine ...................... 30
Locator Service – name resolution......................................................................................... 30
General machine requirements ............................................................................................. 31
Hard-disk size ................................................................................................................................. 31
Date and time properties ............................................................................................................... 31
Automatic logon ............................................................................................................................. 31
Windows error reporting ............................................................................................................... 31
Windows updates and security ...................................................................................................... 31
Windows Indexing .......................................................................................................................... 32
Shutdown Event Tracker ................................................................................................................ 32
Response to Windows system failure ............................................................................................ 33
Windows event logs ....................................................................................................................... 33
Network adapters – binding order ................................................................................................. 33
Display and power-saving properties ............................................................................................. 34
Preparing the Database Server machine ............................................................................... 34
March 2015 System Administrator Guide Page 3 of 404
Page 4

Microsoft SQL Server log-in password ........................................................................................... 34
Install Microsoft SQL Server 2008 .................................................................................................. 34
Configure SQL Server...................................................................................................................... 35
Preparing the Media Store ..................................................................................................... 35
Preparing Output Server machines ........................................................................................ 36
Driver for SDI video card ................................................................................................................ 36
License dongle ................................................................................................................................ 36
Windows sound scheme ................................................................................................................ 36
Smooth edges of screen fonts ........................................................................................................ 36
Preparing Encode Server machines ....................................................................................... 36
Windows sound scheme ................................................................................................................ 37
Direct connection to a VTR............................................................................................................. 37
Installing Drivers for SDI video cards ..................................................................................... 37
AJA video card driver version ......................................................................................................... 37
Installing the drivers ....................................................................................................................... 38
Steps to follow when using the Hardware Update Wizard ............................................................ 39
Installing iTX software modules ..................................................................................... 40
Installation notes.................................................................................................................... 40
Pre-installation check list ....................................................................................................... 41
Running the iTX installer ........................................................................................................ 42
Start the iTX installer ...................................................................................................................... 42
About the installer configuration file ............................................................................................. 44
About the main iTX Installer dialog ................................................................................................ 45
Running the iTX installer to upgrade or modify an installation ..................................................... 45
Setting up an iTX domain and load-balanced Locator Services ...................................................... 46
Install the Database Server module ....................................................................................... 48
Installing the iTX Database on a Remote Server .................................................................... 49
The Add Tables to Database dialog: ............................................................................................... 50
The Time Service Config dialog: ..................................................................................................... 51
Install the Media Watcher on a stand-alone Media Store, or other machine ....................... 53
iTX Desktop layouts ........................................................................................................................ 54
Configuring a Media Watcher after installation ............................................................................. 54
Install an Output Server module ............................................................................................ 55
The iTX Channel Config dialog (Output Server 1 only) ................................................................... 57
Configuring services on the Output Server machine after installation .......................................... 59
Install a Desktop Client module ............................................................................................. 59
Check the connection of an iTX Desktop to the Media Store ........................................................ 59
Digital Dorothy files ........................................................................................................................ 59
Install the Software Distributor module on a stand-alone machine ..................................... 60
Install the Encode Server module .......................................................................................... 61
Importing encode presets .............................................................................................................. 62
Re-configuring a service after installation ............................................................................. 62
Creating a Locator domain configuration file ........................................................................ 63
Locator Service Config .................................................................................................................... 63
March 2015 System Administrator Guide Page 4 of 404
Page 5

About the DomainConfig.xml file ................................................................................................... 64
Create a DomainConfig.xml file ...................................................................................................... 65
Setting up services to start automatically on machine start-up ............................................ 66
Starting the iTX system services ..................................................................................... 67
Start the system services ............................................................................................................... 67
Checking the Server Controllers ............................................................................................. 68
Checking the iTX system services ........................................................................................... 70
Adding users to the security system ...................................................................................... 71
Security in an iTX system ................................................................................................ 72
The security system of the iTX System Service ...................................................................... 72
Users............................................................................................................................................... 72
Groups ............................................................................................................................................ 72
Security attributes .......................................................................................................................... 73
Configuring the security system ..................................................................................................... 74
The built-in administrator .............................................................................................................. 75
About Manual Logon ...................................................................................................................... 75
About the Security Tool ......................................................................................................... 76
Logging onto the Security Tool ....................................................................................................... 76
The Security Tool menus ................................................................................................................ 76
Using the Security Tool .......................................................................................................... 81
Open the Security Tool ................................................................................................................... 81
Manually log onto the Security Tool with administrator rights ..................................................... 81
Import users, groups or computers ............................................................................................... 81
Add a group .................................................................................................................................... 82
Add a user ...................................................................................................................................... 83
Modify the membership of a group ............................................................................................... 83
Assign a user, computer or application to one or more groups..................................................... 83
Set security options for a group, user, computer or application ................................................... 84
Set a manual log-on password ....................................................................................................... 84
Configuring a Media Watcher ........................................................................................ 85
The Setup tab ......................................................................................................................... 86
File-store types ............................................................................................................................... 87
Inbox settings ......................................................................................................................... 87
Specify an Inbox folder ................................................................................................................... 87
Monitor the Inbox folder................................................................................................................ 88
Hold event durations for .osc imports ........................................................................................... 88
Create browse copies of video clips ............................................................................................... 88
Create keyframes from video clips ................................................................................................. 88
Check mono tracks for Dolby E data .............................................................................................. 88
Group mono tracks ........................................................................................................................ 88
Extended Audio language tagging for grouping mono tracks ........................................................ 89
Set a delay for media-file registration ............................................................................................ 89
Set the high-water mark for the Inbox folder ................................................................................ 90
Apply the Inbox high-water mark to Media folders on iTX Media Stores ...................................... 90
March 2015 System Administrator Guide Page 5 of 404
Page 6

Adding a file store of the store type to the File Stores list .................................................... 90
Add a file store of the store type to the File Stores list.................................................................. 91
Modify the options for a file store of the store type ..................................................................... 91
Adding a file store of the search type to the File Stores list .................................................. 92
Media Watcher plug-ins for external file stores ............................................................................ 92
About iTX timestamps on media files copied from external file stores ......................................... 95
Add a file store of the search type to the File Stores list ............................................................... 95
Set file-store options for an external IT store or Omneon video server ........................................ 96
Set file-store options for a Colossus system database ................................................................... 96
Set file-store options for a Front Porch Digital DIVArchive ............................................................ 97
Set file-store options for remote iTX domains ............................................................................... 98
Set file-store options for an FTP server .......................................................................................... 99
Set file-store options for a Suitcase TV archive .............................................................................. 99
Adding file stores of the Mirror type to the File Stores list ................................................. 100
Add a file store of the mirror type to the File Stores list .............................................................. 100
Modifying the File Stores list................................................................................................ 100
Remove a file store from the File Stores list ................................................................................ 100
Re-order file stores ....................................................................................................................... 100
Managing file stores ............................................................................................................. 101
Check the Media Watcher can access a file store ........................................................................ 101
Set up automatic access checking for file stores.......................................................................... 101
Set up the Media Watcher to recheck external file stores when searching for media files ........ 101
Set up the Media Watcher to delete old schedules ..................................................................... 102
File-copying speed................................................................................................................ 102
Change the file-copying speed ..................................................................................................... 102
Selecting default clip templates for media files imported through the Inbox ..................... 102
Select the default clip template for HD video clips ...................................................................... 103
Select the default clip template for SD video clips ....................................................................... 103
Searching for files requested by a Media Cache Service ..................................................... 103
Setting up search domains under the Domains tab ............................................................. 103
Create a central domain search list .............................................................................................. 104
Configuring a Media Watcher to copy media files to an independent back-up system ...... 104
Configuring the Time Service ........................................................................................ 105
Display the Time Service Configuration tool ................................................................................ 105
Configure the Time Service .......................................................................................................... 106
Starting iTX Desktops .................................................................................................... 107
Start an iTX Desktop ..................................................................................................................... 107
About the iTX Desktop ......................................................................................................... 107
About the iTX Desktop at a system-administrator workstation ................................................... 108
About the iTX Desktop at an operator workstation ..................................................................... 109
Checking the connection of iTX Desktops to the system services ....................................... 109
About service status indicators ............................................................................................ 110
Setting up views for workstations and operators ........................................................ 111
March 2015 System Administrator Guide Page 6 of 404
Page 7

Layout views ......................................................................................................................... 111
Selecting the workstation view or user view ............................................................................... 111
Registering of workstations and operators before the assigning of layout views ............... 112
Layouts available for layout views ....................................................................................... 112
Standard layouts .................................................................................................................. 113
Using cloned layouts ............................................................................................................ 116
Creating a system-administrator layout view ...................................................................... 116
Manage Views dialog ................................................................................................................... 116
Add layouts to your system-administrator user view .................................................................. 117
Assigning layout views from your system-administrator view ............................................ 118
Display the View Management pop-up layout ............................................................................. 120
Select a workstation layout view ................................................................................................. 120
Select a user layout view .............................................................................................................. 120
Add a layout to a layout view ....................................................................................................... 120
Change the order of layouts in a layout view............................................................................... 120
Remove a layout from a layout view ............................................................................................ 121
Refreshing a layout view .............................................................................................................. 121
About channel views ............................................................................................................ 121
Channel access levels ................................................................................................................... 122
Display the Channel View Management pop-up layout ............................................................... 122
Setting up a channel view .................................................................................................... 122
Create a channel view .................................................................................................................. 123
Select a channel view in the View Editor ..................................................................................... 123
Modify a channel view ................................................................................................................. 123
Delete a channel view .................................................................................................................. 124
Assigning a channel view ..................................................................................................... 124
Add a workstation to the Workstation Editor list ........................................................................ 124
Select a workstation in the Workstation Editor ........................................................................... 124
Assign channel views to a workstation ........................................................................................ 125
Delete a workstation from the Workstation Editor list ................................................................ 125
Modifying layouts ......................................................................................................... 126
About the layout-editing mode ............................................................................................ 127
Select the layout-editing mode .................................................................................................... 127
Configuring service-monitoring components ...................................................................... 128
Dummy routing ............................................................................................................................ 129
Connect the Server Monitor to a Database Server ...................................................................... 129
Connect a Channel Monitor to an Output Server ........................................................................ 129
Attaching an audio file to an Alert button ........................................................................... 130
Attach a sound file to an Alert button.......................................................................................... 130
Adding an Auto Failover Control to a layout ........................................................................ 130
Configuring component groups ........................................................................................... 131
Change the properties of a Group component ............................................................................ 132
Configuring the PinPoint panel on the Asset layout ............................................................ 132
Configure the group of Asset Type buttons on the PinPoint panel.............................................. 133
March 2015 System Administrator Guide Page 7 of 404
Page 8

Configuring search buttons on the Asset layout .................................................................. 133
Set the PinPoint search criteria for a search button .................................................................... 133
Configuring Encoder Settings buttons ................................................................................. 133
Configuring router components ........................................................................................... 134
Map destination buttons to router destinations ......................................................................... 134
Map source buttons to router sources ........................................................................................ 135
Set up a Destination Monitor ....................................................................................................... 136
Configuring the hold time for the previewing of events...................................................... 137
Configure the hold time for a Channel Selector ........................................................................... 137
Configure the hold time for a Timeline Display ........................................................................... 138
Configuring Re-cue control .................................................................................................. 138
Configure Re-cue to enable “Follow on air item” mode .............................................................. 138
Making a layout global ......................................................................................................... 138
Saving a layout ..................................................................................................................... 139
Exiting the layout-editing mode ........................................................................................... 139
Cancelling unsaved changes to a layout .............................................................................. 139
Configuring channels .................................................................................................... 140
Display the Channel Configuration pop-up layout ....................................................................... 140
Modifying the properties of channels .................................................................................. 140
Select a channel for configuration ............................................................................................... 140
Set channel properties ................................................................................................................. 141
Using the Channel tab .......................................................................................................... 141
Channel Config 1 – for all channel types .............................................................................. 142
Alias .............................................................................................................................................. 142
Details........................................................................................................................................... 142
Image ............................................................................................................................................ 142
Configure tracks ........................................................................................................................... 142
Channel Config 2 – for playout, edit and scheduled-ingest channels .................................. 143
Automation Engine Active ............................................................................................................ 143
Auto Cue After Live Event ............................................................................................................ 143
Fixed Availability Windows .......................................................................................................... 143
UTC Offset .................................................................................................................................... 144
Daylight Saving Time Boundaries ................................................................................................. 144
Frame rate (Output Server 1 only) ............................................................................................... 144
Channel Config 3 – for playout channels ............................................................................. 145
Type .............................................................................................................................................. 145
Hold Time ..................................................................................................................................... 146
Schedule Lock Out ........................................................................................................................ 146
Manual item updates ................................................................................................................... 146
Routing panel ............................................................................................................................... 146
Default Live Asset ......................................................................................................................... 147
Sub Channel Configuration........................................................................................................... 148
On Air ........................................................................................................................................... 148
Master/Slave Setup ...................................................................................................................... 148
March 2015 System Administrator Guide Page 8 of 404
Page 9

Simulcast Setup (Output Server 2 only) ....................................................................................... 149
Create As Run ............................................................................................................................... 149
Don’t Wait for Secondaries .......................................................................................................... 150
As-run schedules .......................................................................................................................... 150
As-run iTXML files. ........................................................................................................................ 150
As Run Start .................................................................................................................................. 151
Standby Video .............................................................................................................................. 151
Wide Screen Switch ...................................................................................................................... 151
3D Channel ................................................................................................................................... 152
Manual Events .............................................................................................................................. 152
Route on Failure ........................................................................................................................... 152
Offset Channel panel .................................................................................................................... 152
Search-domains panel .................................................................................................................. 152
Channel Config 4 – for playout channels ............................................................................. 153
Media Watcher ............................................................................................................................ 153
Off Air Slide .................................................................................................................................. 153
Breakdown Slide ........................................................................................................................... 154
Take Next Sequence ..................................................................................................................... 154
Manual Takes panel ..................................................................................................................... 154
Default Transitions panel ............................................................................................................. 154
Output Server panel ..................................................................................................................... 155
Alerts panel .................................................................................................................................. 155
Evergreen configuration panel ..................................................................................................... 155
Audio Mapping panel ................................................................................................................... 156
Advanced Aspect Ratio Control panel .......................................................................................... 156
Nielsen Ratings panel (Output Server 1 only) .............................................................................. 157
Secondary Record ........................................................................................................................ 158
Using the Configure Output Server dialog (Output Server 1 only) ...................................... 159
General Output Server settings .................................................................................................... 160
Resolution .................................................................................................................................... 160
Restart on input resolution change .............................................................................................. 161
Reference ..................................................................................................................................... 161
Cache Throttle in Mb/s ................................................................................................................ 161
SCTE 104 Signal – for sequence control ....................................................................................... 161
Enhanced SCTE104 ....................................................................................................................... 162
Dolby Digital settings.................................................................................................................... 164
Using the Configure Alerts dialog ........................................................................................ 165
Using the Advanced Aspect Ratio Control – Mapping Configuration dialog ....................... 166
The AFD code ............................................................................................................................... 167
Set the mapping configuration ..................................................................................................... 167
Use a default mapping configuration ........................................................................................... 168
Available ARC modes .................................................................................................................... 168
Media Keep List – for playout channels ............................................................................... 169
Manage the Media Keep List ........................................................................................................ 170
Export a Media Keep List .............................................................................................................. 170
March 2015 System Administrator Guide Page 9 of 404
Page 10

Import a Media Keep List ............................................................................................................. 170
The Cache Settings tab – cache channels ............................................................................ 171
Media Watcher ............................................................................................................................ 171
Search-domains panel .................................................................................................................. 171
The Scheduled Booking Config tab – scheduled-ingest channel ......................................... 172
Look Ahead ................................................................................................................................... 172
The Ingest Config tab – scheduled-ingest channel .............................................................. 172
Hold Time ..................................................................................................................................... 173
Creating device pools ................................................................................................................... 173
Using a spreadsheet to set properties for a group of playout channels.............................. 174
Configure playout and edit channels by using a spreadsheet ...................................................... 174
Configuring channel plug-ins ........................................................................................ 175
Modifying the properties of channel plug-ins...................................................................... 176
Select a channel for configuration ............................................................................................... 176
Set channel plug-in properties ..................................................................................................... 176
The Schedule Event Configuration panel ..................................................................................... 177
The External Subtitler Configuration panel .................................................................................. 178
The GPI Configuration panel ........................................................................................................ 179
The VANC Configuration panel ..................................................................................................... 179
The Clarity Configuration panel ................................................................................................... 180
The VizRT Graphic Configuration panel........................................................................................ 181
The VertigoXG panel .................................................................................................................... 181
The Studio Setup panel ................................................................................................................ 184
The Video Clip Configuration panel .............................................................................................. 184
The Schedule Import Configuration panel ................................................................................... 185
Map a generic logo to a logo file .................................................................................................. 186
Map a generic logo to an external logo ....................................................................................... 187
Set default playout properties for a mapped logo ....................................................................... 187
Map a CG template to a CG file .................................................................................................... 189
Set default playout properties for a CG template ........................................................................ 189
Map a graphics-script template to a graphics script .................................................................... 190
Set default playout properties for a graphics-script template ..................................................... 191
Delete all mappings for CG and graphics-script templates .......................................................... 191
Map a generic GPI output to an output on a GPI matrix ............................................................. 192
The Route Event Configuration panel .......................................................................................... 192
Conditional Access Configuration panel....................................................................................... 193
Scheduled Ingest Defaults panel .................................................................................................. 193
The External Logo panel ............................................................................................................... 194
The Logo Setup panel ................................................................................................................... 195
SCTE104 Configuration panel ....................................................................................................... 197
System Wide Config ...................................................................................................... 198
Displaying drop frame time codes as non-drop frame time codes ...................................... 198
Re-indexing the Opus service ....................................................................................................... 199
Configuring the audio output for a playout channel .................................................... 202
March 2015 System Administrator Guide Page 10 of 404
Page 11

About audio channels and tracks (and streams).................................................................. 202
Output-channel limit .................................................................................................................... 203
Encoded-data formats for playout ....................................................................................... 203
Configuring the audio output of an Output Server .............................................................. 203
Selecting the audio type ............................................................................................................... 204
Compatibility of source tracks ...................................................................................................... 206
Examples of a PCM stereo output from various source types ..................................................... 207
Distribution of source PCM channels in a Dolby D 5.1 output ..................................................... 207
Channel mapping ......................................................................................................................... 208
How iTX determines which source track to use for the output ................................................... 209
Track grouping .............................................................................................................................. 210
Track-group numbering for mono-track outputs ......................................................................... 211
Replicating a mono source track for a PCM stereo output track ................................................. 211
XML code for the channel-mapping configuration ...................................................................... 211
Testing a channel-mapping configuration .................................................................................... 212
Clip mapping ................................................................................................................................ 213
Using the Audio Mapping panel ........................................................................................... 213
Display the Audio Mapping panel ................................................................................................ 214
Add an audio track to the output of a playout channel ............................................................... 214
Remove an audio track from the output of a playout channel .................................................... 214
Configure an output audio track .................................................................................................. 214
Display the XML code for a channel-mapping configuration ....................................................... 215
Display a report showing the audio-track details for a video clip ................................................ 215
Modifying the list of available track tags in the Language Selection dialog ................................. 216
Upgrading a system that is configured for clip mapping ..................................................... 216
Output Server settings for Dolby Digital and Dolby E audio ................................................ 217
Running iTX services ..................................................................................................... 218
Common user-interface tabs ............................................................................................... 219
The Service Details tab ................................................................................................................. 219
The Trace Logs tab ....................................................................................................................... 221
The Installation Info tab ............................................................................................................... 222
Using the Server Controller Configuration tool ................................................................... 223
Start-up parameters ..................................................................................................................... 223
Modify start-up parameters ......................................................................................................... 226
Working with the services on the Database Server machine ...................................... 227
Service-window features of iTX services on the Database Server machine ........................ 228
System Service – Alerts Details tab .............................................................................................. 228
System Service – Alerts History tab .............................................................................................. 229
Logging Service – Messages tab ................................................................................................... 229
OPUS Service – Management, Control tab: ................................................................................. 230
OPUS Service – Management, Configuration tab: ....................................................................... 231
OPUS Service – Management, Job Types tab: .............................................................................. 231
Routing Data Service – Matrix Details tab:................................................................................... 232
Locator Service – Services tab ...................................................................................................... 232
March 2015 System Administrator Guide Page 11 of 404
Page 12

Locator Service – Domain Info tab ............................................................................................... 234
Working with the Media Watcher ................................................................................ 235
Copying and registering files ........................................................................................................ 235
Clip Templates .............................................................................................................................. 236
Re-ingesting files .......................................................................................................................... 237
Valid formats for media files and other types of file ................................................................... 237
Animated sequences and their different playout modes ............................................................ 239
Importing a single TARGA frame for use as a logo ....................................................................... 240
Registering of reference MOV and MXF files ............................................................................... 240
Registering of recordings ............................................................................................................. 241
Registering of media on an external Media Store ........................................................................ 241
Copying of media files for playout ............................................................................................... 241
Registering of Licenses ................................................................................................................. 242
Deleting files ................................................................................................................................. 242
Extra service-window features for the Media Watcher ....................................................... 243
Media Watcher – Setup tab ......................................................................................................... 243
Media Watcher – Media tab ........................................................................................................ 244
Media Watcher – Domains tab .................................................................................................... 245
Alternative Workflow-driven media imports ............................................................... 246
Media Import Configuration Tool ................................................................................. 247
Installation ........................................................................................................................... 247
Useage .................................................................................................................................. 248
Import Overrides (media registration) ......................................................................................... 248
Output Overrides (Playout) .......................................................................................................... 248
Local Overrides ............................................................................................................................. 249
Working with iTX services on an Output Server machine ............................................ 250
Extra service-window features for services on the Output Server machine ....................... 250
TXPlay and TXEdit – service-window headers .............................................................................. 251
Output Server 1 – Video Output tab ............................................................................................ 251
Output Server 1 – Engineering tab ............................................................................................... 252
The iTX Player window ......................................................................................................... 258
The Media Cache Service .............................................................................................. 259
Caching in a single domain ................................................................................................... 259
Checking media items .................................................................................................................. 259
Cache requests ............................................................................................................................. 259
Caching from an iTX Media Store ................................................................................................. 260
Caching from a search folder ....................................................................................................... 260
Caching a file that is being ingested ............................................................................................. 260
Skipping of missing media files ............................................................................................ 261
Interruption to caching ........................................................................................................ 261
Cache management ............................................................................................................. 261
Caching in a multi-domain system ....................................................................................... 261
Caching for a sub-channel .................................................................................................... 262
March 2015 System Administrator Guide Page 12 of 404
Page 13

Search order of domains in multi-domain caching .............................................................. 262
Setting up a system for multi-domain caching .................................................................... 263
Set up a system to copy files without registering them in the new domain ................................ 263
Media Cache Service window .............................................................................................. 263
Media Cache 1/2 - Service Details ................................................................................................ 263
Media Cache 1/2 - Status tab ....................................................................................................... 264
Media Cache 2 - Configuration tab .............................................................................................. 265
Cache channel in a Schedule Grid ........................................................................................ 266
Working with iTX services on an Encode Server machine ............................................ 268
Creating media files ...................................................................................................................... 268
Registering media files ................................................................................................................. 268
Recording of VANC data ............................................................................................................... 268
Video-format detection ................................................................................................................ 268
Encode Server control of a VTR .................................................................................................... 269
Extra service-window features for the services on an Encode Server machine .................. 269
Encode Server – service-window header ..................................................................................... 269
Encode Server – Settings tab ........................................................................................................ 269
Select a Media Watcher for file registration ................................................................................ 270
Import encode presets ................................................................................................................. 270
Set the in-point timecode flag for recordings .............................................................................. 271
Request the iTX Encoder to detect the timecode track in an SD video feed ............................... 271
Set the pre-roll time for a VTR connected directly to the Encode Server .................................... 271
Test the connection between an Encode Server machine and a VTR .......................................... 271
Release a locked Encode Server ................................................................................................... 272
Restart the Encode Server ............................................................................................................ 272
Request the Encode Server to create a snapshot log file ............................................................. 272
Using iTX Desktop layouts for system administration .................................................. 273
The Engineering layout ........................................................................................................ 273
Monitoring iTX services ................................................................................................................ 274
Selecting a different playout source in a transmission chain ....................................................... 274
View the Media Store Gauge ....................................................................................................... 275
Monitoring system alerts ............................................................................................................. 275
Alert buttons ................................................................................................................................ 275
Active Alerts list ............................................................................................................................ 275
Acknowledge or cancel an alert ................................................................................................... 276
Cancelling and restarting TXPlay alerts ........................................................................................ 276
Active Alerts pop-up layout .......................................................................................................... 276
System Management pop-up layouts .......................................................................................... 277
The Logging pop-up layout ................................................................................................... 278
Filtering log-message lists ............................................................................................................ 278
Creating a manual log entry ......................................................................................................... 279
The OPUS Administration pop-up layout ............................................................................. 280
Create a live event........................................................................................................................ 280
Using the Store Manager ............................................................................................................. 280
March 2015 System Administrator Guide Page 13 of 404
Page 14

Delete installation zip files ........................................................................................................... 281
Untag all assets from a category .................................................................................................. 281
Delete a category ......................................................................................................................... 281
The Naming Rule Configuration pop-up layout ................................................................... 281
Rule elements............................................................................................................................... 282
Create a naming rule .................................................................................................................... 283
Add elements to a naming rule .................................................................................................... 283
Create a sequence for an automatically generated name ........................................................... 284
The Colour Configuration pop-up layout ............................................................................. 285
Change the colour of a schedule event type ................................................................................ 286
Add a new schedule event type ................................................................................................... 286
Delete a schedule event type ....................................................................................................... 286
Restore the default colour scheme .............................................................................................. 286
The Colour Selector .............................................................................................................. 287
Use the Colour Selector................................................................................................................ 287
The Server Manager layout .................................................................................................. 288
About the Server Manager ........................................................................................................... 288
Register and connect to a Server Controller ................................................................................ 289
Upgrading or uninstalling iTX software modules on single machines ......................... 291
Upgrading an iTX software module ..................................................................................... 292
Upgrade an iTX software module ................................................................................................. 292
Uninstalling an iTX software module ................................................................................... 293
Prepare to uninstall a software module by using the iTX installer to automatically select
components ................................................................................................................................. 293
Prepare to uninstall a software module by manually selecting components .............................. 293
Uninstall components of an iTX software module ....................................................................... 294
Installing a different type of iTX software module on a machine ........................................ 294
Manually delete the installer configuration file ........................................................................... 294
Replace an installed iTX software module with a module of a different type ............................. 294
Migrating between Output Server 1 and Output Server 2 .................................................. 295
Upgrading a batch of iTX server machines ................................................................... 296
The Software Distributor ...................................................................................................... 296
Registering of iTX installation folders ........................................................................................... 296
The iTX Software Updater .................................................................................................... 297
Setting up and running an automatic batch upgrade .......................................................... 297
Register a new iTX installation folder ........................................................................................... 298
Specify upgrade requirements and start an upgrade .................................................................. 298
Create an installation report ........................................................................................................ 299
Closing down your iTX system ...................................................................................... 300
Closing down an iTX Desktop ............................................................................................... 300
Closing down a server machine ........................................................................................... 300
System resilience .......................................................................................................... 301
Service resilience modes ...................................................................................................... 301
March 2015 System Administrator Guide Page 14 of 404
Page 15

Configuring resilience modes ....................................................................................................... 302
Checking the resilience mode ...................................................................................................... 302
Redundancy options ............................................................................................................ 302
System Database .......................................................................................................................... 302
Output Server ............................................................................................................................... 302
Configuring an N+1 Server ........................................................................................................... 303
Encode Server .............................................................................................................................. 304
Media Store .................................................................................................................................. 304
Live Sources .................................................................................................................................. 304
Running a back-up Database Server .................................................................................... 305
Back-up System Database ............................................................................................................ 305
Back-up system services ............................................................................................................... 305
Preparing a back-up Database Server .......................................................................................... 305
Set up a back-up Database Server to run the iTX services ........................................................... 305
Configuring the System Service to use the back-up Database Server .......................................... 306
Running a back-up Output Server ........................................................................................ 306
Master and slave channels ........................................................................................................... 306
Failover of an Output Server ........................................................................................................ 307
Use of a dummy router to identify the master channel .............................................................. 307
Prepare the back-up Output Server cache ................................................................................... 307
Add a back-up Output Server 1 to an iTX system ......................................................................... 308
Add a back-up Output Server 2 to an iTX system ......................................................................... 308
Running a standby Output Server ........................................................................................ 308
Add a standby Output Server to an iTX system ............................................................................ 309
Failover a live schedule to a standby Output Server .................................................................... 309
Running a back-up Encode Server........................................................................................ 310
Set up a back-up Encode Server ................................................................................................... 310
Add a Output Server 2 simulcast channel to an iTX system ................................................ 310
Duplicating a live source ...................................................................................................... 311
Set up live sources ........................................................................................................................ 311
Using iTX with a matrix router ...................................................................................... 314
Setting up an iTX system for routing .................................................................................... 314
iTX router-control services ........................................................................................................... 314
Dummy router .............................................................................................................................. 314
Routing Data Service .................................................................................................................... 315
Installing a Router Bridge ..................................................................................................... 315
Machine requirements for a Router Bridge ................................................................................. 315
Install the Router Bridge .............................................................................................................. 316
Running the Router Bridge ........................................................................................................... 316
Configuring an iTX system after the installation of a Router Bridge .................................... 316
Change the name of the Router Bridge........................................................................................ 316
Test the Router Bridge connection .............................................................................................. 317
Copy crosspoint details to the System Database from the Router Bridge ................................... 317
Perform test routes from the Router Bridge ................................................................................ 317
March 2015 System Administrator Guide Page 15 of 404
Page 16

Updating information from the Router Bridge .................................................................... 318
Copy all information from the Router Bridge to the System Database ....................................... 318
Copy selected information from the Router Bridge to the System Database .............................. 319
Installing a GVG Acappella Router Server ............................................................................ 320
Install the GVG Acappella Router Server ...................................................................................... 320
Running the Acappella Router Server .......................................................................................... 320
Configuring an iTX system after the installation of a GVG Acappella Router Server ........... 321
Add the Acappella Router configuration panel to a layout .......................................................... 321
Enter network-connection details ................................................................................................ 321
Enter crosspoint details in the System Database ......................................................................... 322
Perform test routes ...................................................................................................................... 322
Installing an NVision NV9000 Router Control System Service ............................................. 322
Install the NVision NV9000 Router Service .................................................................................. 322
Running the NVision NV9000 Router Service ............................................................................... 323
Configuring an iTX system after the installation of an NVision NV9000 Router Control
System Service ..................................................................................................................... 323
Enter the router connection details in the program configuration file ....................................... 323
Enter router connection details in the NVision NV9000 Router Control System Service ............ 323
Enter crosspoint details in the System Database ......................................................................... 324
Perform test routes ...................................................................................................................... 324
Reloading Configuration changes to the NV9000 ........................................................................ 324
Installig the Evertz 7700 Router Server ................................................................................ 325
Install the Evertz7700 Router Server ........................................................................................... 325
Running the Evertz7700 Router Server ........................................................................................ 325
Configuring an iTX system after the installation of an Evertz 7700 Router Server .............. 325
Add the Evertz 7700 Router configuration panel to a layout....................................................... 325
Enter connection details in the Evertz 7700 Router configuration panel .................................... 326
Enter crosspoint details in the System Database ......................................................................... 326
Perform test routes ...................................................................................................................... 327
Installing the Quartz Router Service .................................................................................... 327
Install the Quartz Router Service ................................................................................................. 327
Running the Quartz Router Service .............................................................................................. 327
Configuring an iTX system after the installation of a Quartz Router Service....................... 327
Add the Quartz Router configuration panel to a layout............................................................... 327
Enter connection details in the Quartz Router configuration panel ............................................ 328
Enter crosspoint details in the System Database ......................................................................... 328
Perform test routes ...................................................................................................................... 329
Installing the Hardwired Router (for a dummy router) ....................................................... 329
Install the Hard Wired Router ...................................................................................................... 329
Running the Hard Wired Router................................................................................................... 329
Configuring an iTX system after the installation of a Hardwired Router ............................. 329
Stop the router-control service .................................................................................................... 329
Enter crosspoint details for the dummy router in the program configuration file ...................... 330
Example of a dummy-router configuration file ............................................................................ 330
March 2015 System Administrator Guide Page 16 of 404
Page 17

Restart the router-control service................................................................................................ 331
Enter crosspoint details in the System Database ......................................................................... 331
Perform test routes ...................................................................................................................... 331
The Routing Configuration pop-up layout ........................................................................... 331
Routing Configuration Tool .......................................................................................................... 332
Log Monitor .................................................................................................................................. 332
Display the Routing Configuration pop-up layout ........................................................................ 332
Use the Routing Configuration Tool to enter crosspoint details in the System Database ........... 332
Use the Routing Configuration Tool to perform test routes ........................................................ 333
Viewing details of a router event in the Log Monitor .................................................................. 333
Filtering by groups in routing configuration ........................................................................ 333
Setting up router control on the Router Control layout ...................................................... 334
Configuring the Router Control layout ......................................................................................... 335
Using the features on the Router Control layout ................................................................ 335
Route a source to a destination from a router control panel ...................................................... 335
Using iTX with a GPI device .......................................................................................... 337
Supported GPI devices ................................................................................................................. 337
The GPI Service ..................................................................................................................... 337
Installing the GPI Devices module ........................................................................................ 338
Configuring the GPI Service .................................................................................................. 338
Start the GPI Service Configuration application ........................................................................... 338
Add a driver for a GPI device ........................................................................................................ 339
Configuration settings for a GPI Service driver ............................................................................ 340
Enable a GPI Service driver........................................................................................................... 341
Edit the settings for a GPI Service driver ...................................................................................... 341
Delete a GPI Service driver ........................................................................................................... 341
Restart the GPI Service ................................................................................................................. 342
Assign names to GPI input and output triggers ........................................................................... 342
Check inputs and outputs under the driver Status tab ................................................................ 342
Assigning GPI inputs to playout actions ............................................................................... 343
Setting up a Videoframe VNode .......................................................................................... 343
Using Missing Materials Manager ................................................................................ 344
About Missing Materials Manager ....................................................................................... 344
Reports ......................................................................................................................................... 345
Running multiple instances of Missing Materials Manager ......................................................... 345
License dongle .............................................................................................................................. 345
Installing the Missing Material Service module ................................................................... 345
Configuring Missing Materials Manager .............................................................................. 346
Saving your settings ..................................................................................................................... 347
Automatic deletion of media files to clear disk space ................................................................. 347
Selecting Media Watchers for Missing Materials Manager to work with .................................... 349
Searching stored schedules for events with missing media files ................................................. 349
Event types for checking .............................................................................................................. 350
Look-ahead time .......................................................................................................................... 351
March 2015 System Administrator Guide Page 17 of 404
Page 18

Cache-ahead time ........................................................................................................................ 351
Specifying which live schedules Missing Materials Manager should monitor ............................. 351
Missing Materials Manager Reporting ......................................................................................... 352
Configuring an iTX Desktop to accept commands from a keyboard or hard panel ..... 354
Component-input mapping .................................................................................................. 355
Assign a keyboard shortcut or hard-panel control to an action of a layout component ............. 355
Delete an input mapping .............................................................................................................. 357
Editing data for an input mapping ............................................................................................... 358
View details of all input mappings ............................................................................................... 358
Components that support input mapping ................................................................................... 359
Macro mapping .................................................................................................................... 362
Assign a keyboard shortcut or hard-panel control to an iTX Desktop macro .............................. 362
Delete the mapping for an iTX Desktop macro ............................................................................ 363
Using iTX with the XML Adaptor ................................................................................... 364
About the XML Adaptor ....................................................................................................... 364
License dongle .............................................................................................................................. 364
Installing the iTX XML Adaptor module ............................................................................... 364
Setting up multiple service instances................................................................................... 364
Configuring the XML Adaptor .............................................................................................. 365
Configure the XML Adaptor ......................................................................................................... 365
Configuration settings .................................................................................................................. 366
Media types in schedule update messages .................................................................................. 367
Using iTX with the Alerts Forwarding Service .............................................................. 368
About the Alerts Forwarding Service ................................................................................... 368
Installing the Alerts Forwarding Service module ................................................................. 368
Configuring the Alerts Forwarding Service .......................................................................... 368
Stop the Alerts Forwarding Service .............................................................................................. 369
Add the Alerts Forwarding SNMP Plugin Configuration tool to a layout ..................................... 369
Enter connection details .............................................................................................................. 369
Restart the Alerts Forwarding Service .......................................................................................... 369
Testing the Alerts Forwarding Service ................................................................................. 370
Test the operation of the Alerts Forwarding Service ................................................................... 370
Check the logs for the Alerts Forwarding Service ........................................................................ 370
iTX Emergency Alerts Service ............................................................................................... 370
Using iTX with the RSS Streamer .................................................................................. 371
Installing the RSS Streamer module ..................................................................................... 371
Starting the RSS Streamer .................................................................................................... 371
Configuring the RSS Streamer .............................................................................................. 372
Add an RSS feed to the list ........................................................................................................... 372
Delete an RSS feed ....................................................................................................................... 373
Change the number of headlines the RSS Streamer includes in an output file ........................... 373
Change the type of information the RSS Streamer includes in an output file ............................. 373
Refresh the RSS feed content ....................................................................................................... 373
March 2015 System Administrator Guide Page 18 of 404
Page 19

Edit the program configuration file .............................................................................................. 374
Using iTX Workflow ...................................................................................................... 375
About the Workflow Service and job services ..................................................................... 375
Proxy Generation Service ............................................................................................................. 376
Keyframe Generation Service ...................................................................................................... 376
File Copy Service .......................................................................................................................... 376
Media Rules and MediaFlow Processes ............................................................................... 377
Installing ITX Workflow components ................................................................................... 377
Selection of software modules ..................................................................................................... 377
Install the Workflow Service ........................................................................................................ 378
Install a job service ....................................................................................................................... 379
Install Media Rules components .................................................................................................. 379
Install MediaFlow Processes components ................................................................................... 379
Configuring workflow definitions in the Workflow Service ................................................. 380
Open the Workflow Configuration tool ....................................................................................... 380
Configure the Keyframe All workflow definition .......................................................................... 380
Configure the Proxy All workflow definition ................................................................................ 381
Configure the Media Flow Export Asset workflow definition ...................................................... 381
Restart the Workflow Service ...................................................................................................... 382
Configuring the File Copy Service......................................................................................... 382
Configure the File Copy Service on start-up ................................................................................. 382
Configuring the Proxy Generation Service ........................................................................... 383
Proxy Quality ................................................................................................................................ 383
Single Pass .................................................................................................................................... 383
Running the ITX Workflow services ..................................................................................... 383
Enabling iTX v2 to use the assets in an iTX v1 system .................................................. 384
Identifying the iTX v1 domain .............................................................................................. 384
Installing the iTX software module ...................................................................................... 385
iTX v2 Locator Service configuration ............................................................................................ 385
Install the migration services ....................................................................................................... 385
Configuring other services ................................................................................................... 386
Edit the Media Data Service configuration file ............................................................................ 386
Set up the Media Watcher for multi-domain operation .............................................................. 387
Running the new services .................................................................................................... 387
Checking the interaction of the two systems ...................................................................... 387
BXF Schedule Importing ............................................................................................... 388
Installing the Workflow Application Service ........................................................................ 388
Configuring the Workflow Application Service .................................................................... 388
Configuring File Based Workflow ................................................................................................. 390
Configuring the Web Service Workflow ....................................................................................... 392
Importing of Harris ADC100 schedules ........................................................................ 394
Setting up the Workflow Application Service for importing Harris ADC100 schedules....... 394
BXF As Run Support ...................................................................................................... 395
March 2015 System Administrator Guide Page 19 of 404
Page 20

HDSDI/SDI Preview from an iTX Desktop ..................................................................... 396
Video playout ....................................................................................................................... 396
Audio playout ....................................................................................................................... 396
Volume-level meters .................................................................................................................... 397
Installing the feature ............................................................................................................ 397
Video card .................................................................................................................................... 397
FPP installation ............................................................................................................................. 398
Media Viewer options .......................................................................................................... 398
Show/hide the volume-level meters ............................................................................................ 398
Licensing ............................................................................................................................... 399
Not supported ...................................................................................................................... 399
Comparison of functionality ................................................................................................. 399
Supporting Tools ........................................................................................................... 401
OPUS Metadata import tool for Core Systems .................................................................... 401
Updating Aspect Ratio information database location ........................................................ 402
Installing Clip Fixer ....................................................................................................................... 402
Setting the media format with Clip Fixer ..................................................................................... 402
March 2015 System Administrator Guide Page 20 of 404
Page 21

About this manual
About this manual
In this manual, we describe the steps you should follow to install and configure the software
modules that provide the functionality in an iTX system.
We tell you how to start the system services, which are used by operators at iTX Desktop Client
workstations, and how to monitor these services to ensure the iTX system continues to run
effectively.
Software versions
The manual covers various releases of iTX version 2 (identified by version numbers v2.1, v2.2,
etc.). Some of the features described in the manual may not be available in your version of
software. For more information, contact iTX Support.
This manual covers generic installation and configuration for both Output Server 1 and Output
Server 2-based iTX systems. However, the installation of Output Server 2 and the configuration
of Output Server 2 channels is covered in the iTX Output Server 2 Channel Configuration Guide.
Assumptions
To successfully install and set up an iTX system, you need to have a certain level of IT
knowledge and experience. We make these assumptions:
• You have system-administrator privileges for the network.
• You have experience of installing and configuring client-server software on a TCP/IP
• You are capable of installing and setting up an SQL database.
• You will install the software on machines that have been connected to a LAN or WAN
• You are familiar with the arrangement of the machines in the iTX system and know
• You understand generally the main broadcasting concepts of the iTX system; e.g. the
network.
by a competent network engineer.
which machine is to be used for which purpose. We describe the different types of
machines in "About the iTX system" (see page 22) in this manual.
function of the VITC time feed, and the method used for broadcasting the output of
the iTX system.
March 2015 System Administrator Guide Page 21 of 404
Page 22

About the iTX system
About the iTX system
System architecture
For those who are familiar with previous versions of iTX, we summarise below the main
differences between the system architectures of iTX v1 and iTX v2.
Whereas iTX v1 operates within our previous (G
our latest iTX platform. There are two significant differences between the two system
architectures:
• The ability in iTX v2 to use Microsoft Windows Discovery Service for service and client
connections. This makes it possible for iTX v2 to work using either of two serviceconnection models: Locator-based or Discovery-based.
• The merging of functionality into fewer services in iTX v2.
We explain the differences in more detail below.
3
) Framework, iTX v2 is designed to operate on
Service-connection model and system domains in iTX v1
iTX v1 uses the Locator model for the connecting of services and clients. In this model, the
Locator Service gives services and clients the connection details they need to interact with each
other; it also manages failover to back-up services. The Locator Service defines the iTX domain
in which the various system components (services and iTX Desktops) operate.
Service-connection models and system domains in iTX v2
iTX v2 can use either the Locator model or the Discovery model for service and client
connections. Failover of services is generally managed by the services themselves. An iTX
domain is formed by services and clients that have a common domain name – this is set for the
machines on which they run.
In the Locator model, the iTX Locator Service provides the service connection details.
In the Discovery model, an alternative method for connecting services and clients is available
through the Microsoft Windows Discovery Service. Each service and client broadcasts its
presence to all other services and clients in its domain; it keeps its own list of domain members
and the connection details it needs to be able to interact with them.
The Discovery model requires special configuration of the IT network and is best suited to
single-domain systems.
For multi-domain systems, especially those spread over a large network, we recommend you
use a Locator Service in each domain to share service-connection information with each other.
In such a system, there is less network traffic between domains than there is in a system that
uses the Discovery model. Such a set-up is necessary if any of the domains is an iTX v1 domain,
since iTX v1 does not support the Discovery model.
March 2015 System Administrator Guide Page 22 of 404
Page 23
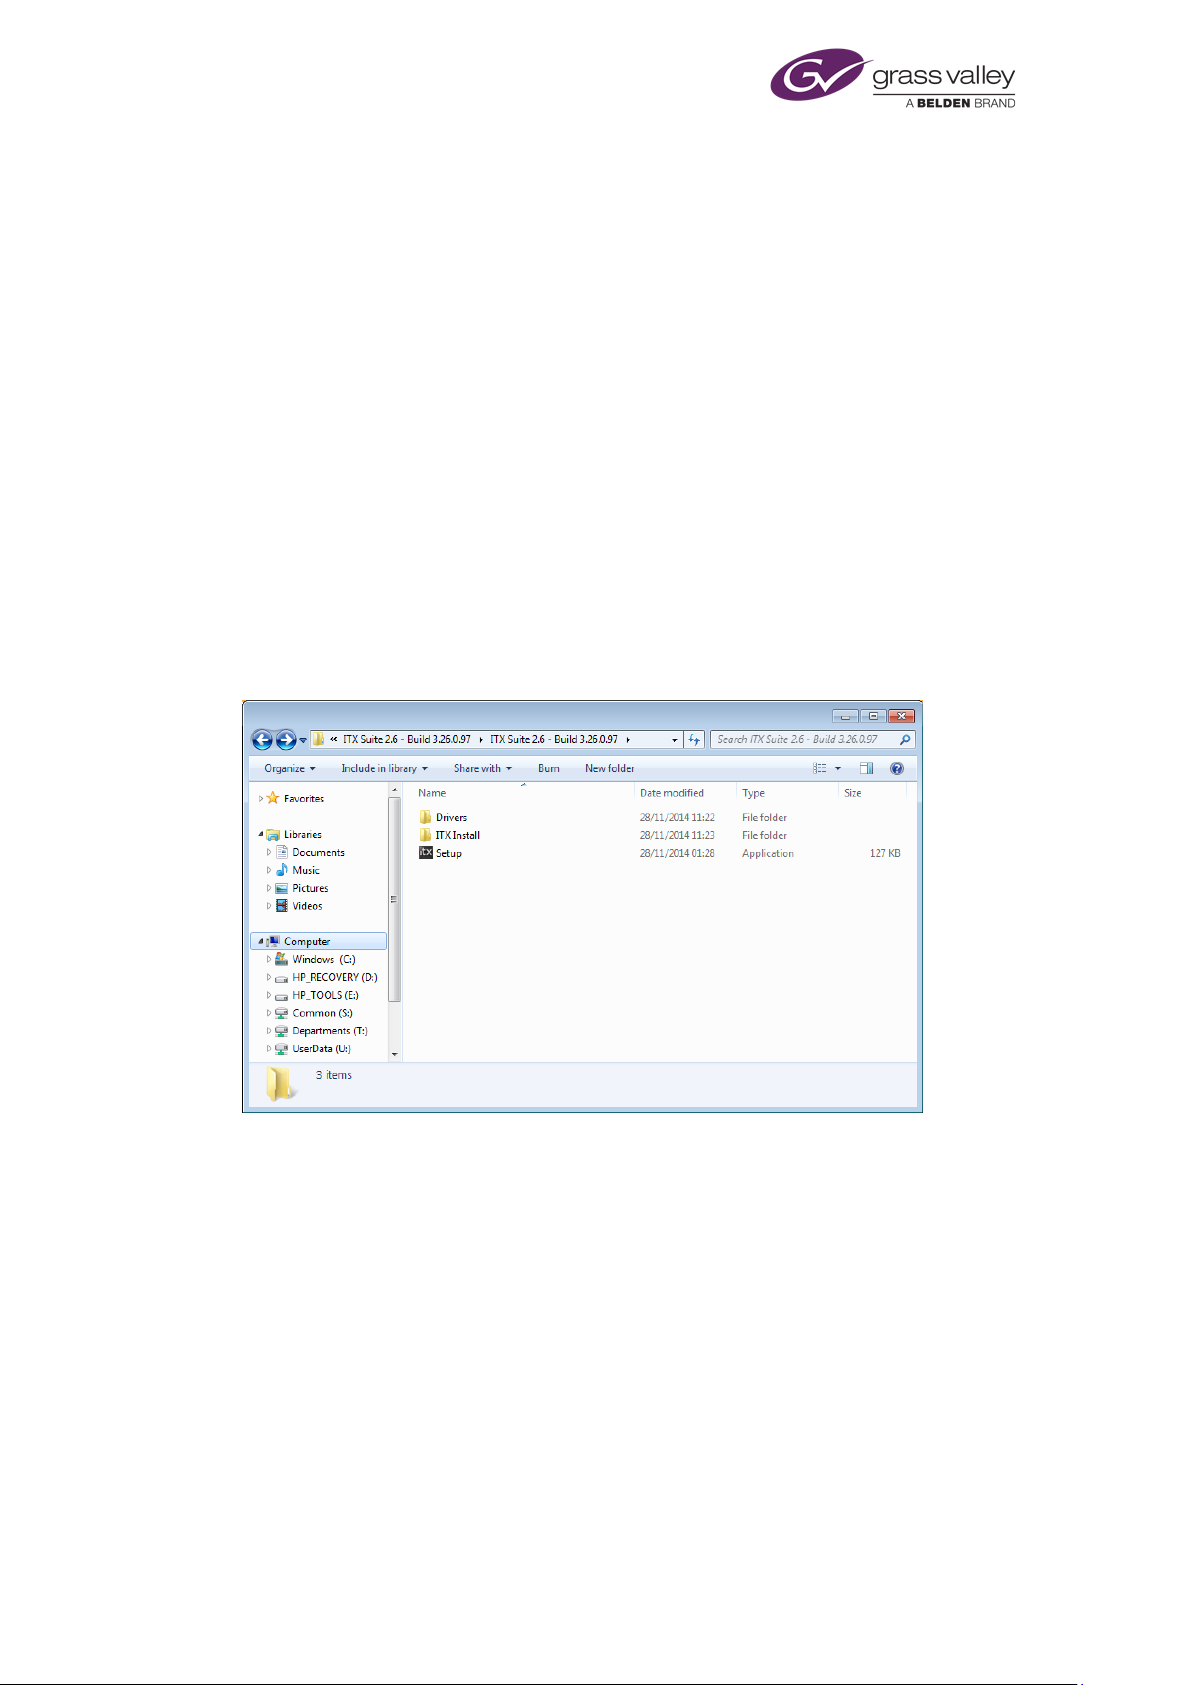
About the iTX system
Merged services and new services
Some individual Framework Services that iTX v1 uses have been combined into a single
Framework Service for iTX v2: the iTX System Service replaces the Object Data Service, Security
Service and Alerts Service.
Similarly, the two services for media-asset management are merged: the OPUS 2 service
replaces the Media Search Service and the Media Data Service. The OPUS 2 Service also
includes two services, the Keyframe Service and the Text Indexer Service, that were not in iTX
v1.
The iTX Logging Service replaces the previous Logging Service.
The iTX As Run Service replaces the Schedule Data Service.
All iTX v2 services run under the control of the iTX Server Controller.
iTX software modules
The iTX system software is organised in a number of software modules and supplied in a folder
called iTX Suite (followed by the software-version number):
The folder includes an automatic installer, called Setup. By running the installer, you can install
standard iTX v2 software modules and some custom ones.
For a basic playout system with the manual ingest of media, you usually install these modules:
• Database Server
• Output Server
• Desktop Client
• Media Watcher
• Encode Server
• Software Distributor
March 2015 System Administrator Guide Page 23 of 404
Page 24

About the iTX system
Required operating
Microsoft Windows Server 2008, Standard 64-bit Edition R2 with
Required other software:
A Microsoft SQL database server:
iTX software module:
Database Server.
Media Watcher (with iTX Desktop layouts).
Drivers for SDI video cards
The installation folder includes a subfolder, called Drivers. This folder contains the required
device drivers for the SDI video cards that iTX can use. If any machine in your iTX system does
not have the correct driver for the version of Output Server you are using, you need to install
one from this folder. More details, page 37.
Processing of multi-channel audio
iTX includes an option to use Dolby* technology to decode and encode Dolby Digital and Dolby
E audio content. For these options, separate iTX Licenses are required.
*Dolby is a registered trademark of Dolby Laboratories.
iTX machines, their operating systems and other required software
For a basic iTX system, with playout and recording facilities, you need the machines we
describe here. Complex iTX systems may require additional, or more powerful, machines.
Database Server – one per system
system:
The Database Server module includes the iTX System Database and the system services.
In small systems, the Database Server machine may also act as a Media Store. It then requires
the Media Watcher to run on it. The iTX Desktop layouts are installed with the Media Watcher,
which registers them for use in your iTX system. More details, page 25.
If you are using iTX with any of the following system options, you may install the required
software modules on the Database Server machine:
Service Pack 1.
SQL Server 2008 Standard Edition.
Optional:
• A matrix router.
• A GPI device.
• The Missing Materials Manager.
• The XML Adaptor.
March 2015 System Administrator Guide Page 24 of 404
Page 25
About the iTX system
Required operating
For a standalone Media Store:
iTX software module:
Media Watcher (with iTX Desktop layouts).
Required operating
Microsoft Windows Server 2008, Standard 64-bit Edition R2 with
iTX software module:
Output Server or Output Server HD.
Media Watcher.
Media Store – one or more per system
system:
The Media Store holds the media files that are to be available for use in playout schedules. It
may be a standalone machine, or it may be part of the Database Server machine. There may be
more than one Media Store in an iTX system.
The Media Watcher runs on the Media Store (provided the Media Store allows this). Where
there are multiple Media Stores, it runs on the main one.
If the Media Store does not allow iTX software to run on it, the Media Watcher should run on
the Database Server machine instead. Since this requires the use of network (UNC) paths in file
transfers, the processing of files in the Inbox takes slightly longer than when the Media
Watcher runs on the Media Store.
There must be at least one Media Watcher in an iTX system, to monitor the Inbox on the Media
Store. There may be other Media Watchers in a system, doing the same jobs for different
Media Stores as well as managing the copying of media files that are needed for playout to the
Output Server caches.
iTX Desktop layouts are installed with the Media Watcher, which registers them for use in your
iTX system.
Any version of Microsoft Windows that gives a specified number
of users’ simultaneous access to the Media Store contents.
Output Server – one per playout channel (SD or HD)
system:
The Output Server machine is the iTX playout engine for a single channel.
For a system that requires a channel to play out content to several regions simultaneously, you
can include up to 8 additional regional channels per main playout channel. Each regional
channel requires an additional Output Server.
Service Pack 1.
Optional:
March 2015 System Administrator Guide Page 25 of 404
Page 26
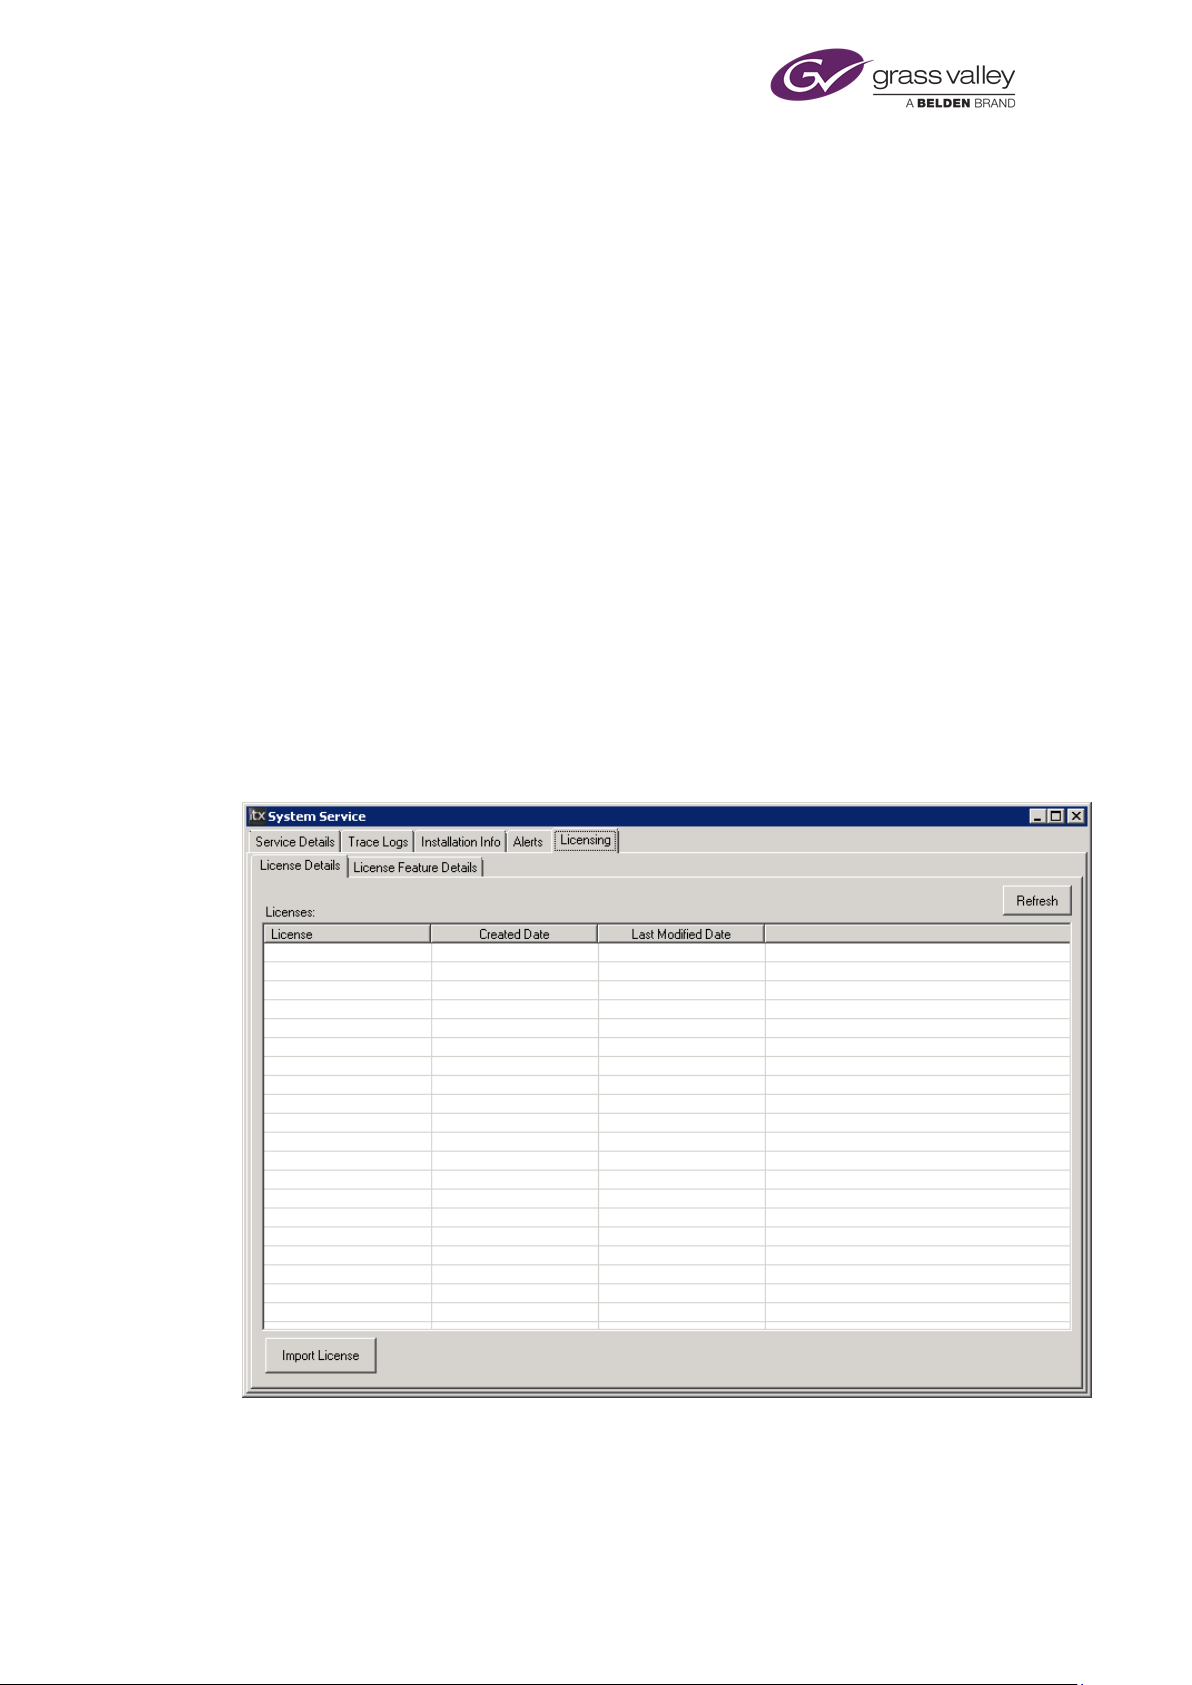
About the iTX system
License dongle
The Output Server machine must have a hardware License key, or "dongle", inserted in one of
its USB slots. This authenticates the iTX software and allows you to use the software once the
License is registered in the iTX system.
The License allows specific iTX plug-ins to run. The plug-ins provide the features on components
that the scheduling services, TXPlay and TXEdit, use to process media files of different types.
You may start with a basic iTX system that has reduced functionality, and later increase the
functionality by adding License files to activate more plug-ins; you do not need to change the
dongle.
New License files can be registered with the system in two ways. They can either be copied into
any Media Watcher’s Inbox, where they will be processed by the Media Watcher itself and the
iTX database will be updated with details of the new functionality.
Or you can import them via the System Service, which is usually running on a framework server:
1. Locate the System Service and click on the Licensing tab.
2. Select the sub tab labelled License Details.
3. Click the Import License button.
4. Browse to the directory where you have downloaded your License files to.
5. Select the License file and click OK.
NOTE: You will need to restart the services running on the machine you have updated the
License for in order for it to expose the new features.
March 2015 System Administrator Guide Page 26 of 404
Page 27
About the iTX system
Required operating
Microsoft Windows XP Professional with Service Pack 2 or
iTX software module:
Desktop Client.
Required operating
Microsoft Windows Server 2008, Standard 64-bit Edition R2 with
iTX software module:
Encode Server.
iTX Desktop layout
Desktop Client workstation – one per operating position.
system:
The Desktop Client module consists of the iTX Desktop (a user interface for systems based on
iTX technology), a set of iTX Desktop layouts, and the controls that feature on the layouts.
Together these form the iTX Desktop, through which an operator interacts with the iTX system
in building and controlling playout schedules and in recording and managing media for use in
schedules.
There is only one version of the iTX Desktop, but it can run in administrator mode or operator
mode; this depends on the security attributes of the user who starts it.
Microsoft Windows 7.
Optional (on a system-administrator workstation):
Software Distributor.
Encode Server – number dependent on the required capacity for simultaneous recordings
system:
The Encode Server module provides a recording channel under the control of the Encode
Server. This operates an encoder to record a digital video signal, which the machine receives
through a serial (SDI) connection. The source of the video signal may be a videotape, video
server or live feed. The encoder converts the video into a file, in a selected storage format, and
places this in the Media Store.
The Encode Server machine must have a video capture card, capable of handling the incoming
video.
March 2015 System Administrator Guide Page 27 of 404
Service Pack 1.
Page 28

About the iTX system
License dongle
The Encode Server machine must have a hardware License key, or "dongle", inserted in one of
its USB slots. This authenticates the iTX software and allows you to use the software once the
License is registered in the iTX system.
Note: If there is no requirement to record media, the iTX system does not have to include an
Encode Server machine.
iTX system design
iTX systems can vary greatly in the number of Output Servers, Desktop Clients, Media Stores
and Encode Servers they contain. But, in general, every basic system is a variation of one of two
models. In one model, the main Media Store is a standalone device; in the other, the Media
Store is part of the Database Server machine.
System time source
The Time Service keeps time in an iTX system and distributes it to parts of the system that
require it; for instance, TXPlay, the playout service on the Output Server.
The time the service delivers is in the international time standard known as UTC (Universal
Time, Co-ordinated). To be able to supply the correct time, the Time Service needs to receive
an accurate time reference signal. It may get this from one of three sources:
• A VITC input card connected to a VITC generator.
• The PC clock on the Database Server machine.
• An external NTP (Network Time Protocol) server.
If the reference signal is interrupted, the Time Service continues to keep time using an internal
system process, until the reference signal is restored.
The Time Service runs on a separate machine, the Time Server, in a system that uses a VITC
generator to provide a time reference signal. In a system with no VITC generator, it runs on the
Database Server machine.
Back-up protection
You can apply various levels of back-up protection to an iTX system. More details, page 301.
System options
The iTX system software has modules for a variety of system options. These include:
• Media acquisition features that enable iTX to access media content on Front Porch
Digital DIVArchives, Suitcase TV archives, Omneon Spectrum video servers and FTP
servers.
March 2015 System Administrator Guide Page 28 of 404
Page 29

About the iTX system
• Regional channels that can play out their own media content (such as commercial
• Control of a Screen Polistream subtitling system that iTX delivers its output signal to.
• Control of an external Grass Valley logo inserter that iTX delivers its output signal to.
• Control of an external character generator that iTX delivers its output signal to.
• The control of GPI devices, matrix routers and hard panels.
• The management of missing media content.
• The generation of keyframes and low-resolution browse copies for video clips.
breaks) across multiple regions. You can include up to 8 regional channels per playout
channel. Each regional channel in an iTX system requires an additional Output Server.
Supported devices include the Pixel Power Clarity and the VizRT character generator.
March 2015 System Administrator Guide Page 29 of 404
Page 30

Preparing a system for iTX software
Preparing a system for iTX software
Before you install the iTX software modules on their machines, you should ensure the system
meets the requirements that we outline in this section.
Network connection
The machines that are to receive the iTX software modules should be connected to a TCP/IP
network – LAN or WAN – in an arrangement with these characteristics:
• The network and the machines can handle data rates of at least 1000 Mbps.
• All machines are in the same network domain or workgroup.
• None of the machines is connected to the internet.
Ensure all intended users have network user accounts.
Using a DHCP server to allocate an IP address for a Locator Service machine
The iTX system services, which provide the operating platform for iTX, include an optional
service called the Locator Service. Many iTX systems use this service, even single-domain
systems that use the Discovery model for finding services. Sometimes a system has multiple
Locator Services, for load balancing or multi-domain connections.
Any machine on which a Locator Service runs must have a static IP address. If the iTX network
uses a DHCP server to allocate IP addresses, this server should be set up to provide a static
address for each Locator Service machine.
Locator Service – name resolution
All other system services contact the Locator Service by using its host name, "omn-locator". iTX
translates this host name into an IP address in one of two ways: either by using a WINS or DNS
server, if there is one in the system; or by referring to a local-machine Hosts file.
Important: If you are installing iTX in a system that uses a WINS or DNS server to resolve host
names, you must enter the Locator Service details in the server before starting to install the iTX
software.
To enable iTX to get IP addresses from a Hosts file instead of a DNS server, you enter the IP
address of the Locator Service during the software-installation process. For more information
about Hosts files, see the Help information for a particular machine operating system (e.g.
Windows XP).
March 2015 System Administrator Guide Page 30 of 404
Page 31

Preparing a system for iTX software
General machine requirements
Hard-disk size
We recommend you install the iTX software modules onto machine C-drives.
For the Database Server, the capacity of the C-drive (or alternative hard-disk partition) should
be at least 20 GB; for other iTX machines, at least 10 GB.
For an Output Server, ensure the Cache partition is separate to the machine C-drive.
For an Encode Server, ensure the media storage partition is separate to the machine C-drive if
you are going to encode media to the local drive.
Date and time properties
Set the time zone on all machines to GMT. Ensure daylight saving time is not enabled and the
correct date and time are set.
Automatic logon
To allow a machine in the iTX system to restart more quickly, you set the machine for
automatic logon.
For more information about setting a machine for automatic logon, see the Help information
for the machine operating system.
Windows error reporting
Certain conditions may cause an iTX system service to stop. If this happens, iTX keeps running
by restarting the service automatically.
The error reporting feature of the Windows operating system can interfere with the automatic
restarting. Ensure error reporting is disabled for all machines that run system services
(Database Server, Media Store, Output Servers, and Encode Servers). You set the option under
the Advanced tab of the System Properties control panel.
Windows updates and security
Some common security features may prevent iTX working properly and should not be used:
– On all machines, switch off automatic software updates.
Apply all Windows software updates and services packs before you install the iTX software
modules.
If you run anti-virus software on the iTX machines, you should configure it so that it does not
scan any folders containing media files.
March 2015 System Administrator Guide Page 31 of 404
Page 32

Preparing a system for iTX software
Windows Indexing
Windows Indexing and the Indexing Service can adversely affect system performance. You
should disable these on all machines in the iTX system.
Display the Properties dialog for the hard-disk partition onto which you are going to install any
iTX software module.
Under the General tab, clear the check box for Allow Indexing Service to index this disk for fast
file searching:
From the Windows Start menu, select Run and enter "services.msc" to display the Services
window in the Microsoft Management Console. Stop the Indexing Service and set its Startup
type to "Disabled".
Shutdown Event Tracker
If the Windows operating system on a machine stops, you need to restart the machine. A
feature of the operating system – the Shutdown Event Tracker – can reduce the speed of the
machine restarting. To prevent it doing so, you should disable the feature on all iTX servers.
From the Windows Start menu, select Run and enter "gpedit.msc" to display the Group Policy
window in the Microsoft Management Console.
Under Computer Configuration in the console tree, open the Administrative Templates folder
and then the System folder to display the contents of the System administrative template.
Open the Display Shutdown Event Tracker Properties dialog. Under the Setting tab, select
Disabled:
March 2015 System Administrator Guide Page 32 of 404
Page 33

Preparing a system for iTX software
Response to Windows system failure
You should configure the Windows system on each machine to provide information about the
cause of any Windows system failures. You do this in the Startup and Recovery dialog, which
you display by selecting it under the Advanced tab of the System Properties control panel.
In the System failure section:
– Select the Write an event to the system log check box.
– Clear the Automatically restart check box.
In the Write debugging information section:
– Select Complete memory dump.
Windows event logs
To ensure the Windows operating system on all machines in the iTX system is working properly,
the event logs should be checked and cleared.
From the Administrative Tools control panel, display the Event Viewer in the Microsoft
Management Console. In the list of event types, check and clear the event logs for the
Application, Security and System events.
Network adapters – binding order
In an iTX system with multiple network connections, the order that Windows network services
access the network connections may prevent iTX from working properly. If the order is
incorrect, the iTX services may not be able to interact.
On each server machine, ensure the Local Area Connection for the iTX network is first (highest)
in the Connections list. You can view this list in the Network Connections Advanced Settings
dialog:
March 2015 System Administrator Guide Page 33 of 404
Page 34

Preparing a system for iTX software
To display the dialog, open the Network Connections folder from the Windows Start menu;
select Advanced Settings from the Advanced menu.
Display and power-saving properties
• Switch off screen savers.
• Switch off power-saving options for monitors and hard disks.
Preparing the Database Server machine
Before you install any iTX software module on the Database Server machine, you need to install
Microsoft SQL Server 2008; we recommend you install the Standard Edition.
Microsoft SQL Server log-in password
In a standard system, iTX communicates with Microsoft SQL Server through the trusted
connection of your system-administrator Windows user account. So, simply starting the
Database Server machine by entering your system-administrator username and password
enables iTX to connect to SQL Server.
In SQL Server, an alternative user account may be created with the required access rights and a
log-in password specified (this is a separate password to the one you use for your systemadministrator user account).
When you install the Database Server module, you need to select the method of access to the
SQL Server. You may select the trusted connection; or you may select the alternative user
account. If you select the second option, you must enter the correct log-in password; failing to
do so prevents the iTX installer installing the iTX software module.
Install Microsoft SQL Server 2008
1. Disable the firewall on the Database Server machine, or open the ports that are required
for the remote access of SQL Server.
2. Follow the Microsoft installation instructions to install SQL Server 2008. In general, accept
the default settings. For the particular settings listed below, select the options as
described.
• On the Feature Selection page, select: Database Engine Services; Management Tools -
Basic. For a mirrored system, select: Management Tools - Complete.
• On the Instance Configuration page, select: Default instance.
March 2015 System Administrator Guide Page 34 of 404
Page 35

Preparing a system for iTX software
• On the Server Configuration page, under the Service Accounts tab, select: Use the same
account for all SQL Server services.
• On the Server Configuration page, under the Collation tab, ensure the default setting in
the Database Engine box indicates case-insensitivity (CI); e.g. Latin1_General_CI.
• On the Database Engine Configuration page, under the Account Provisioning tab, select
Mixed Mode authentication, and enter the iTX password; select the Windows user
account as a SQL Server administrator.
• On the Error and Usage Reporting page, ensure the options for error and usage
reporting are not selected.
3. On finishing the installation, restart the machine to start SQL Server.
4. Install the latest SQL Server service pack and Microsoft Windows updates. Restart the
machine.
Configure SQL Server
1. In the SQL Server Configuration Manager, under SQL Server Network Configuration, select
Protocols for MSSQLSERVER; ensure the TCP/IP protocol is enabled.
Preparing the Media Store
iTX requires two shared folders to be on the Media Store, on the same drive:
• One called Inbox. This is to be monitored by the Media Watcher, which registers
media that enters the Inbox, so that iTX can use it. The folder name must begin with a
capital letter.
• One called Media. This is to hold the media files after the Media Watcher registers
them. The folder name must begin with a capital letter.
You should create these folders before installing the iTX software module for the Media
Watcher.
This illustration shows a folder structure with the shared folders:
If a system contains more than one Media Store, you should create these folders on the main
Media Store.
March 2015 System Administrator Guide Page 35 of 404
Page 36

Preparing a system for iTX software
Preparing Output Server machines
On each Output Server machine, create a volume (disk partition) called Cache to act as a local
cache for schedule items that are due to play out.
In the Cache volume, create a folder also called Cache. The folder name must begin with a
capital letter.
This illustration shows a folder structure for this arrangement:
Driver for SDI video card
Ensure the correct device driver for the SDI video card in the machine is installed.
Note:
• Output Server 1 and Output Server 2 require different versions of the AJA video card
drivers, both of which are provided with the iTX iTX Suite. This includes device drivers for
supported Xena SDI-video cards. More details, page 37.
License dongle
On each Output Server machine, insert the supplied License dongle in a USB port.
Windows sound scheme
A Microsoft Windows sound scheme, which you use to assign sounds to system events, can
disrupt the playout of audio from an Output Server machine. Ensure all sound schemes are
disabled on Output Server machines; alternatively, disable the Audio Service.
Smooth edges of screen fonts
CG files usually include text. To ensure the text displays properly, select the "Standard" method
to smooth the edges of screen fonts on Output Server machines.
Preparing Encode Server machines
An Encode Server machine has similar requirements to an Output Server machine. For each
Encode Server machine:
• Ensure the correct device driver for the SDI-video card in the machine is installed.
• Insert the supplied License dongle in a USB port.
March 2015 System Administrator Guide Page 36 of 404
Page 37

Preparing a system for iTX software
Windows sound scheme
A Microsoft Windows sound scheme, which you use to assign sounds to system events, can
disrupt the recording of audio on an Encode Server machine. Ensure all sound schemes are
disabled on Encode Server machines; alternatively, disable the Audio Service.
Direct connection to a VTR
If you want the Encode Server to be able to control a VTR (videotape machine), connect a
breakout cable with a Sony 9-pin connector between the Encode Server machine and the VTR.
This functionality requires a suitable SDI-video card to be installed in the Encode Server
machine. More details are in the iTX Hardware Specification, which you can download from the
Club iTX website.
Installing Drivers for SDI video cards
AJA video card driver version
Output Server 1 requires AJA video card driver version v7.4.0.49 and Output Server 2 requires
AJA video card driver version 12.1.0.107. Both versions of the drivers are included in the iTX
Suite, within the Drivers folder.
You can verify the version of the currently installed drivers by accessing the AJA Corvid SDI I/O
Properties or AJA Kona 3G SDI I/O Properties window from Device Manager.
Note:
• Do not use drivers that are supplied with the card or have been downloaded from the
AJA website. The required drivers for iTX are specially supplied by AJA and are included
with the iTX Suite in the Drivers folder.
• For more information on SDI I/O cards for Output Server 2, see the Output Server 2
Channel Configuration Guide.
To verify the current version of the AJA card drivers:
1. On the Windows desktop, right-click the Computer desktop icon and select Manage
from the displayed menu commands. The Computer Management window appears.
2. Within Computer Management (Local), select Device Manager. The Device Manager
window appears.
3. Expand the Sound, video and game controllers category.
4. Right-click AJA Corvid SDI I/O or AJA KONA 3G SDI I/O and select Properties.
The Properties window for your model of AJA card opens.
5. Select the Drivers tab and take note of the version number.
March 2015 System Administrator Guide Page 37 of 404
Page 38

Preparing a system for iTX software
Installing the drivers
The SDI video card in an Output Server or Encode Server machine requires the correct device
driver. Grass Valley supply drivers for supported cards in the installation folder, iTX Suite. The
drivers are contained in a Zip file in the Drivers folder:
When you extract the Zip-file contents, various unzipped files appear in three folders. One of
the folders, called 1 - Drivers, has subfolders containing the driver installation files for different
types of video card:
The drivers are for the Xena 2Ke and the Corvid SDI video cards.
1. After copying the iTX Suite folder to a machine, unzip the AJA Drivers Zip file.
2. Install the required driver in one of the standard ways, depending on how the operating
system that is running on the machine responds to the presence of the SDI video card.
For example, start the Windows device-driver installation wizard from the Device Manager
control panel. See below, "Steps to follow when using the Hardware Update Wizard".
When prompted to specify the driver that is to be installed, select it from one of the
folders. Drivers are identified by files with the filename extension ".inf".
3. Restart the machine.
March 2015 System Administrator Guide Page 38 of 404
Page 39

Preparing a system for iTX software
Steps to follow when using the Hardware Update Wizard
You may use the Windows Hardware Update Wizard to find the driver for an SDI video card, so
that the system can install it. To start the wizard, you right-click the entry for the 'unknown'
video card in the Device Manager list and select Update Driver from the displayed menu:
Select the following options on the various dialogs as you use the wizard.
• Decline the offer for the wizard to get the driver from Windows Update:
• Select the option to install the driver from a specific location:
• Prevent Windows from searching for the driver:
• Select Have Disk:
• Instead of following the wizard instruction to insert a disk, click Browse and navigate
to the correct subfolder in the Drivers folder.
• Select the driver (.inf file).
The system displays a security message, requesting whether or not you want it to install the
driver.
• Click Install.
The system installs the driver and displays a dialog to show the installation is complete.
• Close the dialog and check the entry for the driver in the Device Manager list:
March 2015 System Administrator Guide Page 39 of 404
Page 40

Installing iTX software modules
Installing iTX software modules
In this section, following some general installation notes and a pre-installation check list, we
explain how you use the iTX installer to install individual software modules on iTX machines.
Configuration instructions appear in the following sections.
Installation notes
• You install a software module by double-clicking the icon of the iTX installer,
Setup.exe, selecting the module and responding to on-screen prompts.
• Each module contains a number of program files.
• During the installation process, the installer places the program files in their own
folder at a specified location. The default path of this location is:
C:\Program Files (x86)\iTX 2.0\Services
• A program folder contains the program executable, programname.exe, and a
configuration file, programname.exe.config.
• All modules for iTX services include a Server Controller. iTX uses Server Controllers to
start the services automatically and keep them running.
• The iTX installer registers each service with the Server Controller, on the same
machine, and causes the service to display a user interface. (The user-interface
property is denoted by the entry "-ui" in the Startup Parameters column under the
Controlled Services Information tab of the Server Controller window.)
• You configure the services via dialogs during installation. Some services require
additional configuration after you install them.
• On each machine that has a Server Controller, the iTX installer installs an extra service
called the iTX Software Updater. This service enables you to upgrade all iTX servers
from your system-administrator workstation. (You may choose not to have the service
installed if you do not want to use this feature.)
March 2015 System Administrator Guide Page 40 of 404
Page 41

Installing iTX software modules
Task
Done ()
Connect the iTX machines to the network.
Ensure the Database Server machine has a static IP address.
If your system uses a WINS or DNS server, enter the Database Server IP
(If applicable.)
On the Media Store, create Media and Inbox folders.
In each Output Server and Encode Server machine, insert a License
On each Output Server and Encode Server machine, install the videoOn each Output Server, create a cache for media files.
Install and configure Microsoft SQL Server on the Database Server;
If you are going to use a VITC generator to provide a reference time
(If applicable.)
Pre-installation check list
Below, we list key tasks that need to be done before you install iTX software modules. When
you can enter ticks in the "Done" column against each task, your system is ready for the
installation of these modules.
address for the host name "omn-locator".
dongle.
card driver.
specify the password we supply for the SQL Server log-in password.
signal, connect the VITC feed to a machine in the system.
March 2015 System Administrator Guide Page 41 of 404
Page 42

Installing iTX software modules
Running the iTX installer
Start the iTX installer
1. Download the zip file from the Grass Valley website and copy it to the computer you wish
to install iTX on.
2. Depending on the security settings of your computer, you might need to make sure that
the installation process will not be blocked as potentially dangerous. Right click the zip file
and select ‘properties’.
3. From the properties menu, select the ‘General’ tab. If the computer is configured to block
the installation of files that could be harmful, the bottom section of the menu will have a
Security statement: “This file came from another computer and might be blocked to help
protect this computer”. Click ‘unblock’. Click OK.
4. Extract the zip file’s contents into the directory you wish to install the software from.
NOTE: You must be logged on to the local machine with administrative user rights in order
for the installation process to continue successfully.
5. Open the iTX suite folder and righ-click Setup.exe. Select ‘Run as Administrator’ if this
option is available. If not, simply double-click the Setup.exe to begin the installation
process.
The installer checks to see whether or not the pre-requisite software is installed on the
machine.
March 2015 System Administrator Guide Page 42 of 404
Page 43

Installing iTX software modules
If the pre-requisites are installed, the installer displays the Select Software To Install dialog:
The dialog displays a list of available software modules. The modules are arranged in
categories, depending on the type of functionality they provide.
A category is indicated by a name in a bold typeface. Clicking the check box before a
category entry expands the entry to show the modules in the category. Some categories
contain sub-categories (also indicated by names in bold typeface).
Modules are indicated by names in a regular typeface.
You use the check boxes to select the modules you want to install.
March 2015 System Administrator Guide Page 43 of 404
Page 44

Installing iTX software modules
When you select a module, its entry expands to show a list of the components the module
contains:
Clicking
You may clear the check boxes of components you do not want to install.
Clicking OK displays the main iTX Installer dialog (see below). From this, you start the
installation. While installing a software module, the installer may prompt you to enter
certain configuration details.
Note:
or expands or collapses a list of components.
• To change your selection of software modules at any time, you may display the Select
Software to Install dialog from the main iTX Installer dialog.
About the installer configuration file
The installer records what iTX software modules it installs on a machine; it enters the details in
a configuration file which it stores on the machine. The file is stored in an application-data
folder under the logged-on username.
You may re-run the installer; for instance, to upgrade or uninstall any software module. When
you do, the installer checks the configuration file and automatically selects the same software
modules. It displays the selection in the Select Software To Install dialog.
You may accept or change the selection, before allowing the installer to continue its
operations.
You can delete the configuration file by clicking Delete Config in the iTX Installer dialog. Doing
so prevents the installer from pre-selecting modules for the next installation.
March 2015 System Administrator Guide Page 44 of 404
Page 45

Installing iTX software modules
About the main iTX Installer dialog
After you select a software module in the Select Software To Install dialog, the installer displays
the iTX Installer dialog, showing the components in the module:
It sorts the components into two lists: an action list in the upper half of the dialog; a no-action
list in the lower half.
The action list contains components that the installer is going to take specified action on; the
no-action list, components that it is not going to take any action on.
You may use the Action and No Action buttons to move selected components from one list to
the other.
The first time you run the installer on a particular machine, all software components in selected
modules are selected for installation. They appear in the action list; the no-action list is empty.
Note:
• We recommend you accept the default selection for the first installation of a software
module.
Running the iTX installer to upgrade or modify an installation
When you re-run the iTX installer after installing any iTX software module, the iTX Installer
dialog appears (instead of the Select Software To Install dialog). The dialog displays details of
installed components; these appear in the no-action list if the installed versions match those in
the installation folder; or in the action list (together with any new components requiring
installation) if the installation folder contains later versions.
You may use the buttons at the bottom of the dialog when upgrading software, changing the
usage of a machine or re-configuring a machine for a different System Database:
March 2015 System Administrator Guide Page 45 of 404
Page 46

Installing iTX software modules
Click:
• Select Software to display the Select Software To Install dialog.
• Delete Config to delete the configuration file. You should uninstall any installed
modules first.
• Set Variables to change the System Database connection details. Since the System
Database details do not usually change in the lifetime of a system, it is unlikely you will
need to use this button.
Setting up an iTX domain and load-balanced Locator Services
iTX services and clients (including iTX Desktops) on the same TCP/IP network can interact with
each other if they are in the same iTX domain. An iTX domain is identified by a domain name
assigned to machines on which iTX software runs.
In general, iTX services and clients belong to the same iTX domain if they run on machines that
have the same iTX-domain name.
You assign a domain name to a machine during the installation of the first iTX software module
on the machine. You do so when the installer displays the iTX Domain Configuration dialog:
There is almost no limit to the possible length of a domain name; but for practical reasons the
name should be short – containing a maximum of about 10 characters. It should clearly
distinguish the domain from other iTX domains. You may include any character apart from a
colon (:) in the name.
March 2015 System Administrator Guide Page 46 of 404
Page 47

Installing iTX software modules
Through the same dialog, you may specify a Locator Service – or a group of load-balanced
Locator Services – for the domain. You add the Locator Services to a list in the Locators panel,
which appears when you select Use Locator Service:
The order of Locator Services in the list determines the order in which iTX selects them to
handle connection requests: a service that requires connection details contacts the Locator
Service at the top of the list; if this one is busy, the next in the list; and so on.
The list should be the same for each Locator Service in a load-balanced group.
When you save the configuration, the installer performs a number of actions. It:
• Enters the domain name in the Windows registry. iTX services and the iTX Desktop get
the domain information from the registry when they start up.
• Creates a domain configuration file, containing domain and Locator Service details. It
stores this in an application-data folder under the logged-on username.
• Creates a Locator-mode configuration file, Omnibus.config, indicating whether or not
iTX is to use the Locator model for service and client connections. It stores this in the
iTX program folder.
• Adds Locator Service details to the machine Hosts file.
Do the following to enter domain and Locator Service details through the iTX Domain
Configuration dialog.
1. In the iTX Domain box, enter a name for the iTX domain that the iTX services are to
operate in.
2. Select Use Locator Service to display the Locators panel.
3. Do the following to identify a machine with a Locator Service.
• Click Add to display the Add Locator dialog.
• Enter the IP address of the machine.
• Click OK to close the Add Locator dialog.
The machine IP address appears in the Locators panel.
4. Repeat the previous step to add details of any other Locator Services (in the same domain)
that you want to use for load balancing.
5. Use the Move Up and Move Down buttons to change the position of any Locator Service in
the list.
6. Click Save.
The installer saves the configuration; the iTX Domain Configuration dialog closes.
March 2015 System Administrator Guide Page 47 of 404
Page 48

Installing iTX software modules
Note:
• The Advanced Options button on the iTX Domain Configuration dialog displays a range
of settings that should only be modified by Grass Valley engineers.
• You may use the Domain Configuration tool to modify the configuration after the
installation of software. More details, page 62.
Install the Database Server module
Once you have installed Microsoft SQL Server and the pre-requisite software on the Database
Server machine, you can install the Database Server module. The procedure below includes the
installation of the optional Locator Service module – we recommend you install a Locator
Service for most systems; the service is essential for multi-domain systems.
To ease the workload on this Locator Service, you may install Locator Services on other
machines in the same domain. All Locator Services then perform similar tasks in a loadbalanced arrangement.
In general, two load-balanced Locator Services meet the requirements of most systems.
Note:
• For the installer to be able to perform the required tasks in SQL Server during the
installation of the Database Server module, the user account you use must be a
member of the dbcreator fixed server role in SQL Server; it must also be a member of
the sysadmin fixed server role. (You give the user account these roles in Microsoft SQL
Management Studio).
1. Double-click Setup.exe to start the iTX installer.
2. Select Database Server and Locator Service from the Select Software To Install dialog.
If you want to install the Media Watcher (with iTX Desktop layouts) at the same time as the
Database Server module, also select Media Watcher.
Click OK to close the dialog.
The installer displays the iTX Installer dialog, showing the components in the selected
modules.
3. Click Continue.
The installer performs the installation. The progress bar at the bottom of the dialog shows
the operation progressing.
The installer installs the System Database schema and some iTX services.
For some tasks, the installer displays a dialog requesting you to enter certain system
details. We describe how to use these dialogs below.
In the iTX Domain Configuration dialog, enter domain and Locator Service information.
More details, page 46.
March 2015 System Administrator Guide Page 48 of 404
Page 49

Installing iTX software modules
The Create Database dialog:
• Check "ITX" appears in the Database Name box. This is the required name of the iTX
System Database; it is not case-sensitive.
• Check the network name of the Database Server machine appears in the Database
Server box.
• In the Database Location box, enter the path to the folder where you want the installer
to install the iTX System Database. This folder may be one created during the
installation of the SQL Server.
Note: The System Database and program files should be installed on different drives.
• If the system design includes a backup (or mirror) SQL Server, enter the network name
of the backup machine in the Backup Database Server box.
• To set up iTX to access the SQL Server through the user account that you are using for
the installation, leave the Use Trusted Connection check box selected.
• If you want to specify a different user account for iTX to use when accessing the SQL
Server, clear the Use Trusted Connection check box; enter the account details in the
User ID and Password boxes.
• Click Save. The Create Database dialog closes.
The installer creates the iTX System Database on the Microsoft SQL Server.
Installing the iTX Database on a Remote Server
In earlier versions of iTX, it was normal procedure to install the Locator Service, Media Watcher
and any framework services you require on the same server as the iTX Database, particularly on
a small system.
Previously, if you wanted to install the Locator Service (along with any other Frame Work
Services) on a different server to the Database Server, you would have to carry out the
procedure on each of the relevant machines.
With iTX 2.4, you can now install the iTX Database simultaneously on a remote server while
installing other Framework Services locally. Both servers must be in the same network domain.
March 2015 System Administrator Guide Page 49 of 404
Page 50

Installing iTX software modules
To use this option, enter the database details in the Create Database dialog as detailed below,
but instead of entering the name of the local server, you enter the name of the remote server
on the network. You then specify the designated drive that you wish to install the database to
in the usual way.
Note:
• For a remote database installation to be successful, you must be logged on to the local
server with a user account that also has administrative rights for the database server.
If remote installation encounters a problem, the dialog will now display an error along with a
button labelled “OpenDBTool.log”. Clicking this button will open the database install log to help
identify the problem the installation encountered.
The Add Tables to Database dialog:
• Check the name of the newly created System Database appears in the Database box.
• Check the network name of the Database Server appears in the Primary Database
Server box.
• Specify the database connection method (i.e. by trusted or named user).
• Click Save. The Add Tables To Database dialog closes.
The installer adds the iTX tables to the System Database.
March 2015 System Administrator Guide Page 50 of 404
Page 51

Installing iTX software modules
The Database Configuration dialog:
Through this dialog you provide the information the System Service needs to connect to
the System Database.
• Check the correct name appears in the Database box.
• Check the network name of the Database Server appears in the Primary Database
Server box.
• If the system includes a backup SQL Server, check the correct name appears in the
Backup Database Server box.
• Click Save. The Database Configuration dialog closes.
The installer creates a configuration file, containing the details you enter, in an applicationdata folder under the logged-on username.
The Time Service Config dialog:
• In the Time Service Format box, select the television standard that specifies the frame
rate iTX is use for its output.
• Click Save. The Time Service Config dialog closes.
The installer creates a configuration file, containing the details you enter, in an applicationdata folder under the logged-on username.
March 2015 System Administrator Guide Page 51 of 404
Page 52

Installing iTX software modules
Following the installation of the System Database, the OPUS2 Service Configuration dialog:
• In the Path box, under Keyframes, enter the path to the folder where the OPUS2 Service
is to find keyframes. In the Posterframe store box, enter the path to the folder where
the service is to find poster frames.
• In the Working folder box, under Indexing, enter the details of the folder for the Search
index.
• Click Save & Close.
The Add Tables To Database dialog appears for two more services: the OPUS2 Service and
the Routing Data Service. Each time it does, you need to enter the same information as you
do when it first appears (for the System Service) to continue the installation.
The installer completes the installation of the Database Server and Locator Service
modules.
If you include the Media Watcher module in the installation, the installer next starts to
install the module. During this process, you need to specify options through the Media
Watcher Configuration dialog; the procedure is the same as if you are installing the Media
Watcher on a stand-alone Media Store. More details, page 53.
When installing the Media Watcher, the installer copies the iTX Desktop layouts to a Media
Watcher folder. (When the Media Watcher starts for the first time, it copies the iTX
Desktop layouts to the System Database so that they become available to use at iTX
Desktop workstations.)
4. Click Finish to close the iTX Installer dialog.
On successful installation of the Database Server and Locator Service modules, folders for the
installed components appear in the Program Files\iTX 2.0\Services folder:
March 2015 System Administrator Guide Page 52 of 404
Page 53

Installing iTX software modules
The installed services are:
• The Server Controller
• The System Service
• The Logging Service
• The Time Service
• The OPUS 2 Service
• The As Run Logging Service
• The Routing Data Service
• The Locator Service
• The iTX Software Updater
If it is included in the installation:
• The Media Watcher
Install the Media Watcher on a stand-alone Media Store, or other machine
There must be at least one Media Watcher in an iTX system, to monitor the Inbox on an iTX
Media Store. This Media Watcher registers the media files, and other valid files, that are placed
in the Inbox; it rejects files that iTX cannot use.
In certain circumstances, it may also be used by a Media Cache Service to copy files so that they
are available for playout. More details, page 260.
There may be other Media Watchers in a system, doing the same jobs for different Media
Stores and Output Servers.
You should install the only or main Media Watcher on the machine that is to be the main Media
Store; this may be the Database Server machine or, more likely, a stand-alone Media Store. If it
is not possible to run the Media Watcher on a stand-alone Media Store, you may install it on
the Database Server machine.
Perform the following procedure to install the Media Watcher and iTX Desktop layouts on a
stand-alone Media Store or other machine.
Note: If you want to install the Media Watcher on the Database Server machine, do this at the
same time as you install the Database Server module. See "Install the Database Server module",
page 48.
1. Double-click Setup.exe to start the iTX installer.
2. Select Media Watcher from the Select Software To Install dialog.
Click OK to close the dialog.
The installer displays the iTX Installer dialog, showing the components that make up the
Media Watcher module.
3. Click Continue.
The installer performs the installation. For some tasks, it displays a dialog requesting you to
enter certain system details. We describe how to use these dialogs below.
March 2015 System Administrator Guide Page 53 of 404
Page 54

Installing iTX software modules
In the iTX Domain Configuration dialog, enter domain and Locator Service information.
More details, page 46.
The Media Watcher Configuration dialog:
• For the main Media Watcher, ensure the name in the Name box is "Media Watcher".
Enter different names for other Media Watchers.
• Ensure the Disable Inbox Monitoring check box is not selected.
• Click Save.
The installer creates a configuration file, containing the details you enter, in an applicationdata folder under the logged-on username.
It completes the installation of the Media Watcher and copies the iTX Desktop layouts to a
Media Watcher folder.
4. Click Finish to close the iTX Installer dialog.
On successful installation of the Media Watcher module, folders for the installed components
appear in the Program Files\iTX 2.0\Services folder. The installed services are:
• The Media Watcher
• The iTX Software Updater
iTX Desktop layouts
During the installation of the Media Watcher, the installer places a set of iTX Desktop layouts in
a Zip file in the Media Watcher program folder.
On first starting, the Media Watcher registers the layouts and stores them in the System
Database. With a folder structure representing the organisation of data in the System
Database, the layouts are located in a Templates folder.
Note:
• If you run the installer to upgrade the Media Watcher, the Media Watcher overwrites
existing Templates layouts with any new ones that have the same names.
Configuring a Media Watcher after installation
After installing a Media Watcher, you may need to modify its configuration. You do this under
the Setup tab of its user interface, which the Media Watcher displays while it is running.
You can specify extra folders for media-file storage, and other folders for the Media Watcher to
search when caching or mirroring. More details, page 85.
March 2015 System Administrator Guide Page 54 of 404
Page 55

Installing iTX software modules
Install an Output Server module
iTX offers two versions of the Output Server module. Output Server 1 (OS1) and Output Server
2 (OS2).
Introduced in iTX v2.5, Output Server 2 is Grass Valley’s next generation iTX video engine and
while it supersedes the previous video engine, Output Server 1 is still supported. Although you
cannot run Output Server 1 and Output Server 2 on the same playout server, due to the AJA SDI
I/O card driver requirements of each, it is possible to run both video engines within the same
iTX System on different playout servers.
Note:
• The steps below outline the process of installing Output Server 1. For information on
Output Server 2 refer to the Output Server 2 Channel Configuration Guide.
Whether you are using Output Server 1 or Output Server 2, you install an Output Server module
on each machine that is to provide a playout channel. The module is suitable for either
standard-definition (SD) or high-definition (HD) output; you configure the channel resolution
after installing the service.
You also install an Output Server module on each machine that is to render the content of a
schedule as media for on-demand video.
Services in the Output Server modules need authentication from a License dongle before they
can run.
For information on migrating between Output Server 1 and Output Server 2 see the Output
Server 2 Channel Configuration Guide.
To install an Output Server module:
1. Double-click Setup.exe to start the iTX installer.
2. Select Output Server from the Select Software To Install dialog.
Click OK to close the dialog.
The installer displays the iTX Installer dialog, showing the components that make up the
Output Server module.
3. Click Continue.
The installer performs the installation. For some tasks, it displays a dialog requesting you to
enter certain system details. We describe how to use these dialogs below.
In the iTX Domain Configuration dialog, enter domain and Locator Service information.
More details, page 46.
The Media Cache Configuration dialog:
March 2015 System Administrator Guide Page 55 of 404
Page 56

Installing iTX software modules
A default name for the Media Cache Service appears in the Name box; this is formed from
the machine name and the suffix "-CACHE". You may change this name, but you should
ensure any new name is different from the names of all channels in the iTX system; it must
also contain the "-CACHE" suffix.
• Enter a new name in the Name box, if you want to.
• If you have not already created a shared directory on the Output Server machine to
cache your media to, click Create Cache Share.
• The following dialog box will appear:
• You can either type the path and name of the folder you wish to use if you have already
created it, or click the browse button to navigate to the location where you wish to
create the share.
• Click the Make New Folder Button and name the new folder.
• Click OK.
• Click Share This Folder As Cache. The Create Share dialog will close, leaving the Media
Cache Configuration dialog open.
• Click Save. The Media Cache Configuration dialog closes.
The installer creates a configuration file, containing the details you enter, in an applicationdata folder under the logged-on username. It configures the Server Controller on the
Output Server machine to run the Media Cache Service.
The iTX Channel Config dialog will then appear in order for you to configure your channel
(or channels if you are installing on an iTX Appliance Server).
March 2015 System Administrator Guide Page 56 of 404
Page 57

Installing iTX software modules
The iTX Channel Config dialog (Output Server 1 only)
The iTX Channel Config dialog appears towards the end of the Output Server 1 installation and
is used to enter the basic details of the channels you want to run on the playout server.
• Enter a name for the playout channel in the Unmodified Name box. The installer
repeats the name in the Channel Name box. The default name for a channel is iTX-1.
– The name must be different to all other channel names and must not contain any
spaces.
– For a sub-channel used to play out regional content, the sub-channel name must
have the same name as the primary channel followed by #n, where n is the number
of the sub-channel (1-8). For example, iTX1#4 is sub-channel 4 of the primary
channel iTX1.
Note: You must restart TXPlay on the Output Server for the primary channel after a
sub-channel is added to the iTX system.
The installer automatically enters names (based on the unmodified name) for any other
type of channel – back-up, edit or live – that you specify in the dialog.
• Select Backup if you want the installer to create a back-up channel. The installer adds
“-BACKUP” to the channel name.
• From the Playout dropdown menu, select one of the following:
– For the output of content to a normal television transmission system using an AJA
SDI video card, select AJAXena.
– For a channel used to render the content of a schedule as media for video on
demand, select Render. The installer adds "-RENDER" to the end of the channel
name.
– For an iTX On Demand channel, select On Demand.
March 2015 System Administrator Guide Page 57 of 404
Page 58

Installing iTX software modules
• Select Edit Channel if you want the installer to create an edit channel; the installer
automatically enters a name for the channel. This option is selected by default.
• Select Live Channel if you want the installer to create a live channel; the installer
automatically enters a name for the channel. You should only select this option if there
is a requirement for the ability to play out schedule events by using the Live Control on
an iTX Desktop layout.
• Select Live Record to File if you want iTX to record selected live feeds as files when it
plays them out. If you select this option, you need to specify file properties by setting an
encode profile. More details, page 182.
• Select the IntegratedXG option if the output server is an iTXG output server with Grass
Valley Vertigo graphics software on board.
• If the output server machine is an iTX Appliance Server, it is capable of running two
channels (if fitted with two Xena video cards). If you wish to add a second playout
channel, click Add Extra Channel. This will open the Add Extra Channel dialog box:
• Type the name of the second channel in the dialog box and click OK.
• The installer then returns you to the Channel Config Dialog. You can then select each
channel In the Unmodified Name drop down selector and configure them individually,
using the same steps detailed above. When both channels are configured, click Save.
Note:
• The device number dialog is automatically incremented when a second channel is added.
This refers to which Xena card within the iTX Appliance server will be used for this
particular channel.
• You can also use this dialog to delete a channel from the server if you no longer require
it. Select the channel you wish to delete from the Unmodified Name dialog and click
Delete Channel.
• When you have finished configuring your channel or channels, click Save and the iTX
Channel Config setup will close.
The installer creates a configuration file, containing the details you enter, in an applicationdata folder under the logged-on username. It configures the Server Controller on the
Output Server machine to run the various channel services.
This completes the installation of the Output Server module.
On successful installation of the Output Server module, folders for the installed components
appear in the Program Files\iTX 2.0\Services folder. The installed services are:
• TXPlay
• TXEdit (optional)
• The Output Server
• The iTX Player
• The Media Cache Service
March 2015 System Administrator Guide Page 58 of 404
Page 59

Installing iTX software modules
• The iTX Software Updater
Configuring services on the Output Server machine after installation
Installation of the Output Server module creates a playout channel with a default set of
properties. You should check these properties on the Channel Configuration pop-up layout at
an iTX Desktop workstation; you may need to change them to suit your broadcasting
requirements.
In particular, you may want to specify a standby slide and a breakdown slide – still images that
iTX is to display when there is no schedule running in the channel, or if there is an unplanned
interruption to a schedule.
More details, page 140.
Install a Desktop Client module
You need to install the Desktop Client module on any machine that is allocated for system
administration and on all operator workstations.
By setting the security privileges through the iTX Security Tool, you can control the amount of
functionality available at each iTX Desktop. On a system-administrator workstation, you should
be able to make changes to the set-up of the iTX system. On an operator workstation, it should
be possible for an operator to perform the required operational tasks.
1. Double-click Setup.exe to start the iTX installer.
2. Select Desktop Client from the Select Software To Install dialog.
Click OK to close the dialog.
The installer displays the iTX Installer dialog, showing the components that make up the
Desktop Client module.
3. Click Continue.
The installer performs the installation. During this process, the installer displays a dialog
requesting you for domain details.
In the iTX Domain Configuration dialog, enter domain and Locator Service information.
More details, page 46.
The installer completes the installation of the Desktop Client module.
4. Click Finish to close the iTX Installer dialog.
Check the connection of an iTX Desktop to the Media Store
To save schedules and preview video clips, each iTX Desktop workstation must have access to
the Media folder on the Media Store.
1. From Windows Explorer, open the Media folder on the Media Store.
Digital Dorothy files
On each iTX Desktop workstation, the installer installs a small application called Digital Dorothy.
This application provides the voice counts that operators may listen to when iTX is counting
March 2015 System Administrator Guide Page 59 of 404
Page 60

Installing iTX software modules
down to, or up from, the start of an event. The counts happen at specified intervals; they
correspond to the Now and Next timecode displays on the Channel Control layout.
The recordings for the voice counts are contained in .wav files which the installer places in a
folder on the workstation. In the same folder, it places the files that control the timing of the
counts. The default path to the folder is:
C:\Program Files\iTX 2.0\Applications\Desktop\Digital Dorothy
There are three timing-control files: CountIn.txt, CountOut.txt and CountTo.txt. In these, a
single line sets each count. The line contains two elements, separated by a colon: the time (in
seconds) of the count from the start of the event to which it applies; the name of the .wav file
used for the count.
For example, the line for the count at 10 seconds from the start of the event reads:
10:10.wav
You may replace the existing recordings with ones of your own; you may edit the timing-control
files to vary the count intervals.
Install the Software Distributor module on a stand-alone machine
We recommend you install the Software Distributor module on the system-administrator
machine; this enables you to upgrade system servers from your system-administrator
workstation.
1. Double-click Setup.exe to start the iTX installer.
2. When the installer displays the Select Software To Install dialog, select Software
Distributor.
Click OK.
The installer displays the iTX Installer dialog, showing the Software Distributor component
selected for installation.
3. Click Continue.
The installer performs the installation. During this process, the installer displays a dialog
requesting you for domain details.
In the iTX Domain Configuration dialog, enter domain and Locator Service information.
More details, page 46.
The installer completes the installation of the Software Distributor module.
4. Click Finish to close the iTX Installer dialog.
On successful installation of the Software Distributor module, a folder for the installed
components appears in the Program Files\iTX 2.0\Services folder. The installed service is:
• The iTX Software Updater
March 2015 System Administrator Guide Page 60 of 404
Page 61

Installing iTX software modules
Install the Encode Server module
You install the Encode Server module on each machine that is to provide a recording channel.
The module contains components – encode plug-ins – for different types of media card. The
listed plug-ins in this illustration are for a Lynx audio card and AJA video card:
It does not matter how many of the plug-ins you select for installation, so long as you include
the one required by the media card that iTX is to use for encoding. During the installation, you
specify what type of card this is.
If the card is for video encoding, the installer sets up a single recording channel.
If the card is for audio encoding, the installer sets up eight recording channels, numbered 1 to
8. It gives the channels default names, which have two parts: the first part is a prefix, which you
set during the installation; this is followed by “-REC# n”, where n represents the channel
number.
Services in the Encode Server module need authentication from a License dongle before they
can run.
1. Double-click Setup.exe to start the iTX installer.
2. Select Encode Server from the Select Software To Install dialog.
Click OK to close the dialog.
The installer displays the iTX Installer dialog, showing the components that make up the
Encode Server module.
You may clear the check boxes of any plug-ins that iTX does not need.
3. Click Continue.
The installer performs the installation. For some tasks, it displays a dialog requesting you to
enter certain system details. We describe how to use these dialogs below.
In the iTX Domain Configuration dialog, enter domain and Locator Service information.
More details, page 46.
The iTX Encoder Config dialog:
• In the Channel Name box, enter a name for the recording channel. This name must be
different to all channel names in the iTX system; it must not contain any spaces. The
installer automatically adds "_REC" to the name, to indicate a recording channel.
March 2015 System Administrator Guide Page 61 of 404
Page 62

Installing iTX software modules
• From the Device dropdown menu, select the type of video or audio card installed in the
Encode Server machine.
The installer creates a configuration file, containing the details you enter, in an applicationdata folder under the logged-on username. It configures the Server Controller on the
Encode Server machine to run the Encode Server: one instance for a video card, eight
instances for an audio card.
It completes the installation of the Encode Server module.
4. Click Finish to close the iTX Installer dialog.
On successful installation of the Encode Server module, folders for the installed components
appear in the Program Files\iTX 2.0\Services folder. The installed services are:
• The Encode Server
• The iTX Software Updater
Importing encode presets
When performing a recording, an Encode Server creates a media file with properties that are
defined in a template called an encode preset. We provide a number of encode presets in the
installation folder. After installing the Encode Server module, you need to import the encode
presets that are to be available for recordings. More details, page 270.
Re-configuring a service after installation
The iTX installer places a number of configuration tools in subfolders in the Services folder; it
adds shortcuts to them on the Windows desktop. These tools display the configuration dialogs
that appear when you install software modules; you can use them to change various
configuration details.
You may use these tools to modify the various configurations:
Database Server
• The Domain Configuration tool (DomainConfig.exe) to edit the domain name and
Locator Service details.
• The System Service Configuration tool (ObjectDatabaseConfig.exe) to edit the
database connection details.
• The Time Service Configuration tool (TimeServiceConfig.exe) to edit the setting for the
time-service format.
Media Watcher
• The Media Watcher Configuration tool (MediaWatcherConfig.exe) to edit the Media
Watcher details.
Output Server
• The Media Cache Configuration tool (MediaCacheConfig.exe) to edit the media-cache
name.
• The iTX Channel Configuration tool (ITXChannelConfig.exe) to edit channel details.
Encode Server
March 2015 System Administrator Guide Page 62 of 404
Page 63

Installing iTX software modules
• The iTX Encoder Configuration tool (EncoderConfig.exe) to edit the recording-channel
details.
Creating a Locator domain configuration file
The iTX Locator Service maintains a list of all known services on the system. This could consist
of services within the same iTX domain or ones running in separate iTX domains, each with its
own group of playout channels. You can set up the latter systems for multi-domain operation,
which makes it possible to move media files between domains and to control channels in one
domain from an iTX Desktop in a different domain.
Each server in any of the iTX domains has to have at least one Locator Service. This service can
then give information on the services that are running in its (local) domain to any Locator
Service in another (remote) domain.
Locator Service Config
For each Locator Service you need to create a domain configuration file, (DomainConfig.xml),
containing details of the Locator Services in the same or other domains.
To create or edit the file, you use the Locator Service Configuration tool:
This is installed with the Locator Service. You can display the tool from the Windows Start
menu.
You need to list each Locator Service in the configuration tool of each server in the format:
tcp:/255.255.255.255:8999
March 2015 System Administrator Guide Page 63 of 404
Page 64

Installing iTX software modules
Note:
• You do not use the Locator Service Configuration tool to set up load-balanced Locator
Services. You usually configure such an arrangement during installation of the
software. If you want to modify the configuration, you use the Domain Configuration
tool.
About the DomainConfig.xml file
The DomainConfig.xml file contains a domain section for the Locator Service in the local
domain. The section has entries for the domain name, the address of the Locator Service, and
the address of any back-up Locator Service.
For example:
<locatorService>
<domain name="iTX1">
<primaryUri>tcp://omn-locator:8999</primaryUri>
<backupUris>tcp://backup-locator:8999</backupUris>
<domainPrefix> </domainPrefix>
</domain>
...
...
</locatorService>
The domain-name entry identifies the iTX domain that includes the primary Locator Service; the
domainPrefix entry is not normally required by iTX.
For multiple back-up Locator Services, you can use comma-separated entries. For example:
<locatorService>
<domain name="iTX1">
<primaryUri>tcp://omn-locator:8999</primaryUri>
<backupUris>tcp://backup-locator:8999,
tcp://backup-locator1:8999</backupUris>
<domainPrefix> </domainPrefix>
</domain>
...
...
</locatorService>
The configuration file also contains an otherDomains section, with details for each remote
domain that the Locator Service is to be able to get information from for its clients. This section
should contain similar entries to those for the local domain; i.e. the domain name; the IP
addresses of primary and back-up Locator Services.
March 2015 System Administrator Guide Page 64 of 404
Page 65

Installing iTX software modules
For example:
<locatorService>
<domain name="iTX1">
<primaryUri>tcp://omn-locator:8999</primaryUri>
<backupUris>tcp://backup-locator:8999</backupUris>
<domainPrefix> </domainPrefix>
</domain>
<otherDomains>
<domain name="iTX2">
<primaryUri>tcp://192.170.0.200:8999</primaryUri>
<backupUris>tcp://192.170.0.210:8999,
tcp://192.170.0.215:8999</backupUris>
<domainPrefix> </domainPrefix>
</domain>
<domain name="iTX3">
<primaryUri>tcp://192.168.120.100:8999</primaryUri>
<backupUris>tcp://192.168.120.115:8999,
tcp://192.168.120.121:8999</backupUris>
<domainPrefix> </domainPrefix>
</domain>
</otherDomains>
</locatorService>
The information in the configuration file is displayed under the Domain Info tab of the Locator
Service window.
Create a DomainConfig.xml file
Using the Locator Service Configuration tool, do the following to create the configuration file.
Ensure the Locator Service entries are in the same form as those in the example XML file above
(e.g. tcp://omn-locator:8999; tcp://192.168.120.100:8999).
1. Enter the name of the local iTX domain in the Domain Name box.
2. Enter the details of the primary Locator Service in the Primary Locator Uri box.
3. Enter the details of any back-up Locator Services in the Backup Locator Uri(s) box.
4. Do the following for any remote iTX domains that you want the local domain to be able to
connect to.
• Right-click the Other Domains pane and select Add New Domain from the displayed
menu. The Other Domain configuration window opens.
• Enter the details of the remote domain in this window.
• Click OK.
The configuration tool displays an entry for the remote domain in the Other Domains pane.
5. Click Save.
The configuration tool saves the configuration file in the Locator Service folder.
March 2015 System Administrator Guide Page 65 of 404
Page 66

Installing iTX software modules
Note:
• For most systems, you may leave the Domain Prefix box blank.
• You may delete or edit a remote-domain entry after right-clicking its name in the
Other Domains pane and selecting Edit Domain or Delete Domain from the displayed
menu.
• If you modify the configuration file while the Locator Service is running, you can
update the service by clicking Reload Config under the Domain Info tab. You may need
to restart the Locator Service to enable it to connect to any additional remote
domains.
Setting up services to start automatically on machine start-up
On each machine that runs iTX services (that is the Database Server, Output Servers, Encode
Servers and any Media Store on which the Media Watcher is installed), an iTX application called
the Server Controller starts these services.
If you want the services to start automatically when you start a machine and log onto the
network, you need to add the program shortcut for the Server Controller to the Windows
Startup folder. For instructions on how to do this, see the Microsoft Windows Help
documentation.
If you do not set up the Server Controller to start automatically, you may start it manually from
the Windows Start menu. Or you may create a shortcut on the Windows desktop and use this
to start the program.
March 2015 System Administrator Guide Page 66 of 404
Page 67

Starting the iTX system services
Starting the iTX system services
To make the iTX system fully operational, you ensure all the system services are running; you
then start the iTX Desktops.
To start the services on any machine, you should start the Server Controller on that machine
and let the Server Controller start the services under its control. You should not start individual
services manually.
Before you start the Server Controller on an Output Server or Encode Server machine for the
first time, you should place a License file for the services on that machine in the Media Watcher
Inbox folder; you should then check that the Media Watcher processes the License file.
Start the system services
1. Start the system services on the iTX machines in this order:
• Database Server machine.
• Media Stores.
• Output Server machines.
• Encode Server machines.
If the Windows Startup folder contains a shortcut for the Server Controller, the Server
Controller starts automatically when the machine starts up.
To start the Server Controller manually, select Server Controller from the Windows Start
menu; or double-click a shortcut, if there is one, on the Windows desktop.
The Server Controller starts; it then starts all the iTX system services on its machine.
March 2015 System Administrator Guide Page 67 of 404
Page 68

Starting the iTX system services
Checking the Server Controllers
When a Server Controller starts, it displays a user interface. This takes the form of a window,
which you can move and resize. The Server Controller immediately starts the iTX system
services under its control. For each service, a selection button appears in the Windows taskbar.
In a Server Controller window, the information is arranged under a number of main selection
tabs: Service Details, Trace Logs, Installation Info, Controlled Services and Databases.
For more information about the Server Controller window, see the section "Running iTX
services", page 218.
1. On each machine that the system services run on, check that the status indicator in the
Server Controller window has a green light:
This shows that the program is running normally.
The indicator is visible in the window's default view (i.e. with the Service Details main tab
selected).
March 2015 System Administrator Guide Page 68 of 404
Page 69

Starting the iTX system services
Machine
Service
Database Server
System Service
Output Server
TXPlay
Encode Server
Encode Server
Media Store
Media Watcher
2. Click the Controlled Services tab to display a list of all the services running under the
control of the Server Controller:
Check that, for each service, the entry in the Status column reads "Running".
In a basic iTX system, these services should be running on the various machines:
Locator Server (optional)
Logging Service
Time Service
OPUS 2 Service
As Run Service
Routing Data Service
iTX Software Updater
TXEdit
Output Server
iTX Player
Media Cache Service
iTX Software Updater
iTX Software Updater
iTX Software Updater
March 2015 System Administrator Guide Page 69 of 404
Page 70

Starting the iTX system services
Checking the iTX system services
Each service, running under the control of a Server Controller, displays the same type of user
interface. Like the one for the Server Controller, this takes the form of a window that you can
move and resize. This illustration shows a System Service window:
For more information about the user interfaces of the system services, see the section
"Running iTX services", page 218.
1. For each service, check that the status indicator has a green light, showing that the service
is running normally:
The indicator is visible in the window's default view (i.e. with the Service Details main tab
selected).
2. For each Output Server machine, check the License status boxes in the TXPlay and TXEdit
user interfaces:
These should show that the services are licensed.
Note: The two services share the License. If only one of them appears licensed, close the
window of the 'unlicensed' service to stop the service. The Server Controller then restarts
the service and iTX applies the License.
3. Check the License-status box of any Encode Servers that are installed in your system.
March 2015 System Administrator Guide Page 70 of 404
Page 71

Starting the iTX system services
Adding users to the security system
All operators of the iTX system must be registered with the security system of the System
Service. You should use the Security Tool (installed with the System Service) to:
• Add users to the security system.
• Arrange the users in groups.
• Assign security attributes to your system-administrator account (see the note below)
and to the groups.
More details, page 72.
Note:
• Your system-administrator account should have the security attributes of Desktop
Administrator and Desktop Author assigned to it. These give you the rights to set up
iTX Desktop layouts and make them available to operators.
Operator user accounts, in general, should not have these security attributes.
March 2015 System Administrator Guide Page 71 of 404
Page 72

Security in an iTX system
Security in an iTX system
The security system of the iTX System Service
The iTX System Service operates a security system for checking the rights of operators who log
onto iTX
enables iTX to manage security in two ways:
The security system does not directly allow or deny any user or computer the use of any asset.
Instead, it authenticates users and computers (i.e. checks their credentials) at the request of
other iTX services and applications. The requesting service or application then determines
whether or not to allow a user or computer to use its functionality on the asset.
Desktops to use the system content – or “assets” (video clips, schedules, etc.). This
• Access permissions. iTX controls access to information that is stored in the System
Database; it gives authorised users access to assets; it denies such access to
unauthorised users. To make this possible, the security system keeps a list of
permissions for all assets. The list contains details of which registered groups, users,
computers and applications have access, of any defined type (e.g. read or write), to
each asset.
• User rights. iTX controls what tasks users can perform with the assets that they have
access to; e.g. some users may have the right to delete media files.
Users
iTX Desktop users log onto an iTX system with their Windows-network user accounts, which
have associated user rights. Before they can do this, you have to manually register the users in
the security system. In doing so, you create user accounts and set security options for them.
• The user names (logon IDs) for these accounts must be the same as the user names in
the Windows network.
• You do not need to set passwords in the security system for the new accounts.
Any non-registered user that logs onto the iTX system does so as a guest user; there is a special
user account for this. By default the guest user has very limited user rights, which you may
change.
You can withdraw access rights from any registered user. You may do this temporarily, by
disabling the user account; or permanently, by deleting the user account.
Groups
Access permissions and user rights may be assigned to individual users, computers and
applications, or to any defined group of these as a whole. A group may contain any number of
users, computers, applications and other groups.
The easiest way to set identical security options for multiple users is to create a group
containing these users and set the security options for the group.
March 2015 System Administrator Guide Page 72 of 404
Page 73

Security in an iTX system
Desktop Administrator
The ability to create and edit iTX Desktop layouts, and make them
Desktop Author
The ability for any particular user to build and edit that user's own
Manual Logon
The ability to log onto certain iTX services and Desktop components
Security Replication
The ability to copy security data (used by the security system)
Impersonation
Allows impersonation of another user.
Service Manager
The ability to use the Server Manager to remotely start and stop
Service Administrator
The same rights given by the Service Manager attribute. Also, the
Search Publisher
Allows a user to publish saved searches.
Job Type Management
Indicates that a user, group, application or computer may create job
Opus Job Administrator
Indicates that a user, group, application or computer has full control
Dashboard Author
Indicates that a user can author SmartClient dashboards.
The security system keeps three permanent groups – Everyone, Users and Administrators.
• All registered users and the guest user are members of the Everyone group.
• All registered users are members of the Users groups.
• The Administrators group contains a built-in administrator; other users who require
the same administrative rights as the built-in administrator may be added to this
group. See below, "The built-in administrator".
You cannot delete these groups.
Some iTX services create groups when they are installed. For instance, the OPUS2 Service
creates a group called OPUS Administrators (and assigns a security attribute to it). By adding
users to these groups, you can give them special rights for working with the services.
Security attributes
Security attributes determine the rights of users to perform certain actions. To give a user
particular rights, you may assign any of these attributes to the user account:
Attribute Rights
available to any user or workstation.
layouts, and change what layouts appear in the user view.
with different user rights to those of the user that is logged onto
the machine. See later in this section, "
across domains in a multi-domain system.
services in the local domain.
ability to remotely change settings for any service running under a
Server Controller in the local domain.
About Manual Logon".
types.
over all job instances.
March 2015 System Administrator Guide Page 73 of 404
Page 74

Security in an iTX system
System Manager
Grants user the right to access various System Management
Metadata Management
Indicates that a user, group, application or computer has permission
Asset Lock
Indicates that a user, group, application or computer has permission
Asset Unlock
Indicates that a user, group, application or computer has permission
Administrator
Enables Administrative rights
Ignore Security
Ignores Privilege checks
Ignore Permissions
Ignores Permission checks
Attribute Rights
features.
to perform administration of the business metadata configuration.
to lock an asset or media location.
to unlock an asset or media location.
Configuring the security system
A tool for configuring the security system is installed with the System Service. Called the
Security Tool, it has a window with tabs, under which it displays tables of security-system
information:
The basic steps for configuring the security system are:
1. Open the Security Tool and manually log onto it as the built-in administrator (or any
member of the Administrators group).
2. Create user accounts.
3. Create groups and add users to them.
4. Assign security attributes to your system-administrator account and to groups.
5. Close the Security Tool.
March 2015 System Administrator Guide Page 74 of 404
Page 75

Security in an iTX system
The Security Tool simplifies the task of registering users and groups by enabling you to import
the details from a Windows NT network.
There is no need to manually register workstations or applications; this happens automatically.
See later in this section, "About the Security Tool".
The built-in administrator
For its own configuration, the security system includes a built-in user account that has full
administrative rights in the system; this account has the user name "Administrator". You can
use it to configure different aspects of the security system.
An entry for the account appears under the Users tab of the Security Tool:
The built-in administrator is a member of the Administrators group. An entry for this appears
under the Groups tab:
Any user you add to this group gets the same rights for configuring the security system as the
built-in administrator. No other user can change the security-system configuration.
Note:
• There are other types of administrator in an iTX system – for instance, an iTX Desktop
administrator and a resource-type administrator. The built-in administrator for the
security system does not necessarily have the rights that these have for different parts
of the wider iTX system. Where you want the built-in administrator to be able to
perform other administrator roles, you should use the Security Tool to add the
necessary rights to the built-in administrator account.
About Manual Logon
Any user with the Manual Logon security attribute can log onto certain iTX services and
Desktop components with their own user rights.
The attribute is particularly useful when it is necessary to temporarily override restrictions that
apply to an operator who is logged onto an iTX Desktop; for instance, to allow a supervisor to
perform an action that the operator does not have the right to perform.
By default, only the built-in administrator has the Manual Logon attribute.
You may use the Security Tool to assign the attribute to other users. When you do this, you
should set passwords in the security system for these users. Not doing so weakens the security
system: it makes it possible for anyone who knows or can successfully guess a user name to
change the configuration without having to enter a password. More details, page 84.
March 2015 System Administrator Guide Page 75 of 404
Page 76

Security in an iTX system
Users should carefully manage their passwords; they may change them if they want to.
About the Security Tool
Through the Security Tool, you configure different aspects of the security system that the tool
is connected to. By default, it connects to the security system managed by the local System
Service. But you can make it connect to the security system in any remote iTX domain that is on
the same network.
When you right-click a table (e.g. "Groups"), the Security Tool displays a menu with options for
tasks you may want to perform. Later in this section, we describe procedures for some of the
more important tasks. Among these are how to:
• Manually log onto the Security Tool. More details, page 81.
• Import user details from a Windows NT system. More details, page 81.
• Create groups. More details, page 82.
• Create user accounts. More details, page 83.
• Manage group membership. More details, page 83.
• Assign individual users, computers and applications to one or more groups. More
details, page 83.
• Set security options for users, groups, computers and applications. More details, page
84.
Logging onto the Security Tool
To make changes to the security system, you first need to log onto the Security Tool with
administrator rights. The first time you do this, you can only do so by using the Manual Logon
attribute of the built-in administrator.
The built-in administrator account is created with no password; you log onto the Security Tool
with a blank password entry. To prevent unauthorised use of this account, you should set a
password for it the first time you log onto the Security Tool.
Once you add yourself to the security system as a user, you can give yourself the same user
rights as the built-in administrator by adding yourself to the Administrators group. You may
then modify the security-system configuration after logging onto the Security Tool with your
own account.
Important: To ensure the effectiveness of the security system, administrator rights should only
be given to users who have to perform system-administrator tasks.
The Security Tool menus
When you right-click a table under a tab, the Security Tool displays a menu. The menu options
depend on what aspect of the security system is associated with the selected tab. For instance,
under the Groups tab, you can create a group:
March 2015 System Administrator Guide Page 76 of 404
Page 77

Security in an iTX system
Short menu
Long menu
Refresh
Reload the information for the current table.
Logon as Another User …
Open the Logon dialog. You can then manually log onto the
Change Password
Open the Set Password dialog. You can then change the
Import
Open the Import Users, Import Groups or Import Computers
of users and computers that
Exit
Close the Security Tool.
The range of options depends on where in the table you click. If you click a blank line, the
Security Tool displays a short menu with general options; some of these options are present for
all tabs. If you click an entry in a table, a long menu appears with extra options for performing
actions on that entry.
The next illustrations show the short and long forms of the Groups menu.
If you log onto the Security Tool without administrator rights, the menu options are modified:
you can view settings, but not change them.
In the following tables, we describe all the menu options; these are available when the Security
Tool is in administrator mode.
Common options (on all menus):
Option Action
Security Tool as a different user (e.g. the built-in
administrator).
manual log-on password for the user that is currently logged
onto the Security Tool.
You need to know the current password before you can
change it. If you do not know it, you may set a new password
through the Set User Password option in the Users menu.
Users
Groups
Computers
dialog. Through these, you can copy details of users, groups
and computers to the security system from the Windows NT
system; also, you can copy details
are held in the security system of another System Service.
March 2015 System Administrator Guide Page 77 of 404
Page 78

Security in an iTX system
Manage Group Membership
Opens the Manage Group Members dialog for the selected
Manage Security Attributes
Opens the Manage Security Attributes dialog for the selected
Add New Group
Opens the Add Group dialog. You can then create a group in
Edit Group
Opens the Edit Group dialog for the selected group. You can
Delete Group
Deletes the selected group from the security system. The
Manage Group Membership
Opens the Manage Groups dialog for the selected user. You
Manage Security Attributes
Opens the Manage Security Attributes dialog for the selected
Add New User
Opens the New User dialog. You can then create a user
Edit User
Opens the Edit User dialog for the selected user. You can then
Delete User
Deletes the selected user from the security system. The
Set User Password
Opens the Set Password dialog for the selected user. You can
Disable User Account
Disables (or enables) the selected user account.
Options on the Groups menu:
Option Action
group. You can then choose what members are to belong to
the group.
group. You can then assign security attributes to the group.
the security system; you enter a group name and description
in the dialog, or copy the details from the Windows NT
system.
then change the description for the group.
Security Tool performs the deletion when you confirm that
you want it to do so.
Options on the Users menu:
Option Action
can then choose what groups the user is to belong to.
user. You can then assign security attributes to the user.
account in the security system; you enter the user details in
the dialog, or copy them from the Windows NT system.
change the display name and description for the user.
Security Tool performs the deletion when you confirm that
you want it to do so.
then change the manual log-on password for the user; you do
not need to know the user's existing password.
(Enable User Account)
March 2015 System Administrator Guide Page 78 of 404
Options on the Computers menu:
Use this if you want to temporarily remove the rights from a
registered user without deleting the user account.
A user whose user account is disabled may log onto the iTX
system through the guest account.
Page 79

Security in an iTX system
Manage Group Membership
Opens the Manage Groups dialog for the selected computer.
Manage Security Attributes
Opens the Manage Security Attributes dialog for the selected
Edit Computer
Opens the Edit Computer dialog for the selected computer.
Delete Computer
Deletes the selected computer from the security system. The
Manage Group Membership
Opens the Manage Groups dialog for the selected application.
Manage Security Attributes
Opens the Manage Security Attributes dialog for the selected
Edit Application
Opens the Edit Application dialog for the selected application.
Delete Application
Deletes the selected application from the security system. The
Option Action
Options on the Applications menu:
You can then choose what groups the computer is to belong
to.
computer. You can then assign security attributes to the
computer.
You can then change the display name and description for the
computer.
Security Tool performs the deletion when you confirm that
you want it to do so.
Option Action
You can then choose what groups the application is to belong
to.
application. You can then assign security attributes to the
application.
You can then change the description for the application.
Security Tool performs the deletion when you confirm that
you want it to do so.
Note: This action does not uninstall the application from the
host machine.
March 2015 System Administrator Guide Page 79 of 404
Page 80

Security in an iTX system
Add New Attribute
Opens the Add Attribute dialog. You can then create an
Edit Attribute
Opens the Edit Attribute dialog for the selected attribute. You
Delete Attribute
Deletes the selected attribute from the security system. The
rity Tool performs the deletion when you confirm that you
Edit Resource
Opens the Edit Resource dialog.
Options on the Attributes menu:
Option Action
Options on the Resources menu:
attribute in the security system; you enter the attribute name
and description in the dialog.
Note: The attribute only becomes useful when it is defined in
the iTX software.
can then change the description for the attribute.
Secu
want it to do so.
Option Action
You may specify groups that have administrator rights for
resources of the selected type.
The option Default Permission Set for 'Everyone' group has
'Full Control' affects the permission set that is attached to new
resources. It is used by other Grass Valley applications; it is not
used by iTX. By default, the option is not selected for any type
of resource; you should not change this setting.
March 2015 System Administrator Guide Page 80 of 404
Page 81

Security in an iTX system
Using the Security Tool
To change the configuration of the security system, you need to log onto the Security Tool as
the built-in administrator or a user in the Administrators security group.
Open the Security Tool
The Database Server installer creates a shortcut for the Security Tool in the Programs category
of the Windows Start menu.
1. Select iTX Security Tool from the Windows Start menu.
The Security Tool opens, under the user account you are logged onto the Database Server
machine with.
The title bar shows the account details. If you log on as a user who has administrator rights,
"[Admin]" appears after the username:
If the user account does not have administrator rights, you need to manually log onto the
Security Tool with an account that does.
Manually log onto the Security Tool with administrator rights
You can manually log onto the Security Tool with any account that has the Manual Logon
security attribute. More details, page 84.
1. Right-click the table under any tab of the Security Tool; select Logon as Another User from
the displayed menu.
The Logon dialog appears.
2. Do the following to enter the new log-on details.
• In the User ID box, enter "administrator". Or enter the domain name, a backslash and
then the user name (domainname\username) of the user you want to log on as.
• In the Password box, enter the manual log-on password for the specified user. When
you log onto the Security Tool as the built-in administrator for the first time, the user
account does not have a password set for it in the security system. So, until you set one,
you should leave the Password box blank.
• In the Domain box, select the domain in which the security system you want the
Security Tool to connect to is active. Usually, you work in the local domain and so leave
this unchanged.
• Click OK.
The Security Tool connects to the security system using the specified user account.
Import users, groups or computers
The easiest way to register a large number of users, groups or computers when you are
installing a new iTX system is to import them from the existing Windows NT system. You can
use the same procedure to import these details from a security system in another iTX domain.
March 2015 System Administrator Guide Page 81 of 404
Page 82

Security in an iTX system
NOTE: Currently iTX CANNOT directly query Active Directory in order to generate lists of users.
This feature will be introduced in version 2.4. The security tool currently uses NT LAN Manager
API to query the domain controller. This means that populating the list of users can take up to
several minutes, depending on the number of users in a group etc.
1. Right-click the table under any tab and select Import followed by Users, Groups or
Computers from the displayed menu.
The Import Users, Import Groups or Import Computers dialog appears.
2. In the dialog, do the following.
• Select either Import from an NT Domain or Import from a Security Service.
• In the Domain box, select a domain.
• Click Fetch Users, Fetch Groups or Fetch Computers.
The security system reads information from the selected domain and displays a list of
users, groups or computers in the dialog.
• In the displayed list, select the check boxes of the users, groups or computers you want
the Service to import.
• Click Import Selected Users, Import Selected Groups or Import Selected Computers.
The security system imports the selected details.
3. Click Close to close the dialog.
4. Check the imported details in the Security Tool.
Add a group
Use this procedure to add groups one at a time:
1. Select the Groups tab.
2. Right-click the table under the tab, and select Add New Group from the displayed menu.
The Add Group dialog appears.
3. Do one of the following to enter the group details.
• Enter a name in the Group Name box and, if you want to, a description in the
Description box.
• Click Select NT Group to open the Select NT Group dialog; select an iTX domain; select a
group from the displayed list of groups in that domain; click OK to close the dialog.
4. Click OK to close the Add Group dialog.
An entry for the new group appears in the Groups table.
March 2015 System Administrator Guide Page 82 of 404
Page 83

Security in an iTX system
Add a user
Use this procedure to add users one at a time:
1. Select the Users tab.
2. Right-click the table under the tab, and select Add New User from the displayed menu.
The New User dialog appears.
3. Do one of the following to enter the user details.
• Enter the domain name, a backslash and then the user name (domainname\username)
in the User ID box; enter a name and description, if you want to, in the Name and
Description boxes.
• Click Select NT User to open the Select NT User dialog; select an iTX domain; select a
user from the displayed list of users in that domain; click OK to close the dialog.
4. Click OK to close the New User dialog.
An entry for the new user appears in the Users table:
Modify the membership of a group
In this procedure, you select a group and then modify its contents by adding or removing
members:
1. Select the Groups tab.
2. Right-click an entry in the table under the tab, and select Manage Group Membership
from the displayed menu.
The Manage Group Members dialog opens. This displays a list of the group members and a
list of available group members.
3. By selecting items in either list and using the buttons (Add, Remove, Remove All), set the
contents of the Group Members list.
4. Click Close to save your changes and close the dialog.
Assign a user, computer or application to one or more groups
In the following procedure, you select a user, computer or application; you then specify the
groups that you want the selection to belong to.
1. Select the Users, Computers, or Applications tab.
March 2015 System Administrator Guide Page 83 of 404
Page 84

Security in an iTX system
2. Right-click an entry in the table under the selected tab. Select Manage Group Membership
from the displayed menu.
The Manage Groups dialog opens. This displays a list of the groups to which the selected
item belongs and a list of available groups.
3. By selecting groups in either list and using the buttons (Add, Remove, Remove All), set the
contents of the Group Membership list.
4. Click Close to save your changes and close the dialog.
Set security options for a group, user, computer or application
1. Select the Groups, Users, Computers, or Applications tab.
2. Right-click an entry in the table under the selected tab. Select Manage Security Attributes
from the displayed menu.
The Manage Security Attributes dialog opens. This displays a list of the attributes assigned
to the selected item and a list of available attributes.
3. By selecting attributes in either list and using the buttons (Add, Remove, Remove All),
ensure the Attributes list contains just the attributes you want to assign to the item.
4. Click Close to save your changes and close the dialog.
Set a manual log-on password
If you assign the Manual Logon security attribute to a user account, you should set a password
for the account.
1. Select the Users tab.
2. Right-click the entry for the user whose manual log-on password you want to set; select
Set User Password from the displayed menu.
The Set Password dialog appears, with the name of the selected user in the UserID box.
The Current Password box is greyed out, as you do not need to enter the current
password.
3. Enter the new password in the New Password and Confirm Password boxes. Click Set to
set the password and close the dialog.
Note:
• The password you set in this procedure is for the manual log-on process only; it is not
required when the account is used to log onto the iTX Desktop.
• If a user enters a wrong manual log-on password 3 successive times, the security
system disables the user account. You can enable the user account again, by selecting
Enable User Account from the Users menu.
March 2015 System Administrator Guide Page 84 of 404
Page 85

Configuring a Media Watcher
Configuring a Media Watcher
All iTX systems include a Media Watcher. This usually runs on an iTX Media Store (if that
machine allows it to).
More complex systems may have more than one Media Watcher. For example, if you keep the
media files for different groups of channels on different Media Stores, you may allocate a
separate Media Watcher to each Media Store.
For each Media Watcher, the configuration includes details of the paths of an Inbox folder and
a Media folder on the iTX Media Store. The Media Watcher monitors the Inbox folder for files
being added to the iTX system. It moves the files to the Media folder after registering them:
In some systems, you may install the Media Watcher on an iTX machine that is not an iTX
Media Store. For instance, when using a NAS (network-attached storage) system to hold the
media files, you may run the Media Watcher on the Database Server machine. You should then
place the Inbox and Media folders inside the same, shared folder on the iTX Media Store; this
ensures the Media Watcher transfers files between the Inbox and the Media folder most
efficiently.
You specify the Inbox and Media folder paths when configuring a Media Watcher after
installing it. Through other configuration settings, you may:
• Specify additional iTX Media Stores for media storage and playout.
• Set properties for iTX Media Stores, including a high-water mark for disk-space usage.
• Specify external file stores so that the Media Watcher has access to their media files.
In doing this, you may set up the Media Watcher to copy required files to the Inbox, to
register them in the iTX system before moving them to the Media folder. External file
stores may be folders on external storage devices; or file stores in other iTX domains.
The Media Watcher does not manage external file stores.
• Adjust the rate at which the Media Watcher copies files from an external file store to
an iTX Media Store.
• Specify a limit (high-water mark) for disk-space usage by the Inbox; the Media
Watcher stops copying files to the Inbox from external file stores when the limit is
reached.
• Start or stop the Media Watcher monitoring the Inbox (and processing any files that
appear in it).
• Set a registration delay, to prevent the Media Watcher registering files too early. You
may need to do this to ensure the Media Watcher only registers any file copied from
an FTP server when the complete file is in the Inbox.
• Request the Media Watcher to automatically create, on the iTX Media Store, browse
copies of new video clips after they are registered. A browse copy is a low bit-rate
Windows Media 9 file.
• Request the Media Watcher to automatically create, on the iTX Media Store,
keyframes from new video clips after they are registered.
March 2015 System Administrator Guide Page 85 of 404
Page 86

Configuring a Media Watcher
• Select templates for the Media Watcher to use when registering media files.
Templates define default values for various properties of SD and HD video clips.
• Specify paths to mirror folders, for the storage of back-up copies of media files that
are placed in the Inbox. The Media Watcher does not manage mirror folders.
You make these settings under the Setup tab of the Media Watcher user interface; see below,
“The Setup tab”.
You cannot configure a Media Watcher as a back-up service. You can, though, configure a spare
Media Watcher and have it on "cold standby" (i.e. ready to take on the tasks of a Media
Watcher that fails) but not active until it is required.
The Setup tab
You configure a Media Watcher, while it is running, by using the features under the Setup tab
of its user interface:
Under this tab, the Media Watcher shows the name of the specified Inbox folder.
It also displays a File Stores list, containing the details of all file stores it has access to. It can
store media files in these file stores and/or get files for playout from them. The first file store
contains the Media folder to which the Media Watcher moves files from the Inbox.
You can modify the File Stores list by adding file stores, removing file stores or changing their
order.
When searching for a media file, the Media Watcher starts with the first file store in the list and
works through the others (but not mirror folders) in order, until it finds the file.
March 2015 System Administrator Guide Page 86 of 404
Page 87

Configuring a Media Watcher
File-store types
File stores for playout are usually one of two types:
• Store. This describes a folder, on a Windows-based machine, to which the Media
Watcher can move media files that are placed in the Inbox; the files are then available
to iTX for playout. A file store of this type is, by definition, an iTX Media Store.
• Search. This type of file store may be one of the following: a folder, containing media
files that iTX can use, on a machine that is not an iTX Media Store; a set of file stores in
another iTX domain; an archive in a Colossus automation system.
A file store of either of these types is identified by a file-store name, which is mapped to the
specified folder, remote domain or clip database.
For resilience, it is possible to use a third type of file store:
• Mirror. This describes a folder to which the Media Watcher adds back-up media files;
these are copies of the media files it moves from the Inbox to a media folder on an iTX
Media Store. iTX does not manage mirror folders; nor does it include them as locations
in assets in the System Database; the files on them are not available to iTX for playout.
File stores of the mirror type are identified by the UNC path of the specified folder.
For each file store, you should set the sharing permissions of the associated folder to Full
Control for all users.
Inbox settings
You specify an Inbox folder and set properties for it in the Source Folder - Inbox panel:
Specify an Inbox folder
1. Click Set Inbox.
The Media Watcher displays the Select Inbox Folder dialog.
2. Do one of the following to select an Inbox folder.
• Enter the folder-path details in the UNC Path box.
• Click Browse to open the Browse For Folder dialog; select the Inbox folder and click OK
to close the dialog.
3. Click OK to close the Select Inbox Folder dialog.
The Set Inbox box shows the folder-path.
March 2015 System Administrator Guide Page 87 of 404
Page 88

Configuring a Media Watcher
Monitor the Inbox folder
The Media Watcher must monitor the Inbox folder if it is to register new media files and make
them available for use in the iTX system.
1. Ensure Monitor Inbox is selected.
Hold event durations for .osc imports
If you are importing .osc schedules with tc_dur values for the clip duration (Hold Duration),
Media Watcher can import these values and use this to hold the duration of the event.
1. Select Hold Import Duration.
Create browse copies of video clips
If there is a Proxy Generation Service in your system, the Media Watcher can use this to create
a low bit-rate, browse copy for a video clip when it registers the clip.
2. Select Auto Low-Res Proxy.
Create keyframes from video clips
If there is a Keyframe Generation Service in your system, the Media Watcher can use this to
create keyframes for a video clip when it registers the clip.
1. Select Auto Keyframing.
Check mono tracks for Dolby E data
In media files placed in the Inbox, audio content in Dolby E format is normally carried in a single
track containing a pair of stereo channels. The Media Watcher identifies the channels as a
stereo pair that are to play out together.
Dolby E content in some files may appear on two separate tracks, each containing a mono
channel. This separation of content prevents the Media Watcher automatically identifying the
tracks as a pair for playout.
The Media Watcher can detect two separate Dolby E tracks, though, if they are the first two
tracks in a file. It does this by sampling the content of these tracks; if it detects Dolby E data, it
marks the tracks as the component parts of a Dolby E stereo pair.
1. Select Analyze for Dolby E if you want the Media Watcher to check the first two tracks of
all video files for Dolby E data.
Group mono tracks
Track grouping is a way of linking two mono tracks so that iTX can use them to produce a PCM
stereo or Dolby E output signal. You can set up the Media Watcher to automatically perform
this process.
1. Select Group Mono Tracks if you want the Media Watcher to group pairs of adjacent mono
tracks for all video clips.
March 2015 System Administrator Guide Page 88 of 404
Page 89

Configuring a Media Watcher
Note:
• An operator can manually group mono tracks on the Asset layout.
Extended Audio language tagging for grouping mono tracks
In iTX2, audio tracks using language tags now have the option to use an extra fourth character
to describe its channel designation, in order to be grouped automatically, when the clip is
registered via Media Watcher.
For example: "ENGL" and "ENGR" may now be recognized as corresponding left and right mono
channels of the same language track "ENG" and therefore automatically grouped together (e.g.
group 0) upon registration.
The fourth character is treated as a 'wildcard' by Media Watcher and is therefore not restricted
to L, or R but can be any single character - only the first three characters need to match.
This is automatically made active by enabling the settings option "Group mono tracks" in the
Media Watcher's Setup tab.
Once active, clips tagged in this way will show the same Group ID in the "Location" tab of the
Asset Layout when loaded for preview:
With "Group mono tracks" disabled, clips with mono pairs regardless of the number of
characters used will retain a unique group ID.
Set a delay for media-file registration
Normally, the Media Watcher registers a media file immediately after checking that the file is in
a valid format and copying the file property information to the System Database. Once
registered, the media file becomes available to use in the iTX system.
When a media file is being copied to the Inbox from an FTP server (more details, page 99), the
Media Watcher may need to introduce a delay – to ensure the file copying is complete – before
it registers the file.
During the delay, the Media Watcher repeatedly checks the modification time of the file. Each
time this property changes, the Media Watcher restarts the delay. When the property stays the
same for the duration of the delay, the Media Watcher registers the media file.
March 2015 System Administrator Guide Page 89 of 404
Page 90

Configuring a Media Watcher
In most iTX systems, the registration delay is set to zero. It is only necessary to set a delay for
copying processes during which the media file is not locked (e.g. FTP transfer).
1. To set a registration delay, enter the value for the length of the delay (in seconds) in the
Delay after file copy box.
Set the high-water mark for the Inbox folder
The Media Watcher stops copying media files to the Inbox folder from external file stores when
the amount of disk space used by the Inbox folder reaches the high-water mark. This is a setting
that controls the amount of disk space allocated to the Inbox-folder; it is given as a percentage
of the total available space on the drive that contains the Inbox.
1. Enter a percentage value in the High Water Mark (%) box to set the disk-space limit for the
Inbox.
Apply the Inbox high-water mark to Media folders on iTX Media Stores
When you set a high-water mark for the Inbox folder, you can apply the same value to Media
folders that iTX manages; i.e. ones on iTX Media Stores that appear in the File Stores list.
1. Select Apply to All if you want Media folders on iTX Media Stores to use no more disk
space than the percentage level that you set for the Inbox folder.
In the Store Location Options dialog for each iTX Media Store, the Media Watcher
overwrites the high-water mark with the Inbox value. See below, “Adding a file store of the
store type to the File Stores list”.
Adding a file store of the store type to the File Stores list
The first time the Media Watcher starts, the File Stores list is blank. You need to add at least
one file store of the store type, i.e. an iTX Media Store. This must map to a folder called
"Media" on the iTX Media Store.
To add the file store, you use the Store Location Options dialog:
Through this dialog, you create a file store and give it a simple name; the name appears in the
File Store box. You enter details of the folder path in the Path box.
You can specify a high-water mark for the file store – a limit to the total amount of space that
media files in the mapped folder can take up. The Media Watcher stops adding media files to
the file store when the used space reaches the high-water mark.
March 2015 System Administrator Guide Page 90 of 404
Page 91

Configuring a Media Watcher
You can add other file stores of the store type to the File Stores list, and let the Media Watcher
choose which one to use for storing registered media files – it chooses the one with the most
available free space. The name of the mapped folder for each additional file store must start
with "Media" (e.g. "Media For Today").
At any time, you may remove a file store from the File Stores list. iTX continues to hold the
details of the file store. If you want to re-add it to the list later, you can select it in the File Store
box.
Add a file store of the store type to the File Stores list
1. Click Add Store under the Media Watcher Setup tab.
The Media Watcher displays the Store Location Options dialog.
2. Do the following to create a file store.
• Click New to display the Enter File Store Name dialog.
• Enter a name in the Name box; click OK to close the dialog.
iTX creates a file store with the specified name. The Store Location Options dialog shows
the name in the File Store box and “Invalid UNC Accessor” (meaning there is no mapped
folder) in the Path box.
3. Click Edit to display the Select Media Folder dialog.
4. Do one of the following to select a shared folder to map the file store to.
• Enter the folder-path details in the UNC Path box.
• Click Browse to open the Browse For Folder dialog; select a folder and click OK to close
the dialog.
5. Click OK to close the Select Media Folder dialog.
6. If you do not want the Media Watcher to search the store folder for missing media files
that iTX is due to play out in a schedule, select Disable Searches on this Volume.
7. To set the high-water mark, enter a percentage value in the High Water Mark (%) box.
Note: This entry is replaced by the corresponding Inbox-folder value if you select Apply to
All in the Source Folder - Inbox panel.
8. Click OK to close the Store Location Options dialog.
The Media Watcher adds the file store to the File Stores list.
Modify the options for a file store of the store type
1. Select a file store in the File Stores list.
2. Click Options.
The Media Watcher displays the Store Location Options dialog.
3. Edit any of the options in the way you want to.
4. Click OK to close the Store Location Options dialog.
March 2015 System Administrator Guide Page 91 of 404
Page 92

Configuring a Media Watcher
Plug-in
Description
(None)
For basic search-folder functionality
read timecode information from the file header, it adds this information to
Adding a file store of the search type to the File Stores list
A file store of the search type – or external file store – may be any of the following.
• A shared folder on an external machine; i.e. a machine that is not an iTX Media Store.
The machine may be an IT store, a video server or a video archive.
• The set of file stores in the Files Stores list of any remote iTX domain.
• An archive in a Colossus automation system.
To add such a file store, you use the Store Location Options dialog:
Through this dialog, you create a file store and give it a name; the name appears in the File
Store box. You select a Media Watcher plug-in in the Plugin box and configure settings for this
plug-in.
Where the file store is a shared folder on an external machine, you usually configure iTX to
copy required files from the store to an iTX Media Store; from there, a Media Cache Service can
cache them to an Output Server. In some circumstances, you may configure iTX to play out files
from the file store directly. To allow it to do this, the files need to be registered. More details,
page 241.
When working with assets in a remote iTX domain, iTX copies the assets and their associated
media files to the local domain.
To use video clips from a Colossus system, iTX creates its own assets from the clips and copies
the associated media files to an iTX Media Store.
Media Watcher plug-ins for external file stores
With the standard external-search License, Media Watcher can work with shared network
folders and folders on Omneon servers.
Separate Media Watcher plug-ins (each requires its own License) enable a Media Watcher to
use a range of types of external file store. We describe the plug-ins in the following table.
The Media Watcher can use these types of folder as file stores:
– A shared folder on a Windows-based IT store; you need to specify the
UNC path to the folder.
– A media folder on an Omneon video server or MediaGrid.
March 2015 System Administrator Guide Page 92 of 404
More details, page 96.
When a reference MOV or MXF file on an Omneon video server is copied to
an iTX Media Store, the Media Watcher registers the reference file. If it can
Page 93

Configuring a Media Watcher
Plug-in
Description
the iTX asset. The video and audio (essence) files are stored in a subfolder
Core
For access to a Colossus system database
of the reference file folder.
iTX can copy clip information from a Colossus system database.
When an event in a live schedule features an asset that is not registered in
the iTX system, the Media Watcher searches the Colossus database for a
matching clip; the clip must be associated with a media file in an archive
location (specified in the plug-in configuration).
On finding the clip, it creates a corresponding asset in the iTX System
Database and copies the clip information from the Colossus database. The
iTX asset includes a useclip flag – a property setting that causes iTX, when
playing out the clip, to use the in- and out-points copied from the clip in the
Colossus system.
Once the iTX asset is created from the Colossus clip, the Media Watcher
manages the copying of the required media file from the archive to an iTX
Media Store. For this, it requires the DIVArchive plug-in.
March 2015 System Administrator Guide Page 93 of 404
Page 94

Configuring a Media Watcher
Plug-in
Description
DIVArchive
For access to a Front Porch Digital DIVArchive
You can configure the Media Watcher to use a DIVArchive as an external
file store in three types of archive operation:
– The restoring of a media file from a DIVArchive.
– The archiving of a media file to a DIVArchive.
– The deleting of a media file from a DIVArchive.
More details, page 97.
Restoring
When a schedule event features a media file that is not on an iTX Media
Store but is on a DIVArchive, iTX can restore the media file; i.e. copy it from
the archive to an iTX Media Store.
For an operation of this type, the Media Watcher requests the DIVArchive
to copy the media file to the Inbox folder. Once the file is there, the Media
Watcher registers it and moves it to an iTX Media Store.
If the restored media file is later deleted from the iTX system, iTX may keep
its asset (with details of the archive location) in the System Database. This
makes it easier for iTX to restore the media file the next time it is needed.
Manual and Schedule based Restore Jobs are issued with a HIGH priority
(75/100)
Archiving
iTX can archive a media file to the DIVArchive when the Media Watcher
registers the file from the Inbox. In general, it can archive files of the types
identified by the filename extensions listed below.
Video
.avi; .gxf; .mov; .mpg; .mpeg; .mxf; .saf; .ts; .wmv; .xtl
Audio
.mp3; .wav; .wma
Still image
.bmp; .jpeg; .jpg; .png; .spg; .tif; .tiff
iTX CG
.cap
In the archiving process, the DIVArchive copies a media file from its Media
Store location; the original media file is not deleted.
Archiving jobs are issued with a MEDIUM priority (50/100)
Deleting
iTX can delete a media file from the DIVArchive when its asset is deleted
(for example, on the Asset layout).
March 2015 System Administrator Guide Page 94 of 404
Page 95

Configuring a Media Watcher
Plug-in
Description
External
For access to one or more remote iTX domains
FTP
For access to an FTP server
Suitcase
For access to a Suitcase TV archive
Domain
You select a plug-in when you set up an external file store in the Search Location Options
dialog.
iTX can copy assets and media files from other iTX domains.
When an event in a live schedule features an asset that is not in the local
iTX system, the Media Watcher searches specified remote domains for a
matching asset. On finding the asset, it creates a copy of it in the iTX System
Database in the local domain.
Once the asset is created, the Media Watcher manages the copying of the
required media file to an iTX Media Store in the local domain.
iTX can use a media folder on an FTP server as a search folder. The FTP
server must be able to handle either Unix or Microsoft IIS commands. More
details, page 99.
iTX can use a media folder on a Suitcase TV video server as a search folder.
More details, page 99.
About iTX timestamps on media files copied from external file stores
When registering a media file, iTX adds the term "_OMN" and a timestamp to the file name
when it places the file in the Media folder on an iTX Media Store. So, for example, MyFile.mpg
may become MyFile_OMN1123164831.mpg. The iTX asset references the renamed file.
You can configure a Media Watcher to search an external folder for files with or without the
timestamp. If the external folder is on an iTX Media Store in another system, the required file
may have the iTX timestamp; if it is on any other type of storage device, the required file is
unlikely to have the iTX timestamp.
To allow the Media Watcher to search most efficiently, you should only request it to search for
iTX-timestamped files when it is necessary to do so.
Add a file store of the search type to the File Stores list
1. Click Add Search Path under the Media Watcher Setup tab.
The Media Watcher displays the Search Location Options dialog.
2. Do the following to create a file store.
• Click New to display the Enter File Store Name dialog.
• Enter a name in the Name box; click OK to close the dialog.
iTX creates a file store with the specified name; the name appears in the File Store box.
3. Select a plug-in in the Plugin box.
March 2015 System Administrator Guide Page 95 of 404
Page 96

Configuring a Media Watcher
4. Set options for the plug-in (see one of the following procedures).
5. Click OK to close the Search Location Options dialog.
The Media Watcher adds the file store to the File Stores list.
Note:
• You can view or modify file-store options by selecting a file store in the File Stores list
and clicking Options.
Set file-store options for an external IT store or Omneon video server
After adding a file store for an external IT store or Omneon video server, you do the following
to configure it in the Search Location Options dialog.
1. Select "None" in the Plugin box.
2. Do the following to select a search folder.
• Click
• Enter the folder-path details in the UNC Path box.
Or, click Browse to open the Browse For Folder dialog; select a folder and click OK to
close the dialog.
• Click OK to close the Select Share dialog.
3. Select Copy media to central store if you want the Media Watcher to copy media files
from the external file store to an iTX Media Store.
4. If you want the Media Watcher to search for iTX-timestamped media files, select Search
for Omnibus '_OMN' files.
You should select this option only when it is needed (e.g. to search a folder on an iTX
Media Store in a different system). More details, page 95.
5. Click OK to close the Search Location Options dialog.
to open the Select Share dialog.
Set file-store options for a Colossus system database
The Core plug-in enables a Media Watcher to copy clip information and archived media files
from a Colossus system.
To enable iTX to use a Colossus clip, the Media Watcher has to copy the clip information from
the Colossus database into an iTX asset. It must do this before it restores the associated media
file. To ensure this happens, you need to make the Colossus database the highest file store of
the search type (after all file stores of the store type) in the File Stores list.
To be able copy the associated media files, the Media Watcher requires an archive plug-in (e.g.
the DIVArchive one).
After adding a file store for a Colossus system, you do the following to configure it in the Search
Location Options dialog.
1. Select the Core plug-in in the Plugin box.
2. Do the following to enter a sample folder path for the plug-in.
• Click
March 2015 System Administrator Guide Page 96 of 404
to display the Select Share dialog.
Page 97

Configuring a Media Watcher
• In the UNC Path box, enter path details of a sample folder, such as "\\Core\Plugin"; the
path must include the double-slash and the single slash; you may type any text after the
slashes (it does not have to correspond to an existing folder).
• Click OK to close the dialog.
The plug-in may not work without the sample path.
3. Ensure Search for Omnibus '_OMN' files is not selected.
4. Enter the details the Media Watcher needs to access to the Colossus database:
• In the Server box, enter the name of the Microsoft SQL Server that runs the Colossus
database.
• In the Database Name box, enter the name of the Colossus database.
• Select Trusted Authentication. Or enter the required database-access credentials in the
Username and Password box.
5. Leave the entry in the Shared Procedure box unchanged.
This identifies a special program the Media Watcher uses to get information from the
Colossus database.
6. In the Locations box, enter details of any archive or FTP locations that video clips you want
to work with should include. You may specify multiple locations, separated by commas.
For the Media Watcher to identify a matching Colossus clip, the clip must have the
specified location details. The Media Watcher includes the same location details in the iTX
asset it creates.
7. Click OK to close the Search Location Options dialog.
Note:
• You need to include an archive search folder after the Core search folder.
Set file-store options for a Front Porch Digital DIVArchive
After adding a file store for a Front Porch Digital DIVArchive, you do the following to configure
it in the Search Location Options dialog.
1. Select the DIVArchive plug-in the Plugin box.
2. Ensure Search for Omnibus '_OMN' files is not selected.
3. Enter the IP address of the DIVArchive in the Diva IP Address box.
4. Enter the port number for the DIVArchive in the Diva Port box.
5. In the Simultaneous Jobs box, enter the maximum number of media files the Media
Watcher is to handle at one time.
6. In the Restore Host box, enter the host name of the server to which the Media Watcher
should send requests to copy media from the DIVArchive. This host name must be the
same as the one set in the DIVArchive configuration settings.
7. In the Archive Transfer Type box, select the type of transfer the Media Watcher should use
to copy media from the DIVArchive.
8. In the Category box, enter the name of the category iTX is to use for archiving and
restoring media files. The name must match the name set in the DIVArchive configuration
settings.
March 2015 System Administrator Guide Page 97 of 404
Page 98

Configuring a Media Watcher
You may enter up to 5 categories, separated by commas, for iTX to search when restoring
files; it searches the categories in order until it finds a required media file. iTX uses only the
first category in the list for archiving.
9. If you want iTX to delete a media file from the DIVArchive when its media item is deleted
on the Asset layout, select Delete from Archive.
10. If you want iTX to archive a media file to the DIVArchive when the Media Watcher registers
the file, select Archive on Ingest.
Do one of the following.
• Select Overwrite Archive if you want iTX to overwrite any previously archived copy of
the media file.
• Ensure Overwrite Archive is not selected if you do not want iTX to overwrite any
previously archived copy of the media file.
11. If iTX is to archive media files to the DIVArchive, enter the group name for the archived
media in the Default Media Name box. The name must match the name set in the
DIVArchive configuration settings.
12. Click any of the following buttons to open PinPoint. Then set search criteria to create a list
of media files, of a particular type, that iTX is to be able to archive.
• Set Video Archive Filter, for video clips.
• Set Audio Archive Filter, for audio clips.
• Set Graphics Archive Filter, for still images (e.g. logos).
• Set CG Archive Filter, for CGs.
Set search criteria for each type you want iTX to be able to handle: iTX only archives items
that appear in PinPoint search results.
13. Click OK to close the Search Location Options dialog.
Set file-store options for remote iTX domains
After adding a file store for one or more remote iTX domains, you do the following to configure
it in the Search Location Options dialog.
1. Select the external-domain plug-in the Plugin box.
The Media Watcher displays a search-domains panel with two panes: Available Domains
and Selected Domains. Each domain you define in the Locator Service Configuration tool
appears in one of the panes. More details, page 63.
March 2015 System Administrator Guide Page 98 of 404
Page 99

Configuring a Media Watcher
2. Ensure only the remote domains you want iTX to be able to search in appear in the
Selected Domains pane.
• To move a domain from one pane to the other, select it and click
• To re-postion a domain in the Selected Domains list, select it and click Move Up or
Move Down.
The order of domains in the Selected Domains pane defines the search order: iTX searches
the one at the top of the list first.
3. In the Simultaneous Jobs box, enter the maximum number of media files the Media
Watcher is to handle at one time.
4. Click OK to close the Search Location Options dialog.
or .
Set file-store options for an FTP server
After adding a file store for an FTP server, you do the following to configure it in the Search
Location Options dialog.
1. Select the FTP server plug-in in the Plugin box.
2. Select Copy media to central store if you want the Media Watcher to copy media files
from the external file store to an iTX Media Store.
3. If you want the Media Watcher to search for iTX-timestamped media files, select Search
for Omnibus '_OMN' files.
You should only select this option when it is needed (e.g. to search a folder on an iTX
Media Store in a different system). More details, page 95.
4. In the Max Jobs box, enter the maximum number of media files the Media Watcher is to
handle at one time.
5. Enter the IP address of the FTP server in the IP Address box.
6. Enter the path details of the search folder in the Path box.
7. Enter the port number for the FTP server in the Port box.
8. Enter the required access credentials in the Username and Password boxes.
9. Select the type of FTP server in the Type box.
10. If your FTP server has an FTP proxy running on the firewall software, select the Enable
Proxy FTP check box.
If your FTP server does not have an FTP proxy, clear this check box.
11. Click OK to close the Search Location Options dialog.
Set file-store options for a Suitcase TV archive
After adding a file store for a Suitcase TV archive, you do the following to configure it in the
Search Location Options dialog.
1. Select the Suitcase TV plug-in in the Plugin box.
2. Enter the path details of the search folder in the Path box.
3. If you want the Media Watcher to search for iTX-timestamped media files, select Search
for Omnibus '_OMN' files.
March 2015 System Administrator Guide Page 99 of 404
Page 100

Configuring a Media Watcher
You should only select this option when it is needed (e.g. to search a folder on an iTX
Media Store in a different system). More details, page 95.
4. Enter the IP address of the Suitcase TV archive in the IP Address box.
5. Enter the port number for the Suitcase TV archive in the Port box.
6. In the Inbox Alias box, enter the inbox configuration set for the Suitcase TV archive.
7. In the Simultaneous Jobs box, enter the maximum number of media files the Media
Watcher is to handle at one time.
8. Click OK to close the Search Location Options dialog.
Adding file stores of the Mirror type to the File Stores list
Mirror stores may be used to hold media files in a back-up system. More details, page 104.
Add a file store of the mirror type to the File Stores list
1. Click Add Mirror.
The Media Watcher displays the Select Media Folder dialog.
2. Do one of the following to select a folder on a mirror file store.
• Enter the folder-path details in the UNC Path box.
• Click Browse to open the Browse For Folder dialog; select a folder and click OK to close
the dialog.
3. Click OK to close the Select Media Folder dialog.
The Media Watcher adds the mirror file store to the File Stores list.
Modifying the File Stores list
You may want to remove a file store from the File Stores list to stop the Media Watcher
accessing it.
When searching for media files, the Media Watcher searches file stores in the order in which
they appear in the File Stores list. You may change the positions of file stores to change the
search order.
Remove a file store from the File Stores list
1. Select a file store in the File Stores list.
2. Click Remove.
Re-order file stores
1. Select a file store in the File Stores list.
2. Click Up or Down.
March 2015 System Administrator Guide Page 100 of 404
 Loading...