

Page 1

ITX SMARTCLIENT
WEB-BASED MEDIA ASSET MANAGEMENT
Operator Guide
iTX v2.6
2015-03-23
Page 2

Notices
Copyright and Trademark Notice
Copyright © 2015, Grass Valley USA, LLC. All rights reserved.
Belden, Belden Sending All The Right Signals, and the Belden logo are trademarks or
register
other jurisdictions. Grass Valley USA, LLC, Miranda, iTX, SmartClient, [LIST ALL Grass Valley
TRADEMARKS (REGISTERED, AND NOT REGISTERED) MENTIONED IN THIS DOCUMENT] are
trademarks or registered trademarks of Grass Valley USA, LLC. Belden Inc., Grass Valley USA,
LLC, and other parties may also have trademark rights in other terms used herein.
ed trademarks of Belden Inc. or its affiliated companies in the United States and
Terms and Conditions
Please read the following terms and conditions carefully. By using iTX documentation, you
agree to the following terms and conditions.
Grass Valley hereby grants permission and license
manuals for their own internal business use. Manuals for Grass Valley products may not be
reproduced or transmitted in any form or by any means, electronic or mechanical, including
photocopying and recording, for any purpose unless specifically authorized in writing by
Grass Valley.
to ow
ners of iTXs to use their product
A Grass Valley manual may have been revised to reflect changes made to the product
during its manufacturing life. T
product. Care should be taken to ensure that one obtains the proper manual version for a
specific product serial number.
Information in this document is subject to change without
commitment on the part of Grass Valley.
Warranty information is available in the Support section of the Grass Valley Web site
ww.grassvalley
(w
Title iTX SmartClient Operator Guide
.com).
hus, different versions of a manual may exist for any given
notice and does not represent a
Software Version v2.6
Revision
ii
2016-03-23, 11:56
Page 3

Table of Contents
1 About SmartClient. . . . . . . . . . . . . . . . . . . . . . . . . . . . . . . . . . . . . . 1
What is iTX SmartClient? . . . . . . . . . . . . . . . . . . . . . . . . . . . . . . . . . . . . . . . . . . . . . . . . . . . . . . . . . . . 1
The SmartClient User Interface. . . . . . . . . . . . . . . . . . . . . . . . . . . . . . . . . . . . . . . . . . . . . . . . . 2
Playing of Media Files. . . . . . . . . . . . . . . . . . . . . . . . . . . . . . . . . . . . . . . . . . . . . . . . . . . . . . . . . . 2
The SmartClient Home Page . . . . . . . . . . . . . . . . . . . . . . . . . . . . . . . . . . . . . . . . . . . . . . . . . . . . . . . 2
About the Dashboard . . . . . . . . . . . . . . . . . . . . . . . . . . . . . . . . . . . . . . . . . . . . . . . . . . . . . . . . . 2
Opening SmartClient . . . . . . . . . . . . . . . . . . . . . . . . . . . . . . . . . . . . . . . . . . . . . . . . . . . . . . . . . 3
Loading an alternative Dashboard. . . . . . . . . . . . . . . . . . . . . . . . . . . . . . . . . . . . . . . . . . . . . 3
Activities and Workspaces . . . . . . . . . . . . . . . . . . . . . . . . . . . . . . . . . . . . . . . . . . . . . . . . . . . . . 3
Selecting a workspace . . . . . . . . . . . . . . . . . . . . . . . . . . . . . . . . . . . . . . . . . . . . . . . . . . . . . . . . 4
Returning to the home page . . . . . . . . . . . . . . . . . . . . . . . . . . . . . . . . . . . . . . . . . . . . . . . . . . 4
Workspace levels . . . . . . . . . . . . . . . . . . . . . . . . . . . . . . . . . . . . . . . . . . . . . . . . . . . . . . . . . . . . . 4
Automatic Opening of a Workspace and Loading of a Video Clip by URL . . . . . . . . 5
Job Monitoring. . . . . . . . . . . . . . . . . . . . . . . . . . . . . . . . . . . . . . . . . . . . . . . . . . . . . . . . . . . . . . . . 5
System Administration . . . . . . . . . . . . . . . . . . . . . . . . . . . . . . . . . . . . . . . . . . . . . . . . . . . . . . . . 5
Entering Information in SmartClient. . . . . . . . . . . . . . . . . . . . . . . . . . . . . . . . . . . . . . . . . . . . . . . . 5
Specifying Dates and Times. . . . . . . . . . . . . . . . . . . . . . . . . . . . . . . . . . . . . . . . . . . . . . . . . . . .6
Specifying a date . . . . . . . . . . . . . . . . . . . . . . . . . . . . . . . . . . . . . . . . . . . . . . . . . . . . . . . . . . . . . 6
Specifying a time . . . . . . . . . . . . . . . . . . . . . . . . . . . . . . . . . . . . . . . . . . . . . . . . . . . . . . . . . . . . . 6
Using a keyboard to adjust a time value . . . . . . . . . . . . . . . . . . . . . . . . . . . . . . . . . . . . . . . 6
Access Rights to Assets . . . . . . . . . . . . . . . . . . . . . . . . . . . . . . . . . . . . . . . . . . . . . . . . . . . . . . . . . . . . 7
2 The Browse Workspace . . . . . . . . . . . . . . . . . . . . . . . . . . . . . . . . . 9
About Workspace Levels. . . . . . . . . . . . . . . . . . . . . . . . . . . . . . . . . . . . . . . . . . . . . . . . . . . . . . . . . . . 9
Search Level. . . . . . . . . . . . . . . . . . . . . . . . . . . . . . . . . . . . . . . . . . . . . . . . . . . . . . . . . . . . . . . . . . . 9
Automatic switching to the clip level . . . . . . . . . . . . . . . . . . . . . . . . . . . . . . . . . . . . . . . . . 10
Clip Level . . . . . . . . . . . . . . . . . . . . . . . . . . . . . . . . . . . . . . . . . . . . . . . . . . . . . . . . . . . . . . . . . . . .10
Switching Between Levels . . . . . . . . . . . . . . . . . . . . . . . . . . . . . . . . . . . . . . . . . . . . . . . . . . . .11
Clip-Level Options. . . . . . . . . . . . . . . . . . . . . . . . . . . . . . . . . . . . . . . . . . . . . . . . . . . . . . . . . . . .11
Operating modes . . . . . . . . . . . . . . . . . . . . . . . . . . . . . . . . . . . . . . . . . . . . . . . . . . . . . . . . . . . . 11
Selecting the Browse Workspace. . . . . . . . . . . . . . . . . . . . . . . . . . . . . . . . . . . . . . . . . . . . . .12
About the Browse Clip-level Tabs . . . . . . . . . . . . . . . . . . . . . . . . . . . . . . . . . . . . . . . . . . . . . . . . .12
The Metadata Tab . . . . . . . . . . . . . . . . . . . . . . . . . . . . . . . . . . . . . . . . . . . . . . . . . . . . . . . . . . . .13
The Events Tab . . . . . . . . . . . . . . . . . . . . . . . . . . . . . . . . . . . . . . . . . . . . . . . . . . . . . . . . . . . . . . .13
The Actions Tab . . . . . . . . . . . . . . . . . . . . . . . . . . . . . . . . . . . . . . . . . . . . . . . . . . . . . . . . . . . . . .13
The Event Logging Tab . . . . . . . . . . . . . . . . . . . . . . . . . . . . . . . . . . . . . . . . . . . . . . . . . . . . . . .13
Marking an event . . . . . . . . . . . . . . . . . . . . . . . . . . . . . . . . . . . . . . . . . . . . . . . . . . . . . . . . . . . . 14
How Tab Selection Affects the Media Viewer . . . . . . . . . . . . . . . . . . . . . . . . . . . . . . . . . . . . . .14
Performing Tasks in the Browse Workspace . . . . . . . . . . . . . . . . . . . . . . . . . . . . . . . . . . . . . . .15
Previewing a Video Clip. . . . . . . . . . . . . . . . . . . . . . . . . . . . . . . . . . . . . . . . . . . . . . . . . . . . . . .15
Annotation of Video Clips. . . . . . . . . . . . . . . . . . . . . . . . . . . . . . . . . . . . . . . . . . . . . . . . . . . . .15
Viewing video-clip metadata . . . . . . . . . . . . . . . . . . . . . . . . . . . . . . . . . . . . . . . . . . . . . . . . . 16
iii
Page 4

Table of Contents
Editing a video clip. . . . . . . . . . . . . . . . . . . . . . . . . . . . . . . . . . . . . . . . . . . . . . . . . . . . . . . . . . . 16
Annotating a video clip . . . . . . . . . . . . . . . . . . . . . . . . . . . . . . . . . . . . . . . . . . . . . . . . . . . . . . 16
Event Logging and Annotating . . . . . . . . . . . . . . . . . . . . . . . . . . . . . . . . . . . . . . . . . . . . . . .16
Playing back an event and view its metadata . . . . . . . . . . . . . . . . . . . . . . . . . . . . . . . . . 16
Editing an event . . . . . . . . . . . . . . . . . . . . . . . . . . . . . . . . . . . . . . . . . . . . . . . . . . . . . . . . . . . . . 17
Deleting an event . . . . . . . . . . . . . . . . . . . . . . . . . . . . . . . . . . . . . . . . . . . . . . . . . . . . . . . . . . . . 17
Marking an event in a video clip and add metadata to it . . . . . . . . . . . . . . . . . . . . . . . 17
Deleting a Video Clip . . . . . . . . . . . . . . . . . . . . . . . . . . . . . . . . . . . . . . . . . . . . . . . . . . . . . . . . .18
Keyboard Shortcuts . . . . . . . . . . . . . . . . . . . . . . . . . . . . . . . . . . . . . . . . for Event Logging18
Configuration. . . . . . . . . . . . . . . . . . . . . . . . . . . . . . . . . . . . . . . . . . . . . . . . . . . . . . . . . . . . . . . . 19
Using the Actions Menu . . . . . . . . . . . . . . . . . . . . . . . . . . . . . . . . . . . . . . . . . . . . . . . . . . . . . .19
Video AutoPlay Check Box . . . . . . . . . . . . . . . . . . . . . . . . . . . . . . . . . . . . . . . . . . . . . . . . . . . .20
3 The Placeholders Workspace . . . . . . . . . . . . . . . . . . . . . . . . . . . 21
About the Placeholders Workspace . . . . . . . . . . . . . . . . . . . . . . . . . . . . . . . . . . . . . . . . . . . . . . .21
Selecting the Placeholders workspace. . . . . . . . . . . . . . . . . . . . . . . . . . . . . . . . . . . . . . . . .22
Performing Tasks in the Placeholders Workspace . . . . . . . . . . . . . . . . . . . . . . . . . . . . . . . . . .22
Selecting a Placeholder Clip . . . . . . . . . . . . . . . . . . . . . . . . . . . . . . . . . . . . . . . . . . . . . . . . . .22
Finding and loading a placeholder clip . . . . . . . . . . . . . . . . . . . . . . . . . . . . . . . . . . . . . . . 22
Working with a Placeholder Clip . . . . . . . . . . . . . . . . . . . . . . . . . . . . . . . . . . . . . . . . . . . . . .22
Viewing placeholder-clip metadata . . . . . . . . . . . . . . . . . . . . . . . . . . . . . . . . . . . . . . . . . . . 23
Editing placeholder-clip metadata. . . . . . . . . . . . . . . . . . . . . . . . . . . . . . . . . . . . . . . . . . . . 23
4 The Shot List Workspace and Project Clips . . . . . . . . . . . . . . 25
About Project Clips . . . . . . . . . . . . . . . . . . . . . . . . . . . . . . . . . . . . . . . . . . . . . . . . . . . . . . . . . . . . . . .25
Selecting the Shot List Workspace . . . . . . . . . . . . . . . . . . . . . . . . . . . . . . . . . . . . . . . . . . . .26
Clip Management Buttons . . . . . . . . . . . . . . . . . . . . . . . . . . . . . . . . . . . . . . . . . . . . . . . . . . . .26
The Source Shot Selection Tab . . . . . . . . . . . . . . . . . . . . . . . . . . . . . . . . . . . . . . . . . . . . . . . .27
The Target Project Tab. . . . . . . . . . . . . . . . . . . . . . . . . . . . . . . . . . . . . . . . . . . . . . . . . . . . . . . .28
Project Clips Main Features For Creating And Editing . . . . . . . . . . . . . . . . . . . . . . . . . . . . . .28
Source Clip Selection Buttons . . . . . . . . . . . . . . . . . . . . . . . . . . . . . . . . . . . . . . . . . . . . . . . . .28
Clip Search . . . . . . . . . . . . . . . . . . . . . . . . . . . . . . . . . . . . . . . . . . . . . . . . . . . . . . . . . . . . . . . . . . .29
Event Search . . . . . . . . . . . . . . . . . . . . . . . . . . . . . . . . . . . . . . . . . . . . . . . . . . . . . . . . . . . . . . . . .29
Recent. . . . . . . . . . . . . . . . . . . . . . . . . . . . . . . . . . . . . . . . . . . . . . . . . . . . . . . . . . . . . . . . . . . . . . . 31
The Shot-List Grid . . . . . . . . . . . . . . . . . . . . . . . . . . . . . . . . . . . . . . . . . . . . . . . . . . . . . . . . . . . .31
Playing back a shot from the shot-list grid . . . . . . . . . . . . . . . . . . . . . . . . . . . . . . . . . . . . 32
Shot-list grid buttons . . . . . . . . . . . . . . . . . . . . . . . . . . . . . . . . . . . . . . . . . . . . . . . . . . . . . . . . 32
The events grid . . . . . . . . . . . . . . . . . . . . . . . . . . . . . . . . . . . . . . . . . . . . . . . . . . . . . . . . . . . . . . 32
Playing back an event from the events grid . . . . . . . . . . . . . . . . . . . . . . . . . . . . . . . . . . . 33
Events-grid buttons . . . . . . . . . . . . . . . . . . . . . . . . . . . . . . . . . . . . . . . . . . . . . . . . . . . . . . . . . . 33
Shot Marking Features on the Media Viewer. . . . . . . . . . . . . . . . . . . . . . . . . . . . . . . . . . .33
Creating a Project Clip . . . . . . . . . . . . . . . . . . . . . . . . . . . . . . . . . . . . . . . . . . . . . . . . . . . . . . . . . . . .34
Starting a new project clip . . . . . . . . . . . . . . . . . . . . . . . . . . . . . . . . . . . . . . . . . . . . . . . . . . .34
Loading a project clip . . . . . . . . . . . . . . . . . . . . . . . . . . . . . . . . . . . . . . . . . . . . . . . . . . . . . . . . 34
Loading a source clip in the Media Viewer . . . . . . . . . . . . . . . . . . . . . . . . . . . . . . . . . . . . 35
Adding a shot from the Media Viewer to a project clip. . . . . . . . . . . . . . . . . . . . . . . . . 35
Adding a shot from the Events panel to a project clip . . . . . . . . . . . . . . . . . . . . . . . . . 35
Editing a shot in a shot list. . . . . . . . . . . . . . . . . . . . . . . . . . . . . . . . . . . . . . . . . . . . . . . . . . . . 36
iv
Page 5

Saving a project clip . . . . . . . . . . . . . . . . . . . . . . . . . . . . . . . . . . . . . . . . . . . . . . . . . . . . . . . . . 36
Saving a copy of a project clip . . . . . . . . . . . . . . . . . . . . . . . . . . . . . . . . . . . . . . . . . . . . . . . . 36
Annotating a Project Clip or Source Clip . . . . . . . . . . . . . . . . . . . . . . . . . . . . . . . . . . . . . . . . . . .36
Editing a Project Clip . . . . . . . . . . . . . . . . . . . . . . . . . . . . . . . . . . . . . . . . . . . . . . . . . . . . . . . . . . . . .37
Exporting a Project Clip . . . . . . . . . . . . . . . . . . . . . . . . . . . . . . . . . . . . . . . . . . . . . . . . . . . . . . . . . . .37
Optimizing the Space Available to Shot Lists on the Shot List Tab . . . . . . . . . . . . . . . . . .38
5 The Live Logging Workspace . . . . . . . . . . . . . . . . . . . . . . . . . . . 39
About the Live Logging Workspace . . . . . . . . . . . . . . . . . . . . . . . . . . . . . . . . . . . . . . . . . . . . . . .39
The Logging Period . . . . . . . . . . . . . . . . . . . . . . . . . . . . . . . . . . . . . . . . . . . . . . . . . . . . . . . . . .40
Checking Marked Events. . . . . . . . . . . . . . . . . . . . . . . . . . . . . . . . . . . . . . . . . . . . . . . . . . . . . .40
Selecting the Live Logging Workspace . . . . . . . . . . . . . . . . . . . . . . . . . . . . . . . . . . . . . . . .40
Performing Tasks in the Live Logging Workspace . . . . . . . . . . . . . . . . . . . . . . . . . . . . . . . . . .40
Preparing a Placeholder Clip for Live Event Logging . . . . . . . . . . . . . . . . . . . . . . . . . . .40
Creating a placeholder clip . . . . . . . . . . . . . . . . . . . . . . . . . . . . . . . . . . . . . . . . . . . . . . . . . . .41
Loading a placeholder clip . . . . . . . . . . . . . . . . . . . . . . . . . . . . . . . . . . . . . . . . . . . . . . . . . . .41
Logging Events. . . . . . . . . . . . . . . . . . . . . . . . . . . . . . . . . . . . . . . . . . . . . . . . . . . . . . . . . . . . . . .41
Double Clicking to Cancel a Logging Event . . . . . . . . . . . . . . . . . . . . . . . . . . . . . . . . . . . .42
Applying Offset Handles to Open Ended Live Logging . . . . . . . . . . . . . . . . . . . . . . . . .42
Deleting Events from the Scratchpad . . . . . . . . . . . . . . . . . . . . . . . . . . . . . . . . . . . . . . . . .43
iTX SmartClient
Operator Guide
6 The AE Workspace . . . . . . . . . . . . . . . . . . . . . . . . . . . . . . . . . . . . . 45
iTX Assets Used on the AE Workspace . . . . . . . . . . . . . . . . . . . . . . . . . . . . . . . . . . . . . . . . . . . . .45
Search Level. . . . . . . . . . . . . . . . . . . . . . . . . . . . . . . . . . . . . . . . . . . . . . . . . . . . . . . . . . . . . . . . . . . . . .45
View Level – AE Pages . . . . . . . . . . . . . . . . . . . . . . . . . . . . . . . . . . . . . . . . . . . . . . . . . . . . . . . . . . . .46
View Level – AE Templates. . . . . . . . . . . . . . . . . . . . . . . . . . . . . . . . . . . . . . . . . . . . . . . . . . . . . . . .47
View Level – AE Projects . . . . . . . . . . . . . . . . . . . . . . . . . . . . . . . . . . . . . . . . . . . . . . . . . . . . . . . . . .48
7 Searching for Assets . . . . . . . . . . . . . . . . . . . . . . . . . . . . . . . . . . . 49
About PinPoint . . . . . . . . . . . . . . . . . . . . . . . . . . . . . . . . . . . . . . . . . . . . . . . . . . . . . . . . . . . . . . . . . . .49
Using the Search Builder . . . . . . . . . . . . . . . . . . . . . . . . . . . . . . . . . . . . . . . . . . . . . . . . . . . . . . . . . .49
Performing a Search . . . . . . . . . . . . . . . . . . . . . . . . . . . . . . . . . . . . . . . . . . . . . . . . . . . . . . . . . .50
Entering Text in the Any Text Box . . . . . . . . . . . . . . . . . . . . . . . . . . . . . . . . . . . . . . . . . . . . .50
Specifying text to include video clips in search results. . . . . . . . . . . . . . . . . . . . . . . . . 51
Specifying text to exclude video clips from search results . . . . . . . . . . . . . . . . . . . . . 51
Organizing multiple search terms . . . . . . . . . . . . . . . . . . . . . . . . . . . . . . . . . . . . . . . . . . . . 51
Using wildcard characters . . . . . . . . . . . . . . . . . . . . . . . . . . . . . . . . . . . . . . . . . . . . . . . . . . . .52
Using Search Filters. . . . . . . . . . . . . . . . . . . . . . . . . . . . . . . . . . . . . . . . . . . . . . . . . . . . . . . . . . .52
Graphical devices for filter settings . . . . . . . . . . . . . . . . . . . . . . . . . . . . . . . . . . . . . . . . . . . 54
Filter suggestion lists . . . . . . . . . . . . . . . . . . . . . . . . . . . . . . . . . . . . . . . . . . . . . . . . . . . . . . . . 54
Adding a search filter . . . . . . . . . . . . . . . . . . . . . . . . . . . . . . . . . . . . . . . . . . . . . . . . . . . . . . . . 54
About Stem-Based Searching . . . . . . . . . . . . . . . . . . . . . . . . . . . . . . . . . . . . . . . . . . . . . . . . .55
Specifying the Sort Order for Search Results . . . . . . . . . . . . . . . . . . . . . . . . . . . . . . . . . . .55
Multi-Domain Searching. . . . . . . . . . . . . . . . . . . . . . . . . . . . . . . . . . . . . . . . . . . . . . . . . . . . . .56
The Search History Panel. . . . . . . . . . . . . . . . . . . . . . . . . . . . . . . . . . . . . . . . . . . . . . . . . . . . . . . . . .57
Publishing Searches . . . . . . . . . . . . . . . . . . . . . . . . . . . . . . . . . . . . . . . . . . . . . . . . . . . . . . . . . .57
Refreshing saved searches . . . . . . . . . . . . . . . . . . . . . . . . . . . . . . . . . . . . . . . . . . . . . . . . . . . 58
v
Page 6

Table of Contents
Pinning and Unpinning the Search History Panel . . . . . . . . . . . . . . . . . . . . . . . . . . . . . .59
8 Working with Search Results . . . . . . . . . . . . . . . . . . . . . . . . . . . 61
Display of Search Results in the Results Browser . . . . . . . . . . . . . . . . . . . . . . . . . . . . . . . . . . .61
Viewing-Format Selection Buttons . . . . . . . . . . . . . . . . . . . . . . . . . . . . . . . . . . . . . . . . . . . .61
Navigating Through Pages of Search Results . . . . . . . . . . . . . . . . . . . . . . . . . . . . . . . . . .62
Working with the Results Panel . . . . . . . . . . . . . . . . . . . . . . . . . . . . . . . . . . . . . . . . . . . . . . . . . . .62
Preview Pane Features. . . . . . . . . . . . . . . . . . . . . . . . . . . . . . . . . . . . . . . . . . . . . . . . . . . . . . . .63
Working with the Results Table . . . . . . . . . . . . . . . . . . . . . . . . . . . . . . . . . . . . . . . . . . . . . . . . . . .65
Results Table Features . . . . . . . . . . . . . . . . . . . . . . . . . . . . . . . . . . . . . . . . . . . . . . . . . . . . . . . .65
Setting up the Results Table . . . . . . . . . . . . . . . . . . . . . . . . . . . . . . . . . . . . . . . . . . . . . . . . . . 66
Selecting a Video Clip in the Results Table . . . . . . . . . . . . . . . . . . . . . . . . . . . . . . . . . . . . 66
Working with the Results Timeline . . . . . . . . . . . . . . . . . . . . . . . . . . . . . . . . . . . . . . . . . . . . . . . .67
Results Timeline Features . . . . . . . . . . . . . . . . . . . . . . . . . . . . . . . . . . . . . . . . . . . . . . . . . . . . .67
Setting up the timeline. . . . . . . . . . . . . . . . . . . . . . . . . . . . . . . . . . . . . . . . . . . . . . . . . . . . . . . 68
Selecting a video clip on the timeline . . . . . . . . . . . . . . . . . . . . . . . . . . . . . . . . . . . . . . . . . 68
Search Assistance Lists. . . . . . . . . . . . . . . . . . . . . . . . . . . . . . . . . . . . . . . . . . . . . . . . . . . . . . . . . . . .69
Using a Search Assistance List for Searching . . . . . . . . . . . . . . . . . . . . . . . . . . . . . . . . . . .69
9 Playing Video Clips . . . . . . . . . . . . . . . . . . . . . . . . . . . . . . . . . . . . 71
About the Media Viewer . . . . . . . . . . . . . . . . . . . . . . . . . . . . . . . . . . . . . . . . . . . . . . . . . . . . . . . . . .71
Media Viewer Operating Modes. . . . . . . . . . . . . . . . . . . . . . . . . . . . . . . . . . . . . . . . . . . . . . .72
Playing Back a Video Clip, Marked Event or Shot . . . . . . . . . . . . . . . . . . . . . . . . . . . . . . . . . . .73
Using the Playback Cursor . . . . . . . . . . . . . . . . . . . . . . . . . . . . . . . . . . . . . . . . . . . . . . . . . . . .73
Using the Control Bar. . . . . . . . . . . . . . . . . . . . . . . . . . . . . . . . . . . . . . . . . . . . . . . . . . . . . . . . .74
Tracking the Clip Position During Playback . . . . . . . . . . . . . . . . . . . . . . . . . . . . . . . . . . . .75
Playing Out Audio . . . . . . . . . . . . . . . . . . . . . . . . . . . . . . . . . . . . . . . . . . . . . . . . . . . . . . . . . . . .75
Marking the Boundary Points for a Clip, Event or Shot. . . . . . . . . . . . . . . . . . . . . . . . . . . . . .75
Resetting Video-Clip Boundary Points . . . . . . . . . . . . . . . . . . . . . . . . . . . . . . . . . . . . . . . . .76
Displaying a Particular Frame in the Media Viewer . . . . . . . . . . . . . . . . . . . . . . . . . . . . . . . . .77
Using the Cue-To Buttons. . . . . . . . . . . . . . . . . . . . . . . . . . . . . . . . . . . . . . . . . . . . . . . . . . . . .77
Selecting a Frame While Viewing Keyframes on the Duration Timeline . . . . . . . . .78
Using a Mouse Wheel to Step Through a Media File. . . . . . . . . . . . . . . . . . . . . . . . . . . .78
The Keyframe Timeline . . . . . . . . . . . . . . . . . . . . . . . . . . . . . . . . . . . . . . . . . . . . . . . . . . . . . . . . . . .78
Working with the Keyframe Timeline. . . . . . . . . . . . . . . . . . . . . . . . . . . . . . . . . . . . . . . . . .79
Reviewing a Video Clip While its Media is Being Recorded. . . . . . . . . . . . . . . . . . . . . . . . . .79
Keyboard Shortcuts . . . . . . . . . . . . . . . . . . . . . . . . . . . . . . . . . . . . . . . . . . . . . . . . . . . . . . . . . . . . . .81
10 Viewing and Editing Metadata . . . . . . . . . . . . . . . . . . . . . . . . . 83
The Metadata and Events Tabs . . . . . . . . . . . . . . . . . . . . . . . . . . . . . . . . . . . . . . . . . . . . . . . . . . . .83
About Metadata Types . . . . . . . . . . . . . . . . . . . . . . . . . . . . . . . . . . . . . . . . . . . . . . . . . . . . . . .83
About Annotation Templates . . . . . . . . . . . . . . . . . . . . . . . . . . . . . . . . . . . . . . . . . . . . . . . . .84
Tabs and Panels With the Same Features . . . . . . . . . . . . . . . . . . . . . . . . . . . . . . . . . . . . . .84
The Metadata Tab . . . . . . . . . . . . . . . . . . . . . . . . . . . . . . . . . . . . . . . . . . . . . . . . . . . . . . . . . . . . . . . .84
Standard-Metadata Sections . . . . . . . . . . . . . . . . . . . . . . . . . . . . . . . . . . . . . . . . . . . . . . . . . .85
Business-Metadata Sections . . . . . . . . . . . . . . . . . . . . . . . . . . . . . . . . . . . . . . . . . . . . . . . . . .85
Media and Asset Records . . . . . . . . . . . . . . . . . . . . . . . . . . . . . . . . . . . . . . . . . . . . . . . . . . . . .86
vi
Page 7

Viewing Metadata . . . . . . . . . . . . . . . . . . . . . . . . . . . . . . . . . . . . . . . . . . . . . . . . . . . . . . . . . . . .86
Editing Metadata . . . . . . . . . . . . . . . . . . . . . . . . . . . . . . . . . . . . . . . . . . . . . . . . . . . . . . . . . . . . .86
Adding Business-Metadata Sections to the Metadata Tab . . . . . . . . . . . . . . . . . . . . . .87
Setting Up the Default Metadata Tab View . . . . . . . . . . . . . . . . . . . . . . . . . . . . . . . . . . . .88
Working with Categories . . . . . . . . . . . . . . . . . . . . . . . . . . . . . . . . . . . . . . . . . . . . . . . . . . . . .88
Adding Metadata by Using Controlled Lists . . . . . . . . . . . . . . . . . . . . . . . . . . . . . . . . . . .89
Setting Access Rights . . . . . . . . . . . . . . . . . . . . . . . . . . . . . . . . . . . . . . . . . . . . . . . . . . . . . . . . .90
Using Search Hints . . . . . . . . . . . . . . . . . . . . . . . . . . . . . . . . . . . . . . . . . . . . . . . . . . . . . . . . . . .91
About search words. . . . . . . . . . . . . . . . . . . . . . . . . . . . . . . . . . . . . . . . . . . . . . . . . . . . . . . . . . 91
About exclude words . . . . . . . . . . . . . . . . . . . . . . . . . . . . . . . . . . . . . . . . . . . . . . . . . . . . . . . . 91
Adding search hints. . . . . . . . . . . . . . . . . . . . . . . . . . . . . . . . . . . . . . . . . . . . . . . . . . . . . . . . . . 92
Deleting a search hint . . . . . . . . . . . . . . . . . . . . . . . . . . . . . . . . . . . . . . . . . . . . . . . . . . . . . . . . 92
The Events Tab . . . . . . . . . . . . . . . . . . . . . . . . . . . . . . . . . . . . . . . . . . . . . . . . . . . . . . . . . . . . . . . . . . .92
Viewing Full Event Metadata. . . . . . . . . . . . . . . . . . . . . . . . . . . . . . . . . . . . . . . . . . . . . . . . . .93
Expanding event entries . . . . . . . . . . . . . . . . . . . . . . . . . . . . . . . . . . . . . . . . . . . . . . . . . . . . .93
Playing back an event . . . . . . . . . . . . . . . . . . . . . . . . . . . . . . . . . . . . . . . . . . . . . . . . . . . . . . . . 93
Displaying the first or last frame of an event . . . . . . . . . . . . . . . . . . . . . . . . . . . . . . . . . . 93
Filtering Event Entries . . . . . . . . . . . . . . . . . . . . . . . . . . . . . . . . . . . . . . . . . . . . . . . . . . . . . . . .93
Filtering by event type . . . . . . . . . . . . . . . . . . . . . . . . . . . . . . . . . . . . . . . . . . . . . . . . . . . . . . . 94
Filtering by contained word . . . . . . . . . . . . . . . . . . . . . . . . . . . . . . . . . . . . . . . . . . . . . . . . . . 94
Removing a filter. . . . . . . . . . . . . . . . . . . . . . . . . . . . . . . . . . . . . . . . . . . . . . . . . . . . . . . . . . . . . 94
Editing Event Metadata. . . . . . . . . . . . . . . . . . . . . . . . . . . . . . . . . . . . . . . . . . . . . . . . . . . . . . .94
Updating an event . . . . . . . . . . . . . . . . . . . . . . . . . . . . . . . . . . . . . . . . . . . . . . . . . . . . . . . . . . . 94
Deleting an event . . . . . . . . . . . . . . . . . . . . . . . . . . . . . . . . . . . . . . . . . . . . . . . . . . . . . . . . . . . . 95
Saving Modified Clips. . . . . . . . . . . . . . . . . . . . . . . . . . . . . . . . . . . . . . . . . . . . . . . . . . . . . . . . .95
iTX SmartClient
Operator Guide
11 Working on the Actions Tab . . . . . . . . . . . . . . . . . . . . . . . . . . . . 97
About Action buttons . . . . . . . . . . . . . . . . . . . . . . . . . . . . . . . . . . . . . . . . . . . . . . . . . . . . . . . . . . . .97
Creating a Job . . . . . . . . . . . . . . . . . . . . . . . . . . . . . . . . . . . . . . . . . . . . . . . . . . . . . . . . . . . . . . . . . . . .98
12 Working with jobs . . . . . . . . . . . . . . . . . . . . . . . . . . . . . . . . . . . . . 99
About Jobs in iTX . . . . . . . . . . . . . . . . . . . . . . . . . . . . . . . . . . . . . . . . . . . . . . . . . . . . . . . . . . . . . . . . .99
Different Ways in which SmartClient can Display Job Lists. . . . . . . . . . . . . . . . . . . . . . . . . .99
The My Submitted Jobs Pop-Up Window. . . . . . . . . . . . . . . . . . . . . . . . . . . . . . . . . . . . 100
Displaying the My Submitted Jobs pop-up window . . . . . . . . . . . . . . . . . . . . . . . . . .100
The Jobs-List Level of a Workspace. . . . . . . . . . . . . . . . . . . . . . . . . . . . . . . . . . . . . . . . . . 101
Displaying the jobs-list level. . . . . . . . . . . . . . . . . . . . . . . . . . . . . . . . . . . . . . . . . . . . . . . . . 102
The Job Management workspace. . . . . . . . . . . . . . . . . . . . . . . . . . . . . . . . . . . . . . . . . . . . 102
Displaying the Job Management workspace . . . . . . . . . . . . . . . . . . . . . . . . . . . . . . . . .103
The Jobs Query Widget . . . . . . . . . . . . . . . . . . . . . . . . . . . . . . . . . . . . . . . . . . . . . . . . . . . . . 104
Job Details . . . . . . . . . . . . . . . . . . . . . . . . . . . . . . . . . . . . . . . . . . . . . . . . . . . . . . . . . . . . . . . . . 104
Expanded Job Entries. . . . . . . . . . . . . . . . . . . . . . . . . . . . . . . . . . . . . . . . . . . . . . . . . . . . . . . 105
Taking Control of a Job in an iTX Workflow Process . . . . . . . . . . . . . . . . . . . . . . . . . . . . . . 105
vii
Page 8

Table of Contents
viii
Page 9

This operator guide describes how you can use Grass Valley’s web-based media asset
management tool iTX SmartClient within an iTX system.
For installation and configuration instructions, see the SmartClient System Administrator
Guide. This is available from the Grass Valley Support Portal:
http://www2.grassvalley.com/support/software/index
Summary
What is iTX SmartClient? . . . . . . . . . . . . . . . . . . . . . . . . . . . . . . . . . . . . . . . . . . . . . . . . . . . . . . . . . . . . . . 1
The SmartClient Home Page . . . . . . . . . . . . . . . . . . . . . . . . . . . . . . . . . . . . . . . . . . . . . . . . . . . . . . . . . . . 2
Entering Information in SmartClient . . . . . . . . . . . . . . . . . . . . . . . . . . . . . . . . . . . . . . . . . . . . . . . . . . . 5
Access Rights to Assets . . . . . . . . . . . . . . . . . . . . . . . . . . . . . . . . . . . . . . . . . . . . . . . . . . . . . . . . . . . . . . . . 7
What is iTX SmartClient?
The Miranda iTX SmartClient (also known as just SmartClient) is an application that
provides access to the resources of an iTX system to enable you to research video clips,
assemble shot lists and perform various asset-management tasks.
About SmartClient
You can use SmartClient to:
• Find and view details of assets (video clips, project clips and placeholder clips).
• Play back video clips.
• Edit video-clip in- and out-points.
• Edit video-clip metadata.
• Annotate video clips by marking events and adding metadata.
• Annotate a live feed by marking events and adding metadata.
• Create and edit project clips (shot lists).
• Find and view details of Adobe After Effects (AE) projects, templates and pages in iTX.
• Edit the content of text layers in AE pages and templates.
Any of the above tasks may be related to jobs in iTX Workflow processes.
After performing a task, you may use SmartClient to set up other jobs. For example, after
marking the in- and out-points of a video clip, you may trigger a job for an operator to
check the quality of the high-resolution media.
1
Page 10
About SmartClient
The SmartClient User Interface
The SmartClient User Interface
You interact with SmartClient through a Web-based user interface that connects to a
SmartClient server, on which the SmartClient services run . You view the user interface in a
Web browser (e.g. Internet Explorer on a Windows PC or Safari on a Mac).
Starting from the SmartClient home page, you can navigate to any of a number of
tClient pages - called workspaces - which are specially equipped with the features you
Smar
need for particular tasks.
Playing of Media Files
Some workspaces contain a Media Viewer. In this, you can preview low-bit-rate versions of
media files that are registered in iTX. The Media Viewer can play complete files with the
.mp4, .wmv or .ism filename extension. It can also play files while they are being recorded
with Microsoft Live Smooth Streaming technology.
Note: An .ism file is a Smooth Streaming file that contains details of the
video and audio content of a media file.
The SmartClient Home Page
You start SmartClient by entering the Web address of the SmartClient server in your Web
browser. You may need to ask your system administrator for this address.
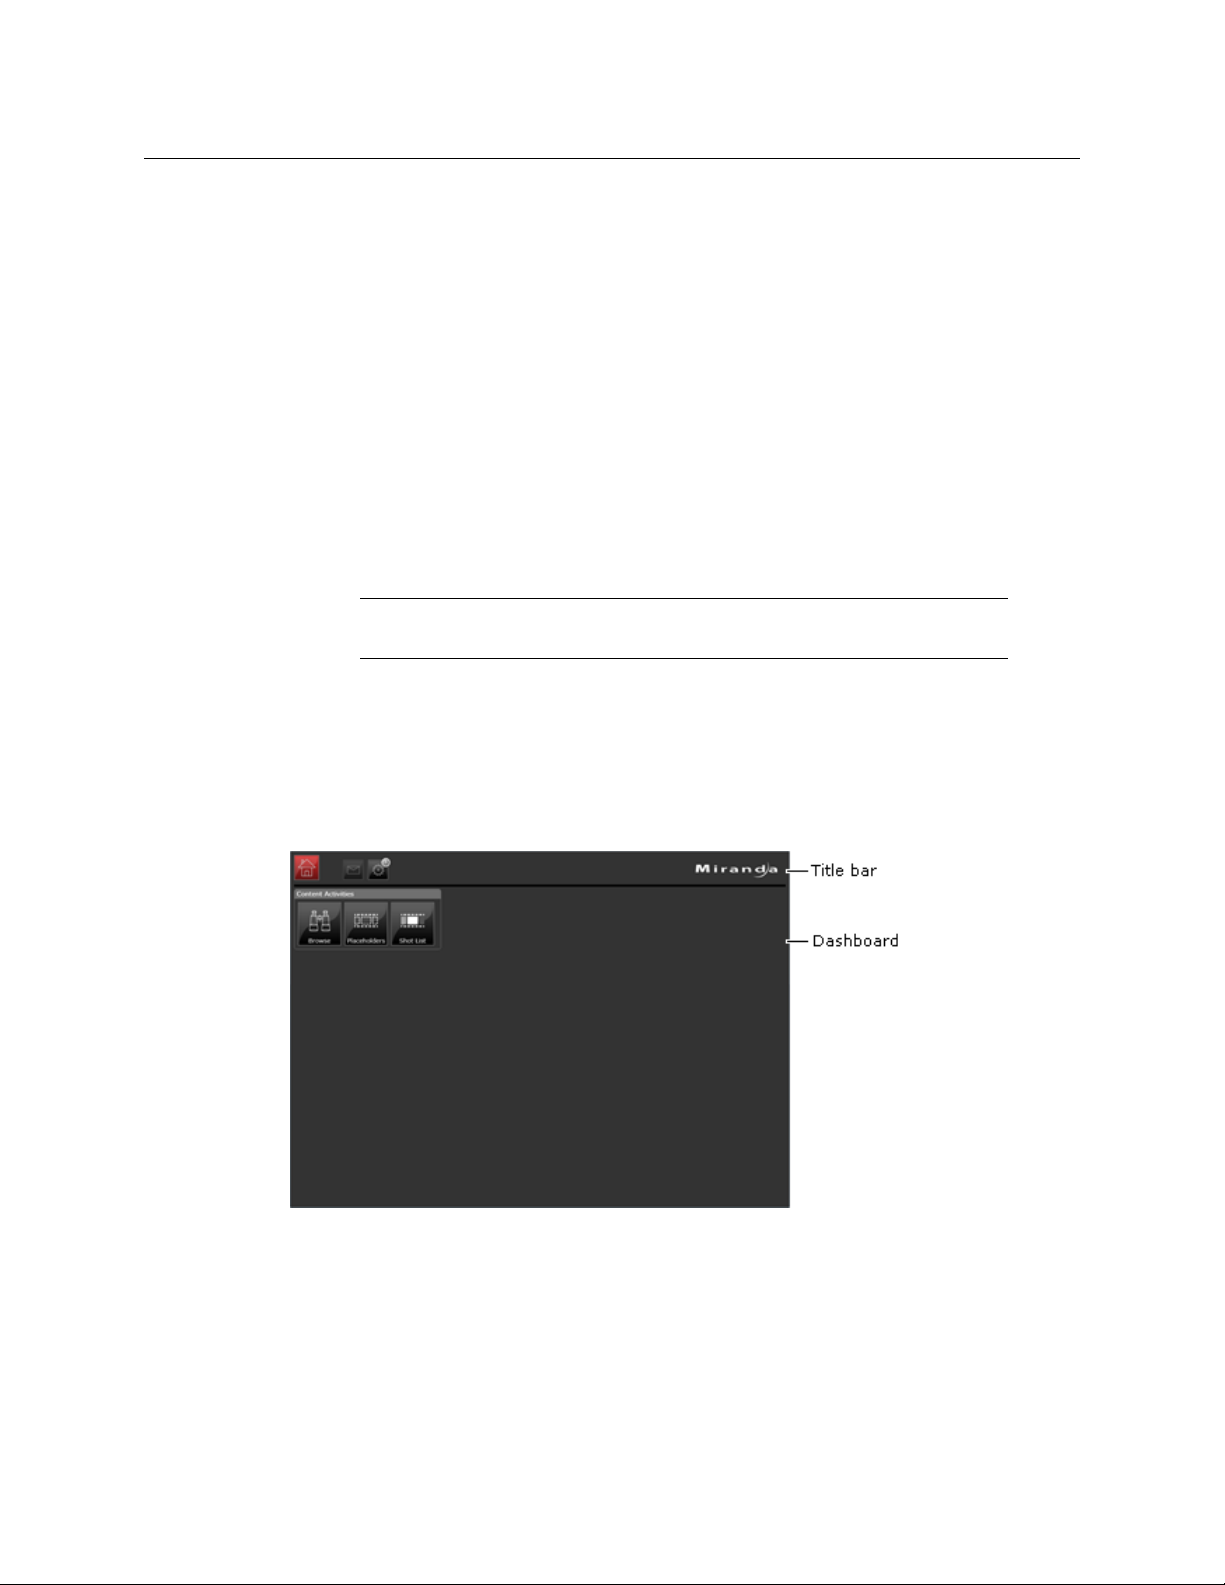
The SmartClient home page appears:
The home page has two distinct areas: the title bar at the top and the Dashboard below it.
About the Dashboard
The Dashboard contains a set of buttons for navigating to the various SmartClient
workspaces. It may also contain other items (or "widgets"), such as a clock or service
monitors. The availability and arrangement of these items depends on how your system
administrator designs your Dashboard.
2
Page 11
iTX SmartClient
Operator Guide
You may have access to multiple Dashboards, each configured for different working
requirements.
Opening SmartClient
To open SmartClient:
1 In a web browser on your PC, enter the URL of your SmartClient server.
2 Press Enter.
SmartClient opens and displays its home page, with the default Dashboard.
Note: SmartClient uses the Microsoft Silverlight browser plug-in to build its
user interface. If this is not installed on your SmartClient workstation, a dialog
appears - prompting you to download and install the plug-in - when you try
to connect to the SmartClient server.
Respond to the prompts to install the plug-in.
Loading an alternative Dashboard
If you have access to multiple Dashboards, do the following when you want to switch to a
different one.
To load an alternative Dashboard
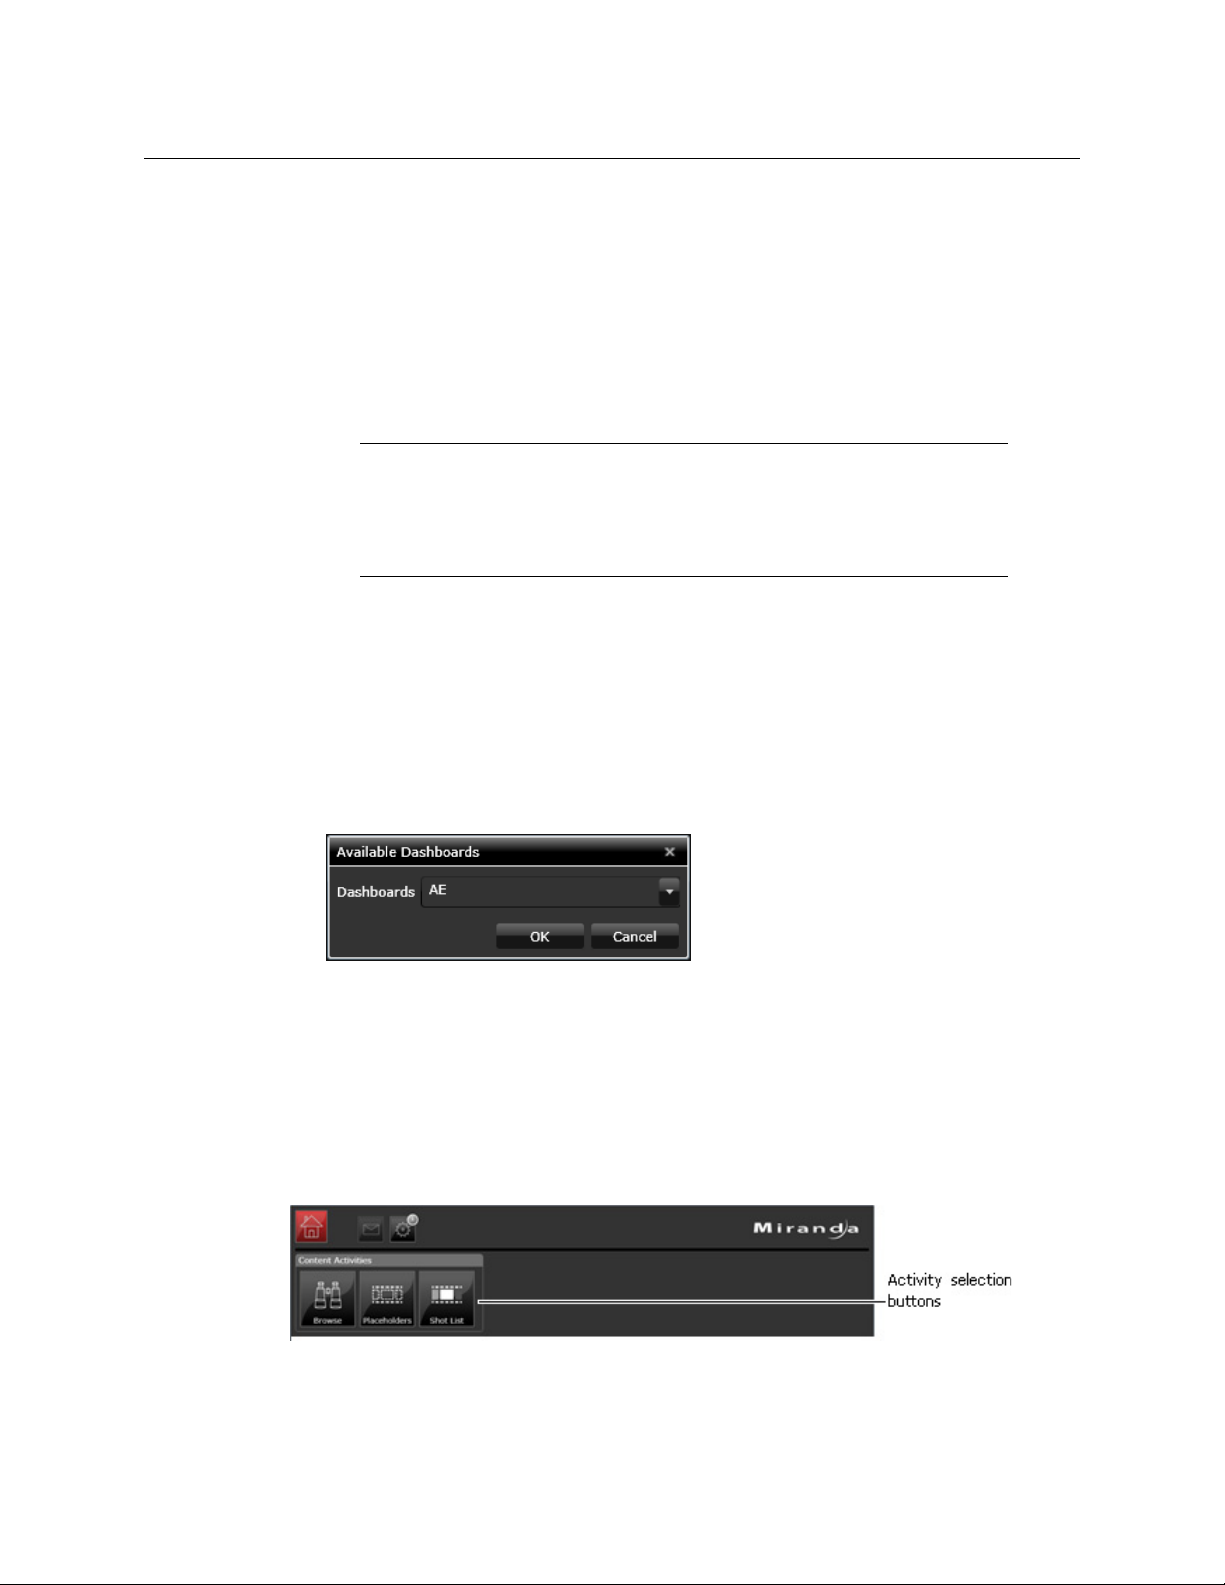
1 Right-click on the current Dashboar
displayed menu.
The Available Dashboards dialog appears:
2 Select a Dashboard.
3Click OK.
SmartClient displays your selected Dashboard.
Activities and Workspaces
SmartClient has a number of workspaces, which contain features for different activities.
These are represented by selection buttons on the Dashboard:
d and select required Dashboard from the
A Dashboard may include selection buttons that represent any of these activities:
•Browse
3
Page 12
About SmartClient
Activities and Workspaces
• Placeholders
•Shot List
• Live Logging
• AE asset management
• Job Monitoring
We describe how to use the workspaces lat
er in this manual.
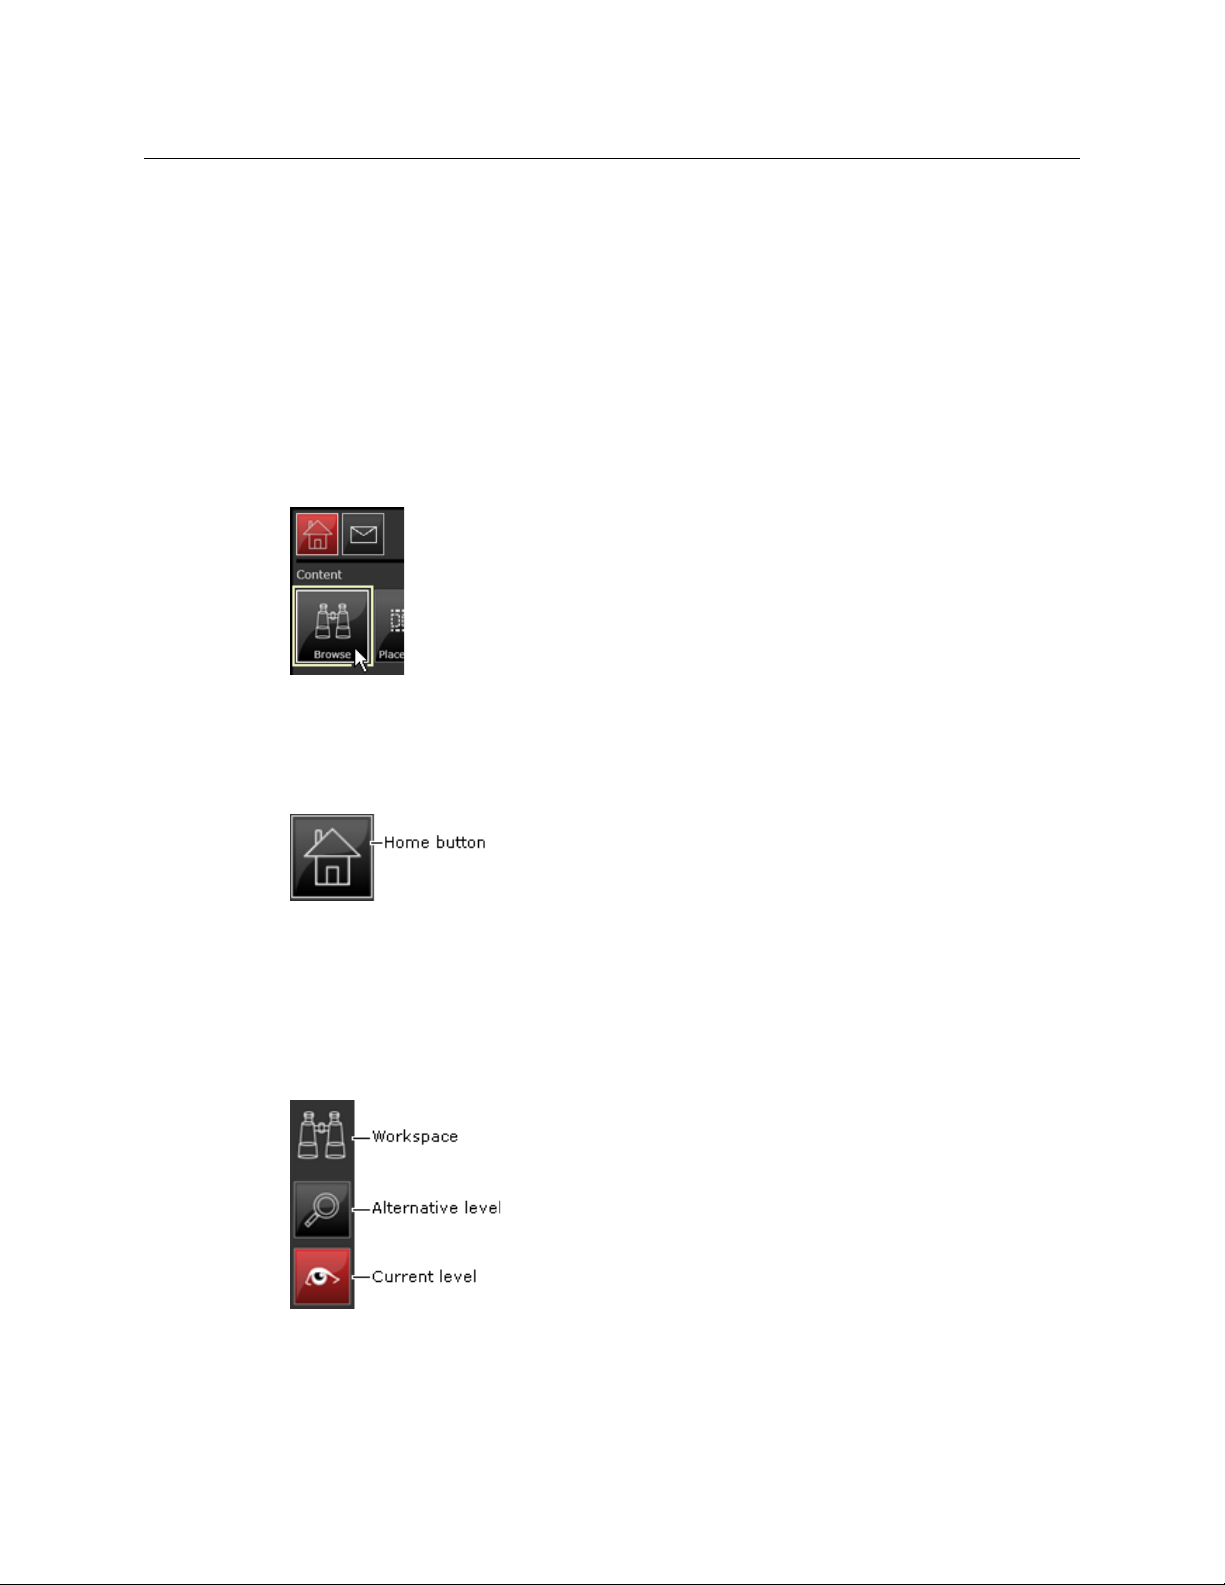
Selecting a workspace
You choose a workspace by clicking one of the activity buttons. For example, to display the
Browse workspace, click the Browse button:
Returning to the home page
You can return to the home page from any workspace by clicking the Home button, which
is always visible:
[
The button is highlighted red on the home page.
Workspace levels
A workspace may have different levels for different tasks. To the upper left of the
workspace, SmartClient displays a set of navigation buttons for these levels. The button for
the current level is highlighted red.
You can move between available levels by clicking a navigation button.
Sometimes, a level becomes available only after y
example, in the Browse workspace, selecting a clip on the search level gives you access to
the clip level.
4
ou perform a task on another level. For
Page 13

iTX SmartClient
Operator Guide
Resting your mouse pointer over a button shows when the associated level is available: a
white border appears around the button.
Automatic Opening of a Workspace and Loading of a Video Clip by URL
SmartClient can open a workspace and load a video clip in it on receiving a valid URL from a
traffic system or similar third-party application. This is mainly for use in systems in which
the third-party application connects to iTX via iTX Interchange.
The URL needs to specify the required workspace and the unique ID (AssetUid) of the video
clip. It can take one of two forms depending on whether or not the asset ID is encoded or
not:
1 http://{host}:{port}/#{workspace}={AssetUid}
Example: http://svr123:81/#browse=newsfeed
2 http://{host}:{port}/#{workspace}={encodedAssetUid}
Example: http://svr123:81/#browse=SVRYMjNTUDNfMV8xNjU1Ng~~
The asset ID, plain or encoded, is passed to the third-party application by iTX Interchange.
SmartClient displays workspace and video clip if the application has the required access
rights.
Job Monitoring
A Dashboard may contain features for working with jobs in an iTX Workflow system:
• A Jobs widget displays buttons that represent job types you have access rights for.
Clicking a button calls up the workspace for the associated job type.
• A Jobs Query widget displays a detailed list of jobs of a particular job type or workflow
status. This is for viewing only.
System Administration
If you are a system administrator, you can configure metadata types, schemas, templates,
alternates, search-menu filters and job types in the Administrator workspace. You call up
this workspace by clicking a selection button on an administrator Dashboard.
Use of this workspace is covered in the SmartClient Administrator Guide we mentioned at
the beginning of this section.
Entering Information in SmartClient
SmartClient displays a number of common user-interface features for you to use when
entering information. Examples are:
• Text boxes, in which you can type text, including numbers.
• Drop-down lists, from which you can select an entry.
• Check boxes, for switching options on or off.
5
Page 14
About SmartClient
Specifying Dates and Times
• Ratings scales, on which you can select a value.
It also displays special graphical devices for specifying dat
use these below.
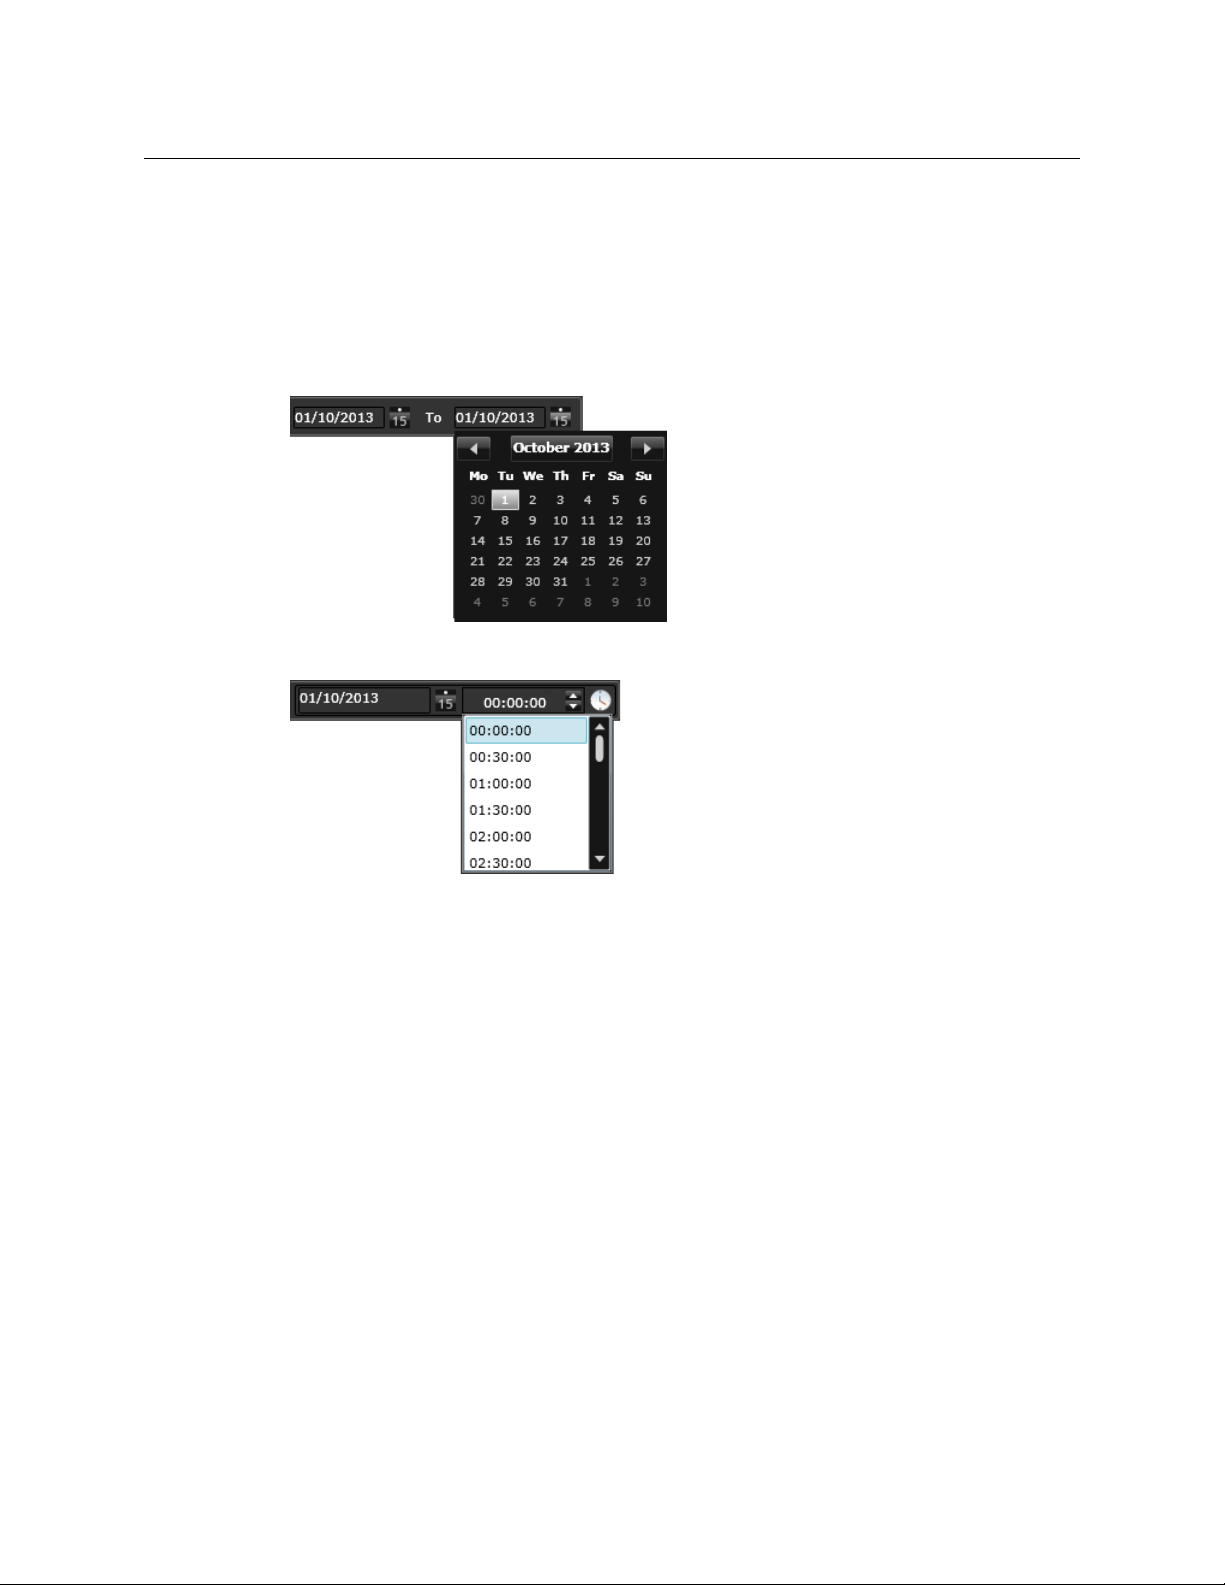
Specifying Dates and Times
For dates, SmartClient displays a calendar:
For a point in time, SmartClient displays a list of times at fixed intervals:
es and times. We describe how to
Specifying a date
To spe c ify a date:
1 Click the calendar button, to the right of a date box, to display a monthly view.
2 Click one of the arrow buttons on either side of
later month.
3 Click a day number to select it.
the month name to select an earlier or
Specifying a time
To spe c ify a time
1 Click the clock button to the right of the time bo
2 Use the scroll bar to move up or down the list.
3 Click a time to select it.
x to display the list of times.
Using a keyboard to adjust a time value
When setting a time value, you can overtype the value in an entry box; or you can adjust
the value by clicking the arrow buttons to the right of the box.
6
Page 15

Alternatively, you may use the arrow keys on your keyboard to adjust a value when it is in
focus - indicated by the cursor flashing to the left of the value.
To adjust a time value with a keyboard
1 Click a point just in front of the value you want to change; check a flashing cursor
appears in front of the value.
2 Press the up or down arrow key to increase or decrease the value.
Access Rights to Assets
Your ability to work with assets (video clips, placeholder clips, project clips or AE assets) that
are registered in your System Database is dependent on the access rights you have for
those assets. You get access rights through the user groups to which you belong.
iTX SmartClient
Operator Guide
Access rights are given to user groups for eac
administrator or the owner of the asset.
h asset individually, usually by your system
7
Page 16

About SmartClient
Access Rights to Assets
8
Page 17
The Browse Workspace
The Browse workspace is used to perform the following tasks:
• Search through the assets in the iTX System Database to find video clips you are
in
terested in.
• Select a video clip and load it in the workspace.
• Play back the video clip in the Media Viewer.
• View and edit the video-clip metadata.
• View and edit details of events in the video clip.
• Mark and annotate new events.
Summary
About Workspace Levels . . . . . . . . . . . . . . . . . . . . . . . . . . . . . . . . . . . . . . . . . . . . . . . . . . . . . . . . . . . . . . . 9
About the Browse Clip-level Tabs . . . . . . . . . . . . . . . . . . . . . . . . . . . . . . . . . . . . . . . . . . . . . . .
How Tab Selection Affects the Media Viewer . . . . . . . . . . . . . . . . . . . . . . . . . . . . . . . . . . . . . . . . . . 14
Performing Tasks in the Browse Workspace . . . . . . . . . . . . . . . . . . . . . . . . . . . . . . . . . . . . . . . . . . . 15
. . . . . . 12
About Workspace Levels
The Browse workspace has two levels: the search level and the clip level.
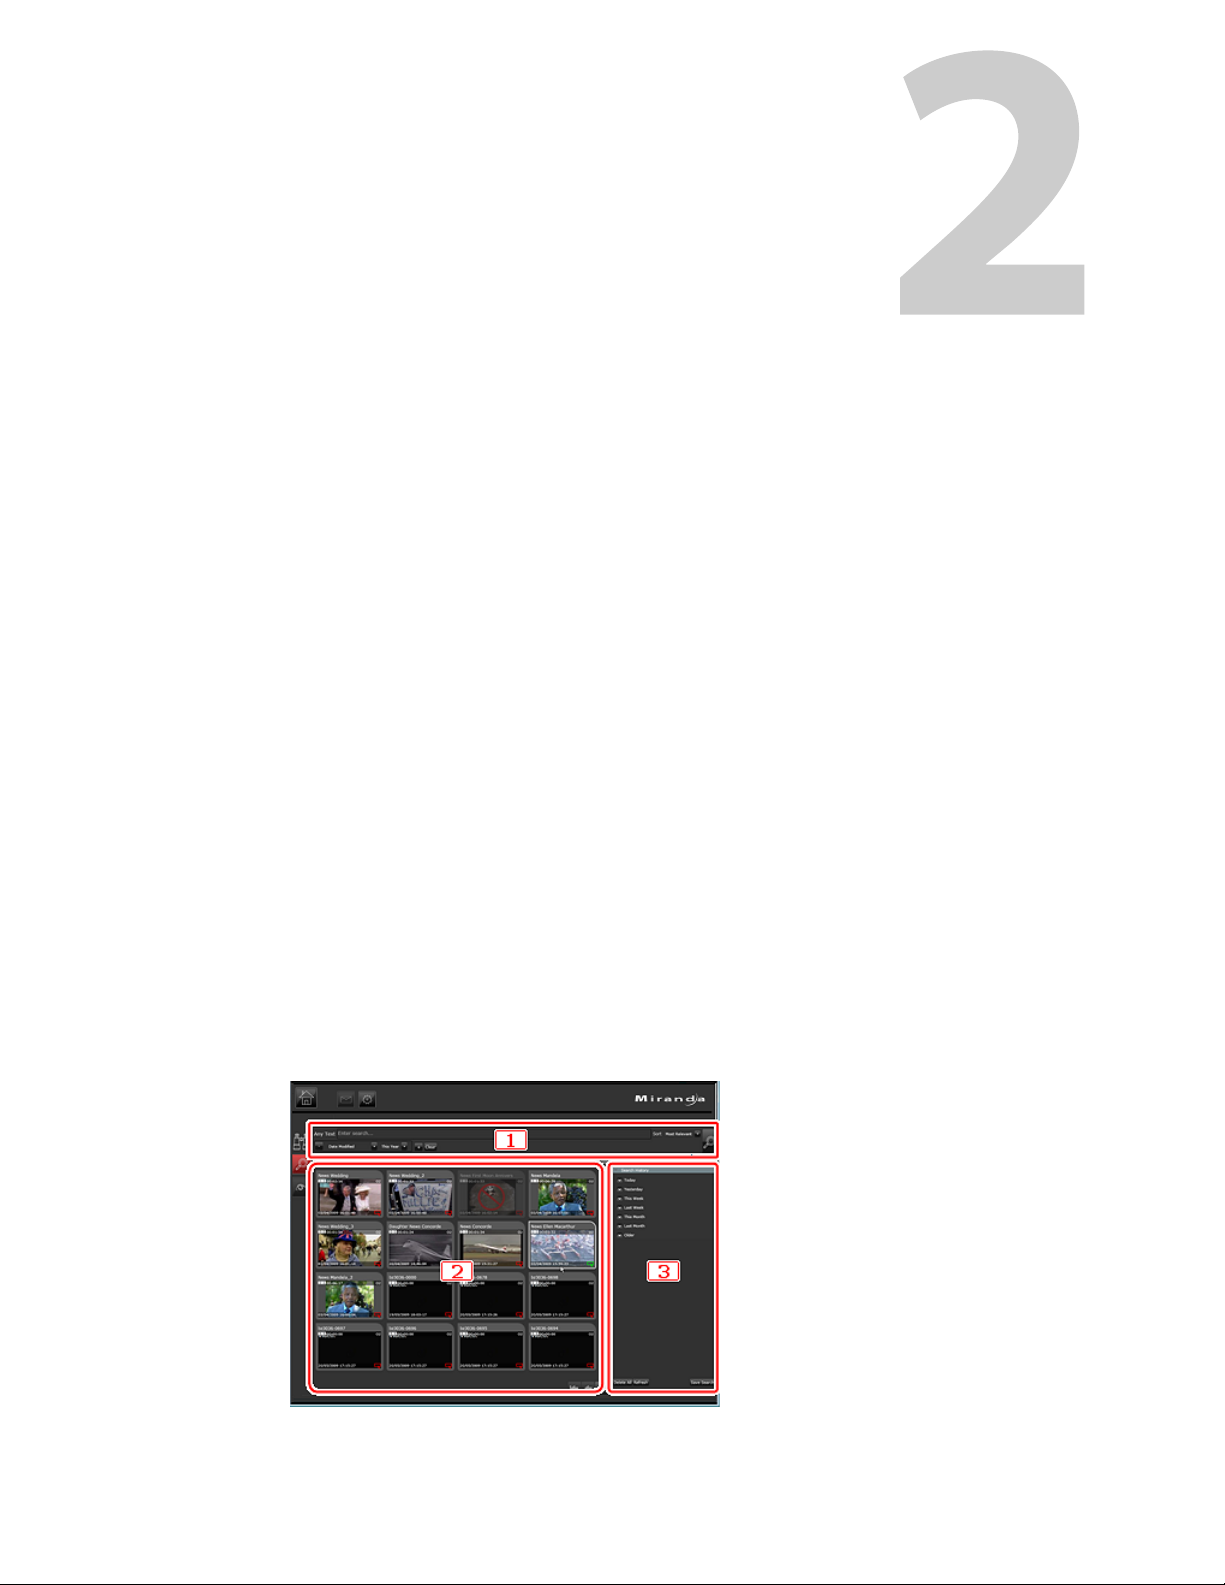
Search Level
On the search level, you organize searches for video clips with particular content and view
search results. From the results, you select a clip to work with.
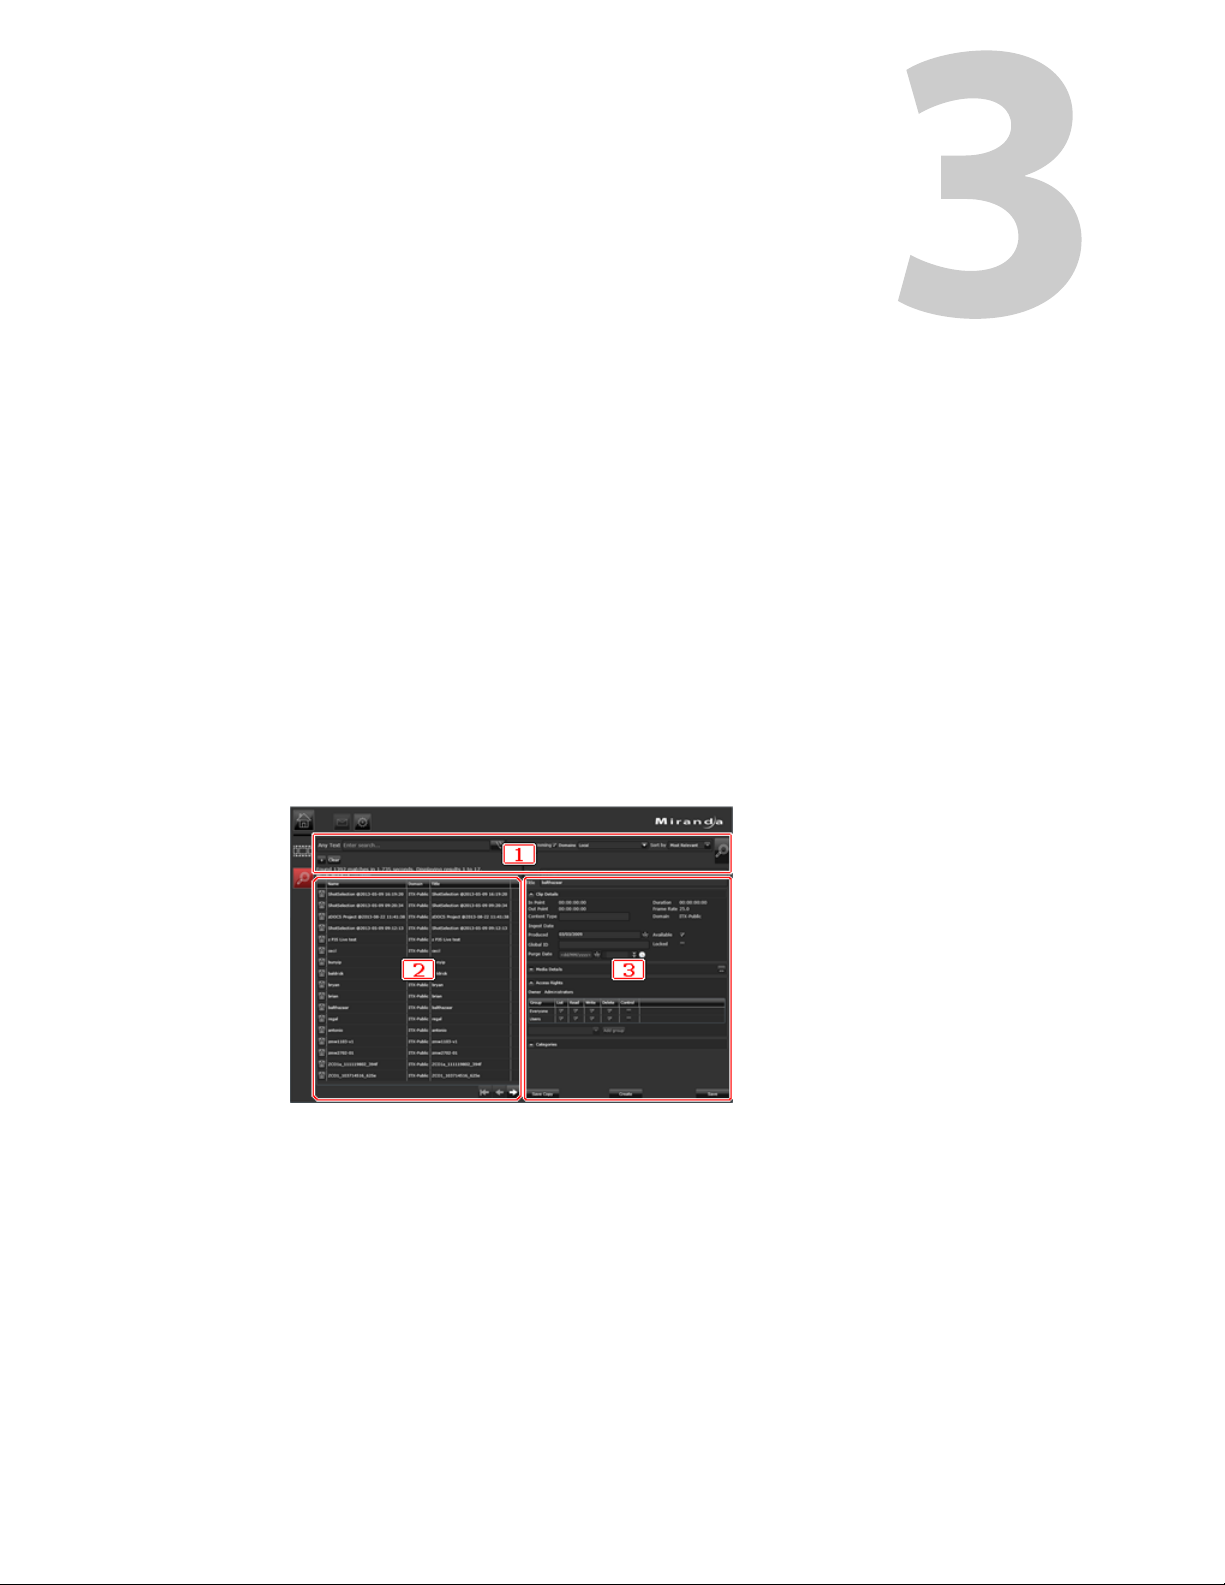
This level has three main sections, identified in the illustration:
9
Page 18
The Browse Workspace
Clip Level
The purpose of each section is described below:
1 In the Search Builder, you specify a set of search criteria for the video clips you are
2 In the Results Browser, SmartClient displays its findings in one of three views, which you
3 From the Search History panel, you can quick
Automatic switching to the clip level
When you select a video clip in the Results Browser, SmartClient automatically switches to
the clip level of the workspace, where you can then work with the clip.
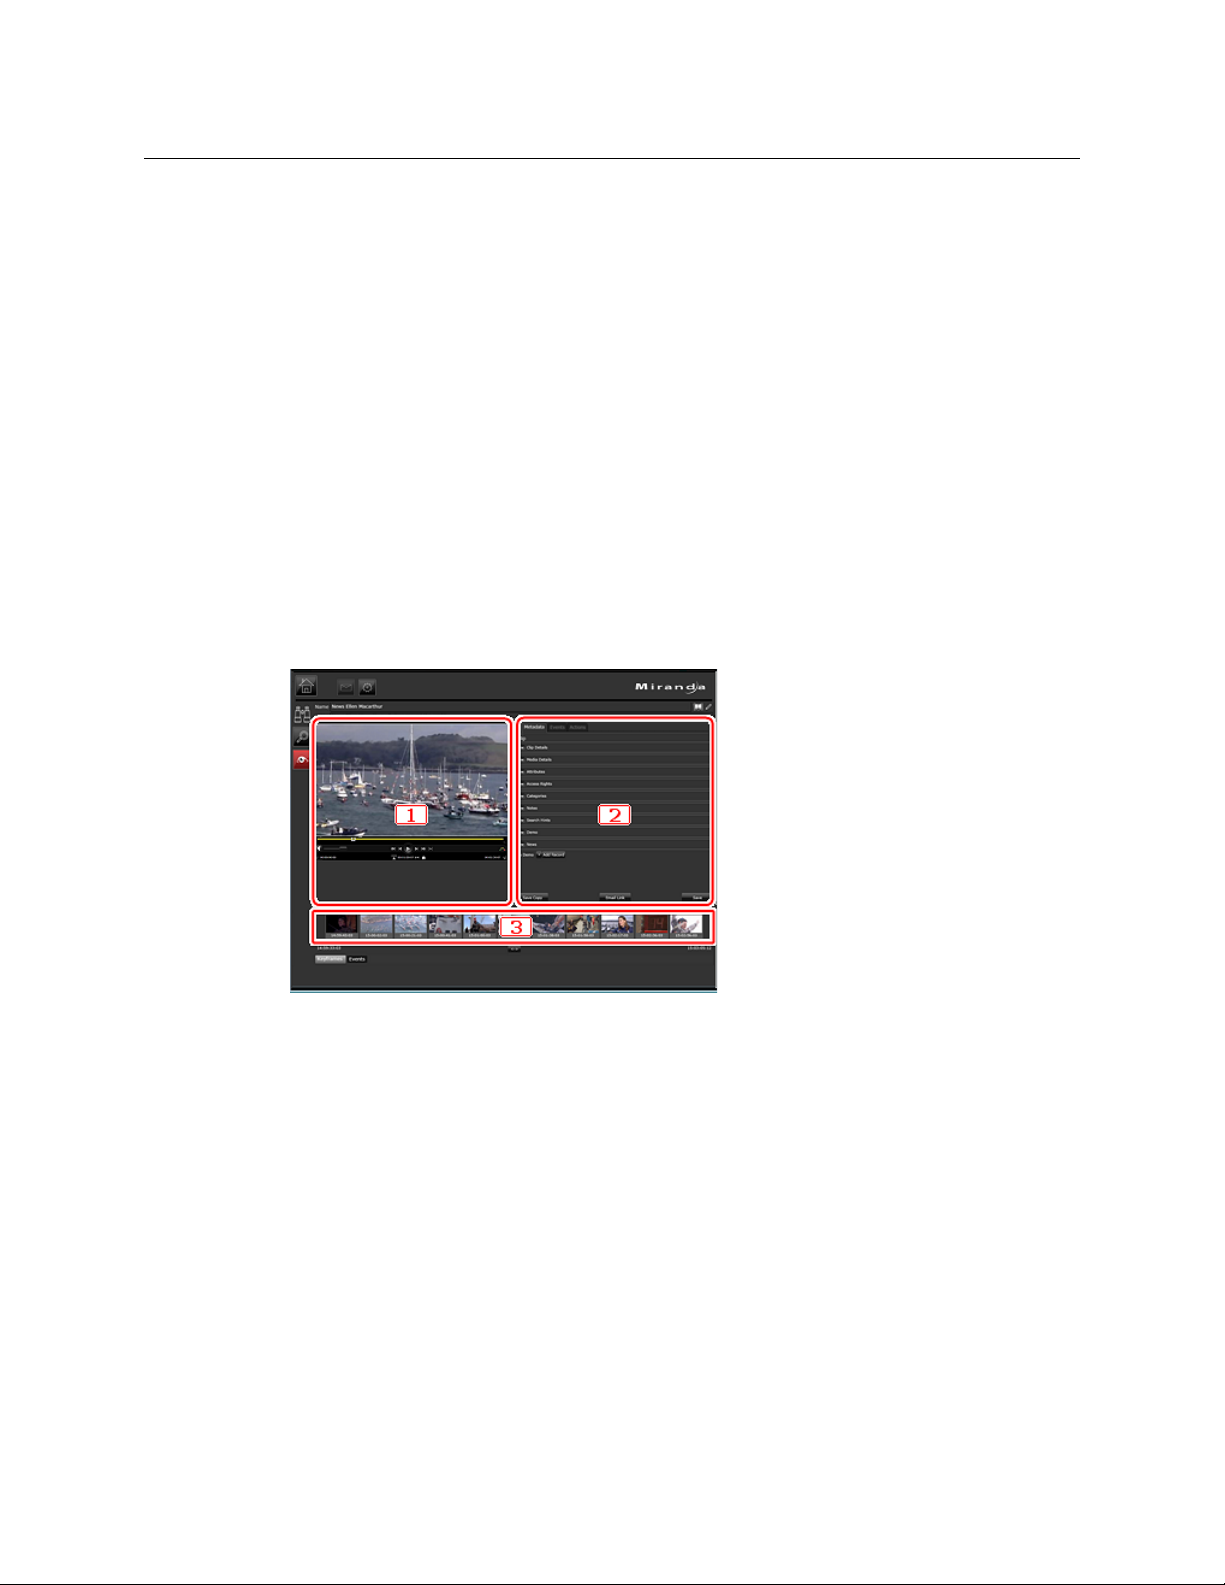
Clip Level
On the clip level, SmartClient has two operating modes: one just for viewing video clips,
their metadata and events; the other for annotating video clips and marking events. For
both modes, it displays the same main features:
interested in. You then request SmartClient to find video clips that meet these criteria.
n switch between: a thumbnails grid, a results table or a scrollable timeline. In any
ca
view, you can select a clip to work with.
ly repeat previous searches.
10
The purpose of each section is described below:
1 You can play and watch your chosen video clip in the Media Viewer. When SmartClient
is in the annota
out-point).
2 You can view video-clip metadata and event
When SmartClient is in the annotating mode,
sections of business metadata (based on metadata records) for the whole clip. On the
Event Logging tab, you can mark events in the clip and attach business metadata to
them.
On the Actions tab, you can set up iTX Workflo
3 On the Keyframe Timeline, you can view keyframes
use them to position the clip in the Media Viewer.
ting mode, you can edit the clip boundary points (i.e. its in-point and
details on the Metadata and Events tabs.
you can edit clip metadata; you can add
w jobs to be performed on the video clip.
at various points of a video clip and
Page 19
Switching Between Levels
The search level is always available; the clip level becomes available when you load a video
clip from the search level. You can move between levels by using the navigation buttons on
the left of the workspace.
Clip-Level Options
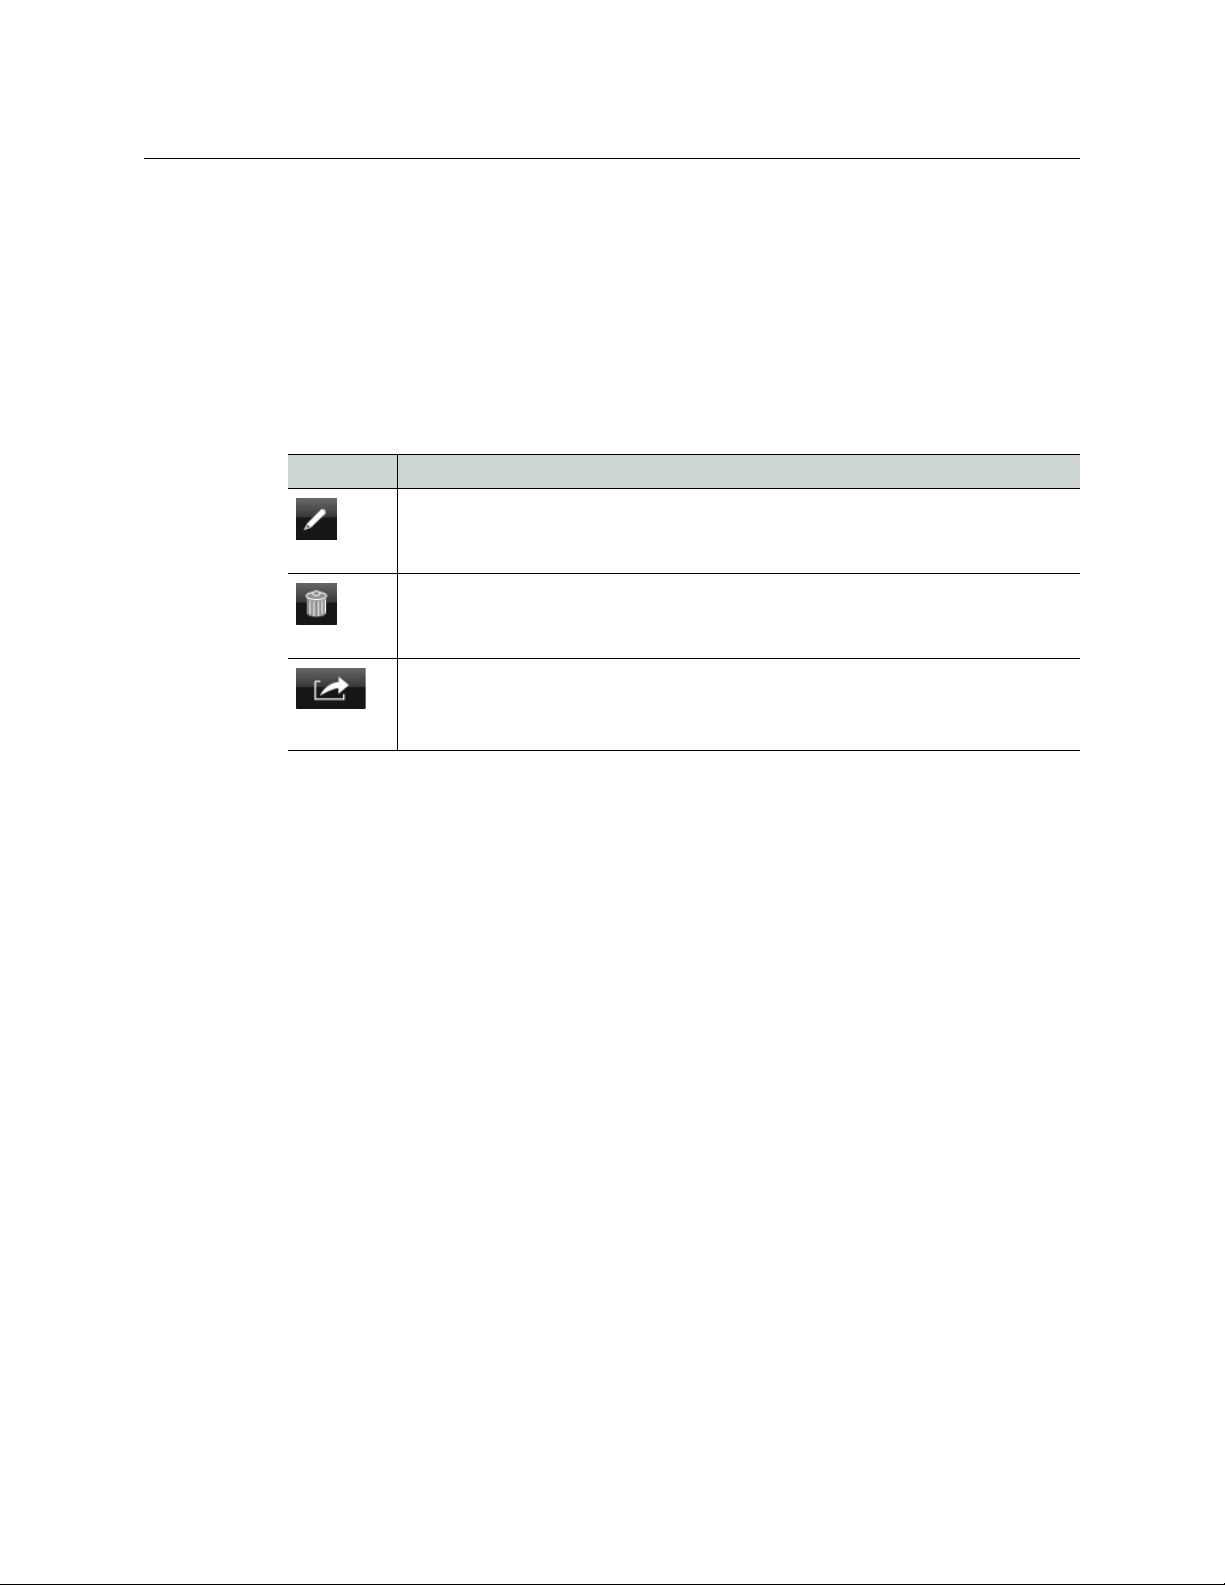
On the clip level, SmartClient displays a row of buttons for various operations on the
selected video clip:
Button Operation
Put SmartClient in the annotating mode, in which it allows you to edit the video clip and
its meta
Annotate
Delete the video clip.
Delete
Display a menu, from which you can:
• Send an email containing a link to the video clip.
Actions
• Load the video clip in the Shot Selection workspace.
• Set up a job in an iTX Workflow process.
iTX SmartClient
Operator Guide
data; or, return SmartClient to the view-only mode. See below, "Operating modes".
The buttons are only active for clips that you have the required access rights for.
Operating modes
The Annotate button changes the SmartClient operating mode between view only and
annotating.
In the view-only mode, you can:
• Play back the selected video clip.
• View any keyframes captured from the media file f
• View metadata, along with any even
ts marked for the video clip.
• Set up a job for the clip in an iTX Workflow pr
compliance or QC checking.
In the annotating mode, you can additionally:
• Edit the video-clip in- and out-points.
• Edit the video-clip metadata.
• Edit event metadata.
• Mark events and add metadata to them.
or the video clip.
ocess; for example, submit the clip for
11
Page 20
The Browse Workspace
Selecting the Browse Workspace
Selecting the Browse Workspace
You display the Browse workspace by clicking the Browse activity button on your
SmartClient Dashboard:
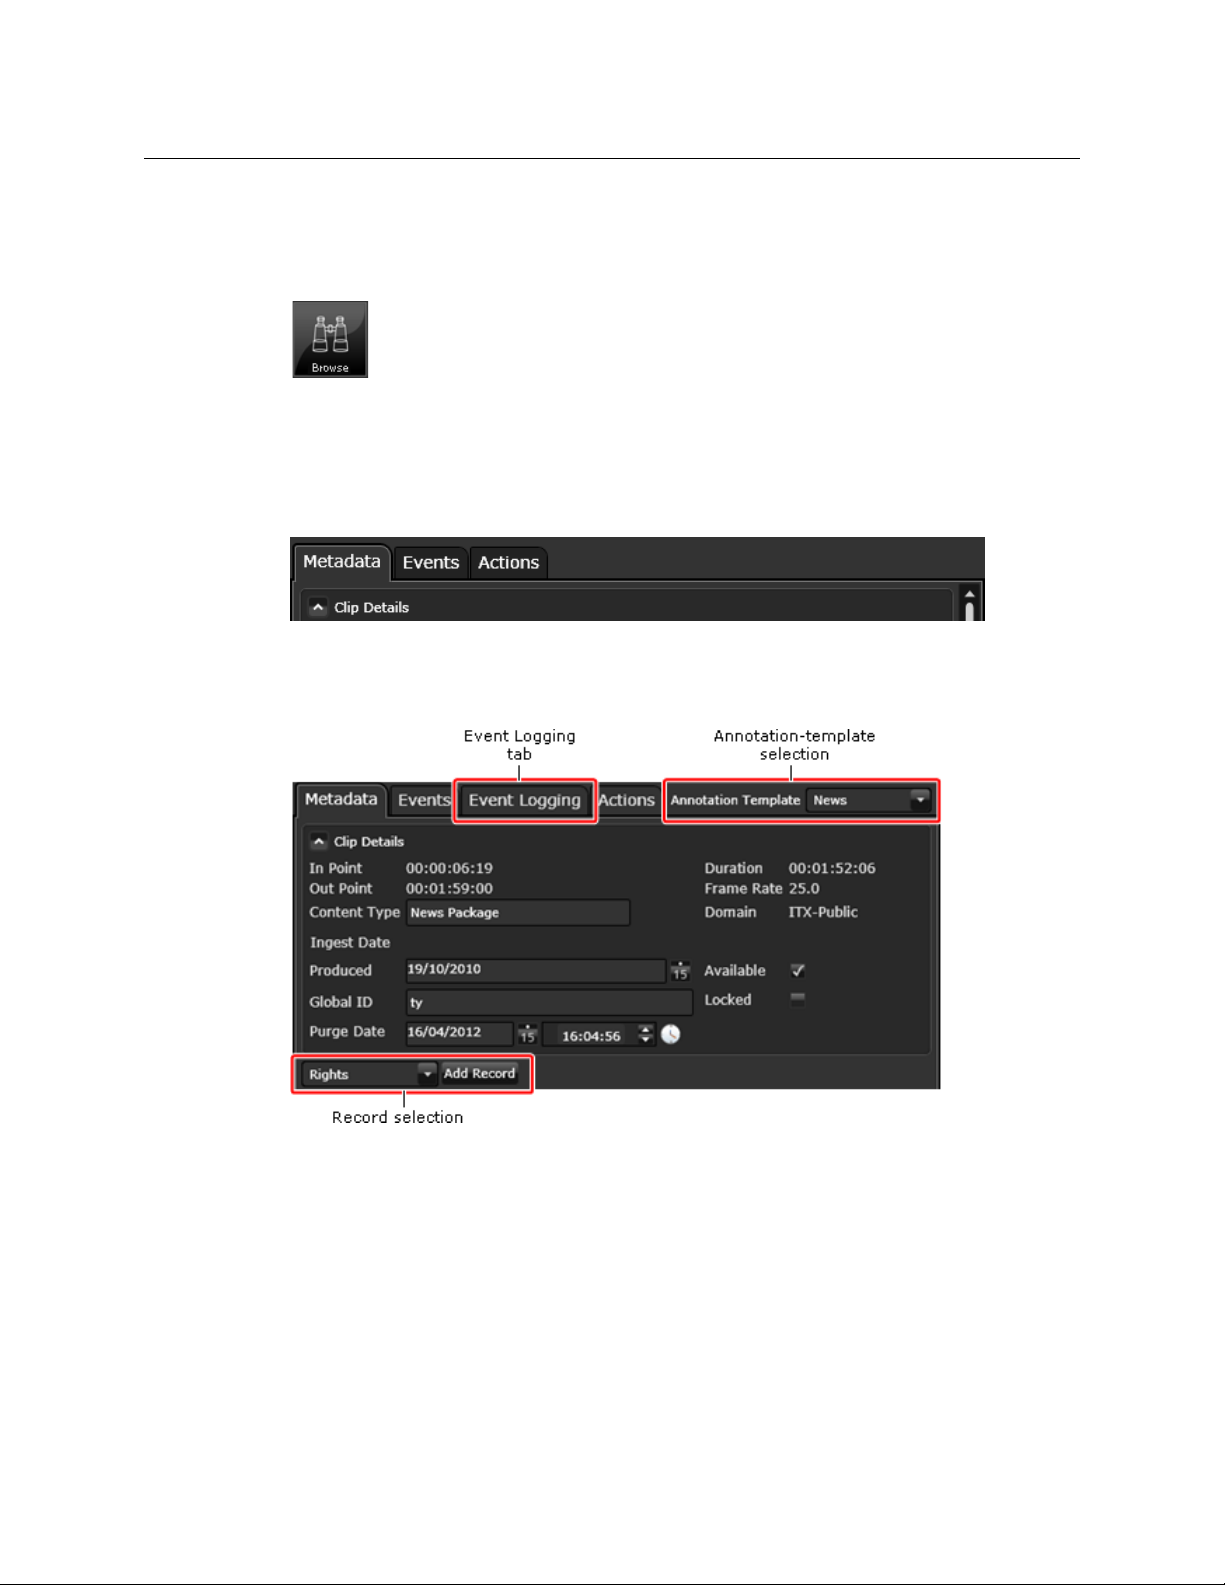
About the Browse Clip-level Tabs
With SmartClient in the view-only mode, three tabs (Metadata, Events and Actions) appear
to the right of the Media Viewer:
When you switch SmartClient to the annotating mode, the information on the Metadata
and Events tabs becomes editable. The Event Logging tab appears, along with other new
features:
12
•The Annotation Template box enables you to select a template to use for annotating.
• On the Metadata tab, the metadata-record drop-down list and Ad
next to it, enable you to select a business-metadata record and add a section based on
this record to the tab. What records appear in the list depends on what annotation
template you select.
ve and Save Copy buttons appear at the bottom of the tab.
• Sa
The annotation template controls both the avail
drop-down list and the configuration of features on the Event Logging tab.
ability of business-metadata records in the
d Record button,
Page 21
The Metadata Tab
On the Metadata tab, you can view and edit metadata that has been added to a video clip.
We explain how to use the features on this tab later in this manual. See V
Metadata on page 83.
The Events Tab
On the Metadata tab, you can view and edit metadata for marked events in a video clip. We
explain how to use the features on this tab later in this manual. See V
Metadata on page 83.
The Actions Tab
You use any of the active button on the Actions tab to trigger an iTX Workflow job for a
video clip. We explain how to use the features on this tab later in this manual. See Wo
on the Actions Tab on page 97.
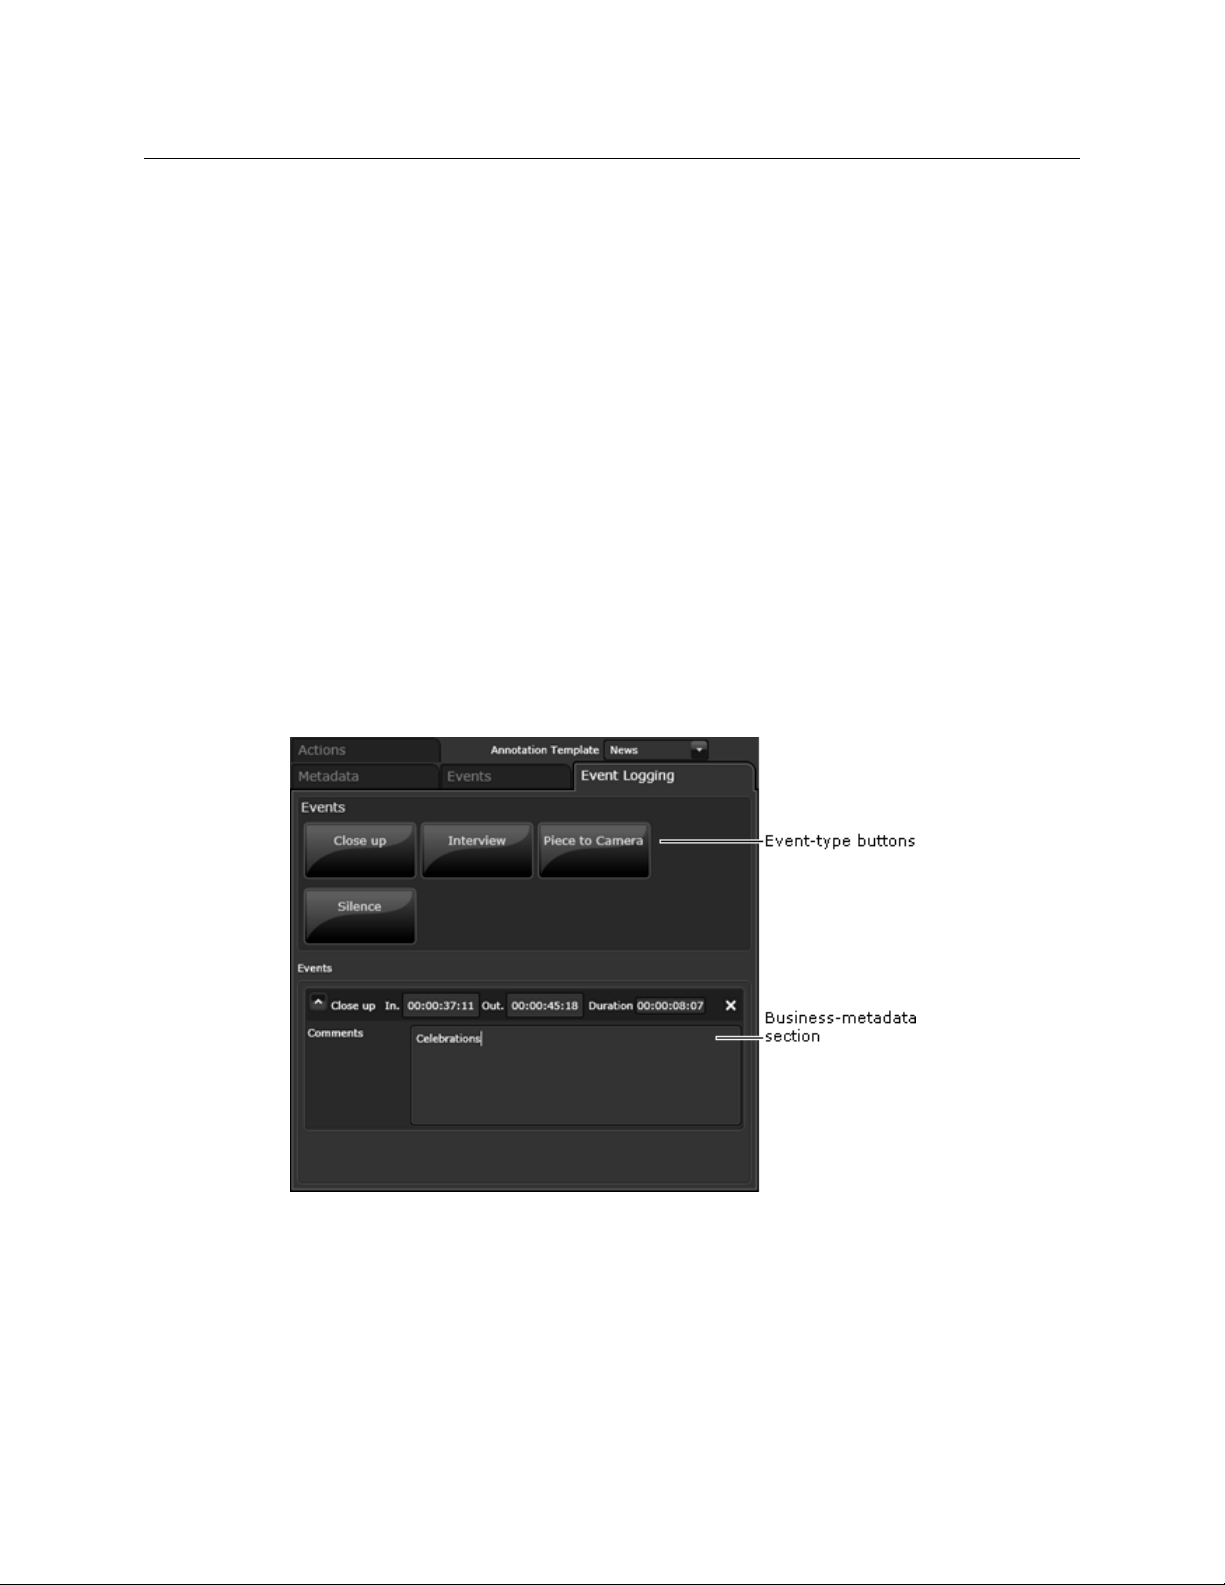
The Event Logging Tab
iTX SmartClient
Operator Guide
iewing and Editing
iewing and Editing
rking
The Event Logging tab displays a set of event-type buttons for marking events:
The configuration of the buttons depends on what annotation template is selected in the
Annotation Template box. Different sets of buttons appear for different templates.
Each time you mark an event, a business-metadata section appears below the buttons. This
s you to add business metadata to the event. An entry for the new event appears on
enable
the Events tab. The sections are cleared if you load another clip without saving your
changes.
13
Page 22
The Browse Workspace
How Tab Selection Affects the Media Viewer
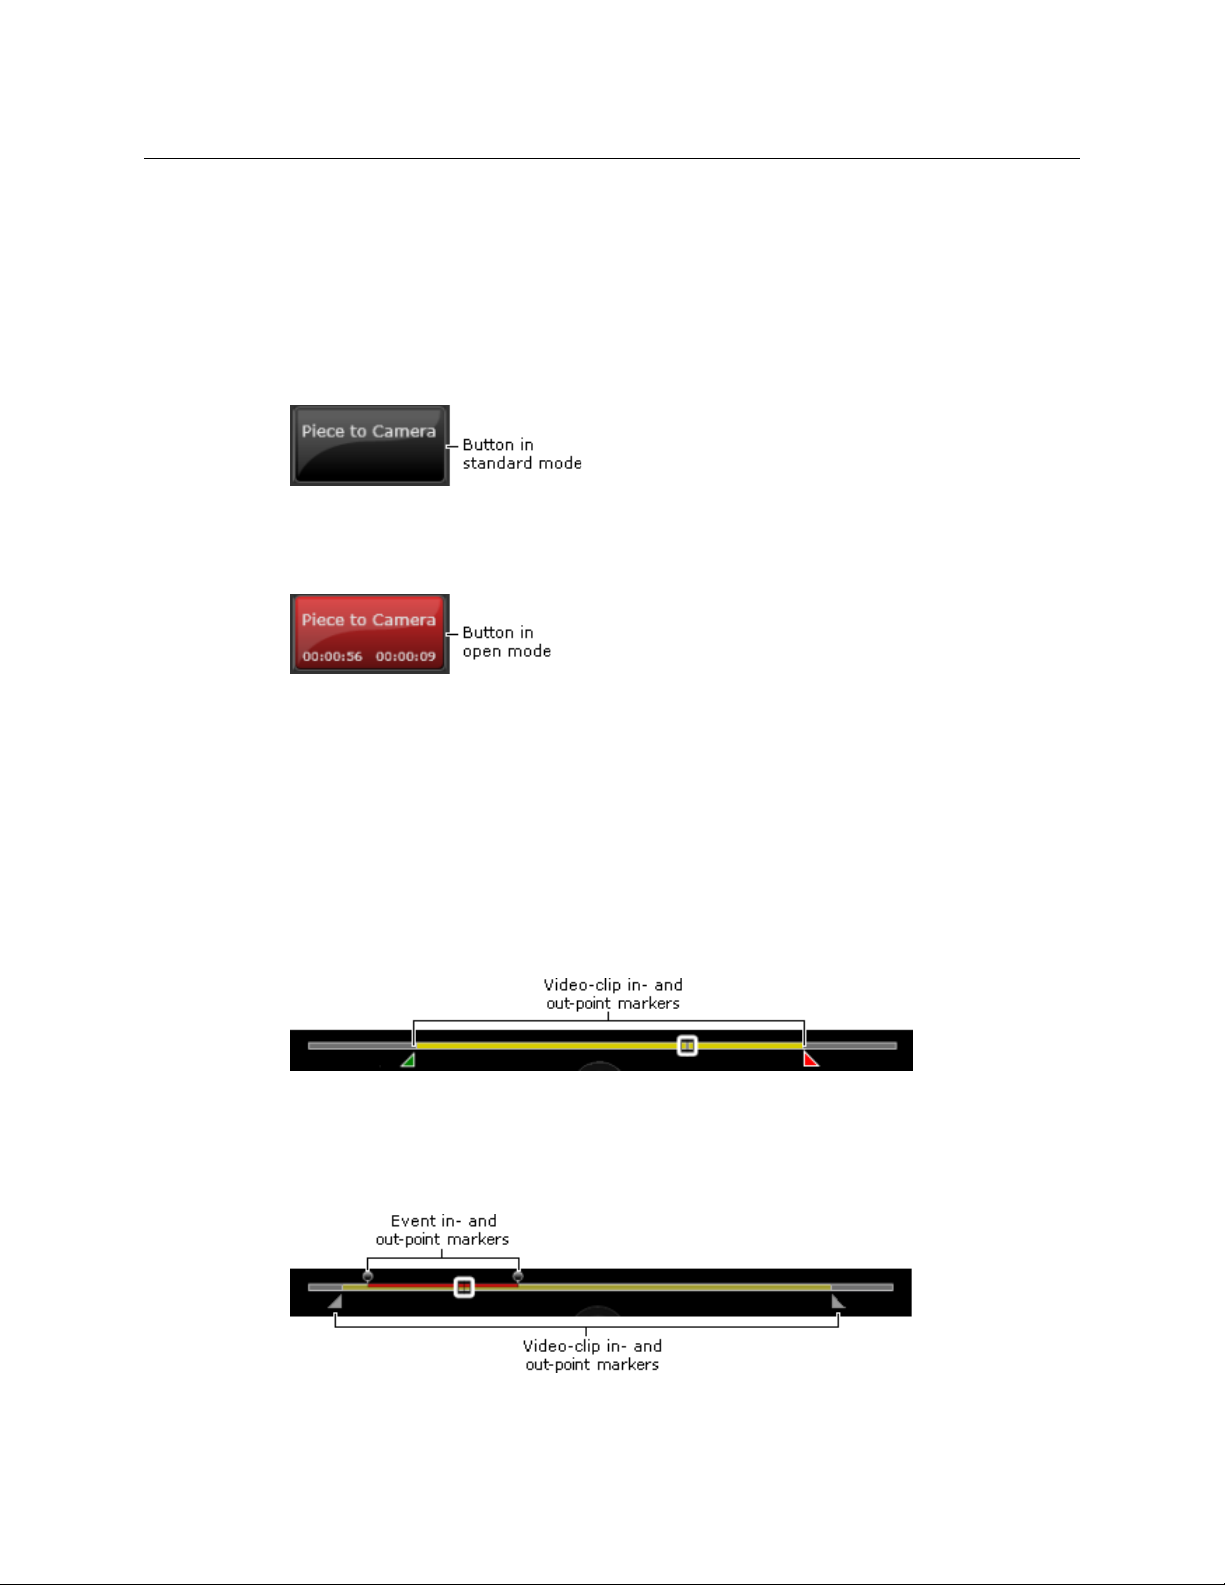
Marking an event
You use the event-type buttons to mark events in a selected video clip. These can operate
in either of two modes, giving two ways of marking an event. The modes are: standard and
open.
To use a button in standard mode, you first set the event in- and out-points in the Media
iewer. You then click the button to assign an event type to the event. In this mode, the
V
button shows just the name of the event type:
To use a button in open mode, you double-click the button while a clip is playing in the
Media Viewer. The button turns red, displays the in-point timecode and starts measuring
the duration of the event:.
As the Media Viewer continues to play the clip, you click the button when it reaches the
event out-point. The button registers the event and changes back to its original color.
How Tab Selection Affects the Media Viewer
SmartClient configures the Media Viewer slightly differently for video clips than for events.
Since you use different tabs for these different item types, SmartClient determines what
configuration to use by what tab you select.
The Metadata and Actions tabs apply to video clip
Media Viewer shows the video-clip in- and out-points on the duration timeline:
The buttons on the control bar for playing, positioning and marking a segment of a media
file (and the corresponding keyboard shortcuts) apply to the video clip.
The Events and Event Logging tabs apply to even
Media Viewer shows the in- and out-points of a selected event on the duration timeline:
s. When you select either of these, the
ts. When you select either of these, the
14
[
Page 23

The video-clip in- and out-point markers are dimmed: you cannot adjust them at this stage.
The buttons on the control bar for playing, positioning and marking a segment of a media
file (and the corresponding keyboard shortcuts) apply to the event.
Performing Tasks in the Browse Workspace
Below, we describe how you may perform a number of tasks in the Browse workspace. In
these tasks, you use major SmartClient features that are common to other workspaces. We
explain these features in detail in later sections of this manual.
• For information about the Media Viewer, see Playing Video Clips, on page 71.
• For information about searching the iTX System Database for particular assets, see
Searching for Assets, on page 49.
• For information about selecting an asset from search results, see Working with Search
Results, on page 61.
Previewing a Video Clip
In previewing a video clip, you use the features on the search level to find the clip; you then
load the clip in the workspace on the clip level, where you can play it back in the Media
Viewer.
iTX SmartClient
Operator Guide
To load and play back a video clip
1 Do one of the following to display the search level of the Browse workspace.
• Click the Browse activity button on the Dashboard.
• If the clip level of the Browse workspace is displayed, click the Search Level
selection button.
2 Specify search criteria in the Search Builder and start a search. See Using the Search
Builder on page 49.
SmartClient displays a set of search results in the Results Browser.
3 Select a video clip from the Results Browser. See Display of Search Results in the Results
Browser on page 61.
SmartClient loads the clip on the clip level; it displays clip metadata on the Metadata
tab and any event details on the Events tab.
4 Use the Media Viewer playback controls to play back the video clip. See About the
Media Viewer on page 71.
Annotation of Video Clips
On the clip level, you can view metadata for the video clip that is loaded in the workspace.
If you have editing rights for the clip, you can switch SmartClient to the annotating mode.
You can then modify the clip in- and out-points; edit the clip metadata; and add business
metadata.
15
Page 24

The Browse Workspace
Event Logging and Annotating
Viewing video-clip metadata
To view video-clip metadata:
1 Load a video clip on the clip level.
2 Select the Metadata tab.
3 Ensure the tab displays the information you want to view.
• Expand or collapse visible sections as necessary. See The Metadata Tab on page 84.
• Show any hidden sections you need to see. See Setting Up the Default Metadata
Editing a video clip
To edi t a vid e o cli p :
1 Load a video clip on the clip level.
2 Ensure SmartClient is in the annotating mode (the Annotate button is red).
3 On the Media Viewer, use one of the following methods to change either or both of the
clip boundary points.
• Drag the in-point or out-point marker.
• Click a timecode display, or the point-marking button next to it, when the Media
4Click Save to save the clip, or Save Copy to save a copy of it with a different name.
Tab View on page 88.
Viewer is showing the frame at the intended in-point or out-point.
Annotating a video clip
To annotate a video clip:
1 Load a video clip on the clip level.
2 Ensure SmartClient is in the annotating mode (the Annotate button is red).
3 Select the Metadata tab.
4 Edit any of the existing metadata you want to change. See Editing Metadata on
page 86.
5 Add a new business-metadata section, if necessary, and enter the required details. See
Adding Business-Metadata Sections to the Metadata Tab on page 87.
6Click Save to save the clip, or Save Copy to save a copy of it with a different name.
Event Logging and Annotating
On the clip level, you can view details of events in the video clip that is loaded in the
workspace.
If you have editing rights for the clip, you can put SmartClient in the annotating mode. You
can then: modify event in- an out-points; delete an event; mark and annotate a new event.
Playing back an event and view its metadata
To play back an event and view its metadata:
1 Load a video clip on the clip level.
2 Select the Events tab.
16
Page 25

iTX SmartClient
Operator Guide
3 Select an event.
SmartClient expands the event entry. The expanded entry includes Cu
buttons.
4 Use the buttons in the expanded entry to position or play the video clip:
•Click a Cu
Viewer.
•Click the Pla
e to button to display the first or last frame of the event in the Media
y button to play the event in the Media Viewer.
e to and Play
Editing an event
To edit an event
1 Load a video clip on the clip level.
2 Ensure SmartClient is in the annotating mode (the Annotate button is red).
3 Select the Ev
4 Select an event.
SmartClient expands the event entry and shows the in- and out-point markers of the
ev
ent on the Media Viewer timeline.
5On the Me
event boundary points.
• Drag the in-point or out-point marker.
• Click a point-marking button when the Media Viewer is showing the frame at the
in
6Click Upda
7 Edit the event business metadata, if required.
8Click S
ents tab.
dia Viewer, use one of the following methods to change either or both of the
tended in-point or out-point.
te.
ave to save the clip, or Save Copy to save a copy of it with a different name.
Deleting an event
To delete an event:
1 Load a video clip on the clip level.
2 Ensure SmartClient is in the annotating mode (the A
3 Select the Ev
4 Select an event.
5 SmartClient expands the event entry; this then displays a Delet
6Click Delet
7 SmartClient removes the event entry from the Ev
8Click S
ents tab.
e .
ave to save the clip, or Save Copy to save a copy of it with a different name.
nnotate button is red).
ents tab.
Marking an event in a video clip and add metadata to it
To mark an event in a video clip and add metadata to it
1 Load a video clip on the clip level.
2 Ensure SmartClient is in the annotating mode (the A
3 Select the Event Logging tab.
nnotate button is red).
e button .
17
Page 26
The Browse Workspace
Deleting a Video Clip
4 Select an annotation template in the Annotation Template box.
The Event Logging tab displays the set of event-type buttons specified in the template.
5 Do one of the following to mark an event:.
• If you want to use an event-type button in the standard mode, position the in- and
out
event; click an event-type button.
• If you want to use an event-type button in the open mode, play back the video clip;
double
of the event; click the button when the Media Viewer displays the last frame of the
event.
SmartClient adds a business-metadata section to the Ev
for the event to the Events tab.
6 Enter metadata for the event either on the Eve
7Click S
ave to save the clip or Save Copy to save a copy of the clip.
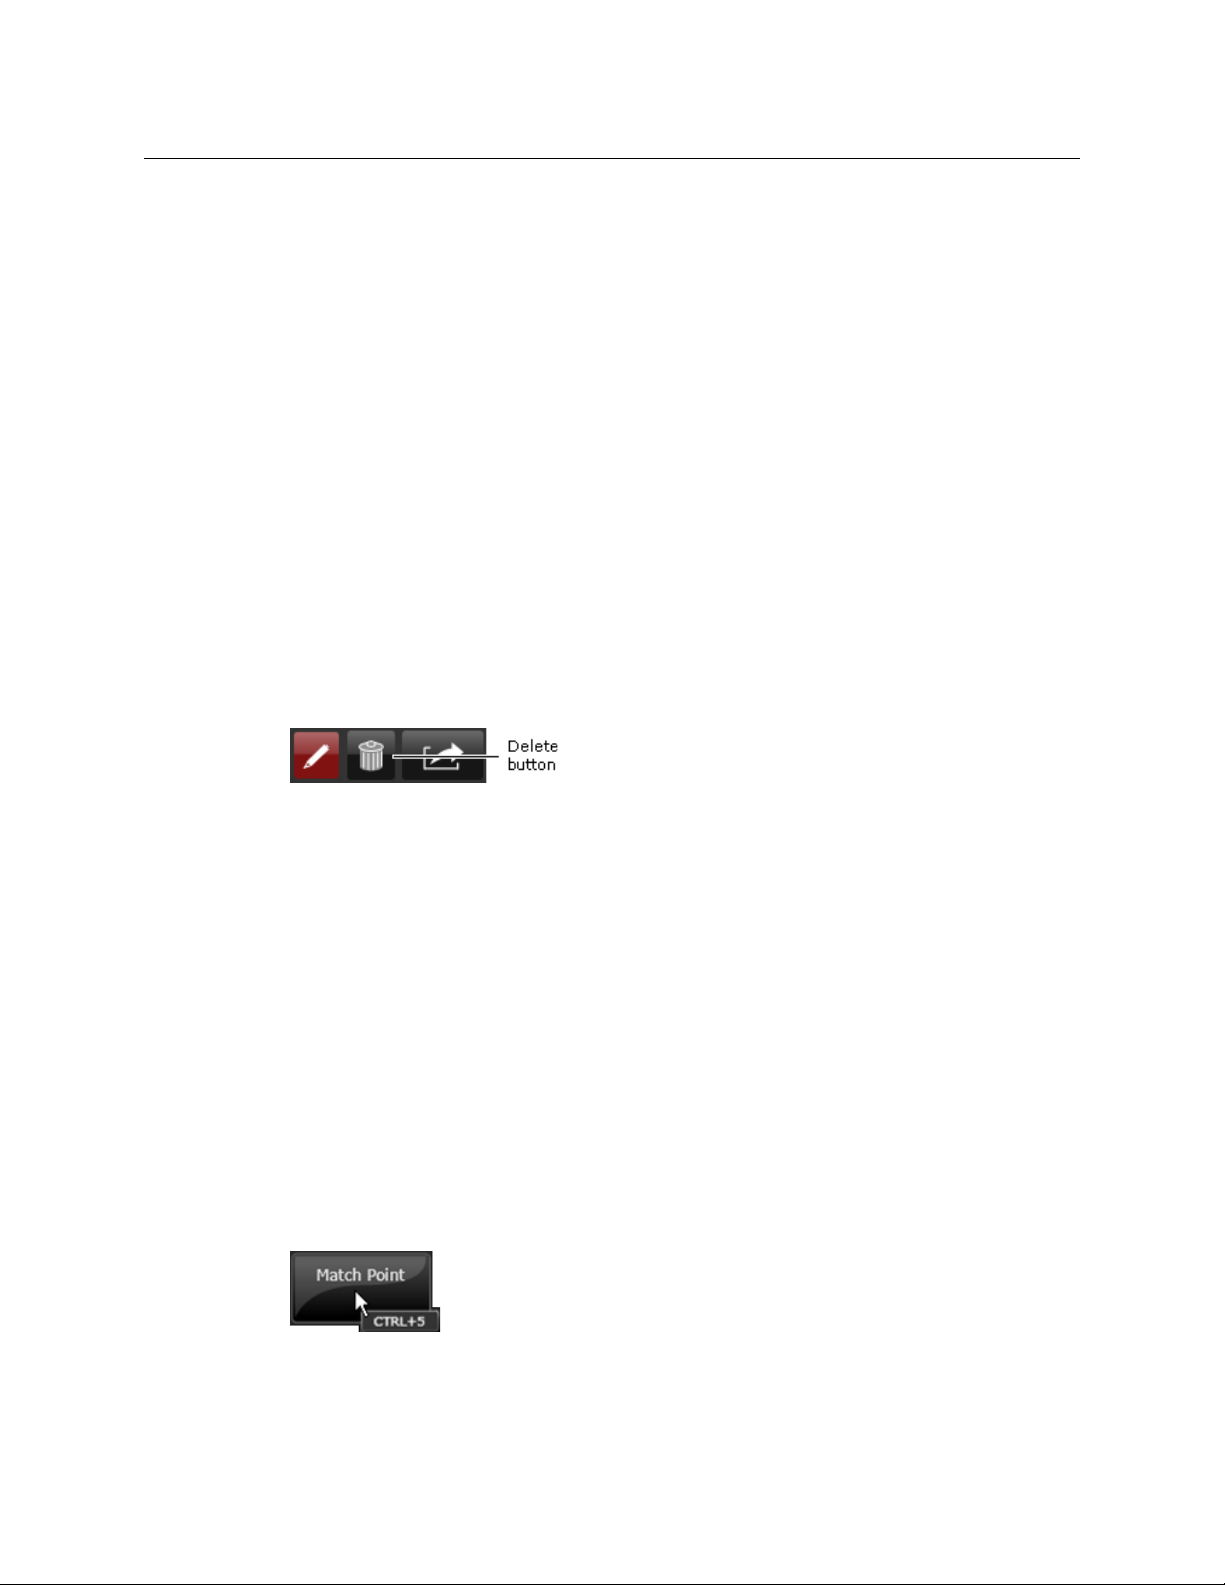
Deleting a Video Clip
You can delete a video clip if you have deletion rights for it. To do so, you use the delete
button:
-point markers on the Media Viewer timeline at the first and last frame of the
-click an event-type button when the Media Viewer displays the first frame
ent Logging tab and an entry
nt Logging tab or the Events tab.
To delete a video clip
1 Load a video clip on the clip level.
2Click the De
SmartClient displays a dialog that requests you to confirm you want to delete the video
cl
ip.
3Click Ye
SmartClient deletes the video clip from the iTX System Database and returns to the
sear
ch level. If no other video clip references the same media file, it sets up an iTX
Workflow job to delete the file.
lete button.
s .
Keyboard Shortcuts for Event Logging
Keyboard shortcuts can now be assigned to event-logging buttons that appear in some
SmartClient workspaces (e.g. the Browse and Shot List workspaces). The shortcut is a twokey combination consisting of: the Control key and a number from the number pad. A
tooltip displays the associated shortcut when you hover your mouse pointer over a button:
18
Page 27
iTX SmartClient
Operator Guide
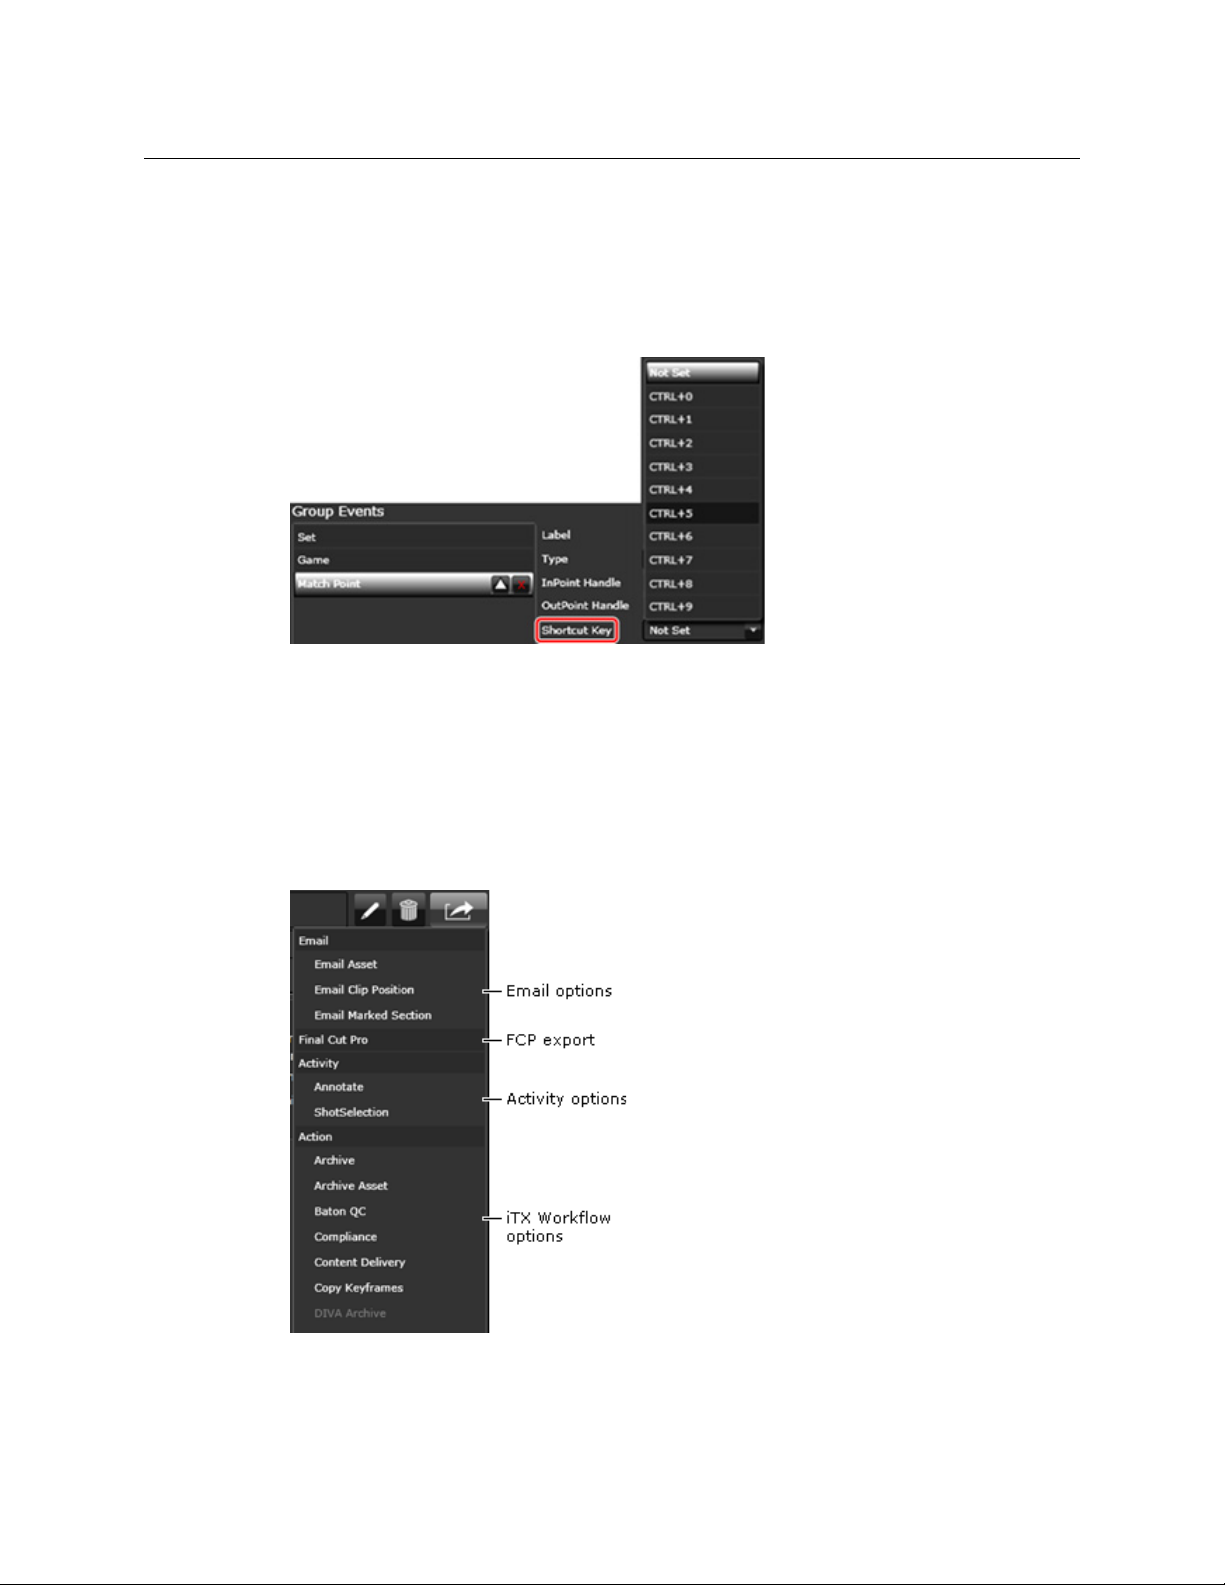
Configuration
You can configure keyboard shortcuts if you are a SmartClient system administrator; you do
it while creating or editing templates in the Administrator workspace.
After selecting an event type in the Group Events panel
Shortcut Key box:
Up to ten shortcuts (Ctrl + 0 to Ctrl + 9) per template are available; only one of these can be
assigned to any particular event-type button.
For more information on creating and editing templates, see the iT
Administrator Guide. This is available on the Grass Valley Support Portal.
Using the Actions Menu
Clicking the Actions button displays the Actions menu:
, you select a shortcut for it in the
X SmartClient
19
Page 28
The Browse Workspace
Video AutoPlay Check Box
You can select menu options to perform a number of actions for the selected video clip:
Option Action
Email Asset Email an asset link to another SmartClient operator. The link opens
Email Clip Position Email a clip-position link to another SmartClient operator. The link
Email Marked Section Email a marked-section link to another SmartClient operator. The link
Final Cut Pro Export the media file to an external location and save the video clip in
Annotate This option is not used.
tClient with the video clip loaded in the Browse workspace.
Smar
SmartClient opens your main email application for this action.
pens SmartClient with the video clip loaded in the Browse
o
workspace, ready to play from the current in-point.
SmartClient opens your main email application for this action.
pens SmartClient with the video clip loaded in the Browse
o
workspace, ready to play between the current in- and out-points.
SmartClient opens your main email application for this action.
ormat that allows it to be used in Apple Final Cut Pro.
a f
Shot Selection Switch SmartClient to the Shot Sele
iTX Workflow job
ious)
(var
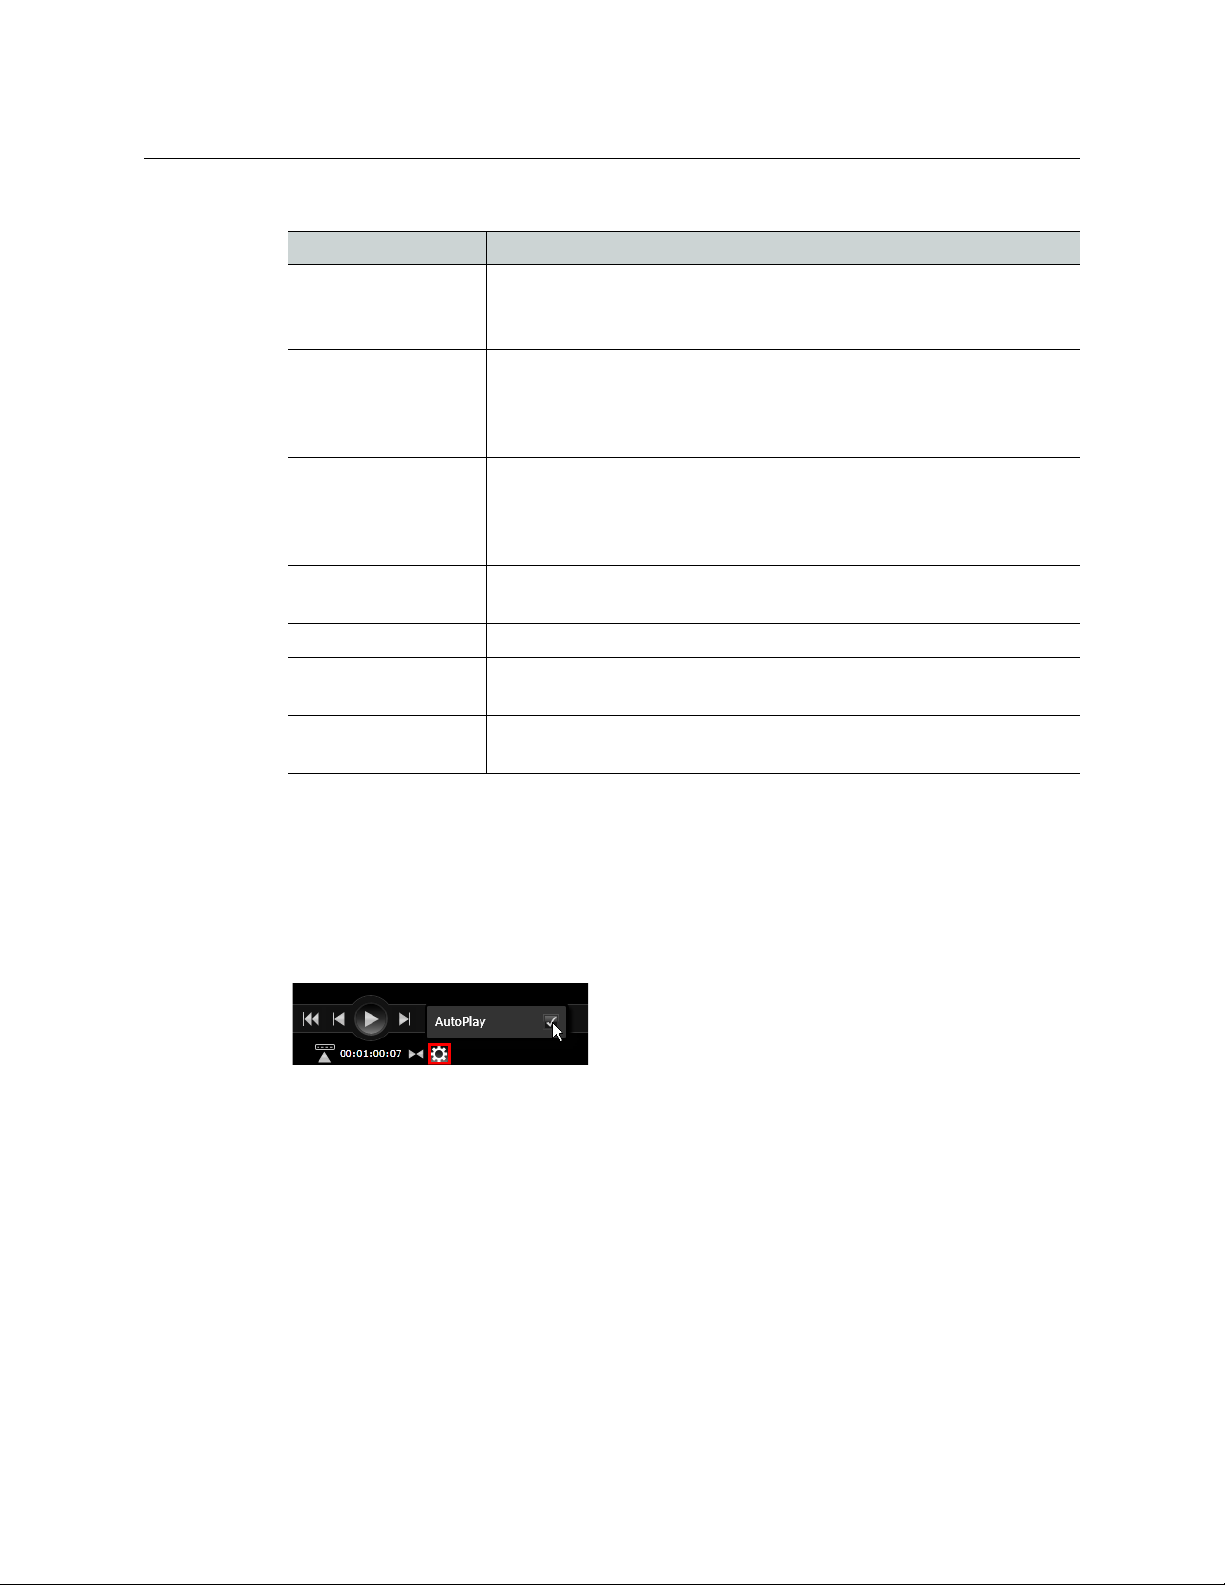
Video AutoPlay Check Box
iTX SmartClient allows the ability for video clips selected in the Browse workspace to play
automatically once loaded, or pause on the first frame.
To configure this option, click the 'viewer settings' butt
transport controls (highlighted in red)
To have the clip automatically play once loaded, check the AutoPlay check box. To have the
clip pause on the first frame when loaded, uncheck the AutoPlay check box.
ction workspace with the video
clip loaded.
Set up a job of the selected type for the video clip. Available job types
depend on what iTX Workflow definitions are installed in your system.
on below the video player's
20
Page 29
The Placeholders Workspace
The Placeholders workspace is for working with placeholder clips. These are clips that are
registered in your System Database but have no media yet.
Summary
About the Placeholders Workspace . . . . . . . . . . . . . . . . . . . . . . . . . . . . . . . . . . . . . . . . . . . . . . . . . . . 21
Performing Tasks in the Placeholders Workspace . . . . . . . . . . . . . . . . . . . . . . . . . . . . . . . . . . . . . . 22
About the Placeholders Workspace
The workspace contains features you use to:
• Search through the assets in the iTX System Database to find placeholder clips.
• Select a placeholder clip.
• View and edit the placeholder-clip metadata.
This workspace has just one level, with similar features to the Browse workspace:
The purpose of each section is described below:
1 A Search Builder, with an in-built filter for finding pl
criteria, before starting a search.
2 A Results Browser, containing a results table, for displaying search results.
3 A Metadata panel, in which you view the metada
aceholder clips. You can add search
ta of a selected placeholder clip.
21
Page 30

The Placeholders Workspace
Selecting the Placeholders workspace
Selecting the Placeholders workspace
You display the Placeholders workspace by clicking the Placeholders activity button on
your SmartClient Dashboard:
Performing Tasks in the Placeholders Workspace
Below, we describe how you may perform a number of tasks in the Placeholders workspace.
In these tasks, you use major SmartClient features that are common to other workspaces.
We explain these features in detail in later sections of this manual.
• For information about searching the iTX System Database f
Searching for Assets, on page 49.
• For information about selecting an asset from search results, see Working with Search
Results, on page 61.
or particular assets, see
Selecting a Placeholder Clip
You use the features in the Search Builder to search for placeholder clips and display a list of
them in the Results Browser. You can then select one to work with.
Finding and loading a placeholder clip
To find and load a placeholder clip
1 In the Placeholder workspace, specify search criteria in the Search Builder and start a
search. Using the Search Builder, on page 49.
SmartClient displays a set of searc
2 Select a placeholder clip from the Results Browser. Display of Search Results in the
Results Browser, on
SmartClient loads the clip and displays clip metada
Results Browser.
page 61.
Working with a Placeholder Clip
After loading a placeholder clip in the workspace, you may do any of the following:
• View the clip metadata in the Metadata panel
• Edit the clip metadata if you have editing rights for the clip.
• Copy the clip name to your Windows clipboar
dialog in an editing application that you are using to create the clip media. Doing this
guarantees the media name matches the name of the placeholder clip.
• Save a copy of an existing placeholder to create a new one.
h results in the Results Browser.
ta in the panel to the right of the
.
d. From there, you can paste it into a
22
Page 31

iTX SmartClient
Operator Guide
Viewing placeholder-clip metadata
To view placeholder-clip metadata:
1 Ensure the Metadata panel displays the information you want to view.
2 Expand or collapse visible sections as necessary. Viewing Metadata, on page 86.
3 Show any hidden sections you need to see. Setting Up the Default Metadata Tab View,
on page 88.
Editing placeholder-clip metadata
To edit placeholder-clip metadata:
1 In the Metadata panel, edit any of the existing metadata you want to change. Editing
Metadata, on page 86.
2 Add a new business-metadata section, if necessary, and enter the required details.
Adding Business-Metadata Sections to the Metadata Tab, on page 87.
3 Click Save to save the clip, or Save Copy to save a copy of it with a different name.
23
Page 32

The Placeholders Workspace
Working with a Placeholder Clip
24
Page 33

The Shot List Workspace and Project Clips
The Shot List workspace is designed to enable you to select "shots"- i.e. segments of video
clips - and combine them in project clips. Once a project clip has been created it can be
editing, annotated or exported as required.
Summary
About Project Clips . . . . . . . . . . . . . . . . . . . . . . . . . . . . . . . . . . . . . . . . . . . . . . . . . . . . . . . . . . . . . . . . . . . 25
Project Clips Main Features For Creating And
Creating a Project Clip . . . . . . . . . . . . . . . . . . . . . . . . . . . . . . . . . . . . . . . . . . . . . . . . . . . . . .
Annotating a Project Clip or Source Clip . . . . . . . . . . . . . . . . . . . . . . . . . . . . . . . . . . . . . . . . . . . . .
Editing a Project Clip . . . . . . . . . . . . . . . . . . . . . . . . . . . . . . . . . . . . . . . . . . . . . . . . . . . . . . .
Exporting a Project Clip . . . . . . . . . . . . . . . . . . . . . . . . . . . . . . . . . . . . . . . . . . . . . . . . . . . . .
Optimizing the Space Available to Shot Lists on the Shot List T
About Project Clips
A project clip is a database record for a group of shots joined together in a continuous
sequence; it is sometimes called a shot list or an edit decision list (EDL). The shots may come
from one or more source video clips.
Editing . . . . . . . . . . . . . . . . . . . . . . . . . . . . . . . . . . 28
. . . . . . . . . . 34
. 36
. . . . . . . . . . 37
. . . . . . . . . . 37
ab . . . . . . . . . . . . . . . . . . . . . . 38
Once a project clip is complete, it can be used in iTX playout schedules: iTX caches the
required media and plays out the shots one after another.
25
Page 34

The Shot List Workspace and Project Clips
Selecting the Shot List Workspace
If you want the shot list to be available as a single piece of media, you may export the
project clip and required files for rendering in a third-party video-editing application, such
as Apple Final Cut Pro or Adobe Premiere. The file created in the rendering process may be
given the same name as the project clip and imported into iTX; it can then be used for
playout.
The features in the Shot List workspace are organized on two main tabs:
• The Source Shot Selection tab has features for working with the source video clips to
build shot l
ists:
• The Target Project tab enables you to add metadata and set up an export job for the
project clip:
Selecting the Shot List Workspace
You display the Shot List workspace by clicking the Shot List button on your SmartClient
Dashboard:
Clip Management Buttons
Buttons for managing project clips appear above the two main tabs in the Shot List
workspace:
You use the buttons to:
• Create a project clip.
• Load an existing project clip.
• Save changes to the current project clip.
• Save a copy of the current project clip with a different name.
26
The name and title of the current proje
ct clip appear between the buttons.
Page 35

The Source Shot Selection Tab
On the Source Shot Selection tab, you create and edit project clips by selecting shots from
video clips as you play them in the Media Viewer.
iTX SmartClient
Operator Guide
The purpose of each section is described below:
1 Source-clip selection buttons. You use these to select video clips containing the
content you want to include in a project clip. You can select a clip from a PinPoint clip
search, from a PinPoint event search or from a list of recent clips.
2 A Media Viewer, in which you play a selected video clip
and out-points to identify shots you want to include in a project clip.
3 A Keyframe Timeline, which displays keyframes fr
Media Viewer. This helps you to navigate to a particular point in a video clip.
4 A Shot List tab. This contains a grid which displays details of the shots in the current
p
roject clip. It includes features for managing the shot list; i.e. adding, re-ordering and
deleting shots.
5 An Events panel. On this, you can view details of any marked events in the video clip
that
is loaded in the Media Viewer. The panel is hidden when a clip has no marked
events.
6 A Metadata tab, which displays the metadata for the current source video clip. You can
add business metada
ta for this clip.
. While doing this, you mark in-
om the video clip that is loaded in the
27
Page 36

The Shot List Workspace and Project Clips
The Target Project Tab
The Target Project Tab
On the Target Project tab, you can view details of shots and events in a selected project clip.
You can view and add metadata. You can set up jobs for the project clip or export it for use
in Apple Final Cut Pro.
The purpose of each section is described below:
1 A Shot List panel. This contains a grid similar to the one on the Shot List tab on the
Source Selection tab, with features for managing the shot list.
2 A Metadata tab, for the project clip.
3 An Events tab, for the project clip. A project clip
appear in its source clips. This happens for event types that are set as inheritable when
they are defined. (You may add events in the Browse workspace.)
4 An Actions tab. Job request buttons become activ
may automatically include events that
e for a project clip once it is saved.
Project Clips Main Features For Creating And Editing
Source Clip Selection Buttons
The source-clip selection buttons on the Source Shot Selection tab give you three ways of
selecting a clip to load in the Media Viewer.
You may use them to select a video clip from:
• The results of a PinPoint video-clip search.
• The results of a PinPoint event search.
• A list of recently-viewed clips.
28
This is illustrated in Figure 4-1 on
page 29.
Page 37

Clip Search
iTX SmartClient
Operator Guide
Fig. 4-1: The source-clip selection buttons provide three ways of selecting a clip to load in the Media
Viewer.
The Name and Title boxes under the buttons show the name and title of the video clip in
the Media Viewer.
In a clip search, you use PinPoint to find video clips based on criteria that relate to their
general properties (and not to properties of any marked events in clips); for example, the
name or title of a clip.
Event Search
Clicking Cl
This has standard PinPoint features including the Search Builder and Results Table. When
you select a clip in the search results, SmartClient loads it in the Media Viewer.
ip Search opens the PinPoint Source Search window:
In an event search, you use PinPoint to find clips based on criteria that relate to event
properties; for example, text in event annotations.
29
Page 38

The Shot List Workspace and Project Clips
Event Search
Clicking Event Search opens the PinPoint Event Search window. This has standard PinPoint
features, like the search window for clips. But the number of available search filter types is
limited to just those that are relevant to events.
These include the Event Type filter:
You use this filter to focus the PinPoint search on events of one or more particular types.
The filter includes an option to include sub-types in the s
earch. So, for example, a search for
an event type called "News" will include event types called "News\Interview" and
"News\Correspondent" in search results when the option is selected.
Since keyframes are linked to whole clips and not
events, SmartClient displays no video
images for the events in search results:
When you select an event in the search results, SmartClient loads the clip containing the
event in the Media Viewer.
An event in a co-reference may occur in a number
of other co-references. Because of this, if
you select such an event, SmartClient opens a window showing all co-references in which it
appears. Clicking one of these loads the video clip in the Media Viewer.
30
Page 39

Recent
Clicking Recent displays a drop-down list of recent video clips - ones you have viewed since
logging onto SmartClient. When you select a clip in this list, SmartClient loads it in the
Media Viewer.
The Shot-List Grid
The shot-list grid appears on both the Shot List tab (on the Source Shot Selection tab) and
Shot List panel (on the Target Project tab). It gives details of the shots in the current project
clip:
iTX SmartClient
Operator Guide
The shots appear in their order of playback.
While playing a video clip in the Media Viewer, you can mark in- and out-points for a shot
and add the shot to the shot l
Selecting a shot in the shot list expands its entry:
You can use the features in the expanded entry to:
• Move the shot up or down the list.
• Delete the shot from the list.
• Add or edit a comment.
You can also modify a selected shot by setting new in- and out
ist.
-points in the Media Viewer.
31
Page 40

The Shot List Workspace and Project Clips
The Shot-List Grid
Playing back a shot from the shot-list grid
The Auto Display option controls how the Media Viewer responds when you select a
different shot in the shot list:
• With the option selected, the Media Viewer automatically plays the shot.
• With the option not selected, the Media Viewer
of the shot, which you do by using the play button in the expanded entry.
Shot-list grid buttons
The buttons on the shot-list grid control the following actions.
Button Action
Move the shot up the list.
Move the shot down the list.
Start playback of the shot in the Media Viewer.
Delete the shot from the list.
waits for you to manually start playback
Add the marked segment of the video clip in the Media Viewer to the shot list.
Update the in- and out-points of the selected shot with the timecode values
shown in the Media Viewer.
The events grid
The events grid (on the Source Shot Selection tab) shows what events are marked in the
video clip currently loaded in the Media Viewer:
32
Selecting an event expands its entry, showing any metadata that has been added for the
event:
Page 41

iTX SmartClient
Operator Guide
Through the Add Shot button, you can add the event directly as a shot to the current
project clip.
Playing back an event from the events grid
When you select an event, the in- and out-point markers on the Media Viewer move to the
start and end of the event; the timecode displays show the timecode at these points.You
can use the playback buttons in the expanded entry to play the video clip between the
marked points.
Events-grid buttons
The buttons on the events grid control the following actions.
Button Action
Display the event in-point in the Media Viewer.
Display the event out-point in the Media Viewer.
Play the video clip between the event in- and out-points.
Add the event to the project clip.
Shot Marking Features on the Media Viewer
The Media Viewer control bar has shot-marking features that you can use to mark the inand out-points of a shot:
To mark a point, you may drag its marker; or you may click a timecode display when the
Media Viewer is showing the frame at the intended in-point or out-point.
When you display a shot from the shot-list grid, t
the start and end of the shot.
he markers and timecode displays identify
33
Page 42

The Shot List Workspace and Project Clips
Creating a Project Clip
Creating a Project Clip
In general, the creation of a finished project clip is a 3-step process. You create the project
clip, without media, in the System Database; you add the media in the form of a shot list to
the project clip; you save the completed project clip.
This diagram shows the steps:
Below, we first describe the general procedure for producing a completed project clip. We
then give detailed instructions for performing various tasks referred to in the general
procedure.
To create a finished project clip:
1 Use one of the clip-management buttons to selec
• New t
• Load to load an existing project clip.
2 On the Source Shot Selection tab, do the following for each shot you want to include in
yo
ur project clip.
• Load a source clip in the Media Viewer.
• Mark a shot and add it to the shot list.
3Click S
complete.
o start a new project clip.
ave to save the project clip at any time while working on it and when it is
t a project clip to work with:
Starting a new project clip
To start a new project clip:
1Click New.
SmartClient enters a default name and title in the Name and Ti
project clip; it displays a clear Source Shot Selection tab.
2 Edit the Name and Ti
3Click S
ave.
SmartClient saves the new project clip in the iTX System Database.
tle entries, if you want to.
tle boxes for a new
Loading a project clip
You may load a project clip that has previously been saved from SmartClient or that has
been imported into your system.
To loa d a proj e ct c l ip:
1Click Lo
SmartClient opens the PinPoint Project Search window. This has standard PinPoint
features, including the Search Builder and Results Table.
2 Enter search criteria in the Sear
type you want to work with. SmartClient displays the search results in the Results Table.
3 Select a project clip.
ad.
ch Builder, and perform a search for project clips of the
34
Page 43

iTX SmartClient
Operator Guide
4Click OK to close the Project Search window.
SmartClient displays the name and title of your clip in the Name and Ti
loads the video clip that contains the first shot in the Media Viewer and shows shot and
events details.
tle boxes. It
Loading a source clip in the Media Viewer
Do one of the following to select a video clip.
•Click Clip Sear
of video clips that meet your search criteria; select a video clip from the search results.
•Click Eve
of video clips with events that meet your search criteria; select a video clip from the
search results.
•Click Rec
SmartClient loads the selected clip in the Media Viewer; it displays a list of marked events
the clip c
ontains in the Events panel.
Note: You can also load a source clip in the Media Viewer by selecting a shot
in the shot-list grid. SmartClient automatically loads the clip if the Auto
Display option is turned on; you may manually load it, it this option is turned
off.
ch to open the PinPoint Source Search window; use PinPoint to find a list
nt Search to open the PinPoint Event Search window; use PinPoint to find a list
ent to and select one of the recently viewed video clips from the displayed list.
Adding a shot from the Media Viewer to a project clip
In this procedure, you mark a segment of a source clip in the Media Viewer before adding it
to the project clip.
To add a shot from the Media Viewer to a project clip:
1 Load a source clip in the Me
2 Do one of the following to mark a shot.
• Position the clip at the start of the shot and click the in-point timecode display;
position the clip at
You may mark either point while the clip is playing.
• Drag the in-point marker to the start of the shot and the out-point marker to the
end
.
3Click Ad
4 SmartClient adds the shot to your shot list a
in the Shot Selection panel.
5 Type a comment about the shot into the Co
(optional).
d Shot on the Shot List tab.
dia Viewer on the Source Shot Selection tab.
the end of the shot and click the out-point timecode display.
nd displays an expanded entry for the shot
mment box of the expanded entry
Adding a shot from the Events panel to a project clip
In this procedure, you add the media from a marked event to the project clip.
To add a shot from the Events panel to a project clip:
1 Select an event in the Events panel.
The event entry expands.
35
Page 44

The Shot List Workspace and Project Clips
Annotating a Project Clip or Source Clip
2 Do one of the following, depending on whether or not you want SmartClient to include
any event comments with the event media.
•Click Ad
•Click Ad
SmartClient adds the shot to your shot list and displays an expanded entry for the shot
in the Shot Selection panel. The entry includes event comments if you start the
operation from the Events panel; the comments do not appear if you use the Shot List
tab.
d Shot in the expanded entry.
d Shot on the Shot List tab.
Editing a shot in a shot list
You can modify the in- and out-points of a shot in the shot list.
To edit a shot in a shot list:
1 Select a shot in the Shot List.
2 If Auto Display is turned off, to display the shot in the Media Viewer click Displa
3 Mark the new in- and out-points.
4Click Edit Shot.
SmartClient updates the in- and out-points of the shot to match those shown in the
Me
dia Viewer.
y.
Note: You cannot use this procedure to overwrite the shot with a segment
from a different source clip.
Saving a project clip
Once you save a project clip, you can re-load it at any time and edit it.
To save a project clip while working on a project clip:
•Click S
ave at any time.
SmartClient saves the project clip.
Saving a copy of a project clip
Instead of overwriting an original project clip after editing it, you may save a copy of it with
a different name.
1Click S
2 Enter a name for the new clip and click S
ave Copy.
SmartClient displays the S
SmartClient creates a new project clip and keeps it loaded in the workspace. This
pr
oject clip is independent of the original one - it is not a co-reference.
ave Copy dialog.
ave.
Annotating a Project Clip or Source Clip
36
You can view and edit metadata for project clips and source clips on separate Metadata
tabs:
• The Metadata tab on the Target Project tab displa
project clip.
ys the metadata for the current
Page 45

• The Metadata tab on the Source Shot Selection tab displays the metadata for the
selected source clip.
For information on how to manage metadata, see Viewing and Editing Metadata, on
page 83.
Editing a Project Clip
After loading a project clip into the Shot List workspace, you may edit it by:
• Changing its name or title.
• Modifying the contents of the shot list in the Shot Selection panel.
• Editing the clip metadata on the Metadata tab (on the Target Project tab).
After editing a clip, you may overwrite the original clip; or you may leave the original
unchanged and, instead, save a copy of it under a different name.
Exporting a Project Clip
You can export a project clip and its required media files from SmartClient so that they can
be worked on in the Apple Final Cut Pro video-editing application. In this operation, the
project clip is converted into an FCP project file (in the Final Cut Pro XML Interchange
format).
iTX SmartClient
Operator Guide
In Apple FCP, the project file can be used to load the project. Then, the individual media
segments can be combined into one media file in a process known as rendering.
To export a project clip for use in Apple Final Cut Pro:
1 Load your project clip in the Shot List workspace.
2 Select the Target Project tab.
3Click FCP Export.
SmartClient opens the FCP Export dialog.
4 Select the machine that you want SmartClient to copy the required media files to.
5Click Next.
SmartClient opens the Save As dialog.
6 Enter a name for the FCP project file and select the folder where you want SmartClient
to place this file.
7Click Save to close the dialog.
SmartClient creates an FCP project file from the project clip and copies the required
media files to the specified machine.
37
Page 46

The Shot List Workspace and Project Clips
Optimizing the Space Available to Shot Lists on the Shot List Tab
Optimizing the Space Available to Shot Lists on the Shot List Tab
To maximize the display of shot details on the Source Shot Selection tab in the Shot List
workspace, SmartClient automatically hides the Events panel if the video clip loaded in the
Media Viewer has no marked events. It does this by collapsing the Events panel to the
bottom of the tab.
The illustrations below show the two configurations of the Shot List tab; the red line
denotes the border between the shot-list grid and the Events panel.
The video clip in the first illustration contains marked events; the Events panel appears in
the bottom half of the tab.
The video clip in the second illustration contains no
marked events; the Events panel is
hidden, allowing the shot-list grid to take up the full height of the tab.
38
Page 47

The Live Logging Workspace
In the Live Logging workspace, you can annotate a placeholder clip while the media for the
clip is being created. During this time the media is not available for playing back in
SmartClient.
A situation in which you may do this is when an external encoder creates a file by recording
an incoming video f
recorded; but you can mark events for a placeholder clip that is loaded in the workspace
while viewing the feed on a video monitor.
Summary
About the Live Logging Workspace . . . . . . . . . . . . . . . . . . . . . . . . . . . . . . . . . . . . . . . . . . . . . . . . . . . 39
Performing Tasks in the Live Logging Workspace . . . . . . . . . . . . . . . . . . . . . . . . . . . . . . . . . . . . . . 40
About the Live Logging Workspace
The Live Logging workspace has similar features to the Browse workspace for viewing
metadata, logging events and setting up jobs:
eed. SmartClient does not have access to the media that is being
The purpose of each section is described below:
1 Placeholder-clip create and load buttons. You use these to create a placeholder clip to
w
ork with, or to load an existing one from PinPoint search results.
2 An Event Logging panel. You use this to mark events and add business metadata for
.
them
39
Page 48

The Live Logging Workspace
The Logging Period
3 An Events tab. On this, you can view details of events within the selected placeholder
clip and the business metadata that has been assigned to them.
4 A Metadata tab, which displays the metadata
an annotation template, you can add metadata for this clip.
5 An Actions tab. You use the buttons on this tab to trigger an iTX Workflow job for the
ted placeholder clip
selec
Note: The encoder should have the same time reference as SmartClient, so
that the timecode values of marked events correspond with the timecode
values in the media that the events relate to.
The Logging Period
SmartClient allows you to mark events during the logging period of a placeholder clip. This
is the period when the time of day falls on or between the timecode values of the clip
boundary points.
for the selected placeholder clip. By using
For example. The following illustration shows a plac
10:00:00:00 and 10:05:00:00. The logging period is then from 10:00 to 10:05; you can mark
events for this clip between these times.
Checking Marked Events
When a recording finishes, the new media file is imported into iTX and associated with the
placeholder clip; a low-bit-rate media file, suitable for previewing, is created. Once this is
done, you can check the marked events in SmartClient and adjust them where necessary.
Selecting the Live Logging Workspace
You display the Live Logging workspace by clicking the Live Logging activity button on
your SmartClient Dashboard:
eholder clip with in- and out-points of
Performing Tasks in the Live Logging Workspace
Preparing a Placeholder Clip for Live Event Logging
Before starting to log events in a placeholder clip, you need to create the clip or load it from
the iTX System Database.
40
Page 49

iTX SmartClient
Operator Guide
Creating a placeholder clip
To create a placeholder clip:
1Click Create.
SmartClient displays the Cr
2 Enter the required information in the dialog:
• A name for the placeholder clip.
• The frame rate of the playout system in which the clip is to be used.
• The clip in-point and duration.
3Click OK.
SmartClient creates a placeholder clip and loads it in the workspace. It displays the
name and title of the clip in
on the Metadata tab.
eate Placeholder dialog.
the Name and Title boxes. You can view the clip metadata
Loading a placeholder clip
Load a placeholder clip
1Click Lo
SmartClient opens the P
PinPoint features, including the Search Builder and Results Table.
2 Enter search criteria in the Sear
the type you want to work with.
SmartClient displays the search results in the R
3 Select a placeholder clip and click OK to cl
SmartClient displays the name and title of your clip in the Name and Title boxes. It
loads the placeholder clip and shows its metadata and events details on the Metadata
and Events tabs.
ad.
inPoint Live Logging Search window. This has standard
ch Builder, and perform a search for placeholder clips of
esults Table.
ose the Live Logging Search window.
Logging Events
When a placeholder clip is loaded in the workspace, SmartClient repeatedly compares the
current time with the logging period of the clip.
When the time is outside the logging period, the buttons are inactive and the time display
ed:
is r
Event-type buttons on the panel are also inactive. You cannot then mark events.
When the time is within the logging period, the event In and Ou
time display is white:
Event-type buttons on the panel are also active. You can then mark events.
t buttons are active and the
41
Page 50

The Live Logging Workspace
Double Clicking to Cancel a Logging Event
To log an event:
1 On the Event Logging panel, select an annotation template in the Annotation
Te mp la t e box.
ent Logging panel displays the set of event-type buttons specified in the
The Ev
template.
2 When the logging period starts, check the timecode display is white and the event-
t
ype buttons are active.
3 Do one of the following to mark an event.
• If you want to use an event-type button in the standard mode, click In when y
see the first frame of the event; click Out when you see the last frame of the event;
click an event-type button. SmartClient displays the timecode values of these
frames after the buttons.
• If you want to use an event-type button in the open mode, double-click an event-
e button when you see the first frame of the event; click the button when you
typ
see the last frame of the event.
SmartClient creates an event. It adds a business
Logging panel; it adds an entry for the event to the Events tab.
4 Enter metadata for the event either on the Eve
5Click Save to save the clip, or Save Copy to save a copy of the clip.
ou
-metadata section to the Event
nt Logging panel or the Events tab.
Double Clicking to Cancel a Logging Event
In Live and Event Logging, open ended events can be created manually by double clicking
the pre-created event button.
If the user then decides the event has been crea
event has started will now cancel the event and remove it from the system.
Previously, if a user began logging an event in err
in the scratch pad or events tab and clicking the
A single click will end the event manually.
ted in error a further double click after the
or it could only be deleted by selecting it
button.
Applying Offset Handles to Open Ended Live Logging
Live event logging applies the offset handles (as set in the template) to open ended live
events.
In live logging, a single clicked event is creat
added to the duration.
A double clicked live event is open ended - it has no
the event button again - the button turns red and a clock on the button counts the duration
until the event is stopped manually.
ed with a fixed duration, with offset handles
outpoint until the user manually clicks
42
Page 51

iTX SmartClient
Operator Guide
The start time is shown as the time the button was double clicked, minus the in-point offset
handle. E.g. If the event is started at 10:00:00:00, but the in-point offset is 10 seconds, then
the start time of the event will show as 09:59:50:00.
The same is applied to the out-point, when the
In addition to this, offset handles can now be configur
to 600 seconds instead of the previous 100.
Deleting Events from the Scratchpad
Events can be deleted from the system completely via the scratchpad (below the logging
buttons), rather than just removed from the scratchpad itself, by clicking the
right hand side of the scratchpad dialog for each event.
If you wish to simply remove the dialog from the scratchpad after annotating an event, you
w click the
no
This has made deleting unwanted events much ea
button only removed the event from the scratchpad.
button.
user clicks to end the event.
ed in the logging template to be up
on the top
sier than before. Previously, clicking the
43
Page 52

The Live Logging Workspace
Deleting Events from the Scratchpad
44
Page 53

In the AE workspace, you work with iTX assets that are used in the production of media files
in which variable information is combined with video content generated in the Adobe After
Effects (AE) video-effects application. An example of such a media file is a short "coming
next" video clip that advertises details of the next program scheduled to play out.
Summary
iTX Assets Used on the AE Workspace . . . . . . . . . . . . . . . . . . . . . . . . . . . . . . . . . . . . . . . . . . . . . . . . . 45
Search Level . . . . . . . . . . . . . . . . . . . . . . . . . . . . . . . . . . . . . . . . . . . . . . . . . . . . . . . . . . . .
View Level – AE Pages . . . . . . . . . . . . . . . . . . . . . . . . . . . . . . . . . . . . . . . . . . . . . . . . . . . . . .
View Level – AE Templates . . . . . . . . . . . . . . . . . . . . . . . . . . . . . . . . . . . . . . . . . . . . . . . . . . . . . .
View Level – AE Projects . . . . . . . . . . . . . . . . . . . . . . . . . . . . . . . . . . . . . . . . . . . . . . . . . . . .
iTX Assets Used on the AE Workspace
Three types of iTX asset are involved in the process:
• An AE project is created in the iTX System Database when an AE project file is imported
into iTX. The project file may contain one or more AE compositions.
• An AE template is created for each composition in an imported project.
• An AE page is created when data on a text la
then used to create a single media file. We describe this process as “rendering” the AE
page.
The AE Workspace
. . . . . . . . . . . . . . 45
. . . . . . . . . . 46
. . . . . . 47
. . . . . . . . . . 48
yer is added to an AE template, which is
The AE workspace is similar to the Browse workspace. It has two levels: one for searching for
AE as
SmartClient displays the AE workspace in one of thr
three AE asset types it is set up to handle.
Search Level
The search level has the same features for all three asset types. It contains three searchscope buttons (each representing one of the AE asset types):
Clicking one of these buttons selects an operating mode and limits searches to just the
associated asset type. So, for example, only AE pages appear in search results when the AE
Page scope button is selected.
sets; the other for viewing them.
ee modes, depending on which of the
45
Page 54

The AE Workspace
View Level – AE Pages
View Level – AE Pages
When you select an AE page in search results, SmartClient switches to the view level and
loads the page:
On this level, you can:
• View basic asset details of the AE page.
• View the content of text data layers in the page.
• Play back the page in the Media Viewer.
• Delete the page.
You can switch SmartClient to the annotating mode and then:
• Change the target event level of the AE page. The page may be used in either a primary
or sec
ondary schedule event in a playout channel. The different levels require different
media-file formats.
• Edit the content of text data layers.
46
Page 55

View Level – AE Templates
When you select an AE template in search results, SmartClient switches to the view level
and loads the template.
iTX SmartClient
Operator Guide
On this level, you can:
• View basic asset details of the AE template
• View the data on text layers in the template.
• Play back the template in the Media Viewer.
• Delete the template.
• Set up an iTX Workflow job to render an AE page from the template.
You can switch SmartClient to the annotating mode and then:
• Change the target event level of an AE page rendered from the template. The page may
b
e used in either a primary or secondary schedule event in a playout channel. The
different levels require different media-file formats.
• Edit the data on text layers.
.
Note: Instructions for using SmartClient to render a page from an AE
template are given in the separate user manual, "iTX Render Service for
Adobe After Effects".
You can get a copy of this from the Grass Valley Support Portal:
http://www2.grassvalley.com/support/details/product/iTX.
47
Page 56

The AE Workspace
View Level – AE Projects
View Level – AE Projects
When you select an AE project in search results, SmartClient switches to the view level and
loads the project:
On this level, you can:
• View basic asset details of the AE project.
• Delete the AE project.
48
Page 57

SmartClient uses the iTX search tool, PinPoint, to find assets in your iTX System Database.
Summary
About PinPoint . . . . . . . . . . . . . . . . . . . . . . . . . . . . . . . . . . . . . . . . . . . . . . . . . . . . . . . . . . . . . . . . . . . . . . . 49
Using the Search Builder . . . . . . . . . . . . . . . . . . . . . . . . . . . . . . . . . . . . . . . . . . . . . . . . . . . .
The Search History Panel . . . . . . . . . . . . . . . . . . . . . . . . . . . . . . . . . . . . . . . . . . . . . . . . . . .
About PinPoint
SmartClient resents PinPoint in one of two forms, depending on which workspace is active
• In some workspaces (e.g. the Browse workspace), the PinPoint features are displayed on
their own separate level - the search level.
• In other workspaces (e.g. the Shot List workspace), SmartClient displays the PinPoint
eatures in a search dialog. The dialog appears when you click a search button.
f
When using PinPoint in SmartClient, the same main features are available as in iTX Desktop:
•The Search Builder.
• The Search History panel.
• The Results Browser.
Searching for Assets
. . . . . . . . . . 49
. . . . . . . . . . 57
In this section, we describe how you use the Search Builder and the Search History panel to
pe
rform searches.
Using the Search Builder
Every asset registered in an iTX System Database has its own, unique name. The easiest way
to get a video clip from the database is to specify this name and request SmartClient to find
the clip and load it in a workspace.
Sometimes, though, you may not know the name. Or, you may want to view a batch of
video clips that ha
request SmartClient to find clips by using other search criteria; for example, text in
annotations that describe the clips; or properties such as creation or modification dates.
You specify search criteria in the Search Builder:
ve some common characteristics. In these circumstances, you may
49
Page 58

Searching for Assets
Performing a Search
•The Search Builder has two types of feature for specifying search criteria:
•The Any Text box works in a similar way to the search-text box of internet search
engines. You enter search terms in the box. A search term may be a single word or a
phrase; it may relate to any metadata text (description or annotation) associated
with an asset, not just the name.
• A search filter contains details of an asset property, e.g. the modification date of a
video clip. In sifting through the items in the System Database, SmartClient uses
the search filter to separate out assets that meet search criteria from those that do
not. You can specify search criteria in multiple search filters.
• The Search Builder also has options that enhance the search criteria or affect the scope
of a search:
•Through the Stemming check-box, you can turn stem-based searching on or off.
•In the Domains box, you can specify what iTX domains to search in a multidomain
system.
•The Sort By option allows you to specify how search results are ordered in the Results
Browser.
•The Search button starts a search.
Performing a Search
Below, we outline the general procedure for searching the System Database. We give more
information about the individual tasks in the following topics.
To perform a search:
1In the Any Text box, enter any search terms you want SmartClient to search for.
2 Add any search filters you want SmartClient to use.
3 Select or clear the Stemming check box, depending on whether or not you want
SmartClient to use stem-based searching.
4 If you are using SmartClient in a multi-domain system, select the domains you want
SmartClient to search in the Domains box.
5From the Sort list, select the sort order for the search results.
6Click the Search button, or press the Enter key, to start a search.
After performing the search, SmartClient displays its findings in the Results Browser.
Entering Text i n the A ny Tex t Box
In the Any Text box, you enter search terms associated with video clips you want
SmartClient to find. The terms may relate to clip names, titles or annotations describing
video clips. SmartClient searches for the specified words in the database records.
In composing search-text criteria, you can add one of the logic operators OR, AND or NOT
before a search term. Doing this determines how the presence or absence of a word in a
database field affects what video clips appear in the search results.
50
Page 59

iTX SmartClient
Operator Guide
Specifying text to include video clips in search results
In general, SmartClient includes a video clip in search results if any of the specified words
appears in the text fields of the database record for the video clip. This is because
SmartClient automatically applies the logic operator OR to any search term that does not
have a logic operator in front of it.
The search criteria shown in these two e
The search results include any video clip that has either "sailing" or "race" in a database
field.
If you insert "and" before the second word, the s
have both "sailing" and "race" in their database fields:
For the same effect, you may use a plus sign instead of "and":
You can request SmartClient to look for a phrase by putting quotation marks around the
phrase:
SmartClient does not search for common words such as "the" and "if" unless they are part
of a phrase.
xamples produce the same results:
earch results include only video clips that
Specifying text to exclude video clips from search results
To avoid having to scroll through search results that contain a large number of unwanted
video clips, you can exclude video clips that you are not interested in. For this, you add "not"
before a word or phrase that is associated with the unwanted video clips:
You may use a minus sign instead of "not":
Organizing multiple search terms
When using multiple search terms with different logic operators, how you arrange the
search terms may have a significant effect on the search results. To ensure SmartClient
reads the criteria in the way you want it to, you should add brackets around search terms
that you want SmartClient to read together.
In these two examples, the same search ter
which terms are bracketed together:
ms produce different results depending on
51
Page 60

Searching for Assets
Using Search Filters
Using wildcard characters
Instead of spelling a search term in full, you may use wildcard characters (? and *) to
represent a single character or multiple characters. Enter one of these: ? for a single
character; * for multiple characters.
In this example, all words that contain the specified letters - and any character in place of
the wildcar
In this example, all words that start with "trim" meet the search criteria:
d character - meet the search criteria:
Using Search Filters
Search filters specify criteria that relate to properties of assets registered in the System
Database. SmartClient uses them to determine what assets to includes in a results list
The more filters SmartClient uses, the more focused are the search results.
When adding a search filter, you select a type from the search filter menu:
What types of search filter are available depends on the structure of your database and how
your system administrator configures the search filter menu for SmartClient.
[
52
Page 61

We list the most commonly used search filters in the following table.
Filter type Asset property the filter is based on
Category A category that a clip may be associa
ted with, or "tagged to".
Categories are used to group together related clips, and so make it
ea
sier to find them. For example, if you are looking for a video clip of a
particular sports event, you can request SmartClient to display a list of
all video clips that are tagged to a category called "Sport".
Search criteria may be that an item is tagged to a selected category; or
tagged to that category.
is not
Created The date and (where specified) time of
creation of a video clip. This
may be described in one of a number of ways:
• Before Last. Ear
lier than the specified most recent interval of hours,
days, weeks or months.
• Da
te. On, before or after the specified date or interval, or within a
specified range of dates.
• Da
y. On a particular day of the week.
• In
Last. Within the specified most recent interval of hours, days,
weeks or months.
• Ti
me. At, before or after a specified time, or within a specified range
of times.
iTX SmartClient
Operator Guide
Created By The name of the person who created a clip.
Modified The date and (where specified) time of the last modification of a video
. This may be described in one of a number of ways:
clip
fore Last. Earlier than the specified most recent interval of hours,
• Be
days, weeks or months.
• Da
te. On, before or after the specified date or interval, or within a
specified range of dates.
• Da
y. On a particular day of the week.
• In Last. Within the specified most recent interval of hours, days,
weeks or months.
me. At, before or after a specified time on a specified day, or within
• Ti
a specified range of times.
Name The name of a clip.
Notes Text in annotations associated with a clip.
Placeholder A flag (i.e. a database entry indicatin
g one of two possible states) that
identifies a clip as a placeholder clip or not.
A placeholder clip is one f
or which there is a database record but, as
yet, no media.
Project A flag (i.e. a database entry indicatin
g one of two possible states) that
identifies a clip as a project clip or not.
A project clip is one that is made up of segments from one or more
video clips
.
Sub type The sub-type of a clip.
Each clip can belong to one sub-type classification; e.g. "news",
commercial". The sub-type property assigns default settings for other
"
clip properties.
Temp late A template assigns values to selected clip properties.
Title The title of the clip - often a more desc
riptive alternative to the name.
53
Page 62

Searching for Assets
Using Search Filters
Graphical devices for filter settings
SmartClient has a number of special graphical devices which it displays for some filter
settings.
For dates, it displays a calendar; for a point in time, it displays a list of times at fixed intervals.
See Specifying Dat
es and Times on page 6.
For intervals that may vary in length from hour
timescale:
• Click the arrow buttons at either end of the scale to show a different range of values.
• Click a point on the scale, or move the slider to that point, to select a particular value.
s to months, SmartClient displays a
Filter suggestion lists
Some types of filter with a plain text entry box may display a suggestion list when you start
typing. The list contains items that start with the characters you enter and gets smaller as
you type more characters.
This illustration shows a list of countries that
text entry box:
appear when you type the letter "u" into the
54
Without having to complete the word you start typing, you can select an item from the list
and so quickly define a filter.
Depending on how it is configured, the filter may only allow you to select suggested items;
or it ma
y allow you to enter text freely.
Adding a search filter
To add a search filter
1In the S
SmartClient adds a filter of the first type in the search filter menu.
2 To change the type, click the filter name a
search filter menu.
3 Set options to define the search filter. For example:
earch Builder, click to add a search filter.
nd select a new type from the displayed
tegory - select a category and state whether required assets are tagged to the
• Ca
category or not tagged to the category.
• Create
d or Modified - select a date, period or time for the creation or modification
of required assets.
Page 63

• Created By - enter the name of a user; state whether the user is the creator or not
the creator of required assets.
• Name -enter name text; state how this text relates to the names of required assets i.e. whether it is part of the name or the full name, etc.
• Notes -enter notes text; state how this text appears in the metadata notes field of
required assets.
• Placeholder - state whether or not required assets are placeholder clips.
• Project - state whether or not required assets are project clips.
• Sub type - enter the name of the sub-type that is assigned to required assets.
• Te mp la t e - state whether or not required assets are templates.
• Title - enter text that appears in the titles of required assets.
About Stem-Based Searching
Stem-based searching is the way in which SmartClient normally performs text searches.
When you enter a word in the Any Text box (or in a Name or Title filter) SmartClient
identifies the stem of that word - the group of letters that form the main section of the word
and which also appear in words that are closely related to it. For example, "sail-" is the stem
of sailing, sailed and sailor. SmartClient can find any words that have the same stem.
iTX SmartClient
Operator Guide
This makes it easy for you to specify text as search criteria when you are unsure about the
form of a particular word in a text field; you do not have to enter all the variations of this
word, just any word that contains the stem.
In displaying search results, SmartClient includes a Matched Words list. This contains all
words, appearing in database text fields, that have the same stem as a search term.
Specifying the Sort Order for Search Results
You can set up SmartClient to order search results in a number of ways:
• By name in alphabetical order.
• By date of creation, modification or production, starting with the earliest or latest.
• By duration, starting with the longest or shortest.
• By relevance, determined by the frequency of search terms in database text fields. A
search term that matches a search word assigned to a clip as a search hint increases the
relevance of that clip.
You specify the sort order, before starting a search, by selecting an option from the Sort
drop-down list:
55
Page 64

Searching for Assets
Multi-Domain Searching
Multi-Domain Searching
If you are working in a multi-domain system, you can set up SmartClient to search the
database of any domain for which it has access rights.
A multi-domain system is one that is divided in
each having its own System Database and operating independently of other domains.
Clicking the entry in the Domains bo
domains for SmartClient to search:
To select domains for searching in a multi-domain system:
1 Click the entry in the Dom
2 Do one of the following to specify which domains you want SmartClient to search in.
•Click Lo
•Click All
•Click Se
selected domains.
3Click Cl
cal for a search of just the domain you are working in.
for a search of all domains.
lection and then select the check boxes in the domains list for a search of
ose to close the menu.
x displays the domains menu, which you use to select
ains box to display the domains menu.
to separate smaller systems called domains -
56
Page 65

The Search History Panel
SmartClient stores the set of search criteria for each of your 50 most recent searches, and
lets you permanently save any of these. At any time, you can recall stored search criteria
(most recent or saved) and use it to repeat a search.
iTX SmartClient
Operator Guide
SmartClient lists the stored search criteria in sepa
• Your recent searches appear in the Search History pane.
• Your saved searches appear in the S
• Searches that other users have made available to you also appear in the Saved Searches
pane; these are distinguished from yours by the user name in brackets after the search
name.
aved Searches pane.
rate panes of the Search History Panel:
You can view the panes one at time by clicking their title bars.
When you click an entry in either list, SmartClient immediately performs a search with the
ociated search criteria and displays the search results in the Results Browser.
ass
To save search criteria:
1 Select a recent, unsaved search in the Se
2Click S
3 SmartClient displays the Sa
4 Enter a name for the search and click S
SmartClient saves the search and adds it to the Saved Searches pane.
Publishing Searches
You can make your saved searches available to other SmartClient users by publishing them.
You do this from the Saved Searches pane.
When you publish a search, you specify the user groups that are to have access to it.
tClient displays a list of all user groups that are registered in your system for you to
Smar
select from:
arch History pane.
ave Search.
ve A Search dialog.
ave.
57
Page 66

Searching for Assets
Publishing Searches
Note: To be able to publish a saved search, you must have the system
rights of a search publisher. System rights are managed by your system
administrator.
To publish a saved search:
1 Select a search in the S
aved Searches pane.
2Check the Publish button becomes active.
If it does not, ask your system administrator to ensur
3Click Pu
blish.
e you have search-publisher rights.
SmartClient displays a list of user groups.
4 Select the check boxes of the user groups you want to make your saved search
ava
ilable to.
5Click Pu
SmartClient adds the search to the Sa
blish.
ved Searches list of all users; those with
SmartClient open may need to refresh their list.
You may need to refresh your saved-search list to vie
w searches saved and published by
other SmartClient users.
Refreshing saved searches
To refresh your saved-search list:
1 Select the S
2Click Ref
SmartClient updates your saved searches list.
aved Searches pane.
resh.
58
Page 67

Pinning and Unpinning the Search History Panel
When you select a search level or open a search dialog, the Search History panel is visible in
the right of the workspace or dialog. It is fixed or "pinned" in this position; the icon on the
pin button appears vertical.
By clicking the pin button, you can unpin the panel. When the panel is unpinned,
SmartClient hides it when it is not in use; the pin button appears horizontal.
To show or hide the Search History panel when it is unpinned:
1 When the panel is hidden, move your mouse pointer over the right edge of the
orkspace or dialog until the panel appears.
w
You can then work in the panel while the mouse poi
2 Move the mouse pointer away from the panel to hide it.
iTX SmartClient
Operator Guide
nter is over it;
59
Page 68

Searching for Assets
Pinning and Unpinning the Search History Panel
60
Page 69

Working with Search Results
Once the results of a search have been returned, PinPoint allows you to view them in a
variety of ways, as well as providing a list to search assistance list.
Summary
Display of Search Results in the Results Browser . . . . . . . . . . . . . . . . . . . . . . . . . . . . . . . . . . . . . . . 61
Working with the Results Panel . . . . . . . . . . . . . . . . . . . . . . . . . . . . . . . . . . . . . . . . . . . . . . . . .
Working with the Results Table . . . . . . . . . . . . . . . . . . . . . . . . . . . . . . . . . . . . . . . . . . . . . . . . .
Working with the Results Timeline . . . . . . . . . . . . . . . . . . . . . . . . . . . . . . . . . . . . . . . . . . . . . . . . . . .
Search Assistance Lists . . . . . . . . . . . . . . . . . . . . . . . . . . . . . . . . . . . . . . . . . . . . . . . . . . . . .
Display of Search Results in the Results Browser
The Results Browser can display search results in any of three viewing formats:
• In a Results Panel.
• In a Results Table.
• On a Results Timeline.
. . . . . . 62
. . . . . . 65
. 67
. . . . . . . . . . 69
We describe these in detail in this section.
Viewing-Format Selection Buttons
The choice of viewing format depends on the operation of the format selection buttons,
which appear at the top of the Results Browser:
To choose a viewing format:
• You may set the viewing format before or af
viewing-format selection button.
esults Browser presents search results in the format represented by the button.
The R
ter performing a search by clicking a
61
Page 70

Working with Search Results
Navigating Through Pages of Search Results
Navigating Through Pages of Search Results
Whichever viewing format is selected, search results may be spread over a number of pages
that you can view one at a time. You use the navigation buttons to move through the
pages:
Working with the Results Panel
In the Results Panel, SmartClient displays a preview pane for each item in the search results.
62
The preview panes can be one of three sizes, as shown in the pane-size box at the top of the
panel:
Page 71

To set the preview pane size:
• From the drop-down menu, select one of the following:
•Small
•Medium
•Large
Preview Pane Features
If the item is a video clip that has keyframes, the preview pane contains a poster frame (i.e.
a keyframe that has been marked to represent the video clip in search results) and some
basic clip details:
iTX SmartClient
Operator Guide
The three main asset types are identified by an indicator:
Only video clips display a poster frame. The preview pane is blank for project clips and
placeholder clips.
When you rest your mouse pointer over the poster frame, SmartClient successively loads all
keyframes
operation is taking place:
Once the keyframes are loaded, you can display each one in turn by moving your mouse
pointer over the image in the preview pane:
into the preview pane. A red progress bar under the poster frame shows this
63
Page 72

Working with Search Results
Preview Pane Features
Resting your mouse pointer over the title-bar of the preview pane causes an information
box to appear:
Where an item in the Results Panel is a video clip that contains no marked keyframes, or is a
different type of item (e.g. an audio clip), the preview pane shows the details and a
description of the clip type:
To select a video clip in the Results Panel:
1 Use the navigation buttons, if you need to, to select the page with the video clip you
are interested in.
2 Click the preview pane for the clip.
Depending on which form PinPoint appears in, Sma
rtClient switches to the clip level of
the current workspace or closes the search dialog. It loads the clip in the Media Viewer
and displays keyframes on the Keyframe Timeline. It presents metadata and event
details in the Clip Data pane.
64
Page 73

Working with the Results Table
In the Results Table, SmartClient displays a row for each item in the search results and gives
details in various columns.
iTX SmartClient
Operator Guide
Results Table Features
SmartClient displays search results in the order you specify before starting a search. You
can re-order the results by clicking the title-bar in the column you want to use for sorting.
For example, you may click the title-bar in the Name column to order search results
alphabetically by name; or in the Duration column to order them by duration.
A sort indicator in the title bar shows the colu
direction (up or down):
Clicking the same column a second time reverses the sort order.
Column width is variable. You change the width by dragging the right border of a column.
You can do this when the cursor ap
mn used for the re-sorting and the order
pears as a double-headed in the title-bar:
65
Page 74

Working with Search Results
Results Table Features
You can specify what columns appear in the column view. Right-clicking the title bar
displays a list of available columns:
Selecting or clearing check-boxes shows or hides columns.
Setting up the Results Table
To set up the Results Table:
1 To re-order the results list, click the title-bar in the column you want to base the order
of r
esults on. Click the column a second time if you want to reverse the order.
2 To change the width of a column, move your mouse pointer over the right border of
the c
two-headed arrow.
3 To set up the column view, right-click the title
check boxes of any column you want to include in the view; clear the check boxes of
the others; move your cursor away to hide the list.
SmartClient updates the list as you add or remove columns to the view.
olumn in the title bar. Drag the pointer to the right or left when it appears as a
-bar to display the column list; select the
66
Selecting a Video Clip in the Results Table
To select a video clip in the Results Table
1 Use the navigation buttons, if you need to, to select the page with the video clip you
are interes
2 Click the entry for the clip in the Results Table.
Depending on which form PinPoint appears in, Sma
the current workspace or closes the search dialog. It loads the clip in the Media Viewer
and displays keyframes on the Keyframe Timeline. It presents metadata and event
details in the Clip Data pane.
ted in.
rtClient switches to the clip level of
Page 75

Working with the Results Timeline
On the Results Timeline, SmartClient displays a preview pane for each item in the search
results. It arranges the panes on a scrollable timeline that represents a date range.
iTX SmartClient
Operator Guide
Results Timeline Features
The timeline covers the dates on which video clips are processed in some way. The sorting
of the panes is based on the dates of one of three types of process (production, creation or
modification). The selected sort order is indicated in the processing- date type box, which
appears above the timeline:
Only search results that fall within the part of the timeline on which SmartClient is focused
are visible. This diagram shows the SmartClient focus for a 7-day period:
67
Page 76

Working with Search Results
Results Timeline Features
The width of the focus is variable. You can zoom in to view more details over fewer days, or
zoom out for a more general view of a longer period. You can do this by double-clicking
your mouse on the timeline. Or you can use the zoom (+ and -) or fixed period buttons:
You can move the focus to earlier or later on the timeline. You may click one of three
buttons to move the e focus to today, or to the earliest or latest day that has a search result:
You can use the scroll buttons at the bottom of the timeline to move the focus by a day,
month or year at a time:
The focus indicator shows which month and year the days in focus fall in.
Setting up the timeline
To set up the timeline:
1 To arrange the search results by processing date of a particular type, select one of the
f
ollowing from the drop-down list:
•Production Date
•Created Date
• Modified Date
2 Do one of the following to zoom into or out of the timeline.
• Click one of the zoom buttons,
•Click 7, 14, or
31 to show a fixed time interval.
or .
• Double-click the timeline to zoom in; press the Alt key and double-click to zoom
out.
3 Do one of the following to move the focus to an earlier or later part of the timeline.
• Click a day, month or year scroll button to mo
•Click
, , or To da y to display the first result, last result or today's results.
ve the timeline left or right.
Selecting a video clip on the timeline
To select a video clip on the timeline:
1 Use the navigation buttons, if you need to, to select the page with the video clip you
are interes
2 Click the entry for the clip in the Results T
ted in.
able.
68
Page 77
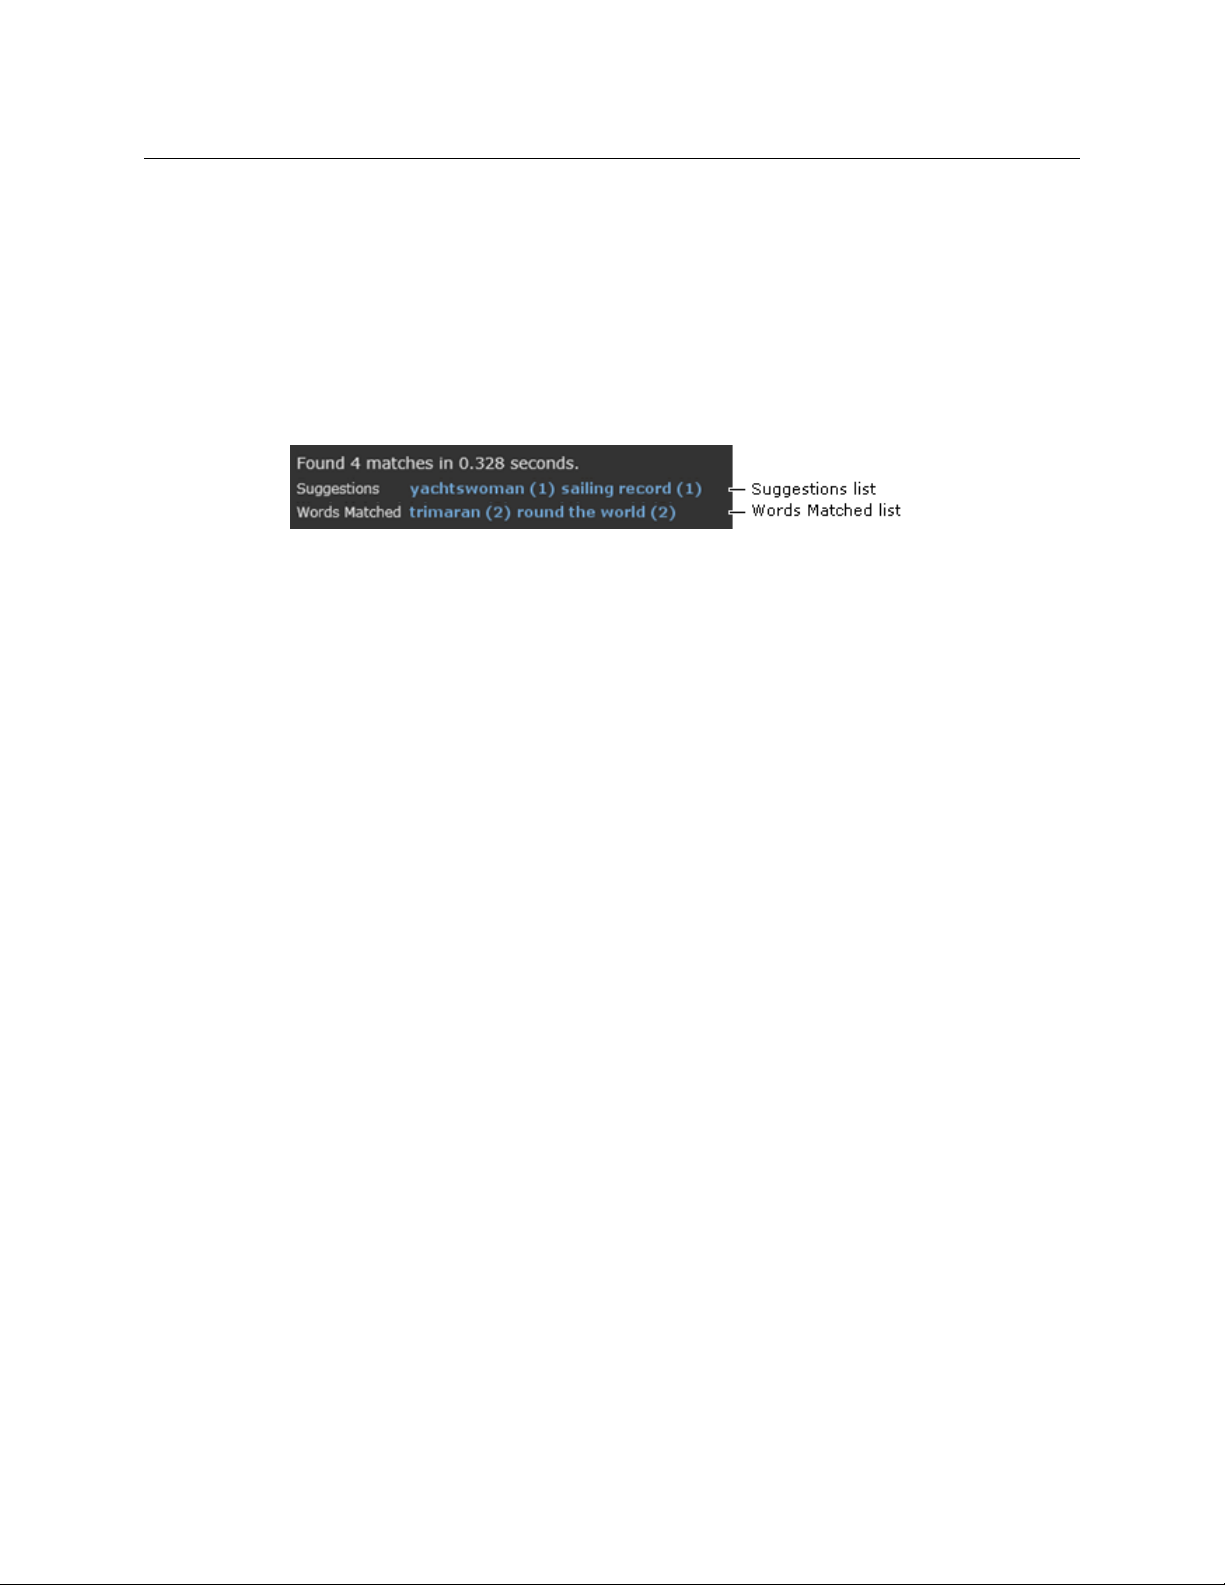
Depending on which form PinPoint appears in, SmartClient switches to the clip level of
the current workspace or closes the search dialog. It loads the clip in the Media Viewer
and displays keyframes on the Keyframe Timeline. It presents metadata and event
details in the Clip Data pane.
Search Assistance Lists
After a search that includes Any Text search criteria, SmartClient may display two lists
above the search results:
• The Suggestions list shows words or phrases that have been added as search hints to
the metadata of assets in the search results. You can select any one of these to use as
criteria in another SmartClient search to find similar clips to ones in the current search
results. For more information on adding search hints to asset metadata, see Using
Search Hints, on page 91.
• The Words Matched list shows which words in the search criteria appear in the text
fields of a
as search criteria but have the same stem as a word that is.) You can select any one of
these to use as search criteria in another SmartClient search and so filter the current
search results.
ssets in the search results. (This list may include words that are not specified
iTX SmartClient
Operator Guide
Using a Search Assistance List for Searching
If you click an entry in either list, SmartClient replaces the original Any Text search terms
with the word or phrase you click. You can then repeat your search with the new criteria.
To repeat a search using criteria from a search assistance list:
1 Do the following if you want to find similar clip
• Click an entry in the Suggestions list.
•Click the Se
2 Do the following if you want to reduce the current search results to contain just the
video clips that contain a certain search term.
• Click an entry in the Wo
•Click the Se
arch button or press the Enter to start a search.
rds Matched list.
arch button or press the Enter to start a search.
s to ones in the current search results.
69
Page 78

Working with Search Results
Using a Search Assistance List for Searching
70
Page 79

When you select a video clip in a Results Browser and there is a suitable media file available,
the Media Viewer loads this file. Similarly, when you select a shot in a project clip, the Media
Viewer loads the media file that contains the shot.
Summary
About the Media Viewer . . . . . . . . . . . . . . . . . . . . . . . . . . . . . . . . . . . . . . . . . . . . . . . . . . . . . . . . . . . . . . 71
Playing Back a Video Clip, Marked Event or Shot . . . . . . .
Marking the Boundary Points for a Clip, Event or Shot . . . . . . . . . . . . . . . . . . . . . . . . . . . . . . . . . 75
Displaying a Particular Frame in the Media Viewer . . . . . . . . . . . . . . . . . . . . . . . . . . . . . . . . . . . . 77
The Keyframe Timeline . . . . . . . . . . . . . . . . . . . . . . . . . . . . . . . . . . . . . . . . . . . . . . . . . . . . .
Reviewing a Video Clip While its Media is Being Rec
Keyboard Shortcuts . . . . . . . . . . . . . . . . . . . . . . . . . . . . . . . . . . . . . . . . . . . . . . . . . . . . . . . .
About the Media Viewer
The Media Viewer can play back media files that are in one of these storage formats:
• Microsoft Smooth Stream (including Live Smooth Stream for in-progress recordings)
• MPEG-4
• WMV (Windows Media Video)
Playing Video Clips
. . . . . . . . . . . . . . . . . . . . . . . . . . . . . . . 73
. . . . . . . . . . 78
orded . . . . . . . . . . . . . . . . . . . . . . . . . . . . . 79
. . . . . . . . . . 81
You can then review the video clip or shot. If y
edit the in- and out-points of the video-clip and any marked events within the video clip.
You can edit shot in- and out-points. For all these tasks, you use the main features shown in
the illustration:
ou have the required access rights, you can
71
Page 80

Playing Video Clips
Media Viewer Operating Modes
We describe how you use these features in this section.
Note: When a video clip has references to files in both supported
formats, the Media Viewer loads the Smooth Stream one rather than the
MPEG-4 file. This is because of the greater amount of playback control the
Smooth Stream file allows.
Media Viewer Operating Modes
The Media Viewer has two operating modes; these determine whether it loads a whole
media file or just a marked segment. In each mode, the duration timeline represents the
duration of the loaded media.
•In media mod
duration timeline, between in- and out-point markers, shows the location of the media
that is referenced by a video clip or shot.
e, the Media Viewer loads the full media file. The yellow portion of the
•In clip mode, the Media Viewer loads just the media referenced by the selected video
clip or shot. The in- and out-point markers then appear at each end of the duration
timeline, which is filled yellow along its full length.
The operating mode is set by the mode selection button on the control bar:
72
Page 81
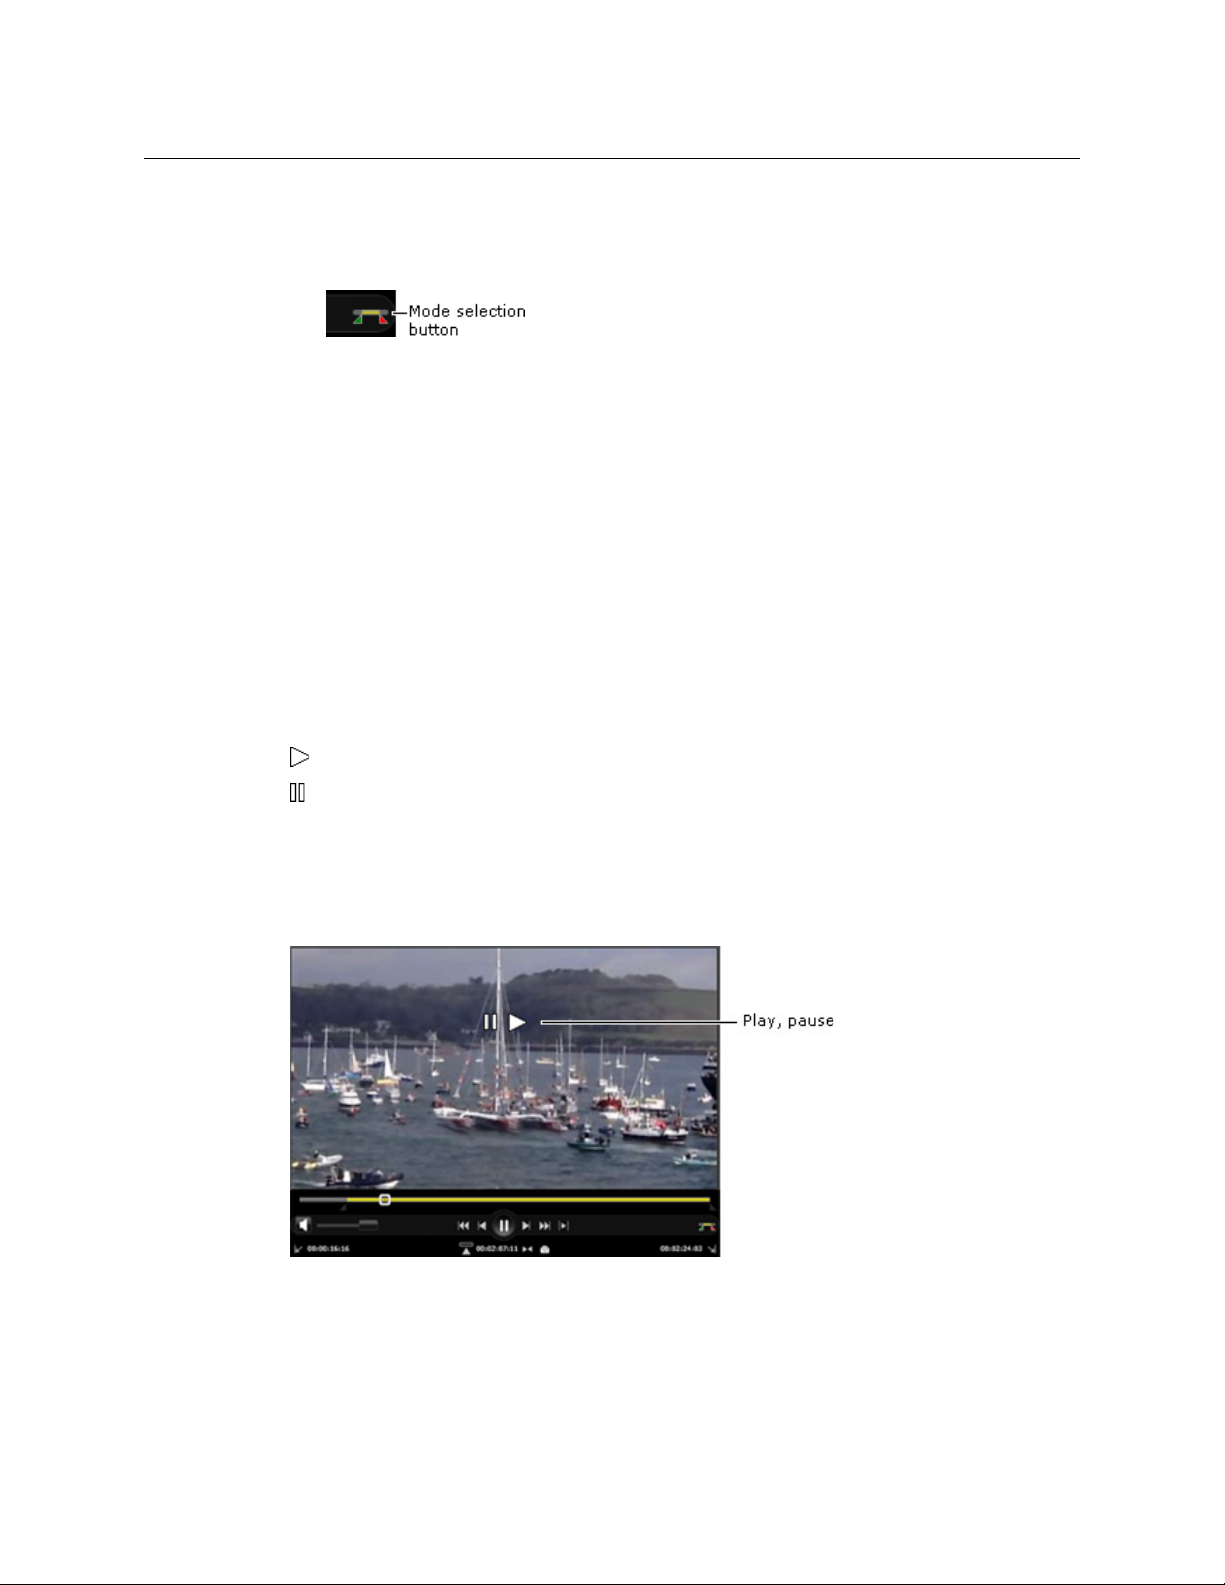
To set the Media Viewer operating mode:
• Click the mode selection button to switch
modes.
the Media Viewer between media and clip
Playing Back a Video Clip, Marked Event or Shot
You can use different Media Viewer features to play back a video clip, marked event or shot:
• The playback cursor, which appears in the image windo
• The playback buttons on the Media Viewer control bar.
iTX SmartClient
Operator Guide
w.
Audio controls enable you to adjust the v
Using the Playback Cursor
Your mouse pointer changes to the playback cursor when you move it over the image in
the Media Viewer window. The shape of the cursor at any time resembles a typical videocontrol symbol and indicates the type of operation it is ready to perform.
For example:
Play
Pause
The range of available playback operations depen
Media Viewer.
For MPEG-4 media files, you can use the playbac
loaded media file. The cursor displays either the play or pause cursor:
olume level of the audio during playout.
ds on the storage format of the file in the
k cursor to alternately play and pause the
For Microsoft Smooth Stream files, the playback cursor displays the play symbol until you
start to play the video clip. Then the symbol varies according to the cursor location.
In the center, the cursor displays the pause symbol; to the left, the rewind and enhanced
r
ewind symbols; to the right, the fast-forward and enhanced fast-forward symbols.
73
Page 82

Playing Video Clips
Using the Control Bar
Double arrow-heads indicate rewind or fast-forward operations at normal speed; triple
arrow-heads, at enhanced speed.
To use the playback cursor to play back a video clip :
1 To play the media file in the Media Viewer, click the image when the pla
yback cursor
shows the play symbol.
2 To pause the media file, click the image when the p
layback cursor shows the pause
symbol.
3 To rewind a Smooth Stream media file, move the cursor to the left while the file is
pla
ying; click the image when the cursor shows the normal rewind symbol or the
enhanced rewind symbol.
4 To fast-forward a Smooth Stream media file, move the cursor to the right while the file
is pla
ying; click the image when the cursor shows the normal rewind symbol or the
enhanced rewind symbol.
Using the Control Bar
The control bar has two buttons you can use to play a media file:
You use the play/pause button to alternately play and pause the media file over the
duration of the full loaded media. You use the Play Segment button to play the media file
between the in- and out-points of a marked segment.
To use the control-bar features to play a media file or a marked segment of it:
1Click the Pla
position; click the Pause button to pause the clip.
The Pause button replaces the Play button when the clip starts.
2Click the Pa
The Play button replaces the Pause button when the clip stops.
3Click the Pla
74
y button to play the clip, starting from the frame indicated by the cursor
use button to pause the media file.
y Segment button to play the marked segment of a media file.
Page 83

Tracking the Clip Position During Playback
Two features on the Media Viewer reflect the changing position of a video clip during
playback:
• The timeline cursor moves to show the relative position of the currently displayed
frame.
• The timecode display in the image windo
Playing Out Audio
The Media Viewer includes two features for controlling playout of the audio content of a
media file: a mute button and a volume slider.
iTX SmartClient
Operator Guide
w shows the timecode of this frame.
These control playout of the audio you hear at your SmartClient workstation; they do not
affect the audio content in a video clip.
To cont r ol au d io p l ayout:
1 Click the mute button to alternately switch
2 Drag the volume slider or click a point on its scale to vary the volume level.
the audio playout off or on.
Marking the Boundary Points for a Clip, Event or Shot
In most cases, a video clip references only a portion of the available media in a media file;
the same is true for an event in the clip and a shot in a project clip. In each case, the
required media is defined by boundary points - an in-point and an out-point - that identify
the first and last frames based on their timecodes.
The in-point and out-point markers on the con
points. For video clips and shots, the Media Viewer displays triangular in- and out-point
markers below the duration timeline:
trol bar show the current marked boundary
75
Page 84
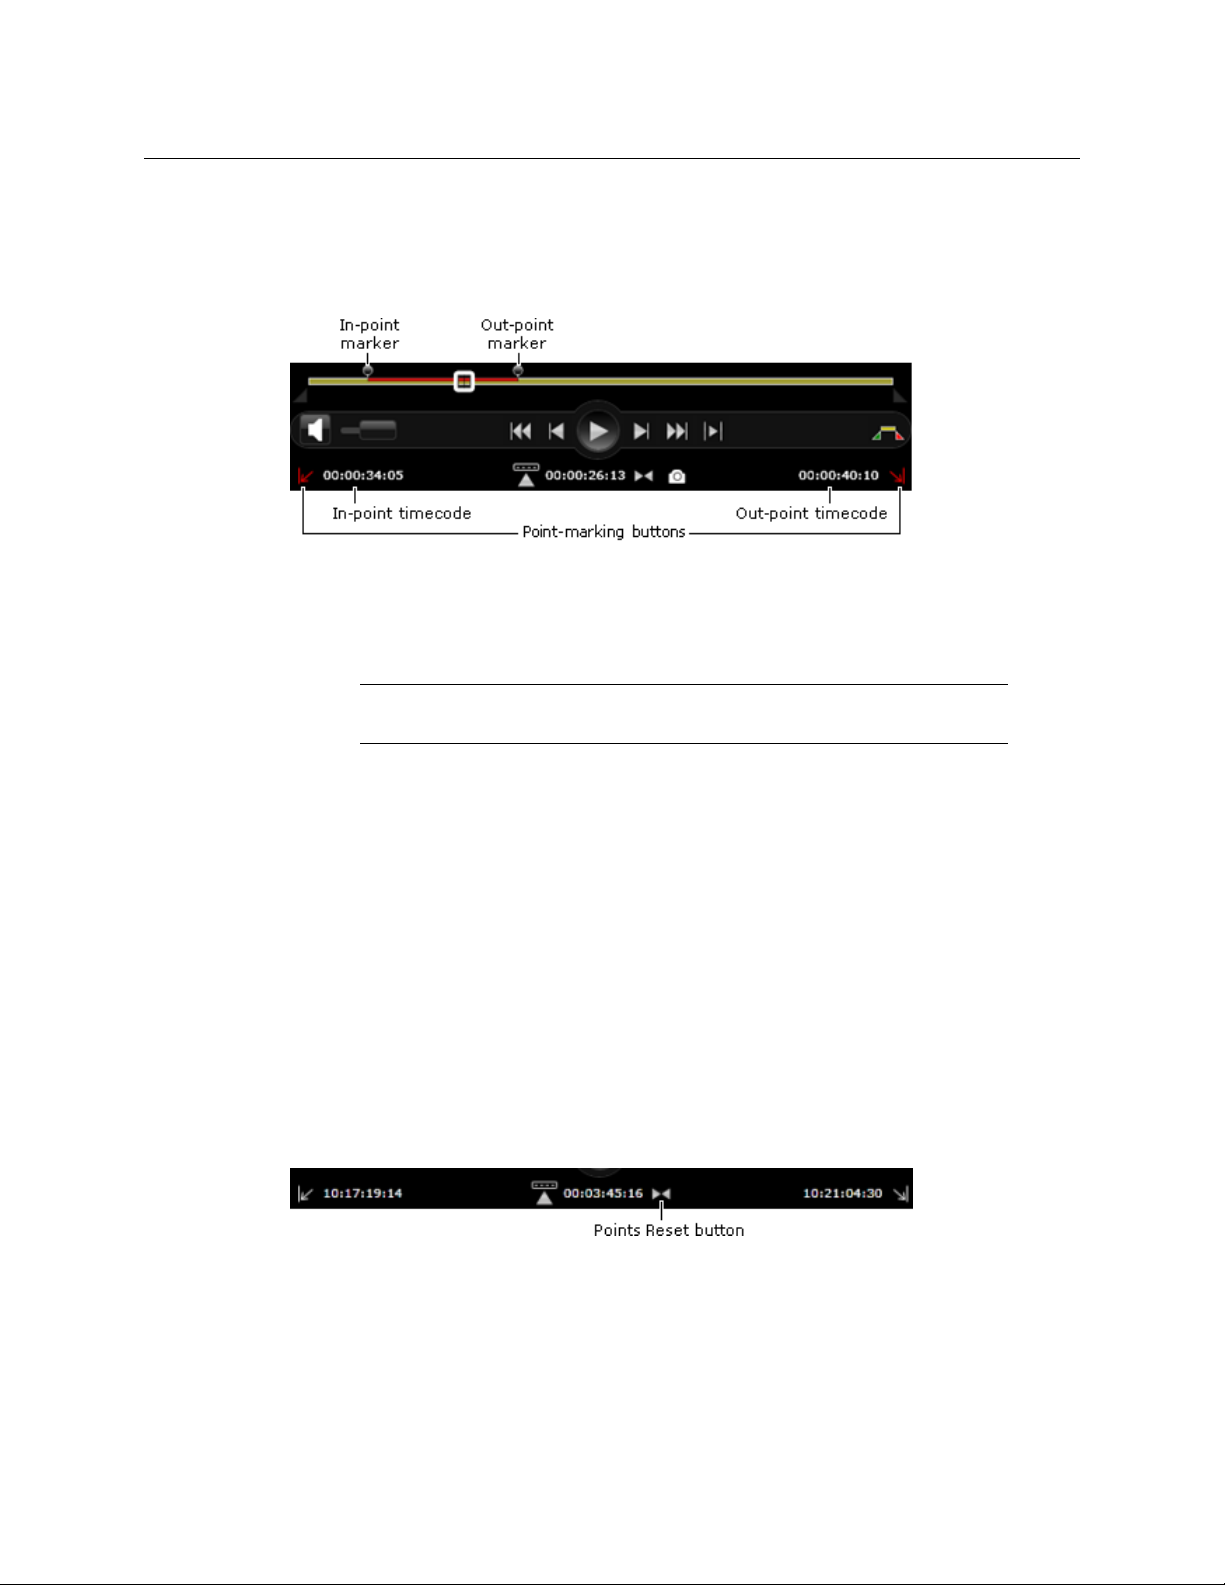
Playing Video Clips
Resetting Video-Clip Boundary Points
Timecode values for these points and the duration between them appear at the bottom of
the control bar.
For marked events in a video clip, the Media Viewer displays circular in- and out-point
markers abo
The in- and out-point markers for the video clip, below the timeline, are greyed out.
ve the duration timeline:
While playing a media file, you can set in- and out
ways: by dragging the markers on the timeline; by clicking a timecode display; or by
clicking a point-marking button.
Note: To be able to edit boundary points in the Browse workspace,
SmartClient must be in the annotating mode.
To mark in- and out-points:
1 Do one of the following to mark the boundary points of a video clip or project-clip shot.
• Drag the in-point and out-point markers to where you want to mark the points.
• Position the clip where you want to mark the in-point; click the in-point timecode
displa
y or the point-marking button next to it. You may mark the points while the
clip is playing.
• Mark the out-point in a similar way, by click
marking button.
2 You need to save a video clip if y
Resetting Video-Clip Boundary Points
When working with MPEG-4 files with the Media Viewer in the clip mode, you can instantly
reset the in- and out-point to their saved values by using the Points Reset Button:
-points. You can do this in a number of
ing the out-point timecode or point-
ou want it to keep the new points.
76
To reset boundary points:
•Click the Po
SmartClient returns the in- and out-point markers to the points saved in the video clip.
ints Reset button.
Page 85

Displaying a Particular Frame in the Media Viewer
When you want to display a particular frame in the Media Viewer, you may use buttons on
the control bar to move instantly to that frame; or you may select a point while viewing
keyframes on the duration timeline.
iTX SmartClient
Operator Guide
If you have a wheel mouse, you can use the wheel to step f
when your mouse pointer is over the Media Viewer.
Using the Cue-To Buttons
The control bar contains a number of 'cue to' buttons, which instantly position the Media
Viewer at a particular frame:
Four of these cause the Media Viewer to move to a preset point in the file: the start or end of
the file; the in-point or out-point of a video clip or project-clip shot.
With the any-point cue-to button, you can move the Media V
Clicking the button brings up a timecode display, in which you enter the frame timecode:
orward or back to any frame
iewer to any specified frame.
To display a preset frame in the Media Viewer:
• Click one of the preset-frame cue-to buttons to move the Media Viewer to the
cor
responding frame:
• The first frame of the available media.
• The last frame of the available media.
• The in-point of a video clip or shot.
• The out-point of a video clip or shot.
To display any specified frame in the Media Viewer:
1 Click the any-point cue-to button.
The timecode display appears.
2 Enter the timecode of the frame you want the Media Viewer to display.
You may overtype the current entry. Or you may click a value to select it (a red bar
ap
pears under the value) and then scroll it by using a mouse wheel or up/down arrow
key.
3 Press the Enter key.
77
Page 86

Playing Video Clips
Selecting a Frame While Viewing Keyframes on the Duration Timeline
The Media Viewer moves to the specified frame.
Selecting a Frame While Viewing Keyframes on the Duration Timeline
When you move your mouse pointer along the duration timeline, keyframes appear one at
time at approximately one-second intervals:
The keyframes show images from various sequences in the file. Clicking a keyframe causes
the Media Viewer to move to a frame in the sequence identified by the keyframe.
To display a frame from a sequence identified by a keyframe:
1 Display keyframes by moving your mouse poin
2 Click a keyframe that is in the sequence you are interested in.
The Media Viewer moves to a frame in the sequence that contains the keyframe.
ter along the duration timeline.
Using a Mouse Wheel to Step Through a Media File
You can use the wheel of a wheel mouse to step forwards or backwards through a media
file by one frame at a time. In general, you use this method when you want to carefully view
a short sequence of frames.
To step forwards or backwards through a short sequence of frames:
1 Place your mouse pointer over the Media Viewer.
2 Roll the mouse wheel forwards or backwards to step through the media file.
The Keyframe Timeline
When the Media Viewer loads a media file, the Keyframe Timeline displays a selection of
keyframes from the file:
At first, these keyframes are from points that are wide apart and span the full duration of
the clip. You can adjust the view to show a closer group of keyframes from a shorter
segment of the clip.
78
Page 87

Working with the Keyframe Timeline
When you click a keyframe, SmartClient performs two tasks:
• It causes the Media Viewer to move to the keyframe.
• It zooms the Keyframe Timeline, keeping the focus on the clicked keyframe.
Each time you click a keyframe, SmartClient displays a set of them that are from a smaller
r
ange of points either side of the keyframe you clicked. You may keep doing this until the
keyframe range is so small that it contains only a few keyframes, as the illustration shows:
iTX SmartClient
Operator Guide
The filled section of the Keyframe Timeline shows the length and position of the keyframe
range. You can extend the range by clicking the Zoom Out (<->) button.
To cue the Media Viewer to play from a particular keyframe:
1 Adjust the Ke
display.
2Click the keyframe.
yframe Timeline so it shows the keyframe you want the Media Viewer to
Reviewing a Video Clip While its Media is Being Recorded
In certain circumstances, the Media Viewer can play the media file for a video clip as it is
being recorded by an iTX Encode Server: it can do so when a Live Smooth Streaming file is
created in the recording.
79
Page 88

Playing Video Clips
Reviewing a Video Clip While its Media is Being Recorded
When you load the video clip, a green progress bar under the duration timeline shows how
much of the scheduled recording has taken place:
The progress bar shows the limit of the available media; it extends as the recording
continues.
You can use the Media Viewer features to:
• Play back the available media.
• Move the Media Viewer forwards or backwards to any recorded frame.
• Click the file-end cue-to button to move the Media Viewer to the frame corresponding
t
o the end of the green progress bar.
• Mark an in- and out-point.
• Add metadata to the clip.
Note: A Live Smooth Stream clip becomes available for reviewing, marking
and annotating about 1 minute after the recording starts.
80
Page 89

Keyboard Shortcuts
You may use the following keyboard shortcuts when you are working with the Media
Viewer.
Keyboard shortcut Action
A Add the selected shot to a shot list.
C Cue to specified time code. Enter requir
G Take a screen capture of the current frame.
I Mark an in-point at the current frame.
Shift + I Cue the Media Viewer to the in-point.
J or Step the Media Viewer back one frame.
K Play or pause the media file.
L or Step the Media Viewer forward one frame.
M Mute or play audio content.
O Mark an out-point at the current frame.
Shift + O Cue the Media Viewer to the out-point.
iTX SmartClient
Operator Guide
ed timecode then press Enter.
Space Play or pause the media file.
Shift + Space Play the media file between the in- and out-points.
Home Cue to Media Viewer to the start of the media file.
81
Page 90

Playing Video Clips
Keyboard Shortcuts
82
Page 91

Viewing and Editing Metadata
iTX SmartClient allows you to view and edit the metadata for any video clip or event.
Summary
The Metadata and Events Tabs . . . . . . . . . . . . . . . . . . . . . . . . . . . . . . . . . . . . . . . . . . . . . . . . . . . . . . . 83
The Metadata Tab . . . . . . . . . . . . . . . . . . . . . . . . . . . . . . . . . . . . . . . . . . . . . . . . . . . . . . . . . .
The Events Tab . . . . . . . . . . . . . . . . . . . . . . . . . . . . . . . . . . . . . . . . . . . . . . . . . . . . . . . . .
The Metadata and Events Tabs
Video-clip and event metadata are stored in fields in the iTX System Database. In various
SmartClient workspaces, you can view and edit the contents of some of these fields on two
tabs:
• The Metadata tab, on which you can view and edit metadata f
• The Events tab, on which you can view and edit metadata for any marked event in a
video clip. (A marked event is a video-clip segment that has its own metadata.)
Usually, a workspace displays the tabs one at a time.
. . . . . . . . . . 84
. . . . . . . . . . . . . . 92
or a selected video clip.
Note:You can add metadata on the Event Logging tab as you mark
events in the Browse or Live Logging workspace. See
About Metadata Types
Video-clip metadata is divided into two types, as shown in the diagram:
All video clips have a set of standard metadata. In addition, they may have a number of
business-metadata records assigned to them.
• Standard metadata is information about basic
depending on their type; for example, the aspect ratio or a media location of a video
clip.
• Business metadata is additional inf
a particular broadcasting facility; it includes annotations for marked events in video
clips. The range of business metadata varies from one facility to another.
Information on the Metadata tab may be either sta
Events tab is usually business metadata.
properties that are common to all assets
ormation that is used in the operational practices of
ndard or business metadata; that on the
83
Page 92

Viewing and Editing Metadata
About Annotation Templates
About Annotation Templates
You use an annotation template to add business metadata - either to a whole clip or to an
event in a clip.
The template contains a number of metadata records which it makes available to you. Each
ecord specifies a set of fields in the iTX System Database in which you can enter
r
information. The records are divided into ones designed for video clips and ones designed
for events:
• For video clips, you select a record directly fr
defined in the template.
• For events, you select a record indirectly by clicking an event-type button to mark an
ent: each event-type button is associated with a record. Groups of available event-
ev
type buttons are defined in the template.
Annotation templates are designed by your system administrator. You can use any that are
igned to the user groups that you are a member of.
ass
Tabs and Panels With the Same Features
In different workspaces, SmartClient may present a particular set of features on either a tab
or a panel. For example, the Browse workspace has an Events tab; the Shot List workspace
has an Events panel.
om a drop-down list of records. The list is
(In general, a tab becomes visible when it is selec
panel may be always visible, although this depends on whether or not it appears on a tab
that can be hidden.)
The procedures for using the features are the same. So, for simplicity, in the following
opics, we describe the features by referring to just the tabs.
t
The Metadata Tab
The Metadata tab organizes information about a video clip in separate sections:
ted and may be hidden by another tab; a
84
Each section displays metadata for a group of related fields.
Page 93

An example is the Clip Details section, which displays the timecode values of a video clip's
in- and out-points and duration, along with details of other properties:
Standard-Metadata Sections
SmartClient automatically associates a new video clip with standard metadata fields. It
presents information from these fields in pre-defined sections on the Metadata tab. The
table below describes these sections.
iTX SmartClient
Operator Guide
SmartClient automatically enters information in some of the fi
video clip. You may add details for others; e.g. the start and end of a usage window.
Section Description
Clip Details Basic video-clip information; e.g. in- and ou
Media Details Information about the properties and locations of media files for the
Usage Window Start and end dates (if such time limits apply) within which the video
Part/Set Details Segmentation details for a video clip tha
TX Details Dates and times of the first and last oc
Aspect Ratio Source format and active region.
Attributes Creation and modification information.
Domains Details of domains in which a matching clip is registered.
All Media A graphical indication of the locations of media files for the video clip.
Business-Metadata Sections
video clip
clip ma
smaller video clips (co-references).
played out.
.
y be used.
elds; e.g. the duration of the
t-points and duration.
t is split up into multiple
casions when the video clip was
SmartClient presents business metadata in sections that you can add to the Metadata tab.
These sections are based on metadata records that are available in annotation templates.
Depending on the asset template that is used t
o create a clip, iTX may associate a new clip
with business-metadata fields that are specified in a metadata record. SmartClient then
displays a section for the record on the Metadata tab.
85
Page 94

Viewing and Editing Metadata
Media and Asset Records
Media and Asset Records
Business-metadata sections may be formed from either media records or asset records:
• Metadata in a media record is shared by all co-references (video clips that reference the
same media file).
• Metadata in an asset record is owned exclusively by the asset with which it is
ass
ociated.
The type of record from which a section is formed is indi
the section name: 'M' for a media record; 'A' for an asset record.
Most business-metadata records are media records.
Viewing Metadata
To start with, all sections on the Metadata tab are collapsed; the information in each one is
hidden. You can expand a section, and so show the information it contains, by clicking the
arrow button next to the section name:
cated by a letter in brackets after
To expand or contract a metadata section:
• Click the arrow button next to a section name to alternately expand or collapse the
section.
Editing Metadata
You can edit some metadata for any video clip if you have the required access rights for that
clip. In most cases, you do this by using one of these common methods:
• Typing words or values directly into a text box.
•Clicking a check box.
• Selecting an option from a drop-down list.
• Clicking a point on a ratings scale.
86
Page 95

There are special graphical devices for entering dates and times. See Specifying Dates and
Times on page 6.
Note: When working in the Browse workspace, you need to switch
SmartClient to the annotating mode before you can edit metadata.
To edi t met a data :
1 Expand a section to display the metadata you want to edit.
2 In the features displaying editable metadata, enter new metadata where you want to.
The S
ave button flashes red, indicating the video clip has unsaved changes.
3Click Save to save your changes in the current video clip; or Save Copy to save them in
a new video clip.
Adding Business-Metadata Sections to the Metadata Tab
To add a business-metadata section, you select an annotation template; then, from this, a
metadata record to form the section.
iTX SmartClient
Operator Guide
A drop-down list of available templates appears in the Annotation T
Metadata tab:
A drop-down list of the business-metadata records in the selected annotation template
appears next to an Add Record button (underneath the Clip Details record). You can use
any of these records to create a business-metadata section.
To add a business-metadata section to the Metadata tab:
1 Select the Me
2 Select an annotation template in the A
3 Select a record from the drop-down list under the Clip Details sec
4Click Ad
SmartClient adds a section for the selected record under the C
same time, it removes the record from the drop-down list - to prevent you adding
unnecessary copies of the same record.
tadata tab.
nnotation Template box.
d Record.
emplate box above a
tion.
lip Details section. At the
87
Page 96

Viewing and Editing Metadata
Setting Up the Default Metadata Tab View
The drop-down list and Add Record button disappear when you add the last available
record in a template.
Setting Up the Default Metadata Tab View
Each time SmartClient loads a video clip, the Metadata tab displays information in a default
view - i.e. in selected sections that may be expanded or collapsed. You can define the
default view in the view-options menu, which appears when you right-click the Metadata
tab:
The menu lists all the sections that can display standard or business metadata for the
current video clip.
For each section, one of three view options may be selected: to show the section expanded;
o show the section collapsed; or to hide the section. The options are represented by three
t
columns of check boxes; icons above the columns (see the above illustration) indicate the
options.
To set up the Metadata tab view:
1Right-click the Metada
2 Select a check box for each section: to show the section expanded or collapsed; or to
hide the sec
SmartClient refreshes the tab each time you make a selection.
3 Move your mouse pointer clear of the menu to make the menu disappear.
tion.
Working with Categories
In an iTX system, video clips may be associated with - or "tagged to" - one or more
categories.
A category gives a way of labelling a video clip to provide an indication of the clip content.
V
ideo clips with a particular type of content are associated with the same category (News,
Sport, Movies, etc.). Specifying a category in a search filter can help you find a clip you want
to work with.
ta tab to display the view-options menu.
88
Page 97

iTX SmartClient
Operator Guide
In SmartClient, you can create your own categories and tag clips to them through the
Categories section:
To show or hide the category list:
•Click the Show/H
ide button to alternately show or hide the category list.
To create a category:
1 Enter a name in the New Category box.
2Click Create.
Your new category appears in the category list.
To tag a clip to categories:
1 Select the check boxes of the categories you wan
check boxes of other categories are clear.
2Click S
ave.
Adding Metadata by Using Controlled Lists
The Controlled Lists Service is an optional iTX service. It is used to build metadata dropdown lists for event annotating and to auto-complete entries you type in text boxes. In this
way it helps you to quickly and accurately add annotations.
The illustration below shows the selection of a
completion of team names and player names.
t a clip to be tagged to; ensure the
tournament from a drop-down list and auto-
89
Page 98

Viewing and Editing Metadata
Setting Access Rights
Setting Access Rights
What actions you can perform on a video clip depends on your access rights. You get these
through the user group(s) to which you belong.
You can view access rights for a video clip in the Acce
ss Rights section:
If you are a system administrator or the owner of an asset, you can set access rights for a
video clip by giving the following permissions to selected user groups.
Permission Description
List Ability to view details of the video-clip in
Read Ability to load the video clip in a w
Media Viewer.
Write Ability to modify the video clip.
Delete Ability to delete the video clip.
Control Ability to change the video-clip permissions.
PinPoint search results.
orkspace and play it back in the
To set access rights:
1Expand the Acce
ss Rights section.
2 To change access rights, select or clear the f
particular user group:
• List
• Read
• Wr
ite
• De
lete
• Co
ntrol
ollowing check boxes in the row of a
90
Page 99

Using Search Hints
A search hint is a helpful word or phrase that you may associate with a video clip. Its
purpose is to help all SmartClient users get search results that are most relevant to their
requirements. SmartClient displays the details in the Search Hints section of the Metadata
tab:
A search hint can be one of two types:
•A search word.
•An exclude word.
iTX SmartClient
Operator Guide
About search words
A search word that is associated with a video clip appears in a list of Suggestions in the
Results Browser when SmartClient includes the video clip in search results. The word
prompts you to repeat a search with the search word added to the search criteria. By
responding to the prompt, you use the search word to refine the current set of search
results.
Example: A
the clip appears in search results, yacht appears in the Suggestions list. If you click this
word, SmartClient performs a new search with yacht included in the search criteria.
SmartClient then returns a filtered results list - one containing just video clips that have
content about yacht sailing instead of every video clip that relates to sailing.
video clip about sailing has the search word "yacht" associated with it. When
About exclude words
An exclude word associated with a video clip prevents SmartClient including the clip in
search results in certain circumstances. The circumstances are where SmartClient uses Any
Text search criteria to find video clips that have the exclude word in any of their text fields.
The purpose of this type of search hint is to enable SmartClient to ignore words that are
unimportant in a particular context.
Example: T
whales. Because the reference is not likely to be of interest to anyone searching for video
footage of whales, you may define "whale" as an exclude word for the clip.
he metadata for a video clip about sailing contains a minor reference to
If you then request SmartClient to perform a search using "whale" as Any Text search
criteria, the sailing clip does not appear in the search results; this is an effect of the
exclude word.
91
Page 100

Viewing and Editing Metadata
The Events Tab
Adding search hints
To add a search hint:
1Expand the Sear
When you move your mouse pointer over the expanded section, plus buttons appear
under Search Words and Exclude Words. Clicking a plus button alternately shows and
hides the features you use to add search hints.
2 Do the following under Se
3 Click the plus button to display a text box and Ad
4 Enter a word or phrase in the text box and click Ad
want to add.
5 SmartClient adds the new search hints to the Se
Deleting a search hint
To delete a search hint:
1 Rest your mouse pointer over a search hint.
SmartClient displays a red cross to the right of the search hint.
2 Click the red cross
ch Hints section.
arch Words or Exclude Words.
d button.
d. Do this for each search hint you
arch Words or Exclude Words list.
to delete the search hint.
The Events Tab
The Events tab contains a table with entries for each marked event in the selected video
clip:
To start with , all entries are collapsed. Each one gives basic details of an event: the name of
the event type; the timecode of the event in-point; the event duration; and the first few
words of any comments that have been entered for the event.
92
 Loading...