

Page 1

ITX OUTPUT SERVER 2
NEXT GENERATION VIDEO ENGINE
Channel Configuration Guide
v2.6
2015-04-20
Page 2

Notices
Copyright and Trademark Notice
Copyright © 2014–2015, Grass Valley USA, LLC. All rights reserved.
Belden, Belden Sending All The Right Signals, and the Belden logo are trademarks or
egistered trademarks of Belden Inc. or its affiliated companies in the United States and
r
other jurisdictions. Grass Valley USA, LLC, Miranda, iTX, Output Server 2, Output Server 1,
TXPlay, TXPlay 2, MediaCache, MediaCache 2, Vertigo XG, XG Inside and iTX Desktop Client
are trademarks or registered trademarks of Grass Valley USA, LLC. Belden Inc., Grass Valley
USA, LLC, and other parties may also have trademark rights in other terms used herein.
Terms and Conditions
Please read the following terms and conditions carefully. By using iTX documentation, you
agree to the following terms and conditions.
Grass Valley hereby grants permission and license
manuals for their own internal business use. Manuals for Grass Valley products may not be
reproduced or transmitted in any form or by any means, electronic or mechanical, including
photocopying and recording, for any purpose unless specifically authorized in writing by
Grass Valley.
A Grass Valley manual may have been revised to reflect changes made to the product
during its manufac
product. Care should be taken to ensure that one obtains the proper manual version for a
specific product serial number.
Information in this document is subject to change without
commitment on the part of Grass Valley.
Warranty information is available in the Support section of the Grass Valley Web site
ww.grassvalley.com).
(w
turing life. Thus, different versions of a manual may exist for any given
to owners of iTXs to use their product
notice and does not represent a
Title Output Server 2 Channel Configuration Guide
Part Number v2.6
Revision 2015-04-20, 15:04
ii
Page 3

Table of Contents
1 Introducing Output Server 2 . . . . . . . . . . . . . . . . . . . . . . . . . . . . 1
About Output Server 2. . . . . . . . . . . . . . . . . . . . . . . . . . . . . . . . . . . . . . . . . . . . . . . . . . . . . . . . . . . . . 1
Comparison Chart - Output Server 1 and Output Server 2 . . . . . . . . . . . . . . . . . . . . . . . . . . . 2
About Playout Types for Output Server 2 . . . . . . . . . . . . . . . . . . . . . . . . . . . . . . . . . . . . . . . . . . . 3
Single Channel Playout . . . . . . . . . . . . . . . . . . . . . . . . . . . . . . . . . . . . . . . . . . . . . . . . . . . . . . . . 3
Dual Channel Playout. . . . . . . . . . . . . . . . . . . . . . . . . . . . . . . . . . . . . . . . . . . . . . . . . . . . . . . . . . 3
Simulcast Playout . . . . . . . . . . . . . . . . . . . . . . . . . . . . . . . . . . . . . . . . . . . . . . . . . . . . . . . . . . . . . 3
Playout Type Support . . . . . . . . . . . . . . . . . . . . . . . . . . . . . . . . . . . . . . . . . . . . . . . . . . . . . . . . . 4
About Leader/Follower Channel Communication. . . . . . . . . . . . . . . . . . . . . . . . . . . . . . . . . . . 4
Known limitations of Output Server 2 . . . . . . . . . . . . . . . . . . . . . . . . . . . . . . . . . . . . . . . . . . . . . .5
2 Preparing for Output Server 2 . . . . . . . . . . . . . . . . . . . . . . . . . . . 7
Prerequisites and Compatibility Requirements . . . . . . . . . . . . . . . . . . . . . . . . . . . . . . . . . . . . . 7
Required Software and Driver Versions . . . . . . . . . . . . . . . . . . . . . . . . . . . . . . . . . . . . . . . . . 7
Required System Configuration . . . . . . . . . . . . . . . . . . . . . . . . . . . . . . . . . . . . . . . . . . . . . . . . 8
License Requirements . . . . . . . . . . . . . . . . . . . . . . . . . . . . . . . . . . . . . . . . . . . . . . . . . . . . . . . . . 8
Installing iTX licenses . . . . . . . . . . . . . . . . . . . . . . . . . . . . . . . . . . . . . . . . . . . . . . . . . . . . . . . . . 8
Process Overview - Output Server 2 Installation and Channel Configuration . . . . . . . . . 9
Upgrading from Output Server 1 to Output Server 2 . . . . . . . . . . . . . . . . . . . . . . . . . . . . . . . . 9
3 Installing Output Server 2 on a New System . . . . . . . . . . . . . 11
Installing Output Server 2. . . . . . . . . . . . . . . . . . . . . . . . . . . . . . . . . . . . . . . . . . . . . . . . . . . . . . . . .11
Creating and Sharing a Media Cache Folder . . . . . . . . . . . . . . . . . . . . . . . . . . . . . . . . . . . . . . .12
4 Upgrading to Output Server 2 . . . . . . . . . . . . . . . . . . . . . . . . . . 15
Guidelines for Transitioning from OS1 to OS2. . . . . . . . . . . . . . . . . . . . . . . . . . . . . . . . . . . . . .15
Transitioning to Output Server 2 . . . . . . . . . . . . . . . . . . . . . . . . . . . . . . . . . . . . . . . . . . . . . .15
Operating a Mixed Output Server System . . . . . . . . . . . . . . . . . . . . . . . . . . . . . . . . . . . . . . . . .16
Upgrading to the Output Server 2 Service . . . . . . . . . . . . . . . . . . . . . . . . . . . . . . . . . . . . . . . . .17
5 Adding Channels to an ITX Playout Server. . . . . . . . . . . . . . . 21
Channel Resiliency Guidelines . . . . . . . . . . . . . . . . . . . . . . . . . . . . . . . . . . . . . . . . . . . . . . . . . . . .21
About the iTX Channel Config Dialog . . . . . . . . . . . . . . . . . . . . . . . . . . . . . . . . . . . . . . . . . . . . .22
Creating Your First Channel . . . . . . . . . . . . . . . . . . . . . . . . . . . . . . . . . . . . . . . . . . . . . . . . . . . . . . .23
Adding a Backup Channel to an iTX System . . . . . . . . . . . . . . . . . . . . . . . . . . . . . . . . . . . . . . .24
Adding a Simulcast Channel to an iTX System . . . . . . . . . . . . . . . . . . . . . . . . . . . . . . . . . . . . .25
Adding a Simulcast Backup Channel to an iTX System . . . . . . . . . . . . . . . . . . . . . . . . . . . . .26
Adding Extra Channels to a Playout Server . . . . . . . . . . . . . . . . . . . . . . . . . . . . . . . . . . . . . . . .26
i
Page 4

Table of Contents
Creating a Dual Channel iTX System. . . . . . . . . . . . . . . . . . . . . . . . . . . . . . . . . . . . . . . . . . . . . . .27
6 Output Server 2 Channel Configuration . . . . . . . . . . . . . . . . . 29
Setting a Reference, Frame Rate Family and Output Timing . . . . . . . . . . . . . . . . . . . . . . . .29
Accessing the Output Server 2 User Interface . . . . . . . . . . . . . . . . . . . . . . . . . . . . . . . . . . . . . .31
Selecting the Channel Resolution and Frame Rate . . . . . . . . . . . . . . . . . . . . . . . . . . . . . . . . .32
Configuring Ancillary Data . . . . . . . . . . . . . . . . . . . . . . . . . . . . . . . . . . . . . . . . . . . . . . . . . . . . . . . .33
Selecting the XG Inside Channel . . . . . . . . . . . . . . . . . . . . . . . . . . . . . . . . . . . . . . . . . . . . . . . . . .33
Configuring Channel Delay . . . . . . . . . . . . . . . . . . . . . . . . . . . . . . . . . . . . . . . . . . . . . . . . . . . . . . .34
Configuring Nielsen Watermarking. . . . . . . . . . . . . . . . . . . . . . . . . . . . . . . . . . . . . . . . . . . . . . . .35
Configuring Dolby Metadata. . . . . . . . . . . . . . . . . . . . . . . . . . . . . . . . . . . . . . . . . . . . . . . . . . . . . .36
Configuring Audio Upmixing . . . . . . . . . . . . . . . . . . . . . . . . . . . . . . . . . . . . . . . . . . . . . . . . . . . . .37
Configuring a Channel to Process SCTE104 Messages . . . . . . . . . . . . . . . . . . . . . . . . . . . . . .38
About the VANC plugin. . . . . . . . . . . . . . . . . . . . . . . . . . . . . . . . . . . . . . . . . . . . . . . . . . . . . . .39
About the SCTE104 plugin . . . . . . . . . . . . . . . . . . . . . . . . . . . . . . . . . . . . . . . . . . . . . . . . . . . .39
Configuring SCTE104 Features . . . . . . . . . . . . . . . . . . . . . . . . . . . . . . . . . . . . . . . . . . . . . . . .39
Configuring the SCTE104 Message Types. . . . . . . . . . . . . . . . . . . . . . . . . . . . . . . . . . . . . .42
Configuring the legacy VANC plugin. . . . . . . . . . . . . . . . . . . . . . . . . . . . . . . . . . . . . . . . . . 42
Configuring enhanced SCTE104 plugin . . . . . . . . . . . . . . . . . . . . . . . . . . . . . . . . . . . . . . . 42
Configuring sequences for SCTE104 . . . . . . . . . . . . . . . . . . . . . . . . . . . . . . . . . . . . . . . . . . 42
Configuring Subtitles . . . . . . . . . . . . . . . . . . . . . . . . . . . . . . . . . . . . . . . . . . . . . . . . . . . . . . . . . . . . .43
Accessing the Subtitles Tab . . . . . . . . . . . . . . . . . . . . . . . . . . . . . . . . . . . . . . . . . . . . . . . . . . .43
Creating a Subtitle Stream . . . . . . . . . . . . . . . . . . . . . . . . . . . . . . . . . . . . . . . . . . . . . . . . . . . .44
Configuring a Subtitle Stream. . . . . . . . . . . . . . . . . . . . . . . . . . . . . . . . . . . . . . . . . . . . . . . . .45
Creating a Subtitle Service . . . . . . . . . . . . . . . . . . . . . . . . . . . . . . . . . . . . . . . . . . . . . . . . . . . .45
Allocating a Subtitle Service to a Subtitle Stream . . . . . . . . . . . . . . . . . . . . . . . . . . . . . .45
About Channel and Live Event Routing. . . . . . . . . . . . . . . . . . . . . . . . . . . . . . . . . . . . . . . . . . . .46
Prerequisites for Channel Routing. . . . . . . . . . . . . . . . . . . . . . . . . . . . . . . . . . . . . . . . . . . . .46
About the Routing Panel . . . . . . . . . . . . . . . . . . . . . . . . . . . . . . . . . . . . . . . . . . . . . . . . . . . . .46
Routing Channels to Destinations. . . . . . . . . . . . . . . . . . . . . . . . . . . . . . . . . . . . . . . . . . . . .47
Routing Live Events to Destinations for Simulcast Setups . . . . . . . . . . . . . . . . . . . . . .48
About Channel Communication Setup . . . . . . . . . . . . . . . . . . . . . . . . . . . . . . . . . . . . . . . . . . . .49
Configuring the Channel Communication Setup. . . . . . . . . . . . . . . . . . . . . . . . . . . . . . .49
About Audio Output for Output Server 2 . . . . . . . . . . . . . . . . . . . . . . . . . . . . . . . . . . . . . . . . . .49
Configuring Audio Output for Output Server 2 . . . . . . . . . . . . . . . . . . . . . . . . . . . . . . . .50
About Simulcast Event Substitution Rules . . . . . . . . . . . . . . . . . . . . . . . . . . . . . . . . . . . . . . . . .51
Cascading Logo Replacement Rules. . . . . . . . . . . . . . . . . . . . . . . . . . . . . . . . . . . . . . . . . . .52
Configuring Event Substitution Rules for Simulcast Channels . . . . . . . . . . . . . . . . . .53
About GPI Devices and Simulcast Setups . . . . . . . . . . . . . . . . . . . . . . . . . . . . . . . . . . . . . . . . . .53
Appendix A SDI I/O Card Connection Reference . . . . . . . . . . . . 55
About I/O Device Controller Engineering Panel . . . . . . . . . . . . . . . . . . . . . . . . . . . . . . . . . . . .55
Accessing the I/O Device Controller Engineering Panel . . . . . . . . . . . . . . . . . . . . . . . .56
Corvid 1 I/O Connections . . . . . . . . . . . . . . . . . . . . . . . . . . . . . . . . . . . . . . . . . . . . . . . . . . . . . . . . .57
Kona 3G I/O Connections . . . . . . . . . . . . . . . . . . . . . . . . . . . . . . . . . . . . . . . . . . . . . . . . . . . . . . . . .57
Corvid 44 I/O Connections . . . . . . . . . . . . . . . . . . . . . . . . . . . . . . . . . . . . . . . . . . . . . . . . . . . . . . . .58
Corvid 88 I/O Connections . . . . . . . . . . . . . . . . . . . . . . . . . . . . . . . . . . . . . . . . . . . . . . . . . . . . . . . .58
ii
Page 5

Appendix B Operation and Maintenance
of an OS2 System . . . . . . . . . . . . . . . . . . . . . . . . . . . . . . . . . . . . . . 59
Starting Output Server 2 . . . . . . . . . . . . . . . . . . . . . . . . . . . . . . . . . . . . . . . . . . . . . . . . . . . . . . . . . .59
About Output Server 2 Channel Status Indicators . . . . . . . . . . . . . . . . . . . . . . . . . . . . . . . . . .60
Configuring Server Controller for Output Server 2 Components . . . . . . . . . . . . . . . . . . . .60
Server Controller Configuration for the I/O Device Controller . . . . . . . . . . . . . . . . . .60
Server Controller Configuration for Output Server 2 . . . . . . . . . . . . . . . . . . . . . . . . . . .61
Viewing the Output Server 2 Engineering Panel . . . . . . . . . . . . . . . . . . . . . . . . . . . . . . . . . . .63
About the Hardware Tab . . . . . . . . . . . . . . . . . . . . . . . . . . . . . . . . . . . . . . . . . . . . . . . . . . . . .63
About the Event Log . . . . . . . . . . . . . . . . . . . . . . . . . . . . . . . . . . . . . . . . . . . . . . . . . . . . . . . . .64
Log File Locations . . . . . . . . . . . . . . . . . . . . . . . . . . . . . . . . . . . . . . . . . . . . . . . . . . . . . . . . . . . . . . . .65
Honoring NTSC SD Field Orders . . . . . . . . . . . . . . . . . . . . . . . . . . . . . . . . . . . . . . . . . . . . . . . . . . .65
Deleting a Channel . . . . . . . . . . . . . . . . . . . . . . . . . . . . . . . . . . . . . . . . . . . . . . . . . . . . . . . . . . . . . . .66
Downgrading from Output Server 2 to Output Server 1 . . . . . . . . . . . . . . . . . . . . . . . . . . . .67
iTX Output Server 2
Channel Configuration Guide
iii
Page 6

Table of Contents
iv
Page 7

This guide describes the features and functionality of Output Server 2 (OS2), the differences
between Output Server 2 and its predecessor, Output Server 1 (OS1) and the features and
underlying principles of Output Server 2. It also explains how to install or upgrade to
Output Server 2, how to create and configure channels using Output Server 2 and day-today operational and maintenance information for Output Server 2 systems.
Summary
About Output Server 2 . . . . . . . . . . . . . . . . . . . . . . . . . . . . . . . . . . . . . . . . . . . . . . . . . . . . . . . . . . . . . . . . . 1
Comparison Chart - Output Server 1 and Output Server 2 . . . . . . . . . . . . . . . . . . . . . . . . . . . . . . 2
About Playout Types for Output Server 2 . . . . . . . . . . . . . . . . . . . . . . . . . . . . . . . . . . . . . . . . . . . . . . . 3
About Leader/Follower Channel Communication . . . . . . . . . . . . . . . . . . . . . . . . . . . . . . . . . . . . . . 4
Known limitations of Output Server 2 . . . . . . . . . . . . . . . . . . . . . . . . . . . . . . . . . . . . . . . . . . . . . . . . . . 5
About Output Server 2
Output Server 2 integrates with the current iTX framework, allowing customers to easily
upgrade their existing channels. Working alongside our next generation video engine is
our new automation controller, TXPlay 2, which supports the new features and
functionality that Output Server 2 provides, and our new caching mechanism, Media Cache
2.
Introducing Output Server 2
Output Server 2 has improved standards compliance, more flexibility and greater stability,
and forms the basis for future iTX development. Among the new features and functionality
offered by Output Server 2 are improved image quality, the ability to perform on-air
updates for AFD and duration changes, per stream configuration for Dolby D and E, full
audio processing for XG inside and the ability to perform dual channel or simulcast
broadcast from a single playout server.
Whilst Output Server 2 supersedes the previous video engine, Output Server 1 is still
supported and it is even possible to run both video engines in the same iTX system.
Transitioning to Output Server 2 on page 15.
See
1
Page 8

Introducing Output Server 2
Comparison Chart - Output Server 1 and Output Server 2
Comparison Chart - Output Server 1 and Output Server 2
The table below details the differences between the Output Server 1 and Output Server 2
service.
Feature Output Server 1 Output Server 2
AJA Kona 3G SDI I/O card Supported Supported from iTX v2.6
AJA Corvid 1 SDI I/O card Supported Supported
AJA Corvid 44 SDI I/O card Not supported Supported from iTX v2.6
AJA Corvid 88 SDI I/O card Not supported Supported from iTX v2.6
Dedicated SDI I/O video card
service
(I/O Device Controller)
Simulcast Not supported Supported from iTX v2.6
Not available Available from iTX v2.6
Single server dual channel Supported with dual Corvid
L/P SDI I/O Cards only *
On-air update: Active Format
Description (AFD) change
On-air update: Duration
change
Dolby E and D per stream
configuration
XG Inside: Full audio
processing (audio flows from
OS2 to XG and back to OS2)
Output Server audio
configuration: Output group
definitions
Cross conversion: 50hz to
59hz standards
Cross conversion: Same family
of standards. For example:
• 1080i50 <-> 750p50 <-> 625
• 1080i59 <-> 720p59 <-> 525
SCTE104: VANC splice
commands
SCTE104: Multiple operations
within Multiple Operation
Messages
SCTE104: Segmentation
commands to identify local
and national avail inserts)
Not supported Supported
Not supported Supported
Not supported Supported
Not supported Supported
Optional Mandatory
Permitted Not permitted
Supported Supported
Supported Supported
Supported Supported
Supported Supported
Supported from iTX v2.6
2
Page 9

iTX Output Server 2
Channel Configuration Guide
Feature Output Server 1 Output Server 2
SCTE104: DTMF descriptor
data request operations
Cue to first frame Optional Default
Interlaced NTSC SD media -
nterpretation
field i
System message logs All messages in a single CSV
Supported Supported
User controlled User controlled or
automatically detected
(global setting)
iewing the Output
See V
file
Server 2 Engineering Panel on
page 63
Output Server Engineering
onfiguration
C
Located within Engineering
layout of iTX Desktop
Note:
• * Output Server 2 does not support playout servers with dual SDI I/O cards (i.e. two
Corvid L/P cards). If your playout server is equipped with dual SDI I/O cards, only
the card that Windows identifies as device 0 will be used and only in single channel
mode.
• Although iTX 2.x supports the Kona 3G SDI I/O cards, it does not support Kona 3
rd.
ca
About Playout Types for Output Server 2
iTX Output Server 2 supports three different types of playout.
Single Channel Playout
Single channel playout means the channel has a single input and a single output. This
playout type can be used for main channels in any iTX system, including backup channels
running on their own playout servers.
Dual Channel Playout
Located within Output Server
2 user interface
Dual channel playout means there are two independent channels running on a single
playout server, each with a single input and output. This can be used to run a main channel
and the backup of another channel on a single playout server (providing it is equipped with
a Corvid 44 or Corvid 88 SDI I/O card, such as the Grass Valley Playout Appliance 2 server).
Simulcast Playout
In a simulcast system, two channels share two inputs, but have independent outputs. A
typical use case for a simulcast system is to generate HD and SD transmissions from a single
schedule that is loaded on to the main channel. Because the main and simulcast channels
have different requirements for the resolution, aspect ratio control (ARC) and audio output,
the two channels are configured independently.
3
Page 10

Introducing Output Server 2
Playout Type Support
In order to transmit appropriate branding for a simulcast channel, iTX allows users to
configure event substitution rules, which can be used to swap assets such as logos and CGs
based on their names in the main channel’s schedule.
iTX manages the broadcasting of main and s
networked instances of TXPlay 2, known as a leader/follower network. The main channel in
any iTX system is identified as a leader channel. When a simulcast channel and its
corresponding backup channels are added to the iTX system, they are designated as
followers. See About L
information about the leader/follower model.
Playout Type Support
The table below shows which playout types are available to the supported models of AJA
SDI I/O card:
Playout Type K3G C1 C44 C88 Comment
Single channel
Dual Channel
Simulcast
Simulator N/A Select for test channels only.
imulcast channels using a system of
eader/Follower Channel Communication on page 4 for more
Default for all models of SDI I/O card. Use for stand
alone main or backup channels.
Select to configure two channels running on the
same playout server (i.e. channel A main and channel
B backup).
Select if you are configuring a simulcast channel on a
separate playout server or you are configuring main
and simulcast channels on the same playout server.
About Leader/Follower Channel Communication
When configuring a main channel and its backup in Output Server 1, it communicates
between the two channels using a master/slave model. The two channels share the same
configuration, schedule, assets and iTX Desktop controls, and changes to any of these on
the main channel (the master) are also sent to the backup channel (the slave). The backup
also checks the database every 30 seconds and changes to the schedule on the main
channel cause a schedule restore on the backup channel. This results in a delay of up to 30
seconds between schedule changes on the main and backup.
Master/slave operation relies on the status of a
determine which channel should act as the master. In the event of a failover, the backup
channel takes over the transmission of the scheduled programming.
Output Server 2 uses a leader/follower model f
main channel is the leader and its backup channel is the follower; in a simulcast system, the
simulcast channel and its backup channel are also followers. This is known as a
leader/follower network. When the iTX Desktop operator performs a manual control,
schedule change or changes an asset, the leader channel passes these changes on to its
followers and they respond instantaneously. This ensures the channels in the
leader/follower network are always in sync with each other, regardless of the number of
followers.
single router crosspoint (destination) to
or channel communication. This means the
4
Page 11

Failovers are controlled in the same way as the master/slave model, however, iTX can only
promote main and backup channels to be leader channels; simulcast and simulcast backup
channels can only be followers.
Known limitations of Output Server 2
Output Server 2 has the following known limitations:
• Automatic Loudness Control (ALC) is currently not supported and set to Off by default
in the Output Server 2 Configuration panel.
• Raw audio mode is not supported for MPEG audio codecs.
• When using Dolby E (Auto) output, Dolby Metadata is not supported.
• Squeeze effects are not supported for CGs or logos in either Output Server 2 or Output
Server 1.
• Output Server 2 does not currently support regional sub-channels.
iTX Output Server 2
Channel Configuration Guide
5
Page 12

Introducing Output Server 2
Known limitations of Output Server 2
6
Page 13

Preparing for Output Server 2
This chapter discusses the hardware and software prerequisites for operating an Output
Server 2 iTX system, including the additional licenses that may be required. It also provides
an overview of the installation process for new iTX systems and upgrades from Output
Server 1.
Summary
Prerequisites and Compatibility Requirements . . . . . . . . . . . . . . . . . . . . . . . . . . . . . . . . . . . . . . . . . 7
Process Overview - Output Server 2 Installation and Channel Configuration . . . . . . . . . . . . 9
Upgrading from Output Server 1 to Output Server 2 . . . . . . . . . . . . . . . . . . . . . . . . . . . . . . . . . . . . 9
Prerequisites and Compatibility Requirements
Output Server 2 has both hardware and software prerequisites that must be met before the
module is installed.
Required Software and Driver Versions
Software Requirement
AJA SDI I/O Video
ard Driver Version
C
Framework Version Your playout server and framework server must be running the same
Vertigo Suite version If you are using Vertigo XG graphics, Output Server 2 requires Vertigo
Output Server 2 requires AJA video card driver version 12.1.0.107 to be
installed via Windows Device Manager before installing or upgrading
iTX.
If you have previously installed Output Server 1, the version 7.4.0.49
JA drivers must be uninstalled and deleted from Device Manager
A
before installing the latest drivers.
IMPORTANT:
Do not use drivers that are supplied with your AJA SDI I/O card or any
tha
t have been downloaded from the AJA website. The required
drivers for iTX are specially supplied by AJA and are included with the
iTX Suite in the
ersion of their respective iTX components for Output Server 2 to
v
function.
Suite 5.0
The Vertigo Suite software is available from the Grass Valley Support
Po
rtal.
http://www2.grassvalley.com/support/details/product/Vertigo
Drivers folder.
SP1.
7
Page 14

Preparing for Output Server 2
Required System Configuration
Required System Configuration
Feature Requirement
Dual channel playout To transmit dual channel or simulcast broadcasts, your playout server
l need the following:
Simulcast playout
Vertigo XG Inside When XG Inside is enabled, Remote Deskt
wil
• An AJA Corvid 44 or Corvid 88 SDI video card.
• AJA SDI I/O video card driver version 12.1.0.107.
• The I/O Device Controller service (available from iTX v2.6 onwards).
playout server.
License Requirements
The modules that make up the iTX system are individually licensed and add-on
components (such as XG Inside) require their own license to function.
Depending on your system architecture, the following licenses may be required to operate
Output S
• XG Inside graphics on Output Server 2 requires the iT
erver 2:
op must be disabled on the
X IntegratedXG license.
For more information about licensing and the Grass Valley license dongle, please contact:
ensing@grassvalley.com.
itxlic
Installing iTX licenses
The modules that make up the iTX system are individually licensed and add-on
components (such as XG Inside) require their own license to function.
Licenses are stored in
a USB port on the playout server.
To install the iTX license file
1Open the iT
2 Place a copy of the .lic file in the Inbox shared folder of the iTX Framework Server
where the Media Watcher resides.
The license file is automatically ingested by the M
the file disappears from the Inbox folder.
When TXPlay 2 starts it will check that the requir
of the licenses can be checked by running diagnostics on TXPlay 2
.lic files and require a Grass Valley license dongle to be inserted into
X License folder shortcut located on the Windows desktop.
edia Watcher service, at which point
ed licenses have been installed. The status
8
Page 15

iTX Output Server 2
Channel Configuration Guide
Process Overview - Output Server 2 Installation and Channel Configuration
The process of installing Output Server 2 and configuring a channel consists of the
following actions:
Step Description See section(s)
1 Install the required licenses and drivers Prerequisites and Compatibility
Requirements, on page 7.
2 Install the Output Server 2 module on your
yout server.
pla
NOTE: If you have purchased a Grass Valley
P
layout Appliance 2 it will come pre-
installed with Output Server 2.
3 Add your first channel, followed by any
subsequent ch
4 Start Server Controller on each playout
ver.
ser
5 Channel configuration - Output Server 2:
• Confirm your reference input
• Set resolution and frame rate
•Configure ancillary data
• Select XG Inside (if applicable)
• Configure channel delay
• Configure Nielsen watermark (if applicable)
• Configure Dolby metadata
• Configure audio upmixing (if applicable)
•Configure SCTE104
• Configure subtitles (mi
6 Channel configuration - iTX Desktop:
• Configure channel routing
• Configure channel communication setup
• Configure audio output
• Configure event substitution for simulcast
ch
annels (is applicable)
• Configure GPI devices
annels.
nimum required setup)
Installing Output Server 2, on page 11.
Adding Channels to an ITX Playout Server,
on page 21.
Setting a Reference, Frame Rate Family and
Output Timing, o
Output Server 2 Channel Configuration, on
page 29.
Output Server 2 Channel Configuration, on
page 29..
n page 29
Upgrading from Output Server 1 to Output Server 2
iTX allows broadcasters to transition from an Output Server 1 system to an Output Server 2
system by running both video engines in parallel within the same iTX system during the
upgrade. This is known as a “mixed Output Server system” and is only recommended
during the upgrade and testing process, and not for day-to-day operation.
ransitioning to Output Server 2 on page 15.
See T
9
Page 16

Preparing for Output Server 2
Upgrading from Output Server 1 to Output Server 2
10
Page 17

Installing Output Server 2 on a New System
This chapter discusses how to install the Output Server 2 components on your playout
server and how to create a shared folder to use as a media cache.
IMPORTANT
If you have a Grass Valley Appliance Server 2 playout server, it will be preinstalled with Output Server 2. Therefore you can skip this chapter move on
See Adding Channels to an ITX Playout Server on page 21.
to
Summary
Installing Output Server 2 . . . . . . . . . . . . . . . . . . . . . . . . . . . . . . . . . . . . . . . . . . . . . . . . . . . . . . . . . . . . 11
Creating and Sharing a Media Cache Folder . . . . . . . . . . . . . . . . . . . . . . . . . . . . . . . . . . . . . . . . . . 12
Installing Output Server 2
The Output Server 2 module includes other critical components, such as TXPlay 2, Media
Cache 2, File Processing Pipeline, Domain Config Tool and the I/O Device Controller, which
are all installed along with the main Output Server 2 service. Of these components, Media
Cache 2 and TXPlay 2 require user input before the installation is complete.
To perform a new installati
1 Access and open the iTX Installer.
2Right-click the Se
The iTX Se
3Expand the Pla
4Check Ou
5Click OK.
The S
6On the iT
The selected components will install on your playout server.
7 Before the installation completes, the Med
Enter the cache name and location, as described in Creating and Sharing a Media
Cache Folder, below.
8 After creating a media cache folder, the i
At this point you should add any channels that you require on this playout server. See
Adding Channels to an ITX Playout Server on
9 Complete the installation of any other iTX modules you have selected, as described in
the iT
lect Software to Install window appears.
yout section
tput Server 2.
elect Software to Install window closes.
X Installer window, click CONTINUE.
X System Administrator Guide.
on of Output Server 2:
tup.exe file and select Run as administrator.
ia Cache Configuration dialog appears.
TX Channel Config dialog for TXPlay2 appears.
page 21.
11
Page 18
Installing Output Server 2 on a New System
Creating and Sharing a Media Cache Folder
10 Apply any additional configuration that is required for your channel. See Output Server
2 Channel Configuration on page 29 for more information.
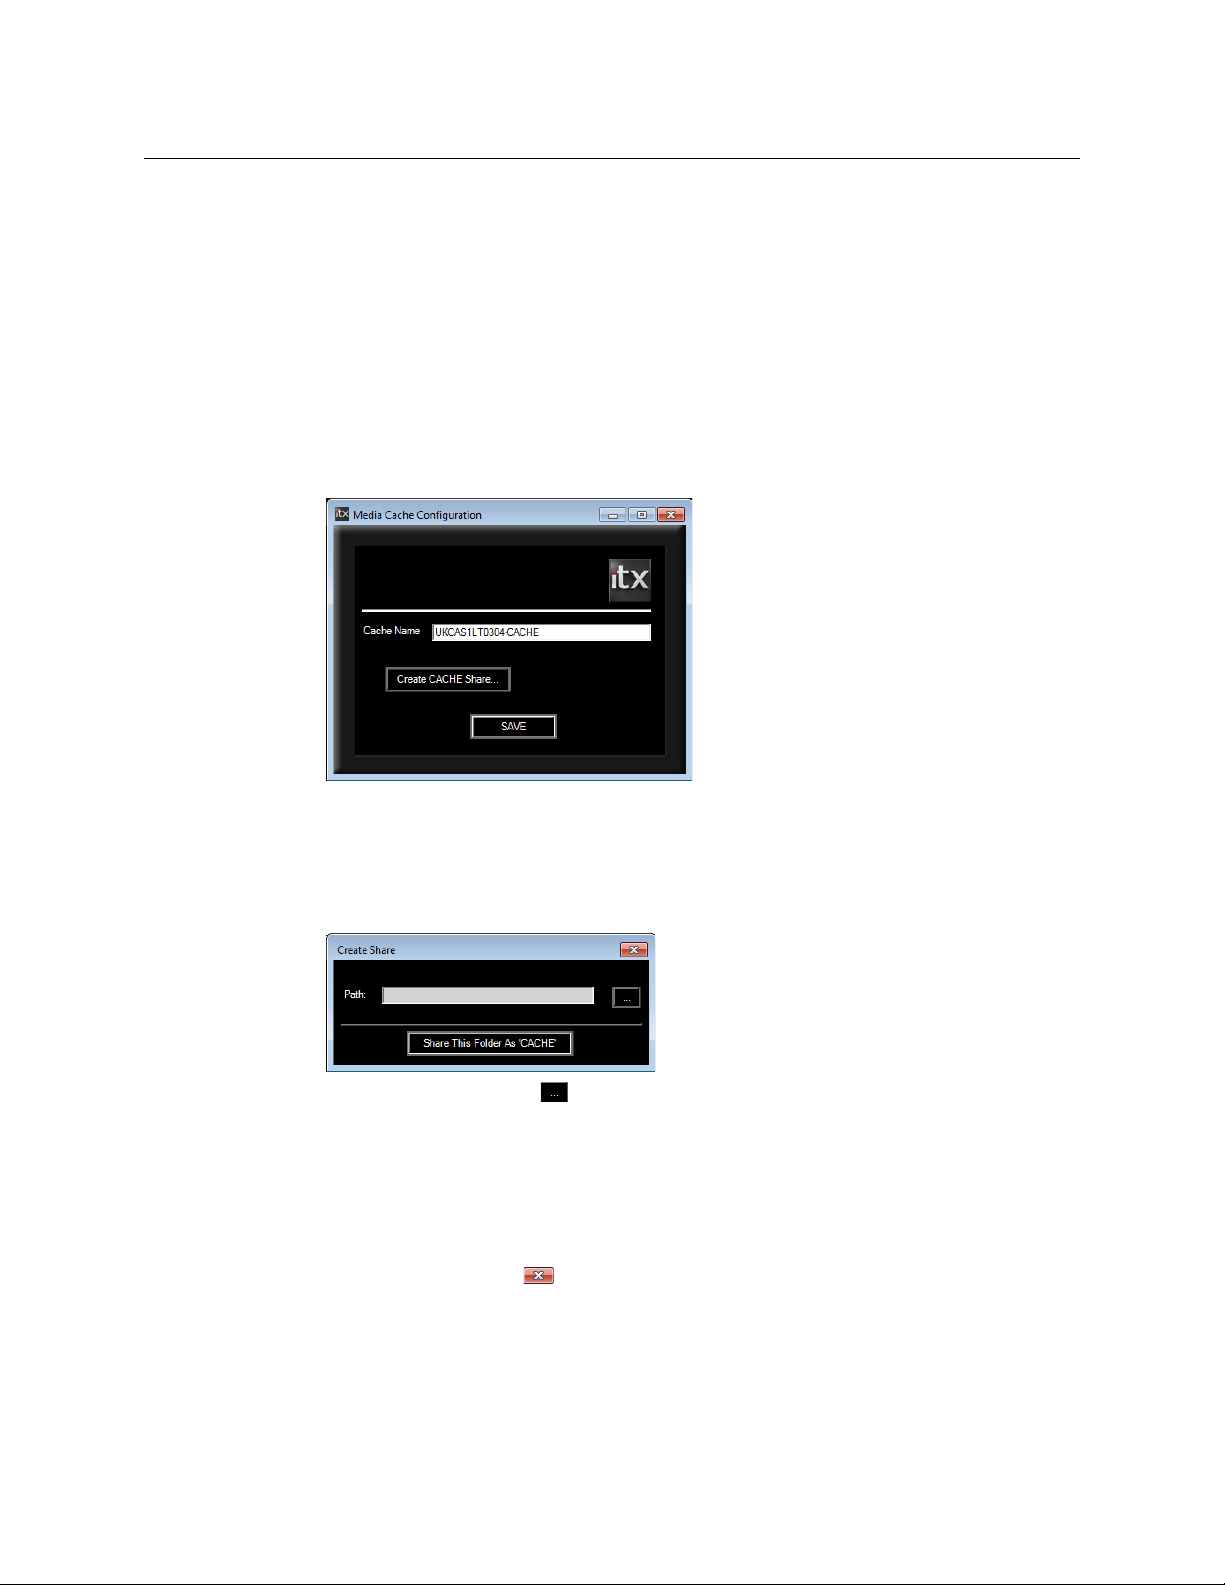
Creating and Sharing a Media Cache Folder
As part of the installation of Output Server 2, you are required to create a folder on your
playout server to use as the caching location for media as it transitions from your media
store to playout.
To configure the Media Cache for your playout server:
1 During the installation of Output Server 2, the M
appears.
edia Cache Configuration dialog
2 By default, the Cache Name field will be populated with the playout server’s Windows
Computer Name followed by the suffix
-CACHE.
You may enter a name of your choice, but you must ensure the name does not match
an
y channel names in your iTX system. The name must also include the
-CACHE suffix.
3Click Create CACHE Share. The Create Share dialog appears.
4Click the Browse button . The Browse For Folder dialog appears.
5 Select a location to create the caching folder (e.g.
6Click M
ake New Folder and enter the name Cache.
Computer > C:).
7Click OK.
The B
rowse For Folder dialog closes and you are returned to the Create Share dialog.
8Click Sh
are This Folder as ‘CACHE’.
9Click the Close button . The Create Share dialog disappears, retaining your
selection and you are returned to the M
10 Click SA
VE to confirm your media cache configuration.
edia Cache Configuration dialog.
The installation continues.
12
Page 19

iTX Output Server 2
Channel Configuration Guide
11 After creating a media cache folder, the iTX Channel Config dialog for TXPlay2 appears.
At this point you should add any channels that you require on this playout server.
See
Adding Channels to an ITX Playout Server on page 21.
12 Complete the installation of any other iTX modules you have selected, as described in
the iTX System Administrator Guide.
13 Apply any additional configuration that is required for your channel. See Output Server
2 Channel Configuration on page 29 for more information.
14
13
Page 20

Installing Output Server 2 on a New System
Creating and Sharing a Media Cache Folder
14
Page 21

Upgrading to Output Server 2
If you are upgrading from an Output Server 1 system to Output Server 2, there are
additional precautions and procedures to take into consideration compared to a new
installation. This includes how best to transition from one system to the other and how to
operate with a mix of video engines during the transition.
Summary
Guidelines for Transitioning from OS1 to OS2 . . . . . . . . . . . . . . . . . . . . . . . . . . . . . . . . . . . . . . . . . 15
Operating a Mixed Output Server System . . . . . . . . . . . . . . . . . . . . . . . . . . . . . . . . . . . . . . . . . . . . . 16
Upgrading to the Output Server 2 Service . . . . . . . . . . . . . . . . . . . . . . . . . . . . . . . . . . . . . . . . . . . . . 17
Guidelines for Transitioning from OS1 to OS2
During the transition from Output Server 1 to Output Server 2, it will be necessary to
temporarily operate with some channels on Output Server 2 and some still on Output
Server 1. This is known as a mixed Output Server system.
Below are some guidelines for operating a mixed Output Server system during this
transition.
• Output Server 2 does not support playout servers with dual SDI I/O cards (i.e. two
Corvid L/P cards). If your playout server is equipped with dual SDI I/O cards, only the
card that Windows identifies as device 0 will be used and only in single channel mode.
• You cannot run Output Server 1 and Output Server 2 on the same playout server. This
because each service requires different AJA SDI I/O card drivers.
• During the transition, it is recommended that an Output Server 2 playout server is
setup as the backup to an Output Server 1 playout server, rather than the other way
around.
• Main/backup setup for a mixed Output Server system is configured in the same way as
a standard main/backup setup.
See About Channel and Live Event Routing on page 46.
Transitioning to Output Server 2
The steps below provide a high level overview of the process for transitioning from Output
Server 1 to Output Server 2.
To transition to Output Server 2:
1 Make sure main channel (legacy master) is routed to air
2 Decommission the backup channel (legacy slave).
3 As near as possible, there must be parity between the configuration of the Output
Server 1 and Output Server 2 playout servers. Apply any configuration changes to the
15
Page 22

Upgrading to Output Server 2
Operating a Mixed Output Server System
Output Server 1 master that are required to bring it into line with the Output Server 2
backup (e.g. configuring enhanced SCTE 104).
See Operating a Mixed Output Server System, on page 16.
4 Upgrade the backup channel to Output Server 2 and perform the required
configuration.
See Upgrading to the Output Server 2 Service on page 17.
5Start Server Controller on the Output Server 2 backup and confirm the following
configuration:
• On the instance of I/O Device Controller for the channel, check the Reference input
is correct.
See Setting a Reference, Frame Rate Family and Output Timing on page 29.
• On the instance of Output Server 2 for the channel, check the Resolution is correct.
• Apply any other configuration, as required. Backup channels should mirror the
configuration of their main, although when running a mixed Output Server system
some differences in configuration may be required.
See Operating a Mixed Output Server System, on page 16 for differences in
configuration.
See Output Server 2 Channel Configuration on page 29 for more information on
channel configuration.
6 Run the Output Server 1 and Output Server 2 channels in parallel until you are satisfied
with the stability of the system.
7 When you are ready to upgrade the main channel to Output Server 2, route the Output
Server 2 backup to air.
8 Failover the Output Server 1 main, so the channel plays out from the Output Server 2
backup.
9 Upgrade the main channel to Output Server 2 and perform the required configuration.
10 Route new main channel to air.
11 Failover the backup, so the channel plays out from the new main (Output Server 2)
playout server.
Operating a Mixed Output Server System
When running a mixed Output Server system, consider the following differences in
behavior between the two video engines:
Feature Comment
Internal captions Output Server 2 has improved rendering for internal captions. As
such you may see some differences in captions between the two
video engines. For example, outlines and drop shadows are clearer
on Output Server 2.
Cue and commit timings The timing for cueing and committing events was redesigned for
Output Server 2 and it does not mirror Output Server 1.
The differences are visible on the schedule grid when viewing an
Output Server 1 main and Output Server 2 backup side by side.
These differences do not affect when items are played out to air.
16
Page 23

iTX Output Server 2
Channel Configuration Guide
Feature Comment
Playout timing Output Server 2’s playout is frame accurate, which means a
scheduled item may playout earlier on the Output Server 2 backup
channel compared to the Output Server 1 main, but the difference
should be marginal.
Live pass-through delay The live pass-through delay was redesigned for Output Server 2
and is different to Output Server 1. It may be possible to
synchronize the live pass-through for an Output Server 1 main and
an Output Server 2 backup by altering the delay on both channels.
For information on changing the output buffer and time delay on
Output Server 1, see the iTX System Administration Guide.
For information on changing the Channel Delay on Output Server
2, see
Configuring Channel Delay, on page 34.
Audio output types On Output Server 2, the PCM (Auto) audio output type will assign
16 channels to the track, even if not all of the channels are
required. Any unused channels will be automatically set to mute.
See About Audio Output for Output Server 2 on page 49 for more
information.
SCTE 104 Output Server 2 only supports enhanced SCTE 104. Therefore, the
Output Server 1 main will also need to be configured to use
enhanced SCTE 104.
For more information on enhanced SCTE 104 configuration for
Output Server 1, see the iTX System Administration Guide.
For more information on SCTE 104 configuration for Output Server
2, see
See Configuring a Channel to Process SCTE104 Messages on
page 38.
NTSC SD field order
Output Server 1 and Output Server 2 handle the field order for
NTSC SD assets in different ways. Output Server 1 often
required user intervention to reverse the field order on a perasset basis, while Output Server 2 is able to interpret this
information from the media itself. This can cause problems
when trying to playout assets that have been altered on a
mixed Output Server system.
See Honoring NTSC SD Field Orders on page 65 for more
information.
Upgrading to the Output Server 2 Service
Before upgrading a playout server to Output Server 2, Output Server 1 must be uninstalled.
This can be done as part of the upgrade process.
The iTX installer will convert the current channel configuration from Output Server 1 to
Output Server 2. However, the channel name is not migrated as that information is stored in
different locations on each service. To support the I/O Device Controller (which was not
present for Output Server 1), you need to select your required playout type. Therefore,
during the upgrade the iTX Channel Config dialog appears so that these details can be
entered. It is also possible make changes to the channel details, as required.
17
Page 24

Upgrading to Output Server 2
Upgrading to the Output Server 2 Service
For more information on the iTX Channel Config dialog, including adding channels, see
Adding Channels to an ITX Playout Server, on
Note: Customers who are upgrading to iTX v2.6 Output Server 2 from an iTX
v2.5 Output Server 2 system will also be prompted to their confirm channel
configuration.
To upgrade a playout server to Output Server 2:
1 Download and extract the required version of the iTX Suite.
2 Access and open the iTX Installer.
3Right-click the Se
The iT
X Installer appears.
4Click SELEC
T SOFTWARE.
The Select Software to Install window appears.
5Expand the Pla
6 Uncheck Output Server 1.
This will uninstall Output Server 1 as Output Server 2 is installed.
7Check Ou
tput Server 2.
8Click OK.
The S
elect Software to Install window closes.
9On the iT
X Installer window, click CONTINUE.
The new and updated software will install.
10 Before the upgrade completes, the iTX Channel Config dialog for TXPlay 2 appears.
To confirm your channel details:
a Select your required Pla
For main or backup channels running on their own playout server, the Pla
Type can be set to a single channel type. If another playout type is required, select
it from the drop down list.
bIn the Ro
c Confirm the following fields are correct, as required:
• Channel Name
• Backup (
• Si
mulcast (if present)
• Plu
gin
• E
dit channel (if present)
• Liv
e channel (if present)
• In
tegrated XG
• U
se Dedicate Softel Driver
page 21.
tup.exe file and select Run as administrator.
yout section
yout Type.
yout
ot Name field, re-enter the base channel name.
This must be checked for backup channel upgrades)
18
Note: The combination of these fields that is available is determined by the
selected playout type.
Page 25

iTX Output Server 2
Channel Configuration Guide
11 Click SAVE.
The iTX Channel Config window closes.
12 Complete the installation of any other iTX modules you have selected, as described in
the iTX System Administrator Guide.
13 Apply any additional configuration that is required for your playout server. See Output
Server 2 Channel Configuration on page 29 for more information.
19
Page 26

Upgrading to Output Server 2
Upgrading to the Output Server 2 Service
20
Page 27

Adding Channels to an ITX Playout Server
This chapter explains how to add each type of channel to an iTX system, via the iTX Channel
Config dialog for TXPlay 2, and the basic rules for ensuring your combination of channels
and playout servers provide a solid resilience model.
For detailed information on setting up an iTX system, refer to the iTX System Administration
Guide.
Summary
Channel Resiliency Guidelines . . . . . . . . . . . . . . . . . . . . . . . . . . . . . . . . . . . . . . . . . . . . . . . . . . . . . . . . 21
About the iTX Channel Config Dialog . . . . . . . . . . . . . . . . . . . . . . . . . . . . . . . . . . . . . . . . . . . . . . . . . 22
Creating Your First Channel . . . . . . . . . . . . . . . . . . . . . . . . . . . . . . . . . . . . . . . . . . . . . . . . . . . . . . . . . . . 23
Adding a Backup Channel to an iTX System . . . . . . . . . . . . . . . . . . . . . . . . . . . . . . . . . . . . . . . . . . . 24
Adding a Simulcast Channel to an iTX System . . . . . . . . . . . . . . . . . . . . . . . . . . . . . . . . . . . . . . . . . 25
Adding a Simulcast Backup Channel to an iTX System . . . . . . . . . . . . . . . . . . . . . . . . . . . . . . . . . 26
Adding Extra Channels to a Playout Server . . . . . . . . . . . . . . . . . . . . . . . . . . . . . . . . . . . . . . . . . . . . 26
Creating a Dual Channel iTX System . . . . . . . . . . . . . . . . . . . . . . . . . . . . . . . . . . . . . . . . . . . . . . . . . . 27
Channel Resiliency Guidelines
When adding channels to an iTX system consider the following guidelines:
• Backup channels should be kept on separate playout servers from their main channels.
• If your playout servers have Corvid 44 or 88 SDI I/O cards, a dual channel playout type
can be used transmit the main for one channel and backup for a different channel. For
example:
• Playout Server 1 runs channel A main and channel B backup.
• Playout Server 2 runs channel B main and channel A backup.
• A simulcast channel does not provide redundancy for a main channel. If a main channel
fails its simulcast follower will also fail. Therefore, it is acceptable to run a main channel
and its simulcast channel on the same playout server.
• If your playout servers have Corvid 44 or 88 SDI I/O cards, it is acceptable to run the
main channel, its backup, the simulcast and the simulcast backup in the following
ways:
• Playout Server 1 runs the main channel and the simulcast backup.
• Playout Server 2 runs the simulcast channel and the main backup.
21
Page 28

Adding Channels to an ITX Playout Server
About the iTX Channel Config Dialog
About the iTX Channel Config Dialog
The basic details for the channel (or channels) you want to run on a playout server are
created using TXPlay 2’s iTX Channel Config dialog. From here you can define the channel
name, playout type, channel type and whether or not to use Vertigo XG graphics or the
legacy Softel subtitle drivers.
This dialog appears during the installation of Output Server 2 and can also be accessed
independently using the TXPlay 2 Config shortcut on your playout server’s Windows
desktop.
22
The table below describes the features of the iTX Channel Config dialog:
Field Description
Playout Type This drop-down list contains the available playout types for the SDI I/O
rd in the playout server. The playout type you select here will determine
ca
whether certain other fields and options are displayed.
Channel Name This drop-down list contains the full names of all of the channels that have
en added to the playout server. This includes any suffixes that are
be
applied when
Backup Checking this option identifies the channel as a backup channel and adds
the suffix
Backup or Simulcast are checked.
-BACKUP to the name in the Channel Name drop-down list.
Page 29

iTX Output Server 2
Channel Configuration Guide
Field Description
Simulcast Checking this option identifies the channel as a simulcast channel and
adds the suffix
This option is only available if a simulcast playout type is selected.
Root Name This field is used to enter the user defined channel name. When entering
names the following rules must be followed:
• Each channel name must be unique.
• You cannot enter hyphens or minus symbols (-).
• Backup and Simulcast channels must have the same name as their main channel
(followed by the appropriate suffix).
Note:
An alias for the Root Name can be created in iTX Desktop to provide a user
friendly channel name within the Channel Control layouts. For more
information see the iTX System Administration Guide.
Plugin The contents of this field defaults to ITXPlayer2.
It is recommended that you do not change the contents of this field.
-SIM to the name in the Channel Name drop-down list.
Additional
Channels
•Edit channel
Additional
Channels
•Live channel
Integrated XG Check this option if the playout server features integrated Grass Valley
Use Dedicated
Softel Driver
Add Extra Channel If you have selected a playout type that supports multiple channels on a
Check this option to create an edit channel alongside the current channel.
Check this option if you need to play out schedule events using the Live
Control on iTX Desktop
Vertigo XG graphics solution (often called XG Inside).
For more information about configuring XG Inside, see the Vertigo XG
Inside User Manual.
By default, the legacy Softel driver is enabled. Check this option to enable
the updated driver, introduced in iTX v2.5.
single playout server (such as dual channel or simulcast), click
Channel
Delete Channel Deletes the currently selected channel.
Save Any changes you make to a channel are only applied when you click Save.
This includes channel deletions.
Creating Your First Channel
Add Extra
to create the additional channels.
During a new installation of Playout Server 2, TXPlay 2’s iTX Channel Config dialog appears
so that you can create your first channel. Whether this is a main, backup or simulcast
channel depends on how you wish to configure your iTX system.
To create your first channel during installation:
1 Before the installation of Output Server 2 completes, the ITX Channel Config dialog for
TXPlay 2 Config appears.
2On the Playout Type drop-down list, select the required playout type.
23
Page 30

Adding Channels to an ITX Playout Server
Adding a Backup Channel to an iTX System
For the main channel in any iTX system, the default single channel Playout Type can be
used. If another playout type is required, select it from the drop down list.
3In the Ro
4 Check the following fields, as required:
•Backup
•Simulcast (if pr
• Edit channel (if present)
• Live channel (if pr
•Integrated XG
• Use Dedicate Softel Driver
ot Name field, enter the a name to identify the channel.
Note: The fields that are available are determined by the selected Playout
Type.
5Click SAVE.
The iT
X Channel Config window closes.
6 Complete the iTX installation as described in the iT
7 Configure Output Server 2 for your channel. See Output Server 2 Channel
Configuration on page 29 for more information.
esent)
esent)
X System Administration Guide.
Adding a Backup Channel to an iTX System
If you are creating a main/backup setup, you need to add the backup channel on a separate
playout server from the main channel. This ensures the backup channel is unaffected in the
event of the main channel failing.
To add a backup channel on its own playout server:
1 If is it not currently running, start TX
Config icon on the Windows desktop.
The iT
X Channel Config dialog appears.
2The Pla
channel in a typical main/backup setup a single channel type is recommended.
3In the Ro
4Check Backup.
The Ch
-BACKUP, e.g. ITX1-BACKUP.
5 Check the following fields, as required:
6Click SA
7 If you are adding a backup channel as part of an installation, complete the installation
as nor
yout Type drop-down list will default to a single channel type. For a backup
ot Name field, enter the same channel name as the main channel.
annel Name field now displays the contents of the Root Name field, followed by
• Edit channel
• Live channel
•Integrated XG
• Use Dedicate Softel Driver
VE. The iTX Channel Config window closes.
mal.
Play 2 Config by double-clicking on the TXPlay 2
24
Page 31

8 Backup channels should be configured in exactly the same way as their main channel.
See Output Ser
ver 2 Channel Configuration on page 29 for more information.
Adding a Simulcast Channel to an iTX System
A simulcast channel can be created for any existing channel, providing the playout server
has a compatible SDI I/O card installed. For more information see Playout Type Support, on
page 4.
Note: The steps below describe the process for creating a simulcast
channel on its own playout server. To add a simulcast channel to a
playout server that already has a channel configured on it, see Adding
Extra Channels to a Playout Server
To add a simulcast channel to its own playout server:
1 If is it not currently running, start TX
Config icon on the Windows Desktop.
TX Channel Config dialog appears.
The I
2On the Pla
Simulcast
yout Type drop-down list, select a simulcast playout type (e.g. Corvid 44,
).
3In the Root Name field, enter the same channel name as the main channel.
4Check Si
The Ch
-SIM, e.g. ITX1-SIM.
mulcast.
annel Name field now displays the contents of the Root Name field, followed by
5 Check the following fields, as required:
•Integrated XG
• Use Dedicate Softel Driver
6Click SA
The iT
VE.
X Channel Config window closes.
7 If you are adding a simulcast channel as part of an installation, complete the
lation as normal.
instal
8 Simulcast channels should be configured in the same wa
the following differences:
•Resolution
• Aspect Ratio Control rules
• Audio output
• Event substitution
See Output Ser
ver 2 Channel Configuration on page 29 for more information.
, on page 26.
Play 2 Config by double-clicking on the TXPlay 2
iTX Output Server 2
Channel Configuration Guide
y as their main channel, with
25
Page 32

Adding Channels to an ITX Playout Server
Adding a Simulcast Backup Channel to an iTX System
Adding a Simulcast Backup Channel to an iTX System
If you have a backup channel for your main channel, as well as a simulcast channel, it is
recommended that you also add channel that is a backup of the simulcast channel.
Note: The steps below describe the process for creating a simulcast
backup channel on its own playout server. To add a simulcast backup
channel to a playout server that already has a channel configured on it,
see Adding Extra Channels to a Playout Server
To add a simulcast backup channel to its own playout server:
1 If is it not currently running, start TX
Config icon on the Windows Desktop.
TX Channel Config dialog appears.
The I
2On the Playout Type drop-down list, select a simulcast playout type (e.g. Corvid 44,
Simulcast
3In the Ro
4Check Backup.
The Ch
-BACKUP, e.g. ITX1-BACKUP.
5Check Simulcast.
The Ch
-BACKUP-SIM, e.g. ITX1-BACKUP-SIM.
6 Check the following fields, as required:
•Integrated XG
• Use Dedicate Softel Driver
7Click SA
8 If you are adding a simulcast backup channel as part of an installation, complete the
instal
9 Simulcast backup channels should be configur
simulcast channel. See Output S
information.
).
ot Name field, enter the same channel name as the main channel.
annel Name field now displays the contents of the Root Name field, followed by
annel Name field now displays the contents of the Root Name field, followed by
VE. The iTX Channel Config window closes.
lation as normal.
Play 2 Config by double-clicking on the TXPlay 2
erver 2 Channel Configuration on page 29 for more
, on page 26.
ed in exactly the same way as the
Adding Extra Channels to a Playout Server
If are going to operate multiple channels from a single playout server (i.e. a simulcast
channel on the same playout server as the main channel), the extra channel can be added
to your iTX system from the iTX Channel Config dialog in TXPlay 2 Config.
To add an extra channel to a single playout server:
Play 2 Config by double-clicking on the TXPlay 2
26
1 If is it not currently running, start TX
Config icon on the Windows Desktop.
TX Channel Config dialog appears.
The I
2 From the Playout Type drop-down list, select one of the following types:
• Corvid 44, Simulcast
Page 33

iTX Output Server 2
Channel Configuration Guide
• Corvid 44, Dual Channel
• Corvid 88, Simulcast
• Corvid 88, Dual Channel
The Add Extra Channel button appears at the bottom of the dialog.
3Click A
dd Extra Channel.
The A
dd Extra Channel dialog appears.
4In the New Channel Root Name field, type the basic name for the extra channel, as per
the rules defined in About the iTX Channel Config Dialog, on
page 22.
5 Define the channel’s function:
a If you are creating a backup channel, check Ba
ckup.
b If you are creating a simulcast channel, check Simulcast.
c If you are creating a simulcast backup channel, check both Backup and Simulcast.
6Click OK.
The A
dd Extra Channel dialog closes.
7On the iTX Channel Config dialog, the following details are displayed:
•The Ro
ot Name field will display the name of the new channel.
•The Channel Name drop-down menu will now include the new channel name with
the appropriate suffixes (e.g.
-BACKUP for a backup channel, -SIM for a Simulcast
channel or both).
You can select each channel from the Channel Name dr
op-down list and configure
them individually, as required.
8Click SA
The iT
VE.
X Channel Config window closes.
9 If you are adding a channel as part of an installation, complete the installation as
nor
mal.
10 Apply any additional configuration that is required for your playout server. See Ou
tput
Server 2 Channel Configuration on page 29 for more information.
Creating a Dual Channel iTX System
iTX allows for two different channels to operate on a single playout server (for example
channel A main and channel B backup), providing it has a compatible SDI I/O card installed.
For more information see Playout Type Support, on
To create a dual channel system on a single playout server:
1 If is it not currently running, start TX
Config icon on the Windows Desktop.
page 4.
Play 2 Config by double-clicking on the TXPlay 2
27
Page 34

Adding Channels to an ITX Playout Server
Creating a Dual Channel iTX System
The ITX Channel Config dialog appears.
2 From the Playout Type drop-down list, select one of the following types:
• Corvid 44, Dual Channel
• Corvid 88, Dual Channel
3 Add the first channel, as described in Creating Your First Channel, on page 23.
4Click Add Extra Channel. The Add Extra Channel dialog appears.
5Fill-in the Add Extra Channel dialog, as described in Adding Extra Channels to a
Playout Server, on page 26.
6 Apply any additional configuration that is required for your playout server. See Output
Server 2 Channel Configuration on page 29 for more information.
28
Page 35

Output Server 2 Channel Configuration
Once Output Server 2 has been installed and you have defined your channels, each channel
must be configured to your specific requirements. This includes the channel configuration
needs to be done from within both the Output Server 2 user interface and iTX Desktop.
that
Note:
• Automatic Loudness Control (ALC) is not supported in iTX v2.6. This field
should be set to Off (the default setting).
Summary
Setting a Reference, Frame Rate Family and Output Timing . . . . . . . . . . . . . . . . . . . . . . . . . . . 29
Accessing the Output Server 2 User Interface . . . . . . . . . . . . . . . . . . . . . . . . . . . . . . . . . . . . . . . . . . 3
Selecting the Channel Resolution and Frame Rate . . . . . . . . . . . . . . . . . . . . . . . . . . . . . . . . . . . . 32
Configuring Ancillary Data . . . . . . . . . . . . . . . . . . . . . . . . . . . . . . . . . . . . . . . . . . . . . . . . . . . . .
Selecting the XG Inside Channel . . . . . . . . . . . . . . . . . . . . . . . . . . . . . . . . . . . . . . . . . . . . . . . .
Configuring Channel Delay . . . . . . . . . . . . . . . . . . . . . . . . . . . . . . . . . . . . . . . . . . . . . . . . . . . . .
Configuring Nielsen Watermarking . . . . . . . . . . . . . . . . . . . . . . . . . . . . . . . . . . . . . . . . . . . . . . . . . .
Configuring Dolby Metadata . . . . . . . . . . . . . . . . . . . . . . . . . . . . . . . . . . . . . . . . . . . . . . . . . . .
Configuring Audio Upmixing . . . . . . . . . . . . . . . . . . . . . . . . . . . . . . . . . . . . . . . . . . . . . . . . . . .
Configuring a Channel to Process SCTE104 Messages . . . . . . . . . . . . . . . . . . . . . . . . . . . . . . . . . 38
Configuring Subtitles . . . . . . . . . . . . . . . . . . . . . . . . . . . . . . . . . . . . . . . . . . . . . . . . . . . . . . .
About Channel and Live Event Routing . . . . . . . . . . . . . . . . . . . . . . . . . . . . . . . . . . . . . . . . . . . . . . .
About Channel Communication Setup . . . . . . . . . . . . . . . . . . . . . . . . . . . . . . . . . . . . . . . . . . . . . . . . 4
About Audio Output for Output Server 2 . . . . . . . . . . . . . . . . . . . . . . . . . . . . . . . . . . . . . . . . . . . . . .
About Simulcast Event Substitution Rules . . . . . . . . . . . . . . . . . . . . . . . . . . . . . . . . . . . . . . . . . . . . .
About GPI Devices and Simulcast Setups . . . . . . . . . . . . . . . . . . . . . . . . . . . . . . . . . . . . . . . . . . . . . .
. . . . . . 33
. . . . . . 33
. . . . . . 34
. . . . . . 36
. . . . . . 37
. . . . . . . . . . 43
1
. 35
46
9
49
51
53
Setting a Reference, Frame Rate Family and Output Timing
Before configuring Output Server 2, you should confirm your I/O Device Controller is using
the correct reference. If you have an external reference connected to your SDI I/O card, the
I/O Device Controller will automatically detect the input and set the frame rate family
accordingly. If you do not have an external reference, you will need to set the reference to
Freerun, select a frame rate family and enter output timing control manually, otherwise
the Output Server 2 service will start up in an error state.
29
Page 36

Output Server 2 Channel Configuration
Setting a Reference, Frame Rate Family and Output Timing
You can set a manual reference and frame rate from the Configuration panel of the I/O
Device Controller user interface.
Note: The Reference and Frame Rate Family for the channel must be
specified from the I/O Device Controller user interface before a Resolution
can be selected in the Channel tab of the Output Server 2 user interface.
To set the reference, frame rate family or output timing control:
1 On the playout server running the service, maximize the S
If Server Controller is not running, it can usually be found in Start>All Programs>iTX
2.0.
2 Select the C
ontrolled Services tab.
All of the services running on that server are listed.
3 Double-click on I/O Devic
e Controller.
The I/O Device Controller user interface appears.
4Click the Co
The C
nfiguration tab.
onfiguration panel appears.
erver Controller application.
30
5On the Reference drop-down list, if you are using an external reference, this should be
set to
External, otherwise select Freerun.
6 If you are using manual reference, select a value from the Fra
down list (e.g.
50.00 Hz).
This will determine the resolution you can set in the Channel tab of the
user interface. See S
electing the Channel Resolution and Frame Rate on page 32 for
me Rate Family drop-
Output Server 2
more information.
7 You can adjust the horizontal and vertical output timing relative to a time reference
signal using the c
ontrols in the Output Timing Control (Ext. Ref. Only) section. This
allows the SDI I/O card to synchronize an incorrectly timed video input signal to the
time reference signal.
Page 37

a To set the horizontal output timing value in pixels, enter a value or use the slider on
the Horizontal (Pixels) field.
b To set the vertical output timing value in lines
, enter a value or use the slider on the
Vertical (Lines) field.
8Click S
ave to store your changes and automatically reboot the I/O Device Controller
service.
Accessing the Output Server 2 User Interface
The configuration of the Output Server 2 service is performed from the Output Server 2
user interface, which is external to the iTX Desktop client. The user interface consists of two
panels, the Configuration panel and the Engineering panel.
iTX Output Server 2
Channel Configuration Guide
To access the Configuration and Engineering pa
1 On the playout server running the service, maximize the S
If Server Controller is not running, start it by going to
2.0
>Server Controller.
2 Select the C
ontrolled Services tab.
nels for the Output Server 2 service:
erver Controller application.
Start>All Programs>iTX
All of the services running on that server are listed in a grid, along with their status, URI
p
ath, executable path, failure information and command line arguments.
If you have more than one channel configured
on your playout server, there will be an
instance of the Output Server 2 service for each one. Each instance can be identified by
-n (channel name) argument in the Startup Parameters column.
the
3 Double-click on required instance of the Output Server 2 service.
The user interface for Output Server 2 appears showing three tabs, Sys
tem Status,
Configuration and Engineering.
The image below shows the C
onfiguration tab.
31
Page 38

Output Server 2 Channel Configuration
Selecting the Channel Resolution and Frame Rate
Selecting the Channel Resolution and Frame Rate
The resolution and frame rate for a channel is configured from the Channel tab of the
Output Server 2 user interface.
Note: If you are not using an external reference input into your SDI I/O card,
you must set the Reference and Frame Rate Family for the channel from the
I/O Device Controller user interface, otherwise Output Server 2 will start up
in an error state. See V
page 63.
To configure the Resolution and Frame Rate for an Output Server 2 channel:
1 Open the Output Server 2 user interface for
described in Accessing the Output Server 2 User Interface, on
2Go to Co
The channel configuration options appear. The R
on the top left of the window.
3 Specify the Resolution (e.g. 720p) for the channel using the drop-down list.
4The Fra
configuration and cannot be changed from Output Server 2.
5Click S
Alternatively, wait until you have finished making changes in other areas of the
C
onfiguration panel, then click Save.
nfiguration > Channel tab.
me Rate is determined by the Frame Rate Family setting I/O Device Controller
ave to store your changes and automatically reboot the Output Server 2 service.
iewing the Output Server 2 Engineering Panel on
the channel you want to configure, as
esolution and Frame Rate controls are
page 31.
32
Page 39

Configuring Ancillary Data
The ancillary data for a channel is configured from the Channel tab of the Output Server 2
user interface.
To configure ancillary data for an Output Server 2 channel:
1 Open the Output Server 2 user interface for
described in Accessing the Output Server 2 User Interface, on
2Go to Configuration > Channel tab.
The channel configuration options appear. The ancillary data options are grouped
t
ogether on the middle left of the window.
3 The values for the Active Format Description (AFD) insertion lines are determined by
the selected Resolution. The default is typically the switch line +2 for all formats.
To change the default values, enter the new values into the following fields:
• AFD S2016 Insertion Line
• AFD RP186 Insertion Line.
4 If you are using a vertical interval timecode (
complete the following fields, as required:
• SD VITC Detection Line
• SD VITC Insertion Line
5 To configure the ancillary timecode (ATC) data f
options from the following drop-down lists:
•HD ATC Source Type
•HD ATC Output Type
6Click S
ave to store your changes and automatically reboot the Output Server 2 service.
Alternatively, wait until you have finished making changes in other areas of the
C
onfiguration panel, then click Save.
iTX Output Server 2
Channel Configuration Guide
the channel you want to configure, as
page 31.
VITC) generator for an SD channel,
or a HD channel, select the required
Selecting the XG Inside Channel
If you have an SDI I/O card that supports multiple channels and have extra channels
configured on the same playout server, you must specify which channel XG Inside is to use
for each instance of Output Server 2. This is done from the Channel tab of the Output
Server 2 user interface.
For more information about configuring Vertigo XG Inside, see the Ve
Guide.
rtigo XG Inside User
33
Page 40

Output Server 2 Channel Configuration
Configuring Channel Delay
To select the XG Inside channel for Output Server 2:
1 Open the Output Server 2 user interface for the channel you want to configure, as
described in Accessing the Output Server 2 User Interface, on
2Go to Co
The channel configuration options appear. The XG Inside options are in the top right
corner of the window.
nfiguration > Channel tab.
IMPORTANT
If this area is grayed out it means you do not have the necessary software
installed on your playout server. For more information about configuring
Vertigo XG Inside, see the
page 31.
Vertigo XG Inside User Guide.
3For Co
4Click S
nfigure XG Inside, use the drop-down list to select the channel on which to
render XG Inside graphics.
ave to store your changes and automatically reboot the Output Server 2 service.
Alternatively, wait until you have finished making changes in other areas of the
C
onfiguration panel, then click Save.
Configuring Channel Delay
A channel delay may be needed to adjust the output timing for transitions, such as when
switching the output of a national channel into and out of regional sub-channels. For
accurate transitions, the internal processing may need adjusting to take account of the
throughput time of a live source. This is configured from the Channel tab of the Output
Server 2 user interface.
To configure a the channel delay for an Output Server 2 channel:
1 Open the Output Server 2 user interface for
described in Accessing the Output Server 2 User Interface, on
2Go to Co
The channel configuration options appear. The channel delay options are on the
bottom left of the window.
nfiguration > Channel tab.
the channel you want to configure, as
page 31.
34
3To set the Channel Delay seconds:ms, enter a value in seconds and milliseconds or use
the slider.
4Click S
ave to store your changes and automatically reboot the Output Server 2 service.
Alternatively, wait until you have finished making changes in other areas of the
Configuration panel, then click Save.
Page 41
Configuring Nielsen Watermarking
The Nielsen watermark is an inaudible cue tone in the audio stream of the channel output
signal. In the USA and Canada, the Nielsen watermark is detected by devices that provide
information for television audience measuring.
Both Nielsen watermarking version 2 (N2) and version 4 (NW) are supported. Either format
can be inser
To configure Nielsen Watermarking on audio output:
1 Open the Output Server 2 user interface for
described in Accessing the Output Server 2 User Interface, on
2Go to Co
3Check Enable W
The Nielsen Watermark Encoder Configuration panel appears.
ted individually or both can be inserted simultaneously into the data stream.
Note: Unlike N2 watermarking, NW processing does not support the
overwriting of audio codes that are present in the stream before the
watermarking process begins. Instead, the watermark engine leaves
space for a second (and possibly a third) Final Distributor Service ID in the
program band.
nfiguration > Watermark tab.
atermarking On Audio Output.
iTX Output Server 2
Channel Configuration Guide
the channel you want to configure, as
page 31.
4In the Audio Output Group field, enter the output group to which you want to apply
the watermark.
5In the P
6In Ser
rocess Type field, select one of the following:
• N2
• NW
• Bo
th
vice ID field, enter the Nielsen channel ID number.
35
Page 42

Output Server 2 Channel Configuration
Configuring Dolby Metadata
7In the Check Digit field, enter the two-letter Nielsen check digit.
8In the Distribution Type field, select one of the following:
• Pro
gram Content
• F
inal Distributor
• Unknown Distribution
9Click S
ave to store your changes and automatically reboot the Output Server 2 service.
Alternatively, wait until you have finished making changes in other areas of the
Configuration panel, then click Save.
Configuring Dolby Metadata
Dolby metadata can be configured for Dolby E and Dolby D output groups using the Dolby
Metadata tab. During configuration, you can set specific values for each parameter and set
a resolution rule.
Setting the Rul
Setting the Rul
that if the Dolby decoder provides a setting for that metadata parameter, then the
decoder’s setting takes precedent over the set value.
To configure metadata for Dolby E and/or Dolby D output groups:
1 Open the Output Server 2 user interface for
described in Accessing the Output Server 2 User Interface, on
2Go to Co
The Dolby metadata configuration options appear.
e field to Manual Value applies the set value as the constant default.
e field to Decoders, then manual value applies a conditional setting such
the channel you want to configure, as
page 31.
nfiguration > Dolby Metadata tab.
36
Page 43

3 Select a Dolby output group from the Audio Output field.
Note: Clicking Reset will revert the values to the default profile, as defined
by the type of Dolby output chosen in iTX Desktop (e.g. DolbyD 2.0, DolbyE
5.1)
4 Review and/or set the metadata parameters that are listed in the Metadata column.
Hovering over the metadata setting field disp
parameter.
5 For each metadata parameter, set the associated Ru
• Manual V
• De
6Click S
ave to apply and store the metadata parameter settings.
Alternatively, wait until you have finished making changes in other areas of the
Configuration panel, then click Save.
alue
coders, then Manual value.
Configuring Audio Upmixing
iTX Output Server 2
Channel Configuration Guide
lays a brief description of the metadata
le field to either:
The Upmixing tab is only required for channels where the audio input needs to be upmixed
to a 5.1 group before being output. For example a stereo input being upmixed to Dolby 5.1.
To enable and configure audio upmixing:
1 Open the Output Server 2 user interface for
described in Accessing the Output Server 2 User Interface, on
2Go to Configuration > Upmixing tab.
The upmixing configuration options appear.
the channel you want to configure, as
page 31.
3 Select a Dolby output group from the Audio Output field.
37
Page 44

Output Server 2 Channel Configuration
Configuring a Channel to Process SCTE104 Messages
The parameters for the upmix are only visible when a 5.1 audio group is selected (e.g
DolbyE 5.1, DolbyD 5.1, PCM 5.1)
Note: Clicking Reset will revert the values to the default profile, as defined
by the type of Dolby output chosen in iTX Desktop (e.g. DolbyD 2.0, DolbyE
5.1)
4Click Upmixing Enabled. The red cross changes to a green tick.
5In the St
ereo (L/R) Channels Level field, enter the stereo input volume level in decibels.
The minimum value is -24dB and the maximum is 6dB. The default is -6dB.
Alternatively set the level to
6In the St
7In the C
ereo Width field, enter a value from 0 to 31. The default is 27.
enter (C) Channel Level field, enter the center input volume level in decibels.
The minimum value is -24dB and the maximum is 6dB. The default is 1dB.
Alternatively set the level to
8In the LFE Level field, enter the low-frequency effects input volume level in decibels.
The minimum value is -24dB and the maximum is 6dB. The default is -10dB.
Alternatively set the level to
9In the LFE Filter field, enter a value in hertz for low-frequency effects. The default is 80
Hz for 50Hz video formats and 66.7Hz for 59Hz video formats.
10 Click the Surr
ound Mode field.
The Select Item dialog appears.
11 Select the required surround mode. The options are:
•
Speech (default)
• Standard
• Movie.
12 In the Surround (Ls/Rs) Channels Level field, enter the surround sound input volume
level in decibels. The minimum value is -24dB and the maximum is 6dB. The default is 5dB.
Alternatively set the level to
13 In the Surr
ound Delay (ms) field, enter the required delay in milliseconds. The default is
16.
14 Click S
ave to apply and store the upmixing settings.
Alternatively, wait until you have finished making changes in other areas of the
C
onfiguration panel, then click Save.
Mute.
Mute.
Mute.
Mute.
Configuring a Channel to Process SCTE104 Messages
The video signal to the SDI video card in the playout server can contain SCTE 104 messages
(also known as digital cue tones). iTX can detect such messages and respond to them to
start the playout of a sequence that is on hold in a schedule or end a sequence iTX is
currently playing. SCTE refer to the time space provided by broadcasters to trigger these
sequences as the “avail”. Output Server 2 gives users the ability to enable and disable
individual SCTE 104 features independently, depending on their requirements.
38
Page 45

There are two sides to configuring SCTE104: the features you want to use need to be
configured in the SCTE104 tab on the Output Server 2 Configuration panel, while the
message types need to be configured via one of two different plugins in the iTX Desktop:
•The legacy VAN C plugin
• The enhanced SCTE104 plugin
The differences between these plugins are explained below.
About the VANC plugin
The VANC plugin is the legacy SCTE104 solution, which supports the following features:
• The ability to react to inbound splice request commands sent in a Multiple Operation
Message, providing they are the only command in the Multiple Operation Message.
• Pass-through of splice request commands to downstream services. Any unsupported
commands are stripped from the message.
• Insertion of outbound splice commands.
About the SCTE104 plugin
iTX Output Server 2
Channel Configuration Guide
The SCTE104 plugin supports the following enhanced features:
• The ability to react to inbound Multiple Operation Messages containing more than one
command, including:
• Splice request commands.
• Local and National Avail Insert Commands, either individually or both in the same
Multiple Operation Message.
•Legacy DTMF triggers.
• Enhanced message pass-through, which provides the following additional
functionality:
• All inbound SCTE104 messages can be either passed through or blocked.
• When pass-through is enabled, iTX allows for the passing of “NULL” SCTE messages
for heartbeating to downstream services.
• The ability to enable or disable pass-through for all commands within a Multiple
Operation Message.
Splice commands received outside of a configured available window are unchanged.
• Insertion of outbound Multiple Operation Messages containing the following
additional commands:
• Local and National Avail Insert Commands, either individually or both in the same
Multiple Operation Message.
•Legacy DTMF triggers.
Configuring SCTE104 Features
To configure SCTE104 features for Output Server 2:
1Open the Configuration panel and click the SCTE104 tab, as described in Accessing the
Output Server 2 User Interface, on page 31.
39
Page 46
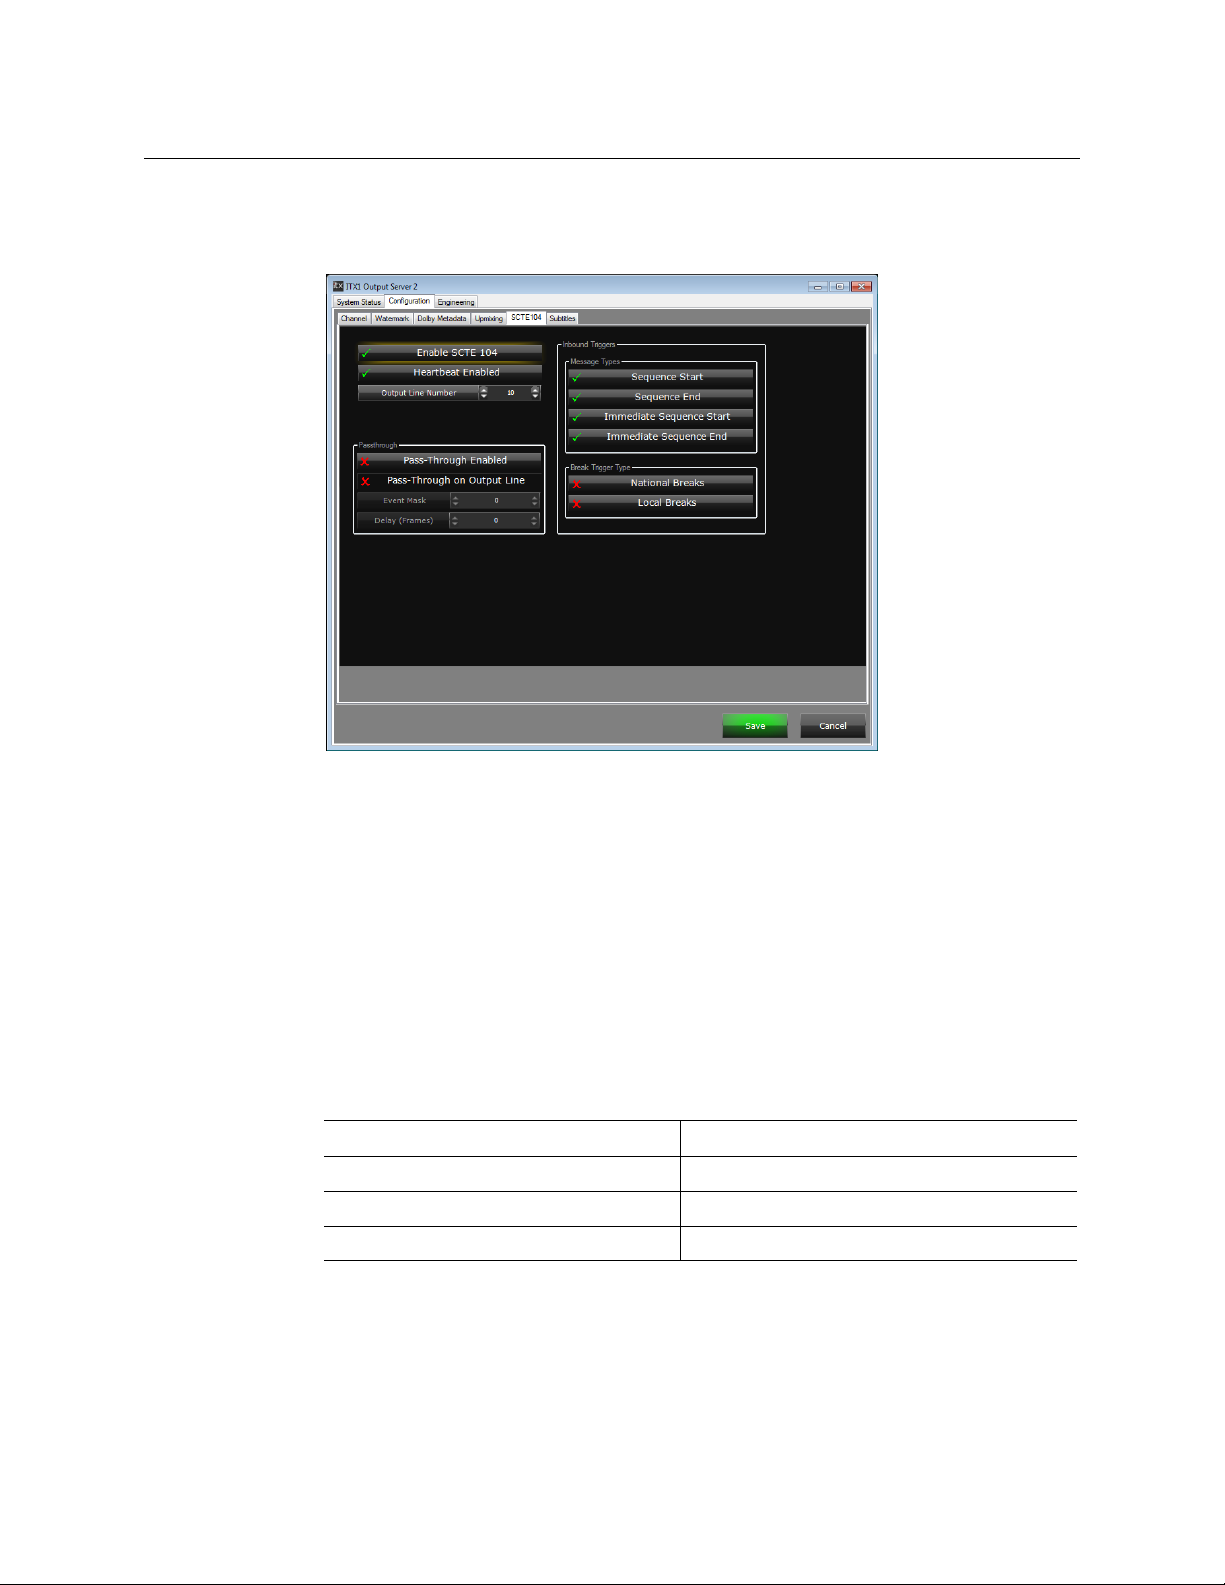
Output Server 2 Channel Configuration
Configuring SCTE104 Features
2Check Enable SCTE 104.
As well as enabling SCTE104 signals, checking this options makes the additional
SCTE104 features appear.
3 To enable the passing of null SCTE messages for heartbeating to downstream services,
click Heartbeat Enabled.
This option is only supported by the SCTE104 plugin.
4In the Out
put Line Number field, enter the vertical ancillary (VANC) line number on
which to output SCTE messages.
5 To enable pass-through to downsteam services, check P
ass-Through Enabled.
This option is only supported by the SCTE104 plugin.
6 To have incoming messages passed through on th
e selected output line number, check
Pass-Through on Output Line.
7 To perform partial or full replacement of splice
event inbound SCTE messages, enter a
value in Event Mask.
The mask configuration allows for bit level "OR" masking. For example:
Incoming message (hex):
Inputted Event Mask string (dec):
Actual Event Mask (hex):
Output (hex):
0x00005c7e
1073741824
0x40000000
0x40005c7e
This option is only supported by the SCTE104 plugin.
8 To set the delay TXPlay 2 allows before it r
esponds to Start Sequence and End
Sequence messages, enter a value in Delay (Frames).
9 Enable the required I
nbound Triggers by checking any of the following options:
40
Page 47
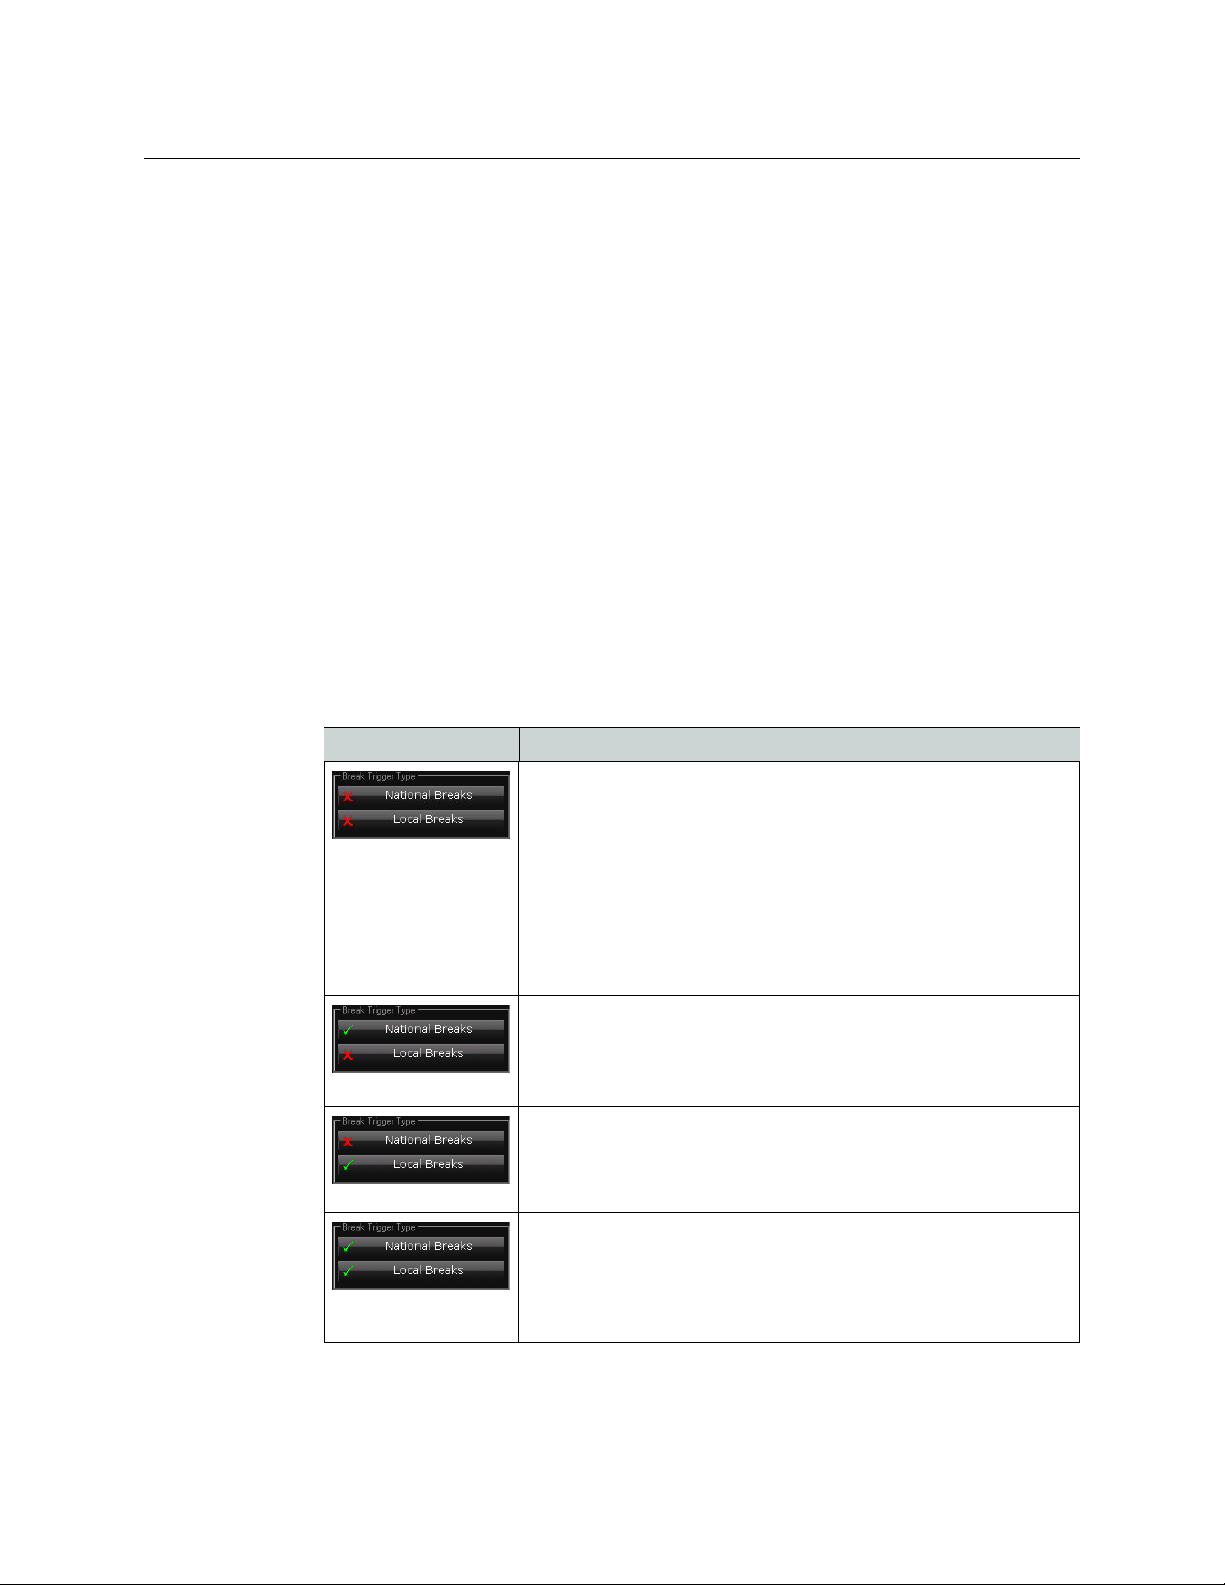
iTX Output Server 2
Channel Configuration Guide
• If you want the channel to process spliceStart_normal insert commands, enable
Sequence Start.
• If you want the channel to process
spliceEnd_normal insert commands, enable
Sequence End.
• If you want the channel to process
spliceStart_immediate insert commands,
enable Immediate Sequence Start.
These commands can be used to start a sequence early, but their usage is not
r
commended by SCTE 35 [1] and may result in inaccurate splices.
e
• If you want the channel to process
spliceEnd_immediate insert commands,
enable Immediate Sequence End.
These commands can be used to terminate a sequence earl
y, but must include the
correct event ID for the sequence that is to be canceled.
All message types can be enabled at once
10 Enable the required Break T
rigger Types by enabling or disabling the following
required.
, if
options:
• National Breaks
•Local Breaks
The table below describes the effects from v
rious combinations of these two options:
a
Combination Result
iTX will trigger in all cases, i.e. when it receives Multiple Operation
Messages with:
•Only a splice_request_data command (legacy SCTE104)
•Both a splice_request_
segmentation_descriptor_request (for either local or national
breaks).
NOTE:
If you are only using the legacy VANC plugin, both break trigger
types must be disabled.
iTX will only trigger if a Multiple Operation Message is received
with a
segmentation_descriptor_request with the
segmentation_type_id set to National (value 0x32).
iTX will only trigger if a Multiple Operation Message is received
with a
segmentation_descriptor_request with the
segmentation_type_id set to Local (value 0x30).
iTX will only trigger if a Multiple Operation Message is received
with a
segmentation_descriptor_request with the
segmentation_type_id set to Local (value 0x30) or National
(value 0x32).
data and a
splice_request_data and a
splice_request_data and a
splice_request_data and a
11 Click Save to store your changes and automatically reboot the Output Server 2 service.
41
Page 48

Output Server 2 Channel Configuration
Configuring the SCTE104 Message Types
Alternatively, wait until you have finished making changes in other areas of the
Configuration panel, then click Save.
Configuring the SCTE104 Message Types
In addition to the configuration that has to be performed in the Output Server 2 user
interface, the following configuration needs to be performed within iTX Desktop. The
required configuration is dependent on whether you are using just the legacy features or
both the legacy and enhanced features.
Configuring the legacy VANC plugin
For channels that will only process legacy SCTE104 messages:
•In Engineering > Channel Config > Plugins > VANC specify:
• In
sert Type (select SPLICER)
•Automatic System Index
•Duration (Frames)
For more information see the iT
X System Administration Guide.
Configuring enhanced SCTE104 plugin
For channels that will process both legacy and enhanced SCTE104 features:
•In Engineering > Channel Config > Plugins > SCTE104 specify:
•Insert Type
•Automatic System Index
•Duration (Frames)
For more information see the iT
X System Administration Guide.
Configuring sequences for SCTE104
A sequence is a small group of schedule events that iTX handles as a single event block. A
typical sequence might contain a few video clip events and secondary events, with certain
transitions or vision effects. As such, sequences can be used to schedule a block of
advertisements or trails, triggered to start and stop by SCTE104 messages.
• For sequence control via SCTE104 messages, in the Eve
enable the Allow External Takes.
• For scheduled break sequences on the inbound channel:
•In Eng
ineering > Channel Config > Channel Config 2, the Fixed Availability
Windows is used to control how the start and end times for a sequence are
interpreted.
When enabled, the Sta
applied as specified in the Event Editor for the item. The Start and End Window
times include the time and date for the item.
rt Window and End Window times for sequences are
nt Editor for the sequence
42
Page 49

iTX Output Server 2
Channel Configuration Guide
When disabled, the Start Window and End Window times for sequences are
applied relative to the start time of the item.
Note: Once an availability window has been set and applied it cannot be
removed. If the availability window is changed, the new window will take
effect, but the previous window will not be removed until the Output Server
2 service is restarted.
•In Event Editor for the sequence item:
• Specify the sequence’s availability window by entering timecodes in the Start
Window and End Window fields.
How these times are interpreted is dependent on the F
Windows option in Channel Config 2.
• If required, enable SC
iTX inserts an SCTE 104 message to trigger the insertion of local advertisement.
It does this when it plays out a sequence as a result of receiving an SCTE
message containing a delay.
Unless you require this specific functionalit
not selected.
TE104 LocalAd.
y, you should ensure the option is
ixed Availability
For more information on configuring availability windows see the iT
Guide.
For more information on working with sequences see the iT
Configuring Subtitles
IMPORTANT
• For basic closed captions or subtitles to function you must configure a
minimum of one stream and one service (e.g. page 888).
• The Subtitles tab is a placeholder for future development. The following
func
tionality is not currently supported:
•The
Channel section
• Multiple language closed captions.
• Open captions.
Accessing the Subtitles Tab
To access the Subtitles tab:
1 Open the Output Server 2 user interface for
described in Accessing the Output Server 2 User Interface, on
2Go to Co
The Subtitles configuration options appear. By default all of the subsections are
collapsed.
nfiguration > Subtitles tab.
X System Administration
X Desktop Operator Guide.
the channel you want to configure, as
page 31.
43
Page 50

Output Server 2 Channel Configuration
Creating a Subtitle Stream
3 You should now create and configure a subtitle stream. See Creating a Subtitle Stream
below.
Creating a Subtitle Stream
Streams are used to carry one or more subtitle services within the video. Therefore, you
must create a stream before you can create a service.
To create a stream:
1On the Subti
2Click Add.
An Ad
3 Enter the new stream name in the Str
4In the In
required for subtitle transmission.
For timely delivery of a single subtitle servic
5Click OK to exit the Ad
6 The stream can now be configured. See C
tles tab, expand the Stream section.
d Stream window appears.
sertion Frames section, check the boxes to allocate the number of video lines
eam Name field.
e, 4 continuous video lines will be needed.
d Stream window.
onfiguring a Subtitle Stream below.
44
Page 51

Configuring a Subtitle Stream
To conf igure a strea m :
1On the Subti
2 Select a stream from the St
3Check the Du
active.
a Enter the page and magazine where the dummy data to be transmitted is stored.
b Select, from the Language dr
data.
4Expand the In
needs to be changed. The video lines were specified when the stream was created.
5Click S
Alternatively, wait until you have finished making changes in other areas of the
C
onfiguration panel, then click Save.
tles tab, expand the Stream section.
mmies check box if empty Teletext data is to be sent to keep the stream
sertion Frames section, if the video lines the subtitles are to be sent on
ave to store your changes and automatically reboot the Output Server 2 service.
Creating a Subtitle Service
iTX Output Server 2
Channel Configuration Guide
ream drop-down list.
op-down list, the character set to be used for dummy
Each closed subtitle page requires its own service e.g. page 888.
To cre a te a se rvi ce:
1On the Subti
2Click Add.
An Ad
3 Enter the Nam
4 Select a Type of Teletext (closed) from the drop-down list.
5 The service can now be allocated to a strea
Allocating a Subtitle Service to a Subtitle Stream be
tles tab, expand the Service section.
d Service window appears.
e for the service (e.g. p888).
m and configured as required. See
Allocating a Subtitle Service to a Subtitle Stream
low.
To allocate a service to a stream:
1On the Subti
2 Select a service from the Se
3 Select a stream to which the service is to be allocated from the St
tles tab, expand the Services section.
rvice drop-down list.
ream drop-down list.
45
Page 52
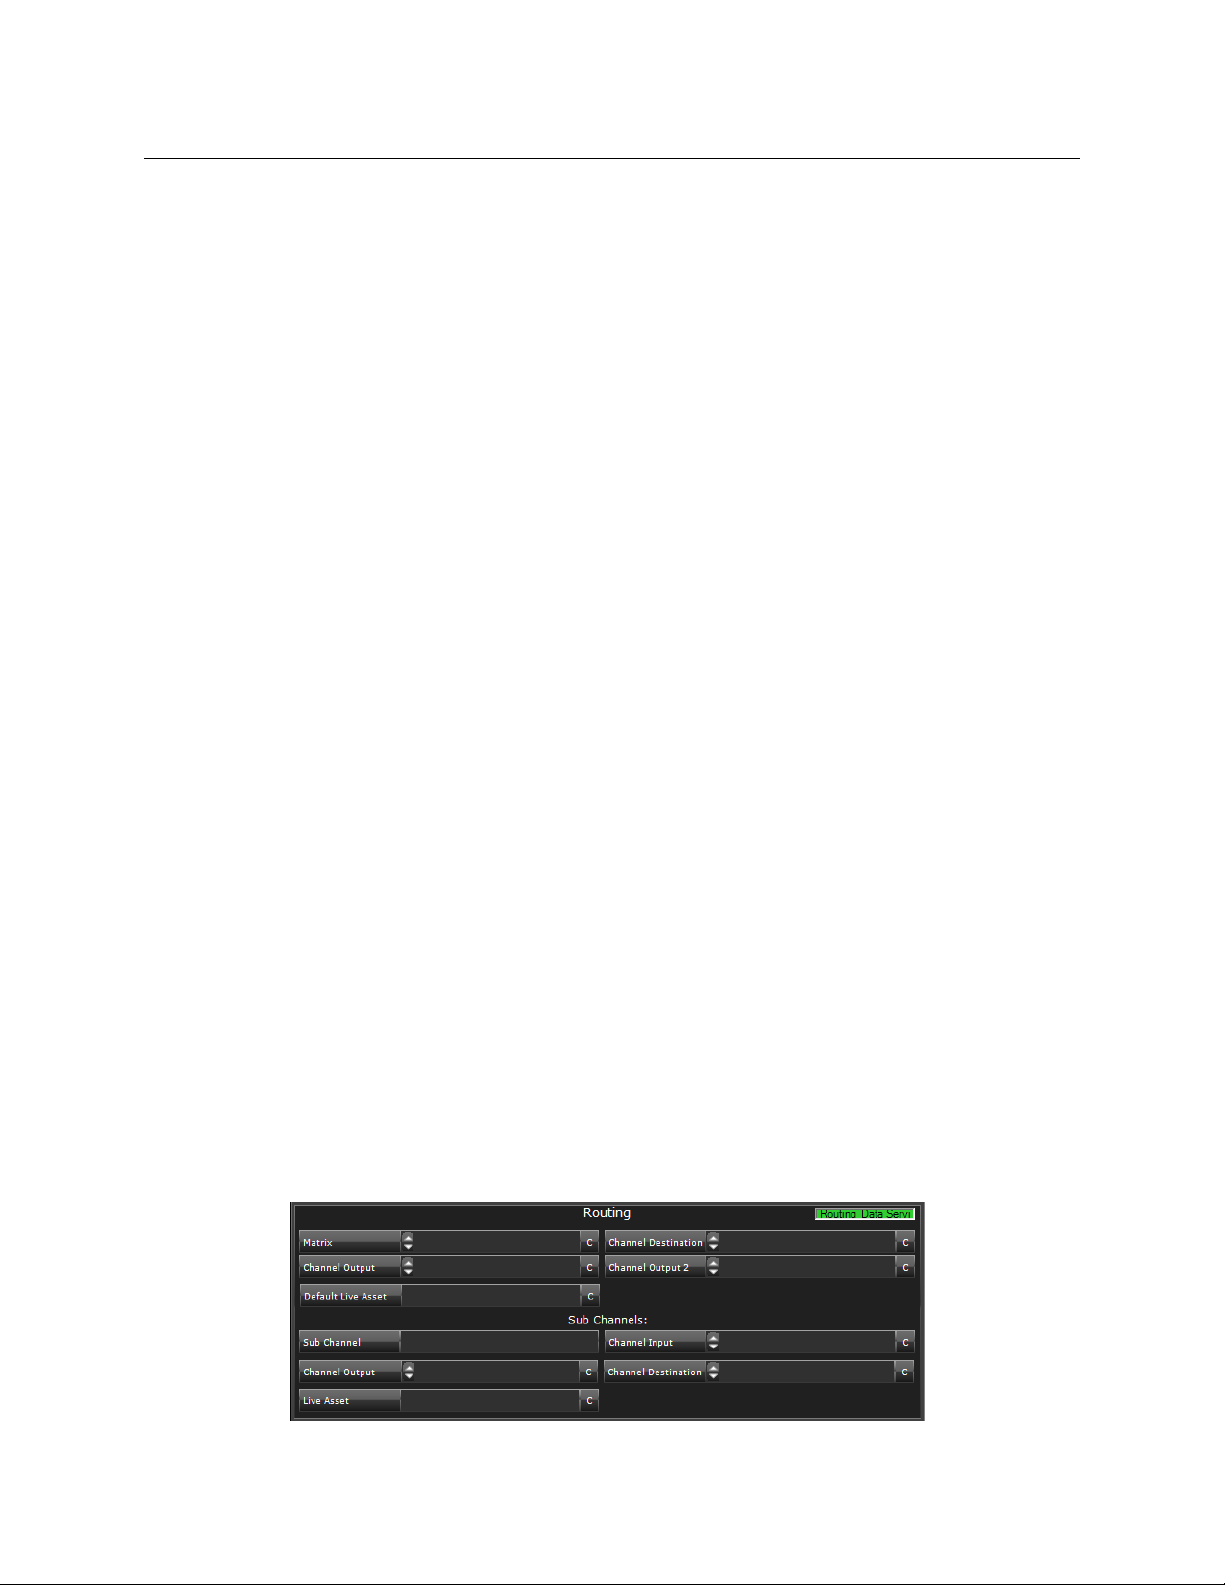
Output Server 2 Channel Configuration
About Channel and Live Event Routing
4 Select the subtitle language character set to be used, from the Language drop-down
list.
5 Complete the Ma
be displayed on.
6Click S
ave to store your changes and automatically reboot the Output Server 2 service.
Alternatively, wait until you have finished making changes in other areas of the
C
onfiguration panel, then click Save.
gazine and Header Page fields of the Teletext page the subtitles will
About Channel and Live Event Routing
So that each channel is sent to the right transmission system, iTX needs to know the details
of channel sources and the matrix router crosspoints (destinations). This is known as
routing and it is configured via the Routing panel on the Channel Config pop-up layout in
the iTX Desktop.
The way each channel needs routing depends on the
channels share the same destination as their main channel, while a simulcast needs a
different destination to their main channel.
For a live event, iTX receives a live feed from a router source and switches this into the
channel output instead of
destination on a matrix router and one or more live feeds are connected as sources. The
router sources of available live feeds are specified in assets called live events in the system
database.
playing out a media file. The playout server is connected as a
Prerequisites for Channel Routing
To correctly route iTX channels, you must install the following on your framework server:
• Routing Data Service
•TXRoute service
• The router service for you model of router (e.g. HCO).
For more information on installing and configuring routing, refer to the iT
Administrator Guide.
About the Routing Panel
The Routing panel is located in iTX Desktop in Engineering > Channel Config > Channel
Config 3 tab. From here you can select which matrix router a channel should use, the
channel outputs, the channel destination and the default live asset.
channel type. For example, backup
X System
46
Page 53

iTX Output Server 2
Channel Configuration Guide
The Routing panel consists of the following fields:
Field Description
Matrix Use this field to select the matrix router (or Router Bridge) from the list
available routers. This field is required for all routing configurations.
of
Channel Destination Use this field to select the router destina
system receiving the channel output is connected.
iTX requires this entry if the channel is par
Any channel that is routed to this destina
leader channel.
Channel Output Use this field to select router source
the channel is running on.
iTX requires this entry if the channel is par
Channel Output 2 Use this field to select any router source you want to monitor. iTX can
oute this source to a monitor when the channel is selected on the
r
Channel Control layout. This option is useful for monitoring the live
video signal for a pass-through channel that is being fed into an
playout server.
Default Live Asset Where a fixed or hardwired router source is used for a number of
erent live assets that are unknown to iTX, a default live asset can be
diff
substituted in each case without changing the unique names of the
original live assets. Use this field to select the name of the default live
asset:
Note: You also need to clear the
Matrix and Destination boxes on the
tion to which the transmission
t of a main/backup setup.
tion is, by definition, the
name of the playout server that
t of a main/backup setup.
Live Event Configuration panel if they are populated. See Routing
Live Events to Destinations for Simulcast Setups on
page 48.
Routing Channels to Destinations
To configure the routing for a channel:
1 Start the iTX Desktop on a client PC and login with an Administrator profile.
2Open the Eng
3Click Ch
The Channel C
4From the Vi
5 Select a channel to configure.
6Click the Channel C
7For Ma
8For Channel Destina
• The main and backup should be routed to the same destination.
• The simulcast channel and simulcast backup should be routed to the same
dest
9For Cha
10 For Cha
ineering layout.
annel Config.
onfig pop-up layout appears.
ew list, select the view with the channels to be configured.
onfig 3 tab.
trix select the matrix with the required destination and output.
tion select the destination required the channel being configured:
ination.
nnel Output select an output for monitoring the channel.
nnel Output 2 select an output for monitoring the channel, if required.
47
Page 54

Output Server 2 Channel Configuration
Routing Live Events to Destinations for Simulcast Setups
11 Click Save.
12 Repeat step 4 to step 11 for each channel to be configured.
Routing Live Events to Destinations for Simulcast Setups
For live events, you must specify the router matrix and destination of the playout server in
the Live Event Configuration panel of the Live plugin configuration.
In a simulcast setup, each channel must be routed to the same destination.
To specify the router destination for live events in a simulcast setup:
1 Start the iTX Desktop on a client PC and login with an Administrator profile.
2Open the Eng
3Click Ch
The Channel C
4From the Vi
5 Select a channel to configure.
6Click the Plu
7Click the Liv
The L
ive Event Configuration panel appears.
8For Ma
9For Destina
• The main and simulcast pair should be r
• The backup and simulcast back
10 For Default Duration box, set a default duration for live events with no duration in the
live event asset or schedule.
The hierarchy for live event durations is a duration specified in the schedule has the
highest priorit
11 Click S
12 Repeat step 4 to step 10 for each channel to be configured.
ave.
ineering layout.
annel Config.
onfig pop-up layout appears.
ew list, select the view with the channels to be configured.
gins tab.
e plugin tab.
trix, select the router matrix with the required destination and output.
tion select the destination required the channel being configured:
outed to the same destination.
up pair should be routed to the same destination.
y then asset durations then default durations.
48
Page 55

For information on how to configure live events for standard channels, see the iTX System
Administration guide.
About Channel Communication Setup
In addition to the way your channels are defined in TXPlay2’s iTX Channel Config, in iTX
Desktop you need to define the channel communication setup. This is critical for TXPlay 2
to be able to manage the leader/follower network for any channels that are in a
main/backup or simulcast setup.
There are two options that within the Engineering layout that need to be enabled or
sabled, depending on the type iTX channel setup you are configuring. The options are
di
called Master/Slave Setup and Simulcast Setup and they can be found in the Channel
Config pop-up layout, on the Channel Config 3 tab, under the Routing options.
Configuring the Channel Communication Setup
To configure the channel communication setup for a channel:
1 Start the iTX Desktop on a client PC and login with an Administrator profile.
2Open the Eng
3Click Ch
The Channel C
4From the View list, select the view with the channels to be configured.
5 Select a channel to configure.
6Click the Channel C
The channel communication setup options appear be
ineering layout.
annel Config.
onfig pop-up layout appears.
onfig 3 tab.
iTX Output Server 2
Channel Configuration Guide
low the Routing panel.
7 Enable the channel communication options using the following criteria:
• For any backup channel or cha
• For any simulcast channel or main channel with a simulcast channel, enable
Sim
ulcast Setup.
• For any channel that is part of both a main/backup setup and a simulcast setup,
enable both
8Click S
9Repeat step 4 and step 8 for each channel to be configured.
ave.
options.
nnel with a backup, enable Master/Slave Setup.
About Audio Output for Output Server 2
Output Server 2 needs to be instructed how to embed audio tracks in its SDI output signal.
This configuration is performed from wi
on the Channel Configuration pop-up layout, on the Engineering layout, shown below:
thin iTX Desktop, using the Audio Mapping panel
49
Page 56

Output Server 2 Channel Configuration
Configuring Audio Output for Output Server 2
The Language, Group and Default columns are used to map each track to a channel. The
mapping is hierarchical:
1 First iTX will attempt to map the track via the selected Language.
2 If a language is not available, iTX will map using the Gr
3 If neither the Language nor the Group are available, the track will be defaulted to the
group selected in the Default column.
Configuring Audio Output for Output Server 2
IMPORTANT
• When configuring the audio output for a backup channel, the settings must mirror
its main channel.
• When configuring the audio output for a simulcast ch
the requirements of the simulcast channel, not the main channel.
• When configuring the audio output for a simulcast backup channel, the settings
must mir
ror the simulcast channel.
oup.
annel, the settings must meet
To configure the audio mapping for an Output Server 2 system:
1 Open the iTX Desktop and click the En
gineering layout.
2Click Channel Config.
The Channel C
3From the Vi
onfig pop-up layout appears.
ew list, select the view containing the channels to be configured. The
channels associated with that view appear.
4 Click the name of the channel to be configured.
5Click the Channel C
onfig 4 tab.
6In the Audio Mapping section there will be a default output track, with the following
settings:
dio Type column set to DolbyD.
• Au
• Language column with no value (blank).
• Gr
oup column set to Unset.
• Default column set to 0.
These settings should be changed to match the tracks in your audio input.
7 On the first track, click the Au
Dolby D 5.1)
dio Type drop-down list and select the required type (e.g.
When selecting an Audio Type, consider the following:
• PCM (Auto) will assign 16 channels to the track, even if not all of the channels are
required. Any unused channels will be automatically set to mute.
Dolby D (Auto) is the same as Dolby D 5.1.
•
50
Page 57

• Dolby E (Auto) is not a recommended setting. Use either DolbyE 5.1 or DolbyE
.
5.1+2
• Raw for MPEG audio codecs is not supported.
8 To map the track by a language tag:
aClick on the Lang
uage field.
The Language Selection pop-up layout appears.
b Select the language code(s) for the default output track.
cClick Ad
d.
dClick OK.
9 To map the track by a group, click on the Gr
10 Click the De
fault column and select a group value to assign to the track. This is the
oup drop-down list and select a value.
group that will be used in the event neither the language nor the group are available.
11 To map another track, click Ad
12 Click S
ave then Close.
d then repeat step 7 to step 10.
About Simulcast Event Substitution Rules
iTX Output Server 2
Channel Configuration Guide
If you require alternative logos, CGs or stills for your simulcast channel compared to your
main channel, this can be configured from the Simulcast Channel Config panel on the
Channel Config pop-up layout in iTX Desktop.
This panel only appears for simulcast channels and
allows you to define a rule to determine
when logo, CG and stills events scheduled on the main channel are substituted on the
simulcast channel. Only one rule can be defined and it is applied to all matching assets.
Substitutions are defined by the suffix of the HD asset name, the suffix of the SD asset name
or both. For example, if
_HD is entered into the Original Suffix field and _SD is entered into
51
Page 58

Output Server 2 Channel Configuration
Cascading Logo Replacement Rules
the Substitution field, an asset called iTX-Logo_HD would be substituted for a file called
iTX-Logo_SD
before playing out on the simulcast channel.
Note:
• If Logo or CG are selected for substitution, live logos and live captions will
also be subject to the same replacement rules.
• Both the original and the substitution assets must be a
media store in order for the substitutions to take place.
• If you are operating a simulcast backup channel, you must apply the same
substitution rules on
the simulcast channel as its simulcast channel.
Cascading Logo Replacement Rules
On playout, if a scheduled logo is defined in the Logo Setup plugin it will be substituted for
its replacement before going to air.
If you are running a Simulcast channel and the replacement logo then meets the criteria
de
fined in the Simulcast Replacement Rules, a further replacement will be performed.
This provides two levels of control for logo replacement, as illustrated by Figure 6-1.
vailable on the
52
Fig. 6-1: How logo replacement rules cascade in iTX Desktop
Page 59

Channel Configuration Guide
For more information about logo replacement using the Logo Setup configuration, see the
iTX System Administration Guide.
Configuring Event Substitution Rules for Simulcast Channels
IMPORTANT
The required assets must be prepared with the appropriate suffixes prior
to being scheduled.
To define an event substitution rule:
1 Open the iTX Desktop and click the En
2Click Ch
The Channel C
3From the Vi
annel Config.
onfig pop-up layout appears.
ew list, select the view containing the channels to be configured. The
channels associated with that view appear.
4 Click the name of the channel to be configured.
5Click the Simulcast Channel C
6In the Original Suffix field
7In the Sub
stitution field, enter the characters used to identify the SD events that will be
used in the substitution (e.g.
8As you type in the Ori
ginal Suffix or Substitution fields, the For Example text updates
onfig tab.
, enter the characters used to identify HD events (e.g. _HD).
_SD).
to demonstrate how the rules will be applied. For example:
gineering layout.
iTX Output Server 2
Original Suffix
text
(None) (None)
(None)
_HD
_HD _HD AssetName_HD Replace with Ass
Substitution
text
_SD AssetName Append to Make AssetName_SD
(None)
For example text
AssetName Keep as AssetName
AssetName_HD Remove to Make AssetName
9From the Available Plugins list, select which event types you want to substitute, then
click >> to add them to the Selected Plugins list.
10 Click S
ave.
About GPI Devices and Simulcast Setups
As simulcast channels follow the main channel and cannot, in a leader/follower network,
become leader channels, there is no requirement to configure GPI devices for simulcast or
simulcast backup channels.
etName_SD
53
Page 60

Output Server 2 Channel Configuration
About GPI Devices and Simulcast Setups
54
Page 61
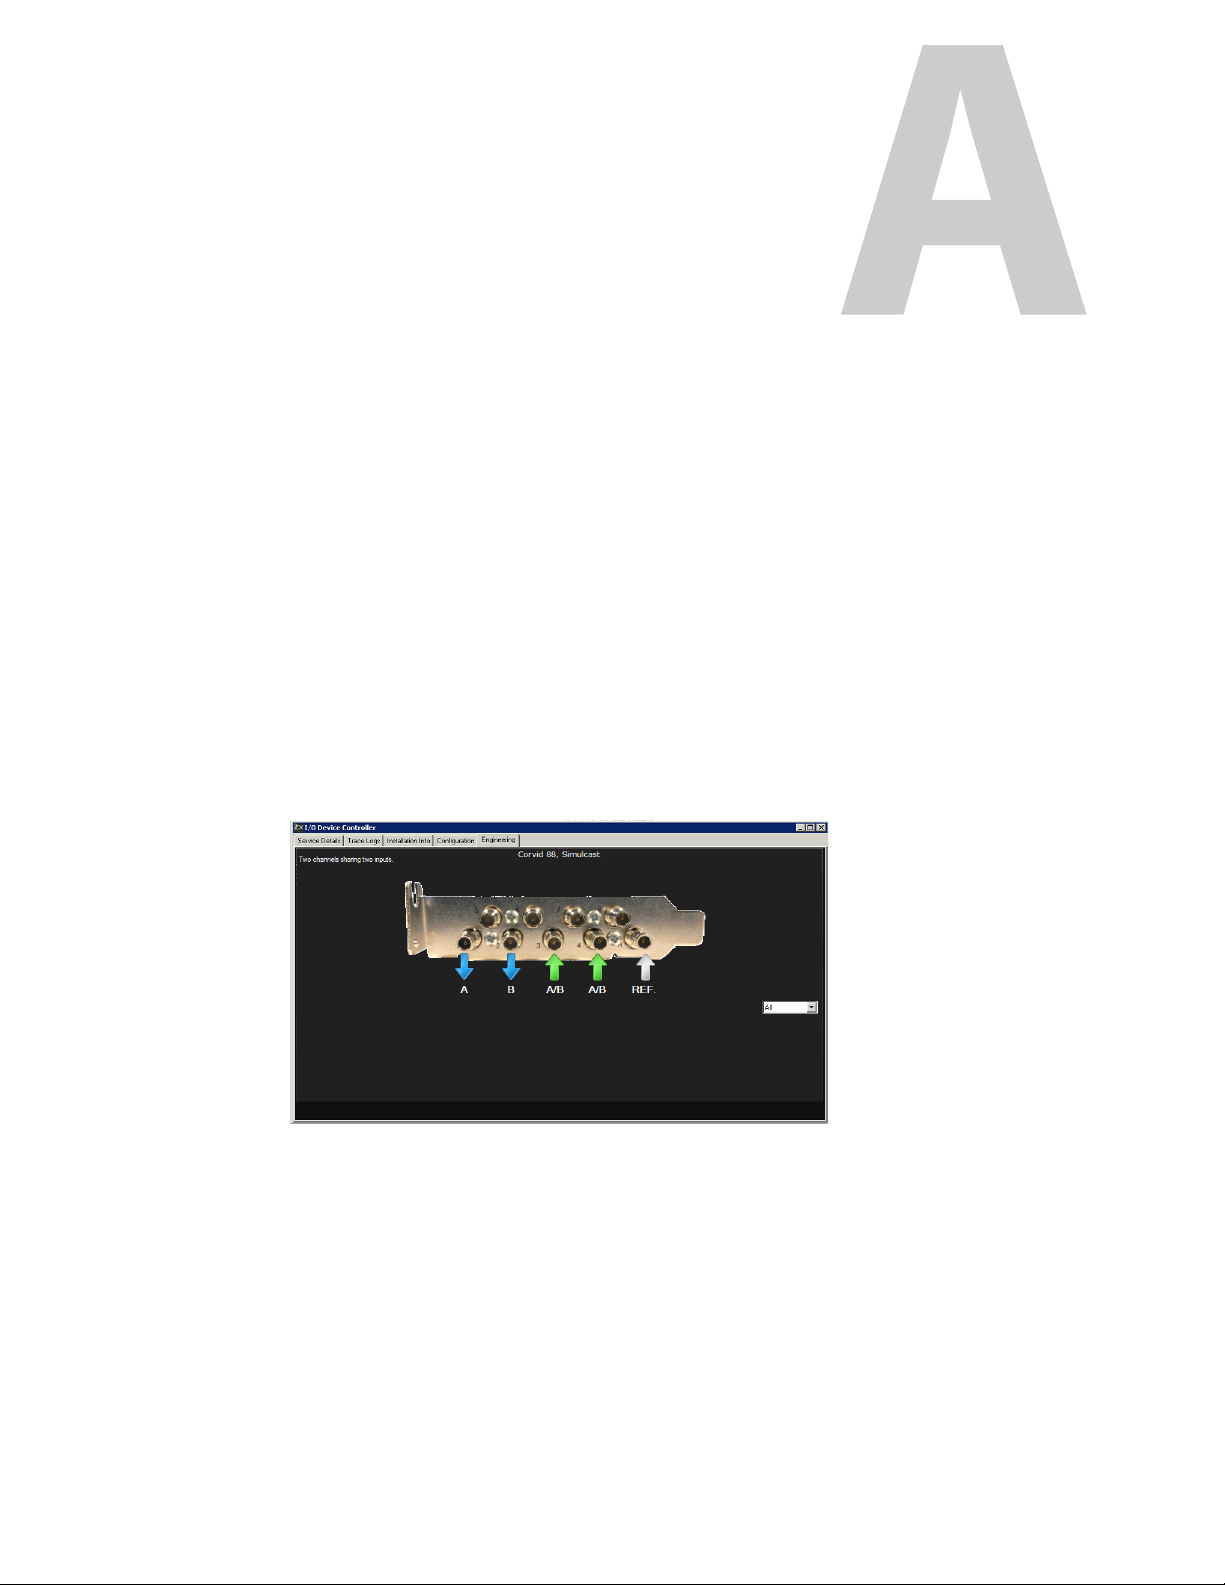
SDI I/O Card Connection Reference
This appendix discusses the I/O Device Controller Engineering Panel, which contains the
schematics for every combination of SDI I/O card and playout type. This can be used as a
reference when connecting inputs and outputs to your SDI I/O card.
Summary
About I/O Device Controller Engineering Panel . . . . . . . . . . . . . . . . . . . . . . . . . . . . . . . . . . . . . . . . 55
Corvid 1 I/O Connections . . . . . . . . . . . . . . . . . . . . . . . . . . . . . . . . . . . . . . . . . . . . . . . . . . .
Kona 3G I/O Connections . . . . . . . . . . . . . . . . . . . . . . . . . . . . . . . . . . . . . . . . . . . . . . . . . . . . . . .
Corvid 44 I/O Connections . . . . . . . . . . . . . . . . . . . . . . . . . . . . . . . . . . . . . . . . . . . . . . . . . . . . . .
Corvid 88 I/O Connections . . . . . . . . . . . . . . . . . . . . . . . . . . . . . . . . . . . . . . . . . . . . . . . . . . . . . .
About I/O Device Controller Engineering Panel
The I/O Device Controller Engineering Panel shows your SDI I/O cards inputs and outputs
for your currently selected playout type (in TXPlay 2 Config). The image below shows the
Engineering panel for a Corvid 88 set to the simulcast playout type:
. . . . . . . . . . 57
. . . . . . 57
. . . . . . 58
. . . . . . 58
55
Page 62

SDI I/O Card Connection Reference
Accessing the I/O Device Controller Engineering Panel
The Engineering panel uses the following indicators:
Indicator Description
Output spigot
Output spigot (Corvid 88 ports 5 - 8 only)
Input spigot
Input spigot (Corvid 88 ports 5 - 8 only)
Reference input spigot
The drop-down menu on the bottom right can be used as a filter to show different inputs
and outputs individually:
• All
•Inputs
•Output
• Channel A
• Channel B
Accessing the I/O Device Controller Engineering Panel
To access the I/O Device Controller Engineering panel:
1 On the playout server running the service, maximize the Server Controller application.
If Server Controller is not running, it can usually be found in
.
2.0
2 Select the Controlled Services tab. All of the services running on that server are listed.
3 Double-click I/O Devic
The I/O Device Controller user interface appears. It includes tabs for Se
Trace Logs, Installation Info, Configuration and Engineering.
4Click on the Engineer
The schematic for your SDI I/O card appears.
e Controller.
ing tab.
Start>All Programs>iTX
rvice Details,
56
Page 63

Corvid 1 I/O Connections
Corvid 1 SDI I/O cards only support the single channel playout type and have the following
inputs and outputs:
Port
Playout type
Single channel - Ref in Ch A
RS-422
Port R Port 1 Port 2
Ch A in
t
ou
iTX Output Server 2
Channel Configuration Guide
Kona 3G I/O Connections
Kona 3G SDI I/O cards only support the single channel playout type and have the following
inputs and outputs:
Playout Type Port J1 HDMI
Single channel Ref in - - Ch A in - Ch A
Port
SDI 1
Port
SDI 2
Port
SDI 3
Port
SDI 4
ou
t
57
Page 64
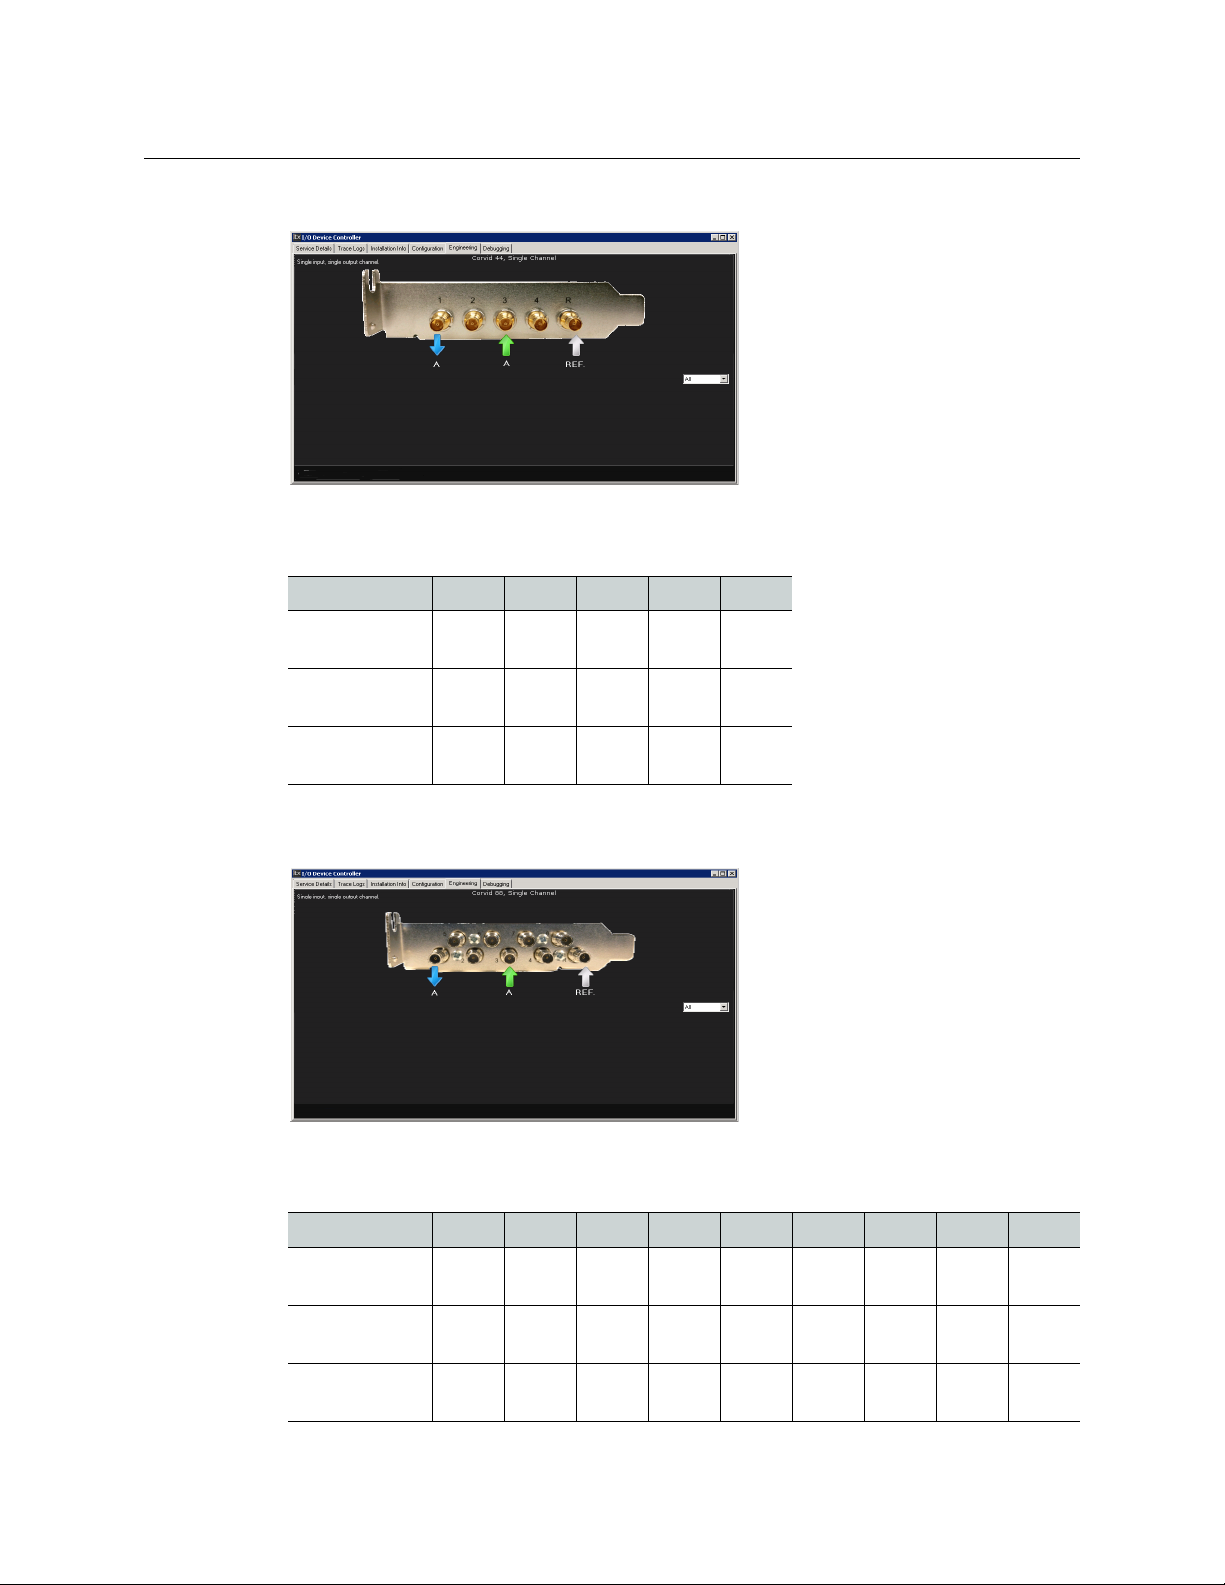
SDI I/O Card Connection Reference
Corvid 44 I/O Connections
Corvid 44 I/O Connections
Depending on the selected playout type, Corvid 44 SDI I/O cards uses the following inputs
and outputs:
Playout Type Port 1 Port 2 Port 3 Port 4 Port R
Single channel Ch A
t
ou
- Ch A
in
- Ref
in
Dual channel Ch A
t
ou
Simulcast Ch A
t
ou
Corvid 88 I/O Connections
Depending on the selected playout type, Corvid 88 SDI I/O cards use the following inputs
and outputs:
Playout Type Port 1 Port 2 Port 3 Port 4 Port 5 Port 6 Port 7 Port 8 Port R
Single channel Ch A
t
ou
Dual channel Ch A
t
ou
Simulcast Ch A
t
ou
Ch B
out
Ch B
out
- Ch A
Ch B
out
Ch A
out
Ch AinCh B
in
Ch A/B inCh A/B inRef
- - - - - Ref
in
Ch AinCh AinCh BinCh B
Ch A/B inCh A/B
in
Ref
in
in
- - - - Ref
in
- - Ref
in
in
in
58
Page 65

Operation and Maintenance
This appendix contains information about day-to-day operation and maintenance of
Output Server 2 and supporting services. This includes the location of log files, the OS2
Engineering panel, how to downgrade from Output Server 2 back to Output Server 1 and
other operation and maintenance information.
Summary
Starting Output Server 2 . . . . . . . . . . . . . . . . . . . . . . . . . . . . . . . . . . . . . . . . . . . . . . . . . . . . . . . . . . . . . . 59
About Output Server 2 Channel Status Indicators . . . . . . . . . . . . . . . . . . . . . . . . . . . . . . . . . . . . . 60
Configuring Server Controller for Output Server 2 Components . . . . . . . . . . . . . . . . . . . . . . . 60
Viewing the Output Server 2 Engineering Panel . . . . . . . . . . . . . . . . . . . . . . . . . . . . . . . . . . . . . . . 63
Log File Locations . . . . . . . . . . . . . . . . . . . . . . . . . . . . . . . . . . . . . . . . . . . . . . . . . . . . . . . . . . . . . . . . . . . . 65
Honoring NTSC SD Field Orders . . . . . . . . . . . . . . . . . . . . . . . . . . . . . . . . . . . . . . . . . . . . . . . . . . . . . . . 65
Deleting a Channel . . . . . . . . . . . . . . . . . . . . . . . . . . . . . . . . . . . . . . . . . . . . . . . . . . . . . . . . . . . . . . . . . . . 66
Downgrading from Output Server 2 to Output Server 1 . . . . . . . . . . . . . . . . . . . . . . . . . . . . . . . 67
Starting Output Server 2
of an OS2 System
As iTX services, Output Server 2, TXPlay 2, the I/O Device Controller and Media Cache 2 are
controlled by the Server Controller module, which is installed with any iTX component.
When the Server Controller is started, all of the services installed on the playout server are
started, one after another. If a service is shut down, Server Controller can restart them
automatically to protect system integrity.
Through Server Controller, Output Server 2 can be configured to control the way it starts,
the channels it runs and the way those channels are setup.
To start Server Controller:
•Go to Start > All Programs > iTX 2.0 > Server Controller.
The Server Controller appears and loads all of the installed services in their current
configuration.
59
Page 66

Operation and Maintenance of an OS2 System
About Output Server 2 Channel Status Indicators
About Output Server 2 Channel Status Indicators
The table below describes the indicators that may appear on top of the Schedule Grid for
an Output Server 2 system:
Indicator Description
In a leader/follower system, this indicator appears for the leader (main)
channel.
In a leader/follower system, this indicator appears for any of the follower
channels. This includes:
• Backup channels
• Simulcast channels
• Simulcast backup channels.
In an simulcast system, this indicator appears on simulcast and simulcast
backup channels, alongside the Follower label.
In a system with a matrix router, this indicator appears when the channel
output is routed to a destination to which the transmission system is
connected.
Note:
• Channel control and schedule changes cannot be performed on Follower
channels.
• During transition from Output Server 1 to Output Server 2, Output Server
1 ma
ster channels will display a Master indicator and their Output Server
2 slave channels will display a Follower indicator.
Configuring Server Controller for Output Server 2 Components
Under normal operating conditions, the Service Controller configuration for each iTX
service is updated and maintained by modifying the respective configuration utility.
However, sometimes it is necessary to make changes to the way a service runs by changing
the Server Controller configuration directly.
Server Controller Configuration for the I/O Device Controller
To edit the Server Controller configuration for I/O Device Controller:
1 From Windows, click Star
The Server Controller Configuration dialog appears.
2Go to the Ser
vices tab.
3 Select the I/O Devic
The Se
rvice Details dialog appears.
t > All Programs > iTX2.0 > Server Controller Config.
e Controller service then click Edit.
60
Page 67
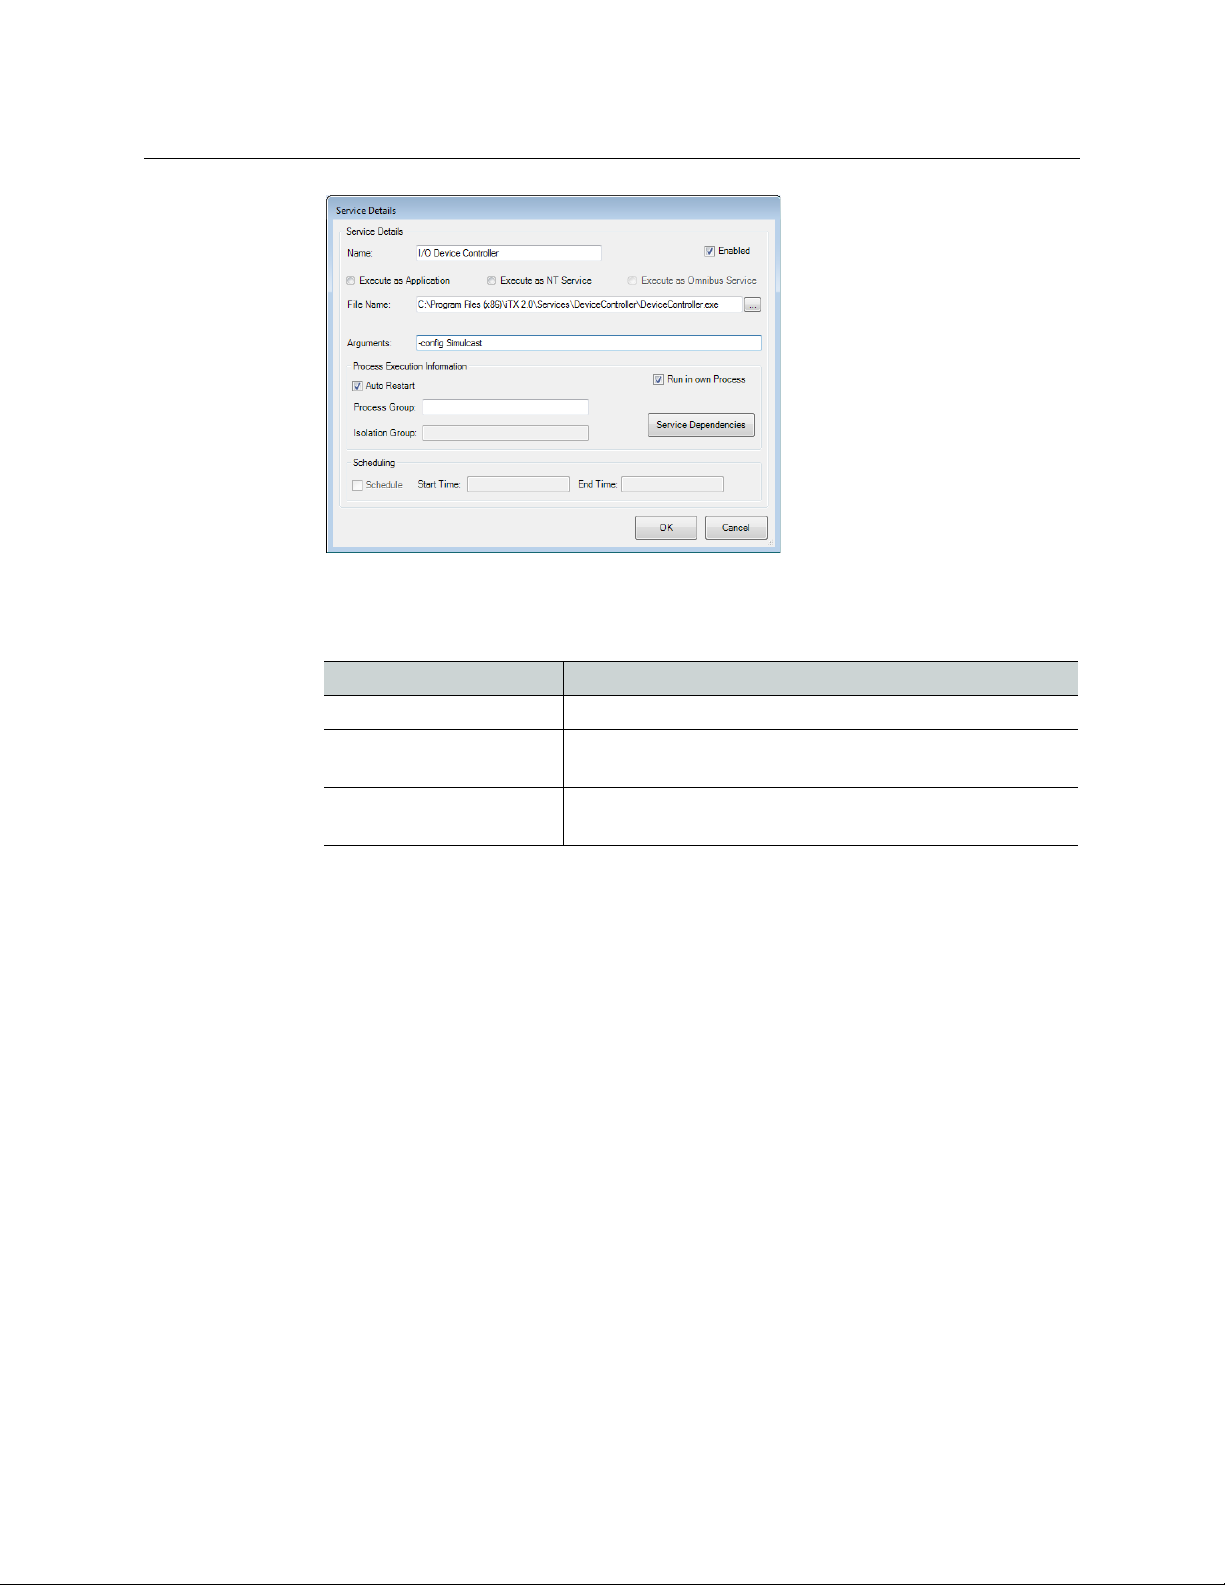
iTX Output Server 2
Channel Configuration Guide
4Make sure Enabled is checked. This will run the instance of the service when Server
Controller is started.
5In the Ar
Argument Description
-config SingleChannel
-config DualChannel
-config Simulcast
guments field, the following arguments are available:
Single input, single output channel (for all I/O cards).
Two independent channels, each with a single input (for
Corvid 44 and Corvid 88 SDI I/O cards only).
Two channels sharing two inputs (for Corvid 44 and Corvid
88 SDI I/O cards only).
6Make sure Auto Restart is checked. This ensure Server Controller automatically
restarts the I/O Device Controller service in the event of a failure.
Server Controller Configuration for Output Server 2
To edit the Server Controller configuration for an Output Server 2 channel:
1 From Windows, click Star
The Server Controller Configuration dialog appears.
2Go to the Ser
3 Select the O
The Se
vices tab.
utput Server 2 service then click Edit.
rvice Details dialog appears.
t > All Programs > iTX2.0 > Server Controller Config.
61
Page 68

Operation and Maintenance of an OS2 System
Server Controller Configuration for Output Server 2
4Make sure Enabled is checked. This will run the instance of the service when Server
Controller is started.
5In the Ar
guments field, the following arguments are available:
Argument Description Inclusion
-ui
Enables the user interface, which is required
Required
to access Output Server 2’s Configuration and
Engineering panels.
-n <Name>
Specifies the name of the service. For
Required
example, for a channel called "GV Movies 1"
you might enter:
-n GVMovies1 (no spaces)
A user friendly alias for channel names can be
cr
eated in iTX Desktop.
-backup
Used to indicate an instance is a backup
Optional
service.
-t <Card type>
Describes the type of video or audio card
Required
fitted in the host machine. For example, for an
-t AJAKona3G
Required for
Corvid 44 or 88
cards
Default
-id <Letter>
-p ITXPlayer 2
AJA Kona 3G video card:
Used to identify the inputs/outputs on the
SDI I/O card being used for the channel. For
example:
-id A
This argument is added to Server Controller
Config by default and identifies that Output
Server 2 is using the FPP plugin.
- p Simulator
Enables Output Server 2’s simulator mode. Use for testing
only
62
6Make sure Auto Restart is checked. This ensure Server Controller automatically
restarts the Output Server 2 service in the event of a failure.
Page 69

Viewing the Output Server 2 Engineering Panel
Along with the Configuration panel, Output Server 2’s user interface includes an
Engineering panel, which contains the following tabs:
• Hardware
•Event Log
For information on accessing the user interface, see Accessing the Output Server 2 User
Interface, o
About the Hardware Tab
The Hardware tab shows the input status of the SDI I/O card and information about the File
Processing Pipeline. It also allows you to select the I/O Device and also adjust the audio
synchronization for the current clip.
n page 31.
iTX Output Server 2
Channel Configuration Guide
63
Page 70

Operation and Maintenance of an OS2 System
About the Event Log
About the Event Log
The Event Log displays events sent from FPP to Output Server 2. This information can be
used by GV Care to diagnose potential issues with either FPP or Output Server 2.
64
Page 71

Log File Locations
The log files for an Output Server 2 channel and its related components can be found in the
following locations:
Component Logs
Output Server 2
vice
ser
VyConsoleApp for
FPP
VyCOMScheduler
for FPP Engineering logs
VyCOMScheduler
or FPP - Command
f
logs
iTX Output Server 2
Channel Configuration Guide
Each messages sent from TXPlay 2 to OutputServer2 is logged as an
individual XML file in the following location:
C:\ITXLogs\OutputServe
Each pooled VyConsoleApp process cr
following location:
%APPDATA%\Miranda\VyConsoleApp_CHANNELNAME_SC_COM_POOLI
D.log.*
The engineering logs are written to the following location:
%APPDATA%\Miranda\VyCOMScheduler\VyCOMScheduler_CHANNEL
NAME.log
This file will roll over when it reaches about 10 MiB and up to 5 rolled
over files are kept.
All commands that VyCOMScheduler receives are logged as executable
powershell scripts.
%APPDATA%\Miranda\VyCOMScheduler\SchedulerCommandLog.ps
1.*
This file will roll over when it reaches about 10 MiB and up to 5 rolled
over files are kept.
r\YYYY-MM-DD\*.xml
eates its own log file in the
Note: T
tells Grass Valley Support exactly what Output Server 2 received and
when, and allows Grass Valley Support to replay the commands.
hese scripts must be provided when reporting an issue since it
Honoring NTSC SD Field Orders
In an Output Server 1 system, the field order for NTSC SD assets often had to be reversed on
a per-asset basis for video to playout as expected. This was done by checking the Reverse
Field Order checkbox on
able to interpret the field order from the media itself. As such, Output Server 2 defaults to
ignoring the Reverse Field Order checkbox and plays out the asset as the media dictates.
If you are operating a mixed Output Server system,
playout servers to ignore assets with reversed field orders. This can be controlled using a
global configuration called OS2 Ignore “Reverse Field Order”. If this option is set
incorrectly for you system, your NTSC SD assets it may play out incorrectly (juddering or
shaking).
To configure OS2 to honor Reverse Field Order:
1 On a playout server that is running Output Server 2, start the iT
2 Log in with a system administrator profile.
3Open the Eng
ineering layout.
4Click Channel Config.
the Asset tab of the Asset layout in iTX Desktop. Output Server 2 is
you may not want Output Server 2
X Desktop client.
65
Page 72
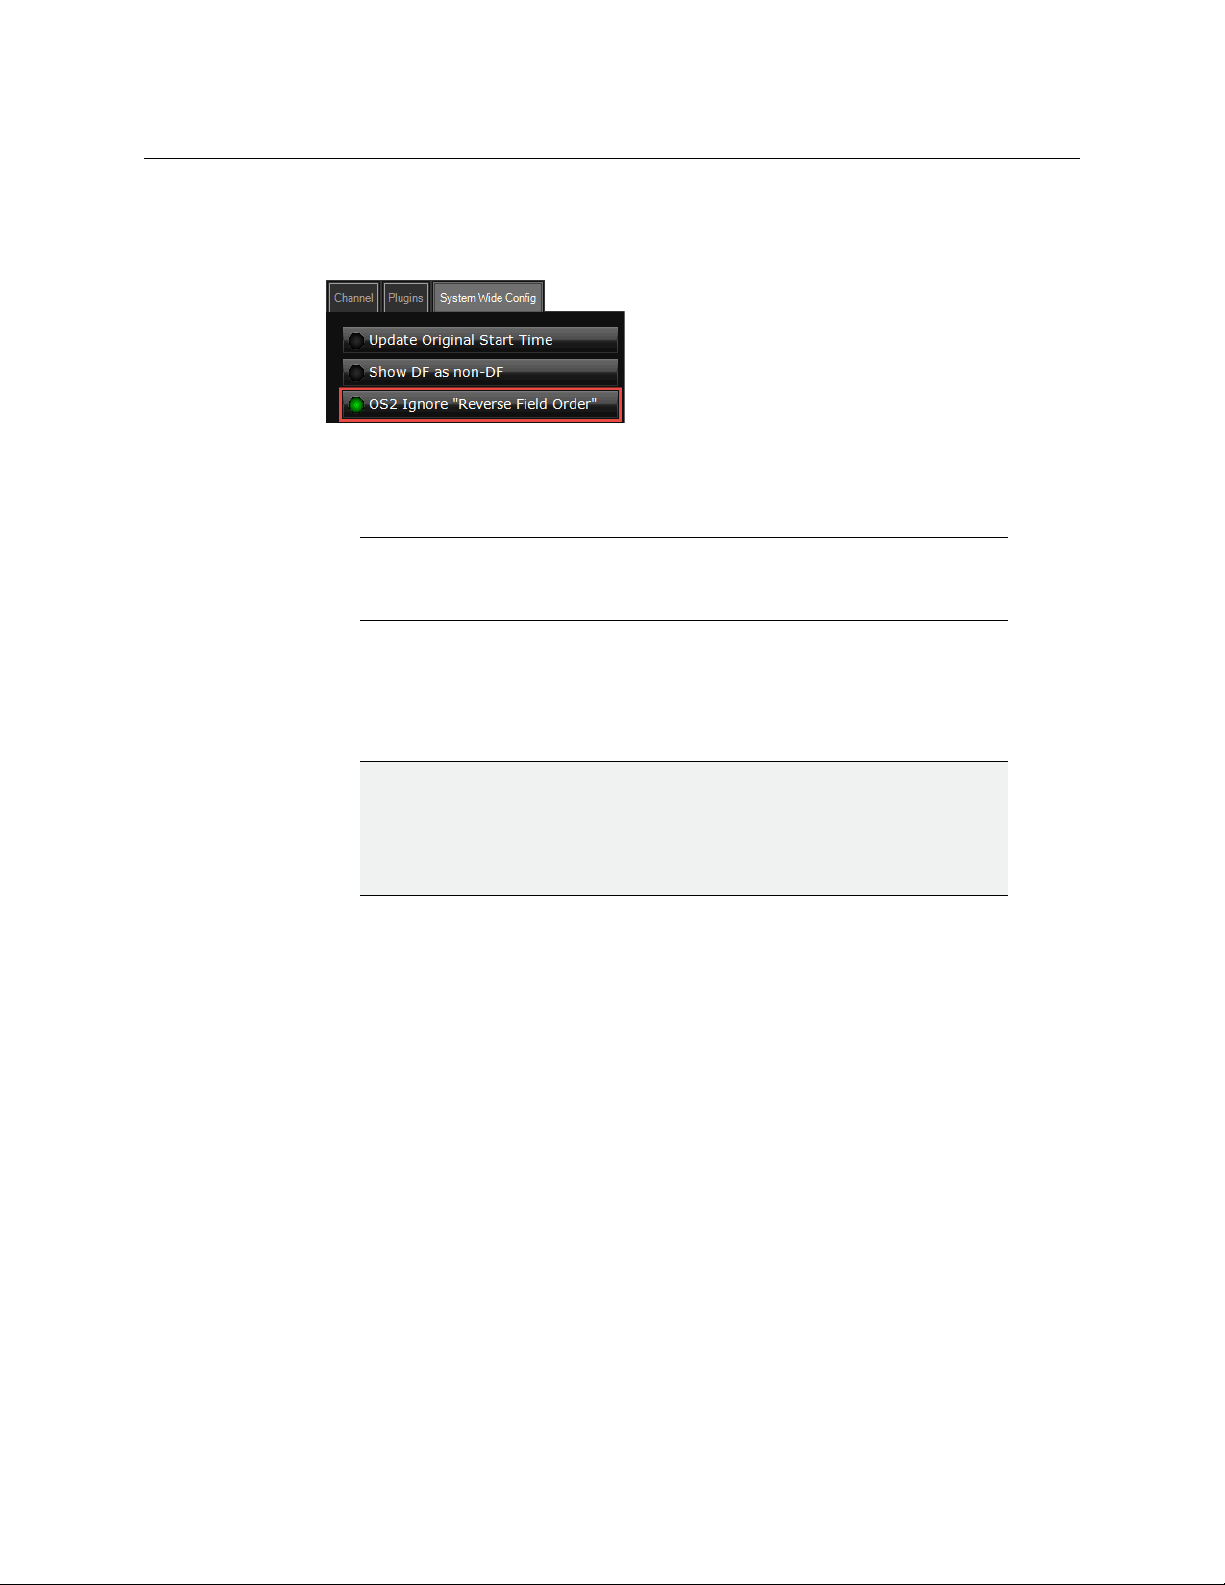
Operation and Maintenance of an OS2 System
Deleting a Channel
The Channel Config pop-up layout appears.
5Click the System Wide Config tab.
6The OS
Click OS2 Ignore “Reverse Field Order” to disable it.
7Click Cl
8 The Channel Config pop-up layout closes.
2 Ignore “Reverse Field Order” field is enabled (lit green) by default.
ose.
Note: For Output Server 2, a video asset’s detected field order can be seen
in the Field Order field on the Locations tab in the Asset layout of iTX
Desktop.
Deleting a Channel
Channels can be deleted from the ITX Channel Config dialog of TXPlay 2 Config.
IMPORTANT
• You must make sure you stop the instances of TXPlay 2 and Output Server
2 associated with the channel to be deleted before you begin.
• Deleting a channel from an playout server does not remove it from any
view
s in iTX Desktop.
To delete a channel:
1 On the Windows desktop of the playout server, double-click on the TX
icon. The ITX Channel Config dialog appears.
2 If there is more than one channel configured on the pla
to be deleted from the Channel Name drop-down list.
3Click Delet
The channel disappears from TXPlay 2 Config.
4Click S
e Channel.
ave to confirm the deletion.
yout server, select the channel
Play 2 Config
66
Page 73

Channel Configuration Guide
Downgrading from Output Server 2 to Output Server 1
It is possible to downgrade from Output Server 2, back to Output Server 1, if required. iTX
stores the configuration data for both versions of the service separately, so that after rolling
back to Output Server 1 you will be reverted to its own configuration settings.
IMPORTANT
• Output Server 1 does not support dual channel or simulcast broadcasting.
If you require this functionality you must use Output Server 2.
• Before reinstalling Output Server 1, you must uninstall and delete the
v1
2.1.0.107 AJA video card drivers on your playout server, then reinstall
v7.4.0.49 drivers.
To downgrade from Output Server 2 back to Output Server 1:
1 Access and open the iTX Installer files.
2Right-click the
3Click SEL
4Expand the Pla
5 Uncheck Output Server 2
6Click OK to ret
7Click CO
8Click FINISH to complete the uninstall.
9 Uninstall and delete the v12.1.0.107 AJA video card on your playout server, then
r
einstall v7.4.0.49. These can be found in the Drivers folder of the iTX Suite.
10 Restart the iTX Installer.
11 Click SELEC
12 Expand the Playout section
13 Check Ou
14 Click OK to ret
15 Click CONTINUE to reinstall Output Server 1.
16 Finish the installation as normal.
Setup.exe file and select Run as administrator.
ECT SOFTWARE.
yout section
urn to the iTX Installer dialog.
NTINUE. Allow Output Server 2 to uninstall completely.
T SOFTWARE.
tput Server 1.
urn to the iTX Installer dialog.
iTX Output Server 2
67
Page 74

Operation and Maintenance of an OS2 System
Downgrading from Output Server 2 to Output Server 1
68
Page 75

Grass Valley Technical Support
For technical assistance, contact our international support center, at
1-800-547-8949 (US and Canada) or +1 514 333 1772.
To obtain a local phone number for the support center nearest you, please consult the
Contact Us section of Grass Valley’s Web site (
An online form for e-mail contact is also available from the Web site.
Corporate Head Office
Grass Valley
3499 Douglas-B.-Floreani
St-Laurent, Quebec H4S 2C6
Canada
Telephone: +1 514 333 1772
Fax: +1 514 333 9828
www.grassvalley.com
Contact Us
www.grassvalley.com).
 Loading...