

Page 1

ITX
INTEGRATED PLAYOUT
Desktop Operator Manual
iTX v2.6
2015-03-16
Page 2

Copyright & Trademark Notice
Title
Operator Manual for the iTX Desktop v2.6 (Piccadilly)
First Issued
16 March 2015
Copyright © 2015 Grass Valley USA, LLC. All rights reserved.
Belden, Belden Sending All The Right Signals, and the Belden logo are trademarks or registered
trademarks of Belden Inc. or its affiliated companies in the United States and other jurisdictions.
Grass Valley and iTX are trademarks or registered trademarks of Grass Valley, a Belden Brand.
Belden Inc., Grass Valley and other parties may also have trademark rights in other terms used
herein.
Terms and Conditions
Please read the following terms and conditions carefully. By using iTX v2.x documentation, you
agree to the following terms and conditions.
Grass Valley, a Belden Brand (“Grass Valley”) hereby grants permission and license to owners of iTX
to use their product manuals for their own internal business use. Manuals for Grass Valley products
may not be reproduced or transmitted in any form or by any means, electronic or mechanical,
including photocopying and recording, for any purpose unless specifically authorized in writing by
Grass Valley.
A Grass Valley manual may have been revised to reflect changes made to the product during its
manufacturing life. Thus, different versions of a manual may exist for any given product. Care
should be taken to ensure that one obtains the proper manual version for a specific product serial
number.
Information in this document is subject to change without notice and does not represent a
commitment on the part of Grass Valley.
Warranty information is available in the Support section of the New Grass Valley Web site
(www.grassvalley.com).
i
Page 3

Contents
About this manual ............................................................................................................ 1
Terminology ............................................................................................................................. 2
Software versions ..................................................................................................................... 2
Valid characters in names and titles of media items ............................................................... 3
Further reading ........................................................................................................................ 3
About iTX .......................................................................................................................... 4
Grass Valley client-server technology ...................................................................................... 4
The main parts of an iTX system .............................................................................................. 5
The iTX Desktop ....................................................................................................................... 6
Workstation View and User View .................................................................................................... 6
Pop-up layouts ................................................................................................................................. 7
Starting the iTX Desktop........................................................................................................... 7
Quick tour of the iTX Desktop .......................................................................................... 8
About service status indicators in layout components .......................................................... 12
About system time and local time ......................................................................................... 12
Working with schedules ................................................................................................. 13
About iTX channels ................................................................................................................. 13
Monitoring and controlling live schedules ............................................................................. 14
iTX Desktop components for working with schedules ........................................................... 14
The Content Selector ...................................................................................................... 15
About the Content Selector ................................................................................................... 15
Content Selector palettes .............................................................................................................. 16
Setting up palettes on the Content Selector .................................................................................. 17
Changing the properties of an asset in the Content Selector ........................................................ 17
Managing the contents of a palette selection pane .............................................................. 18
Add assets to a palette selection pane .......................................................................................... 18
Remove assets from a palette selection pane ............................................................................... 18
Editing a schedule by dragging and dropping assets from the Content Selector .................. 19
Creating schedule events ............................................................................................................... 19
Primary and secondary events ....................................................................................................... 19
Locating a new schedule event ...................................................................................................... 20
Create a schedule event by dropping an asset into the Schedule Grid ......................................... 21
Create a schedule event by dropping an asset onto the Timeline Display .................................... 22
Remove one or more events from a schedule ............................................................................... 23
Working with video clips ........................................................................................................ 24
About the Video Clip palette .......................................................................................................... 24
Adding a video-clip event to a schedule ........................................................................................ 25
ii
Page 4

Previewing a video clip in the preview window ............................................................................. 25
Changing video-clip properties ...................................................................................................... 25
Using an unknown video clip in a schedule event ......................................................................... 26
Adding a VTR event to a schedule .................................................................................................. 26
Working with logos ................................................................................................................ 27
About the Logo palette .................................................................................................................. 27
Adding a logo event to a schedule ................................................................................................. 28
Options for controlling the playout of logos .................................................................................. 28
Temporary removal of all logos ..................................................................................................... 29
Set the logo-type property ............................................................................................................. 29
Change the title of a logo ............................................................................................................... 29
Change the default duration of a logo event ................................................................................. 30
Assign a logo to a different layer.................................................................................................... 30
Suppress or restore all active logos ............................................................................................... 30
Clearing all logos at the start of a new schedule ........................................................................... 31
Working with external logo inserters..................................................................................... 31
About the External Logo palette .................................................................................................... 31
Options for controlling the playout of logos .................................................................................. 32
Adding an external-logo event to a schedule................................................................................. 33
Add an external logo to the palette selection pane ....................................................................... 33
Scheduling logos using the External Key and Fill inputs of the LGK-3901 ...................................... 34
Remove an external logo from the palette selection pane ............................................................ 34
Working with CGs ................................................................................................................... 35
About the CG palette ..................................................................................................................... 35
Adding a CG event to a schedule ................................................................................................... 36
Edit a CG in the iTX CG application ................................................................................................. 36
Change the title of a CG ................................................................................................................. 36
Change the duration of a CG event ................................................................................................ 36
Working with subtitle files ..................................................................................................... 37
About the Subtitle palette .............................................................................................................. 37
Adding a subtitle event to a schedule ............................................................................................ 37
Working with still images ....................................................................................................... 38
About the Stills palette ................................................................................................................... 38
Adding a still-image event to a schedule ....................................................................................... 39
Change the title of a still image ...................................................................................................... 39
Change the default duration of a still-image event ....................................................................... 39
Working with voiceover clips ................................................................................................. 40
About the Voice Over palette ........................................................................................................ 40
Adding a voiceover-clip event to a schedule .................................................................................. 40
Play a voiceover clip ....................................................................................................................... 41
Change the title of a voiceover clip ................................................................................................ 41
Change the in-point or out-point of a voiceover clip ..................................................................... 41
Working with live events ........................................................................................................ 42
About the Live palette .................................................................................................................... 42
iii
Page 5

Adding a live event to a schedule................................................................................................... 42
Display live-event properties ......................................................................................................... 43
Set a duration of a live event ......................................................................................................... 43
Set the Aspect Ratio Properties for Live Events (OS2 only) ........................................................... 44
Working with sequences ........................................................................................................ 46
About the Sequence palette .......................................................................................................... 46
Adding an existing sequence to a schedule ................................................................................... 47
Change the name or title of a sequence ........................................................................................ 47
Add a blank sequence to a schedule .............................................................................................. 47
Create a sequence with a fixed duration ....................................................................................... 48
Working with stored schedules ............................................................................................. 48
About the Schedule palette ........................................................................................................... 48
Adding a nested schedule to a main schedule ............................................................................... 49
Live update of a nested schedule ................................................................................................... 49
Working with split breaks ...................................................................................................... 50
About the Split Break palette ......................................................................................................... 50
Adding a split break to a schedule ................................................................................................. 50
Enter a name and title for a split break .......................................................................................... 51
Select split-break regions ............................................................................................................... 51
Change the default duration of a split break ................................................................................. 51
Add events to a sequence for each regional channel .................................................................... 51
Adding events for playout in the main channel during a split break ............................................. 52
Working with slide shows ...................................................................................................... 52
About the Slide Show palette ......................................................................................................... 52
Add a still image or audio clip to the slide show ............................................................................ 52
Change the order of the still images or audio clips ........................................................................ 53
Change the duration of a still image .............................................................................................. 53
Preview a still image ....................................................................................................................... 53
Adjust the volume of an audio clip ................................................................................................ 53
Add a slide show to a schedule ...................................................................................................... 54
Working with an external subtitler ........................................................................................ 54
About the Ex Subtitler palette ........................................................................................................ 54
Adding an external subtitle event to a schedule ............................................................................ 55
Working with external CG devices and graphics systems ...................................................... 55
About the Clarity palette ................................................................................................................ 56
Add a Clarity CG template to the palette selection pane ............................................................... 56
Adding a Clarity CG event to a schedule ........................................................................................ 57
Change the name of a Clarity CG template .................................................................................... 57
Change the properties of a CG template ....................................................................................... 57
Change the duration of a Clarity CG event ..................................................................................... 57
About the VizRT palette ................................................................................................................. 58
Add a VizRT CG page to the palette selection pane ....................................................................... 59
Adding a VizRT CG event to a schedule .......................................................................................... 59
Working with GPIs .................................................................................................................. 60
iv
Page 6

About the GPI palette .................................................................................................................... 60
Adding a GPI event to a schedule ................................................................................................... 60
Select the GPI matrix ...................................................................................................................... 61
Change the duration of a GPI ......................................................................................................... 61
Set the time mode of a GPI ............................................................................................................ 61
Working with studio sources ................................................................................................. 62
About the Studio palette ................................................................................................................ 62
Adding a studio-source event to a schedule .................................................................................. 62
Change the default duration of a studio-source event .................................................................. 63
Working with router events ................................................................................................... 64
About the Router Event palette ..................................................................................................... 64
Adding a router event to a schedule .............................................................................................. 64
Configure a router event ................................................................................................................ 65
Change the default duration of a router event .............................................................................. 65
Working with a studio switcher ............................................................................................. 66
About the Studio Switcher palette ................................................................................................. 66
Adding a studio switcher event to a schedule ............................................................................... 67
Working with VANC data ....................................................................................................... 67
About the VANC Data palette ........................................................................................................ 67
Adding a VANC-message event to a schedule ................................................................................ 68
Set up a SCTE 104 message ............................................................................................................ 68
Add a SCTE 104 message event to a schedule ............................................................................... 68
Working with enhanced SCTE104 data .................................................................................. 69
About the SCTE104 palette ............................................................................................................ 69
Adding an enhanced SCTE104 message event to a schedule ........................................................ 70
Set up and insert an enhanced SCTE104 message: ........................................................................ 71
Add an enhanced SCTE104 message event to a schedule ............................................................. 72
Working with rating categories .............................................................................................. 72
About the V-Chip palette ............................................................................................................... 72
Adding a rating-category event to a schedule ............................................................................... 73
Select a rating system .................................................................................................................... 73
Change the title of a rating category .............................................................................................. 73
Change the duration of a rating category ...................................................................................... 73
Specify sub-rating options for a rating category ............................................................................ 73
Adding comments .................................................................................................................. 74
About the Comment palette .......................................................................................................... 74
Adding a comment line to a schedule ............................................................................................ 74
The Event Editor ............................................................................................................. 75
About the Event Editor ........................................................................................................... 75
Changing the properties of an asset in the Event Editor................................................................ 76
Event timings in local time or UTC ................................................................................................. 76
Editing events of different types ............................................................................................ 76
Editing a video-clip event ............................................................................................................... 76
v
Page 7

Editing a CG event .......................................................................................................................... 77
Editing a logo event ........................................................................................................................ 77
Editing an external-logo event ....................................................................................................... 78
Editing a still-image event .............................................................................................................. 78
Editing the properties of a sequence ............................................................................................. 78
Editing a voiceover-clip event ........................................................................................................ 79
Editing a subtitle event .................................................................................................................. 79
Editing a stored schedule ............................................................................................................... 80
Editing a live event ......................................................................................................................... 80
Editing a slide-show event ............................................................................................................. 80
Editing a GPI event ......................................................................................................................... 81
Editing a VANC-message event ...................................................................................................... 81
Editing an Enhanced 105 VANC message event ............................................................................. 81
Editing inbound enhanced SCTE 104 VANC message events ......................................................... 82
Editing a split-break event ............................................................................................................. 83
Editing an external subtitle event .................................................................................................. 83
Editing an external CG or graphics event ....................................................................................... 83
Editing a rating-category event ...................................................................................................... 83
Editing a studio-source event ......................................................................................................... 84
Editing a router event .................................................................................................................... 84
Saving or cancelling changes to events .................................................................................. 85
Changing the title of the item in an event ............................................................................. 85
Change the title of the item in an event ........................................................................................ 85
Setting event playout times ................................................................................................... 86
About the timing properties that affect event start and end times .............................................. 86
Possible time modes ...................................................................................................................... 87
Set the time mode for an event ..................................................................................................... 88
Set the start time for a fixed event ................................................................................................ 88
Set the end time for a fixed-end event .......................................................................................... 88
Set the time offset for a secondary event ...................................................................................... 88
Manual events ................................................................................................................................ 89
Set the manual property for an event ............................................................................................ 89
Join-in-progress events .................................................................................................................. 90
About the display of local or UTC start times for events ............................................................... 94
About DST and the timing of fixed-start and fixed-end events ...................................................... 94
Enter an event start time that could be before or after the end of DST ........................................ 95
Enter an event end time that could be before or after the end of DST ......................................... 96
Setting event durations .......................................................................................................... 96
Durations for different types of event ........................................................................................... 96
Automatic durations for secondary events .................................................................................... 96
Change an event duration .............................................................................................................. 97
Set an automatic duration to make a secondary event finish at the same time as its primary event
........................................................................................................................................................ 97
vi
Page 8

Set an automatic duration to make a secondary event start and finish at the same time as its
primary event ................................................................................................................................. 97
Setting the regional channel for a regional event.................................................................. 98
About regional channels ................................................................................................................ 98
Set the regional channel for a regional event ................................................................................ 99
Video and audio transitions for primary events .................................................................. 100
Add a transition at the start of a primary event .......................................................................... 100
Creating a picture-in-picture effect ..................................................................................... 101
Picture-in-picture formats ............................................................................................................ 102
Mix and zoom options for a picture-in-picture effect .................................................................. 102
About the picture-in-picture format dialog.................................................................................. 103
Set the size and position of the items in a picture-in-picture effect ............................................ 103
Adjust the background audio level for a picture-in-picture effect ............................................... 104
Add a background image to a picture-in-picture effect ............................................................... 104
Change the format stored in a preset-format button .................................................................. 105
Set a mix transition into, and out of, a picture-in-picture effect ................................................. 105
Set a zoom action into, and out of, a picture-in-picture effect .................................................... 105
Transitions and vision effects for secondary events ............................................................ 106
Setting transitions and vision effects for logo events .................................................................. 106
Set a transition for a logo event ................................................................................................... 106
Set a wipe, slide or squeeze effect for a logo event..................................................................... 107
Using the Event Editor features for sequences .................................................................... 108
Restricting the use of a sequence to a defined period ................................................................ 108
Prevent iTX starting a sequence before the start of a break window .......................................... 109
Set iTX to skip a sequence that it does not start by the end of a break window ......................... 109
Apply a standard set of transitions to the events in a sequence ................................................. 110
Prevent iTX switching a pass-through channel back to its live source before a sequence has played
out for a specified duration .......................................................................................................... 111
Prevent iTX continuing to play out events in a sequence after a specified duration ................... 111
Inserting an SCTE 104 message to trigger the insertion of local advertising ............................... 111
Changing volume levels for voiceover events ...................................................................... 112
Set volume levels for a voiceover event and its primary event ................................................... 112
Set the duration of the audio ramps at the start and end of a voiceover event ......................... 112
Replacing a video clip, live asset or logo in a schedule event .............................................. 113
Replace the video clip or live asset in one or more events .......................................................... 113
Selecting a videotape machine to play out a VTR event ...................................................... 114
Select a videotape machine for playout ....................................................................................... 114
Setting up the recording of sequences and live events ....................................................... 115
About the different recording modes .......................................................................................... 116
About channel default settings .................................................................................................... 116
Use the Event Editor to quickly mark an event for recording ...................................................... 117
Use the Schedule Grid to quickly mark an event for recording ................................................... 117
Use the Event Editor to specify settings for the recording of an event ....................................... 117
Use the Schedule Grid to specify settings for the recording of an event ..................................... 118
vii
Page 9

Edit the recording properties for an event .................................................................................. 118
Monitor a recording ..................................................................................................................... 118
Preview a recording ..................................................................................................................... 119
Cancel a recording ........................................................................................................................ 119
Scheduling notes .......................................................................................................................... 120
Changing the GPI output for a GPI event ............................................................................. 120
Change the GPI output for a GPI event ........................................................................................ 120
Changing the routing properties for a router event ............................................................ 121
Change the routing properties for a router event ....................................................................... 121
Changing the external subtitle file for an external subtitle event ....................................... 121
Select a different subtitle file for an external subtitle event ....................................................... 121
Entering information in editable CG text blocks .................................................................. 122
Enter information in an editable CG text block ............................................................................ 122
Changing page details in a VizRT CG event .......................................................................... 123
Change VizRT CG page details ...................................................................................................... 123
Changing the rating category for a rating-category event ................................................... 124
Change the rating category for a rating-category event .............................................................. 124
Entering and viewing schedule notes .................................................................................. 125
Enter notes for a schedule event ................................................................................................. 125
Using the follow-next feature .............................................................................................. 126
Set up iTX to automatically display details for the next event in the Event Editor ...................... 126
The Timeline Display ..................................................................................................... 127
About the Timeline Display .................................................................................................. 127
Adding an event to a schedule by dropping an asset onto the Timeline Display ................ 128
Tracking an event on the Timeline Display .......................................................................... 128
Viewing information about an event ................................................................................... 130
Changing the view of the Timeline Display .......................................................................... 130
Zoom the Timeline Display ........................................................................................................... 130
Shift the focus of the Timeline Display ......................................................................................... 130
Changing the track configuration of the Timeline Display ................................................... 131
Change the track configuration of the Timeline Display .............................................................. 131
Using the default track configuration of the Timeline Display ..................................................... 132
The Schedule Grid ......................................................................................................... 133
About the Schedule Grid ...................................................................................................... 133
Changing properties of assets in video-clip and logo events ....................................................... 133
Channel-status indicators ............................................................................................................. 134
Creating a schedule event by dropping an item into the Schedule Grid ............................. 134
Noting the time mode of events .......................................................................................... 135
Tracking an event ................................................................................................................. 135
Viewing information about an event ................................................................................... 137
Preventing schedule underruns and overruns ..................................................................... 137
Show or hide secondary events ........................................................................................... 138
viii
Page 10

Change the order of schedule events .................................................................................. 138
Event warnings ..................................................................................................................... 138
Media limit warning ..................................................................................................................... 139
Invalid in-point warning ............................................................................................................... 139
Modified media warning .............................................................................................................. 139
Acknowledge a warning ............................................................................................................... 139
Fix a warning ................................................................................................................................ 139
Add a filter to the Schedule Grid .......................................................................................... 140
Using the options in the Schedule Grid menu ..................................................................... 141
Defining the Schedule Grid view .................................................................................................. 142
Set up the column arrangement and text appearance in the Schedule Grid ............................... 142
Restore the default column arrangement in the Schedule Grid .................................................. 143
Set up the Schedule Grid for drag-and-drop schedule changes ................................................... 143
Switch off the transition-editing feature of the Schedule Grid .................................................... 143
Show or hide secondary events in a filtered list .......................................................................... 144
Show or hide events that have taken place ................................................................................. 144
Set up the Schedule Grid to display warnings of potential underruns and overruns .................. 144
Choose which tracks iTX displays information for in the Schedule Grid ...................................... 145
Show or hide tooltips ................................................................................................................... 145
Load the global Schedule Grid view ............................................................................................. 145
Set the Schedule Grid view as the global Schedule Grid view ..................................................... 145
Print the current schedule ........................................................................................................... 145
Cut and paste an event or group of events .................................................................................. 146
Copy and paste an event or group of events ............................................................................... 146
Delete an event or group of events ............................................................................................. 146
Delete all events ........................................................................................................................... 147
Cancel recent changes to a schedule ........................................................................................... 147
Update a back-up schedule instantly ........................................................................................... 147
Update an event or group of events ............................................................................................ 147
Check for the missing media item in an event ............................................................................. 148
Skip an event or group of events ................................................................................................. 148
Unskip an event or group of events ............................................................................................. 148
Schedule event colors .......................................................................................................... 149
Cache status indicators ........................................................................................................ 149
Caching progress .......................................................................................................................... 149
Changing the transitions for events in the Schedule Grid ................................................... 150
Change an event transition in the Schedule Grid ......................................................................... 150
Changing the duration and media limits from the Schedule Grid ....................................... 151
Automatic replacement of missing media files with evergreen content ............................. 152
About VTR events in the Schedule Grid ............................................................................... 152
Cue the VTR event ........................................................................................................................ 152
Play out a VTR event .................................................................................................................... 153
Recording schedule events .................................................................................................. 153
ix
Page 11

The Schedule Manager ................................................................................................. 154
About the Schedule Manager .............................................................................................. 154
Loading stored schedules in the Schedule Manager ........................................................... 155
Load any schedule ........................................................................................................................ 155
Load a schedule that has date and channel labels ....................................................................... 156
Adding stored schedules to the current schedule ............................................................... 156
Add a stored schedule to the current schedule ........................................................................... 156
Saving the current schedule ................................................................................................. 157
Modify an existing stored schedule ............................................................................................. 157
Save the current schedule as a new schedule ............................................................................. 157
Save the current schedule with channel and date labels ............................................................. 158
Creating sequences and sequence templates ..................................................................... 158
About sequences and sequence templates ................................................................................. 158
Using a sequence template .......................................................................................................... 159
Create a sequence from a group of schedule events ................................................................... 159
Create a sequence or sequence template from a sequence entry .............................................. 160
Creating a looping schedule ................................................................................................. 160
Adding an hour or a day to the start time of the current schedule ..................................... 161
Put back the start of the current schedule by an hour or a day .................................................. 161
The Schedule Manager menu .............................................................................................. 161
The Next-Event Control Panel ...................................................................................... 162
About the Next-Event Control Panel .................................................................................... 162
Cueing and taking short events .................................................................................................... 162
Color coding of Cue Next and Take Next buttons ........................................................................ 163
Resuming normal playout after a schedule interruption ............................................................. 163
Control the playout of the next event .......................................................................................... 163
Roll under the current on-air event ............................................................................................. 163
Resume normal playout after a roll under ................................................................................... 164
The Live Logo Inserter .................................................................................................. 165
About the Live Logo Inserter ................................................................................................ 165
Setting up the Live Logo Inserter ......................................................................................... 165
Set up the Live Logo Inserter ........................................................................................................ 166
Using the Live Logo Inserter ................................................................................................. 166
Manually switch a logo on or off in a live schedule ..................................................................... 166
Channel-control pop-up layouts ................................................................................... 167
Using the Emergency Audio pop-up layout ......................................................................... 168
Master Audio Level slider ............................................................................................................. 168
Lip-sync buttons ........................................................................................................................... 168
Using the Channel Health pop-up layout ............................................................................. 169
Emergency removal of logos and captions .................................................................................. 169
Using the News Flash pop-up layouts .................................................................................. 170
Interrupt a schedule event for a news flash ................................................................................ 170
x
Page 12

Removing a news-flash sequence before it starts ....................................................................... 171
Using the Sequence Control pop-up layout ......................................................................... 171
Using the Selected Item Control pop-up layout................................................................... 172
Manually cue a future event ........................................................................................................ 172
Manually take a future event to air ............................................................................................. 172
Searching with PinPoint ................................................................................................ 173
The PinPoint dialog and panel ............................................................................................. 173
Hidden panes ............................................................................................................................... 174
Search filters ........................................................................................................................ 175
Specifying an asset name in a filter .............................................................................................. 177
Search blocks ........................................................................................................................ 177
Nested search blocks .................................................................................................................... 178
Specifying the sort order of results ...................................................................................... 178
Multi-domain searching ....................................................................................................... 178
Stemming ............................................................................................................................. 178
Searching .............................................................................................................................. 179
Perform a search .......................................................................................................................... 179
Create a search filter .................................................................................................................... 180
Delete a search filter .................................................................................................................... 180
Clear a filter set ............................................................................................................................ 180
Working in the results pane ................................................................................................. 181
Working in List view ..................................................................................................................... 181
Sort a results-list column .............................................................................................................. 181
Change the results-list column format ......................................................................................... 181
Navigating through a PinPoint list ................................................................................................ 182
Navigate to an item by typing initial characters .......................................................................... 182
Working in Thumbnail view ......................................................................................................... 183
Repeating searches .............................................................................................................. 184
Show the search-history pane ...................................................................................................... 184
Repeat a search ............................................................................................................................ 185
Save a set of search criteria ......................................................................................................... 185
Viewing metadata ................................................................................................................ 185
Build a search block ...................................................................................................................... 186
Resizing the PinPoint dialog ................................................................................................. 186
Maximize or restore the PinPoint dialog ...................................................................................... 186
Common operational tasks for iTX Desktop features .................................................. 187
Playing a video clip in a preview window ............................................................................ 187
Indication of the extent of clip media .......................................................................................... 189
Using the options in the preview-window menu ......................................................................... 190
Marking the boundary points of a video clip ....................................................................... 192
Change the in-point or out-point of a video clip .......................................................................... 192
Changing the audio level of a previewing video clip ............................................................ 193
Change the audio level of a video clip .......................................................................................... 193
xi
Page 13

Specifying properties for video clips and voiceover clips .................................................... 193
Audio output channels ................................................................................................................. 194
Source Format and Active Region settings ................................................................................... 194
Identifying 3D-stereoscopic video clips ........................................................................................ 195
Looping a video clip ...................................................................................................................... 195
Copy Guard settings ..................................................................................................................... 196
Display the Clip Properties dialog ................................................................................................ 196
Select the audio output channels for a voiceover clip or a secondary video clip ........................ 196
Set the source format and active region of a video clip............................................................... 196
Mark a video clip as stereoscopic-3D ........................................................................................... 196
Set up looping for a video clip ...................................................................................................... 197
Change the copy-protection setting for a video clip .................................................................... 197
Entering a value in an iTX time-entry box ............................................................................ 197
Using a shortcut when entering a time value .............................................................................. 198
Entering a time value through the Time Calculator ..................................................................... 198
Entering values in a date-and-time box ............................................................................... 200
Switching a recorded voice countdown on or off ................................................................ 200
The CG application ........................................................................................................ 201
About the CG application ..................................................................................................... 201
Operating Modes ......................................................................................................................... 202
Multiple objects and layers .......................................................................................................... 202
Editable text blocks ...................................................................................................................... 203
Dynamic text blocks ..................................................................................................................... 203
Transparent objects ..................................................................................................................... 203
Transitions and vision effects ....................................................................................................... 203
Saving your CGs ............................................................................................................................ 204
Working with text ................................................................................................................ 204
Creating and editing CG text ........................................................................................................ 204
Select the text operating mode .................................................................................................... 205
Create a simple text block, containing fixed CG text ................................................................... 205
Create an editable text block ....................................................................................................... 206
Create a dynamic text block ......................................................................................................... 207
Resize and move a text block ....................................................................................................... 208
Specify a font for CG text ............................................................................................................. 209
Set the alignment of CG text ........................................................................................................ 209
Set the spacing of CG text ............................................................................................................ 210
Apply a drop shadow to CG text .................................................................................................. 210
Apply a solid fill to CG text ........................................................................................................... 211
Apply a graduated fill to CG text .................................................................................................. 211
Apply a textured fill to CG text ..................................................................................................... 212
Edit CG text .................................................................................................................................. 213
Apply a crawl to CG text ............................................................................................................... 213
Save text properties as a text-layer style ..................................................................................... 214
Apply a text-layer style to a text block ......................................................................................... 214
xii
Page 14

Set the group number for a text block ......................................................................................... 215
Delete a text block ....................................................................................................................... 215
Working with rectangles ...................................................................................................... 215
Creating and modifying rectangles .............................................................................................. 215
Select the rectangle operating mode ........................................................................................... 215
Create a rectangle ........................................................................................................................ 215
Resize and move a rectangle ........................................................................................................ 216
Apply a solid fill to a rectangle ..................................................................................................... 216
Apply a graduated fill to a rectangle ............................................................................................ 216
Apply a textured fill to a rectangle ............................................................................................... 218
Change the color and thickness of a rectangle border ................................................................ 219
Select a pre-defined rectangle layout style .................................................................................. 219
Set the group number for a rectangle .......................................................................................... 220
Delete a rectangle ........................................................................................................................ 220
Working with background images ....................................................................................... 221
Using the image controls.............................................................................................................. 221
Select the image operating mode ................................................................................................ 221
Load an image .............................................................................................................................. 221
Resizing an image ......................................................................................................................... 222
Change the color and thickness of an image border .................................................................... 222
Set the group number for an image ............................................................................................. 222
Delete an image ........................................................................................................................... 222
Resizing and moving CG objects .......................................................................................... 223
Manually resize an object of any type ......................................................................................... 223
Manually move an object of any type .......................................................................................... 223
Automatically centralize an object ............................................................................................... 224
Changing the stacking order of objects ............................................................................... 224
Re-order layers ............................................................................................................................. 224
Working with multiple objects ............................................................................................. 225
Select multiple objects of any type .............................................................................................. 225
Select all objects of the same type ............................................................................................... 225
Undoing and redoing changes ............................................................................................. 225
Undo a change ............................................................................................................................. 225
Redo a change .............................................................................................................................. 225
The Color Selector ................................................................................................................ 226
Use the Color Selector .................................................................................................................. 226
Setting properties (visual effects, crawl speeds) for groups ................................................ 227
About groups ................................................................................................................................ 227
Select the animation operating mode.......................................................................................... 227
Specify a playout layer for a group .............................................................................................. 227
Set a transition for a group .......................................................................................................... 227
Set a vision effect for a group ...................................................................................................... 228
Set the speed of a crawl ............................................................................................................... 228
Preview transitions and vision effects .......................................................................................... 229
xiii
Page 15

Using the template controls................................................................................................. 229
About the file-management buttons ........................................................................................... 229
Select the template operating mode ........................................................................................... 229
Load an existing CG template ....................................................................................................... 229
Save changes to the current CG template ................................................................................... 229
Save changes in a new CG template ............................................................................................ 230
Export a CG template as a graphic ............................................................................................... 230
Load an animated logo ................................................................................................................. 230
Change the position of an animated logo .................................................................................... 231
Clear the workspace ..................................................................................................................... 231
Setting the CG application window options ......................................................................... 231
About the CG application window options .................................................................................. 231
Select the options operating mode .............................................................................................. 231
Set the grid options ...................................................................................................................... 231
Show or hide the safe-area guide frame ...................................................................................... 232
Closing the CG application ................................................................................................... 232
Ingesting files through the Media Store Inbox ............................................................. 233
Valid formats for media files and other types of file ........................................................... 233
Re-importing media files ...................................................................................................... 233
Ingest media files through the Media Store Inbox .............................................................. 234
Ingest reference MOV and MXF files through the Media Store Inbox ................................ 235
Ingesting media by using an Encode Server ................................................................. 237
Crash recordings, automatic recordings and batch recordings ........................................... 237
Recording from a videotape................................................................................................. 238
The ingest layouts ................................................................................................................ 239
The Manual Ingest layout ............................................................................................................. 239
The Dual Ingest layout .................................................................................................................. 240
The Ingest Multi layout ................................................................................................................ 241
The Tape Ingest layout ................................................................................................................. 242
The Encode control panel .................................................................................................... 243
About the Encode Server lock button .................................................................................. 243
About the VTR control button .............................................................................................. 244
Setting the structure of the media file created by an Encode Server .................................. 244
Encode presets for video storage formats ................................................................................... 245
Audio channels ............................................................................................................................. 245
Asset template ............................................................................................................................. 245
Encode profiles ............................................................................................................................. 246
Specify the encode settings and asset template for a recording ................................................. 246
Save the settings for a recording as a new encode profile .......................................................... 246
Recall an encode profile ............................................................................................................... 247
Update an encode profile ............................................................................................................ 247
Delete an encode profile .............................................................................................................. 247
Preparing your iTX system for recordings ............................................................................ 247
xiv
Page 16

Set up a recording source for live ingest ...................................................................................... 247
Set up a recording source for tape ingest .................................................................................... 248
Select a recording channel ........................................................................................................... 248
Deny or allow an Encode Server control of a VTR ........................................................................ 248
Lock or unlock an Encode Server ................................................................................................. 249
Set options for new media files and their assets ......................................................................... 249
Using the Encode control panel to record media files ......................................................... 250
Perform a crash recording from a line feed ................................................................................. 250
Set up and start an automatic recording from a line feed ........................................................... 251
Perform a crash recording from a videotape ............................................................................... 252
Set up and start an automatic recording from a videotape ......................................................... 253
Cancelling a recording .................................................................................................................. 254
Performing a back-up recording .................................................................................................. 254
Using the Tape Ingest layout for single or batch ingest ....................................................... 255
About placeholder clips ................................................................................................................ 255
Options for ingest on the Tape Ingest layout ............................................................................... 255
Create a placeholder clip .............................................................................................................. 256
Load a placeholder clip in the Clip Holder .................................................................................... 256
Send a placeholder clip for ingest ................................................................................................ 256
Add placeholder clips to the Batch Ingest control panel from PinPoint ...................................... 257
Set up and start a batch recording ............................................................................................... 257
Start a recording from the Encode control panel ........................................................................ 258
Previewing and playing out media while it is being recorded ............................................. 258
Using Ingest Manager ................................................................................................... 259
About Ingest Manager ......................................................................................................... 259
Planned recordings....................................................................................................................... 259
Ad-hoc recordings ........................................................................................................................ 260
The standard Ingest Manager layouts ................................................................................. 260
Bookings for planned recordings ......................................................................................... 261
The Scheduled Booking dialogs .................................................................................................... 262
Choosing a clip name when making a booking request ....................................................... 262
Automatic clip names for repeat recordings ................................................................................ 263
Creating bookings ................................................................................................................ 263
Create a booking for a scheduled recording ................................................................................ 263
Editing bookings ................................................................................................................... 265
Edit a booking for a scheduled recording..................................................................................... 265
Managing bookings .............................................................................................................. 265
Delete a booking for a scheduled recording ................................................................................ 265
Suspend the scheduling of recordings for a booking ................................................................... 265
Resume the scheduling of recordings for a booking .................................................................... 266
About the Instant Ingest Request panel .............................................................................. 266
Editing a recording job ................................................................................................................. 267
Managing a recording job ............................................................................................................ 267
xv
Page 17

Using the Instant Ingest Request panel ............................................................................... 268
Request an ad-hoc recording ....................................................................................................... 268
Edit an entry in the recording schedule ....................................................................................... 269
Stop a recording that is in progress ............................................................................................. 269
Manually start a recording job ..................................................................................................... 269
Put a recording job on hold .......................................................................................................... 270
Cancel a recording job .................................................................................................................. 270
Using a naming rule for an ad-hoc recording ....................................................................... 270
Select a naming rule ..................................................................................................................... 270
Monitoring and managing scheduled recordings ................................................................ 271
Recording-status colors ................................................................................................................ 271
Select which tracks appear on the Timeline Display .................................................................... 272
Zoom the Timeline Display ........................................................................................................... 272
View different parts of the timeline ............................................................................................. 273
Change the channel selection for the Recording Schedule Grid .................................................. 273
Change what columns appear in the Recording Schedule Grid ................................................... 273
Adjust column widths in the Recording Schedule Grid ................................................................ 274
Filter the list in the Recording Schedule Grid ............................................................................... 274
Delete an entry in the Recording Schedule Grid .......................................................................... 274
Responding to failed recordings .......................................................................................... 275
Preparing media items for playout ............................................................................... 276
About the Asset layout ......................................................................................................... 276
About database assets and media files ................................................................................ 278
Co-references ............................................................................................................................... 278
Deleting assets and media files .................................................................................................... 278
Warning when a user deletes an asset in iTX that is in a live schedule ....................................... 279
Re-ingesting a media file .............................................................................................................. 279
User rights ............................................................................................................................ 279
Searching for assets ............................................................................................................. 280
Viewing search results.................................................................................................................. 280
Select an asset to work with ........................................................................................................ 281
Selecting single or multiple assets ............................................................................................... 281
Viewing a media file in the Media Viewer ........................................................................... 282
Playback features for video and audio clips ................................................................................. 283
Trimming features for video and audio clips ............................................................................... 284
Display of VANC data ................................................................................................................... 285
Working with a video clip while it is being recorded ................................................................... 285
Resizing the Media Viewer ........................................................................................................... 286
Media Viewer settings.................................................................................................................. 286
Preview and modify a video or audio clip in the Media Viewer .................................................. 288
Working with the Property Editor ........................................................................................ 288
Asset flags .................................................................................................................................... 288
Expanding panels ......................................................................................................................... 289
xvi
Page 18

Reloading an asset ....................................................................................................................... 289
Asset locking ................................................................................................................................. 289
Saving asset changes .................................................................................................................... 289
The Asset tab ................................................................................................................................ 290
Change the name or title of an asset ........................................................................................... 290
Set the availability flag ................................................................................................................. 290
Change the production date ........................................................................................................ 291
Specify a usage window ............................................................................................................... 291
Set timing properties .................................................................................................................... 291
Change aspect-ratio properties for a video clip ........................................................................... 292
Change the field playout order .................................................................................................... 292
Change the transition type or duration........................................................................................ 293
Identify an asset that is stereoscopic-3D formatted .................................................................... 293
Adjust audio properties ................................................................................................................ 293
Select a poster frame ................................................................................................................... 294
Create or modify a live event ....................................................................................................... 295
The Locations tab ......................................................................................................................... 298
Open the folder for the file associated with an asset .................................................................. 300
Delete a file for a single asset ...................................................................................................... 300
Delete multiple files for a single asset ......................................................................................... 300
Delete multiple files from the same location ............................................................................... 301
Manage audio tracks for a video clip ........................................................................................... 301
The Attributes tab ........................................................................................................................ 303
The Access Rights tab ................................................................................................................... 304
Change the clip permissions for a user group .............................................................................. 305
Assign clip permissions to a new user group ............................................................................... 305
The Categories tab ....................................................................................................................... 305
Tag an asset with a category ........................................................................................................ 306
Untag an asset from a category ................................................................................................... 306
Create a category ......................................................................................................................... 306
The Notes tab ............................................................................................................................... 307
Attach notes to a media item ....................................................................................................... 307
The Co-References tab ................................................................................................................. 308
The Actions tab ............................................................................................................................ 309
Create a low-bit-rate proxy copy of a video clip .......................................................................... 309
Create a set of keyframes for a video clip .................................................................................... 310
Archive a media file to a DIVArchive ............................................................................................ 310
Restore a media file from a DIVArchive ....................................................................................... 310
Vantage jobs ................................................................................................................................. 310
Use a Vantage system to transcode a media file ......................................................................... 311
Use a Vantage system to perform a QC check on a media file .................................................... 311
Use a Vantage system to import a media file .............................................................................. 311
Durations and Media Limits ................................................................................................ 312
Changing an event to hold its duration ........................................................................................ 314
xvii
Page 19

Changing an event to hold its points ............................................................................................ 314
Disabling Hold Duration ............................................................................................................... 315
Disabling Hold Points ................................................................................................................... 315
Saving assets ........................................................................................................................ 315
Save a modified asset ................................................................................................................... 316
Create a copy of an asset ............................................................................................................. 316
Change a duplicate name while saving a copy of an asset ........................................................... 316
Locking assets and media-file locations ............................................................................... 316
Operations allowed with locked assets ........................................................................................ 317
Edit Unlock state .......................................................................................................................... 318
Copying a locked asset ................................................................................................................. 318
Re-importing the media file to a locked media location .............................................................. 318
Locking media locations in co-references .................................................................................... 318
Batch operations with locked items ............................................................................................. 319
Lock an asset ................................................................................................................................ 319
Lock a media location ................................................................................................................... 319
Unlock an asset ............................................................................................................................ 319
Unlock a media location ............................................................................................................... 319
Edit a locked asset ........................................................................................................................ 320
Reading the Media Store Gauge .......................................................................................... 320
About asset templates ......................................................................................................... 320
Create or modify an asset template ............................................................................................. 321
Working with the Logo Editor ...................................................................................... 322
Display a logo in the Logo Editor .................................................................................................. 323
Re-position a logo ........................................................................................................................ 323
Resize a logo ................................................................................................................................. 323
Set a transition or vision effect for a logo .................................................................................... 324
Adjust the transparency of a logo ................................................................................................ 325
Assign a logo to a layer ................................................................................................................. 325
Mark a logo as stereoscopic-3D formatted .................................................................................. 326
Entering values in the measurements panel ................................................................................ 327
Working on the Asset Segmentation layout................................................................. 328
Clip Segmenter features ............................................................................................................... 329
Load a base video clip in the Clip Segmenter ............................................................................... 330
Create segment clips from a base video clip ................................................................................ 330
Set segment-naming options ....................................................................................................... 331
Rename segments ........................................................................................................................ 331
Using iTX with a keyboard or hard panel ..................................................................... 332
Optional features .......................................................................................................... 333
The Live CG Inserter ............................................................................................................. 334
Set up the Live CG Inserter ........................................................................................................... 334
Manually switch a CG on or off during a live schedule ................................................................ 334
Next-event gang buttons ..................................................................................................... 334
xviii
Page 20

Hold the next event in all live schedules in a selected channel view ........................................... 335
Cue the next event in all live schedules in a selected channel view ............................................ 335
Take the next event to air in all live schedules in a selected channel view ................................. 335
The Count To Control ........................................................................................................... 335
Select a schedule event for a count ............................................................................................. 335
The Schedule Preview Control ............................................................................................. 336
About the Preview Channel layout .............................................................................................. 336
Set the preview durations ............................................................................................................ 336
Preview the start of a schedule event .......................................................................................... 336
Preview the end of a schedule event ........................................................................................... 336
Preview a group of selected schedule events .............................................................................. 337
The Direct Preview Control .................................................................................................. 337
Add a sequence with a video clip to the preview-channel schedule ........................................... 338
The Global Editor.................................................................................................................. 339
Using the Global Editor ................................................................................................................ 340
Use the Global Editor to make schedule changes in multiple channels....................................... 341
The Live Channel Management panel .................................................................................. 341
Switch the source of the channel output ..................................................................................... 342
Handling of manual events in the main channel while rolling under .......................................... 343
The Live Video Inserter ........................................................................................................ 343
Using the Live Video Inserter on the Line Playback layout .......................................................... 344
Select edit and playout channels on the Line Playback layout .................................................... 344
Load video clips in the Live Video Inserter from PinPoint ............................................................ 344
Load video clips in the Live Video Inserter from an edit channel ................................................ 344
Add video-clip events to a playout channel from the Live Video Inserter ................................... 345
Add a live event to a playout channel from the Live Video Inserter ............................................ 345
Take events to air from the Live Video Inserter ........................................................................... 345
The Recue Item control panel .............................................................................................. 345
The Missing Material status channel ................................................................................... 346
Automatic display of schedule events on a video monitor .................................................. 348
Display the schedule events in a selected channel ...................................................................... 348
Display the next events in the different channels of a channel view ........................................... 348
Appendix A: The iTX Import Protocol ........................................................................... 349
Formatting clip lists .............................................................................................................. 349
Formatting schedules ........................................................................................................... 350
Formatting wipe lists ............................................................................................................ 352
xix
Page 21

About this manual
About this manual
This manual is for iTX, version 2.6. It contains these main sections:
• About iTX: A brief description of iTX and its key system parts, especially the iTX Desktop;
instructions for starting the iTX Desktop.
• Quick tour of the iTX Desktop: Details of the main features of the iTX Desktop and its
layouts.
• Working with schedules: General comments about schedules, and an explanation of online
(live) and offline schedules.
• The Content Selector: Instructions for building schedules by using the Content Selector.
• The Event Editor: Instructions for using the Event Editor to set the properties of schedule
events.
• The Timeline Display: A description of the features of the Timeline Display.
• The Schedule Grid: A description of the features of the Schedule Grid.
• The Schedule Manager: Instructions for saving and loading schedules through the
Schedule Manager.
• The Next-Event Control Panel: Instructions for performing actions on the next item due to
play out in a schedule.
• The Live Logo Inserter: Instructions for setting up the Live Logo Inserter and using it to
manually switch logos on and off.
• Channel-control pop-up layouts: Descriptions of pop-up layouts you can select from the
Channel Control layout.
• Searching with PinPoint: How to use the iTX search tool, PinPoint, to find assets in your iTX
System Database.
• Common operational tasks for iTX Desktop features: Operating procedures for certain iTX
Desktop features that you may use frequently.
• The CG application: Instructions for creating and modifying CGs using the iTX CG
application.
• Ingesting media files through the Media Store Inbox: Instructions for using the Inbox
folder on the Media Store to ingest media files into the iTX system.
• Ingesting media by using an Encode Server: Instructions for using the ingest layouts to
create media files in the iTX system by recording media from a video feed.
• Using Ingest Manager: A description of Ingest Manager services and how to use these for
the automated recording of live feeds.
• Preparing media items for playout: Instructions for using the Asset layout to prepare
assets before you use them in schedule events.
• Working with the Logo Editor: Instructions for using the Logo Editor.
• Working on the Asset Segmentation layout: Instructions on how to most easily segment
video clips.
March 2015 iTX Desktop: Operator Manual 1
Page 22

About this manual
• Using iTX with a keyboard or hard panel: A statement about the ability to control certain
iTX operations from a PC keyboard or hard panel.
• Optional features: Instructions for using optional features that may be added to your
system.
Terminology
Different terms are used in different countries to describe visual elements that are
superimposed on the main television picture. In this manual, we use the following terms to
refer to these items.
CG: Text that is usually set against a graphical background (such as a colored
Subtitles: Text of the words spoken in, or accompanying, video scenes; the text continually
geometric shape) in a design similar to that produced by a character generator;
the text may be accompanied by a still or animated image.
A CG is typically used to identify the speaker in an interview, or the location
featured in the main video. A CG usually stays on the screen for just a few
seconds.
updates as a dialogue or narrative proceeds. Sometimes called open captions.
Subtitles, when provided, always appear on-screen – the viewer cannot turn
them off.
Captions: Text, similar to subtitles but including expressions for sound effects, intended to
describe the audio content for the deaf or hard-of-hearing. The way captions are
transmitted (inserted into the video signal) allows the viewer to switch them on
or off.
Also called closed captions, these are more commonly known as subtitles in
countries outside of the US and Canada.
Logo: A still or animated image occupying a small area of the screen, away from the
main area of interest; used as a branding device for the channel that is playing
out.
Software versions
The manual covers various releases of iTX version 2 (identified by version numbers v2.1, v2.2,
v2.3, v2.4 etc.). Some of the features described in the manual may not be available in your
version of software. For more information, contact iTX Support.
March 2015 iTX Desktop: Operator Manual 2
Page 23

About this manual
Valid characters in names and titles of media items
When storing and retrieving media files, iTX identifies them by the unique filenames with which
the files are registered in the iTX system. A filename may contain up to 60 characters, and can
include almost any European character except these:
/ \ < > ? : * |
Each file can have a secondary name, which we call its title. Although often the same as the
filename, the title can be more descriptive of a file's content. This is particularly true when the
filename is based on a simple alphanumeric sequence, rather than words.
Further reading
Some iTX Desktop features depend on other Grass Valley equipment. For information on how
to schedule and edit events of the following types in an iTX playout channel, see the user
documentation for the Grass Valley devices that provide the source items.
• Vertigo XG
• iTX Render
March 2015 iTX Desktop: Operator Manual 3
Page 24

About iTX
About iTX
iTX is a playout automation system for television. You use it to prepare television schedules and
to play out the media content required by those schedules in one or more playout channels.
From each playout channel, iTX delivers an audio-visual output to a transmission system for
broadcasting.
Depending on its design, your iTX system may deliver the channel output through a
conventional television transmission system or over the internet. It can display video content at
an aspect ratio of 16x9 or 4x3, and at either SD (standard-definition) or HD (high-definition)
resolution.
In delivering each channel output, iTX can play out video either from media files that it holds on
its own storage device (known as a Media Store) or from a live feed; the media files may be in
various storage formats. iTX can play files from some broadcast video servers, including some
files that are held in a special way – i.e. within "wrappers".
In a playout schedule, you can mix video, audio and other items (such as CGs, logos, animated
images, still images and live events). For live events, an SD channel requires the live event to be
at SD resolution; and an HD channel requires the live event to be at HD resolution.
iTX has video and audio mixing functionality for producing an output that includes image
overlays, video transitions, wipes, two-dimensional DVEs (digital video effects), audio
transitions and voiceovers.
Media acquisition features enable you to ingest media onto a storage device in the iTX system.
You may do this either by copying existing files over a network or from a local drive; or by
recording digital video sources. This media is then available for use in playout schedules.
If you have media files on an external storage device that iTX can access, you can register these
in the iTX system and then use them in schedules.
Grass Valley client-server technology
iTX is based on Grass Valley client-server network technology. Running in the background on a
group of server machines, a number of iTX system services interact to provide functionality to
any number of iTX Desktops.
An iTX Desktop is an application that runs on an operator workstation. It provides the user
interface through which you use the functionality of the services. Multiple iTX Desktops can
access the services at the same time.
March 2015 iTX Desktop: Operator Manual 4
Page 25

About iTX
iTX Desktop Client
Servers
iTX Desktop Client
iTX Desktop Client
iTX Desktop Client
Channel outputs
(iTX system services)
The main parts of an iTX system
An iTX system has these main parts:
• The System Database stores all the data required by the system. This includes assets and
schedules. By assets, in this case, we mean database records that contain information
about available media files; you use them to build schedules.
• The Media Store stores the media files (video clips, CGs, logos, etc.) that you can use in
schedules.
• The Output Server runs the schedules; it gets the media files from the Media Store and
plays them out at the scheduled times. The Output Server also provides an offline edit
channel so that you can build schedules without affecting live playout. Each playout
channel runs on its own Output Server.
• The Desktop Client workstation displays the iTX Desktop, through which you build and
control schedules and manage the media in the system. Your system may have multiple
Desktop Clients.
• An Encode Server (optional) enables you to add media to the iTX system by recording it
from a video source, such as a live feed or a videotape. It converts the video into a file in a
specified storage format; it places the file in the Media Store.
March 2015 iTX Desktop: Operator Manual 5
Page 26
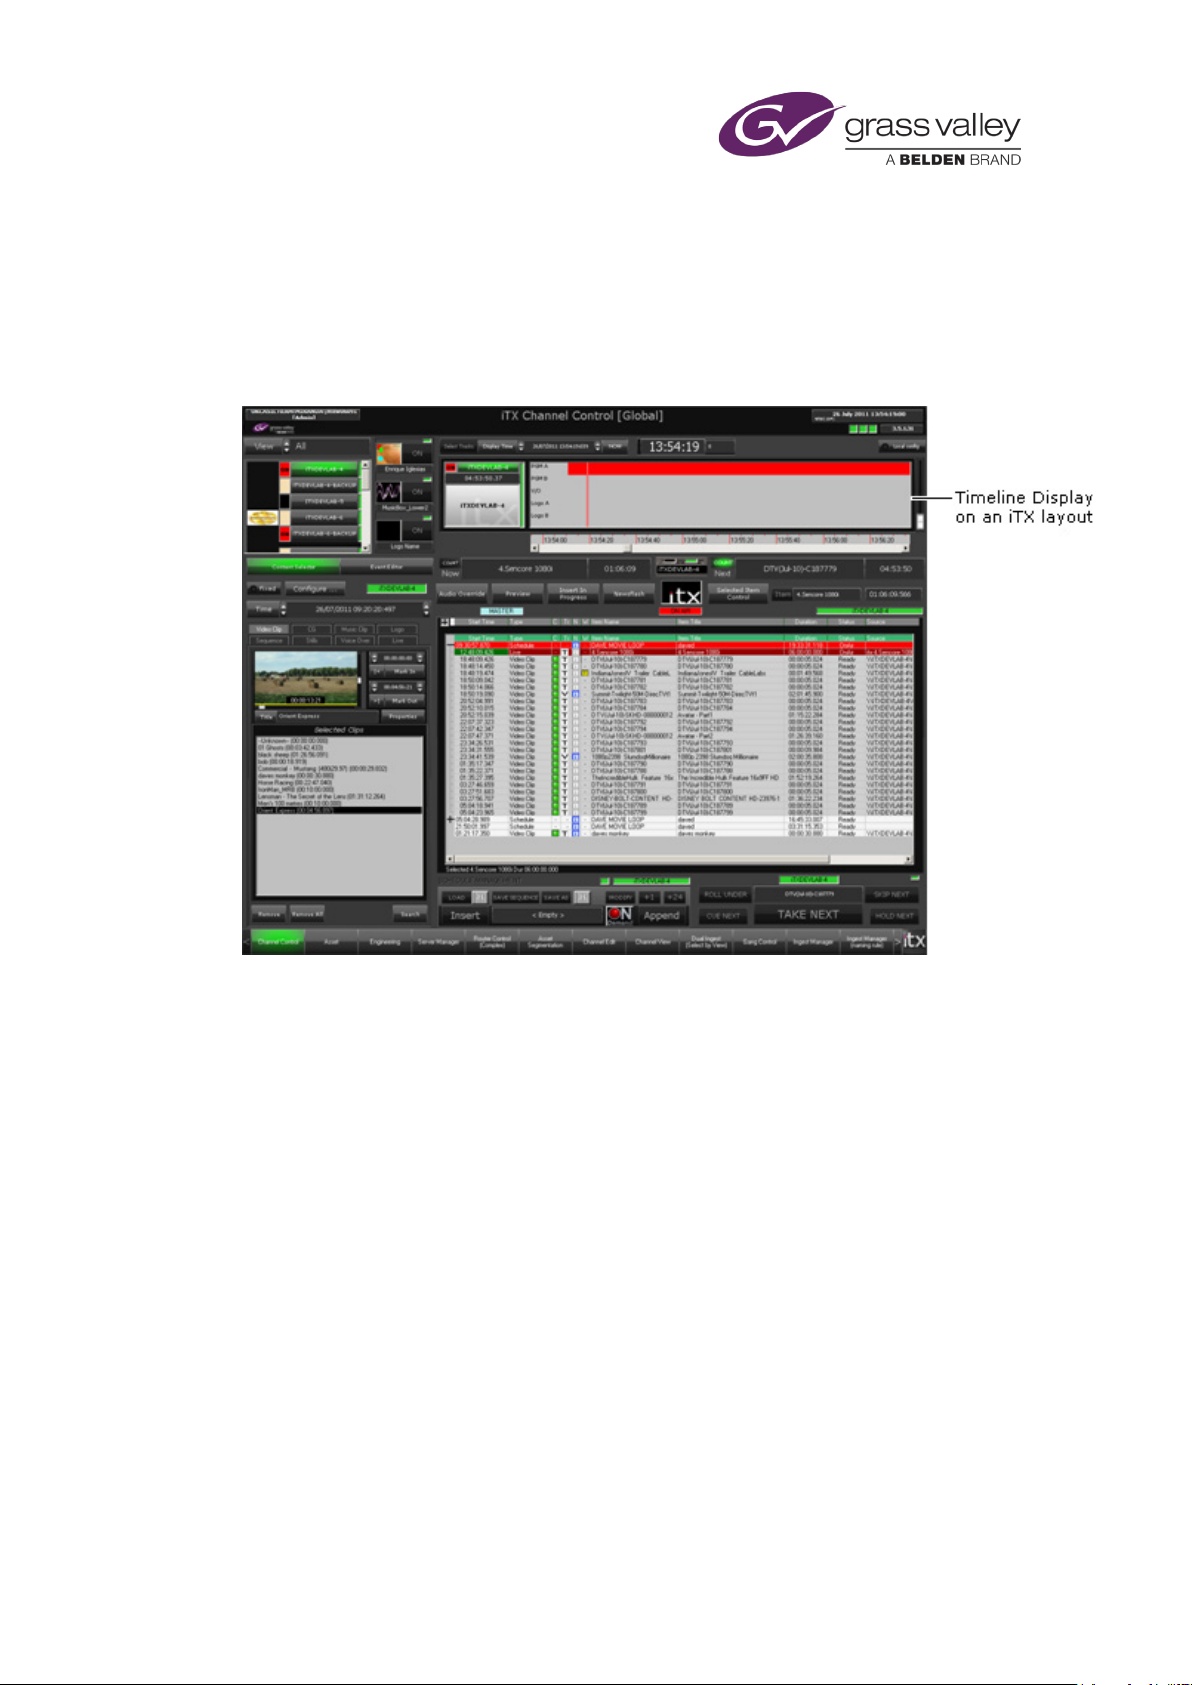
About iTX
The iTX Desktop
The iTX Desktop, illustrated below, is the user interface for the iTX system. It may include any
number of iTX layouts.
A layout is a set of iTX Desktop components (such as the Timeline Display in the above
illustration) arranged together to provide the features that you can see at your workstation.
The features enable you to perform an action, or give you information. Through them you
interact with iTX system services.
Your system administrator configures the iTX Desktop on your workstation to include a number
of operator layouts in a particular order. Depending on this configuration, you can view any of
these layouts, one at a time.
Workstation View and User View
The iTX Desktop can display two layout views. By "layout view", we mean the set of layouts that
are immediately available on the iTX Desktop. The views are:
• The Workstation View, which is the view assigned to the workstation. All users logging
onto the workstation see the same set of layouts in this view.
• A User View, which is the view assigned to the user logged onto the workstation. Users
logging on at the same workstation, under their usernames, see their own sets of layouts.
Your system administrator should tell you which layout view to use.
March 2015 iTX Desktop: Operator Manual 6
Page 27

About iTX
Pop-up layouts
A layout may contain a selection button for a pop-up layout; this is a layout of any size that
appears on top of the main layout. Clicking the button causes the pop-up layout to appear and
become active. When you finish using the pop-up layout, you close it to return to the main
layout.
Starting the iTX Desktop
You log onto the iTX network at your workstation by entering your username and password in
the standard Microsoft network log-on dialog. Once you have done this, you can start the iTX
Desktop.
1. Do one of the following to start the iTX Desktop.
• Double-click the ITX Desktop shortcut on your Windows desktop.
• Select the iTX Desktop from the Windows Start menu.
The iTX Desktop opens and displays the first of the available iTX layouts in the primary
view. The Starting Desktop message box shows the progress as iTX loads the view and
displays the first layout assigned to that view.
The primary view is determined by the views available to your workstation; a view is
available when it has layouts assigned to it. When a workstation view is available, it is the
primary view; otherwise, the user view is the primary view.
2. If you need to change the iTX Desktop view, do the following.
• Right-click the title bar to display the iTX Desktop menu:
• Select the workstation view or user view from the menu.
When you first change the view after starting the iTX Desktop, the Loading View message
box shows the progress as iTX loads the view and displays the first layout assigned to that
view.
Note:
• To work, the iTX Desktop needs the services that run on the iTX system servers. You may
need to ask your system administrator to ensure these services are running.
March 2015 iTX Desktop: Operator Manual 7
Page 28

Quick tour of the iTX Desktop
Quick tour of the iTX Desktop
In this section we introduce you to the key features of the iTX Desktop and its layouts.
The iTX Desktop has three main parts:
• At the top is the title bar.
• In the middle is the selected layout.
• At the bottom is the layout selection bar.
The title bar has these features:
The service status indicators, on the right, show the operational status of some key iTX system
services; they display green lights when the services are working normally.
If an indicator displays a yellow light, a service may have a temporary problem but iTX may still
be able to continue working. If an indicator appears red or black, you should ask your system
administrator to check the iTX system services.
From the title bar (and from other parts of the iTX Desktop), you can access the iTX Desktop
menu. Through this, you may select which layout view to display (workstation or user), log off
the iTX network, or exit the iTX Desktop. More details, page 9.
March 2015 iTX Desktop: Operator Manual 8
Page 29

Quick tour of the iTX Desktop
Channel Control
The main layout for the creating, editing and control of live schedules.
The layout selection bar looks like this:
You can select different layouts by clicking the layout selection buttons.
From the iTX logo on the right, you can access the window menu. Through this, you may
minimize, restore or exit the iTX Desktop.
When you exit the iTX Desktop, the Closing View message box shows the progress as the iTX
Desktop closes:
Between the title bar and the selection bar, iTX displays your selected layout. By clicking the
layout selection buttons, you may be able to select any of the layouts listed below (depending
on how your iTX Desktop is set up).
Layouts for schedule playout
Layout name Description
It also allows you to prepare schedules offline, in edit channels.
The layout has these key features:
Channel View Selector.
Channel Selector.
Content Selector.
Event Editor.
Timeline Display.
Schedule Grid.
Schedule Manager.
Next Event Control Panel.
Live Logo Inserter.
Buttons for various pop-up layouts
On this layout, you have access to one channel at a time; this may be
any channel in the channel views available to you.
March 2015 iTX Desktop: Operator Manual 9
Page 30

Quick tour of the iTX Desktop
Channel Control
Similar to the standard Channel Control layout but with a wider
Multi-Channel
For the control of playout in multiple channels. A Timeline Display
Multi-Channel
For monitoring playout in multiple channels. A Timeline Display shows
Multi-Channel
For monitoring playout in multiple channels. The layout includes the
Gang Control
Similar to the Multi-Channel Control layout, but giving simultaneous
Item Insertion
For the control of playout in a selected channel with the ability to
Live Channel
For creating, editing and controlling schedules in two parallel channels
Channel Edit
For editing a schedule in any channel in a selected channel view. There
Channel View
For viewing schedule activity in any channel in a selected channel
Channel Group
Similar to the Gang Control layout, for simultaneous control of playout
Preview Channel
For previewing schedule events on a video monitor before iTX plays
Layout name Description
(Wide)
Control
Display
Monitor
Bypass
Schedule Grid. The Content Selector and Event Editor are available on
pop-up layouts.
shows schedule activity in all the channels in a selected view. You can
control playout on any selected channel in this view. There are no
schedule-editing features.
schedule activity in all the channels in a selected view.
ability to route the output from selected channels to video monitors. A
Timeline Display shows schedule activity in all the channels in a
selected view. Three Schedule Grids give schedule details for selected
channels.
control of playout in all channels in a selected view (rather than any
individual channel).
insert a news-flash sequence, which you can select from an edit
channel.
running on the same Output Server machine: the main playout
channel and an associated live channel.
iTX runs different schedules independently in both channels; but only
one plays out the events that provide the channel output. You select
which channel this is by using the Live Channel Management panel on
the layout.
The live channel needs to be set up in your system before you can use
this layout.
are no event-control features (Next Event Control Panel).
view. There are no schedule-editing or event-control features.
Control
in all channels in a selected view. It includes a Schedule Grid and
Global Editor, which you can use to make repeat changes to schedules
in selected channels in a channel view.
them out.
March 2015 iTX Desktop: Operator Manual 10
Page 31

Quick tour of the iTX Desktop
Manual Ingest
For the manual recording of media from a video line feed, with no
Dual Ingest
For the manual recording of media from a video line feed, with routes
Ingest Multi
For the manual recording of media from a video line feed, with no
Tape Ingest
For the manual or automatic recording of media from a videotape
Ingest Manager
For the monitoring and control of automated recordings in a system
Ingest Manager
Similar to the Ingest Manager layout, but with an automatic naming
Asset
For the preparation of media for schedule playout.
Asset
For dividing long video clips into smaller ones.
Layouts for the ingesting of media
Layout name Layout purpose
router control from within the iTX system.
You can control simultaneous independent recordings in up to 3
recording channels within a selected channel view.
set from within the iTX system.
You can control simultaneous independent recordings in up to 2
recording channels within selected channel views.
router control from within the iTX system.
You can control simultaneous independent recordings in up to 6
recording channels within a selected channel view.
machine connected directly to an Encode Server.
that includes Ingest Manager (an option iTX service).
Includes a button for a pop-up layout:
Scheduled Bookings. This is for the configuration and scheduling
of automated recordings.
(Naming Rule)
feature.
Layouts for the preparation and management of assets
Layout name Layout purpose
The layout has features for searching for assets, previewing them and
editing their metadata.
Segmentation
Any workstation or user view should contain just the layouts a particular operator needs; e.g.
for scheduling (Channel Control and Multi-Channel) or media preparation (Asset and Manual
Ingest).
Note:
• The illustrations of the layouts in this manual may vary from your iTX Desktop layouts,
depending on how your system administrator has configured your iTX Desktop.
March 2015 iTX Desktop: Operator Manual 11
Page 32

(green)
Normal. The service is operating normally.
Warning. A current system event or condition may prevent the
(red)
Failure. The service has failed.
(black)
Off. The service is not running.
Quick tour of the iTX Desktop
About service status indicators in layout components
A number of layout components contain a service status indicator box, usually in their top right
corner.
A green light in the box indicates that an iTX service that the component depends on is working
properly. Where the service is running on an Output Server, the box may display the name of
the playout channel running on that server.
This illustration shows two service status indicators in the Schedule Manager on the iTX
Channel Control layout:
The color of an indicator light shows the status of a service. The colors have these meanings:
Indicator Status
(yellow)
service operating normally; the service continues to run.
About system time and local time
In many television broadcasting stations, system time is measured in the international standard
time system known as UTC (Co-ordinated Universal Time). For each channel in your iTX system,
your system administrator can specify local time as an offset from UTC; this may include
adjustments for periods of daylight saving time (DST). Whether a layout component shows UTC
or local time depends upon the component. The following components on the iTX Channel
Control layout can display times of either type.
• The Content Selector. You can toggle the display between UTC and local time by clicking
the UTC button on the component. More details, page 20.
• The Event Editor. As with the Content Selector, you can toggle the display between UTC
and local time by clicking the UTC button on the component. More details, page 94.
• The Schedule Grid. The Start Time column in the Schedule Grid shows the start time of
schedule events in UTC. By adding the Local Start Time column to the Schedule Grid, you
can view the start time of schedule events in local time. More details, page 142.
The following component on the iTX Channel Control layout displays time information in local
time.
• The Timeline Display. More details, page 127.
March 2015 iTX Desktop: Operator Manual 12
Page 33

Working with schedules
Working with schedules
An iTX schedule is a list of events in which assets play out at specified times. The events may
involve assets of different types – such as video clips, CGs and logos. Each event has a start time
and a duration (i.e. the length of time for which the asset plays).
This illustration shows an example of part of a schedule:
When working with a schedule, you can: manually build one from the start; edit one that is
currently in a channel; or load an existing schedule that is stored in the System Database.
You can load schedules that have been created in another application, such as a traffic
scheduling application. You need to import such schedules first, by using the iTX system service
called the Media Watcher. The Media Watcher can import schedule files if they are in the
schedule format defined by the iTX Import Protocol. For more information about this, see
"Appendix A: The iTX Import Protocol", page 349.
About iTX channels
You work with schedules in a schedule channel – an iTX feature for the organizing of events.
There are two types of schedule channel:
• A playout channel (sometimes called an online channel or a transmission channel) has
playout functionality. When there is a schedule in a channel of this type, iTX gets the
schedule items and plays them out at the specified times. iTX delivers the channel output
to a transmission system for broadcasting.
We call a schedule that is in a playout channel a live schedule. You should be careful when
making changes to events in a live schedule that you do not accidentally disrupt playout in
the channel.
• An edit channel (sometimes called an offline channel) does not have playout functionality.
You use an edit channel to build schedules before loading them into a playout channel. By
doing this, you avoid the risk of interfering with live playout.
For each iTX playout channel in your system, there is a corresponding edit channel. This
has the same name as the playout channel but with the suffix "-EDIT".
When creating schedules in iTX, you build most of the schedule in an edit channel; you then
load this into a playout channel where you may perform minor editing operations.
You may have access to any number of playout channels and edit channels within your iTX
system. You use the Channel Selector to select the channel you want to work in.
March 2015 iTX Desktop: Operator Manual 13
Page 34

Working with schedules
Monitoring and controlling live schedules
The iTX Channel Control layout contains components that give information on the live schedule
in a playout channel. Through these components, you can view information about the current
event, recent past events and future events.
You may edit a schedule by inserting events, deleting events or making last-minute changes to
event properties.
In controlling playout, you may end the current event early by taking the next event or any
selected event to air.
iTX Desktop components for working with schedules
In the next few sections, we describe how you use the components on the iTX Channel Control
layout to organize and control schedule events:
• The Content Selector, to select assets from the System Database and create schedule
events that feature these assets. More details, page 15.
• The Event Editor, to edit the properties of any event in the current schedule. More details,
page 75.
• The Timeline Display, to monitor schedule events. More details, page 127.
• The Schedule Grid, to monitor and edit schedule events. More details, page 133.
• The Schedule Manager, to save and load schedules; and create sequences. More details,
page 154.
• The Next Event Control Panel, to perform an action on the schedule event that is due to
take place next. More details, page 162.
• The Live Logo Inserter, to manually start or stop the playout of a logo over the main video.
More details, page 165.
March 2015 iTX Desktop: Operator Manual 14
Page 35

The Content Selector
The Content Selector
About the Content Selector
The Content Selector, on the iTX Channel Control layout, is one of a pair of components that
you tend to work with alternately when you edit playout schedules (the other is the Event
Editor). You use the Content Selector to select assets from the System Database and include
them in schedule events; you use the Event Editor to change the properties of schedule events
that feature these assets.
The assets contain the location details that iTX needs to find media files on the Media Store;
they also contain information about other properties of the media, such as a video clip's in- and
out-points. In the System Database, there is a different type of asset for each different type of
media file on the Media Store: video clip, CG, logo, etc.
The Content Selector gives you access to the System Database through PinPoint (an iTX tool for
database searching). You can search the System Database, select assets and copy these to the
Content Selector. In this way, you create shortlists of assets on the Content Selector that you
can use in schedule events. More details, page 173.
You can modify assets on the Content Selector (e.g. change an in-point), before using them in
schedule events. Changes you make in this way do not affect the original assets in the System
Database.
As well as assets, the Content Selector handles other types of item you can use in schedule
events. You use these items for operations such as the insertion of VANC data in the video
signal and the playout of graphics from an external Vertigo XG graphics system.
March 2015 iTX Desktop: Operator Manual 15
Page 36

The Content Selector
Content Selector palettes
The Content Selector organizes assets and other items that can feature in schedule events on
palettes. It has a separate palette for each type of asset and schedule item. Depending on what
software plug-in licenses you have for your iTX system, the Content Selector may include any of
the following palettes.
Palettes for assets
• Video Clip
• Logo
• CG
• Subtitle
Palettes for other types of schedule item
• External Logo
• Split Break
• Slide Show
• External Subtitler
Palettes for schedule items managed by other Grass Valley equipment
• Stills
• Voice Over
• Music Clip
• Live
• Clarity
• VizRT
• GPI
• Studio
• Sequence
• Schedule
• Router Event
• VANC Data
• V-Chip
• News Story
• iTX Render (see the note below)
• VertigoXG (see the note below)
Comments palette
There is an extra palette that enables you to insert comment lines in a schedule, to provide
information (comment lines are not schedule events):
• Comment
The Content Selector displays one palette at a time. When you want to work with a particular
type of asset or schedule item, you select the palette for that type by clicking a palette
selection button.
Each palette has a selection pane in which it displays a shortlist of available assets or schedule
items; some palettes display a list of names; others, thumbnail images of graphic items (e.g.
CGs). When an asset or other item is in a selection pane, you may include it in events in the
current schedule.
If you are controlling multiple playout channels on your iTX Desktop, the contents of a selection
pane vary according to what channel you select through the Channel Selector.
Note:
• We do not cover the use of the iTX Render and VertigoXG palettes in this section.
Complete information for these is instead given in separate documentation, available from
Grass Valley.
March 2015 iTX Desktop: Operator Manual 16
Page 37

The Content Selector
Setting up palettes on the Content Selector
To simplify the selection of palettes, you can set up the Content Selector to show only the ones
that you want to work with.
1. On the Content Selector, click Configure.
iTX displays the Content Selector configuration dialog:
The names of hidden palettes appear in the Hidden Panels pane; the names of visible
palettes, in the Displayed Panels pane.
2. Do the following to set the palette layout.
• Use the arrow buttons,
just the ones you want to appear on the Content Selector are in the Displayed Panels
pane.
• To change the order of palette selection buttons, select any palette in the Displayed
Panels pane; click Down or Up.
3. Click OK.
and , to move selected palettes between panes until
Changing the properties of an asset in the Content Selector
Before you include an asset in a new schedule event, you can edit some of its properties in the
Content Selector. The properties you can change depend on the asset type. For example, you
can edit the in- and out-points of a video clip; you can change the size and position of a CG.
The asset has the new properties the next time you use it in a schedule event.
Your changes affect only the copy of the asset on the Content Selector – not the original asset
in the System Database.
Changing asset properties on the Content Selector affects whether or not iTX updates an event
if the asset it features is changed on the Asset layout. More details, page 133.
March 2015 iTX Desktop: Operator Manual 17
Page 38

The Content Selector
Managing the contents of a palette selection pane
A palette selection pane contains a shortlist of assets that you can include in schedule events.
You can manage a shortlist by adding or removing assets.
Add assets to a palette selection pane
1. Select a palette on the Content Selector.
2. Click Search to open PinPoint.
3. Use PinPoint to select assets from the System Database. More details, page 179.
When you close PinPoint, the selection pane updates to include the assets you select.
Remove assets from a palette selection pane
Once you no longer need an asset, you may remove it from a selection pane.
1. Select a palette on the Content Selector.
2. Do one of the following to remove unwanted assets.
• To remove assets one at a time, select an asset in the palette selection pane; click
Remove.
• To remove all assets, click Clear All.
Note:
• iTX automatically removes an asset from a palette selection pane if you delete the asset
from the System Database.
March 2015 iTX Desktop: Operator Manual 18
Page 39

The Content Selector
Editing a schedule by dragging and dropping assets from the Content Selector
Creating schedule events
You use the Content Selector to create events in a schedule one at a time.
To create a schedule event, you select an asset in the Content Selector; you then drag and drop
the asset onto either the Schedule Grid or the Timeline Display:
iTX enters the new event in the Schedule Grid; it displays a block to represent the event on the
Timeline Display.
Primary and secondary events
The drag-and-drop process may create either a primary event or a secondary event. A primary
event plays in sequence with other primary events; a secondary event generally plays at the
same time as a primary event, with which it is associated. During playout, iTX displays the
media in a secondary event over the top of the media in a primary event. The secondary-event
media is sometimes called an overlay.
Primary events usually feature video clips or still images. Secondary events usually feature CGs,
logos or voiceovers.
March 2015 iTX Desktop: Operator Manual 19
Page 40

The Content Selector
If a primary event has an associated secondary event, a plus sign appears in front of the
primary event in the Schedule Grid. Clicking the plus sign expands the entry for the primary
event to show the secondary events.
On the Timeline Display, iTX shows secondary events occurring at the same time but on
separate tracks to their primary events. This illustration shows the timeline for a schedule that
contains primary and secondary events:
Locating a new schedule event
Three factors affect how iTX fits a new event into a schedule. These are:
• The event time mode.
• The event level (primary or secondary).
• Where you drop the asset to create the event.
Before dragging an asset, you set an event time mode through the event-scheduling controls
on the Content Selector:
You can set an event to have a Fixed time mode or an Auto time mode. An event with a Fixed
time mode starts at a time that you specify in the Time box. An event with an Auto time mode
starts at a time that iTX calculates based on the event’s position in the schedule. After creating
an event, you can give it one of a wider range of time modes in the Event Editor. More details,
page 86.
March 2015 iTX Desktop: Operator Manual 20
Page 41

The Content Selector
You may drag an asset to the Schedule Grid to create a primary event with an Auto time mode.
iTX locates the new event immediately after the event that you drop the asset onto; it adjusts
the start times of later events to accommodate the new event.
In a similar way, you may create a secondary event with an Auto time mode. iTX schedules this
event to start at the same time as the primary event that you drop the asset onto.
To create a primary event with an Auto time mode by dragging an asset to the Timeline Display,
you need to drop the asset onto a space on a video track. iTX locates the new event after the
last primary event. If, instead, you drop the asset onto a primary event, you create a secondary
event at the point in the schedule where you drop the asset.
Displaying UTC or local time when creating Fixed events
If you are working with a channel that is configured with a time offset from UTC, you may
schedule the start time of a new Fixed event by referring to either local time or UTC in the
Content Selector. Clicking the UTC button toggles the time in the Time box between the two
types: UTC is shown when the button displays a red light. More details, page 12.
Create a schedule event by dropping an asset into the Schedule Grid
1. Select the palette that handles the type of asset you want to include in a new event.
2. Ensure the asset you want to use is in the palette selection pane. More details, page 18.
3. Do one of the following to set the event timing.
• If you want to set the start time manually, select Fixed; enter the start time in the
Time box. More details, page 197.
• If you want iTX to calculate the start time, based on the scheduling of other events,
ensure Fixed is not selected.
Note: If Fixed is not selected for the first event in a schedule, iTX schedules the event to
start almost immediately (there is a delay of about 30 seconds during which iTX locates and
cues the asset in the event).
4. Do the following to create an event.
• Select an asset in the palette selection pane.
• Drag the asset onto the Schedule Grid.
• Drop the asset when the mouse pointer is over the event that you want the new event
to immediately follow. If you set a fixed time mode for the event, you may drop the
asset anywhere on the Schedule Grid.
iTX enters the new event in the Schedule Grid; it displays a block to represent the event on
the Timeline Display.
March 2015 iTX Desktop: Operator Manual 21
Page 42

The Content Selector
Note:
• You can select any event in the Schedule Grid and check its properties in the Event Editor.
You can edit some of these properties. For instance, you may set a video transition for a
video clip. More details, page 75.
• If the drag-and-drop option is enabled for the Schedule Grid, you can re-order events by
dragging and dropping them within the Schedule Grid. More details, page 143.
• When you create a Fixed event in a channel with a UTC offset, remember the Start Time
column in the Schedule Grid shows the event start time in UTC. This may be different to
the value in the Time box on the Content Selector, depending on the status of the UTC
button.
Create a schedule event by dropping an asset onto the Timeline Display
1. Select the palette that handles the type of asset you want to include in a new event.
2. Ensure the asset you want to use is in the palette selection pane. More details, page 18.
3. Do one of the following to set the event timing.
• If you want to set the start time manually, select Fixed; enter the start time in the
Time box. More details, page 197.
• If you want iTX to calculate the start time, based on the scheduling of other events,
ensure Fixed is not selected.
Note: If Fixed is not selected for the first event in a schedule, iTX schedules the event to
start almost immediately (there is a delay of about 30 seconds during which iTX locates and
cues the asset in the event).
4. Select an asset in the palette selection pane and drag it onto the Timeline Display. Then do
one of the following.
• To create a primary event, drop the asset in a clear area on any timeline track. iTX
automatically locates the new event after the last event on the correct track.
• To create a secondary event, drop the asset onto the event that is to be its primary
event. iTX automatically locates the new event alongside its primary event on the
correct track; it schedules the secondary event to start at the time corresponding to
the point on the timeline where you drop the asset.
iTX enters the new event in the Schedule Grid; it displays a block to represent the event on
the Timeline Display.
March 2015 iTX Desktop: Operator Manual 22
Page 43

The Content Selector
Note:
• You can select any event in the Schedule Grid and check its properties in the Event Editor.
You can edit some of these properties. For instance, you may set a video transition for a
video clip. More details, page 75.
• If the drag-and-drop option is enabled for the Schedule Grid, you can re-order events by
dragging and dropping them within the Schedule Grid. More details, page 143.
• When you create a Fixed event in a channel with a UTC offset, remember the Start Time
column in the Schedule Grid shows the event start time in UTC. This may be different to
the value in the Time box on the Content Selector, depending on the status of the UTC
button.
Remove one or more events from a schedule
1. Do one of the following to permanently remove events from a schedule.
• To remove a single event, right-click the event in the Schedule Grid and select Delete
• To remove multiple events, select the events in the Schedule Grid; press the Shift or
from the displayed menu.
Control key while clicking events to select them. Right-click any of the events and
select Delete from the displayed menu.
• To remove all events, right-click the Schedule Grid and select Delete All from the
displayed menu.
When iTX prompts you to confirm your instruction, click Yes. iTX removes the selected
events from the Schedule Grid and the Timeline Display.
Note:
• When controlling a live schedule, you can instruct iTX to skip an event. iTX leaves the event
in the Schedule Grid but omits it from scheduling operations. More details, page 148.
March 2015 iTX Desktop: Operator Manual 23
Page 44
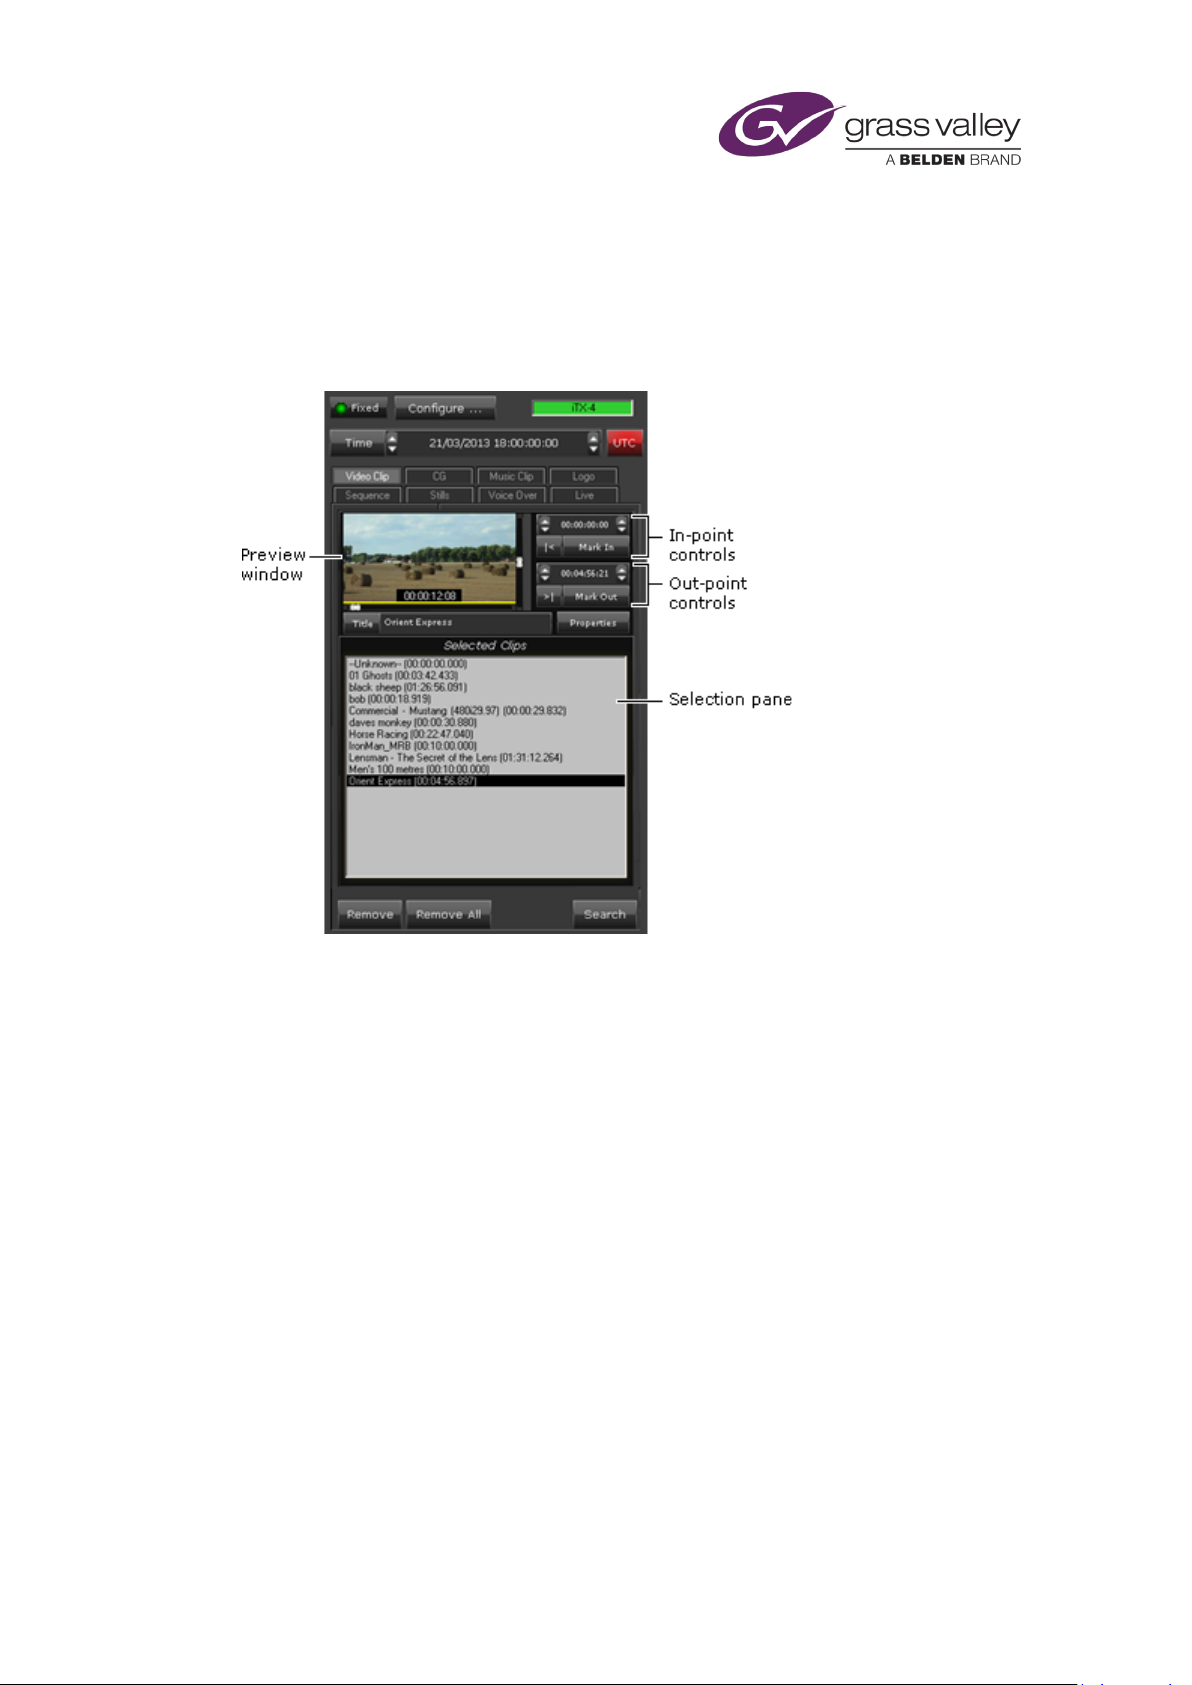
The Content Selector
Working with video clips
About the Video Clip palette
On the Video Clip palette, you build a shortlist of video clips for including in schedule events:
In building the shortlist, you use PinPoint to select video clips from the System Database; these
then appear in the Selected Clips list in the palette selection pane. More details, page 18.
Once a clip is in the Selected Clips list, you can include it in a schedule event. Before you do,
you may:
• Preview the clip in the preview window. More details, page 187.
• Change the in-point or out-point of the clip. More details, page 192.
• Change the audio level of the clip. More details, page 193.
• Select the audio output channels iTX uses to deliver the clip content for a secondary video
clip. More details, page 196.
• Change the aspect-ratio details (source format and active region) of the clip. More details,
page 196.
• Set up the video clip to play repeatedly (loop) in an event. More details, page 197.
• Change the copy-protection setting for the clip. More details, page 197.
• For a stereoscopic 3D playout channel, mark the video clip as in the channel’s native
format. More details, page 196.
March 2015 iTX Desktop: Operator Manual 24
Page 45

The Content Selector
Adding a video-clip event to a schedule
When you add a video-clip event to a schedule, you may make it either a primary event or a
secondary event.
Adding a video-clip event as a primary event
Usually, you make a video-clip event a primary event. To do so, you drag and drop the video
clip onto the Schedule Grid or a clear part of the Timeline Display.
iTX enters the new event in the Schedule Grid; it displays a block to represent the event on the
Timeline Display.
iTX normally places the block on the first program video (PGM A) track. An exception to this is if
the event starts with a cross-fade transition and follows an event represented on the PGM A
track. In this case, iTX places the block for the new event on the second program video (PGM B)
track instead – since both events are on air at the same time during a cross-fade transition.
Adding a video-clip event as a secondary event, for a picture-in-picture effect
You can create a picture-in-picture effect by dropping a video clip onto a primary event
(featuring either another video clip or a still image) on the Timeline Display. The new event
becomes a secondary event, associated with the primary event you drop the video clip onto.
The video in the secondary event displays within an area of the picture in the primary event;
you define this area in the Event Editor.
iTX enters the new secondary event in the Schedule Grid. It displays a block to represent the
event on one of the video tracks (PGM A or PGM B) on the Timeline Display – alongside the
block (on the other video track) for the associated primary event.
You should check and edit the properties of the secondary event – in particular, its offset – in
the Event Editor.
Previewing a video clip in the preview window
After you select a video clip in the Selected Clips list, you can play the clip in the preview
window using a range of available controls. More details, page 187.
Changing video-clip properties
After you select a video clip in the Selected Clips list, you can change some of its properties
before creating a schedule event based on it. More details, page 76.
Note:
• If you want to change any event property (such as the start time or transition) of a video-
clip event, you need to use the Event Editor.
March 2015 iTX Desktop: Operator Manual 25
Page 46

The Content Selector
Using an unknown video clip in a schedule event
The first item, called Unknown, in the Selected Clips list of the Video Clip palette is a special
item. You use it to create a schedule event based on a video clip that is not registered in the iTX
system. The video clip needs to be registered before the event can take place.
As with existing video clips, you can specify an in- and out-point for an unknown clip, and so
define the clip duration. When you create a schedule event by dragging Unknown to the
Schedule Grid or Timeline Display, iTX displays the Enter Item Name dialog:
The dialog requests you to name the video clip in the new event. When you enter a name and
close the dialog, iTX creates a schedule event based on a video clip with that name.
At first, the schedule event has a status of "Not Ready". When a video clip with the same name
as the one you specify for the unknown clip gets registered, iTX updates the event.
Note:
• Instead of entering the name of a real video clip in the schedule event, you may enter a
temporary name – one that is not intended to be given to any real clip. You can then use
the Event Editor to replace the unknown clip with any registered video clip, which you
select from the System Database. More details, page 113.
• If you give the unknown clip the same name as a video clip that is already registered, iTX
automatically includes the registered clip in the new schedule event.
Adding a VTR event to a schedule
If your iTX system includes the Device Manager Service, you can add a VTR event to a schedule.
To do so, you import a video clip with a videotape location (in a format defined by the iTX
Import Protocol). After the VTR clip is registered, you use PinPoint to add it to the Selected
Clips list. You then drag the VTR clip to the Schedule Grid or Timeline Display. The resulting VTR
event is highlighted yellow and has a status of "Not Ready".
On the Event Editor, you select a videotape machine for iTX to use to play out the VTR event.
More details, page 114.
For more information about the iTX Import Protocol, see "Appendix A: The iTX Import
Protocol", page 349.
March 2015 iTX Desktop: Operator Manual 26
Page 47

The Content Selector
Working with logos
About the Logo palette
iTX creates logo assets for graphics files that are placed in the Logos folder in the Media Store
Inbox.
Logos may be still images or animations (e.g. animated TARGA or VAF sequences). In an
animation, iTX displays the images at the playout frame rate of the channel.
In the selection pane of the Logo palette, you assemble a set of logos that you want to be
available for including in schedule events. To do so, you use PinPoint to select logos from the
System Database. More details, page 179.
Once a logo is in the selection pane, you can include it in schedule events. Before you do, you
may:
• Preview the logo in the preview window – iTX displays the logo in the preview window
when you select it in the selection pane.
• Set an on, off or duration property for the logo.
• Change the title of the logo.
• Change the default duration of the logo. iTX applies the default duration to any logo event
that you add to a schedule.
• Change which graphics layer (from 1 to 10) the logo appears on. A logo on a higher-
numbered layer appears in front of graphics items that are on lower-numbered layers.
March 2015 iTX Desktop: Operator Manual 27
Page 48

The Content Selector
Note:
• A logo has some asset properties that you can modify in the Logo Editor. More details,
page 322.
Adding a logo event to a schedule
Usually, a logo plays out as an overlay on a video clip or still image.
In adding a logo event to a schedule, you make it a secondary event. To do so, you drop the
logo onto its primary event on the Schedule Grid or Timeline Display.
iTX enters the new logo event in the Schedule Grid; it displays a block to represent the event on
the Logo track on the Timeline Display. In the Schedule Grid, iTX nests the secondary event
within the primary event.
You should check and edit the properties of the logo event – in particular, its time mode and
offset – in the Event Editor.
Options for controlling the playout of logos
There are two ways of controlling the playout of a logo:
• You can use two schedule events, one to switch the logo on and the other to switch it off.
This is particularly useful when you want to relate the logo timing to the start or end of
another schedule event; you do not then need to calculate an exact duration.
• You can create a single schedule event in which iTX displays the logo for a specified
duration – just as it does for other types of item (video clip, CG, etc.).
Options (On, Off and Dur) on the Logo palette set the logo property that affects the type of
logo event created in the drag-and-drop process. You should select the required option, before
adding a logo event to a schedule; you can change it in the Event Editor afterwards.
Note:
• To ensure iTX removes logos when they are no longer required, remember to schedule a
corresponding off logo event for each on logo event.
March 2015 iTX Desktop: Operator Manual 28
Page 49

The Content Selector
Temporary removal of all logos
Sometimes, you may want to temporarily remove all logos that iTX is displaying – just while
certain events play out – and later restore them. You can do this by creating events using two
special items: the Suppress item and the Restore item. These items are always present in the
selection pane of the Logo palette. In a Suppress logo event, iTX switches off all active logos; in
a Restore logo event, it switches them on again.
Set the logo-type property
1. Select a logo in the Logo-palette selection pane.
iTX loads the logo in the preview window.
2. Do one of the following, depending on how you want iTX to handle the logo in a schedule
event.
• Click ON if you want iTX to switch the logo on.
• Click OFF if you want iTX to switch the logo off.
• Click DUR if you want iTX to display the logo for the specified duration. Enter the
required value in the Dur box.
Note:
• You can also change the logo-type property using the Event Editor.
Change the title of a logo
1. Select a logo in the Logo-palette selection pane.
2. Enter the new title in the Title box; press Return to complete the entry.
iTX displays the new title of the logo in the palette selection pane.
March 2015 iTX Desktop: Operator Manual 29
Page 50

The Content Selector
Change the default duration of a logo event
iTX assigns a default duration to any logo event you create with the Dur option selected. You
can change this default value.
1. Enter the new value in the Dur box. More details, page 197.
Note:
• You can also change the duration of a logo event by using the Event Editor.
Assign a logo to a different layer
iTX can stack graphics assets on up to ten layers in front of the video image. The layers are
numbered 1 to 10 – with layer 10 at the front. Assets on higher-numbered layers appear in
front of assets on lower-numbered layers.
By default, iTX assigns logos to layer 5. You may move any logo to a different layer to prevent it
being obscured by other graphics assets.
1. Select a logo in the Logo-palette selection pane.
2. Enter the layer number in the Layer box.
Note:
• You can also change the layer number in the Logo Options dialog (which you can select
from the Logo Editor).
Suppress or restore all active logos
1. To stop the display of all logos that are scheduled to play out from a specific point in a
schedule, do the following.
• Drag the Suppress item from the selection pane of the Logo palette; drop it onto
either the Schedule Grid or the Timeline Display. iTX enters a suppress-logo event in
the Schedule Grid, and displays a block to represent it on the Timeline Display.
• Check the event timing in the Event Editor, and adjust it if necessary.
2. To restart the display of all logos that are scheduled to play out, do the following.
• Drag the Restore item from the selection pane of the Logo palette; drop it onto either
the Schedule Grid or the Timeline Display. iTX enters a restore-logo event in the
Schedule Grid, and displays a block to represent it on the Timeline Display.
• Check the event timing in the Event Editor, and adjust it if necessary.
March 2015 iTX Desktop: Operator Manual 30
Page 51

The Content Selector
Clearing all logos at the start of a new schedule
There may be times when a schedule running in a playout channel is replaced by another one
before all events have played out. This can result in a logo staying on air when the logo event
that switches it off is among the unplayed events.
To prevent iTX displaying unwanted logos from a previous schedule, a new schedule may start
with a logo event that switches off all logos. For this, you create a logo event with a special logo
– one with the name “Clear All”. The Clear All logo must be registered as an asset in your iTX
system.
Working with external logo inserters
When the output signal from a channel is fed to an external logo inserter, iTX may be able to
operate this device to insert logos into the signal. It can do so if the logo inserter is one of these
types:
• Grass Valley Imagestore (various models).
• Grass Valley LGK-3901
About the External Logo palette
In the selection pane of the External Logo palette, you create a list of external logos that you
want to be available for including in schedule events.
March 2015 iTX Desktop: Operator Manual 31
Page 52

The Content Selector
In building the list, you enter the details of logos that are stored on an external logo inserter.
For each one, you specify:
• The logo name.
• The on, off or duration property for the logo.
• The in- and out-transitions for the logo.
• The number of the graphics layer (from 1 to 10) the logo is to appear on. A logo on a
higher-numbered layer appears in front of graphics items that are on lower-numbered
layers.
You specify the details in the External Logo Properties dialog when you add a logo to the
palette selection pane.
When a logo is in the External Logos list of the palette selection pane, you can use the Content
Selector to include it in schedule events.
Options for controlling the playout of logos
Just as for logos that are stored on an iTX Media Store, there are two ways of controlling the
playout of an external logo:
• You can use two schedule events, one to switch the logo on and the other to switch it off.
• You can create a single schedule event in which iTX displays the logo for a specified
duration.
Options (On, Off and Dur) on the External Logo Properties dialog set the logo property that
affects the type of logo event created in the drag-and-drop process. You can change this in the
Event Editor afterwards.
Note:
• The Suppress and Restore commands that are available on the Logo palette do not affect
external logos.
• The Grass Valley LGK-3901 allows iTX to use up to 3 layers for logo insertion and up to two
external Key and fill input pairs.
March 2015 iTX Desktop: Operator Manual 32
Page 53

The Content Selector
Adding an external-logo event to a schedule
Usually, a logo plays out as an overlay on a video clip or still image.
In adding an external-logo event to a schedule, you make it a secondary event. To do so, you
drop the logo onto its primary event on the Schedule Grid or Timeline Display.
iTX enters the new external-logo event in the Schedule Grid; it displays a block to represent the
event on the Logo track on the Timeline Display. In the Schedule Grid, iTX nests the secondary
event within the primary event.
You should check and edit the properties of the external-logo event – in particular, its time
mode and offset – in the Event Editor.
Add an external logo to the palette selection pane
1. Select the External Logo palette on the Content Selector.
2. Click Add Logo to display the External Logo Properties dialog.
3. Enter the name of the logo in the Logo box.
4. Enter a layer number in the Layer box.
5. Do one of the following, depending on how you want iTX to handle the logo in a schedule
event.
• Click ON if you want iTX to switch the logo on.
• Click OFF if you want iTX to switch the logo off.
• Click DUR if you want iTX to display the logo for the specified duration. Enter the
required value in the Dur box.
6. Do the following to set an in-transition.
• Select IN.
• Click a transition selection button to select a transition type (cut or dissolve).
• If you select a dissolve transition, enter the duration of the transition in the IN time-
entry box.
7. Do the following to set an out-transition.
• Select OUT.
• Click a transition selection button to select a transition type (cut or dissolve).
• If you select a dissolve transition, enter the duration of the transition in the OUT time-
entry box.
8. Click OK to close the dialog.
The logo appears in the External Logos list.
Note:
• You can change the logo properties by using the Event Editor.
March 2015 iTX Desktop: Operator Manual 33
Page 54

The Content Selector
Scheduling logos using the External Key and Fill inputs of the LGK-3901
iTX handles content from an external device in the same way it handles logos stored
on the card – allowing it to be scheduled to switch on, switch off or play for a specified
duration.
In schedule events, this content is referenced by one of two special names. The
following default names are used for this (they can be changed in the LGK-3901
configuration).
For the first pair of inputs:
> K1+F1 <
For the second pair of inputs:
> K2+F2 <
Note: a space appears after the first angle bracket and before the second one in each
name.
Events can be scheduled from the Content Selector on the Channel Control layout and
modified in the Event Editor; they can also be included in imported schedules. The
Content Selector shows the name, layer and logo type for available items:
Two graphics, one for each key-and-fill input pair, are automatically generated by the
plug-in and always appear in the Content Selector list.
Others with the same names but with different properties (layer, logo type) can be
made available. This is done by clicking Add Logo and specifying the details in the Add
Logo dialog:
Remove an external logo from the palette selection pane
1. Select a logo in the External Logos list.
2. Click Delete Logo.
March 2015 iTX Desktop: Operator Manual 34
Page 55

The Content Selector
Working with CGs
About the CG palette
In the selection pane of the CG palette, you can assemble a set of CGs that you want to be
available for including in schedule events. There are two ways of doing this:
• Click Search to use PinPoint to select existing CGs from the System Database. More details,
page 179.
• Click Create to use the iTX CG application to create new CGs, which you can then open
from the CG palette. More details, page 201.
Once a CG is in the selection pane, you can include it in schedule events. Before you do, you
may:
• Preview the CG in the preview window – iTX displays the CG in the preview window when
you select it in the selection pane.
• Edit the CG, if it is one that you created using the iTX CG application.
• Change the title of the CG.
• Change the default duration of the CG. iTX applies the default duration to any CG event
that you add to a schedule.
March 2015 iTX Desktop: Operator Manual 35
Page 56

The Content Selector
Adding a CG event to a schedule
Usually, a CG plays out as an overlay on a video clip or still image.
In adding a CG event to a schedule, you make it a secondary event. To do so, you drop the CG
onto its primary event in the Schedule Grid or on the Timeline Display.
iTX enters the new CG event in the Schedule Grid; it displays a block to represent the event on
the CG track on the Timeline Display. In the Schedule Grid, iTX nests the secondary event within
the primary event.
You should check and edit the properties of the CG event – in particular, its time mode and
offset – in the Event Editor.
Edit a CG in the iTX CG application
1. Select a CG in the selection pane of the CG palette.
iTX displays the CG in the preview window.
2. Click the preview window.
The iTX CG application opens with the selected CG loaded.
3. Use the features of this application to edit and save the CG. More details, page 201.
Change the title of a CG
1. Select a CG in the selection pane of the CG palette.
2. Enter the new title in the Title box; press Return to complete the entry.
iTX displays the new title of the CG in the palette selection pane.
Change the duration of a CG event
iTX assigns a default duration to any CG event you create featuring a CG from the CG palette.
You can change this default value.
1. Enter the new value in the Dur box. More details, page 197.
Note:
• You can also change the duration of a CG event by using the Event Editor.
March 2015 iTX Desktop: Operator Manual 36
Page 57

The Content Selector
Working with subtitle files
About the Subtitle palette
In the Subtitle palette, you load a subtitle clip that you want to attach to a particular video-clip
or still-image event. In doing so, you use PinPoint to select the subtitle clip from the System
Database. More details, page 173.
Once the subtitle clip is loaded in the palette, you can include it in a schedule event.
At the bottom of the Subtitle palette is the subtitle insertion bar, which you use to add a
subtitle event to a schedule.
Adding a subtitle event to a schedule
A subtitle clip contains lines of text that play out over a video clip or still image. In adding a
subtitle event to a schedule, you make it a secondary event. To do so, you drag the subtitle
insertion bar and drop it onto the primary event in the Schedule Grid or on the Timeline
Display.
iTX enters the new subtitle event in the Schedule Grid; the event has the same start time and
duration as the primary event; it displays a block to represent the event on the Subtitles track
on the Timeline Display. In the Schedule Grid, iTX nests the secondary event within the primary
event.
You may modify the time mode and offset of the subtitle event in the Event Editor.
March 2015 iTX Desktop: Operator Manual 37
Page 58

The Content Selector
Working with still images
About the Stills palette
In the selection pane of the Stills palette, you assemble a set of still images that you want to be
available for including in schedule events. In doing so, you use PinPoint to select still images
from the System Database. More details, page 179.
iTX automatically adjusts the proportions of a still image to fit the display format (4x3 or 16x9)
of the playout channel.
Once a still image is in the selection pane, you can include it in a schedule event. Before you do,
you may:
• Preview the still image in the preview window – iTX displays the still image in the preview
window when you select it in the selection pane.
• Change the title of the still image.
• Change the default duration of the still image. iTX applies the default duration to any still
image that you add to a schedule.
March 2015 iTX Desktop: Operator Manual 38
Page 59

The Content Selector
Adding a still-image event to a schedule
You may add a still-image event to a schedule as either a primary event or a secondary event.
Adding a still-image event as a primary event
To create a still-image event as a primary event, you drag and drop a still image onto the
Schedule Grid or a clear part of the Timeline Display.
iTX enters the new event in the Schedule Grid; it displays a block to represent the event on the
Timeline Display.
Adding a still-image event as a secondary event, for a picture-in-picture effect
You can create a picture-in-picture effect by dropping a still image onto a primary event (which
may feature either a video clip or another still image) on the Timeline Display. The new event
becomes a secondary event; it is associated with the primary event you drop the still image
onto.
The still image in the secondary event displays within an area of the picture in the primary
event. You define this area in the Event Editor when the secondary event is selected.
iTX enters the new secondary event in the Schedule Grid. It displays a block to represent the
event on one of the video tracks (PGM A or PGM B) on the Timeline Display – alongside the
block (on the other video track) for the associated primary event. You should check and edit the
properties of the secondary event – in particular, its offset – in the Event Editor.
Change the title of a still image
1. Select a still image in the Stills-palette selection pane.
2. Enter the new title in the Title box; press Return to complete the entry.
iTX displays the new title of the still image in the palette selection pane.
Change the default duration of a still-image event
iTX assigns a default duration to any still-image event you create using a still image from the
Stills palette. You can change this default value.
1. Enter the new value in the Dur box. More details, page 197.
Note:
• You can change the duration of a still-image event by using the Event Editor.
March 2015 iTX Desktop: Operator Manual 39
Page 60

The Content Selector
Working with voiceover clips
About the Voice Over palette
Through the Voice Over palette, you build a shortlist of voiceover clips that you want to be
available for including in schedule events. In building the shortlist, you use PinPoint to select
voiceover clips from the System Database; these then appear in the Selected Audio Clips list on
the palette. More details, page 179.
Once a clip is in the Selected Audio Clips list, you can include it in a schedule event. Before you
do, you may:
• Play and listen to the voiceover clip.
• Change the title of the voiceover clip.
• Change the in- and out-point of the voiceover clip.
• Select the audio output channels iTX uses to deliver the clip content for the voiceover clip.
More details, page 196.
Once the voiceover is on air, you cannot stop it before its scheduled end.
Adding a voiceover-clip event to a schedule
A voiceover clip plays out over a video clip or still image. In adding a voiceover-clip event to a
schedule, you make it a secondary event. To do so, you drop the voiceover clip onto its primary
event in the Schedule Grid or on the Timeline Display.
March 2015 iTX Desktop: Operator Manual 40
Page 61

The Content Selector
iTX enters the new voiceover-clip event in the Schedule Grid; it displays a block to represent
the event on the V/O track on the Timeline Display. In the Schedule Grid, iTX nests the
secondary event within the primary event.
You should check and edit the properties of the voiceover-clip event – in particular, its time
mode and offset – in the Event Editor.
Play a voiceover clip
1. Select a voiceover clip in the Selected Audio Clips list.
2. Use the clip playback controls to play the clip:
• Click
• Click
• Click
to play the clip.
to pause the clip.
to reset the clip to the start.
Change the title of a voiceover clip
1. Select a voiceover clip in the Selected Audio Clips list.
2. Enter the new title in the Title box; press Return to complete the entry.
When you add the voiceover clip to a schedule, iTX displays the title of the clip in the
Schedule Grid.
Change the in-point or out-point of a voiceover clip
1. Select a voiceover clip in the Selected Audio Clips list.
2. Do one of the following if you want to change the in-point.
• Enter a new value directly in the In Point timecode box.
• Click In Point to display the Time Calculator. Use this to enter a timecode value in the
In Point timecode box.
More details, page 197.
3. Do one of the following if you want to change the out-point.
• Enter a new value directly in the Out Point timecode box.
• Click Out Point to display the Time Calculator. Use this to enter a timecode value in
the Out Point timecode box.
More details, page 197.
Note:
• You can change any event property (such as the start time or transition) of a voiceover-clip
event in the Event Editor.
March 2015 iTX Desktop: Operator Manual 41
Page 62

The Content Selector
Working with live events
About the Live palette
An Output Server can be set up to receive a live feed from a matrix router: the Output Server is
connected as a router destination; one or more live feeds, as router sources. The live feed
becomes available for playout by iTX when it is included in a type of asset called a live event.
You can create live events on the Asset layout. More details, page 295.
On the Live palette, you can add live events to the Live Sources list; you use PinPoint to do this.
While a live event is in the list, you can add it to schedules. You may also:
• View the live-event properties.
• Set an event duration. iTX assigns the duration to any schedule event it creates when you
add the live event to a schedule.
Adding a live event to a schedule
When adding a live event to a schedule, you make it a primary event. You drag and drop the
live event into the Schedule Grid or onto a clear part of the Timeline Display.
iTX enters the new schedule event in the Schedule Grid; it displays a block to represent it on
the Timeline Display.
March 2015 iTX Desktop: Operator Manual 42
Page 63

The Content Selector
Display live-event properties
1. Select a live event in the Live Sources list.
2. Click Properties.
iTX displays the Properties dialog. This shows details of the properties specified in the live
event, including the name of the router source that provides the live feed:
The dialog only lets you view the property details. To change any of them, you need to
work on the Asset layout.
If there is GPI data configured for the live event (not added as a secondary item), this
information is also displayed in Properties.
Set a duration of a live event
1. Enter the new value in the Dur box. More details, page 197.
Note:
• You can change the duration of a live event using the Event Editor.
March 2015 iTX Desktop: Operator Manual 43
Page 64

The Content Selector
Set the Aspect Ratio Properties for Live Events (OS2 only)
For channels running on Output Server 2, Live assets include two Aspect Ratio Properties,
Source Format and Active Region. There is no auto-detection of the input aspect ratio for a Live
asset, therefore it is recommended that you specify the required aspect ratio from the
properties of the Live Event Asset before using it in a schedule. When the aspect ratio is set on
the Asset, it is applied to all instances of the Live event.
To set the aspect ratio properties for a Live asset:
1. Open the Asset layout.
2. Using PinPoint, search for a Live asset.
3. With a Live asset selected in the search results, select the Asset tab.
4. Scroll down to Aspect Ratio Properties.
5. Select an aspect ratio from the Source Format drop-down list.
6. Select Pass through or an aspect ratio from the Active Region drop-down list.
7. Click Save.
NOTE:
• If you set the aspect ratio to 16:9 and the source is 4:3, the image will be stretched on
playout. In these situations, it is possible to correct the aspect on-air using the Live Event
Editor.
March 2015 iTX Desktop: Operator Manual 44
Page 65

The Content Selector
The Aspect Ratio Properties can also be accessed and modified in the following ways:
• By loading a Live event in the Live Content Selector, then clicking the Properties button.
• By selecting a Live event in the Schedule Grid, then clicking Properties in the Event Editor.
March 2015 iTX Desktop: Operator Manual 45
Page 66

The Content Selector
Working with sequences
About the Sequence palette
You use the Sequence palette to add sequences to schedules. A sequence is a very small
schedule – a group of schedule events that iTX handles as a single event block. A typical
sequence might contain a few video-clip events and secondary events, with certain transitions
or vision effects. You can move a sequence, as a block, within a schedule; you do not have to
move each event individually.
Through the Sequence palette, you can build a shortlist of sequences that you want to be
available for including in schedules. In doing so, you use PinPoint to select sequences from the
System Database; these then appear in the Sequences list in the palette selection pane. More
details, page 179. You can add any sequence from this list to the current schedule.
Using the New button, you can add an empty sequence to the Sequences list; i.e. one with no
events. You may rename it before adding it to a schedule. Once it is in the schedule, you can
add events to it; you may also save it in the System Database.
To add a sequence to a schedule, you may drag it from the Sequences list or drag the insertion
bar while the sequence is selected.
In a system with a pass-through channel – e.g. a channel used for commercial insertion into a
live video source – you may use the Fixed Dur button to set a fixed duration for a sequence of
commercials. Then the pass-through channel does not return to the live source until the end of
the sequence, even if the last event in the sequence ends before this point. You can set a fixed
duration for a blank sequence.
March 2015 iTX Desktop: Operator Manual 46
Page 67

The Content Selector
Adding an existing sequence to a schedule
Usually, you add a sequence to a schedule by dragging it from the Sequences list and dropping
it into the Schedule Grid. iTX handles the sequence as a single block of events, which you can
move anywhere in your current schedule.
If the start time of the sequence is not within an interval called the Schedule Lookahead time of
the channel you are working in, iTX displays a single entry for the sequence in the Schedule
Grid; it displays a single block to represent the sequence on the Timeline Display.
When the start time of the sequence falls within the Schedule Lookahead time, iTX displays a
plus sign in front of the entry in the Schedule Grid. By clicking the plus sign, you can expand the
entry and view the individual events. On the Timeline Display, blocks for the individual events
replace the single block for the sequence.
Note:
• Your system administrator can set the length of the Schedule Lookahead time.
Change the name or title of a sequence
1. Select a sequence in the Sequences list.
2. Enter a new name in the Name box, if you want to.
3. Enter a new title in the Title box, if you want to.
Add a blank sequence to a schedule
1. Click New.
iTX adds a blank sequence (called “Blank Sequence”) to the Sequences list.
2. Enter a name and title for the blank sequence in the Name and Title boxes.
3. Enter a default duration in the Dur box. More details, page 197.
4. Drag the sequence to the Schedule Grid and drop it onto the event you want it to
immediately follow.
iTX displays an entry for the blank sequence in the Schedule Grid; it displays a block to
represent the sequence on the Timeline Display.
You can add events to the sequence by dragging and dropping assets from the Content
Selector.
March 2015 iTX Desktop: Operator Manual 47
Page 68
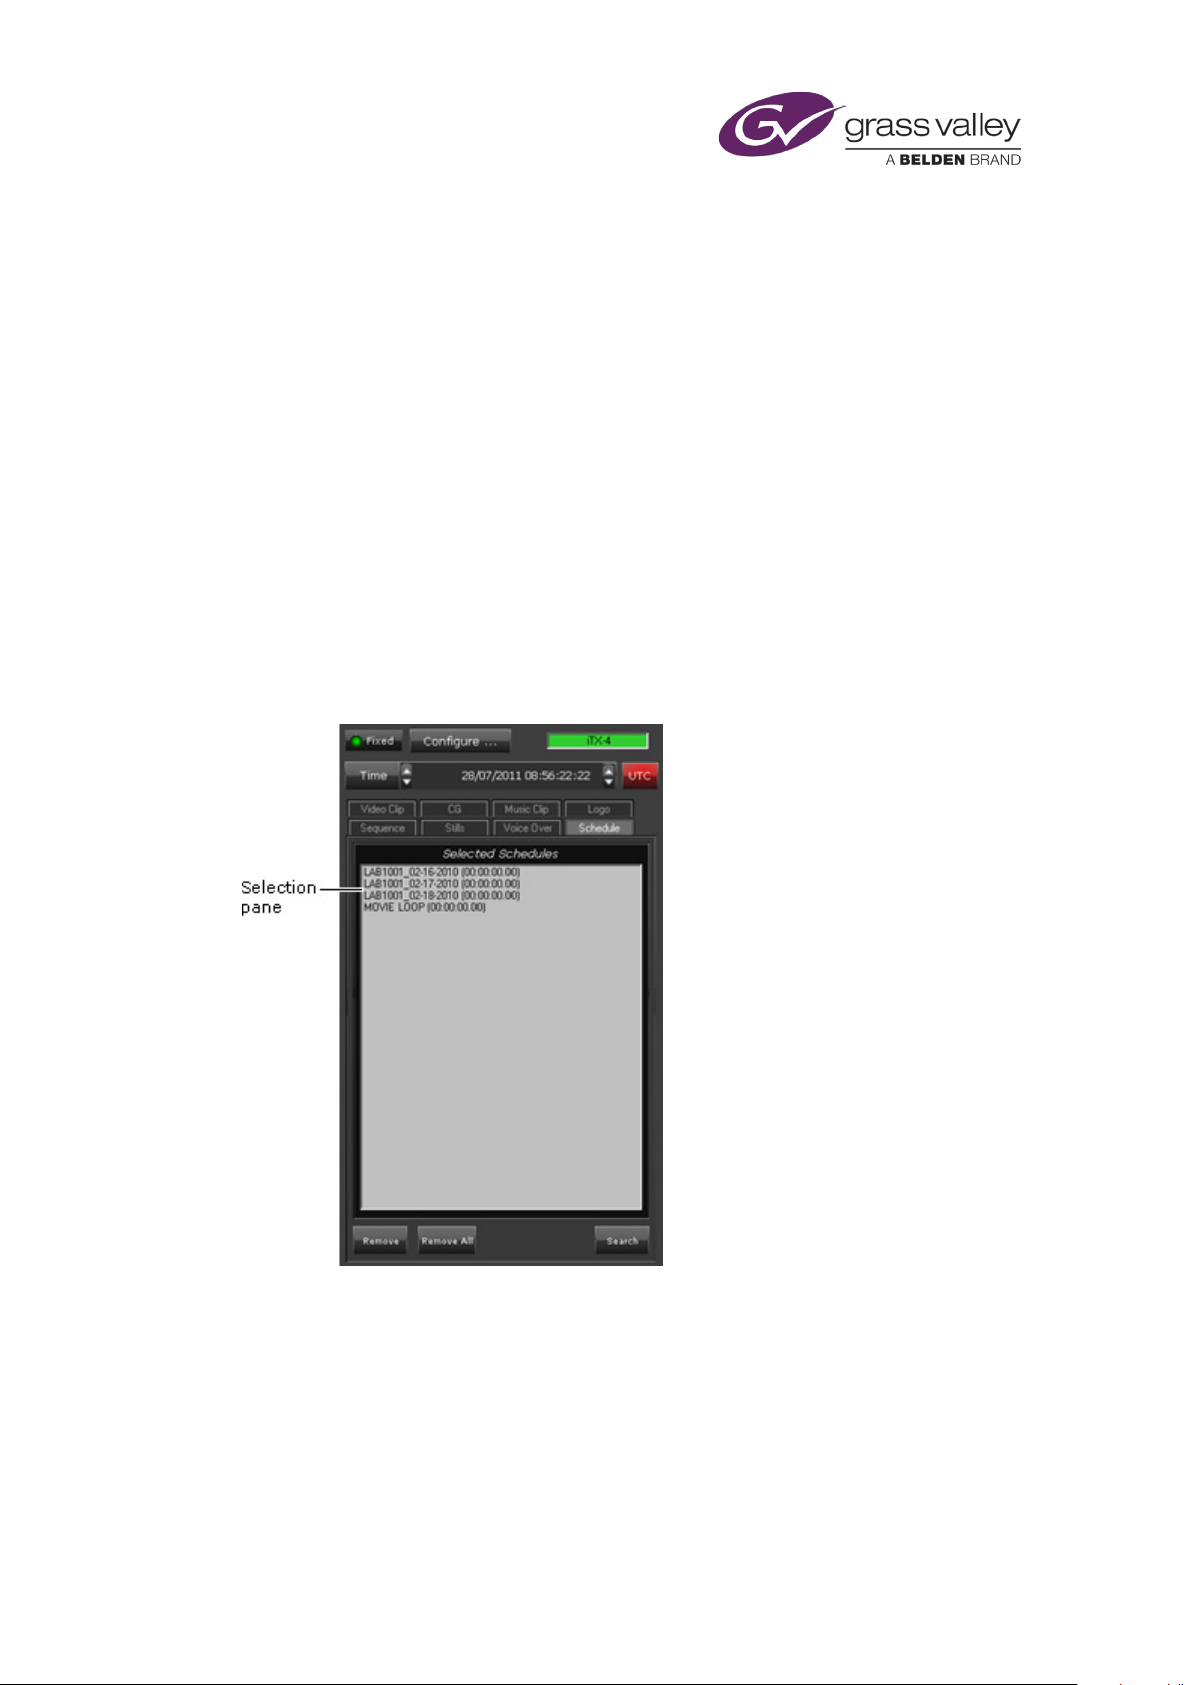
The Content Selector
Create a sequence with a fixed duration
You should create a sequence with a fixed duration only in a pass-through channel.
1. Create a blank sequence and enter a default duration in the Dur box.
2. Select Fixed Dur.
3. Drag the sequence insertion bar into the Schedule Grid and drop it onto the event you
want the sequence to immediately follow.
iTX displays an entry for the schedule in the Schedule Grid; it displays a block to represent
the sequence on the Timeline Display.
You can add events to the sequence by dragging and dropping media items from the
Content Selector.
Working with stored schedules
About the Schedule palette
The Schedule palette enables you to select a stored schedule from the System Database and
include it in a main schedule (i.e. one you are working on in the Schedule Grid).
The stored schedule may be one that you create in the Schedule Grid, while working in either a
live or offline channel; you save such schedules by using the Schedule Manager. More details,
page 154. Or, the schedule may be one that is created in another application (such as a traffic
scheduling application); you import schedules of this type through the Media Store Inbox.
In the palette selection pane, you build a shortlist of stored schedules that you want to be
available for including in a main schedule. In doing so, you use PinPoint to select stored
March 2015 iTX Desktop: Operator Manual 48
Page 69

The Content Selector
schedules from the System Database. More details, page 179. You can add any stored schedule
from the shortlist to the current main schedule.
Adding a nested schedule to a main schedule
From the Schedule palette, you add a stored schedule to your current schedule by dropping it
into the Schedule Grid. There, it becomes a nested schedule within the main schedule: iTX
handles the nested schedule as a single block of events, which you can move up or down the
main schedule. iTX can update the nested schedule if the stored schedule in the System
Database is modified. See below, "Live update of a nested schedule", page 49.
Note: This is different to what happens when you add a stored schedule to the main schedule
from the Schedule Manager. Then, iTX inserts the events from the stored schedule into the
main schedule as a block of single events; the events are not bound together as those in a
nested schedule are.
If the start time of the nested schedule is not within an interval called the Schedule Lookahead
time of the channel you are working in, iTX displays a single entry for the schedule in the
Schedule Grid. It displays a single block on the Timeline Display to represent the nested
schedule.
When the start time of the nested schedule falls within the Schedule Lookahead time, iTX
displays a plus sign in front of it in the Schedule Grid. By clicking the plus sign, you can expand
the entry and view the individual events. On the Timeline Display, blocks for the individual
events replace the single block for the nested schedule.
Note:
• Your system administrator specifies the length of the Schedule Lookahead time.
Live update of a nested schedule
After you add a stored schedule as a nested schedule to the main schedule, a modified version
of it may appear in the System Database. This may happen as a result of the stored schedule
being edited in an edit channel; or as a result of it being edited in a traffic scheduling
application and re-imported through the Media Store Inbox.
Depending on how your system is set up, iTX may automatically update the nested schedule, or
it may inform you the schedule has been modified and allow you to select events for updating.
In updating a nested schedule, iTX reloads all schedule events that come after the on-air event;
or all schedule events that come after a defined period, called the lockout period. Your system
administrator sets the length of any lockout period.
March 2015 iTX Desktop: Operator Manual 49
Page 70

The Content Selector
Working with split breaks
About the Split Break palette
A split break enables you to schedule playout of regional schedule events, such as commercial
breaks, on regional playout channels. For more information, see "About regional channels",
page 98.
In the selection pane of the Split Break palette, you select the regional channels you want to
play out events during a split break.
Note:
• You can set a regional channel to play out any selected schedule event. More details, page
99.
Adding a split break to a schedule
You add a split break to a schedule by dragging the split-break insertion bar from the Split
Break palette and dropping it into the Schedule Grid; you drop it onto the event you want it to
immediately follow. iTX creates a primary event for the split break and a blank sequence for
each selected regional channel; the sequences are secondary events associated with the split
break.
You need to add events to the sequences and set their properties.
Each sequence ends with a Return event, which causes iTX to return the regional channel to
playing out the output of the main channel.
March 2015 iTX Desktop: Operator Manual 50
Page 71

The Content Selector
iTX handles the sequences in the split break as a single block of events, which you can move
anywhere in your schedule.
Enter a name and title for a split break
1. Enter a name for a split break in the Name box.
2. Enter a title in the Title box.
Select split-break regions
1. In the selection pane, select the check boxes for the regional channels you want to play out
events during a split break.
Change the default duration of a split break
iTX assigns a default duration to a split break; this is also the duration of the sequence for each
regional channel. You can change this default value.
1. Enter a new value in the Dur box. More details, page 197.
Note:
• You can also change the duration of the sequence for each regional channel using the
Event Editor.
Add events to a sequence for each regional channel
You can add events to each regional-channel sequence by dragging and dropping assets from
the Content Selector.
1. Add the first event by dropping an asset onto the sequence entry.
2. Add the second event by dropping an asset onto the first event.
3. Add other events by dropping an asset onto the event each new event is to follow.
March 2015 iTX Desktop: Operator Manual 51
Page 72

The Content Selector
Adding events for playout in the main channel during a split break
If you want the main channel to continue playing out events during a split break, you need to
add the events after the Return event for the last regional-channel sequence.
Working with slide shows
About the Slide Show palette
You use the Slide Show palette to add slide shows to schedules.
A slide show is a series of still images and a series of audio clips that play together as a single
event. The images and audio clips repeat for the duration of the event.
In the Slide Show palette, you choose the still images and audio clips that make up a slide show.
You can then include the slide show in a schedule. Before you do, you may:
• Change the order of the still images or audio clips.
• Change the duration of a still image.
• Adjust the volume of an audio clip.
• Preview a still image.
You use the insertion bar to add the slide show to a schedule.
Add a still image or audio clip to the slide show
1. To add still images to the slide show, do the following.
March 2015 iTX Desktop: Operator Manual 52
Page 73

The Content Selector
• Select Slides.
• Click Search to open PinPoint.
• Use PinPoint to select still images from the System Database. More details, page 179.
The selected still images appear in the list in the palette selection pane.
2. To add audio clips to the slide show, do the following.
• Select Audio.
• Click Search to open PinPoint.
• Use PinPoint to select audio clips from the System Database.
The selected audio clips appear in the list in the palette selection pane.
Change the order of the still images or audio clips
1. To change the order of the still images in the slide show, do the following.
• Select Slides.
• Select a still image and click Move Up or Down.
2. To change the order of the audio clips in the slide show, do the following.
• Select Audio.
• Select an audio clip and click Move Up or Down.
Change the duration of a still image
1. Select Slides.
2. Select a still image and click Properties.
iTX displays the Slide Show Properties dialog.
3. Enter a new duration in the Slide Duration box. More details, page 197.
4. Click OK to close the dialog.
Preview a still image
1. Select Slides.
2. Double-click a still image.
iTX displays the image in the Still Image Preview dialog.
3. Click OK to close the dialog.
Adjust the volume of an audio clip
1. Select Audio.
2. Select an audio clip and click Properties.
March 2015 iTX Desktop: Operator Manual 53
Page 74
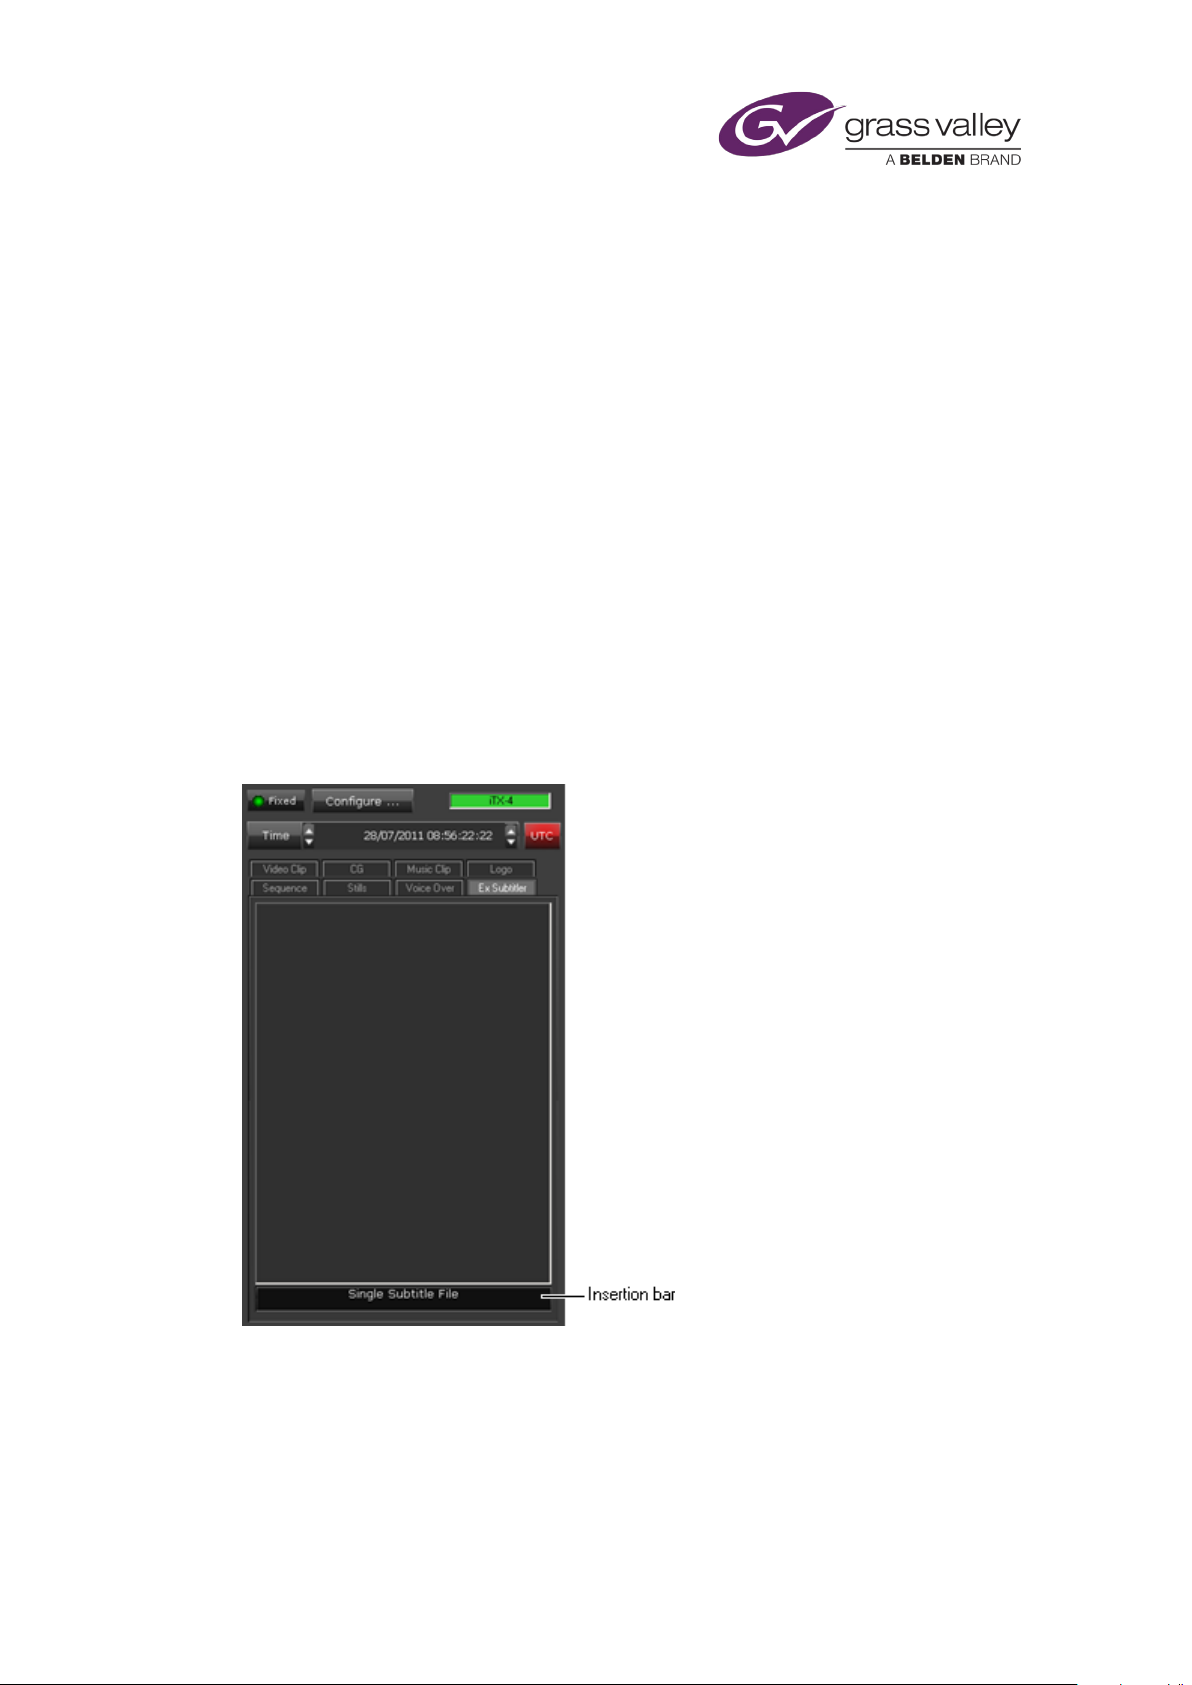
The Content Selector
iTX displays the Slide Show Properties dialog.
3. Drag the Music Level slider along the scale to change the volume.
4. Click OK to close the dialog.
Add a slide show to a schedule
1. Enter a name for the slide show in the Name box.
2. Enter a duration in the Dur box.
Note: The still images and audio clips repeat, if required, for the duration of the slide-show
event.
3. Drag the insertion bar to the Schedule Grid and drop it onto the event you want the slide
show to immediately follow.
Working with an external subtitler
About the Ex Subtitler palette
iTX can deliver the output signal from a playout channel to an external subtitling device and
operate the device to insert subtitles into this signal. When your iTX system is set up for this,
you can use the Ex Subtitler palette to add an external subtitle event to a schedule.
March 2015 iTX Desktop: Operator Manual 54
Page 75

The Content Selector
Adding an external subtitle event to a schedule
In adding an external subtitle event to a schedule, you make it a secondary event. To do so, you
drag the subtitle insertion bar and drop it onto the primary event in the Schedule Grid or on the
Timeline Display.
iTX enters the new external subtitle event in the Schedule Grid; the event has the same start
time and duration as the primary event; it displays a block to represent the event on the
Subtitles track on the Timeline Display. In the Schedule Grid, iTX nests the secondary event
within the primary event.
You may modify the time mode and offset of the subtitle event in the Event Editor.
Working with external CG devices and graphics systems
iTX can deliver the output signal from a channel to an external CG device or graphics system
and operate this to insert CGs or graphics into the signal. The external device or system may be
one of these types:
• Pixel Power Clarity.
• VizRT.
• Vertigo XG.
Note:
• For information about the VertigoXG palette, see the separate documentation available
from Grass Valley.
March 2015 iTX Desktop: Operator Manual 55
Page 76

The Content Selector
About the Clarity palette
In the selection pane of the Clarity palette, you create a list of Clarity CGs that you want to be
available for including in schedule events.
In building the list, you select CG templates from a Pixel Power Clarity character generator;
these then appear in the Clarity Template list of the palette selection pane.
Once a CG template is in the selection pane, you can include it in schedule events. Before you
do, you may:
• Change the name of the CG template.
• Change the properties of the CG template.
• Change the default duration of the CG template. iTX applies the default duration to any
Clarity CG event that you add to a schedule.
Add a Clarity CG template to the palette selection pane
1. Select the Clarity palette on the Content Selector.
2. Click Create to display the Template Setup dialog.
3. Click Template Page to select a CG template from the Clarity character generator; click OK.
4. If the CG template has editable text blocks, enter text into the text blocks.
5. Click OK.
The selection pane updates to include the CG template you select.
March 2015 iTX Desktop: Operator Manual 56
Page 77

The Content Selector
Adding a Clarity CG event to a schedule
Usually, a CG plays out as an overlay on top of a video clip or still image. In adding a Clarity CG
event to a schedule, you make it a secondary event. To do so, you drop the CG onto its primary
event in the Schedule Grid or on the Timeline Display.
iTX enters the new Clarity CG event in the Schedule Grid; it displays a block to represent the
event on the CG track on the Timeline Display. In the Schedule Grid, iTX nests the secondary
event within the primary event.
You should check and edit the properties of the Clarity CG event – in particular, its time mode
and offset – in the Event Editor.
Change the name of a Clarity CG template
1. Select a CG template in the Clarity palette selection pane.
2. Enter the new name in the Name box; press Return to complete the entry.
iTX displays the new name of the CG template in the palette selection pane.
Change the properties of a CG template
You can change the text in the editable text blocks of a Clarity CG template when the CG
template is in the palette selection pane.
1. Select a CG template in the Clarity palette selection pane.
2. Click the Properties button to display the Template Setup dialog.
3. Change the text in the editable text blocks.
4. Click OK.
iTX updates the CG template.
Change the duration of a Clarity CG event
iTX assigns a default duration to any Clarity CG event you create featuring a CG template from
the Clarity palette. You can change this default value.
1. Enter the new value in the duration box (below the Name box). More details, page 197.
Note:
• You can also change the duration of a Clarity CG event by using the Event Editor.
March 2015 iTX Desktop: Operator Manual 57
Page 78

The Content Selector
About the VizRT palette
In the selection pane of the VizRT palette, you create a list of VizRT CGs that you want to be
available for including in schedule events. The CGs are defined by pages on the VizRT character
generator; each has its own page number. You specify the page number in creating the VizRT
Pages list.
If you specify the number of a page that does not exist, iTX may create the page based on a
VizRT template. Whether or not it does this depends on how your system administrator
configures the VizRT functionality.
If a page has text fields, you may enter the content for these fields or you may specify a macro
to generate the content.
March 2015 iTX Desktop: Operator Manual 58
Page 79

The Content Selector
Add a VizRT CG page to the palette selection pane
To specify a VizRT CG, you use the Create Page dialog:
In this dialog, you enter the page number for the CG. You may also specify a template for iTX to
use to create a new page (when the system configuration allows it to do so). The Directory box
on this dialog is not currently used.
1. Select the VizRT palette on the Content Selector.
2. Click Create New Page to display the Create Page dialog.
3. Enter a page number in the Page ID box.
4. If you want iTX to create a page that is not already on the VizRT device, enter the name of
a VizRT template in the Template box.
5. To enter the field content for the CG, do the following.
• Click Edit Page Text to display the Edit Page Fields dialog.
• Enter the field details for each field in the CG: the field name in the Field ID column;
then either the field text in the Field String column, or the name of a macro to
generate the text in the Macros column; if you use a macro, you may need to enter
macro parameters in the Macro Param column.
• Click OK to close the dialog.
6. Click OK to close the Create Page dialog.
The page appears in the VizRT Pages List.
Adding a VizRT CG event to a schedule
Usually, a CG plays out as an overlay on top of a video clip or still image. In adding a VizRT CG
event to a schedule, you make it a secondary event. To do so, you drop the CG onto its primary
event in the Schedule Grid or on the Timeline Display.
iTX enters the new VizRT CG event in the Schedule Grid; it displays a block to represent the
event on the CG track on the Timeline Display. In the Schedule Grid, iTX nests the secondary
event within the primary event.
You should check and, if necessary, edit the properties of the VizRT CG event – in particular, its
time mode and offset – in the Event Editor.
The duration of a VizRT CG event is defined in the VizRT template; you cannot change it from
within iTX.
March 2015 iTX Desktop: Operator Manual 59
Page 80

The Content Selector
Working with GPIs
About the GPI palette
GPIs are electronic switches that can control a wide range of equipment in a television station.
You use the GPI palette to add GPI events to a schedule. These GPI outputs trigger an action to
control an external device (for example, an aspect ratio converter).
In the palette, you select the GPI matrix that provides the GPI outputs; these appear in the GPI
Outputs list.
Once a GPI is in the GPI Outputs list, you can include it in a schedule event. Before you do, you
may:
• Change the duration of the GPI.
• Set the time mode of the GPI.
Adding a GPI event to a schedule
In adding a GPI to a schedule, you make it a secondary event. To do so, you drop the GPI onto
its primary event in the Schedule Grid or on the Timeline Display.
iTX enters the new GPI event in the Schedule Grid; it displays a block to represent the event on
the GPI track on the Timeline Display. In the Schedule Grid, iTX nests the secondary event
within the primary event.
You should check and edit the properties of the GPI event – in particular, its time mode and
offset – in the Event Editor.
March 2015 iTX Desktop: Operator Manual 60
Page 81

The Content Selector
Select the GPI matrix
1. Click GPI Matrix.
iTX displays the Select Matrix dialog.
2. Select the matrix that provides the GPI outputs you want to add to a schedule. Click OK.
The GPI outputs appear in the GPI Outputs list.
Change the duration of a GPI
GPI events must have a duration of at least 2 seconds.
1. Select a GPI output in the GPI Outputs list.
2. In the Dur box, enter a new duration. More details, page 197.
Set the time mode of a GPI
You can set the time mode of a GPI output in the GPI palette by clicking the Time Mode box.
More details, page 86.
March 2015 iTX Desktop: Operator Manual 61
Page 82

The Content Selector
Working with studio sources
About the Studio palette
You use the Studio palette to add studio-source events to a schedule. A studio source contains
a GPI output – an electronic switch that can control a wide range of equipment in a television
station.
Your iTX system may be able to provide many studio sources, with different ones being
allocated to different channels. iTX displays a list of available studio sources in the Studio
Sources list.
While a studio source is in the Studio Sources list, you can include it in a schedule event. Before
you do, you may set the duration of the studio source.
Adding a studio-source event to a schedule
When adding a studio-source event to a schedule, you may make it either a primary event or a
secondary event.
Adding a studio-source event as a primary event
You can make a studio-source event a primary event. To do so, you drag and drop the studio
source onto the Schedule Grid or a clear part of the Timeline Display.
iTX enters the new event in the Schedule Grid; it displays a block to represent the event on the
Timeline Display.
March 2015 iTX Desktop: Operator Manual 62
Page 83

The Content Selector
Adding a studio-source event as a secondary event
Usually you make a studio-source event a secondary event. To do this, you drop a studio source
onto a primary event on the Timeline Display. The new event becomes a secondary event,
associated with the primary event you drop the studio source onto.
iTX enters the new secondary event in the Schedule Grid. It displays a block to represent the
event on one of the video tracks (PGM A or PGM B) on the Timeline Display – alongside the
block (on the other video track) for the associated primary event.
You should check and edit the properties of the secondary event – in particular, its offset – in
the Event Editor.
Change the default duration of a studio-source event
iTX assigns a default duration to any studio-source event you create using a studio source from
the Studio Sources list. You can change this default value.
1. Enter the new value in the Dur box. More details, page 197.
Note:
• You can also change the duration of a studio-source event using the Event Editor.
March 2015 iTX Desktop: Operator Manual 63
Page 84

The Content Selector
Working with router events
About the Router Event palette
Your iTX system may be set up to operate a matrix router in response to requests contained in
router events. If it is, you may use the Router Event palette to add router events to a schedule.
A router can have any number of crosspoints – i.e. sources and destinations. In a router event,
iTX connects a selected source to a selected destination.
At the end of the router event, depending on how it is configured, iTX may do one of three
things: it may route the original source back to the destination; it may route another specified
source (known as a park source) to the destination; or it may leave the routing unchanged.
A typical router event might involve iTX routing a video source – other than the channel output
– to the router destination that feeds the transmission system. We call this type of router event
a by-pass event.
In the Router Event palette, you configure a router event by selecting the router, destination
and source for a router event. Once you do this, you can set a duration for the event before
adding the event to the schedule.
Adding a router event to a schedule
When adding a router event to a schedule, you may make it either a primary event or a
secondary event.
Adding a router event as a primary event
March 2015 iTX Desktop: Operator Manual 64
Page 85

The Content Selector
You make a by-pass event a primary event. To do so, you drag and drop the selected router
source onto the Schedule Grid or a clear part of the Timeline Display.
iTX enters the new event in the Schedule Grid. For a live schedule, it displays a block to
represent the event on the Timeline Display.
At the end of the event, iTX routes the channel output to the router destination connected to
the transmission system.
Adding a router event as a secondary event
When you configure a router event with a destination that is not supplying a feed to the
transmission system, you make it a secondary event; you drop the selected router source onto
a primary event on the Timeline Display. The new event becomes a secondary event, associated
with the primary event you drop the router source onto.
iTX enters the new secondary event in the Schedule Grid. It displays a block to represent the
event on one of the video tracks (PGM A or PGM B) on the Timeline Display – alongside the
block (on the other video track) for the associated primary event.
You should check and edit the properties of the secondary event – in particular, its offset – in
the Event Editor.
Configure a router event
1. Select a router matrix in the Matrix box.
iTX displays the available router sources in the palette selection pane.
2. Select a router destination in the Dst box.
3. Select a router source in the palette selection pane.
Change the default duration of a router event
iTX assigns a default duration to any router event you create. You can change this default value.
1. Enter the new value in the Duration box. More details, page 197.
Note:
• You can also change the duration of a router event using the Event Editor.
March 2015 iTX Desktop: Operator Manual 65
Page 86

The Content Selector
Working with a studio switcher
About the Studio Switcher palette
Where iTX is used in a news-studio environment, it may be set up to interact with a Sony DVS9000 production switcher. With the Studio Switcher palette displayed, you can add studioswitcher events to the current schedule. The palette displays switcher items under two tabs:
Sources and Scenes. From either of these, you can create events that relate to a particular way
of controlling the switcher:
• Sources tab, for source selection. iTX selects a source crosspoint on a specified bank (P/P,
ME1, etc.) of the switcher and puts the source to air. The source may be any of a number
of configured sources; among these may be the output of the iTX playout channel that has
control of the switcher.
• Scenes tab, for scene recall. iTX recalls a scene, referenced by a name or a number. The
scene may be a defined state or function – “keyframe” or “snapshot”, in switcher
terminology – on a specified bank (P/P, ME1, etc.) of the switcher. The operation may
produce a particular graphical layout or play a DVE. A snapshot can include the sending of
GPIs as take-next commands to iTX.
Note:
• What sources and scenes are available depend on the channel configuration.
• The existing support of GPIs means that iTX can respond to any GPI it receives from the
switcher.
March 2015 iTX Desktop: Operator Manual 66
Page 87

The Content Selector
Adding a studio switcher event to a schedule
In adding a source or scene studio-switcher event to a schedule, you may make it either a
primary or secondary event.
Working with VANC data
About the VANC Data palette
iTX can insert different types of VANC data into its output video signal. The possible data types
include SCTE 104 messages, which can be used by external equipment to trigger the insertion
of advertisements in commercial breaks; they can also be used to start the playout of
sequences.
The VANC Data palette enables you to add SCTE 104 message events to a schedule. After
specifying message properties, you use the VANC-message insertion bar to add a message
event to a schedule.
Although the palette displays options for other types of VANC data (e.g. AFD codes), you do not
use it for these – there are other ways of setting up iTX to include the relevant data. For
example, you may specify AFD data as a video-clip property on the Asset layout.
March 2015 iTX Desktop: Operator Manual 67
Page 88

The Content Selector
Adding a VANC-message event to a schedule
In adding a VANC message to a schedule, you make it a secondary event. To do so, you drop the
VANC message onto its primary event in the Schedule Grid or the Timeline Display.
iTX enters the new VANC-message event in the Schedule Grid; it displays a block to represent
the event on the VANC Data track on the Timeline Display. In the Schedule Grid, iTX nests the
secondary event within the primary event.
You should check and edit the properties of the VANC message event – in particular, its time
mode and offset – in the Event Editor.
Set up a SCTE 104 message
1. Select "Splicer" in the Type box.
The VANC Data palette displays properties for an SCTE-104 message.
2. In the Preroll Time box, enter a value for the required interval (in milliseconds) between
the time iTX plays out a message event and the start of the commercial break the message
is due to trigger.
3. In the Break Duration box, enter a value for the duration (in tenths of a second) of the
commercial break.
4. Enter any required values in the DPI PID Index and Unique Program ID boxes.
If you are setting up a message to take a sequence in another iTX channel to air, the value
in the DPI PID Index box should match one of the Op Codes configured for that channel.
Your system administrator should be able to tell you what the required value is.
Add a SCTE 104 message event to a schedule
After you set the properties for a VANC message, you add it to the schedule.
1. In the Name box, enter a name for the VANC message.
2. Drag the VANC message insertion bar into the Schedule Grid and drop it onto the event
you want the VANC message to be associated with.
March 2015 iTX Desktop: Operator Manual 68
Page 89

The Content Selector
Working with enhanced SCTE104 data
About the SCTE104 palette
The SCTE104 palette enables you to create enhanced SCTE104 message events and insert them
into a schedule.
The enhanced SCTE104 VANC functionality allows iTX to process Multiple Operation Messages
for both Local & National Avail Insert Commands and the ability to react to legacy DTMF
triggers. It also provides support for additional inbound and outbound commands and extends
the pass-through functionality for SCTE104 messages.
March 2015 iTX Desktop: Operator Manual 69
Page 90

The Content Selector
break
break
segmentation_type_id set to National (value 0x32).
segmentation_type_id set to Local (value 0x30).
(value 0x32).
The table below describes how the configuration of national and local breaks affects the
messages that are output:
National
Local
Description
iTX will trigger in all cases, i.e. when it receives Multiple Operation
Messages with:
• Only a splice_request_data command
• Both a splice_request_data and a
segmentation_descriptor_request (for either local or
national breaks).
iTX will only trigger if a Multiple Operation Message is received
with a splice_request_data and a
segmentation_descriptor_request with the
iTX will only trigger if a Multiple Operation Message is received
with a splice_request_data and a
segmentation_descriptor_request with the
iTX will only trigger if a Multiple Operation Message is received
with a splice_request_data and a
segmentation_descriptor_request with the
segmentation_type_id set to Local (value 0x30) or National
More information about enhanced SCTE104configuration can be found in the iTX System
Administrator Guide.
Adding an enhanced SCTE104 message event to a schedule
To add an enhanced SCTE104 message to a schedule, drag and drop the message from the
insertion bar onto a primary event in the Schedule Grid or the Timeline Display. The SCTE104
message will be created as a secondary event. This is represented by a block on the SCTE104
track in the Timeline Display. In the Schedule Grid, iTX nests this secondary event within the
primary event.
You should check and edit the properties of the enhanced SCTE104 message event – in
particular, its time mode and offset – in the Event Editor.
March 2015 iTX Desktop: Operator Manual 70
Page 91

The Content Selector
Set up and insert an enhanced SCTE104 message:
1. Open the Content Selector and select the SCTE104 tab.
2. If you want the event to be sent with a fixed time and date, click the Fixed button, then
enter the required time and date in the Time box.
3. In the Preroll Time box, enter a value for the required interval (in milliseconds) between
the time iTX plays out the message event and the start of the break the message is due to
trigger.
4. In the Break Duration box, enter a value for the duration (in tenths of a second) of the
break.
5. If you are setting up a message to take a sequence in another iTX channel to air, the value
in the DPI PID Index box should match one of the ‘Op Codes’ configured in that channel’s
Output Server Configuration. Your system administrator should be able to tell you what the
required value is.
6. In the Unique Program ID box, select the Unique Program Identifier of the program which
is scheduled to air.
7. If you require segmentation for local or national breaks:
a. ISelect the Segmentation Descriptor tab.
b. Click the Include button.
c. Click either the Local or National button.
8. If you need to send a DMTF command, select the ‘DTMF Descriptor’ tab, then in the DMTF
command area (pictured below), type in a string consisting of valid DMTF characters (0-9,
A-D, * and #):
Note:
• If ‘Enhanced SCTE 104’ is not enabled in the Output Server Configuration (under Channel
Control), any attempt to drag and drop a SCTE 104 event into a Schedule Grid will result in
an error.
March 2015 iTX Desktop: Operator Manual 71
Page 92

The Content Selector
Add an enhanced SCTE104 message event to a schedule
After you set the properties for an enhanced SCTE104 message, you add it to the schedule.
1. In the Name box, enter a name for the enhanced SCTE104 message.
2. Drag the enhanced SCTE104 message insertion bar into the Schedule Grid and drop it onto
the event you want the enhanced SCTE1104 message to be associated with.
3. To change the item from a fixed start time to an automatic start time, select the item in the
schedule grid, then go to the Event Editor. More details, page 82.
Working with rating categories
About the V-Chip palette
iTX can insert V-Chip data into the video signal for an SD channel. This data identifies a program
rating category, which indicates the suitability of the program content for a particular audience
type. In the US and Canada, rating categories are superimposed on the main television picture
at the start of programs.
You use the V-Chip palette to add rating-category events to a schedule.
March 2015 iTX Desktop: Operator Manual 72
Page 93

The Content Selector
Adding a rating-category event to a schedule
A rating category plays out as an overlay on top of a video clip. In adding a rating-category
event to a schedule, you make it a secondary event. To do so, you drop the rating category
onto its primary event in the Schedule Grid or Timeline Display.
iTX enters the new rating-category event in the Schedule Grid; it displays a block to represent
the event on the V-Chip track on the Timeline Display. In the Schedule Grid, iTX nests the
secondary event within the primary event.
You should check and edit the properties of the rating-category event – in particular, its time
mode and offset – in the Event Editor.
Select a rating system
In different countries, different rating systems are used to describe the suitability of program
content for a particular type of audience.
1. In the Rating System box, select the rating system you want to use.
Thumbnail images representing available rating categories appear in the selection pane of
the V-Chip palette.
Change the title of a rating category
1. Enter a new title in the Title box; press Return to complete the entry.
iTX assigns the new title to any rating category you use in a schedule event.
Change the duration of a rating category
iTX assigns a default duration to any rating-category event you create from the V-Chip palette.
1. Enter a new value in the Dur box. More details, page 197.
Note: You can also change the duration in the Event Editor.
Specify sub-rating options for a rating category
When you select a rating category in the "TV Parental Guidelines" rating system, sub-rating
options may appear in the selection pane:
March 2015 iTX Desktop: Operator Manual 73
Page 94

The Content Selector
Any selected sub-rating information is displayed with the rating category at the start of rated
programs.
1. Select the rating category you want to add to a schedule.
2. Select the check boxes of the sub-rating options that are relevant to the program content.
Adding comments
About the Comment palette
Through the Comment palette, you can add comment lines between events in the Schedule
Grid. You use these lines to divide a schedule in distinct sections and to provide information on
each section.
Adding a comment line to a schedule
You add a comment line by dragging the insertion bar to the Schedule Grid. Before you do, you
may:
• Enter a short comment in the Comment box.
• Enter further details in the Details box.
• Enter notes in the Notes box.
In the Schedule Grid, the comment line has a blue background. Text you enter in the Comment
and Details boxes appears in the Name and Title columns. You can view the associated notes by
displaying the Event Editor Notepad.
March 2015 iTX Desktop: Operator Manual 74
Page 95
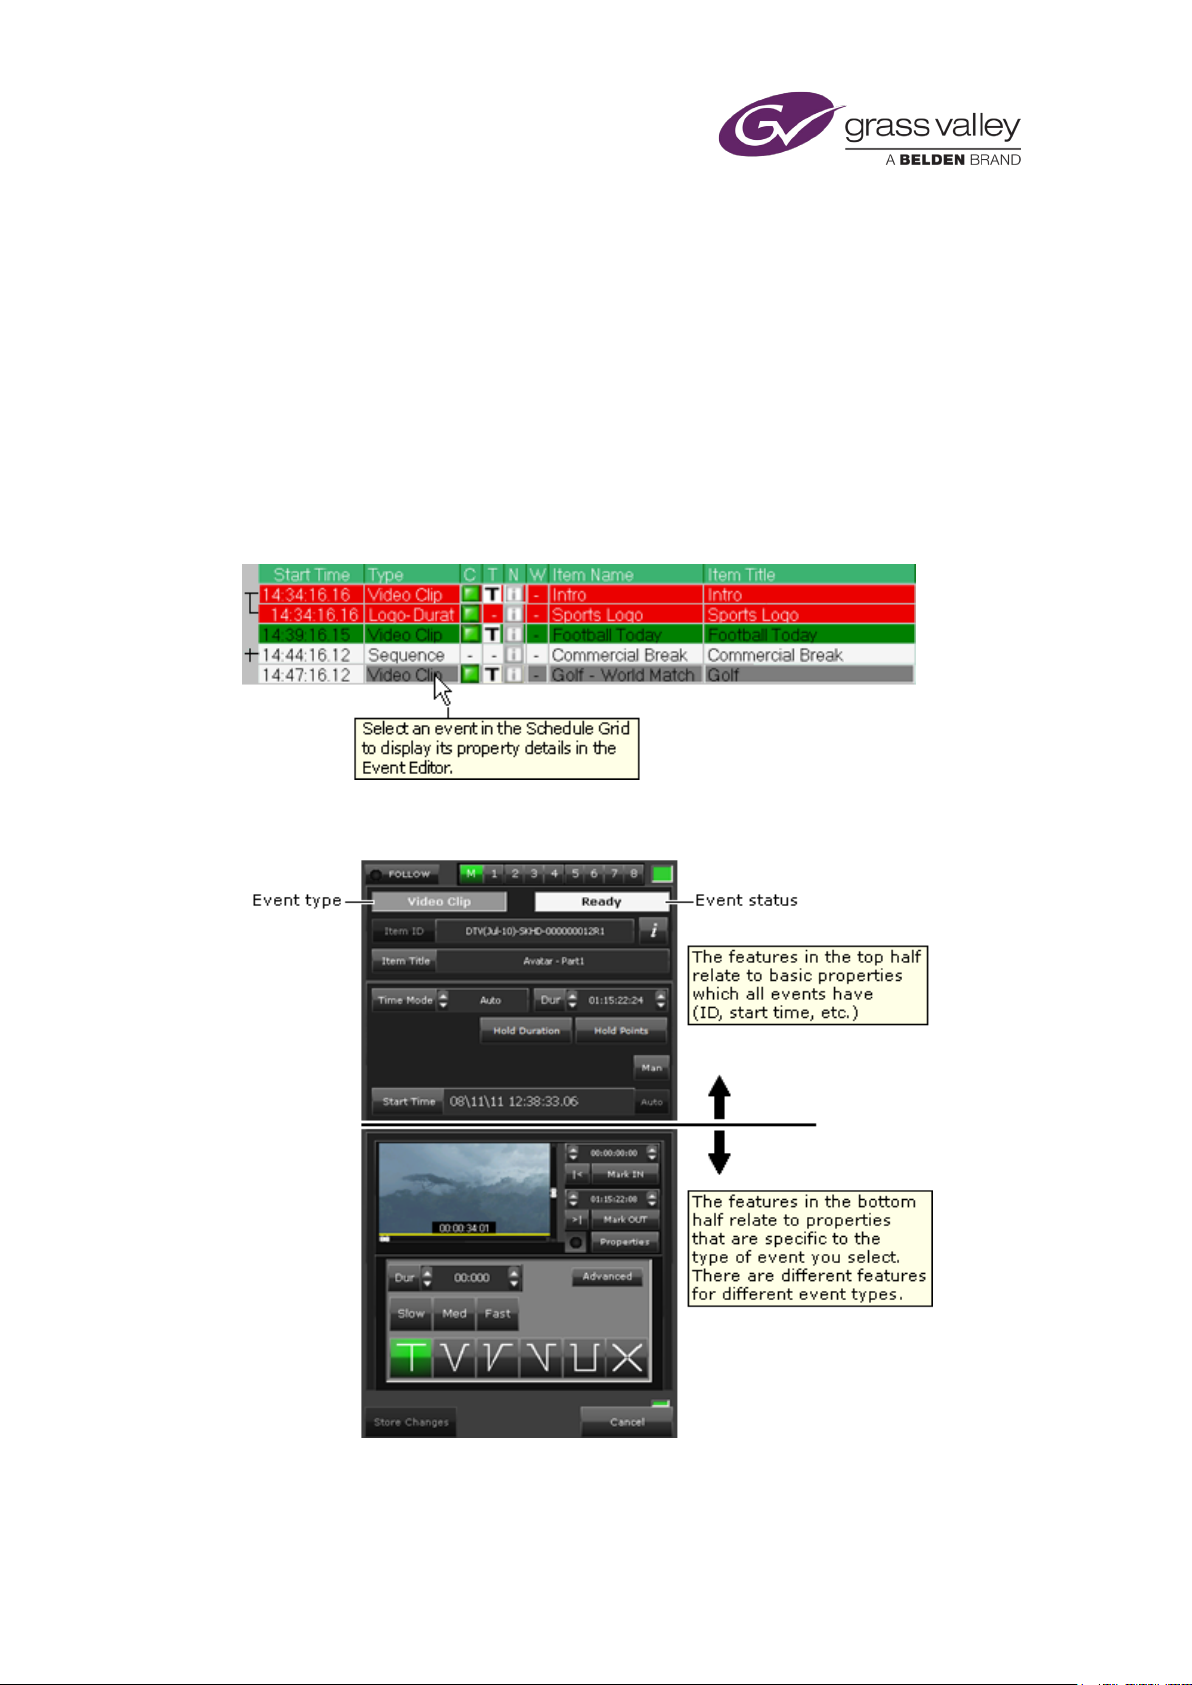
The Event Editor
The Event Editor
About the Event Editor
The Event Editor on the iTX Channel Control layout is one of a pair of components that you may
work with alternately when you perform scheduling tasks – the other is the Content Selector.
You use the Event Editor to change the properties of events in your current schedule; you use
the Content Selector to select assets and other schedule items to include in schedule events.
When you select an event in the Schedule Grid, the Event Editor displays information about the
event properties:
You can modify these properties using the Event Editor features, which are arranged in two
sections:
March 2015 iTX Desktop: Operator Manual 75
Page 96

The Event Editor
Changing the properties of an asset in the Event Editor
When you use the Event Editor to change any asset properties in an event, your changes apply
only to the copy of the asset in the selected event. They do not affect any other schedule event
that includes the same asset; nor do they affect the original asset in the System Database.
Such changes do affect whether or not iTX updates an event if the original asset is changed on
the Asset layout. More details, page 133.
Event timings in local time or UTC
If you are working with a channel that is configured with a time offset from UTC, you can set up
the Event Editor to display event start times in either local time or UTC. More details, page 94.
Editing events of different types
Editing a video-clip event
When you select a video-clip event in the Schedule Grid, the Event Editor displays details of
properties that you can edit.
Just as when you load a video clip in the Content Selector, you can:
• Play the clip in the preview window. More details, page 187.
• Edit the marked in- and out-points. More details, page 192.
• Adjust the audio level. More details, page 193.
• Select the audio output channels iTX uses to deliver the clip content for a secondary video-
clip event. More details, page 196.
• Change aspect-ratio details (describing source format and active region) of the clip. More
details, page 196.
• Change the field order of the clip. More details, page 292.
• Set up the video clip to loop in an event. More details, page 197.
• Change the copy-protection setting for the clip. More details, page 197.
Also, you can:
• Change the title of the event. More details, page 85.
• Change the timing of the event. More details, page 86.
• Set a video transition for the start of the event – if the event is a primary event. More
details, page 100.
• Set picture-in-picture properties for the event – if the event is a secondary event. More
details, page 101.
• Replace the video clip in the event. More details, page 113.
March 2015 iTX Desktop: Operator Manual 76
Page 97

The Event Editor
• Change whether an event holds its duration, its media limits or both. More details, page
312.
• Select the VTR (videotape machine) iTX uses to play out a VTR event. More details, page
114.
Editing a CG event
When you select a CG event in the Schedule Grid, the Event Editor displays details of properties
that you can edit.
Just as when you load a CG in the Content Selector, you can:
• Change the duration of the event. More details, page 36.
• Preview the CG in the preview window – iTX displays the CG in the preview window when
you select the event.
• Modify the CG, if it is one you created in the iTX CG application. More details, page 201.
Also, you can:
• Change the title of the event. More details, page 85.
• Change the timing of the event. More details, page 86.
• Enter text into any editable text blocks that the CG in the event might contain. More
details, page 122.
Editing a logo event
When you select a logo event in the Schedule Grid, the Event Editor displays details of
properties that you can edit.
Just as when you load a logo in the Content Selector, you can:
• Preview the logo in the preview window – iTX displays the logo in the preview window
when you select the event.
• Change the layer of the logo. More details, page 30.
• Set the logo to switch on, switch off, or play for a specified duration. More details, page 29.
Also, you can:
• Change the title of the event. More details, page 85.
• Change the timing of the event. More details, page 86.
• Set transitions to apply to the start and end of the event. More details, page 106.
• Instead of transitions, set vision effects to apply to the start and end of the event. A vision
effect may be a wipe, a slide or a squeeze. More details, page 107.
March 2015 iTX Desktop: Operator Manual 77
Page 98

The Event Editor
Editing an external-logo event
When you select an external-logo event in the Schedule Grid, the Event Editor displays details
of properties that you can edit. The properties are the ones you set when you add the logo to
the palette selection pane of the Content Selector. More details, page 33.
You can:
• Specify a different logo by changing the name in the Logo box.
• Specify a different layer for the logo in the Layer box.
• Set the logo to switch on, switch off, or play for a specified duration.
• Change the in- and out-transitions.
Also, you can:
• Change the timing of the event. More details, page 86.
Editing a still-image event
When you select a still-image event in the Schedule Grid, the Event Editor displays details of
properties that you can edit.
Just as when you load a still image in the Content Selector, you can:
• Preview the image in the preview window – iTX displays the still image in the preview
window when you select the event.
• Change the duration of the event. More details, page 39.
Also, you can:
• Change the title of the event. More details, page 85.
• Change the start time of the event. More details, page 86.
• Set a video transition for the start of the event – if the event is a primary event. More
details, page 100.
• Set picture-in-picture properties for the event – if the event is a secondary event. More
details, page 101.
Editing the properties of a sequence
When you select a sequence in the Schedule Grid, the Event Editor displays details of
properties that you can edit.
You can:
• Change the title of the sequence. More details, page 85.
• Change the start time of the sequence. More details, page 86.
• Restrict the use of a sequence based on a defined period. More details, page 108.
• Apply a standard set of transitions to the events in the sequence. More details, page 110.
March 2015 iTX Desktop: Operator Manual 78
Page 99

The Event Editor
• Prevent iTX returning a pass-through channel to a live source too early. More details, page
111.
• Prevent iTX continuing a sequence for longer than a specified duration. More details, page
111.
• Enter comments in the Synopsis and Notes boxes.
After expanding the sequence in the Schedule Grid, you can select individual events and edit
them in the Event Editor.
Editing a voiceover-clip event
When you select a voiceover clip in the Schedule Grid, the Event Editor displays details of
properties that you can edit.
Just as when you load a voiceover clip in the Content Selector, you can:
• Play and listen to the voiceover clip. More details, page 41.
• Enter new values for the in- and out-points of the voiceover clip. More details, page 41.
• Mark new in- and out-points. More details, page 41.
• Select the audio output channels iTX uses to deliver the clip content for the voiceover clip.
More details, page 196.
Also, you can:
• Change the title of the event. More details, page 85.
• Change the timing of the event. More details, page 86.
• Change the audio levels of the voiceover clip and any video clip that plays at the same
time. More details, page 112.
• Set the duration of the audio ramps at the start and end of the voiceover. More details,
page 112.
Editing a subtitle event
When you select a subtitle event in the Schedule Grid, the Event Editor displays details of
properties that you can edit.
You can:
• Change the title of the event. More details, page 85.
• Change the start time of the event. More details, page 86.
March 2015 iTX Desktop: Operator Manual 79
Page 100

The Event Editor
Editing a stored schedule
When you select the entry for a stored schedule in the Schedule Grid, the Event Editor displays
details of properties that you can edit.
You can:
• Change the start time of the stored schedule. More details, page 86.
• Enter comments in the Notes box.
• After expanding the stored schedule in the Schedule Grid, you can select individual events
and edit them in the Event Editor.
The Item Title box contains information about who last changed the schedule; the Notes box
shows where and when the schedule was last modified.
Editing a live event
When you select a live event in the Schedule Grid, the Event Editor displays details of
properties that you can edit.
Just as when you select a live event in the Content Selector, you can:
• Change the title of the event. More details, page 85.
• Change the duration of the event. More details, page 97.
Also, you can:
• Change the timing of the event. More details, page 86.
• Preview the feed for the event in the preview window.
• Set a video transition for the start of the event. More details, page 100.
• On Output Server 2 you can also change the Source Format and Active Region of a Live
Event whilst it is on-air. More details, page 44.
Editing a slide-show event
When you select a slide-show event in the Schedule Grid, the Event Editor displays details of
properties that you can edit.
Just as when you create a slide-show event in the Content Selector, you can:
• Add still images or audio clips to the slide show. More details, page 52.
• Change the order of the still images or audio clips. More details, page 53.
• Change the duration of a still image. More details, page 53.
• Adjust the volume of an audio clip. More details, page 53.
• Preview a still image. More details, page 53.
March 2015 iTX Desktop: Operator Manual 80
 Loading...