

Page 1

HD SPARK
HD THUNDER
Installation Manual
ENGLISH FRANÇAIS DEUTSCH
F095810302
Page 2

ENGLISH
Cautions
(1) It is prohibited to copy a part or all of this product without prior
permission.
(2) The contents or specif ications of this product may be changed without
prior notice.
(3) We have prepared the contents of this product to the best of our ability;
however if you have any questions about the contents, or if there are any
errors or missing items, please contact Thomson Grass Valley.
(4) However we do not take any responsibility for malfunctions arising from
use, ir respective of the points outlined in (3).
(5) Irrespective of whether it was due to a usage error, Thomson Grass
Valley takes no responsibility for extraordinary, incidental or derivative
claims, including those for lost earnings generated by the application of
this product.
(6) It is prohibited to analyze, reverse engineer, decompile or disassemble
any of the items included with this product, including the software,
hardware and manual.
(7) Microsoft and Windows are registered trademarks of the Microsoft
Corporation, USA.
(8) QuickTime is the registered trademark of the Apple Computer, Inc.,
USA.
(9) Adobe, Adobe logo, Adobe Photoshop, Premiere and After Effects are
registered trademarks of Adobe Systems Incorporated.
(10) Intel, Pentium and Xeon are the trademarks or registered trademarks of
Intel Corporation or its subsidiaries in the United States of America and
other countries.
(11) HDV and HDV logos are the trademarks of Sony Corporation and Victor
Company of Japan, Limited (JVC).
(12)
trademarks of Dolby Laboratories.
They are manufactured based on their own license.
(13)
HDMI, the HDMI logo and High-Definition Multimedia Interface are
trademarks or registered trademarks of HDMI Licensing LLC.
(14) Other product names or related brand names are trademarks or registered
trademarks of their respective companies.
Dolby, Dolby and the Double D symbol are registered
ii
HDSPARK/HDTHUNDER - Installation Manual
Page 3

ENGLISH
Manual Explanation
Information not described in this manual may be displayed in some cases.
•
Make sure to read the text le attached to the disc.
If there are any variations between the explanation in this manual and
•
the actual application method, priority is given to the actual application
method.
The screens used as examples in this manual are those of the development
•
stage, so they may vary from those in the nal product.
This manual is written for people who have a basic knowledge of how to use
•
a computer. If there are no special instructions, perfor m the same operation
as a normal computer operation.
In this manual, EDIUS 5 and EDIUS series are called 'EDIUS'.
•
In this manual, Microsoft® Windows® XP Professional operating system is
•
called Windows XP Professional or Windows XP. Microsoft® Windows®
XP Home Edition operating system is called Windows XP Home Edition or
Windows XP.
In this manual, Windows Vista® Home Basic, Windows Vista® Home
•
Premium, Windows Vista® Business, Windows Vista® Ultimate is called
Windows Vista Home Basic, Windows Vista Home Premium, Windows
Vista Business, Windows Vista Ultimate or Windows Vista.
In this manual, Adobe Photoshop is called Photoshop, and Adobe After
•
Effects is called After Effects.
Information in this manual is subject to change without notice, due to the
•
change in product specications etc.
ENGLISH
HDSPARK/HDTHUNDER - Installation Manual
Installation Manual
October 31, 2008
Copyright © 2008 Thomson
All rights reserved.
iii
Page 4

ENGLISH
iv
HDSPARK/HDTHUNDER - Installation Manual
Page 5

ENGLISH
Table of Contents
Table of Contents
ENGLISH
Section1
Section2
Section3
Section4
Section5
Before Using
Notices & Warranties . . . . . . . . . . . . . . . . . . . . . . . . . . . . . . . . 1
Support . . . . . . . . . . . . . . . . . . . . . . . . . . . . . . . . . . . . . . . . . . .6
Hardware Setting
Setting the Main Board . . . . . . . . . . . . . . . . . . . . . . . . . . . . . . .7
Part names . . . . . . . . . . . . . . . . . . . . . . . . . . . . . . . . . . . . . . . 10
Software Installation / Uninstallation
Installing EDIUS . . . . . . . . . . . . . . . . . . . . . . . . . . . . . . . . . . . 11
Installing Attached Application Software . . . . . . . . . . . . . . . . . 17
Conrmation after installation . . . . . . . . . . . . . . . . . . . . . . . . .20
Uninstallation . . . . . . . . . . . . . . . . . . . . . . . . . . . . . . . . . . . . .24
License Transfer
Transferring license . . . . . . . . . . . . . . . . . . . . . . . . . . . . . . . .27
Hardware Specications
HDSPARK Main Board (HSX-E1) . . . . . . . . . . . . . . . . . . . . . . 31
HDTHUNDER Main Board (HTX-E1) . . . . . . . . . . . . . . . . . . .32
HDSPARK/HDTHUNDER - Installation Manual
v
Page 6

ENGLISH
vi
HDSPARK/HDTHUNDER - Installation Manual
Page 7

ENGLISH
Before Using
Notices & Warranties
Notices & Warranties
Copyright Regulations
It is illegal for anyone to violate any of the rights provided by the copyright
laws to the owner of copyright, except for fair use (mainly private
noncommercial use). Also, in certain cases copying is prohibited with no
exceptions. In no event shall Thomson Grass Valley be liable for any direct or
indirect damages whatsoever arising f rom the use of captured materials.
Warranty
This product is covered by a limited warranty when you register your
Thomson Grass Valley product. This war ranty is for a period of one year
(or two years in European Union countories) from the date of purchase from
Thomson Grass Valley or an authorized Thomson Grass Valley agent. This
warranty applies only to the original purchaser of the Thomson Grass Valley
product and is not transferable, Thomson Grass Valley war rants that for
this period the product will be in good working order. Should our product
fail to be in good working order, Thomson Grass Valley will, at its option,
repair or replace it at no additional charge, provided that the product has not
been subjected to misuse, abuse or non-Thomson Grass Valley authorized
alternations, modications and/or repair. Proof of purchase is required to
validate your warranty.
Thomson Grass Valley is not responsible for any lost prots, lost savings
or other incidental or consequential damages arising out of the use of, or
inability to use, this product. This includes damage to property and, to the
extent permitted by law, damages for personal injury. This warranty is in lieu
of all other warranties of merchantability and tness for a particular purpose.
Section
1
ENGLISH
HDSPARK/HDTHUNDER - Installation Manual
Page 8

ENGLISH
Section 1 - Before Using
DANGER
The following conditions indicate the potential for serious bodily injury or
loss of life.
Health precautions
In rare cases, ashing lights or stimulation from the br ight light of a computer
display or TV monitor may trigger temporary epileptic seizures or loss
of consciousness. It is believed that even individuals whom have never
experienced such symptoms may be susceptible. If you or close relatives
have experienced any of these symptoms, consult a doctor before using this
product.
Do not use in environments requiring a high degree of
reliability and safety
This product is not to be used in medical devices or life support systems. The
characteristics of this product are not suited for use with such systems.
Protect against static electricity
An electrostatic discharge may damage components of this product. Do not
directly touch any of the connectors or component surfaces.
Static electricity can be generated on clothing and on people. Before handling
the product, discharge static electricity from your body by touching a
grounded metal surface.
Do not disassemble
Do not remove the cover or modify the Product. Fire, electric shock or
malfunction may result. For internal inspection or repair, please contact your
system integrator or Thomson Grass Valley directly.
CAUTION
The following conditions indicate the potential for bodily harm, damage to
hardware or loss of data.
Do not setup in areas subject to heat
Do not setup in an area exposed to direct sunlight or near a heating apparatus.
The heat can accumulate, causing burns, re or damage. Also, the unit may
become deformed or change color.
Only setup using the prescribed method
Do not setup in a manner other than prescribed. Do not use while wrapped in
cloth or plastic. Heat can accumulate, causing burns, re or damage.
HDSPARK/HDTHUNDER - Installation Manual
Page 9

ENGLISH
Notice
Notices & Warranties
<HDSPARK>
This equipment has been tested and found to comply with the limits for the
class B digital device, pursuant to part 15 of the FCC Rules. These limits are
designed to provide reasonable protection against interference in a residential
installation. This equipment generates, uses and can radiate radio frequency
energy and if not installed, and used in accordance with the instr uctions, may
cause harmful interference to radio communications. However, there is no
guarantee that interference will not occur in a particular installation. If this
equipment does cause harmful interference to radio or television reception,
which can be determined by turning the equipment off and on,the user is
encouraged to try and correct the interference by one or more of the following
measures:
Reorient or relocate the receiving antenna.
Increase the separation between the equipment and receiver.
Connect the equipment into an outlet on a circuit different from that to which
the receiver is con nected.
Consult the dealer or an experienced radio/TV technician for help.
This equipment has been cer ti ed to comply with the limits for a class B
computing device, pursuant to FCC Rules. In order to maintain compliance
with FCC regulations, shielded cables must be used with this equipment.
Operation with non-approved equipment or unshielded cables is likely to
result in interference to radio and TV reception. The user is cautioned that
changes and modi cations made to the equipment without the approval of
manufacturer could void the user’s authority to operate this equipment.
This device complies with part 15 of the FCC Rules. Operation is subject
to the following two conditions: (1)This device may not cause harmf ul
interference, and (2) this device must accept any interference received,
including interference that may cause undesired operation.
ENGLISH
This Class B digital apparatus complies with Canadian ICES-003.
Cet appareil numérique de la classe B est conforme á la norme NMB-003 du
Canada.
HDSPARK/HDTHUNDER - Installation Manual
Page 10

ENGLISH
Section 1 - Before Using
<HDTHUNDER>
This equipment has been tested and found to comply with the limits for a
Class A digital device, pursuant to Part 15 of the FCC Rules. These limits are
designed to provide reasonable protection against harmful interference when
the equipment is operated in a commercial environment. This equipment
generates, uses, and can radiate radio frequency energy and, if not installed
and used in accordance with the instruction manual, may cause harmful
interference to radio communications. Operation of this equipment in a
residential area is likely to cause harmful interference in which case the user
will be required to correct the interference at his own expense.
This Class A digital apparatus complies with Canadian ICES-003.
Cet appareil numérique de la classe A est conforme á la norme NMB-003 du
Canada.
Declaration of Conformity
According to FCC Part 15
Responsible par ty Name: Grass Valley, Inc
Address: 400 Providence Mine Road, Nevada City, CA
Telephone: 530-478-3000
95959
HDSPARK/HDTHUNDER - Installation Manual
Page 11

ENGLISH
Operation environment
EDIUS operation is not necessarily guaranteed even in the
Notes
PC
CPU: Intel Pentium 4, Xeon, Core Duo or higher
CPU supporting SSE2 instructions or higher is essential for operating
*
EDIUS.
EDIUS complies with multi-processor and hyper threading technology.
*
PCI bus
HDSPARK: PCI Express x1 (PCI Express Spec. Revision 1.0 or later) x1
HDTHUNDER: PCI Express x4 (PCI Express Spec. Revision 1.1 or later) x1
Memor y
Memory space with 1GB or larger required, larger than 2GB recommended.
Hard disk drive
800MB or larger space required for software installation.
Drive with ATA100 / 7200rpm or faster is necessary for video storage.
* RAID 0 is recommended for HD resolution editing.
Graphics
Graphics Processing Unit supporting Direct 3D 9.0c or later or PixelShader
Model 3.0 or later is required.
Some DirectDraw overlay f unctions cannot be used.
*
For use of GPUfx, video memory of 256 MB or larger for HD projects or of
*
128 MB or larger for SD projects is required.
Sound system
Support for WDM driver is required.
Optical drive
DVD-ROM drive required for software installation
For storage on a Blu-ray or DVD disc, a supporting drive is required.
*
OS
Windows Vista SP1 or later (32bit/64bit)
Windows XP SP3 or later
•
environments satisfying all conditions below.
Notices & Warranties
ENGLISH
HDSPARK/HDTHUNDER - Installation Manual
Page 12

ENGLISH
Section 1 - Before Using
USB port
One USB port required (USB 1.1 or higher, for use of the USB key)
Miscellaneous
Availabilit y of Internet access and e-mail address required
This is necessary for activation, user registration, and updating of software
*
and receiving suppor t.
Limitations
Following are limitations to use this product. Please also see the Readme text
included in the installation DVD-ROM for the latest information.
Stand-by mode
Set stand-by mode for screen saver and monitor power supply to "OFF" when
using this product.
Support
Customer Support
For questions regarding hardware set up and usage, please contact your
local Thomson Grass Valley ofce, distributor or the store where you have
purchased this product.
Web-site
Including EDIUS, the latest company information is announced at our website:
http://desktop.grassvalley.com/
The latest drivers utilities, product manuals, FAQs, etc. are also available at
our web-site.
Online User Registration
You can register your EDIUS here.
http://desktop.grassvalley.com/support/
HDSPARK/HDTHUNDER - Installation Manual
Page 13

ENGLISH
Hardware Setting
Setting the Main Board
Before board setting, be sure that your work area is dust-free and dry. Prepare
a Philips screwdriver and an empty box for removed screws in advance.
Also, be sure that your PC is turned off and that the cables (including power)
are removed from the PC.
* The product components vary depending on the product of your purchase.
POINT
See the instruction manual for your PC (motherboard) for the
PCI (PCI Express) slot type.
The slot to set your HDSPARK/HDTHUNDER varies
depending on the product of your purchase.
See the instruction manual for your PC (motherboard) for the
PCI slot type.
<HDSPARK>
- Set the main board (HSX-E1) in the PCI Express slot (PCI
Express x1).
- When PCI Express x1 is not available, either PCI Express
x4, x8 or x16 can be used.
<HDTHUNDER>
- Set the main board (HTX-E1) in the PCI Express slot (PCI
Express x4).
- When PCI Express x4 is not available, either PCI Express
x8 or x16 can be used.
Section
2
ENGLISH
HDSPARK/HDTHUNDER - Installation Manual
Page 14

ENGLISH
Section 2 - Hardware Setting
1 Tightly set the main board in PCI (PCI Express) slot.
POINT
The main board should t in the PCI (PCI Express) slot
•
without using any force. If the board cannot be inserted
fully, please do not force in or bend any parts of the board.
HDSPARK/HDTHUNDER - Installation Manual
Page 15
ENGLISH
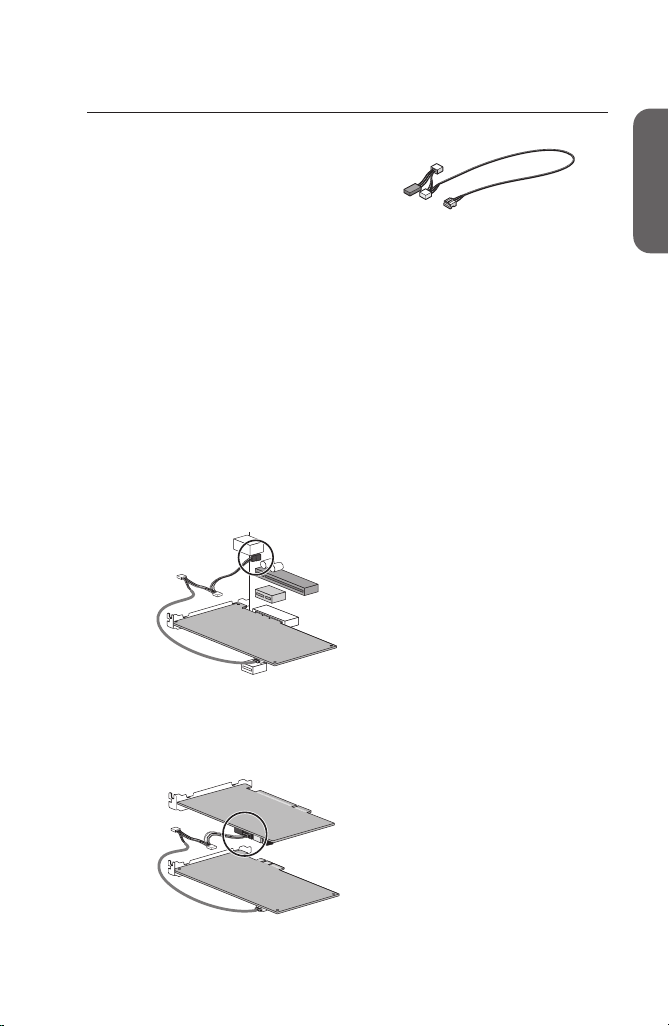
Audio output (HDTHUNDER only)
A
udio cable (4pin-4pin)
Specication of audio cable (4pin-4pin) is:
Red : Right channel (R)
White : Left channel (L)
Black : Ground (G)
For audio output, use the attached audio cable (4pin-4pin) to connect sound
device in output destination and the main board.
* Attached audio cable (4pin-4pin) branches off connectors with different
type and wiring specication. Connect the side without branch to main
board, and the side with branch to sound device in output destination. Use a
connector that complies with the connector type and wiring specication for
connecting destination. If you cannot use the attached audio cable (4pin4pin), prepare another cable separately.
Output from sound device on board
Connect the audio cable to the terminal of motherboard.
* Note that onboard sound device (sound device installed in motherboard:
for details, see the instruction manual for your PC or motherboard) might
interfere with the board installed in slot depending on connector position of
the device.
Setting the Main Board
ENGLISH
Output from sound board
Connect the audio cable to the terminal of sound board.
HDSPARK/HDTHUNDER - Installation Manual
Page 16
ENGLISH
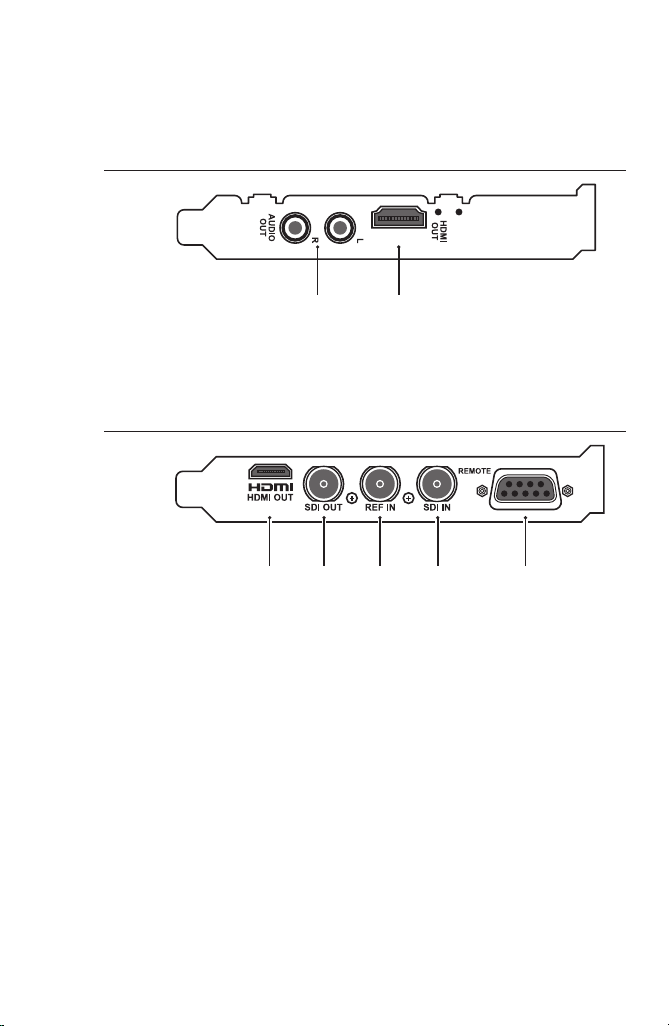
[2][1]
[5][4][3][2][1]
Section 2 - Hardware Setting
Part names
HDSPARK Main board (HSX-E1) rear panel
[1] Analog audio output connector (AUDIO OUT)
[2] HDM I output connector (HDMI OUT)
HDTHUNDER Main board (HTX-E1) rear panel
[1] HDMI Mini output connector (HDMI OUT)
[2] SDI output connector (SDI OUT)
[3] Reference input connector (REF IN)
[4] SDI input connector (SDI IN)
[5] Remote connector (REMOTE)
0
HDSPARK/HDTHUNDER - Installation Manual
Page 17

ENGLISH
Section
3
Software Installation / Uninstallation
Installing EDIUS
This section explains how to install EDIUS both on Windows Vista and
Windows XP.
When you start up PC after setting up the board, "Found
Notes
POINT
•
New Hardware"("Found New Hardware Wizard" in
Windows XP) appears. Select [Cancel] here.
Before starting installation, close all the other applications
•
that may be running in the task tray.
Installation requires the account authorized for the
•
administrator (such as PC administrator).
In order to install, you must log in as a user with
•
administrator privileges.
When you use the Video Out Plug-ins, install the product
•
which you want to use the plug-in for in advance.
Application to be installed may differ depending on model.
•
To use GPUfx transition, the following conditions are
•
required.
- Direct3D 9.0c or later, PixelShader 3.0 or later
- SD 128 MB or larger required, 256 MB or larger
recommended
- HD 256 MB or larger required, 512 MB or larger
recommended
ENGLISH
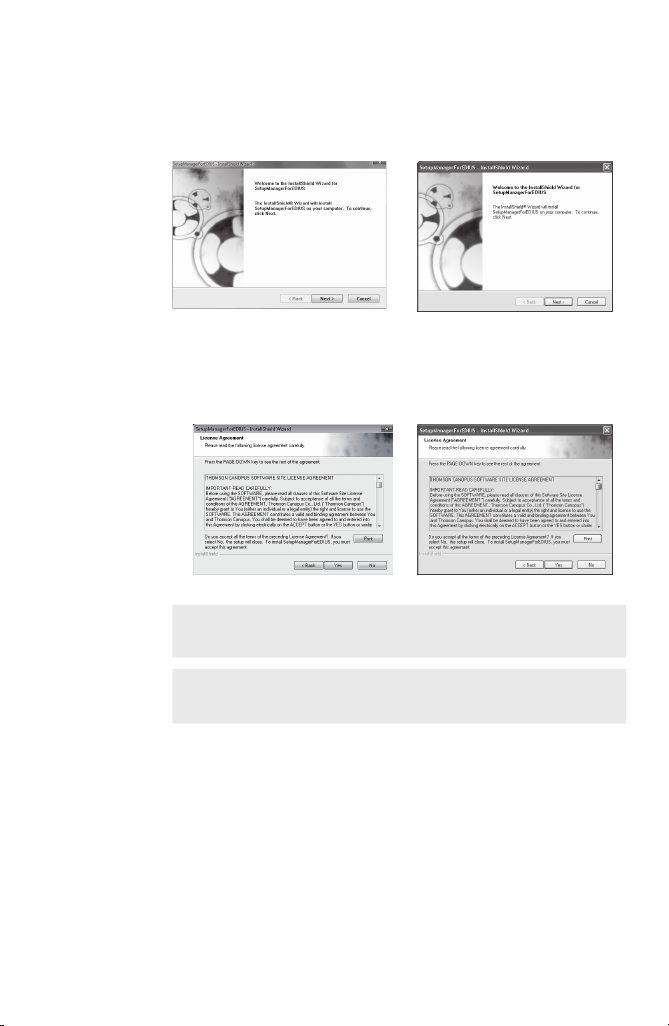
1 Set the product DVD into the DVD- ROM drive.
If the application does not start automatically, open the product DVD, and
double-click "SetupManagerForEDIUS.exe".
2 Click [Install].
"InstallShield Wizard" dialog box appears.
When the other version of EDIUS has been installed,
POINT
HDSPARK/HDTHUNDER - Installation Manual
•
uninstall it along to the screen instruction and restar t PC.
Page 18
ENGLISH
Section 3 - Software Installation / Uninstallation
3 Click [Next].
Windows Vista Windows X P
4 Click [ Yes] to agree the license agreement .
Windows Vista Windows X P
If you do not accept the terms, click [No]. If you do not
POINT
•
agree to the license agreement, you cannot use this product.
Notes
Be sure of reading through terms and conditions by
•
scrolling whole description.
HDSPARK/HDTHUNDER - Installation Manual
Page 19
ENGLISH
Installing EDIUS
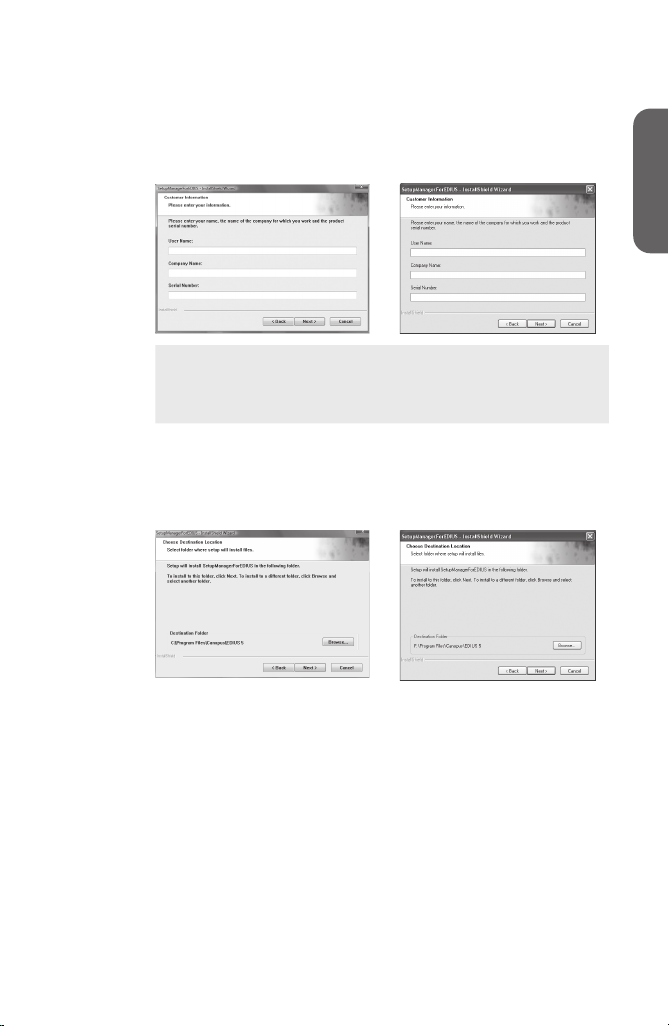
5 Specify the user name, company name, and serial
number, and click [Next].
Windows Vista Windows X P
Enter the serial number of 6 to 16 digits, which is pasted on
POINT
•
the product package of the EDIUS 5 product DVD.
Please note that the serial number cannot be reissued. Keep
•
the number securely.
6 Specify the folder to install EDIUS, and click [Next].
Click [Browse], and select the folder, to install in another folder.
Windows Vista Windows X P
ENGLISH
HDSPARK/HDTHUNDER - Installation Manual
Page 20
ENGLISH
Section 3 - Software Installation / Uninstallation
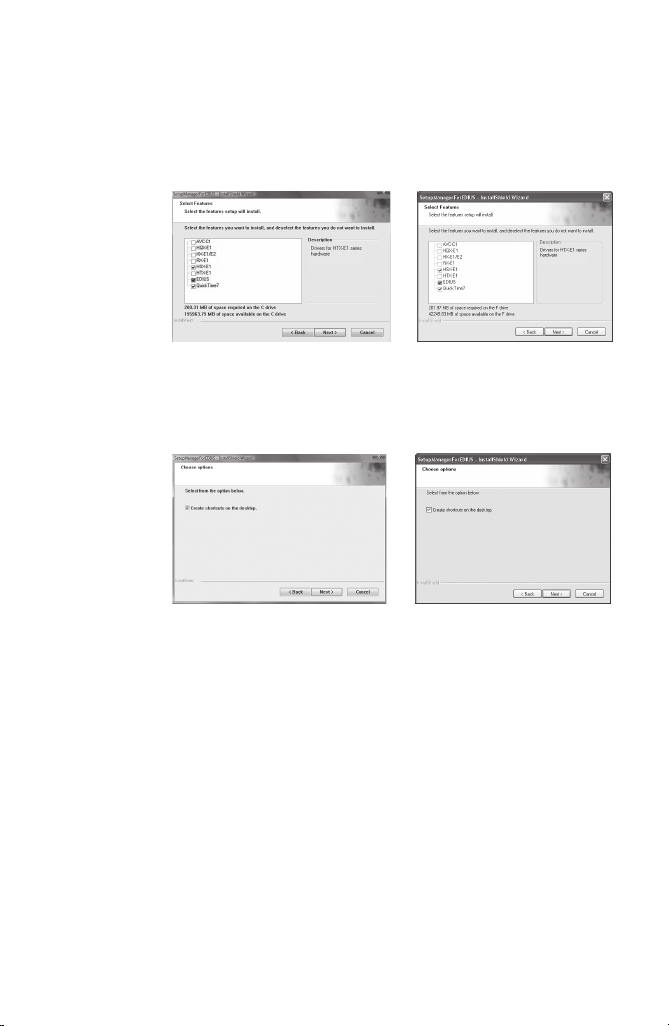
7 Check on the component to install, and click [Next].
[HSX-E1] must be checked for HDSPARK.
[HTX-E1] must be checked for HDTHUNDER.
Windows Vista Windows X P
8 Check "Create shortcuts on the desktop." and click
[Next].
Windows Vista Windows X P
HDSPARK/HDTHUNDER - Installation Manual
Page 21
ENGLISH
Installing EDIUS
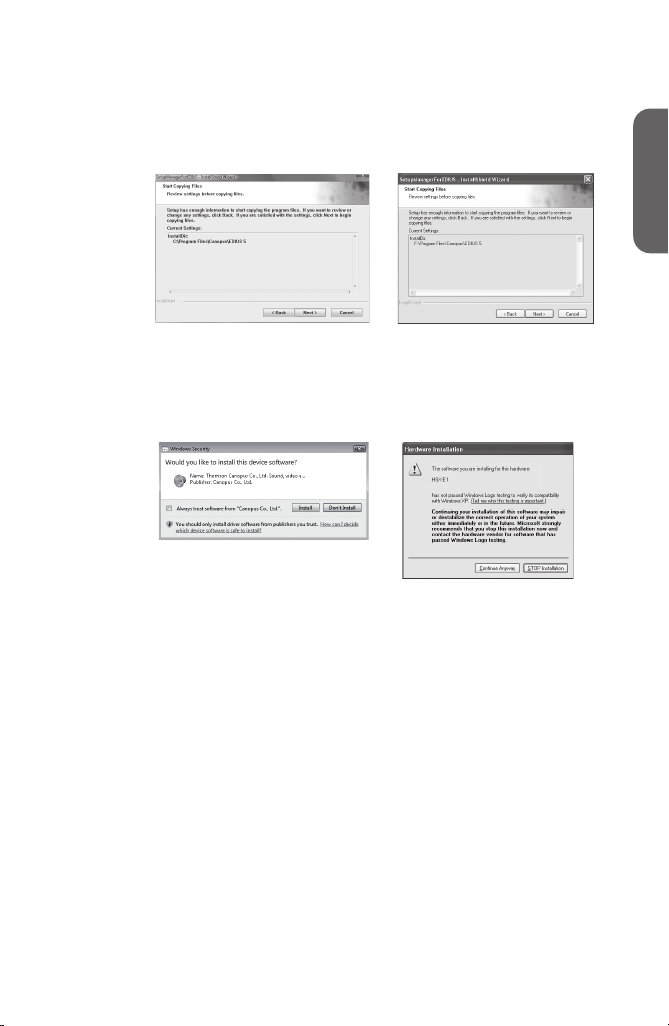
9 Check the settings and click [Next].
Installation of EDIUS starts up.
Windows Vista Windows X P
10
Click [Install]. (Click [Continue Anyway] in Windows
XP.)
Windows Vista Windows X P
This screenshot is of HDSPARK.
Instead of [HSX-E1], [HTX-E1] is
displayed for HDTHUNDER.
ENGLISH
HDSPARK/HDTHUNDER - Installation Manual
Page 22
ENGLISH
Section 3 - Software Installation / Uninstallation
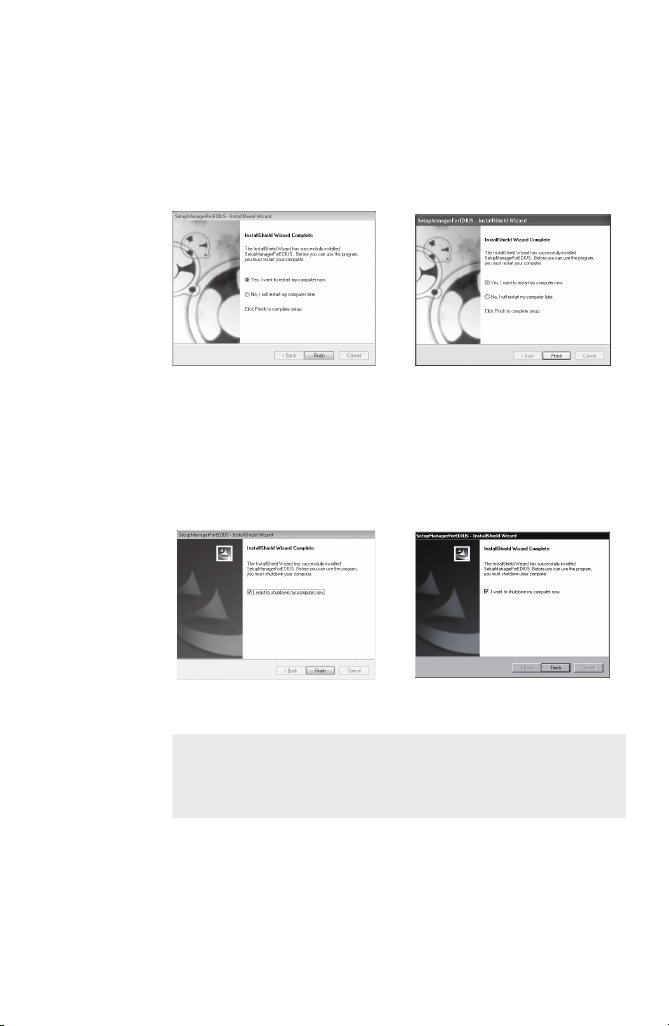
11
<HDSPARK>
Select "Yes, I want to restart my computer now." and
click [Finish].
Windows Vista Windows X P
PC restarts. Installation of EDIUS is completed.
11
<HDTHUNDER>
Select "Yes, I want to shutdown my computer now."
and click [Finish].
Windows Vista Windows X P
PC shuts down. Installation of EDIUS is completed.
USB key in the package stores the license for using EDIUS.
POINT
•
Attach the USB key to the USB port of PC for using EDIUS.
•
If the detection is completed properly, the message appears
to notify that new hardware is found.
HDSPARK/HDTHUNDER - Installation Manual
Page 23

ENGLISH
Installing Attached Application Software
Installing Attached Application
Software
Install attached application software if necessary.
This section explains how to install EDIUS both on Windows Vista and
Windows XP.
The supplied application programs vary, depending on the
Notes
•
product package you purchased.
Installing TitleMotion Pro
TitleMotion Pro is the application software specic for the title creation. A
variety of expression is available such as 3D text or animation. It implements
3 functions to create a title by switching each function according to the
operation purpose.
1 Set TitleMotion Pro Installation CD into the CD-ROM
drive.
"InstallShield Wizard" dialog box appears.
2 Click [Next].
Windows Vista Windows X P
ENGLISH
Installation of TitleMotion Pro starts up.
HDSPARK/HDTHUNDER - Installation Manual
Page 24

ENGLISH
Section 3 - Software Installation / Uninstallation
3 Select "Yes, I want to restart my computer now." and
click [Finish].
Windows Vista Windows X P
PC restarts. Installation of TitleMotion Pro is completed.
Tools Folder contents
The following contents are provided in Tools Folder in the product DVD.
AdobeReader
AVCHD
converter
EdiusLM
Keyboard
Shortcut
Adobe Reader is included. Use it to view the PDF
manuals provided.
If Adobe Reader has not been installed on your PC,
execute the setup le and install it by following the
on-screen instr uction.
This tool conver ts AVCHD video les (such as
m2ts) into AVI les for Canopus HQ Codec. By
using AVCHD converter, you can convert data into
AVI les for Canopus HQ Codec, and the response
in edit operation improves.
To install the tool, double-click "setup.exe" and
follow the on-screen instructions.
For details on the installation and operation, see
the PDF manual in Tools Folder.
License Transfer Tool is included. Without
attaching the USB key, you can use the license of
EDIUS or other optional products.
License Transfer ►p. 27
Included les are the default shortcut key le,
"Avid shortcut for EDIUS.dat", "EDIUS Pro3
shortcut.dat", "FinalCutPro shortcut for EDIUS.
dat", and "FinalCutPro shortcut for EDIUS (104
Keys - English) .dat". Refer to Reference Manual
for details to read the le.
HDSPARK/HDTHUNDER - Installation Manual
Page 25

ENGLISH
Installing Attached Application Software
VideoOut Plug-ins is included. It is plug-in
software for 'NewTek LightWave 3D', 'Autodesk
Maya', 'Autodesk 3ds Max', 'Autodesk Combustion',
'TVPaint Mirage', 'Adobe Photoshop' and 'Adobe
VideoOut
Plug-ins
After Effects'. This outputs videos or images
displayed in each applications from video output
on appropriate product to TV monitor.
For details on the installation and operation, see
the PDF manual in "Manual" → "ENG" folder in
EDIUS 5 Installation DVD.
HSX-E1 Monitor/HTX-E1 Monitor
HSX-E1 Monitor or HTX-E1 Monitor is software for checking the video
display capabilities and the number of receivable audio channels of the
monitoring device that is con nected to the Thomson HSX-E1/HTX-E1 via an
HDMI cable, beforehand. They are automatically installed when the HSX-E1
Monitor driver or HTX-E1 Monitor driver is installed.
ENGLISH
HDSPARK/HDTHUNDER - Installation Manual
Page 26
ENGLISH
Section 3 - Software Installation / Uninstallation
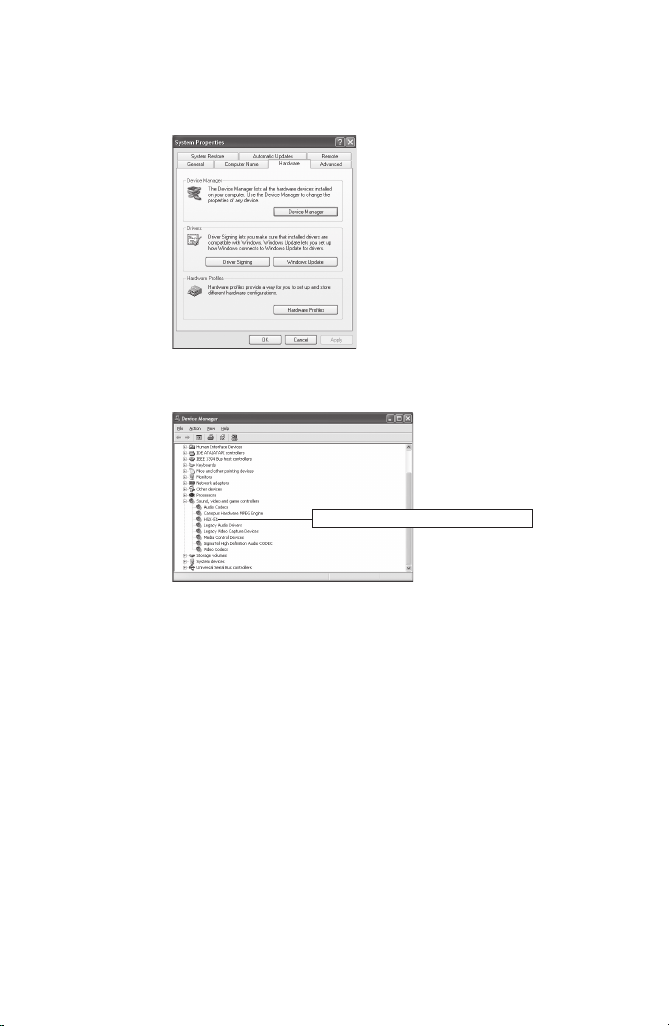
Conrmation after installation
Conrming resource (in Windows Vista)
Conrm whether driver has been normally installed after restarting when
driver and application software installation is nished.
In the following procedures, operations for HDSPARK are explained as an
*
example.
1 Proceed to [System and Maintenance] from [Control
Panel] of [Start] menu.
Or right click [Computer] of [Start] menu and select
[Proper ties].
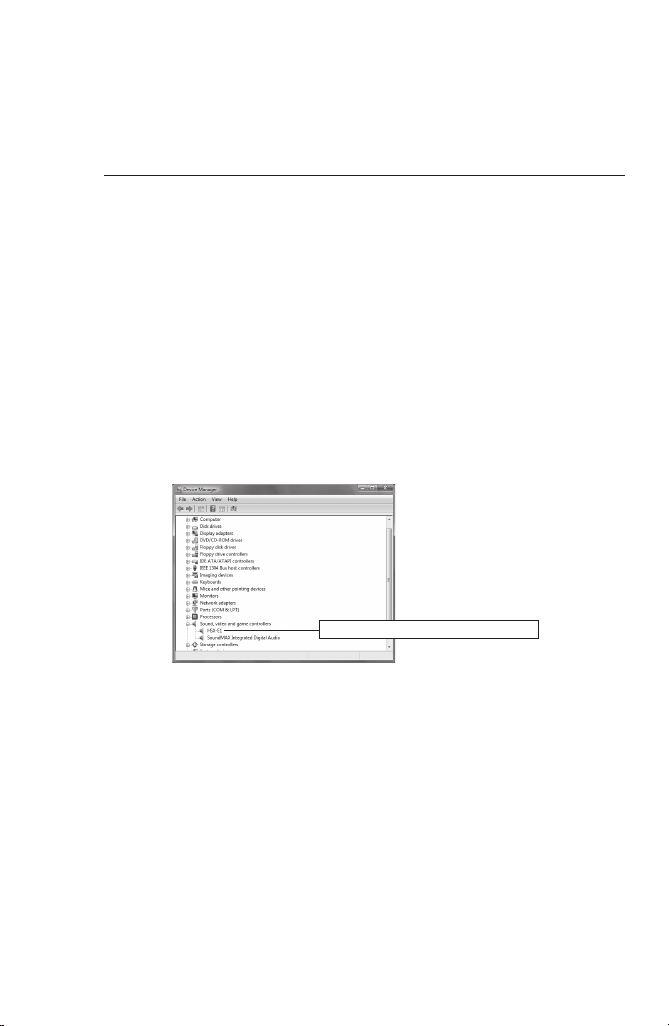
2 Click [Device Manager].
3 Double click [Sound, video and game controllers].
[HTX-E1] is displayed for HDTHU NDER.
0
4 Conrm the device names.
[HSX-E1] (HDSPARK)
•
•
[HTX-E1] (HDTHUNDER)
If you nd ! or X mark at the top of device name, that means you failed
installing HSX-E1 / HTX-E1 driver.
Try installation again, check rival resource, or change board insertion
position.
5 Close [Device Manager].
Checking the d river for the main board now nishes.
HDSPARK/HDTHUNDER - Installation Manual
Page 27

ENGLISH
Conrmation after installation
When resources compete
EDIUS will not operate normally if your and other devices compete or share
PC resources. Try following solution.
•
Remove other device that share interrupting or change IRQ of other device.
•
Change resource setting with BIOS of PC or motherboard. See inst ruction
manual of PC or motherboard since BIOS setting method varies by
manufacturer.
IRQ set method varies depending on PC or motherboard
POINT
•
manufacturer. Some types assign arbitrar y IRQ to each PCI
Express slot with BIOS, other types program special IRQ
in advance.
Conrming resource (in Windows XP)
Conrm whether driver has been normally installed after restarting when
driver and application software installation is nished.
In the following procedures, operations for HDSPARK are explained as an
*
example.
1 Double click [System] from [Control panel] of [star t]
menu.
Or right click [My Computer] of [start] menu and
select [Properties].
ENGLISH
HDSPARK/HDTHUNDER - Installation Manual
Page 28
ENGLISH
Section 3 - Software Installation / Uninstallation
2 Select [Hardware] tab and click [Device Manager].
3 Double click [Sound, video and game controllers].
4 Conrm the device names.
[HSX-E1] (HDSPARK)
•
•
[HTX-E1] (HDTHUNDER)
If you nd ! or X mark at the top of device name, that means you failed
installing HSX-E1 / HTX-E1 driver.
Try installation again, check rival resource, or change board insertion
position.
[HTX-E1] is displayed for HDTHU NDER.
5 Close [Device Manager].
Checking the d river for the main board now nishes.
HDSPARK/HDTHUNDER - Installation Manual
Page 29

ENGLISH
Conrmation after installation
When resources compete
EDIUS will not operate normally if your and other devices compete or share
PC resources. Try following solution.
•
Remove other device that share interrupting or change IRQ of other device.
•
Change resource setting with BIOS of PC or motherboard. See inst ruction
manual of PC or motherboard since BIOS setting method varies by
manufacturer.
IRQ set method varies depending on PC or motherboard
POINT
•
manufacturer. Some types assign arbitrar y IRQ to each PCI
Express slot with BIOS, other types program special IRQ
in advance.
ENGLISH
HDSPARK/HDTHUNDER - Installation Manual
Page 30
ENGLISH
Section 3 - Software Installation / Uninstallation
Uninstallation
Uninstalling driver and application software
from Windows Vista
Before starting uninstallation, close all the other
Notes
In the following procedures, operations for HDSPARK are explained as an
*
example.
•
applications that may be r unning in the task tray.
In order to uninstall, you must log in as a user with
•
administrator privileges.
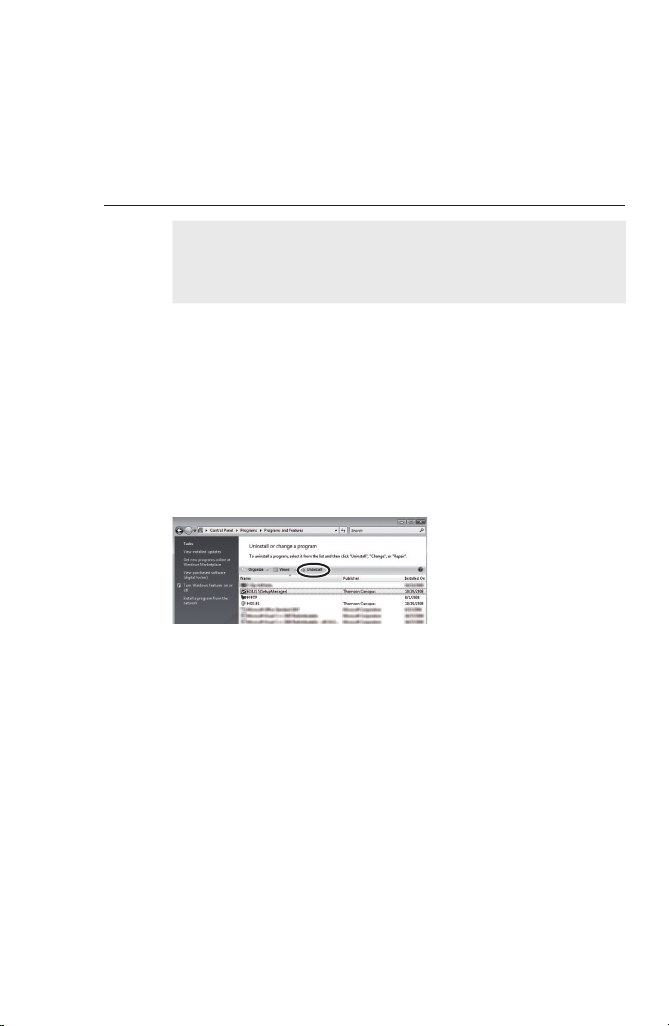
1 Click "Start" menu and click "Control Panel".
2 Click "Uninstall a program".
3 Select "EDIUS 5 (SetupManager)" and click
[Uninstall].
4 Click [Continue] to continue uninstallation.
HDSPARK/HDTHUNDER - Installation Manual
Page 31

ENGLISH
Uninstallation
5 Check on the component to uninstall and click [Next].
[HSX-E1] (HDSPARK)
•
•
[HTX-E1] (HDTHUNDER)
Uninstallation starts.
6 Click [Finish].
PC will be rebooted. Uninstallation is now completed.
Alternative
Click "Start" menu and click "All Programs". Click and open "Canopus"
•
folder, and click "Uninstall" in "EDIUS 5" folder. Then follow the procedure
in Step4 to 6.
Uninstalling driver and application software
from Windows XP
Before starting uninstallation, close all the other
Notes
•
applications that may be r unning in the task tray.
In order to uninstall, you must log in as a user with
•
administrator privileges.
ENGLISH
In the following procedures, operations for HDSPARK are explained as an
*
example.
1 Click "Start" menu, and click "Control Panel".
2 Double-click "Add or Remove Programs".
HDSPARK/HDTHUNDER - Installation Manual
Page 32

ENGLISH
Section 3 - Software Installation / Uninstallation
3 Select "EDIUS 5 (SetupManager)", and click
[Remove].
4 Check on the component to uninstall, and click
[Next].
[HSX-E1] (HDSPARK)
•
•
[HTX-E1] (HDTHUNDER)
Uninstallation starts.
5 Click [Finish].
The computer will reboot. Uninstallation is completed.
Alternative
Click "Start" menu, then click "All programs" → "Canopus" → "EDIUS 5"
•
→ "Uninstall". Check the items to uninstall and click [Next].
HDSPARK/HDTHUNDER - Installation Manual
Page 33

ENGLISH
License Transfer
Transferring license
When you are using EDIUS on a desktop PC where the numbers of USB ports
are limited, or when you do not want to carry USB key, consider transferring
EDIUS licenses. Make sure to read and understand the following notes before
transferring licenses.
The procedure in Windows Vista is described here. The operation is same in
Windows XP.
The license transfer tool must be executed on a PC where
Notes
•
EDIUS has been installed.
When you close the license transfer tool, make sure that the
•
transferring procedures of license have been completed. If
you close the tool while processing, your EDIUS license
may be lost.
Please note that the USB key cannot be reissued no matter
•
what the circumstances (even when the license information
exists on a PC). Keep the USB key securely.
License can only be transferred between PC and USB key,
•
or between USB and USB. It cannot be transferred from a
PC to another PC.
If you have several licenses of the same product, they cannot
•
be integrated in one USB key.
If you have transferred the license to a PC, there is a
•
possibility that the license may be lost because of the
malfunction of a hard disk drive or any other reasons. We
recommend that you should not transfer the license to a PC
unless there is a compelling reason.
Note that when you have transferred the license to a PC, the
•
registered license data may become invalid if you change
the hardware (CPU, Memory, Motherboard, HDD, NIC, etc)
congurations.
Section
4
ENGLISH
HDSPARK/HDTHUNDER - Installation Manual
Page 34

ENGLISH
Section 4 - License Transfer
Using License Transfer tool
1 Set the USB key that contains the licenses you want
to transfer to a USB port of a PC.
2 Set the product DVD into the DVD- ROM drive.
3 Open "Tools", "EdiusLM" and double-click "EdiusLM.
exe".
[EDIUSLM] dialog appears.
HDSPARK/HDTHUNDER - Installation Manual
Page 35

ENGLISH
Transferring license
Transfer between a USB key and a local disk
of a PC
1 Click the "USB to PC" tab on the "EDIUSLM" dialog.
2 Select the license to transfer and click [->].
To transfer from a PC to a USB key, click [<-].
3 Wait until the license is transferred, and click [Close].
ENGLISH
HDSPARK/HDTHUNDER - Installation Manual
Page 36

ENGLISH
Section 4 - License Transfer
Transfer between a USB key and another USB
key
1 Click the "USB to USB" tab on the "EDIUSLM" dialog.
2 Select the license to transfer and click [->].
3 Remove the USB key, set the USB key to transfer the
license to, and then click [Refresh].
Make sure to remove the USB key where the license had
Notes
•
been stored, before setting the destination USB key.
When you change the USB keys, do not fail to click
•
[Refresh] in order to update the License list.
0
4 Select the license and click [<-] to transfer it to the
new USB key.
5 Wait until the license is transferred, and click [Close].
Do not remove the USB key when the licenses are being
Notes
•
transferred.
To transfer licenses, make sure to replace USB keys step
•
by step.
HDSPARK/HDTHUNDER - Installation Manual
Page 37

ENGLISH
Section
Hardware Specications
HDSPARK Main Board (HSX-E1)
5
ENGLISH
Bus I/F
Output
connectors
External
dimensions
Weight
Maximum
consumption
current
Operating
temperature
Operating
humidity
PCI Express x1 (rev 1.0)
HDMI
outpu t
Analog
audio
outpu t
97.0 (W) x 68.9 (H) mm, excl. PCI bracket
Approx. 55 g (Incl. PCI bracket)
+3.3V/0.9A, +12V/0.05A
0-45C°
10-80% (*no condensation)
HDMI TM Connector x1
(LPCM 8 channels audio
suppor ted)
RCA jacks (stereo, 1 system)
HDSPARK/HDTHUNDER - Installation Manual
Page 38

ENGLISH
Section 5 - Hardware Specications
HDTHUNDER Main Board (HTX-E1)
Bus I/F
Input /
Output
connectors
External
dimensions
Weight
Maximum
consumption
current
Operating
temperature
Operating
humidity
PCI Express x4 (rev 1.1)
BNC ×1
Video:
HD/SD-SDI
input
HD/SD-SDI
outpu t
HDMI output
Analog
audio output
Reference
input
VTR
control
167.65 (W) x 111.15 (H) mm, excl. PCI bracket
Approx. 170 g (Incl. PCI bracket)
+3.3V/0.5A, +12V/1.6A
0-45C°
10-80% (*no condensation)
In compliance with SMPTE 292M,
259M-C
Audio:
In compliance with SMPTE 299M,
272M-A
BNC ×1
Video:
In compliance with SMPTE 292M,
259M-C
Audio:
In compliance with SMPTE 299M,
272M-A
HDMI TM Mini Connector x1
(LPCM 8-channel audio supported)
Inter nal connector ×1
Unbalanced stereo
BNC ×1
NTSC/PAL black burst or HD
tri-level sync
D-SUB 9-pin ×1
RS-422A
HDSPARK/HDTHUNDER - Installation Manual
Page 39

ENGLISH
ENGLISH
HDSPARK/HDTHUNDER - Installation Manual
Page 40

Page 41

HD SPARK
HD THUNDER
Guide d’installation
FRANÇAIS
Page 42

FRANÇAIS
HDSPARK/HDTHUNDER - Guide d’installation
ii iii
FRANÇAIS
HDSPARK/HDTHUNDER - Guide d’installation
Avertissement
(1) Il est interdit de copier tout ou partie de ce produit sans autorisation
expresse préalable.
(2) Le contenu ou les spécifications de ce produit peuvent faire l'objet de
modif ications sans préavis.
(3) Le contenu de ce produit a été élaboré avec le plus grand soin. Toutefois,
si vous avez des questions ou si vous constatez des erreurs ou des
éléments manquants, veuillez contacter Thompson Grass Valley.
(4) Cependant, nous ne saurions être tenus responsables de
dysfonctionnements résultant d'une utilisation, que les points soulignés à
l'avertissement (3) soient valides ou non.
(5) Thomson Grass Valley ne saurait être tenu responsable de dommages
extraordinaires, fortuits ou dérivés, y compris de pertes de profits
générés par l'application de ce produit.
(6) Toute opération d'analyse, de rétrotechnique, de décompilation ou de
désassemblage des éléments inclus dans ce produit (logiciel, matériel et
documentation compris) est formellement interdite.
(7) Microsoft et Windows sont des marques commerciales de Microsoft
Corporation, États-Unis.
(8) QuickTime est une marque déposée de Apple Computer, Inc,. États-Unis.
(9) Adobe, le logo Adobe, Adobe Photoshop, Adobe Premiere et Adobe After
Effects sont des marques déposées de Adobe Systems Incorporated.
(10) Intel, Pentium et Xeon sont des marques ou des marques déposées de
Intel Corporation ou de ses filiales aux États-Unis d'Amérique et dans
d'autres pays.
(11) HDV et les logos HDV sont des marques de Sony Corporation et Victor
Company of Japan, Limited (JVC).
(12) iLink et les logos correspondants sont des marques déposées.
(13)
Leur fabrication est réglementée par l'accord de licence
correspondant.
(14) HDMI, le logo HDMI et High-Definition Multimedia Interface sont des
marques ou des marques déposées de HDMI Licensing LLC.
(15) Les autres noms de produits ou noms associés à une marque sont des
marques ou des marques déposées de leurs détenteurs respectifs.
Dolby, Dolby et le symbole Double D sont des marques
déposées de Dolby Laboratories.
Page 43

FRANÇAIS
HDSPARK/HDTHUNDER - Guide d’installation
FRANÇAIS
HDSPARK/HDTHUNDER - Guide d’installation
Explication relative au Guide
■ Il est possible que des informations qui ne sont pas décrites dans ce manuel
s'affichent à l'écran. Veillez à consulter le fichier texte accompagnant le
disque.
■ En cas de disparité entre les explications présentées dans ce guide et la
méthode d'application pratique, cette dernière a priorité.
■ Les écrans utilisés comme exemples dans ce manuel ont servi pendant la
phase de fabrication, ils peuvent ainsi différer des écrans du produit fini.
■ Ce manuel s'adresse à des utilisateurs ayant des connaissances
élémentaires en informatique. Les opérations sans instructions spéciales
sont des opérations informatiques courantes.
■ Dans ce g uide, EDIUS 5 et la série EDIUS sont appelés « EDIUS ».
■ Dans ce g uide, le système d'exploitation Microsoft® Windows® XP
Professionnel est appelé Windows XP Professionnel ou Windows XP. Le
système d'exploitation Microsoft® Windows® XP Édition Familiale est
appelé Windows XP Édition Familiale ou Windows XP.
■ Dans ce g uide, Windows Vista® Familial Basique, Windows Vista®
Familial Premium, Windows Vista® Entreprise, Windows Vista® Intégral
sont appelés Windows Vista Familial Basique, Windows Vista Familial
Premium, Windows Vista Entreprise, Windows Vista Intégral ou Windows
Vista.
■ Dans ce g uide, Adobe Photoshop est appelé Photoshop et Adobe After
Effects est appelé After Effects.
■ Les informations indiquées dans ce guide sont susceptibles d'être
modif iées sans préavis en raisons des modifications appor tées aux
spécifications du produit, etc.
Guide d’installation
31 octobre 2008
Copyright © 2008 Thomson
Tous droits réservés.
Page 44

FRANÇAIS
HDSPARK/HDTHUNDER - Guide d’installation
iv v
FRANÇAIS
HDSPARK/HDTHUNDER - Guide d’installation
Page 45

FRANÇAIS
HDSPARK/HDTHUNDER - Guide d’installation
FRANÇAIS
HDSPARK/HDTHUNDER - Guide d’installation
Table de contenu
Section1
Avant toute utilisation
Informations et garanties . . . . . . . . . . . . . . . . . . . . . . . . . . . . .1
Assistance . . . . . . . . . . . . . . . . . . . . . . . . . . . . . . . . . . . . . . . .6
Table de contenu
Table de contenu
Section2
Section3
Section4
Section5
Conguration matérielle
Conguration de la carte principale . . . . . . . . . . . . . . . . . . . . .7
Noms des composants . . . . . . . . . . . . . . . . . . . . . . . . . . . . . .10
Installation/désinstallation de logiciel
Installation de EDIUS . . . . . . . . . . . . . . . . . . . . . . . . . . . . . . . 11
Installation des logiciels d'application associés . . . . . . . . . . . . 17
Conrmation de l'installation . . . . . . . . . . . . . . . . . . . . . . . . . .20
Désinstallation . . . . . . . . . . . . . . . . . . . . . . . . . . . . . . . . . . . .24
Transfert de licence
Transfert de licence . . . . . . . . . . . . . . . . . . . . . . . . . . . . . . . .27
Spécications matérielles
Carte principale HDSPARK (HSX-E1) . . . . . . . . . . . . . . . . . . 31
Carte principale HDTHUNDER (HTX-E1) . . . . . . . . . . . . . . .32
Page 46

FRANÇAIS
HDSPARK/HDTHUNDER - Guide d’installation
vi
FRANÇAIS
HDSPARK/HDTHUNDER - Guide d’installation
Page 47

FRANÇAIS
HDSPARK/HDTHUNDER - Guide d’installation
FRANÇAIS
HDSPARK/HDTHUNDER - Guide d’installation
Avant toute utilisation
Section
Section
1
1
Informations et garanties
Informations et garanties
Réglementations de copyright
Toute transgression des droits d'auteurs est condamnée par la législation sur
les droits d'auteurs, sauf en cas d'utilisation équitable (pour des ns privées
et non commerciales). Par ailleurs, dans certains cas, la reproduction est
interdite sans exception. Thomson Grass Valley ne peut en aucun cas être tenu
pour responsable des dommages directs ou indirects résultant d'une utilisation
des ressources capturées.
Garantie
Ce produit est couvert par une garantie limitée lors de l'enregistrement de
votre produit Thomson Grass Valley. Cette garantie est valide pour une
période d’un an (ou de deux ans dans les pays de l’Union européenne) à
partir de la date d’achat de Thomson Grass Valley ou un agent autorisé de
Thomson Grass Valley. Cette garantie ne s'applique qu'à l'acheteur initial du
produit Thomson Grass Valley et elle ne peut être transférée. Thomson Grass
Valley garantit le bon fonctionnement du produit pendant la période indiquée.
Thomson Grass Valley s'engage à réparer ou remplacer le produit, sans frais
supplémentaires, si le produit venait à présenter un défaut de fonctionnement
qui ne soit pas le résultat d'une mauvaise manipulation, d'un abus ou de toute
opération, modication ou réparation non autorisées par Thomson Grass
Valley. La garantie du produit ne peut être validée que sous présentation d'une
évidence d'achat.
Thomson Grass Valley ne peut être tenu pour responsable des pertes de
bénéces, per tes d'argent ou autres dommages accessoires ou indirects
résultant de l'utilisation de ce produit ou de l'impossibilité de l'utiliser. Cela
inclut les dommages matériels et, dans les limites légales, les dommages
corporels. Cette garantie remplace toutes les autres garanties de valeur
marchande et d'adéquation à un usage particulier.
Page 48

Section 1 - Avant toute utilisation
FRANÇAIS
HDSPARK/HDTHUNDER - Guide d’installation
FRANÇAIS
HDSPARK/HDTHUNDER - Guide d’installation
DANGER
Les conditions suivantes indiquent la possibilité de blessures corporelles ou
de perte de vie.
Précautions sanitaires
Dans des situations exceptionnelles, la luminosité intense ou le clignotement
des écrans d'ordinateur ou de télévision peuvent provoquer des crises
d'épilepsie ou des pertes de connaissance momentanées. Il existe des raisons
de penser que même des individus n'ayant jamais éprouvé de tels symptômes
peuvent y être prédisposés. Si vous ou des personnes de votre entourage avez
été sujets à de tels symptômes, consultez un médecin avant toute utilisation
de ce produit.
Ne pas utiliser dans un environnement qui exige un
niveau élevé de abilité et de sécurité
Ce produit ne doit en aucun cas être utilisé sur des appareils médicaux ou des
appareils de prise en charge de la vie. Les caractéristiques de ce produit ne
sont pas compatibles avec de tels systèmes.
Protection contre l'électricité statique
Une décharge électrostatique peut endommager les composants de ce produit.
Une décharge électrostatique peut endommager les composants de ce produit.
De l'électricité statique peut être générée sur les personnes et les vêtements.
Avant toute utilisation du produit, déchargez toute électricité statique de votre
corps par un contact avec une surface métallique reposant sur le sol.
Ne pas démonter
Ne pas ôter la protection ou modier le produit. Il peut en résulter un
incendie, une électrocution ou dysfonctionnement. Pour toute vérication
inter ne ou toute réparation, contactez votre intégrateur système ou
directement Thomson Grass Valley.
AVERTISSEMENT
Les conditions suivantes indiquent la possibilité de blessures corporelles, de
dommage matériel, ou de perte de données.
Ne pas installer dans les zones de fortes
températures
Ne pas installer dans des zones exposées aux rayons solaires ou près d'un
appareil de chauffage. L'accumulation de la chaleur peut causer des brûlures,
des incendies ou des dégâts. En plus, l'unité peut subir des déformations ou
changer de couleur.
Page 49

FRANÇAIS
HDSPARK/HDTHUNDER - Guide d’installation
FRANÇAIS
HDSPARK/HDTHUNDER - Guide d’installation
Suivre attentivement les instructions
d'installation
Suivez attentivement les instructions d'installation. Ne pas utiliser dans un
emballage plastique ou de tissu. L'accumulation de la chaleur peut causer des
brûlures, des incendies ou des dégâts.
Notication
<HDSPARK>
Ce matériel a été testé et trouvé compatible aux limites de périphérique
numérique de classe B, conformément au paragraphe 15 de la réglementation
FCC. Ces limites sont conçues pour assurer une protection raisonnable
contre les interférences dans une installation résidentielle. Ce matériel peut
générer, utiliser et émettre de l'énergie de fréquence radio, et s'il n'est pas
installé et utilisé conformément aux instr uctions, il est susceptible de causer
des interférences sur la communication radio. Toutefois, il n'existe aucune
garantie relative à l'absence d'interférences dans une installation donnée. Les
utilisateurs sont invités à suivre les instructions suivantes pour corriger toute
interférence nocive générée par le matériel à la radio ou à la télévision ; ces
interférences peuvent être déter minées par l'allumage et l'arrêt du matériel.
Réorienter ou déplacer l'antenne de réception.
Accroître la distance entre le matériel et le récepteur.
Connecter le matériel à la sortie d'un circuit différent de celui auquel le
matériel est connecté.
Consulter le fournisseur ou un technicien de radio/TV compétent pour obtenir
de l'aide.
Ce matériel est certié compatible aux limites d'un dispositif de calcul
de classe B, conformément à la réglementation FCC. Conformément à la
réglementation FCC, des câbles blindés doivent être utilisés pour ce matériel.
Les opérations avec un matériel inapproprié ou des câbles non blindés
pourraient produire des interférences de réception radio/TV. L'utilisateur est
averti que tout changement ou modication du matériel sans l'approbation du
fabricant peut annuler son autorisation à utiliser ce matériel.
Ce dispositif est conforme au paragraphe 15 de la réglementation FCC. Son
fonction nement est sujet aux conditions suivantes : (1)Ce dispositif n'est pas
susceptible de produire des interférences nocives. (2) Ce dispositif doit être
capable de recevoir des interférences, y compris celles qui peuvent entraîner
des perturbations dans son fonctionnement.
Informations et garanties
Informations et garanties
Cet appareil numérique de la classe B est conforme á la norme NMB-003 du
Canada.
Page 50

Section 1 - Avant toute utilisation
FRANÇAIS
HDSPARK/HDTHUNDER - Guide d’installation
FRANÇAIS
HDSPARK/HDTHUNDER - Guide d’installation
<HDTHUNDER>
Le présent équipement a été testé et approuvé comme répondant aux normes
des dispositifs numériques de Classe A, conformément à la Partie 15 des
règlements du FCC. Ces limites sont conçues pour fournir une protection
raisonnable contre les brouillages préjudiciables dans un environnement
commercial. Cet appareil produit, utilise et peut dégager de l’énergie
radioélectrique et, s’il n’est pas installé et utilisé selon les instructions, il
peut être la source d’interférences gênantes pour les communications radio.
L’utilisation de cet appareil dans une zone résidentielle peut également causer
des interférences gênantes, auquel cas l’utilisateur s’engage à mettre n à ces
interférences à ses frais.
Cet appareil numérique de la classe A est conforme á la norme NMB-003 du
Canada.
Déclaration de conformité
Conformément au paragraphe 15 de la réglementation FCC
Nom du responsable : Grass Valley, Inc
Adresse : 400 Providence Mine Road, Nevada
City, CA 95959
Téléphone : 530-478-3000
Page 51

FRANÇAIS
HDSPARK/HDTHUNDER - Guide d’installation
FRANÇAIS
HDSPARK/HDTHUNDER - Guide d’installation
Environnement d'exploitation
Le fonctionnement de EDIUS n'est pas toujours
Remarq ue
Ordinateur
Processeur : Intel Pentium 4, Xeon, Core Duo ou supérieur
Un processeur prenant en charge les instructions SSE2 est essentiel pour
*
l’opération de EDIUS.
EDIUS est conforme à la technologie multiprocesseur et HyperThreading.
*
Bus PCI
Les emplacements PCI ci-contre sont requis :
HDSPARK: PCI Express x1 (PCI Express Spéc. Révision 1.0 ou ultérieur) x1
HDTHUNDER: PCI Express x4 (PCI Express Spéc. Révision 1.1 ou ultérieur)
Mémoire
Espace mémoire de 1 Go minimum requis, 2 Go minimum recommandé.
Disque dur
800 Mo ou capacité supérieure, nécessaire à l'installation.
Disque ATA de 100/7200 tr/min minimum pour le stockage vidéo.
* RAID 0 recommandé pour le montage en résolution HD.
Graphiques
Une unité de traitement graphique prenant en charge Direct 3D 9.0c ou
ultérieur ou PixelShader Model 3.0 ou ultérieur est nécessaire.
Certaines fonctions d’incrustation de DirectDraw ne peuvent pas être
*
utilisées.
En cas d’utilisation de GPUfx, une mémoire vidéo de 256 Mo ou plus pour
*
les projets HD ou de 128 Mo ou plus pour les projets SD est nécessaire.
Système audio
Une prise en charge de pilote WDM est nécessaire.
Lecteur optique
Un lecteur DVD-ROM est nécessaire pour l’installation des logiciels
Pour stockage sur un disque Blu-ray ou DVD, un lecteur approprié est
*
requis.
SE
WindowsVista SP1 ou ultérieur (32 bits/ 64 bits)
Windows XP SP3 ou ultérieur
•
garanti, même lorsque les environnements répondent à
toutes les conditions ci-dessous.
x1
Informations et garanties
Informations et garanties
Page 52

Section 1 - Avant toute utilisation
FRANÇAIS
HDSPARK/HDTHUNDER - Guide d’installation
FRANÇAIS
HDSPARK/HDTHUNDER - Guide d’installation
Port USB
Un port USB est requis (USB 1.1 ou plus, pour utilisation de la clé USB)
Divers
Un accès Internet et une adresse de messagerie sont nécessaires
Nécessaire pour activation, enregistrement de l’utilisateur et mise à jour
*
des logiciels, et assistance technique.
Limitations
Cette section liste les limitations d’utilisation du produit. Pour obtenir les
toutes dernières informations, lisez le texte Readme contenu dans le DVDROM d'installation.
Mode de mise en veille
Dénissez le mode de mise en veille pour l'économiseur d'écran et contrôlez
l'alimentation en énergie en appuyant sur "OFF" lors de l'utilisation du
produit.
Assistance
Service d'assistance à la clientèle
Pour toutes vos questions sur l'utilisation et la cong uration matérielles,
veuillez contacter l'agence Thomson Grass Valley de votre région, votre
revendeur ou la boutique où vous avez acquis le produit.
Site Web
Pour obtenir les toutes dernières informations sur EDIUS et Canopus, veuillez
consulter le site Web :
http://desktop.grassvalley.com/
Le site contient également les derniers pilotes, utilitaires, guides sur les
produits, FAQ, etc.
Enregistrement utilisateur en ligne
Enregistrez votre produit EDIUS ici.
http://desktop.grassvalley.com/support/
Page 53

FRANÇAIS
HDSPARK/HDTHUNDER - Guide d’installation
FRANÇAIS
HDSPARK/HDTHUNDER - Guide d’installation
Conguration matérielle
Section
Section
2
2
Conguration de la carte principale
Avant la cong uration de la carte, assurez-vous que votre zone de travail est
dépoussiérée et sèche. Préparez d'avance un tournevis Philips et un boîtier
vide pour les vis à retirer.
Assurez-vous également que votre ordinateur est éteint et que les câbles (y
compris d'alimentation) sont retirés du système.
* Les composantes du produit varient en fonction de votre choix lors de
l'achat.
POINT
Pour le ty pe d'emplacement du PCI (PCI Express), veuillez
consulter le guide d'instructions de votre ordinateur (carte
mère).
L'emplacement de destination de HDSPARK /
HDTHUNDER varie en fonction du produit acheté.
Pour le ty pe d'emplacement du PCI (PCI Express), veuillez
consulter le guide d'instructions de votre ordinateur (carte
mère).
<HDSPARK>
- Veuillez paramétrer la carte principale (HSX-E1) dans
l'emplacement PCI Express (PCI Express x1).
- Vous pouvez utiliser un PCI Express x4, x8 ou x16 lorqu'un
PCI Express x1 n'est pas disponible.
<HDTHUNDER>
- Veuillez paramétrer la carte principale (HTX-E1) dans
l'emplacement PCI Express (PCI Express x4).
- Vous pouvez utiliser un PCI Express x8 ou x16 lorqu'un
PCI Express x4 n'est pas disponible.
Page 54

Section 2 - Conguration matérielle
FRANÇAIS
HDSPARK/HDTHUNDER - Guide d’installation
FRANÇAIS
HDSPARK/HDTHUNDER - Guide d’installation
Câble audio (4 broches - 4 broches)
1 Insérez fermement la carte principale dans
l'emplacement PCI (PCI Express).
La carte principale doit être insérée dans l'emplacement PCI
POINT
Sortie audio (HDTHUNDER uniquement)
Les spécications du câble audio (4 broches - 4 broches) sont :
Rouge : Canal droit (R)
Blanc : Canal gauche (L)
Noir : Masse (G)
•
(PCI Express) sans violence. Si la carte ne peut s'insérer
totalement, veiller à ne pas l'insérer de force ou à ne pas
plier une quelconque partie de
celle-ci.
Pour la sor tie audio, utilisez le câble audio intégré (4 broches - 4 broches)
pour connecter le périphérique audio à la destination de sortie et à la car te
principale.
* Le câble audio intégré (4 broches - 4 broches) branche les connecteurs
de types et de câblage différents. Connectez la par tie n'ayant pas de
branchement à la carte principale et la partie avec branchement au
périphérique audio de la destination de sortie. Utilisez un connecteur
compatible au type de connecteur et au câblage de la destination de
connexion. Si vous ne pouvez pas utiliser le câble audio intégré, (4 broches
- 4 broches), préparez séparément un autre câble.
Page 55

Conguration de la carte principale
FRANÇAIS
HDSPARK/HDTHUNDER - Guide d’installation
FRANÇAIS
HDSPARK/HDTHUNDER - Guide d’installation
Conguration de la carte principale
Sortie du périphérique audio de la carte
Connectez le câble audio au terminal de la car te mère.
* Notez que le périphérique audio intégré (périphérique audio installé dans la
carte mère : (pour plus d'informations, consultez le guide d'instructions de
votre ordinateur ou carte mère) peut interférer avec la carte installée dans
l'emplacement en fonction de la position du connecteur du périphérique.
Sortie de la carte son
Connectez le câble audio au terminal de la car te son.
Page 56

Section 2 - Conguration matérielle
FRANÇAIS
HDSPARK/HDTHUNDER - Guide d’installation
0
FRANÇAIS
HDSPARK/HDTHUNDER - Guide d’installation
[2][1]
[5][4][3][2][1]
Noms des composants
Panneau arrière de la carte principale HDSPARK
(HSX-E1)
[1] Connecteur de sortie audio analogue (AUDIO OUT)
[2] Connecteur de sortie HDMI (HDMI OUT)
Panneau arrière de la carte principale
HDTHUNDER (HTX-E1)
[1] Connecteur de sortie mini HDMI (HDMI OUT)
[2] Connecteur de sortie SDI (SDI OUT)
[3] Connecteur d’entrée de référence (REF IN)
[4] Connecteur d’entrée SDI (SDI IN)
[5] Connecteur d’entrée (REMOTE)
Page 57

Section
FRANÇAIS
HDSPARK/HDTHUNDER - Guide d’installation
FRANÇAIS
HDSPARK/HDTHUNDER - Guide d’installation
Section
Installation/désinstallation de
logiciel
Installation de EDIUS
Cette partie démontre comment installer EDIUS sur Windows Visa et sur
Windows XP.
Lorsque vous démarrez votre ordinateur après
Remarq ue
POINT
1 Insérez le DVD correspondant dans le lecteur de
DVD-ROM.
Si l'application ne démarre pas automatiquement, ouvrez le DVD, puis cliquez
deux fois sur le "chier SetupManagerForEDIUS.exe".
•
l'installation de la carte, le message "Nouveau matériel
détecté" ("L'assistant nouveau matériel détecté" dans
Windows XP) s'afche. Ici, sélectionnez [Cancel] =
[Annuler].
Avant de démarrer l'installation, nous vous conseillons
•
de fermer tous les autres programmes ouver ts dans la
barre des tâches.
Pour procéder à l'installation, vous devez disposer
•
d'un compte d'administrateur (administrateur PC par
exemple).
Pour installer, connectez-vous en tant que administrateur.
•
Lorsque vous utilisez les plug-ins Videoout, installez
•
d'abord le produit pour lequel vous compter l'utiliser.
La procédure d'installation peut varier en fonction du
•
modèle.
Les conditions suivantes sont requises pour utiliser la
•
transition GPUfx.
- Direct3D 9.0c ou ultérieur, PixelShader 3.0 ou ultérieur
- SD 128 Mo ou capacité supérieure nécessaire, 256 Mo
ou capacité supérieure recommandé
- HD 256 Mo ou capacité supérieure nécessaire, 512 Mo
ou capacité supérieure recommandé
3
3
Page 58

Section 3 - Installation/désinstallation de logiciel
FRANÇAIS
HDSPARK/HDTHUNDER - Guide d’installation
FRANÇAIS
HDSPARK/HDTHUNDER - Guide d’installation
2 Cliquez sur [Installer]=[Install].
La boîte de dialogue de l'Assistant InstallShield s'afche.
Lorsqu'une autre version d'EDIUS est installée sur le PC,
POINT
•
désinstallez-la en suivant les instructions qui s'afchent à
l'écran puis redémar rez l'ordinateur.
3 Cliquez sur [Suivant]=[Next].
Windows Vista Windows X P
4 Cliquez sur [Oui]=[Yes] pour accepter les termes de
l'accord de licence.
Windows Vista Windows X P
Cliquez sur [Non]=[No] si vous n'acceptez pas les termes
POINT
Remarq ue
•
de l'accord de licence. Auquel cas, vous ne pourrez pas
utiliser ce produit.
Assurez-vous de lire attentivement les termes et
•
conditions de l'accord. Pour cela, faites-le déler dans
son intégralité.
Page 59

Installation de EDIUS
FRANÇAIS
HDSPARK/HDTHUNDER - Guide d’installation
FRANÇAIS
HDSPARK/HDTHUNDER - Guide d’installation
Installation de EDIUS
5 Indiquez le nom d'utilisateur, le nom de la société et
le numéro de série, puis cliquez sur [Suivant]=[Next].
Windows Vista Windows X P
Entrez le numéro de série de 6 à 16 chiffres, apposé sur le
POINT
•
coffret contenant le DVD d'EDIUS version 5.
Veuillez noter que le numéro de série ne peut pas être émis
•
à nouveau. Conser vez-le en lieu sûr.
6 Indiquez le dossier d'installation de EDIUS, puis
cliquez sur [Suivant]=[Next].
Pour sélectionner un dossier d'installation différent, cliquez sur
[Parcourir]=[Browse].
Windows Vista Windows X P
Page 60

Section 3 - Installation/désinstallation de logiciel
FRANÇAIS
HDSPARK/HDTHUNDER - Guide d’installation
FRANÇAIS
HDSPARK/HDTHUNDER - Guide d’installation
7 Activez les cases à cocher des composants à
installer, puis cliquez sur [Suivant]=[Next].
Pour HDSPARK, cochez [HSX-E1].
Pour HDTHUNDER, cochez [HTX-E1].
Windows Vista Windows X P
8 Activez la case à cocher "Create shortcuts on the
desktop" pour créer des raccourcis sur le bureau,
puis cliquez sur [Suivant]=[Next].
Windows Vista Windows X P
Page 61

Installation de EDIUS
FRANÇAIS
HDSPARK/HDTHUNDER - Guide d’installation
FRANÇAIS
HDSPARK/HDTHUNDER - Guide d’installation
Installation de EDIUS
9 Vériez les paramètres et cliquez sur [Next].
L'installation de EDIUS démarre.
Windows Vista Windows X P
10
Cliquez sur [Installer]=[Install]. (Cliquez sur
[Continuer] = [Continue Anyway] dans Windows XP.)
Windows Vista Windows X P
La capture d'écran afchée est
celle de HDSPARK.
[HTX-E1] s'afche pour
HDTHUNDER à la place de
[HSX-E1].
Page 62

Section 3 - Installation/désinstallation de logiciel
FRANÇAIS
HDSPARK/HDTHUNDER - Guide d’installation
FRANÇAIS
HDSPARK/HDTHUNDER - Guide d’installation
11
<HDSPARK>
Redémarrez votre ordinateur en sélectionnant
[Oui, je souhaite redémarrer mon ordinateur
maintenant]=[Yes, I want to restart my computer now]
avant de cliquer sur [Terminer]=[Finish].
Windows Vista Windows X P
L'ordinateur redémarre. L'installation de EDIUS est terminée.
<HDTHUNDER>
Redémarrez votre ordinateur en sélectionnant [Oui, je
souhaite arréter mon ordinateur maintenant]=[Yes, I
want to shutdown my computer now] avant de cliquer
sur [Terminer]=[Finish].
Windows Vista Windows X P
L’ordinateur s’éteint. L'installation de EDIUS est terminée.
La clé USB du coffret contient la licence d'exploitation du
POINT
•
logiciel EDIUS.
Pour utiliser EDIUS, connectez la clé USB au port USB
•
de votre ordinateur. Un message conr me la détection du
nouveau matériel.
Page 63

Installation des logiciels d'application associés
FRANÇAIS
HDSPARK/HDTHUNDER - Guide d’installation
FRANÇAIS
HDSPARK/HDTHUNDER - Guide d’installation
Installation des logiciels d'application associés
Installation des logiciels d'application
associés
Au besoin, installez les logiciels d'application associés.
Cette section explique comment installer EDIUS sur Windows Vista et
Windows XP.
Les applications fournies varient selon le produit
Remarq ue
•
que vous avez acheté.
Installation de TitleMotion Pro
TitleMotion Pro est un logiciel de création de titres. Il permet des opérations
aussi diverses que la composition de textes en 3D ou la création d'animations.
Il présente trois fonctions de création de titre, per mutables en fonction du
mode de fonctionnement.
1 Insérez le CD d'installation TitleMotion Pro dans le
lecteur de CD-ROM.
La boîte de dialogue de l'Assistant InstallShield s'afche.
2 Cliquez sur [Suivant]=[Next].
Windows Vista Windows X P
L'installation de TitleMotion Pro démarre.
Page 64

Section 3 - Installation/désinstallation de logiciel
FRANÇAIS
HDSPARK/HDTHUNDER - Guide d’installation
FRANÇAIS
HDSPARK/HDTHUNDER - Guide d’installation
3 Redémarrez votre ordinateur en sélectionnant
[Oui, je souhaite redémarrer mon ordinateur
maintenant]=[Yes, I want to restart my computer now]
avant de cliquer sur [Terminer]=[Finish].
Windows Vista Windows X P
L'ordinateur redémarre. L'installation de TitleMotion Pro est terminée.
Éléments du dossier outils
Le DVD EDIUS contient les éléments suivants dans son dossier Outils.
AdobeReader
Convertisseur
AVCHD
Adobe® Reader® est inclus. Utilisez-le
pour parcourir les guides au format PDF
inclus.
Si Adobe® Reader® n'est pas installé
sur votre ordinateur, exécutez son chier
d'installation et installez-le en suivant les
instructions apparaissant à l'écran.
Cette application convertit les chiers
vidéo AVCHD (tels que m2ts) en chiers
AVI pour Canopus HQ Codec. Grâce à
AVCHD converter, vous pouvez convertir
les données en chiers AVI pour Canopus
HQ Codec et améliorer le résultat de vos
montages.
Cliquez deux fois sur "setup.exe" et
suivez les instructions d'installation qui
s'afchent.
Consultez le guide PDF dans le dossier
outils pour plus d'informations sur son
installation et exploitation.
Page 65

Installation des logiciels d'application associés
FRANÇAIS
HDSPARK/HDTHUNDER - Guide d’installation
FRANÇAIS
HDSPARK/HDTHUNDER - Guide d’installation
Installation des logiciels d'application associés
Outil de transfert de licence inclus. Vous
pouvez exploiter EDIUS ou ses autres
EdiusLM
Raccourci clavier
Plug-ins de sortie
vidéo
produits optionnels sans connecter la clé
USB.
Transfert de licence ►p.27
Enn, le DVD contient le chier des
raccourcis clavier par défaut Avid shortcut
for EDIUS.dat, EDIUS Pro3 shortcut.dat, et
"FinalCutPro shortcut for EDIUS.dat". Pour
plus d'informations sur la lecture du chier,
reportez-vous à la page 5.
Plug-ins de sortie vidéo inclus. C'est
un logiciel plug-in pour "NewTek
LightWave3D", "Autodesk Maya 7",
"Autodesk 3ds max 8", "Autodesk
Combustion 4", "Bauhaus Software Mirage
1.5a", "Adobe Photoshop CS2" et "Adobe
After Effects 7.0". Ce logiciel transmet
les vidéo ou images qu'afchent chaque
application dans la sor tie vidéo du produit
correspondant, à l'écran TV.
Cliquez deux fois sur le chier "setup.exe"
et suivez les instructions d'installation qui
s'afchent.
HSX-E1 Monitor/HTX-E1 Monitor
HSX-E1 Monitor ou HTX-E1 Monitor sont des logiciels utilisés pour vérier
par avance les capacités d’afchage vidéo et le nombre de canaux audio
qui peuvent être reçus du périphérique de monitorage connecté aux cartes
HSX-E1/HTX-E1 de Thomson via un câble HDMI. Ils sont automatiquement
installés lors de l’installation des pilotes de HSX-E1 Monitor ou HTX-E1
Monitor.
Page 66

Section 3 - Installation/désinstallation de logiciel
FRANÇAIS
HDSPARK/HDTHUNDER - Guide d’installation
0
FRANÇAIS
HDSPARK/HDTHUNDER - Guide d’installation
Conrmation de l'installation
Conrmation de ressource (sur Windows Vista)
Cette dernière conr me, après redémarrage du système une fois l'installation
du pilote et du logiciel d'application ter minée, l'installation réussie du pilote.
Dans les procédures suivantes, les opérations de HDSPARK sont utilisées
*
comme exemple.
1 Passez à [Système et maintenance]=[System
and Maintenance] à partir du [Panneau de
conguration]=[Control Panel] dans le menu
[Démarrer]=[Start].
Ou cliquez à droite sur [Poste de travail]=[Computer]
du menu [Démarrer]=[Start] et sélectionnez [Propriét
és]=[Properties].
2 Cliquez sur [Gestionnaire de périphériques]=[Device
Manager].
3 Cliquez deux fois sur [Contrôleurs de son, vidéo et
jeu]=[Sound, video and game controllers].
[HTX-E1] est af ché pou r HDTHUNDER.
4 Conrmez les noms de périphériques.
[HSX-E1] (HDSPARK)
•
•
[HTX-E1] (HDTHUNDER)
Si le point ! ou X apparaît au dessus du nom du périphérique, cela signie que
le pilote HSX-E1/HTX-E1 n'a pas été installé.
Réessayez de nouveau, activez la ressource concurrente ou changez la
position d'insertion de la carte.
Page 67

Conrmation de l'installation
FRANÇAIS
HDSPARK/HDTHUNDER - Guide d’installation
FRANÇAIS
HDSPARK/HDTHUNDER - Guide d’installation
Conrmation de l'installation
5 Fermez le [Gestionnaire de périphériques] = [Device
Manager].
Le pilote de la carte principale est à présent activé.
Utilisation simultanée des ressources
EDIUS perd sa capacité optimale lorsque vos périphériques et des
périphériques divers sont simultanément activés ou partagent les ressources
de l'ordinateur. Si tel est le cas, essayez la solution suivante.
•
Retirez l'autre périphérique actif ou changez son IRQ.
•
Modiez le réglage des ressources à l'aide du BIOS de l'ordinateur ou de la
carte mère. La méthode de conguration de BIOS varie selon le fabricant,
nous vous conseillons de consulter le guide d'instr uctions du PC ou de la
carte mère.
La méthode de conguration IRQ varie en fonction du
POINT
Conrmation de ressource (sur Windows XP)
Cette dernière conr me, après redémarrage du système une fois l'installation
du pilote et du logiciel d'application ter minée, l'installation réussie du pilote.
Dans les procédures suivantes, les opérations de HDSPARK sont utilisées
*
comme exemple.
•
fabricant de l'ordinateur ou de la carte mère. Certains types
affectent un IRQ arbitraire à chaque emplacement PCI
Express comportant un BIOS, d'autres assignent un IRQ
spécial par anticipation.
1 Cliquez sur [Démarrer]=[Start], [Panneau de
conguration]=[Control panel], puis cliquez deux fois
sur [Système]=[System].
Ou cliquez à droite de [Poste de travail]=[My
Computer] à partir du menu [démarrer]=[start] et
sélectionnez [Propriétés]=[Properties].
Page 68

Section 3 - Installation/désinstallation de logiciel
FRANÇAIS
HDSPARK/HDTHUNDER - Guide d’installation
FRANÇAIS
HDSPARK/HDTHUNDER - Guide d’installation
2 Sélectionnez l'onglet [Matériel]=[Hardware] et
cliquez sur [Gestionnaire de périphériques]=[Device
Manager].
3 Cliquez deux fois sur [Contrôleurs de son, vidéo et
jeu]=[Sound, video and game controllers].
[HTX-E1] est af ché pou r HDTHUNDER.
4 Conrmez les noms de périphériques.
[HSX-E1] (HDSPARK)
•
•
[HTX-E1] (HDTHUNDER)
Si le point ! ou X apparaît au dessus du nom du périphérique, cela signie que
le pilote HSX-E1/HTX-E1 n'a pas été installé.
Réessayez de nouveau, activez la ressource concurrente ou changez la
position d'insertion de la carte.
Page 69

Conrmation de l'installation
FRANÇAIS
HDSPARK/HDTHUNDER - Guide d’installation
FRANÇAIS
HDSPARK/HDTHUNDER - Guide d’installation
Conrmation de l'installation
5 Fermez le [Gestionnaire de périphériques] = [Device
Manager].
Le pilote de la carte principale est à présent activé.
Utilisation simultanée des ressources
EDIUS perd sa capacité optimale lorsque vos périphériques et des
périphériques divers sont simultanément activés ou partagent les ressources
de l'ordinateur. Si tel est le cas, essayez la solution suivante.
•
Retirez l'autre périphérique actif ou changez son IRQ.
•
Modiez le réglage des ressources à l'aide du BIOS de l'ordinateur ou de la
carte mère. La méthode de conguration de BIOS varie selon le fabricant,
nous vous conseillons de consulter le guide d'instr uctions du PC ou de la
carte mère.
La méthode de conguration IRQ varie en fonction du
POINT
•
fabricant de l'ordinateur ou de la carte mère. Certains types
affectent un IRQ arbitraire à chaque emplacement PCI
Express comportant un BIOS, d'autres assignent un IRQ
spécial par anticipation.
Page 70

Section 3 - Installation/désinstallation de logiciel
FRANÇAIS
HDSPARK/HDTHUNDER - Guide d’installation
FRANÇAIS
HDSPARK/HDTHUNDER - Guide d’installation
Désinstallation
Désinstallation du pilote et du logiciel
d'application sur Windows vista
Avant de démarrer la désinstallation, nous vous
Remarq ue
Dans les procédures suivantes, les opérations de HDSPARK sont utilisées
*
comme exemple.
•
conseillons de fermer tous les autres programmes
ouverts dans la barre des tâches.
Pour désinstaller, connectez-vous en tant que
•
administrateur.
1 Cliquez sur le menu "Démarrer"="Start", puis sur
"Panneau de conguration"="Control Panel".
2 Cliquez sur "désinstallation d'un
programme"="Uninstall a program".
3 Sélectionnez "EDIUS 5 (SetupManager)" et cliquez
sur [désinstaller]=[Uninstall].
4 Cliquez sur [Continuer]=[Continue] pour continuer la
désinstallation.
Page 71

FRANÇAIS
HDSPARK/HDTHUNDER - Guide d’installation
FRANÇAIS
HDSPARK/HDTHUNDER - Guide d’installation
5 Activez les cases à cocher des composantes à
désinstaller, puis cliquez sur [Suivant]=[Next].
[HSX-E1] (HDSPARK)
•
•
[HTX-E1] (HDTHUNDER)
La désinstallation est lancée.
6 Cliquez sur [Finish].
L'ordinateur redémarre. La désinstallation est terminée.
Alternative
Cliquez sur le menu "Démarrer"="Start", puis sur "tous les
•
programmes"="All Programs". Cliquez et ouvrez le chier "Canopus", puis
cliquez sur "désinstaller"="Uninstall" dans le chier "EDIUS 5". Ensuite,
suivez la procédure des étapes 4 à 6.
Désinstallation du pilote et du logiciel
d'application de Windows XP
Désinstallation
Désinstallation
Remarq ue
Dans les procédures suivantes, les opérations de HDSPARK sont utilisées
*
comme exemple.
1 Cliquez sur le menu "Démarrer"="Start", puis sur
"Panneau de conguration"="Control Panel".
2 Cliquez deux fois sur "Ajout ou suppression de
programmes"="Add or Remove Programs".
Avant de démarrer la désinstallation, nous vous
•
conseillons de fermer tous les autres programmes
ouverts dans la barre des tâches.
Pour désinstaller, connectez-vous en tant que
•
administrateur.
Page 72

Section 3 - Installation/désinstallation de logiciel
FRANÇAIS
HDSPARK/HDTHUNDER - Guide d’installation
FRANÇAIS
HDSPARK/HDTHUNDER - Guide d’installation
3 Sélectionnez "EDIUS 5 (SetupManager)" et cliquez
sur [supprimer]=[Remove].
4 Activez les cases à cocher des composants à
désinstaller, puis cliquez sur [Suivant]=[Next].
[HSX-E1] (HDSPARK)
•
•
[HTX-E1] (HDTHUNDER)
La désinstallation est lancée.
5 Cliquez sur [Finish].
L'ordinateur redémarre. La désinstallation est terminée.
Alternative
Cliquez sur le menu "Démarrer"="Start", puis sur "tous les
•
programmes"="All Programs" → "Canopus" → "EDIUS 5" →
"Désinstaller". Vériez les éléments à désinstaller et cliquez
[suivant]=[Next].
Page 73

FRANÇAIS
HDSPARK/HDTHUNDER - Guide d’installation
FRANÇAIS
HDSPARK/HDTHUNDER - Guide d’installation
Transfert de licence
Section
4
Transfert de licence
Lorsque vous utilisez EDIUS sur un ordinateur dont les ports USB sont
limités, ou lorsque vous ne voulez pas transporter la clé USB, il est préférable
de transférer les licences EDIUS. Veuillez lire et comprendre les informations
suivantes avant de procéder au transfert des licences.
La procédure de transfert sur Windows Vista est décrite dans les lignes qui
suivent. La procédure est la même sur Windows XP.
L'outil de transfert de licence doit être exécuté dans un
Remarq ue
•
ordinateur sur lequel EDIUS est installé.
Ne fermez l'outil de t ransfert de licence que lorsque
•
les procédures de transfert de licence sont terminées.
Vous courez le risque de perdre votre licence EDIUS
si vous fermez l'outil lorsque le transfert est en cours.
Veuillez noter que la clé USB ne peut en aucun cas
•
être émise à nouveau (même lorsque les informations
de licence se trouvent sur l'ordinateur). Conservez-la
en lieu sûr.
Les licences ne peuvent être transférées qu'entre
•
des ordinateurs et des clés USB, et d'une clé USB à
une autre. Une licence ne peut être transférée d'un
ordinateur à un autre.
Si vous possédez plusieurs licences du même produit,
•
vous ne pouvez pas les transférer sur une seule clé
USB.
La licence peut se perdre lorsqu'elle a été transférée
•
dans un ordinateur, en cas de dysfonctionnement du
lecteur du disque dur ou pour toute autre raison. Nous
déconseillons vivement le transfert d'une licence dans
un ordinateur, sauf pour cas de force majeure.
Veuillez noter que lorsque la licence a été transférée
•
dans un ordinateur, les données de la licence d'origine
peuvent devenir invalides si vous changez les
congurations du matériel (unité centrale, mémoire,
carte mère, lecteur de disque dur, carte réseau, etc.).
Page 74

Section 4 - Transfert de licence
FRANÇAIS
HDSPARK/HDTHUNDER - Guide d’installation
FRANÇAIS
HDSPARK/HDTHUNDER - Guide d’installation
Utilisation des outils de transfert de licence
1 Insérez la clé USB qui contient les licences que vous
souhaitez transférer au port USB d'un ordinateur.
2 Insérez le DVD dans le lecteur DVD-ROM.
3 Ouvrez "Tools", "EdiusLM" et cliquez deux fois sur
"EdiusLM.exe".
La boîte de dialogue [EDIUSLM] s'afche.
Page 75

Transfert de licence
FRANÇAIS
HDSPARK/HDTHUNDER - Guide d’installation
FRANÇAIS
HDSPARK/HDTHUNDER - Guide d’installation
Transfert de licence
Transfert entre une clé USB et le disque local
d'un ordinateur
1 Dans la boîte de dialogue EDIUS LM, cliquez sur
l'onglet [USB à ordinateur]=[USB to PC].
2 Sélectionnez la licence à transférer, puis cliquez sur
[->].
Pour effectuer le transfert d'un ordinateur à une clé USB, cliquez sur [<-].
3 Attendez jusqu'à la n du transfert et cliquez sur
[Close].
Page 76

Section 4 - Transfert de licence
FRANÇAIS
HDSPARK/HDTHUNDER - Guide d’installation
0
FRANÇAIS
HDSPARK/HDTHUNDER - Guide d’installation
Transfert d'une clé USB à une autre clé USB
1 Dans la boîte de dialogue EDIUS LM, cliquez sur
l'onglet [USB à USB]=[USB to USB].
2 Sélectionnez la licence à transférer, puis cliquez sur
[->].
3 Remplacez la clé USB par celle sur laquelle transférer
la licence, puis cliquez sur [Actualiser]=[Refresh].
Retirez la clé USB dans laquelle la licence est située,
Remarq ue
•
avant d'insérer la clé USB destinataire.
Lors du changement des clés USB, veillez à cliquer
•
sur [Actualiser]=[Refresh] an de mettre à jour la
liste des licences.
4 Sélectionnez la licence et cliquez sur [<-] pour la
transférer à la nouvelle clé USB.
5 Attendez jusqu'à la n du transfert et cliquez sur
[Close].
Ne pas retirer la clé USB lorsque le transfert des
Remarq ue
•
licences est en cours.
Au cours du transfert des licences, veuillez
•
remplacer les clés USB étape par étape.
Page 77

FRANÇAIS
HDSPARK/HDTHUNDER - Guide d’installation
FRANÇAIS
HDSPARK/HDTHUNDER - Guide d’installation
Spécications matérielles
Section
Section
5
5
Carte principale HDSPARK (HSX-E1)
Bus d’interface
Connecteurs de
sortie
Dimensions
externes
Poids
Consommation
maximale de
courant
Température
d’opération
Humidité
d’opération
HDMI
Sortie
Sortie
audio
analogue
97,0 (L) x 68,9 (H) mm, sans suppor t PCI
Environ 55 g (avec support PCI)
+3,3V/0,9 A, +12V/0,05 A
0-45C°
10-80% (* sans condensation)
PCI Express x1 (rev 1.0)
Connecteur HDMI TM x 1
(8 canaux audio LPCM pris en
charge)
Prises RCA (stéréo, 1 système)
Page 78

Section 5 - Spécications matérielles
FRANÇAIS
HDSPARK/HDTHUNDER - Guide d’installation
FRANÇAIS
HDSPARK/HDTHUNDER - Guide d’installation
Carte principale HDTHUNDER (HTX-E1)
Bus d’interface
Connecteurs
de sortie/
d’entrée
Dimensions
externes
Poids
Maximum
Consommation
maximale de
courant
Température
d’opération
Humidité d’
opération
PCIExpressx4(rev1.1)
BNC ×1
Vidéo :
Entrée HD/
SD-SDI
Sortie HD/
SD-SDI
Sortie HDMI
Sortie audio
analogue
Entrée de
référence
Contrôles
VTR
167,65 (L) x 111,15 (H) mm, sans support PCI
Environ 170 g (avec support PCI)
+3,3V/0,5 A, +12V/1,6 A
0-45C°
10-80% (* sans condensation)
En confor mité avec SMPTE 292M,
259M-C
Audio :
En confor mité avec SMPTE 299M,
272M-A
BNC ×1
Vidéo :
En confor mité avec SMPTE 292M,
259M-C
Audio :
En confor mité avec SMPTE 299M,
272M-A
Mini connecteur HDMI TM x 1
(8 canaux audio LPCM pris en
charge)
Connecteur interne ×1
Stéréo non équilibré
BNC ×1
Signal de référence NTSC/PAL ou
sync trois niveaux HD
D-SUB, 9 broches ×1
RS-422A
Page 79

Carte principale HDTHUNDER (HTX-E1)
FRANÇAIS
HDSPARK/HDTHUNDER - Guide d’installation
FRANÇAIS
HDSPARK/HDTHUNDER - Guide d’installation
Carte principale HDTHUNDER (HTX-E1)
Page 80

Page 81

HD SPARK
HD THUNDER
Installationshandbuch
DEUTSCH
Page 82

DEUTSCH
HDSPARK/HDTHUNDER - Installationshandbuch
ii
DEUTSCH
Warnungen
(1) Es ist nicht erlaubt, dieses Produkt ohne vorherige Erlaubnis ganz oder
(2) Die Inhalte oder Spezifikationen dieses Produkts können sich ohne
(3) Wir haben die Inhalte dieses Produkts entsprechend unseren
(4) Wir übernehmen jedoch keinerlei Haftung für Betriebsstörungen,
(5) Unabhängig davon, ob ein Fehler in der Nutzung vorlag, übernimmt
(6) Die Analyse, Rückwärtsentwicklung oder Deassemblierung jeglicher
(7) Microsoft und Windows sind eingetragene Marken der Microsoft
(8) QuickTime ist eine eingetragene Marke der Apple Computer, Inc., USA.
(9) Adobe, das Adobe-Logo, Adobe Photoshop, Premiere und After Effects
(10) Intel, Pentium und Xeon sind Marken oder eingetragene Marken der
(11) HDV und die HDV-Logos sind Marken der Sony Corporation und der
(12)
(13)
(14) HDMI, das HDMI-Logo und High-Definition Multimedia Interface
(15) Andere Produktnamen oder damit in Verbindung stehende
auszugsweise zu kopieren.
vorherige Ankündigung ändern.
Möglichkeiten aufbereitet und bereitgestellt. Wenn Sie jedoch Fragen
zu den Inhalten haben oder Fehler oder Auslassungen bemerkt haben,
setzen Sie sich bitte mit Thomson Grass Valley in Verbindung.
die aus der Nutzung entstehen können. Dies gilt unabhängig von den
Hinweisen unter Punkt (3).
Thomson Grass Valley keinerlei Haftung für Forderungen aus
außerordentlichen, zuf älligen oder Folgeschäden, einschließlich
entgangener Gewinne durch die Anwendung dieses Produkts.
in diesem Produkt enthaltenen Elemente, einschließlich Software,
Hardware und Handbuch, ist nicht gestattet.
Corporation, USA.
sind eingetragene Marken von Adobe Systems Incorporated.
Intel Corporation oder ihrer verbundenen Unternehmen in den USA und
anderen Ländern.
Victor Company of Japan, Limited (JVC).
iLink und die entsprechenden Logos sind eingetragene Marken.
Sie werden basierend auf ihrer eigenen Lizenz hergestellt.
sind Marken oder eingetragene Marken der HDMI Licensing LLC.
Markennamen sind Marken oder eingetragene Marken der jeweiligen
Eigentümer.
Dolby, das Dolby- und das Double D-Symbol sind
eingetragene Marken der Dolby Laboratories.
Page 83

DEUTSCH
DEUTSCH
iii
HDSPARK/HDTHUNDER - Installationshandbuch
Erläuterungen zum Handbuch
In diesem Handbuch nicht beschriebene Information können in manchen
•
Fällen an anderer Stelle offen gelegt sein. Lesen Sie unbedingt die an diesen
Datenträger angehängte Textdatei.
Wenn Differenzen zwischen den Erläuterungen im vorliegenden Handbuch
•
und der tatsächlichen Anwendungsmethode auftreten, hat die tatsächliche
Anwendungsmethode Vorrang.
Die in diesem Handbuch als Beispiele verwendeten Screenshots
•
entstammen der Entwicklungsphase und können somit vom Endprodukt
abweichen.
Dieses Handbuch wurde für Personen mit Grundkenntnissen im Umgang
•
mit Computern geschrieben. Wenn keine spezischen Anweisungen
gegeben werden, führen Sie den Vorgang so durch, wie Sie dies
normalerweise auf Ihrem Computer tun.
In diesem Handbuch werden die Serien EDIUS 5 und EDIUS als 'EDIUS'
•
bezeichnet.
In diesem Handbuch wird das Betriebssystem Microsoft® Windows® XP
•
Professional als Windows XP Professional oder Windows XP bezeichnet.
Das Betriebssystem Microsoft® Windows® XP Home Edition wird als
Windows XP Home Edition oder Windows XP bezeichnet.
In diesem Handbuch werden Windows Vista® Home Basic, Windows
•
Vista® Home Premium, Windows Vista® Business, Windows Vista®
Ultimate als Windows Vista Home Basic, Windows Vista Home Premium,
Windows Vista Business, Windows Vista Ultimate oder als Windows Vista
bezeichnet.
In diesem Handbuch wird Adobe Photoshop als Photoshop und Adobe After
•
Effects als After Effects bezeichnet.
Die Informationen in diesem Handbuch unterliegen aufgr und von
•
Änderungen in Produk tspezikationen usw. Änderu ngen ohne vorheriger
Ankündigung.
Installationshandbuch
31. Oktober 2008
Copyright © 2008 Thomson
Alle Rechte vorbehalten.
Page 84

DEUTSCH
HDSPARK/HDTHUNDER - Installationshandbuch
iv
DEUTSCH
Page 85

DEUTSCH
DEUTSCH
v
HDSPARK/HDTHUNDER - Installationshandbuch
Inhalt
Inhalt
Section1
Section2
Section3
Section4
Section5
Vor der Verwendung
Hinweise und Garantien . . . . . . . . . . . . . . . . . . . . . . . . . . . . . .1
Support . . . . . . . . . . . . . . . . . . . . . . . . . . . . . . . . . . . . . . . . . . .6
Einrichten der Hardware
Einsetzen der Hauptplatine. . . . . . . . . . . . . . . . . . . . . . . . . . . .7
Bauteilbezeichnungen . . . . . . . . . . . . . . . . . . . . . . . . . . . . . .10
Installation und Deinstallation der Software
Installieren von EDIUS . . . . . . . . . . . . . . . . . . . . . . . . . . . . . . 11
Installieren zusätzlicher Anwendungssoftware . . . . . . . . . . . . .17
Überprüfung nach der Installation . . . . . . . . . . . . . . . . . . . . .20
Deinstallation . . . . . . . . . . . . . . . . . . . . . . . . . . . . . . . . . . . . .24
Lizenzübertragung
Übertragen der Lizenz . . . . . . . . . . . . . . . . . . . . . . . . . . . . . .27
Hardwarespezikationen
HDSPARK Hauptplatine (HSX-E1) . . . . . . . . . . . . . . . . . . . . . 31
HDTHUNDER Hauptplatine (HTX-E1) . . . . . . . . . . . . . . . . . .32
Page 86

DEUTSCH
HDSPARK/HDTHUNDER - Installationshandbuch
vi
DEUTSCH
Page 87

DEUTSCH
DEUTSCH
HDSPARK/HDTHUNDER - Installationshandbuch
Vor der Verwendung
Hinweise und Garantien
Hinweise und Garantien
Urheberrechtliche Vorschriften
Die Verletzung der im Rahmen der Urhebergesetze dem Copyright-Inhaber
gewährten Rechte verstößt gegen das Gesetz, es sei denn dies geschieht für
einen zulässigen Verwendungszweck (in der Regel private nicht kommerzielle
Verwendung). In einigen Fällen ist das Kopieren unter keinen Umständen
zulässig. In keinem Fall haftet Thomson Grass Valley für direkte oder
indirekte Schäden, die aus der Verwendung erfasster Materialien entstehen.
Gewährleistung
Dieses Produkt wird durch eine eingeschränkte Gewährleist ung abgedeckt,
wenn Sie Ihr Thomson Grass Valley-Produkt registrieren. Diese Garantie
gilt für einen Zeitraum von einem Jahr (oder zwei Jahren in Ländern der
Europäischen Union) ab dem Datum des Kaufs von Thomson Grass Valley
oder bei einem autorisierten Vertreter von Thomson Grass Valley. Diese
Gewährleistung gilt nur für den ursprünglichen Käufer des Thomson
Grass Valley-Produkts und ist nicht übertragbar. Thomson Grass Valley
gewährleistet die Funktionstüchtigkeit des Produkts in diesem Zeitraum.
Sollte unser Produkt nicht ordnungsgemäß funktionieren, liegt es im
Ermessen von Thomson Grass Valley, das Produkt ohne zusätzlichen
Kostenaufwand für den Kunden zu reparieren oder zu ersetzen, vorausgesetzt
das Produkt wurde nicht falsch verwendet, missbraucht oder mittels nicht
von Thomson Grass Valley genehmigter Änderungen modizier t und /oder
repariert. Für die Anerkennung Ihrer Gewährleistung ist ein Kaufnachweis
erforderlich.
Thomson Grass Valley übernimmt keine Haftung für entgangene Gewinne,
entgangene Einspar ungen oder andere zufällige oder Folgeschäden, die
sich aus der Nutzung oder der Unmöglichkeit der Nutzung dieses Produkts
ergeben. Dazu zählen Sachschäden und, soweit gesetzlich z ulässig,
Schadenersatz bei Personenschäden. Die Gewährleistung gilt anstelle jeder
anderen Gewährleistung für Handelsüblichkeit und Eignung f ür einen
bestimmten Zweck.
Section
1
Page 88

DEUTSCH
HDSPARK/HDTHUNDER - Installationshandbuch
DEUTSCH
Section 1 - Vor der Verwendung
GEFAHR
Die folgenden Bedingungen weisen auf potenzielle Gefahren ernsthafter
Körperverletzung oder Lebensgefahr hin.
Gesundheitsvorsorge
In seltenen Fällen können blinkende Lichter oder die Stimulierung von
dem hellen Licht einer Computeranzeige oder eines TV-Bildschirms
vorübergehende epileptische Anf älle oder den Verlust des Bewusstseins
auslösen. Es wird angenommen, dass selbst Personen, die nie solche
Symptome gezeigt haben, davon betroffen sein können. Wenn nahe
Verwandte diese Symptome gezeigt haben, sollten Sie vor der Nutzung dieses
Produkts einen Arzt befragen.
In Umgebungen mit hohen Anforderungen bezüglich
Zuverlässigkeit und Sicherheit nicht verwenden
Dieses Produkt ist nicht für die Verwendung in medizinischen Geräten oder
lebenserhaltenden Systemen vorgesehen. Die Eigenschaften dieses Produkts
sind für die Verwendung in solchen Systemen nicht geeignet.
Schutz gegen elektrostatische Auadung
Eine elektrostatische Entladung kann zu Schäden an Komponenten dieses
Produkts f ühren. Vermeiden Sie die direkte Berührung der Anschlüsse und
Komponentenoberächen.
Elektrostatische Au adu ng kann in Verbindung mit Kleidung und Personen
auftreten. Sorgen Sie vor dem Arbeiten mit dem Produkt dafür, dass eine
statische Entladung von Ihrem Körper stattndet, indem Sie eine geerdete
Metalloberäche berühren.
Nicht disassemblieren
Entfernen Sie nicht die Abdeckung und modizieren Sie das Produkt
nicht. Dies könnte zu Feuer, Elektroschock oder Betriebsstörung führen.
Für interne Inspektions- oder Reparaturzwecke setzen Sie sich mit Ihrem
Systemintegrator oder direkt mit Thomson Grass Valley in Verbindung.
WARNUNG
Die folgenden Bedingungen weisen auf potenzielle Gefahren von
Körperverletzung, Schäden an der Hardware oder Verlust von Daten hin.
Nicht in Umgebungen unter Hitzeeinuss
aufstellen
Stellen Sie das Produkt nicht an Orten auf, die direktem Sonnenlicht oder
dem Einuss einer Heizquelle ausgesetzt sind. Dies kann zu Hitzestau und
damit zu Brand, Feuer oder anderen Schäden f ühren. Es kann auch passieren,
dass sich das Gerät deformier t oder Farbänderungen am Gerät auftreten.
Page 89

DEUTSCH
DEUTSCH
HDSPARK/HDTHUNDER - Installationshandbuch
Aufstellung nur entsprechend der beschriebenen
Methode
Stellen Sie das Produkt nicht auf eine andere als die beschriebene Weise auf.
Verwenden Sie das Produkt nicht, wenn es in Stoff oder Plastik eingewickelt
ist.
Dies kann zu Hitzestau und damit zu Brand, Feuer oder anderen Schäden
führen.
Hinweis
<HDSPARK>
Dieses Gerät wurde geprüft und hält die Grenzwer te für digitale Geräte
der Klasse B entsprechend Teil 15 der FCC-Vorschriften ein. Diese
Grenzwerte bieten einen ausreichenden Schutz gegen Interferenzen
bei Installation in Wohnbereichen. Das Gerät erzeugt und verwendet
hochfrequente Schwingu ngen und kann sie ausstrahlen. Wenn es nicht
gemäß den Anweisungen des Herstellers installiert und betrieben wird,
können schädliche Störungen im Radio- und Fernsehempfang auftreten. In
Ausnahmefällen können bestimmte Installationen aber dennoch Störungen
verursachen. Sollte der Radio- oder Fernsehempfang beeinträchtigt sein, was
durch Ein- und Ausschalten des Geräts festgestellt werden kann, empehlt
sich die Behebung der Störung durch eine oder meh rere der folgenden
Maßnahmen:
Richten Sie die Empfangsantenne neu aus.
Vergrößer n Sie den Abstand zwischen Gerät und Empfänger.
Stecken Sie den Netzstecker des Geräts in eine andere Steckdose, sodass
Gerät und Empfänger an verschiedene Stromkreise angeschlossen sind.
Bitten Sie Ihren Händler oder einen erfahrenen Radio- oder Fernsehtechniker
um Hilfe.
Dieses Gerät wurde zertiziert u nd hält die Grenzwerte f ür digitale Geräte
der Klasse B entsprechend der FCC-Vorschriften ein. Zur Einhaltung der
FCC-Bestimmungen müssen abgeschirmte Kabel verwendet werden. Der
Betrieb mit nicht genehmigter Ausrüst ung oder nicht abgeschirmten Kabeln
kann leicht zur Beeinträchtigung des Radio- und Fer nsehempfangs führen.
Der Benutzer wird davor gewarnt, Änderungen und Modizierungen am
Gerät oh ne vorherige Genehmigung des Herstellers durchzuführen. Die
Berechtigung zum Betrieb dieses Geräts durch den Benutzer kann hierdurch
nichtig werden.
Dieses Gerät erfüllt Teil 15 der FCC-Vorschriften. Der Betrieb unterliegt den
folgenden beiden Bedingungen: (1)Dieses Gerät darf keine Störstrahlung
verursachen und (2) dieses Gerät muss jede einwirkende Störung tolerieren,
einschließlich solcher Störungen, die Fehlfunktionen verursachen können.
Hinweise und Garantien
Dieses Gerät der Klasse B entspricht der kanadischen Norm ICES-003.
Page 90

DEUTSCH
HDSPARK/HDTHUNDER - Installationshandbuch
DEUTSCH
Section 1 - Vor der Verwendung
<HDTHUNDER>
Dieses Gerät wurde getestet und es wurde festgestellt, dass dieses Gerät die
Grenzwerte eines Digitalgerätes der Klasse A, gemäß Teil 15 der FCCRegeln, einhält. Diese Grenzwer te wurden entwickelt, um einen sinnvollen
Schutz gegen schädliche Störungen zu bieten, wenn das Gerät in einer
gewerblichen Umgebung eingesetzt wird. Dieses Gerät erzeugt und
verwendet Hochfrequenzenergie und kann diese ausstrahlen u nd
kann bei unsachgemäßer Installation und Verwendung nicht gemäß
der Bedienungsanleitung möglicherweise schädliche Störungen von
Funkverbindungen verursachen. Der Betrieb dieses Geräts in einer
Wohnumgebung verursacht wahrscheinlich schädliche Störungen, wobei
der Benutzer die Störungen auf eigene Kosten beheben muss.
Dieses Gerät der Klasse A entspricht der kanadischen Norm ICES-003.
Konformitätserklärung
Gemäß Teil 15 der FCC-Vorschriften
Name der verantwortlichen Partei: Grass Valley, Inc
Anschrift: 400 Providence Mine Road,
Nevada City, CA 95959 (USA)
Telefon: 530-478-3000
Page 91

DEUTSCH
DEUTSCH
HDSPARK/HDTHUNDER - Installationshandbuch
Betriebsumgebung
Das Funktionieren von EDIUS wird nicht
Hinweise
PC
CPU: Intel Pentium 4 mit, Xeon, Core Duo oder höher
CPU mit Unterstützung für SSE2-Anweisungen ist für das Funktionieren
*
von EDIUS erforderlich.
EDIUS erfüllt die Bedingungen für die Multiprozessor- und die Hyper-
*
Threading-Technologie.
PCI-Bus
Die nachstehenden PCI-Steckplätze sind erforderlich:
HDSPARK:
HDTHUNDER:
Arbeitsspeicher
Mindestens 1 GB Arbeitsspeicher erforderlich; 2 GB oder mehr empfohlen
Festplattenlaufwerk
800 MB oder mehr freier Festplattenspeicher ist erforderlich für die
Softwareinstallation.
Laufwerk mit ATA 100/7200 rpm oder schneller ist notwendig zum Speichern
von Videos.
RAID 0 wird für die Bearbeitung mit H D-Auösung empfohlen.
*
Graken
Ein Grakprozessor, der Direct 3D 9.0c oder höher oder PixelShader Model
3.0 oder höher unterstützt, ist erforderlich.
Einige DirectDraw-Overlayfunktionen können nicht verwendet werden.
*
Bei der Verwendung von GPUfx ist ein Videospeicher von 256 MB oder
*
mehr für HD-Projekte bzw. von 128 MB oder mehr für SD-Projekte
erforderlich.
Soundsystem
Unterstütz ung für WDM-Treiber ist erforderlich.
Optisches Laufwerk
Für die Software-Installation ist ein DVD-ROM-Laufwerk erforderlich.
Zur Speicherung auf einer Blu-ray oder DVD-Disc ist ein entsprechendes
*
Laufwerk erforderlich.
•
notwendigerweise garantiert, auch nicht in
Umgebungen, die alle nachstehend aufgeführten
Bedingungen erfüllen.
PCI Express x1
PCI Express x4 (PCI Express Spec. Revision 1.1 oder höher) x1
Hinweise und Garantien
(PCI Express Spec. Revision 1.0
oder höher
) x1
Page 92

DEUTSCH
HDSPARK/HDTHUNDER - Installationshandbuch
DEUTSCH
Section 1 - Vor der Verwendung
Betriebssystem
Windows Vista SP1 oder höher (32 Bit/64 Bit)
Windows XP SP3 oder höher
USB-Anschluss
Ein USB-Anschluss ist erforderlich (USB 1.1 oder höher, zur Verwendung des
USB-Schlüssels)
Verschiedenes
Verfügbarkeit von Internet-Zugriff und E-Mail-Adresse erforderlich
Diese werden zur Aktivierung, Benutzerregistrierung, Aktualisier ung von
*
Software und zum Erhalt von Support benötigt.
Einschränkungen
Es folgen Nutzungseinschränkungen zu diesem Produkt. Die neuesten
Informationen nden Sie in der Readme-Datei auf der DVD-ROM für die
Installation.
Stand-by-Modus
Stellen Sie den Stand-by-Modus für den Bildschirmschoner und die
Stromversorgung des Monitors auf "AUS", während Sie dieses Produkt verwenden.
Support
Kundensupport
Bei Fragen bezüglich der Hardwareeinrichtung und -verwendung setzen Sie
sich mit dem Thomson Grass Valley-Büro, -Vertrieb oder -Geschäft, in dem
Sie das Produkt erworben haben, in Verbindung.
Website
Die neusten Unternehmensinformationen, auch zu EDIUS, nden Sie auf
unserer Website: http://desktop.grassvalley.com/
Die neuesten Treiberdienstprogramme, Produkthandbücher, FAQs usw.
stehen auf unserer Website zur Verf ügung.
Online-Benutzerregistrierung
Sie können Ihre EDIUS-Version hier registrieren.
http://desktop.grassvalley.com/support/
Page 93

DEUTSCH
DEUTSCH
HDSPARK/HDTHUNDER - Installationshandbuch
Section
Einrichten der Hardware
Einsetzen der Hauptplatine
Stellen Sie vor dem Einsetzen der Platine sicher, dass der
Arbeitsbereich staubfrei und trocken ist. Halten Sie einen Philips
Kreuzschlitzschraubendreher und eine leeres Gefäß für die entfernten
Schrauben bereit. Stellen Sie außerdem sicher, dass Ihr Computer
ausgeschaltet ist und die Kabel (einschließlich Stromkabel) vom Computer
getrennt sind.
Die Produktkomponenten können je nach erworbenem Produkt
*
unterschiedlich sein.
INFO
Informationen zum Steckplatztyp PCI (PCI Express) nden Sie im
Handbuch zu Ihrem Computer oder Motherboard.
Der Steckplatz zum Einsetzen von HDSPARK/ HDTHUNDER
hängt vom erworbenen Produkt ab.
Informationen zum Steckplatztyp PCI nden Sie im Handbuch zu
Ihrem Computer oder Motherboard.
<HDSPARK>
- Setzen Sie die Hauptplatine (HSX-E1) in den normalen PCI
Express (PCI Express x1) ein.
- Wenn der PCI-Express-x1-Steckplatz nicht verfügbar ist,
können stattdessen die Steckplätze PCI Express x4, x8 oder
x16 verwendet werden.
<HDTHUNDER>
- Setzen Sie die Hauptplatine (HTX-E1) in den PCI-Express-
Steckplatz (PCI EXpress x4) ein.
- Wenn der PCI-Express-x4-Steckplatz nicht verfügbar ist,
können stattdessen die Steckplätze PCI Express x8 oder x16
verwendet werden.
2
Page 94

DEUTSCH
HDSPARK/HDTHUNDER - Installationshandbuch
DEUTSCH
A
udiokabel (4-Pin auf 4-Pin)
Section 2 - Einrichten der Hardware
1 Setzen Sie die Hauptplatine fest in den PCI-(PCI
Express)-Steckplatz ein.
Die Hauptplatine sollte ohne Kraftanwendung in den PCI-
•
INFO
Audioausgabe (nur HDTHUNDER)
Spezikationen für das Audiokabel (4-Pin auf 4-Pin):
Rot : Rechter Kanal (R)
Weiß : Linker Kanal (L)
Schwarz : Erde (G)
Steckplatz (PCI-Express-Steckplatz) eingesetzt werden. Wenn
die Platine nicht vollständig eingesetzt werden kann, wenden
Sie keine Gewalt an und verbiegen Sie die Platine nicht.
Verwenden Sie für die Audioausgabe das beiliegende Audiokabel (4-Pin auf
4-Pin) und verbinden Sie damit das für die Ausgabe vorgesehene Audiogerät
und die Hauptplatine.
* Das beiliegende Audiokabel (4-Pin auf 4-Pin) verfügt über zusätzliche
Anschlüsse unterschiedlichen Typs und verschiedener Belegung. Schließen
Sie das unverzweigte Ende an die Hauptplatine und das verzweigte Ende an
das vorgesehene Audiogerät an. Verwenden Sie dafür einen Stecker, der in
Typ und Belegung dem A nschluss des anzuschließenden Geräts entspricht.
Wenn Sie das beiliegende Audiokabel (4-Pin auf 4-Pin) nicht verwenden
können, müssen Sie selbst ein passendes Kabel vorbereiten.
Page 95

DEUTSCH
DEUTSCH
HDSPARK/HDTHUNDER - Installationshandbuch
Einsetzen der Hauptplatine
Ausgabe vom Audiogerät auf der Platine
Verbinden Sie das Audiokabel mit dem Anschluss am Motherboard.
Beachten Sie, dass das Audiogerät auf der Platine (auf dem Motherboard
*
eingebautes Audiogerät: Genaueres dazu nden Sie im Handbuch zu
Computer oder Motherboard) sich, je nach Anschlussposition des Geräts,
möglicherweise störend auf die im Steckplatz eingebaute Platine auswirkt.
Ausgabe von der Audioplatine
Verbinden Sie das Audiokabel mit dem Anschluss an der Audioplatine.
Page 96

DEUTSCH
HDSPARK/HDTHUNDER - Installationshandbuch
0
DEUTSCH
[2][1]
[5][4][3][2][1]
Section 2 - Einrichten der Hardware
Bauteilbezeichnungen
HDSPARK-Hauptplatine (HSX-E1) Rückseite
[1] Analog-Audio-Ausgang (AUDIO OUT)
[2] HDM I-Ausgang (HDMI OUT)
HDTHUNDER-Hauptplatine (HTX-E1) Rückseite
[1] HDMI- Miniausgang (HDMI OUT)
[2] SDI -Ausgang (SDI OUT)
[3] Referenzeingang (REF IN)
[4] SDI- Eingang (SDI IN)
[5] Remote-Anschluss (REMOTE)
Page 97

DEUTSCH
DEUTSCH
HDSPARK/HDTHUNDER - Installationshandbuch
Section
3
Installation und
Deinstallation der Software
Installieren von EDIUS
In diesem Abschnitt wird die Installation von EDIUS sowohl unter Windows
Vista wie auch Windows XP erläuter t.
Wenn Sie nach dem Einbau der Platine den PC neu
Hinweise
•
starten, erscheint die Meldung "Neue Hardware
gefunden"(in Windows XP der Assistent für das
Suchen neuer Hardware ). Klicken Sie hier auf
"Abbrechen".
Beenden Sie vor der Installation alle möglicherweise
•
noch aktiven Anwendungen, die in der Taskleiste
angezeigt werden.
Zur Installation muss Windows mit
•
Administratorrechten ausgeführt werden.
Sie müssen sich gegebenenfalls mit
•
Administratorrechten am System anmelden, um die
Installation auszuführen.
Wenn Sie die Videoout Plug-ins verwenden wollen,
•
installieren Sie zuerst das Produkt, für welches Sie das
Plug-in verwenden wollen.
Die zu installierende Anwendung kann sich von Modell
•
zu Modell unterscheiden.
INFO
erfüllt sein.
- Direct3D 9.0c oder höher, PixelShader 3.0 oder höher
- SD: Mindestens 128 MB erforderlich; 256 MB oder mehr
empfohlen
- HD: Mindestens 256 MB erforderlich; 512 MB oder mehr
empfohlen
Für GPUfx-Übergänge müssen folgende Voraussetzungen
•
1 Legen Sie die Produkt-DVD ins DVD-ROM-Laufwerk
ein.
Sollte die Anwendung nicht automatisch starten, öffnen Sie die Produkt-DVD
und doppelklicken Sie auf "SetupManagerForEDIUS.exe".
Page 98

DEUTSCH
HDSPARK/HDTHUNDER - Installationshandbuch
DEUTSCH
Section 3 - Installation und Deinstallation der Software
2 Klicken Sie auf "Install".
Das Dialogfeld des InstallShield-Assistenten wird angezeigt.
Wenn bereits eine ältere Version von EDIUS installiert
•
INFO
ist, deinstallieren Sie diese entsprechend den
Bildschirmanweisungen und starten Sie den PC neu.
3 Klicken Sie auf "Weiter".
Windows Vista Windows X P
4 Klicken Sie auf "Ja", um die Lizenzvereinbarung zu
bestätigen.
Windows Vista Windows X P
Um die Vereinbarung abzulehnen, klicken Sie auf "Nein".
•
INFO
Hinweise
Wenn Sie der Lizenzvereinbarung nicht zustimmen, können
Sie das Produkt nicht verwenden.
Lesen Sie die allgemeinen Geschäftsbedingungen
•
genau durch, indem Sie bis zum Ende durch den Text
scrollen.
Page 99

DEUTSCH
DEUTSCH
HDSPARK/HDTHUNDER - Installationshandbuch
Installieren von EDIUS
5 Geben Sie den Benutzernamen, den Firmennamen
und die Seriennummer ein und klicken Sie
anschließend auf "Weiter".
Windows Vista Windows X P
Geben Sie die 6- bis 16-stellige Seriennummer ein, die sich auf
•
INFO
der Verpackung der EDIUS 5-Produkt-DVD bendet.
Beachten Sie, dass bei Verlust der Seriennummer kein Ersatz
•
geleistet werden kann. Bewahren Sie die Nummer sicher auf.
6 Geben Sie den Installationsordner für EDIUS ein und
klicken Sie auf "Weiter".
Um einen anderen Installationsordner zu wählen, klicken Sie auf
"Durchsuchen" und wählen Sie den entsprechenden Ordner aus.
Windows Vista Windows X P
Page 100

DEUTSCH
HDSPARK/HDTHUNDER - Installationshandbuch
DEUTSCH
Section 3 - Installation und Deinstallation der Software
7 Markieren Sie die zu installierenden Komponenten
und klicken Sie auf "Weiter".
Für HDSPARK muss "HSX-E1" ausgewählt werden.
Für HDTHUNDER muss "HTX-E1" ausgewählt werden.
Windows Vista Windows X P
8 Markieren Sie die Option zum Erstellen einer
Desktopverknüpfung und klicken Sie auf "Weiter".
Windows Vista Windows X P
 Loading...