

Page 1

GV STRATUS
Media Workflow Application Framework
User Manual
Software Version 3.1
071-8813- 08
2014 02 21
Page 2

Page 3
GV STRATUS
Media Workflow Application Framework
User Manual
Software Version 3.1
071-8813- 08
2014 02 21
Page 4
Page 5

Contents
Overview of the GV STRATUS application.................................................................................................11
About the GV STRATUS product............................................................................................................11
Logging on..............................................................................................................................................12
About the GV STRATUS application.......................................................................................................13
About customizing the application workspace........................................................................................14
Arranging control tray buttons.................................................................................................................14
Viewing the application window in full screen.........................................................................................15
The Navigator panel...............................................................................................................................15
The Asset List panel...............................................................................................................................17
Asset List panel buttons......................................................................................................................18
The Inspector panel................................................................................................................................18
About GV STRATUS tools......................................................................................................................20
The Send Message tool..........................................................................................................................21
The Web Monitor....................................................................................................................................22
The Dashboard tool................................................................................................................................23
Previewing a live streaming video...........................................................................................................25
Quick Start Screencasts.............................................................................................................................27
Creating a Channel Panel workspace.....................................................................................................27
Ingesting assets using the Channel Panel tool.......................................................................................32
Editing for production using the Storyboard Editor tool..........................................................................36
Editing for production using EDIUS and STRATUS................................................................................41
Managing assets........................................................................................................................................49
Using the Explore section.......................................................................................................................49
About the GV STRATUS Assets view.....................................................................................................49
Browsing assets......................................................................................................................................50
Asset indicators......................................................................................................................................50
Adding a favorite ....................................................................................................................................51
Removing or deleting a favorite..............................................................................................................52
Managing Asset Lists..............................................................................................................................52
About view modes...............................................................................................................................52
Customizing the display of list items...................................................................................................53
Sorting a list view................................................................................................................................54
Adding and removing columns in a list................................................................................................55
Opening multiple Asset List panels.....................................................................................................56
To compare multiple Asset List panels ...............................................................................................56
Managing multiple tabs in a panel.......................................................................................................56
Locking an asset using Inspector........................................................................................................56
Locking multiple assets in Asset List...................................................................................................57
Filtering assets....................................................................................................................................57
Deleting assets....................................................................................................................................57
Searching assets....................................................................................................................................59
About searches...................................................................................................................................59
Searching assets with the Simple Search tool....................................................................................59
About advanced query syntax, advanced searches and custom expressions....................................60
Searching assets with the advanced search tool................................................................................62
Determining the location of a search result asset...............................................................................63
Search constraints and considerations...............................................................................................64
Stopping a search or stopping refreshing a bin...................................................................................65
Saving searches .................................................................................................................................65
Using a saved search..........................................................................................................................65
Creating bins and groups........................................................................................................................66
2014 02 21 GV STRATUS User Manual 5
Page 6

Contents
Asset copies and deletions.....................................................................................................................66
Viewing a video asset.............................................................................................................................68
Viewing a video asset in full screen....................................................................................................68
Restoring viewer to normal size..........................................................................................................68
Sending video asset to the next display monitor.....................................................................................69
Access to multiple GV STRATUS sites...................................................................................................69
Configuring Source User Preference..................................................................................................70
Adding or modifying metadata................................................................................................................72
Printing asset metadata..........................................................................................................................73
Using custom metadata in Inspector......................................................................................................73
Reordering properties in Inspector.........................................................................................................74
Viewing relationships..............................................................................................................................75
Viewing the properties of an item...........................................................................................................75
Verifying proxy association.....................................................................................................................76
Regenerating proxy.................................................................................................................................77
Ingesting assets.........................................................................................................................................79
The Scheduler tool..................................................................................................................................79
Scheduler buttons...............................................................................................................................80
About view modes...............................................................................................................................81
Event status colors..............................................................................................................................83
Adding an event..................................................................................................................................84
Adding an event using Quick Schedule...............................................................................................86
Adding a recurring event.....................................................................................................................87
Adding a backup event .......................................................................................................................89
Adding a channel reservation..............................................................................................................90
Starting a crash record event..............................................................................................................91
Locating an event................................................................................................................................91
Modifying an event..............................................................................................................................92
Viewing and modifying metadata of events.........................................................................................94
Extending an event..............................................................................................................................95
Moving an event..................................................................................................................................96
Deleting an event................................................................................................................................96
Deleting a recurring event...................................................................................................................97
Previewing an event............................................................................................................................97
Creating a template.............................................................................................................................98
The RMI tool.........................................................................................................................................101
RMI format specifications..................................................................................................................102
RMI buttons.......................................................................................................................................103
Configuring RMI User Preferences...................................................................................................103
Accessing media...............................................................................................................................104
Adding media....................................................................................................................................105
Adding a media ID.............................................................................................................................106
Previewing a clip...............................................................................................................................106
Editing clip properties........................................................................................................................107
Linking clip to a placeholder .............................................................................................................109
Merging clips into group....................................................................................................................111
Trimming a clip..................................................................................................................................112
Importing clips...................................................................................................................................112
Working with K2 channels........................................................................................................................115
The Channel Panel tool........................................................................................................................115
Channel Panel buttons......................................................................................................................116
Configuring Channel Panel User Preferences......................................................................................117
Creating a Channel Panel.....................................................................................................................119
Launching and closing a Channel Panel...............................................................................................121
Modifying a Channel Panel while in use...............................................................................................123
Resizing channels and gangs...............................................................................................................124
6 GV STRATUS User Manual 2014 02 21
Page 7

Contents
Modifying a Channel Panel configuration.............................................................................................124
Copying a Channel Panel configuration................................................................................................125
About recording clips in a Channel Panel.............................................................................................125
Recording on a single channel using crash record...........................................................................125
Recording on a single channel using new clip..................................................................................126
Recording on ganged channels using crash record..........................................................................126
Recording on ganged channels using new clip.................................................................................127
Recording on an individual channel in a gang using crash record....................................................129
Recording on an individual channel in a gang using new clip...........................................................130
Recording on ChannelFlex channels................................................................................................131
About playing clips in a Channel Panel.................................................................................................131
Loading an asset for playback in a Channel Panel...........................................................................132
Playing a clip on a single channel.....................................................................................................133
Playing clips on ganged channels.....................................................................................................134
Playing ganged clips on a single channel.........................................................................................134
Playing a clip on a single channel in loop play..................................................................................135
Playing ganged channels in loop play...............................................................................................135
Controlling an individual channel in a gang..........................................................................................136
Locating a loaded clip or playlist...........................................................................................................137
About salvos.........................................................................................................................................137
Creating a salvo................................................................................................................................138
Loading a salvo.................................................................................................................................138
Deleting a salvo.................................................................................................................................138
Modifying a salvo..............................................................................................................................139
Configure router settings in Channel Panel..........................................................................................139
The Playlist Editor tool..........................................................................................................................140
Editor Panel buttons..........................................................................................................................140
About playlists and sequences..........................................................................................................141
Creating a playlist .............................................................................................................................142
Opening a Playlist ............................................................................................................................144
Loading a playlist into the Playlist Editor ..........................................................................................144
Rearranging or deleting events in a playlist.......................................................................................144
Splitting an event...............................................................................................................................144
About keyboard shortcuts and input focus in a Channel Panel............................................................145
Modifying the clip name in a Channel Panel.........................................................................................145
Loading an asset into the Inspector from a Channel Panel..................................................................145
Using the scrub bar to navigate through a clip.....................................................................................145
Identifying and selecting the timecode type..........................................................................................146
Selecting timecode type to navigate and mark clips.............................................................................147
Channel panel markers.........................................................................................................................147
Hiding transport controls.......................................................................................................................148
Managing Channel Panel configurations..............................................................................................148
Channel status indicators.....................................................................................................................148
Reconnecting to a K2 system...............................................................................................................149
Importing, Exporting, and Transferring.....................................................................................................151
About importing, exporting, and transferring.........................................................................................151
Creating an export share......................................................................................................................151
Importing files to a Grass Valley system ..............................................................................................151
Exporting assets from a K2 Summit system ........................................................................................152
Transferring assets from one bin to another.........................................................................................152
Transferring using Send Destination.....................................................................................................153
Sending assets for playout....................................................................................................................154
Monitoring imports, exports, or transfers..............................................................................................156
Conforming a complex asset to a simple clip........................................................................................156
About archiving assets..........................................................................................................................158
Archiving an asset.............................................................................................................................158
Searching archived assets................................................................................................................159
2014 02 21 GV STRATUS User Manual 7
Page 8

Contents
About restoring assets..........................................................................................................................160
Restoring archived assets.................................................................................................................161
Partially restoring an asset................................................................................................................162
Editing......................................................................................................................................................165
The Storyboard Editor tool....................................................................................................................165
Opening a Storyboard ......................................................................................................................165
Using the Audio Overlay....................................................................................................................166
The Source Viewer...............................................................................................................................166
Viewer buttons...................................................................................................................................167
Using Source Viewer.........................................................................................................................168
J, K, L keyboard shortcuts for transport control.................................................................................169
Using mouse wheel for transport control...........................................................................................169
Using mark-in and mark-out points.......................................................................................................169
Create a subclip....................................................................................................................................170
Trimming a clip in Inspector..................................................................................................................171
Adding keywords...................................................................................................................................171
Adding markers.....................................................................................................................................172
Navigating to keywords or markers in an asset....................................................................................173
The Storyboard.....................................................................................................................................173
Storyboard buttons............................................................................................................................174
Adding markers to a playlist..............................................................................................................174
The Sequence Viewer...........................................................................................................................175
Sequence Viewer buttons..................................................................................................................176
Creating a sequence ............................................................................................................................177
Editing an event....................................................................................................................................177
Splitting an event..................................................................................................................................177
Using a keyword to add an event to a sequence..................................................................................178
Adding and removing transitions..........................................................................................................178
Rearranging or deleting events in a sequence.....................................................................................178
Playing a sequence..............................................................................................................................179
Launching a sequence in the EDIUS XS application............................................................................179
Viewing the properties of an item.........................................................................................................181
Using the GV STRATUS application in EDIUS XS...............................................................................181
Logging on to the GV STRATUS application in EDIUS XS...............................................................182
Opening the GV STRATUS panel in EDIUS XS................................................................................184
Opening GV STRATUS assets in EDIUS XS application..................................................................184
Viewing GV STRATUS assets in EDIUS XS.....................................................................................185
Adding GV STRATUS assets to EDIUS XS timeline.........................................................................187
Sending EDIUS XS sequences to the K2 system.............................................................................187
Using EDIUS XRE Monitor................................................................................................................189
Using the GV STRATUS application in Adobe® Premiere® Pro...........................................................190
Setting up K2 storage for Adobe Premiere Pro.................................................................................191
Setting up GV STRATUS in Adobe Premiere Pro.............................................................................191
Launching the GV STRATUS plug-in................................................................................................192
Navigating assets..............................................................................................................................194
Searching assets...............................................................................................................................195
Modifying asset metadata.................................................................................................................196
Importing GV STRATUS assets........................................................................................................196
Logging assets.........................................................................................................................................199
The Advanced Logging tool..................................................................................................................199
Logging Tool button...........................................................................................................................201
The Button Panel..................................................................................................................................201
Button Panel buttons.........................................................................................................................201
The Log Panel.......................................................................................................................................201
Adding a Logging Tool..........................................................................................................................203
Adding Button Panels...........................................................................................................................206
8 GV STRATUS User Manual 2014 02 21
Page 9

Contents
Adding logging buttons to a Button Panel.............................................................................................208
Adding blank logging buttons to a Button Panel...................................................................................211
Adding markers using logging buttons..................................................................................................212
Using a keyword or marker to add an event to a sequence..................................................................214
Modifying Logging Tools and Button Panels.........................................................................................214
Modifying logging buttons of the Button Panel......................................................................................215
Deleting logging buttons from a Button Panel.......................................................................................215
Pinning logging buttons .......................................................................................................................215
Changing Advanced Logging user preferences....................................................................................217
Viewing keywords and markers ...........................................................................................................218
Viewing logging history of markers ......................................................................................................222
Importing keywords configuration.........................................................................................................223
Using the Assignment List........................................................................................................................225
The Assignment List tool......................................................................................................................225
Assignment List buttons....................................................................................................................226
Story status colors................................................................................................................................226
Changing ALP User Preferences..........................................................................................................227
Adding placeholders.............................................................................................................................232
Modifying a placeholder........................................................................................................................234
Deleting a placeholder..........................................................................................................................234
Adding a new sequence.......................................................................................................................235
Checking missing clips.........................................................................................................................236
Viewing placeholder properties ............................................................................................................237
Viewing and modifying metadata of placeholders................................................................................237
Creating a new sequence in the EDIUS XS application.......................................................................239
Using the GV STRATUS application in a Newsroom Computer System .............................................241
About Newsroom Basic.....................................................................................................................241
Using GV STRATUS with ENPS ......................................................................................................241
Using GV STRATUS with iNEWS.....................................................................................................246
Using GV STRATUS with Octopus ...................................................................................................248
Using GV STRATUS with OpenMedia..............................................................................................252
Using the GV STRATUS application in Aurora Playout.........................................................................255
Inserting placeholders from GV STRATUS.......................................................................................256
Linking clips automatically from GV STRATUS.................................................................................256
Integrating assets with traffic system and K2 Edge..................................................................................257
Integration with traffic system and playout automation.........................................................................257
The Segmentation tool..........................................................................................................................257
Segmentation Tool button..................................................................................................................258
Adding a Segmentation panel...........................................................................................................259
Assigning segments to assets...........................................................................................................260
Renaming a segment........................................................................................................................261
Deleting a segment...........................................................................................................................261
Deleting a Segmentation Panel.........................................................................................................261
The House Number List panel..............................................................................................................261
Linking asset to a house number......................................................................................................262
Configuring the GV STRATUS application...............................................................................................265
Configuring User Preference................................................................................................................265
Installing a GV STRATUS language pack.............................................................................................266
Customizing the application workspace................................................................................................267
About customizing the application workspace..................................................................................267
Showing a panel................................................................................................................................267
Hiding a panel...................................................................................................................................269
Undocking a panel............................................................................................................................270
Docking a panel................................................................................................................................270
Saving an application workspace......................................................................................................271
Copying an application workspace....................................................................................................272
2014 02 21 GV STRATUS User Manual 9
Page 10

Contents
Opening a closed panel....................................................................................................................272
Loading an application window workspace.......................................................................................273
Reordering an application workspace...............................................................................................273
Deleting an application workspace....................................................................................................273
Troubleshooting the GV STRATUS application........................................................................................275
About application status........................................................................................................................275
Viewing and copying version and status information............................................................................276
If you have trouble launching EDIUS XS..............................................................................................277
Troubleshooting tips..............................................................................................................................278
Keyboard shortcuts..................................................................................................................................279
Inspector keyboard shortcuts................................................................................................................279
Channel Panel keyboard shortcuts.......................................................................................................280
Playlist Editor keyboard shortcuts.........................................................................................................281
Scheduler keyboard shortcuts..............................................................................................................282
Segmentation keyboard shortcuts........................................................................................................282
Sequence Viewer keyboard shortcuts..................................................................................................282
Source Viewer keyboard shortcuts.......................................................................................................283
Storyboard keyboard shortcuts.............................................................................................................285
All keyboard shortcuts..........................................................................................................................286
Specifications...........................................................................................................................................291
System requirements for GV STRATUS client PC ...............................................................................291
K2 system specifications......................................................................................................................292
Video codec description K2 Summit/Solo ........................................................................................292
Playout of multiple formats................................................................................................................296
Internationalization............................................................................................................................297
Limitations for creating and naming assets and bins........................................................................298
Formats supported for import and export..........................................................................................300
Trademarks and Agreements...................................................................................................................307
Trademarks...........................................................................................................................................307
JPEG acknowledgment.........................................................................................................................307
Glossary...................................................................................................................................................309
10 GV STRATUS User Manual 2014 02 21
Page 11
Overview of the GV STRATUS application
About the GV STRATUS product
The GV STRATUS™Media Workow Application Framework is the next generation of Grass
Valley application software, designed for the entertainment, on-air operations, and news markets.
GV STRATUS includes a powerful asset management solution and all the tools to help you produce
your content from all ingests needs, preparation, editing, review and approval, playout and of course,
archiving. GV STRATUS uses a common Service Oriented Architecture, to provide a modular, high
performance, and highly congurable user experience and does away with the old concept of separate,
individual tools which can be hard to congure, and even harder to use. GV STRATUS is built with
modules that are added as services to assemble your workspace into an environment tailored
specically to your needs, in an almost innite number of combinations. This means you have a
virtually unlimited and fully integrated tool-set at your command. GV STRATUS is format and
resolution independent. Proxies are generated on the y for any video coming into the system and
are fully available to all the users within seconds.
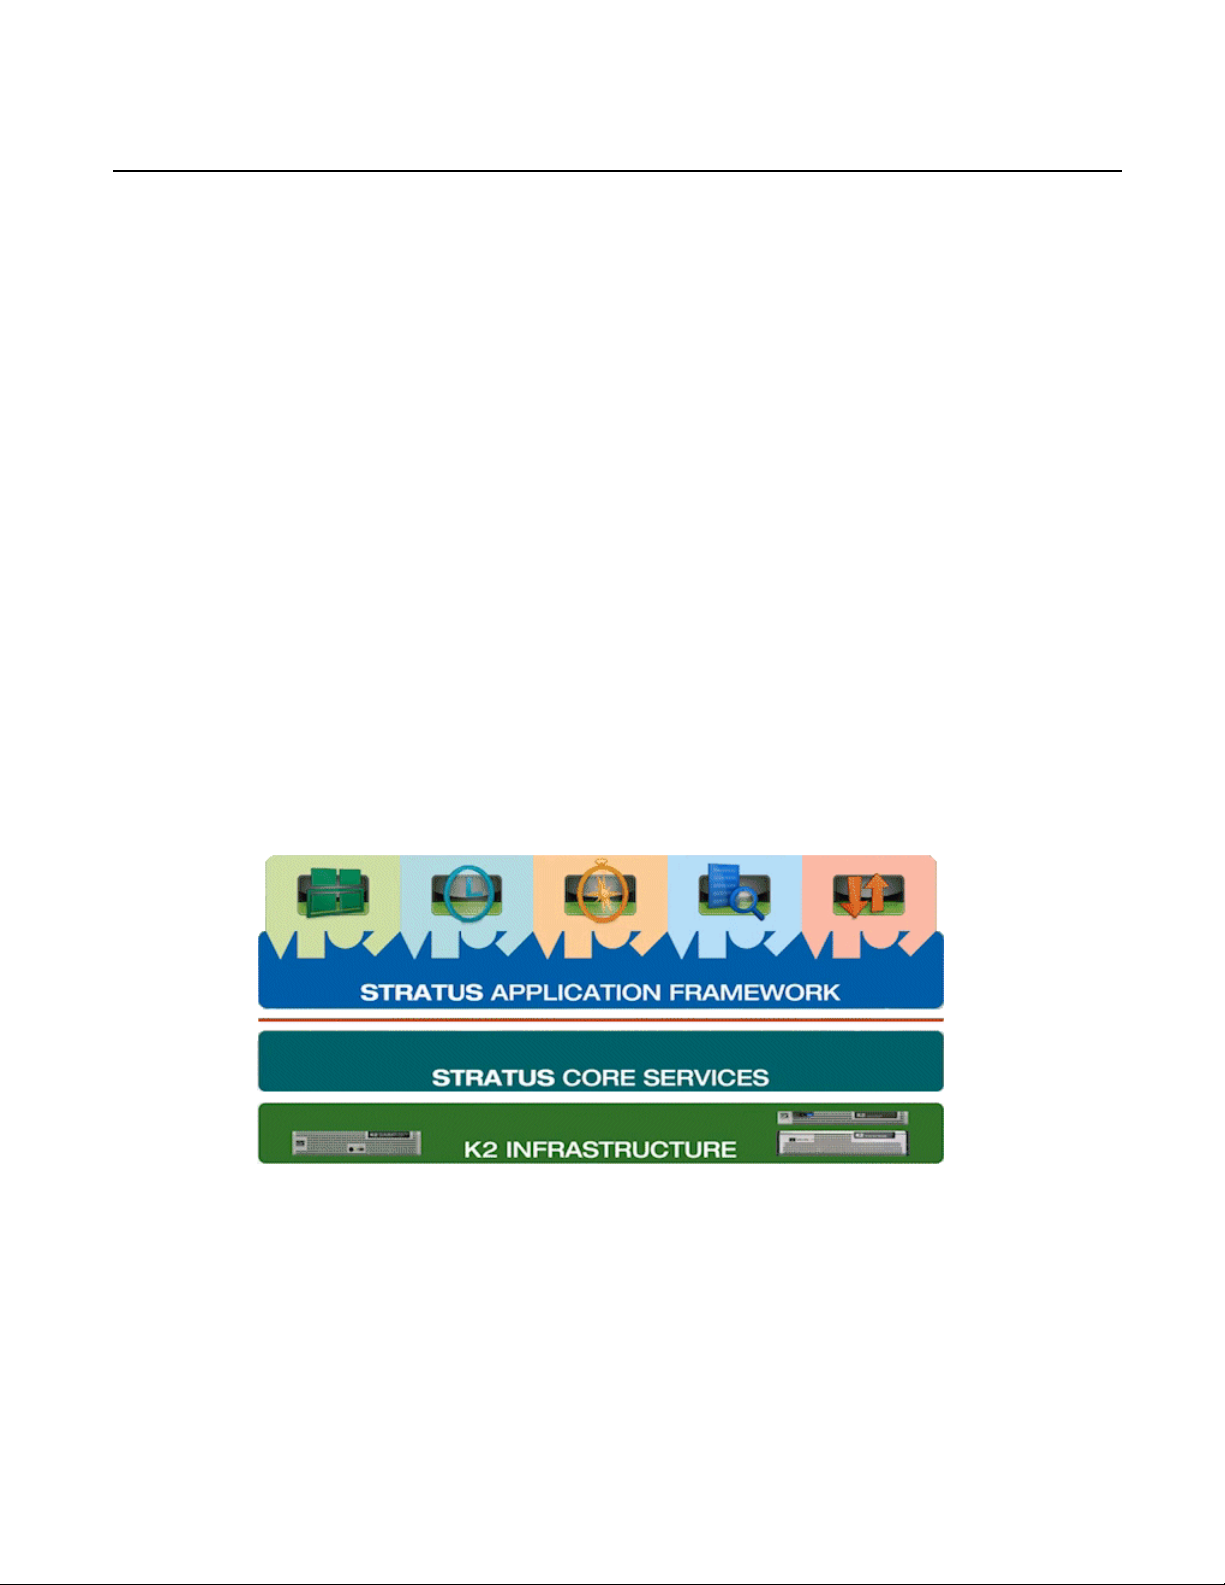
The GV STRATUS product includes the GV STRATUS Application Framework and the GV
STRATUS Core Services. These layers provide you with access to the K2 Infrastructure to support
your workow requirements.
The GV STRATUS Application Framework includes the following:
• The GV STRATUS application — This is the primary application for using GV STRATUS tools
for your media workow. It is documented in this document.
• The GV STRATUS Control Panel application — The GV STRATUS application that provides
central conguration of the software components of the GV STRATUS system. It is documented
in "GV STRATUS Installation and Service Manual".
• The GV Event Viewer — This is the application that displays detailed information about
signicant events on your GV STRATUS server, which is very useful when troubleshooting
problems and errors. It is documented in "GV STRATUS Installation and Service Manual".
2014 02 21 GV STRATUS User Manual 11
Page 12
Overview of the GV STRATUS application
These applications run on standard networked PCs.
The GV STRATUS Core Services include software components that run as services on one or more
GV STRATUS Core servers. They are documented in "GV STRATUS Installation and Service
Manual".
The K2 Infrastructure includes the devices and software that make up a K2 Summit system at version
8.0 and higher. Depending on the system necessary to support your workow requirements, this
can include K2 clients, servers, RAID storage devices, and network switches. They are documented
in "GV STRATUS Installation and Service Manual" and "K2 SAN Installation and Service Manual".
Logging on
When you log on, the GV STRATUS application assigns GV STRATUS licenses and roles based
on your user account credentials, as set by the system administrator in the GV STRATUS Control
Panel application. Your credentials must also give you access to all your K2 systems.
1. From the Windows desktop, do one of the following:
• Open the GV STRATUS icon shortcut.
• Click Start | Programs | Grass Valley and click the STRATUS icon.
A Log On dialog box opens.
2. Enter your username.
If you use domain credentials, enter in format <domain>\<username>. For example, if your
domain is "gv" and your username is "GVuser", enter gv\GVuser.
3. Enter your password.
4. Verify that the application is correctly referencing the Control Panel Services Host as follows:
a) If not already showing, click the Options button to show settings.
b) Verify or enter the hostname, not IP address of the GV STRATUS server with the SiteCong
role of GV STRATUS Control Panel Service. This is the Control Panel Services Host. In
most systems this is the main GV STRATUS Core server.
5. Click Log On.
The GV STRATUS application opens.
Features are enabled according to the roles associated with your log on credentials.
When you log on to the application, the settings you make on one PC are available on other PCs
when using the same user credentials, including the following:
• Settings from the User Preferences dialog box
• Workspaces
• Channel Panel congurations and Salvos
• Searches
12 GV STRATUS User Manual 2014 02 21
Page 13
About the GV STRATUS application
The GV STRATUS application allows you to manage assets and K2 channels for digital video
production workows. The GV STRATUS application runs on a networked Windows operating
system computer.
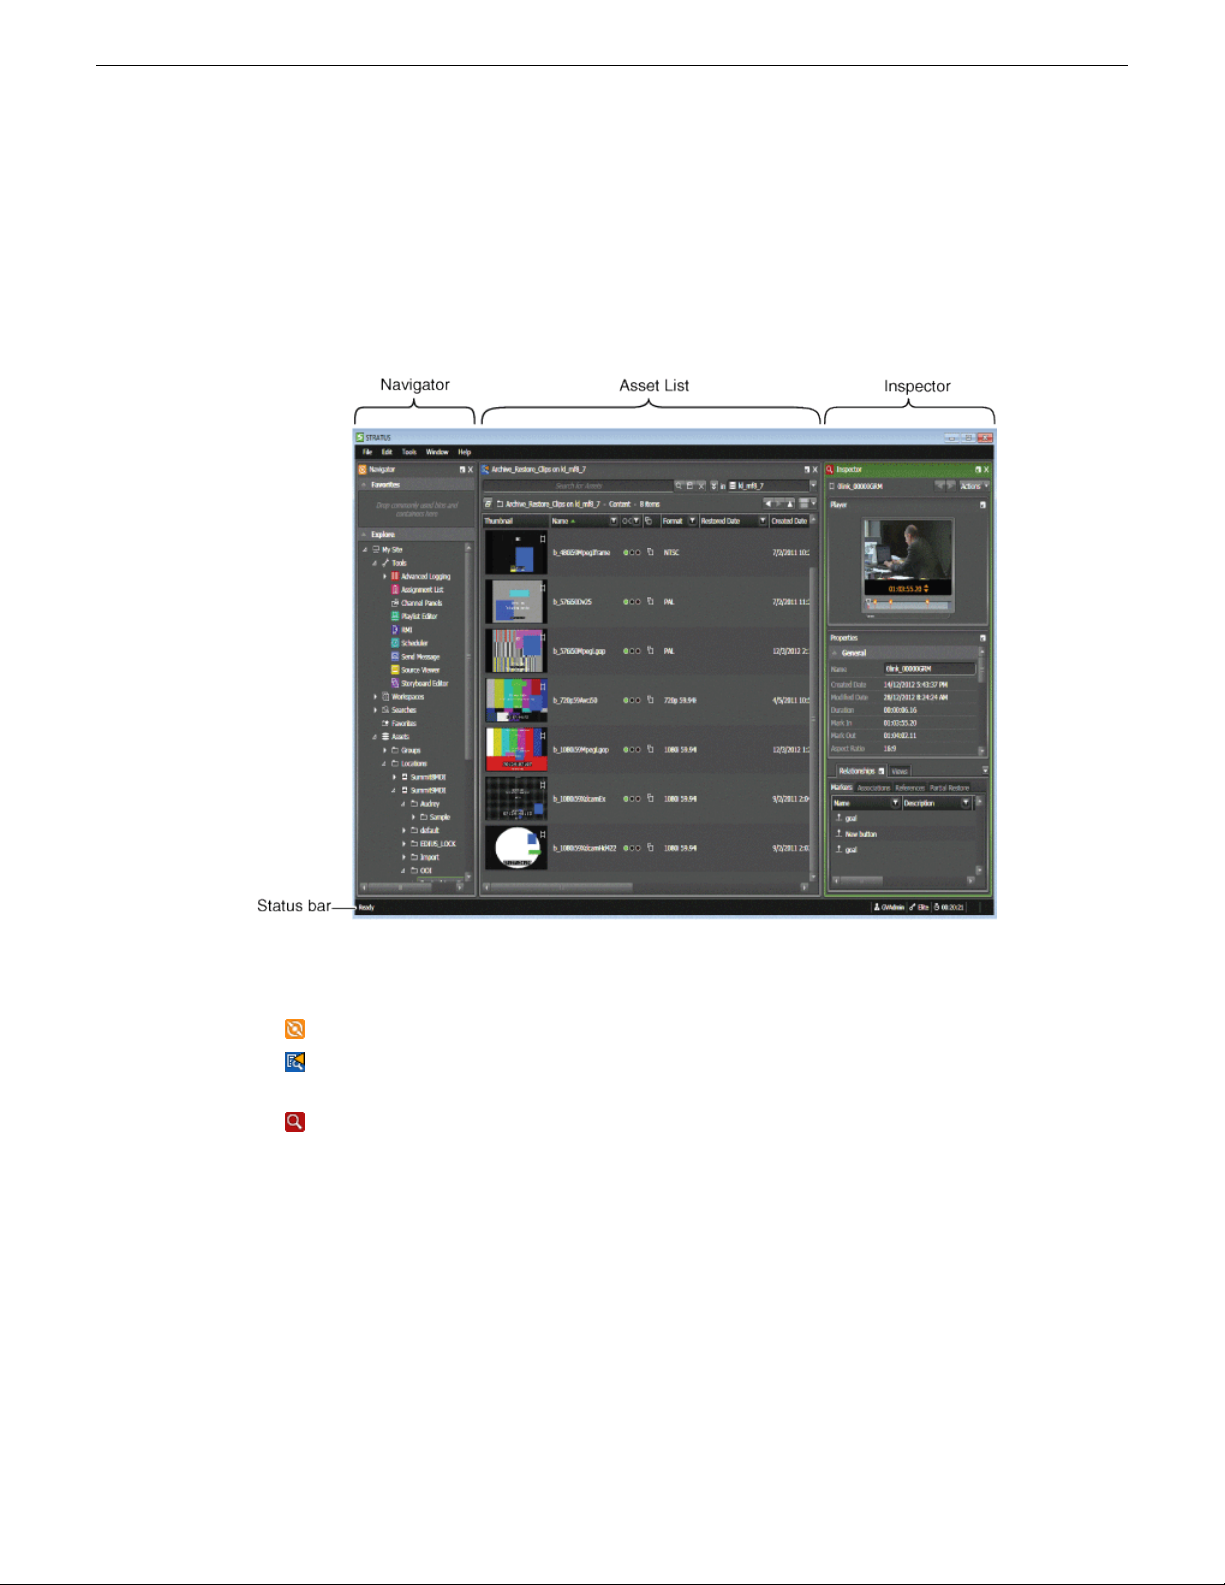
Overview of the GV STRATUS application
The GV STRATUS application provides the following panels for use in most workows:
Navigator: The panel that contains the tree-view.
Asset List: The panel that displays the list for the item currently selected in the Navigator
panel or the search results.
Inspector: The panel that displays details of the asset currently loaded.
The Status bar reports application status and displays status indicators.
In addition, the GV STRATUS application provides tools designed for specic workows. You
can arrange the panels and tools of the GV STRATUS application to create a customized workspace.
Available tools and devices within the GV STRATUS application are according to assigned role
and licensing. For example, the Newsroom Basic license limits the panels and tools in the application.
Related Topics
About application status on page 275
Customizing the application workspace on page 267
Arranging control tray buttons on page 14
About Newsroom Basic on page 241
2014 02 21 GV STRATUS User Manual 13
Page 14
Overview of the GV STRATUS application
About customizing the application workspace
You can rearrange the panels of the application to best suit your workow needs.
Features for customizing the workspace are as follows:
• Undock panels and move them to another location within the application window, within another
panel, or to their own location on the Windows desktop.
• Hide panels so that they show only as a tab.
• Close panels.
• Resize panels.
• Save an arrangement of docked and undocked panels as a uniquely named workspace.
• Load a workspace to automatically arrange panels.
Related Topics
Customizing the application workspace on page 267
Arranging control tray buttons
Viewers and players have a control tray that provides access to buttons. As you resize a panel smaller
and the buttons do not all t in the control tray, the buttons overow onto a drop-down menu. You
can congure buttons to show and to overow as the panel is resized.
1. To show/hide the control tray, click the Show/Hide Control Tray button.
14 GV STRATUS User Manual 2014 02 21
Page 15

Overview of the GV STRATUS application
2. Click the drop-down arrow on the far right of the control tray.
The overow menu displays hidden buttons.
3. Click Add/Remove.
A menu of buttons opens.
4. Select the buttons to display.
5. If desired, select Reset Toolbar to return the buttons to their default display.
Your button conguration is saved with your GV STRATUS user preferences and propagated as
follows:
• When you select buttons to display in a Channel Panel, all channels of the same type
(player/recorder or recorder-only) and view mode size in that Channel Panel display your selection
of buttons. Similarly, all gangs of the same type (containing at least one player/recorder or all
recorder-only) display your selection of buttons.
• When you select buttons to display in a Playlist Editor, any channel in the Playlist Editor displays
your selection of buttons.
Viewing the application window in full screen
The following applies to the GV STRATUS application and the GV STRATUS Control Panel
application.
Click Window | Full Screen. ( CTL + ALT + 0)
The application window expands and displays without the Windows titlebar.
The Navigator panel
The Navigator panel functions as the starting point for workows using the GV STRATUS
application. For most of the items in the Navigator, if you select the item it is displayed in the active
Asset List panel.
2014 02 21 GV STRATUS User Manual 15
Page 16
Overview of the GV STRATUS application
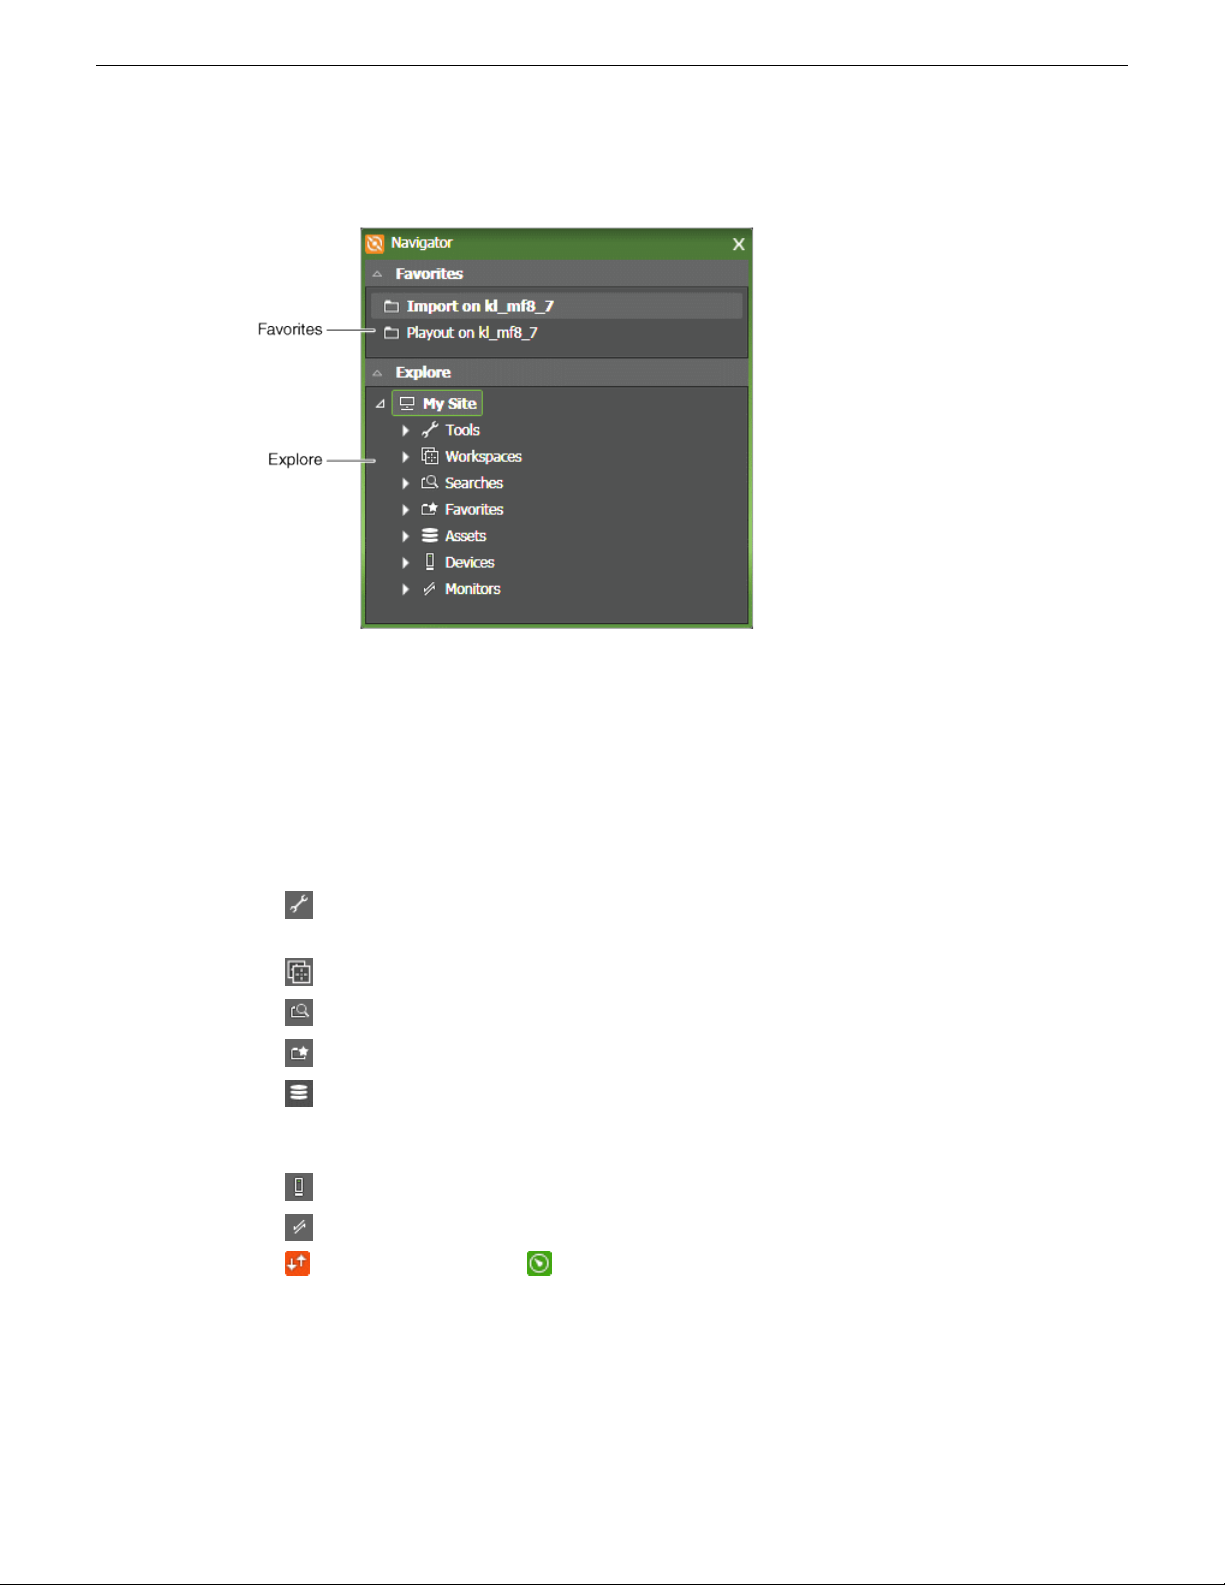
The Navigator panel contains the following sections:
• Favorites — A list of shortcuts to bins, searches, and mapped drives.
• Explore — A tree-based hierarchy with which you can browse your system.
From the Explore section, you can access the following:
Tools: Expands to display the tools that support the various workows available in the
STRATUS application.
Workspaces: Expands to display default and saved workspaces.
Searches: Expands to display searches that can be reused and shared.
Favorites: Expands to display a list of favorites.
Assets: Expands to display a view of groups and assets based on the information available
in the STRATUS database. Any assets can be grouped together, regardless of their actual location
in K2 system storage.
Devices: Expands to display the devices that the STRATUS application accesses or controls.
Monitors: Expands to display tools for monitoring transfers and web pages. The Jobs icon
and the Dashboard icon appear here.
The Navigator panel displays all items under the node for your local site.
16 GV STRATUS User Manual 2014 02 21
Page 17
If you have remote sites congured in your system, the Navigator panel displays nodes for those
sites. Only the Assets node is displayed under remote sites. Asset indicators identify assets on remote
sites.
Related Topics
About the GV STRATUS Assets view on page 49
Asset indicators on page 50
The Asset List panel
The Asset List panel displays the contents of the item selected in the Navigator panel, such as a tool,
bin, or search. Each time you select an item in the Navigator panel, an updated view of its contents
is displayed. The Asset List panel typically appears on the middle of the GV STRATUS application
window.
Overview of the GV STRATUS application
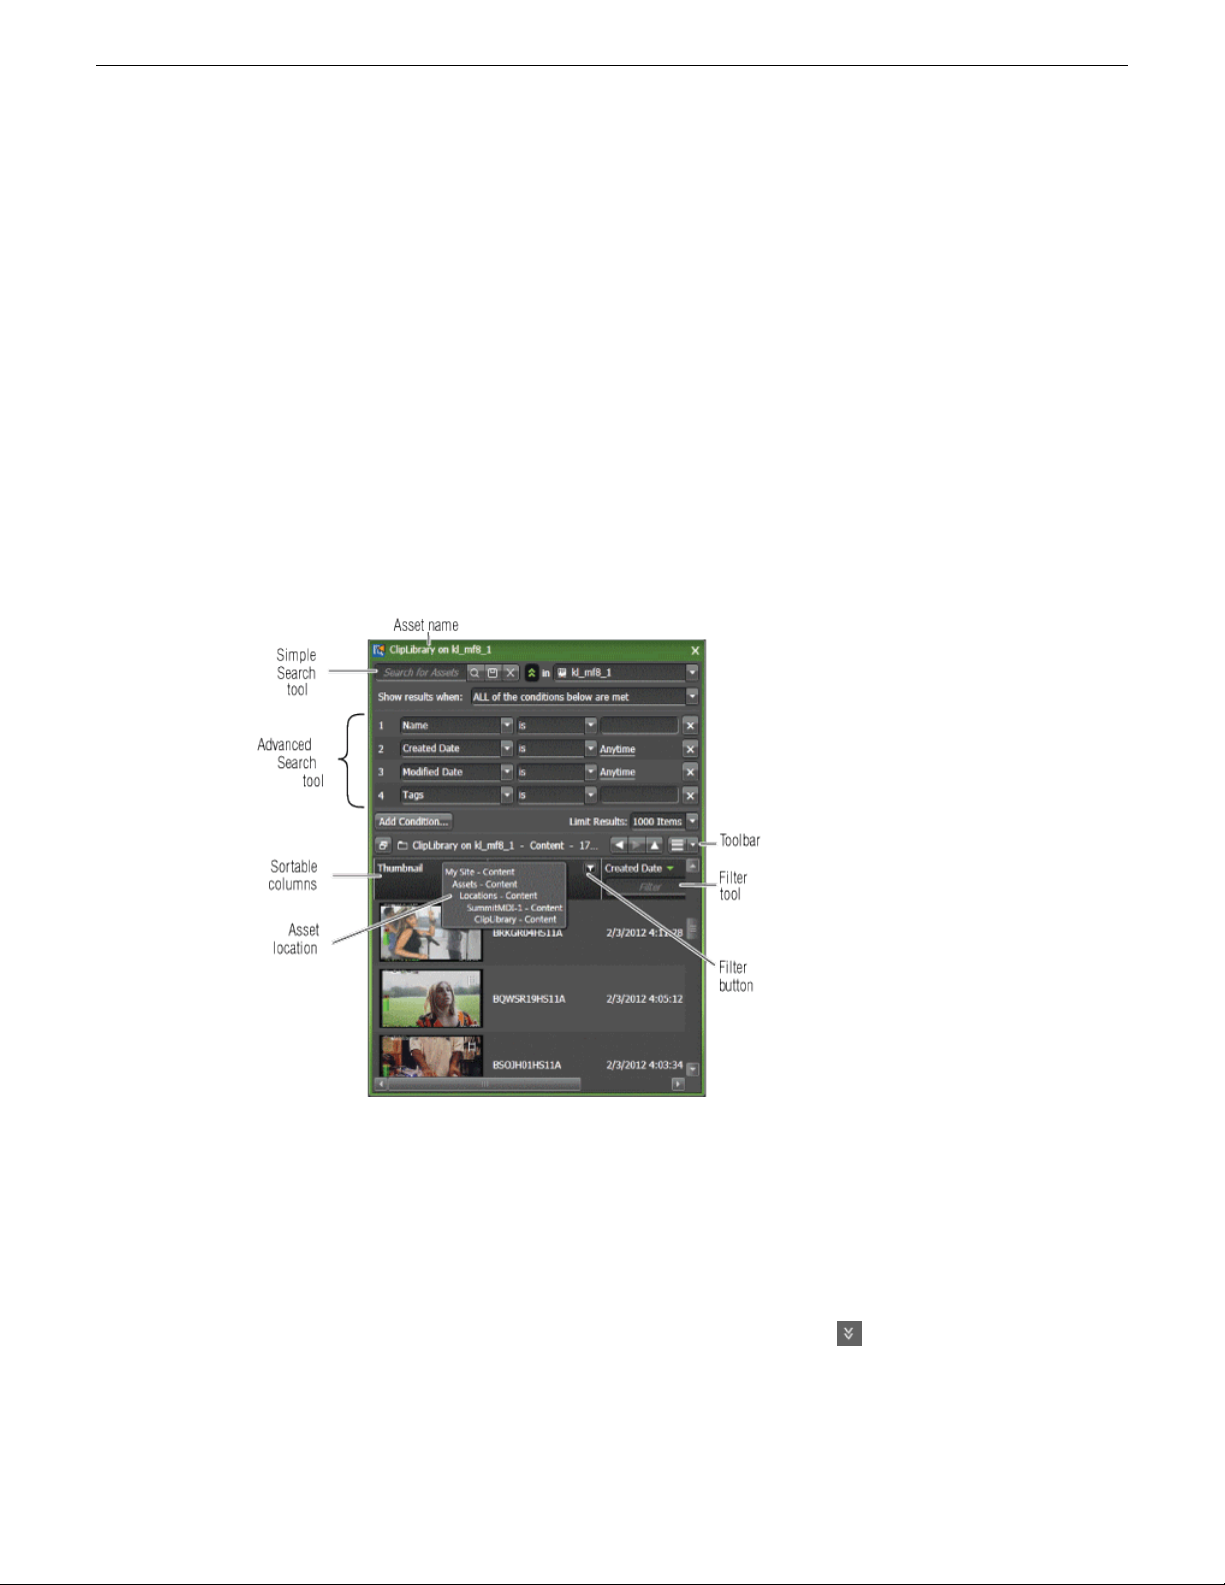
The Asset List panel features are as follows:
• Asset name — The name of the item that has its contents displayed in the Asset List panel. The
asset name is displayed in the title bar and in the toolbar.
• Simple Search tool — Searches on asset names, asset Descriptions, asset Tags, asset Comments,
and custom Text elds.
• Advanced Search tool — Searches on asset metadata and other properties. The Advanced Search
tool opens when you click the Advanced Search Toggle button.
• Sortable columns — Sorts the list when you click the column head.
• Asset location — Displays the location of the asset, relative to the Navigator hierarchy, when
you hover over the asset name in the toolbar.
• Toolbar — Provides buttons for navigating and displaying asset lists.
2014 02 21 GV STRATUS User Manual 17
Page 18
Overview of the GV STRATUS application
• Filter tool — Filters the list based on criteria you enter. The Filter tool opens when you click the
Enable Filter button.
You can open multiple Asset List panels and compare them side by side. Only one Asset List panel
is active at a time. The active panel dynamically updates when you select an item in the Navigator
panel. You can click on a panel to make it the active Asset List panel.
Related Topics
About searches on page 59
Customizing the display of list items on page 53
Asset List panel buttons
These buttons located on the Asset List panel toolbar let you perform various functions:
Start Search: Initiates a search for the specied items.
Save Search: Saves this search for future use.
Delete: Deletes the selected item or items. Disabled if delete rights denied in GV STRATUS
Control Panel.
Advanced Search Toggle: Toggles display of the advanced search parameters for the current
provider
Navigate Asset Lists: Goes to previous, to next, and up.
Open New Panel: Opens a new panel.
View Mode: Controls the display and size of the items in a list or panel.
Enable Filter: Enables the list to be ltered by the values in the column.
The Inspector panel
The Inspector panel allows you to mark up, manage, and view detailed information for an asset.
The Inspector panel typically appears on the right side of the GV STRATUS application window.
18 GV STRATUS User Manual 2014 02 21
Page 19
Overview of the GV STRATUS application
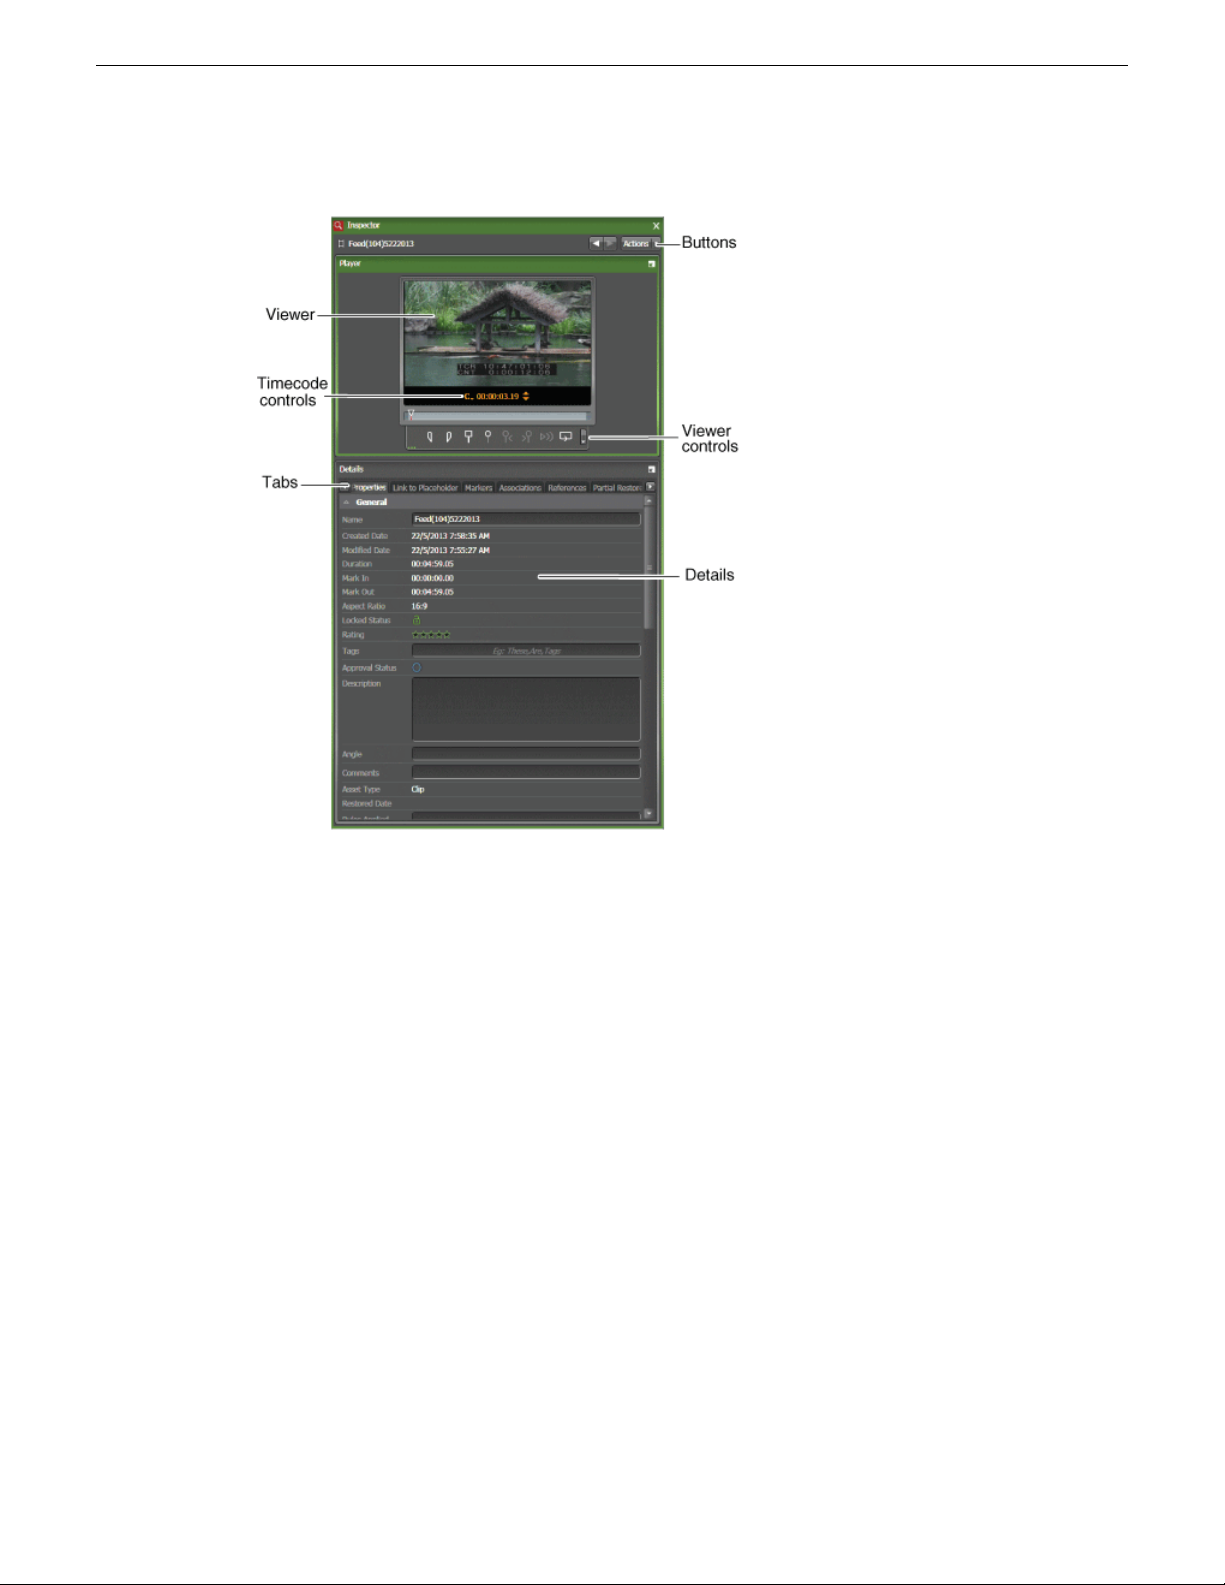
The Inspector panel features are as follows:
• Viewer — Allows you to view and mark up an asset. You can show and hide viewer controls to
accommodate resizing the Inspector panel.
• Buttons — Provides a menu of actions for managing the asset and navigation buttons to view
previous/next objects.
• Viewer controls — Allows you to mark up the asset.
• Timecode Controls — Allows you to select the mark in/out and other timecode types to display.
Also lets you navigate through the clip to a specic timecode.
• Details — Provides tabs for viewing properties, metadata, placeholders, markers, and relationships.
On some tabs you can make changes, such as modifying metadata, linking assets to placeholders,
and setting recurring events. Standard Asset List features, such as sortable columns, are available
on tabs with a list display.
The features in the Inspector panel can change dynamically, depending on the tool that launches the
Inspector panel, the roles assigned, and the type of asset that is displayed. The Viewer controls are
the same as those in the Source Viewer.
Related Topics
Viewer buttons on page 167
Using the Audio Overlay on page 166
Identifying and selecting the timecode type on page 146
2014 02 21 GV STRATUS User Manual 19
Page 20
Overview of the GV STRATUS application
About GV STRATUS tools
The GV STRATUS application contains the following tools. You can nd the tools in the Navigator
panel under the Tools node.
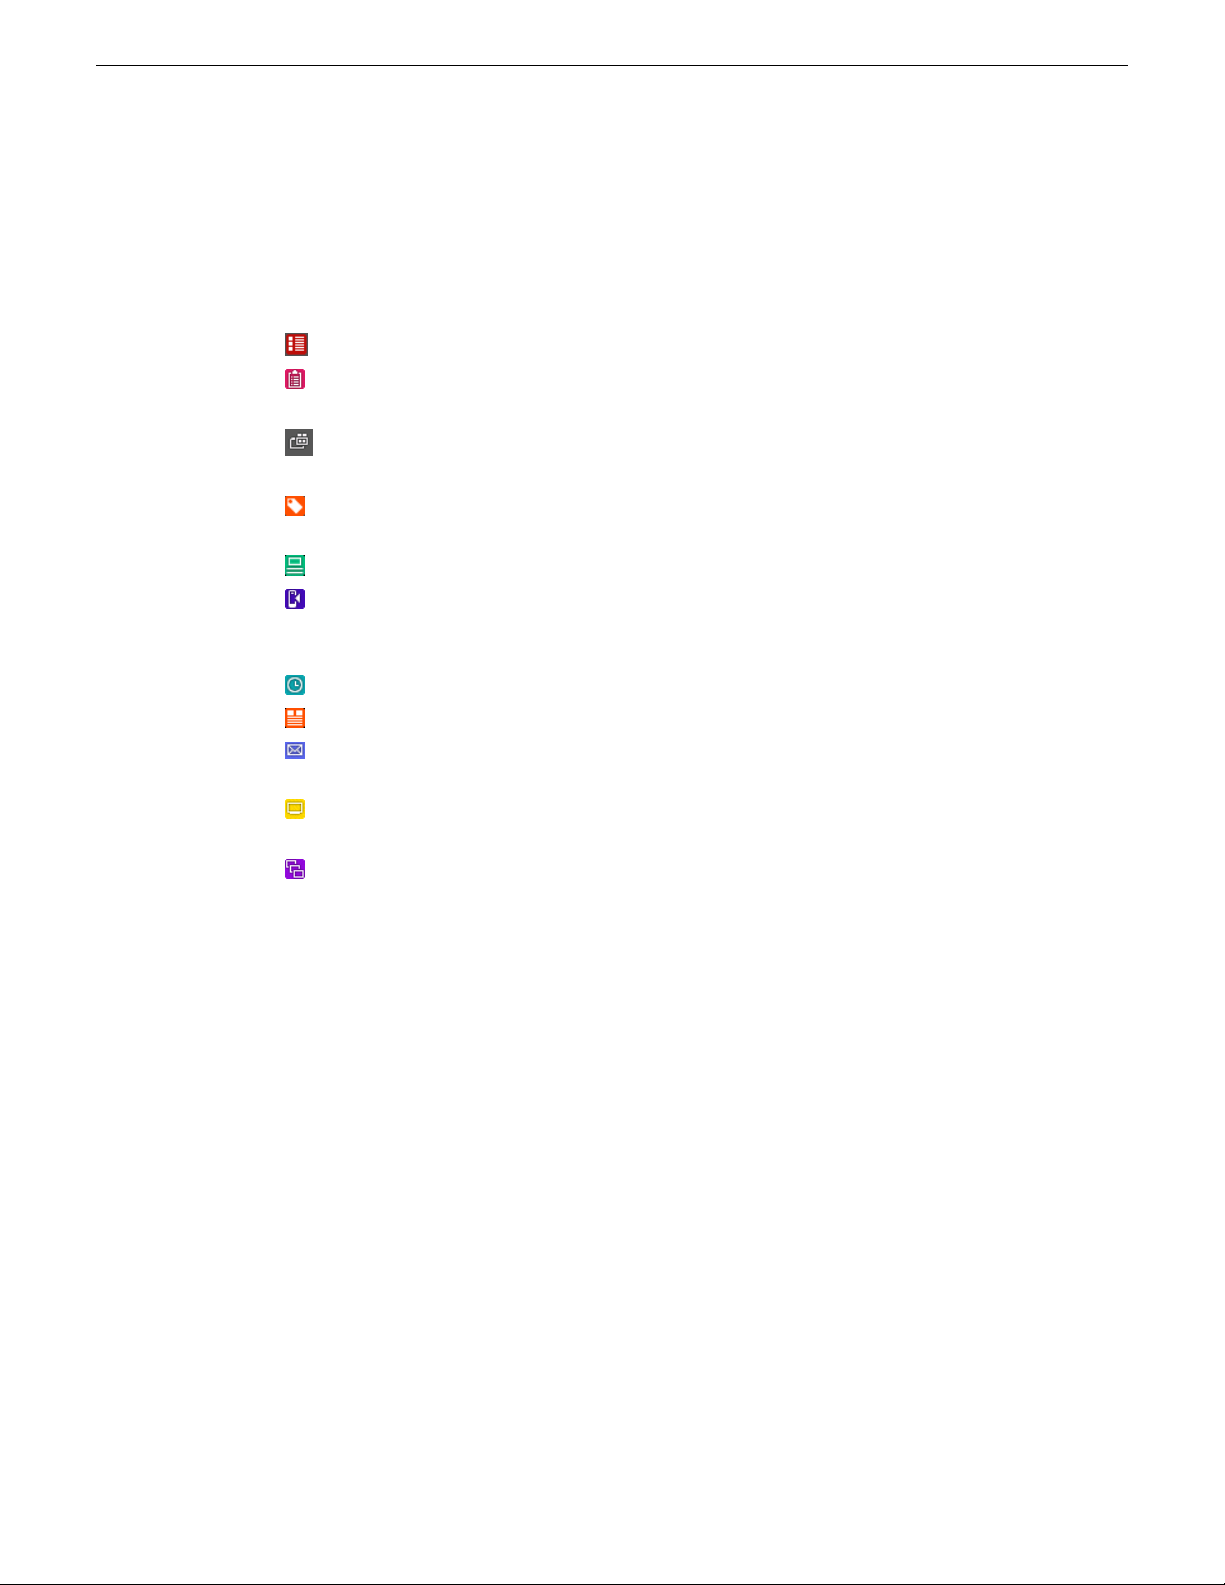
Advanced Logging: The tool that creates and customizes logging of assets.
Assignment List: The tool that creates placeholders for clips and coordinates with rundown
stories on the Newsroom Computer System and with Aurora Playout.
Channel Panel : The tool that includes channels and channel gangs for controlling one or
more K2 channels.
House Number: The panel that populates the house number list and links assets to house
numbers from the trafc system.
Playlist Editor: The tool that creates and modies playlists. This tool uses a K2 channel.
RMI: RMI is the acronym for Removable Media Interface. It is the tool that populates and
ingests les from multiple removable media devices such as P2 and XDCAM. RMI tool is for
iSCSI GV STRATUS app clients only.
Scheduler: The tool that schedules events to be recorded.
Segmentation: The tool that creates segments from assets.
Send Message: The tool that sends and receives messages and attachments between users
logged on to GV STRATUS applications.
Source Viewer: The tool that plays assets and provides controls for adding markers, keywords,
and other features.
Storyboard Editor: The tool that creates and modies sequences. This tool does not use a K2
channel.
Related Topics
The Advanced Logging tool on page 199
The Assignment List tool on page 225
The Channel Panel tool on page 115
The House Number List panel on page 261
The RMI tool on page 101
The Playlist Editor tool on page 140
The Scheduler tool on page 79
The Segmentation tool on page 257
The Source Viewer on page 166
The Storyboard Editor tool on page 165
The Send Message tool on page 21
The Director tool
20 GV STRATUS User Manual 2014 02 21
Page 21
The Send Message tool
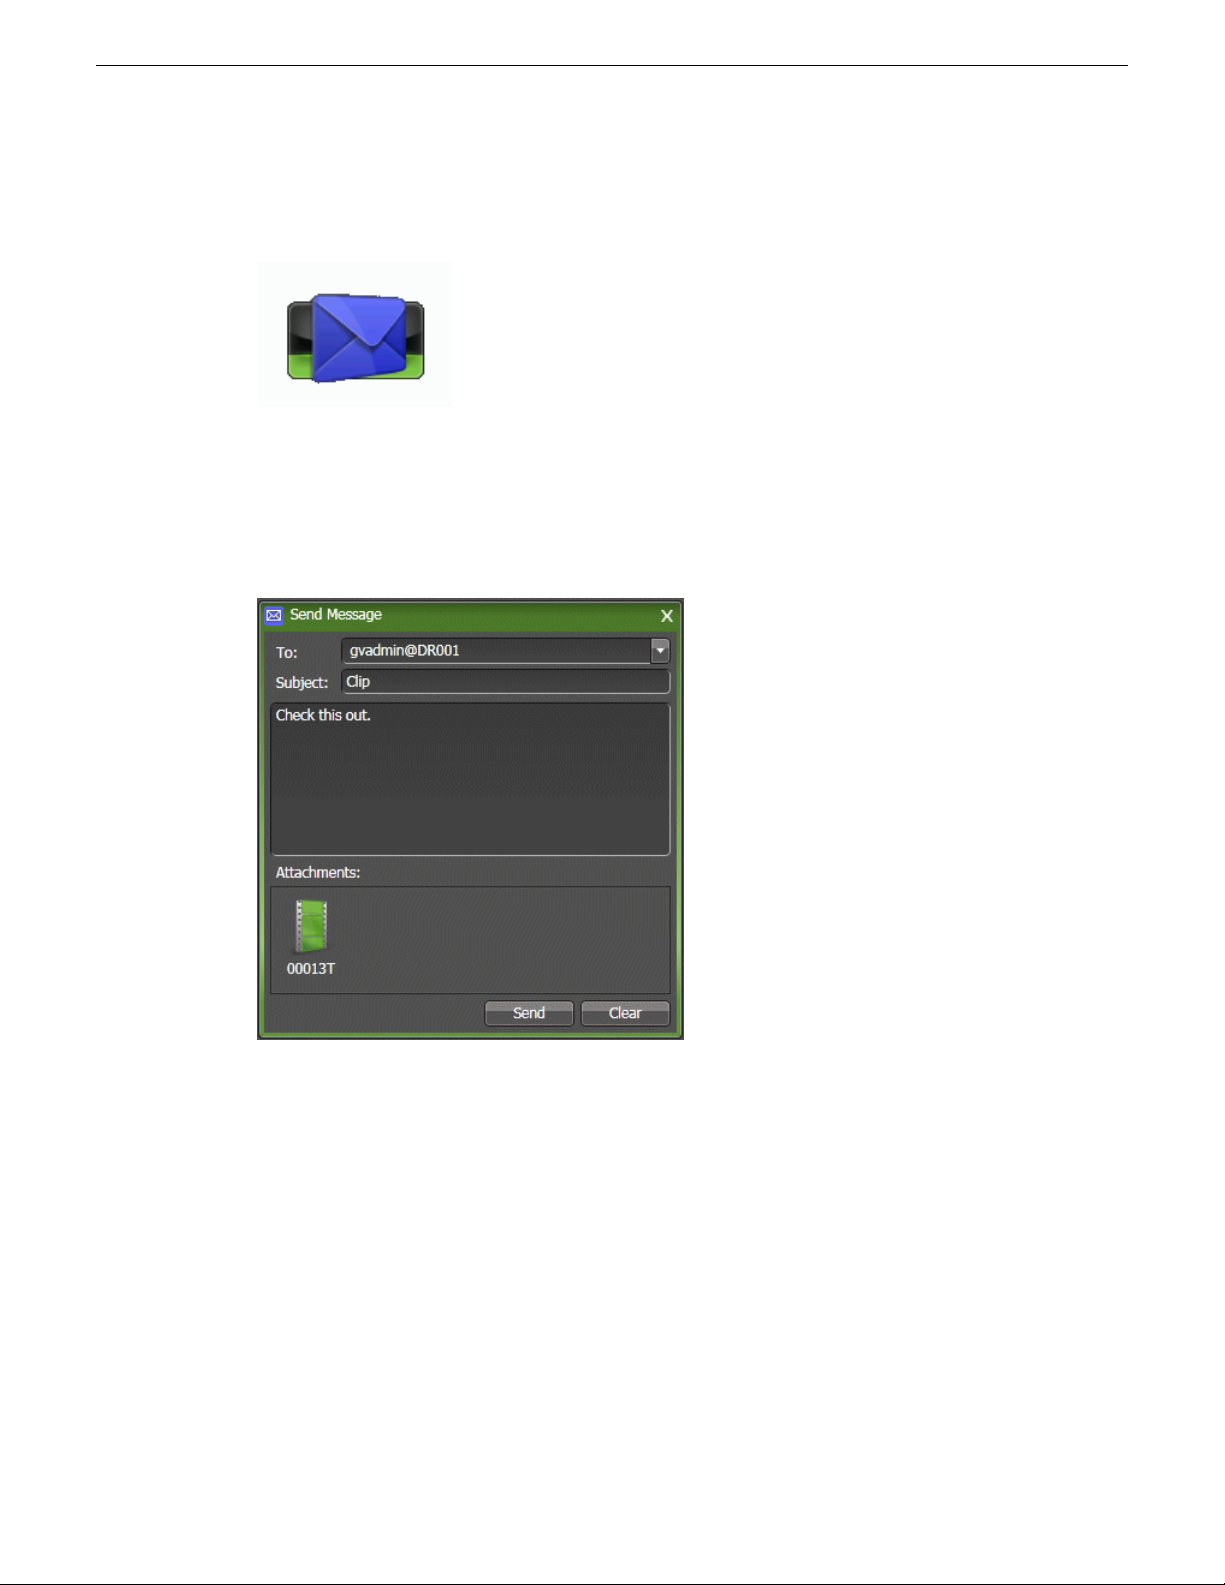
The Send Message tool allows you to send and receive messages with attachments. If you are logged
on to a GV STRATUS application you can send a message to another person that is currently logged
on to a GV STRATUS application and on the same network subnet. The Send Message tool appears
in the GV STRATUS application and in the GV STRATUS Control Panel application when you
launch it from the Navigator panel.
Overview of the GV STRATUS application
Send Message tool features are as follows:
• To eld — Species the GV STRATUS user to whom the message is sent. Select a user from
the drop-down list.
• Subject eld — Contains the title of the message.
• Message eld — Contains the message.
• Attachments eld — Provides a eld to which you drag attachments.
• Send button — Sends the message.
• Clear button — Clears all elds in the Send Message panel.
You can attach the following:
• Clips
• Playlists
• Saved searches
2014 02 21 GV STRATUS User Manual 21
Page 22

Overview of the GV STRATUS application
• Workspaces
• Bins
• Logging buttons
• Button Panels
• Tools
• Devices
• Locations
• Monitors
• Channel Panels
• Drives
When you send an attachment, you are actually sending a link to the attachment, rather than the
attachment itself.
When you receive a message, a Message dialog box opens and displays the message. If the message
has an attachment, you can do the following:
• Open the attachment by double-clicking it.
• Create a copy of the attachment in the Navigator panel or drag it to other panels in the GV
STRATUS application. Consider the size of the attachment before creating a copy.
The Send Message tool is more similar to Instant Messaging than it is to E-mail, as there is no
Outbox or Inbox functionality to store messages. If a person is not logged on to a GV STRATUS
application you can not send them a message. Likewise, if you are not logged on to a GV STRATUS
application you can not receive a message.
The Web Monitor
The Web Monitor allows you to view a web page in a GV STRATUS application panel. You
congure the web page address in GV STRATUS Control Panel. You can congure multiple web
pages. The Web Monitor displays the name of each congured web page in the GV STRATUS
application Navigator panel, from which you can launch each web page as a separate Web Monitor
panel. When you hover your cursor near the side borders of the Web Monitor panel, forward and
back browse buttons appear.
22 GV STRATUS User Manual 2014 02 21
Page 23
Overview of the GV STRATUS application
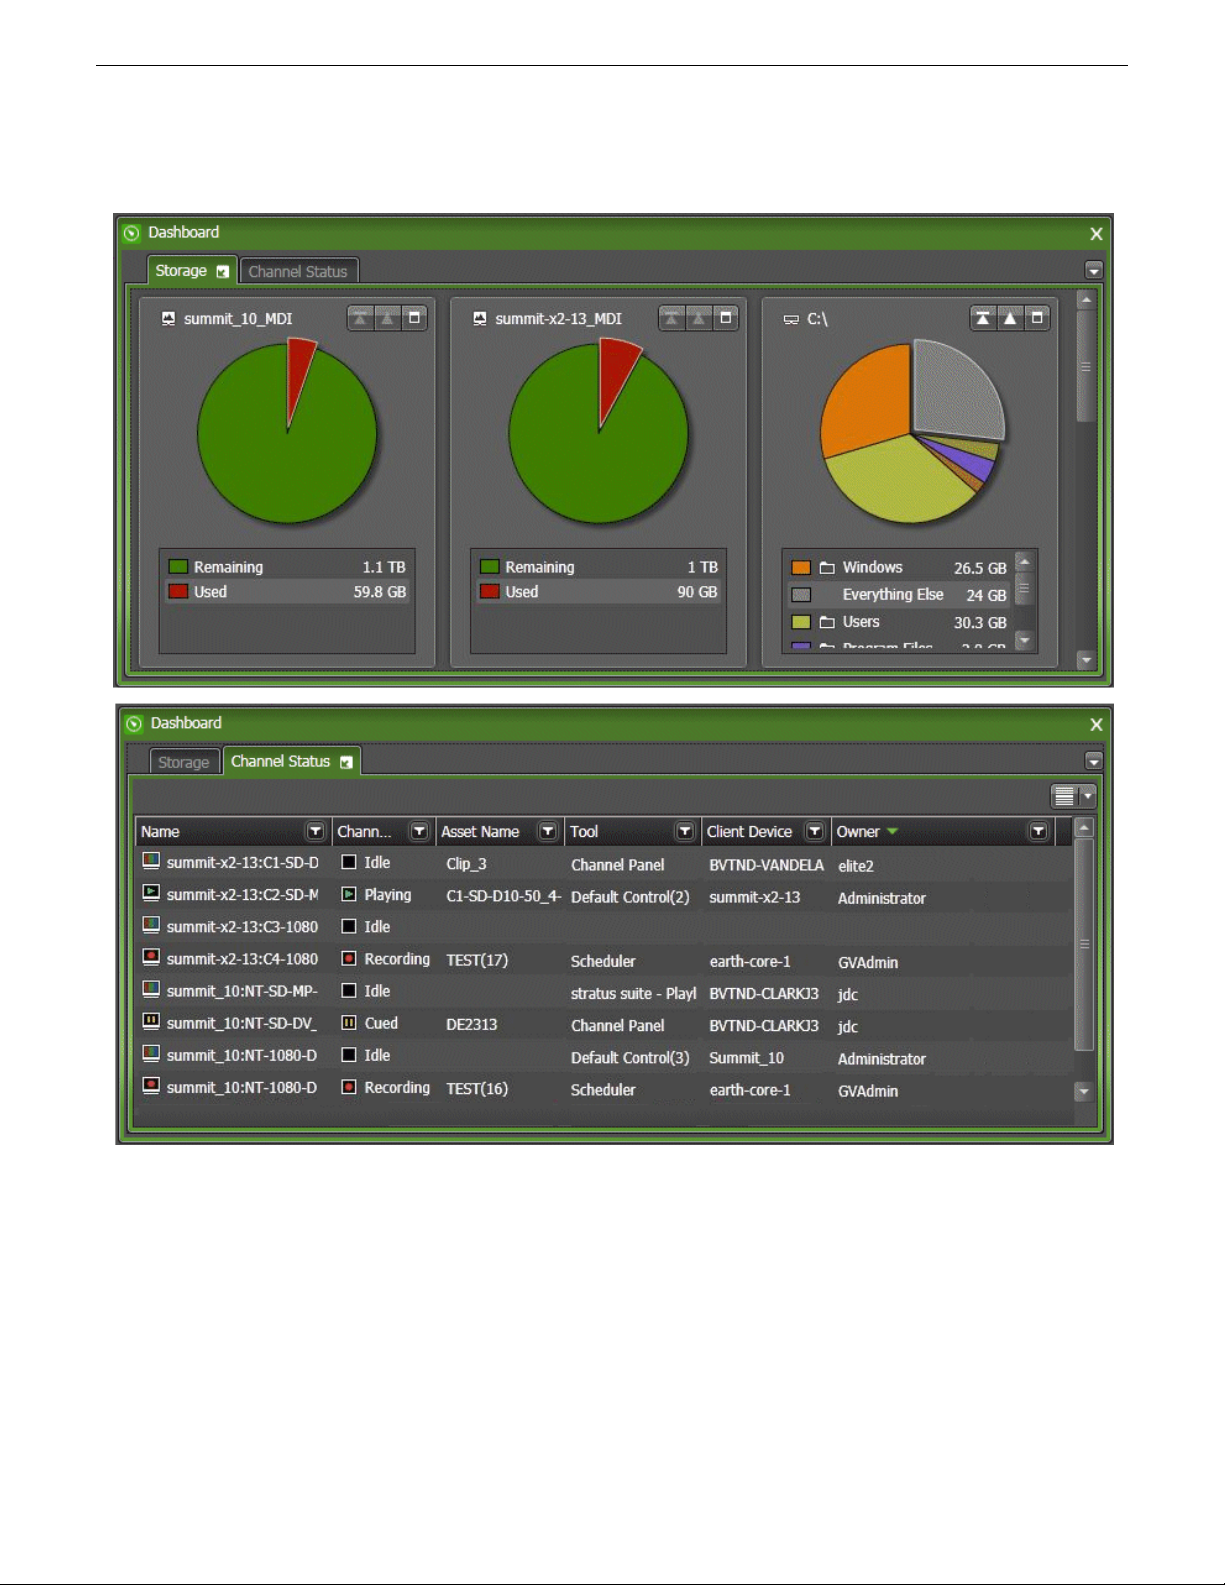
The Dashboard tool
The Dashboard tool allows you to view information about the current activity on the GV STRATUS
system.
The Storage tab reports storage capacity available on K2 devices and on the local GV STRATUS
PC. You can right-click on the Used report to explore storage levels further.
The Channel Status tab displays channel state and usage information. You can customize the display
of list items, similar to Asset List items, with features such as sort, lter, and add/remove columns.
You can launch the Dashboard tool in the GV STRATUS application and in the GV STRATUS
Control Panel from the Navigator panel under the Monitors node.
2014 02 21 GV STRATUS User Manual 23
Page 24
Overview of the GV STRATUS application
24 GV STRATUS User Manual 2014 02 21
Page 25
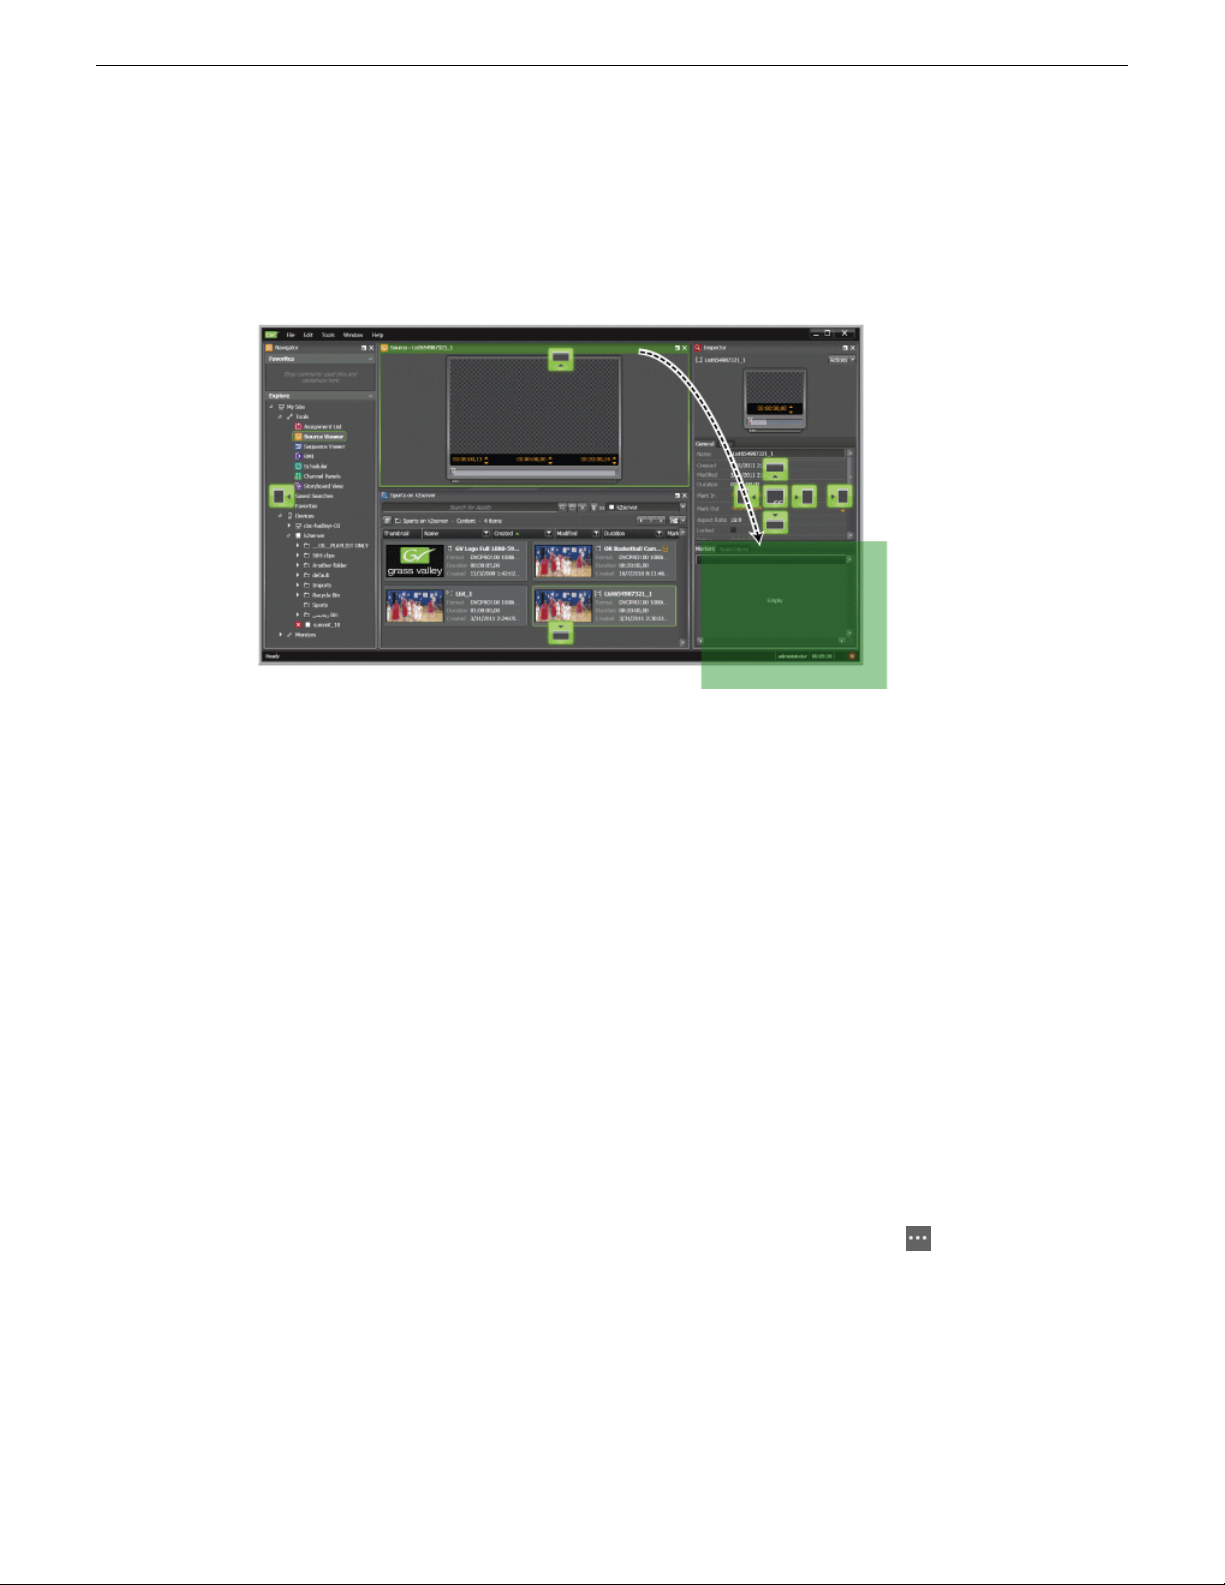
Previewing a live streaming video
You can preview live video input of K2 Summit channels.
1. Click the Live Streaming Video button on a Channel Panel, Playlist Editor, Source Viewer, or
Scheduler tool.
The live streaming video is displayed as follows:
• If a Playlist Editor or Channel Panel, the video is displayed in the K2 channel.
• If a Source Viewer or Scheduler tool, the video is displayed in Source Viewer.
2. Click the Live Streaming Audio button to isolate the selected audio for a live video stream.
When enabled, audio from all other live video streams is automatically muted.
The Live Streaming Audio button is disabled by default when the channel rst opens.
Related Topics
Using the Audio Overlay on page 166
Overview of the GV STRATUS application
2014 02 21 GV STRATUS User Manual 25
Page 26

Overview of the GV STRATUS application
26 GV STRATUS User Manual 2014 02 21
Page 27
Quick Start Screencasts
1
2
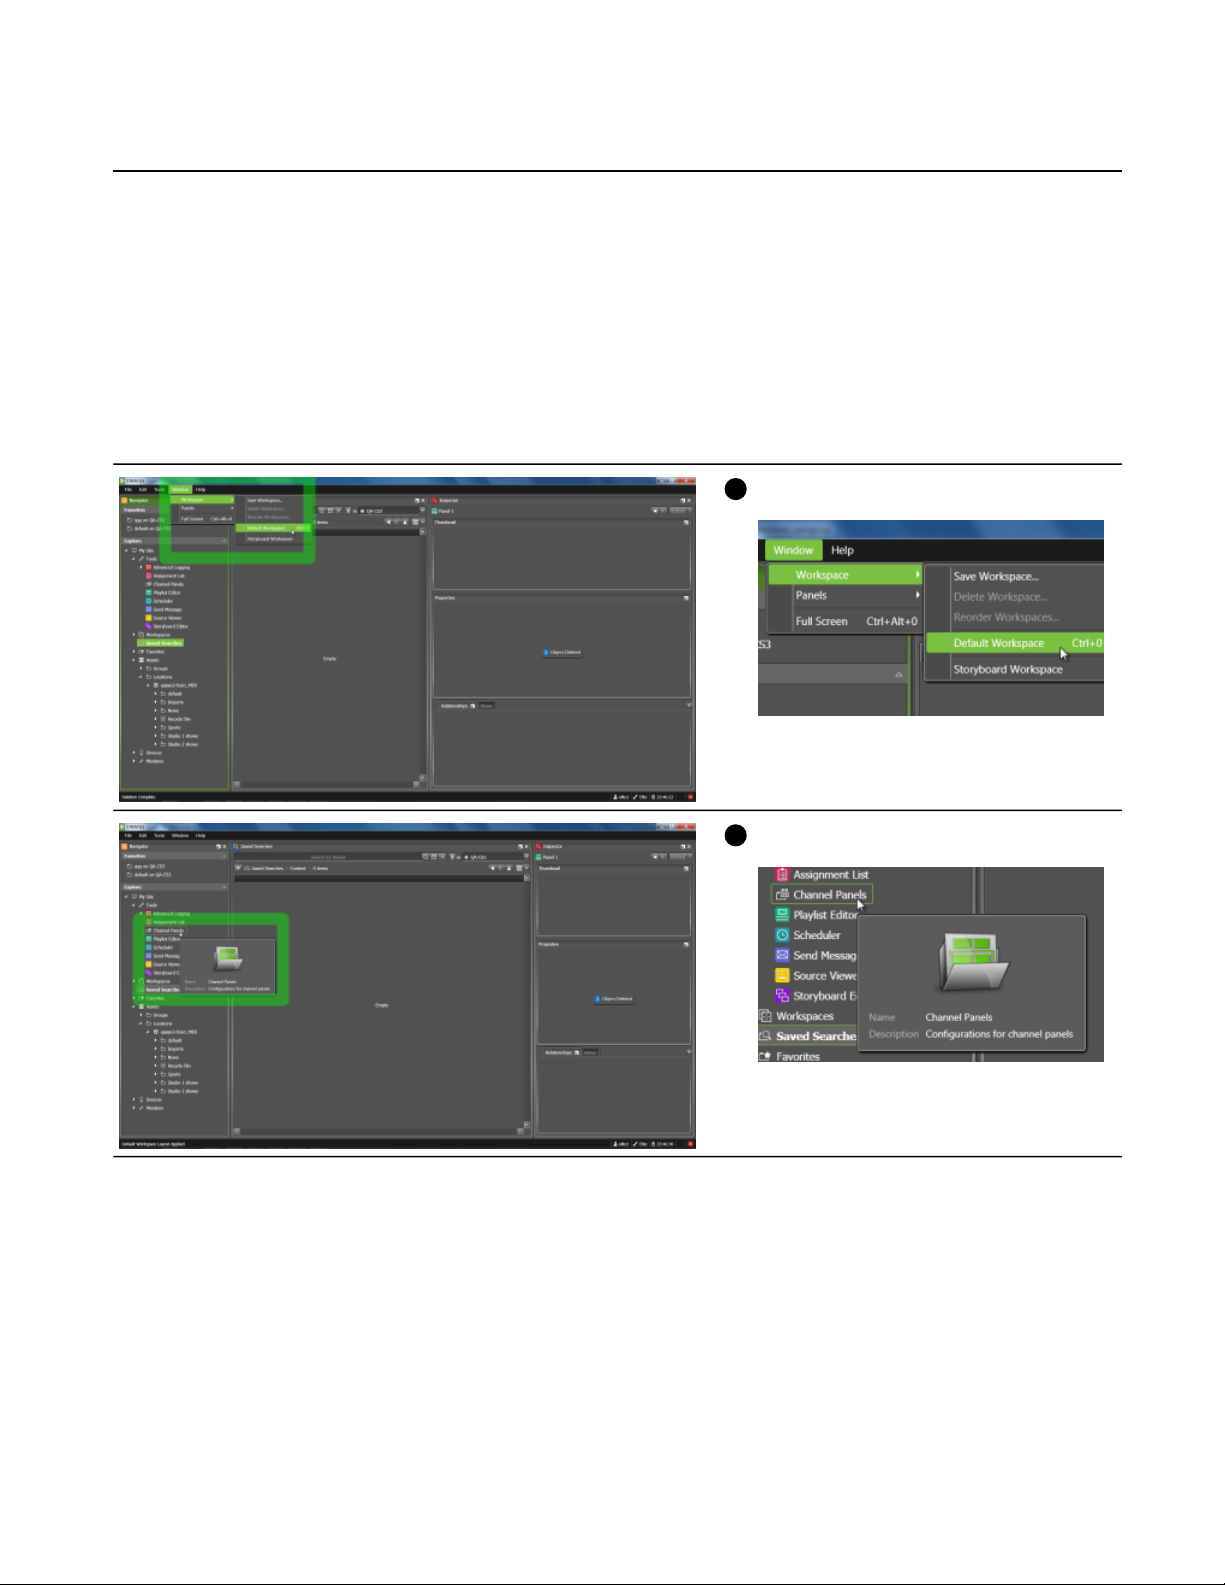
Creating a Channel Panel workspace
You can view a video screencast of this Quick Start at the following:
http://www.grassvalley.com/products/stratus/interactive
Load the default workspace.
Select the Channel Panel tool.
2014 02 21 GV STRATUS User Manual 27
Page 28
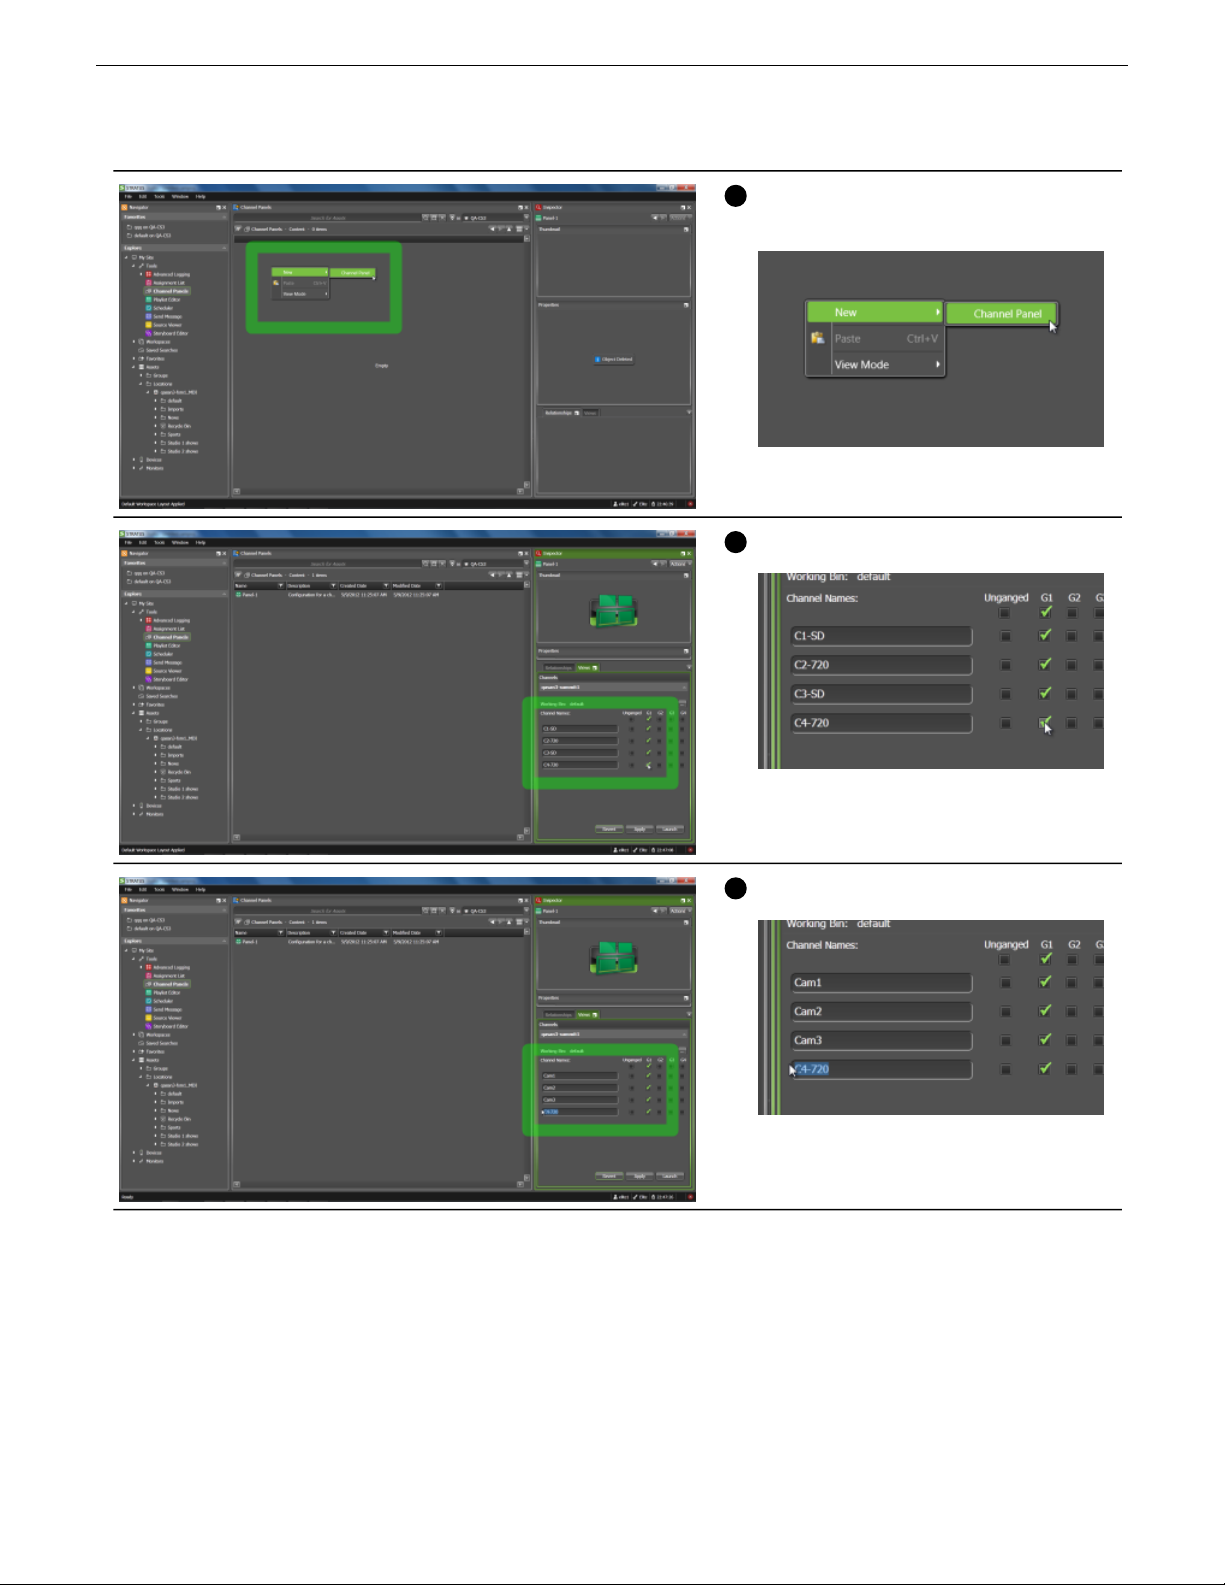
3
4
5
Quick Start Screencasts
In the empty Asset List area, right-click
and select New | Channel Panel.
Select the channels to include in the gang.
Name the channels in the gang.
28 GV STRATUS User Manual 2014 02 21
Page 29
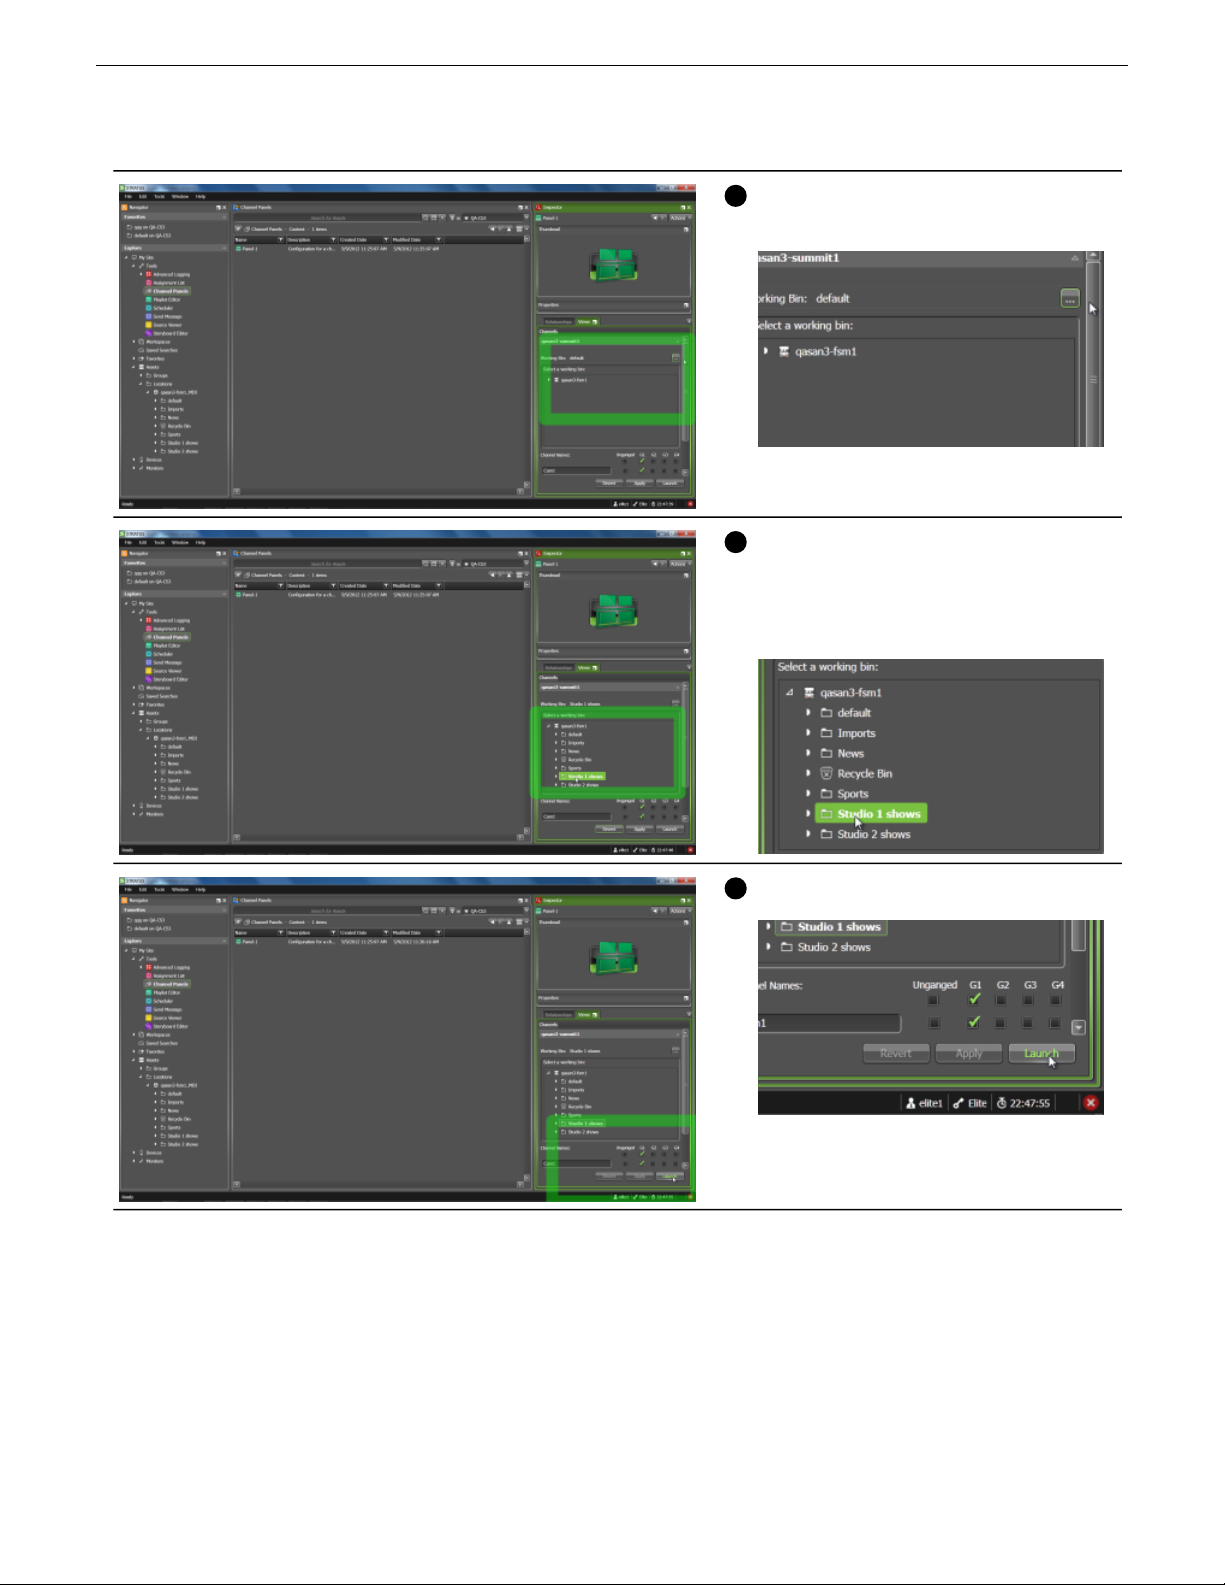
6
7
8
Quick Start Screencasts
Click the ... button to browse the bins on
the K2 Summit/SAN system.
Select the working bin for the channels
on that K2 Summit/SAN system.
The working bin is the location to which
the channels record their clips.
Click Apply, then Launch.
2014 02 21 GV STRATUS User Manual 29
Page 30
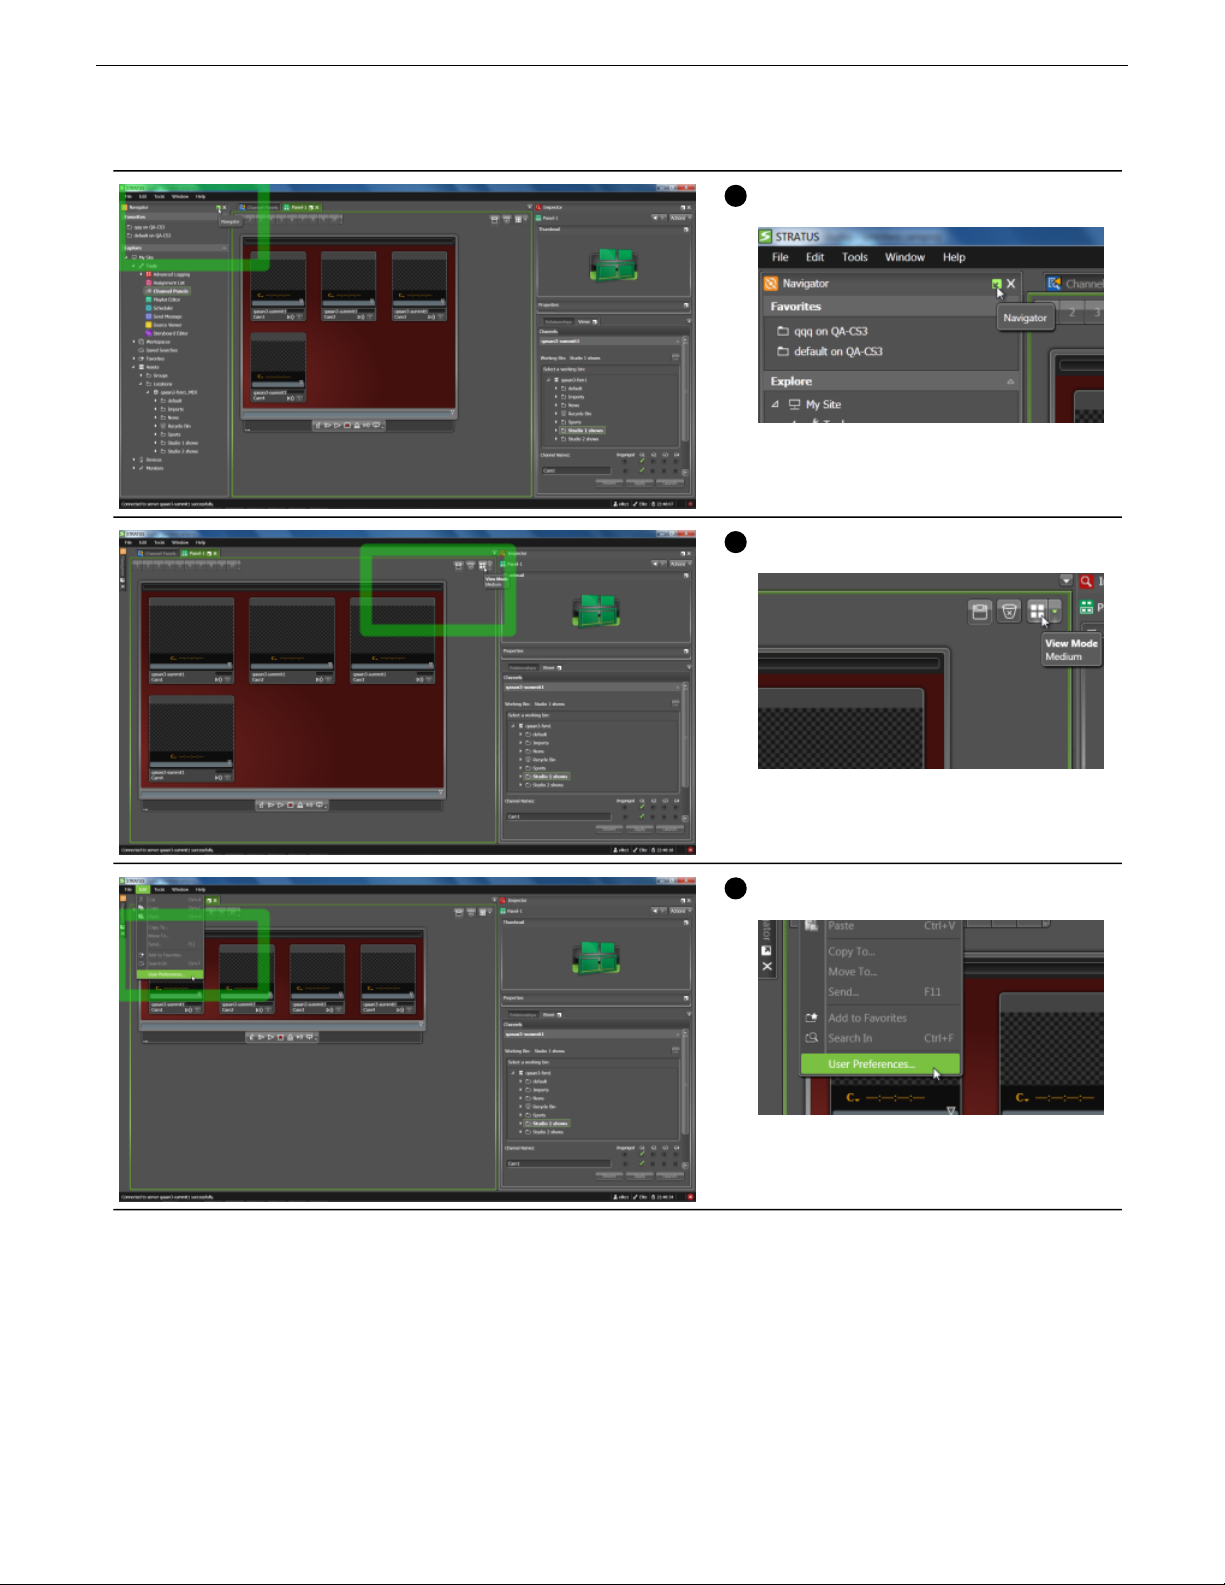
9
10
11
Quick Start Screencasts
Hide the Navigator panel.
Resize channels as desired.
Click Edit | User Preferences.
30 GV STRATUS User Manual 2014 02 21
Page 31

12
13
14
Quick Start Screencasts
Set the clip name prex to be based on
the channel name.
Set panel shutdown behavior to close
channels.
Click OK to save settings and close.
2014 02 21 GV STRATUS User Manual 31
Page 32

15
16
1
Quick Start Screencasts
Open the Save Workspace dialog box.
Name and save the workspace.
Ingesting assets using the Channel Panel tool
You can view a video screencast of this Quick Start at the following:
http://www.grassvalley.com/products/stratus/interactive
Load a Channel Panel workspace.
32 GV STRATUS User Manual 2014 02 21
Page 33

2
3
4
Quick Start Screencasts
Create new clips for the ganged channels.
Accept the default clip name.
Start a gang record.
2014 02 21 GV STRATUS User Manual 33
Page 34

5
6
7
Quick Start Screencasts
While recording, click and hold on a
channel's asset type icon.
Drag the clip to load into the Inspector
panel.
Show the control tray, if it is not already
showing.
34 GV STRATUS User Manual 2014 02 21
Page 35

8
9
10
Quick Start Screencasts
Add a marker.
Enter information for the marker.
Click OK to save settings and close.
2014 02 21 GV STRATUS User Manual 35
Page 36

11
1
Quick Start Screencasts
Related Topics
Customizing the application workspace on page 267
The Channel Panel tool on page 115
After the desired duration, stop the gang
record.
Editing for production using the Storyboard Editor tool
You can view a video screencast of this Quick Start at the following:
http://www.grassvalley.com/products/stratus/interactive
Load a Storyboard workspace.
36 GV STRATUS User Manual 2014 02 21
Page 37

2
3
4
Quick Start Screencasts
In a bin, right-click and select New |
Sequence.
Name the new sequence.
Drag an asset from the bin into the Source
Viewer.
You can do this while the asset is
recording.
2014 02 21 GV STRATUS User Manual 37
Page 38

5
6
7
Quick Start Screencasts
Show the control tray.
Navigate to mark points.
Mark in.
38 GV STRATUS User Manual 2014 02 21
Page 39

8
9
10
Quick Start Screencasts
Mark out.
Drag the event to the Storyboard Editor.
Repeat to add events and create a
sequence.
Use the overlay transport controls for
navigation.
2014 02 21 GV STRATUS User Manual 39
Page 40

11
12
13
Quick Start Screencasts
Drag the scrub bar slider to view the
sequence.
Split an event.
Rearrange events.
40 GV STRATUS User Manual 2014 02 21
Page 41

14
Related Topics
1
Customizing the application workspace on page 267
The Storyboard Editor tool on page 165
Quick Start Screencasts
Save the sequence.
Editing for production using EDIUS and STRATUS
You can view a video screencast of this Quick Start at the following:
http://www.grassvalley.com/products/stratus/interactive
Open EDIUS New Project Settings.
2014 02 21 GV STRATUS User Manual 41
Page 42

2
3
4
Quick Start Screencasts
View the GV STRATUS window.
In the GV STRATUS Assignment List
tool, select a placeholder.
Drag the placeholder to the EDIUS
window.
42 GV STRATUS User Manual 2014 02 21
Page 43

5
6
7
Quick Start Screencasts
In EDIUS, drop the placeholder on the
GV STRATUS icon in New Project
Settings.
Click OK to create a new EDIUS project
associated with the GV STRATUS
placeholder.
In GV STRATUS, use Ctrl + Click to
select multiple assets.
2014 02 21 GV STRATUS User Manual 43
Page 44

8
9
10
Quick Start Screencasts
Drag assets to the EDIUS window.
Drop assets on the EDIUS timeline.
In GV STRATUS, add a marker to one
of the assets.
44 GV STRATUS User Manual 2014 02 21
Page 45

11
12
13
Quick Start Screencasts
Name the marker.
Access the marker in EDIUS.
In EDIUS, click on the sequence tab and
drag the nished sequence to the Source
Browser.
2014 02 21 GV STRATUS User Manual 45
Page 46

14
15
16
Quick Start Screencasts
Drop the sequence in a K2 SAN bin.
On the Project Exporter dialog box, click
OK.
EDIUS exports the sequence as a program
to the K2 SAN.
46 GV STRATUS User Manual 2014 02 21
Page 47

17
Quick Start Screencasts
Access the sequence in GV STRATUS.
2014 02 21 GV STRATUS User Manual 47
Page 48

Quick Start Screencasts
48 GV STRATUS User Manual 2014 02 21
Page 49

Managing assets
Using the Explore section
The Explore section of the Navigator panel lets you browse the various items in the application.
1. In the Navigator panel, expand the Explore section by clicking on the Show/Hide button.
The Explore section expands.
2. Select the node that you want to explore.
The Asset List panel displays the contents of the selected node.
About the GV STRATUS Assets view
In the Navigator panel, the Assets node provides a view that is based on the information available
in the GV STRATUS Database. This allows the GV STRATUS application to provide you with
exibility for viewing and organizing your assets. You can congure bins and folders based on
users, projects, events, or other parameters to suit your particular workows.
Under the Assets node are the following nodes:
• Groups — Provides a view of folders that can contain assets from any location in the GV
STRATUS system. This allows you to create folders and group assets without being constrained
by the locations of the assets. The folders you create are visible and accessible by everyone on
the GV STRATUS system. The folders exist in the GV STRATUS Database but not in K2
Summit/SAN storage. In previous Grass Valley products, Groups were known as "Collections".
• Locations — Provides a view of bins in K2 Summit/SAN storage. When you create a bin, it is
created in K2 Summit/SAN storage.
The Navigator panel also provides a Devices node. Under the Devices node you nd the local
computer on which the GV STRATUS application is installed. Archive servers congured in GV
STRATUS Control Panel are also shown under the Devices node if you have the Archive Rights or
Restore Rights roles.
If you have the role of Media Manager, as congured in GV STRATUS Control Panel, the Navigator
panel also provides the following:
• The Groups view includes the Lost and Found folder, which you can check for assets that do not
have a location or that might not be otherwise accessible in the Assets view.
• Permission is granted to move assets from an archive system to the GV STRATUS system.
Without this permission, assets may be copied but not moved.
The GV STRATUS Database controls both the Assets view and the Devices view. The database
keeps the operations you perform in synchronization with the GV STRATUS/K2 system overall.
The GV STRATUS Database also associates extended metadata with each of your assets, as well
2014 02 21 GV STRATUS User Manual 49
Page 50

Managing assets
Browsing assets
Asset indicators
as keeps track of relationships between assets. You can use this metadata as search criteria with the
advanced search tool.
From the Navigator panel, you can access bins and sub-bins of assets.
1. In the Navigator panel, select the bin, group or location you want to browse.
The list of sub-bins and top-level assets or les displays in the Asset List panel.
2. To expand a bin, click the arrow next to the bin name in the Navigator panel. To minimize the
bin, click the arrow next to the bin name a second time.
3. Use the scroll bar to move up and down the list of bins and sub-bins.
These icons indicate the type of asset.
3D Clip: Identies the asset as a 3D clip.
Clip: Identies the asset as a clip.
Clip Transfer: Identies the asset status as in progress for import or transfer.
Key and Fill: Identies the asset as a key and ll.
Multimedia: Identies the asset as multimedia.
Placeholder: Identies the asset as a placeholder.
Playlist: Identies the asset as a playlist.
Recording Clip: Identies the asset as a recording clip.
Sequence: Identies the asset as a sequence.
Subclip: Identies the asset as a subclip or any single clip that references a parent clip.
Archived Clip: Identies the asset as type archived clip.
Archived Multimedia: Identies the asset as type archived multimedia.
Proxy: Indicates that the high-resolution asset has proxy.
Remote asset: Identies the asset as type remote clip.
These colors provide additional indicators.
Asset with no content: Identies the asset as type with no content.
Clip: Identies the asset as type clip.
Playlist: Identies the asset as a playlist.
Subclip: Identies the asset as a subclip or any single clip that references a parent
clip.
Sequence: Identies the asset as a sequence.
These indicators report the status of the high resolution asset.
50 GV STRATUS User Manual 2014 02 21
Page 51

Managing assets
RemoteUnavailableArchivedOnline
Identies that the asset
has high-resolution
material on the K2
Summit/SAN system.
Status not indicated: Identies that the indicator is not reporting the relevant status. For example,
if a particular colored indicator reports that an asset is "Remote", this dark indicator reports that the
asset is "Not Remote".
These buttons provide the ability to toggle the Locked Status of assets in the Asset List and Inspector.
Unlocked: Identies that the asset is unlocked and available for public use.
Locked: Indicates that the asset is locked.
These buttons allow the change of an asset's approval status in the Inspector.
None: Identies the approval status of the clip as none.
Approved: Identies the approval status of the clip as approved.
Rejected: Identies the approval status of the clip as rejected.
Adding a favorite
Identies that the
high-resolution material
of the asset is archived.
Identies that the
high-resolution material
of the asset is
unavailable.
Identies that the
high-resolution material
of the asset is on a
remote GV STRATUS
system.
You can drag and drop a bin, location, tool, volume, Jobs monitor or search to the Navigator panel
and save it there as a shortcut.
1. In the Navigator panel, expand the Favorites section by clicking on the Favorites Show/Hide
control.
The Favorites section expands.
2. In the Explore section of the Navigator panel, or from the Asset List panel, select the volume,
folder, bin or search that you want to make a favorite.
3. Drag and drop the selected item to the Favorites section.
A shortcut to the item is displayed in the Favorites section.
2014 02 21 GV STRATUS User Manual 51
Page 52

Managing assets
Removing or deleting a favorite
Managing Asset Lists
About view modes
1. To remove a favorite from the Favorites section, right-click on the favorite and select Delete.
2. Depending on the type of favorite selected, either a Conrm Remove or a Delete or Remove
dialog box opens. Select Remove orRemove from Favorites.
The favorite is removed from the Favorites section. The item itself is not deleted from its original
location.
3. To delete the item itself, select Delete in the Delete or Remove dialog box.
The item is deleted from its original location.
The topics in this section describe features for managing Asset Lists.
You can customize the arrangement of items in a list in the Asset List panel. There are 3 types of
view modes that can be selected as follows:
Details view
Tiles view
52 GV STRATUS User Manual 2014 02 21
Page 53

Thumbnails
view
Customizing the display of list items
To customize the arrangement of items in a list, do one of the following:
• Either right-click in the list and click View Mode or click the View Mode down-arrow and select
your preferred view.
• Click the View Mode button multiple times to toggle between sizes.
• You can shrink or enlarge the Thumbnails view mode as follows:
a) Right-click in the list and select View Mode, or click the View Mode button down-arrow.
Managing assets
b) To adjust the size, use the Slider bar.
• You can select the order of properties displayed in the Tiles view mode as follows:
a) Right-click in the list and select View Mode and Tiles.
b) Right-click in the list and select Tile Properties
The Property Order dialog box displays the top three properties.
c) Highlight a property and use the up/down arrows to move the property up or down in the
display.
d) Click OK.
The property is displayed in the desired order.
• In Detail mode, you can add or remove columns as follows:
a) Right-click a column head.
b) Select Columns.
c) Select or de-select the columns to display.
2014 02 21 GV STRATUS User Manual 53
Page 54

Managing assets
Sorting a list view
Once the changes have been made, the customized display is saved only in your last Workspace.
The changes are not applied by the Save Workspace command or under User Preferences.
Related Topics
The Asset List panel on page 17
1. You can do the following:
a) Click a column head.
Items are sorted based on the entries in that column.
b) To reverse the sort order, click the column head again.
2. To sort items in a list, do the following:
a) Right-click an item.
b) Select Arrange By.
A list of categories is displayed.
c) Select the category on which to sort.
The items are sorted based on the selected category.
d) To reverse the sort order, select the category again.
54 GV STRATUS User Manual 2014 02 21
Page 55

Adding and removing columns in a list
You can congure the columns displayed in an Asset List to support your specic workow.
1. Right-click a column head and select Columns.
A menu of columns opens.
Managing assets
2. Select or clear checkmarks to arrange the columns displayed in your list.
Custom metadata elds, as congured in GV STRATUS Control Panel, are displayed at the
bottom of the menu.
Related Topics
Using custom metadata in Inspector on page 73
2014 02 21 GV STRATUS User Manual 55
Page 56

Managing assets
Opening multiple Asset List panels
To compare multiple Asset List panels
When you open a new Asset List panel, it displays as a tab in the original Asset List panel. The new
panel can be undocked or moved to another location within the application window or to its own
location on the Windows desktop. For example, if you are ingesting les on two different servers,
you could compare the contents of their bins by viewing two adjacent Asset List panels.
To open a new Asset List panel, click the Open New Panel button.
The new Asset List panel has the same view mode as the original Asset List panel and is automatically
set as active; when you click on a bin in the Navigator panel, or create a new search, the results are
displayed in this active panel even if it is hidden beneath other panels.
You can easily compare searches or the contents of different bins by creating multiple Asset List
panels.
1. Open a new Asset List panel.
The newly created Asset List panel is automatically made active.
2. Dock the newly created Asset List panel next to the original Asset List panel.
3. To populate the active Asset List panel, click on the desired item in the Navigator panel or perform
a search.
4. To populate the other Asset List panel, rst make it active.
5. Populate the other Asset List panel by clicking on the desired item in the Navigator panel or
performing another search.
Managing multiple tabs in a panel
If you have more tabs than the application can display at one time, you can use the following:
• Left/right arrows at the top left and right corners of the panel let you scroll the displayedtabs in
a panel.
• Hovering the mouse over a tab allows you to preview the contents of that tab.
• A drop-down arrow lets you select from a list of all the tabs open in the panel.
• Pressing CTRL + Tab allows you to switch between all open tabs in every panel.
Locking an asset using Inspector
1. In the Asset List, double-click on the asset.
The asset is loaded into the Inspector panel.
2. On the General tab, click the Unlocked button.
The asset is now locked. To verify this, you can hover over the Locked button and view the
Locked property.
3. To unlock the asset, click the Locked button.
NOTE: Locked assets cannot be renamed, deleted, or modied in any way.
56 GV STRATUS User Manual 2014 02 21
Page 57

Locking multiple assets in Asset List
1. In the Asset List, if it is not already displayed, display the Locked Status column.
2. In the row for each asset you are locking, click the Unlocked button.
Assets toggle from unlocked to locked.
Filtering assets
You can lter a list of assets in the Asset List panel.
1. In the Navigator panel, select the bin or group that you want to lter. You can also lter search
results.
The assets are displayed in the Asset List panel.
2. Identify the column by which to lter assets. Next to the column heading, click the Enable Filter
button.
A text eld opens in the column heading cell.
3. Enter the lter criteria. As you enter each character, the list displays results accordingly.
4. To lter by multiple criteria, click the Enable Filter button in multiple columns and enter lter
criteria. The list displays only results that match all criteria.
Managing assets
5. To remove a lter, click the X button in the eld.
Deleting assets
Your delete operations depend on how your user account is congured in GV STRATUS Control
Panel. Delete buttons, menu items, and keyboard shortcuts are disabled if delete rights are denied.
An asset with a child association (shallow copy) cannot be deleted. Deleting an asset with multiple
2014 02 21 GV STRATUS User Manual 57
Page 58

Managing assets
high-resolution associations (deep copy) deletes the entire asset from multiple locations. A Media
Manager has additional options to delete parts of an asset.
1. In an Asset List panel, right-click the asset you are deleting and select Delete.
A Delete Type dialog box opens. The dialog box for Media Managers offers additional options.
2. If you are not a Media Manager, select your options as follows:
• Entire Asset — Select this to delete the entire asset including online material and proxy.
Archived material is not deleted.
• Online Material Only— Select this to only delete online material. Metadata, proxy, and
archived material is not deleted.
3. If you are a Media Manager, select your options as follows:
• Entire Asset — Select this to delete the entire asset including online material, archived material,
and proxy.
• Online Material — Select this to only delete online material of the asset on the K2
Summit/SAN system.
• Archived Material — Select this to only delete archived material of the asset on the archived
system.
• Proxy — Select this to only delete the proxy of the asset.
4. Click OK or Delete.
58 GV STRATUS User Manual 2014 02 21
Page 59

The asset is deleted according to your selection. However, online material can only be deleted if the
asset is not in use or referenced.
Related Topics
Asset copies and deletions on page 66
Searching assets
The topics in this section describe search features.
About searches
You can search assets using the Simple Search tool at the top of the Asset List panel. When you
type in text, specify the remote or local GV STRATUS system to search (the search provider), and
press Enter. Results are displayed in a search results asset list.
For a simple search you can enter text with advanced query syntax. Assets with names, tags,
descriptions, comments, marker text, or custom text data that match the search are returned.
Managing assets
Use the the Advanced Search Toggle button next to the Search text eld to use additional criteria
and conditions.
You can save a search and re-use it later on. Searches are saved in the Navigator panel. When you
click on a search, the search runs and results are displayed.
These search features apply to searching the GV STRATUS system. If you search outside the GV
STRATUS system, GV STRATUS search features do not apply.
Related Topics
The Asset List panel on page 17
About advanced query syntax, advanced searches and custom expressions on page 60
Searching assets with the Simple Search tool
1. In an Asset List panel Location drop-down list, select the GV STRATUS system you want to
search.
2. In the Simple Search tool, enter your search.
For a simple search you can enter text with advanced query syntax. Assets with names, tags,
descriptions, comments, marker text, or custom text data that match the search are returned.
3. To start the search, press Enter.
Assets matching the search criteria are displayed in a search results asset list.
2014 02 21 GV STRATUS User Manual 59
Page 60

Managing assets
About advanced query syntax, advanced searches and custom expressions
If it is not apparent why some assets were returned for your search, add columns to the search results
asset list or view assets in Inspector.
Related Topics
About searches on page 59
Search constraints and considerations on page 64
About advanced query syntax, advanced searches and custom expressions on page 60
A combination of search features provide exibility in creating GV STRATUS searches. Entering
text with advanced query syntax is available in both the Simple Search tool and the Advanced Search
tool. The Advanced Search tool provides additional capabilities.
The advanced query syntax available when you enter text is as follows:
• If you search on one or more words (with no search syntax), the search returns assets that match
all the words in any order. This is the Boolean "AND" operator. This is a change from previous
versions, where this was a phrase search.
• Search syntax is as follows:
• If you enter words surrounded by quotation marks, the search returns assets that match that
exact phrase, with the words in the exact order.
• Text surrounded by quotation marks is searched literally. Any search syntax or operators
within the quotation marks are interpreted as plain text instead.
• Simple boolean operators AND, OR and NOT are supported. Enter these operators in all
capital letters.
• Parenthesis control the precedence of the boolean operations.
The following are advanced query syntax examples. Each example is followed by the steps the GV
STRATUS system goes through as it processes the search:
• “the quick brown” (fox OR dog) jumped over the NOT lazy cat
1. Contains the phrase “the quick brown” AND
2. Contains ‘fox’ or ‘dog’ AND
3. Contains ‘jumped’ AND
4. Contains ‘over’ AND
5. Contains ‘the’ AND
6. Does not contain ‘lazy’ AND
7. Contains ‘cat’
• abc AND (def OR ghi)
1. Contains ‘abc’ AND
2. Contains ‘def’ OR ‘ghi’
• abc AND def OR ghi
1. Contains ‘abc’ AND ‘def’ OR
2. Contains ‘ghi'
60 GV STRATUS User Manual 2014 02 21
Page 61

Managing assets
The Advanced Search Toggle button next to the Simple Search tool provides additional capabilities
to the search tool.
You can search using multiple conditions. You dene the type of search as follows:
• ALL of the conditions below are met — This is the Boolean "AND" operator. The search returns
assets that match all conditions. Only conditions with values (conditions that are not blank) are
included in the search.
• ANY of the conditions below are met — This is the Boolean "OR" operator. The search returns
assets that match any of the conditions. Only conditions with values (conditions that are not
blank) are included in the search.
• Custom — You can enter text to create a custom expression using Boolean operators.
In your custom expression, you use the condition numbers (1, 2, 3, 4, etc) to represent the condition
on which you are searching. For example, if you have congured condition 1 as "Asset Name
is basketball" and condition 2 as "Asset Created is Today", then entering custom expression "1
AND 2" nds assets named basketball created today.
The "OR" and "AND" operators are at the same precedence, so for complex expression you use
parentheses to group relationships. The following are examples of complex expressions:
• (1 AND 2) OR (1 AND 3)
• ((1 AND 4) OR 3) AND ((2 OR 4) AND 3)
When entering a custom expression, you must reference only conditions with values (conditions
that are not blank).
2014 02 21 GV STRATUS User Manual 61
Page 62

Managing assets
Searching assets with the advanced search tool
You can use advanced query syntax in the Advanced Search tool. When you create a "contains"
condition that searches a text eld, you can enter text with advanced query syntax to search that
eld. The following is an example of this type of condition:
• Name | contains | guitar NOT rock
In this way a search in the Simple Search tool is equivalent to a "contains" search that searches
multiple text elds by default. For a simple search you can enter text with advanced query syntax.
Assets with names, tags, descriptions, comments, marker text, or custom text data that match the
search are returned.
For an extended application of boolean logic in the Advanced Search tool, you can create multiple
conditions that search text elds, each of which use advanced query syntax. Then you can combine
those conditions as a custom expression.
Related Topics
Searching assets with the advanced search tool on page 62
1. In an Asset List panel, clear the Simple Search eld.
2. Click the Advanced Search Toggle button next to the Simple Search tool.
The advanced search options open.
3. In the Location drop-down list, select the location (search provider) you want to search.
4. Congure search conditions as follows:
• For each condition (1, 2, 3, 4, etc) select from lists or enter text to dene the condition.
A Marker search includes marker name, marker description, and marker tags.
• Click the Add Condition button or the X button to add or remove conditions from the list.
• When you create a "contains" condition that searches a text eld, you can enter text with
advanced query syntax to search that eld.
62 GV STRATUS User Manual 2014 02 21
Page 63

5. In the Show results when drop-down list, select the type of search you are doing:
• ALL of the conditions below are met — The search returns assets that match all conditions.
• ANY of the conditions below are met — The search returns assets that match any condition.
• Custom — A Custom Expression eld opens in which you can enter a custom search
expression.
6. In the Limit Results drop-down list, select the maximum number of assets in your search results.
7. To start the search, press Enter.
Assets matching the search criteria are displayed in a search results asset list.
If it is not apparent why some assets were returned for your search, add columns to the search results
asset list or view assets in Inspector.
Related Topics
Search constraints and considerations on page 64
About advanced query syntax, advanced searches and custom expressions on page 60
Determining the location of a search result asset
Managing assets
If a location of an asset is not displayed in the search result asset list Path column, you can nd all
of the asset's locations in the Associations tab of the Inspector panel.
1. From the search result list, select the asset that needs its location path determined.
2014 02 21 GV STRATUS User Manual 63
Page 64

Managing assets
2. Open the asset in the Inspector panel.
The asset displays in the Inspector. The location of the asset displays under the Path column in
the Associations tab.
Related Topics
Adding and removing columns in a list on page 55
Search constraints and considerations
By default, search results are limited to 1000 items. In the advanced search section, you can dene
the limit, from 50 to 5000 items.
To increase the success of your search, do the following:
• Do not use wildcards or quotation marks in a search.
• Search on alphanumeric characters only.
64 GV STRATUS User Manual 2014 02 21
Page 65

• Non-alphanumeric characters, such as !, -, _, @, #, %, etc., are interpreted as breaks and are
searched the same as a space between words in the search string. Do not form a search using
these characters alone. The exception is the asterisk character (*), which is not interpreted as a
break.
• Non-alphanumeric characters that are a part of common conventions such as dates, times, decimals,
fractions, timecode, email addresses, IP addresses, etc., are not interpreted as a break in the
convention.
Stopping a search or stopping refreshing a bin
To stop a search or a refresh in progress, click the red X in the Progress indicator
The application stops the search or refresh, and the Progress indicator disappears.
Managing assets
Saving searches
Searches that you create can be saved in the Navigator panel and reused later.
1. To save a search, click the the Save button next to the Search text eld.
The Save Search dialog box displays.
2. Enter the name of the search and, if desired, a description.
3. If you have the role of Media Manager, you can make the search available to all GV STRATUS
system users by selecting Public Search.
4. Click OK.
Using a saved search
1. In the Navigator panel, expand the Searches node.
2. Find saved searches, organized as follows:
• Public Searches: Searches saved as public by GV STRATUS system users with the role of
Media Manager.
• Saved Searches: Searches saved by you.
2014 02 21 GV STRATUS User Manual 65
Page 66

Managing assets
Creating bins and groups
3. Select a saved search.
The search is re-run. The Asset List panel displays the latest results.
Use this procedure to create a bin in your K2 Summit/SAN system storage.
NOTE: Creating bins under the Locations node in Navigator creates a corresponding bin in K2
storage. Groups created under the Groups node in Navigator create shortcut folders in the
STRATUS database, which do not correspond directly to K2 bins.
1. Do one of the following:
• In the Navigator panel, right-click a K2 Summit/SAN system or a bin.
• Right-click in an Asset List panel for a K2 Summit/SAN system bin.
NOTE: To prevent corrupting the K2 database, do not exceed 8 nested bins levels when
creating bins.
2. Select New | Bin.
A New Bin dialog box opens.
3. Enter a name for your bin and click OK.
Related Topics
Limitations for creating and naming assets and bins on page 298
Asset copies and deletions
When you copy an asset, different types of associations are created, depending on the K2 storage
location and the type of asset copy, as follows:
• Shallow copy — When you copy assets and both copies are in the same K2 storage location,
shallow copies are created. With a shallow copy, the high-resolution media les are not copied.
Rather, the K2 media database and the GV STRATUS database contain a record for each shallow
copy, and each record references the same media les. In the GV STRATUS system, this results
in an asset with multiple references, similar to a subclip.
66 GV STRATUS User Manual 2014 02 21
Page 67

Managing assets
Figure 1: Shallow copy
• Deep copy — When you copy assets and the copies are in different K2 storage locations, deep
copies are created. With a deep copy, the high-resolution media les are copied. The K2 media
database on each K2 system references its own media les. The GV STRATUS database
references all the media les on all the different K2 storage locations and archive locations. In
the GV STRATUS system, this results in an asset with multiple high-resolution associations.
Figure 2: Deep copy
When deleting assets, the following occurs:
• Assets with shallow copies — When the GV STRATUS system attempts to delete the shallow
copy, the asset is not deleted. You must delete the referenced copy before you can delete the
asset.
• Assets with deep copies — When you delete any one of the associated high-resolution assets, in
any K2 storage or archive location, by default the GV STRATUS system deletes all the
high-resolutions assets in all locations. Since it is one asset with multiple high-resolutions
associations, the entire asset with all its associations is deleted.
Take care when creating copies, considering your workow in which copied assets are deleted. The
GV STRATUS roles of Delete Rights and Media Manager can be assigned to user accounts to
2014 02 21 GV STRATUS User Manual 67
Page 68

Managing assets
Viewing a video asset
implement the desired workow. As part of the delete operation, Media Managers can specify
online/archive deletion.
Related Topics
Deleting assets on page 57
1. Do one of the following:
• Double-click an asset in the Asset List.
• Drag an asset from the Asset List and drop it on the Inspector video player area.
• Right-click on an asset in the Asset List, select Open With | Inspector.
The asset displays in the Inspector.
2. View the video displayed in the upper area of the Inspector.
3. If desired, expand the video to full-screen view.
Related Topics
Using the Audio Overlay on page 166
Viewing a video asset in full screen
The following applies to viewing video asset in the Source Viewer, Sequence Viewer, and viewers
in Inspector, Advanced Logging, and Segmentation tools.
Click the Full Screen button on the upper right of the viewer.
The viewer expands and displays in full screen.
The overlay transport controls and keyboard shortcuts can still be used to navigate through the asset
in full screen mode.
Restoring viewer to normal size
Click the Restore button on the upper right of the viewer.
The viewer restores to its normal size.
68 GV STRATUS User Manual 2014 02 21
Page 69

Sending video asset to the next display monitor
The video asset needs to be in full screen mode before you can enable the next display control.
1. Click the Next Display button on the upper right of the viewer.
The video asset displays on the next display monitor.
The viewer in GV STRATUS application shows the Displayed Fullscreen dialog.
Managing assets
2. To view the asset in both next display monitor and GV STRATUS viewer, load the same asset
in the Inspector panel and click the Full Screen button.
3. To restore the playback from the next display monitor to the GV STRATUS viewer, click the
Restore button.
Access to multiple GV STRATUS sites
You can access assets on remote GV STRATUS sites.
If you have remote sites congured in your system, the Navigator panel displays nodes for those
sites. Only the Assets node is displayed under remote sites. Asset indicators identify assets on remote
sites.
When you access multiple GV STRATUS sites, you do so from the context of your local site. Both
local and remote GV STRATUS client PCs must be able to resolve the hostnames of local GV
system servers, such as Core Server, Proxy Server, and K2 system. This local site is your primary
site, where you do your normal workow tasks, such as ingesting, editing, and playing out on
channels. When you access a remote site, you can search and browse the remote assets, but you
cannot edit or do other operations on remote assets. You must transfer the remote asset to your local
2014 02 21 GV STRATUS User Manual 69
Page 70

Managing assets
Configuring Source User Preference
site in order to apply the full range of GV STRATUS operations to the asset. Asset transfers are
allowed both ways between your local and remote sites.
The GV STRATUS system uses progressive download to display low-resolution proxy video of
assets from remote sites. This minimizes the effect of a slower load time when you load an asset
into Inspector or some other GV STRATUS viewer. Progressive download selectively downloads
and caches the portion of the low-resolution proxy video asset just before and after the current scrub
bar position in the video player, until nally the entire proxy le asset is downloaded. As long as
the GV STRATUS application remains open, the downloaded proxy asset remains locally available.
If you load the proxy asset into the video player again, the GV STRATUS application uses the
locally cached proxy le asset. In the GV STRATUS viewer, a spinning progress indicator displays
caching and shaded indicators on the scrub bar display the portion of the proxy asset cached. You
can also edit Source User Preferences to control when progressive download occurs.
Related Topics
Asset indicators on page 50
When remote assets are slow to open in a GV STRATUS video player, you can congure how the
GV STRATUS application handles the download to the video player.
1. Select Edit | User Preferences.
The User Preferences dialog box opens.
The GV STRATUS application shows or hides tabs based on the roles assigned to your GV
STRATUS log on credentials.
2. To congure how GV STRATUS video players download assets, select the Source tab.
70 GV STRATUS User Manual 2014 02 21
Page 71

Managing assets
3. Select one of the following progressive download options:
• Always: If you only access remote GV STRATUS sites, select this option. The GV STRATUS
application uses progressive download for all assets on all sites.
• Automatic: If you access both local and remote sites, or if your network access is sometimes
slow, select this option. If a remote site, the GV STRATUS application uses progressive
download. If a local site, the GV STRATUS application tests each asset's download speed
and if slow, the application tries to download it three times. If the speed is still slow, the GV
STRATUS application switches to progressive download for all assets from all sites. The GV
STRATUS application continues to use progressive download until it is restarted.
• Never: If you never access remote sites and you do not want to use progressive download,
select this option. The GV STRATUS application does not test an asset's download speed. If
an asset's download speed is too slow, performance of other GV STRATUS operations can
be affected.
Progressive download selectively downloads and caches the portion of the low-resolution proxy
video asset just before and after the current scrub bar position in the video player, until nally
the entire proxy le asset is downloaded. As long as the GV STRATUS application remains
open, the downloaded proxy asset remains locally available. If you load the proxy asset into the
video player again, the GV STRATUS application uses the locally cached proxy le asset.
4. To apply a change and continue editing user preferences settings, click Apply.
5. To accept any changes and close the dialog box, click OK.
The dialog box closes.
2014 02 21 GV STRATUS User Manual 71
Page 72

Managing assets
Adding or modifying metadata
1. To add or modify metadata in the Inspector panel, do the following:
a) Open an asset in the Inspector panel.
b) On the Properties tab, click the Show/Hide button of the General or Other (if displayed)
area to display metadata.
c) Add star ratings, tags, descriptions, comments and other information.
Tags are comma delimited, so you can enter multiple tags.
d) To add a keyword, click the Add Keyword button. ( `)
e) To add a marker, click the Add Marker button. ( Insert)
72 GV STRATUS User Manual 2014 02 21
Page 73

2. To add or modify metadata in an Asset List, do the following:
a) Display assets in an Asset List.
b) View the Asset List in the Details view.
c) Display the desired columns.
d) Use ALT + Click to modify text.
Related Topics
Limitations for creating and naming assets and bins on page 298
Printing asset metadata
1. Right-click on an asset in the Asset List and select Print. ( Ctrl + P)
The Print dialog appears.
Managing assets
2. Select your printer and click Print.
Asset metadata prints on the selected printer in the same order of appearance as in the Inspector.
Using custom metadata in Inspector
You can use custom metadata elds, as congured in GV STRATUS Control Panel, to support your
workow.
1. From the Inspector panel, do the following to use custom metadata:
a) Open an asset in the Inspector panel.
b) On the Properties tab, click the Show/Hide button of the General section.
c) View or modify your custom metadata as desired.
2014 02 21 GV STRATUS User Manual 73
Page 74

Managing assets
Reordering properties in Inspector
2. From an Asset list, do the following to use custom metadata:
a) Add the column or columns to the Asset List that correspond to your custom metadata.
b) Use ALT + Click to modify text, numbers and dates.
Related Topics
Adding and removing columns in a list on page 55
To do this task, you must be logged on to the GV STRATUS application with administrator privileges.
1. Right-click in the Properties tab of the Inspector and select Reorder Properties.
The Reorder Properties dialog box opens.
2. Select a property and use the up/down arrows to move the position of the property.
3. Repeat the above step with each property that you want to reorder.
4. If you want those properties at their default positions, click the Revert to Default button.
5. Click OK.
Properties in the Inspector reordered according to your selection.
The reordered properties take effect globally for all user accounts at next log on to the GV STRATUS
application.
74 GV STRATUS User Manual 2014 02 21
Page 75

Viewing relationships
You can view lists of related assets, based on the type of relationship.
In the Asset List identify the asset whose relationships you want to view and do one of the
following:
• Open the asset in the Inspector panel and select a tab from several relationship tabs.
• Right-click the asset and select View Related. A menu of relationship types is displayed. Select
a relationship type. Relationships are displayed in the Asset List.
Viewing the properties of an item
You can view the properties of an item in several locations in the application.
• To view basic asset properties as a tooltip, hover the mouse pointer over an item in the Asset
List panel.
• To view more asset properties, open the asset in the Inspector panel and view the General area.
• To view properties of a playlist or sequence event, right-click on the event in the Editor Panel
and select Properties, or drag the event to the Inspector panel.
The event's properties display in the Inspector panel.
Managing assets
• To modify the display of properties in Tiles view, right-click on the Asset List panel, select Tile
Properties, and reorder the top three items as desired.
• To view the properties associated with a keyword or marker, hover the mouse pointer over the
symbol associated with that keyword or marker.
The thumbnail and properties associated with the keyword or marker appear as an overlay tooltip.
2014 02 21 GV STRATUS User Manual 75
Page 76

Managing assets
Verifying proxy association
1. To verify the proxy association of a single asset using the Inspector panel, do the following:
a) In the GV STRATUS application Asset List, double-click an asset.
The asset is displayed in the Inspector.
b) In the Details area of the Inspector, click the Associations tab.
c) Verify that there is a row that reports Proxy in the Device Location column.
76 GV STRATUS User Manual 2014 02 21
Page 77

Managing assets
2. To verify the proxy association of multiple assets in an Asset List, do the following:
a) Add the Has Proxy column to the Asset List, if it is not already added.
b) Identify assets with the the Proxy asset type icon in the column.
c) Sort the list on the Has Proxy column.
Related Topics
Regenerating proxy on page 77
Adding and removing columns in a list on page 55
Sorting a list view on page 54
Regenerating proxy
A low-resolution proxy is automatically generated for a high-resolution asset if you have the proxy
encoder in your operation. If you have a high-resolution asset for which there is no low-resolution
proxy, you can regenerate the proxy for that asset only.
You cannot generate proxy for a growing clip. You must allow the recording of the high-resolution
asset to complete before generating proxy.
1. If the asset is currently loaded in the Inspector panel, eject it before generating proxy for it.
2. In the GV STRATUS application Asset List, right-click the asset and select Regenerate Proxy.
The Proxy Encoder creates the proxy asset.
Related Topics
Verifying proxy association on page 76
2014 02 21 GV STRATUS User Manual 77
Page 78

Managing assets
78 GV STRATUS User Manual 2014 02 21
Page 79

Ingesting assets
The Scheduler tool
The Scheduler tool allows you to view congured channels and schedule events to be recorded for
later use. The Scheduler tool appears in the application as a panel that can be accessed from the
Window menu or the tools section of the Navigator panel.
The Scheduler tool features are as follows:
• Clock — Shows current time according to the system time of the Ingest Service server.
• Timeline — Shows dates and hours to guide event scheduling.
• Available channels — Shows channels that are congured to record events.
• Scheduler toolbar — Consists of buttons for scheduling and viewing events.
• Current time indicator — Moves along the timeline according to the current time.
• Scheduled events — Shows events that have been added to the Scheduler tool.
• Ingest Service status indicator — Shows the connection status between Ingest core service and
the Scheduler tool.
• — Connected
• — Disconnected
2014 02 21 GV STRATUS User Manual 79
Page 80

Ingesting assets
With the tool, you can schedule events to record in advance, by specifying the date, time, and duration
of the recording. You can also choose whether to schedule a single event, main and backup events,
recurring events, open ended events, or crash record an event.
By default, the Scheduler tool opens to the current day, date, and time according to your system
time.
If you hover on an event on the Scheduler tool, a tooltip appears to show the event name, video
thumbnail, router source, recording location, channel, time information, duration of the event, and
error description if available.
If you hover on a channel, a tooltip appears to show the channel name, server name, recording port,
router destination, remaining storage and status of the channel. When the channel is down, the font
color of the channel name changes from white to orange.
NOTE: Recording will not proceed if there is insufcient storage on the K2 system. The recording
button is disabled when remaining storage is less than the default crash duration as set in the
GV STRATUS Control Panel application.
Scheduler buttons
These buttons located on the Scheduler toolbar let you perform various functions.
Add Event: Adds a scheduled event.
80 GV STRATUS User Manual 2014 02 21
Page 81

Ingesting assets
Modify Event: Modies the selected event.
Delete Event: Deletes the selected event.
Go to Current: Goes to the current time of day in the Scheduler window.
Toggle Timelock: Goes to the current time of the day in the Scheduler and turns on the timelock
mode.
Go to Date: Goes to the current day in a calendar.
Zoom In: Zooms in the Scheduler tool.
Zoom Out: Zooms out the Scheduler tool.
View Mode: Controls the display and size of the items in a list or panel.
These buttons located on each channel window in the Scheduler let you record an event immediately.
Record: Starts recording. Toggles with Stop button.
Stop: Stops recording. Toggles with Record button.
Expand: Shows/hides settings and lists.
Live Streaming Video: Enables/disables the display of the live video stream.
About view modes
You can customize event display in the Scheduler tool. There are 6 types of view modes that can
be selected as follows:
Details view
2014 02 21 GV STRATUS User Manual 81
Page 82

Ingesting assets
Tiles view
Small
Thumbnails
view
Medium
Thumbnails
view
82 GV STRATUS User Manual 2014 02 21
Page 83

Large
Thumbnails
view
Track view
Ingesting assets
Related Topics
Customizing the display of list items on page 53
Event status colors
Each event displays in a color that identies its status in the Scheduler.
NOTE: In track view, ready events display in blue. While in all other view modes,
ready events display in gray.
Event StatusEvent Color
READYBlue
RESERVED CHANNEL FOR SPECIFIC RECORDINGBlack
CUEINGYellow
CUEDOrange
RECORDINGRed
RECORDED SUCCESSFULLYGreen
ERROR IN RECORDINGPurple
2014 02 21 GV STRATUS User Manual 83
Page 84

Ingesting assets
Adding an event
To ingest feeds, add an event in the Scheduler tool for each feed that you want to record.
1. Click the Add Event button. ( A)
The Inspector panel loads event properties.
Tip: You can also right-click anywhere on the Scheduler's track view and select Add
Event from the context menu. The Inspector panel automatically shows the channel and
start time based on the location of your mouse on the Scheduler interface.
84 GV STRATUS User Manual 2014 02 21
Page 85

Ingesting assets
2. Fill in properties of your event according to the following:
a) Template — Select a template from the drop-down list, if it's already congured.
b) Name — Enter a name for the scheduled event.
c) Router Source — If a router is congured as part of the system, select router source for the
event from the drop-down list.
d) Recording Channel — Channel availability depends on the conguration in your system. You
can only see and select channels that have been congured for the Scheduler tool. Make sure
that the channel is not in Continuous Record mode.
e) Clip Location — Select a record location for the event from the drop-down list.
f) Start Record Now — Check this box to start recording immediately after you click the Add
button. If you don't enter the end time of the event, the default is set to1 hour. You can also
set the default duration in the Feed Ingest panel of the GV STRATUS Control Panel
application.
g) Start Date — Enter the date and time you want the recording to start. The default date is the
current date. You can also select your start date from the calendar when you click the
drop-down arrow. Enter the time using the format hour:minutes:seconds.
NOTE: When scheduling two events back to back, a space of 10 seconds is required from
the stop of the rst record to the start of the second record. In order to compensate this, it
is recommended that the default record duration reect a stop time 10 seconds prior to the
rounded duration (e.g., 00:59:50 for a 1 hour record).
h) Open Ended Record — Check this box if you want the recording to continue until you manually
stop it. With this record, you only need to provide the start time.
i) Duration — Enter the duration of the event. The default duration can be set in the Feed Ingest
panel of the GV STRATUS Control Panel application. The maximum duration that can be
set for an event is 23:59:59.
j) End Date — Enter the date and time you want the recording to end. You can also select your
end date from the calendar when you click the drop-down arrow.
k) Record Backup — Check this box if you want to record a backup of the feed.
l) Backup Channel — Select a backup channel from the drop-down list.
NOTE: You cannot select the same channel for both main and backup recordings. Backup
channel is disabled when only one channel is congured for the Scheduler.
m) Backup Clip Location — Select a record location for the backup clip.
n) Tags — Enter a tag, or tags for the event.
o) Description — Enter the description of the event.
p) Comments — Enter any comments that you have on the event.
By default, the Scheduler tool opens to the current day, date, and time according to your system
time. The time of day format within the Scheduler is directly from the current time of day format
of your machine.
To set the 24 hour format to your Scheduler, change the time format of your Windows client by
selecting Start | Control Panel | Clock, Language and Region, and change the time format
accordingly.
NOTE: Changes to the Scheduler’s time format can only be seen after a restart of the GV
STRATUS application.
2014 02 21 GV STRATUS User Manual 85
Page 86

Ingesting assets
3. You can also check other properties of the asset under the Other section.
4. In the Misc tab of the Inspector, you can select the Recurring Event check box if you want the
scheduled event to occur more than once.
NOTE: If your recurring event includes the start or end time of the Daylight Saving Time, a
dialog pops up to warn the possibility of time change in your scheduled recording.
Click OK to close the dialog.
5. In the Link to Placeholder tab of the Inspector, you can select a placeholder if you want to link
it to your event, and click the Link button.
The placeholder name and ID ll in to replace the name of the event, and the placeholder row
color changes to light blue to signify it as Being Edited in the Assignment List tool. You can
also congure the Being Edited status color in the ALP tab of user preferences settings.
NOTE: For playout, make sure the clip record location is the same as the playout location.
6. Click the Add button in the Inspector panel.
The event is added to the Scheduler tool with a Ready status.
Related Topics
Limitations for creating and naming assets and bins on page 298
Adding an event using Quick Schedule
With Quick Schedule, you can add events directly on the scheduling interface.
NOTE: Quick Schedule is only supported on the Track view mode of the Scheduler tool.
1. Right-click on the scheduling track and select Quick Schedule. ( Q)
Once you are in the Quick Schedule mode, your mouse pointer turns into the Add Event icon
with time tooltip for your reference.
86 GV STRATUS User Manual 2014 02 21
Page 87

Ingesting assets
2. Click to select the start time, and drag your mouse to the right to select the end time.
3. Release the mouse after the end time is selected.
4. Right-click on the event, and select Modify Event to add more information.
The Inspector loads the event properties with start time, end time, and recording channel readily
selected.
5. Fill out other information of the event.
6. Click the Modify button.
The event adds to the Scheduler tool with a Ready status.
Adding a recurring event
If you want to schedule an event to record on more than one occasion, such as every day, every
week, or once a month, you can create a recurring event.
Scheduling a recurring event is the same as scheduling a one-time recording except that you enter
information about how the event recurs throughout time. You can schedule the event to recur up to
three years in advance.
1. Add a new event.
The Inspector panel loads new event properties that need to be lled in.
2. Click on the Misc tab.
2014 02 21 GV STRATUS User Manual 87
Page 88

Ingesting assets
3. Select the Recurring Event check box.
The Recurring Event section opens.
4. Select how you want the event to recur:
• Daily - Enter the number of days for the event to recur or select Every Weekday.
• Weekly - Enter the number of weeks for the event to recur and check the boxes for the day
or days you want the event to record.
• Monthly - Select a specic date of the month or a specic day of the month to record.
5. Select the range of recurrence, by selecting a Start date, and either an End by date or an End after
a certain number of occurrences.
NOTE: If your range of recurrence includes the start or end time of the Daylight Saving
Time, a dialog pops up to warn the possibility of time change in your scheduled recording.
Click OK to close the dialog.
6. Click Add.
Recurring events appear on the Scheduler tool.
88 GV STRATUS User Manual 2014 02 21
Page 89

Adding a backup event
You can create a backup event simultaneously with the main event, to avoid unexpected loss of a
recording. You can also set a backup event if you want to record multiple volumes with different
front end K2 systems.
1. Add a new event.
2. Select the Record Backup checkbox.
3. Select the Backup Channel from the drop-down list.
Available channels are listed depending on channel setup within Feed Ingest setting in the Control
Panel application.
Ingesting assets
4. Select the Backup Clip Location from the drop-down list.
It is highly recommended that you select a separate bin or server for the location of the backup.
NOTE: If the clip location for main and backup events are the same, the title of the backup
event will be appended with '_b' to differentiate it from the main event.
5. Click Add.
Both main and backup events appear on the Scheduler tool.
2014 02 21 GV STRATUS User Manual 89
Page 90

Ingesting assets
Adding a channel reservation
Channel reservation allows you to reserve a channel for future events and crash records. This ensures
that the channel is reserved for a specic recording and cannot be used to schedule any other events.
1. Right-click and select Add Channel Reservation.
The Add Channel Reservation dialog opens.
2. Specify the name of the reservation.
3. Select the recording channel from the drop-down list.
4. Select the start date, start time, end date, and end time in the Time/Date Info section.
5. Click the Recurring Event Show/Hide control if you want to reserve the channel for a recurring
event.
Select how you want the event to recur by lling up the Recurring Event section.
6. Click Add.
The channel reservation appears as a black event on the Scheduler tool.
90 GV STRATUS User Manual 2014 02 21
Page 91

You cannot quick-schedule other events or extend other events to overlap with a channel reservation,
but you are allowed to crash record.
Starting a crash record event
You can crash record when you want to record an event immediately. You can also congure a
default duration for all crash record events in the GV STRATUS Control Panel application.
NOTE: Ensure that you have sufcient storage before proceeding with crash record. If the
remaining storage on the K2 system is less than the default crash duration that was set in the
GV STRATUS Control Panel, the Record button is disabled.
Ingesting assets
1. Enter the name of the clip in the Name eld. If you do not enter a name prior to the crash record,
the application sets a default name with a default sufx. If a clip already exists with the same
name, the application uses the next available default sufx.
2. Select the router source for the recording from the Source drop-down list, if it is available.
3. Select the bin for the clip to be recorded into from the Location drop-down list. If you do not
enter a location prior to the crash record, the clip is recorded into the channel's default bin.
4. Select the Aspect ratio if recording to an SD channel.
5. Click the Record button.
The event cues and begins recording. While recording, the channel and event display red.
6. If you want to change the event duration while recording, right-click on the event and select
Modify Event, or click the Modify Event button. ( M)
Event properties display in the Inspector panel.
You can also double-click the recording event to launch event properties in the Inspector.
7. Enter the new End Time for the event and click Modify.
The crash record event updates to the new end time.
8. If you want to stop the recording at any time, click the Stop button. ( S)
Recording stops and the event status changes to Done.
Locating an event
To locate an event in the Scheduler tool, you can scroll along the timeline and use navigation buttons
on the toolbar.
1. Scroll to the date and time of the event on the timeline if you know the starting date and time of
the recording.
2014 02 21 GV STRATUS User Manual 91
Page 92

Ingesting assets
2. Click the Zoom In button. ( Up Arrow)
The Scheduler window zooms in to show the timeline in detail. You can keep zooming in until
it shows one-minute increments on the timeline.
3. Scroll along the timeline to nd your event.
4. To zoom out the Scheduler window, click the Zoom Out button. ( Down Arrow)
You can keep zooming out until it shows six-hour increments on the timeline.
5. You can go to the previous day ( G) or the next day ( H) by scrolling the timeline or pressing
those shortcut keys.
6. To nd other events on different dates, click the Go to Date button. ( D)
A calendar opens for you to select a specic date to view on the Scheduler. You can select a day
of any month from the calendar and go to that date in the Scheduler.
7. To automatically get to the current time of the day in the Scheduler's track view mode, choose
one of these steps below:
• Click the Go to Current button.
• Click the Toggle Timelock button. The timelock turns on and the current time indicator is
locked to the center of the Scheduler tool. The timeline moves accordingly but the Scheduler
locks the current time display at the center of the scheduling track all the time.
This is useful if you want to check the event that is currently recording.
The timelock turns off if you scroll along the track again.
Modifying an event
You can modify an event by changing the event title, recording channel, clip location, router source,
timing information, add a backup for the existing event or link the event to a placeholder.
1. Select the event you want to modify on the Scheduler tool.
92 GV STRATUS User Manual 2014 02 21
Page 93

2. Do one of the following:
• Click the Modify Event button. ( M)
• Right-click and select Modify Event.
The event opens in the Inspector panel.
Ingesting assets
3. If the event is part of a series, a dialog box pops up asking if you want to modify this occurrence
or the entire series. Select the one you want to modify and click OK.
NOTE: Link to a placeholder is not supported for recurring events.
4. Modify the event details or link it to a placeholder.
5. Click Modify.
The event updates with those changes on the Scheduler tool.
NOTE: When double-click an event or drag it into the Inspector panel, the Inspector loads
properties of assets. If then linked to a placeholder, the clip will not be renamed according to the
2014 02 21 GV STRATUS User Manual 93
Page 94

Ingesting assets
Viewing and modifying metadata of events
placeholder's title. Make sure that you follow the exact steps in this topic to modify event in the
Inspector and link to a placeholder.
You can view and modify metadata of an event in the Inspector panel. The inserted metadata can
then be used as the search criteria to easily search assets in the Asset List panel.
1. To view or modify metadata of an event, do one of the following below:
• Drag and drop the event into the Inspector panel.
• Double-click the event.
The event metadata loads into the Inspector panel.
2. On the Properties tab, you can view or modify metadata of the event.
3. To lock the status of the event, click the Unlocked button.
The event is now locked. To unlock, click the Locked button.
94 GV STRATUS User Manual 2014 02 21
Page 95

Ingesting assets
4. To add a star rating, click the star or stars next to Rating.
When you add a star, it retains the color ll even when the mouse is no longer hovering over it.
5. To view other metadata, click the Other drop-down arrow.
6. Set the MetadataExpireDate and Source ID, if needed.
7. To view list of placeholders and related assets, see other tabs of the Inspector panel.
Related Topics
Viewing relationships on page 75
Verifying proxy association on page 76
Extending an event
You can extend the start and end time of an event on the scheduling interface itself.
NOTE: This feature is only supported in the Scheduler's track view mode.
1. Select the event that you want to extend within the Scheduler tool.
2. Point your mouse at the edge of the event so that the mouse pointer turns into a double-sided
arrow.
2014 02 21 GV STRATUS User Manual 95
Page 96

Ingesting assets
3. Click and drag to extend the start or end time of the event.
You can see the time tooltip and event shadow indicating the time change.
4. Release your mouse at the new time.
A dialog box opens for you to conrm the change.
5. Click Yes.
The Scheduler tool updates the event to a new start time or end time.
Moving an event
You can move a scheduled event within the same channel or to a different channel. This is useful
when the current channel is not available or another event needs to be scheduled into the channel
at the same time.
NOTE: This feature is only supported in the Scheduler's track view mode.
1. Select the event you want to move on the Scheduler tool.
2. Press the Ctrl button and drag the event to another time or another channel.
Once you drag the event, a tooltip appears to help you decide the start time of the event.
3. Drop the event to the new location and release the Ctrl button.
A dialog box opens for you to conrm the move of the event.
4. Click Yes.
The Scheduler tool updates the event change.
Deleting an event
You can delete events on the Scheduler tool if you need to.
1. Select an event or multiple events that you want to delete.
To select multiple events, hold the Shift key down and select all events between two selected
events; or hold the Ctrl key down and select events randomly.
2. Click the Delete Event button. ( Delete)
3. When prompted Delete this event?, click Yes.
Events are deleted from the Scheduler tool.
96 GV STRATUS User Manual 2014 02 21
Page 97

Deleting a recurring event
When you want to delete a recurring event, you can choose either to delete a single occurrence of
the recurring event or the whole series.
1. Select the recurring event that you want to delete.
2. Click the Delete Event button. ( Delete)
3. When prompted Do you want to delete this occurrence or the entire series?, select the option that
you want.
4. Click OK.
The recurring event is deleted from the Scheduler tool.
Previewing an event
You can preview a currently recording event or a recorded event of the Scheduler tool. The event
can be previewed either on the Inspector or Source Viewer panel.
1. Select a currently recording event or a recorded event on the Scheduler tool.
2. Do one of the following below:
Ingesting assets
• Double-click the event to load it into the Inspector panel.
• Drag the event and drop it into the Inspector or the Source Viewer panel.
The clip loads.
3. You can use transport control buttons within the panel to view the clip.
Related Topics
Previewing a live streaming video on page 25
2014 02 21 GV STRATUS User Manual 97
Page 98

Ingesting assets
Creating a template
Saving event as a template
A template saves time by storing information that can be used for future events.
A template can be created in two ways:
• Create a template from an existing event
• Create a template from the user preferences setting
You can save an existing event as a template in the Scheduler tool.
1. Select the event you want to use as a template.
2. Right-click and select Save As Template.
The Add Template dialog opens.
98 GV STRATUS User Manual 2014 02 21
Page 99

3. Fill in the information that you want included in the template.
Ingesting assets
a) Template — Enter the name of the template.
b) Clip Title — Enter a different clip title if needed. By default, the clip title of the selected event
is automatically entered in this eld.
c) Router Source — Select a different router source to record from in the drop-down list if
needed. By default, the router source of the selected event is automatically entered in this
eld.
d) Aspect ratio — Select the aspect ratio if recording to an SD channel.
e) Recording Channel — Select a different channel than the one automatically entered from the
selected event if needed.
f) Clip Location — Select a different record location than the one automatically entered from
the selected event if needed.
g) Record Backup — Check the box if you want to record backup of an event as part of the event
template. Select the backup channel and clip location from the drop-down lists.
h) Start Record Now — Check this box to save the crash record attribute in the template.
i) Open Ended Record — Check this box to save the open ended record attribute in the template.
j) Make Public — Check this box if you want the template to be available to everyone.
k) Save as Default Template for Recording Channel: — Check this box if you want to assign
the template as a default template for the particular channel. This allows users to crash record
easily and saves time by not having to ll up details of the event.
4. Click Add to save the template.
NOTE: You cannot create a template from a channel reservation, but only from feed events
on the Scheduler tool.
2014 02 21 GV STRATUS User Manual 99
Page 100

Ingesting assets
Adding a template
The template is available for you, and other users within your broadcast operation if you set it as a
public template. You can select it within the Template drop-down list when you add an event.
You can also create an event template within the user preferences window.
1. Select Edit | User Preferences.
The User Preferences dialog box opens.
The GV STRATUS application shows or hides tabs based on the roles assigned to your GV
STRATUS log on credentials.
2. To congure Scheduler template settings, select the Scheduler tab.
3. Click Add to create a template.
The Add Template dialog opens.
100 GV STRATUS User Manual 2014 02 21
 Loading...