

Page 1
GV Connect
Plug-in
Apple Final Cut Pro Integration with K2 systems
User Manual
Software Version 1.0
071-8739-00
December 2009
Page 2
Affiliate with the N.V. KEMA in The Netherlands
CERTIFICATE
Certificate Number: 510040.001
The Quality System of:
Thomson Inc, and its worLdwide Grass Valley division affiliates DBA
GRASS VALLEY
Headquarters
400 Providence Mine Rd
Nevada City, CA 95959
United States
15655 SW Greystone Ct.
Beaverton, OR 97006
United States
10 Presidential Way
Suite 300
Woburn, MA 01801
United States
Kapittelweg 10
4827 HG Breda
The Nederlands
7140 Baymeadows Way
Ste 101
Jacksonville, FL 32256
United States
2300 So. Decker Lake Blvd.
Salt Lake City, UT 84119
United States
Rue du Clos Courtel
CS 31719
35517 Cesson-Sevigné Cedex
France
1 rue de l’Hautil
Z.I. des Boutries BP 150
78702 Conflans-Sainte
Honorine Cedex
France
Technopole Brest-Iroise
Site de la Pointe du Diable
CS 73808
29238 Brest Cedex 3
France
40 Rue de Bray
2 Rue des Landelles
35510 Cesson Sevigné
France
Spinnereistrasse 5
CH-5300 Turgi
Switzerland
Brunnenweg 9
D-64331 Weiterstadt
Germany
Carl-Benz-Strasse 6-8
67105 Schifferstadt
Germany
Including its implementation, meets the requirements of the standard:
ISO 9001:2008
Scope:
The design, manufacture and support of video and audio hardware and software products and
related systems
.
This Certificate is valid until: June 14, 2012
This Certificate is valid as of: June 14, 2009
Certified for the first time: June 14, 2000
H. Pierre Sallé
President
KEMA-Registered Quality
The method of operation for quality certification is defined in the KEMA General Terms
And Conditions For Quality And Environmental Management Systems Certifications.
Integral publication of this certificate is allowed.
KEMA-Registered Quality, Inc.
4377 County Line Road
Chalfont, PA 18914
Ph: (215)997-4519
Fax: (215)997-3809
CRT 001 073004
Accredited By:
ANAB
Page 3
GV Connect
Plug-in
Apple Final Cut Pro Integration with K2 systems
User Manual
Software Version 1.0
071-8739-00
December 2009
Page 4
Copyright Copyright © Grass Valley, Inc. All rights reserved. Printed in the United States of America.
Portions of software © 2000 – 2009, Microsoft Corporation. All rights reserved. This document
may not be copied in whole or in part, or otherwise reproduced except as specifically permitted
under U.S. copyright law, without the prior written consent of Grass Valley, Inc., P.O. Box
59900, Nevada City, California 95959-7900. This product may be covered by one or more U.S.
and foreign patents.
Disclaimer Product options and specifications subject to change without notice. The information in this
manual is furnished for informational use only, is subject to change without notice, and should
not be construed as a commitment by Grass Valley, Inc. Grass Valley, Inc. assumes no
responsibility or liability for any errors or inacc uracies that may appear in this publication.
U.S. Government
Restricted Rights
Legend
Trademarks and
Logos
Revision Status
Use, duplication, or disclosure by the United States Government is subject to restrictions as set
forth in subparagraph (c)(1)(ii) of the Rights in Technical Data and Computer Software clause
at DFARS 252.277-7013 or in subparagraph c(1) and (2) of the Commercial Computer
Software Restricted Rights clause at FAR 52.227-19, as applicable. Manufacturer is Grass
Valley, Inc., P.O. Box 59900, Nevada City, California 95959-7900 U.S.A.
Grass Valley, K2, Aurora, Summit, Dyno, Solo, Infinity, Turbo, Profile, Profile XP, NetCentral,
NewsBrowse, NewsEdit, NewsQ, NewsShare, Ne wsQ Pro, and Media Manager are either
registered trademarks or trademarks of Grass Valley, Inc. in the United States and/or other
countries. Grass Valley, Inc. products are covered by U.S. and foreign patents, issued and
pending. Additional information regarding Grass Valley, Inc. trademarks and other proprietary
rights may be found at www.grassvalley.com.
Other trademarks and logos used in this document are either registered trademarks or
trademarks of the manufacturers or vendors of the associated products, such as Microsoft®
Windows® operating system, Windows Media® play er, Internet Explorer® internet browser,
and SQL Server™. QuickTime and the QuickTime logo are trademarks or registered
trademarks of Apple Computer, Inc., used under license therefrom.
Rev Date Description
December 18,
2009
Initial release of the GV Connect User Manual — 071-8739-00
4 GV Connect User Manual 18 December 2009
Page 5

Contents
Grass Valley Product Support..................................................................................................7
Chapter 1: Getting started..........................................................................................9
About GV Connect................................................................................................................10
Launching GV Connect.........................................................................................................10
Chapter 2: Importing K2 media................................................................................13
Locating K2 media.................................................................................................................14
Locating other media.............................................................................................................14
Adding media to your Final Cut Pro project...........................................................................14
Updating growing files...........................................................................................................15
Chapter 3: Exporting K2 media................................................................................17
Exporting to K2 storage.........................................................................................................18
Using Quick Export................................................................................................................18
Contents
18 December 2009 GV Connect User Manual 5
Page 6

Contents
6 GV Connect User Manual 18 December 2009
Page 7

Grass Valley Product Support
To get technical assistance, check on the status of a question, or to report a new issues,
contact Grass Valley Product Support via e-mail, the Web, or by phone or fax.
Web Technical Support
To access support information on the Web, visit the product support Web page on the
Grass Valley Web site. You can download software or find solutions to problems.
World Wide Web: http://www.grassvalley.com/support/
Technical Support E-mail Address: gvgtechsupport@grassvalley.com
Telephone Support
Use the following information to contact Product Support by phone.
International Support Centers
Our international support centers are available 24 hours a day, 7 days a week.
Authorized Local Support Representative
A local support representative may be available in your country. To locate a support
center during normal local business hours, refer to the following list. This list is
regularly updated on the website for Grass Valley Product Support
(http://www.grassvalley.com/support/contact/phone/)
After–hours local phone support is also available for warranty and contract customers.
Macau
In countryToll freeSupport Center
+33 1 48 25 20 20+800 80 80 20 20France
+1 530 478 4148+1 800 547 8949United States
TelephoneCountyRegion
+86 10 5883 7575ChinaAsia
+852 2531 3058Hong Kong, Taiwan, Korea,
+81 3 6848 5561Japan
+603 7492 3303Southeast Asia - Malaysia
+65 6379 1313Southeast Asia - Singapore
18 December 2009 GV Connect User Manual 7
Page 8

Grass Valley Product Support
South America
TelephoneCountyRegion
+91 22 676 10300India
1 300 721 495AustraliaPacific
0800 846 676New Zealand
+61 3 8540 3650For callers outside Australia
or New Zealand
+55 11 5509 3440AllCentral America,
North America
North America, Mexico,
Caribbean
France
Eastern Europe
Belarus, Russia,
Tadzhikistan, Ukraine,
Uzbekistan
Nordics (Norway, Sweden,
Finland, Denmark, Iceland)
Southern Europe – Italy
+1 800 547 8949;
+1 530 478 4148
+44 118 923 0499UK, Ireland, IsraelEurope
+31 (0) 35 62 38 421Benelux – Netherlands
+32 (0) 2 334 90 30Benelux – Belgium
+800 80 80 20 20;
+33 1 48 25 20 20
+49 6150 104 444Germany, Austria,
+7 095 258 09 20;
+33 (0) 2 334 90 30
+45 40 47 22 37; +32 2 333
00 02
Rome: +39 06 87 20 35 28 ;
+39 06 8720 35 42. Milan:
+39 02 48 41 46 58
+34 91 512 03 50Southern Europe – Spain
+41 56 299 36 32Switzerland
+971 4 299 64 40Middle EastMiddle East, Near East,
Africa
8 GV Connect User Manual 18 December 2009
Near East and Africa
+800 80 80 20 20;
+33 1 48 25 20 20
Page 9

Chapter 1
Getting started
This section contains the following topics:
• About GV Connect
• Launching GV Connect
18 December 2009 GV Connect User Manual 9
Page 10

Getting started
About GV Connect
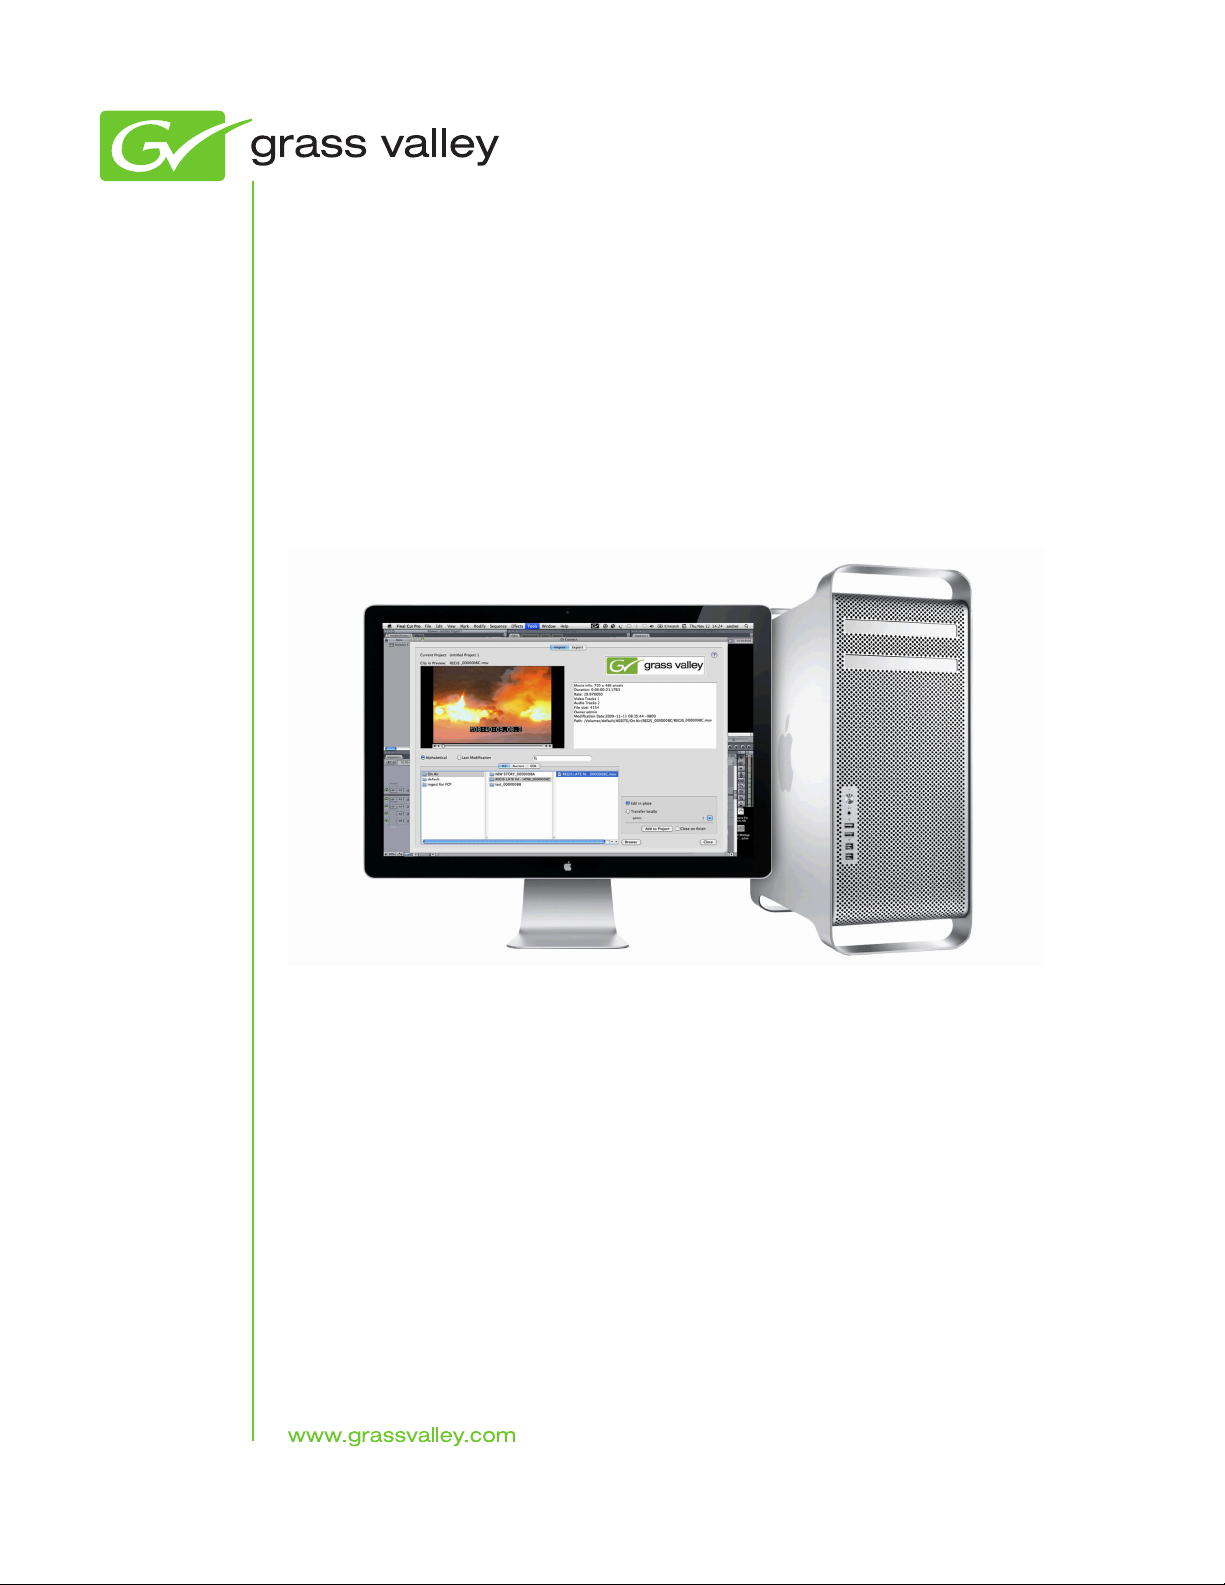
GV Connect is a Grass Valley plug-in for Final Cut Pro. With the plug-in you can
quickly and easily locate QuickTime files on a K2 System (SAN or stand-alone). Then
you can add the files to the current Final Cut Pro project to allow editing of the files
directly over the network or after transfer locally. The capability to add files without
file transfer is called Edit in Place. The plug-in also includes Final Cut Pro support
for Aurora sequences, growing file support, and export/render/flattening of Final Cut
Pro finished sequences on a K2 system for sharing or playout.
With GV Connect you can do the following:
Import
• Browse K2 (SAN or standalone) file structure to find, preview and add or transfer
clips to bin
• Browse K2/Aurora file structure to find, preview and add or transfer clips to bin
• Browse K2/Aurora file structure to find, preview and add Sequences to bin
• Browse local or network path for QuickTime files to preview and add or transfer
to bin as well as adding sequences to bin.
Export
• Export one or multiple clips or sequence to a K2 system (SAN or standalone)
• Two presets available: Export and Quick Export
The GV Connect Final Cut Pro plug-in is installed in the Final Cut Pro plug-in folder
and is available on the Final Cut Pro Tools menu.
Launching GV Connect
The following are prerequisites for launching GV Connect with all functionality
available:
• K2 FCP Connect must be licensed
• A GrassValley "default" drive must be mounted
• The project window in Final Cut Pro must be selected
1. In Final Cut Pro select the project or bin.
2. Click Tools | GV Connect.
The GV Connect window has two main tabs, one for exporting and one for
importing. The same tool is used for both tasks and allows batch operations for
both Import and export.
The GV Connect window opens with the Import tab selected by default.
10 GV Connect User Manual 18 December 2009
Page 11

Getting started
3. Click Export to open the Export tab.
4. Switch between the Import tab and the Export tab as desired.
18 December 2009 GV Connect User Manual 11
Page 12

Page 13

Chapter 2
Importing K2 media
This section contains the following topics:
• Locating K2 media
• Locating other media
• Adding media to your Final Cut Pro project
• Updating growing files
18 December 2009 GV Connect User Manual 13
Page 14

Importing K2 media
Locating K2 media
1. On the Import tab, select the tab for type of media you are locating.
• K2 – Select this tab to find content on a standalone K2 client or on a K2 SAN.
• Aurora – Select this tab to find content created on an Aurora System.
• EDL – Select this tab to find sequences created by Aurora Edit or by other Final
Cut Pro editors on a standalone K2 client or on a K2 SAN.
2. If desired, sort or filter media as follows:
• Alphabetical – Sort view alphabetically A to Z.
• Last Modification – Sort by last modified date on top.
• Search – Filter the view by typing a keyword. This is especially useful when
your folder contains thousands of clips.
3. Double-click media to preview.
The clip loads in the preview window and displays clip metadata.
After you have located the media to edit, add it to your Final Cut Pro project using the Add to
Project button..
Related Links
Adding media to your Final Cut Pro project on page 14
Locating other media
To locate media not in K2 storage you can browse a generic path using the Browse
button, which offers the following functionality:
• Edit in place, transfer, and preview
• Locate and import sequences (XML)
Adding media to your Final Cut Pro project
1. Locate and select the media to add to your project.
2. Select the method for adding the media to your project.
• Edit in place – Use this method to add a clip to the bin without moving the
media. With this method you are playing and editing the clip over the network.
This is the preferred method on a shared storage system such as a K2 SAN.
• Transfer Locally – Use this method to transfer the media corresponding to the
clip to your desired location. This is the preferred method if your editor is
connected via CIFS to a stand-alone K2 client. Depending on clip size, the
transfer can take a significant amount of time. Wait until the cursor no longer
indicates that the operation is in progress before proceeding.
14 GV Connect User Manual 18 December 2009
Page 15

3. Click Add to Project.
The clip is added to your Final Cut Pro project.
4. To return to Final Cut Pro, close the GV Connect plug-in.
Edit the media as desired in Final Cut Pro. When you are finished you can export the
media back to K2 storage.
Related Links
Locating K2 media on page 14
Updating growing files
1. In the Final Cut Pro menu bar (in the upper right in the Mac OSX toolbar), identify
the GV icon.
When this icon displays a green color, it means that a clip that is in your Final
Cut Pro project is currently growing in the K2 system and is ready for updating
in your project.
Importing K2 media
2. When the GV icon displays a green color , click the icon and select an
individual file or Refresh All.
The file or files are updated in your Final Cut Pro project.
18 December 2009 GV Connect User Manual 15
Page 16

Page 17

Chapter 3
Exporting K2 media
This section contains the following topics:
• Exporting to K2 storage
• Using Quick Export
18 December 2009 GV Connect User Manual 17
Page 18

Exporting K2 media
Exporting to K2 storage
1. Select the Export tab.
2. Under "Display only", select whether to display Sequences, Clips, or Both.
3. In the list of media, select the media to export to K2 storage.
You can make one selection or multiple selections.
4. Under Export Settings, select Custom.
5. In the drop-down list select the format in which the media is exported.
6. Click the down-arrow.
The "Choose a Directory for Export" dialog box opens.
7. Browse to the location in K2 Storage to which the media is exported.
8. Click Export.
A message box displays progress for each clip or sequence exported.
Using Quick Export
You can save and reuse export settings with the Quick Export feature. Once you have
configured your Quick Export settings you can use the GV Quick Export menu entry.
This bypasses the GV Connect plug-in main interface and automatically exports the
18 GV Connect User Manual 18 December 2009
Page 19

selected items in the Final Cut Pro bin to your predetermined location on K2 storage.
This feature can be very useful if you export all your finished material to a K2 HotBin.
1. Configure your Quick Export settings as follows:
a) Select the Export tab.
b) Click Quick Export.
c) Make export settings.
2. After your Quick Export settings are configured, you can repeatedly reuse the
settings as follows:
a) On the Final Cut Pro menu click Tools | GV Quick Export.
GV Connect automatically exports the clip to K2 storage, as specified by the
currently configured Quick Export settings.
Related Links
Exporting to K2 storage on page 18
Exporting K2 media
18 December 2009 GV Connect User Manual 19
Page 20

 Loading...