

Grandstream GXW400x User Manual

Grandstream Networks, Inc.
Analog IP Gateway GXW400x
4 or 8 FXS Ports
GXW400x User Manual www.grandstream.com
Firmware Version 1.0.0.77 support@grandstream.com

T
ABLE OF CONTENTS
GXW400x User Manual
WELCOME....................................................................................................................................................4
GATEWAY GXW400X OVERVIEW ............................................................................................................4
SAFETY COMPLIANCES.......................................................................................................................... ..4
WARRANTY ............................................................................................................................................4
CONFIGURE YOUR GXW400X............................................. .... .... .... ... .... .... .... ... ........ .... .... ... .... .... .............5
EQUIPMENT PACKAGING ...........................................................................................................................................5
CONNECT THE GXW400X.........................................................................................................................................5
FIGURE 1: DIAGRAM OF GXW400X BACK PANEL....................................................................................................5
FIGURE 2: DIAGRAM OF GXW400X DISPLAY PANEL ...............................................................................................6
APPLICATION DESCRIPTION........................................... .........................................................................7
EXAMPLES OF GXW400X CONFIGURATIONS ............................................................................................................7
APPLICATION ONE: GXW-400X FXS GATEWAY CONFIGURATION.............................................................7
APPLICATION TWO: GXW400X & GXW410X SCENARIO / TOLL- FREE CALLING BETWEEN LOCATIONS.......7
GXW400X FEATURES.................................................................................................................................8
SOFTWARE FEATURES OVERVIEW .............................................................................................................................8
HARDWARE SPECIFICATION.......................................................................................................................................8
BASIC OPERATIONS................................................................................................................................10
UNDERSTANDING GXW VOICE PROMPTS ...............................................................................................................10
PLACING A PHONE CALL........................................................................................................................................11
PHONE OR EXTENSION NUMBERS..........................................................................................................11
DIRECT IP CALLS .................................................................................................................................11
CALL HOLD.............................................................................................................................................................12
CALL WAITING........................................................................................................................................................12
CALL TRANSFER ....................................................................................................................................................12
3-WAY CONFERENCING .........................................................................................................................................13
HUNTING GROUP.....................................................................................................................................................13
INTER-PORT CALLING..............................................................................................................................................14
PSTN PASS THROUGH/LIFE LINE ............................................................................................................................15
SENDING AND RECEIVING FAX................................................................................................................................15
SUPPORT RADIUS PROTOCOL ................................................................................................................................15
CALL FEATURES.................................................................. ....................................................................16
CONFIGURATION GUIDE .............................................................................................................. ...........17
CONFIGURING GXW400X VIA VOICE PROMPT .......................................................................................................17
CONFIGURING GXW400X WITH WEB BROWSER................................................................................................18
ACCESS THE WEB CONFIGURATION MENU.............................................................................................18
END USER CONFIGURATION ....................................................................................................................................18
IMPORTANT SETTINGS .............................................................................................................................................19
NAT SETTINGS.....................................................................................................................................19
DTMF METHODS..................................................................................................................................19
PREFERRED VOCODER (CODEC)........................................................................................................19
END USER CONFIGURATION..................................................................................................................20
ADVANCED USER SETTINGS....................................................................................................................................22
FIGURE 3: SCREENSHOT OF ADVANCED USER CONFIGURATION LOGIN SCREEN ....................................................22
SAVING THE CONFIGURATION CHANGES.................................................................................................................32
FIGURE 4: SCREEN-SHOT OF SAVE CONFIGURATION PAGE .....................................................................................33
REBOOTING FROM REMOTE.....................................................................................................................................33
FIGURE 5: SCREEN-SHOT OF REBOOTING PAGE.......................................................................................................33
CONFIGURATION THROUGH A CENTRAL SERVER.....................................................................................................34
SOFTWARE UPGRADE.............................................................................................................................35
FIRMWARE UPGRADE THROUGH TFTP/HTTP......................................................................................................35
CONFIGURATION FILE DOWNLOAD........................................................................................................................36
Grandstream Networks, Inc. GXW400x User Manual Page 2 of 37
Firmware 1.0.0.77 Last Updated: 1/2008

FIRMW AR E AND CONFIGURATION FILE PREFIX AND POSTFIX ..............................................................................36
MANAGING FIRMWARE AND CONFIGURATION FILE DOWNLOAD ..........................................................................36
RESTORE FACTORY DEFAULT SETTING...................................................................................................................37
ABLE OF FIGURES
T
GXW400x User Manual
FIGURE 1: DIAGRAM OF GXW400X BACK PANEL ................................... ..........................................................5
IGURE 2: DIAGRAM OF GXW400X DISPLAY PANEL.................................................................... .....................6
F
F
IGURE 3: SCREENSHOT OF ADVANCED USER CONFIGURATION......................................................................22
F
IGURE 4: SCREEN-SHOT OF SAVE CONFIGURATION PAGE.............................................................................33
IGURE 5: SCREEN-SHOT OF REBOOTING PAGE.............................................................................................33
F
T
ABLE OF TABLES
GXW400x User Manual
TABLE 1: DEFINITIONS OF THE GXW CONNECTORS..........................................................................................5
ABLE 2: DEFINITIONS OF THE GXW DISPLAY PANEL.......................................................................................6
T
T
ABLE 3: GXW400X SOFTWARE FEATURES....................................................................................................9
T
ABLE 4: HARDWARE SPECIFICATION OF GXW400X .......................................................................................8
ABLE 5: DEFINITIONS OF THE GXW VOICE PROMPTS....................................................................................10
T
T
ABLE 6: CALL FEATURES TABLE (STAR CODE) ................................................ .............................................16
ABLE 7: BASIC SETTINGS PAGE DEFINITIONS ...............................................................................................20
T
ABLE 8: STATUS PAGE DEFINITIONS ............................................................................................................22
T
ABLE 9: ADVANCED CONFIGURATION PAGE DEFINITIONS..............................................................................23
T
ABLE 10: FXS PORTS CONFIGURATION DEFINITIONS....................................................................................26
T
ABLE 11: PROFILE PAGE DEFINITIONS .........................................................................................................27
T
ONFIGURATION GUI INTERFACE EXAMPLES
C
GXW400x User Manual
http://www.grandstream.com/user_manuals/GUI/GUI_GXW400x.rar
CREENSHOT OF ADVANCED USER CONFIGURATION PAGE
1. S
2. S
CREENSHOT OF BASIC SETTINGS CONFIGURATION PAGE
3. S
CREENSHOT OF FXS PORTS CONFIGURATION LOGIN PAGE
4. S
CREENSHOT OF PROFILE 1 CONFIGURATION PAGE
CREENSHOT OF PROFILE 2 CONFIGURATION PAGE
5. S
6. S
CREENSHOT OF STATUS CONFIGURATION LOG-IN PAGE
Grandstream Networks, Inc. GXW400x User Manual Page 3 of 37
Firmware 1.0.0.77 Last Updated: 1/2008

WELCOME
Thank you for purchasing the Grandstream GXW400x Analog FXS IP Gateway. The GXW40 0x offers an
easy to manage, easy to configure IP communications solution for any business with virtual and/or branch
locations. The GXW400x supports popular voice codec and is designed for full SIP compatibility and
interoperability with 3
technology, integrate a traditional phone system into a VoIP network, and efficiently manage
communication costs.
This manual will help you learn how to operate and manage your GXW FXS Analog IP Gateway and
make the best use of its many upgraded features including simple and quick installation, multi-party
conferencing, and direct IP-IP Calling. This IP Analog Gateway is very easy to manage and scalable,
specifically designed to be an easy to use and affordable VoIP solution for the small – medium business
or enterprise.
Gateway GXW400x Overview
The new GXW400x series has a compact and quiet design (no fans) and offers superb audio qu ality, rich
feature functionality, strong security protection, and good manageability. It is a uto-configurable, remotely
manageable and scalable.
The GXW400x features 4 or 8-port FXS interface for analog telephones, dual 10M/100Mbps network
ports with integrated router, PSTN life line in case of power failure, and an RS232 serial port for
administration. In addition, it supports the option of 2 SIP Server profiles, caller ID for various
countries/regions, T.38 fax, flexible dialing plans, security protection (SIPS/TLS), comprehensive voice
codec including G.711 (a/u-law), G.723.1, G.726(16/24/32/48 bit rates), G.729A/B/E and iLB C.
rd
party SIP providers, thus enabling you to fully leverage the benefits of VoIP
Safety Compliances
The GXW400x is compliant with various safety standards including FCC/CE. Its power adaptor is
compliant with UL standard. Warning: use only the power adapter included in the GXW400x package.
Using an alternative power adapter may permanently damage the unit.
Warranty
Grandstream has a reseller agreement with our reseller customer. End users shou ld con tact the comp an y
from whom you purchased the product for replacement, repair or refund.
If you purchased the product directly from Grandstream, contact your Grandstream Sales and Service
Representative for a RMA (Return Materials Authorization) number. Grandstream reserves the right to
remedy warranty policy without prior notification.
Caution: Changes or modifications to this product not expressly approved by Grandstrea m, or operation
of this product in any way other than as detailed by this User Manual, could void your manufacturer
warranty.
• This document is contains links to Grandstream GUI Interfaces. Please download the se examples
http://www.grandstream.com/user_manuals/GUI/GUI_GXW400x.rar
• This document is subject to change without notice. The latest electronic version of this user manual
is located @ http://www.grandstream.com/user_manual/GXW400x User_Manual.pdf
Reproduction or transmittal of the entire or any part, in any form or by any means, electronic or print, for
any purpose without the express written permission of Grandstream Networks, Inc. is not permitted.
Grandstream Networks, Inc. GXW400x User Manual Page 4 of 37
Firmware 1.0.0.77 Last Updated: 1/2008
for your reference.

CONFIGURE YOUR GXW400X
Connecting your GXW400x is easy. Before you begin, please verify the contents of the GXW400x
package.
EQUIPMENT PACKAGING
Unpack and check all accessories. Equipment includes:
• one 12V universal power adapter
• one Ethernet cable
• one device unit
CONNECT THE GXW400X
Managing the GXW and connecting the unit to the Vo IP network is very simple. Follow these four (4)
steps to connect your GXW to the Internet and access the unit’s configuration pages.
1. Connect standard touch-tone analog phones to the FXS1-FXS8 ports.
2. Insert the Ethernet cable into the WAN port of GXW400X and connect the other end of the
Ethernet cable to an uplink port (a router or a modem, etc.)
3. Conn ect a PC to the LAN port of GXW400X for initial configuration or if it is being used as a
router.
4. Insert the power adapter into the GXW400X and connect it to a wall outlet.
Follow instructions from topic “Configuring GXW 400X with Web Browser
GUI pages will guide you through the remaining steps to set-up your gateway. Examples of the GUI
Interfaces can be downloaded from: http://www.grandstream.com/user_manuals/GUI/GUI_GXW400x.rar
F
IGURE 1: DIAGRAM OF GXW400X BACK PANEL
” for initial configuration. The
.
GXW 400x
Reset
Power
LAN/WAN
RJ-45 Ethernet
Ports
ABLE 1: DEFINITIONS OF THE GXW CONNECTORS
T
LAN (or PC)
WAN (or LAN) Connect to the internal LAN network or router.
RESET
DC 12V
CONSOLE
PSTN Failover
port
FXS1 - FXS8
Grandstream Networks, Inc. GXW400x User Manual Page 5 of 37
Firmware 1.0.0.77 Last Updated: 1/2008
Connect the LAN port with an Ethernet cable to your PC.
Factory Reset button. Press for 7 seconds to reset factory default settings.
Power adapter connection
Console connection for a PC.
When the unit loses power or unit became unregistered, FXS port 1 will be able t o
make/receive calls from the PSTN line connected to this port.
FXS port to be connected to analog phones / fax machines.
Supply
Console
Connection
connection)
(PC
PSTN
Line
FXS
Ports
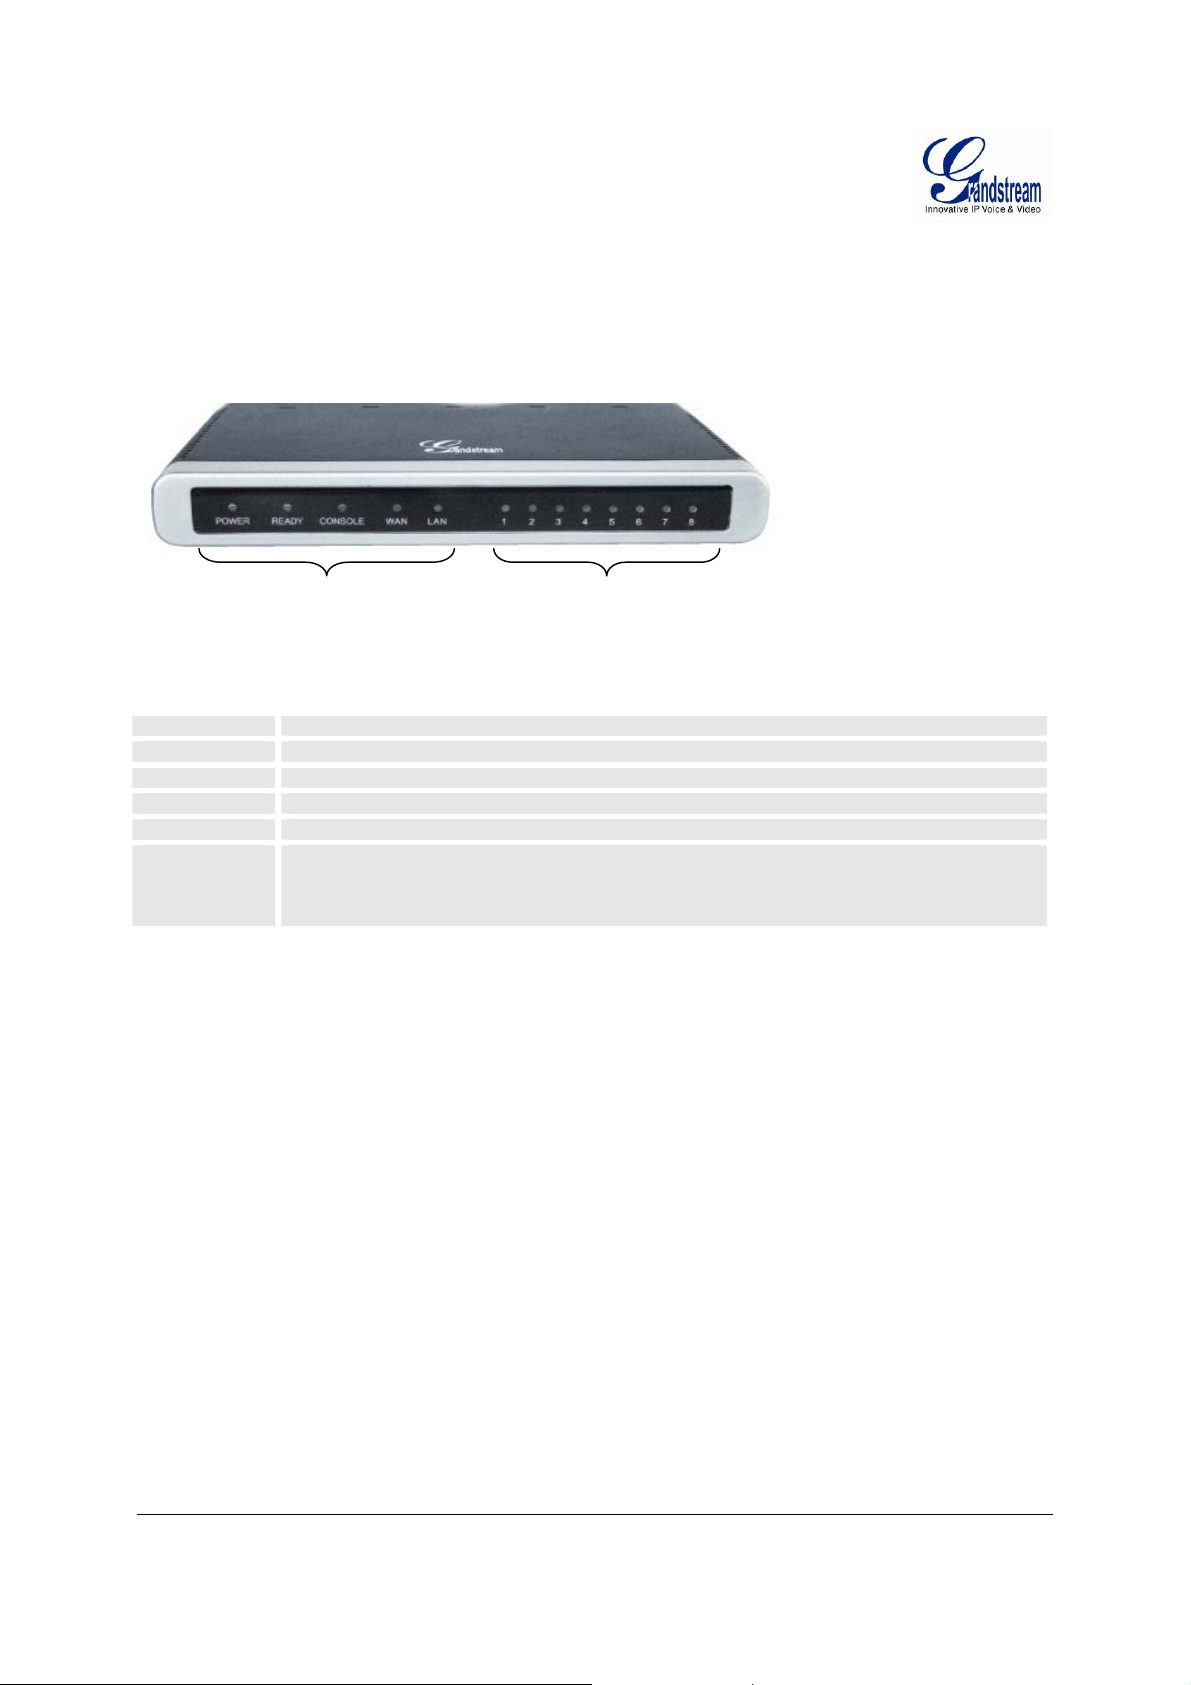
Once the GXW is turned on and configured, the front display panel indicates the status of the unit.
FIGURE 2: DIAGRAM OF GXW400X DISPLAY PANEL
GXW400x
Display LEDs
FXS port status
ABLE 2: DEFINITIONS OF THE GXW DISPLAY PANEL
T
Power LED
Ready LED
Console
LAN LED
WAN LED
LEDs 1 - 8
Indicates Power. Remains ON when Power is connected and turned ON.
Remains ON after boot-up.
Turns ON when Console port is being used.
Indicates LAN (or WAN) port activity
Indicates PC (or LAN) port activity
Indicate status of the respective FXS Ports on the back panel
Busy - ON (Solid Green)
Available - OFF
Slow blinking FXS LEDs indicates Voice Mail for that port.
NOTE: All LEDs display green when ON. Slow blinking of READY, WAN and LAN LED together
indicates a firmware upgrade or provisioning state. LEDs POWER, READY and WAN are ON when
device is up and running and successfully registered to the SIP Server. Slow blinking of READY LED
indicates that device has not registered with any SIP Service provider.
Grandstream Networks, Inc. GXW400x User Manual Page 6 of 37
Firmware 1.0.0.77 Last Updated: 1/2008

APPLICATION DESCRIPTION
There are two scenarios where the GXW400x series can be effectively used to enable any business to
leverage the benefits of VoIP and the Internet.
XAMPLES OF GXW400X CONFIGURATIONS
E
Application One: GXW-400x FXS Gateway Configuration
Anywhere in the world
Analog
Phones
4 or 8 Ports
INTERNET
CLOUD
GXW FXS Series
FXS Gateway acts as a ‘virtual office’,
connecting analog phones directly to
the gateway
Application Two: GXW400x & GXW410x Scenario / Toll- Free Calling Between Locations
Branch A - Boston, MA
4 employees
Analog
Phones
FX0
PPSSTTNN
d
CClloouud
Branch B – Denver, CO
4 employees
IInntteerrnneett
CClloouud
GXW410x
d
GXW400x
Grandstream Networks, Inc. GXW400x User Manual Page 7 of 37
Firmware 1.0.0.77 Last Updated: 1/2008

GXW400X FEATURES
The GXW400x is a next generation IP voice gateway that is interoperable and compatible with leading IPPBXs, Softswitches and SIP platforms. The GXW400x FXS series is auto-configurable, remotely
manageable and scalable. There are two FXS models, the GXW-4004 and GXW-4008, each offering
superb voice quality, traditional telephony functionality, easy deployment, and 4 or 8 FXS ports
respectively. Each model features flexible dialing plans, PSTN failover, integr ated call routin g to support a
pure IP network call and an external power supply.
OFTWARE FEATURES OVERVIEW
S
• 4 or 8 FXS ports
• Two RJ-45 ports (switched or routed)
• Multiple SIP accounts & profiles (4 or 8 accounts / choice of 2 profiles per account)
• Supports Voice Codecs:
G711(a/µ, Annex I & II), G723.1A, G726 (ADPCM with 16/24/32/40 bit rates), G729 A/B/E, iLBC
• T.38 Fax
• Comprehensive Dial Plan support for Outgoing calls.
• G.168 Echo Cancellation
• Voice Activation Detection (VAD), Comfort Noise Generation (CNG), and Packet Loss
Concealment (PLC)
• Supports PSTN/PBX analog telephone sets or analog trunks
HARDWARE SPECIFICATION
The hardware specifications of the GXW FXS series are detailed in Table 4.
ABLE 4: HARDWARE SPECIFICATION OF GXW400X
T
Ports 4 or 8 FXS Ports
LAN interface
PSTN Port
LED
Console
Universal Switching
Power Adaptor
Dimension
Weight
Temperature
Humidity
Compliance
2 x RJ45 10/100Mbps (switched or routed)
PSTN fail-over port
4 or 8 LEDs (GREEN)
Console port for Hyperterminal login
Input: 100-240V AC, 50/60Hz, 0.5A Max
Output: 12V DC, 1.25A
UL certified
225mm (L) x 135mm (W) x 35mm (H)
0.29 lbs (3.5 oz)
32~104°F / 0~40°C
10% - 90% (non-condensing)
FCC, CE
Grandstream Networks, Inc. GXW400x User Manual Page 8 of 37
Firmware 1.0.0.77 Last Updated: 1/2008

TABLE 3: GXW400X SOFTWARE FEATURES
GXW400x FXS Analog Gateway Series
Telephone Interfaces
Network Interface
LED Indicators
Voice over Packet
Capabilities
PSTN Fail-over
Voice Compression
DHCP Server/Client
Fax over IP
QoS
IP Transport
DTMF Method
IP Signaling
Provisioning
Control
Management
Dial Plan
UPnP Support
Power
Mounting
Short and long haul
Caller ID
Polarity Reversal /
Wink
EMC
Safety
GXW4004: 4 ports, 4 SIP accounts & choice of 2 profiles
GXW4008: 8 ports, 8 SIP accounts & choice of 2 profiles
FXS, RJ-11
Two (2) 10M/100 Mbps, RJ-45
Power and Line LEDs
Voice Activity Detection (VAD) with CNG (comfort noise generation) and PLC
(packet loss concealment), AEC with NLP
Packetized Voice Protocol Unit (supports RTP/RTCP and AAL2 protoc ol),
G.168 compliant Echo Cancellation, Dynamic Jitter Buffer, Modem detection
& auto-switch to G.711
PSTN failover port on power failure
G.711 + Annex I (PLC), Annex II (VAD/CNG format) encoder and decoder,
G.723.1A, G.726(ADPCM with 16/24/32/40 bit rates), G.729A/B /E, iLB C
G.726 provides proprietary VAD, CNG, and signal power estimation
Voice Play Out unit (reordering, fixed and adaptive jitter buffer, clock
synchronization), AGC (automatic gain control),
Status output, Decoder controlling via voice packet header
Yes, NAT Router or Switched Mode
T.38 compliant Group 3 Fax Relay up to 14.4kpbs and auto-switch to G.711
for Fax Pass-through,
Fax Datapump V.17, V.19, V.27ter, V.29 for T.38 fax relay
Diffserve, TOS, 802.1 P/Q VLAN tagging
RTP/RTCP
flexible DTMF transmission method, User interface of In-audio, RFC2833,
and/or SIP Info
SIP (RFC 3261)
TFTP, HTTP, HTTPS (pending)
TLS/SIPS
Syslog support, HTTPS (pending), Telnet, remote management using Web
browser
Yes
Yes
Output: 12VDC / Input: 100–240 VAC/50-60 Hz
Rack mount, Wall mount, Desktop
REN3: Up to150 ft on 24 AWG line
Bellcore Type 1 & 2, ETSI, BT, NTT, and DTMF-based CID
Yes
EN55022/EN55024 and FCC part15 Class B
UL
Grandstream Networks, Inc. GXW400x User Manual Page 9 of 37
Firmware 1.0.0.77 Last Updated: 1/2008

BASIC OPERATIONS
UNDERSTANDING GXW VOICE PROMPTS
GXW400x has a stored voice prompt menu for quick browsing and simple configuration. To enter the
voice prompt menu, press *** on the standard analog phone connected to any FXS port.
T
ABLE 5: DEFINITIONS OF THE GXW VOICE PROMPTS
Menu Voice Prompt User’s Options
Main Menu
01
02
03
04
05
07 Preferred Vocoder Enter “9” to go to the next selection in the list:
10
12
13
14
15
16
17
47
71-78
99
Grandstream Networks, Inc. GXW400x User Manual Page 10 of 37
Firmware 1.0.0.77 Last Updated: 1/2008
“Enter a Menu Option” Enter “*” for the next menu option
Enter “#” to return to the main menu
Enter 01 – 05, 07,10 - 17, 47, 86 or 99 Menu option
“DHCP Mode”, “PPPoE
Mode ”or “Static IP Mode”
“IP Address “ + IP address The current WAN IP address is announced
“Subnet “ + IP address Same as Menu option 02
“Gateway “ + IP address Same as Menu option 02
“DNS Server “ + IP address Same as Menu option 02
“MAC Address” Announces the Mac address of the unit.
WAN Port Web Access
Firmware Server IP Address Announces current Firmware Server IP address. Enter 12 digit
Configuration Server IP
Address
Upgrade Protocol Upgrade protocol for firmware and configuration update. Enter “9”
Firmware Version Firmware version information.
Firmware Upgrade Firmware upgrade mode. Enter “9” to rotate among the following
“Direct IP Calling” Enter the target IP address to make a direct IP call, after dial
Phone calls between different
ports of the same GW in case
no SIP server is in use
“RESET” Enter “9” to reboot the device; or
“Invalid Entry” Automatically returns to Main Menu
Enter ‘9’ to toggle the selection
If user selects “Static IP Mode”, user need configure all the IP
address information through menu 02 to 05. If user selects
“Dynamic IP Mode”, the device will retrieve all IP address
information from DHCP server automatically when user reboots
the device.
Enter 12-digit new IP address if in Static IP Mode.
• PCM U
• PCM A
• iLBC
• G-726
• G-723
• G-729
Enter “9” to toggle between enable and disable
new IP address.
Announces current Config Server Path IP address. Enter 12 digit
new IP address.
to toggle between TFTP and HTTP
three options:
1. always check
2. check when pre/suffix changes
3. never upgrade
tone. (See “Make a Direct IP Call”.)
User can make internal calls between different ports inside the
same GW even without being registered to SIP server. By dialing
*** and 7x user can reach colleague connected to port “x”
Enter MAC address to restore factory default setting
(See Restore Factory Default Setting section)

Five Success Tips when using the Voice Prompt
1. “*” shifts down to the next menu option
2. “#” returns to the main menu
3. “9” functions as the ENTER key in many cases to confirm an option
4. All entered digit sequences have known lengths - 2 digits for men u option and 12 digits for IP
address. For IP address
should be key in like 192168000026. No decimal is needed).
5. Key entry can not be deleted but the phone may prompt error once it is detected
, add 0 before the digits if the digits are less than 3 (i.e. - 192.168.0.26
PLACING A PHONE CALL
PHONE OR EXTENSION NUMBERS
1. Dial the number directly and wait for 4 seconds (Default “No Key Entry Timeout”); or
2. Dial the number directly and press # (Use # as dial key” must be configured in web configuration).
Examples:
1. Dial an extension directly on the same proxy, (e.g. 1008), and then press the # or wait for 4
seconds.
2. Dial an outside number (e.g. (626) 666-7890), first enter the prefix number (usually 1+ or
international code) followed by the phone number. Press # or wait for 4 seconds. Check with
your VoIP service provider for furthe r det a ils on prefix numbe r s.
IRECT IP CALLS
D
Direct IP calling allows two parties, that is, a FXS Port with an analog phone and another VoIP Device, to
talk to each other in an ad hoc fashion without a SIP proxy.
Elements necessary to completing a Direct IP Call:
1. Both GXW400x and other VoIP Device, have public IP addresses, or
2. Both GXW400x and other VoIP Device are on the same LAN using private IP addresses, or
3. Both GXW400x and other VoIP Device can be connected through a router using p ublic or private
IP addresses (with necessary port forwarding or DMZ).
GXW400x supports two ways to make Direct IP Calling:
Using IVR
1. Pick up the analog phone then access the voice menu prompt by dial “***”
2. Dial “47” to access the direct IP call menu
3. Enter the IP address using format ex. 192*168*0*160 after the dial tone.
Using Star Code
1. Pick up the analog phone then dial “*47”
2. Enter the target IP address using same format as above.
Note: NO dial tone will be played between step 1 and 2.
Destination ports can be specified by using “*” (encoding for “:”) followed by the port number.
Grandstream Networks, Inc. GXW400x User Manual Page 11 of 37
Firmware 1.0.0.77 Last Updated: 1/2008

Examples:
a) If the target IP address is 192.168.0.160, the dialing convention is
*47 or Voice Prompt with option 47, then 192*168*0*160.
followed by pressing the “#” key if it is configured as a send key or wait 4 seconds. In this ca se,
the default destination port 5060 is used if no port is specified
b) If the target IP address/port is 192.168.1.20:5062, then the dialing co nvention would be:
*47 or Voice Prompt with option 47, then 192*168*0*160*5062 follow ed by pressing the “# ” key
if it is configured as a send key or wait for 4 seconds.
NOTE: When completing direct IP call, the “Use Random Port” should set to “NO”. You can not
direct IP calls between FXS1 to FXS2 since they are using same IP.
.
make
CALL HOLD
Place a call on hold by pressing th e “flash” button on the analog phone (if the phone has that button).
Press the “flash” button again to release the previously held Caller and resume conver sation. If no “flash”
button is available, use “hook flash” (toggle on-off hook quickly). You may drop a call using hook flash.
CALL WAITING
Call waiting tone (3 short beeps) indicates an incoming call, if the call waiting featur e is enabled. Toggle
between incoming call and current call by pressing the “flash” button. First call is placed on hold. Press
the “flash” button to toggle betw e en two active calls.
CALL TRANSFER
Blind Transfer
Assume that call Caller A and B are in conversation. A wants to Blind Transfer B to C:
3. Caller A presses FLASH on the analog phone to hear the dial tone.
4. Caller A dials *87 then dials caller C’s number, and then # (or wait for 4 seconds)
5. Caller A will hear the confirm tone. Then, A can hang up.
NOTE: “Enable Call Feature” must be set to “Yes” in web configuration page.
Caller A can place a call on hold and wait for one of three situations:
1. A quick confirmation tone (similar to call waiting tone) followed by a dial tone. This indicates the
transfer is successful (transferee has received a 200 OK from transfer target). At this point,
Caller A can either hang up or make another call.
2. A quick busy tone followed by a restored call (on supported platforms only). This means the
transferee has received a 4xx response for the INVITE and we will try to recover the call. T he
busy tone is just to indicate to the transferor that the transfer has failed.
3. Co ntinuous busy tone. The phone has timed out. Note: continuous busy tone does not indicate
the transfer has been successful, nor does it indicate th e transfe r has faile d. It often me ans the re
was a failure to receive second NO TI FY – check firmware for most recent release.
Attended Transfer
Assume that Caller A and B are in conversation. Caller A wants to Attend Transfer B to C:
1. Caller A presses FLASH on the analog phone for dial tone.
2. Caller A then dials Caller C’s number followed by # (or wait for 4 seconds).
Grandstream Networks, Inc. GXW400x User Manual Page 12 of 37
Firmware 1.0.0.77 Last Updated: 1/2008
 Loading...