

Grandhall Elite 781, Elite 791 Customer's Operating And Assembly Instructions

These instructions are
a guide to assembling
and using the Elite 781 and
Elite 791 barbecues.
Please read carefully, and
retain for future reference.
Only to be used outdoors. Illustration may
vary from barbecue contained in carton.
FOR YOUR SAFETY.
1. Do not store or use
petrol or other flammable
vapours and liquids in the
vicinity of this or any other
appliance.
2. A gas cylinder not
connected for use must not
be stored in the vicinity of
this or any other appliance.
FOR YOUR SAFETY.
IF YOU SMELL GAS:
1. Shut off gas to the
appliance, if possible.
2. Extinguish any open flame.
3. Open hood.
4. If odour continues,
immediately call your gas
supplier or fire department.
Customer’s operating and assembly instructions
Portable Gas
Barbecues
GENERAL INFORMAT I O N
2
2
You have just purchased a state of the art Outdoor Barbecue
Cooking System.
We understand your desire to protect an investment of this
nature. As such this booklet has been designed to assist you in the
assembling, testing and operating your new barbecue, along with
important safety information, helpful maintenance tips and
troubleshooting. We thank you for choosing our product and
trust that you enjoy years of outdoors entertainment.
CONGRATULATIONS
Purchased from
Date purchased
Serial No.
NOTE:
Sales docket must be kept as proof of
purchase date.
FOR CUSTOMER REFERENCE
(Record and file in a safe place)
Inspect barbecue and trolley parts as you proceed. Contact your
place of purchase for assistance regarding replacement of any
damaged or missing parts. Do not assemble or operate a barbecue
that appears damaged.
Check that the barbecue supplied is correct for the gas type being
used. There is a label on the rear panel of the barbecue.
Barbecues for use with gas cylinders are labelled
‘Universal LPG’. Barbecues for use with natural gas are labelled
‘Natural Gas’.
Check that the label matches the gas type to be used.
CHECK BARBECUE FOR ANY DAMAGE
PARTS SUPPLIED SEALED IN THE
CARTON, OR BY YOUR PLACE OF
PURCHASE, MUST NOT BE ALTERED
IN ANY WAY.
NATURAL GAS BARBECUES
MUST BE INSTALLED BY AN
AUTHORISED PERSON.
While it is possible for one person to assemble the barbecue, we
recommend asking for the assistance of another person when
manoeuvring some of the larger or heavier pieces.
Remove the barbecue and its components from the carton.
Check against parts list and lay components out within easy
reach. Do not throw the shipping carton away – unfold flat and
use as a protective work surface. Contact your place of purchase
for replacement parts if necessary.
GENERAL
Standard Phillips-head screwdriver.
Adjustable spanner
(open end shifter).
TOOLS YOU WILL NEED
General Information 2-3
Safety Instructions 4-5
Parts List – Hardware pack 6
Assembly Instructions 7-8
Inspection 16-18
Operation 11-14
Fault Finding 19
Cleaning and Maintenance Instructions 20-21
Parts Diagram / List 18-21
Contact Points 24
TABLE OF CONTENTS
1. Flatten cardboard packaging and use this as a protective
work surface to assemble upon.
2. Some protective coating may need to be removed from
components prior to assembly.
3. Do not tighten screws and nuts until trolley is fully assembled.
4. Pre-screwing of connection points for securing the side
shelves will assist in securing shelves smoothly.
ASSEMBLY TIPS

GENERAL INFORMAT I O N
3
3
The following minimum clearances from combustible materials
must be maintained: Top – 1000 mm, rear – 450 mm and sides
– 250 mm.
Openings at the rear and sides of the appliance provide
air for combustion, and must not be obstructed.
CLEARANCES
Height – Hood closed 1260 mm.
Hood open 1510 mm.
Width – Elite 781: 1605 mm. Elite 791: 1900 mm
Depth – Hood closed 655 mm.
– Hood open 725 mm.
OVERALL DIMENSIONS
Australian Gas Association Certificate No. 6468.
Barbecues must be used in accordance with the installation
requirements of your local gas supply authority, and the appropriate
installation standard AS5601/AG601.
Barbecues for use with cylinder gas are labelled
‘Universal LPG’. Barbecues for use with natural gas are
labelled ‘Natural Gas’ and must be installed by an authorised
person. Check the gas type sticker attached to the barbecue.
Check that the label matches the gas type to be used.
GAS INSTALLATION CODES HOSE AND REGULATOR SAFETY
NEVER OPERATE THIS BARBECUE
WITHOUT A REGULATOR.
FAILURE TO COMPLY WITH THESE
INSTRUCTIONS COULD RESULT IN A
FIRE OR EXPLOSION WHICH COULD
CAUSE SERIOUS BODILY INJURY,
DEATH OR PROPERTY DAMAGE.
ACCESSIBLE PARTS MAY BE VERY
HOT.
KEEP YOUNG CHILDREN AWAY.
ANY MODIFICATION OF THIS
APPLIANCE MAY BE DANGEROUS.
DO NOT MOVE THIS APPLIANCE
DURING USE.
TURN OFF THE GAS SUPPLY AT THE
GAS CYLINDER AFTER USE.
READ THE INSTRUCTIONS BEFORE
USING THE APPLIANCE.
PARTS SEALED BY THE
MANUFACTURER MUST NOT BE
MANIPULATED.
THIS BARBECUE IS ONLY TO BE USED
AND STORED OUTDOORS.
The regulator and hose assembly supplied with the barbecue is
suitable for use with bottled gas.
A gas regulator adjusted to have an outlet pressure of 2.75
kPa is supplied for connection to the gas cylinder. The regulator
and hose assembly supplied with the appliance must be used.
Replacement regulator and hose assemblies must be those
specified by the appliance manufacturer.
When connecting the hose and regulator assembly to the
gas cylinder, take care to avoid unnecessary twisting of the
flexible hose. After the assembly has been secured, turn on the
gas and check for leaks by brushing a soap and water solution
over all visible and accessible gas line connections. The presence
of bubbles will indicate a gas escape.
DO NOT TEST FOR
GAS ESCAPES WITH AN OPEN FLAME.
If you are unable to correct the leak by tightening the
connection, turn off the gas and contact your place of purchase
immediately.
Always ensure the appliance is kept away from flammable
materials and the gas cylinder clear of any heat source.
When changing over from an empty gas cylinder to a full
one, make sure this procedure is carried out in a flame free
atmosphere.
Inspect the gas hose when replacing the gas cylinder or once
a year whichever is more frequent. If the hose is cracked, cut,
abraded or damaged in any way, the appliance must not be
operated. The hose must be replaced if damaged or when statutory
conditions require it. Contact your place of purchase if uncertain.
The POL fitting of the hose and regulator should be
disconnected from the gas cylinder valve when the outdoor
appliance is not in use.
Appliance specifications can be found on the data label attached
to the rear panel of the barbecue body.
Your barbecue is preset at the factory to operate on
bottled gas only, unless specified otherwise.
SPECIFICATIONS
GAS HOSES ARE FACTORY FITTED AND
LEAK TESTED – DO NOT DISCONNECT.
SAFETY
4
4
FOR YOUR SAFETY:
DO NOT STORE OR USE PETROL OR
OTHER FLAMMABLE VAPOURS AND
LIQUIDS IN THE VICINITY OF THIS OR
ANY OTHER APPLIANCE.
DO NOT STORE EMPTY OR FULL SPARE
GAS CYLINDERS IN STORAGE
COMPARTMENT OR NEAR THIS OR ANY
OTHER APPLIANCE.
KEEP THE GAS HOSE AWAY FROM HOT
SURFACES. PROTECT GAS HOSE FROM
DRIPPING GREASE.
AVOID UNNECESSARY TWISTING OF
HOSE. VISUALLY INSPECT HOSE PRIOR
TO EACH USE FOR CUTS, CRACKS,
EXCESSIVE WEAR OR OTHER DAMAGE.
REPLACE HOSE, IF NECESSARY.
NEVER TEST FOR GAS LEAKS WITH A
LIT MATCH OR OPEN FLAME.
NEVER LIGHT BARBECUE WITH HOOD
CLOSED.
NEVER LEAN OVER COOKING
SURFACE WHILE LIGHTING BARBECUE.
USE GOOD QUALITY INSULATED OVEN
MITTS WHEN OPERATING BARBECUE.
NEVER ALTER OR MODIFY THE
REGULATOR OR GAS SUPPLY ASSEMBLY.
THIS BARBECUE MUST NOT BE USED
INDOORS.
DANGER – IF YOU SMELL OR HEAR THE
HISS OF ESCAPING GAS FROM THE GAS
CYLINDER:
KEEP CLEAR OF THE GAS CYLINDER.
DO NOT ATTEMPT TO CORRECT THE
PROBLEM YOURSELF.
CALL YOUR FIRE DEPARTMENT
(DO NOT MAKE THE CALL FROM
ANYWHERE NEAR THE GAS CYLINDER –
YOUR TELEPHONE IS AN ELECTRICAL
DEVICE, AND COULD PRODUCE A SPARK).
READ CAREFULLY BEFORE
ASSEMBLING AND OPERATING
YOUR BARBECUE.
NEVER CONNECT AN UNREGULATED
GAS CYLINDER TO YOUR BARBECUE.
NEVER STORE YOUR GAS
CYLINDER INDOORS.
FOR STORAGE AND CYLINDER
EXCHANGE, DISCONNECT HOSE AT
THE CYLINDER ONLY – DO NOT
DISCONNECT HOSE FROM
THE APPLIANCE.
DO NOT use your barbecue in garages, porches, breezeways, sheds or other enclosed areas. Your barbecue is to
be used OUTDOORS ONLY. Refer to page 5. The barbecue
is not intended to be installed in or on recreational vehicles
and/or boats and should not be placed under any surface
that will burn. Do not obstruct the flow of combustion and
ventilation air around the barbecue while in use.
LOCATION OF YOUR BARBECUE
Keep children away from barbecue during use and until barbecue has
cooled after you are finished. Do not allow children to operate barbecue,
or to swing on handle.
PROTECT CHILDREN
NEVER TEST FOR LEAKS WITH AN OPEN FLAME.
Prior to first use, and at the beginning of each new season (or, if using
bottled gas, whenever gas cylinder is changed), you must check for gas
leaks.
Follow these steps:
1. Make soap solution by mixing one part liquid detergent and one
part water.
2. Turn burner controls to
‘OFF’, then turn on gas at source.
3. Apply the soap solution to all visible and accessible gas connections.
Bubbles will appear in the soap solution if connections are not
properly sealed. Tighten or rectify as necessary, including
connections to the gas cylinder.
4. If you have a gas leak you cannot rectify, turn off the gas at the
source, disconnect hose from barbecue and immediately contact
the manufacturer for assistance.
Refer to back cover.
CHECKING FOR GAS LEAKS
The gas cylinder should be filled by a reputable gas dealer, or exchanged at
a reputable cylinder exchange outlet. Gas cylinders should be visually
inspected and requalified periodically.
Always keep gas cylinder in an upright position.
Always close the
cylinder valve when the barbecue is not in use.
Do not subject gas cylinder to excessive heat.
If you store your barbecue indoors, ALWAYS disconnect and remove gas
cylinder FIRST, and store gas cylinder safely outside. Gas cylinders
must be stored outdoors in a well ventilated area out of reach of children,
and must not be stored in a building, garage or any other enclosed area.
This is a low pressure barbecue and must only be used with the hose and
regulator supplied.
Your barbecue is designed for use with a 9 kg gas cylinder.
Ensure gas cylinder conforms to Australian standard AS2469 and is
less than 10 years old, or reconstituted if older than 10 years old.
DO NOT CONNECT YOUR BARBECUE TO A GAS
CYLINDER LESS THAN OR EXCEEDING THIS CAPACITY
NOTE:
The cylinder storage is suitable for gas cylinders with
a base ring and overall height not exceeding 215 mm and
480 mm respectively.
GAS CYLINDER USE AND SAFETY
IF YOU SMELL GAS:
1. SHUT OFF GAS TO THE APPLIANCE
AT ITS SOURCE, IF POSSIBLE.
2. EXTINGUISH ANY OPEN FLAME.
3. OPEN HOOD.
4. PERFORM GAS LEAK CHECK
PROCEDURE.
5. IF ODOUR CONTINUES,
IMMEDIATELY CALL YOUR GAS
SUPPLIER OR FIRE DEPARTMENT.
SAFETY
5
5
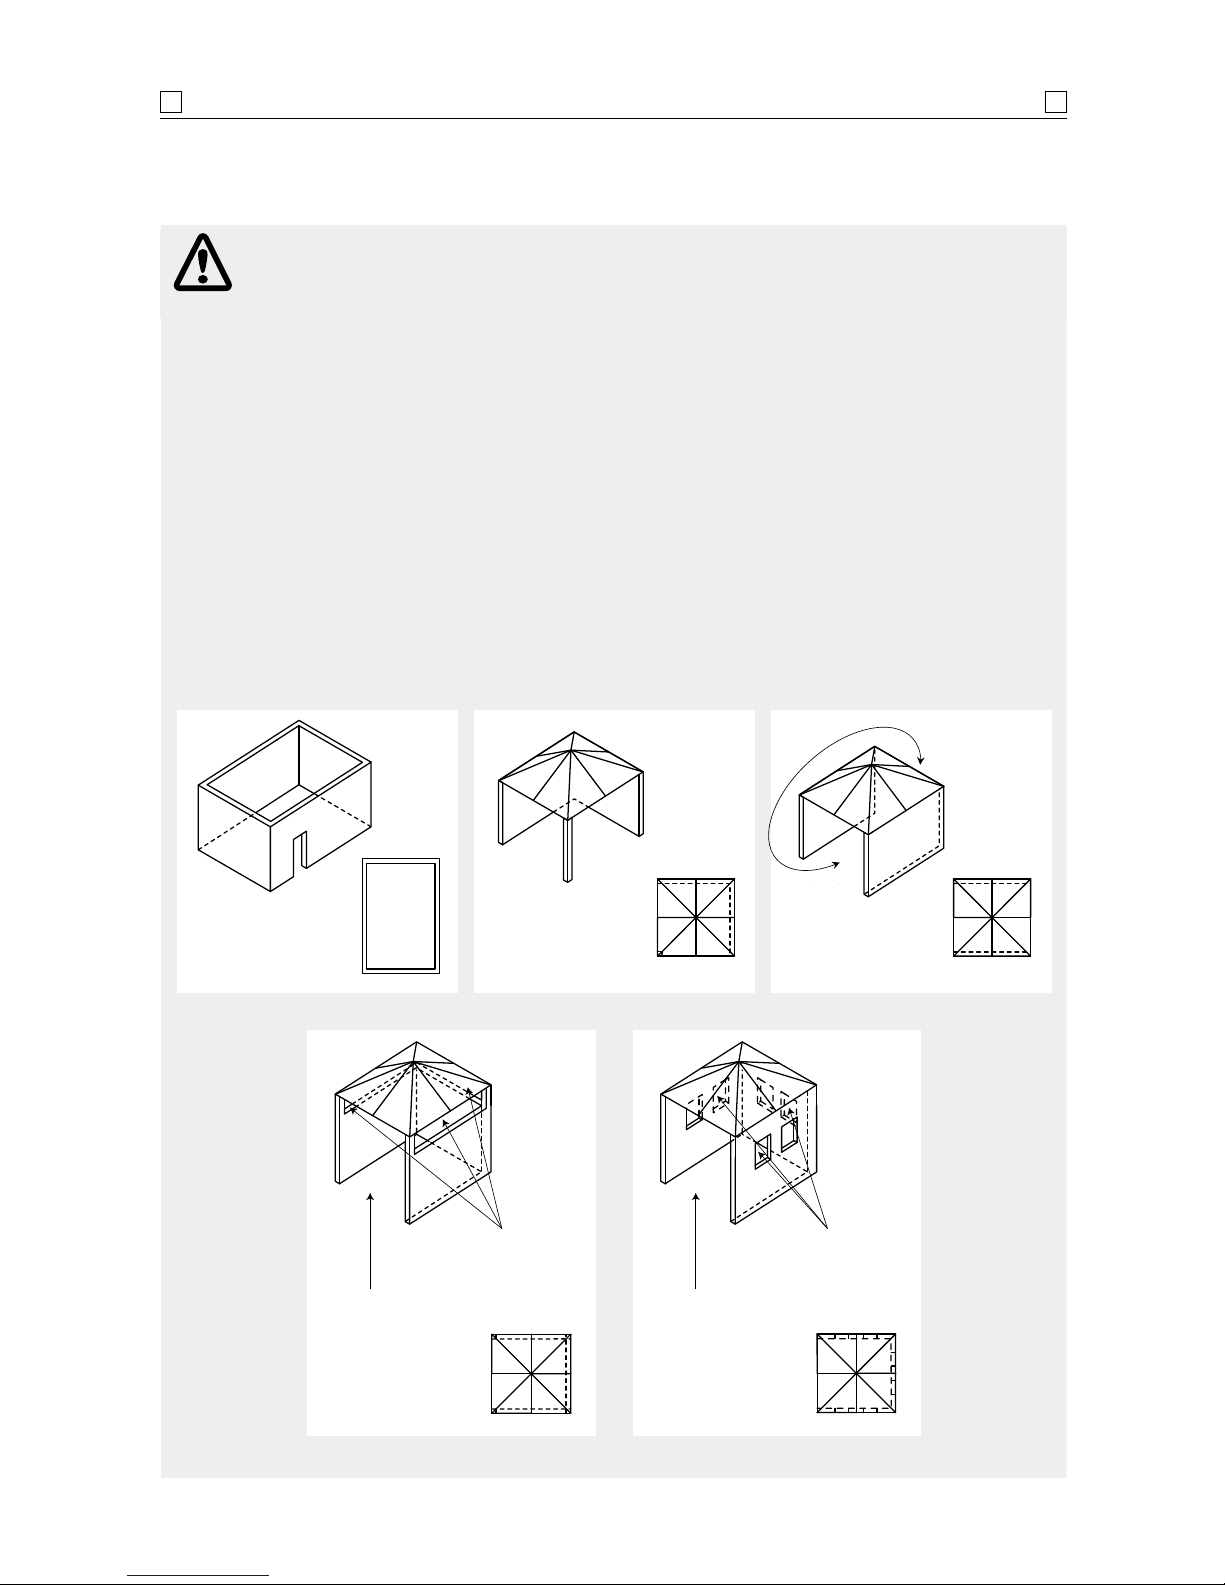
The following diagrams are examples of outdoor areas.
These same principles apply to canopy or shaded cloth areas.
THIS APPLIANCE SHALL ONLY BE USED IN AN ABOVE GROUND OPEN AIR SITUATION WITH NATURAL
VENTILATION, WITHOUT STAGNANT AREAS, WHERE GAS LEAKAGE AND PRODUCTS OF COMBUSTION
ARE RAPIDLY DISPERSED BY WIND AND NATURAL CONVECTION.
ANY ENCLOSURE IN WHICH THE APPLIANCE IS USED SHALL COMPLY WITH ONE OF THE FOLLOWING:
• AN ENCLOSURE WITH WALLS
ON ALL SIDES, BUT AT LEAST
ONE PERMANENT OPENING AT
GROUND LEVEL AND NO
OVERHEAD COVER
• WITHIN A PARTIAL
ENCLOSURE THAT INCLUDES
AN OVERHEAD COVER AND NO
MORE THAN TWO WALLS
• WITHIN A PARTIAL
ENCLOSURE THAT INCLUDES
AN OVERHEAD COVER AND
MORE THAN TWO WALLS, THE
FOLLOWING SHALL APPLY:
(i) AT LEAST 25% OF THE TOTAL
WALL AREA IS COMPLETELY
OPEN: AND
(ii) AT LEAST 30% OF THE
REMAINING WALL AREA IS
OPEN AND UNRESTRICTED
• IN THE CASE OF BALCONIES,
AT LEAST 20% OF THE TOTAL
OF THE SIDE, BACK AND FRONT
WALL AREAS SHALL BE AND
REMAIN OPEN AND
UNRESTRICTED
• DO NOT USE YOUR BARBECUE
IN GARAGES, PORCHES,
BREEZEWAYS, SHEDS OR
OTHER ENCLOSED AREAS.
YOUR BARBECUE IS TO BE
USED OUTDOORS ONLY.
Refer below.
• THE BARBECUE IS NOT
INTENDED TO BE INSTALLED IN
OR USED ON RECREATIONAL
VEHICLES AND/OR BOATS AND
SHOULD NOT BE PLACED
ADJACENT TO OR UNDER ANY
SURFACE THAT WILL BURN.
• DO NOT OBSTRUCT THE FLOW
OF COMBUSTION AND
VENTILATION AIR AROUND
THE BARBECUE HOUSING
WHILST IN USE.
Both ends
open
30% or more in total of
the remaining wall area
is open and unrestricted
30% or more in total of
the remaining wall area
is open and unrestricted
Open side at
least 25% of total
wall area
Open side at
least 25% of total
wall area
The following information is a breakdown of the hardware pack.
It explains which fittings are used during the various stages of assembly.
S122G04241 Phillips-head screw 1/4" x 11/2" 4 Attaches side shelf to barbecue head
S142G04121 Countersink flat-head screw 1/4" x 3/4" 4 Attaches trolley side handle to barbecue head
P05301001A AA battery Elite 781 1 Powers the electric igniter
Elite 791 2
P05301003A 9 V battery 1 Powers the fuel gauge display (LPG model only)
Ref. Component Qty. Purpose of Component
PARTS LIST – HARDWARE PACK
6
6
PARTS LIST
HARDWARE PACK
Elite 781 Elite 791
Side shelf 1 1
Trolley side handle 1 1
Secondary cooking / warming rack 1 1
Grill plates – small 11
Grill plates – large 12
Hot plate 1 1
Flame tamer
– small 11
Flame tamer – large 12
Phillips-head screw
1
/4" x 11/2"
Qty. 4
Ref. # S122G04241
Countersink flat-head screw
1
/4"
x
3
/4"
Qty. 4
Ref. # S142G04121
AA battery
Qty. 1
Ref. # P05301001A
Scale 1:2
9 V battery (LPG model only)
Qty. 1
Ref. # P05301003A
Scale 1:2
CAUTION: While it is possible for one person to
assemble this barbecue, obtain assistance from
another person when handling some of the larger,
heavier pieces.
1. Open the parts boxes. Use the parts list to check that all
parts have been included.
2. Inspect the barbecue for damage as you assemble it. Do
not assemble or operate the barbecue if it appears damaged.
If there are damaged or missing parts when you unpack the
shipping box, or you have questions during the assembly
process, contact place of purchase or manufacture.
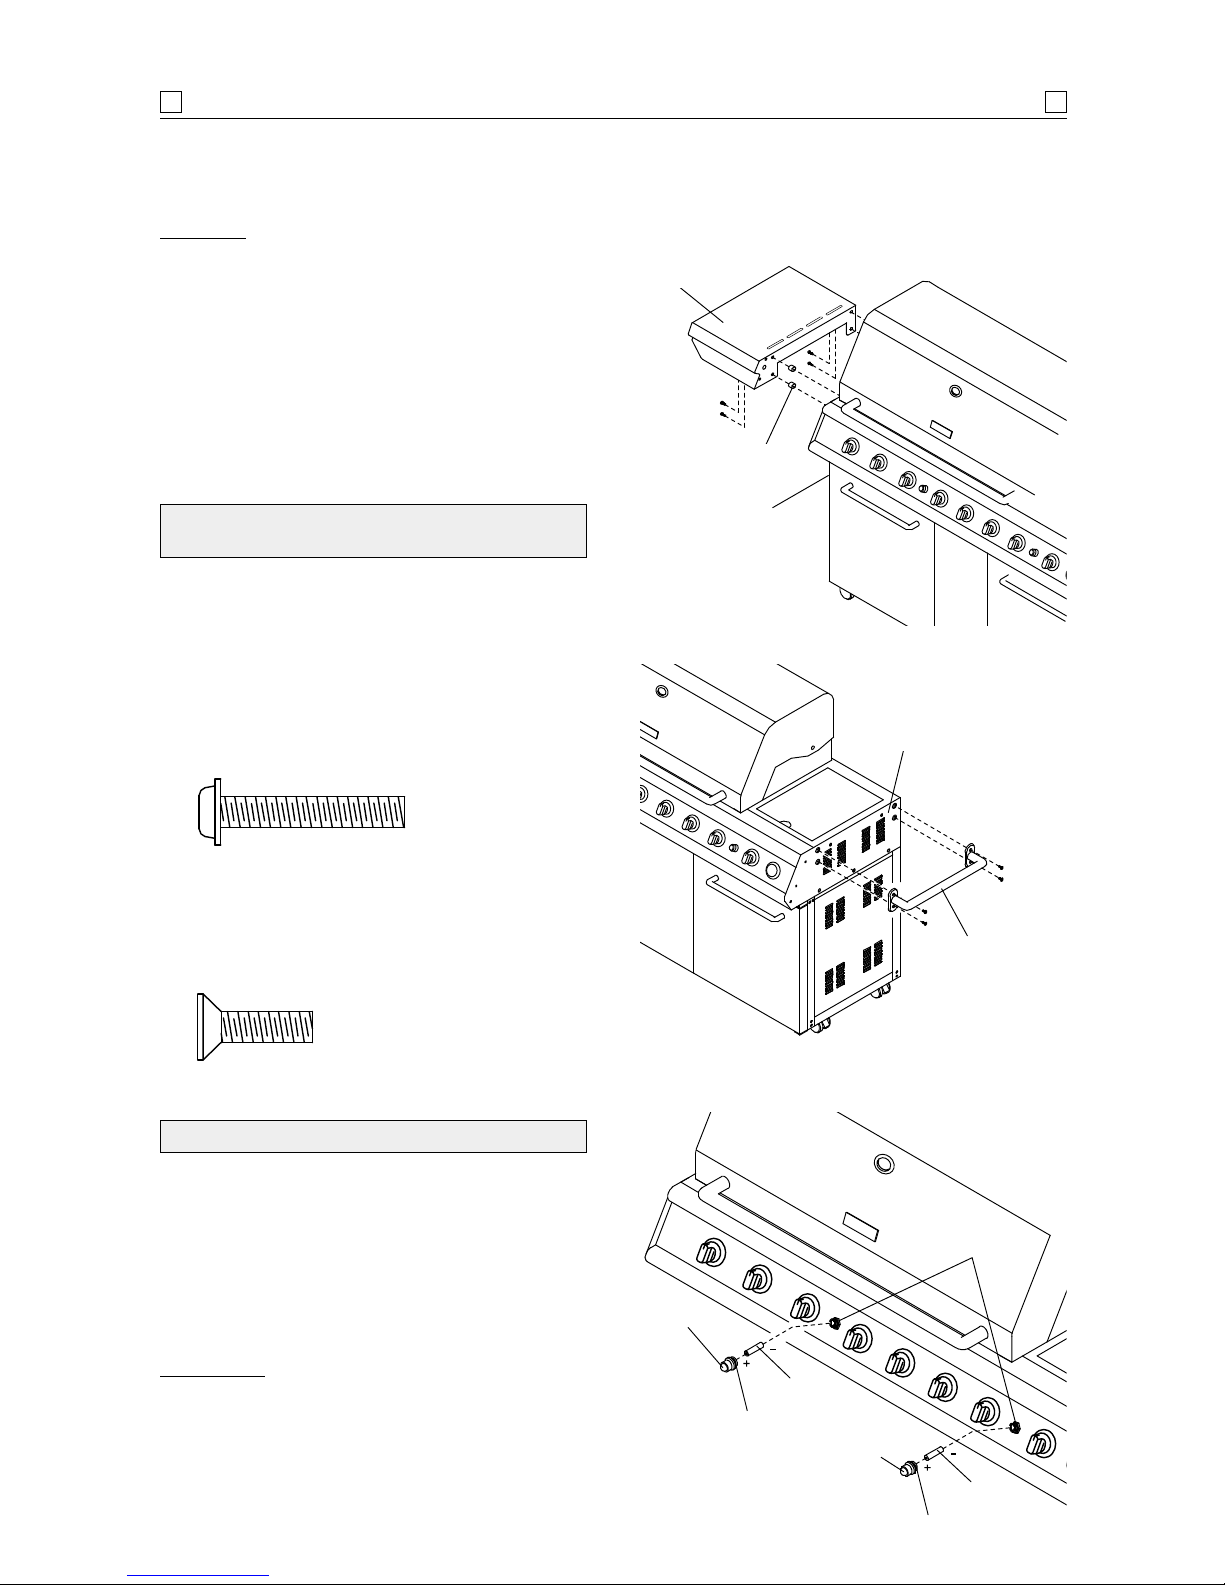
1. Remove the white protective film from the stainless steel side
shelf.
2. With the aid of an assistant, attach side shelf to left side of
barbecue. Install spacers onto the
1
/4" x 11/2" Phillips-head
screws and then align the holes on side shelf with the
threaded holes on left outside body panel. Tighten securely
using four (4) of the
1
/4" x 11/2" Phillips-head screws with
spacers in place.
See diagram 1.
3. Attach trolley side handle to right side of barbecue. Align
the holes on trolley side handle with the threaded holes on
right outside body panel. Tighten securely using four (4) of
the
1
/4" x 3/4" flat-head screws provided. See diagram 2.
INSTALLING SIDE SHELF
AND TROLLEY SIDE HANDLE
ASSEMBLY
7
7
1. Remove the igniter cap located on the barbecue control
panel.
2. Place the supplied AA battery into the igniter slot. Be sure
to place the positive pole facing toward you.
See diagram 3.
3. Place the cap and spring over the AA battery then tighten
the igniter cap onto the barbecue control panel.
4. Repeat step 1 through 3 to install the other AA battery
into the igniter slot.
(Elite 791 model only).
IMPORTANT:
Remove any protective film from outside
and inside of barbecue head.
Before use of this barbecue please refer to cleaning
exterior stainless steel surfaces found on page 17 of
this owner’s manual.
IGNITION BATTERY INSTALLATION
S122G04241 Qty. 4
Countersink flat-head
screw
1
/4"x 11/2"
S142G04121 Qty. 4
Countersink flat-head screw
1
/4"x 3/4"
Left outside
body panel
Right outside
body panel
Trolley side
handle
Igniter slot
Spring
Igniter cap
Igniter cap
AA battery
AA battery
Spring
Left side shelf
Spacers
Diagram 1.
Diagram 2.
Diagram 3.
ASSEMBLY
8
8
INSTALL
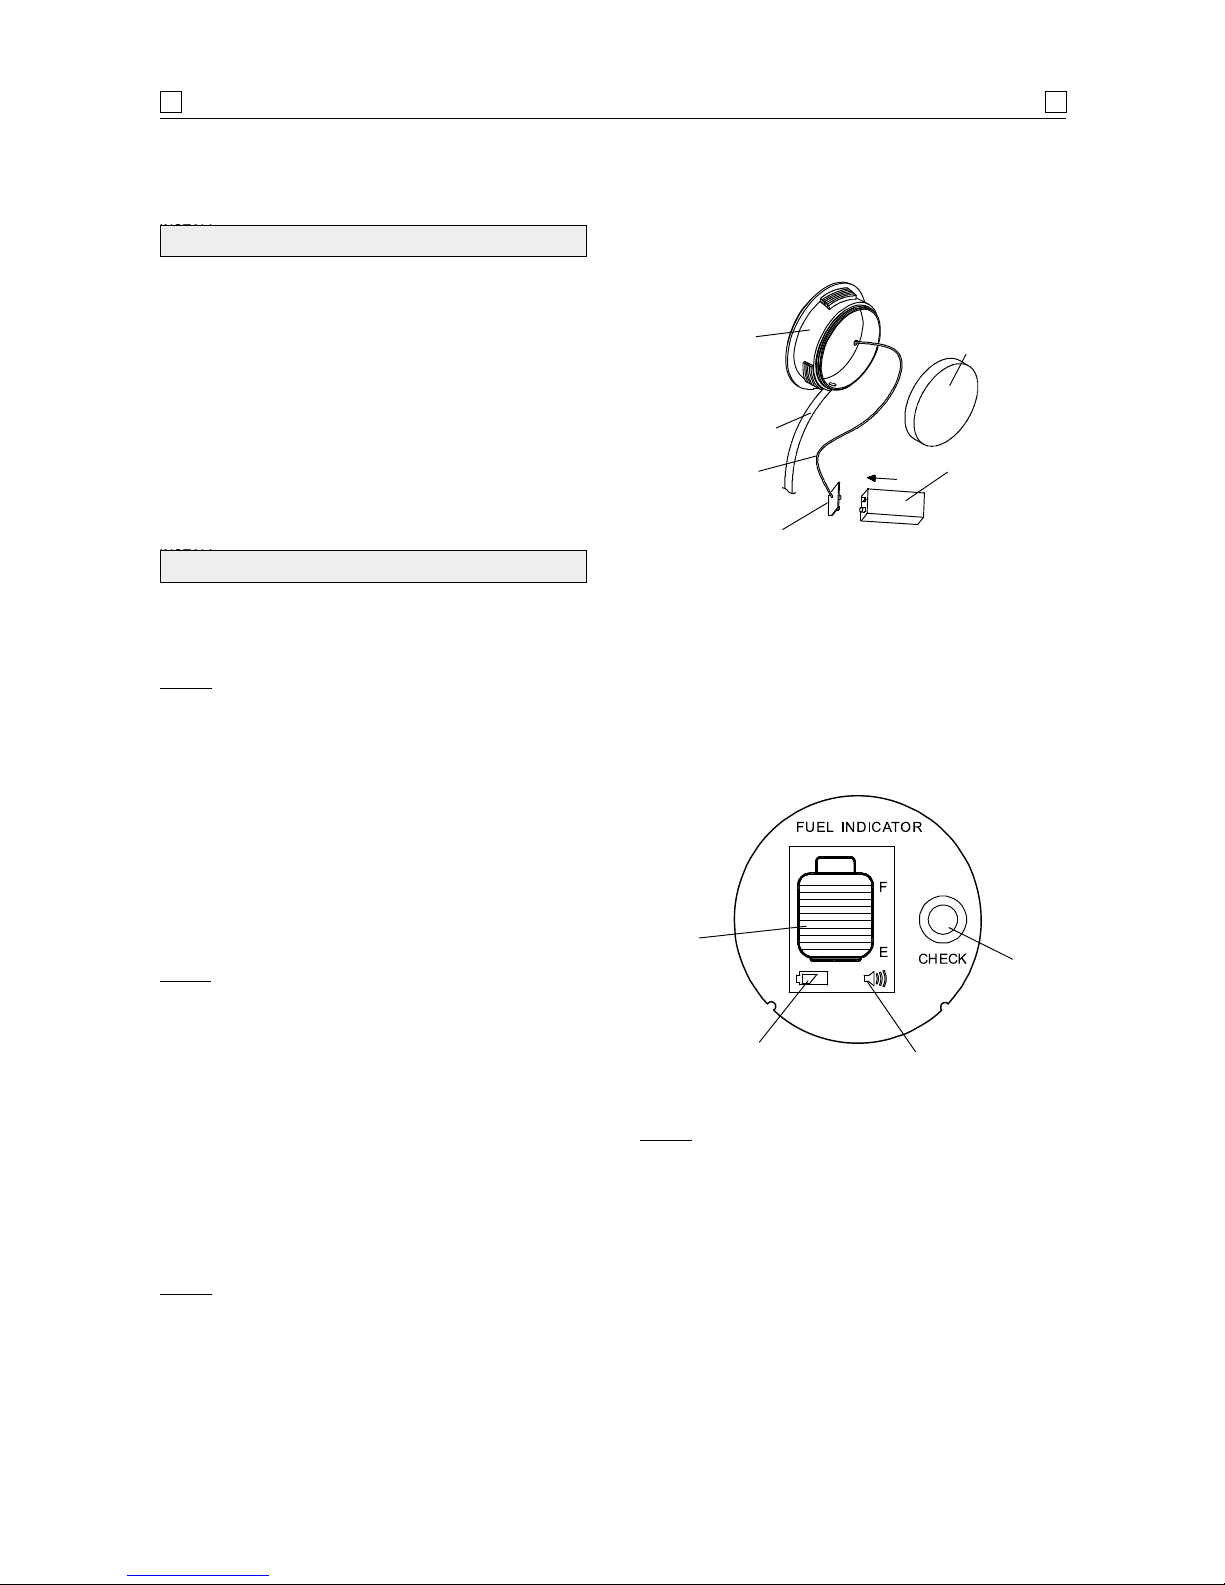
1. Remove the grease tray from the barbecue.
2. Stretch your hand behind control panel and unscrew the
battery cover behind the display box.
3. Pull out the battery with electric wire from the battery
compartment.
4. Attach the battery.
5. Place the battery with electric wire back into battery
compartment.
See diagram 6A.
6. Screw the battery cover back to the display dial.
7. Slide the grease tray back into the barbecue.
INSTALLING THE FUEL GAUGE BATTERY
INSTALL
Press the ‘CHECK’ button to operate fuel gauge display with the
gas cylinder mounted in the cylinder pull-out tray. See diagram 6B
NOTE:
Cylinder must be positioned in tray for fuel
gauge display check
1. Fuel display: Indicates gas cylinder fill level.
2. Fuel warning display: When the gas cylinder fill level is
on the last row, a warning signal will sound for approximately
three (3) seconds to warn you that the cylinder volume is
near empty.
3.
Battery warning display: A low battery warning light
will illuminate when the battery voltage drops to a low level.
Replace the battery – refer to ‘Installing the Fuel Gauge
Battery’
NOTE:
The fuel gauge display lasts for approximately
20 seconds each time you press the ‘CHECK’ button.
After 20 seconds, the fuel gauge display turns
off automatically. If you press the button a second
time within 20 seconds, the fuel gauge display will
be turned off manually. If you press the button a
second time after 20 seconds, the fuel gauge display
will work and last for another 20 seconds.
The fuel gauge display works only with a cylinder
on the cylinder pull-out tray. No readout will appear
if a cylinder is not mounted on the cylinder pull-out
tray.
FUEL GAUGE DISPLAY OPERATING
IMPORTANT: When the gas cylinder is removed from
the cylinder pull-out tray, the fuel gauge display will
not operate.
NOTE: Do not press the Electric Igniter and Check
Button at the same time.
NOTE: For Elite 781 and Elite 791 models, one hot
plate may be replaced by a cooking pan.
Diagram 6A.
9 V battery
Electric wire
Battery
connector
Wire plug
‘A’
Fuel gauge
display box
Fuel gauge
display cover
Diagram 6B.
Fuel warning
display
Battery
warning
display
Fuel
display
Check
button
 Loading...