

Page 1

Graco PD215128D 5/13
TableFit TM
Owners Manual
Page 2

Failure to follow these warnings and the
assembly instructions could result in serious injury or death.
sPLEASE SAVE OWNER’S
MANUAL FOR FUTURE USE.
sADULT ASSEMBLY REQUIRED.
sNEVER LEAVE CHILD
UNATTENDED. Always keep
your child in view.
sPREVENT SERIOUS INJURY
OR DEATH FROM FALLS OR
SLIDING OUT. Always use seat
belt. Secure your child at all
times with the restraint system
provided, in either the reclining
or upright position. The tray is
not designed to hold your
child in the highchair. It is
recommended that the highchair
be used in the upright position
only by children capable of
sitting upright unassisted.
sDO NOT FORCE TRAY
against child. Use only the three
adjustment positions. Be sure
both adjustment fingers are
engaged in armrest slots.
sSTRANGULATION HAZARD:
Do not place highchair in any
location where there are cords,
such as window blind cords,
drapes, phone cords, etc.
sTHIS HIGHCHAIR IS
DESIGNED TO BE USED BY
A CHILD UP TO 3 YEARS
OF AGE. Maximum weight
40 pounds (18.1 kg).
sFOLLOW ASSEMBLY
INSTRUCTIONS CAREFULLY.
If you experience any difficulties,
please contact the Customer
Service Department.
sDISCONTINUE USING YOUR
HIGHCHAIR should it become
damaged or broken.
Page 3
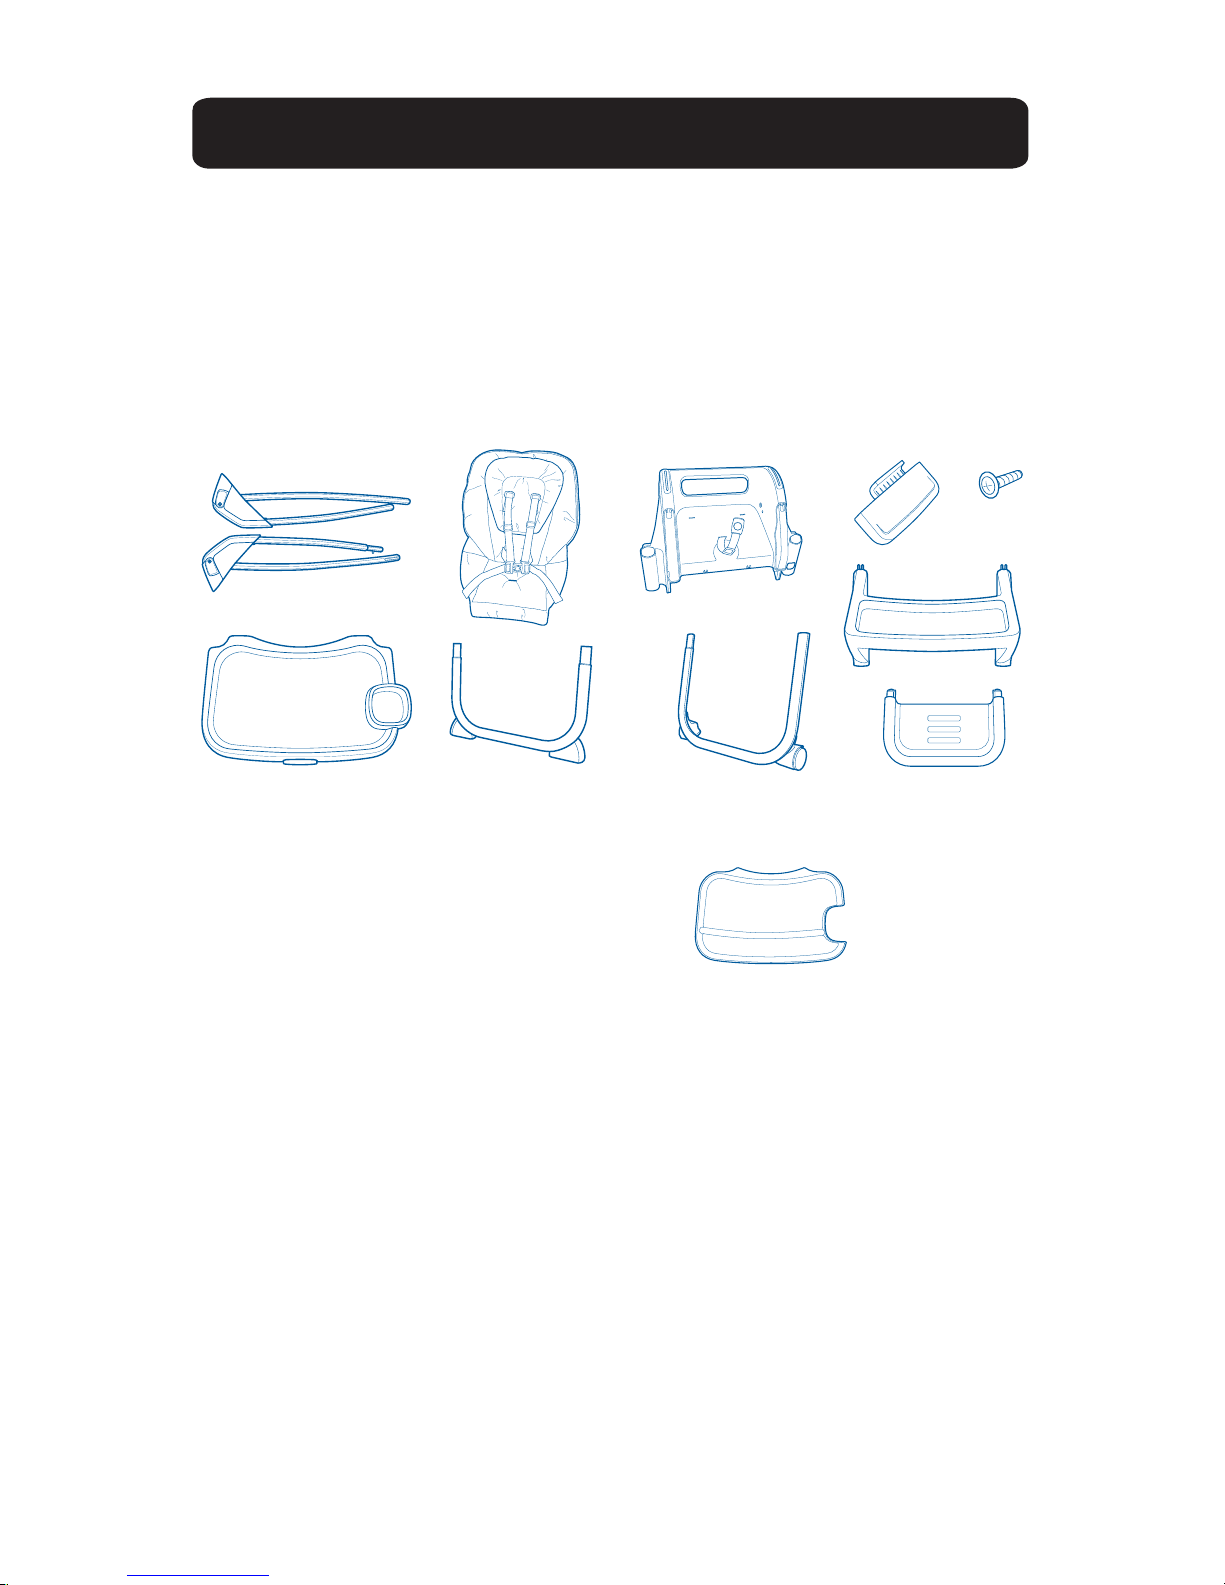
This model may not include some features shown below. Check
that
you have all the parts for this model BEFORE assembling your
product. If any parts are missing, call Customer Service.
Philips Screwdriver
required.
0ARTSLIST
!##%33/2)%3/.#%24!).-/$%,3
Tray Insert
(2 on certain models)
!,,-/$%,3
2X
Page 4
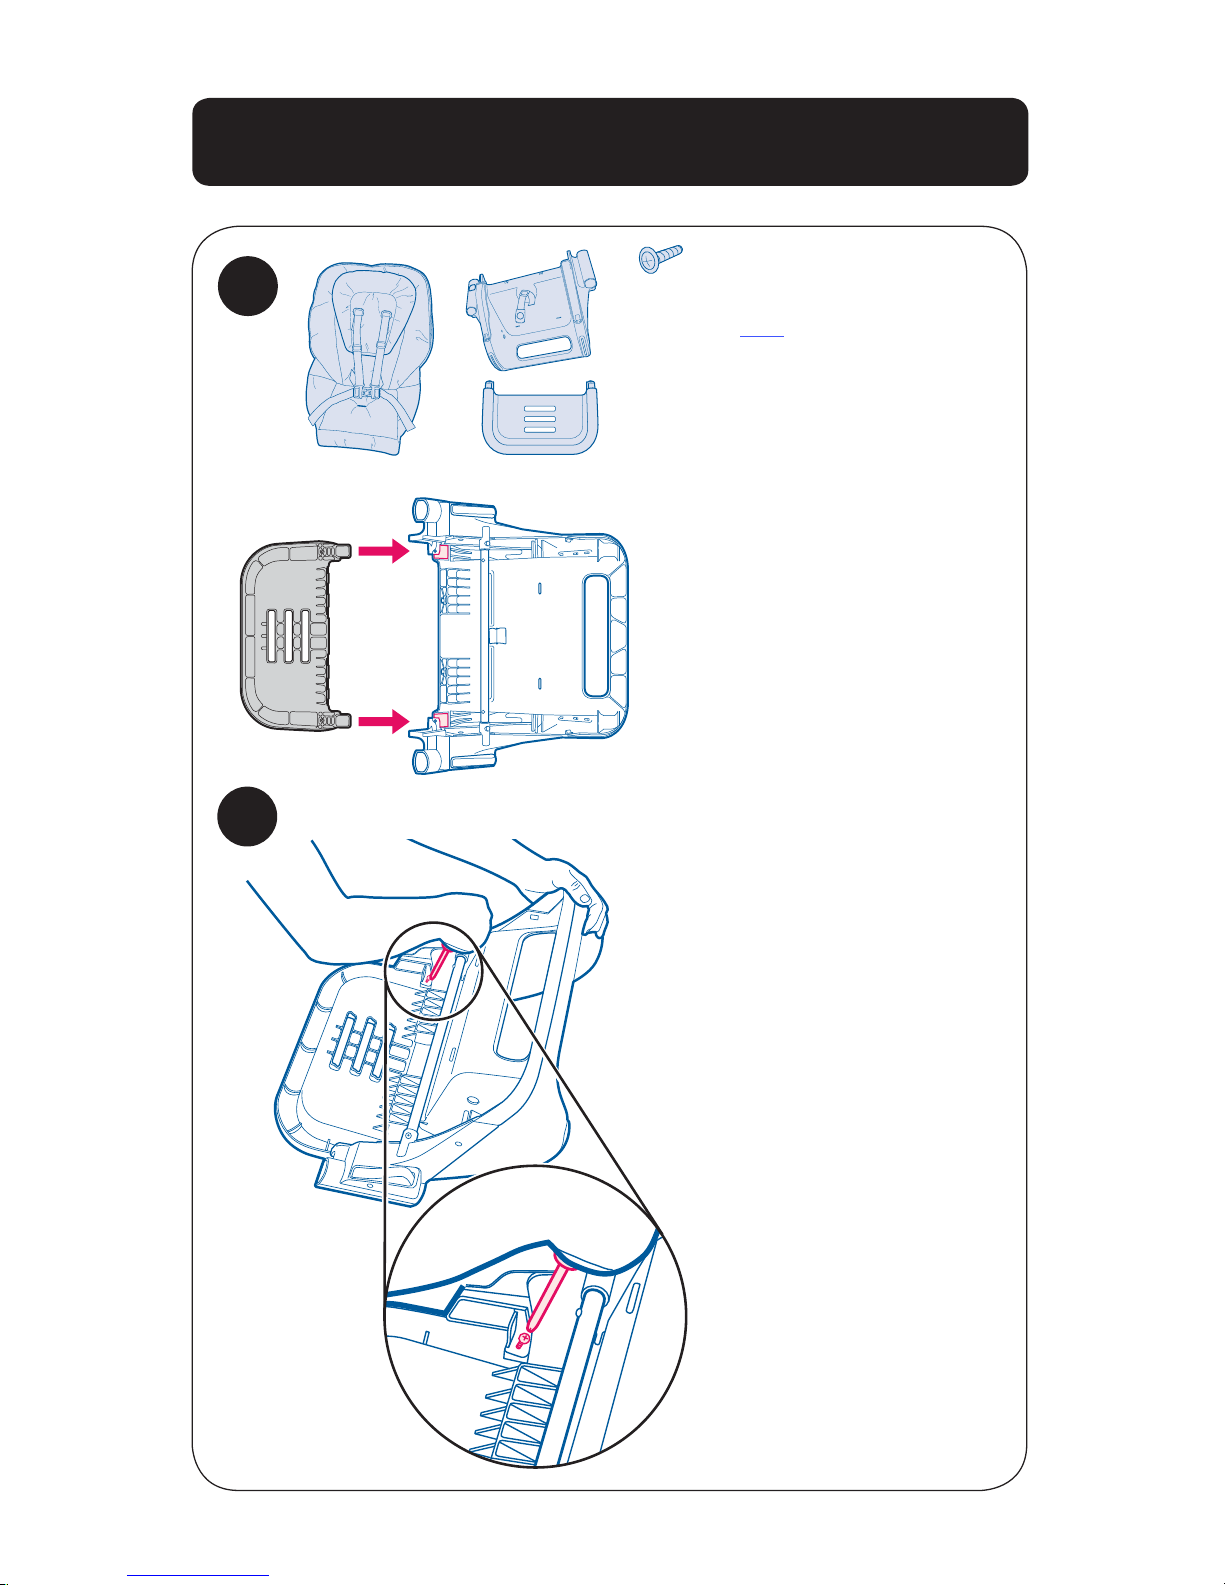
3EATASSEMBLY
1
Flip seat upside down.
Insert footrest into seat
until it snaps into place.
Secure footrest to seat
using a Philips head
screwdriver and provided
screws.
2
2X
Page 5
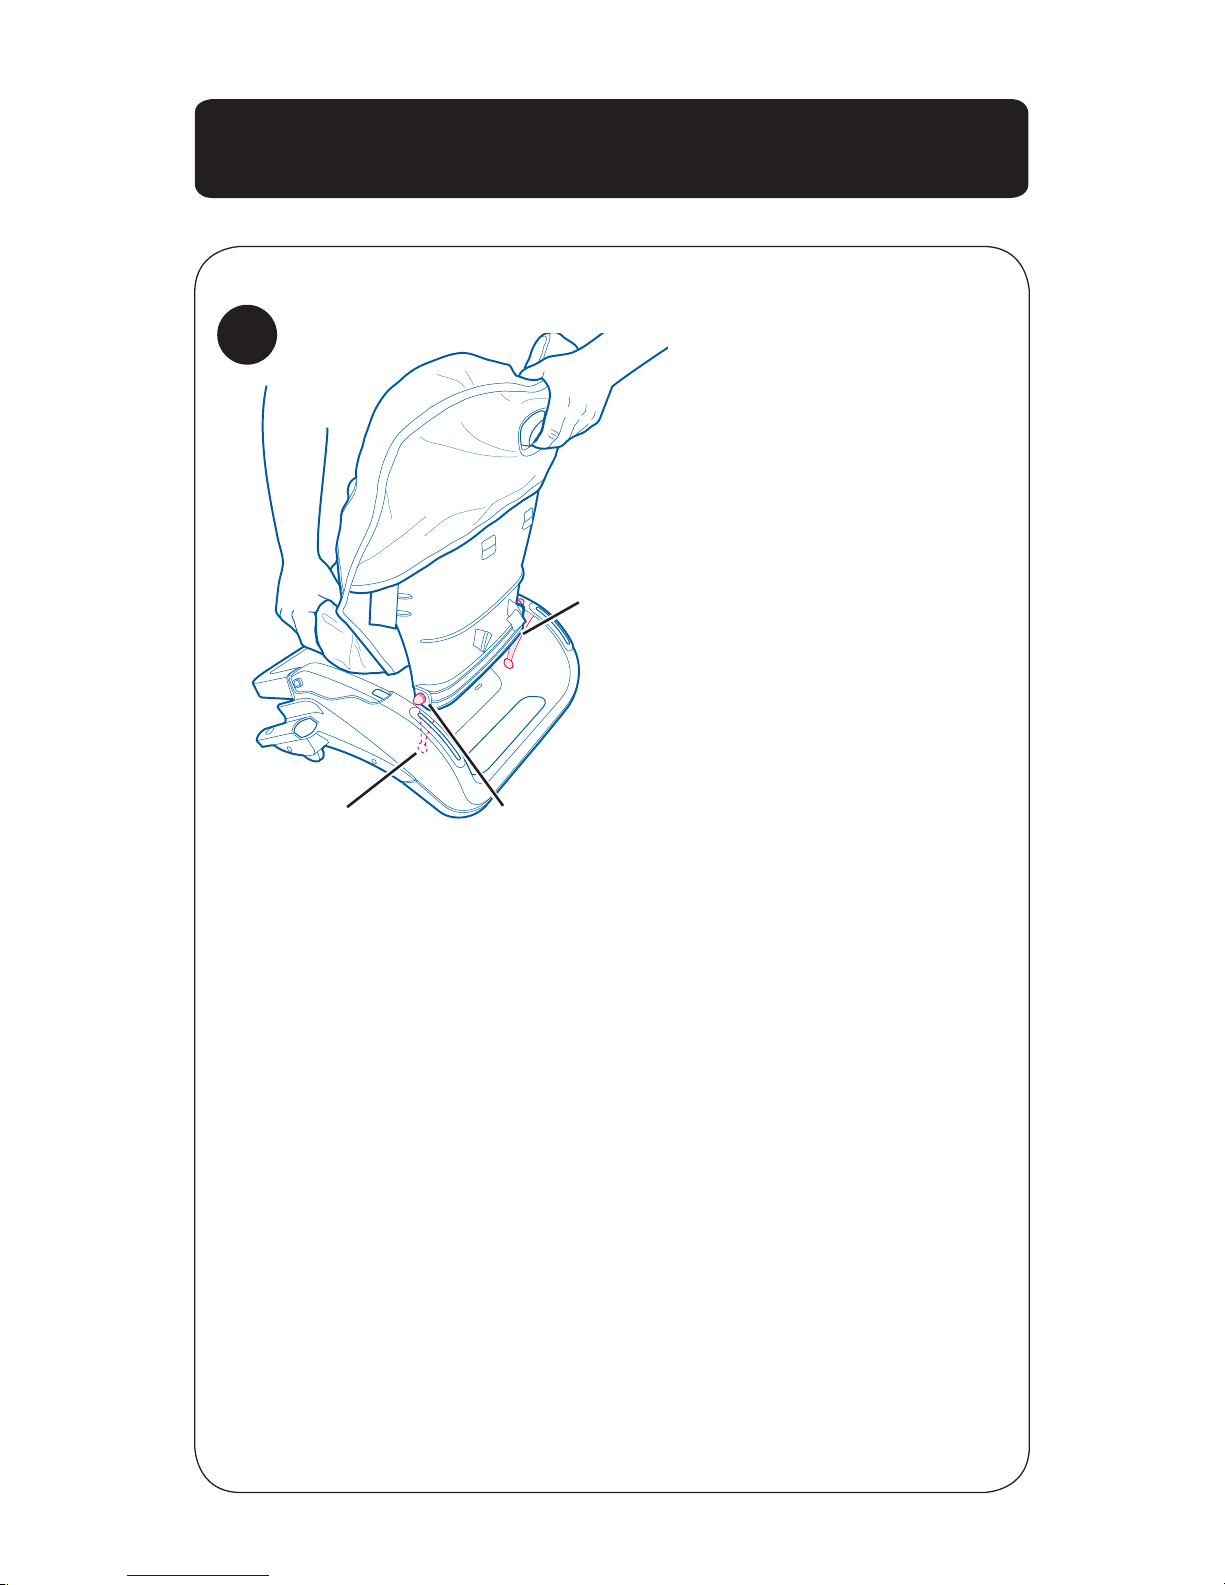
1
Flip seat over.
Hold seat pad up out of
way of slots. Slide pegs on
seat back down channel.
DO NOT press pegs into
holes until Step 3.
!TTACHING"ACKREST
Hole
Peg
Channel
Page 6

Pull seat pad up in order to
press the pegs into the
holes at the bottom of the
channel.
Recline backrest all the way
back.
3
Squeeze recline handle and
guide wire into groove.
Wire
Groove
SNAP!
2
SNAP!
Page 7
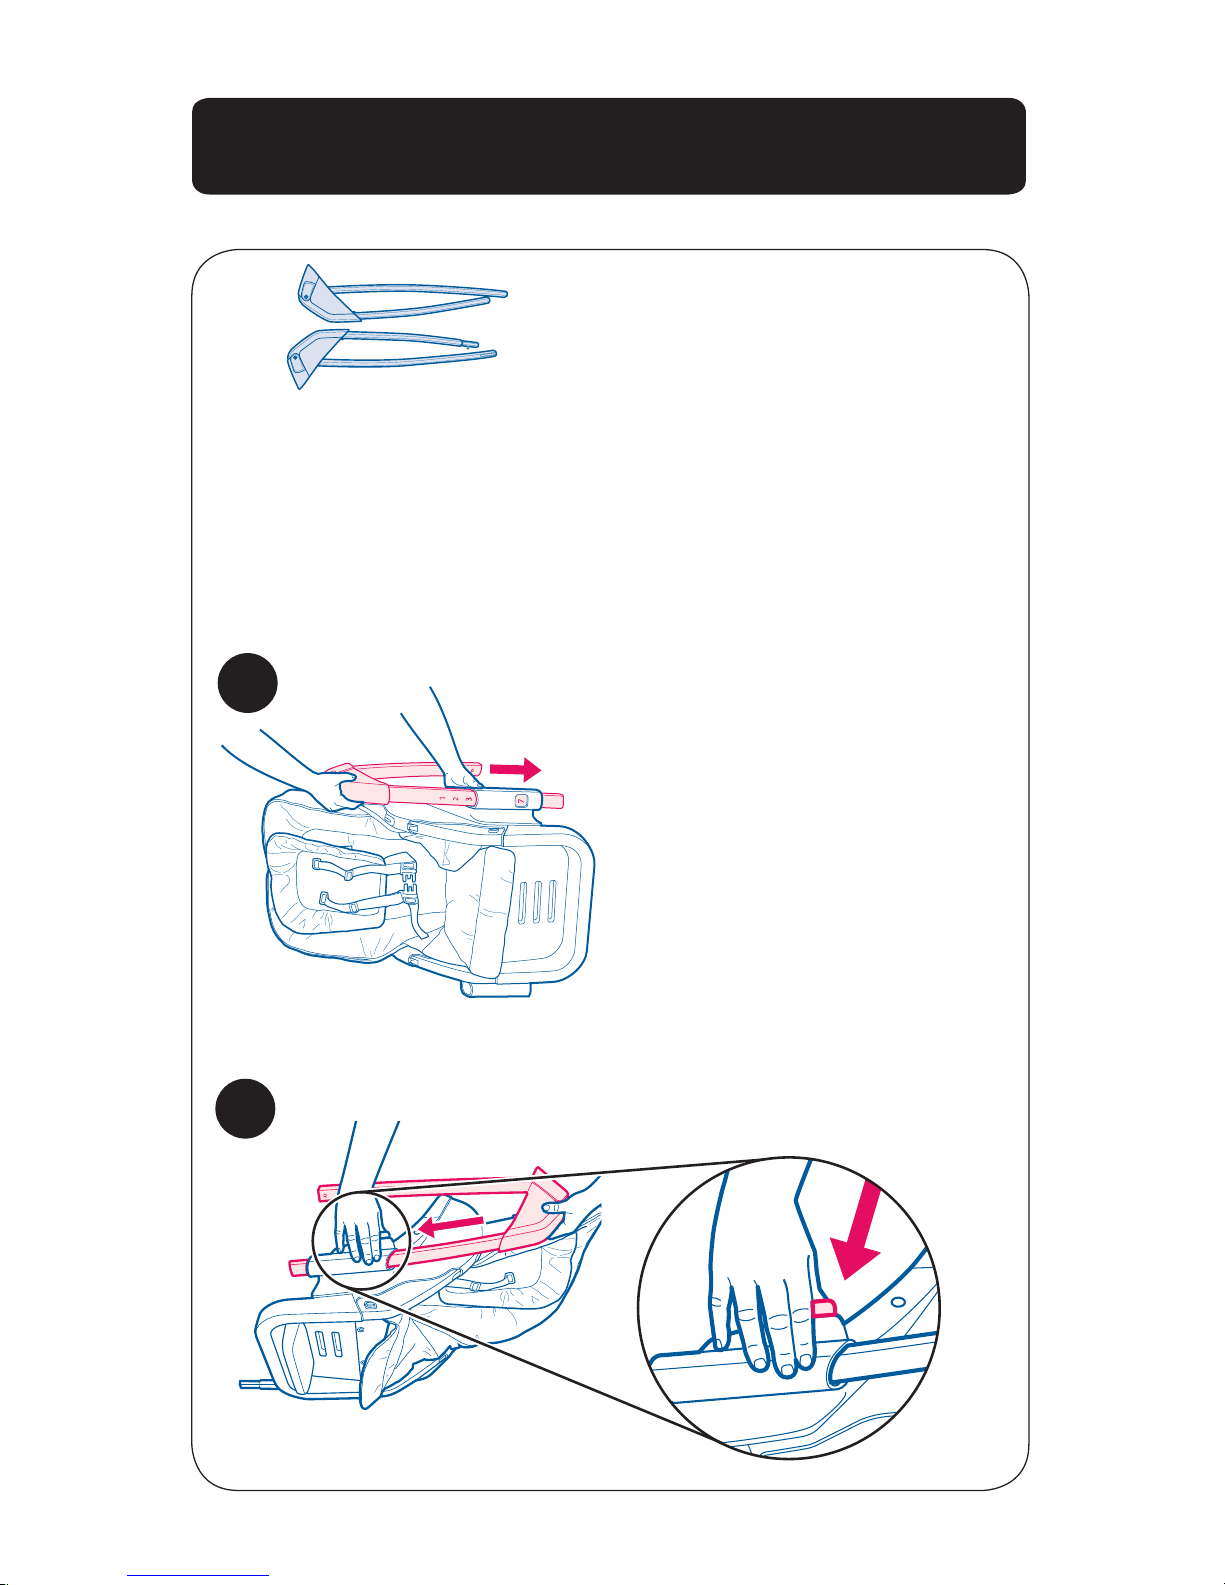
Insert slotted leg post through
the frame of the seat, with logo
facing out and the numbered
leg on the side with window.
Repeat with other leg.
Make sure to squeeze button to
choose one of the other height
options.
1
2
)NSERTINGLEGS
Page 8
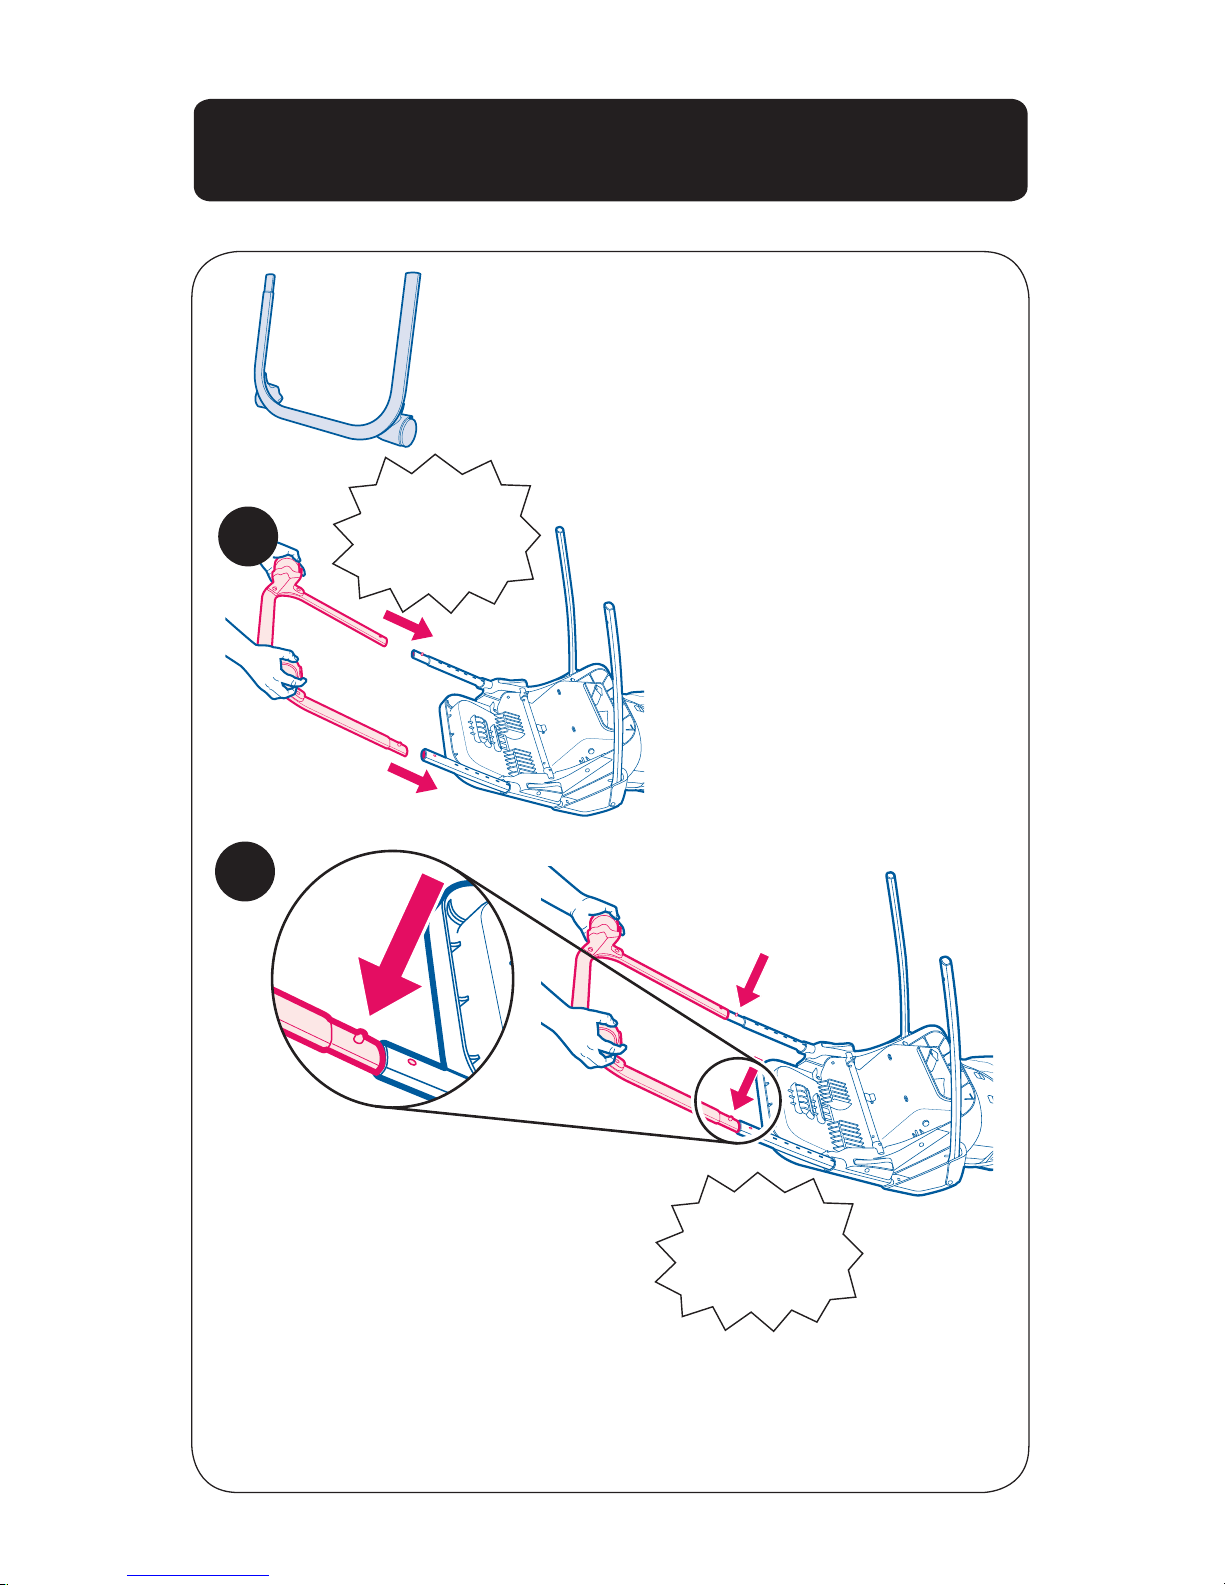
&RONTLEGS
Make sure the buttons snap
into holes.
1
2
Insert “U” tube with wheels
into the front leg tubes.
SNAP!
SNAP!
Page 9

Insert other “U” tube into
the rear tubes until they
snap into place.
Attaching Rear Legs
!TTACHING&OOTREST
Attach footrest to one of the
receiving slots as shown.
SNAP!
SNAP!
Page 10

Attaching Seat Pad
Insert the elastic straps, located on
the back of the pad, through the
slots in the seat area and pull up
on pad to make sure its secure.
1
2
Page 11

Secure the seat pad by wrapping
elastic straps around bottom of seat,
hooking elastic straps as shown.
4
5
Pull crotch strap through slot in seat
pad.
3
Page 12

Attaching Snack Tray
2
SNAP!
Insert hooks on the back of
snack tray into receiving slots.
Swing tray down until both
sides snap into place.
1
Page 13

!TTACHING4RAY
SNAP!
Squeeze adjustment button on
front of tray to adjust tray to fit
child.
1
Squeeze lever on both sides
of tray and place on chair.
2
DO NOT FORCE TRAY against child. Use only the three adjustment
positions. Be sure both adjustment fingers are engaged in armrest
slots.
Page 14

4O5NFOLD
2
1
4RAY)NSERT
1
To remove, pull up from back.
Dishwasher safe.
Page 15

4O3ECURE#HILD
1
4
5
0OINT(ARNESS
WARNING &ALLING(AZARD Always use the seat belt.
2
3
Use slide adjuster at shoulder and
waist for tighter adjustment.
Page 16

0OINT"UCKLE
To convert to 3-pt harness.
1
2
5
3
4
Use slide adjuster at waist for
further adjustment.
Page 17

1
2
Adjust Harness Height
To lengthen harness straps for
older child, pull body support
up as shown until harness is
tight against child's shoulders.
To shorten harness straps for
younger child, pull body of
support down until harness
straps are tight against child's
shoulders.
Page 18

4O2ECLINE
1
2
With baby out of high chair,
squeeze recline lever and adjust
seat back to 1 of 3 positions.
Page 19

1
!DJUSTING(EIGHT
2
Pull up on seat to adjust height.
8 Positions
Push buttons on sides to lower
seat.
Page 20

Remove the seat pad by unfastening
elastic straps from bottom of seat,
shown.
Removing seat pad
1
Push crotch strap through slot in seat
pad.
2
Page 21

Reach under bottom of seat and
push the 2 straps up through the
seat as shown.
3
4
Push crotch strap through slot in
seat pad.
5
Page 22
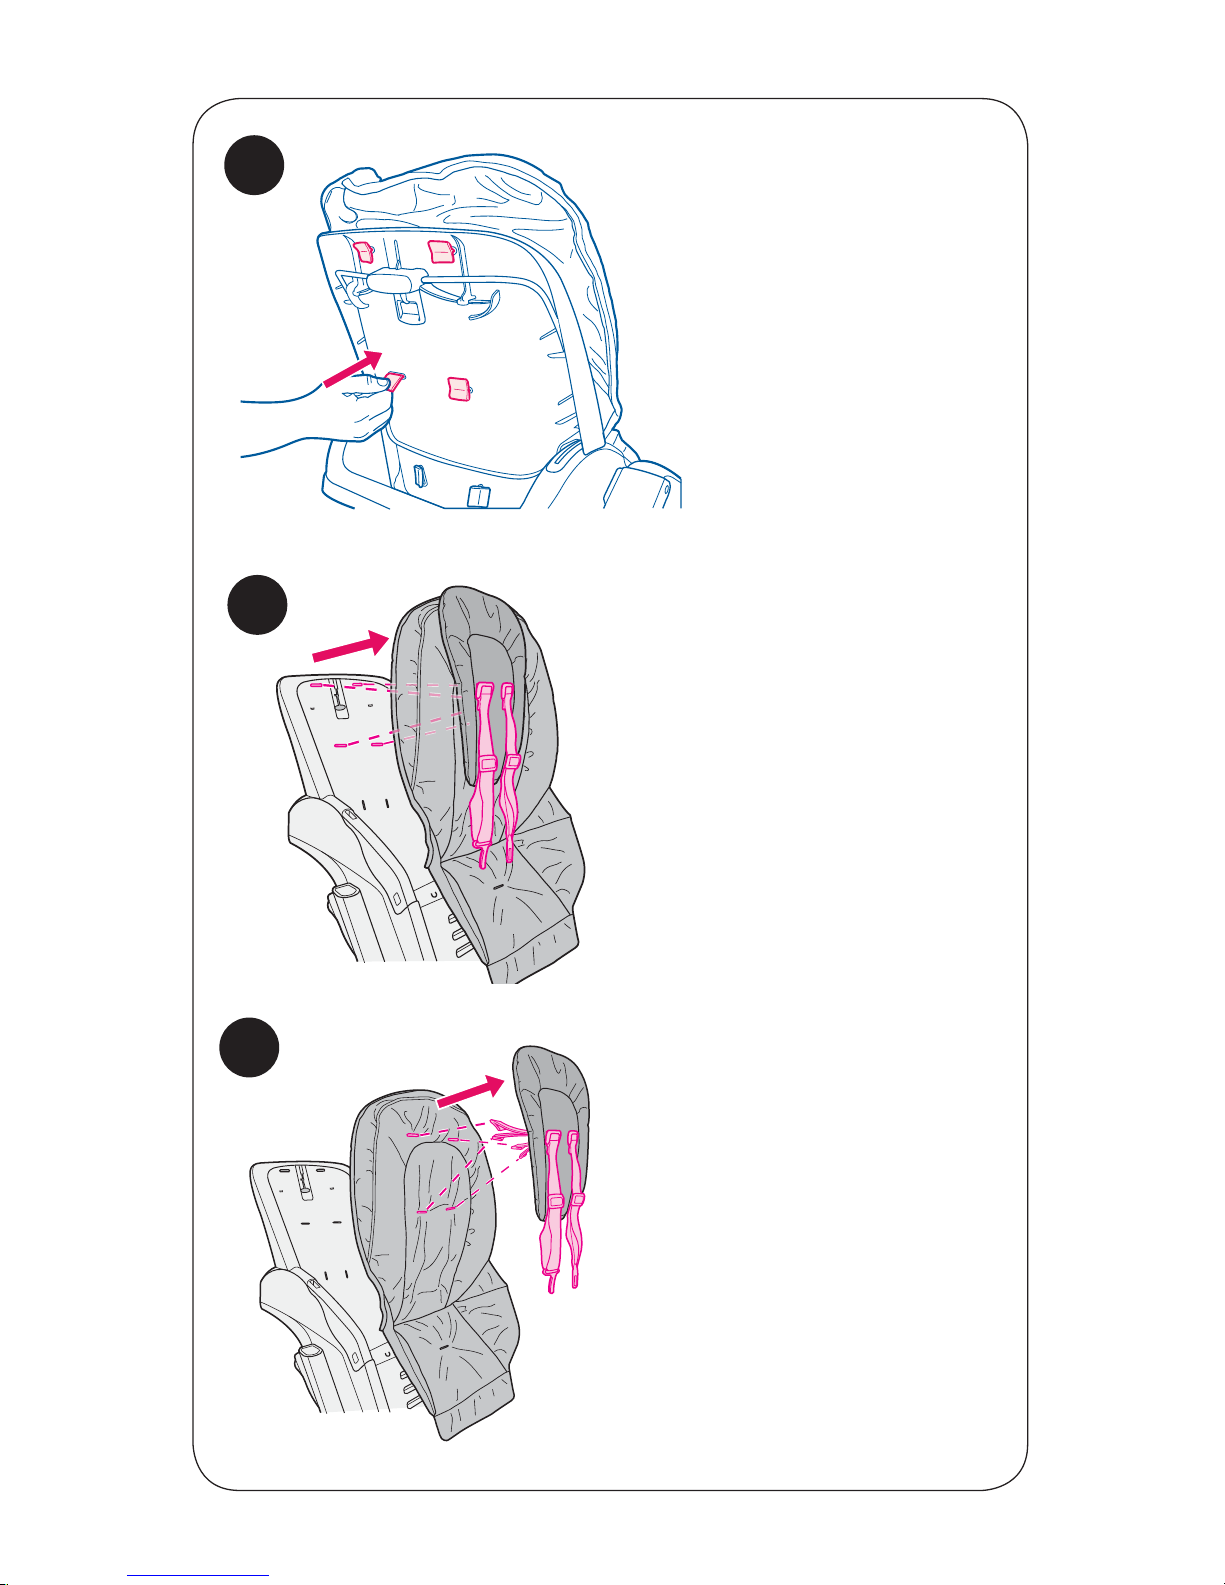
7
6
Push 4 straps through back
of seat pad to remove body
support.
8
Push straps to front of seat
as shown.
Remove pad from seat.
Page 23

Remove 4 straps from
body support as shown.
9
Page 24

Press buttons on the sides of the
legs to close.
To Fold for Storage
1
2
WARNING To prevent
injury from falling, DO NOT lean folded unit against wall.
Page 25

Care and Maintenance
sFROM TIME TO TIME CHECK YOUR HIGHCHAIR for worn parts,
torn vinyl or stitching. Replace or repair the parts as needed. Use
only Graco replacement parts.
sTO CLEAN HIGHCHAIR FRAME, use only household soap and
warm water. NO BLEACH or detergent.
sTO CLEAN REMOVABLE SEAT COVER, Refer to your care tag on
your seat pad for washing instructions. NO BLEACH.
 Loading...