

Page 1
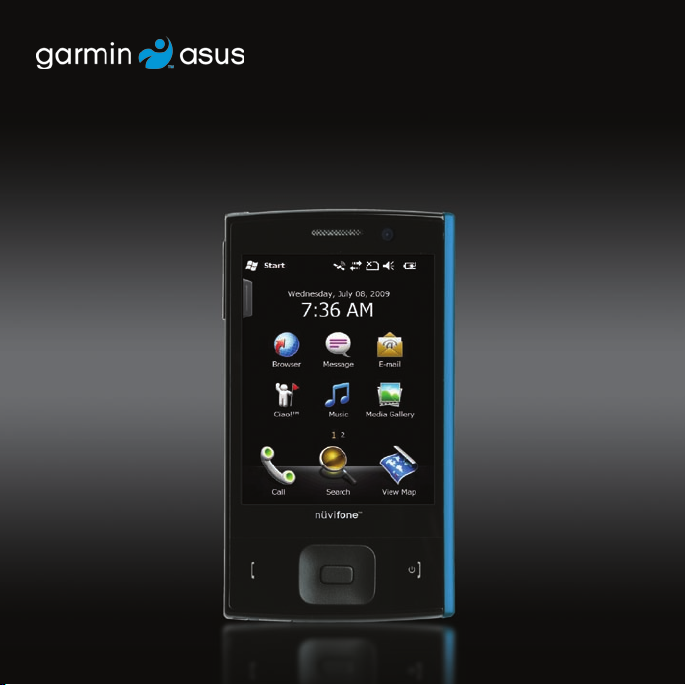
™
nüvifone
M20
quick start manual
Page 2
See the Important Safety and Product Information on page 20 for product
warnings and other important information.
Download the latest owner’s manual at www.garminasus.com/nuvifoneM20.
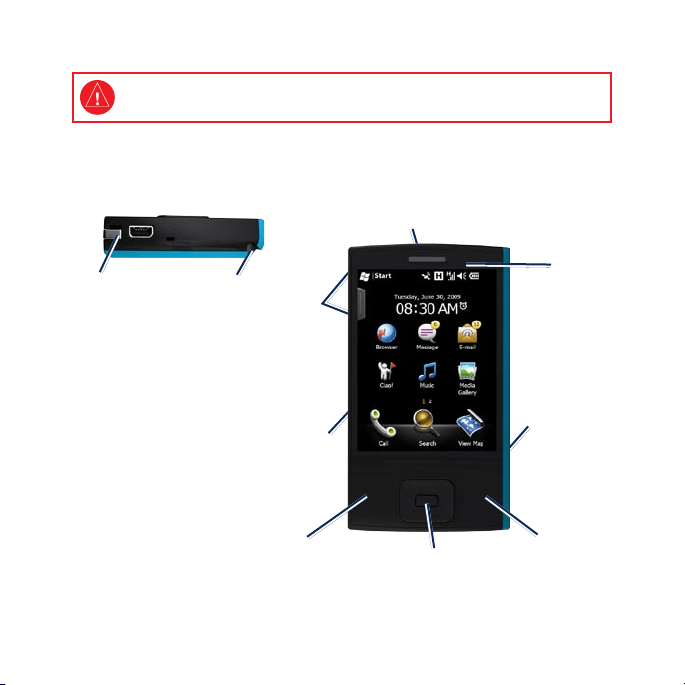
nüvifone Device Features
Camera lens (on back)
Mini-USB
connector for
headphones,
power, and
computer
connection
2 nüvifone M20 Quick Start Manual
Stylus
Volume
up and
down
keys
Navigation
cradle power
connector
Send key
5-Way Navigation key
Camera
lens (not
available
on all
devices)
Hold key;
Slide
down to
lock the
screen.
End/Power
key
Page 3
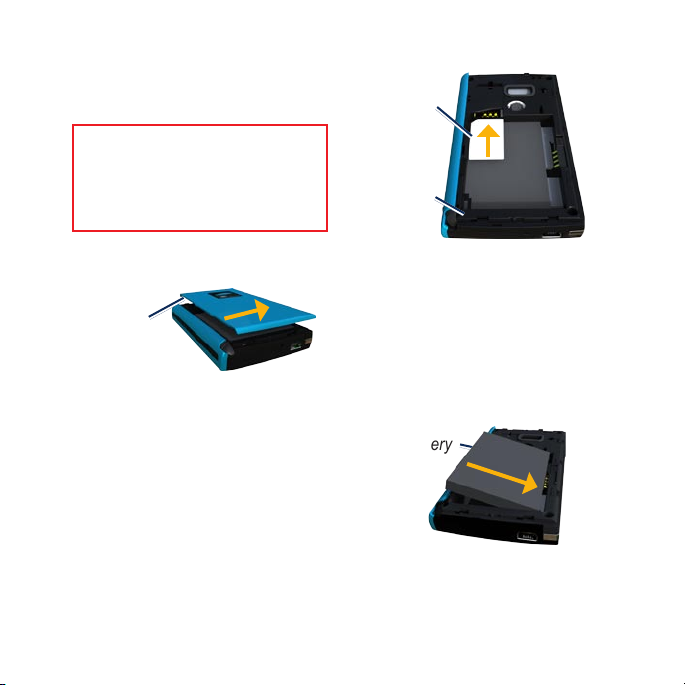
Install the SIM Card and the Battery
WARNING: This product contains
a lithium-ion battery. To prevent
damage, remove the device from the
vehicle when exiting or store it out of
direct sunlight.
1. Slide the battery cover off the
back of the nüvifone.
Battery
cover
2. Insert the Subscriber Identity
Module (SIM) card in the
slot at the top of the battery
compartment. Insert the notched
corner of the SIM Card rst with
the gold contacts facing down.
nüvifone M20 Quick Start Manual 3
SIM card
Reset
button
3. Locate the lithium‑ion battery that
came in the product box.
4. Locate the metal contacts on the
end of the lithium‑ion battery.
5. Insert the battery so that the
metal contacts on the battery
match up with the metal contacts
inside the battery compartment.
Battery
6. Slide the battery cover onto the
back of the nüvifone.
Page 4
Charge the Battery
Charge the battery for up to four
hours before using for the rst time.
If you completely discharge the
battery, recharge it for at least 20
minutes before turning it back on.
1. Insert the plug into the AC power
adapter, if necessary.
2. Plug the
adapter.
3. Connect the mini‑USB end of
the USB cable to the mini‑USB
connector on the bottom of your
nüvifone.
4. Plug in the AC adapter into a
power outlet.
You can also charge the nüvifone
using the USB cable and your
computer.
USB cable into the AC
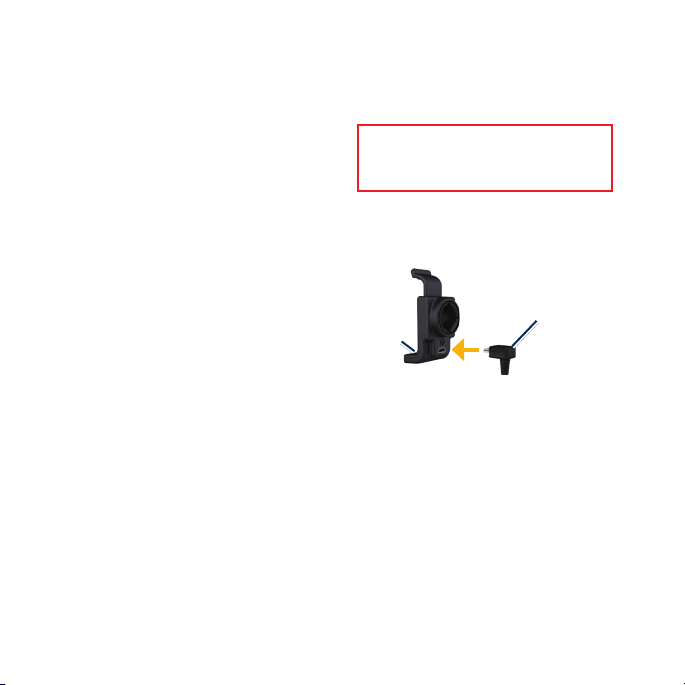
Mount the nüvifone in Your Vehicle
Before mounting the nüvifone, see
page 20 for information about laws
pertaining to windshield mounting.
1. Plug the vehicle power cable into
the power connector on the back
of the cradle.
Cradle
2. Snap the cradle onto the suction
cup arm.
3. Remove the clear plastic from the
suction cup. Clean and dry your
windshield and the suction cup
with a lint-free cloth.
Vehicle
power
cable
Turn On Your nüvifone
Press and hold the Power key to turn
on and turn off the nüvifone.
4 nüvifone M20 Quick Start Manual
Page 5
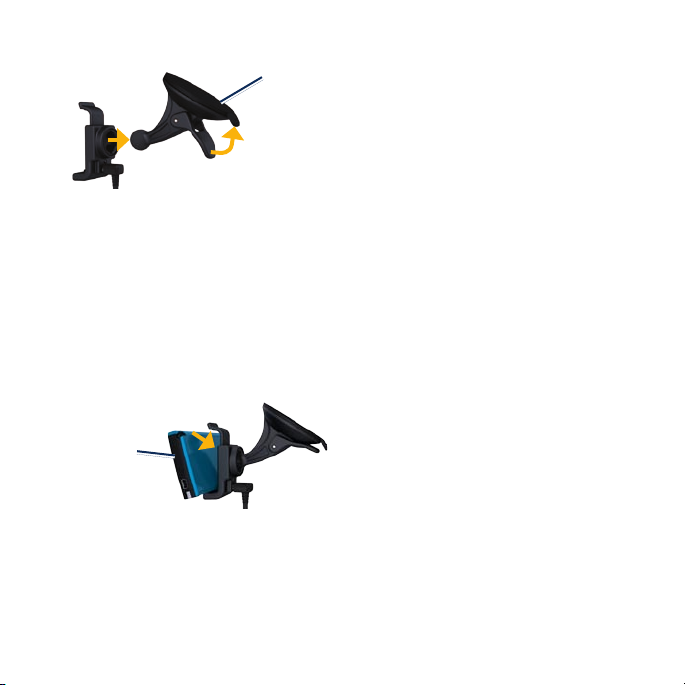
Suction
cup mount
Remove the nüvifone from the Cradle
1. Press up on the tab on the top of
the cradle.
2. Tilt the nüvifone forward.
4. Place the suction cup on the
windshield.
5. Flip the lever back, toward the
windshield.
6. Fit the gold contacts on the left
side of your nüvifone into the
cradle.
7. Tilt the nüvifone back until it
snaps into the cradle.
nüvifone
8. Plug the other end of the vehicle
power cable into a power outlet in
your vehicle.
nüvifone M20 Quick Start Manual 5
Remove the Cradle from the Mount
1. Turn the cradle to the right or left.
2. Apply pressure until the socket on
the cradle releases the ball on the
mount.
Remove the Suction Cup Mount from the Windshield
1. Flip the lever on the suction cup
mount toward you.
2. Pull the tab on the suction cup
toward you.
Page 6
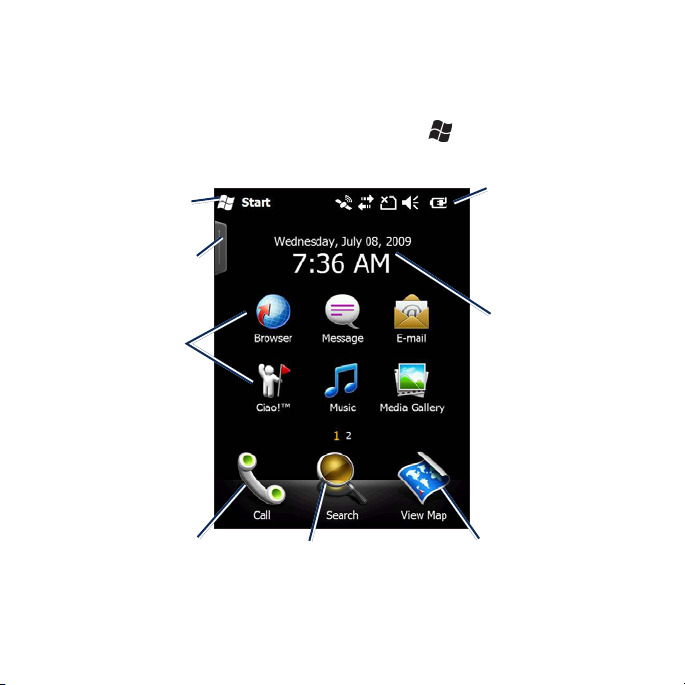
Use the Home Screen
The Home screen appears when you turn on your device. If you are not
currently in a call, you can press the End key or tap > Today to return to
the Home screen.
Tap to open the
Start menu.
Tap and drag the
tab to open the
Today screen.
Application
shortcut icons.
Tap an icon
to open the
application.
To view more
icons, touch and
drag your nger
between the two
rows of icons.
Tap to place a
phone call.
6 nüvifone M20 Quick Start Manual
Tap to nd and navigate
to a location.
Status bar. Tap an
icon to view more
information.
Current date and
time. Tap to set
the clock and
alarms.
Tap to open the
map.
Page 7
Dial a Number
1. Press the Send key or tap Call.
2. Tap
3. Dial the number.
Note: Tap and hold * to enter a ,
4. As you dial, a list appears
5. Press the
to open the keypad.
(comma) and 0 to enter a + (plus
sign).
showing similar numbers you
have dialed.
Tap to view the entire list.
•
Tap a number in the list to
•
select the number.
Tap to return to the
•
keypad.
Send key.
End a Call
To end a call, press the End key.
nüvifone M20 Quick Start Manual 7
Set Up Voicemail
1. Tap > Settings > Personal >
Phone > Services tab.
2. Tap
Voicemail and Text
Messages > Get Settings.
3. Verify that your voicemail number
is correct, and tap OK.
Call Voicemail
1. Press the Send key to open the
phone application.
2. Tap
3. Tap and hold
.
1.
View Call History
1. Press the Send key.
2. Tap
3. Tap a number or a contact in the
, if necessary.
list to view your call history for
that number or contact.
Page 8
Add a Contact
1. Press the Send key.
2. Tap
3. Enter the information for the
4. Tap
> > New Contact.
contact. Tap Done when nished.
to save the contact.
Call a Contact
1. Press the Send key.
2. Tap
3. Tap a contact.
4. Tap
8 nüvifone M20 Quick Start Manual
.
Call.
Find an Address
NOTE: Depending on the version
of the built-in map data on your
device, the button names and
order of steps could be different
than the steps below.
Search > Address.
1. Tap
2. If necessary, select the state,
country, or province.
3. To search all cities, tap
All Cities. You can also tap Spell
City, enter all or part of the name,
and then tap the city in the list.
4. Enter the house number, and
then tap Next.
5. Enter all or part of the street
name or number, and then tap the
street in the list.
6. Tap the correct address in the list.
Search
Page 9
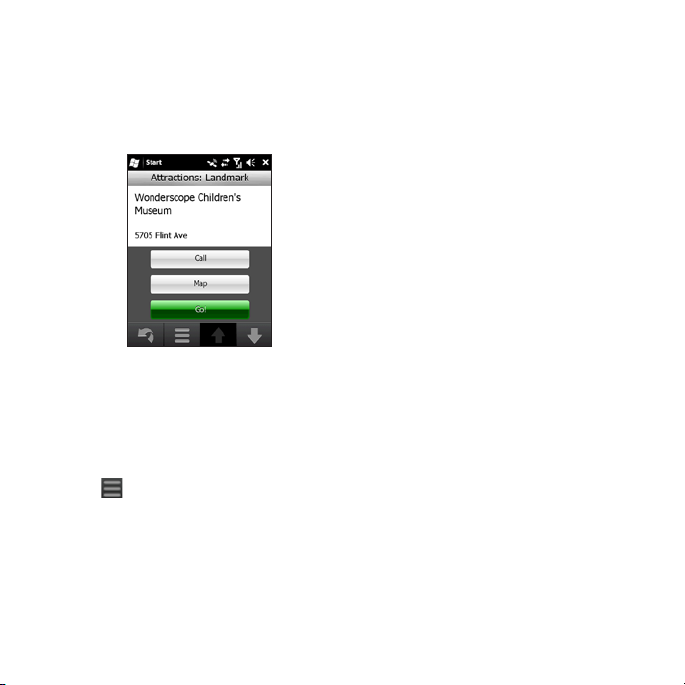
Go! Page Options
After you nd a location, information
about the location appears.
Set Your Home Location
You can save a favorite called
“Home” and quickly generate a route
to it.
1. Tap Search > Home.
2. Tap
Enter My Address or Use
Current Location.
Go Home
After you have saved your home
location, you can create a route to it.
Tap Search > Home.
Call—dial the phone number of the
location, if available.
Map—view the location on the map.
Go!—create a route to the location.
Tap for more options.
nüvifone M20 Quick Start Manual 9
Page 10

Find a Point of Interest
The detailed maps loaded in your
nüvifone contain millions of points
of interest, such as restaurants,
hotels, and auto services.
Find by Category
1. Tap Search > Points of Interest.
2. Tap a category.
3. Tap a subcategory or tap
Categories. A list of items near
your current location appears.
4. Tap the item you want.
Find by Spelling the Name
To nd a destination, enter part or all
of the name.
1. Tap Search > Points of Interest.
2. Tap
Spell Name, enter your
search term, and tap Done.
3. Tap the item you want.
10 nüvifone M20 Quick Start Manual
All
Find a Location Near Your Route
1. Tap Search.
2. Tap
3. Tap the appropriate option, and
> Near.
then tap Done.
Find Selected Text
You can nd location information for
selected text in an SMS message, in
an e-mail, or in your Web browser.
1. Drag to select the text.
2. Tap
3. Select an option:
4. Tap an item in the list.
.
Name—search for the item
•
by name.
Address—search for the item
•
by address.
Local Search—search for the
•
location on the Internet.
Page 11
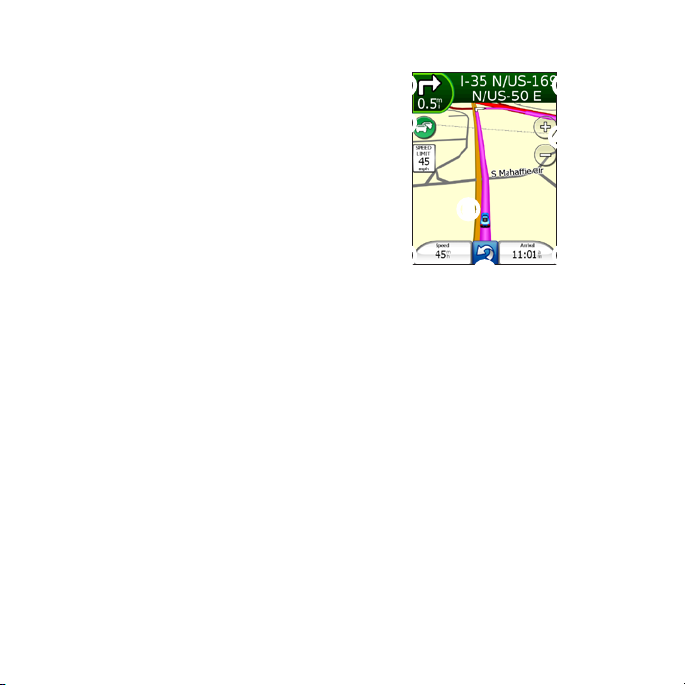
Follow Your Route
After you select a location and tap
Go!, your nüvifone creates a route
to the location. Your route is marked
with a magenta line.
As you travel, your nüvifone guides
you to your destination with voice
prompts, arrows on the map, and
directions at the top of the map.
A checkered ag marks your
destination.
If you depart from the original route,
your nüvifone recalculates the route
and provides new directions.
A speed limit icon may appear as
you travel on major roadways. This
icon displays the current speed limit
of the roadway.
nüvifone M20 Quick Start Manual 11
➊
➌
➎
➏
➊
Tap to view the next turn.
➋
Tap to view the route details.
➌
Tap to view the Trafc menu.
➍
Tap to zoom in and zoom out.
➎
Tap to browse the map.
➏
Tap to view the trip computer.
➐
Tap to return to the Home
screen.
➑
Tap to view the Where Am I?
page.
➐
➋
➍
➑
Page 12

Save My Current Location
1. Tap View Map.
2. Tap the lower-right data eld.
3. Tap
> Save.
Take a Detour
1. While navigating a route, tap .
2. Tap
Detour.
The nüvifone attempts to get you
back on your original route as
quickly as possible. If the route
you are currently taking is the only
reasonable option, the nüvifone
might not calculate a detour.
Edit the Active Route
Via points are additional points or
stops that you add to a route. They
can be addresses, favorites, points of
interest, or any item on the map.
1. While navigating a route, tap the
text bar on the top of the map.
2. Tap
3. Tap
4. Select a method to select a via
5. Tap
You can also add via points to a route
using the Find feature. Find an item,
> Edit.
Add Start Point or Add End
Point.
point.
Done when nished.
and then tap Go!. When prompted
Stop the Route
1. While navigating a route, tap .
2. Tap
Stop.
12 nüvifone M20 Quick Start Manual
to add the point as a via point to the
current route, tap Yes.
Page 13

Send an SMS/Text Message
1. From the Home screen, tap
Message.
2. Tap
Menu > New > Text
Message.
3. Enter a recipient, or tap
> Add Recipient to select from
your Contacts list.
4. Enter the text message.
5. Tap
Send.
NOTE: Your regular messaging
fees apply when sending and
receiving messages.
nüvifone M20 Quick Start Manual 13
Menu
Send an MMS
1. From the Home screen, tap
Message.
2. Tap
Menu > New > Multimedia
Message.
3. Tap
Select.
4. Enter a recipient, or tap
Recipient > Add Recipient to
add a Contact.
5. Tap below the subject line to
attach an image or video.
6. Tap
Insert Text to enter the text
of the message.
7. Tap
Insert Audio to attach an
audio le.
8. Tap
Send.
Menu >
Page 14

Read Messages
1. Tap Message. Unread messages
are displayed in bold.
2. Tap a message to read it.
Reply to a Message
1. Tap Message.
2. Tap a message, and then tap
Menu > Reply/Forward > Reply
or Reply All.
Forward a Message
1. Tap Message.
2. Tap a message, and then tap
Menu > Reply/Forward >
Forward.
3. Enter the addresses to which you
want to forward the message.
14 nüvifone M20 Quick Start Manual
Set up an E-mail Account
Your nüvifone can automatically
congure account information for
some e-mail accounts.
If additional information is required,
see your e-mail account provider.
1. Tap E-mail.
2. Enter your e‑mail address and
password.
3. Tap
Next to obtain your e‑mail
settings from the Internet.
4. Follow the on-screen instructions
to set up your e‑mail account on
your device.
Page 15

Send an E-mail Message
1. Tap E-mail.
2. Tap an e‑mail account.
3. Tap
Menu > New.
4. Enter an e‑mail address in the
To eld, or tap Menu > Add
Recipient to select from your
Contacts list. If you are sending
a message to more than one
recipient, separate the e‑mail
addresses with a semicolon (;).
5. Enter your message in the
message eld.
6. When nished, tap
If you are working ofine (such as in
Flight Mode or out of range), e-mail
messages are saved to the Outbox
folder and sent the next time you
Send.
Read an E-mail Message
1. Tap E-mail.
2. Tap an e‑mail account, if
necessary.
3. Tap an e-mail message to view it.
4. Tap
Reply or Reply All to write a
response. Tap Forward to send
the e‑mail message to another
recipient.
Manually Send/Receive E-mail Messages
1. Tap E-mail.
2. Tap an e‑mail account.
3. Tap
Menu > Send/Receive.
4. To stop this process, tap
Stop Send/Receive.
Menu >
connect.
nüvifone M20 Quick Start Manual 15
Page 16

Ciao!™
Ciao! periodically sends your
location to our partner networks and
downloads the most recent location
of your friends. This application only
submits your location when you tell
it to, unless you enable automatic
updates.
A data connection is required for this
feature.
Register Your Device
Before you join Ciao! for the rst
time, you must rst register your
device.
1. Tap Ciao!.
2. Read and accept the on‑screen
messages.
3. Tap
Register. The Web browser
launches.
16 nüvifone M20 Quick Start Manual
4. Follow the steps to register your
device. After registering, you will
receive an SMS message for
verication.
5. Open the SMS message, and
tap the link to complete the
verication process.
Join Ciao!
After you register your device, you
can join Ciao!.
1. Tap Ciao!.
2. Read and accept the registration
information.
3. Tap a type of location update,
Manual or Automatic.
4. Enter a display name.
5. Tap
Complete. Your location is
updated and becomes available
in the network.
Page 17

Invite a Friend
1. Tap Ciao! > Invite.
2. Tap an option to enter a phone
number.
3. Tap the button under
Country, and select a country.
4. Tap
Send Invite.
5. Select the network your friend is
using. If your friend is using Ciao!,
you can select any network in the
list. Tap OK.
Friend’s
Accept an Invitation
When you receive an invitation, a
message appears on the screen.
1. Select the invitation in your list of
friends.
2. Tap
Accept.
3. Tap
Yes to allow the friend to
view your location. The location
information for the friend appears.
friend, and you can view location
information for each other.
Take a Picture
1. Tap Camera.
2. Aim the viewnder.
3. Tap
+ and – to zoom in and zoom
out.
4. Tap the center of the screen to
focus automatically.
5. Press the center
to take a picture.
Navigation key
Record a Video
1. Tap Camera.
2. Tap
3. Tap
4. Press the center
5. Tap
.
or .
Navigation key
to begin recording the video.
Stop to stop recording the
video.
After you accept an invitation from a
friend, he or she becomes a “trusted”
nüvifone M20 Quick Start Manual 17
Page 18

Install and Congure
ActiveSync on Your
Computer
1. Insert the Getting Started
CD‑ROM in your computer’s CD‑
ROM drive.
2. Follow the on-screen instructions.
3. Connect the mini‑USB plug to
the mini‑USB connector on the
bottom of the device.
4. Connect the other end of the USB
cable to your computer.
5. Follow screen instructions to
complete the wizard.
6. Disconnect the device after the
synchronization is complete.
Each time you connect your nüvifone
to your computer, your nüvifone is
automatically synchronized with
your computer.
18 nüvifone M20 Quick Start Manual
nüMaps Guarantee™
To receive one free map update (if
available), register your nüvifone
at www.garminasus.com within
60 days of acquiring satellites and
driving with your nüvifone. You are
not eligible for the free map update if
you register by phone or wait longer
than 60 days after the rst time you
drive with your nüvifone.
Reset the nüvifone
If the nüvifone stops functioning,
turn off the nüvifone, and then turn
on the nüvifone. If this does not help,
reset the nüvifone.
1. Remove the battery cover.
2. Using the stylus, press the red
Reset button. The nüvifone
should restart and operate
normally.
Page 19

Update the Software
Go to www.garminasus.com
/nuvifoneM20 to download the latest
software update.
Learn More
1. Tap > Help.
2. Tap
Search and enter a search
term.
3. Tap a topic.
Get Support
Go to www.garminasus.com/support
for in-country support information.
Register Your Product
Register your product at
www.garminasus.com to help us
better support you. Keep the original
sales receipt, or a photocopy, in a
safe place.
nüvifone M20 Quick Start Manual 19
Troubleshooting
If your device will not turn on, try
one or more of the following:
Charge the battery.
•
Make sure the Hold key on the
•
right side of the nüvifone is up. If
the red dot near the Hold key is
visible, the nüvifone is locked.
Page 20

Important Safety and Product Information
0700
For updates to the safety and product information, see the most recent owner’s
manual at www.garminasus.com/nuvifoneM20.
Warnings
Failure to avoid the following
potentially hazardous situations
could result in an accident or collision
resulting in death or serious injury.
General Device Warnings:
When installing the device in a
•
vehicle, place the device securely so
it does not obstruct the driver’s view
of the road or interfere with vehicle
operating controls, such as the steering
wheel, foot pedals, or transmission
levers. Do not place in front of or
above any airbag.
Do not become distracted by the
•
device while driving, and always be
fully aware of all driving conditions.
20 nüvifone M20 Quick Start Manual
Always operate the vehicle in a safe
•
manner.
Minimize the amount of time spent
•
viewing the device’s screen while
driving and use voice prompts when
possible.
Do not send text messages, place or
•
receive phone calls, input destinations,
change settings, or access any
functions requiring prolonged use of
the device’s controls while driving.
Pull over in a safe and legal manner
before attempting such operations.
Check and follow local laws regarding
•
device usage.
Page 21

Navigation Warnings:
When navigating, carefully compare
•
information displayed on the device
to all available navigation sources,
including information from street
signs, visual sightings, and maps.
For safety, always resolve any
discrepancies or questions before
continuing navigation and defer to
posted road signs.
Battery Warnings
If these guidelines are not followed,
the internal lithium-ion battery may
experience a shortened life span or may
present a risk of damage to the GPS
device, re, chemical burn, electrolyte
leak, and/or injury.
Do not leave the device exposed to a
•
heat source or in a high temperature
location, such as in the sun in an
unattended vehicle. To prevent damage,
remove the device from the vehicle or
store it out of direct sunlight, such as in
the glove box.
nüvifone M20 Quick Start Manual 21
The device is designed to provide
•
route suggestions. It is not designed
to replace the need for driver
attentiveness regarding road closures
or road conditions, trafc congestion,
weather conditions, or other factors
that may affect safety while driving.
Do not puncture or incinerate.
•
When storing the device for an
•
extended time, store within the
following temperature range: 5°F to
140°F (from -15°C to 60°C).
Do not operate the device outside of
•
the following temperature range: 5°F to
113°F (from -15°C to 45°C).
Contact your local waste disposal
•
department to properly recycle/dispose
of the device/battery.
Page 22

Additional User-replaceable Battery
Warnings:
Do not use a sharp object to remove
•
the battery.
Keep the battery away from children.
•
Do not disassemble, puncture, or
•
damage the battery.
If using an AC charger or external
•
battery charger, only use the accessory
approved for your product.
Only replace the battery with the
•
correct replacement battery. Using
another battery presents a risk of re or
explosion. To purchase a replacement
battery, see your Garmin or ASUS
dealer or the Garmin-Asus Web site.
Additional Non-user-replaceable
Battery Warnings:
Do not remove or attempt to remove
•
the non-user-replaceable battery.
When disposing of the device, take it to
•
a professional service, such as a waste
electronics treatment facility, to have
the battery removed and recycled.
22 nüvifone M20 Quick Start Manual
Pacemakers and Other Medical Devices
Studies have shown that there may be
a potential interaction between mobile
phones and normal pacemaker operation.
The pacemaker industry recommends
that people with pacemakers follow
these guidelines to minimize any risk of
interference with pacemaker operation:
Always maintain a distance of 15 cm
•
(6 inches) between the pacemaker and
any mobile phone that is turned on.
Store the phone on the opposite side of
•
the pacemaker. Do not carry the phone
in a breast pocket.
Use the ear furthest from the
•
pacemaker in order to minimize any
potential for interference.
If you think that interference may
•
be occurring, turn off the phone
immediately.
For other medical devices, consult with
your physician or the manufacturer
to determine if your mobile phone
may interfere with the device, and to
determine any precautions that you can
Page 23

take to avoid interference.
Avoid Hearing Damage
You can permanently damage your
ears and lose hearing if you listen to
the receiver, earbuds, headphones, or
headsets at high volume.
Turn the volume down. The volume is
typically too loud if you cannot hear
people speaking around you. Limit
the amount of time you listen at high
volume.
If you experience ringing in your ears or
mufed speech, stop listening and have
your hearing checked.
Avoid Repetitive Motion
You may experience occasional
discomfort in your hands, arms,
shoulders, neck, or other parts of your
body if you perform repetitive activities,
such as typing or playing games, on the
device.
Take frequent breaks. If you have
discomfort while or after using the
device, stop using and see a physician.
nüvifone M20 Quick Start Manual 23
Avoid Seizures, Blackouts, and Eyestrain
A very small percentage of people can
experience seizures or blackouts caused
by light ashes or patterns, such as while
watching videos or playing games.
If you have experienced, or have a family
history of, seizures or blackouts, consult
a physician before playing games or
watching videos on your device.
Follow these guidelines to reduce the risk
of blackouts, seizures, and eyestrain:
Avoid prolonged use of and take
•
frequent breaks from using the device.
Hold the device away from your eyes.
•
Use the device in a well-lit room.
•
If you experience convulsions, eye or
muscle twitching, loss of awareness,
involuntary movement, or disorientation,
stop using the device use and consult a
physician.
Page 24

FCC Compliance
This device complies with part 15 of the
FCC Rules. Operation is subject to the
following two conditions: (1) this device
may not cause harmful interference,
and (2) this device must accept any
interference received, including
interference that may cause undesired
operation.
This equipment has been tested and
found to comply with the limits for
a Class B digital device, pursuant to
part 15 of the FCC rules. These limits
are designed to provide reasonable
protection against harmful interference in
a residential installation. This equipment
generates, uses, and can radiate radio
frequency energy and may cause harmful
interference to radio communications
if not installed and used in accordance
with the instructions. However, there
is no guarantee that interference will
not occur in a particular installation.
If this equipment does cause harmful
interference to radio or television
reception, which can be determined by
24 nüvifone M20 Quick Start Manual
turning the equipment off and on, the
user is encouraged to try to correct the
interference by one of the following
measures:
Reorient or relocate the receiving
•
antenna.
Increase the separation between the
•
equipment and the receiver.
Connect the equipment into an outlet
•
that is on a different circuit from the
GPS unit.
Consult the dealer or an experienced
•
radio/TV technician for help.
This product does not contain any
user-serviceable parts. Repairs should
only be made by an authorized Garmin
service center. Unauthorized repairs or
modications could result in permanent
damage to the equipment, and void your
warranty and your authority to operate
this device under Part 15 regulations.
Industry Canada Compliance
Category I radiocommunication
devices comply with Industry Canada
Standard RSS-210. Category II
Page 25

radiocommunication devices comply
with Industry Canada Standard RSS-310.
Radio Frequency Exposure /
Specic Absorption Rate
This device is a transmitter and receiver
that uses its antenna to send and
receive low levels of radio frequency
(RF) energy for voice and data
communications. The cellular antenna is
located above the camera lens, along the
top edge of the back of the device. The
Wi-Fi and Bluetooth
to the right of the camera lens on the
back of the device.
Regular review of scientic research
and studies has led to the formation
of international safety guidelines and
regulations regarding limiting exposure
to this RF energy. This product emits RF
energy below the published limits when
operating in its maximum output power
mode and when used with GarminAsus authorized accessories. In normal
operation, the device will operate at even
lower output power modes, depending
on many factors including proximity to
nüvifone M20 Quick Start Manual 25
®
antenna is located
network cellular towers and the absence
of external interference.
The RF exposure guidelines use a unit
of measurement known as the specic
absorption rate, SAR. The SAR limit
applicable to this device set by the FCC
is 1.6 watts per kilogram (W/kg), 1.6
W/kg by Industry Canada, and 2.0 W/kg
by the Council of the European Union.
This device has been tested and is
compliant with the FCC, IC, and
European Union RF exposure guidelines
for cellular, Wi-Fi, and Bluetooth
operation. For countries where this
product is sold outside of the United
States, Canada, and the European
R&TTE member countries, this product
has been tested and is compliant to the
applicable RF exposure requirements of
the local regulatory authority.
To be sure that your exposure to RF
energy does not exceed the FCC and
European Union guidelines, follow these
precautions:
Position the device antenna at least 15
•
mm (5/8 inch) from your body.
Page 26

Only use the device with Garmin-
•
Asus approved accessories. Only use
accessories that do not have metal parts
and that maintain at least 15 mm (5/8
inch) separation between the device
and your body.
Care for Your Device
Avoid dropping your device and
•
operating it in high-shock and highvibration environments.
Do not expose the device to water.
•
Contact with water can cause this
device to malfunction.
Do not store the device where
•
prolonged exposure to extreme
temperatures can occur, because it can
cause permanent damage.
Never use a hard or sharp object to
•
operate the touchscreen, or damage
may result. Though a stylus can be
used to operate the touchscreen, never
attempt this while operating a vehicle.
To help avoid theft, remove the device
•
and mount from sight when not in use.
Remove the residue on the windshield
26 nüvifone M20 Quick Start Manual
left by the suction cup.
Important Information
MAP DATA INFORMATION: One
of the goals of Garmin and ASUS is
to provide customers with the most
complete and accurate cartography that
is available to us at a reasonable cost. We
use a combination of governmental and
private data sources, which we identify
in product literature and copyright
messages displayed to the consumer.
Virtually all data sources contain some
inaccurate or incomplete data. In some
countries, complete and accurate map
information is either not available or is
prohibitively expensive.
NOTICE REGARDING
WINDSHIELD MOUNTING LEGAL
RESTRICTIONS
suction cup mount on your windshield,
check the state and local laws and
ordinances where you drive. Some
state laws prohibit drivers from using
suction mounts on their windshields
while operating motor vehicles. Other
state laws allow the suction mount to
: Before using the
Page 27

be located only in specic locations
on the windshield. Many other states
have enacted restrictions against
placing “non-transparent material”
on the windshield or placing objects
on the windshield in locations that
obstruct the driver’s vision. IT IS THE
USER’S RESPONSIBILITY TO
USE THE GARMIN-ASUS DEVICE
AND MOUNTING OPTIONS IN
SUCH A MANNER THAT THE
USER IS IN COMPLIANCE WITH
ALL APPLICABLE LAWS AND
ORDINANCES.
Garmin-Asus dashboard or friction
mount options should be used to comply
with state and local laws and ordinances.
Always mount your Garmin-Asus device
in a location that does not obstruct the
driver’s view of the road. Garmin and
ASUS do not assume any responsibility
for any nes, penalties, or damages
that may be incurred as a result of
disregarding this notice or as a result
of any state or local law or ordinance
relating to the use of your Garmin-Asus
device.
nüvifone M20 Quick Start Manual 27
Where required, other
Declaration of Conformity
Hereby, Garmin and ASUS declare that
this product is in compliance with the
essential requirements and other relevant
provisions of Directive 1999/5/EC. To
view the full Declaration of Conformity,
see www.garminasus.com/nuvifoneM20.
Equipment Use
This nüvifone is for use worldwide,
including the following countries:
AT EE IS NO
BE ES IT PL
BG FI LI PT
CH FR LT RO
CY GB LU SE
CZ GR LV SI
DE HU MT SK
DK IE NL TR
Page 28

The combined Garmin‑Asus logo is a trademark of Garmin Ltd. and ASUSTeK Computer, Inc.
Garmin® is a trademark of Garmin Ltd. or its subsidiaries, registered in the USA and other countries.
Ciao!™, nüMaps Guarantee™, and nüvifone™ are trademarks of Garmin Ltd. or its subsidiaries. These
trademarks may not be used without the express permission of Garmin.
ActiveSync is either a registered trademark or trademark of Microsoft Corporation in the United States
and/or other countries.
For the latest free software updates (excluding map data) throughout the life of
your nüvifone, visit www.garminasus.com.
Information on this product’s compliance with the European Union regulation 1907/2006 (Registration,
Evaluation, Authorisation, and Restriction of Chemicals) may be found at
http://green.asus.com/english/REACH.htm.
© 2009 Garmin Ltd. or its subsidiaries and ASUSTeK Computer, Inc.
15G06A472000
August 2009 Part Number 190-01128-01 Rev. A Printed in China
 Loading...