

Page 1
Child Restraint/Booster Seat
READ THIS MANUAL
Do not install or use this child restraint until you read and understand the instructions in this manual.
FAILURE TO PROPERLY USE THIS CHILD RESTRAINT INCREASES THE RISK OF SERIOUS
INJURY OR DEATH IN A SUDDEN STOP OR CRASH.
© 2007 Graco ISPC110BB 12/07 US
Owner’s Manual
Page 2
Table of Contents
1.0 Warnings to Parents and Other Users
........................4
2.0 Registration Information.........5
2.1 Register Your Child Restraint 5
2.2 Recall Information..........5
2.3 If You Need Help ..........5
3.0 Features...................6-7
4.0 Assembling the Child Restraint 8-12
5.0 Important Information.......13-14
6.0 Height and Weight Limitations .. . 15
6.1 WITH Built-in Harness......15
6.2 WITHOUT Built-in Harness. . 16
6.3 WITHOUT Back Support ....17
7.0 Choosing an Appropriate Vehicle
Seat Location ...............18
7.1 Vehicle Seat Location Requirements
.......................18
7.2 Vehicle Seat Belt Requirements
......................19
7.3 SAFE Vehicle Seat Belt
Systems ................19
7.4 For Built-in Harness Only . . . 20
7.5 WITH or WITHOUT Built-in
Harness ....................21
7.6 To Install Locking Clip......22
7.7 UNSAFE Vehicle Belt Systems
.....................23-24
8.0 LATCH......................25
9.0 Using Child Restraint WITH Built-in
Harness .................26-31
10.0 Securing the Child Restraint in Your
Vehicle .....................32
10.1 Using a Child Restraint WITH a
Built-in Harness ..........32
10.2 With a Vehicle Lap or
Lap/shoulder belt ......32-33
10.3 With LATCH ..........34-35
11.0 Securing Your Child in the
Child Restraint ............36-37
2
Page 3

Table of Contents (cont.)
12.0 Harness Removal .........38-42
13.0 Using Your Child Restraint WITHOUT
Built-in Harness...........43-45
14.0 Securing Child & Booster Seat in ..
Vehicle ....................46
15.0 Adjusting Head Support........47
16.0 Removing Back Support ....48-50
17.0 Securing Child in Vehicle Belt with
Shoulder Belt Positioning Clip 51-54
18.0 Using the Tether..............55
18.1 Storing LATCH and Tether. .56
19.0 Airplane Use ................57
20.0 Accessories.................58
21.0 Recline Foot ................59
22.0 Care and Maintenance ........60
23.0 To Remove Seat Cover ........61
24.0 Owners Manual Storage .......62
25.0 Replacement Parts and Warranty 64
3
Page 4
1.0 Warnings to Parents and Other Users
Failure to properly use this child restraint increases the risk of serious injury or death in a sharp
turn, sudden stop or crash. Your child’s safety depends on you installing and using this child
restraint correctly.
Even if using this child restraint seems easy to figure out on your own, it is very important to READ
THE OWNER’S MANUAL and the vehicle owner’s manual.
Your child’s safety depends on:
1. Choosing the correct mode of use for the child restraint depending on your child’s size.
2. Inserting the harness straps (if needed) in the proper slots for your child.
3. Selecting a suitable location for the child restraint in your vehicle.
4. Properly routing the vehicle seat belt or LATCH.
5. Properly securing the child restraint in the vehicle using a seat belt designed to restrain
both the child restraint and your child or by using LATCH. Many seat belts are NOT safe to use
with this child restraint, even though they can easily be threaded through or around the child
restraint!
6. Properly securing your child in the child restraint.
4
Page 5
2.0 Registration Information
2.2 For Recall Information
Model Number:
Manufactured in:
Purchase Date:
2.1 Register Your Child Restraint
Please fill in the above information. The model
number and manufactured in (date) can be found
on a label underneath your child restraint. Fill out
the prepaid registration postcard attached to the
harness and mail it today.
Child restraints could be recalled for safety reasons.
You must register this restraint to be reached in a
recall. Send your name, address, and the restraint’s
model number and manufacturing date to:
Graco Children’s Products Inc.
150 Oaklands Blvd. Exton, PA, 19341
or call 1-800-345-4109
or register online at:
http://www. gracobaby.com/carseatregistration
5
Call the U.S. Government’s Vehicle Safety
Hotline at: 1-888-327-4236
(TTY:1-800-424-9153),
or go to http://www.NHTSA.gov
or contact Graco: 1-800-345-4109
or www.gracobaby.com
2.3 If You Need Help
Please contact our Customer Service
Department with any questions you may
have concerning parts, use, or
maintenance. When you contact us, please
have your product’s model and manufactured in (date) ready so that we may help
you efficiently. These numbers can be
found on a label on the underside of your
child restraint.
USA: 1-800-345-4109
or www.gracobaby.com
Page 6
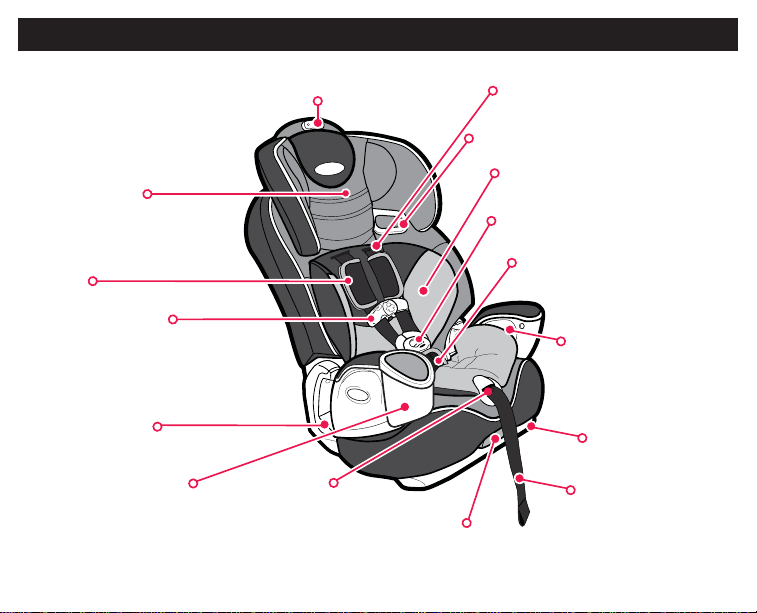
3.0 Features
Crotch strap
Harness buckle
Harness
clip
Vehicle belt
guide
Cupholder
Harness
adjuster
lever
(above strap)
Adjustment
strap
Harness
covers
Harness slots
Height adjust
button
Shoulder belt guide
Recline
handle
Storage compartment
(one on each side)
Body support
Head
support
Recline
foot
6
Page 7
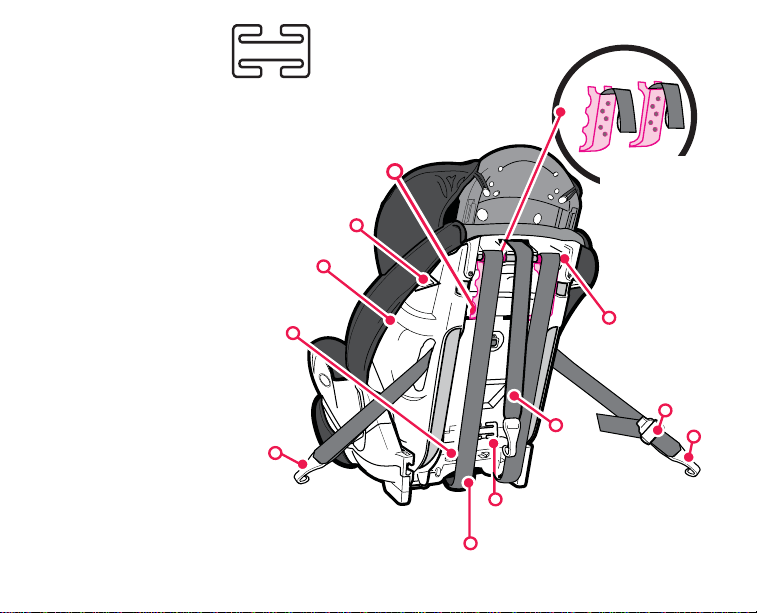
The locking clip is stored
on the back of the child
restraint. You will need
to use it with certain
types of vehicle seat
belts.
United States Federal
Motor Vehicle Safety
Standards have defined
a new system for
installing child restraints
in vehicles. The system
is called LATCH (Lower
Anchorage and Tether
for CHildren). LATCH
may ONLY be used
IN PLACE of vehicle belt
if vehicle is equipped
with LATCH anchor
points. Please refer to
vehicle owners manual
for LATCH locations in
vehicles.
storage bar
LATCH
storage bars
(on each side
of seat)
Release
buttons
LATCH
Harness slots
(behind straps)
Tether
7
Strap
guides
(behind straps)
Red Rollers
(behind straps)
LATCH
adjuster
LATCH
Tether
strap
Locking
clip
Harness
straps
Page 8
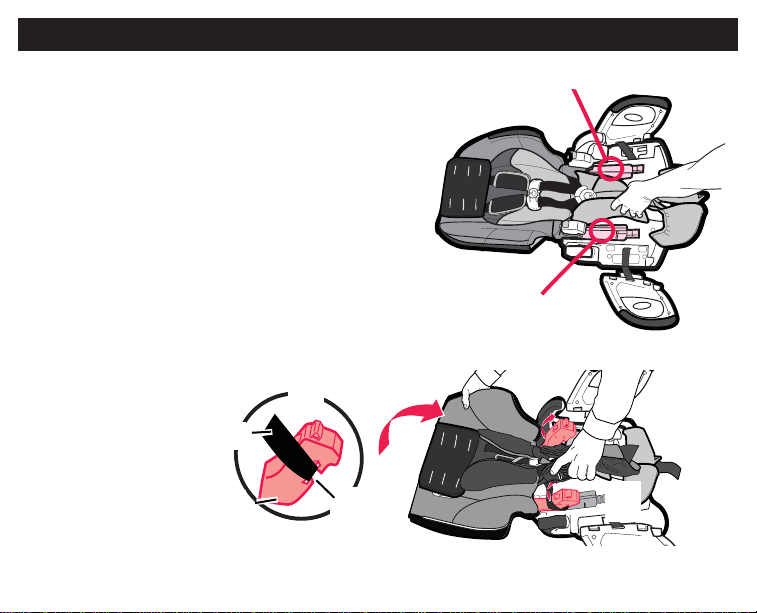
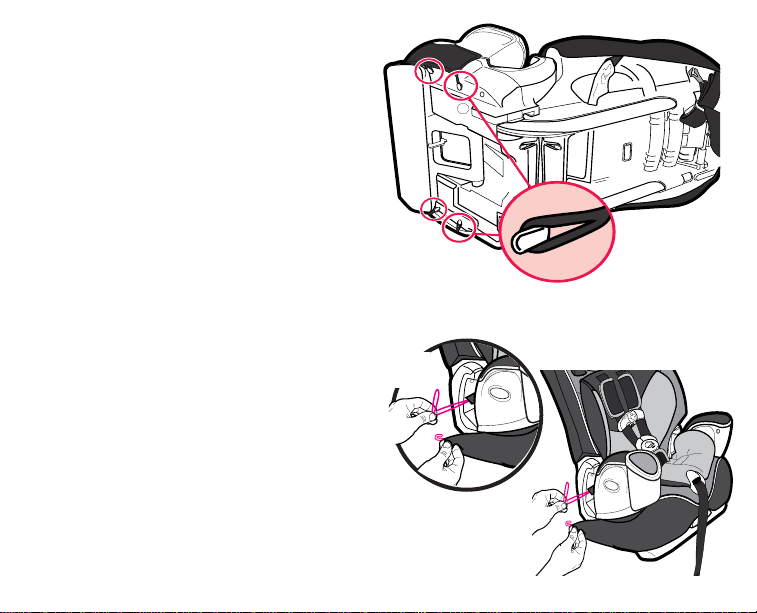
4.0 Assembling the Child Restraint
Adult assembly required.
1. Lay child restraint flat on back with armrests
out to either side of base. Grab seat pad fabric in
sitting area to expose the gutters .
MAKE SURE all hands, fingers and other objects
are clear of the gutters.
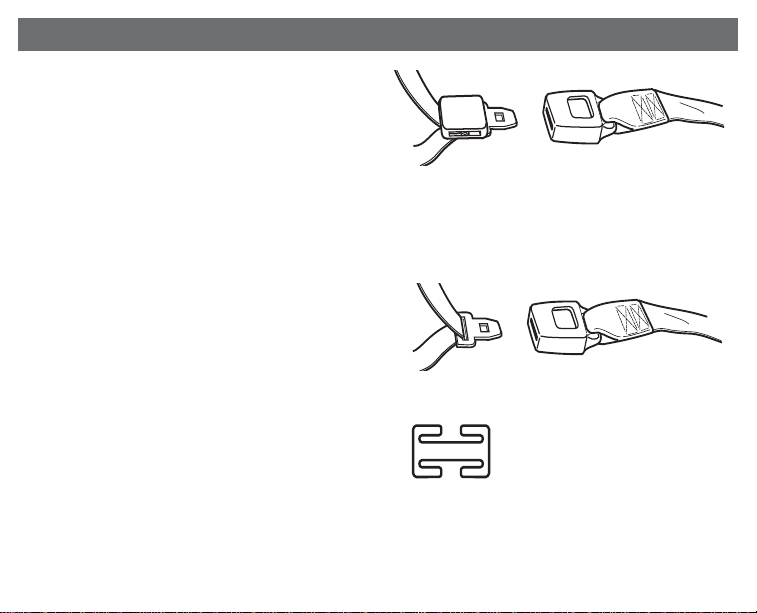
2. MAKE sure the harness straps are securely
attached within the “T”-shaped slots around the
arms as shown .
With your other hand, raise seat back so that
both arms LOCK into the gutters .
KEEP GUTTERS CLEAR
KEEP GUTTERS CLEAR
Harness Strap
A r m
T-slot
8
Page 9
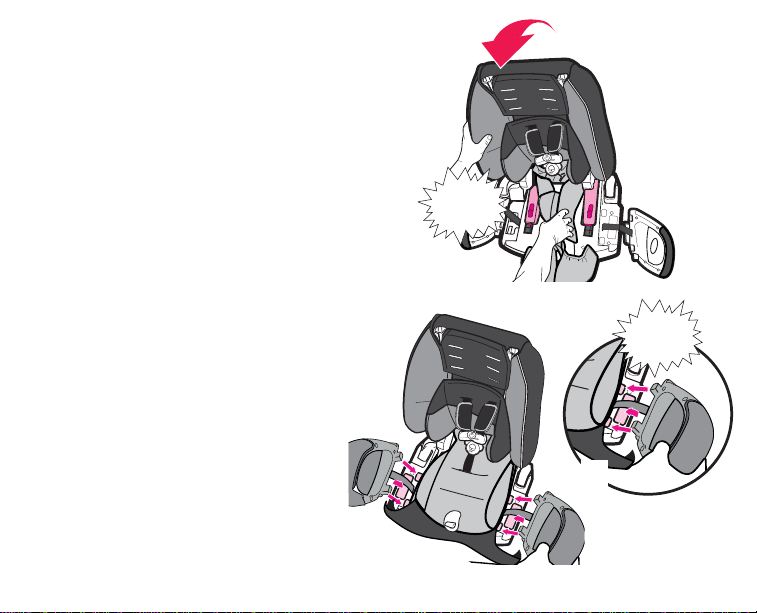
3. Arms should CLICK into the gutters.
Seat assembly should appear as shown .
4. To attach armrests line up armrest with
slots on seat .
Rotate armrest into place until you hear a
“click”. Repeat for other armrest.
CLICK!
CLICK!
9
Page 10
5. Attach 4 elastic loops from the seat pad under
the seat exactly as shown in .
6. Pull elastic loop on the seat pad through the
vehicle belt guide on side of seat and attach to
hook as shown . Repeat on other side.
10
use this
T
DO NO
car seat after December
S utiliser ce siège
PA
NE
e
d'auto après décembr
NO use este asiento para
autos después de Diciembre
2013
Page 11

7. Squeeze height adjust button and push
head support into slots ¡ on the back support
as shown. Head support will click into the back
support.
You may need to unfasten the hook and loop
attachment tape on both sides at the top of
the back support to allow for easier access to
the slots.
Always use child restraint with head support
installed and properly adjusted.
.
¡
CLICK!
11
Page 12
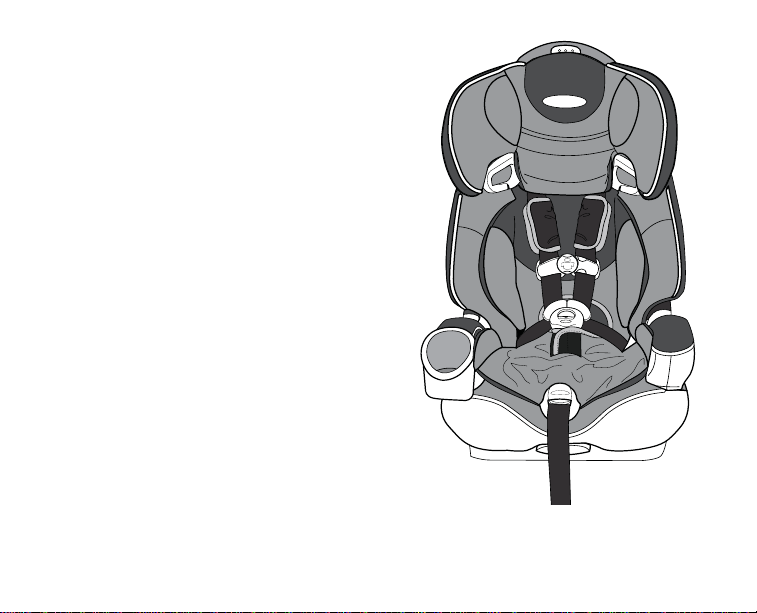
8. The assembly is now complete.
12
Page 13
5.0 Important Information
• NO CHILD RESTRAINT CAN GUARANTEE
PROTECTION FROM INJURY. However,
proper use of this child restraint reduces the
risk of serious injury or death to your child.
• DO NOT INSTALL OR USE THIS CHILD
RESTRAINT UNTIL YOU READ AND
UNDERSTAND THE INSTRUCTIONS IN THIS
MANUAL AND IN YOUR VEHICLE OWNER’S
MANUAL. DO NOT let others install or use the
child restraint unless they understand how to
use it.
• FAILURE TO PROPERLY USE THIS CHILD
RESTRAINT INCREASES THE RISK OF
SERIOUS INJURY OR DEATH IN A SHARP
TURN, SUDDEN STOP OR CRASH. Your child
can be injured in a vehicle even if you are not
in a crash. Sudden braking and sharp turns
can injure your child if the child restraint is not
properly installed or if your child is not properly
secured in the child restraint.
• DO NOT USE LATCH and/or tether in
booster mode.
• DO NOT use locking clip in booster mode.
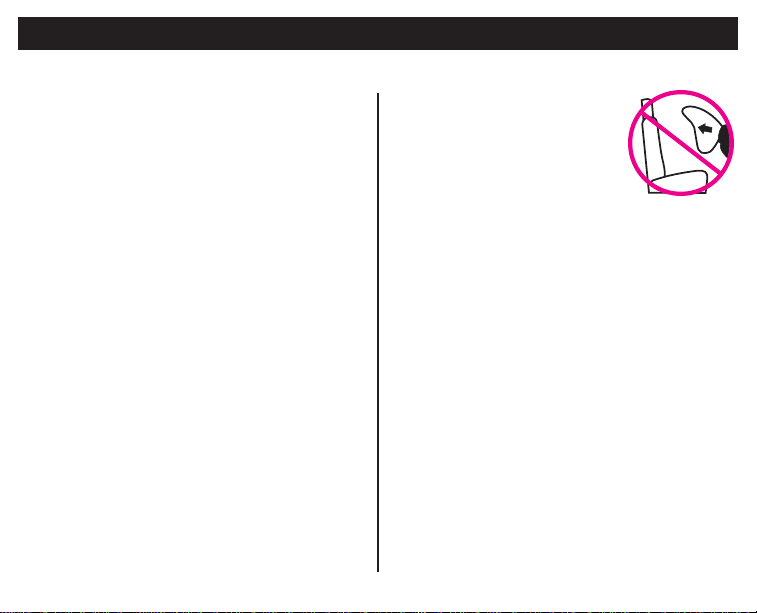
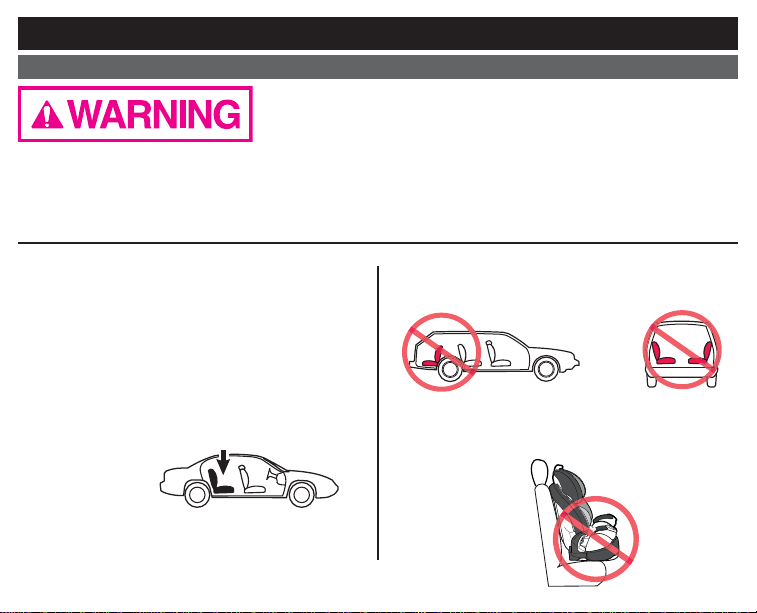
• NEVER PLACE THIS
CHILD RESTRAINT IN A
VEHICLE SEATING
LOCATION THAT HAS A
FRONT AIR BAG. If an air bag
inflates, it can hit the child and child restraint
with great force and cause serious injury or
death to your child. Refer to your vehicle
owner’s manual for information about side air
bags and child restraint installation.
• According to accident statistics,
CHILDREN ARE SAFER WHEN PROPERLY
RESTRAINED IN REAR VEHICLE
SEATING POSITIONS, RATHER THAN
FRONT SEATING POSITIONS. For a
vehicle with a front passenger air bag, refer to
your vehicle owner’s manual as well as these
instructions for child restraint installation.
• NEVER LEAVE YOUR CHILD
UNATTENDED.
13
Page 14

• NEVER LEAVE A CHILD RESTRAINT
UNSECURED IN YOUR VEHICLE. An
unsecured child restraint can be thrown around
and may injure occupants in a sharp turn,
sudden stop or crash. Remove it or make sure
that it is securely belted in the vehicle. If not
using LATCH and tether, make sure LATCH
and tether connectors are properly stored on
back of seat.
• REPLACE THE CHILD RESTRAINT AFTER
AN ACCIDENT OF ANY KIND. An accident
can cause damage to the child restraint that
you cannot see.
• STOP USING
CHILD
RESTRAINT AND
e
siège
cember
embre
iciembr
use this
siento para
T
S utiliser ce
DO NO
PA
2013
car seat after De
d'auto après déc
NE
NO use este a
autos después de D
THROW IT AWAY
after the date
molded onto the
bottom of the child
restraint as shown.
• DO NOT MODIFY YOUR CHILD
RESTRAINT or use any accessories or parts
supplied by other manufacturers.
• NEVER USE CHILD RESTRAINT IF IT HAS
DAMAGED OR MISSING PARTS. Do not use
a cut, frayed or damaged child restraint
harness, LATCH belt or vehicle seat belt.
• THE CHILD RESTRAINT CAN BECOME
VERY HOT IF LEFT IN THE SUN. Contact with
these parts can burn your child’s skin. Always
touch the surface of any metal or plastic parts
before putting your child in the child restraint.
• THIS CHILD RESTRAINT CONFORMS to
all applicable Federal Motor Vehicle Safety
Standards and is certified for use in motor
vehicles. It is certified for use in Aircraft only
when used with the built-in harness. When used
as a booster without the harness, this restraint
is not certified for use in aircraft.
• NEVER GIVE THIS CHILD RESTRAINT to
someone else without also giving them this
manual.
• NEVER USE A SECOND-HAND CHILD
RESTRAINT or a child restraint whose history
you do not know.
DO NOT USE THIS child restraint without
properly assembling it.
14
Page 15
6.0 Height and Weight Limitations
FAILURE TO USE CHILD RESTRAINT IN A MANNER APPROPRIATE FOR YOUR CHILD’S
SIZE MAY INCREASE THE RISK OF SERIOUS INJURY OR DEATH. Instructions for the use of
this child restraint differ greatly depending on the size of your child. Be sure you are using the child
restraint in the correct mode and with the correct features for your child.
6.1 WITH Built-In Harness
Your child must meet all requirements:
• Weight: 20 to 65 lbs (mass between 9 and 29.5 kg)
• Height: 27 to 52 inches (69 and 132 cm) in height
• At least one year old and can sit upright unassisted
• Shoulders are BELOW top harness slots.
If shoulders are above top harness slots, child
is too large for built-in harness.
15
Page 16
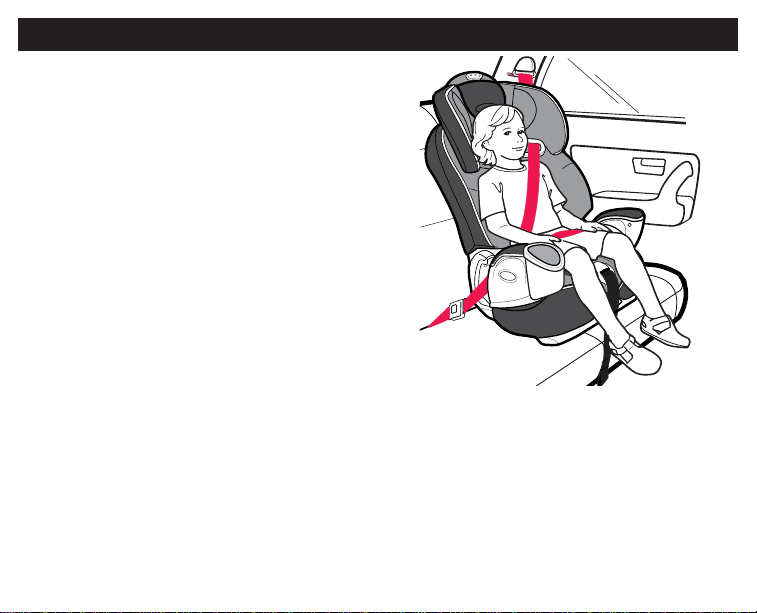
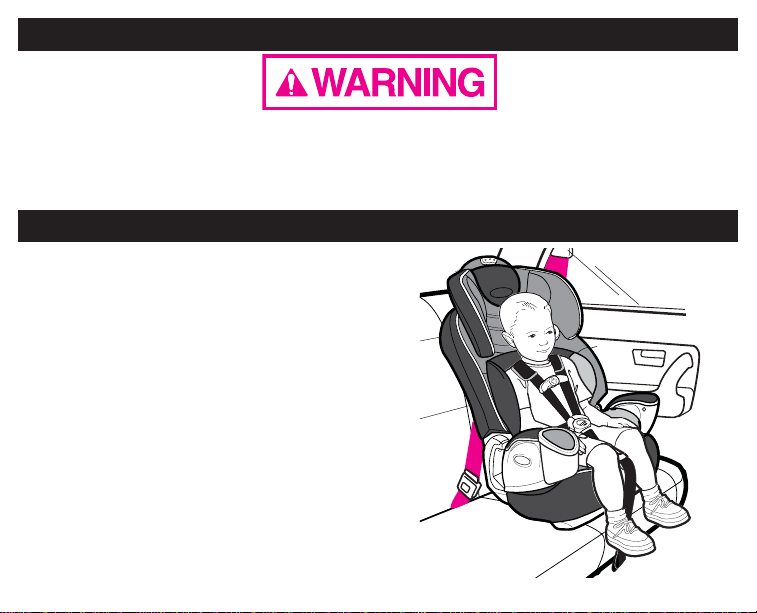
6.2 WITHOUT Built-in Harness
Your child must meet all requirements:
• Weight: 30 to 100 lbs
(mass between 13.6 and 45 kg)
• Height: 38 to 57 inches
(96 and 145 cm) in height
• approximately 3-10 years of age
• the shoulder belt MUST lie across child’s
shoulder as shown and the lap portion of the
belt is positionned low on the child’s hips.
• Child’s ears are BELOW top of booster seat.
If tops of ears are above top of seat, child is too
large for booster seat.
If child is between 30 and 65 lbs and
shoulders are below the upper harness
slots, we highly recommend use of the
built-in harness for as long as possible
(up to 65 lbs).
16
Page 17
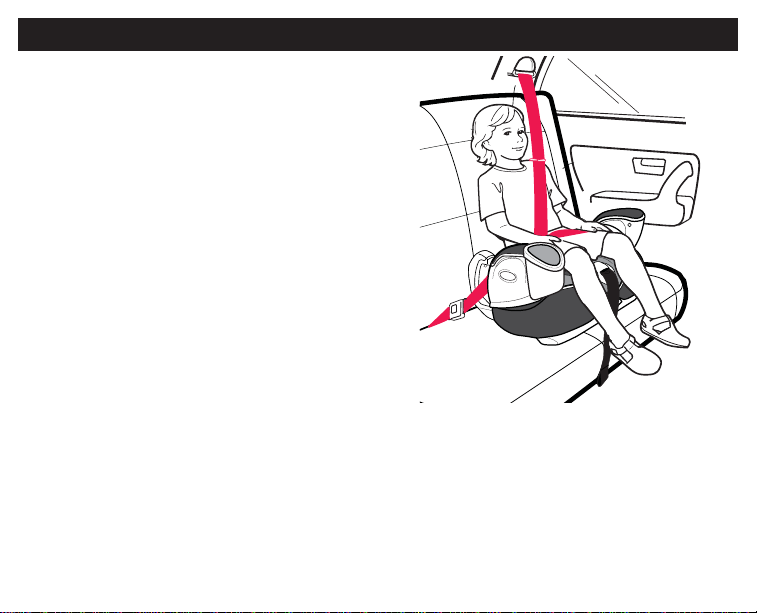
6.3 WITHOUT Back Support
Your child must meet all requirements:
• weigh between 40 and 100 lbs.
(mass between 18 and 45 kg),
• and are between 40 and 57 inches
(101 and 145 cm) in height,
• approximately 4-10 years of age
• the shoulder belt MUST lie across child’s
shoulder as shown and the lap portion of the
belt is positionned low on the child’s hips.
When sitting on the booster seat, your child’s
ears should be below the top of the vehicle seat
cushion / head rest.
Your Graco booster seat can be used with or
without the back support as long as all
requirements are met.
17
Page 18
7.0 Choosing an Appropriate Vehicle Seat Location
7.1 Vehicle Seat Location Requirements
IMPROPER PLACEMENT OF THE CHILD RESTRAINT
INCREASES THE RISK OF SERIOUS INJURY OR DEATH.
Some seating positions in your vehicle may not be safe for this child restraint. Some vehicles do
not have any seating positions that can be used safely with the child restraint. If you are not sure
where to place the child restraint in your vehicle, consult your vehicle owner’s manual or call
Graco Children’s Products Inc.,1-800-345-4109.
• Children are safer when properly
restrained in rear vehicle seating positions.
Whenever possible secure the child restraint in
the center position of the seat directly behind
the front seats. However, this position is
sometimes equipped with a lap belt only and
cannot be used when this child restraint is
used without the built-in harness.
• The vehicle seat must face forward.
• Front of child restraint must not hang over
edge of vehicle seat.
18
Page 19
7.2 Vehicle Seat Belt R equirements
MANY SEAT BELT SYSTEMS ARE NOT SAFE TO USE
WITH THE CHILD RESTRAINT. THE VEHICLE SEAT BELT
MUST BE DESIGNED TO HOLD THE CHILD RESTRAINT
TIGHTLY AT ALL TIMES. Pay careful attention to these systems; some of the seat belts that
are not safe to use look very much like seat belts that are safe to use. If you are unsure,
consult your vehicle owner’s manual or call Graco Children’s Products Inc., 1-800-345-4109.
7.3 SAFE Vehicle Seat Belt Systems
THE FOLLOWING BELT SYSTEMS CAN BE USED WITH YOUR CHILD RESTRAINT, IF the
seat location meets all other requirements of these instructions and those in your vehicle owner's
manual. LATCH can be used in place of the following vehicle belt systems if your vehicle is
equipped with LATCH anchor points. Please refer to vehicle owners manual for LATCH locations.
19
Page 20

7.4 For Built-in Harness Only
• Lap Belts - Manually Adjusted
When buckled, the belt is tightened
manually by pulling on the excess belt.
• Lap Belts with Automatic Locking
Retractor (ALR)
The automatic locking retractor will not
permit the lap belt to lengthen once it is
buckled. Tighten the belt by feeding the belt
back into the retractor while pushing down
hard on the child restraint.
20
Page 21
7.5 With OR W ithout Built-in Har ness
• Combination Lap/Shoulder Belt with
Locking Latch Plate
Once it is buckled, this type of belt has a
latchplate that will not allow the lap portion
of the belt to loosen. Belt is tightened by
pulling hard on the shoulder portion of the
vehicle belt while pushing down hard on
the child restraint.
• Combination Lap/Shoulder Belt with
Sliding Latch PlateThis belt has a
latchplate that slides freely along
• This belt MUST be converted to prevent
movement of the lap portion of the belt. You
must use the locking clip provided with the
child restraint, unless your vehicle's seat
belt can be converted in another way as
described in your vehicle owner's manual.
When using booster seat WITHOUT the
built-in harness, locking clip is NOT
to be used.
the belt.
21
Locking clip
Page 22
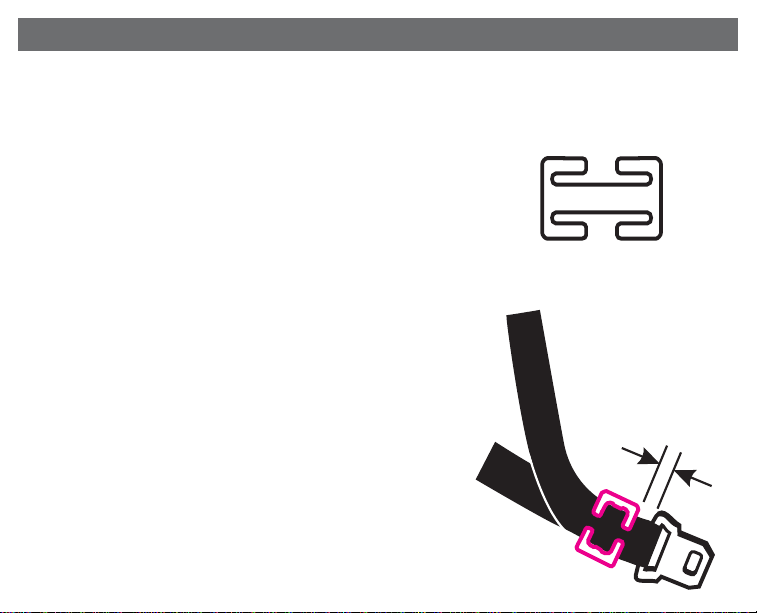
7.6 To Install Locking Clip
1. Tighten the buckled belt by pushing down hard on the child restraint and pulling hard on the
shoulder belt.
2. While pushing down on seat, pinch the two straps together behind the buckle tongue. Unbuckle
the belt without allowing it to slip.
3. Attach locking clip to lap and shoulder belts as shown .
4. Rebuckle belt. Check that lap belt does not move
by pulling hard. If belt loosens or lengthens, repeat
procedure.
Remove locking clip when not using child restraint. Store
under it’s tab on the rear of seat.
Test installation to see if child restraint is secure.
If not secure, additional belt tightening may be required:
• Unbuckle vehicle seat belt.
• Hold belts together and remove locking clip.
• Shorten length of lap belt portion slightly by pulling belt
through latch plate. Re-attach locking clip.
• Buckle vehicle seat belt. Press child restraint further down
into vehicle seat cushion to help buckle vehicle seat belt. Test
installation to see if child restraint is secure. If not secure,
repeat above steps until secure.
22
1/2” (1.25 cm)
Page 23
7.7 UNSAFE Vehicle Belt Systems
DO NOT USE ANY OF THE FOLLOWING SYSTEMS TO SECURE THE CHILD RESTRAINT.
LATCH can be used IN PLACE OF the following unsafe belt systems if your vehicle is equipped
with LATCH anchor points. Please refer to the vehicle owners manual for LATCH locations.
NEVER USE unsafe belt systems.
• Lap Belts with Emergency
Locking Retractor (ELR)
This lap belt stays loose and can move
until it locks in a crash or sudden stop.
• Combination Lap/Shoulder Belt with
Retractor
Each strap has a retractor at one end and
is attached to the latch plate at the other
end.
• Passive Restraint - Lap or Shoulder Belt
Mounted on Door
23
Page 24

• Passive Restraint Lap Belt with Motorized Shoulder Belt
DO NOT use vehicle belts that are
attached to the door in any way or that
move along a track to automatically
surround the passenger when the door is
closed.
• Lap Belts Forward of Seat Crease
24
Page 25
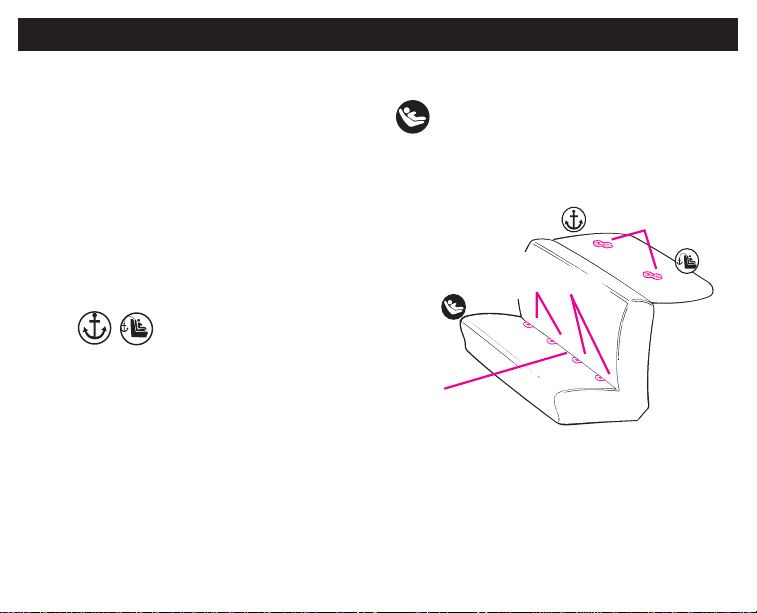
8.0 LATCH
Newer vehicles have one or more seating positions with LATCH anchorage systems. If vehicle is
equipped with LATCH, the vehicle lower anchor points may be visible at the vehicle seat crease.
If not visible, they may be marked with this symbol .
See your vehicle owner’s manual for
exact locations, anchor identification, and
requirements for use with a child restraint.
Check vehicle owner’s manual for vehicle top
tether anchor locations. They may be
identified using one of the anchor symbols as
shown.
ONLY use LATCH on a child restraint in a
seating position recommended by vehicle
manufacturer.
Use vehicle belt (not LATCH connectors) for installations
with children weighing more than 48 pounds (21.7 kg).
NOTE: Some vehicle manufacturers have lower
maximum weight ratings for LATCH anchors, so you must consult your vehicle owner’s manual
or call the vehicle manufacturer to confirm the limits on your vehicle’s LATCH anchors.
Seat Crease
25
Vehicle Lower
Anchor Points
Vehicle
Typical seat in a passenger vehicle.
Other vehicle types may have different
LATCH locations.
Vehicle
Top Tether Anchor
Points
Page 26
9.0 Using Child Restraint WITH Built-in Harness
FAILURE TO PROPERLY ADJUST THE HARNESS STRAPS
FOR YOUR CHILD INCREASES THE RISK OF SERIOUS
INJURY OR DEATH IN THE EVENT OF A SHARP TURN,
SUDDEN STOP OR CRASH. Snugly adjust the belts provided with this child restraint around your
child. A snug strap should not allow any slack. It lies in a relatively straight line without sagging. It
does not press on the child’s flesh or push the child’s body into an unnatural position.
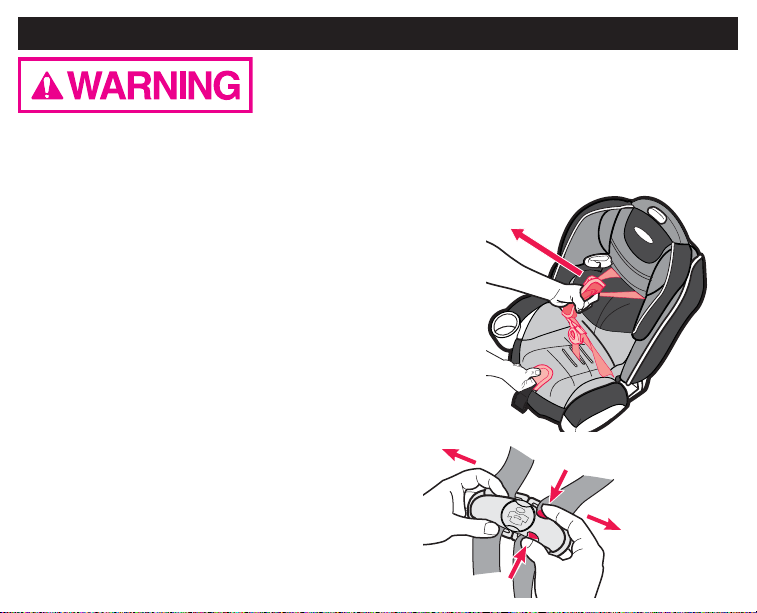
1. Loosen the harness straps by lifting the
harness adjuster lever at front of seat near
the adjustment strap and pulling the straps
toward you .
2. Open harness clip .
26
Page 27
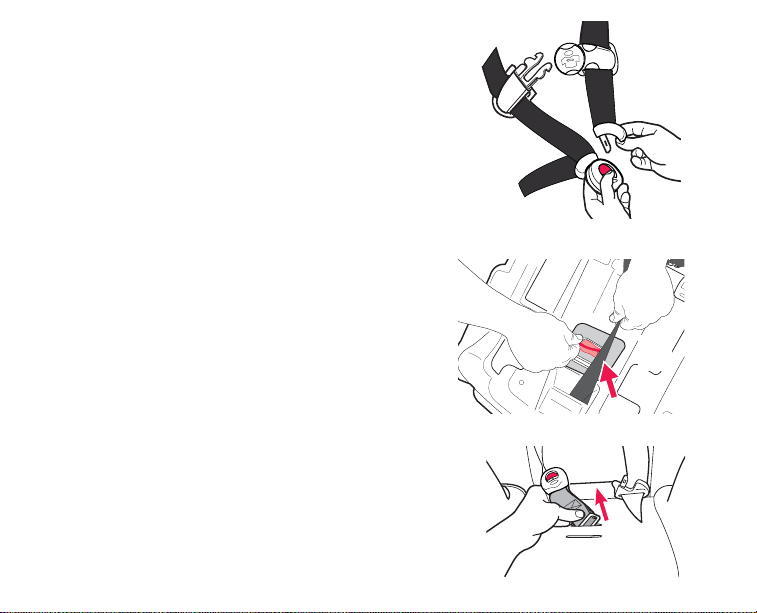
3. Unbuckle harness straps .
4. Check the crotch strap: Choose the
position that is closest to but not under
your child.
To change crotch strap position, push crotch
belt up through the bottom of the child
restraint and grab it from the top to pull out .
Reinsert crotch strap in the desired position.
Make sure crotch strap is not twisted when
reinserting into slot. Pull up on it to make sure
it is secure.
27
Page 28
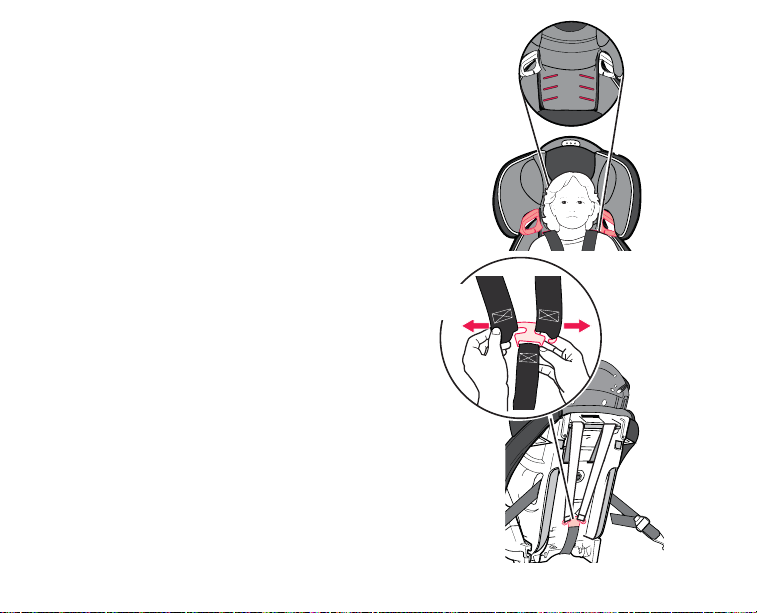
5. The harness straps must go into the slots
even with or just above the shoulders .
If straps are in proper slots go to page 32.
6. To adjust harness straps:
a) Turn seat around, so you will have access to
the rear of the seat.
b) From the rear of the seat remove straps
from metal junction plate .
28
Page 29
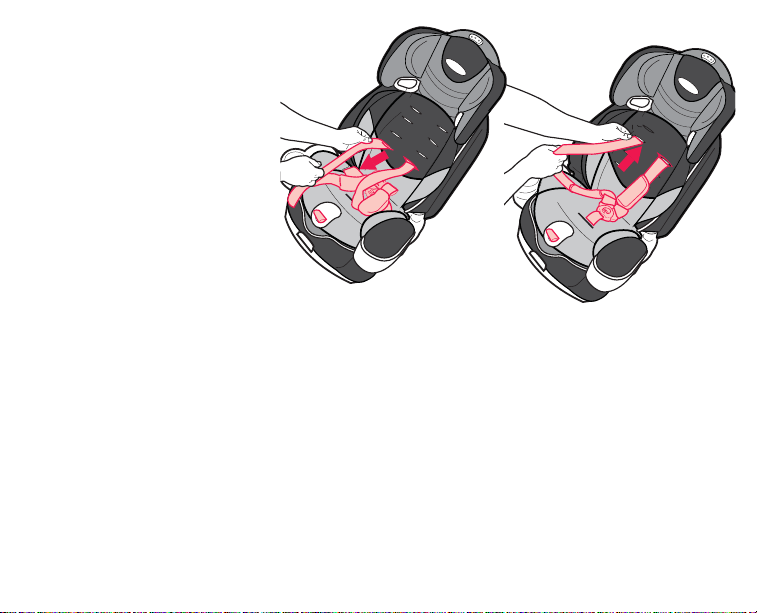
7. Pull strap ends through slots at
front of seat
in the desired slots ¢. Check that
the straps are not twisted.
MAKE SURE harness straps
are inserted into the same slots
on each side of the seat.
Remove body support when not
using harness in the lowest slot
position.
¡ and reinsert them
¡
¢
29
Page 30

8. Use plastic strap guides as
a guide to feed the harness up
over the red rollers. Make sure
to feed straps OVER red rollers
and plastic strap guides .
Make sure that the tether strap
does not interfere when
changing the harness strap
height positions.
9. If the straps are not fed
OVER the red rollers, the
assembly is incorrect and MUST
be corrected before using child
restraint.
10. Reassemble straps onto
metal junction plate exactly as
shown .
12
Check that straps are
completely within the slots
and that they are not twisted.
11
30
11
Harness
straps
MUST
go over
red
rollers.
12
Page 31

11. Check that the straps are inserted at the
same level. Pull on harness to make sure it is
secure .
13
REMEMBER to check the shoulder straps and
crotch strap position as your child grows and
move them to the next position when
necessary. The harness straps must go in the
slots even with or just above the shoulders.
13
31
Page 32

10.0 Securing the Child Restraint in Your Vehicle
FAILURE TO PROPERLY SECURE THE CHILD RESTRAINT IN
THE VEHICLE INCREASES THE CHILD’S RISK OF
SERIOUS INJURY OR DEATH IN THE EVENT OF A SHARP
TURN, SUDDEN STOP OR CRASH. Carefully follow these instructions and those in your vehicle
owner’s manual to be sure your child restraint is properly positioned and held tightly at all times.
10.1 Using Child Restraint WITH Built-in Harness
10.2 With a Vehicle Lap or Lap/shoulder Belt:
Lower anchors must be stored when using vehicle belt.
See Section 18.1, Storing LATCH, page 56.
1. Place the child restraint firmly against the back of a
forward-facing vehicle seat.
2. Thread the seat belt through the belt slot openings:
For Lap/Shoulder belt
For Lap-only belt
3. Buckle the vehicle belt. The vehicle belt should not be
twisted.
32
Page 33

4. Tighten vehicle seat belt
Push down hard with your knee or free hand
in the middle of the child restraint
Then pull and tighten the vehicle belt.
For more information on how to tighten the
belt for your seat belt system, see Section 7.0
Choosing an Appropriate Vehicle Seat Location,
p.18, or your vehicle owner’s manual.
5. If a vehicle top tether anchor is available,
secure the tether to hold seat in place.
See Section 18.0 Using the Tether, page 55.
When not using the tether, hook it on the tether
storage bar on the rear of the seat, see page 56.
6. Safety Check for Secure Installation
Perform this test every time you drive with your child.
Twist and pull child restraint forward and to
both sides to make sure the vehicle belt does not
lengthen or loosen and the child restraint does not
easily move. The child restraint should not move
side to side or forward more than 1 inch (2.5 cm). .If
child restraint is loose or not secure, repeat procedure
OR find another location for the child restraint, see
Section 7.0 Choosing an Appropriate Vehicle Seat
Location, p. 18.
.
33
Page 34

10.3 With LATCH
Use vehicle belt (not LATCH connectors) for
installations with children weighing more than
48 pounds (21.7 kg). NOTE: Some vehicle
manufacturers have lower maximum weight
ratings for LATCH anchors, so you must
consult your vehicle owner’s manual or call the
vehicle manufacturer to confirm the limits on your
vehicle’s LATCH anchors.
1. Unhook LATCH from storage bars on the
sides of the seat. For ease of installation, extend
LATCH to its maximum length.
2. Place the child restraint firmly against the back
of a forward-facing vehicle seat.
3. Hook LATCH Connectors to vehicle lower
anchors
to be sure they are attached. Belt must
lay flat and not be twisted.
4. Tighten LATCH by pushing down hard on
child restraint and pulling the adjustment belt .
5. If you need to remove LATCH to readjust,
pull up on LATCH plate to loosen strap.
. Pull firmly on Connectors
34
Page 35

6.
NEVER put two LATCH connectors on
one vehicle LATCH anchor unless specifically
allowed by the vehicle manufacturer .
7. All LATCH seating positions have
tether anchors.
using the tether strap. See Section 18.0 Using
the Tether, page 55.
8. Safety Check for Secure Installation
Perform this test every time you drive with
your child.
Twist and pull child restraint forward and to
both sides to make sure the LATCH belt does
not lengthen or loosen and the child restraint
does not easily move. The child restraint
should not move side to side or forward more
than 1 inch (2.5 cm). .If child restraint is
loose or not secure, repeat procedure OR find
another location for the child restraint, see
Section 7.0 Choosing an Appropriate Vehicle
Seat Location, p. 18.
Secure the top of the seat
35
Page 36

11.0 Securing Your Child in the Child Restraint
FAILURE TO PROPERLY SECURE YOUR CHILD IN THE CHILD
RESTRAINT INCREASES THE RISK OF SERIOUS INJURY OR
DEATH IN THE EVENT OF A SHARP TURN, SUDDEN STOP
OR CRASH. In a crash, the child restraint provides NO protection for your child unless the harness
straps are properly secured. Follow these instructions carefully to properly secure your child.
• ADJUST THE HARNESS SYSTEM SNUGLY
EVERY TIME you place your child in the child
restraint.
• Avoid bulky clothing.
1. Place child in child restraint with child’s back flat
against back of car seat.
2. Place harness straps over child’s shoulders
and insert tongues into buckle until they click
into place .
CHECK that straps are not twisted.
CHECK that harness is securely latched by pulling up
on straps.
DO NOT use child restraint if harness does not latch.
36
CLICK!
Page 37

3. Fasten harness clip
clip at middle of child’s chest, level with
armpits.
4. Tighten the harness straps by pulling the
adjustment strap on the front of the seat
. Position harness
.
5. Make sure straps are flat and snug
against child’s shoulders and thighs.
You should not be able to pinch
harness straps. A snug strap should not
allow any slack. It lies in a relatively straight
line without sagging. It does not press on
the child’s flesh or push the child’s body into
an unnatural position
.
the
37
Page 38

12.0 Harness Removal
1. Remove harness straps.
Open chest clip and harness buckle
2. Face the rear of the seat and remove the
belt straps from metal junction plate
shown .
3. Remove crotch strap by pushing the strap
retainer on bottom of seat, up through slot.
.
as
38
Page 39

4. Grab the crotch strap buckle and pull it
completely out .
5. Pull on the adjustment strap on the front
of the seat to lock the metal junction plate into
place.
6. Grab hold of the shoulder straps
them out of their respective slots on the seat
pad.
Remove body support and crotch pad.
and pull
39
Page 40

7. On the rear of the seat, detach 2 lower seat
pad elastic straps from hooks as shown in
8. Also detach the elastic straps that are
threaded through the vehicle belt guides on the
sides of the seat as shown in . Repeat on
other side.
.
9. Pull the seat pad out of the way to reveal the
red buttons as shown in the seating area
Slide the buttons to release the back support
from the base and lower it into a flat position.
Hold the back support to avoid it from falling
back and hitting something.
¡ .
¡
40
Page 41

10. Remove harness straps from arms as
shown in
Store the body support, harness covers, crotch
pad cover and harness straps
in safe place for future use.
¢.
Harness Strap
¢
Arm
11. Move seat pad fabric out of the way then
raise seat back so that both arms LOCK into
the gutters .
You should hear a CLICK when the arms lock
into the gutters.
MAKE sure to keep the gutters clear of any
obstructions.
11
41
T-slot
KEEP
GUTTERS CLEAR
11
Page 42

12. Tuck seat pad in between the gap of the
back support and seat area of the booster seat
to allow 2 elastic straps to show at the rear of
the seat.
13. Attach 2 seat pad elastic straps onto the
hooks on the rear of the child restraint as
shown in .
12
14. Pull elastic strap on the seat pad through
the vehicle belt guide on side of seat and
attach to hook as shown.
Repeat on other side .
Reverse instructions to reinstall harness.
See Section 9.0, page 28-31 for the correct
path for the harness.
13
12
13
42
Page 43

13.0 Using Your Child Restraint WITHOUT Built-in Harness
FAILURE TO PROPERLY SECURE YOUR CHILD IN THE CHILD
RESTRAINT INCREASES THE RISK OF SERIOUS INJURY OR
DEATH IN THE EVENT OF A SHARP TURN, SUDDEN STOP OR
CRASH. In a crash, the child restraint provides NO protection for your child unless the vehicle lap/
shoulder belt is properly secured. Follow these instructions carefully to properly secure your child.
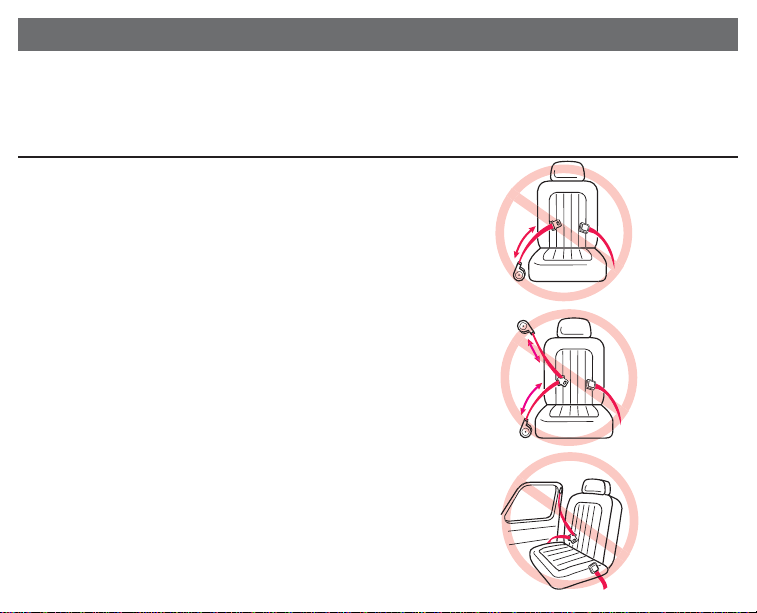
WARNING: Use only the vehicle lap and
shoulder belt system when restraining the child
in the booster seat. LATCH will not secure your
child in the booster seat .
Vehicle belts MUST lay flat against child and
MUST not be twisted.
NEVER use a vehicle lap-only belt across front
of child .
INCORRECT
43
Page 44

DO NOT use shoulder belt loose
or positioned under arm .
DO NOT place shoulder belt behind child’s
back .
Lap portion of lap/shoulder belt MUST be low
and snug on hips, just touching thighs.
DO NOT allow child to slide
down in booster seat .
If child will not keep vehicle belt properly
positioned, DO NOT use this booster seat.
Use a different child restraint system.
DO NOT position vehicle belt over top of the
armrests
.
44
INCORRECT
INCORRECT
INCORRECT
INCORRECT
Page 45

Vehicle seat headrest should not create a
gap between vehicle seat and booster seat
. The front of booster seat MUST NOT
hang over front of vehicle seat .
INCORRECT
45
INCORRECT
Page 46

14.0 Securing Child & Booster Seat in Vehicle
1. Place booster seat firmly against the back of
a forward-facing vehicle seat equipped with a
lap/shoulder belt only.
2. Place child in car seat with child’s back flat
against back of car seat.
3. Position lap/shoulder belt through shoulder
belt guide not underneath shoulder belt
guide . Belt should pass over vehicle belt
guide . Fasten buckle and pull up on the
shoulder belt to tighten.
4. If belt lays across child’s neck, head or face,
redirect belt over shoulder by adjusting the
head support setting, See page 47, Adjusting
Head Support.
5. Check that shoulder belt is properly
positioned over shoulder and snug against
child. A snug strap should not allow any slack.
It lies in a relatively straight line without
sagging. It does not press on the child’s flesh
or push the child’s body into an unnatural
position.
46
Page 47

15.0 Adjusting Head Support
When using with or without the built-in
harness.
BEFORE adjusting the head support height,
have your child lean forward slightly.
Squeeze the red adjustment handle
top of seat and pull back support up until it
snaps into one of the 5 height positions.
To lower, squeeze red adjustment handle
and push down.
CHECK to make sure it is securely snapped
into one of the 5 height positions by pulling
up on head support.
The shoulder belt guides must be even with
or just above the shoulders as shown by
dotted line
.
on
47
Page 48

16.0 Removing Back Support
To use booster seat WITHOUT back
support, remove harness straps if attached
(see section 12.0 Harness Removal, p.38-42)
then continue with the following steps:
1. Detach 2 lower elastic straps from rear of
seat as shown .
2. Detach elastic strap from the hooks on the
seat pad as shown. Repeat on other side .
48
Page 49

3. Pull the seat pad out of the way to reveal
red buttons as shown in . Slide the buttons
to release the back support from the base and
lower it into a flat position.
When removing back support, you must support
the back support when sliding the red buttons that
disengage the back support from the base. Make
sure all hands, fingers and other objects are not
behind the back support when removing it.
4. Move seat pad fabric out of the way and
squeeze red buttons together to release back
support from seat. Pull seat and back support
.
apart
49
Page 50

5. Once back support is separated , store
back support with all the harness straps, head
support, body support and crotch pad cover in
safe place.
6. Reattach the elastic straps at the back of the
and through the vehicle belt guide on
seat
the sides of seat as shown.
7. Seat is ready to install.
To reattach back support if needed, reverse steps
from p. 50 to p. 48.
50
Page 51

17.0 Securing Child in Vehicle with Shoulder Belt
Positioning Clip
The shoulder belt MUST lie across child’s
shoulders in red zone as shown .
If shoulder belt lies outside this zone, the
shoulder belt positioning clip MUST be used.
To attach clip to booster seat:
1. Insert the loop end of strap through the slot
on rear of seat exactly where shown .
There is a slot on each side of booster seat,
the shoulder belt positioning clip MUST be
attached through the slot closest to where the
vehicle shoulder belt lies across the child.
51
Page 52

2. Pass the clip and the strap through the loop
end as shown and pull strap up.
3. NOTE: Free end of strap should face
front of seat.
52
Page 53

4. Slide the vehicle shoulder belt onto the clip as shown and pull free end of strap down to
tighten clip against the child’s shoulder.
The lap portion MUST pass through the vehicle belt guide and be positionned low on the hips.
The belt MUST NOT be twisted.
Shoulder belt
positioning clip
Shoulder belt
positioning clip
REAR VIEW OF CHILD
SITTING IN SEAT
53
Page 54

5. Lap portion of lap/shoulder belt MUST be low and
snug on hips, just touching thighs.
DO NOT allow child to slide down in booster seat .
CORRECT
54
Page 55

18.0 Using the Tether
All LATCH seating positions have tether anchors. Always use tether if a vehicle tether anchor is
available, check your vehicle owner’s manual for the tether anchor location(s). If your vehicle is
not equipped with a tether anchor, it may be possible to install one. Contact your vehicle
dealership for the proper anchor location and installation.
You may purchase tether anchor parts kit by calling Graco Customer Service at 1-800-345-4109.
1. Check that tether is securely attached to
child restraint.
2. Fasten tether clip to anchor point .
3. Tighten the tether strap securely .
4. To loosen, lift up on the metal tongue of the
buckle .
55
Page 56

18.1 Storing Lower Anchors and Tether (LATCH)
1. For ease of storing, extend LATCH to its
maximum length.
Storage bars located
2. Locate the storage bars on back of
child restraint
.
on each side at the
back of the seat
3. Fasten ends of tether and lower anchors
onto their respective storage bars as shown
.
Tether
4. Tether and lower anchors storage should
look like this when complete .
Lower
anchors
Lower
anchors
56
Page 57

19.0 Airplane Use
This restraint is certified for use in Motor Vehicles.
It is certified for use in Aircraft ONLY when used with the built-in harness.
When used as a booster WITHOUT the harness, this restraint is NOT CERTIFIED for aircraft use
because aircraft seats do not have a shoulder belt.
Important points to remember:
1. Airlines have some restrictions about the use of child restraints.
2. Install your car seat on an airplane in the same way it is installed in an automobile with a lap
belt (see Section 10.1, Using Child Restraint WITH Built-in harness, pp. 32-33).
3. Check that the airplane seat belt holds the child restraint securely in place at all times.
57
Page 58

20.0 Accessories (on certain models ONLY)
20.1 Body Support & Harness Covers
To prevent ejection in sudden stop or crash:
• Always make sure shoulder straps are threaded through
slots and properly positioned on shoulders.
• Never allow body support to bunch or fold behind child.
• Use body support with bottom harness slots only.
• Make sure that harness covers do not interfere with
placement of the chest clip at armpit level.
Harness
covers
Body Support
58
Page 59

21.0 Recline Foot
Your child restraint has 3 recline positions: adjust
recline foot before installing child restraint.
1. To recline seat, pull recline handle out and
tilt seat back to extend foot as shown .
2. To set seat to upright position, pull recline
handle out
foot .
and tilt seat foward to retract
59
Page 60

22.0 Care and Maintenance
• Continuous use of child restraint may cause damage to vehicle seat. Use a child restraint mat,
towel or thin blanket to protect upholstery.
• Metal and plastic parts: clean with mild soap and cool water. No bleach or detergents.
• Harness straps and LATCH straps: spot clean or replace. Do not immerse the straps in water.
Doing so may weaken the straps.
• Buckle and harness adjuster lever: clean with a damp cloth.
• Never lubricate the buckle. If buckle or harness adjuster sticks or will not remain tight, check for
foreign objects such as food, dirt, etc. Remove objects with tweezers and/or clean with a cotton
swab. If you cannot get the harness to remain tight with the buckle securely locked, do not use
this child restraint. Call Graco at 1-800-345-4109 to purchase a replacement harness or buckle.
60
Page 61

23.0 To Remove Seat Cover
Seat Cover: clean with a damp sponge using
mild soap and cool water. If necessary, cover
may be removed for cleaning.
1. Remove harness and crotch straps (see
Section 12.0, Harness Removal, p.38).
2. Remove elastic loops from seat as indicated
in and .
3. Machine wash cover in cold water on
delicate cycle and drip-dry. DO NOT USE
BLEACH.
4. To put the seat cover back on, reverse
preceding instructions.
61
Hook and loop
attachment tape
Hook and loop
attachment tape
Page 62

24.0 Owners Manual Storage
Your Owner’s Manual can be stored on
the bottom of the seat inside the slot in the
footrest as shown.
62
Page 63

Notes
63
Page 64

25.0 Replacement Parts and Warranty
To purchase parts or accessories or for warranty information in the United States,
please contact us at the following:
www.gracobaby.com
or
1-800-345-4109
64
Page 65

Sistema de seguridad/asiento para niños
LEA ESTE MANUAL
No instale ni use este sistema de seguridad para niños hasta que haya leído y entendido las
instrucciones en este manual. NO USAR DEBIDAMENTE ESTE SISTEMA DE SEGURIDAD
PARA NIÑOS AUMENTA EL RIESGO DE LESIONES SERIAS O FATALES EN UN ACCIDENTE
O AL DETENERSE DE REPENTE.
© 2007 Graco ISPC125BA 10/07 US SPANISH
Manual del dueño
Page 66

Índice de materias
1.0 Advertencias a padres y otros usuarios
........................4
2.0 Información sobre el registro .....5
2.1 Registro de su sistema de
seguridad para niños .......5
2.2 Información sobre el retiro de
productos del mercado......5
2.3 Si necesita ayuda..........5
3.0 Características ..............6-7
4.0 Armado del sistema de seguridad 8-12
5.0 Información importante ......13-14
6.0 Limitaciones de peso y altura....15
6.1 CON el arnés incorporado . .15
6.2 SIN el arnés incorporado . . .16
6.3 SIN el soporte de la espalda 17
7.0 Cómo elegir un lugar apropiado para
el asiento del vehículo .........18
7.1 Requisitos del lugar del asiento
del vehículo .............18
7.2 Requisitos del cinturón de
seguridad del vehículo .....19
7.3 Sistemas SEGUROS del cinturón
7.4 Para el arnés incorporado
7.5 CON o SIN el arnés
7.6 Para instalar la traba
7.7 Sistemas PELIGROSOS de
8.0 LATCH......................25
9.0 Uso del sistema de seguridad CON
10.0 Asegurar el sistema de seguridad
10.1 Uso de un sistema de seguridad
10.2 Con un cinturón para la falda o
10.3 Con LATCH...........34-35
11.0 Asegurar a su niño al sistema
2
de seguridad del vehículo . . .19
solamente ...............20
incorporado ..............21
de seguridad .............22
cinturones de vehículos . 23-24
el arnés incorporado........26-31
para niños en su vehículo ......32
CON el arnés incorporado .32
falda/hombro del vehículo 32-33
de seguridad..............36-37
Page 67

Índice de materias (cont.)
12.0 Cómo sacar el arnés .......38-42
13.0 Uso del sistema de seguridad
SIN el arnés incorporado ....43-45
14.0 Asegurar al niño y al asiento
de seguridad en el vehículo.....46
15.0 Ajuste del soporte de la cabeza. .47
16.0 Eliminar el soporte de la espalda. 48-50
17.0 Asegurar al niño con el cinturón del
vehículo con traba de posicionamiento
para el cinturón del hombro . 51-54
18.0 Uso del anclaje ..............55
18.1 Cómo guardar el LATCH
y anclaje ...............56
19.0 Uso en aeronaves ............57
20.0 Accesorios ..................58
21.0 Pie reclinatorio ...............59
22.0 Atención y mantenimiento ......60
23.0 Para sacar la funda del asiento .. 61
24.0 Cómo guardar el manual del dueño. 62
25.0 Piezas de repuesto y garantía. . . 64
3
Page 68

1.0 Advertencias a padres y otros usuarios
ADVERTENCIA
No usar debidamente este sistema de seguridad para niños aumenta el riesgo de lesiones serias
o la muerte en una curva cerrada, parada repentina o accidente. La seguridad de su niño depende
de que usted instale y use este sistema de seguridad para niños correctamente.
A pesar de que el uso de este sistema de seguridad para niños parezca fácil de descifrar, es muy
importante LEER EL MANUAL DEL USUARIO y el manual del usuario del vehículo.
La seguridad de su niño depende de que:
1. Elija el modo correcto de uso del sistema de seguridad para niños según el tamaño
de su niño.
2. Inserte las correas del arnés (si fuera necesario) en las ranuras adecuadas para su niño.
3. Seleccione un lugar adecuado para el sistema de seguridad para niños en su vehículo.
4. Pase debidamente el cinturón de seguridad del vehículo o LATCH.
5. Asegure debidamente el sistema de seguridad para niños en el vehículo usando un
cinturón del asiento diseñado para sujetar a ambos el sistema de seguridad para niños y su
niño o usando el LATCH. Muchos cinturones de seguridad NO son seguros para usar con
este sistema de seguridad para niños, a pesar de que se pueden colocar fácilmente a través o
alrededor del sistema de seguridad para niños.
6. Asegure debidamente a su niño en el sistema de seguridad para niños.
4
Page 69

2.0 Información sobre
el registro
Número de modelo:
Fabricado en:
Fecha de compra
:
2.1 Registro de su sistema
de seguridad para niños
Por favor, complete la información que se solicita
más arriba. El número de modelo y la fecha de
fabricación pueden encontrarse en una etiqueta
ubicada debajo del sistema de seguridad para
niños. Llene la tarjeta postal de registro prepagada
que se encuentra en el arnés y envíela hoy mismo.
Los sistemas de seguridad para niños podrán ser
retirados del mercado por problemas de seguridad.
Debe registrar este sistema para que lo podamos
contactar en dicho caso. Envíe su nombre,
dirección y el número del modelo del sistema y la
fecha de fabricación a:
Graco Children’s Products Inc.
150 Oaklands Blvd. Exton, PA, 19341
o llame al 1-800-345-4109
o regístrelo en línea en:
http://www. gracobaby.com/carseatregistration
5
2.2 Para información sobre
el retiro de productos
del mercado
Llame a la Línea telefónica de seguridad
del vehículo del gobierno de EE.UU. al:
1-888-327-4236
(TTY:1-800-424-9153),
o visite http://www.NHTSA.gov
o llame a Graco: 1-800-345-4109
o www.gracobaby.com
2.3 Si necesita ayuda
Por favor, comuníquese con el
Departamento de Servicio al Cliente con
cualquier pregunta que pudiera tener sobre
piezas, uso o mantenimiento. Cuando
se ponga en contacto con nosotros, por
favor tenga listo el número de modelo y la
fecha de fabricación del producto para que
lo podamos ayudar más eficientemente.
Estos números pueden encontrarse en una
etiqueta ubicada en la parte inferior de su
sistema de seguridad para niños.
EE.UU.: 1-800-345-4109
o www.gracobaby.com
Page 70

3.0 Características
Correa de la entrepierna
Hebilla del arnés
Traba del
arnés
Guía del
cinturón del
vehículo
Apoyavasos
Palanca de
ajuste del
arnés
(arriba de la correa)
Correa de ajuste
Fundas
del arnés
Ranuras para el arnés
Botón de ajuste
de la alturate
Guía del cinturón del hombro
Palanca
de reclinación
Compartimiento
para el
almacenamiento
(uno de cada lado)
Soporte del cuerpo
Apoyacabeza
Pie reclinatorio
6
Page 71

La traba de seguridad se
guarda en la parte trasera
del sistema de seguridad
para niños. Necesitará
usarlo con ciertos tipos de
cinturones de seguridad de
automóviles.
Las Normas Federales
para Seguridad de Automóviles de Estados Unidos
han definido un nuevo
sistema de instalación de
los sistemas de seguridad
para niños en los vehículos. El sistema se denomina LATCH (anclaje inferior
y superior para niños).
El LATCH debe usarse
SOLAMENTE EN LUGAR
del cinturón del vehículo si
el vehículo está equipado
con puntos de anclaje
LATCH. Por favor, consulte
el manual del dueño del
vehículo para identificar las
ubicaciones del LATCH en
su vehículo.
Ranuras del arnés
(atrás de las correas)
Barras de
almacenamiento
del anclaje
Barras de
almacenamiento
del LATCH (una
en cada costado
del asiento)
Botones
de destrabe
LATCH
Guías de las
correas (atrás de
las correas)
Rodillos rojos
(atrás de
las correas)
Ajuste
del LATCH
LATCH
Correa de
la soga
Traba
de seguridad
Correas
del arnés
7
Page 72

4.0 Armado del sistema de se guridad
Requiere que lo arme un adulto.
1. Ponga el sistema de seguridad para niños
plano con los apoyabrazos en cada costado de la
base. Agarre la tela del almohadón del asiento en
el lugar donde se sienta para ver las canaletas .
ASEGÚRESE de que todas la manos, dedos y
otros objetos estén lejos de las canaletas.
2. ASEGÚRESE de que las correas del arnés
estén colocadas apretadamente dentro de las
ranuras con forma de T alrededor de los brazos
como se muestra .
Con la otra mano, levante el respaldo del asiento
para que ambos brazos SE TRABEN en las
canaletas .
MANTENGA LAS CANALETAS
SIN OBSTRUCCIONES
MANTENGA LAS CANALETAS
SIN OBSTRUCCIONES
Correa del arnés
Brazo
Ranura
en
T
8
Page 73

3. Los brazos deben TRABARSE con un
“CLIC” en las canaletas. El ensamblaje del
asiento debe aparecer como se indica en .
¡CLIC!
4. Para conectar los apoyabrazos póngalos en
línea con las ranuras del asiento .
Gire el apoyabrazos en su lugar hasta que
escuche un “clic”. Repita el proceso en el otro
apoyabrazo.
¡CLIC!
9
Page 74

5. Sujete 4 nudos elásticos del almohadón del
asiento debajo del asiento exactamente como
se indica en .
6. Pase el nudo elástico del almohadón del
asiento a través de la guía del cinturón del
vehículo en el costado del asiento y conéctelo
al gancho como se indica . Repita el proceso
del otro lado.
10
use this
T
DO NO
car seat after December
S utiliser ce siège
PA
NE
e
d'auto après décembr
NO use este asiento para
autos después de Diciembre
2013
Page 75

7. Apriete el botón de ajuste de la altura y
empuje el soporte de la cabeza en las ranuras
¡ en el soporte de la espalda como se
indica. El soporte de la cabeza se trabará en
el soporte de la espalda.
Podría necesitar desenganchar la cinta del
accesorio con nudo y gancho en ambos
costados en la parte de arriba del soporte de
la espalda para permitir un fácil acceso a las
ranuras.
Use siempre el sistema de seguridad para
niños con el soporte de la cabeza instalado y
debidamente ajustado.
.
¡
¡CLIC!
11
Page 76

8. El ensamblaje está completo.
12
Page 77

5.0 Información importante
• NINGÚN SISTEMA DE SEGURIDAD PARA
NIÑOS PUEDE GARANTIZAR UNA
PROTECCIÓN CONTRA LESIONES. Sin
embargo, el uso apropiado de este sistema
de seguridad para niños reduce el riesgo de
lesiones serias o la muerte a su niño.
• NO INSTALE NI USE ESTE SISTEMA DE
SEGURIDAD PARA NIÑOS HASTA QUE HAYA
LEÍDO Y ENTIENDA LAS INSTRUCCIONES
EN ESTE MANUAL Y EN EL MANUAL DEL
DUEÑO DE SU VEHÍCULO. NO deje que otros
instalen o usen el sistema de seguridad para
niños a menos que entiendan cómo usarlo.
• NO USAR DEBIDAMENTE ESTE SISTEMA
DE SEGURIDAD PARA NIÑOS AUMENTA EL
RIESGO DE LESIONES SERIAS O LA
MUERTE EN UNA CURVA CERRADA,
PARADA REPENTINA O ACCIDENTE. Su niño
puede sufrir una lesión en un vehículo aunque
no sufra un accidente. Una parada repentina o
una curva cerrada puede lesionar a su niño si el
sistema de seguridad para niños no
está debidamente instalado o si el niño no está
debidamente sujetado en el sistema de
seguridad para niños.
• NO USE EL LATCH y/o anclaje en el modo
asiento.
• NO use la traba de seguridad en el modo
asiento.
• NUNCA PONGA ESTE SISTEMA DE
SEGURIDAD PARA NIÑOS EN UN ASIENTO
DEL VEHÍCULO EQUIPADO CON UNA
BOLSA DE AIRE DELANTERA. Si la bolsa de
aire se infla, puede golpear al niño y al sistema
de seguridad para niños con mucha fuerza
y causar lesiones serias o la
muerte de su niño. Consulte el
manual del dueño del vehículo
para obtener información sobre
la instalación de las bolsas de
aire laterales y del sistema de
seguridad para niños.
• Según las estadísticas de accidentes, LOS
NIÑOS ESTÁN MÁS SEGUROS CUANDO
ESTÁN DEBIDAMENTE SUJETADOS EN
LOS ASIENTOS TRASEROS DEL
VEHÍCULO EN LUGAR DE A LOS
ASIENTOS DELANTEROS. En el caso de
un vehículo con una bolsa de aire para el
pasajero delantero, consulte el manual del
dueño de su vehículo así como estas
instrucciones para la instalación del sistema
de seguridad para niños.
• NUNCA DEJE A SU NIÑO SOLO.
13
Page 78

• NUNCA DEJE UN SISTEMA DE
SEGURIDAD PARA NIÑOS SIN SUJETAR EN
SU VEHÍCULO. Un sistema sin sujetar puede
ser arrojado y podría lesionar a los ocupantes
en una curva cerrada, parada repentina o
accidente. Sáquelo o asegúrese de que esté
debidamente sujetado en el vehículo. Si no
usa el LATCH y anclaje, asegúrese que las
conexiones del LATCH estén debidamente
almacenadas en la parte de atrás del asiento.
• CAMBIE EL SISTEMA DE SEGURIDAD
PARA NIÑOS DESPUÉS DE UN ACCIDENTE
DE CUALQUIER TIPO. Un accidente puede
causar daño invisible al sistema de seguridad
para niños.
• DEJE DE USAR
EL SISTEMA DE
SEGURIDAD
PARA NIÑOS Y
e
siège
cember
embre
iciembr
use this
siento para
T
S utiliser ce
DO NO
PA
2013
car seat after De
d'auto après déc
NE
NO use este a
autos después de D
TÍRELO luego de la
fecha indicada en la
parte de abajo
del sistema de
seguridad como
se indica.
• NO MODIFIQUE EL SISTEMA DE
SEGURIDAD PARA NIÑOS ni use accesorios
o piezas suministradas por otros fabricantes.
• NUNCA USE EL SISTEMA DE SEGURIDAD
PARA NIÑOS SI ESTÁ DAÑADO O TIENE
PIEZAS QUE FALTAN. No use un arnés del
sistema de seguridad para niños o cinturón del
asiento del vehículo o cinturón del LATCH roto,
deshilachado o dañado.
• EL SISTEMA DE SEGURIDAD PARA NIÑOS
PUEDE ALCANZAR ALTAS TEMPERATURAS
SI QUEDA EN EL SOL. El contacto con estas
partes puede quemar la piel de su niño. Toque
siempre la superficie de cualquier pieza de
metal o de plástico antes de poner a su niño
en el sistema de seguridad para niños.
• ESTE SISTEMA PARA NIÑOS CUMPLE con
todas las Normas Federales de Seguridad para
Vehículos Automotor y ha sido certificado para el
uso en vehículos automotores. Ha sido certifica-
do para uso en aeronaves solamente cuando se
lo usa con el arnés incorporado. Cuando se lo
usa como silla alta sin el arnés, este sistema no
ha sido certificado para ser usado en aeronaves.
• NUNCA LE ENTREGUE ESTE SISTEMA DE
SEGURIDAD PARA NIÑOS a otra persona si
no les entrega también este manual.
• NUNCA USE UN SISTEMA DE SEGURIDAD
PARA NIÑOS USADO o un sistema de
seguridad cuya historia no conoce.
NO USE ESTE sistema de seguridad para
niños sin armarlo correctamente.
14
Page 79

6.0 Limitaciones de peso y altura
ADVERTENCIA
NO USAR EL SISTEMA DE SEGURIDAD PARA NIÑOS DE MANERA APROPIADA SEGÚN
EL TAMAÑO DE SU NIÑO PODRÍA AUMENTAR EL RIESGO DE LESIONES SERIAS O LA
MUERTE. Las instrucciones para el uso de este sistema de seguridad para niños difieren mucho
según el tamaño de su niño. Asegúrese de que usa el sistema de seguridad para niños de la manera correcta y con las funciones correctas para su niño.
6.1 CON el arnés incorporado
Su niño debe cumplir todos los requisitos:
• Peso: 20 a 65 libras (masa entre 9 y 29,5 kg)
• Altura: 27 a 52 pulgadas (69 a 132 cm) de altura
• Por lo menos debe tener un año de edad y debe
poder sentarse sin ayuda
• Los hombros están DEBAJO de las ranuras
superiores del arnés. Si los hombros están por
encima de las ranuras superiores del arnés, el niño
es demasiado grande para usar el arnés incorporado.
15
Page 80

6.2 SIN el arnés incorporado
Su niño debe cumplir todos los requisitos:
• Peso: 30 a 100 libras (masa entre 13,6 y 45 kg)
• Altura: 38 a 57 pulgadas (96 a 145 cm) de altura
• aproximadamente de 3 a 10 años de edad
• el cinturón del hombro DEBE cruzar los
hombros del niño como se indica y la parte
de la falda del cinturón debe estar baja en la
cadera del niño.
• Los oídos del niño están DEBAJO de la parte
superior del asiento. Si la parte de arriba de los
oídos se encuentran arriba de la parte superior
del asiento, el niño es demasiado grande para
el asiento.
Si el niño pesa entre 30 y 65 libras y los
hombros se encuentran por debajo de las
ranuras superiores del arnés, recomendamos
enfáticamente el uso del arnés incorporado
mientras sea posible (hasta las 65 libras).
16
Page 81

6.3 SIN el soporte de la espalda
Su niño debe cumplir todos los requisitos:
• pesar entre 40 y 100 libras
(masa entre 18 y 45 kg),
• y tener entre 40 y 57 pulgadas
(101 y 145 cm) de altura,
• aproximadamente de 4 a 10 años de edad
• el cinturón del hombro DEBE cruzar los
hombros del niño como se indica y la parte
de la falda del cinturón debe estar baja en la
cadera del niño.
Cuando usa el asiento, los oídos de su
niño deben estar debajo de la parte de
arriba del almohadón del asiento del
vehículo/apoyacabeza.
Su asiento Graco se puede usar con o sin el
soporte de la espalda siempre que se cumplan
todos los requisitos.
17
Page 82

7.0 Cómo elegir un lugar apropiado para el asiento
del vehículo
7.1 Requisitos del lugar del asiento del vehículo
LA COLOCACIÓN INADECUADA DEL SISTEMA DE
ADVERTENCIA
Algunas posiciones del asiento en su vehículo podrían no ser seguras para este sistema de
seguridad para niños. Algunos vehículos no tienen posiciones del asiento que puedan usarse sin
peligro con el sistema de seguridad para niños. Si no está seguro dónde colocar el sistema de
seguridad para niños en su vehículo, consulte el manual del dueño del vehículo o llame a Graco
Children’s Products, Inc., al 1-800-345-4109.
SEGURIDAD PARA NIÑOS AUMENTA EL RIESGO DE
SUFRIR LESIONES SERIAS O LA MUERTE.
• Los niños están más seguros cuando
están debidamente sujetados en las
posiciones de sentado en el asiento trasero
del vehículo. Cuando sea posible, asegure el
sistema de
seguridad para niños en la posición central de
sentado directamente atrás de los asientos
delanteros. Sin embargo, esta posición está
algunas veces equipada solamente con un
cinturón para la falda y no puede usarse con
este sistema de seguridad para niños sin el
arnés incorporado.
• El asiento del vehículo debe mirar hacia
adelante.
• El frente del sistema de seguridad
para niños no debe quedar
suspendido sobre el borde
del asiento del vehículo.
18
Page 83

7.2 Requisitos del cinturón de seguridad del vehículo
ADVERTENCIA
EL CINTURÓN DE SEGURIDAD DEL VEHÍCULO DEBE HABER SIDO DISEÑADO PARA
RETENER AL SISTEMA DE SEGURIDAD PARA NIÑOS DE MODO AJUSTADO EN TODO
MOMENTO. Preste mucha atención a estos sistemas ya que muchos de los sistemas de cintur-
ones de seguridad que no son seguros se parecen mucho a los que no presentan peligro. Si no
está seguro, consulte el manual del dueño del vehículo o llame a Graco Children’s Products, Inc.,
al 1-800-345-4109.
MUCHOS SISTEMAS DE CINTURONES DE
SEGURIDAD NO SON SEGUROS PARA USAR CON
ESTE SISTEMA DE SEGURIDAD PARA NIÑOS.
7.3 Sistemas SEGUROS del cinturón de seguridad
del vehículo
LOS SIGUIENTES SISTEMAS PUEDEN USARSE CON SU SISTEMA DE SEGURIDAD PARA
NIÑOS, SI la ubicación del asiento cumple todos los otros requisitos de estas instrucciones y las
del manual del dueño del vehículo. El LATCH puede usarse en lugar de los siguientes sistemas
de seguridad del vehículo si su vehículo está equipado con puntos de anclaje LATCH. Por favor,
consulte el manual del dueño del vehículo para identificar las ubicaciones del LATCH.
19
Page 84

7.4 Para el arnés incor por ado solamente
• Cinturón para la falda - ajustado
manualmente
Cuando se activa la hebilla, el cinturón se
ajusta manualmente tirando del exceso del
cinturón.
• Cinturón para la falda con retractor de
seguridad automático (ALR por sus
siglas en inglés)
El retractor de seguridad automático no
permitirá que el cinturón de seguridad
para la falda se extienda una vez que está
sujetado en la hebilla. Ajuste el cinturón
pasando el cinturón por el retractor
mientras empuja con fuerza el sistema de
seguridad para niños hacia abajo.
20
Page 85

7.5 Con O sin el arnés incor por ado
• Combinación cinturón para la falda y el
hombro con placa de seguridad con traba
Una vez que esté trabado en la hebilla, este tipo
de cinturón tiene una placa de seguridad que
no permitirá que la parte del cinturón para la
falda se afloje. El cinturón se ajusta tirando con
fuerza de la parte del hombro del cinturón del
vehículo mientras empuja con fuerza el sistema
de seguridad para niños hacia abajo.
• Combinación cinturón para la falda y el
hombro con placa de seguridad con traba
móvil Este cinturón tiene una placa de
seguridad que se mueve libremente a lo largo
del cinturón.
• Este cinturón DEBE convertirse para prevenir el
movimiento de la parte de la falda del cinturón.
Debe usar la traba de seguridad provista con
el sistema de seguridad para niños, a menos
que el cinturón de seguridad del asiento de su
vehículo pueda convertirse de otra manera como
se describe en el manual del dueño del vehículo.
Cuando usa el asiento SIN el arnés
incorporado, NO debe usar la traba
de seguridad.
21
Traba de seguridad
Page 86

7.6 Para instalar la traba de seguridad
1. Ajuste el cinturón trabado empujando con fuerza el sistema de seguridad para niños hacia
abajo y tirando con fuerza el cinturón para el hombro.
2. Mientras empuja el asiento hacia abajo, apriete las dos correas juntas detrás de la lengua de
la hebilla. Destrabe el cinturón sin permitir que se mueva.
3. Sujete la traba de seguridad a los cinturones para el
hombro y la falda como se indica .
4. Vuelva a poner el cinturón en la hebilla. Verifique que el
cinturón para la falda no se mueve tirando con fuerza. Si el
cinturón se afloja o se alarga, repita el procedimiento. Saque la
traba de seguridad cuando no usa el sistema de seguridad para
niños. Guárdelo debajo de la lengüeta detrás del asiento.
Pruebe la instalación para ver si el sistema de seguridad para
niños ha quedado bien sujetado. Si no ha quedado bien
sujetado, quizá sea necesario ajustar más el cinturón:
• Desabroche el cinturón de seguridad del vehículo.
• Sujete los cinturones y saque la traba de seguridad.
• Acorte la longitud de la parte del cinturón para la falda, tirándolo
de la placa de cierre. Vuelva a colocar la traba de seguridad.
• Abroche el cinturón de seguridad del vehículo. Oprima el
sistema de seguridad para niños hacia más abajo sobre el
almohadón del asiento del vehículo para poder abrochar el
cinturón de seguridad del vehículo. Pruebe la instalación
para ver si el sistema de seguridad para niños ha quedado bien
sujetado. Si no, repita los pasos anteriores hasta que quede bien
sujetado.
22
1/2 pulg. (1,25 cm)
Page 87

7.7 Sistemas PELIGROSOS de cinturones de vehículos
NO USE NINGUNO DE LOS SIGUIENTES SISTEMAS PARA SUJETAR EL SISTEMA DE
SEGURIDAD PARA NIÑOS. El LATCH puede usarse EN LUGAR de los siguientes sistemas de
cinturón peligrosos si su vehículo está equipado con puntos de anclaje LATCH. Por favor, consulte
el manual del dueño del vehículo para identificar las ubicaciones donde debe instalarse el LATCH.
NUNCA USE sistemas de cinturones peligrosos.
• Cinturón para la falda con retractor de
traba de emergencia (ELR por sus siglas
en inglés)
Este cinturón de seguridad para la falda se
mantiene flojo y puede moverse hasta que se
trabe en un accidente o parada repentina.
• Combinación de cinturón para la falda y el
hombro con retractor
Cada correa tiene un retractor en una punta y
está conectada a la placa de
seguridad en la otra punta.
• Cinturón pasivo - Cinturón para el hombro o
falda montado en la puerta
23
Page 88

• Cinturón pasivo - Cinturón para la falda
con cinturón para el hombro motorizado
NO use los cinturones del vehículo que
estén conectados a la puerta de manera
alguna o que se muevan a través de un
carril para rodear automáticamente al
pasajero cuando se cierra la puerta
• Cinturón para la falda que está más
adelante del pliegue del asiento
24
Page 89

8.0 LATCH
Los vehículos nuevos tienen uno o varios asientos equipados con sistemas de anclaje LATCH. Si
el vehículo viene equipado con el sistema LATCH, se pueden ver los puntos de anclaje inferiores
en el pliegue del asiento del vehículo. Si no están visibles, pueden estar marcados con este
símbolo.
Vea el manual del dueño de su vehículo para
informarse sobre las ubicaciones exactas, la
identificación de los anclajes y los requisitos para
Puntos de
anclaje superiores
del vehículo
su uso con el sistema de seguridad para niños.
Compruebe la ubicación de los puntos de anclaje
superiores del vehículo en el manual del dueño
Puntos de anclaje
inferiores del
vehículo
del vehículo. Se podrían haber identificado
usando uno de los símbolos de anclaje como
se indica.
Pliegue del
Utilice SOLAMENTE el LATCH en un
sistema de seguridad para niños en el asiento
recomendado por el fabricante del vehículo.
Use el cinturón del vehículo (no los conectores LATCH)
asiento del
vehículo
Un asiento típico de un vehículo de
pasajeros. Otros tipos de vehículos disponen
de otras ubicaciones del sistema LATCH.
en instalaciones para niños que pesen más de 48 libras
(21,7 kg). NOTA: Algunos fabricantes de vehículos usan calificaciones más bajas del peso para
los conectores LATCH, de manera que debe consultar el manual del dueño del vehículo o llamar
al fabricante del vehículo para confirmar los límites de los conectores LATCH de su vehículo.
25
Page 90

9.0 Uso del sistema de seguridad CON
el arnés incorporado
NO AJUSTAR DEBIDAMENTE LAS CORREAS DEL
ADVERTENCIA
CURVA CERRADA, PARADA REPENTINA O ACCIDENTE. Ajuste apretadamente los cinturones
provistos con este sistema de seguridad alrededor de su niño. Una correa tensa no
deberá estar floja. Se mantiene en una línea recta sin doblarse. No aprieta
la carne del niño ni empuja el cuerpo del niño en una posición
que no sea natural.
1. Afloje las correas del arnés levantando la
palanca de ajuste del arnés en la parte de
adelante del asiento cerca de la correa de
ajuste y tirando las correas hacia usted .
ARNÉS DEL NIÑO AUMENTA EL RIESGO DE SUFRIR
LESIONES SERIAS O LA MUERTE EN CASO DE UNA
2. Abra la traba del arnés .
26
Page 91

3. Destrabe las correas del arnés .
4. Verifique la correa para la entrepierna:
Elija la posición que esté más cercana pero
no debajo de su niño.
Para cambiar la posición de la correa para
la entrepierna, empuje la correa para la
entrepierna por la parte de abajo del
sistema de seguridad para niños y agárrela
desde arriba para tirarla .
Vuelva a insertar la correa para la entrepierna
en la posición deseada. Asegúrese de que la
correa para la entrepierna no esté doblada
cuando la inserta en la ranura. Tire de ella para
asegurarse de que esté bien instalada.
27
Page 92

5. Las correas del arnés deben pasar por
las ranuras a la altura o apenas por encima
de los hombros .
Si las correas están en las ranuras correctas,
pase a la página 32.
6. Para ajustar las correas del arnés:
a) De vuelta el asiento para poder acceder a la
parte trasera del asiento.
b) Desde atrás del asiento saque las correas
de la placa de metal .
28
Page 93

7. Pase las puntas de la
correa por las ranuras al frente
del asiento ¡ y vuelva a
insertarlas en las ranuras
deseadas ¢. Verifique que las
correas no estén dobladas.
ASEGÚRESE de que las correas
del arnés estén insertadas en las
mismas ranuras en cada costado
del asiento.
Saque el apoyo del cuerpo
cuando no usa el arnés en la
posición más baja de la ranura.
¡
¢
29
Page 94

8.Use las guías de plástico de
las correas como guía para
pasar el arnés por encima de
los rodillos rojos. Asegúrese
de pasar las correas SOBRE
los rodillos rojos y las guías
de plástico de las correas
.
11
9. Si no se pasan las correas
SOBRE los rodillos rojos, el
armado es incorrecto y DEBE
corregirse antes de usar el
sistema de seguridad para
niños.
10. Vuelva a armar las
correas sobre la placa de
unión de metal exactamente
como se indica .
Verifique que las correas
estén completamente dentro
de las ranuras y que no estén
dobladas.
12
30
11
del arnés
DEBEN
pasar por
encima de
los rodillos
Las
correas
rojos.
12
Page 95

11. Verifique que las correas estén insertadas
al mismo nivel. Tire del arnés para asegurarse
que esté asegurado .
RECUERDE verificar la posición de las correas
para la entrepierna y del hombro a medida
que su niño crece y muévalas a la posición
siguiente cuando sea necesario. Las correas
del arnés deben pasar por las ranuras a la
altura o apenas por encima de
los hombros.
13
13
31
Page 96

10.0 Asegurar el sistema de se guridad para niños
en su vehículo
NO USAR DEBIDAMENTE ESTE SISTEMA DE
ADVERTENCIA
LA MUERTE DEL NIÑO EN UNA CURVA CERRADA, PARADA REPENTINA O ACCIDENTE.
Cumpla detenidamente estas instrucciones y las del manual del dueño de su vehículo para
asegurarse que el sistema de seguridad para niños esté debidamente ubicado y asegurado
apretadamente en todo momento.
SEGURIDAD PARA NIÑOS EN EL VEHÍCULO
AUMENTA EL RIESGO DE LESIONES SERIAS O
10.1 Uso del sistema de seguridad CON el
arnés incor por ado
10.2 Con un cinturón para la falda o falda/hombro
del vehículo:
Guarde el LATCH. Vea la Sección 18.1, Cómo guardar el LATCH y el anclaje, página 56.
1. Coloque el sistema de seguridad para niños firmemente
contra el respaldo del asiento del vehículo que mire hacia
adelante.
2. Pase el cinturón del asiento a través de las aberturas de la
ranura del cinturón:
Para el cinturón del hombro/falda
Para el cinturón para la falda solamente
3. Trabe el cinturón de vehículo. El cinturón del vehículo no
debe estar doblado.
32
Page 97

4. Ajuste el cinturón de seguridad del vehículo
Empuje con fuerza hacia abajo con la rodilla o la mano
libre en el medio del asiento para automóvil .
Luego tire y ajuste el cinturón del vehículo.
Para obtener más información sobre cómo ajustar el
cinturón de su sistema del cinturón de seguridad,
vea la Sección 7.0, Cómo elegir un lugar apropiado para el
asiento del vehículo, pág. 18, o el manual del dueño de
su vehículo.
5. Si hay un anclaje superior del vehículo, asegure el
anclaje para mantener el asiento en su lugar.
Vea la Sección 18.0 Uso del anclaje, página 55.
Cuando no se usa el anclaje, engánchelo en la barra de
almacenamiento del anclaje ubicada atrás del asiento,
vea la página 56.
6. Verificación de seguridad para una instalación segura
Realice esta prueba cada vez que viaja con su niño.
Tuerza y tire el sistema de seguridad para niños hacia
adelante y ambos costados para asegurarse que el cinturón
del vehículo no se alarga o afloja y que el sistema de
seguridad para niños no se mueve con facilidad. El sistema
de seguridad para niños no deberá moverse de un lado a otro
ni hacia adelante más de 1 pulgada (2,5 cm) .Si el sistema
de seguridad para niños no está asegurado o está flojo, repita
el procedimiento O busque otro lugar para el sistema de seguridad
para niños, vea la Sección 7.0 Cómo elegir un lugar apropiado para
el asiento del vehículo, pág. 18.
33
Page 98

10.3 Con LATCH
Use el cinturón del vehículo (no los conectores
LATCH) en instalaciones para niños que pesen más
de 48 libras (21,7 kg). NOTA: Algunos fabricantes
de vehículos usan calificaciones más bajas del peso
para los conectores LATCH, de manera que debe
consultar el manual del dueño del vehículo o llamar al
fabricante del vehículo para confirmar los límites de
los conectores LATCH de su vehículo.
1. Desenganche el LATCH de las barras de
almacenamiento en los costados del asiento. Para
facilitar la instalación, extienda el LATCH hasta el
máximo.
2. Coloque el sistema de seguridad para niños
firmemente contra el respaldo del asiento del vehículo
que mire hacia adelante.
3. Enganche los conectores LATCH en los
anclajes inferiores del vehículo . Tire con
firmeza de las conexiones para estar seguro
de que estén sujetadas. El cinturón debe
mantenerse en posición plana sin doblarse.
4. Tensione el LATCH empujando con fuerza hacia
abajo sobre el sistema de seguridad para niños y
tirando el cinturón de ajuste .
5. Si necesita sacar el LATCH para volver a
ajustarlo, tire de la placa del LATCH para
aflojar la correa.
34
Page 99

6. NUNCA sujete dos conectores LATCH en un solo
punto de anclaje LATCH del vehículo a menos que el
fabricante lo haya permitido específicamente .
7. Todas las posiciones del asiento LATCH tienen
puntos de anclaje. Asegure la parte de arriba del
asiento usando la correa de anclaje. Vea la Sección
18.0 Uso del anclaje, página 55.
8. Verificación de seguridad para una
instalación segura
Realice esta prueba cada vez que viaja con su niño.
Tuerza y tire el sistema de seguridad para niños
hacia adelante y ambos costados para asegurarse
que el cinturón del LATCH no se alarga o afloja y
que el sistema de seguridad para niños no se mueve
con facilidad. El sistema de seguridad para niños no
deberá moverse de un lado a otro ni hacia adelante
más de 1 pulgada (2,5 cm) . Si el sistema de
seguridad para niños no está asegurado o está flojo,
repita el procedimiento O busque otro lugar para el
sistema de seguridad para niños, vea la Sección 7.0
Cómo elegir un lugar apropiado para el asiento del
vehículo, pág. 18.
35
Page 100

11.0 Asegurar a su niño al sistema de se guridad
ADVERTENCIA
MUERTE DEL NIÑO EN UNA CURVA CERRADA, PARADA REPENTINA O ACCIDENTE. En
un accidente, el sistema de seguridad para niños NO ofrece protección a su niño a menos que
las correas del arnés estén debidamente aseguradas. Cumpla estas instrucciones detenidamente
para asegurar debidamente a su niño.
• AJUSTE EL SISTEMA DE ARNÉS APRETADAMENTE
CADA VEZ que coloca a su niño en el sistema de
seguridad para niños.
• Evite usar ropas abultadas.
1. Coloque al niño en el sistema de seguridad para niños con
la espalda del niño plana contra el respaldo del asiento para
automóvil.
2. Coloque las correas del arnés sobre los hombros del niño
e inserte las lengüetas en la hebilla hasta que se traben en su
lugar con un “clic”.
VERIFIQUE que las correas no estén dobladas.
VERIFIQUE que el arnés esté debidamente apretado tirando
de las correas.
NO use el sistema de seguridad para niños si el arnés no
se traba.
NO USAR DEBIDAMENTE ESTE SISTEMA DE
SEGURIDAD PARA NIÑOS EN EL VEHÍCULO
AUMENTA EL RIESGO DE LESIONES SERIAS O LA
¡CLIC!
36
 Loading...