

Page 1

MODES™ 3 LITE XT
• Owner’s Manual
• Manual del propietario
• featuring
• avec
• que incluye
©2016 Graco PD349351B 5/16
Page 2

2
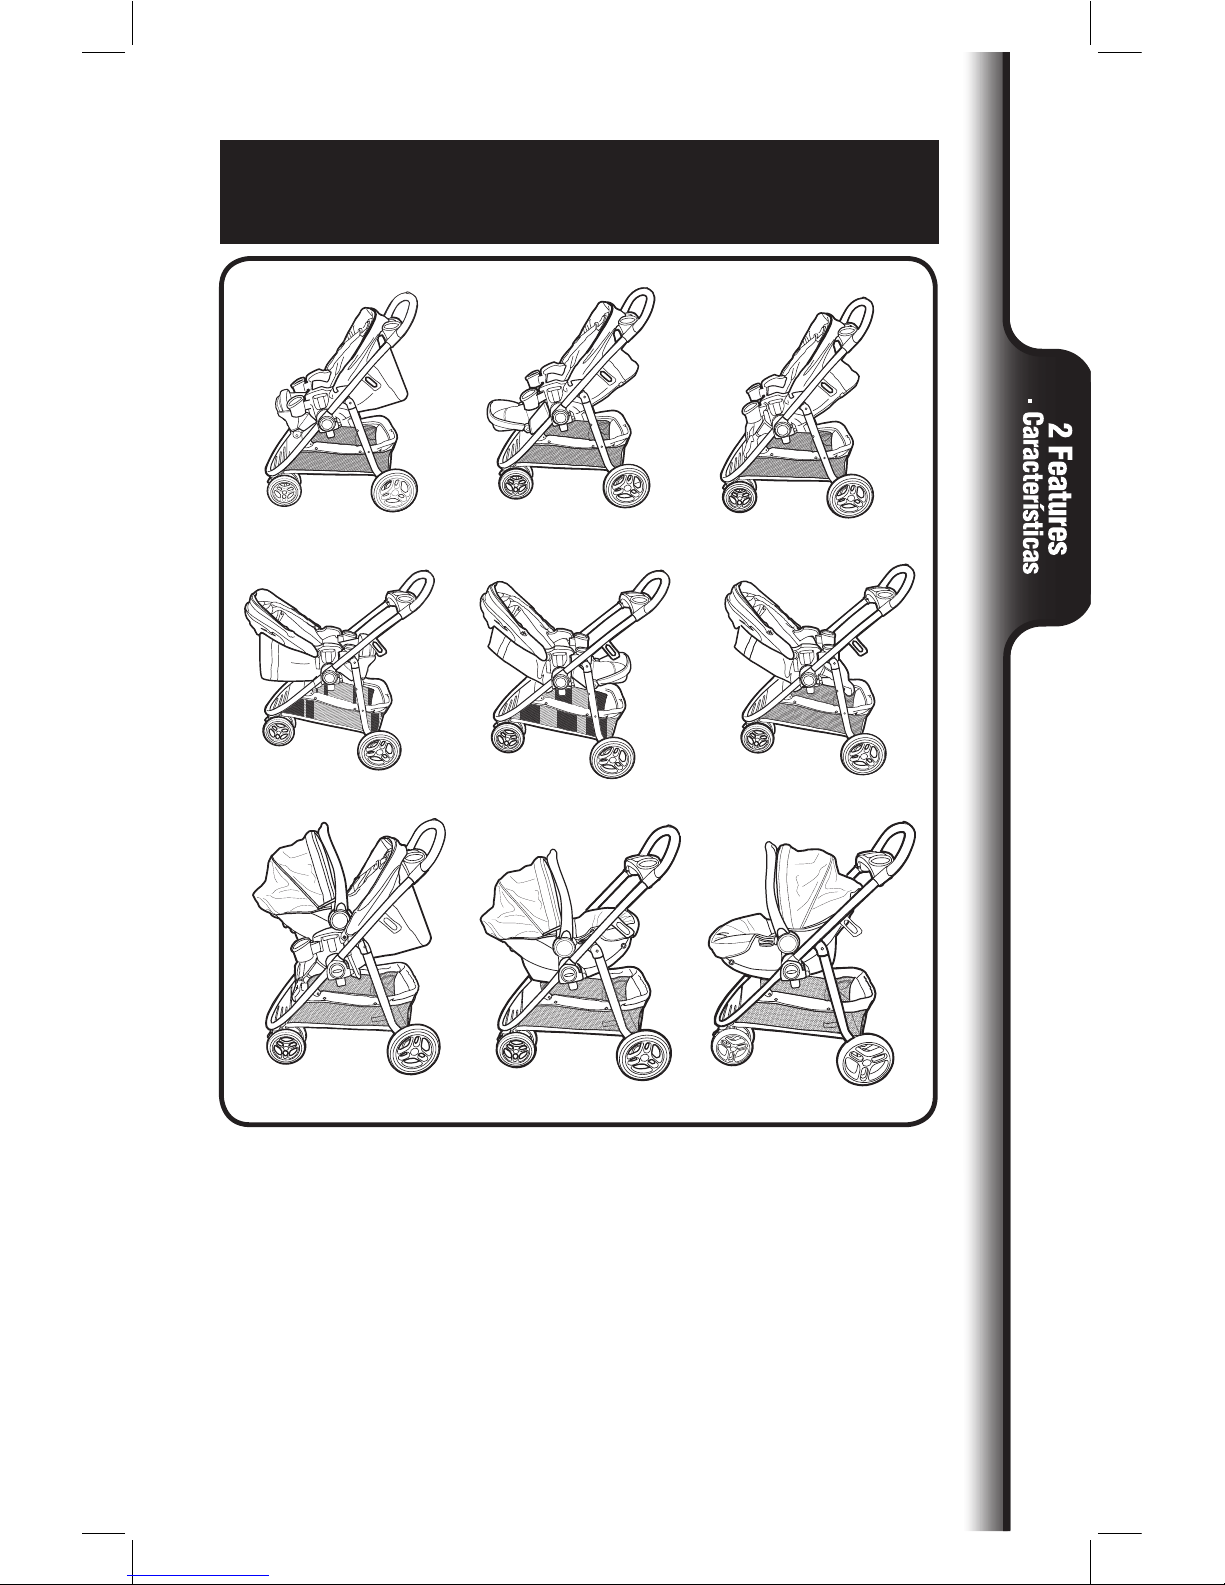
2-A MODES™ 3 Lite XT Use Positions • Posiciones del uso MODES™
3 Lite XT
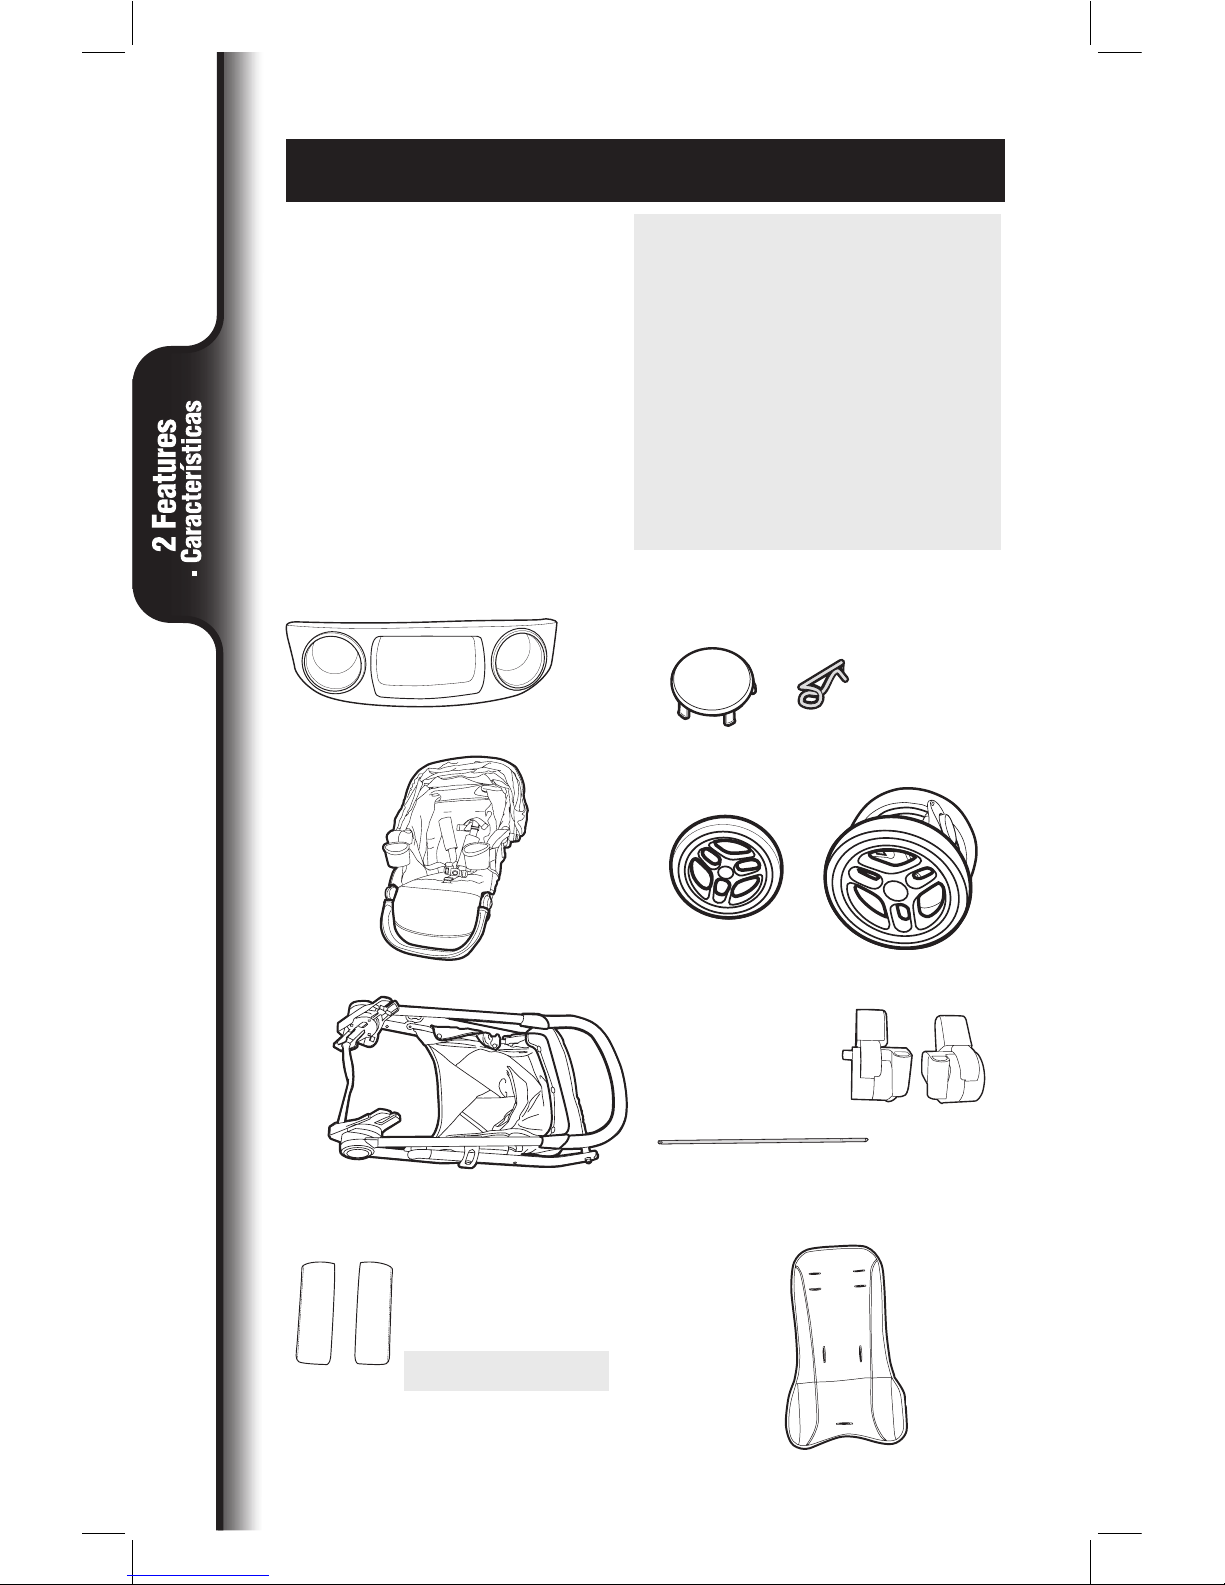
2-B Parts List • Lista de piezas
1 WARNING • ADVERTENCIA
2 Features • Características
Pages • Páginas 4-8
Pages • Páginas 9-10
3-A To Open Stroller • Abrir el cochecito
3-B Rear Wheels • Las ruedas traseras
3-C Front Wheels • Las ruedas delanteras
3-D Parent’s Tray • La bandeja para padres
3 Assembly • Ensamblaje
Pages • Páginas 11-18
4-A To Attach/Remove Toddler Seat • Cómo sujetar/sacar el asiento
para niño pequeño
4-B Canopy • Capota
4-C To Secure Child • Cómo sujetar al niño
4-D To Recline • Para reclinar
4-E Foot Rest • Apoyapié
4-F Reclined Carriage Position • Posición reclinada del cochecito
4-G Brakes • Los frenos
4-H Swivel Wheels • Las ruedas giratorias
4-I To Attach Graco® Infant Car Seat to Toddler Seat • Cómo
sujetar el asiento de automóvil para bebé Graco® al asiento para
niño pequeño
4-J To Attach Graco® Infant Car Seat to Stroller Frame • Para
sujetar el asiento de automóvil para bebé al armazón del
cochecito
4-K To Fold Stroller Frame without Toddler seat • Cómo plegar
el armazón del cochecito sin el asiento para niño pequeño
4-L To Fold Stroller with Toddler seat attached • Cómo
plegar el cochecito con el asiento para niño pequeño sujetado
4-M Body Support (on certain models)
• Soporte del cuerpo (en ciertos modelos)
4-N Harness Covers • Fundas del arnés
4 Use • Uso Pages • Páginas 19-46
Page 3

3
5-A Care & Maintenance • Cuidado y mantenimiento
5-B Replacement Parts • Warranty Information
Piezas de repuesto • Información sobre la garantía
5-C Product Registration • Registro del producto
5 Care • Cuidado Pages • Páginas 47-48
Page 4
4
Failure to follow these warnings and the
assembly instructions could result in serious injury or death.
• PLEASE SAVE OWNER’S
MANUAL FOR FUTURE USE.
• ADULT ASSEMBLY REQUIRED.
• NEVER LEAVE CHILD
UNATTENDED. Always keep
child in view while in stroller.
• AVOID SERIOUS INJURY from
falling or sliding out. Always
use seat belt or infant car seat
harness. After fastening
buckles, adjust belts to get a
snug fit around your child.
• AVOID FINGER ENTRAPMENT.
Use care when folding or
unfolding the stroller. When
making adjustments to stroller,
ALWAYS ENSURE that all parts
of child’s body are clear of any
moving parts.
• NEVER USE STROLLER ON
STAIRS or escalators. You may
suddenly lose control of the
stroller or your child may fall
out. Also, use extra care when
going up or down a step or
curb.
• AVOID STRANGULATION.
DO NOT place items with a
string around your child’s neck,
suspend strings from this
product, or attach strings to
toys.
• USE OF THE STROLLER. The
product will become unstable
with a child weighing more than
50 lb (22.7 kg) or taller than 45
in (114.3cm). Use the stroller
with only one child at a time.
• ALWAYS check that the infant
car seat or toddler seat is
securely attached to the frame
by pulling up on it.
• TO PREVENT A HAZARDOUS,
UNSTABLE CONDITION, never
place purses, shopping bags,
parcels or accessory items on
the handle (other than approved
Graco stroller bags). Never
place anything on the canopy.
• TO PREVENT A HAZARDOUS,
UNSTABLE CONDITION, do not
place more than 10 lbs (4.5 kg)
in the storage basket.
• TO AVOID BURNS, never put
hot liquids in the parent tray.
• TO PREVENT TIPPING, do not
place more than 3lb (1.36kg) in
the parent tray.
• DO NOT use storage basket as
a child carrier.
• DO NOT use toddler seat in an
automobile.
• DO NOT use toddler seat as a
car bed or booster seat.
• DO NOT remove, reverse or
carry the toddler seat while
child is in it.
• DO NOT ALLOW your child to
stand on the basket. It may
collapse and cause injury.
• NEVER PLACE child in the
toddler seat with head toward
footrest.
Page 5
5
• DO NOT use stroller frame
without toddler seat or car seat
attached.
• NEVER ALLOW YOUR
STROLLER to be used as a toy.
• STROLLER TO BE USED only
at walking speed. Product not
intended for use while jogging,
skating, etc.
• NEVER LIFT OR CARRY
toddler seat by the footrest.
• DISCONTINUE USING YOUR
STROLLER should it become
damaged or broken.
• CAREGIVER MUST always help
child get into and out of the
stroller.
• CAREGIVER MUST always
ensure the brakes are engaged
when placing child into stroller.
• USING GRACO® INFANT CAR
SEAT WITH STROLLER:
• TO AVOID INJURY TO YOUR
CHILD: THIS STROLLER IS
ONLY COMPATIBLE WITH
GRACO® SNUGRIDE®
INFANT CAR SEATS WITH
CLICK CONNECT™. Only use
with Graco® infant car seats
that have the
Click Connect™
logo. Improper
use of this
stroller with
other manufacturers’ car
seats may result in serious
injury or death.
• READ THE MANUAL provided
with your Graco car seat before
using it with your stroller.
• FALL HAZARD: Always check
that infant car seat is securely
attached to stroller by pulling up
on the car seat.
• TO AVOID FALLING OUT
always ensure that the toddler
seat is securely attached on
both sides of the stroller frame.
• ALWAYS SECURE your child
with the car seat harness when
using the car seat in the stroller.
If your child is already in the
car seat, check that the child is
secured with the harness.
• Improper use of this stroller
with a car seat may result in
serious injury or death.
• See Graco infant car seat
owners manual for maximum
size of child.
Page 6
6
ADVERTENCIA
No observar estas advertencias y las instrucciones de armado
podría resultar en lesiones serias o la muerte.
• POR FAVOR, GUARDE EL
MANUAL DEL USARIO PARA
USO FUTURO.
• REQUIERE QUE LO ARME UN
ADULTO.
• NUNCA DEJE A UN NIÑO SIN
ATENDER. Mantenga siempre
al niño a la vista mientras está
en el cochecito.
• EVITE SERIAS LESIONES
causadas por caídas o
resbalos. Use siempre el
cinturón de seguridad o arnés
del asiento de automóvil para el
bebé. Luego de sujetar las
hebillas, ajuste las correas para
lograr un calce apretado
alrededor de su niño.
• PARA EVITAR APLASTAR LOS
DEDOS: Use cuidado al doblar
y desplegar el cochecito. Al
ajustar el cochecito, SIEMPRE
ASEGÚRESE que todas las
extremidades del niño estén
fuera del alcance de cualquier
pieza móvil.
• NUNCA USE EL COCHECITO
EN ESCALERAS o escaleras
mecánicas. Podría perder
repentinamente el control del
cochecito o el niño podría
caerse. Además, use mucho
cuidado cuando sube o baja
un escalón o bordillo.
• EVITE LA ESTRANGULACIÓN.
NO ponga artículos con un
cordón alrededor del cuello del
niño, suspenda cordones de
este producto ni ponga
cordones a los juguetes.
• USO DEL COCHECITO. El
producto se volverá inestable
con un niño que pesa más de
50 lb (22.7 kg) o más alto que
45 pulgadas (114.3 cm). Use
el cochecito solamente con un
niño por vez.
• SIEMPRE verifique que el
asiento de automóvil para bebé
o asiento para niño pequeño
esté sujetado con seguridad al
armazón tirando de él.
• PARA PREVENIR UNA
SITUACIÓN PELIGROSA
E INESTABLE, nunca ponga
carteras, bolsas, paquetes o
accesorios en la manija (si no
son las bolsas para cochecito
aprobadas por Graco). No
ponga nunca nada sobre la
capota.
• PARA PREVENIR UNA
SITUACIÓN INESTABLE Y
PELIGROSA, no ponga más de
10 libras (4,5 kg) en la canasta
de almacenamiento.
• PARA EVITAR QUEMADURAS,
nunca ponga líquidos calientes
en la bandeja para padres.
• PARA PREVENIR QUE SE
TUMBE, no ponga más de
3 libras (1,36 kg) en la bandeja
para padres.
Page 7

7
ADVERTENCIA
• NO use la canasta de
almacenamiento como
transportador para niños.
• NO use el asiento para niño
pequeño en un automóvil.
• NO use el asiento para niño
pequeño como cama en un
automóvil o asiento para niños.
• NO saque, invierta ni transporte
el asiento para niño pequeño
mientras el niño esté sentado.
• NO DEJE que el niño se pare
sobre la canasta. Podría
desarmarse y causar lesiones.
• NUNCA PONGA al niño en el
asiento para niño pequeño con
la cabeza hacia el apoyapiés.
• NO use el armazón del
cochecito sin el asiento para
niño pequeño o asiento de
automóvil sujetado.
• NUNCA DEJE QUE EL
COCHECITO se use como
un juguete.
• EL COCHECITO DEBE
USARSE solamente a la
velocidad del caminar. El
producto no debe usarse para
correr, patinar, etc.
• NUNCA LEVANTE NI
TRANSPORTE el asiento
para niño pequeño agarrado
del apoyapié.
• DEJE DE USAR SU
COCHECITO si resulta dañado
o roto
• LA PERSONA A CARGO DEL
CUIDADO debe ayudar siempre
al niño a subirse y bajarse del
cochecito.
• LA PERSONA A CARGO DEL
CUIDADO debe tener la
seguridad de que los frenos
estén activados cuando pone al
niño en el cochecito.
• USO DEL ASIENTO DE
AUTOMÓVIL PARA BEBÉ
GRACO
®
CON EL COCHECITO:
• PARA EVITAR LESIONES A
SU NIÑO: ESTE COCHECITO
SOLAMENTE ES
COMPATIBLE CON LOS
ASIENTOS DE
AUTOMÓVIL
PARA BEBÉ
GRACO®
SNUGRIDE®
CON CLICK CONNECT™.
Úselo solamente con los
asientos de automóvil para
bebé de Graco® que tienen el
logotipo Click Connect™. El
uso inadecuado de este
cochecito con asientos para
automóvil de otros fabricantes
podría resultar en lesiones
serias o la muerte.
• LEA EL MANUAL incluido con
su asiento de automóvil Graco
antes de usarlo con su
cochecito.
• PELIGRO DE CAÍDA: Verifique
siempre que el asiento de
automóvil para bebé esté
debidamente asegurado al
cochecito tirando del asiento
de automóvil hacia arriba.
Page 8
8
ADVERTENCIA
• PARA EVITAR CAÍDAS,
asegúrese siempre de que el
asiento para niño pequeño esté
sujetado en ambos costados
del armazón del cochecito.
• ASEGURE SIEMPRE a su niño
con el arnés del asiento de
automóvil cuando usa el
asiento de automóvil en el
cochecito. Si su niño ya está
en el asiento de automóvil,
verifique que esté asegurado
con el arnés.
• El uso inadecuado de este
cochecito con un asiento de
automóvil podría resultar en
lesiones serias o la muerte.
• Vea el manual del propietario
del asiento de automóvil para
bebé Graco para determinar el
tamaño máximo del niño.
Page 9
9
2-A MODES™ 3 LITE XT Use Positions
• Posiciones del uso MODES™ 3 LITE XT
Page 10
10
2-B Parts List • Lista de piezas
All models • Todos modelos
On certain models • En ciertos modelos
2X
2X
2X
2X
This model may not include some
features shown below. Check that
you have all the parts for this
model BEFORE assembling your
product. If any parts are missing,
call Customer Service.
No tools required.
Este modelo podría no incluir algunas
de las características que se indican a
continuación. Verifique que tenga
todas las piezas de este modelo
ANTES de armar su producto. Si falta
alguna pieza, llame a Servicio al
Cliente.
No requiere
herramientas.
Fundas del arnés
Harness covers
Page 11

11
3-A To Open Stroller • Abrir el cochecito
1. Abra la traba del cochecito.
1. Open stroller lock.
Asegúrese de poner el cochecito sobre un pedazo de cartón o algún otro
material de protección para prevenir dañar el piso.
Be sure to place stroller on top of a piece of cardboard or some other
protective cover to prevent any damage to floor.
2. Levante la manija del cochecito
hacia arriba.
2. Lift handle of stroller up.
Page 12
12
3. VERIFIQUE que el cochecito esté
completamente abierto y trabado
cada vez que lo abre y antes de
continuar los pasos de ensamblaje
restantes.
3. CHECK that the stroller is
completely latched open every
time you open the stroller and
before continuing with the rest of
the assembly steps.
SNAP!
¡CRAC!
3-B Rear Wheels • Las ruedas traseras
1. Las palancas del freno deben
apuntar hacia la parte trasera del
cochecito.
1. Brake levers point toward rear of
stroller.
2. Oprima hacia abajo los
ensamblajes del freno hasta que
se traben en su lugar. VERIFIQUE
que ambas palancas del freno
estén empujadas hacia abajo
como se indica.
2. Press down on brake assemblies
until they snap into place. CHECK
that both brake levers are pushed
down as shown.
SNAP!
¡CRAC!
Page 13

13
3. Inserte la varilla del eje por la
apertura del eje. La llave del eje
debe alinearse con los agujeros
correspondientes.
3. Insert axle rod through axle
opening. Axle key must line up
with key holes.
4. En el caso de que haya problemas
pasando la barra del eje por el
segundo ensamblaje de freno,
saque la barra del eje y retire el
segundo ensamblaje de freno.
Desde el costado interior del
ensamblaje del freno, inserte la
barra del eje a través del
ensamblaje del freno algunas
veces para aflojar la forma en que
queda. Volver a sujetar el
ensamblaje del freno en el
cochecito según los pasos 1 y 2, y
VERIFIQUE que ambas palancas
del freno estén empujadas hacia
abajo como se indica.
Ensamble la barra del eje según el
paso 3.
4. If having trouble getting the axle
rod through the second brake
assembly, remove the axle rod and
remove the second brake
assembly. From the inboard side
of the brake assembly, insert the
axle rod through the brake
assembly a couple times to loosen
the fit. Attach brake assembly
back onto the stroller per steps 1 &
2 and CHECK that both brake
levers are pushed down as shown.
Assemble axle rod per step 3.
Page 14
14
5. Ponga la rueda en el eje.
5. Place wheel on axle.
2X
6. Empuje el lado recto de la clavija
por el agujero del eje. La clavija
se separará alrededor del eje. El
lado curvo de la clavija DEBE
mirar hacia arriba como se indica.
Repite los pasos 5 a 6 en el otro
costado.
6. Push straight side of pin through
axle hole. Pin will separate
around the axle. Curved end of
pin MUST face up as shown.
Repeat steps 5-6 on other side.
2X
Page 15

15
2X
7. Trabe el tapacubos sobre la
clavija como se indica.
Repite con la otra tapacubos.
7. Snap hubcap over pin as shown.
Repeat with other hubcap.
SNAP!
¡CRAC!
Page 16

16
3-C Front Wheels • Las ruedas delanteras
2. Sujete las ruedas delanteras al
poste como se indica.
2. Attach front wheels to post as
shown.
1. Oprima y mantenga oprimido
hacia abajo el botón del resorte
que se encuentra en el eje de la
rueda.
1. Press and hold the spring button
located in the bottom of the wheel
hub down.
SNAP!
¡CRAC!
Page 17

17
3. VERIFIQUE que las ruedas estén
debidamente sujetadas tirando
del ensamblaje de la rueda.
3. CHECK that wheels are securely
attached by pulling on wheel
assembly.
Page 18

18
3-D Parent’s Tray • La bandeja para padres
1. Inserte la bandeja en las ranuras.
1. Insert tray into slots.
2. Asegúrese de que la bandeja
para padres esté trabada con
seguridad en las ranuras de cada
costado del armazón.
2. Make sure parent tray is snapped
securely into slots on each side of
the frame.
Page 19

19
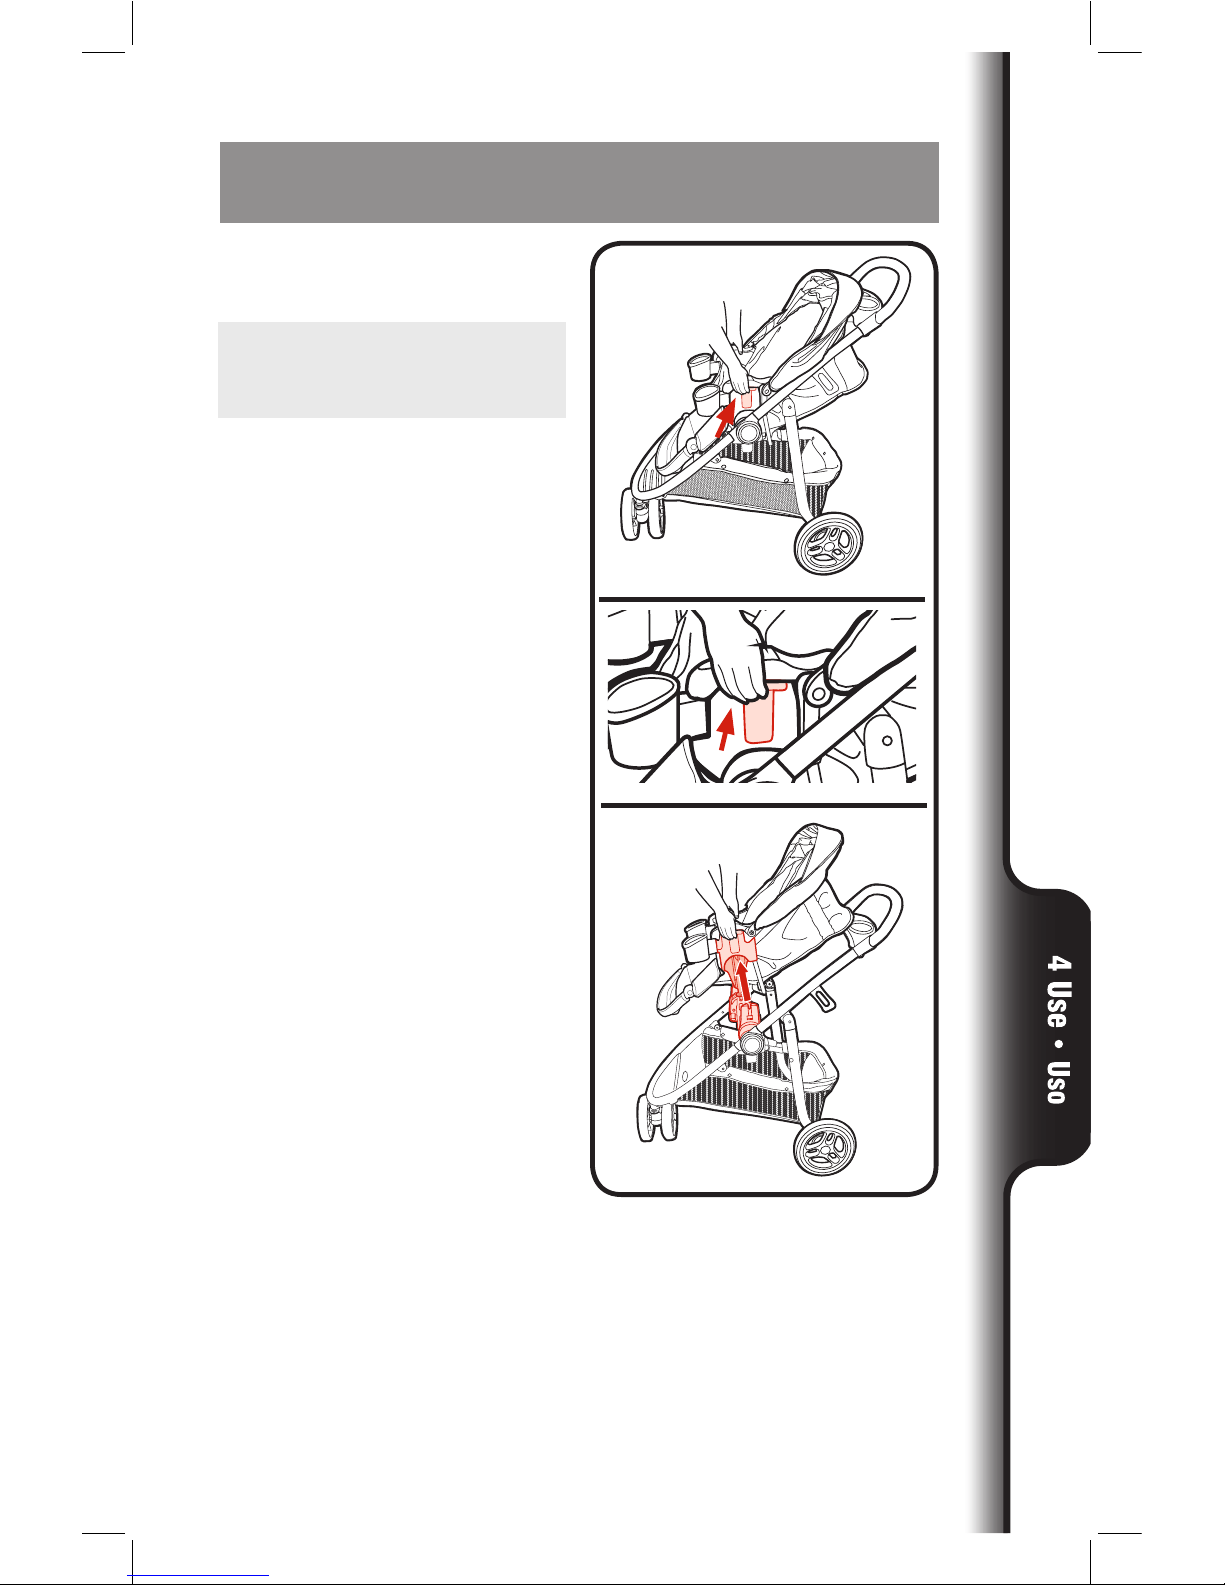
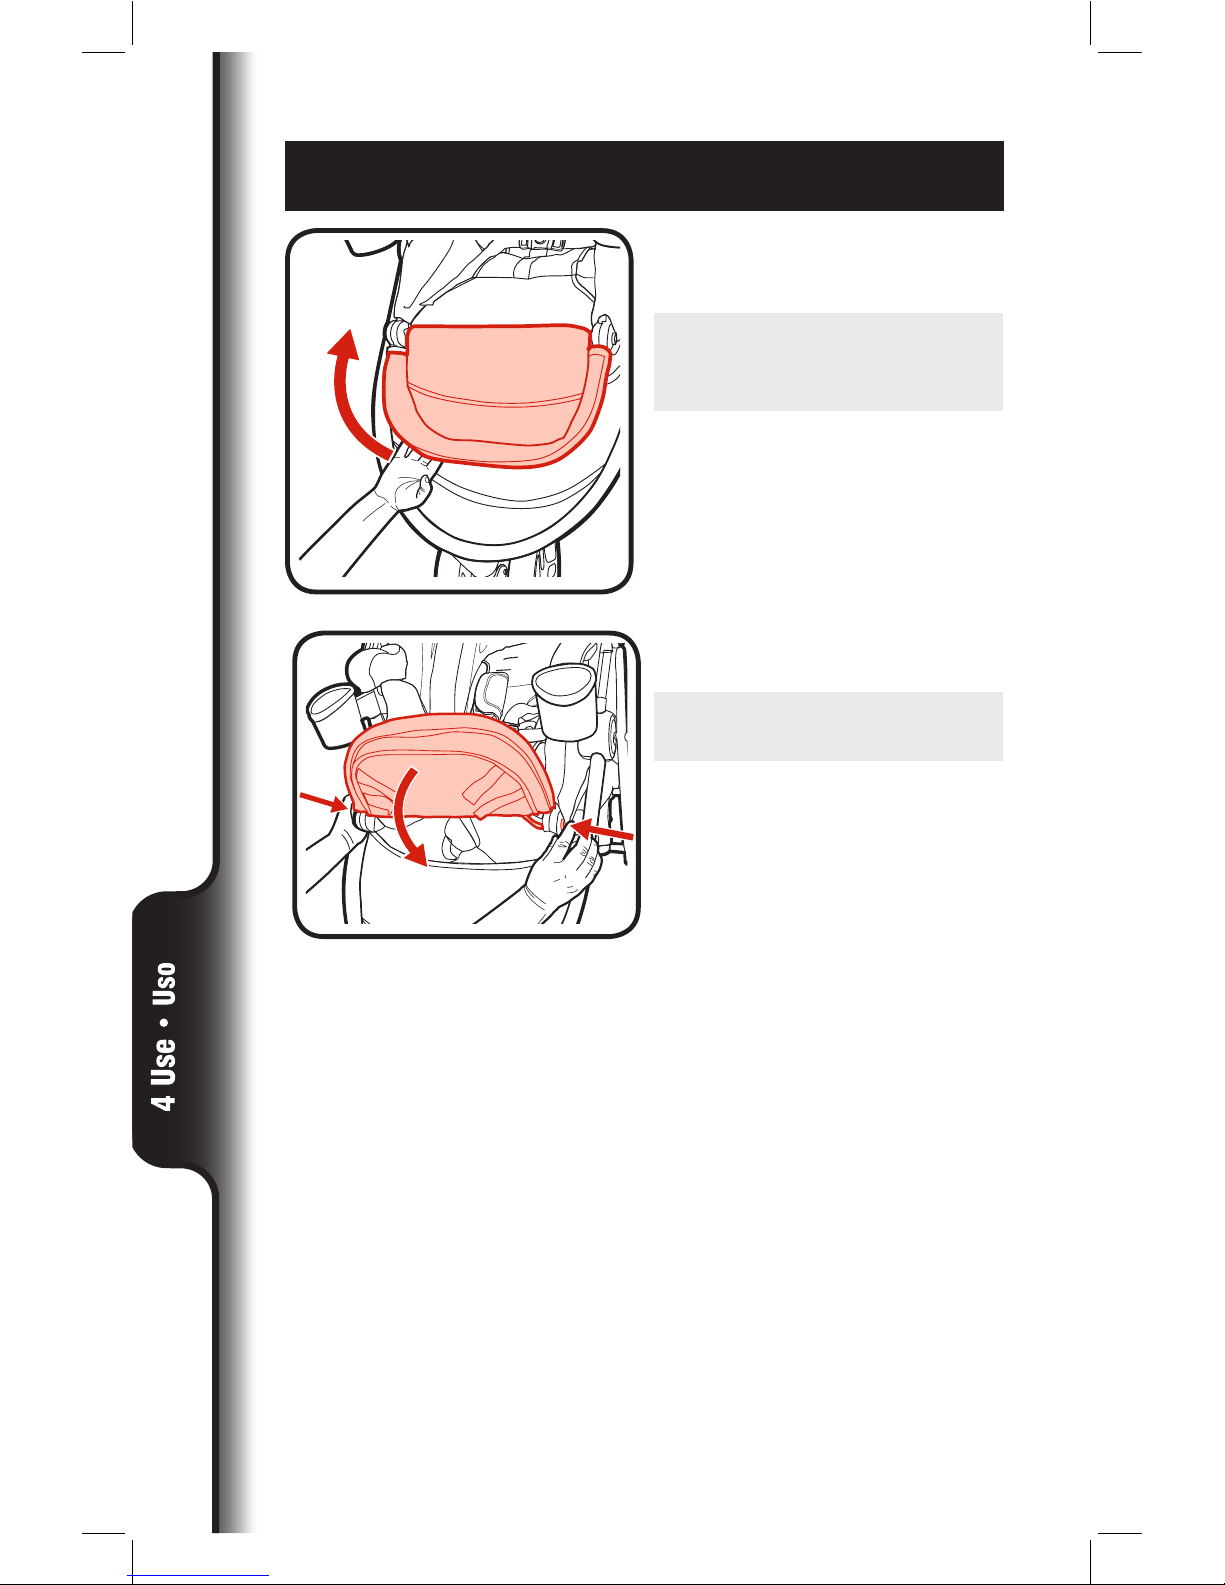
4-A To Attach/Remove Toddler Seat • Cómo
sujetar/sacar el asiento para niño pequeño
1. Para sujetar el asiento, ponga el
asiento en los montantes como
se indica hasta que se traben en
su lugar en ambos costados del
cochecito. Se puede colocar el
asiento en el cochecito en
cualquiera de las dos direcciones.
Vea las advertencias para más
información.
1. To attach seat, place seat on
mounts as shown until they lock
into place on both sides of the
stroller. Seat may be placed on
stroller in either direction.
See warnings for additional
information.
To Attach Toddler Seat • Cómo sujetar el asiento para
niño pequeño
Page 20

20
2. ASEGÚRESE de que los
montantes del asiento estén
debidamente sujetados al
cochecito en ambos lados como
se indica.
2. MAKE SURE seat mounts are
securely attached to the stroller
on both sides as shown.
SNAP!
¡CRAC!
Page 21
21
1. Oprima los botones de ambos
costados del asiento y tire hacia
arriba como se indica.
1. Squeeze buttons on both sides of
the seat and pull up as shown.
To Remove Toddler Seat • Cómo sacar el asiento para
niño pequeño
Page 22

22
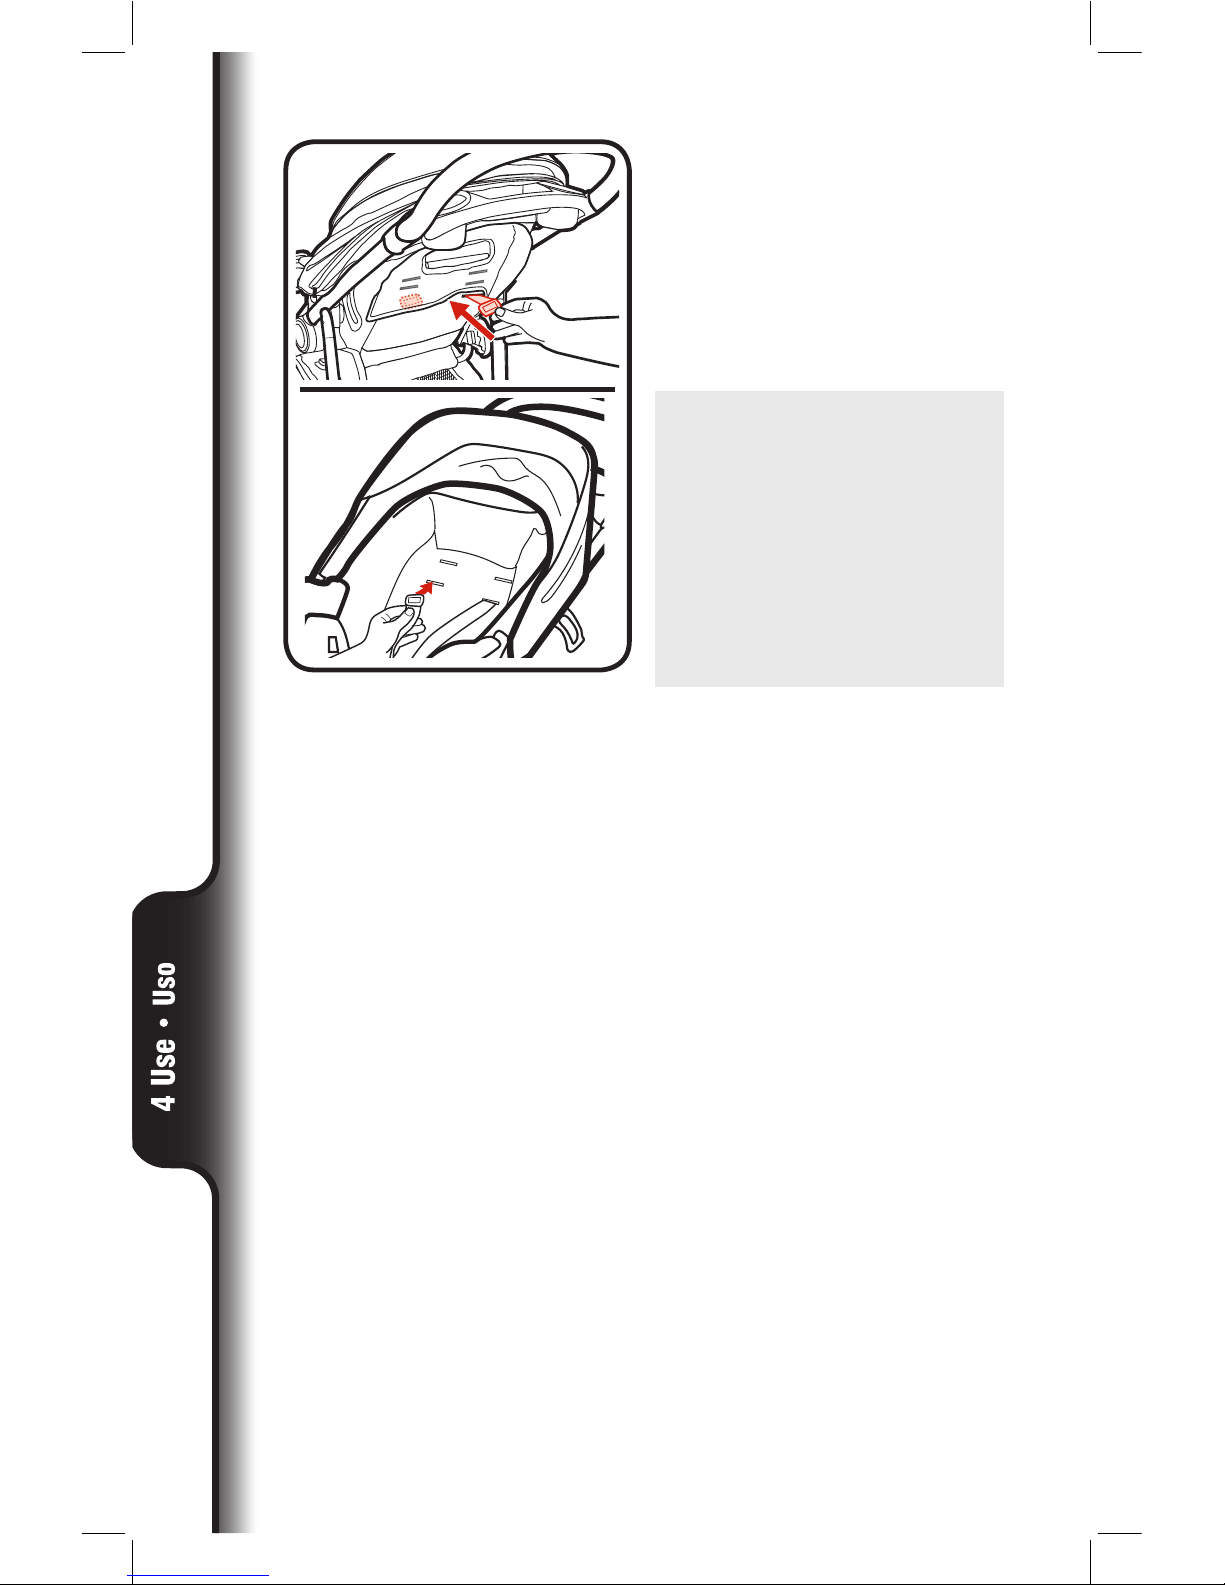
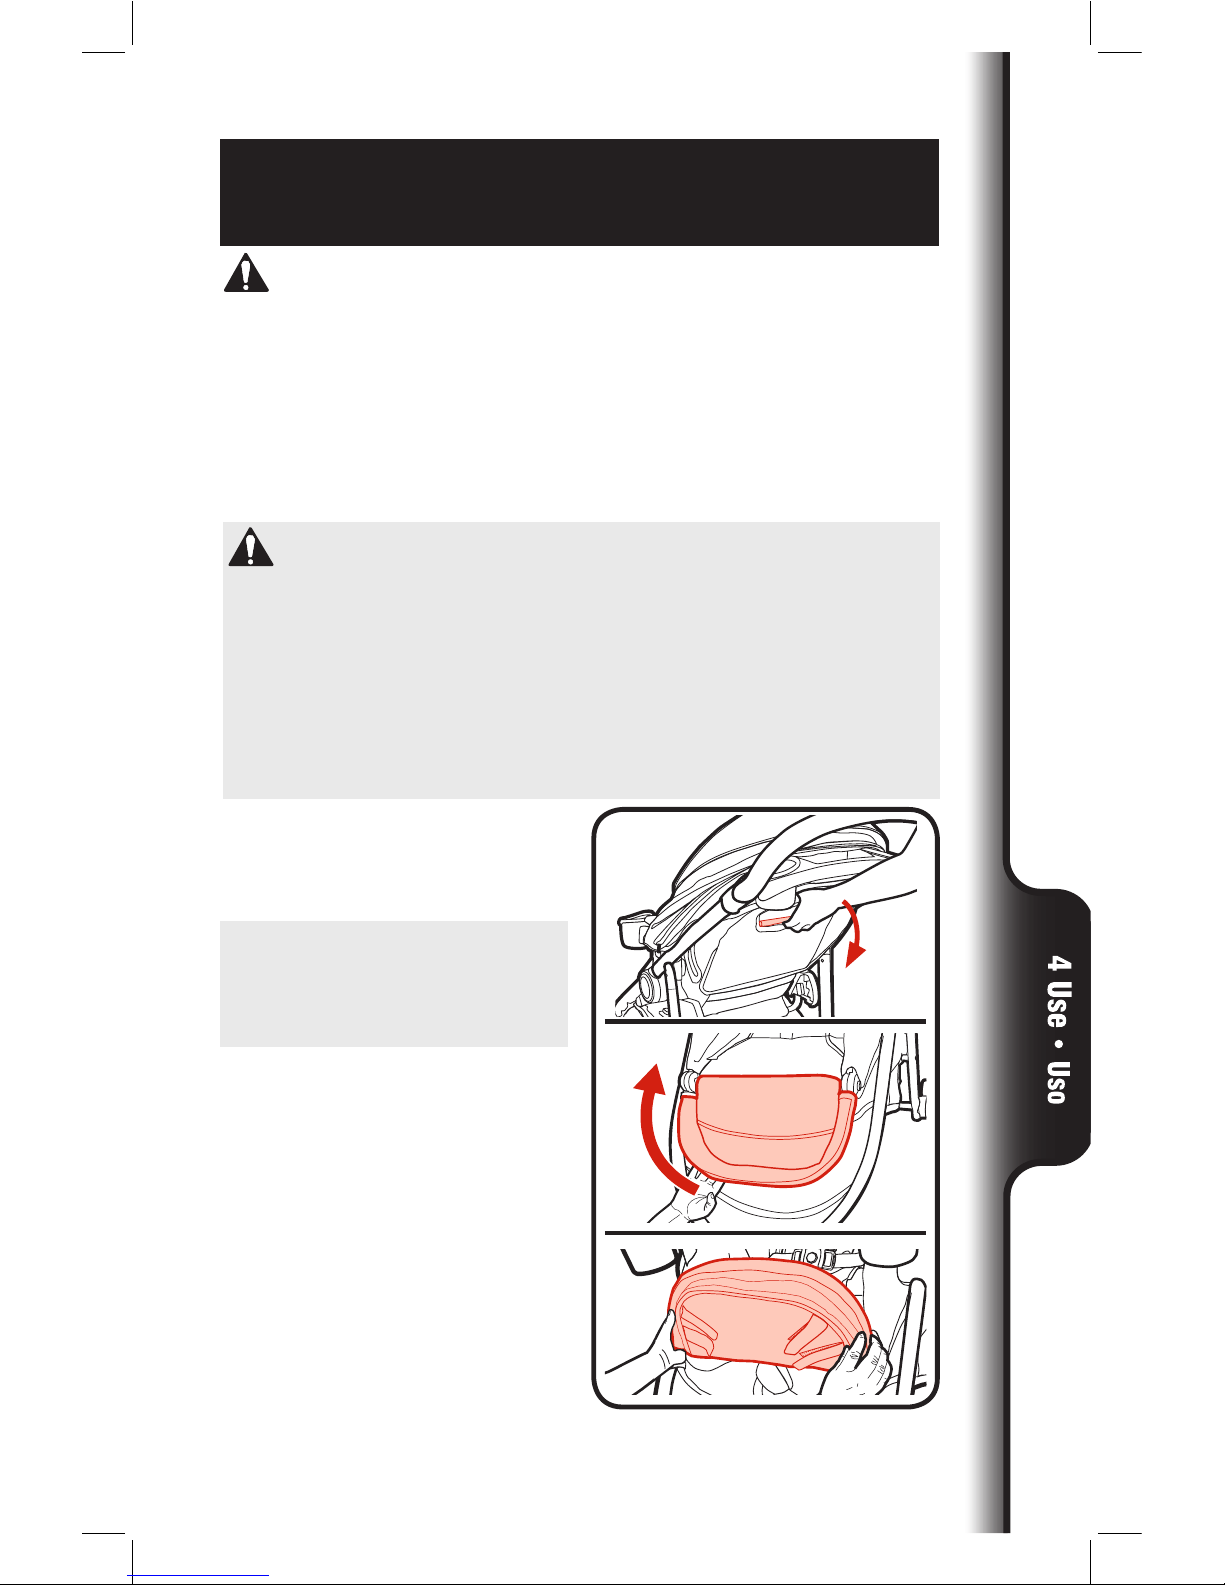
4-B Canopy • Capota
1. Sujete la cinta de gancho y bucle
en la parte de atrás de la capota
como se indica.
ASEGÚRESE que la capota esté
siempre sujetada con la cinta de
gancho y bucle cuando la usa
con el asiento de automóvil para
bebé o cuando usa el asiento
para niño pequeño.
1. Fasten hook and loop tape on the
rear of canopy as shown.
MAKE SURE canopy is always
fastened with the hook and
loop tape when used with infant
carseat or when toddler seat is
in use.
2. Tire hacia adelante para abrir la
capota.
2. Pull forward to open canopy.
Page 23

23
3. Empuje hacia atrás para cerrar la
capota.
3. Push backwards to close canopy.
4. Tire la visera de la capota hacia
afuera para usarla y empújela
hacia atrás debajo del borde de la
capota cuando no la usa.
4. Pull canopy visor out for use,
push back under rim of canopy
when not in use.
5. Abra la cremallera para abrir la
ventana.
5. Unzip to open window.
Page 24

24
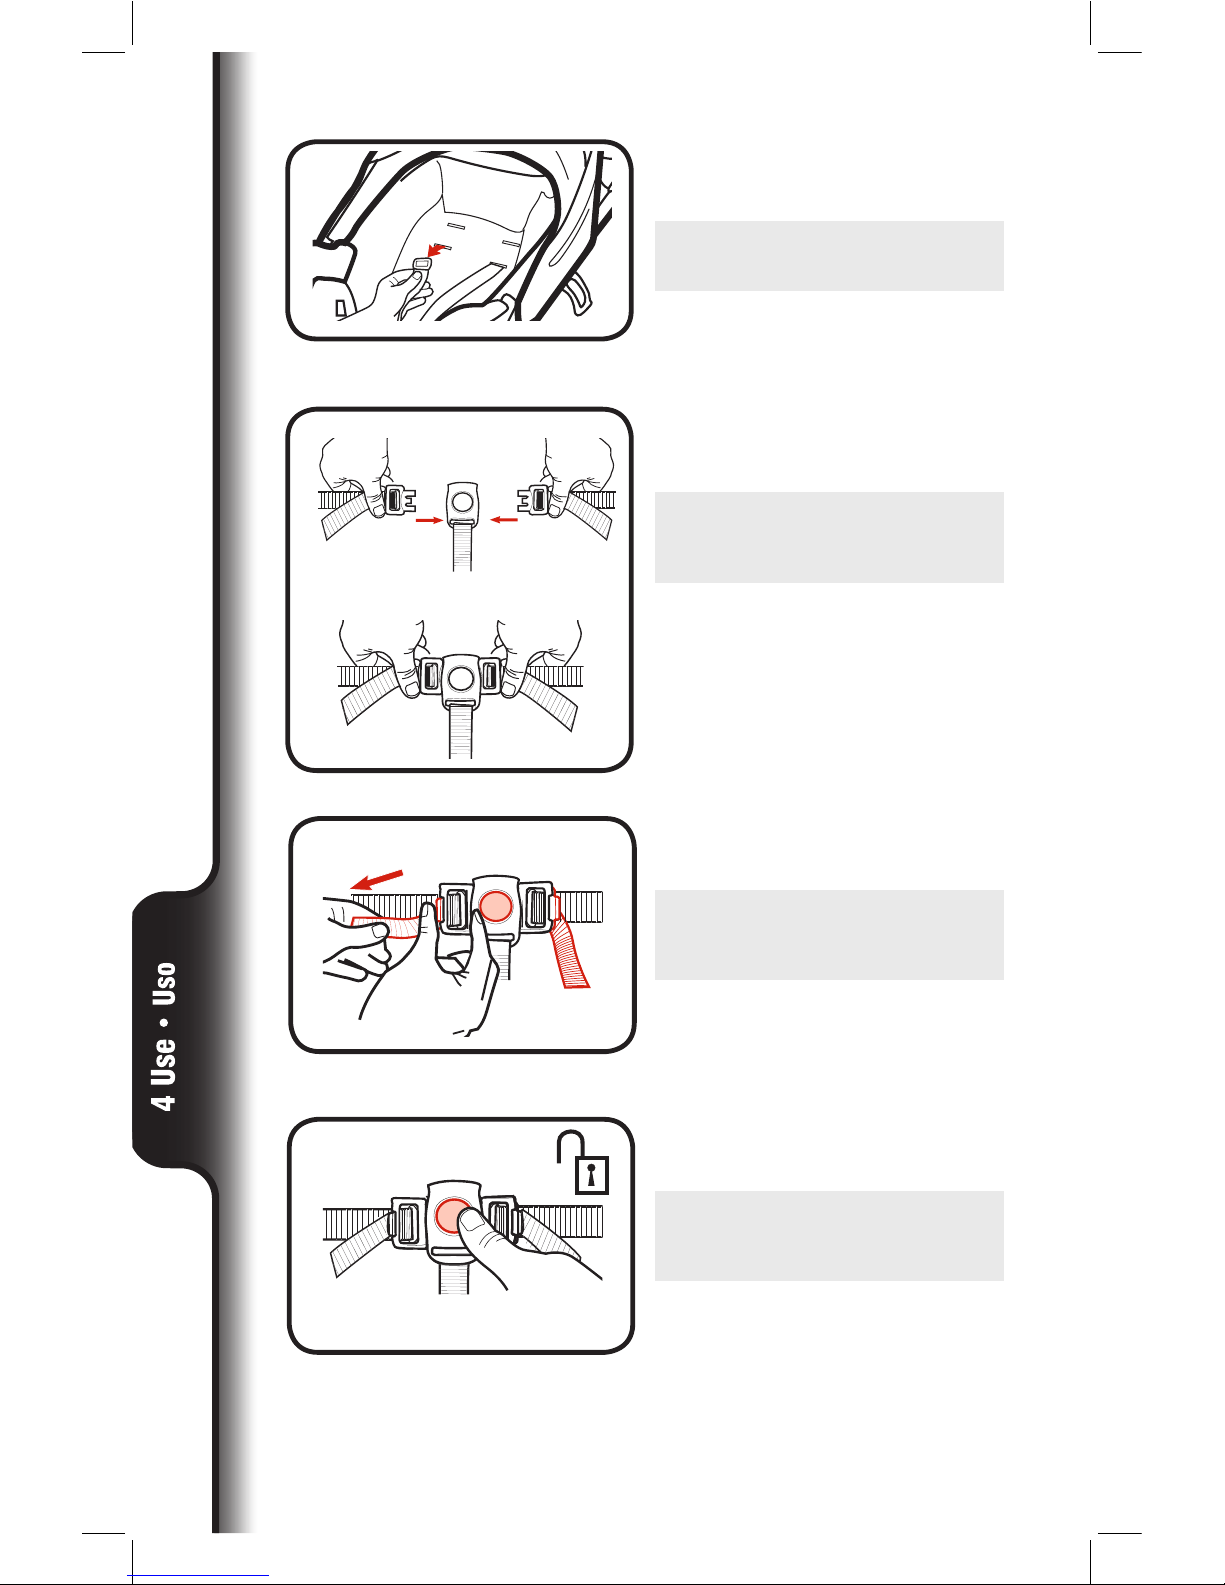
4-C To Secure Child • Cómo sujetar al niño
WARNING Falling Hazard: Always use the seat belt.
ADVERTENCIA
Peligro de caídas: Use siempre el cinturón de seguridad.
1. Para abrirlo, oprima el botón de la
hebilla para liberar las correas de
la cintura.
1. To open, press button on buckle
to release the waist straps.
2. Para cerrarlo, deslice los
conectores de las correas del
hombro en las correas de la
cintura y póngalos en la hebilla.
2. To close, slide shoulder strap
connectors onto waist straps and
insert into buckle.
5 Point Harness • Arnés de 5 puntos
Page 25

25
3. Use el ajuste deslizable en el
hombro y la cintura para hacer
ajustes más apretado. Para
cambiar ranuras del arnés del
hombro vea la página 27.
3. Use slide adjuster at shoulder and
waist for tighter adjustment. To
change shoulder harness slots,
see page 27.
Use slide adjuster at shoulder and
waist for further adjustment.
Repeat on other side.
Utilisez le régulateur coulissant
à l'épaule et à la taille pour un
ajustement plus précis. Répétez
de l'autre côté.
Use el ajuste deslizable en el
hombro y la cintura para hacer
ajustes adicionales. Repita el
proceso del otro lado.
3 Point Buckle • Hebilla de 3 puntos
1. Para abrirlo, oprima el botón de la
hebilla para liberar las correas de
la cintura.
1. To open, press button on buckle
to release the waist straps.
2. Deslice las conexiones de la
correa para los hombros de las
correas para la cintura.
2. Slide shoulder strap connectors
off of waist straps.
Page 26
26
3. Saque las correas para los
hombros del cochecito.
3. Remove shoulder straps from
stroller.
4. Sujete las correas para la cintura
a la hebilla del arnés como se
indica.
4. Attach waist straps to harness
buckle as shown.
5. Use el ajustador deslizable de la
cintura para ajustarlo más
apretadamente.
5. Use slide adjuster at waist for
tighter adjustment.
6. Para abrirlo, oprima el botón de la
hebilla para liberar las correas de
la cintura.
6. To open, press button on buckle
to release the waist straps.
Page 27

27
Adjusting Shoulder Harness position
• Ajustar la posición del arnés para los hombros
Anclaje del arnés del hombro - niño grande
Shoulder harness anchor—larger child
Anclaje del arnés del hombro - niño pequeño
Shoulder harness anchor—smaller child
Ajustador deslizable
Slide adjuster
Page 28
28
1. Pase el sujetador del arnés por el
frente del asiento y luego vuelva
a insertarlo en las ranuras
deseadas a la misma altura. Use
uno de los anclajes del arnés del
hombro en las ranuras que estén
más cerca a la altura del hombro
del niño. Use el ajustador
deslizable para lograr ajustes
adicionales.
1. Push harness anchor through the
front of the seat then re-insert
through desired slots at the same
height level. Use either shoulder
harness anchor in the slots that
are closest to child’s shoulder
height. Use slide adjuster for
further adjustment.
Page 29
29
4-D To Recline • Para reclinar
WARNING
When making adjustments to the stroller seat, make sure child’s head, arms,
and legs are clear of moving seat parts and stroller frame.
ADVERTENCIA
Cuando realiza ajustes al asiento del cochecito, asegúrese que la cabeza,
brazos y piernas del niño están lejos de las piezas del asiento que se
mueven y del armazón del cochecito.
1. Para reclinarlo, apriete la manijay
baje el asiento.
1. To recline, squeeze handle and
lower seat.
2. Para levantarlo, presione la
manija y empuje el asiento hacia
arriba.
2. To raise, squeeze handle and
push seat up.
Page 30
30
4-E Foot Rest • Apoyapié
1. Para levantar el apoyapié,
levántelo hacia arriba como se
indica.
1. To raise footrest, lift up as
shown.
2. Para bajarlo, oprima los botones
como se indica.
2. To lower, push buttons as shown.
Page 31
31
4-F Reclined Carriage Position • Posición reclinada
del cochecito
WARNING
• Child may slip into leg openings and strangle.
• NEVER use in full recline position unless footrest is in the reclined
carriage position.
• Never use any head support in the full recline position.
• To avoid entrapment or strangulation, always attach side flaps when footrest
is fully raised.
ADVERTENCIA
• El niño podría caerse por las aberturas de las piernas y estrangularse.
• NUNCA lo use en la posición totalmente reclinada a menos que el apoyapié
esté en la posición del cochecito reclinado.
• Nunca use un soporte de la cabeza en la posición totalmente reclinada.
• Para evitar el atrapamiento o la estrangulación, sujete siempre las aletas laterales cuando el apoyapie está completamente levantado.
1. Recline el asiento hasta alcanzar
la posición totalmente reclinada y
ponga el apoyapié en la posición
más vertical.
1. Recline seat to full recline
position and place footrest in the
most upright position.
Page 32

32
2. Destrabe la aleta del costado del
asiento como se indica.
2. Unfasten flap from the side of
seat as shown.
3. Destrabe las correas de gancho y
bucle desde abajo del apoyapié
como se indica.
3. Unfasten hook and loop straps
from underneath the footrest as
shown.
4. Pase las correas de por las
ranuras en el panel lateral como
se indica.
4. Insert straps through the slots in
the side panel as shown.
Page 33

33
5. Vuelva a sujetar las correas al
apoyapié como se indica.
5. Re-fasten straps to the footrest
as shown.
6. El ensamblado está completo
como se indica.
6. Assembly is complete as shown.
Page 34

34
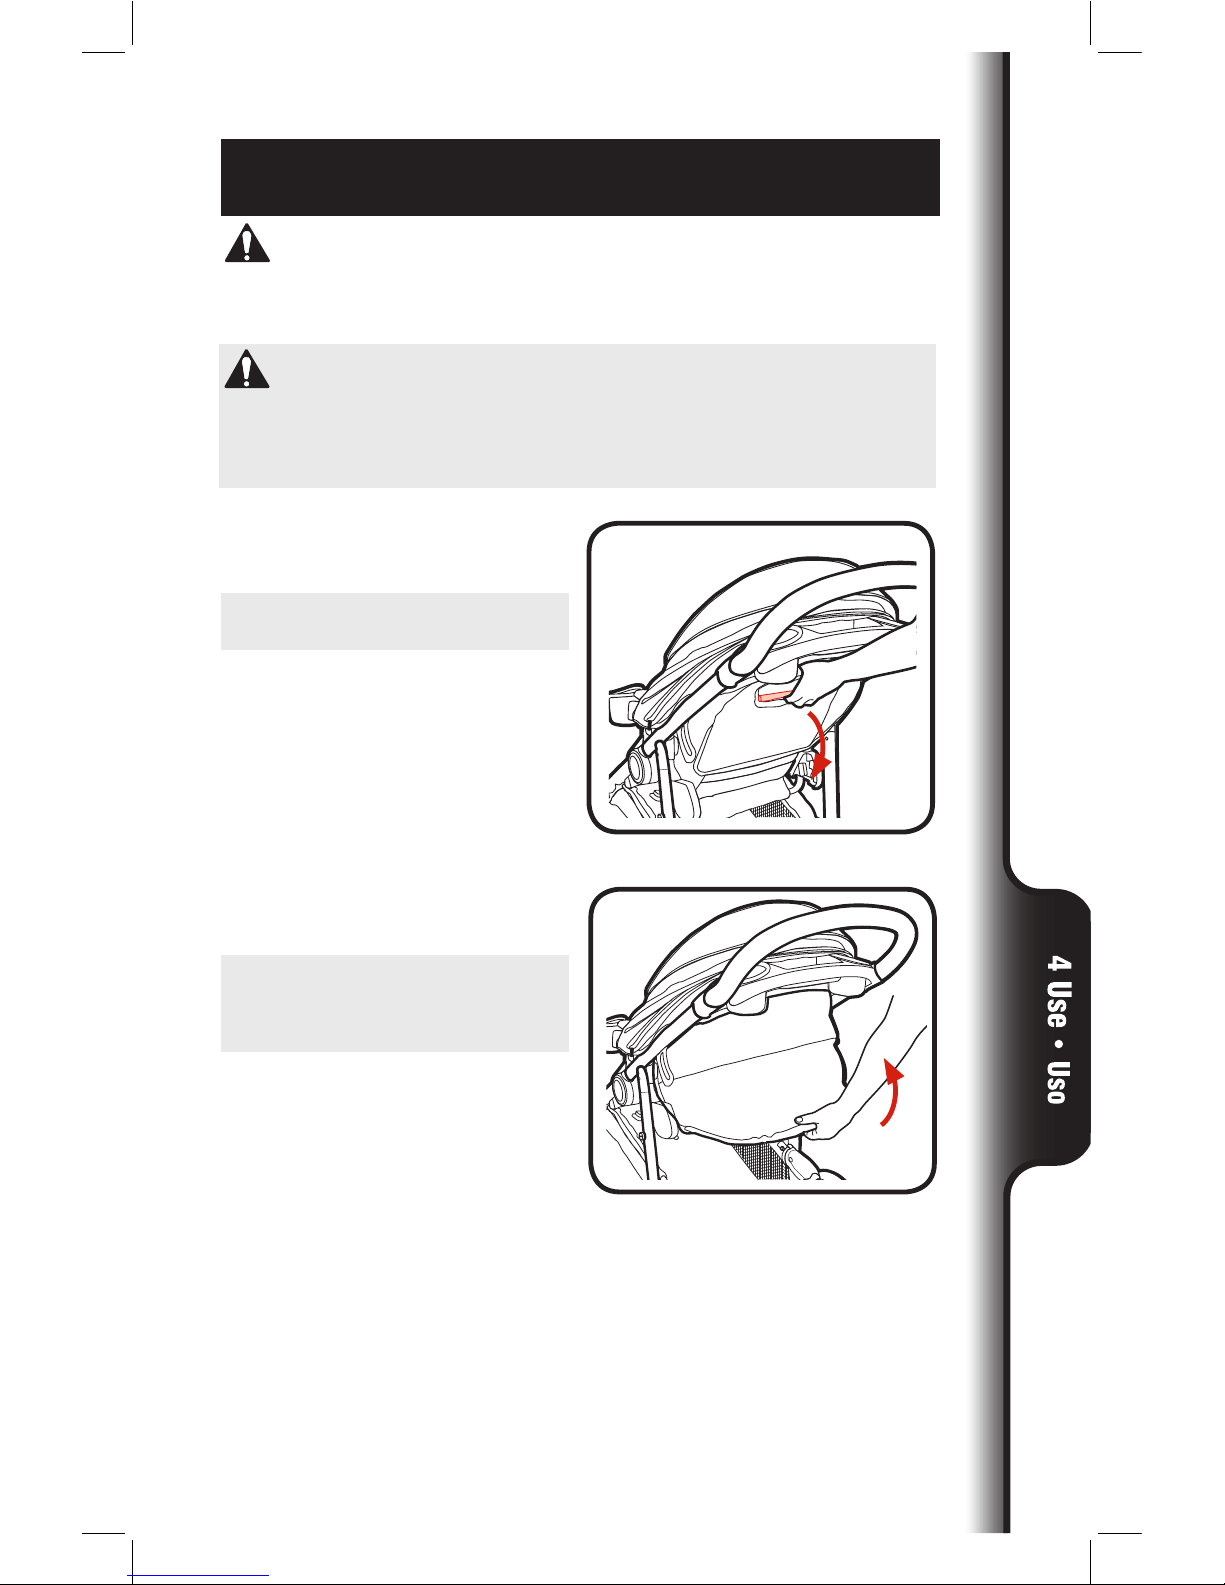
4-G Brakes • Los frenos
WARNING
Always apply both brakes. CHECK that brakes are on by trying to push
stroller.
ADVERTENCIA
Siempre use ambos frenos. INSPECCIONE los frenos tratando de empujar
el cochecito
.
1. Empuje los frenos hacia abajo
para trabarlos.
1. Push down on brake to lock
brakes.
2. Empuje los frenos hacia arriba
para destrabarlos.
2. Push up on brake to unlock brakes.
SNAP!
¡CRAC!
SNAP!
¡CRAC!
Page 35

35
4-H Swivel Wheels • Las ruedas giratorias
Las ruedas giratorias delanteras se traban para el uso en superficies
desparejas tales como césped, piedras o grava.
Front swivel wheels lock for use on uneven surfaces such as grass, stones
or gravel.
1. Para trabarlos, oprima hacia
abajo.
1. To lock, press down.
2. Para destrabarlos, oprima hacia
arriba.
2. To unlock, press up.
SNAP!
¡CRAC!
SNAP!
¡CRAC!
Page 36

36
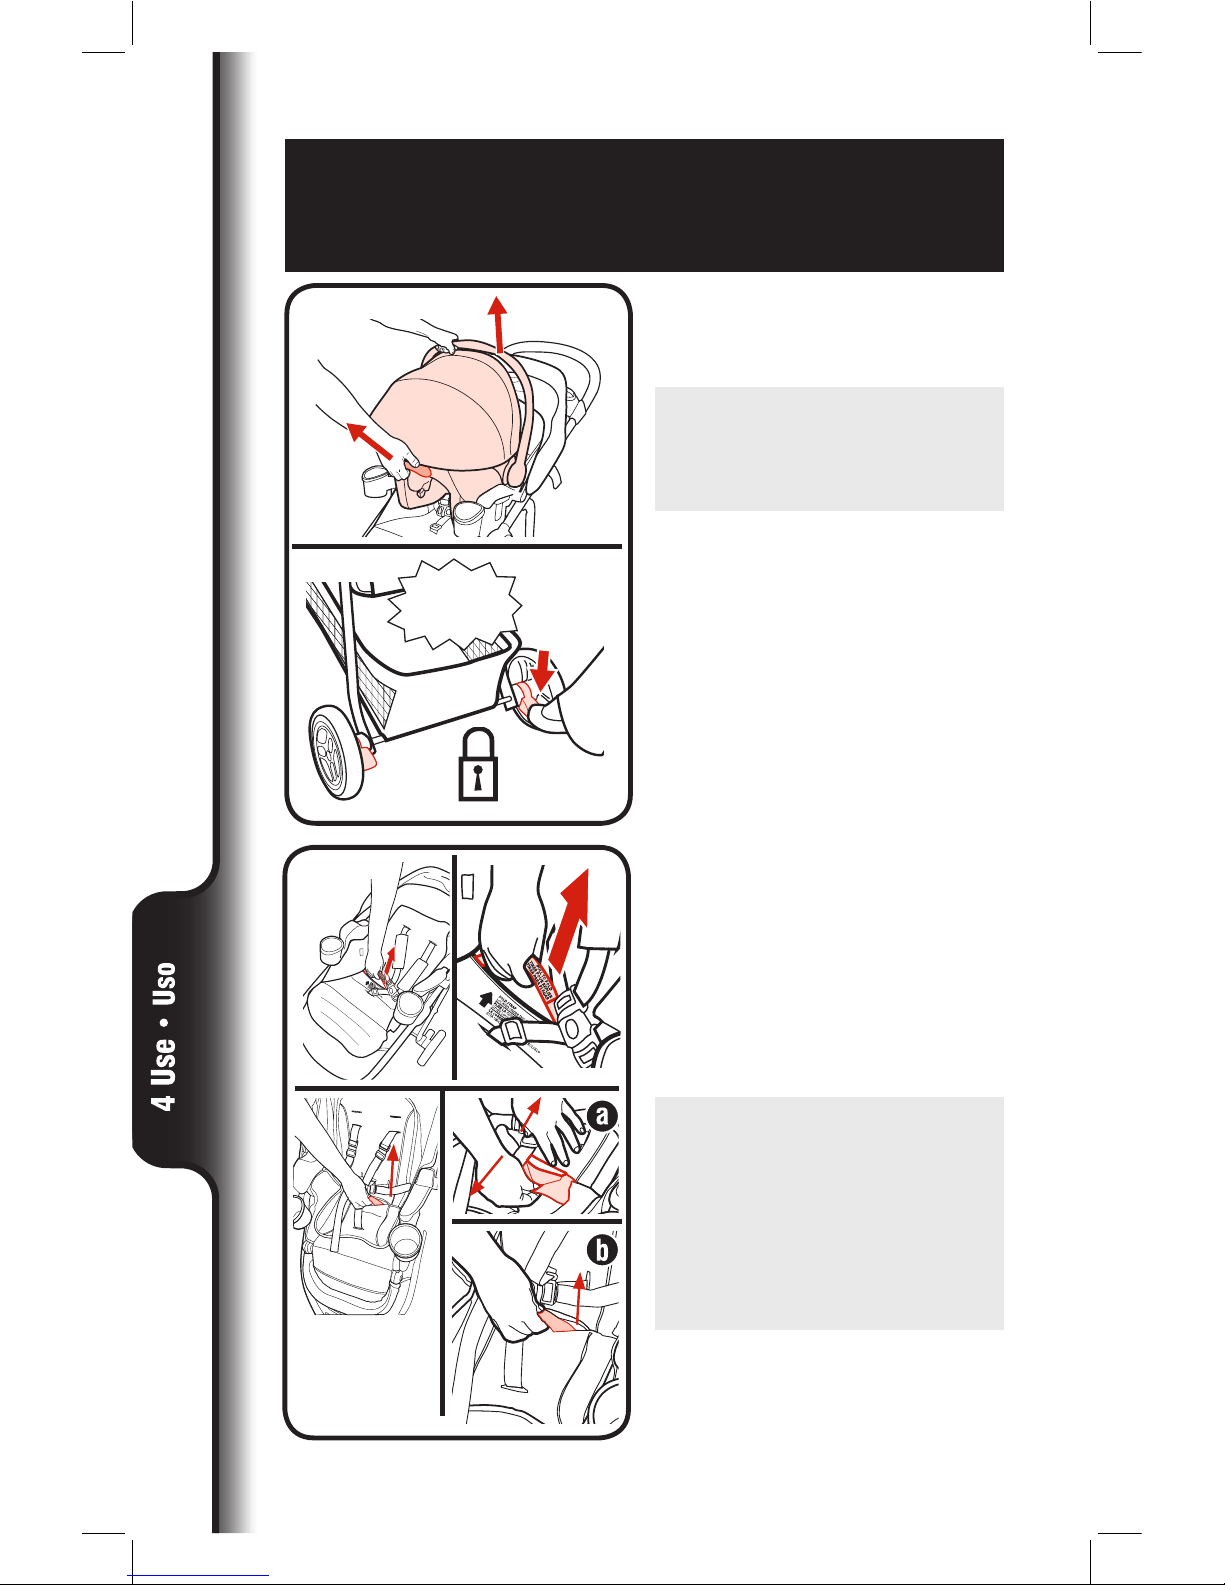
4-I To Attach Graco® Infant Car Seat to Toddler
Seat • Cómo sujetar el asiento de automóvil
para bebé Graco® al asiento para niño
pequeño
For models that do not come with an infant carseat one
may be purchased separately.
WARNING
Use only a Graco® SnugRide® Click Connect™ carseat with this stroller.
This stroller is only compatible with Graco® SnugRide® infant car seats
with Click Connect™. Only use with Graco® infant car seats that have the
Click Connect™ logo. Improper use of this product with a car seat may
result in serious injury or death. Read the manual provided with your Graco
car seat before using it with your product.
• Always secure your child with infant car seat harness when using the car
seat in the product. If your child is already in the car seat, check that the
child is secured with the harness.
Para los modelos que no vienen con un asiento de
automóvil para bebé, se puede comprar uno por
separado.
ADVERTENCIA
Use solamente un asiento de automóvil Graco® SnugRide® Click
Connect™ con este cochecito.
Este cochecito solamente es compatible con los asientos de automóvil para
bebé Graco® SnugRide® con Click Connect™. Úselo solamente con los
asientos de automóvil para bebé de Graco® que tienen el logotipo Click
Connect™. El uso inadecuado de este producto con un asiento para
automóvil podría resultar en lesiones serias o la muerte. Lea el manual
incluido con su asiento para automóvil Graco antes de usarlo con su
producto.
• Sujete siempre a su niño con el arnés del asiento para automóvil cuando
usa el asiento para automóvil en el producto. Si su niño ya está en el
asiento para automóvil, verifique que esté sujetado con el arnés.
Page 37

37
1. NOTA: El asiento de automóvil
para bebé SOLAMENTE puede
estar sujetado orientado hacia
atrás al asiento para niño
pequeño cuando el asiento para
niño pequeño esté en la posición
orientado hacia adelante.
1. NOTE: Infant car seat can ONLY
be attached rear facing to toddler
seat when toddler seat is in
forward facing position.
Page 38

38
3. Busque los montantes en el
asiento para niño pequeño.
3. Find mounts in toddler seat.
4. Ponga el asiento para automóvil
en el cochecito y empuje el
asiento para automóvil hacia
abajo hasta que se trabe en los
soportes Click Connect™.
4. Insert carseat into stroller and
push down on car seat until the
latches snap into the Click
Connect™ mounts.
2. Recline el respaldo del asiento
para niño pequeño hasta la
posición más baja.
2. Recline the toddler seat back to
lowest position.
SNAP!
¡CRAC!
Page 39

39
5. Verifique que el asiento de
automóvil para bebé esté
seguramente instalado
tratando de tirarlo para
arriba.
5. Check that infant car seat is
securely attached by pulling
up on it.
6. Para sacar el asiento de
automóvil: apriete la manija de
liberación de atrás del asiento de
automóvil y levante el asiento de
automóvil fuera del cochecito.
6. To remove car seat: squeeze
release handle at back of car
seat, and lift car seat out of the
stroller.
Page 40

40
4-J To Attach Graco® Infant Car Seat to Stroller
Frame • Para sujetar el asiento de automóvil
para bebé al armazón del cochecito
1. El asiento de automóvil para bebé
se puede colocar en el armazón
del cochecito orientado hacia
atrás y hacia adelante.
1. Infant car seat can be inserted in
stroller frame rear and forward
facing.
2. Ponga el asiento para automóvil
en el cochecito y empuje el
asiento para automóvil hacia
abajo hasta que se trabe en los
soportes Click Connect™.
2. Insert car seat into stroller and
push down on car seat until the
latches snap into the Click
Connect™ mounts.
Mount
Soporte
Page 41

41
3. VERIFIQUE que el asiento de
automóvil para bebé esté
debidamente instalado tratando
de tirarlo para arriba.
3. CHECK that infant car seat is
securely attached by pulling up
on it.
4. Para sacar el asiento de
automóvil: apriete la manija de
liberación de atrás del asiento de
automóvil y levante el asiento de
automóvil fuera del cochecito.
4. To remove car seat: squeeze
release handle at back of car
seat, and lift car seat out of the
stroller.
Page 42

42
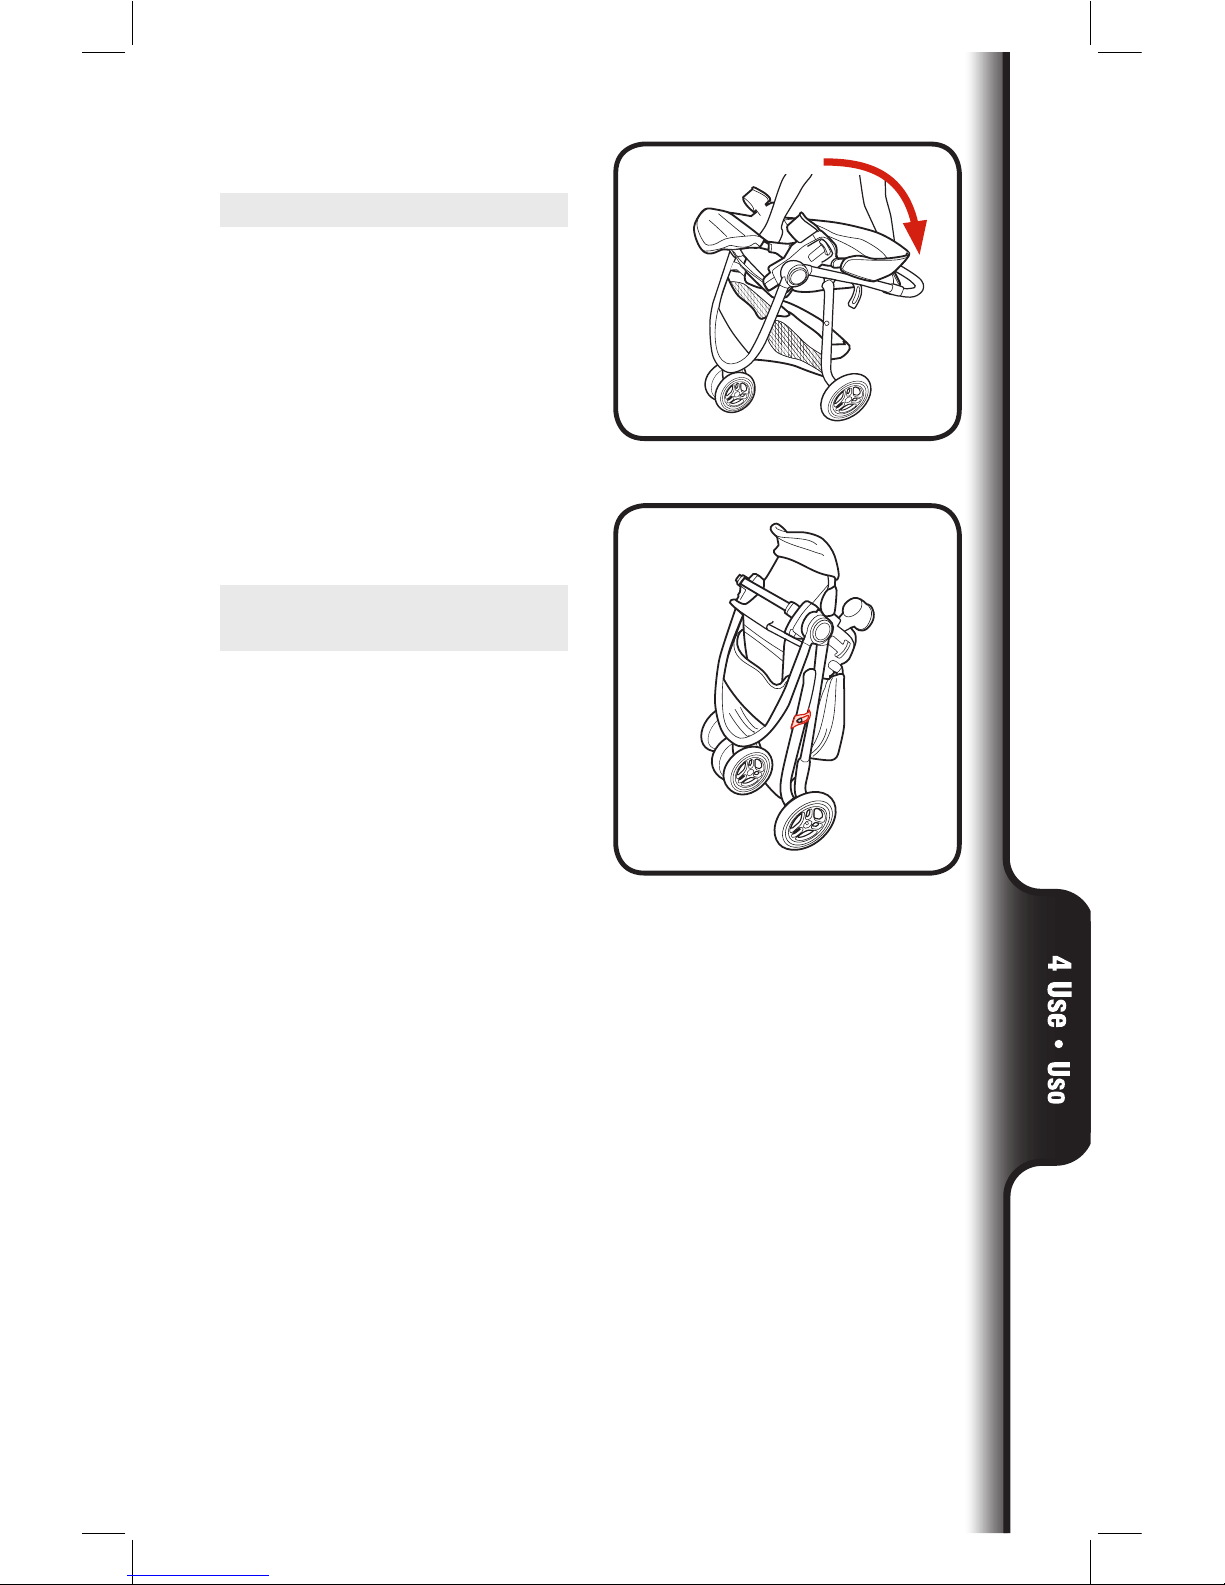
4-K To Fold Stroller Frame without Toddler
seat • Cómo plegar el armazón del
cochecito sin el asiento para niño pequeño
1. Antes de plegar el cochecito:
(a) saque el asiento de automóvil
para bebé si está en uso
(b) trabe los frenos
1. Before folding stroller:
(a) remove infant carseat if in use
(b) lock brakes
2. Tire hacia arriba de la correa de
liberación.
2. Pull up on release strap.
SNAP!
¡CRAC!
Page 43

43
3. Gire la manija hacia abajo.
3. Rotate handle down.
4. VERIFIQUE que la traba de
almacenamiento esté segura.
4. CHECK that the storage latch is
secure.
Page 44
44
4-L To Fold Stroller with Toddler seat
attached • Cómo plegar el cochecito con
el asiento para niño pequeño sujetado
1. Antes de plegar el cochecito:
(a) saque el asiento de automóvil
para bebé si está en uso
(b) trabe los frenos
1. Before folding stroller:
(a) remove infant carseat if in use
(b) lock brakes
2. Tire la correa de plegar que se
encuentra debajo del bolsillo del
asiento. Si el soporte del cuerpo
está instalado: a) desconecte la
cinta de gancho y bucle, b) por la
abertura del soporte del cuerpo,
tire la correa de pliegue que está
debajo del bolsillo del asiento.
2. Pull fold strap located under the
pocket in the seat.
If body support is attached:
(a) disconnect hook and loop
tape, (b) reach through the
opening in body support, and pull
fold strap located under the
pocket in seat.
SNAP!
¡CRAC!
Page 45
45
3. Gire la manija hacia abajo.
3. Rotate handle down.
4. VERIFIQUE que la traba de
almacenamiento esté segura.
4. CHECK that the storage latch is
secure.
Page 46

46
2X
Fundas del arnés
Harness covers
4-M Body Support (on certain models)
• Soporte del cuerpo (en ciertos modelos)
4-N Harness Covers • Fundas del arnés
1. Para sujetar las fundas del arnés,
sujete la cinta de gancho y bucle.
1. To attach harness covers, fasten
hook and loop tape.
1. Pase las correas del arnés por las
aberturas en el soporte del
cuerpo como se indica.
1. Insert harness straps through
openings in body support as
shown.
Page 47

47
5-A Care & Maintenance • Cuidado y
mantenimiento
• TO CLEAN SEAT COVER, refer to your care tag on your seat pad for
washing instructions. NO BLEACH.
• TO CLEAN STROLLER FRAME, use only household soap and warm
water. NO BLEACH or detergent.
• FROM TIME TO TIME CHECK YOUR STROLLER for loose screws, worn
parts, torn material or stitching. Replace or repair the parts as needed.
Use only Graco replacement parts.
• EXCESSIVE EXPOSURE TO SUN OR HEAT could cause fading or
warping of parts.
• IF STROLLER BECOMES WET, open canopy and allow to dry thoroughly
before storing.
• IF WHEEL SQUEAKS, use a light oil (e.g., WD-40, 3-in-1, or
sewing machine oil). It is important to get the oil into the axle
and wheel assembly as illustrated.
• WHEN USING YOUR STROLLER AT THE BEACH completely clean your
stroller afterward to remove sand and salt from mechanisms and wheel
assemblies.
• PARA LIMPIAR LA FUNDA DEL ASIENTO, consulte la etiqueta de cuidado
de la almohadilla del asiento para obtener las instrucciones para el lavado.
NO USE BLANQUEADOR.
• PARA LIMPIAR EL ARMAZÓN DEL COCHECITO, usar solamente jabón
de uso doméstico y agua tibia. NO USE CLORO o detergente.
• DE VEZ EN CUANDO, INSPECCIONE EL COCHECITO para
determinar si hay tornillos flojos, piezas gastadas, material o costuras
rotas. Cambie o repare las piezas según sea necesario. Use solamente
repuestos marca Graco.
• EL CONTACTO EXCESIVO CON EL SOL o el calor podría causar que se
destiña o se tuerzan algunas piezas.
• SI EL COCHECITO SE MOJA, abra la capota y déjelo secar
completamente antes de guardarlo.
• SI LAS RUEDAS HACEN RUIDO, use un aceite liviano (por ej.,
WD-40, 3-en-1, o aceite para máquinas de coser). Es
importante hacer penetrar el aceite en el eje y equipo de la
rueda como se ilustra.
• CUANDO USA EL COCHECITO EN LA PLAYA, limpie el
cochecito completamente después para sacar la arena y la sal de los
mecanismos y equipos de las ruedas.
Page 48

5
Care •Cuidado
a
a
r
r
C
C
u
u
d
d
o
o
48
In
5-B Replacement Parts • Warranty Information (USA)
Piezas de repuesto • Información sobre la garantía (EE.UU.)
www.gracobaby.com
or/ó
1-800-345-4109
5-C Product Registration (USA)
Registro del producto (EE.UU.)
To purchase parts or accessories or for warranty information
in the United States, please
contact us at the following:
Para comprar piezas o accesorios o
para obtener información sobre la
garantía en los Estados Unidos, por
favor comuníquese con nosotros en:
To register your Graco product from within the U.S.A. visit us
online at www.gracobaby.com/productregistration or return registration card
provided with your product. We currently do not accept product
registrations from those living outside the United States of America.
Para registrar su producto Graco desde dentro de los EE.UU., visítenos en línea
en www.gracobaby.com/productregistration o envíe la tarjeta de registro
provista con su producto. Actualmente no aceptamos
registros de los productos de quienes viven fuera de los Estados
Unidos de América.
 Loading...