

Page 1
5
Submerge Suction
Tube into paint. Turn
Power Switch ON and
watch for paint to come
out of the Drain Tube. Turn
Power Switch OFF.
4
Allow fluid to flow up
the Suction Tube and
out of Drain Tube for 30-60
seconds. Turn Power
Switch OFF.
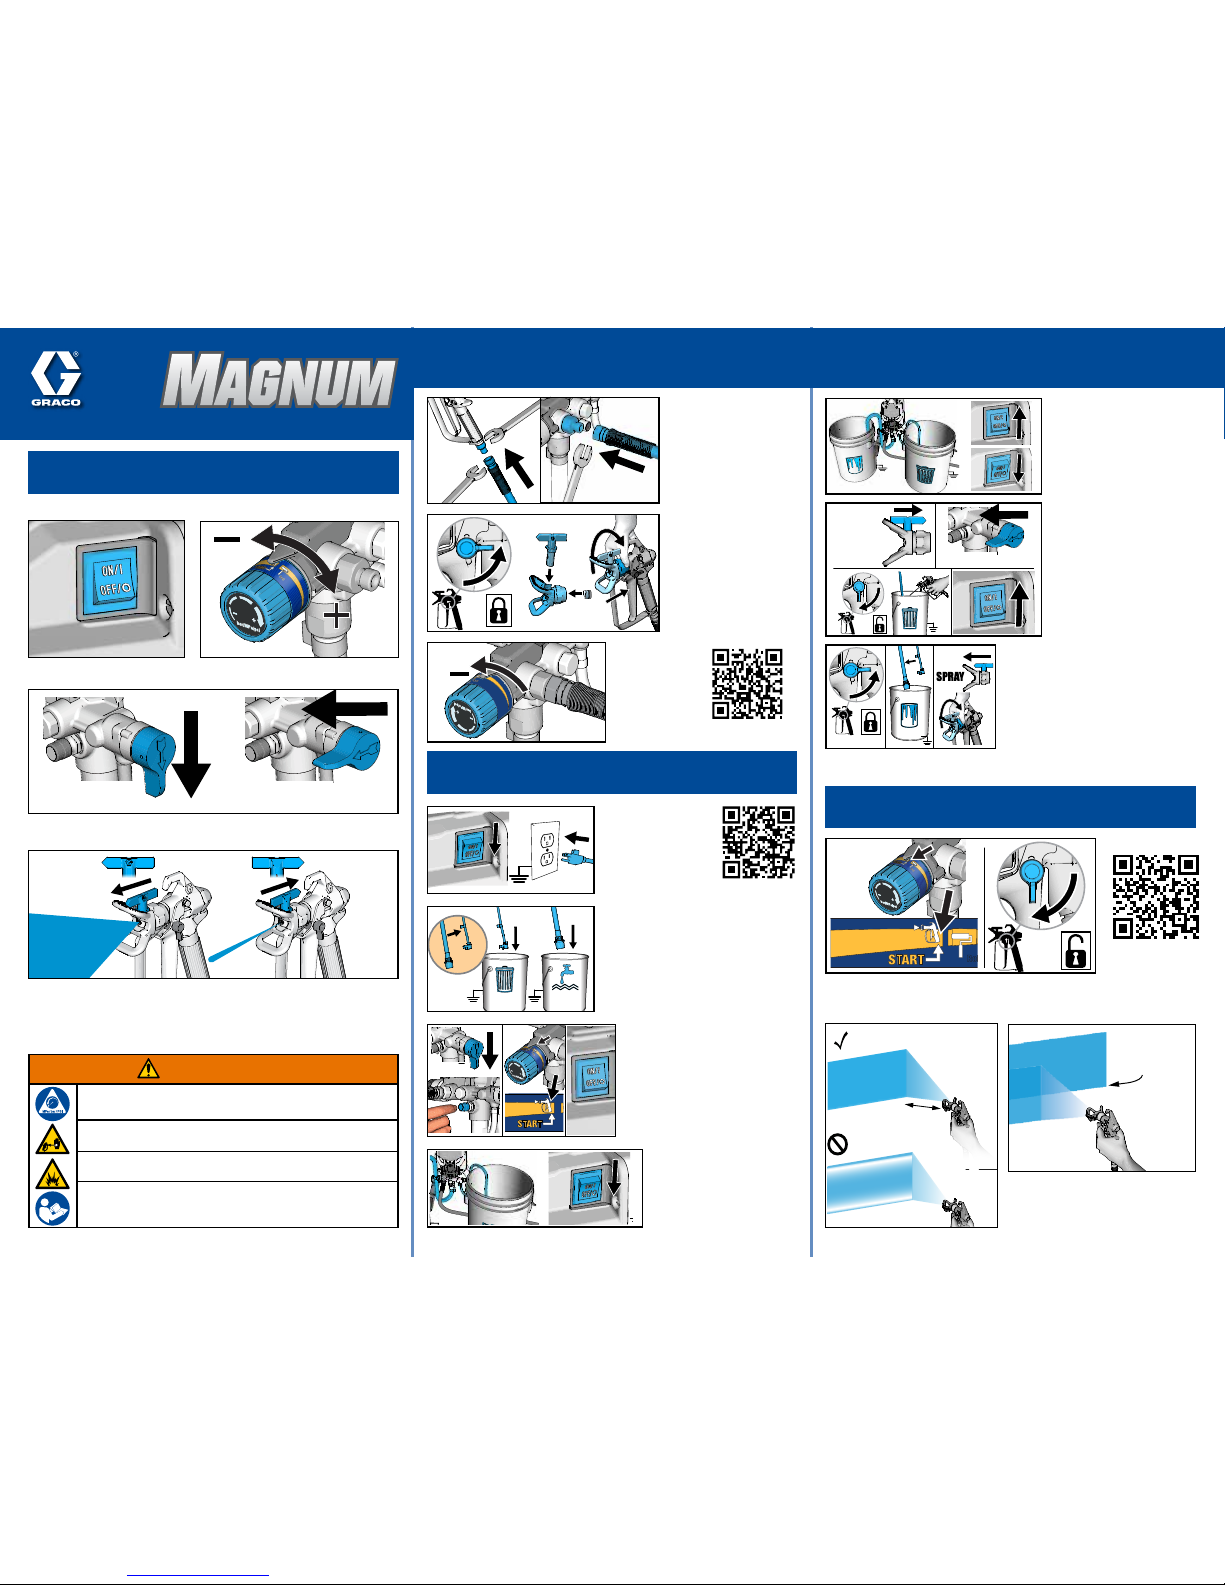
SET UP
START UP
SPRAYING
PRO QUICK GUIDE
KNOW YOUR CONTROLS
Power
Pressure
PRIME
SPRAY
Prime/Spray
SPRAY
UNCLOG
Spray Tip
1
Turn Power
Switch OFF and
plug sprayer into a
grounded outlet.
2
Separate Drain Tube (smaller)
from Suction Tube (larger). Place
Drain Tube in a waste pail. Submerge
Suction Tube into pail filled with water
for water-based material, or mineral
spirits if spraying oil-based material.
3
Turn the Prime/Spray Valve
to the PRIME position. Press
the PushPrime
™
button twice
to loosen inlet valve ball. Turn
Pressure Control Knob to START
position. Turn Power Switch ON.
PRIME
7
When paint comes out of gun,
release trigger. Engage Trigger
Lock. Transfer Drain Tube to paint pail
and attach to Suction Tube. Rotate
Spray Tip back to SPRAY position
and ensure Spray Tip Guard is tight.
1
Turn Pressure Control Knob to the START
position. Disengage the Trigger Lock.
2
Increase Pressure Control Knob
if needed until spray is even and
without gaps at edges.
6
Rotate Spray Tip to
UNCLOG Position.
Disengage Trigger Lock.
Point gun into waste pail,
pull and hold trigger. Turn
the Prime/Spray Valve to
SPRAY position and turn
Power Switch ON.
Aim Gun here
to overlap
stroke by 50%
Release trigger
before end
of stroke.
Pull trigger
after
starting stroke.
Good Spray Pattern
Pressure
too low
Tip Wear
TAILS - Gaps at edges
12 in. (30 cm)
from surface
SPRAY
UNGLOG
Roll
Read Owner’s Manual for complete instructions and warnings. This
quick guide is not a substitute for reading and understanding all
instruction manuals and warning labels supplied with the equipment. Manuals are available at magnum.graco.com
START UP
WARNING
READ AND UNDERSTAND ALL LABELS AND INSTRUCTION
MANUALS BEFORE USE.
FAILURE TO FOLLOW ALL WARNINGS
CAN RESULT IN SERIOUS INJURY, AMPUTATION, OR DEATH.
Follow pressure relief procedure and wear protective
equipment including but not limited to protective eye wear.
SKIN INJECTION HAZARD: Keep clear of spray tip and leaks.
Engage trigger lock when not spraying.
FIRE AND EXPLOSION HAZARD:
Follow fire and explosion warnings as listed in your manual.
magnum.graco.com/quickstart
magnum.graco.com/
howtospray
3
Turn the
Pressure
Control Knob
to the lowest
setting.
2
Engage Trigger Lock.
Assure Spray Tip is
properly inserted into
the Spray Tip Guard,
and the Spray Tip Guard
assembly is tightened
securely to gun.
1
If needed, connect
hose to gun. Remove
red cap, then connect
hose to sprayer. Tighten
securely.
magnum.graco.com/quickassembly
YOU ARE NOW READY TO SPRAY!
Page 2
REVERSIBLE
SPRAY TIPS
STORAGE/PRIMING TOOL
Not available with all models, see Owner’s Manual.
Your sprayer is shipped with a Spray Tip to spray paint. If
you are spraying stain see the store associate to purchase a
smaller Spray Tip size.
If your sprayer stops spraying, you most likely have a Spray
Tip clog. Engage Trigger Lock and reverse the Spray Tip to
the UNCLOG position. Disengage Trigger Lock and spray into
a waste area to remove the clog. Engage Trigger Lock and
return the Spray Tip to SPRAY position. See Owner’s Manual
for more information.
Use the Storage/Priming Tool if you are
experiencing difficulty priming your sprayer.
QUESTIONS?
888- 541-9788
magnum.graco.com/aplus
1
Turn Power Switch OFF.
Place Suction and Drain
Tubes in waste pail. Turn
Prime/Spray Valve to PRIME.
Turn Pressure Control Knob
to START position. Trigger
gun into a waste pail.
2
Engage Trigger Lock.
Remove Spray Tip Guard
assembly from gun and
place in waste pail.
3
Screw Power Flush™ Valve (included
with sprayer) to a garden hose. Turn
on water. Open Power Flush Valve.
Rinse paint off Suction and Drain Tubes,
inlet screen and Spray Tip and Spray
Tip Guard. Close Power Flush Valve.
4
Unscrew inlet screen and
place in waste pail. Thread
Power Flush Valve to Suction Tube.
Open Power Flush Valve. Turn
Power Switch ON and let water run
through Drain Tube for 20 seconds.
Turn Power Switch OFF.
5
To save paint in hose,
disengage Trigger Lock and
trigger gun into paint pail, turn
Prime/Spray Valve to SPRAY and
turn Power Switch ON. When
water comes out of gun, keep
gun triggered and aim into waste
pail. Continue to flush until water
runs clear.
6
Turn Pressure
Control Knob to
lowest setting and
release trigger. Engage
Trigger Lock. Turn the
Prime/Spray Valve to
PRIME and turn Power
Switch OFF.
7
Clean Spray Tip, Spray Tip
Guard and inlet screen with
brush. Remove gun filter and
clean. Reassemble gun filter,
Spray Tip and Spray Tip guard.
20s
SPRAY
1
Remove Pump
Armor
™
bottle cap
and foil seal. If needed,
unscrew inlet screen
from Suction Tube.
2
Turn Prime/Spray Valve
to PRIME. Place Drain Tube
in waste pail. Turn Pressure
Control Knob to START position.
3
While holding the Suction
Tube above the sprayer,
pour approximately 2 ounces
(60 ml) of Pump Armor into the
Suction Tube and turn
Power Switch ON.
4
When Pump Armor is flushed
through the sprayer, turn
Power Switch OFF. Replace
and tighten child-proof cap
for storage.
5
Screw inlet screen back
to Suction Tube. Ensure
that spray gun and hose
stay attached to sprayer.
6
Turn the Spray/Prime
valve to SPRAY position
for storage. Turn Power
Switch OFF and unplug
sprayer from outlet.
3A5510 Revision A, January 2018, Original Instructions. This Quick Guide contains English.
Source Manuals: 3A5507, MM 3A5510. Copyright 2018
PRIME
SPRAY
CLEANUP
Garden hose cleanup for water-based paints only.
See Owners Manual for pail cleanup or oil-based materials.
STORAGE
Perform CLEANUP before STORAGE.
Storage/Priming Tool not available with all models, see Owner’s Manual.
CLEANUPcontinued
See your Storage/Priming
Tool Instruction Guide for
information on how to use
the Priming/Storage Tool.
PRIME
SPRAY
UNCLOG
magnum.graco.com/rac
magnum.graco.com/quickcleanup
 Loading...