

Graco GH 130, GH 200, GH 230, GH 300, dutymax gh 230 Repair Manual
...
334654B
EN
Repair
GH™130/200/230/300 and
DutyMax GH/EH™230/300 Displacement Pump
For professional use only.
Not approved for use in explosive atmosphere or hazardous locations.
For portable airless spraying of architectural paints and coatings.
Models: 24B748, 24W995, 24W996, 24W997, 24W998, 24W999, 24X001
Important Safety Instructions
Read all warnings and instructions in this manual and related manuals.
Be familiar with the controls and the proper usage of the equipment.
Save these instructions.
Use only genuine Graco replacement parts.
The use of non-Graco replacement parts may void warranty.
24X00124W999
24W996
24W998
ti25242a
24B748
24W997
24W995

Table of Contents
2 334654B
Table of Contents
Warnings . . . . . . . . . . . . . . . . . . . . . . . . . . . . . . . . . . . . . . . . . . . 3
Repair . . . . . . . . . . . . . . . . . . . . . . . . . . . . . . . . . . . . . . . . . . . . . . 4
Trigger Lock . . . . . . . . . . . . . . . . . . . . . . . . . . . . . . . . . . . . . . 4
Pressure Relief Procedure . . . . . . . . . . . . . . . . . . . . . . . . . . . 4
Disassemble Pump . . . . . . . . . . . . . . . . . . . . . . . . . . . . . . . . . 6
Assemble Pump . . . . . . . . . . . . . . . . . . . . . . . . . . . . . . . . . . . 9
Notes . . . . . . . . . . . . . . . . . . . . . . . . . . . . . . . . . . . . . . . . . . . . . 13
Parts . . . . . . . . . . . . . . . . . . . . . . . . . . . . . . . . . . . . . . . . . . . . . . 14
Pump 24B748 . . . . . . . . . . . . . . . . . . . . . . . . . . . . . . . . . . . . 14
Parts List . . . . . . . . . . . . . . . . . . . . . . . . . . . . . . . . . . . . . . . . 15
Parts . . . . . . . . . . . . . . . . . . . . . . . . . . . . . . . . . . . . . . . . . . . . . . 16
Pump 24W995 . . . . . . . . . . . . . . . . . . . . . . . . . . . . . . . . . . . 16
Parts List . . . . . . . . . . . . . . . . . . . . . . . . . . . . . . . . . . . . . . . . 17
Parts . . . . . . . . . . . . . . . . . . . . . . . . . . . . . . . . . . . . . . . . . . . . . . 18
Pump 24W996 . . . . . . . . . . . . . . . . . . . . . . . . . . . . . . . . . . . 18
Parts List . . . . . . . . . . . . . . . . . . . . . . . . . . . . . . . . . . . . . . . . 19
Parts . . . . . . . . . . . . . . . . . . . . . . . . . . . . . . . . . . . . . . . . . . . . . . 20
Pump 24W997 . . . . . . . . . . . . . . . . . . . . . . . . . . . . . . . . . . . 20
Parts List . . . . . . . . . . . . . . . . . . . . . . . . . . . . . . . . . . . . . . . . 21
Parts . . . . . . . . . . . . . . . . . . . . . . . . . . . . . . . . . . . . . . . . . . . . . . 22
Pump 24W998 . . . . . . . . . . . . . . . . . . . . . . . . . . . . . . . . . . . 22
Parts List . . . . . . . . . . . . . . . . . . . . . . . . . . . . . . . . . . . . . . . . 23
Parts . . . . . . . . . . . . . . . . . . . . . . . . . . . . . . . . . . . . . . . . . . . . . . 24
Pump 24W999 . . . . . . . . . . . . . . . . . . . . . . . . . . . . . . . . . . . 24
Parts List . . . . . . . . . . . . . . . . . . . . . . . . . . . . . . . . . . . . . . . . 25
Parts . . . . . . . . . . . . . . . . . . . . . . . . . . . . . . . . . . . . . . . . . . . . . . 26
Pump 24X001 . . . . . . . . . . . . . . . . . . . . . . . . . . . . . . . . . . . . 26
Parts List . . . . . . . . . . . . . . . . . . . . . . . . . . . . . . . . . . . . . . . . 27
Technical Specifications . . . . . . . . . . . . . . . . . . . . . . . . . . . . . 28
Graco Standard Warranty . . . . . . . . . . . . . . . . . . . . . . . . . . . . . 29
Graco Information . . . . . . . . . . . . . . . . . . . . . . . . . . . . . . . . . . . 30
Warnings
334654B 3
Warnings
The following warnings are for the setup, use, grounding, maintenance, and repair of this
equipment. The exclamation point symbol alerts you to a general warning and the hazard
symbols refer to procedure-specific risks. When these symbols appear in the body of this
manual or on warning labels, refer back to these Warnings. Product-specific hazard symbols
and warnings not covered in this section may appear throughout the body of this manua l
where applicable.
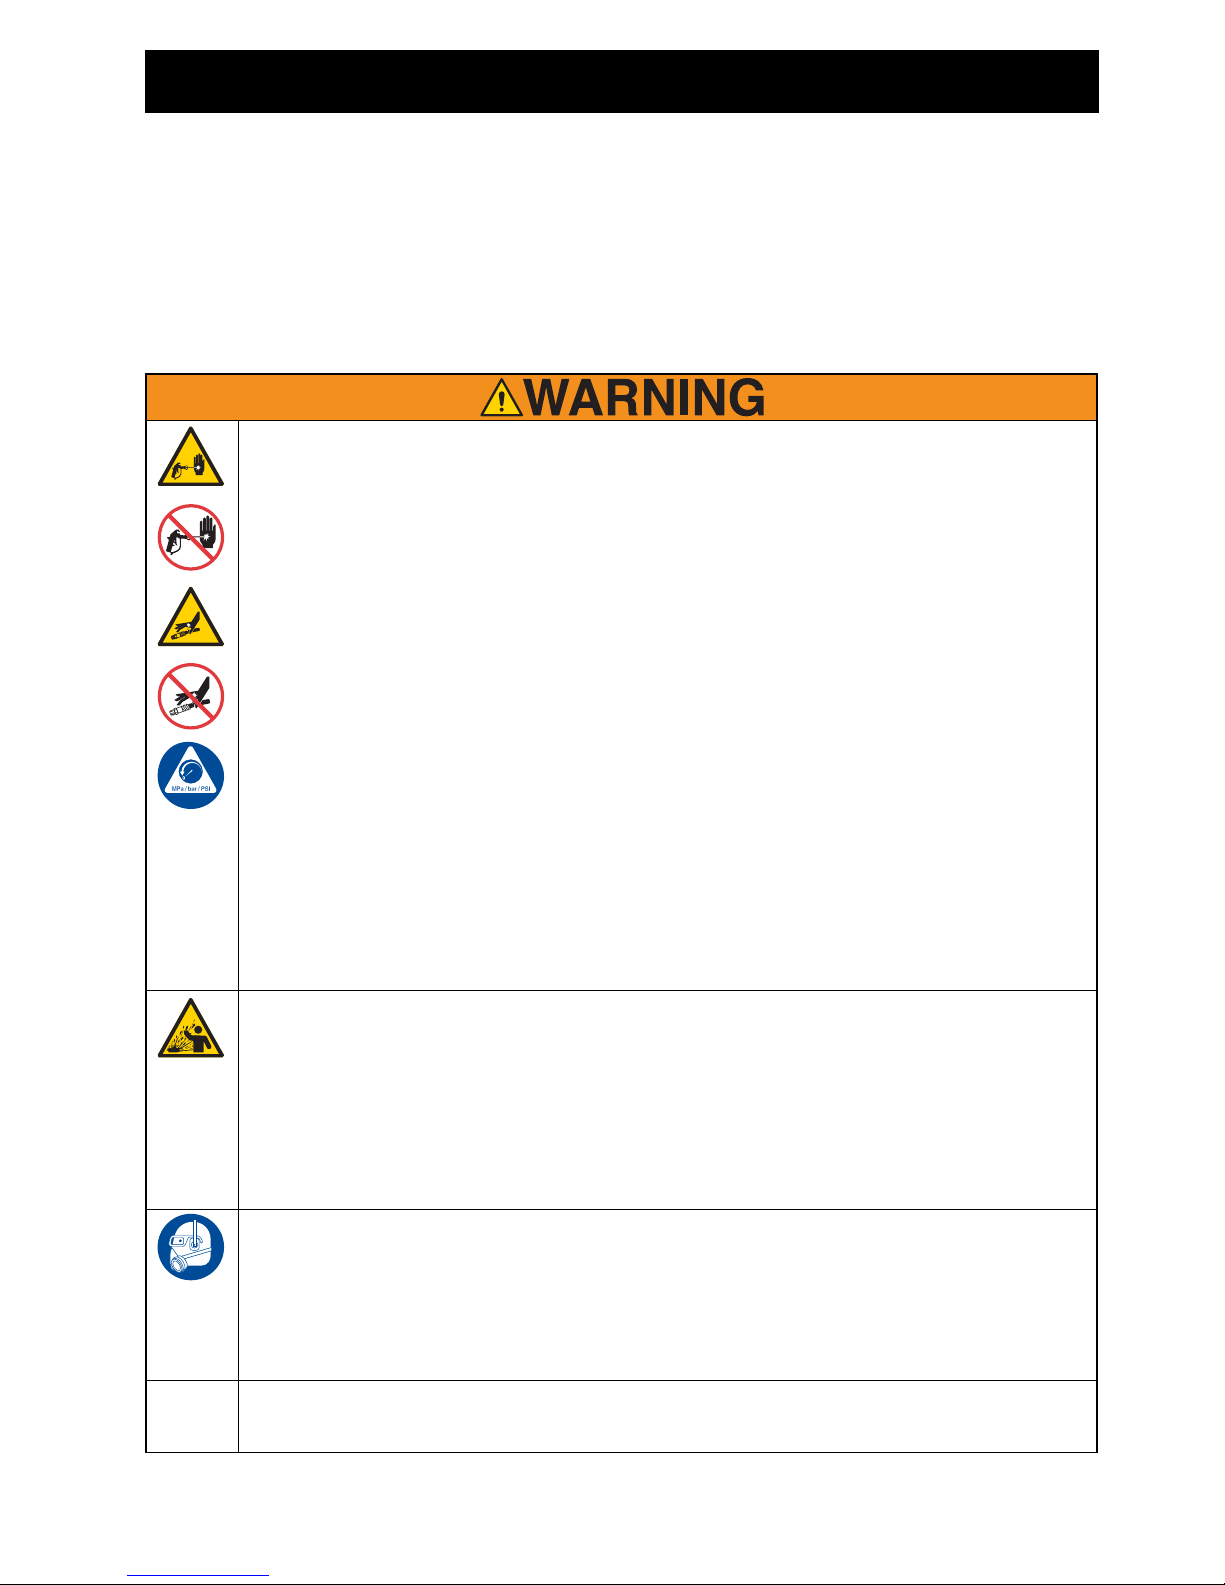
SKIN INJECTION HAZ ARD
High-pressure spray is able to inject toxins into the body and cause serious bodily injury. In the
event that injection occurs, get immediate surgical treatment.
• Do not aim the gun at, or spray any person or animal.
• Keep hands and other body parts away from the discharge. For example, do not try to stop
leaks with any part of the body.
• Always use the nozzle tip guard. Do not spray without nozzle tip guard in place.
• Use Graco nozzle tips.
• Use caution when cleaning and changing nozzle tips. In the case where the nozzle tip clogs
while spraying, follow the Pressure Relief Procedure for turning off the unit and relieving
the pressure before removing the nozzle tip to clean.
• Equipment maintains pressure after power is shut off. Do not leave the equipment
energized or under pressure while unattended. Follow the Pressure Relief Procedure
when the equipment is unattended or not in use, and before servicing, cleaning, or
removing parts.
• Check hoses and parts for signs of damage. Replace any damaged hoses or parts.
• This system is capable of producing 3300 psi. Use Graco replacement parts or accessories
that are rated a minimum of 3300 psi.
• Always engage the trigger lock when not spraying. Verify the trigger lock is functioning
properly.
• Verify that all connections are secure before operating the unit.
• Know how to stop the unit and bleed pressure quickly. Be thoroughly familiar with the
controls.
PRESSURIZED ALUMINUM PARTS HAZARD
Use of fluids that are incompatible with aluminum in pressurized equipment can cause serious
chemical reaction and equipment rupture. Failure to follow this warning can result in death,
serious injury, or property damage.
• Do not use 1,1,1-trichloroethane, methylene chloride, other halogenated hydrocarbon
solvents or fluids containing such solvents.
• Do not use chlorine bleach.
• Many other fluids may contain chemicals that can react with aluminum. Contact your
material supplier for compatibility.
PERSONAL PROTECTIVE EQUIPMENT
Wear appropriate protective equipment when in the work area to help prevent serious injury,
including eye injury, hearing loss, inhalation of toxic fumes, and burns. This protective
equipment includes but is not limited to:
• Protective eye wear, and hearing protection.
• Respirators, protective clothing, and gloves as recommended by the fluid and solvent
manufacturer.
CALIFORNIA PROPOSITION 65
This product contains a chemical known to the State of California to cause cancer, birth defects
or other reproductive harm. Wash hands after handling.

Repair
4 334654B
Repair
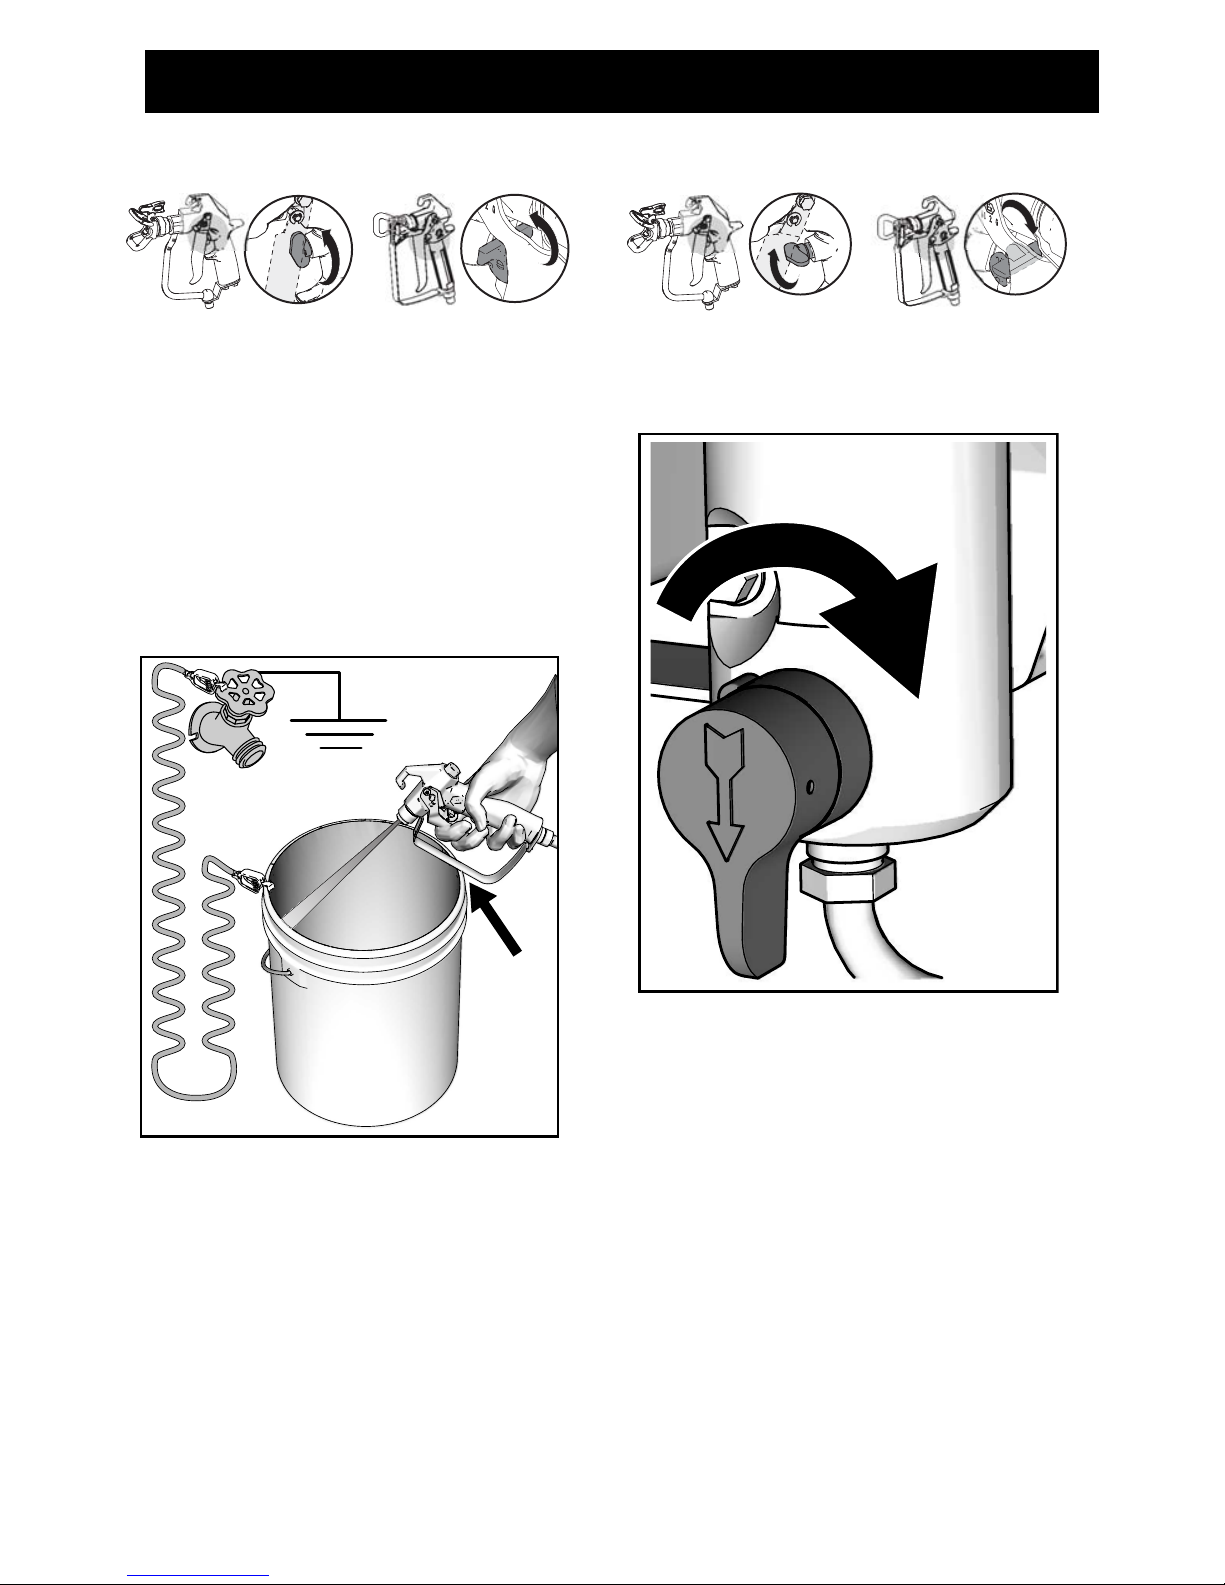
Trigger Lock
Always engage the trigger lock when sprayer
is stopped to prevent the gun from being
triggered accidentally by hand or if droppe d
or bumped.
Pressure Relief Procedure
1. Engage trigger lock.
2. If applicable, turn electric motor ON/OFF
switch to OFF position. Wait 7 seconds
for power to dissipate.
3. Unplug power cord or shut engine off.
This equipment stays pressurized until
pressure is manually relieved. To help
prevent serious injury from pressurized
fluid, such as skin injection, splashed fluid
and moving parts, follow the Pressure
Relief Procedure whenever sprayer is
stopped and before sprayer is cleaned or
checked, and before equipment is
serviced.
ti24612a
ti24851a
OI
I
O
t
ti24853a
ti18812a
ti7529a
Repair
334654B 5
4. Disengage trigger lock.
5. Hold a metal part of the gun firmly to a
grounded metal pail. Trigger the gun to
relieve pressure.
Solvent and oil-based fluids: follow
local code. Use only conductive metal
pails, placed on a grounded surface
such as concrete.
Do not place pail on a non-conductive
surface such as paper or cardboard
which interrupts grounding continuity.
6. Engage trigger lock.
7. Open any fluid drain valves in system.
Leave drain valves open until ready to
spray again.
ti22700a
ti24608a
ti24585a

Repair
6 334654B
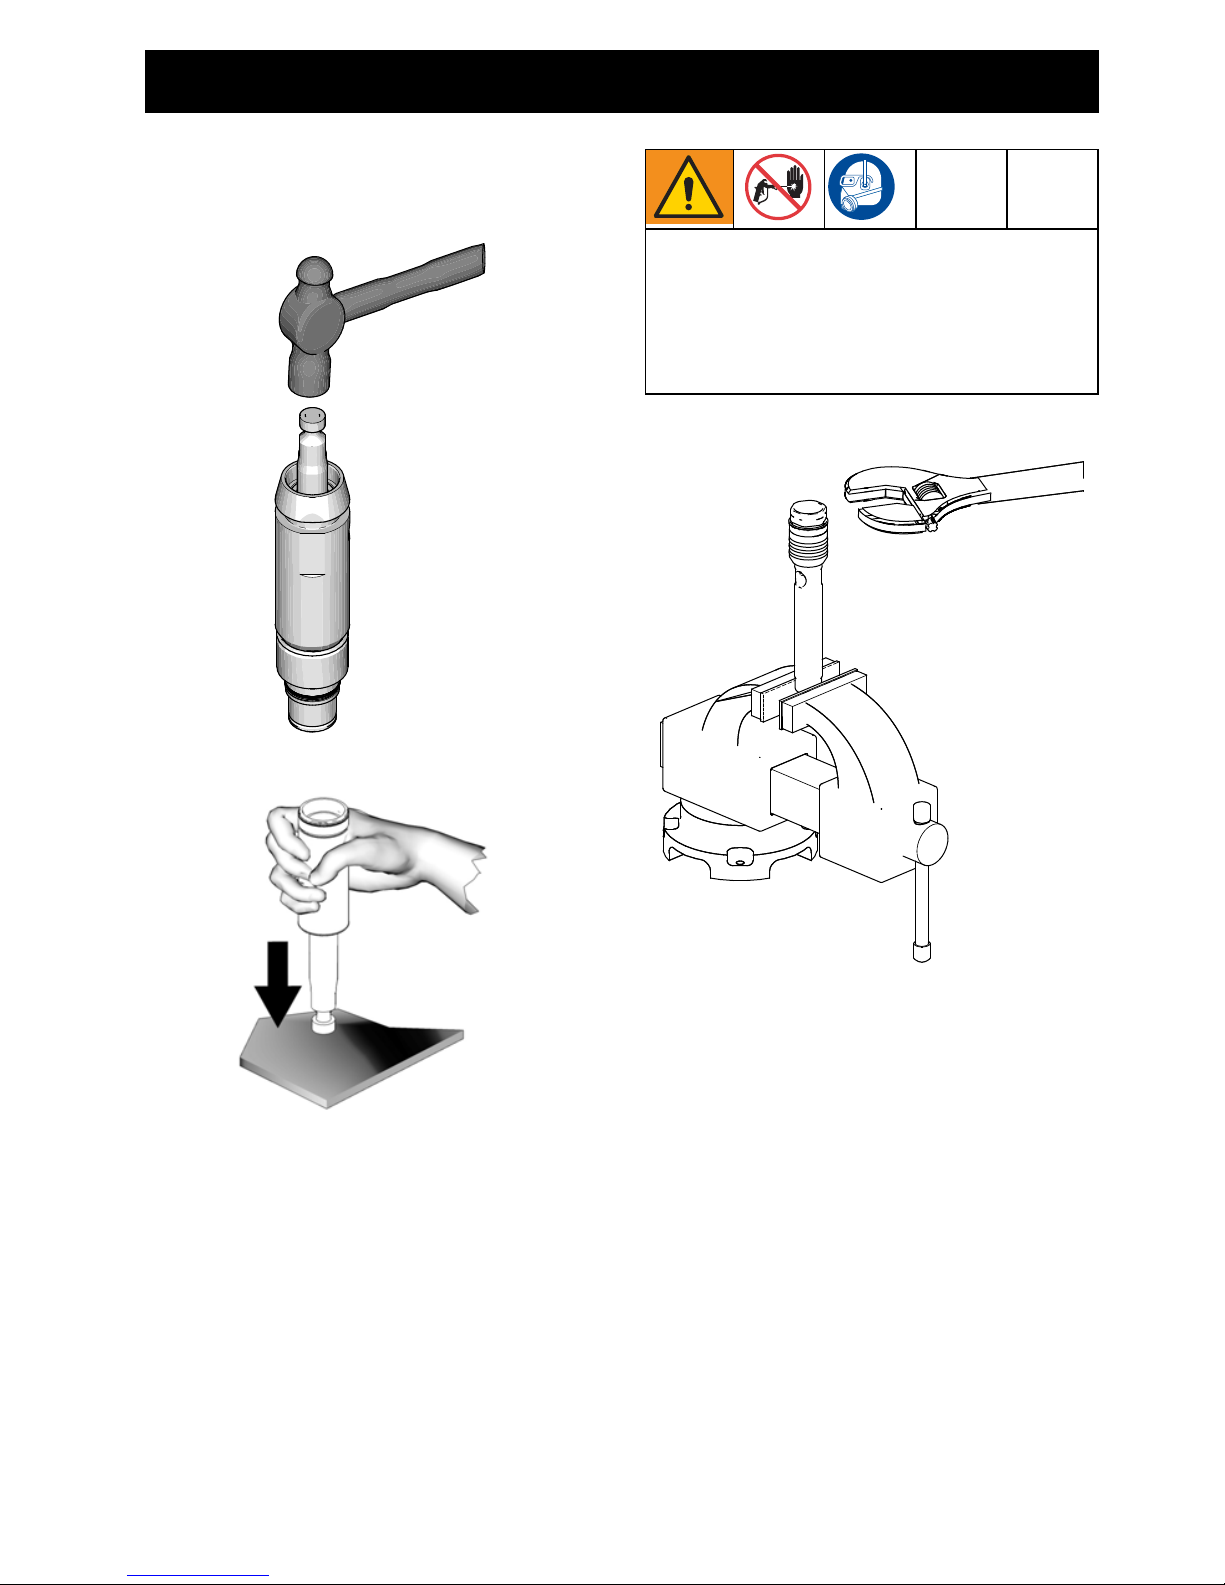
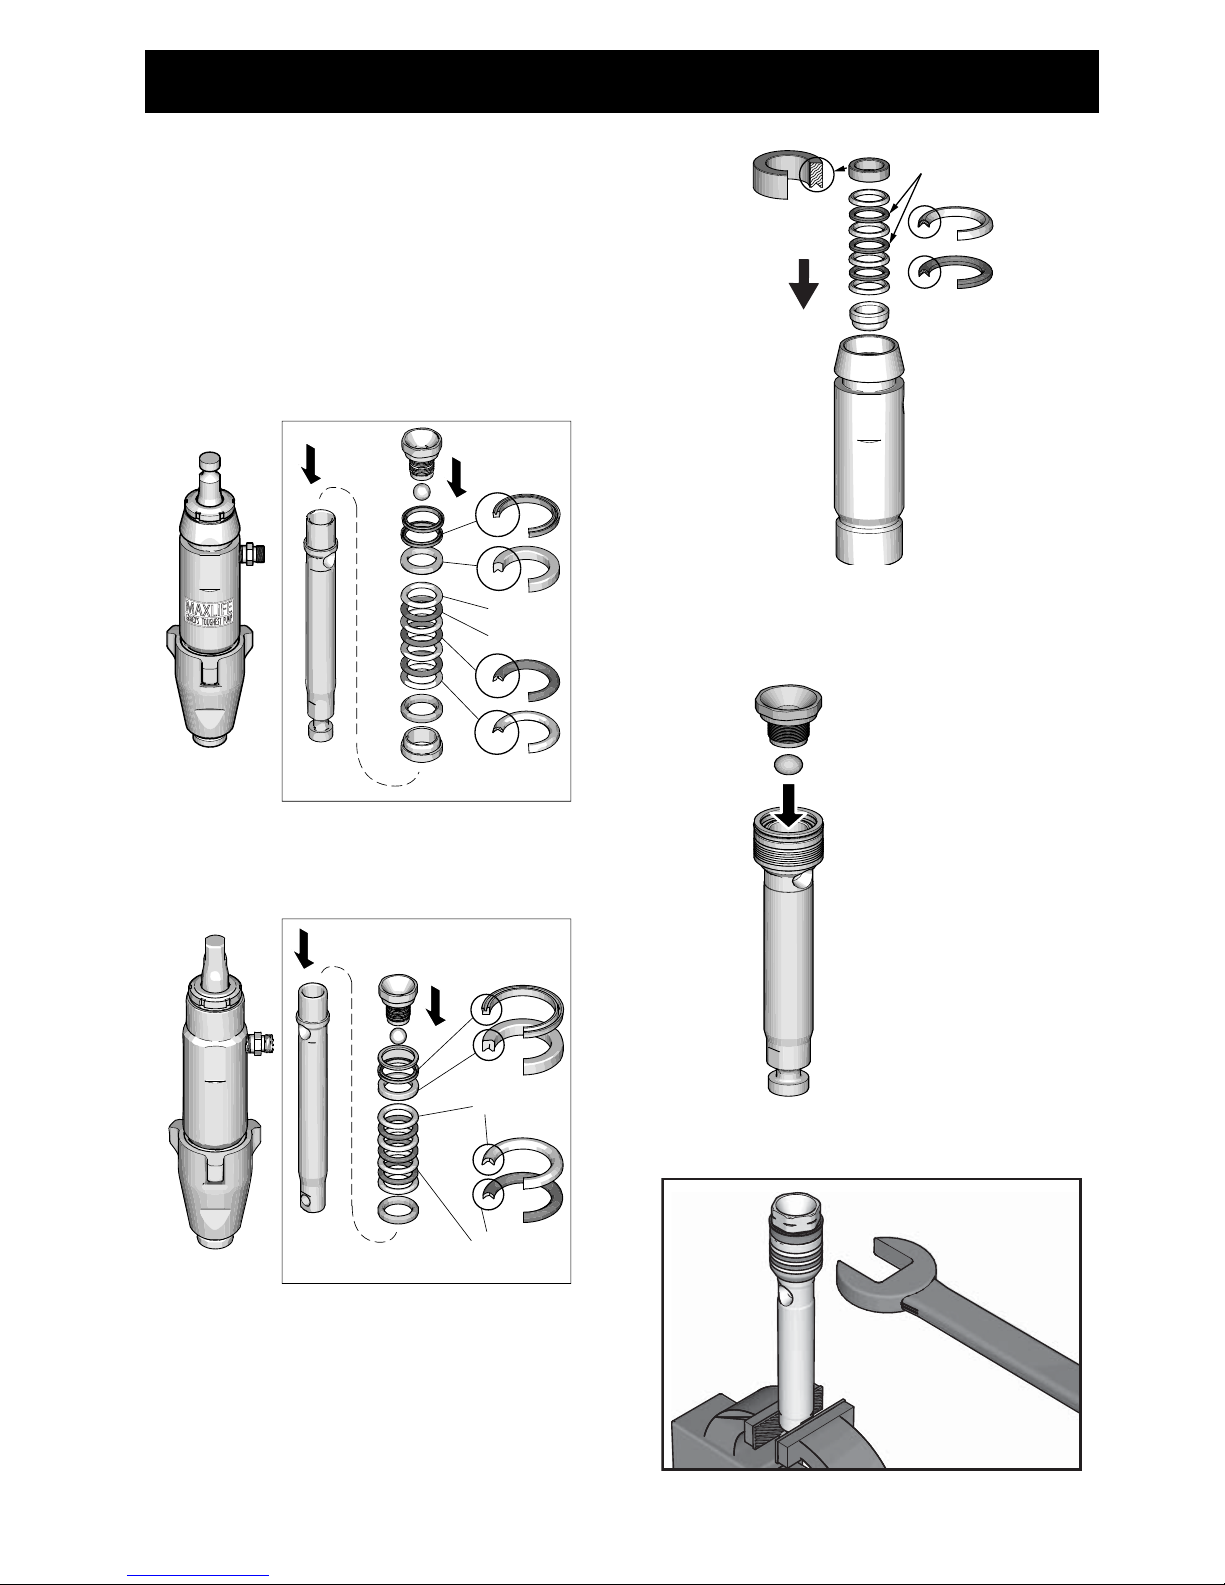
Disassemble Pump
1. Remove packing nut and throat
adjustment spacer.
2. Unscrew cylinder from intake valve.
3. Disassemble intake valve. Clean and
inspect. O-ring may require a pick for
removal.
ti25168a
ti25169a
NOTICE
If using a pick to remove the O-ring use care
to avoid damage to the machined surfaces.
ti25170a
Repair
334654B 7
4. Tap piston rod out of cylinder with a
hammer or flip over and tap piston rod
out against a bench.
5. Remove piston rod from sleeve.
6. Unscrew piston valve from piston rod.
ti25171a
ti8849a
Do not clean or wipe the piston valve
threads. Cleaning the piston valve threads
could destroy the special sealing patch and
cause the piston valve to come loose
during operation, causing a pump burst
and possible serious bodily injury.
Repair
8 334654B
7. Clean and inspect parts. (The piston has
a special thread locking/sealing patch.
Do not remove the patch. The patch
allows for disassembly/assembly
procedures before it is necessary to
apply thread sealant to the threads. On
fifth assembly apply thread sealant to
threads.
8. Remove and discard throat packing and
glands from the cylinder.
ti25172a
ti25173a
Repair
334654B 9
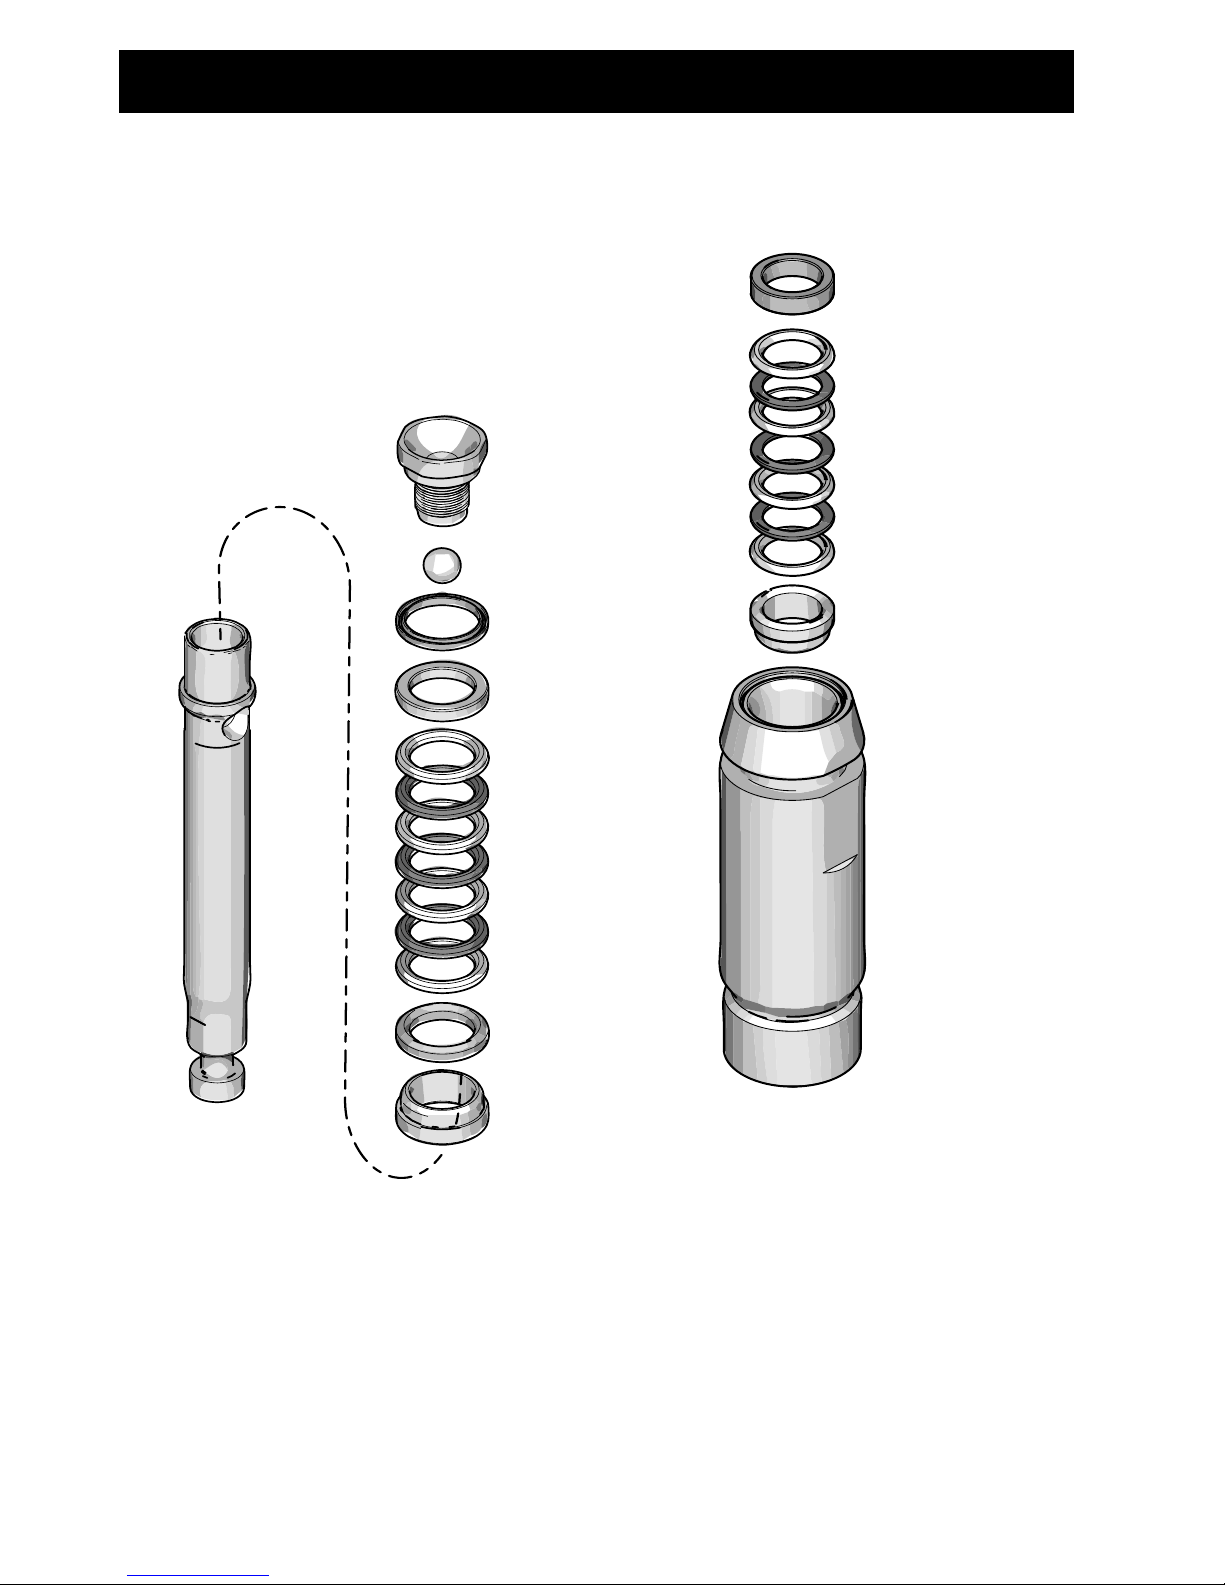
Assemble Pump
1. If applicable, soak leather packings in
SAE 30W oil for one hour before
assembly.
2. Install ball in piston rod. Apply thread
sealant to piston valve threads; ensure
that none gets on the ball.
3. Torque to 55 ± 3 ft-lb (75 ± 4 N•m).
Leather
Packings
Blue
Brown
Blue
ti25174a
Leather
Packings
ti25175a
ti25176a
ti24892a
 Loading...