


GDI-IRC7500
Table of contents
 Loading...
Encore
By Grace Digital
User’s Guide Model No.: GDI-IRC7500
____________________________________________________________


2
User’s Guide Table of Contents
IMPORTANT Safety Instructions and Warnings ............................................................................... 4
QUICKSTART Guide ........................................................................................................................ 7
What you need before you can use your Internet radio ............................................................... 7
Contents (In the box) .................................................................................................................... 11
Radio connections, controls & remote control functions ............................................................. 12
Displays icons .............................................................................................................................. 15
Steps to Connect Your Radio to Your Wireless Network .................................................................. 16
Step 1 - Power up the radio .................................................................................................... 16
Step 2 - Connect to the wireless network ................................................................................ 17
Choosing a radio station to listen to ............................................................................................. 19
Playing a Pandora radio station ................................................................................................... 21
Changing the volume ................................................................................................................... 21
Storing a radio station in a preset................................................................................................. 22
Playing a preset radio station ....................................................................................................... 22
Requesting a station that is currently unavailable ........................................................................ 23
Stations which allow you to choose what you listen to ................................................................. 24
Setting the clock ........................................................................................................................... 25
Setting the alarm .......................................................................................................................... 27
Adjusting the Snooze Time .......................................................................................................... 32
Setting the sleep timer ................................................................................................................. 34
Registering your radio....................................................................................................................... 34
Step 1 – Getting a Registration Key ......................................................................................... 34
Step 2 – Register on the Grace website ................................................................................... 36
Step 3 – Reboot ....................................................................................................................... 37
Making the most of My Stuff ............................................................................................................. 37
Configuring ‘My Profile’ ................................................................................................................ 37
Configuring ‘My Stations’ ............................................................................................................. 37
Configuring ‘My Streams’ ............................................................................................................. 38
Configuring ‘My Podcasts’ ............................................................................................................ 38
Using Pandora .................................................................................................................................. 39
Get a Pandora Account ................................................................................................................ 39
Step 1 – Log into your Grace account ...................................................................................... 39
Step 2 – Enter your Pandora account details ........................................................................... 39
Accessing the Pandora Feedback Menu ..................................................................................... 40

3
SiriusXM .......................................................................................................................................... 40
Dar.FM, Live365 VIP ........................................................................................................................ 40
Settings Menu ................................................................................................................................... 41
WiFi and Network Setup .............................................................................................................. 41
Backlight Settings ......................................................................................................................... 41
Clock Set up ................................................................................................................................. 42
Get Registration Key .................................................................................................................... 42
Equalization.................................................................................................................................. 42
My Home City ............................................................................................................................... 42
Name Your Radio ......................................................................................................................... 42
Properties ..................................................................................................................................... 42
Fahrenheit/Celcius ....................................................................................................................... 42
Speaker On/Off ............................................................................................................................ 42
Headset/Speaker Set Up ............................................................................................................. 42
Reset to Factory Defaults ............................................................................................................. 43
Master Power Reset ..................................................................................................................... 43
Network Firmware Upgrade ......................................................................................................... 43
WiFi Strength ............................................................................................................................... 43
Language ..................................................................................................................................... 43
Media Player ..................................................................................................................................... 44
UPnP Servers .............................................................................................................................. 44
USB Media ................................................................................................................................... 48
Playback Mode ............................................................................................................................. 49
Queue .......................................................................................................................................... 49
Other Cool Stuff & Smartphone Apps ............................................................................................... 49
Troubleshooting ................................................................................................................................ 51
Specifications ................................................................................................................................... 52
License Information and Warranty .................................................................................................... 52
Customer Service and Support ........................................................................................................ 53
Appendix ........................................................................................................................................... 54
Using the USB connection as a USB-Ethernet connection ............................................................. 54

4
Important Safety Instructions and Warnings
Please read before installation
CAUTION:
If this Internet radio has been moved from a cold place, (e.g. a cold car trunk) to a warm place, then
there is a possibility that moisture may condense inside the product. In these conditions DO NOT PLUG
IN. To avoid the damage that can be caused to the radio by powering on in these circumstances,
please simply allow the product to stand in a warm room for 2-3 hours before first use. This will help
any moisture evaporate and prevent unnecessary damage to your Internet radio.
POWER PLUG Ensure that the power plug is easily accessible.
COVERS Do not remove any fixed covers as this may expose dangerous voltages.
VENTILATION The ventilation holes on the casing of your Internet radio prevent it from overheating.
Do not block or cover these holes, especially with cloth or paper. Please allow a
minimum distance of 5cm around the apparatus for sufficient ventilation.
DAMAGE Never use your Internet radio if it is damaged in any way. Always place your Internet
radio on a flat level surface. Please to not position the radio in any location which
may be subject to strong vibration.
TEMPERATURE Avoid extremes of temperature, either hot or cold, place your Internet radio well away
from heat sources such as radiators or gas/electric fires.
HIGH HUMIDITY Do not use this apparatus in humid or tropical climates.
MOISTURE Do not allow your Internet radio to be exposed to rain, moisture or dust. If any liquid
is spilt into your Internet radio it can cause serious damage. If you spill any liquid into
your Internet radio switch it off at the mains immediately and contact your supplier.
Do not open any covers. Do not attempt any repair yourself.
Only qualified personnel may carry out repair work.

5
WARNING:
CAUTION: please READ and FOLLOW the important safety instructions carefully
ADVISORY
North American markets
• To reduce the risk of fire or electrical shock, do not expose the product to rain or moisture.
• The product should not be exposed to any dripping or splashing liquid.
• Objects filled with liquids, such as vases, should not be placed on the product.
• No open flame sources, such as lighted candles, should be placed on the product.
• Keep the remote control battery away from children. It may cause a fire or a chemical burn if
mishandled. Do not recharge, disassemble, heat above 100° C (212° F), or incinerate.
Dispose of used batteries promptly. Replace only with a battery of the correct type and model
number.
1. Please retain these safety instructions for future reference.
2. Please follow these instructions. These instructions contain information for your safety.
3. Please heed the safety warnings on the product and in the user’s guide. Failure to do so could
result in injury or damage to the product.
4. Power source - the product only be connected to a power supply of the type specified in the
user’s guide or as marked on the product.
5. Power cord protection – protect the power cord from damage. Do not walk on the power cord.
Please take care not to let the power cord become pinched, particularly at plug.
6. Water and moisture - the product should not be used near water (for example, near a bathtub,
washbowl, kitchen sink, laundry tub, in a wet basement or near a swimming pool etc)
7. Heat - keep the product away from heat sources such as radiators, heat registers, stoves or
other appliances that produce heat.
8. Damage requiring service - the product should be serviced by qualified service personnel If:
a) The power supply cord or the plug has been damaged: or
b) Objects have fallen or liquid has been spilled into the product: or
c) The product has been exposed to rain: or
d) The product does not appear to operate normally or exhibits a marked performance
change:
e) Or the product has been dropped, or the enclosure damaged.
13. Servicing - the user should not attempt to service the product. All servicing should be referred
to qualified service personnel.
14. Unplug the power adapter during lightning storms or when unused for long periods of time.
This Product is intended for
. The GRACE Wireless Internet Radio GDI-
IRC7500 is in compliance with the essential requirements and other relevant provisions of

6
Directive 1999/5/EC
ADVISORY
FCC Compliance and Advisory Statement
Part 15
FCC Ru
NOTE:
Part 15
FCC Rules
WARNING
Proposition 65
: This device complies with
Operation is subject to the following two conditions: 1) this device may not cause harmful
interference, and 2) this device must accept any interference received, including interference
that may cause undesired operation
This equipment has been tested and found to comply with the limits for a Class B digital
device, pursuant to
protection against harmful interference in a residential installation. This equipment generates
uses and can radiate radio frequency energy and, If not installed and used in accordance with
the instructions, may cause harmful interference to radio communications. However, there is no
guarantee that interference will not occur in a particular installation. If this equipment does
cause harmful interference to radio or television reception, which can be determined by turning
the equipment off and on, the user is encouraged to try to correct the interference by one or
more of the following measures:
To comply with FCC RF exposure compliance requirements, a separation distance of at least 20
cm must be maintained between the antenna of this device and all persons. This device must
not be co-located or operating in conjunction with any other antenna or transmitter.”
This product may contain chemicals listed in
(
http://www.oehha.ca.gov/prop65/prop65_list/Newlist.html) that may be known to cause cancer,
of the
birth defects or other reproductive harm
. These limits are designed to provide reasonable
of the
les.

7
QUICKSTART GUIDE - 1st time set up
What you need before you can use your Internet Radio:
NOTE: IF your wireless (Wi-Fi) network is password protected (WEP or WPA), please obtain your
password before proceeding to Step 1. All passwords are UPPER and lower case sensitive.
Step 1:
Home
Settings
Home screen with the ‘Settings’ icon
highlighted
• A broadband internet connection is required.
• A wireless (Wi-Fi) modem or router connected to your broadband (cable or DSL) internet.
Plug the round jack from the power cord into the back of the radio and the other end into a wall
outlet. On the top of the radio press the power switch to turn the radio “ON” (If the clock is on the
display the radio is in standby mode). The main screen will display and within approximately 4 seconds
will flash a series of messages. The messages that are briefly displayed will be ‘Grace Digital Audio’,
‘Starting…’ then ‘Scanning’.
NOTE: If your radio does not automatically start scanning when plugged into power the 1st time, please
press the ‘Power’ button on the top of the radio to turn your radio on and to view the main radio menu.
Press the ‘
identified by the symbol of a house . This button will always return you to the main menu.
Turn the large Menu knob on the top of the radio to right until the ‘
press the Menu knob inwards to select ‘settings’.
’ button located on the top of the radio on the button panel. This button can be easily
’ icon is highlighted. Now

8
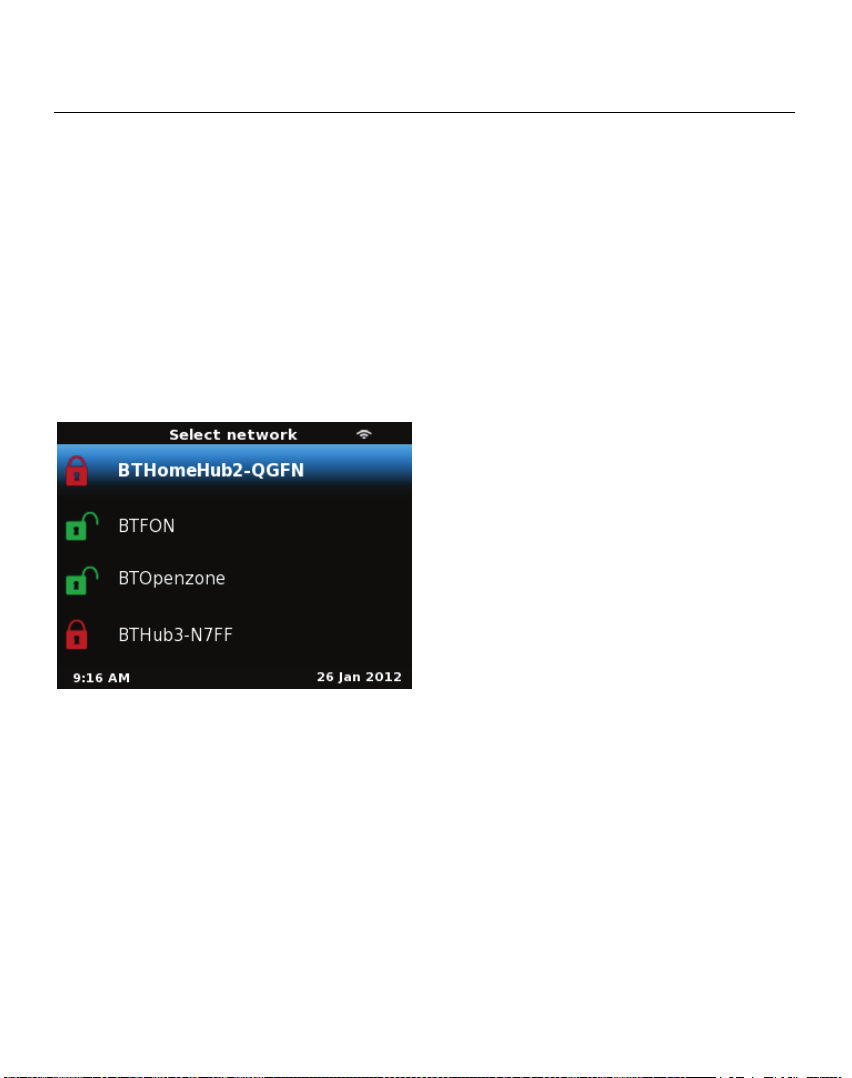
Network Configuration
Back
Scan for networks
Step 2:
On the top of the next screen please select ‘
back to previous menus at any time press the ‘
From the next screen please select ‘
The radio is now scanning for available Wi-Fi (wireless) network(s) in your area. After the
scanning process is complete, the radio will display the names (also referred to as ESSID’s) of one or
more wireless networks that are within range.
’ button on the radio).
’ by pressing the Menu knob. (To go
’ by pressing the Menu knob inwards.
9
Note:
Enter network name
Settings
Network Configuration’
Step 3:
Enter WPA key
Note:
Enter
Scroll the Menu knob to the left or right until the name of your network (ESSID) is highlighted. After you
highlight your network, press the Menu knob dial inwards to select your network.
If your radio does not display the name of your wireless network please make sure you are within
range of your wireless network. If your network does not broadcast its ESSID you can enter it in
manually in the ‘
If there is a private key needed for your wireless network the display will now briefly display
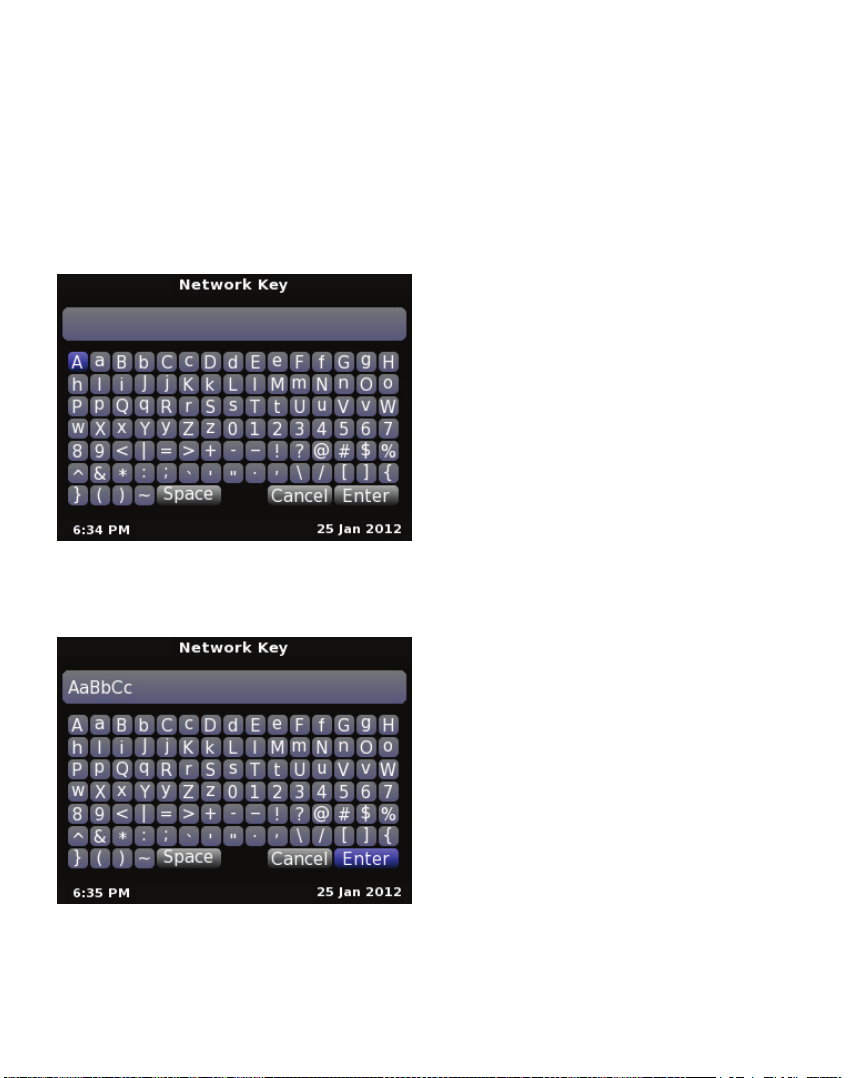
‘
Please enter your wireless network’s key using this screen and select ‘Enter’ at the bottom right of the
screen. This ‘Key’ is the same key (password) you use to connect any wireless device (laptop, mobile
phones, game console etc) to your Wi-Fi (wireless) network. This key or password is also sometimes
called a ‘WEP’ or ‘WPA’ password or ‘code’. If you do not know your password, please contact the
person or company that set up your Wi-Fi (wireless) network to obtain your password.
All passwords are UPPER and lower case sensitive. Thus letters must be entered correctly using
upper or lower case as was used to set the password originally. To enter in your password, scroll the
Menu knob dial to the right or left until the 1
dial inward to select the 1
select ‘
’ and then the text entry screen shown below will appear.
st
’, which can be found at the bottom right of the screen.
letter. Continue this process until the final letter or number is selected, then
’ section of the ‘
st
’ / ‘
letter or number in your password is highlighted. Press the
menu.
10
Note:
Back
Enter
connecting to ….
Step 4:
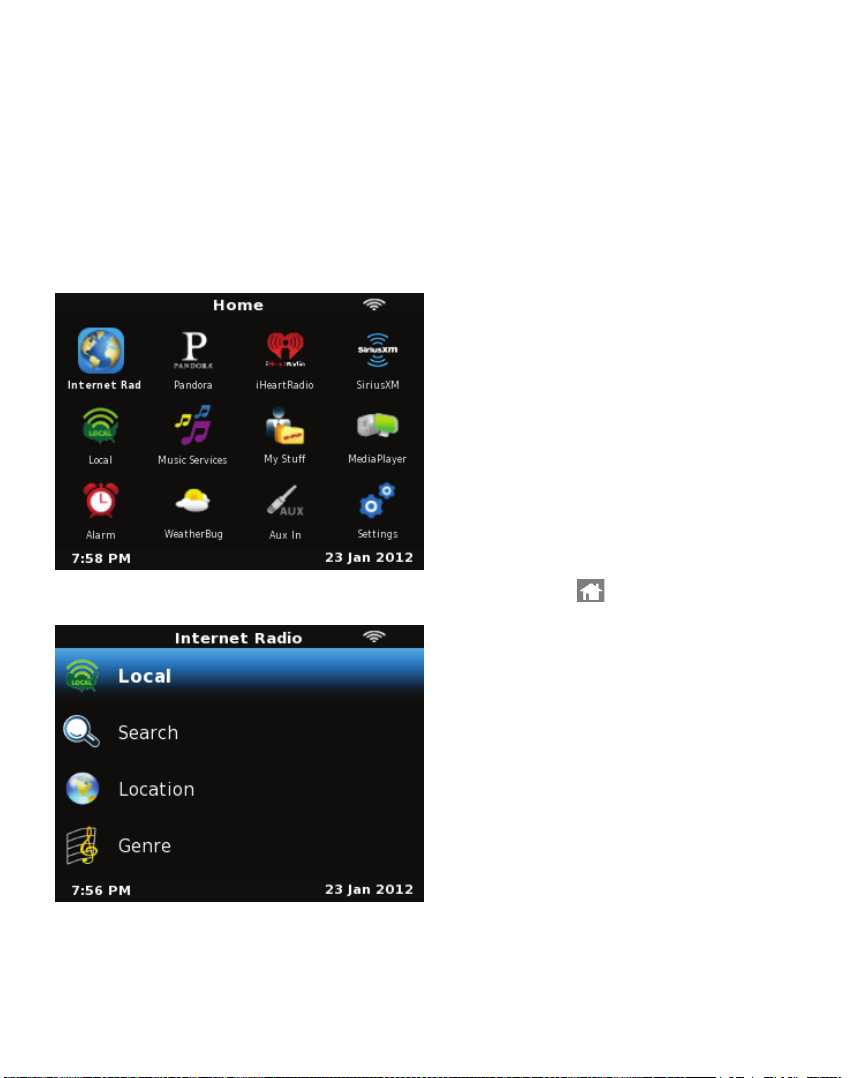
Internet Radio
Home
Local
Search
Location
Genre
College Stations
Weather
Home screen with the ‘Internet radio’
icon highlighted
Once you select ‘Internet Radio’ you
two.
If you make a mistake at any time, press the ‘
select the correct entry.
Once you have selected ‘
messages. When the radio has successfully connected the main menu will be displayed. If the main
menu is not displayed and instead you see the Clock please push in the power button to display the
main menu.
You are now connected to your Wi-Fi network and the internet. To listen to a station, choose the
‘
You can always return to the Home screen by pressing the ‘
radio. This button can be easily identified by the symbol of a house.
The radio will display various search methods: ‘
and ‘
stations. Select the station by pressing the Menu knob inward when the station’s name is highlighted.
After the station finishes buffering turn the volume up on the radio until you hear the music out of the
built in stereo speakers.
’ icon on the main menu.
’. Choose the option you desire and continue through the menu until you see a list of
’ the radio will display ‘
’, ‘
’ button to erase the letter(s) or number(s) then
’, followed by a series of
’ button located at the top of the
will be presented with 6 options.
Scroll down the screen to see the last
’ ‘
’, ‘
’, ‘
’

11
Back
Home
Now Playing
NOTE:
In the box
An example of a popular internet
radio station.
If you are unable to listen to the station you selected please try other stations (pressing the ’
will take you to the previous menu to choose another station). Some stations may not currently be
online.
At any time, pressing the ‘
take you to the main menu. Similarly, the ‘
current station or service. These two buttons should be extremely helpful to your navigation.
Press and hold any preset button whilst the station of your choice is playing to assign that station to the
preset.
you do NOT need to register your radio to listen to our over 50,000 free radio stations. However,
If you would like to register your radio to experience premium music selections (such as Pandora)
please refer to the ‘Registering your radio / creating an account at myradio.gracedigital.com ’ section of
this manual. You can only register your radio and create an account If you radio is successfully
connected to your Wi-Fi network and internet connection.
’ button with the picture of the House located at the top of the radio, will
’ button, will take you to a description of the
’ button
Encore Internet Radio (GDI-IRC7500) AC Power Adapter (UL approved) Remote Control (featuring Pandora) 3.5 mm to RCA Cable User’s Guide

12
Radio connections & remote control functions
TOP PANEL
TOP of the radio
Volume / Mute
Snooze / sleep timer – When the radio is turned on:
Home –
Now Playing –
Preset 1-10 -
Shift -
Back -
Menu knob –
Power –
Stop / Mode / Rewind /Play / Pause buttons
Pandora buttons -
Thumbs up / Down –
Menu –
Play / Pause -
Skip –
•
•
press and hold to enter the alarm menu. When the alarm is sounding you can
press this button to snooze the alarm.
•
•
•
•
•
•
will also allow you to change the back light brightness.
•
•
•
o
o
o
o
– turn to control volume, push in to mute / un-mute the volume
press to set the sleep timer or
displays the radio’s main home screen
displays the currently active radio station
press to play any of the 5 programmable presets
allows access to presets 6 - 10
go to the previous menu screen, or delete entry characters
turn to move through menu and push to select. In standby this knob
push to power unit on / off (standby). Push and hold for reboot
(functions only when playing Pandora stations)
displays Pandora interactive menu
go to the next Pandora song (max 6 skips an hour
like or dislike a Pandora song
pause and resume Pandora songs
– control media player functions
13
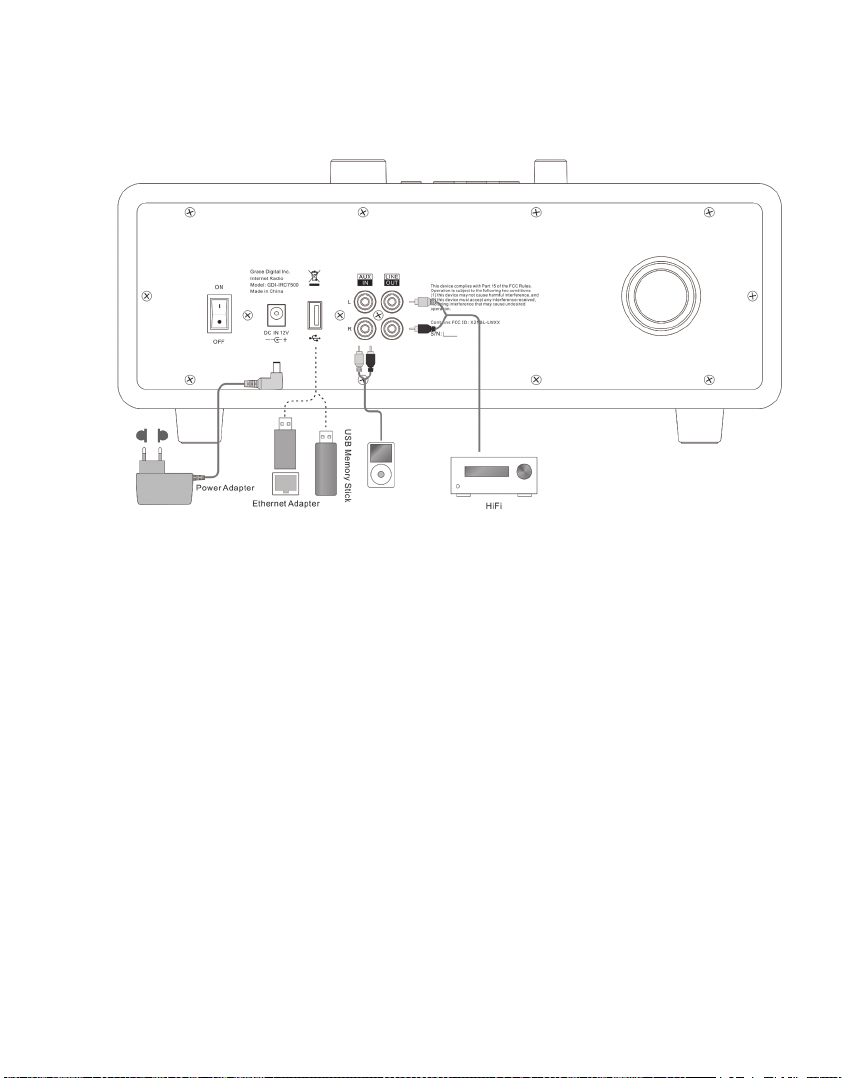
BACK PANEL
AC Power Jack
USB Port
RCA Input Jacks
RCA Output Jacks
Wi-Fi Antenna
Headset jack –
front
•
•
(Ethernet Adapter required for LAN connection. Refer to APPENDIX for details)
•
•
•
•
music coming out of the headset jack is mono. To listen to stereo headset music
on the radio select the ‘Settings’ icon from the home page, then select ‘Stereo
Mode’ and finally ‘Set to Stereo’. For best sound out of the front speaker select ‘Set
to Mono’ (mono mixes the left and right channel and sends it out the front speaker).
– to connect to the included AC power adapter
– play music from USB flash drive or use as Ethernet LAN connection
– connect to optional audio devices, iPhone, cd etc
– connect to home stereo or other devices
– (802.11n) built internally inside the cabinet
(on the
of the radio) for private listening. Note: by default the
REMOTE CONTROL
Standby / ON
BACK
Quick-key
Pandora “Thumbs Down
Pandora “Skip Song
Pandora “Thumbs Up
…
14
Press to return to Menu
to Main Menu
” selection
” selection
” selection
Mute
Volume Up & Volume Down
Preset 1 to 10
Alarm / Timer
Play / Pause
Stop
Next / Previous
Media Queue: media player files
Extra features: Pandora menu/
15
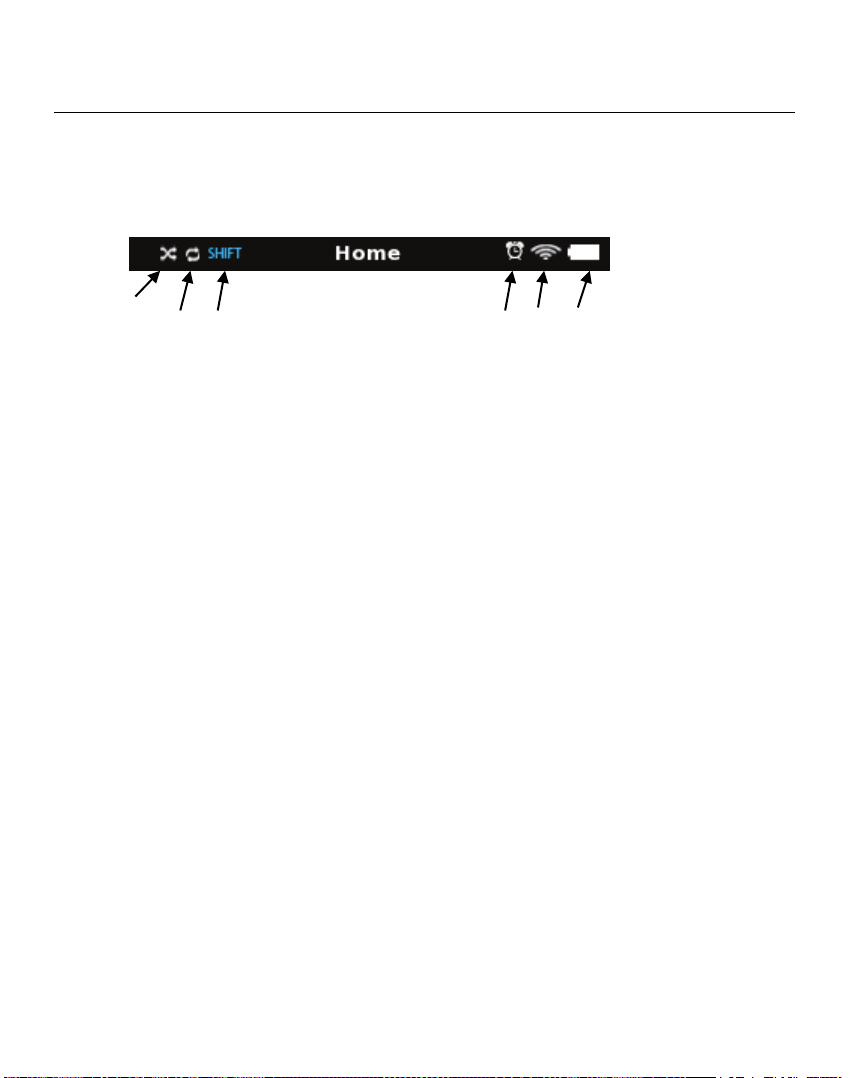
Display icons
1
3
5
6
Small icons displayed at the very top of the display are:
1. Media Player; Shuffle
2. Media Player; Repeat
3. Shift key pressed; allows you to access presets 6 to 10
4. One or more alarms have been set.
5. Wi-Fi network strength: This shows the relative strength of your Wi-Fi signal. 1 is a weak
signal and 4 is a very strong signal. You can enter the radio’s ‘Settings’ menu then
select ‘Wi-Fi Strength’ for a more precise numeric number.
6. When the optional battery is installed this icon will blink while charging. It will be
displayed as a solid white battery when it is completely charged. The icon will not be
displayed when a battery is not connected.
16
Steps to connect your radio to your Wireless Network
Getting Started
Step 1 - Power up the radio
Starting
Scanning
Select network
No networks found
beginning of this manual did not suffice).
To power your radio connect the AC Power on the back of your Grace Digital Encore Radio to a wall
power outlet. The radio can be switched between ‘on’ and standby with the power button on the radio.
Once powered on, the display on the front of the radio will light up and show the Grace Digital Audio
splash screen followed by ‘
available wireless networks should appear underneath this heading.
If the radio does not find a wireless network router, the display will show ‘
If this happens after subsequent attempts you should setup your wireless access point working - see the
instructions supplied with your wireless network.
(use these instructions if the Quick Start guide at the
’, ‘
’ and then A ‘
’ message with a list of the
’:
Loading...