

Govecs GO! S1.2, GO! S2.4 User guide [ml]

GOVECS GO! S1.2 (+)
GO! S2.4 (+)
USER’S MANUAL
AND SERVICE BOOK
BEDIENUNGSANLEITUNG
UND SERVICEHEFT
MANUAL DE USUARIO
I. LIBRO DE MANTENIMIENTO
MANUEL D’UTILISATION
ET CARTE DE SERVICE
LIBRETTO DI ISTRUZIONE
E MANUTENZIONE
www.govecs.com
GEBRUIKERSHANDLEIDING
& SERVICE BOEK
1


GOVECS GO! S1.2 (+)
GO! S2.4 (+)
USER’S MANUAL
AND SERVICE BOOK
www.govecs.com

N
Dear User of scooter GOVECS,
We are excited that you have made the decision to purchase a GOVECS scooter and it is our pleas-
E
ure to welcome you among the great number of GOVECS’ scooter drivers.
This manual includes instructions concerning proper use, maintenance, and care of your GOVECS
scooter. For your own safety and optimal comfort of usage we advice you to carefully read this
manual before the fi rst use.
Proper maintenance of the vehicle, observing all usage instructions included in this manual and
visiting GOVECS service stations for regular inspections will ensure faultless operation of your
scooter as well as continuation of warranty period.
Have a comfortable and accident free journey!
4

Table of contents
1. Safe riding instructions
1.1 Pre-ride activities
1.2 Clothing
1.3 Riding technique
1.4 Carrying cargo and passengers
1.5 After riding
2. Vehicle equipment
2.1 Left side of the vehicle
2.2 Right side of the vehicle
2.3 Operational elements
2.4 Ignition switch
2.5 Speedometer
2.6 Left side controllers
2.7 Right side controllers
2.8 Throttle
2.9 Trunk
2.10 Charging of the battery
2.11 Handle
2.12 Position the vehicle on the center
stand
2.13 Hook for bags
2.14 Lighting
2.15 Tires
2.16 Brakes
2.17 Controll of braking liquid level
2.18 Controll of belt tention
2.19 Motor Controller Communication
Codes
2.20 Technical specifi cation
2.21 How to check the VIN number of a
vehicle
3. Taking care of the vehicle
4 . Transfer of the vehicle
4.1 Inspection before transfer of the
vehicle
4.2 Acceptance of the vehicle
4.3 Warranty terms
4.4 Technical inspection
5. Helpful Tips
5

N
1. Safety guidelines
1.1 Pre-ride activities
Before riding scooter make sure that:
E
• The charging plug is out of the socket
• The battery is su ciently charged
• The lighting, turn signals, and horn function properly
• The mirrors are adjusted for proper use
• There is the correct air pressure and proper tread depth in tires
• The brakes work properly (braking test while pushing the scooter)
• There is the correct level of braking fl uid and that the brake pads are not worn out
• It is easy to turn the handlebars without resistance, fully left and right
• There is proper belt tention
1.2 Clothing
• Always ride in proper clothes and proper helmet.
• Wear tight fi tting and comfortable clothing
• Wear proper boots (don’t ride in high heels, fl ip-fl ops, or similar open footgear)
Inadequate clothing may become a threat to safe riding!
6

1.3 Riding technique
• Vehicle should be ridden carefully and sensibly
• Always hold the handlebars with two hands
• While turning the rider and passenger should tilt along with the scooter
• Particular wariness is recommended while riding on poorly hardened or wet road surfaces
• Pay attention to atypical sounds or behavior of the scooter while riding
1.4 Carrying cargos and passengers
• In order to carry objects or bags one should explicitly use top case, under seat trunk or a
hook for bags. The maximum weight allowance for top case is 5 kg.
• Maximum scooter weight allowance must not be exceeded (150kg including passengers’
weight)
• The scooter is allowed to carry maximum 2 persons
1.5 After riding
• Check if the battery needs charging
Riding with low level of battery signifi cantly decreases its life.
Battery life can be extended by recharging it each time with use of originally installed
GOVECS charger. There is no risk of overcharging, because after reaching maximum
charging level the charger disconnects automatically (even though the fen is still
working).
7
N
2. Vehicle equipment
4
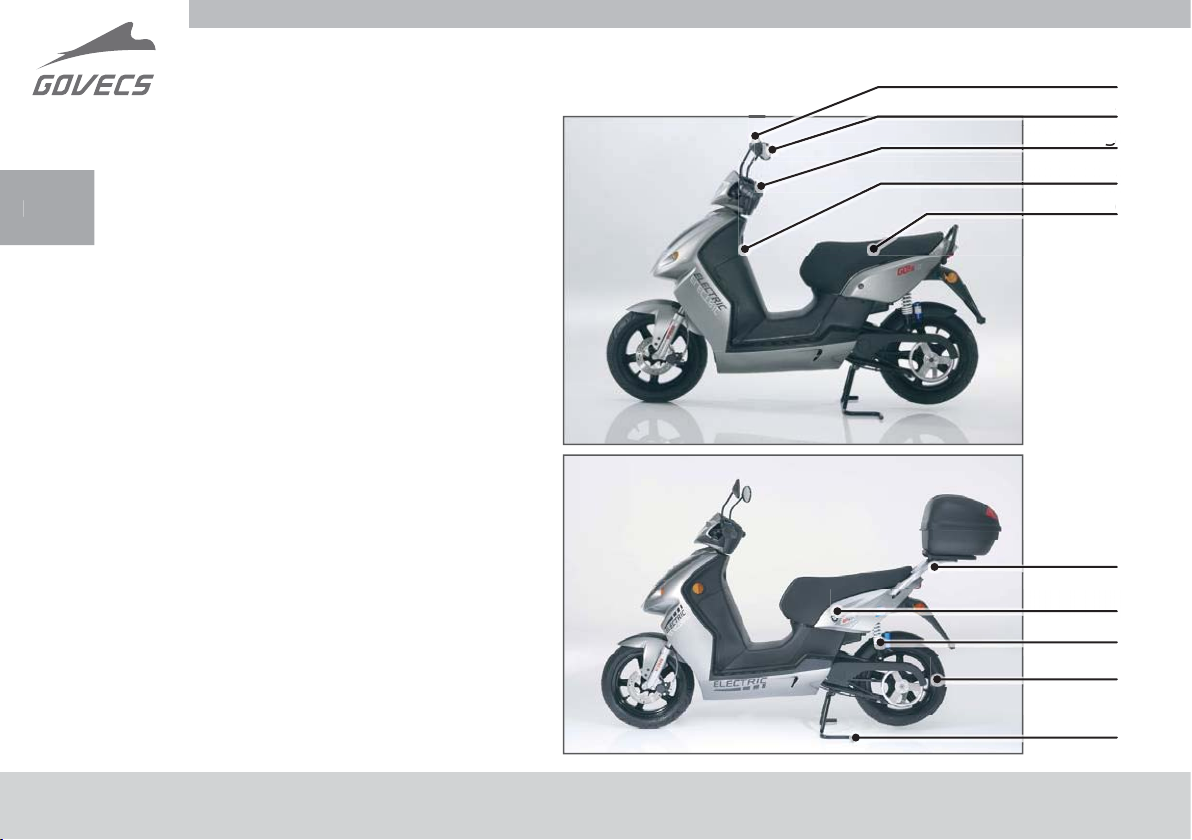
2.1 Left side of the vehicle
1
2
2
3
1. Left mirror
E
2. Right mirror
3. Speedometer
4. Ignition switch
5. Single piece seat
6. Handle
7. Seat lock
8. Rear shock absorber
9. Rear wheel
10. Center stand
4
5
6
7
8
9
10
8
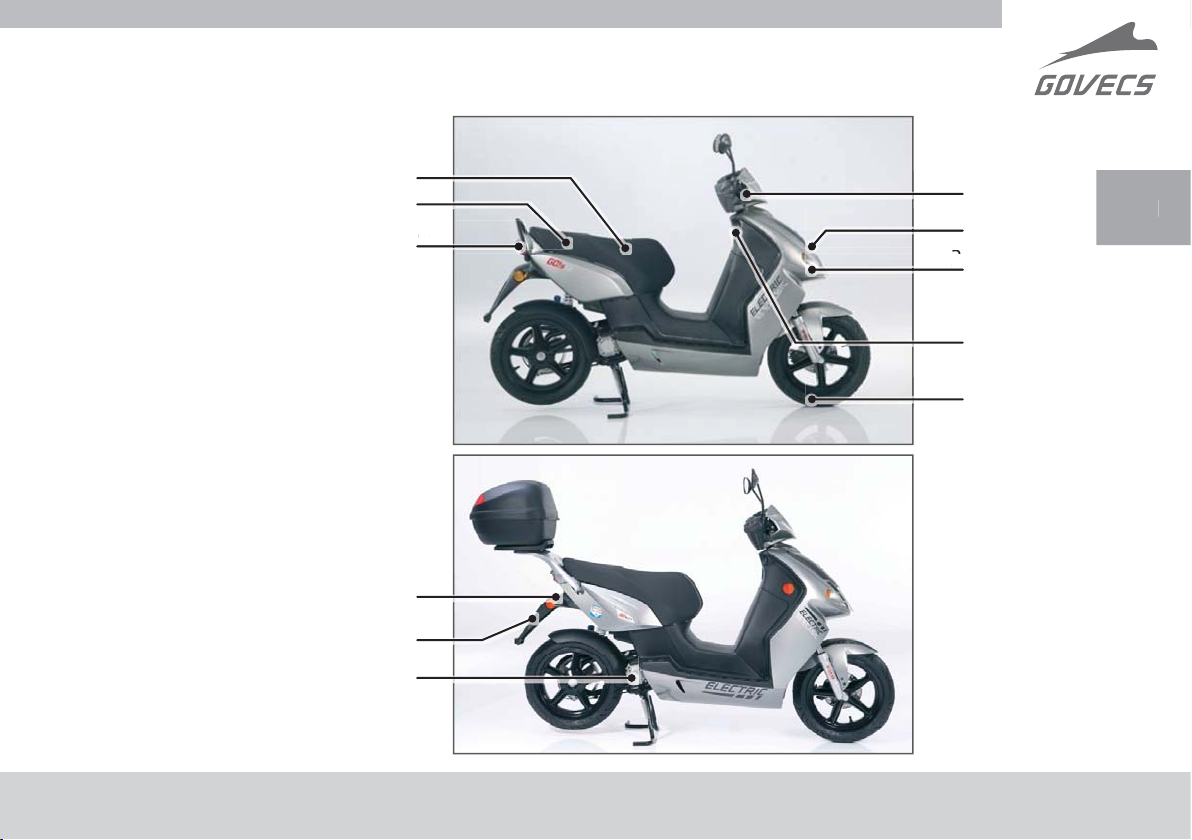
2.2 Right side of the
vehicle
1. Brake lever
2. Head-light
3. Front turn signal
4. Hook for bags
5. Front Wheel
6. Storage compartment
under the seat
7. Cable for charging under
the seat
8. Parking and braking light
9. Rear turn signal
10. Registration Plate
Light (only „+” version)
11. Engine
6
7
8
9
10
11
1
2
3
4
5
9
N
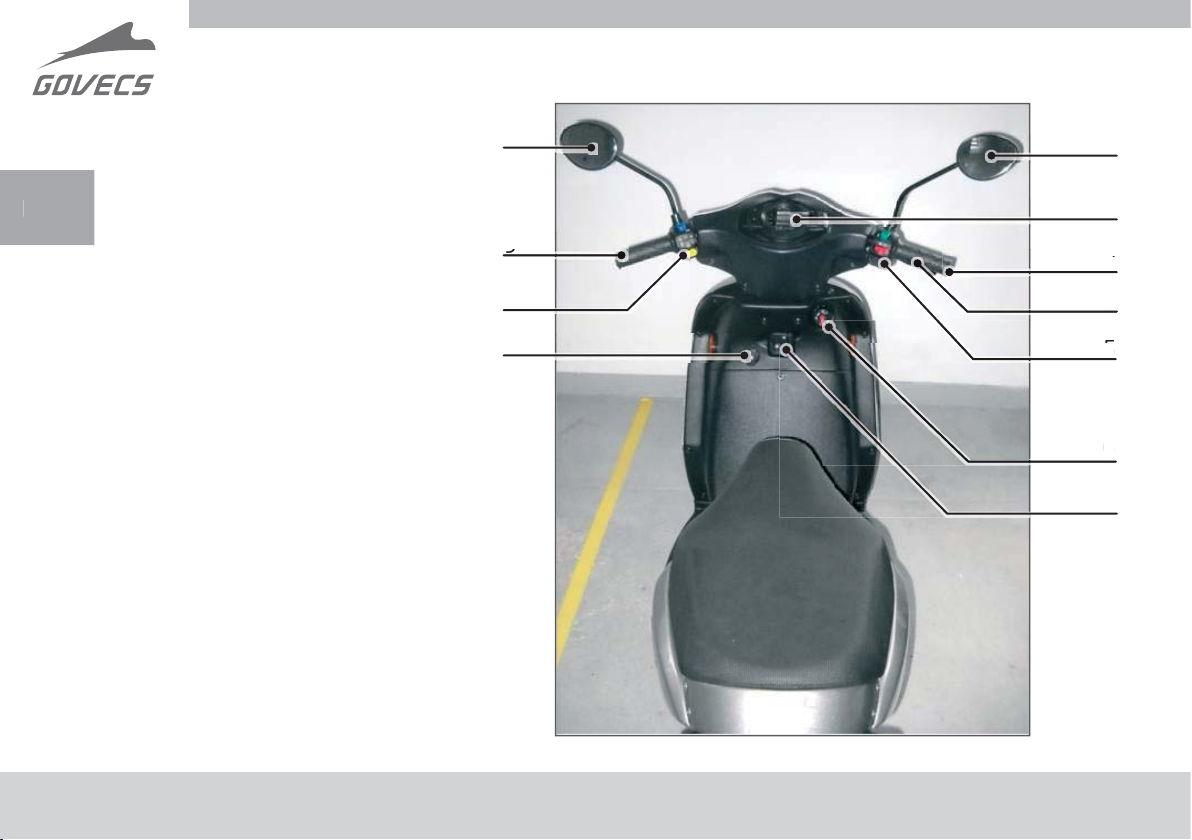
2.3 Operational elements
4
1. Right mirror
2. Speedometer
3. Handlebar throttle
E
4. Front wheel brake lever
5. Right side switches
6. Ignition switch
7. Hook for bags
8. Left mirror
9. Rare wheel brake lever
10. Left side switches
11. Power socket 12V
8
9
10
11
1
2
3
4
5
6
7
10
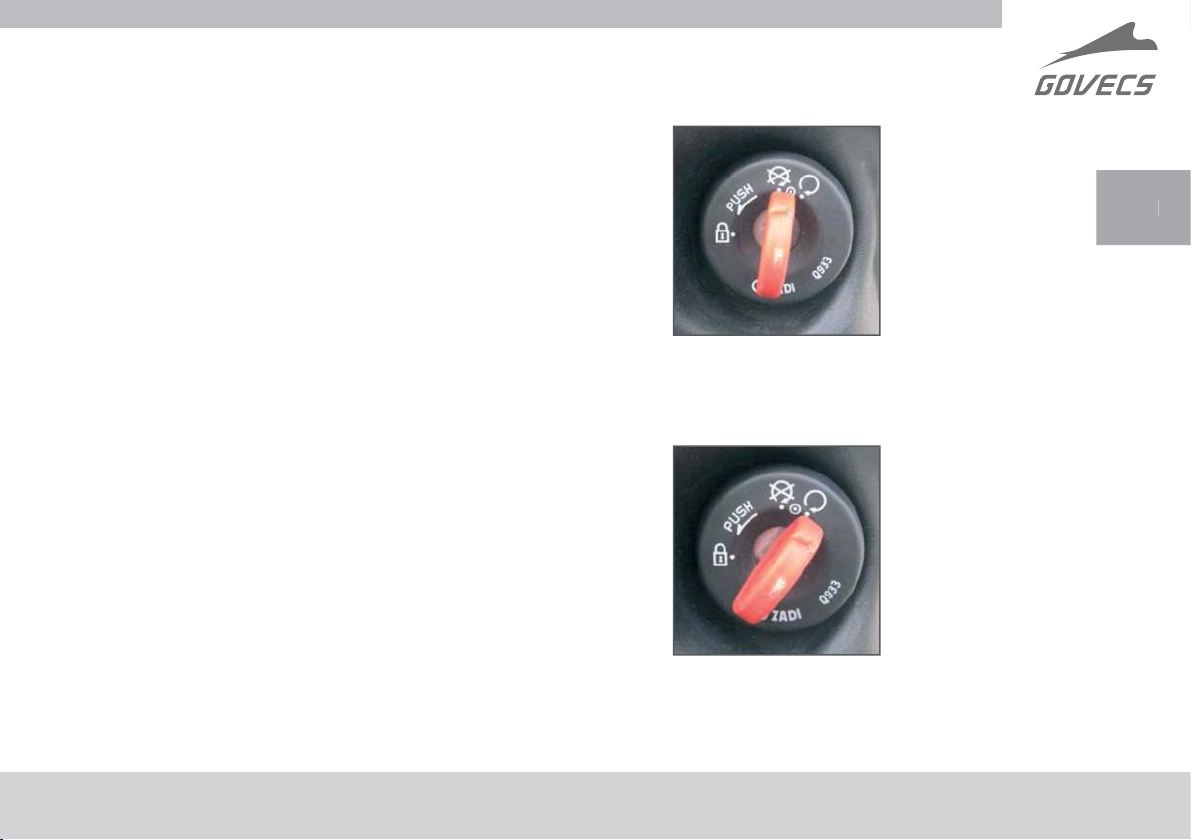
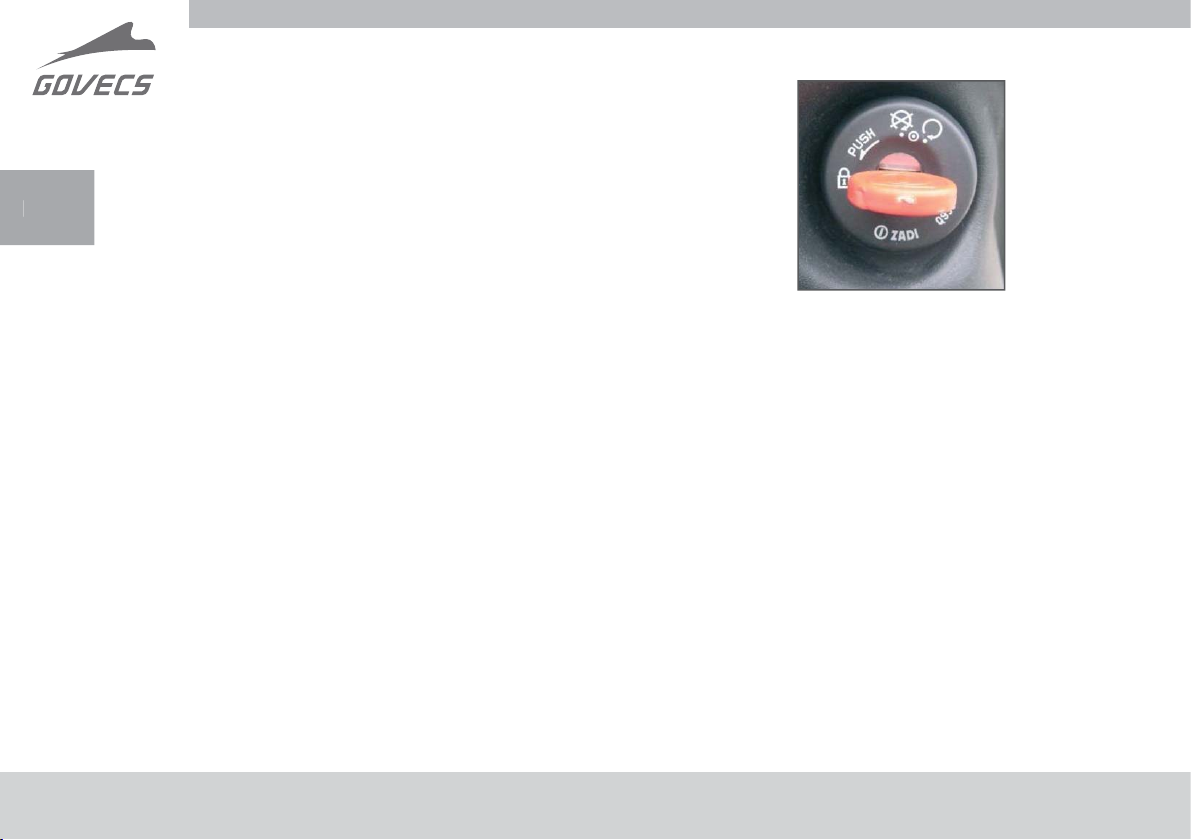
2.4 Ignition switch
Turned o
• All the functions turned o
• Handlebar is not locked
• Scooter can be rolled
• Scooter can be safely handled
Riding position (vehicle turned on)
• All the functions active
• Scooter is ready for riding
• Taking out the key in this position is not possible
• The key should be turned to riding position only
after the rider is seated on the vehicle, directly
before riding.
Note:
The sound of the engine is not heard although
the handlebar throttle is active.
Ignition o
Riding position
11
N
Ignition switch position „Handlebar locked”
• All the functions turned o
• The handlebar locked
• Scooter can be safely handled
E
Locking handlebar
1. Turn the handlebar left all the way to the end
2. Push in the key turning it left at the same time
to the padlock position
3. Pull out the key
Handlebar locked
12
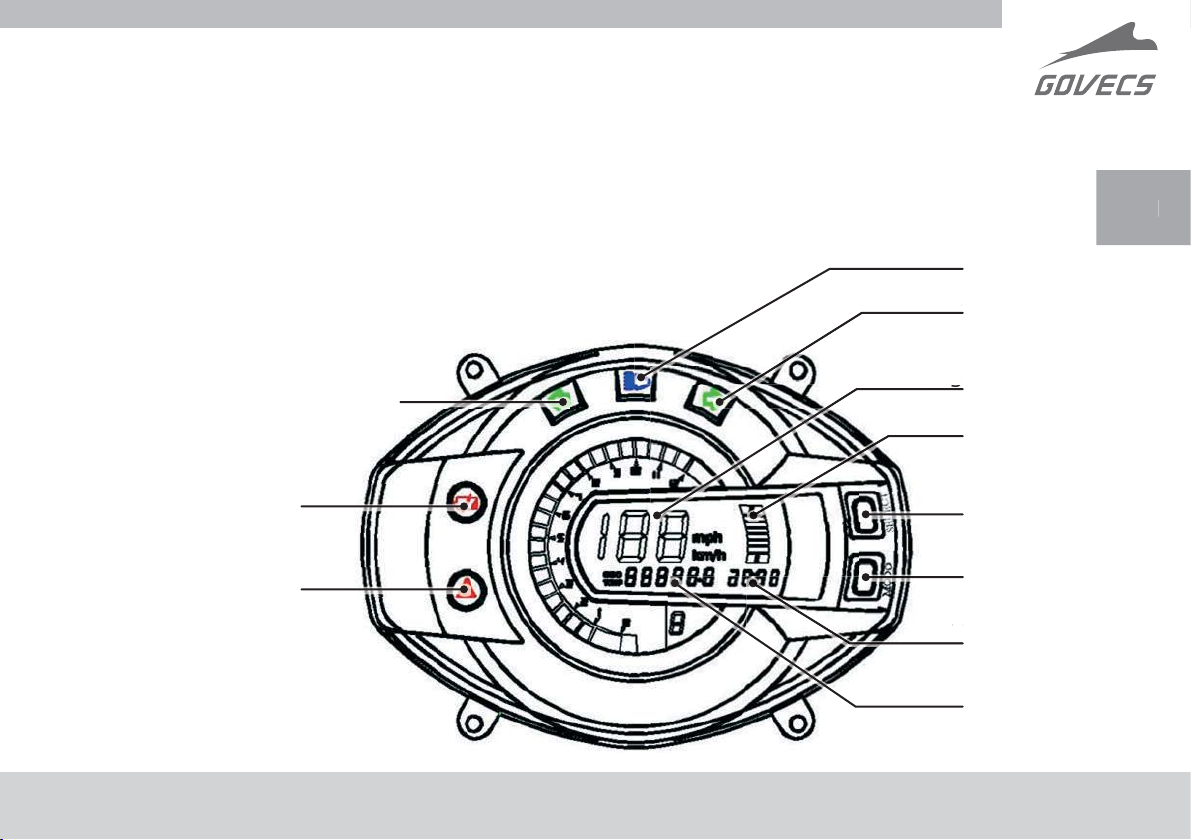
2.5 Speedometer
4
7
Speedometer is equipped with the
following functions and indicators
1. Head light
2. Right turn signal
3. Riding speed
4. Charging battery indicator
5. Selection button [Select]
6. Mode button [Mode]
7. Clock
8. Kilometres: total / daily
9. Left turn signal
10. Battery signal light
11. Charging indicator
9
1
2
2
3
4
10
11
5
6
7
8
13

N
Controllers handling
Switching between total kilometers (odo) and daily kilometres (trip)
Holding pressed mode button [mode] (6) for one second switches from total kilometers count
E
(odo) to the dialy kilometers one (trip) .
Pressing the selection button for 3 seconds [select] (5) results in resetting the trip meter.
Pressing the mode [Mode] (6) and selection [Select] (5) buttons for 3 seconds switches speed
unit from km/h to mph (miles per hour) or vice-versa.
Setting the clock
In order to set up the clock keep pressing the mode [Mode] (6) button until the minutes value
begins to pulsate.
Then set up the minutes by pushing in the selection [Select] (5) button.
After pushing in mode button [Mode] (6) again the hour value begins to pulsate and the hour
can be set. In order to confi rm the setting, the mode button [Mode] (6) should be pushed in
again.
14
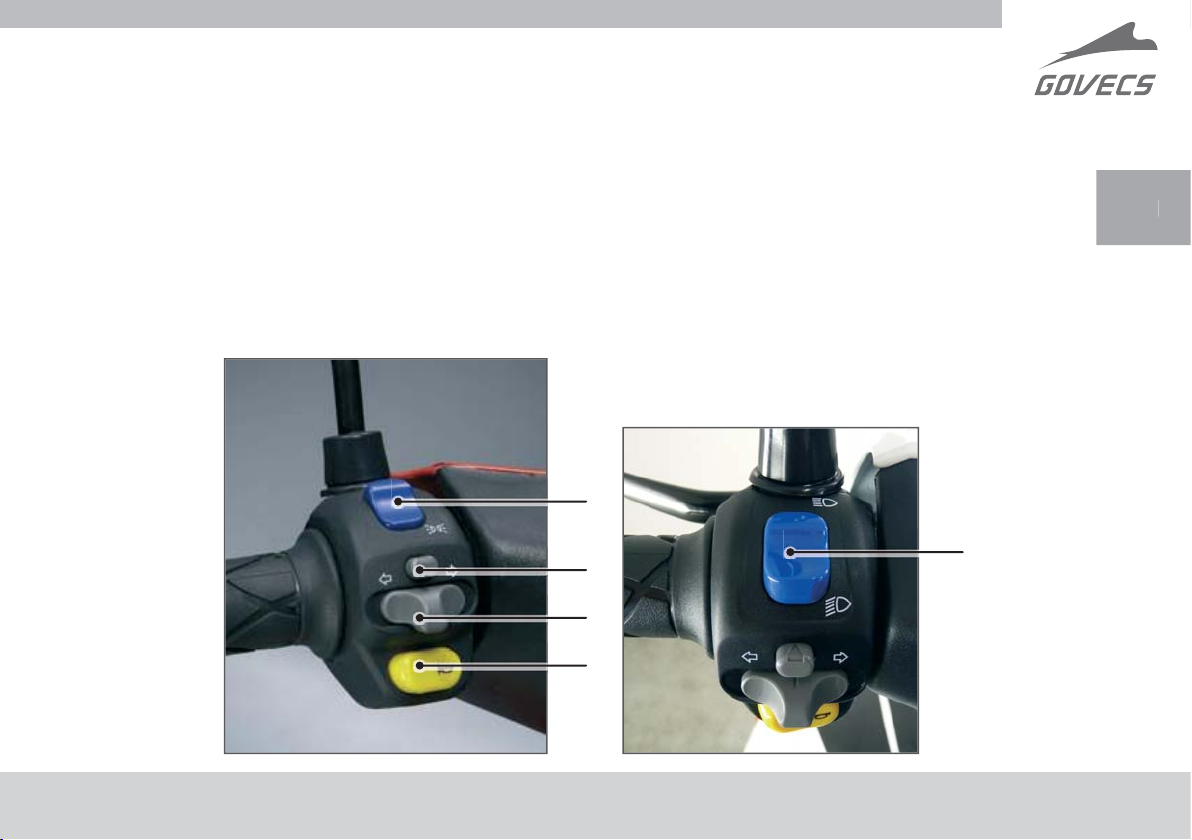
2.6 Left side controllers
Turn light is on by moving to the left or to the right the turn light switch (3) according to
intended riding direction.
In order to turn it o , press the „turn o ” button (2).
1. Running light / head light switch
1.* Running light / high beam switch for „+” version
2. Turn signal button (for canceling)
3. Turn signal switch
4. Horn button
1
2
3
1
*
4
15

N
2.7 Right side controllers
1. On/O economy function switch
• Economy function allows the
increase of vehicle distance
E
range.
• Setting the switch to „on”
position slightly reduces the
acceleration of the scooter, at
the same time lowers the use of
energy, thus increasing the range
of the scooter.
2. Safety kill switch
• - This kill switch MUST be moved to the left hand side position when the ignition
key is being turned on! After ignition is turned on, move the kill switch to the right
hand side position. Scooter is activated. Failure to do so will display the error code
F-0884 on the speedometer.
Economy function does not a ect maximum speed!
3
1
2
2.8 Throttle
By turning of handlebar throttle (3) the speed can be controlled
16
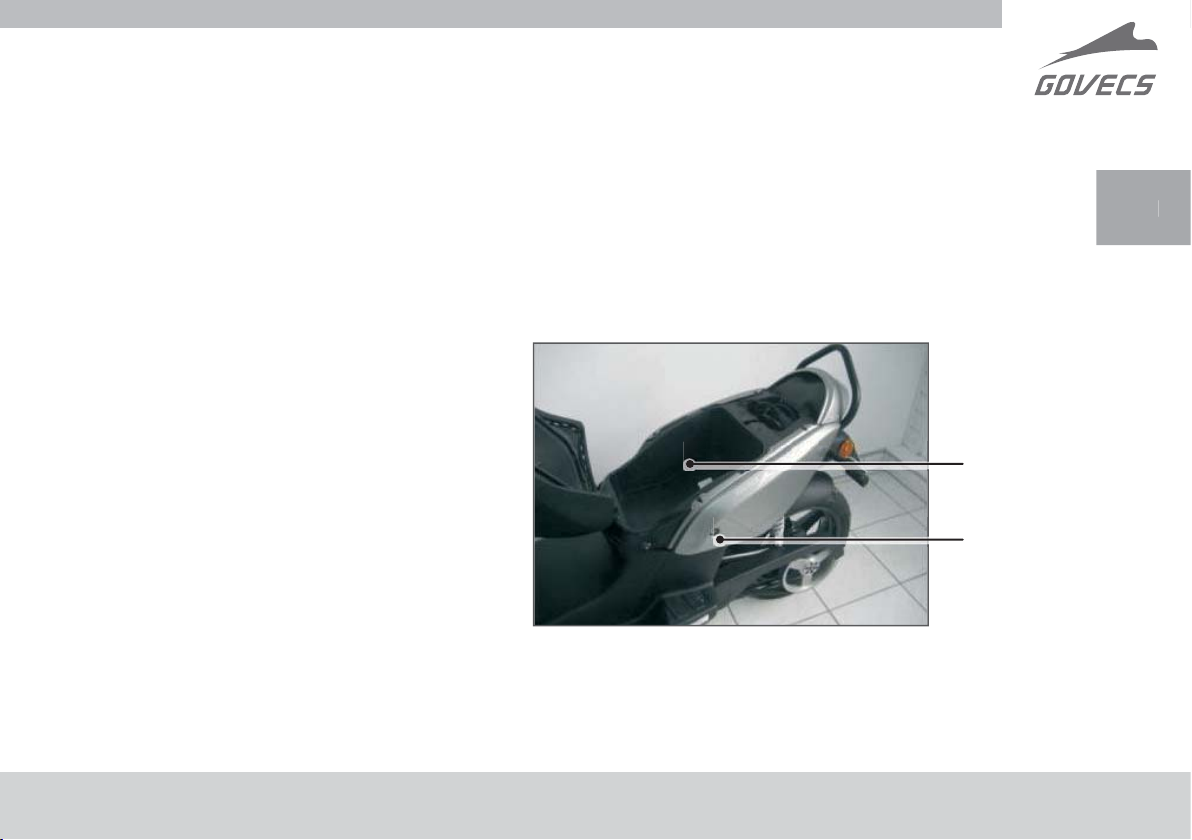
2.9 Trunk
1. Trunk
2. Seat lock
• In order to unlock the seat the key should be inserted and turned
left, then the seat will raise up.
• In order to close the seat push the seat in the middle until you hear
the lock click
• Maximum load of the trunk is 5 kg.
Note!
Never place the key in the trunk before
locking the seat
Please take care of the charging cable
when closing
Trunk*
1
2
* Depending on the model of the scooter it’s appearence may be di erent
17
N
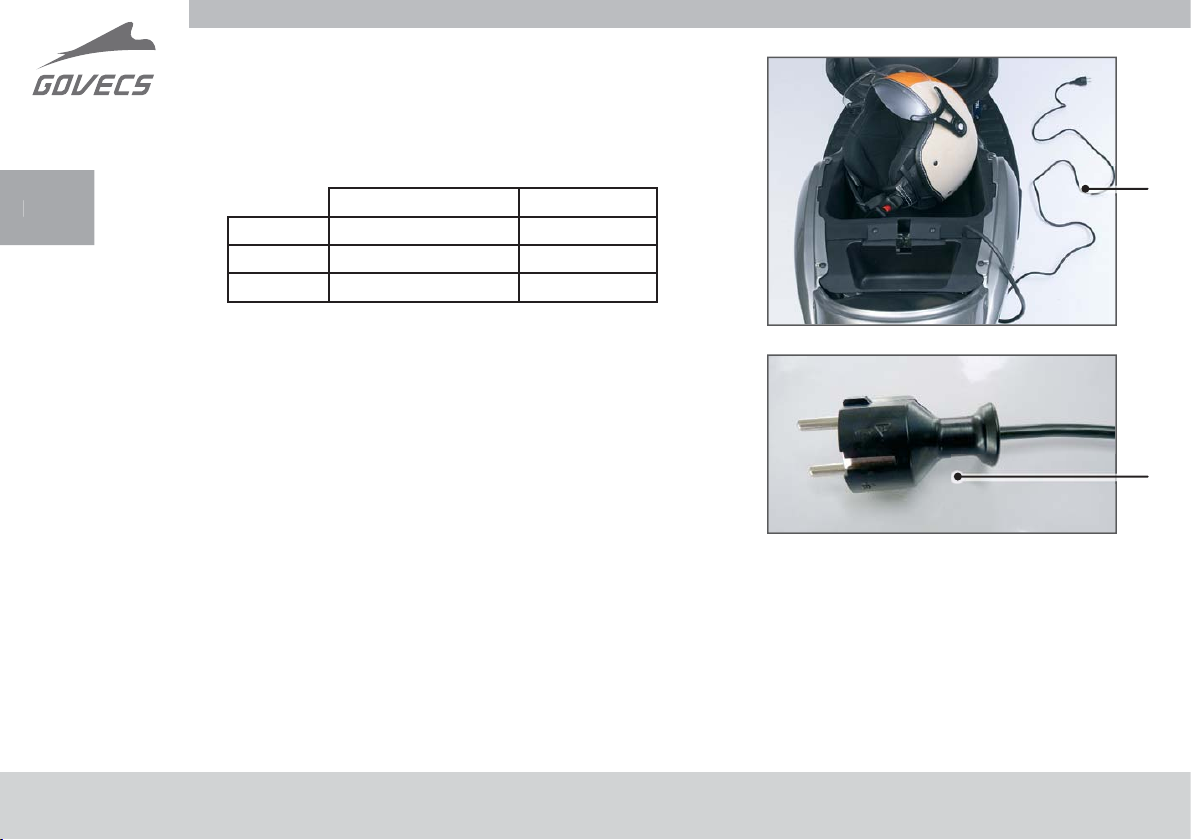
2.10 Charging of the battery
1. Charging cable (in trunk under the seat)
2. Plug CEE7-VII at the end of charging cable
1
E
Blinking 0-80% charged -
Solid light 80-99% charged 80-90% charged
No light 100 % charged 100% charged
Charging cable can be used for all sockets type E/F or
CEE 7/4 with specifi cation 16A/250V.
Charging time of empty battery is about 4-5 hours.
Battery should be charged each time it is possible since it
extends its lifetime.
Charging phase is visible on Batery signal light on
speedometer.
Avoid riding with not fully charged battery since
it decreases its lifetime. There is no possibility to
overcharge the battery.
Important note: battery requires to be charged at least once a month, even if you do
not use your scooter.
Do not load the battery at temperature lower than -10 degrees.
GO! S1.2 GO! S2.4
2
18
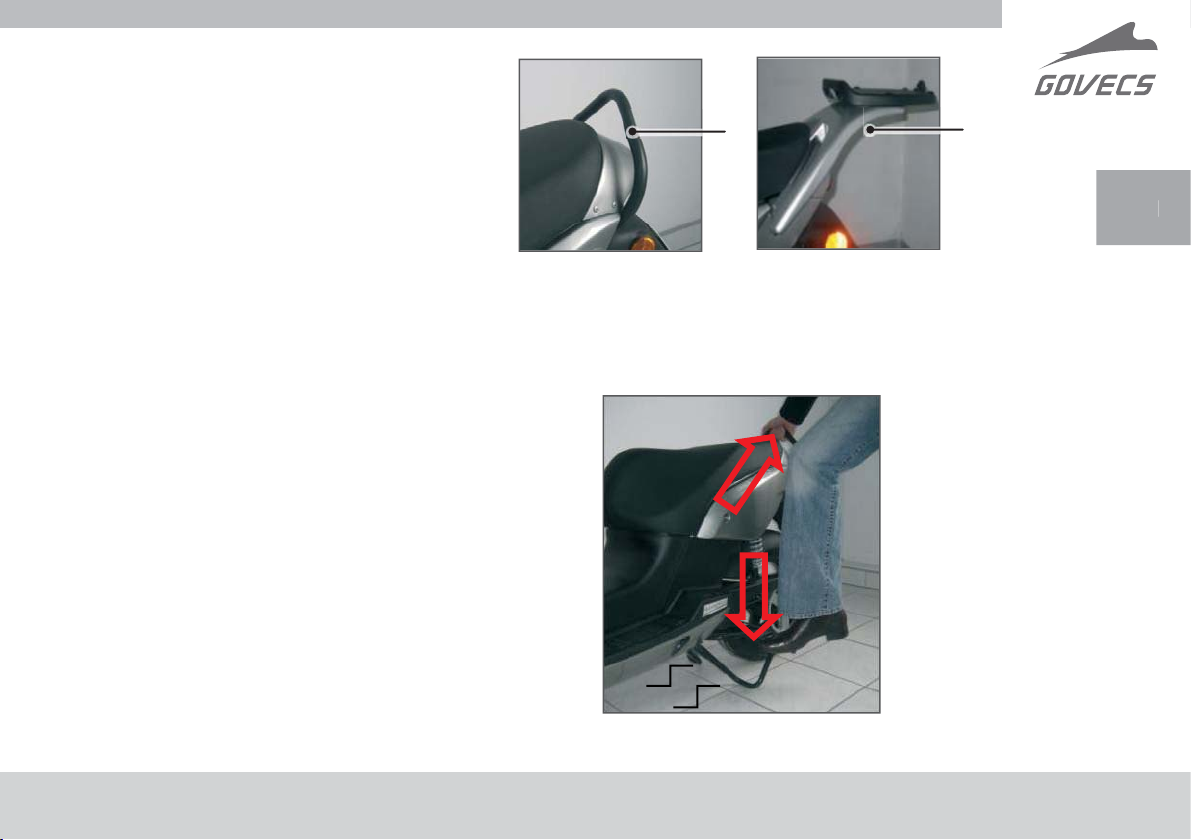
2.11 Handle
3
1
2
Handle (1) allows passenger to hold during
riding. Moreover, the handle is helpful while
positioning the vehicle on center stand.
GO!S2.4 is equipped with handle that is also a
top case holder (2).
2.12 Position the vehicle on the
center stand
1. In order to support the vehicle on stand,
press down the catch of the center stand
from the left side of the scooter (arrow 1)
2. Both legs of center stand must stand on
the surface (arrow 2)
3. Press down the catch of the center
stand at the same time pull the handle
backwards and upwards until the scooter
is safely supported on the center stand.
Do not sit on the scooter while it is
supported on the stand since it may
damage the vehicle!
* Depending on the model of the scooter it’s appearence
may be di erent
Handle GO! S1.2
Position on center stand*
1
Handle GO! S2.4
3
1
2
2
19
N
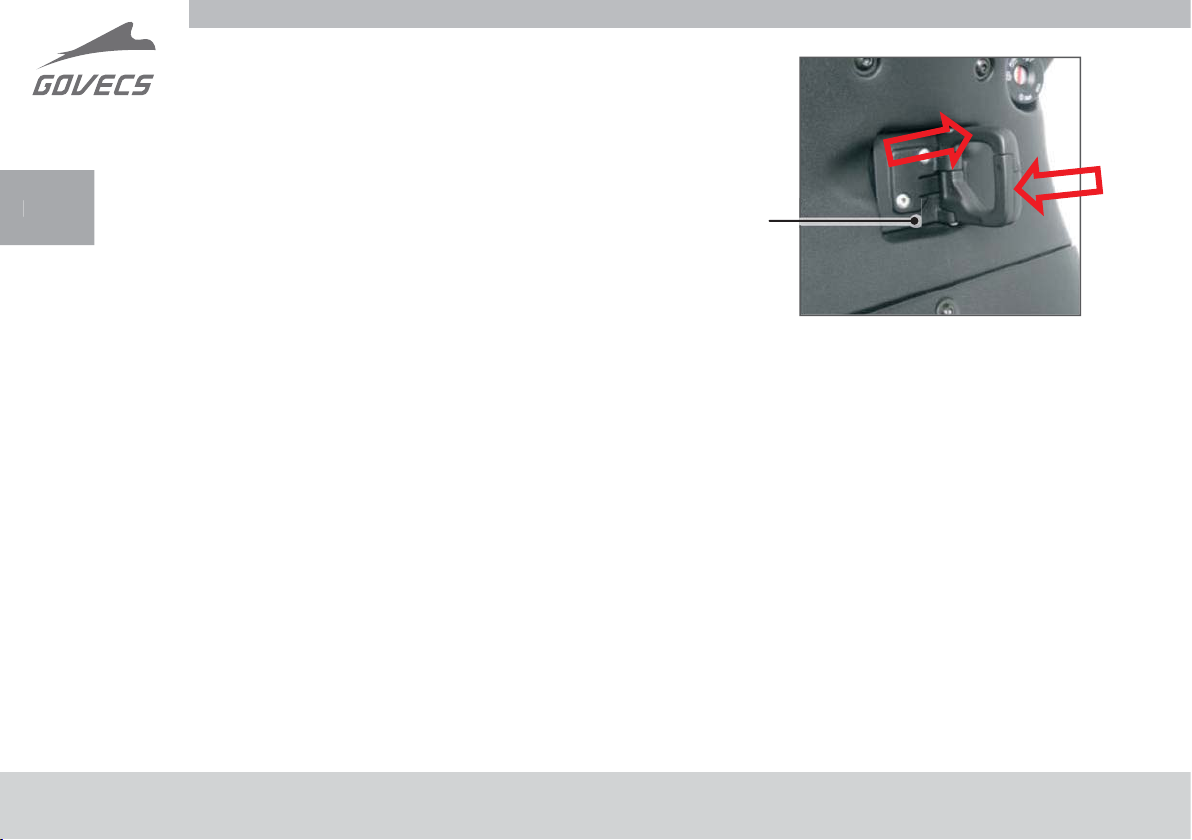
2.13 Hook for bags
Hook for bags (1) can be used to hang bags.
Hook has protection, which prevents from unfastening
E
and loosing the bag.
In order to hang a bag the operator should expand the
hooks in directions showed with arrows.
Remember that while turning the vehicle the
swinging bags may a ect riding.
Do not hang weights exceeding 3 kg on the hook.
1
Hook for bags
2.14 Lighting
Each time, before riding the lighting installation should be checked in respect of its
functionality, damages, and settings.
• Head-light („+” high beam) and parking light
• Front and rear turn signals
• Tail light
• Brake light for front and rear brake
• Number-plate light
Due to the fact that the LED energy-saving bulbs were used in GOVECS scooters, in case
of abnormal functioning or damage of lighting installation, its repair should be ordered
at GOVECS service station.
20

2.15 Tires
It is necessary to check tires before riding for possible damages or lack of air.
Too low air pressure or worn out tires have negative impact on the scooter’s performance
during riding and reducing the scooters’ range.
Tires can be replaced only at the GOVECS service station.
Air pressure in tires can be checked and adjusted at every petrol station. Pressure in tires should
be checked once a week and after longer periods of downtime.
Airpressure Without load With load (2 persons)
Front 2,5 bar 2,6 bar
Rear 2,5 bar 2,8 bar
21

N
2.16 Brakes
Braking system is the safety system of the vehicle. For personal safety one should particularly
consider condition of braking system.
E
The following elements of braking system should be checked before riding:
1. Braking fl uid level (see point 2.17).
2. Seal of the braking system.
3. Performance control.
In order to check performance of the brakes the operator should push the scooter several
meters. While pushing squeeze the front brake and then the rear brake, one at a time. During
braking test the scooter should be fi rmly held, which will prevent it from falling over.
Note! Maintenance works and repair of the braking system are only allowed at GOVECS
service stations.
22
2.17 Control of braking liquid level
Braking liquid level should be checked each
time before riding.
• Position the vehicle on the center stand
• Turn the handlebar to the left
• Check the level on the sight-glass from
the right side of the vehicle - It must fi t
between upper and lower edge of the
sight-glass.
Absence of visible liquid in the sight-glass
means damage of braking system.
Scooter should not be used until the
braking system is repaired at the GOVECS
service station.
2.18 Control of belt tention
The belt tension should be 80-85 Hz which
can be measured with a standard Trummeter
for measuring belt tensions. Please contact
your service station for measurment and
tention adjustment.
Level
min – max
Sight-glass of the braking liquid level
23

N
2.19 Technical specifi cation
GO! S1.2 GO! S2.4 Comments
Length 1800mm without grabhandlle
Width 685 mm without mirrors
E
Height 1120 mm without mirrors
Seat Height 790 mm
Weight ~ 140 kg ~ 115 kg
Loading capacities max 150 kg including the passenger
Under seat trunk capacity max 5 kg
Topcase (optional)
loading capacity
Tire pressure
Tire sizes 130/60-R13
Tire type
Light bulbs
front 2,5 bar 2,6 bar (2 persons)
rear 2,5 bar 2,8 bar (2 persons)
Front - H4 35W 12V
position light power 0,9W
brake light power 2,7W
Indicators - LED 12V 1,0W N9t
Licence Pate Light: LED 12V for “+” version
3 kg
Heidenau K61
Duro DM1017
Duro HF916
Maxxis M6029
Rear: LED 12V
24

GO! S1.2 GO! S2.4 Comments
Fuses 60A, 20A
Transmission ratio 5.69
Motor PMAC
Battery type
Battery voltage nominal 96V nominal 72V
Charger
Battery estimated lifetime 20 000 km 50 000 km
8 x 12V 20Ah
Lead/Silicone
96V / 4A, onboard
charger, 110-240V
(50/60 Hz)
72V, 40Ah Lithium Ion
220-110V; 6A/220 V
Range 50-60 km 60-100 km
Charging time 4-5 hours (95%)
Brakes type
Brake fl uid DOT4
Torque 54 Nm
* Depending on production batch
Front - hydraulic brake,
rear – drum brake/disc brake*
2,5h (80%) and 3,5-4h
(100%)
depending on driving
profi le, tires pressure,
weather conditions etc.
25
N
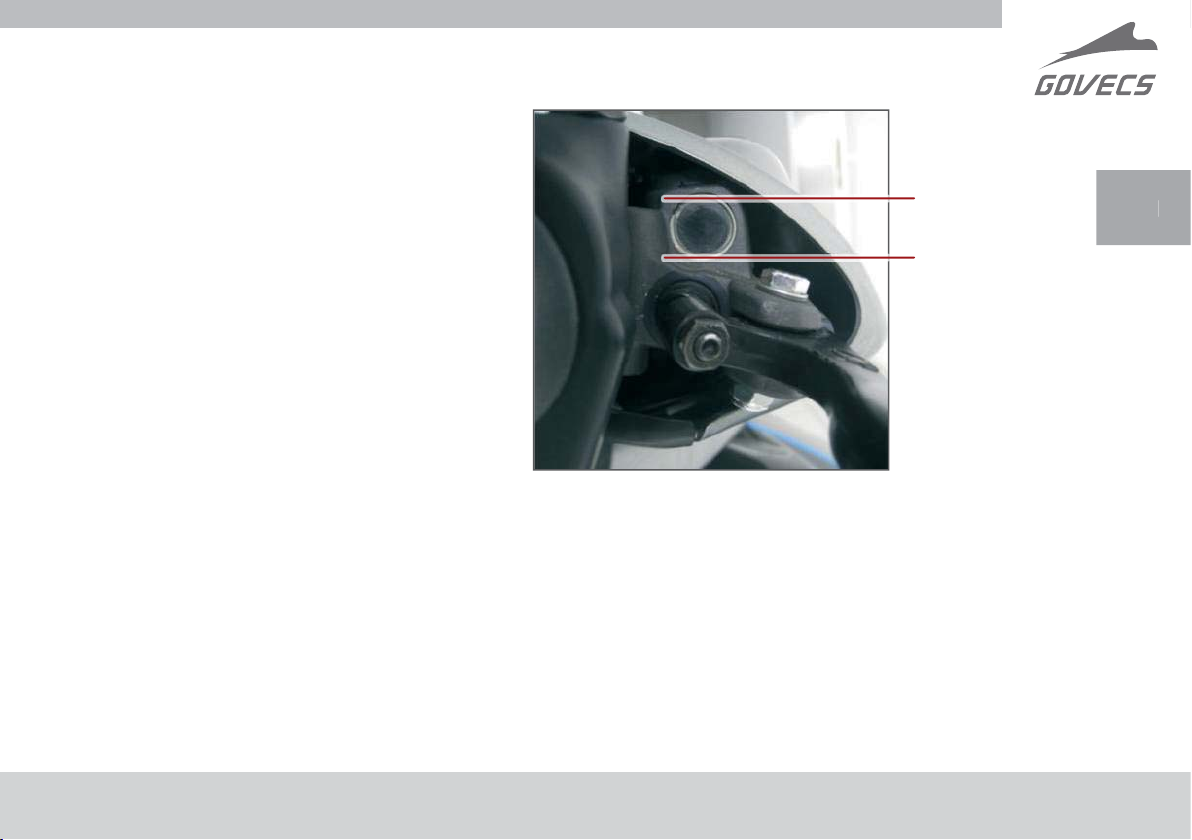
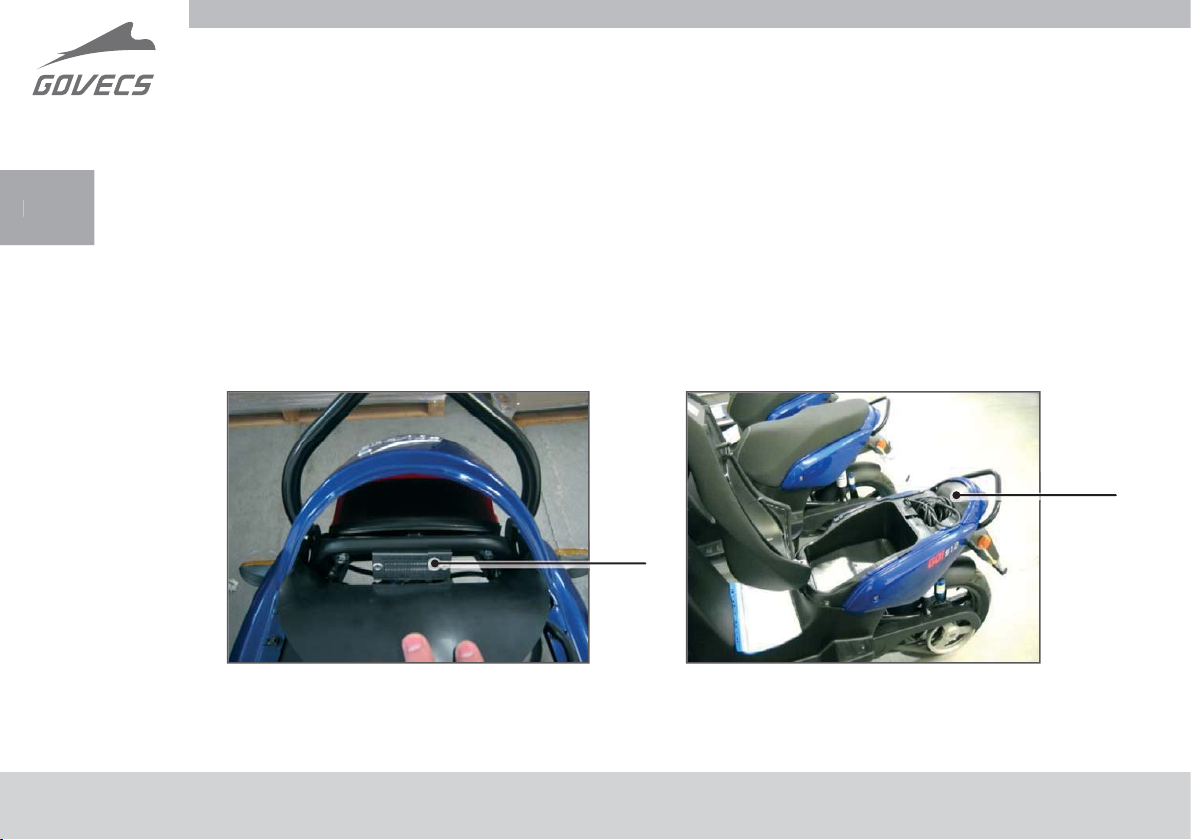
2.20 How to check the VIN number
You can fi nd the VIN number in two di erent places on the scooter: under the seat and under
the charger box cover.
E
1. In order to fi nd the VIN number under the seat, open it and bend back the rubber lamp
cover.*
2. On the rectangle shaped metal plate you will see the VIN number of the vehicle.*
1
1
* Depending on the model of the scooter its appearance may be di erent
26

• In order to fi nd the VIN number
under the plastic charger cover you
need to unscrew it in four places
(please refer to the pictures).
• Once unscrewed, remove the plastic
cover.
• You will fi nd the VIN number
engraved on the right hand side of
the frame.
1
2
4
3
1
27

N
2.21 Motor Controller Communication Codes
Code Message Limit Action
E
F-0884 Sequence code
F-05C1
F-05C2
F-05C3
F-05C4
F-05C5
F-05C6
Battery Discharge
Indicator - Warning
Battery Discharge Cut-out
- Warning
Low Battery Voltage Warning
High Battery Voltage Warning
Hight Capacitor Voltage Warning
Low Battery Voltage Warning
SOC<3% - GO! S1.2/GO! S1.2+;
SOC<10% - GO! S2.4/GO! S2.4+
SOC<1%
80V - GO! S1.2/GO! S1.2+;
56V - GO! S2.4/GO! S2.4+
114V - GO! S1.2/GO! S1.2+;
112V - GO! S2.4/GO! S2.4+
114V - GO! S1.2/GO! S1.2+;
112V - GO! S2.4/GO! S2.4+
39.1V
Please shut o scooter and restart the ignition
with the kill switch in the “O ” position.
The operator should charge the battery. When
the battery is full charge the operator can
resume riding.
The operator should charge the battery. When
the battery is full charge the operator can
resume riding.
The operator should charge the battery. When
the battery is full charge the operator can
resume riding.
The operator should leave scooter in idle state
(ignition ON) for 2-3 minutes, battery balancing
in process.
The operator should leave scooter in idle state
(ignition ON) for 2-3 minutes, battery balancing
in process.
The operator should charge the battery. When
the battery is fully charge the operator can
resume riding.
28

Code Message Limit Action
F-05C7
High Battery Voltage Warning
116V
The operator should leave scooter in idle stage
(ignition ON) for 2-3 minutes, battery balancing
in process
F-05C8
F-05C9
F-0601
F-0602
F-0603
F-0604
High
Curr
High Capacitor Voltage
Warning
Motor in low voltage
cutback
Low Scooter Temperature
- Warning
High Scooter Temperature
- Warning
High Motor Temperature
- Warning
Low Motor Temperature Warning
High current due to
battery regenaration
150V
84V - GO! S1.2/GO! S1.2+;
60V - GO! S2.4/GO! S2.4+
-30 ⁰C
80 ⁰C
130 ⁰C
-30 ⁰C
n/a No action necessary, not a fault indication.
The operator should leave scooter in idle stage
(ignition ON) for 2-3 minutes, battery balancing
in process
The operator should allow the scooter to warm
to room temperature before resuming to ride
the scooter.
The operator should allow the scooter to cool to
room temperature before resuming to ride the
scooter.
The operator should allow the motor to cool to
room temperature before resuming to ride the
scooter.
The operator should allow the motor to warm to
room temperature before resuming to ride the
scooter.
29

N
3. Taking care of the vehicle
In order to maintain the vehicle properly certain instructions must be observed.
E
• Clean the vehicle with sponge and clean water on regular basis.
• Do not use hard sponges or scratching materials for insects removal.
• Varnished covered elements should be cleaned with use of varnish preparations.
• Plastic parts should only be cleaned with agents dedicated to plastic elements.
• Make sure that the anticorrosive aerosol sprays are not used on braking system elements,
varnished parts and plastic elements.
• The vehicle parked outdoor should be protected with a breathing cover. Standard covers
made of artifi cial material cause water condensation under the cover and consequently
make the scooter corroded.
Under no circumstances can the high-pressure washer be used for the scooter cleaning.
30
 Loading...