

Page 1

HERO7 WHITE
USER MANUAL
1
Page 2

JOIN THE GOPRO MOVEMENT
facebook.com/GoPro youtube.com/GoPro
twitter.com/GoPro
instagram.com/GoPro
Page 3

TABLE OF CONTENTS
TABLE OF CONTENTS
The Basics 6
Charging 8
Updating the Software 11
Exploring Your HERO7 White 10
Taking Photos 14
Recording Video 16
Controlli ng Your GoPro wit h Your Voice 20
Playing B ack Your Content 24
Connecting to Other Devices 26
Ooad ing Your Content 28
Advance d Controls 32
Customizin g Your GoPro 36
Important Messages 40
Resetting Your Camera 41
Mounting 42
Removing th e Side Do or 46
Maintenance 48
Battery Information 49
Troubleshooti ng 52
Customer Support 53
Trademarks 53
Regulatory Information 53
Page 4

THE BASICS
GETTING STARTED
1. Shutter Button [
2. Status Light
3. Microphone
4. Side Door
5. Latch Release Button
Learn how to use the ac cessories that came with yo ur GoPro. See Mounting
(page 42).
6 7
]
6. USB -C Port
7. Touch Display
8. Speaker
9. Mode But ton [
10. Bat tery
]
MICROSD CARDS
You’ll need a mi croSD™ card (sold s eparately) to capture video an d
photos. Use a b rand nam e card that meets these re quireme nts:
• microSD, m icroSD HC™, or microS DXC™
• Class 10 o r UHS-I rati ng
• Capaci ty up to 128GB
For a list of the re comme nded microSD card s, visit
gopro.com/workswithgopro.
INSTALLING YOUR MICROSD CARD
1. Hold down the Latch Release button on the side door, then slide the
door open.
2. With your ca mera o, inser t your mic roSD card i nto the card slot wi th
the label facing the U SB port.
You can eject the card by pressing it into the slot with your ngernail.
HEADS UP: Make sure your h ands are dry and cle an when you’re handling
memory cards. Check the memory card manufacturer’s guidelines for
information about use in acceptable temperature ranges.
PRO TIP: Keep your microSD card in good condition by reformatting it
regularly. This will erase all of your content, so be sure to save it rst.
Page 5

GETTING STARTED
UPATING THE SOFTWARE
CHARGING
Your HERO7 White has a built-in battery. Make sure it’s fully charged before
heading out for your adventure.
1. Hold down the Latch Release button on the side door, then slide the
door open.
2. Connect your camera to a computer or other USB charger using the
included USB-C cable.
The came ra status li ght turns o whe n the batter y is fully ch arged.
It takes abo ut 2 hours to ch arge to 100 %. For mo re informatio n, see
Battery Information (page 49).
PRO TIP: For the fastest charging, u se GoPro’s Sup ercharg er (sold
separately).
Having the m ost current software en sures that yo u’ll always have the
latest features and best performance.
Updatin g with the GoP ro App
1. Download the app from the Apple
2. Follow the app’s on-screen instructions to connect your camera.
If an update is avalable, the app will te ll you how to insta ll it.
Updatin g with the Qui k Deskto p App
1. Downlo ad the app f rom gopro.com/apps.
2. Conne ct your cam era to your computer using the included
USB-C cable. If an update is aval able, the a pp will tell yo u how
to install it.
Updating Manually
1. Visit gopro.com/update.
©
App Store© or Google Play.
™
2. Select “H ERO7 White” from the list of c ameras .
3. Click “Up date your ca mera man ually” an d follow the in strution s.
PRO TIP: Need your current software versio n? Swipe down from the
main scre en, then ta p Preferenc es > About T his GoPro.
8 9
Page 6

EXPLORING YOUR HERO7 WHITE
EXPLORING YOUR HERO7 WHITE
POWERING ON
Press the Mode button [ ] to turn on your HERO7 White.
POWERING OFF
Press and hold the Mode button [ ] to turn it o.
WARNING: Us e caution w hen usin g your GoPr o. Always be
aware of your s urroundi ngs to avoid i njury to you rself an d
others.
Abide by al l local law s when usin g your GoP ro and rela ted
mounts an d access ories, in cludin g all priva cy laws, whic h may
restrict recording in certain areas.
10 11
TOUCH DISPLAY
The informa tion that you s ee on the touc h display varies by mo de.
1. Camera Mode
2. Time Remaining/Photos Taken
3. Battery Status
4. Settings
HEADS UP: Some setti ngs are not ava ilable w hen turn you r GoPro to take
portrai t shots. Adj ust those s ettings b efore rotating you r camera .
Page 7
EXPLORING YOUR HERO7 WHITE
EXPLORING YOUR HERO7 WHITE
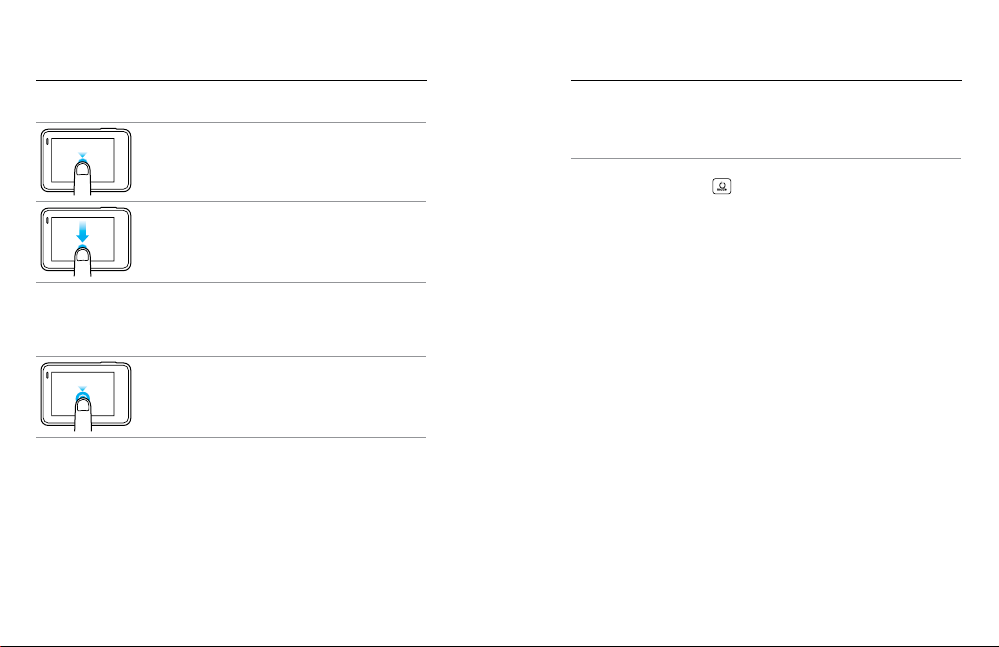
USING THE TOUCH DISPLAY
Tap
Selects a n item, turn s a setting on /o.
Swipe Down
From the main screen, opens the Preferences.
From other scre ens, retur ns you to the main screen .
Swipe Up
Accesses your media.
Press an d Hold
Activates Exposure Control.
PRO TIP: Be sure to swipe fro m the edge of the screen.
12 13
MODES
Your HERO7 White has three modes: Video, Photo and Time Lapse.
Change modes by swiping left or right and tapping the mode you want.
PRO TIP: The touch dis play won’t work un der water. With the ca mera
on, use the Mode bu tton [ ] to switch modes.
Page 8

TAKING PHOTOS
TAKING PHOTOS
HERO7 White takes 1 0MP photos with a wide eld of view (FOV). The
wide FOV helps you captu re as much a s possib le within the frame.
PRO TIP: Crop your photos i f you want to elim inate the sh eye look
around the e dge of the fra me.
TAKING A SINGLE PHOTO
1. Tap the photo icon.
2. Press the Shutter button [
TAKING CONTINUOUS PHOTOS
Press and h old the Shutter button [
rate of XX per se cond. Re lease the b utton to stop.
TAKING BURST PHOTOS
Burst take s 15 photos in 1 se cond. It’s pe rfect capturing fast action.
3. From the photo screen, tap the burst icon.
4. Press the Shutter button [
USING T HE TIME R
Set up the Tim er when you wa nt to take a sel e.
1. From the photo screen, tap the timer icon.
Choose 3 second or 10 seconds.
2. Press the Shutter button [
takes the photo.
PRO TIP: Take Burst seles by tapping th e burst icon before setting up
the Timer.
14 15
].
] to take continu ous photos at a
].
]. The camera starts the countdown and
ZOOM
Use Zoom to capt ure a close r view of the action.
1. From the photo screen, tap the zoom icon.
2. Use the slider to choose how much you want to zoom.
3. Tap anywhere to exit. The zoom level is locked until you re-adjust it,
switch capture modes, or turn o your camera.
PRO TIP: You can set up your sh ot by using any c ombination of Burs t,
Timer an d Zoom that you wa nt.
Page 9

RECORDING VIDEO RECORDING VIDEO
HERO7 White captu res 1440 p video with a w ide eld of v iew (FOV) and 4:3
aspect ratio. This is great for actio ns shots an d sharing to social media.
PRO TIP: Crop you vide os if you want to elm inate the s heye look a round
the edge of the f rame.
RECORDING VIDEO
1. Tap the video ico n.
2. Press the Shutter button [
3. Press the Shutter button [
PRO TIP: You can also reco rd video us ing voice comman ds. See
Controllin g Your GoPro with Your Voice (page 20).
RECORDING A CLIP
Your HERO7 White can sh oot shor t video cl ips that are q uick and e asy to
save on your p hone and s hare on so cial med ia.
1. From the video screen, tap the video ic on.
2. Choose a 15 or 30 second clip.
3. Press the Shutter button [
recordin g a the end of the c lip.
PRO TIP: Press and ho ld the Shut ter button [
clips.
16 17
].
] again to stop re cording .
]. Your camera will a utomatic aly stop
] to take continu ous
RECORDING IN SLOW MOTION
HERO7 White lets you c apture the a ction at 60 frames per second (FP S),
then play it b ack at 2X sl ow motion.
1. From the video screen, tap the slomo icon.
2. Press the Shutter button [
3. Press the Shutter button [
PRO TIP: You can watch your clips in 2X slo mo or norm al spee d. See
Playing Back Your Content (page 20).
ZOOM
Use Zoom to capt ure a close r view of the action.
1. From the photo screen, tap [Zoom icon].
2. Use the slider to choose how much you want to zoom.
3. Tap anywhere to exit. The zoom level is locked until you re-adjust it,
switch capture modes, or turn o your camera.
PRO TIP: You can set up your sh ot by using any c ombination of Clip,
Slomo an d Zoom that you wa nt.
].
] again to stop re cording .
Page 10

RECORDING TIME LAPSE QUIKCAPTURE
Time Lap se spee ds up the action by captu ring fram es every 0.5 seconds
and playi ng them back at norma l speed . It’s great for suns ets and other
shots that happen over a lo ng peri od of time.
1. Tap time lapse ic on.
2. Press the Shutter button [
3. Press the Shutter button [
ZOOM
Use Zoom to capt ure a close r view of the action.
1. From the photo screen, tap the zoom icon.
2. Use the slider to choose how much you want to zoom.
3. Tap anywhere to exit. The zoom level is locked until you re-adjust it,
switch capture modes, or turn o your camera.
18 19
].
] again to stop re cording .
RECORDING VIDEO WITH QUIKCAPTURE
Set up Quik Capture to powe r up your cam era and start reco rding video
with the push of a s ingle bu tton. The c amera is p owered on on ly when it’s
recording, so you conserve battery power.
1. Power o the c amera.
2. Press and hold the Shutter button [
Your camera powers on, beeps several times, and automatically
begins re cording. The lights b link whil e the came ra is record ing.
3. The camera stops recording, beeps several times, and automatically
powers o.
TURNING QUIKCAPTURE OFF
QuikCa pture is on by defa ult, but you c an turn it o, if needed.
1. From the ma in screen, swipe down.
2. Tap Preferences > QuikC apture.
3. Tap O .
] for 2 secon ds.
Page 11

CONTROLLING YOUR GOPRO WITH
YOUR VOICE
CONTROLLING YOUR GOPRO WITH
YOUR VOICE
You can control yo ur HERO7 White with yo ur voice us ing spe cic
comman ds (see list bel ow).
Note: Voice Control per formance m ay be impacted by d istance, wind, and noisy
conditions. Keep the product clean and clear of debris.
USING VOICE CONTROL
Voice Control wo rks best wh en you’re not too far away fro m your GoP ro.
1. From the ma in screen, swipe down.
2. Tap [ ] to turn on Voice C ontrol.
Note: You can also turn Voice C ontrol on or o from the Preferences men u. Tap
Preferences > On C amera Voice Control, then sele ct an option.
3. If this is the r st time you tu rned on voi ce control , conrm or c hange
the voice control language.
4. Say a comm and from List of Voice Commands (page 21).
5. To turn o Voice C ontrol man ually, swipe down on the main s creen,
then tap [ ]. Voi ce Control a lso turns o when your ca mera
automatic ally power s o. For details, s ee Auto O (page 37).
20 21
LIST OF VO ICE CO MMAND S
Two types of comman ds are avail able with Voic e Control:
• Acti on comm ands let yo u immedi ately record video or photos.
For exampl e, if you just stopped rec ording vi deo, you ca n say the
comman d to take a photo or be gin takin g time lap se photos—without
having to rst c hange th e mode.
• Mo de comm ands are us eful if you want to q uickly se lect a mod e and
then use the S hutter bu tton to re cord.
You can use the ac tion comm ands from any mode. Your camera rec ords
video or p hotos base d on the setti ngs you previ ously se lected.
Action Command Description
GoPro start recording Starts recording video
GoPro HiL ight Adds a HiLight Tag to video
That was sic k Adds a HiLight Tag to video
GoPro stop re cording Stops recording video
GoPro take a p hoto Takes a single photo
GoPro sho ot burst Takes burst photos
GoPro star t time lapse Starts ta king time l apse photos
during recording
during recording
Page 12

CONTROLLING YOUR GOPRO WITH
YOUR VOICE
CONTROLLING YOUR GOPRO WITH
YOUR VOICE
Action Command Description
GoPro stop tim e lapse Stops taking time lapse photos
GoPro turn o Powers o the ca mera
GoPro edi t my story Moves vide o and photos from your
Mode Command Description
GoPro Video mode Change s the came ra mode to Vid eo
GoPro Photo m ode Changes the camer a mode to Photo
GoPro Burst mode Changes the c amera mo de to Burst
GoPro Tim e Lapse m ode Change s the came ra mode to
For the most updated li st of comma nds, visi t gopro.com/help.
22 23
most recent session (based on location
and date) to your phon e to create a
™
QuikS tory
Note: If the QuikStorie s feature is turned
on in the GoPro ap p, video and photos are
automatically moved from your camera
to your phone to crea te a QuikStory. This
voice comm and lets you move the co ntent
immediate ly instead of waiting for the
automatic process.
(does not record video)
mode (does not ta ke photos)
mode (does not ta ke burst photos)
Time Lap se (does not take tim e
lapse photos)
PRO TIP: If you are recording video or time lapse, you must stop recording
before issuing a new command.
CHANGING YOUR VOICE CONTROL LANGUAGE
1. From the ma in screen, swipe down.
2. Tap Preferences > Language (in the Voice Control section).
3. Tap a language.
Page 13

PLAYING BACK YOUR CONTENT PLAYING BACK YOUR CONTENT
You can play back your conte nt on a mobil e device, a c omputer, the
camera’s touch display.
VIEWIN G VIDEO A ND PHOTO S ON A MOB ILE DEV ICE
1. Conn ect your camera to GoP ro app. For d etails, se e Connecting to
the GoPro App (page 26).
2. Use the contro ls on the ap p to play back yo ur footage o n your
smartphone/tablet.
PRO TIP: While playing back your video with the GoPro app, you can mark
the best moments by tapping [ ] to add a HiLight Tag.
VIEWIN G VIDEO A ND PHOTO S ON A COMP UTER
To play back your vi deo and p hotos on a computer, you must rs t
transfer these les to a computer. For details, see Ooading Your
Content (page 28).
VIEWIN G VIDEO A ND PHOTO S ON YOUR HERO7 WHITE
1. Swipe up to access yo ur video a nd photos. If yo ur HERO7 White
contains a l ot of content, it mi ght take a min ute for it to load.
2. To display only a ce rtain ty pe of content, select a lte r:
4. To add a HiLight Tag, tap [ ]. HiLight Tags ma ke it easy to nd
the best vid eo and ph otos to share.
5. To return to the thu mbnail s screen, tap [ ].
6. To exit, swipe d own.
DELET ING VID EO AND PH OTOS FROM YOUR HERO7 WHITE
1. Swipe up to access yo ur video a nd photos.
2. Tap [
].
3. Tap the items that you want to delete. To delete every thing on th e
camera, tap [ ].
4. Tap [ ].
5. Tap Delete.
SAVING A PH OTO FROM A S ERIES
You can save an individua l photo from a bur st series .
1. Swipe ri ght, then tap the photo seri es that contains the ph oto that
you want to save.
2. Press and hold the series to open it.
3. Tap [
] to move through th e series .
4. Tap [ ] to save a photo outsid e of the serie s.
• Me dia - Disp lays all vi deos and photos.
• HiLights - Dis plays content that incl udes a HiL ight Tag.
• Ph otos - Displ ays photos, in cludin g those that a re part of a se ries
(continuous, burst).
• Vi deo - Disp lays vide os. Swipe u p to scroll thro ugh the
thumbnails.
Note: For multi-shot p hoto series, the thumbnail d isplays the rst photo in
the series.
3. Tap a video or photo to op en it in full-screen vi ew.
Note: For multi-shot photo series, press and hold to open the series.
24 25
Page 14

CONNECTING TO OTHER DEVICES
CONNECTING TO OTHER DEVICES
CONNECTING TO THE GOPRO APP
With the GoP ro app, your HERO7 White footage a utomatic ally moves to
your phon e and trans forms into a QuikStory™—an awesome video with
eects and m usic. You can al so use the a pp to control you r GoPro, cre ate
short cl ips, sha re your favorite s, and more.
Connecting to the G oPro App fo r the First T ime
1. Downlo ad the GoPro app to your m obile dev ice from the A pple
Store© or Google Play™.
2. Follow the app's on-screen instructions to connect your camera.
Note for iOS: When prom pted, be sure to allow notication s from the GoPro app
so you know when a Qu ikStory is ready. For more informatio n, see Creating a
QuikStory (page 28).
Connecting to the G oPro App af ter the Fir st Time
After conn ecting to the G oPro app for th e rst time , you can connect in
the future thro ugh the Co nnectio ns menu o n the came ra.
1. If your ca mera’s wirele ss is not alre ady turned on, swipe d own, then
tap Connections > Wireless Connections.
2. In the GoPro a pp, follow the on-screen instructions to con nect
your camera.
CONNECTING TO B LUETOOTH DEVI CES
You can conne ct your Go Pro to Bluetooth d evices that track statis tics
about you r activity. That data is then a utomatically added to your vide o to
create a more en gagin g record of your activity.
26 27
©
App
1. Conn ect your camera to the GoPro app. Fo r details, s ee Connecting
to the GoPro App (page 26).
2. In the app, op en the cam era’s setting s, then tap B luetooth Devices.
3. Follow the on-screen instructions.
SELECTING A DIFFERENT CONNECTION SPEED
By default, yo ur GoPro us es the 5GHz W i-Fi band to c onnect to oth er
devices. This ban d provides fa ster transfer speed than the 2.4GHz ba nd.
The transfe r speed ae cts how long it takes for you r video an d photos to
be copie d to your phone to create a Qui kStory.
To use the 5GHz band , your phon e and regi on must al so work with tha t
band. Oth erwise, yo u can cha nge the Wi- Fi band on yo ur GoPro to
2.4GHz.
1. Swipe down, then tap C onnecti ons > Wi-Fi B and.
2. Tap 2.4GHz.
Page 15

OFFLOADING YOUR CONTENT OFFLOADING YOUR CONTENT
All of your vid eo and ph otos are automa tically c opied to you r
smartp hone’s came ra roll. Ori ginals re main on the camera. If you’re
runnin g out of room on yo ur HERO7 White, the n ew content over writes
anything t hat’s already b een copied to your ph one.
CREATING A QUIKSTORY
QuikStories automatically copies video and photos from your camera
to your mobile device. T hen the Go Pro app ser ves up an ed ited vide o,
complete wi th music and eects—a Q uikStory. You can s ave and edit
your QuikStory, or delete it f rom your pho ne.
1. Set up QuikStories:
a. Connect your ca mera to the Go Pro app. For d etails, see
Connecti ng to the GoPro Ap p (page 26).
Note for iOS: When prom pted, be sure to allow notication s from
the GoPro app.
b. Close the a pp.
2. Record vid eo and ph otos on your ca mera.
3. Open the G oPro app and swipe down from the home s creen. Your
camera automatically moves content from your most recent session
to your mobile device. W hen your Q uikStory is ready, you recei ve a
noticati on on your p hone.
4. Open the Q uickStor y and previ ew it.
5. Make additional edits, if needed.
6. S ave the QuikS tory, then share it with your fri ends.
OFFLOADING YOUR CONTENT TO A COMPUTER
To play back your vi deo and p hotos on a computer, you must rs t transfer
these les to a computer.
1. Be sure th at your com puter is ru nning the l atest versi on of the
operating system.
3. Conne ct the came ra to your computer usin g the included
USB-C cable.
4. Power on the ca mera and fo llow the on- screen in structio ns in Quik .
AUTO UPLOADING YOUR CONTENT TO THE CLOUD
With a subsc ription to Go Pro Plus, you can use A uto Upload to u pload
your content to th e cloud. You ca n then view, edit, a nd share it f rom any
of your devic es.
Note: When you uplo ad your content to the cloud, your ori ginal les remain on you r
camera.
1. Subs cribe to Go Pro Plus:
a. Download the GoP ro app to your mo bile devi ce from the Ap ple©
App Store© or Google Play™.
b. Follow the app’s on-screen instructions to connect your camera.
c. If this is th e rst time yo u are conn ecting to the a pp, follow the
on-screen instructions to subscribe to GoPro Plus. Otherwise,
tap [ ] next to the i mage of you r camera a nd follow the
instructions.
2. Conne ct your cam era to a power outlet. When the b attery is c harged,
Auto Upload begins.
Note: Once you set up Au to Upload, you d o not need to connect your cam era to
the GoPro app to us e this feature.
The les i n the cloud a re optimized fo r the web, so mi ght not be full
resolution. To ooad les in their full resolution, connect your camera
to the Quik de sktop app a nd ooad th e les to your c omputer.
PRO TIP: You can also use the Quik desktop app to transfer your les to
your computer. Quik then uploads the les to your GoPro Plus account.
2. Downloa d and insta ll the Qui k desktop app from gopro.com/apps.
28 29
Page 16

OFFLOADING YOUR CONTENT
OFFLOADING YOUR CONTENT
MANUALLY UPLOADING YOUR CONTENT TO THE CLOUD
This optio n lets you upl oad content to the cloud wi thout waiti ng for the
camera b attery to cha rge. (Your GoPro must be co nnected to a p ower
outlet to use th is option.).
1. Subs cribe to Go Pro Plus. Fo r details , see Auto Uploading Your
Content to the Clou d (page 29).
2. Conne ct your cam era to a power outlet.
3. From the main s creen, swi pe down.
4. Tap Preferences > Manual Upload.
ACCESS ING YOUR CLOUD CO NTENT O N YOUR MO BILE D EVICE
1. Open the GoPro ap p.
2. Tap [
], and then s elect Cl oud. You can view, edit, and sha re your
content.
PRO TIP: To turn your cloud co ntent into an edited video, open the Qu ik
app, tap [ ], then s elect G oPro Plus .
TURNING OFF AUTO UPLOAD
You can tempora rily turn o Au to Upload o n the came ra to prevent
automatic u pload to GoPro Plus wh en you con nect your c amera to a
power outlet.
1. Swipe down, then tap C onnecti ons > Auto Upl oad > Upl oad.
2. Tap O .
30 31
CONNECTING TO A D IFFERE NT WIRE LESS NE TWOR K
If you want to use a di erent wirel ess network for Auto Uplo ad, you can
select th at network fro m the came ra.
1. Swipe down, then tap C onnecti ons > Auto Upl oad > Netwo rks.
2. Tap the name of a networ k. The netwo rk must not b e hidden or
require an e nd user li cense a greement (such as the networ k in a
hotel).
3. If neede d, enter the pa ssword.
] to save the new net work.
4. Tap [
Page 17

ADVANCED CONTROLS
ADVANCED CONTROLS
ADDIN G HILI GHT TAGS
If you want to mark m emorable points i n your vide o during re cordin g or
playbac k, press the Mode button [ ] to add a HiLight Tag. Once a
moment is t agged, i t’s easier to n d it later for sha ring.
PRO TIP: You can also ad d HiLight Tags du ring reco rding with th e
GoPro app o r Voice Contro l.
32 33
EXPOSURE CONTROL
By default, yo ur camera uses the entire image to d etermine th e
appropriate exposure level. However, Exposure Control lets you select an
area that you wa nt the came ra to prioritize when determ ining expo sure.
This setti ng is par ticular ly useful in s hots where an importa nt region m ight
otherwise be over- or underexposed.
When you change this s etting, th e touch disp lay imme diately shows you
the eect on your image. If you chang e recording options , the came ra
returns to usin g the entire sc ene to determ ine the co rrect level of
exposure.
Using Exposure Control with Auto Exposure
With this opti on, the cam era always bases expos ure on the are a of the
touch disp lay that you select, reg ardless of what is in that are a.
Suppos e your cam era is mou nted on your da shboa rd. You might want to
select th e upper pa rt of the touc h display s o that the exposure is bas ed
on the scen e outsid e of the windsh ield and not on the das hboard (which
might cause the scene outside to be overexposed).
1. Press th e touch dis play until a square outl ine shrin ks to the midd le of
the screen.
2. Drag the sq uare to the area that you want to use to set the exposu re
level. (You can al so tap that a rea instead of d ragging the square .)
3. Tap [
] in the lower ri ght corne r.
Page 18

ADVANCED CONTROLS
ADVANCED CONTROLS
Using Exp osure Co ntrol with Locked Exp osure
With this opti on, the cam era lock s the exposure. That expos ure level
remains u ntil you can cel it.
For exampl e, suppo se you are sn owboardin g on a sunny d ay. By manually
setting the exposure level based o n your subject's jac ket, the imag es that
you record th roughou t the day are ba sed on the j acket. So, they a re less
likely to be underexpose d compa red to the brig ht snow.
1. Press th e touch dis play until a square outl ine shrin ks to the midd le of
the screen.
2. Drag the sq uare to the area that you want to use to set the exposu re
level. (You can al so tap that a rea instead of d ragging the square .)
3. Tap Auto Exposure to cha nge it to Loc ked Exposu re.
4. Conrm tha t the exposure looks the way you want it to, and th en tap
[
] in the lower ri ght corne r to lock the exp osure.
34 35
Canceling Exposure Control
Exposure Control is automatically canceled when you select a dierent
recordin g option or re start the c amera. You ca n also cancel this s etting
manual ly (below). When you ca ncel the exp osure set ting that you
previous ly set, the cam era returns to u sing the ent ire scene to d etermine
the correct level of exposure.
1. Press th e touch dis play until a square outl ine shrin ks to the midd le of
the screen.
] in the lower lef t corner.
2. Tap [
Page 19

CUSTOMIZING YOUR GOPRO
CUSTOMIZING YOUR GOPRO
From chang ing the be ep volume to tu rning o the s tatus lights , you can
set up your ca mera to work th e way that you want.
CHANGING PREFERENCES
1. Swipe down, then tap Preferences.
2. Tap a setting, then t ap a new optio n.
3. To exit, swipe down.
DATE AND TIME
The date and ti me are autom atically updated wh en you connect your
camera to the GoPro app o r the Quik d esktop ap p. However, you can
manual ly chang e these settings, if ne eded.
Note: If the battery is re moved from the camera for an extende d period of time, you
must reset the date and time (automatically or manually).
DAT E F OR MAT
The date format i s automatically base d on the came ra langua ge that you
select. However, you can m anuall y change thi s setting, if n eeded. T he
options are DD .MM.YY, MM.DD.YY, and YY.MM.DD.
BEEP VOLUME
Sets the volu me of your GoPro's aler ts. The opti ons are Hig h (default),
Med, Low, and O.
LED
Sets which st atus lights b link. The o ptions are A ll On (default), All O, and
Front O.
PRO TIP: Turn the front status lig ht o if you are reco rding in an a rea
with windows o r mirrors th at might cause reecti on in the shot.
36 37
DEFAULT MODE
Sets the reco rding opti on that your G oPro defaults to when power ing up.
The option s are Storie s (default), Photo, Video, or th e last optio n used.
Note: This setting d oes not aect Qu ikCapture.
AUTO OF F
Powers o your G oPro after a p eriod of inactivity to save battery li fe. The
options are 5 m inutes, 1 5 minutes (default), 30 min utes, and N ever.
Note: Voice Control is not avai lable when the camera is o un less the Wake On Voice
setting is turned on. When using Voice Control, consider selecting a higher time period
(or Never) for Auto O.
SCREENSAVER
Turns o the touch dis play after a p eriod of in activity to sa ve battery life.
The option s are 1 minute (defaul t), 2 minutes, 3 minu tes, and Neve r.
To turn on the touch dis play aga in, tap anywhere on the sc reen. Whe n
the touch display turn s o, you can still us e the came ra button s and
Voice Control.
BRIGHTNESS
Adjusts the brightne ss level of the tou ch displ ay. The options a re 10% to
10 0% (d ef a ul t).
Page 20

CUSTOMIZING YOUR GOPRO
CUSTOMIZING YOUR GOPRO
AU TO R OTAT ION
This setti ng determi nes the ori entation of yo ur video o r photos to help yo u
prevent upsi de down foota ge.
Setting Description
(Auto Image Rotatio n) Camera autom atically
Auto
Up (de fau lt)
Down
AUTO LOCK
Locks the tou ch displ ay to prevent acc idental i nput. Thi s setting is o by
default.
• To turn on Auto Lo ck, swipe d own, then tap [
unlock th e screen, swipe down, then tap the touc h display.
• To turn o Auto Loc k, swipe down , then tap [ ].
38 39
selects Up or Down, based on the orientation
of the camer a when reco rding beg ins.
Ensures tha t your resul ting image is always
right-side up.
Camera is set to always reco rd in right-side
up orientation.
Camera is set to always reco rd in upsid e
down orientation.
]. To temporarily
LANGUAG E
Sets the lan guage th at appea rs on the cam era.
VIDEO FORMAT
Sets the regi onal fram e rates that you r camera u ses for reco rding an d
playing b ack vide o on a TV/HDTV. Selectin g the appro priate optio n for
your region helps prevent icker when recording video indoors.
Setting Description
NTSC
PAL
Select th is option to pl ay back you r
video on an NTSC TV (most televisions
in North America)
Select th is option to pl ay back you r video
on a PAL TV (most televis ions out side of
North America)
Page 21

IMPORTANT MESSAGES RESETTING YOUR CAMERA
HIGH TEMPERATURE
The Temperature i con app ears on the to uch disp lay when
the camera becom es too hot and n eeds to co ol down.
Simply let i t sit and co ol before atte mpting to use i t
again. Your camera was designed to identify conditions of
overheatin g and shut s down when ne eded.
FILE REPAIR
If recordin g stopped a bruptly an d the vide o le wasn’t
properly s aved, the l e might be come co rrupted. If thi s
happen s, the cam era displ ays the File Re pair icon while
it tries to repa ir the le. When this pro cess is nished,
you receive a m essag e stating wh ether the rep air was
succes sful or fail ed. Pres s any button to co ntinue us ing the
camera.
STORAGE MESSAGES
FULL Your storage is full. M ove or delete s ome les .
40 41
RESTARTING YOUR GOPRO
If your cam era is not respondin g, press an d hold the Mode bu tton [ ]
for 8 secon ds to shut down th e camera a nd then rest art it. All s ettings
are retained.
RESET TING A LL SET TING S TO THE DEFAULTS
This optio n resets all of yo ur camer a settings to th e defaults, exc ept Date,
Time, camera name and password, Language, and Video Format.
1. From the ma in screen, swipe down.
2. Tap Preferences > Ca mera Defa ults, and th en tap Reset.
RESETTING THE CONNECTIONS
This option clears your connections list and resets the camera’s password.
If you reset the c onnecti ons, you m ust recon nect your d evices to you r
GoPro.
1. From the ma in screen, swipe down.
2. Tap Connections > Reset Connections, and then tap Reset.
RESTORING FACTORY SETTINGS
Follow the steps below to reset all settings, clear your connections, and
deregister the came ra from your G oPro Plus a ccount. Your c amera’s
software rem ains inta ct. This opti on is useful if you are rese lling you r
camera a nd want to reset it to its origina l state.
NOTICE: Restoring factory settings erases all content from your
HERO7 Whi te.
1. From the ma in screen, swipe down.
2. Tap Preferences > Factory Reset, and then tap Reset.
Page 22
MOUNTING
1 2
3
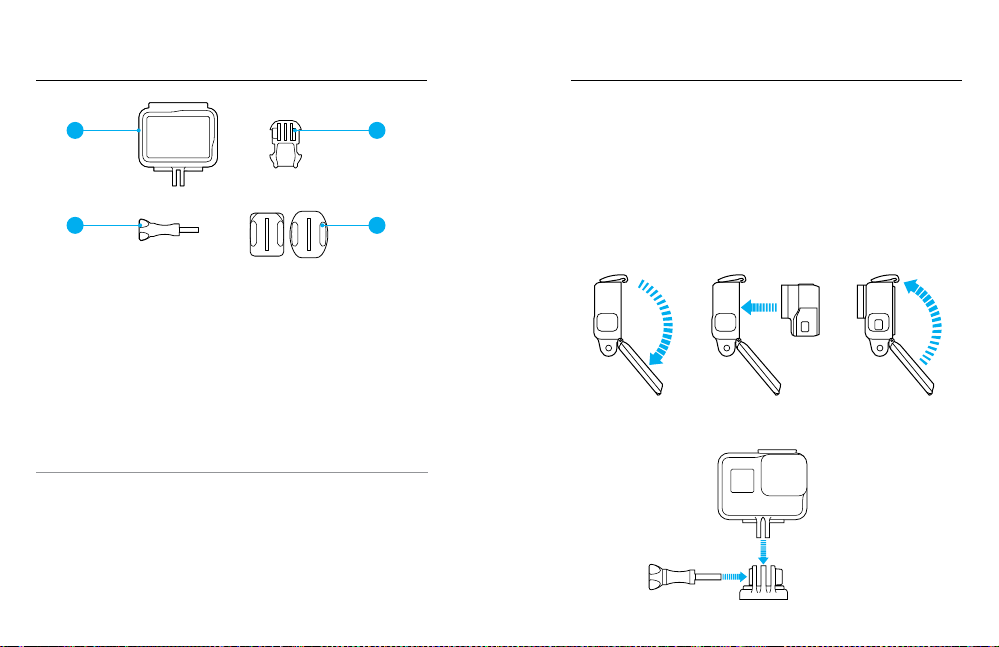
1. The Fram e
2. Mounting Buckle
THE FRAME
The Frame p rovides extra p rotection for yo ur came ra if you drop it, s o you
might want to kee p it in The Fram e during c ertain a ctivities , even if the
camera isn’t mounted.
HERO7 Whi te is water proof to 33’ (10m) with the do ors closed—no
additio nal hous ing is ne eded whe n you use the camera in or a round water.
NOTICE: Th e Frame doe s not provide additio nal waterpro of protection .
PRO TIP: During water activities, use a camera tether for added security
and use a Floaty to keep your camera aoat (both sold separately). For more
information, visit gopro.com.
42 43
3. Thumb Sc rew
4. Curved Adhe sive Mount
4
MOUNTING
ATTACHING YOU R CAMER A TO MOUN TS
To attach your cam era to a mount, yo u need Th e Frame. De pending on
the mount yo u’re using, you al so need a m ounting b uckle an d/or thumb
scr ew.
1. Secu re the came ra in The Fram e:
a. Open the latch.
b. Slide th e camera i nto the frame. T he front of The Fra me has a
raised edge. Be sure the front of the ca mera sits ush against it.
c. Close the door.
d. Lock the latch.
2. Attach Th e Frame to the mo unting bu ckle.
Page 23

MOUNTING
MOUNTING
3. Follow the Mounting Guidelines (page 44) to attach th e adhesive
mount to a sur face.
4. Attach the mounting b uckle to the m ount:
a. Flip up the mounting buckle plug.
b. Slide th e buckle i nto the mount until it clicks into place.
c. Pres s down on the pl ug so that it si ts ush with th e buckle.
• Ap ply the adh esive mou nt only to clea n, dry surfaces. Wax, oil, dirt or
other debr is reduce adhesi on, which c an result i n a weak bond and
risk of losi ng the cam era shoul d the conn ection fail.
• Atta ch the adhesive mount in room temp erature co ndition s. The
adhesive d oes not bo nd prope rly if it’s appli ed in col d or damp
environments to cold or damp surfaces.
• Check state and l ocal reg ulation s and laws to ensure that atta ching
a camera to equipme nt (such as hunting e quipm ent) is permitte d.
Always comply with regulations that restrict the use of consumer
electronics or cameras.
• Du ring water activities, u se a came ra tether and Floaty (both so ld
separately) for added sec urity to keep yo ur came ra aoat.
WARNI NG: To avoid in jury, do not us e a tether when m ounting
the camer a on a helmet . Do not mou nt the came ra directly o n
skis or snowboards.
For more infor mation ab out mou nts, visit gopro.com.
WARNING: If u sing your c amera with a G oPro mount or strap
PRO TIP: If you mount your HERO7 White upside down, the camera
automatically changes the orientation of your image to be right-side up. This
setting helps prevent upside-down images when you view your footage. For
more information, see Auto-Rotation (page 38).
MOUNTING GUIDELINES
Follow thes e guide lines whe n attachi ng the adh esive mou nt to curved
surfaces of helmets, vehicles, and gear:
• Atta ch the adhesive mount at least 24 hou rs before use.
• Th e adhesive mount mus t be mounte d only on sm ooth surfa ces.
Porous or text ured surfaces do not enable a p roper bo nd. When
applyin g the mount, rmly pres s it into plac e and ensu re full contact
over the entire s urface.
44 45
intended f or use with a he lmet, alway s select a h elmet that
meets the applicable safety standard.
Choose th e right helm et for your pa rticul ar sport o r activity
and make su re that it is the r ight t and s ize for you. In spect
your helm et to ensure th at it is in goo d conditi on, and fol low
the helmet manufacturer’s instructions on safe helmet use.
Any helme t that has sus tained a m ajor imp act shoul d
be replac ed. No hel met can pro tect agai nst injur y in
every accident.
Page 24

REMOVING THE SIDE DOOR REMOVING THE SIDE DOOR
In some situations , such as ch arging the c amera within The Fram e, you
must remove th e side do or to acces s the ports.
WARNING: Re move the sid e door onl y when you are u sing the
camera in a d ry, dust-free envir onment. W hen the doo r is open
or removed , the camer a is not waterp roof. Never op erate the
camera wi th the batter y door op en.
REMOVING THE SIDE DOOR
1. Hold down the Latch Release button and slide the door open.
2. Pull the do or o of the cam era.
46 47
REATTACHIN G THE SI DE DOO R
1. Hold d own the Latch Rel ease bu tton and exte nd the tab on th e door.
2. Press the ta b onto the smal l silver ba r.
Page 25

MAINTENANCE BATTERY INFORMATION
Follow thes e guide lines to get the best per formance from your c amera:
• Th e camera i s waterproof to 33’ (10 m)—no housing n eeded. Ensure
that the doo rs are clos ed before usi ng the cam era in or aro und water,
dirt, or sa nd.
• Befo re closin g the doors, be sure the s eals are fre e of debris . If
neede d, clean th e seals with a c loth.
• Befo re openin g the door s, be sure the camera is free of water or
debris. If neede d, rinse the c amera with fresh water an d dry it with a
cloth.
• If sa nd or deb ris harde ns around the doors, soak the ca mera in war m
tap water for 15 mi nutes and th en rinse th oroughl y to remove the
debris before opening the doors.
• In wet e nvironme nts, dry the touch display with a soft cl oth so that it
registers your touch.
• For best aud io perfor mance, s hake the camera or blow o n the
mic to remove water a nd debr is from the mi crophon e holes. To
prevent dam age to the internal waterpro of membra nes, do not use
compres sed air to bl ow into the mic ho les.
• After every use in s alt water, rinse the c amera wit h fresh water, and
dry it with a sof t cloth.
• To clean th e lens or the l ens cover, wipe it wi th a soft, lint-free cloth . If
debris b ecome s lodged between the lens and th e trim ring, ush it out
with water or air. Do not insert fore ign obje cts aroun d the lens.
48 49
MAXIMIZING BATTERY LIFE
Your HERO7 White camera and battery are integrated. You cannot remove
the battery from the camera.
The battery icon displayed on the touch display blinks and shows a battery
low message when the battery drops below 10%. If the battery reaches 0%
while recording, the camera saves the le and powers o.
MAXIMIZING BATTERY LIFE
Extreme cold temperatures can decrease battery life. To maximize battery
life in cold conditions, keep camera in a warm place prior to use.
When you are not using HERO7 White, rotate it in the frame so the Shutter
button is covered to prevent the camera from accidentally
turning on.
Note: To prevent the frame from markin g the surface of your camera, le ave the latch on
the frame open wh en storing your camera in a frame fo r a long period of time.
If the storage becomes full or the battery runs out of power while recording
video, your camera automatically stops recording and saves the video before
powering o.
To maximize battery life, follow these guidelines when possible:
• Turn o Wireless Connections
• Use these settings:
• QuikCapture (page 26)
• Screensaver (page 37)
• Au to O (page 37)
• Brightness (page 37)
Page 26

BATTERY INFORMATION
BATTERY INFORMATION
RECORDING WHILE CHARGING
Using the US B-C cab le that came with your c amera, yo u can record video
and photos wh ile the cam era is plu gged in to a US B chargin g adapter,
the GoPro S upercha rger, another Go Pro charger, or the GoPro Por table
Power Pack. A lthough the batter y does not ch arge duri ng record ing,
you can use o ne of the above m ethods to powe r the came ra and obta in
extended re cordin g time. When yo u stop record ing, cha rging resu mes.
(You cannot rec ord while ch arging the camera th rough a com puter.)
Note: Because th e side door is open, the ca mera is not waterpro of during cha rging.
WARNING: Us ing a wall ch arger othe r than a GoP ro chargin g
device ca n damage th e GoPro ca mera bat tery and co uld
result in r e or leaka ge. With the exc eption of the G oPro
Supercharger (sold separately), only use chargers marked:
Output 5V 1A . If you do not know the volta ge and cur rent
of your char ger, use the incl uded USB c able to cha rge the
camera fr om your com puter.
BATTERY STORAGE AND HANDLING
The camera contains sensitive components, including the battery. Avoid
exposing your camera to very cold or very hot temperatures. Low or high
temperature conditions may temporarily shorten the battery life or cause
the camera to temporarily stop working properly. Avoid dramatic changes in
temperature or humidity when using the camera, as condensation may form
on or within the camera.
The integrated battery in the camera is non-serviceable. Contact GoPro
Customer Service for all battery related issues.
Do not dry the camera or battery with an external heat source such as a
microwave oven or hair dryer. Damage to the camera or battery caused by
contact with liquid inside the camera is not covered under the warranty.
50 51
Do not make any unauthorized alterations to the camera. Doing so may
compromise safety, regulatory compliance, performance, and may void
the warranty.
WARNING: Do not drop, disassemble, open, crush, bend,
deform, pu ncture, sh red, micro wave, incin erate, or pai nt
the camer a or batter y. Do not inser t foreign o bjects in to any
openin g on the came ra, such as t he USB- C port. Do n ot use
the camer a if it has bee n damage d—for exam ple, if crac ked,
puncture d, or harm ed by water. Disas sembli ng or punc turing
the integra ted batter y can caus e an explos ion or re.
Page 27

TROUBLESHOOTING
CUSTOMER SUPPORT
MY GOPR O WON'T P OWER ON
Make sure you r GoPro is ch arged. S ee Charging (page 9).
MY GOPR O WON'T R ESPON D WHEN I PR ESS A BUT TON
See Restarting Your GoPro (page 41).
PLAYBAC K ON MY COM PUTER I S CHOP PY
Choppy pl ayback is t ypical ly not a probl em with the l e. If your footage
skips, on e of these item s is likely the c ause:
• The computer doesn’t work with H.264 codec les. For best results,
download the latest version of the Qu ik desktop app for free at gopro.
com/apps.
• Th e compute r doesn’t meet the minim um require ments for the
software you’re us ing for playback.
I FORGOT M Y CAMER A’S USERNA ME OR PASSWORD
Swipe down, th en tap Con nections > Name & Pa ssword.
I DON’T K NOW WHAT SOF TWARE V ERSIO N I HAVE
From the main s creen, swi pe down. Then tap Preferences > Abo ut This
GoPro. The Ver sion Num ber disp lays the sof tware versi on that you
are running.
I CAN’T FIND MY CAMERA’S SERI AL NUMB ER
You’ll nd your c amera’s serial numbe r here:
• In P references > A bout This GoPro
• On th e inside of th e battery b ay (remove the batter y to see it)
For more answers to commonly asked questions, see gopro.com/help.
52 53
GoPro is de dicated to providing the best pos sible se rvice. To reach G oPro
Customer S uppor t, visit gopro.com/help.
TRADEMARKS
GoPro, HERO, Session, Karma a nd their res pective lo gos are tra demark s
or registere d tradem arks of GoP ro, Inc. in the Un ited States a nd other
countrie s. © 2017 Go Pro, Inc. All r ights reserved. Made in China . Hecho
en China. F or patent information, vi sit gopro.com/patents. GoPro, Inc.,
3000 Cl earview Way, San Mateo CA 944 02 | GoPro G mbH, Flo esserg asse
2, 81369 Munich, Germany
REGULATORY INFORMATION
To see the complete list of countr y certi cation s, refer to the Important
Product + S afety Instru ctions in cluded w ith your cam era or visit
gopro.com/help.
 Loading...