

Page 1
USER GUIDE
Smart Remote
LONG-RANGE REMOTE CONTROL
FOR YOUR GOPRO.
Page 2

To downlo ad this us er guide in a d ifferent la nguage, v isit gopro.com/support.
Pour té lécharg er ce manue l de l’utili sateur da ns une autr e langue, r endez-vo us sur
gopro.com/support.
Wenn Si e dieses Be nutzerh andbu ch in einer a nderen Sp rache he runterl aden
möch ten, besu chen Sie gopro.com/support.
Per sc aricar e questo ma nuale uten te in un’altra l ingua, vi sita gopro.com/support.
Para d escarg ar este man ual de usua rio en otro id ioma, vis ite gopro.com/support.
Para b aixar est e manual do u suário em o utro idio ma, acess e gopro.com/support.
このユーザーマニュアルの他言 語版をダウンロードするには、
gopro.com/supportにアクセ スしてくだ さ い 。
若要下載其他語言版本的使用說明書,請前往:gopro.com/support。
如需下载本用户手 册的其他语言版本,请访问 gopro.com/support。
이 사용자 설명서의 다른 언어 버전은gopro.com/support에서 다운로 드하 십시오.
2
Page 3

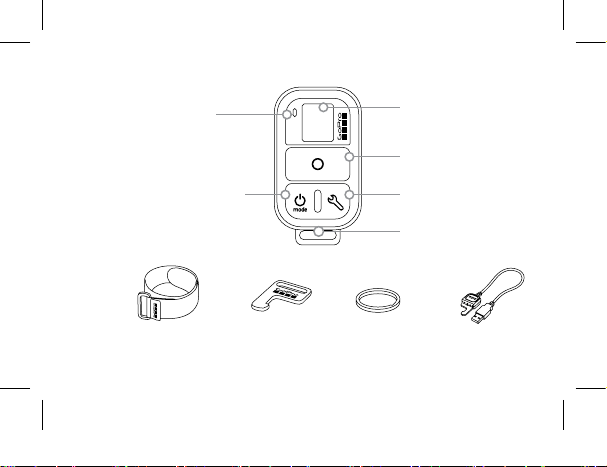
/ The Basics
Status Light
Remote St atus Display
Shutter/Select Button
Power/Mode Button
Wrist Strap
Settings/Tag Button
Charging Port/
Attachment Key Slot
Attachment Key Attachment Ring USB
Charging Cable
3
Page 4

/ Wearing the Smart Remote
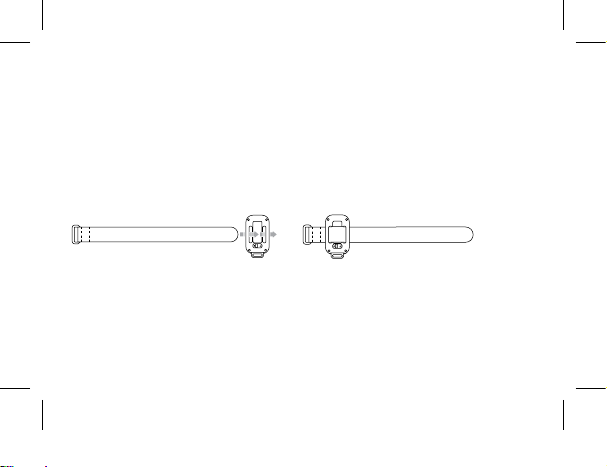
ATTACHIN G THE REM OTE TO T HE STR AP
The at tachment strap s ecures the remote to your wrist, backpac k straps,
ski pol es, bike frames and more.
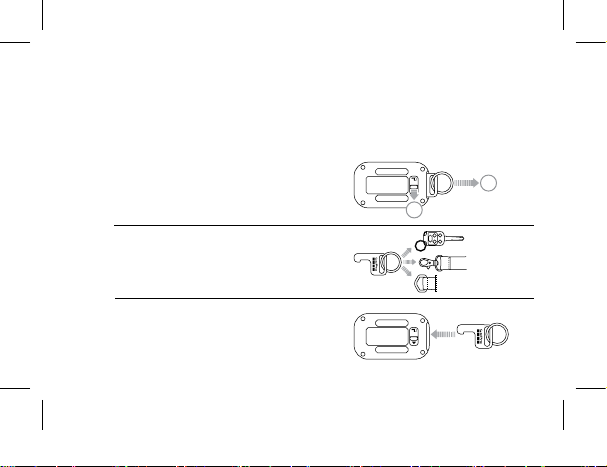
To Attach the Remote to th e Strap:
Step 1
Thread the st rap throug h the slots
on the b ack of the remote.
4
Step 2
Position the remote along the strap
as shown.
Page 5
ATTACHIN G THE REM OTE US ING THE K EY + RING
The at tachment key and ring sec ure the remote to your la nyards, straps ,
car key s, zippers a nd more.
To Attach the Remote Using the Key and Ring:
Step 1
Slide and hold the latch lever in
the direction of the arrow (A), then
pull the key out of t he remote (B).
A
B
Step 2
Attach the ring to your lanya rd,
straps, etc.
Step 3
Push the attachment key into the
key slot until it clicks.
5
Page 6

/ Getting Started
The Sm art Remote lets you power your GoPro on/off, start/stop recor ding
and ch ange camera settings. T he display, status light, Power/Mode button
], Shutter/Select button [ ] and Settings/Tag button* [ ] behave
[
in the same way a s those on your camer a.
The Sm art Remote i s waterpr oof to 32’ (10m). Howeve r,
wirel ess conne ctivit y does not w ork under w ater, so the
remote a nd camer as do not rem ain conne cted if su bmerged .
6
* The Settings/Tag button i s available o nly on HERO4 cameras.
Page 7
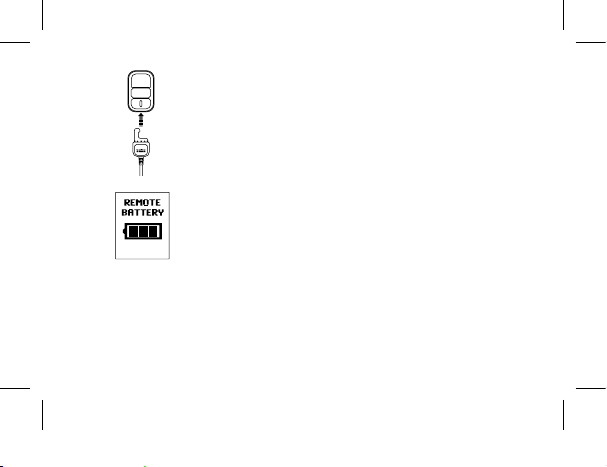
CHA RGING TH E SMAR T REMO TE
We recommend c harging your Smart Remote for o ne hour
before using it t he first time. No damag e occurs if it is used
before being f ully charge d. You can use th e remote while it
is charging.
The status display sho ws the remote’s batter y level while t he
remote i s powering on or charging.
Note: When the r emote is search ing for a camera, th e battery d rains faster. If you ar e not using the rem ote
during ch arging, be sur e to turn it off to conse rve batter y power.
7
Page 8
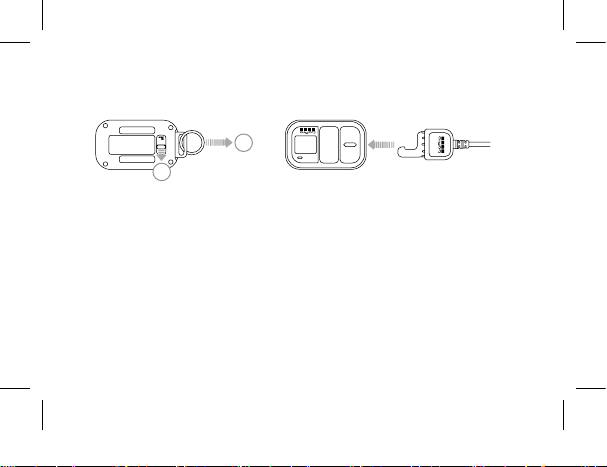
To Charge the Remote:
A
B
Step 1
Slide and hold the latch lever in
the direction of the arrow (A), then
pull the key out of t he remote (B).
8
Step 2
Plug the charging ca ble into
the charging slot until it click s.
Page 9
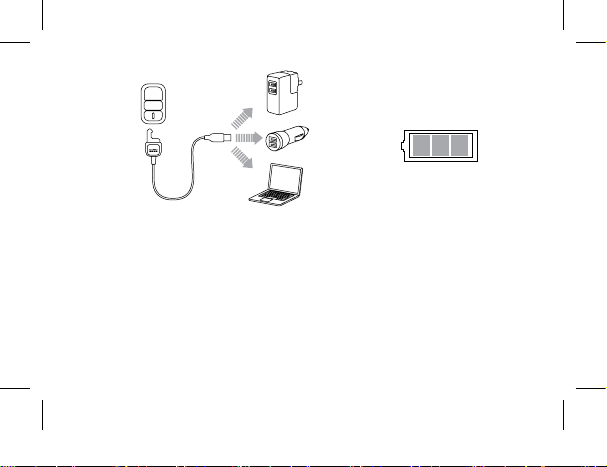
Step 3
Connect the other end of the cable
to a comp uter or other US B power
source.
Note: Be sure th at the compute r is connecte d to a
power source. If the remote status display does
not indic ate that the remote i s charging, use a
differen t USB port.
The ch arging icon on the remote
status displ ay shows a ful l battery
when charging is complete.
9
Page 10
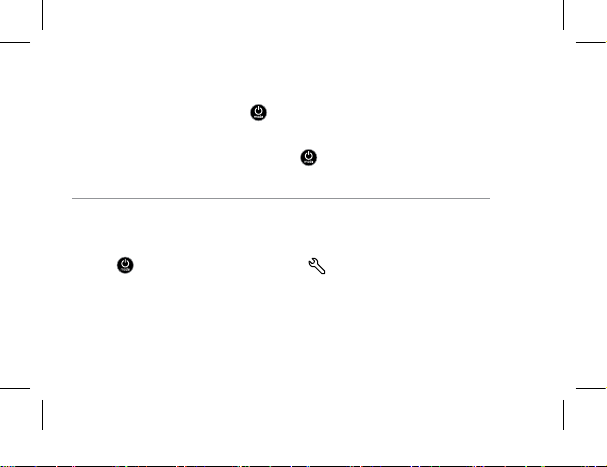
POW ERING T HE REMO TE ON/O FF
To Power On the Remote:
Press the Power/Mode butto n [
].
To Power Off the Remote and Connected Cameras:
Press and hol d the Power/Mode button [
Note: If the cam eras are recor ding, this ac tion powers off o nly the remote. The ca meras continu e recording.
] for two secon ds.
PRO TIP: You can power off the remote and leave the camera powe red on.
This o ption is usef ul if you want to s witch from the remote t o the GoPro App
to control your c amera. To use this option, press and hold the Power/Mode
button [
10
] and th e Settings/Tag button [ ] togeth er for two sec onds.
Page 11

REMOTE STATUS DISPLAY
The information that appea rs on your Smart Remote status display
depe nds on whether you ar e connect ed to multiple c ameras.
Smart Remote Connected to One C amera:
Remote s creen displays th e same infor mation as the
GoPro c amera status screen. Avai lable modes are the
same a s those on the camer a.
Smart Remote Connected to Multiple Cameras:
Remote s creen displays th e number of ca meras
connected, the re cording mode and the battery
status of the re mote.
11
Page 12

When t he remote is connec ted to multiple camer as, these modes
are available:
Default Startup
Modes
Sets a ll camera s to their default
power-up modes
Video Sets a ll camera s to Video mod e
Photo Sets all ca meras to Photo mode
Burst Set s all cameras to Burst mode
Time Lapse Sets all c ameras to Time Lap se mode
SMA RT REM OTE SO FT WARE UPDATE
When s oware updates ar e available for the re mote, you are automatically
notified when you conn ect the remote to a cam era. Follow t he on-scre en
instructions to install the update.
12
Page 13

/ Pairing the Remote and Your GoPro
You can pair the Sma rt Remote wit h any wireless-enabled G oPro camer a.
The re mote can control your c amera from u p to 600 ’ (180 m) away in optimal
conditions . You can co ntrol up to 50 GoP ros at a time wit h the remote. Your
came ra recognizes only one remote at a time.
The di stance from whic h you can control your c amera with t he remote
varies and depend s on factor s such as terr ain, weath er, obstr uctions a nd
electromagnetic interference.
13
Page 14

To Pair Your Remote and Your HERO4:
1. Ensur e that both camera an d remote are powered off.
2. On your came ra, complete these s teps:
a. Press the Power/Mode but ton [
] to power on your camera .
b. Press the Power/Mode but ton [ ] to cycle to Setup mode, a nd
then press the Shutter/Select but ton [
] to sele ct it.
c. Press the Power/Mode button [ ] to cycle to Wireless, and then
press the Shutter/Select button [
] to sele ct it.
d. Press the Power/Mode but ton [ ] to cyc le to WiFi RC (or RC &
App), an d then press t he Shutter/Select button [
If the camera w as never pair ed with a remote or the GoP ro App, it
automatic ally begi ns pairing . Otherw ise, cycle to New (or New RC)
and se lect it to beg in pairing .
3. On the remote, complete these steps:
a. Power on the re mote. If the remote was ne ver paired with a
14
] to sele ct it.
Page 15
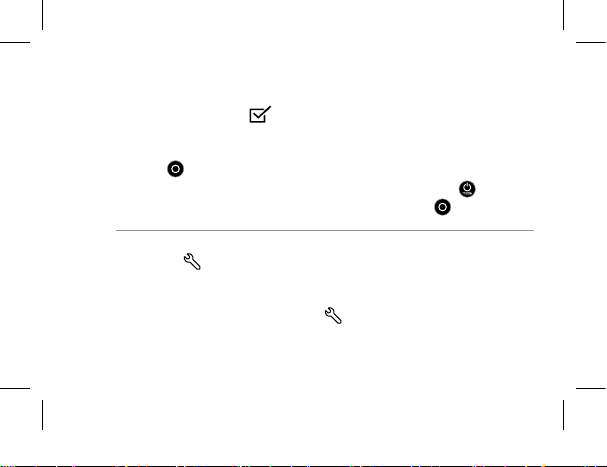
came ra, it automatically begi ns pairing . Otherwise, press and
hold th e Settings/Tag button for four second s to begin pairing.
A chec ked box [
] appea rs on both scr eens once the devi ces
are paired.
b. To conne ct additional ca meras, press the Shutter/Select button
] to select Yes, and then repeat the p airing process.
[
c. When yo u are finishe d, press th e Power/Mode butto n [ ] to cycle
to No, and then press the Shutter/Select button [
] to sele ct it.
PRO TIP: Aer pairing your HER O4, you can press an d hold the Settings/
Tag button [
] on your camera for two se conds to tur n on Wireles s while
the ca mera is powered off. This method co nserves your camera’s bat tery
power and is useful if you want to control your HERO4 with the remote or the
GoPro A pp. The Settings/Tag button [
] opens t he Wireless option (RC,
App, Network) that you used most rece ntly.
15
Page 16

To Pair Your Remote and Your HERO3+ or HERO3:
1. Ensur e that both camera an d remote are powered off.
2. On your came ra, complete these s teps:
a. Press the Power/Mode but ton [
] to power on your camera .
b. Press the Wi-Fi On/Off button [ ] twi ce to turn on Wi-Fi and
access the Wi -Fi menu.
c. Press the Shutter/Select button [
] to open the Wi-Fi m enu [ ].
d. Use the Power/Mode button [ ] to cycle to Wi-F i RC, and the n
press the Shutter/Select button [
].
e. Use the Power/Mode button [ ] to c ycle to New, and t hen
press the Shutter/Select button [
the camera searches: [
16
]. This ico n appears w hile
]
Page 17
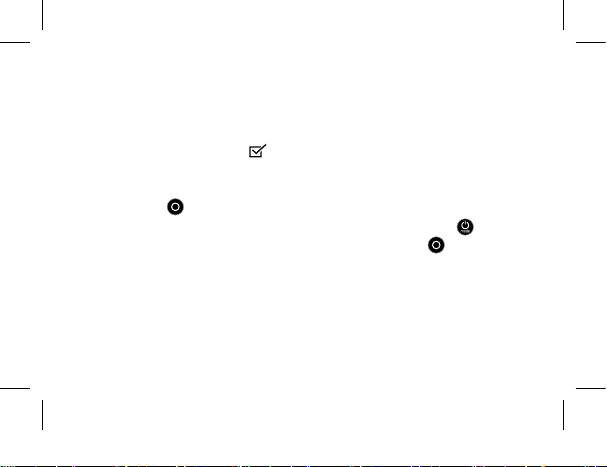
3. On the remote, complete these steps:
a. Power on the re mote. If the remote was ne ver paired with a
came ra, it automatically begi ns pairing . Otherwise, press and
hold th e Settings/Tag button for four second s to begin pairing.
A chec ked box [
] appea rs on both scr eens once the devi ces
are paired.
b. To connect add itional cameras , press the Shutter/Select button
] to sele ct Yes, and the n repeat the pairing proces s.
[
c. When you are finished, press the Power/Mode button [ ] to cycle
to No, and then press the Shutter/Select button [
] to select it.
17
Page 18
/ Connecting the Remote and Your GoPro
Aer your remote a nd camera a re paired, follow th e steps below to conne ct
them in the future. With this pro cedure, your camer a connects to the
remote t hat it conne cted to most recentl y.
To Connec t the Remote and Your HERO 4:
1. Power on the remote and you r camera.
2. On your came ra, complete these s teps:
a. Press the Power/Mode but ton [
then press the Shutter/Select but ton [
b. Press the Power/Mode but ton [ ] to cycle to Wireless, and then
press the Shutter/Select button [
c. Press the Power/Mode button [ ] to cycle to WiFi RC or RC &
App, and then p ress the Shutter/Select button [
18
] to cycl e to Setup mode, and
] to sele ct it.
] to sele ct it.
] to sele ct it.
Page 19
d. Press the Power/Mode but ton [ ] to cycle to Existing, and
then press the Shutter/Select but ton [
] to sele ct it.
To Connec t the Remote and Your HERO3+ or HERO3:
1. Power on the remote and you r camera.
2. On your came ra, complete these s teps:
a. Press the Wireless button [
] twice to turn on Wireless and
open the Wireless settings.
b. Press the Shutter/Select button [
].
c. Press the Power/Mode button [ ] to cycle to Wi-Fi RC, and
then press the Shutter/Select but ton [
] to sele ct it.
d. Press the Shutter/Select button [ ] to sele ct Current.
19
Page 20
/ Capturing Video and Photos
Use the remote to c apture vid eo and photos w ith one cam era or
multiple cameras.
To Start/Stop Recording:
Press the Shutter/Select [
PRO TIP: When you connec t your remote to your HERO4, you can add
HiLight Tags to your vi deo. HiLight Tags m ark specific moments to make
it easier to quickly fin d highlight s during playback, sharing and editing.
While recording, press the Settings/Tag [
add a HiLight Tag.
20
] button.
] button on the re mote to
Page 21

The following features are not available when using the remote
with HERO4:
• QuikCapture
• Continuous p hoto with multiple ca meras
• Manually capturin g photos while recording video with
multiple cameras
The following features are not available when using the remote with
HERO3+ or HERO3:
• One Button mode
• Continuous photo
• Manually capturin g photos while recording video
• The Settings/Tag button [
] on the remote (to ad d a HiLight Tag or
enter the Sett ings menu)
21
Page 22

/ Changing Camera Settings
You can use the Smart Remote to chan ge your camera settings as long as
your ca mera is not ca pturing vi deo or photo.
Note: To change ca mera setting s, the remote must b e connecte d to only one camer a.
To Change Camera Settings for HERO4:
1. Be sure your camera and r emote are powe red on and connec ted.
2. On the remote, press the Power/Mode butto n [
mode w hose settings you want to cha nge.
3. Press the Settings/Tag button [
that mode.
4. Use the Power/Mode button [
5. Press the Shutter/Select button [ ] to cycle through th e options
withi n a setting. To select an o ption, high light it and move to
another screen.
22
] to open the settings menu for
] to cyc le through the settings.
] to cyc le to the
Page 23

6. To g o back or exit the settings menu, press the Settings/Tag
button [
].
To Change Camera Settings for HERO3+ and HERO3:
1. Be sure your camera and r emote are powe red on and connec ted.
2. Press the Power/Mode button [
] to cyc le to Settings.
3. Press the Shutter/Select button [ ] to sele ct Settings.
4. Press the Power/Mode button [ ] to cycle thro ugh the sett ings.
5. Press the Shutter/Select button [ ] to select an option .
6. To exit the settings menu, press the Power/Mode button [ ] to cycle
to EXIT, and then p ress the Shutter/Select button [
] to sele ct it.
23
Page 24

/ Safety Information
WARNING
Failure to follow these sa fety instr uctions could result in fire, elect ric shock
or othe r injury or damage to t he Smart Remote or oth er propert y.
HANDLING
The Sm art Remote co ntains sen sitive component s. Do not drop,
disa ssemble, op en, crush , bend, defo rm, puncture, shr ed, microwave,
incinerate, paint or inser t foreign obje cts into th e product . Do not use the
Smar t Remote if it has b een damaged—for example, if the produc t is
crac ked, punc tured or damaged by water.
WATER RESISTANCE
Do not submerge the Smart Remote in more than 32’ (10m) of wat er.
Damage to the Sm art Remote caused b y excessive wa ter pressur e is not
covered under warranty.
24
Page 25

KEE PING TH E SMAR T REMO TE’S S TATUS DISP LAY CLE AN
Clean your Smart Remote statu s display immediately if it comes into
conta ct with any c ontamina nts that may c ause stains, suc h as ink, dye s,
makeup, dirt , food, oils a nd lotions. To clean the status display, use a so,
slightly damp, lint-free cloth . Avoid getting moistu re in openings. Don’t u se
window cleaners, household cleaners, aerosol sprays, solvents, alcohol,
ammonia or abrasives to clean the sta tus display.
USING CONNECTORS AND PORTS
Never fo rce a connec tor into a por t. Check fo r obstruc tions on the port. If
the connec tor and por t do not join with reasonable ease, the y probably d o
not matc h. Make sure th at the conne ctor match es the port a nd that you
positioned the conn ector correctl y in relation to the por t.
25
Page 26

USE WITH OTHER ELECTRONIC DEVICES
Users of digital transceivers (avalanche beacons) should consult with their
user ma nuals regardin g use of GoPro ca meras and other GPS or elec tronic
devices whe n engaged in t he avalanche bea con search mode in order to
limit potential interference.
TEMPERATURE
Extreme tem peratures m ay temporarily affe ct batter y life or affe ct the
func tionalit y of the Smar t Remote. Avoid dr amatic cha nges in temperature
or humi dity when u sing the Smart Remote, as condensation may form on
or within the pr oduct. When you are using t he Smart Rem ote or charging
the batter y, it is nor mal for the pro duct to get warm. The exter ior of the
product functions as a cooling su rface that transfers h eat from inside the
unit to t he cooler air outsid e.
26
Page 27

/ Regulatory Information
To see the co mplete list of countr y certific ations, refer to the Important
Product + Sa fety Information Guide do cument inc luded with your prod uct.
27
Page 28

Page 29

ユー ザ ガ イド
Smart Remote
GOPRO用長時間対応リモートコン
トロール。
Page 30

To downlo ad this us er guide in a d ifferent la nguage, v isit gopro.com/support.
Pour té lécharg er ce manue l de l’utili sateur da ns une autr e langue, r endez-vo us sur
gopro.com/support.
Wenn Si e dieses Be nutzerh andbu ch in einer a nderen Sp rache he runterl aden
möch ten, besu chen Sie gopro.com/support.
Per sc aricar e questo ma nuale uten te in un’altra l ingua, vi sita gopro.com/support.
Para d escarg ar este man ual de usua rio en otro id ioma, vis ite gopro.com/support.
Para b aixar est e manual do u suário em o utro idio ma, acess e gopro.com/support.
このユーザーマニュアルの他言 語版をダウンロードするには、
gopro.com/supportにアクセ スしてくだ さ い 。
若要下載其他語言版本的使用說明書,請前往:gopro.com/support。
如需下载本用户手 册的其他语言版本,请访问 gopro.com/support。
이 사용자 설명서의 다른 언어 버전은gopro.com/support에서 다운로 드하 십시오.
30
Page 31
/ 基本
ステータスLED
Power/Mode
(電源/モード) ボタン
リモートのステータ
スディスプレイ
Shutter/Select (シャッ
ター/選択)ボタン
Settings/Tag (設定/タ
グ) ボタン
充電ポート/アタッ
チメントキースロ
ット
リスト
ストラップ
アタッチメント
用キー
アタッチメント
用リング
USB
充電用ケーブル
31
Page 32
/ スマートリモ ートの 装着
リモートをストラップに装 着する
アタッチメントストラップ を使用することで、リモートをしっかり手首、バ
ックパックのストラップ、スキ ー のポール、自 転 車のフレーム
などに固定 することが で きます。
リモートをストラップに装着する:
ステップ 1
リモ ート の 後 部 に あ る ス ロットに
スト ラ ップ を 通 し ま す。
32
ステップ 2
図 の よう にリモ ー ト を ストラ ップ 上
に置きます。
Page 33

キーとリング を使用してリモートを装着 する
アタッチメントキ ーとリング を 使 用 することで、ネックストラップ、ストラ
ップ、車のキ ー、チャックその他の 場所にリモートを固定で きます。
キーとリングを使 用してリモ ートを 装 着 する:
ステップ 1
(A)の矢印 方 向にラッチレバーをスラ
イ ド さ せ 固 定 し 、リ モ ー ト の キ ー (B)を
引きま す。
A
B
ステップ 2
リング をネックストラップ、
スト ラ ップ な ど に 装 着 し ま す。
ステップ 3
カチッと音がするまでアタッチメントキ
ーを キ ー のス ロットに 押 し 込 み ま す。
33
Page 34

/ はじめに
スマートリモ ートを使 用 するこ とで、GoProの電源 オン/オ フ 、記 録 の
開始/停 止 の 切 り 替 え 、カ メラ 設 定 の 変 更 を 実 行 で き ま す 。デ ィ ス プ レ
イ、LED、Power/Mode (電源/モード )ボタン[
ター/選択)ボタン[
]およびSettings/Tag (設定/タグ )ボタン *[ ]はカ
メラと同じように動作します。
スマートリモ ートは10m ( 3 2 ’)の 防 水 仕 様 で す 。た だ し 、
ワイヤレスの接続は水中では機能しないため、水中で
はリモートとカメラの接続が失われます。
34
* Settings/Tag (設定/タグ)
ボタンは、
]、Shutter/Select (シャッ
HERO4
カメラでのみ利用できます。
Page 35

スマートリモートの 充 電
初 回 使 用 時 に は 、スマートリモ ートを1時 間 、充 電 す る こ と を
おすすめします。完全に充電されていない状態で使用して
も本体 が 破 損することは ありません 。充 電 中にリモートを 使
用で きます。
ステ ー タスディスプレ イに は 、リ モ ー ト の 電 源 が オ ン の と き 、
または充電 中のリモ ートのバッテリレベルが 表示されます。
注: リモートがカメラを検索するとき、バッテリの消耗が早まります。充電中にリモートを使
用しないときは、バッテリの電力を節約するために電源をオフにしてください。
35
Page 36

リモ ート を 充 電 す る:
A
B
ステップ 1
(A)の矢 印 方向にラッチレバーをス
ラ イ ド さ せ 固 定 し 、リ モ ー ト の キ ー
(B)を 引きま す。
36
ステップ 2
カチッと音がするまで、充電用ス
ロ ット に 充 電 用ケ ーブ ル を 差 し 込
みま す。
Page 37

ステップ 3
ケーブルの逆の先端を、コンピュ
ータまたは他のUSB電源に接続
しま す。
注: コンピュータが必ず電源に接続されている
ことを確認してください。リモートステータ
スディスプレイにリモートが充電中であるこ
とが表示されないときは、別の
使用してください。
USB
ポートを
リモ ートス テ ー タスディスプレイ
の充電アイコンは、充電が完了
すると充 電 完 了のマークに変わ
りま す。
37
Page 38

リモートの電源オン/オフの切り替え
リモートの電 源をオンにする:
Power/Mode (電源/モード )ボタン[
]を押 します。
リモートと接続されたカメラの電源をオフにする:
Power/Mode (電源/モード )ボタン[
注: カメラで録画中のときは、このアクションではリモートの電源のみがオフになります。
カメラは録画を続けます。
]を2秒間 長 押 しし ま す。
PROヒ ン ト: リモートの電源をオフにして、カメラの電源をオンのまま
にすることがで きます。このオプションはカメラの制御 をリモートから
GoProアプリへ切り替えるときに便利です。このオプションを使用する
には、Power/Mode (電源/モード )ボタン [
グ)ボタン[
38
]を同時に2秒 間 長 押しし ま す。
]とSettings/Tag (設定/タ
Page 39

リモ ートのステータスディスプレ イ
スマートリモ ート のス テ ー タスディスプ レイに 表 示される情 報 は 、接続
しているカメラの台数によって異なります。
1台の カメラに 接 続された ス マートリモート:
リモ ートのスクリ ーン に は 、GoProカメラのステ ータス
画面と同じ情報が表示されます。使用できるモード
はカメラ の モ ードと同じ で す。
複 数 のカメラ に接 続 されたスマートリ モート:
リ モ ート の ス ク リ ーン に は 接 続 中 の カ メ ラ の 台 数 、録
画モード、リモ ート のバッテ リの ステータス が 表 示 さ
れます。
39
Page 40

リモートが複数のカメラに接続されているときは、次のモードが使用
で きます。
初 期 の スタートア
ップ モ ード
すべてのカメラを デ フォルトの
電 源 オンモ ード へ 設 定
ビデオ すべ てのカメラをビ デ オモードに設 定
写真 すべ てのカメラを写 真モードに 設 定
連続撮影 すべ てのカメラを連 続 撮 影 モ ード に 設 定
コマ撮り すべ てのカメラをコマ 撮りモ ード に 設 定
スマートリモートのソフトウェアの 更 新
リモートに適用できるソフトウェアの更新がリリースされると、リモート
をカメラへ接続したとき、自動的に通知が表示されます。更新をインス
トールするには、画面の手順に従ってください。
40
Page 41

/ リモートとGoProのペアリング
ワイヤ レス 対 応 の GoProカメラであればどれで もスマートリモ ートとペア
リングできます。リモートは最適条件下で、最大180 m (60 0’)離れたカメ
ラを制御できます。リモート使用時、最大で一度に50台までのGoProカ
メラを 制 御 で きます。カメラは 一 度に1台 のリモ ート を 認 識 します。
リモコンでカメラをコントロールできる距離は 環 境によって異なり、地
形 、気 温 、障 害 物 、電 磁 干 渉 な ど の 各 種 要 因 に 左 右 さ れ ま す 。
41
Page 42

リモ ートとHERO4を ペ アリン グ す る:
1. カメラとリモートの 電 源 が OFFであることを確認してください。
2. カメラ上 で 次 の ス テ ップ を 実 行 し ま す。
a. Power/Mode (電源/モード )ボタン[
]を押してカメラの 電 源 を
入れます。
b. Power/Mode (電源/モード )ボタン [
]を押してセ ットア ップ モー
ド へ 移 動 し 、続 い て 、Shutter/Select (シャッター/選択)ボタン
]を押してそれを選択します。
[
c. Power/Mode (電源/モード )ボタン[ ]を押して Wireless (ワイヤ
レス )まで移 動し、Shutter/Select (シャッター/選択)ボタン[
を押して 選 択しま す。
d. Power/Mode (電源/モード )ボタンを押し 、[
]WiFi RC (または
RC & アプリ)まで移動し、Shutter/Select (シャッター/選択) ボ
]を押してそ れを選 択し ます。カメラとリモートまた は
タン [
GoProアプリをペアリングしたことがないときは、自動的 にペア
42
]
Page 43

リングが開始します。そうでない場合は、新しい(または新しい
RC)へ移動し、ペアリングの開始を選択します。
3. リモ ー トで 次 の ス テ ップ を 完 了 し ま す。
a.リモートの電源を入れる。リモートとカメラをペアリングしたこ
とがないときは、自動的にペアリングが開始します。そうでない
場合は、設定/タグボタンを4秒 間 長 押 し し 、ペ ア リ ン グ し ま す 。
デバイスのペアリングが完了すると両方の画面にチェックボッ
]が現 れ ま す。
クス[
b.追加のカメラを接続する場合は、Shutter/Select (シャッター/選
択)ボタン[
]を押して、はいを選択し、ペアリングプロセスを
繰り 返しま す。
c. 完了したら、Power/Mode (電源/モード )ボタン[
]を押し、
「 い い え 」ま で 移 動 し 、Shutter/Select (シャッター/選択)ボタン
]を押してそれを選択します。
[
43
Page 44

PROヒ ン ト: HERO4を ペ ア リ ン グ し た あ と は 、カ メ ラ の Settings/Tag
(設定/タグ)ボタン [
]を2秒間長押しして、ワイヤレスをオンにします。
このとき、カメラはオフの状態 のままになります。この方法 ではカメラ
のバッテリの電力を 節 約できるので、HERO4をリモートや GoProアプリ
で 制 御 すると きに便 利 で す。 Settings/Tag (設定/タグ)ボタン [
最後に使用したワイヤレスオプション(RC、ア プ リ 、ネ ッ ト ワ ー ク )が開
きま す。
44
]で
Page 45

リモ ートとHERO3+またはHERO3を ペ ア リング す る:
1. カメラとリモートの 電 源 が OFFであることを確認してください。
2. カメラ上 で 次 の ス テ ップ を 実 行 し ま す。
a. Power/Mode (電源/モード )ボタン[
]を押してカメラの 電 源 を
入れます。
b. Wi-Fi On/Off (Wi-Fiオン/オフ)ボタン[
]を2回押して Wi-Fiをオ
ンにし 、Wi-Fiメニューにアクセ スし ま す。
c. Shutter/Select (シャッター/選択)ボタン[
]を開きま す。
ュー[
]を押してWi-Fiメニ
d. Power/Mode (電源/モード )ボタン[ ]を使 用してWi-Fi R Cへ移
動し、Shutter/Select (シャッター/選択)ボタン[
]を押 します。
e. Power/Mode (電源/モード )ボタン [ ]を 使 用して 新 規 へ 移 動
し、Shutter/Select (シャッター/選択)ボタン[
のアイコンはカメラが検索中に表示されます:[
]を押 します。こ
]
45
Page 46

3. リモ ー トで 次 の ス テ ップ を 完 了 し ま す。
a. リ モ ートの電 源を入れ ま す。リモートとカ メラをペ ア リングし た
ことがないときは、自動的 にペアリングが 開始します。そうでな
い場合は、設定/タグボタンを4秒 間 長 押 し し 、ペ ア リ ン グ し ま
す。デバイスのペアリングが完了すると両方の画面にチェックボ
]が現 れ ま す。
ックス[
b.追加のカメラを接続する場合は、Shutter/Select (シャッター/選
択)ボタン[
]を 押 し て 、「 Ye s」(はい)を 選 択 し 、ペ ア リ ン グ プ ロ
セスを 繰 り返し ま す。
c. 完了したら、Power/Mode (電源/モード )ボタン[
「No」(いいえ)まで移動し、Shutter/Select (シャッター/選択)ボ
]を押してそれを選択します。
タン[
46
]を押し、
Page 47

/ リモートとGoProを接続する
リモートとカメラのペアリングが 完了したら、下記のステップに従 い、今
後も接続されるようにします。この手順では、カメラは最後に接続した
リモートに接続されるようになります。
リモ ートとHERO4を 接 続 す る:
1. リモートとカメラの電源を入れます。
2. カメラ上 で 次 の ス テ ップ を 実 行 し ま す。
a. Power/Mode (電源/モード )ボタン[
プ)モ ー ド へ 移 動 し 、続 い て 、Shutter/Select (シャッター/選択)ボ
]を押 して 選 び ます。
タン [
b. Power/Mode (電源/モード )ボタン [ ]を押して ワイヤレス ま で
移動し、Shutter/Select (シャッター/選択)ボタン[
択しす。
]を押してSetup (セットアッ
]を押して選
47
Page 48

c. Power/Mode (電源/モード )ボタン[ ]を押し、WiFi RCまたはRC
& アプリまで 移 動し 、Shutter/Select (シャッター/選択)ボタン
]を押してそれを選択します。
[
d. Power/Mode (電源/モード )ボタン[ ]を押して既 存 ま で 移 動
し、Shutter/Select (シャッター/選択)ボタン[
しす。
48
]を押して選択
Page 49

リモ ートとHERO3+またはHERO3を 接 続 す る:
1. リモートとカメラの電源を入れます。
2. カメラ上 で 次 の ス テ ップ を 実 行 し ま す。
a. Wireless (ワイヤレス)ボタン[
]を2回 押 し て 、ワ イ ヤ レ ス を オ ン
に し 、ワ イ ヤ レ ス の 設 定 を 開 き ま す 。
b. Shutter/Select (シャッター/選択)ボタン[
]を押 します。
c. Power/Mode (電源/モード )ボタン[ ]を押し、WiFi RCまで移動
し、Shutter/Select (シャッター/選択)ボタン[
]を押してそれを
選 択しま す。
d. Shutter/Select (シャッター/選択)ボタン[
]を押 して、
「Current」(現在)を 選 択します。
49
Page 50

/ ビデオ録画と写真撮影
1台の カメラまた は 複 数 台 の カメラでのビ デオ録画や写真撮 影 にリモ ー
トを 使 用します。
録画を開始/停 止 す る:
Shutter/Select (シャッター/選択)[
PROヒ ン ト:リモートをHERO4に接続したとき、ビデオにHiLightTags
(ハイライトタグ)を追加できます。HiLightTags(ハイライトタグ)は再生
中に見 所をすばやく見つけて、共有、編集できるよう、見所にマークを
付 け ま す 。録 画 中 に リ モ ー ト の Settings/Tag (設定/タグ)[
押し、HiLightTag(ハイライトタグ)を追加します。
50
]ボタン を 押します。
]ボタン を
Page 51

HERO4でリモートを使 用するときは、次 の機 能は利 用で きません 。
• QuikCapture
• 複 数 台 の カメラでの連続写 真 撮 影
• 複数のカメラで動画を録画中にマニュアルでの写真撮影
HERO3+またはHERO3でリモートを使用 するときは 、次の機能 は利用
できません。
• ワ ンボタンモ ード
• 連続撮影
• 動画を録 画 中にマニュアルで の 写 真 撮 影
• リモートの Settings/Tag (設定/タグ )ボタン[
](HiLight Tag (ハイラ
イトタグ)を追加する、または設定メニューを表示)
51
Page 52

/ カメラの設定の変更
カメラ でビデオや 写 真 を撮 影 中 で な け れ ば 、スマートリモ ート を 使 用し
てカメラ の 設 定を 変 更 で きます。
注: カ メ ラ の 設 定 を 変 更 す る に は 、リ モ ー ト を1台 のカ メラに の み 設 定 する 必 要 が ありま す。
HERO4用にカメラの設定を変更する:
1. カメラとリモートの 電 源 が オンで、接 続されていることを確認してく
ださい。
2. リ モ ートで、Power/Mode (電源/モード )ボタン[
設 定 の モ ード へ 移 動 します。
3. Settings/Tag (設定/タグ )ボタン[
を開 きます。
4. Power/Mode (電源/モード )ボタン[
しす。
52
]を 押 し て 、モ ー ド の 設 定 メ ニ ュ ー
]を 使 用 し て 、設 定 間 を 移 動
]を 押 し 、変 更 す る
Page 53

5. Shutter/Select (シャッター/選択)ボタン[ ]を押して、設定のオプシ
ョンに移 動し ます。オ プションを選 択 する に は、対象 がハイライトさ
れた状態で別の画面に移動します。
6. 前の画面に戻るまたは設定メニューを終了するには、Settings/Tag
(設定/タグ)ボタン [
]を押 します。
53
Page 54

HERO3+およびHERO3用にカメラの設 定を変更する:
1. カメラとリモートの 電 源 が オンで、接 続されていることを確認してく
ださい。
2. Power/Mode (電源/モード )ボタン [
]を押 して、Settings (設定)へ
移 動します。
3. Shutter/Select (シャッター/選択)ボタン[
]を押して、Settings (設
定)を 選 択します。
4. Power/Mode(電源/モード ) ボタン [
]を 押 し て 、設 定 間 を 移 動 し
ます。
5. Shutter/Select (シャッター/選択)ボタン[
]を 押 し て 、オ プ シ ョ ン を
選 択しま す。
6. 設 定 メニューを 終 了するには、Power/Mode (電源/モード )ボタン
]を押してE XIT (終了)に移動し、Shutter/Select (シャッター/選択)
[
ボタン[
54
]を押してそれを選択します。
Page 55

/ 安全情報
警告
次に 示 す安全上の 手順に従 わ ない場 合、火 災、電気 ショック、他 の 負傷
や破損が生じたり、スマートリモートまたは他の品物に損害を与える可
能 性 が あ りま す。
取り扱い
スマートリモ ートには精 密 機 器 が含まれていま す。製品 の 投 下、分解 、
開放、破砕、折り曲げ、変形、穿刺、裁断、電子レンジによる加熱、焼
却、塗装、または異物の挿入などを行わないでください。割れた、穴が
あいた 、水をかぶったなど の 理 由 で 損 傷し た スマートリモートを 使 用し
ないでください。
55
Page 56

防水性能
水深10m ( 32’)以 上 に ス マートリモートを 沈 めないで くだ さ い 。過 度 の
水 圧 で 損 傷し た スマートリモートは 保 証 対 象 外となりま すのでご 注 意
ください。
スマートリモートのステ ータスディスプレ イを清潔に保 つ
スマートリモ ート のス テ ー タスディスプ レイにイン ク、染 料 、泥、食品 、
油、ローションなど、シミの原因になる可能性のあるものが付着した場
合には、速やかに拭き取ってください。ステータスディスプレイを清掃
するときは 、若干湿らせた 糸くずの出ない柔らかい布 を使用します。隙
間を濡らさないように注意してください。ステータスディスプレイの清
掃には、窓ガラス用洗剤、家庭用洗剤、エアゾールスプレー、溶剤、ア
ルコール、アンモニア、または研磨剤を使用しないでください。
56
Page 57

コネクタとポ ートの使 用
ポート にコネクタを無 理 に 差し込 ま な いでくだ さ い 。ポートに 障 害 物 が
ないことを確 認します。コネクタとポートを容易 に接続 で きない場 合
は、規格が適合していない可能性があります。コネクタがポートに適合
してお り、コ ネクタと ポート の 位 置 が 正しく一致 する ことを 確 認してく
ださい。
他の電子機器との使 用
デジタルトランシーバー(アバ ランチ ビーコン )の ユ ー ザ は 、干 渉 可 能 性 を
制限するために、アバランチビーコンのサーチモードでのGoProカメラ
あるいはその 他のGPSや 電子 装 置の使用方法 に関する取 扱 説 明 書をご
確認ください。
57
Page 58

温度
極端に高い/低 い 気 温は 、バッテリの 残 量 やスマートリモ ートの機 能 自
体 に影 響 を 与える可能 性 が ありま す。スマートリモ ートの 使 用 時 に 温 度
や湿 度が急激に変化すると製品内部で 結露 が発生することがあるの
で、このような 環 境 で は 使 用 し な いで くだ さ い 。通常 、スマートリモ ート
の使用中や充電中は製品本体の温度が上昇します。製品の外側は冷却
面の役割を果たし、内部で発生した熱を外部の空気に発散させます。
58
Page 59

/ 法的情報
国別の認定書 の詳細なリストをご覧いただくには、ご使 用 の製品 に付
属の重要な製品および安全情 報ガイドを参照してください。
59
Page 60

Page 61

使用指南
Smart Remote
最適合 GOP RO 的遠程遙控裝置。
Page 62

To downlo ad this us er guide in a d ifferent la nguage, v isit gopro.com/support.
Pour té lécharg er ce manue l de l’utili sateur da ns une autr e langue, r endez-vo us sur
gopro.com/support.
Wenn Si e dieses Be nutzerh andbu ch in einer a nderen Sp rache he runterl aden
möch ten, besu chen Sie gopro.com/support.
Per sc aricar e questo ma nuale uten te in un’altra l ingua, vi sita gopro.com/support.
Para d escarg ar este man ual de usua rio en otro id ioma, vis ite gopro.com/support.
Para b aixar est e manual do u suário em o utro idio ma, acess e gopro.com/support.
このユーザーマニュアルの他言 語版をダウンロードするには、
gopro.com/supportにアクセ スしてくだ さ い 。
若要下載其他語言版本的使用說明書,請前往:gopro.com/support。
如需下载本用户手 册的其他语言版本,请访问 gopro.com/support。
이 사용자 설명서의 다른 언어 버전은gopro.com/support에서 다운로드하 십시오 .
62
Page 63

/ 基本操作
狀態 LED
遙控器狀態螢幕
快門/選擇按鍵
電源/模式按鍵
腕帶 連接鑰匙 連接環
設定/標記按鍵
充電連接埠/
連接鑰匙插槽
USB
充電傳輸線
63
Page 64

/ 穿戴智慧遙控器
將遙控器裝上腕帶
使用連接環將遙控器接上手腕、背包肩帶、滑雪杖、自行車架等裝備。
將 遙 控 器 裝 上 腕 帶:
第 1 步
將腕帶穿過遙控器背面的插槽。
64
第 2 步
將遙控器放在腕帶上,如圖所示。
Page 65

使用鑰匙與連接環接上遙控器
使用連接鑰匙與連接環將遙控器接上頸帶、腕帶、車鑰匙、拉鍊等
裝 備。
使用鑰匙與連接環接上遙控器:
第 1 步
順著箭頭 (A) 的方向滑動
並 按 住 扣 鎖 控 制 桿,然 後
將鑰匙從遙控器 (B) 拉 出。
A
B
第 2 步
將連接環接上頸帶、
腕 帶 等 裝 備。
第 3 步
將連接鑰匙推入鑰匙插槽,
直 到 其 卡 至 定 位。
65
Page 66

/ 開始使用
智慧遙控器可讓您開啟/關閉 GoPro 電 源、開 始 /停止攝錄以 及 變更相機
設 定。螢 幕、 LED、電源/模式按鍵 [
標記按鍵* [
] 的操作方式跟相機上的設定相同。
智慧遙控器的防水性能達 32 英 尺( 10 公 尺 )。 不 過 , 無
線連線功能在水中無法運作,因此在水下活動時,遙
控器和相機都不能維持在連線狀態。
* 設定/
66
標記按鍵僅適用於
]、快門/選擇按鍵 [ ] 及設定/
HERO4
相機。
Page 67
為智慧遙控器充電
建議您在首次使用前先將智慧遙控器充電一小時。使用未完
全充電的遙控器,並不會對其造成損壞。您可以在充電時使
用遙 控 器。
狀態螢幕會在遙控器開啟或充電時顯示其電池電力。
備註:當遙控器正在搜尋相機時,電池電力會消耗 地較快。如果您不會在充電時使用遙控器,請確
認 已將 其 關 閉 以 節省 電 池 電 力。
67
Page 68

為 遙 控 器 充 電:
B
A
第 1 步
順著箭頭 (A) 的方向滑動
並 按 住 扣 鎖 控 制 桿,然 後
將鑰匙從遙控器 (B) 拉 出。
68
第 2 步
將充電傳輸線插入充電插槽中,
直 到 卡 至 定 位。
Page 69

第 3 步
將傳輸線的另一端連接到電腦或
USB 電 源。
備註:請確認電腦已連接到電源。若遙控器狀
態螢幕並 未 顯 示 遙 控 器 正 在 充 電 中,請 使 用 其
他
USB
連 接 埠。
遙控器狀態螢幕上的充電圖示會
在充電完成時顯示電力已滿。
69
Page 70

開啟/關閉遙控器電源
開啟遙控器電源:
按下電源/模式按鍵 [
]。
關閉遙控器以及已連接相機的電源:
持續按住電源/模式按鍵 [
備註:如果相機正在攝錄,此動作只會關閉遙控器的電源。相機仍會繼續攝錄。
] 兩 秒 鐘。
專 業 提 示:您可以關閉遙控器電源,並讓相機持續保持開啟狀態。
若要從遙控器改為使用 GoPro 應用程式來控制相機,此選項非常有幫
助。若要使用此選項,請同時按住電源/模式按鍵 [
] 兩 秒 鐘。
鍵 [
70
] 與設定/標記按
Page 71

遙控器狀態螢幕
顯示在智慧遙控器狀態螢幕上的資訊會視是否連接多台相機而定。
智慧遙控器連接到單一相機:
遙控器螢幕會顯示與 GoPro 相機狀 態螢幕一樣 的資
訊。提供的模式就跟相機上的模式並無二異。
智 慧 遙 控 器 連 接 到 多 台 相 機:
遙控器螢幕會顯示已連接的相機數量、攝錄模式以及
遙控器的電池狀態。
71
Page 72

若遙控器連接到多台相機,則可使 用下列模式:
預設啟動模式 將所有相機 都設為預設的啟動模式
攝錄 將所有相機 都設為攝 錄模式
照相 將所有相機都設為照相模式
連續快拍 將所有相機都設為連續快拍模式
縮時攝影 將所有相機都設為縮時攝影模式
智慧遙控器軟體更新
若有遙控器適用的軟體更新,您會在連接遙控器與相機時自動收到通
知。請按照螢幕操作說明來安裝更新。
72
Page 73

/ 將遙控器與 GoPro 配對
您可以將智慧遙控器與任何具備無線功能的 GoPro 相 機 進 行 配 對。在
最佳環境的條件下,遙控器可以從最遠 600 英 尺(180 公 尺)的地方控
制 相 機。您 可 以 使 用 遙 控 器 一次 控 制 多 達 50 台 GoPro。相機 一次 只 能 識
別一台遙控器。
您可利用遙控器控制相機的距離不盡相同,且取決於各種因素,例如地
形、氣 候、障 礙 物 以 及 電 磁 干 擾 等。
73
Page 74

將遙控器與 HERO4 配 對:
1. 確認相機 與遙控器均已關閉電源。
2.使用相機完成下列步驟:
a.按下電源/模式按鍵 [
] 即 可 開 啟 相 機 電 源。
b.按下電源/模式按鍵 [ ] 循環切換至設定模 式,然 後 按 下
快門/選擇按鍵 [
] 加 以 選 取。
c.按下電源/模式按鍵 [ ] 循環切換至無線,然 後 按 下 快門/選擇
] 加 以 選 取。
按鍵 [
d.按下電源/模式按鍵 [ ] 循 環 切 換 至「 WiFi RC」
(或「RC & App」), 然 後 按 下 快門/選擇按鍵 [
如果相機從 未與遙 控器或 GoP ro 應用程式配對,就會自動開始
進行 配 對。否則,也可以 循 環切換 至「新增」
(或「 新 增 RC」),再進行選取以開始配對。
74
] 加 以 選 取。
Page 75

3.使用遙控器完成下列步驟:
a.開啟遙控器電源。如果遙控器從未與相機配對,就會自動開始
進 行 配 對。否 則,也 可 以 按 住 設定/標記按鍵四秒鐘以開始配
對。裝置配對完成後,兩個螢幕上都會出現已核取方塊 [
]。
b.若要連接其他台相機,請按下快門/選擇按鍵 [ ] 以選擇
「是」,然後重複配對程序。
c. 完 成 之 後,按 下 電源/模式按鍵 [
下快門/選擇按鍵 [
] 加 以 選 取。
] 循 環 切 換 至 「 否 」, 然 後 按
專 業 提 示:完成 HER O4 配 對 之 後,您 可 以 按 住 相 機 上 的 設定/標記按鍵
] 兩秒鐘,以便在相機電源關閉的狀態下開啟無線功能。這個方法
[
能夠節省相機的電池電力,而且在想使用遙控器或 GoPro 應用程式控制
HERO4 時 也 非 常 有 幫 助。設定/標記按鍵 [
] 可開啟最近使用的無線
選 項(RC、應用程式、網路)。
75
Page 76

將遙控器與 HERO3+ 或 HERO3 配 對:
1. 確認相機 與遙控器均已關閉電源。
2.使用相機完成下列步驟:
a.按下電源/模式按鍵 [
] 即 可 開 啟 相 機 電 源。
b.按下開啟/關閉 Wi-Fi 按鍵 [ ] 兩 次,以 開 啟 Wi-Fi 並存取 Wi-Fi
選 單。
c.按下快門/選擇按鍵 [
] 以開啟 Wi-Fi 選單 [ ]。
d.使用電源/模式按鍵 [ ] 循環切換至 Wi-Fi RC,然 後 按 下 快門/
選擇按鍵 [
] 。
e.使用電源/模式按鍵 [ ] 循環切換 至「新增」,然後 按 下快門/
選擇按鍵 [
76
]。當 相 機 搜 尋 時,螢 幕 會 顯 示 此 圖 示:[ ].
Page 77

3.使用遙控器完成下列步驟:
a.開啟遙控器電源。如果遙控器從未與相機配對,就會自動開始
進 行 配 對。否 則,也 可 以 按 住 設定/標記按鍵四秒鐘以開始配
對。裝置配對完成後,兩個螢幕上都會出現已核取方塊 [
b.若要連接其他相機,請按下快門/選擇按鍵 [ ] 以 選 擇 「 是 」,
然後重複配對程序。
c. 完 成 之 後,按 下 電源/模式按鍵 [
下快門/選擇按鍵 [
] 加 以 選 取。
] 循 環 切 換 至 「 否 」, 然 後 按
]。
77
Page 78

/ 連接遙控器與 GoPro
遙控器與相機配對完成之後,日後請遵循以下步驟連接這些裝置。按照
此程序,相機就會連接到最近連接的遙控器。
連接遙控器與 HERO4:
1.開啟遙控器與相機的電源。
2.使用相機完成下列步驟:
a.按下電源/模式按鍵 [
選擇按鍵 [
b.按下電源/模式按鍵 [ ] 循環切換至「無線」,然後按下快門/
選擇按鍵 [
c.按下電源/模式按鍵 [ ] 循 環 切 換 至「Wi Fi RC」或「R C & App」,
然後按下快門/選擇按鍵 [
d.按下電源/模式按鍵 [ ] 循 環 切 換 至 「 既 有 」, 然 後 按 下 快門/
選擇按鍵 [
78
] 循環切換至設定模 式,然 後 按 下 快門/
] 加以選取。
] 加 以 選 取。
] 加 以 選 取。
] 加 以 選 取。
Page 79

連接遙控器與 HERO3+ 或 HERO3:
1.開啟遙控器與相機的電源。
2.使用相機完成下列步驟:
a.按下無線按鍵 [
] 兩 次,以 啟 用 無 線 功 能 並 開 啟 無 線 設 定。
b.按下快門/選擇按鍵 [ ]。
c.按下電源/模式按鍵 [ ] 並 循 環 切 換 至「Wi-Fi RC」, 然 後 按 下
快門/選擇按鍵 [
] 以進行選取。
d.按下快門/選擇按鍵 [ ] 以 選 取 「 目 前 配 對 」。
79
Page 80

/ 拍攝影片及相片
使 用 遙 控 器,透 過 一 或 多 部 相 機 拍 攝 影 片及 相 片。
若要開始/停 止 攝 錄:
按下快門/選擇 [
專 業 提 示:當遙控器與HERO4連結時,您可以在影片中新增HiLight
Tag s。HiLight Tags可標示特定時刻,方便播放、分享和編輯時迅速找
到 重 點 片 段。攝 錄 時,按 下 的 設定/標記 [
Tag。
80
] 按 鍵。
] 按鍵,即可新增HiLight
Page 81

搭配遙控器使用 HERO4 時 無 法 使 用 以 下 功 能:
• QuikCapture
• 以多台相機連續拍攝相片
• 以多台相機攝錄影z手動拍攝相片
搭配遙控器使用 HERO3+ 或 HERO3 時 無 法 使 用 以下 功 能:
• 單鍵操作模式
• 連續相片
• 攝 錄影片 時手動 拍攝 相片
• 按下遙控器上的設定/標記按鍵 [
](以新增 HiLight Tag或進入設
定選單)
81
Page 82

/ 變更相機設定
只要相機不處於攝錄影片或相片的狀態,您隨時都能使用智慧型遙控
器 變 更 相 機 設 定。
備註:若要變更相機設定,遙控器只能與一台相機連結。
若要變更 HERO4 的 相 機 設 定:
1. 請務必確認相機和遙控器電源皆已開啟並已連接。
2.在遙 控 器 上,按 下 電源/模式按鍵 [
更 設 定 的 模 式。
3.按下設定/標記按鈕 [
4.使用電源/模式按鍵 [ ],循環切換各項設定。
5.按下快門/選擇按鍵 [ ],循環切換各項設定的選項。若要選取選
項,將其反白即可移至 另一畫面。
6.若要返回或退出設定選單,請按下設定/標記按鍵 [
82
],開啟該模式的設定選單。
],然後循環切換至您想要變
]。
Page 83

若要變更 HERO3+ 和 HERO3 的 相 機 設 定:
1. 請務必確認相機和遙控器電源皆已開啟並已連接。
2.按下電源/模式按鍵 [
],循 環 切 換 至 設定。
3.按下快門/選擇按鍵 [ ],選 擇 設定。
4.按下電源/模式按鍵 [ ],循環切換各項設定。
5.按下快門/選擇按鍵 [ ],選取一個選項。
6. 若 要 退 出 設 定 選 單,請 按 下 電源/模式按鍵 [ ] 並循環切換至
「退出」,然 後 按 下 快門/選擇按鍵 [
] 加以選取。
83
Page 84

/ 安全資訊
警告
若 未 遵 守 以 下 安 全 指 示,可 能 導 致 起 火、觸 電,或 對 智 慧 遙 控 器 或 其 他
財產 造 成 傷 害 或 損 壞。
使用操作
智慧遙控器內含敏感元件。請勿摔落、拆解、打開、擠壓、扭曲、變形、
穿刺、絞碎、微波、焚燒、油漆或將異物插入本產品。如果智慧遙控器
已損壞(例如該產品已破裂、遭異物刺穿,或因進水而損壞),請不要
繼 續 使 用。
防水性
請勿將智慧遙控器浸入深度超過 32 英 尺(10 公尺) 的 水 中。水 壓 過 大
而導致智慧遙控器損壞並不在保固範圍內。
84
Page 85

智慧遙控器的狀態螢幕力求保持乾淨
狀態螢幕接觸可能留下汙漬的污染來源(例如墨水、染料、化妝品、灰
塵、食物、油和乳液)時,應立即加以清潔。清潔狀態螢幕時,請使用不
會產生棉絮的柔軟布料,稍微沾濕後加以擦拭。開口處避免浸濕。請勿
使 用 窗 戶 清 潔 劑、家 用 洗 潔 劑、噴 霧 劑、溶 劑、酒 精、氨 水 或 砂 紙 清 潔
狀 態 螢 幕。
連接器和連接埠的使用
請勿將連接器強行插入連接埠。查看連接埠內是否有任何異物阻礙。若
連接器和連接埠無法輕鬆連接,或許就表示兩者不可搭配使用。請確認
連接器與連接埠尺寸相符,並且以正確的方向插入。
搭配其他電子設備
數 位 收 發 器(雪 崩 信 標)的 使 用 者 在 使 用 雪 崩 信 標 搜 索 模 式 時,若 要 使
用 GoPro 的相機和其他 GPS 或電子設備,應查閱相關設備的使用說明,
以 減 少 可能的干擾。
85
Page 86

溫度
極端溫度可能會暫時影響電池壽命或智慧遙控器的功能。避免在溫度
或濕度急劇變化時使用智慧遙控器,因為產品內外可能會產生水氣凝
結。使用智慧遙控器或電池充電時,產品變熱是正常現象。產品外殼具
有冷卻功能,可將內部的熱氣導出產品,與 外部的冷空氣調和。
/ 法規資訊
如要查看完整的國家認證清單,請參照產品隨附的「產品及安全重要資
訊 指 南 」文 件。
86
Page 87

用户指南
Smart Remote
GOPR O 相机专用远 程遥控器。
Page 88

To downlo ad this us er guide in a d ifferent la nguage, v isit gopro.com/support.
Pour té lécharg er ce manue l de l’utili sateur da ns une autr e langue, r endez-vo us sur
gopro.com/support.
Wenn Si e dieses Be nutzerh andbu ch in einer a nderen Sp rache he runterl aden
möch ten, besu chen Sie gopro.com/support.
Per sc aricar e questo ma nuale uten te in un’altra l ingua, vi sita gopro.com/support.
Para d escarg ar este man ual de usua rio en otro id ioma, vis ite gopro.com/support.
Para b aixar est e manual do u suário em o utro idio ma, acess e gopro.com/support.
このユーザーマニュアルの他言 語版をダウンロードするには、
gopro.com/supportにアクセ スしてくだ さ い 。
若要下載其他語言版本的使用說明書,請前往:gopro.com/support。
如需下载本用户手 册的其他语言版本,请访问 gopro.com/support。
이 사용자 설명서의 다른 언어 버전은gopro.com/support에서 다운로 드하 십시오.
88
Page 89

/基础知识
状态 LED 指示灯
遥控器状态显示屏
快门/选择按钮
电源/模式按钮
腕带 远程遥控钥匙 远程遥控环
设置/标签按钮
充电端口/
远程遥控钥匙槽
USB
充电电缆
89
Page 90

/携带智能遥控器
将遥控器套进搭接带
使用搭接带,可将遥控器固定在您的手腕、背包带、滑雪杖、自行车横梁
等位置。
将遥控器套进搭接带的步骤如下:
第 1 步
将搭接带穿过遥控器背面的槽位。
90
第 2 步
将遥控器沿搭接带调整至如上图所
示的 位 置。
Page 91

使用远程遥控钥匙和环固定遥控器
使用远程遥控钥匙和环,可将遥控器固定在您的挂绳、系带、车钥匙、拉
链等 位 置。
使用远程遥控钥匙和环固定遥控器的步骤如下:
第 1 步
按 (A) 所示的箭头方向滑动并按住
顶 闩 柄 ,然 后 按 (B) 所 示的方向
从遥控器中拔出钥匙。
A
B
第 2 步
将远程遥控环固定到您的挂绳、
系带等位置。
第 3 步
将远程遥控钥匙插入钥匙槽,
直至听到咔 哒声。
91
Page 92

/入门
使 用 智 能 遥 控 器 ,您 可 以 打 开 /关闭 GoPro 相 机 、开 始 /停止录 像以 及更
改相机设 置。智能遥控器上的显示屏、LED 屏、电源/模式按钮 [
门/选择按钮 [
能完全相同。
92
] 和设置/标签按钮* [ ] 的功能与您相机上的相应功
智能遥控器具有 10 米(32 英尺)深防水设计。水下不
支持无线连接,因此远程遥控器无法在水中与相机保
持连接。
* 仅 HERO4
相机 上有设置/标签按钮。
]、快
Page 93

给智能遥控器充电
首次使 用智能遥 控器前,建 议您 先给遥 控器 充电一小 时。即 便
在电池未完全充满电之前使用,遥控器也不会受损。您可以在
充电的同时使用遥控器。
遥控器处于开机或充电状态时,状态显示屏会显示遥控器的
电池电 量。
注意:遥控器在搜索相机信号时,电池耗电速度会加快。如果充电时无需使用遥控器,请务必关闭遥
控器,以节省电量。
93
Page 94

为遥控器充电的步骤如下:
A
B
第 1 步
按 (A) 所示的箭头方向滑动并按住
顶 闩 柄 ,然 后 按 (B) 所 示的方向
从遥控器中拔出钥匙。
94
第 2 步
将充电电缆的接头插入到
充 电 槽 中 ,直 至 听 到 咔 哒 声 。
Page 95

第 3 步
将充电电缆的另一端连接到电脑的
USB 端口或其他 USB 电源上。
注意:确保电 脑已连接电源。如果遥控器状态
显示屏未显示遥控器正在充电,请使用其他
USB
端口。
充满电后,遥控器状态显示屏的充
电图标将显示为电池满格状态。
95
Page 96

打开/关闭遥控器
打开遥控器的步骤如下:
按电源/模式按钮 [
]。
关闭遥控器和所连接相机的步骤如下:
按住电源/模式按钮 [
注意:如果相机正在录像,以上操作只会关闭遥控器。相机将会继续录像。
] 两秒钟。
专业提 示:您可以关闭遥控器,而保持相机开机。如果您想从遥控器切
换到使用 GoPro App 控制相机,这个选 项将非常有用。要使用此选项,
请同时按住电源/模式按钮 [
96
] 和设置/标签按钮 [ ] 两秒钟。
Page 97

遥控器状态显示屏
智能遥控器状态显示屏上显示的具体信息,取决于您的遥控器是否同时
连接了多台相 机 。
智能遥控器连接了一台相机:
遥控器屏幕上 显示的信息与 Go Pro 相机状态屏幕上的
信息相同。遥控器上显示的可用模式也与相机上显示
的可用模式 相同。
智能遥控器连接了多台相机:
遥控器屏幕上将显示连接的相机数、录像模式以及遥
控器的电池状态。
97
Page 98

遥 控 器 连 接 了 多 台 相 机 时 ,以 下 模 式 可 用 :
默认启动模式 将所有相机设置为默认的开机模式
视频 将所有相机设 置为视频模式
照片 将所有相机设置为照片模式
连拍 将所有相机设置为连拍模式
定时拍摄 将所有相机设 置为定时拍摄模式
智能遥控器软件更 新
一旦遥控器软件提供更新,在遥控器连接到相机后,将自动提示您进行
软件更新。按照 屏幕上的指示安装 更新。
98
Page 99

/将遥控器与您的 GoPro 相机配对
您可以将智能遥控器与启用无线网络的 GoPro 相机配 对。在最佳使用条
件 下 ,遥 控 器 可 控 制 最 远 18 0 米( 600 英尺)外的相机。遥控器最多可同
时控制 50 台 GoPr o 相机。相机每次只能识别一个遥控器。
在您使用遥控器控制相机时,受到诸如地形、天气、障碍物和电磁干扰
等因素的影响,遥控的距离范围会有所不同。
99
Page 100

将遥控器与 HERO4 相机配对的步骤如下:
1. 请确保相机与遥控器均已关闭。
2.在相机上完成以下步骤:
a.按电源/模式按钮 [
] 以打开相机。
b.按电源/模式按钮 [ ] 以导航至 设置模 式 ,然 后 按 快门/选择按
] 以将其 选中。
钮 [
c.按电源/模式按钮 [ ] 以导航至 无线网络,然 后 按 快门/选择按
] 以将其 选中。
钮 [
d.按电源/模式按钮 [ ] 以 导 航 至“ WiFi RC”( 或 “ RC & Ap p”),
然后按快门/选择按钮 [
] 以将其选中。如果相机之前从未与
任何遥控器或 GoPro A pp 配对过,相机将自动开始配对。如相机
未自动配对,请导航至“新建”(或“新建RC”),并 将 其 选 中 以
开始 配对。
100
 Loading...