

Page 1
COMPACT DISC PLAYER & CASSETTE RECORDER
WITH DAB, FM/MW RADIO
GPS285DAB
Instruction Manual
Table of Contents
What's in the Box.............................................................................................................1
Important Notes...............................................................................................................2
Important Safeguards..................................................................................................... 3-4
Power Supply................................................................................................................ 5
Player Maintenance....................................................................................................... 6
Location of Controls........................................................................................................7
Location of Controls (Remote Control)........................................................................... 8
Listening to the Radio.................................................................................................. 9
Listening to a Compact Disc
Cassette Operation
DAB Operation
Product Specifications
........................................................................................................ 12-15
............................................................................................................... 16-26
...........................................................................................10-11
.....................................................................................................27
What's in the Box
On unpacking the unit the following should be located within the packing.
GPS285DAB
1 x Main Unit
1 x Remote control
1 x Detachable mains power cord with 3 pin plug.
1 x Digital radio questionaries
1 x Digital one station leaflet
1 x Instruction Manual
1 x External wire aerial
Please Read these Instructions prior to first use and retain for future reference.
Goodmans Product Information Helpline 0870 873 0080
Please retain all packaging materials as in the event of the product needing transportation
or return for service these will be needed.
Goodmans Product Information Helpline 0870 873 0080
1
Page 2
Important Notes
Important Safeguards
Your hearing is very important to you and to us so please take care when operating this
equipment. It is strongly recommended that you follow the listed guidelines in order to
prevent possible damage or loss of hearing:
ESTABLISH A SAFE SOUND LEVEL
l
Over time your hearing will adapt to continuous loud sounds and will give the
impression that the volume has in fact been reduced. What seems normal to you may
in fact be harmful. To guard against this set the
BEFORE YOUR HEARING ADAPTS
volume at a low level.
Slowly increase the level until you can hear comfortably and clearly and without
l
distortion.
Damage to your hearing is accumulative and is irreversible.
l
Any ringing or discomfort in the ears indicates that the volume is too loud.
l
Once you have established a comfortable listening level, DO NOT INCREASE THE
SOUND LEVEL FURTHER.
The following list of typical sound levels may assist you in recognising just how loud you
have set the volume level.
DECIBEL
Level dB Example
30dB Quiet library, soft whisper.
40 Living room, fridge freezer bedroom away from traffic.
50 Normal conversation, quiet office, light traffic.
60 Electric sewing machine,
70 Vacuum cleaner, hair dryer, noisy restaurant
PRE FITTED MAINS PLUGS
For your convenience a mains plug has been fitted to this appliance. For your safety please
observe the following information.
1. Should the fuse inthe plug remove the plug from the wall socketand replace the fuse with a 3
Amp ASTAapproved to BS 1362 fuse.
2. Never use the plug without thefuse cover fitted. Replacement fuse covers are available from
your dealer or most electrical retail outlets.
3. If the cable of the mains plug is cut off the cable, rewire the replacement plug in accordance
with instruction given in this manual.
4. CAUTION: Under no circumstances should the discarded plug be inserted mains socket. To
prevent a shock hazard carefully dispose of the discarded plug. Do not leave the plug lying
around where children might see it.
WARNING:
CAUTION: DANGEROUS VOLTAGES EXIST INSIDE THIS UNIT, DO NOT REMOVE COVER
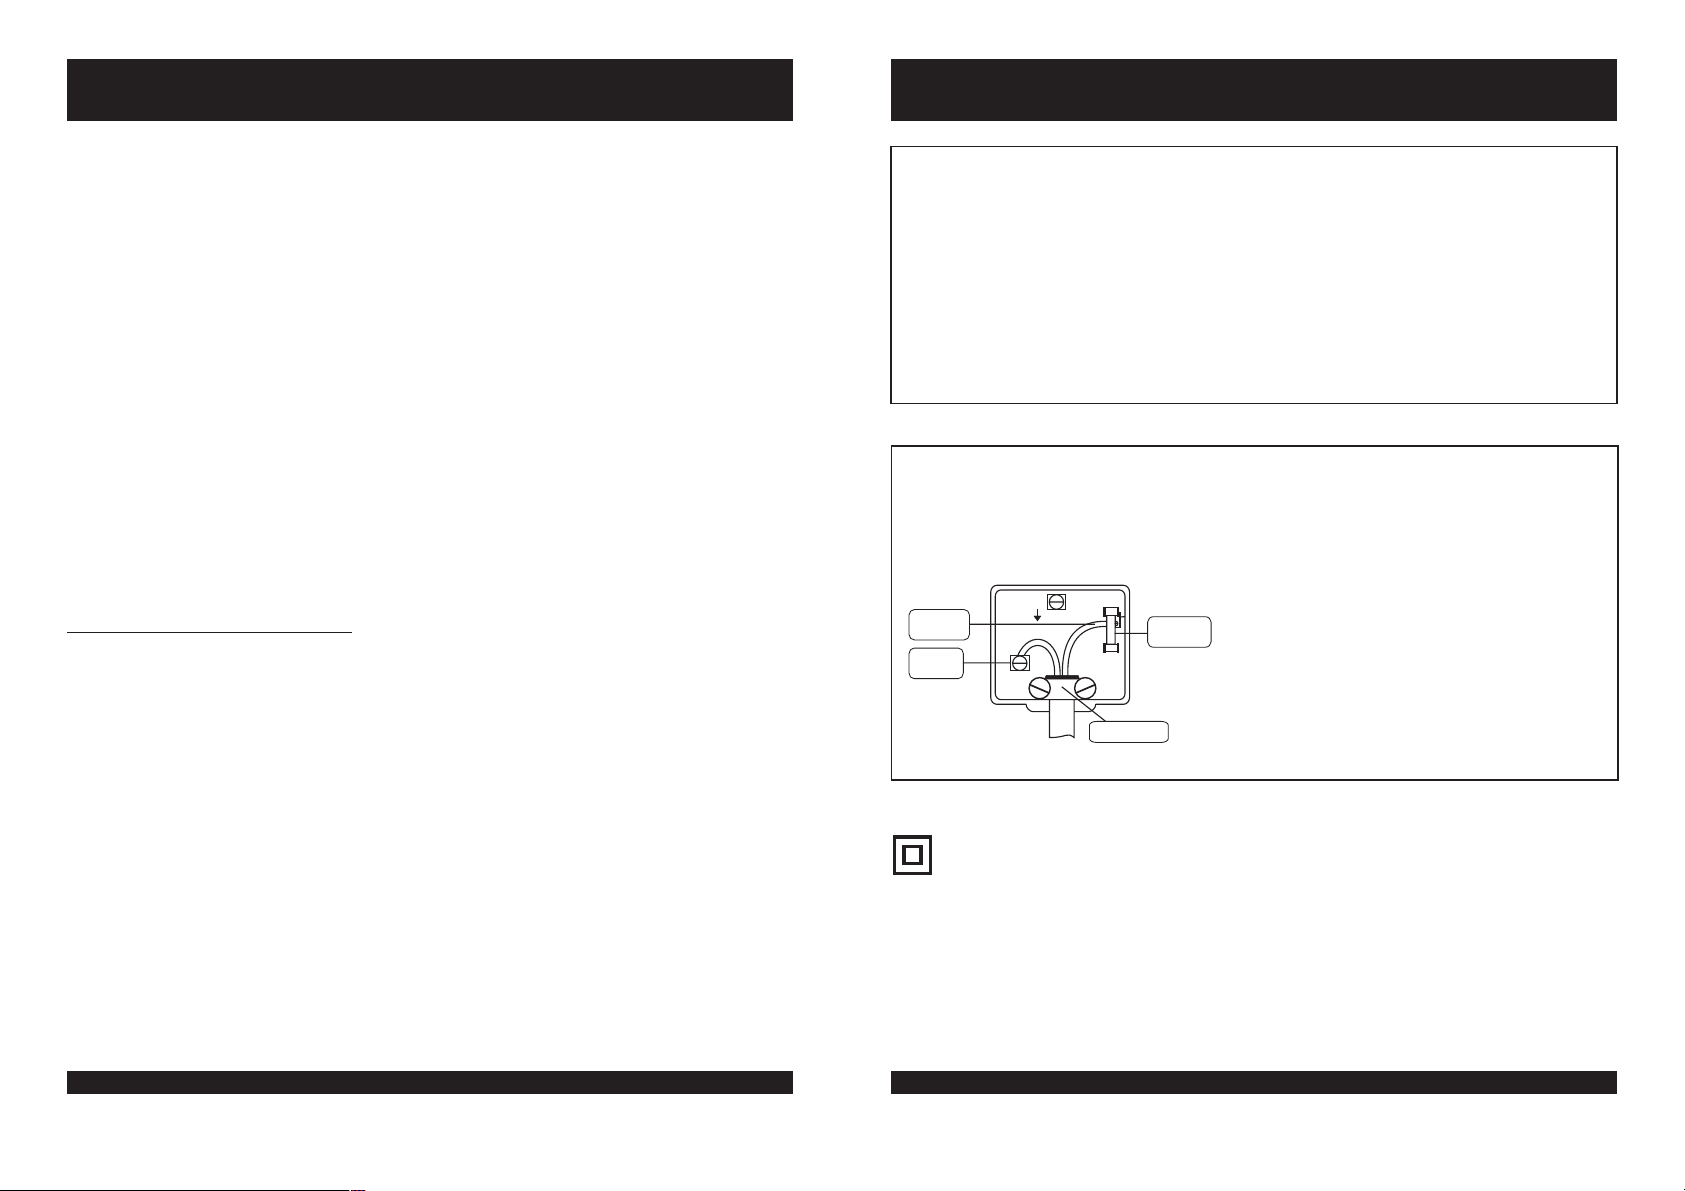
PLUG WIRING DETAILS
BROWN
Live
BLUE
Neutral
To prevent fire or shock hazard do not expose this unittorain or moisture.
(OR BACK). NO USER SERVICEABLE PARTS INSIDE. REFER SERVICING TO
QUALIFIED SERVICE PERSONNEL. DISCONNECT FROM MAINS SUPPLY
WHEN NOT IN USE.
The wires in this mains lead are coloured in
accordance with the following wiring codes:
E
BS 1362
FUSE
N
Cord clamp
Blue................................................. Neutral
Brown................................................... Live
The wires in this mains lead must be
connected to the terminals in the plugs as
follows:
Blue Wire..................................... N or Black
Brown Wire..................................... L or Red
Onlya3Ampfuse should be fitted in the plug
ora5Ampfuse atthedistribution board.
THE FOLLOWING NOISE CAN BE HARMFUL UNDER CONSTANT EXPOSURE
80dB Average city traffic, alarm clock buzzer at 2 feet, food mixer.
90dB Motorcycle, heavy goods vehicle, petrol lawn mower.
100 Pneumatic drill, chain saw, garbage truck, discotec / night-club.
120 Rock band concert, thunderclap.
PERMANENT LOSS OF HEARING
140 Gunshot 2 feet away.
THRESHOLD OF PAIN
180 Rocket Launching pad.
Goodmans Product Information Helpline 0870 873 0080
2
WARNING: UNDER NO CIRCUMSTANCES MUST THE LIVE OR NEUTRAL WIRES BE
CONNECTED TO THE EARTH TERMINALIN A3-PIN MAINS PLUG.
This symbol means that this unit is double insulated.
An earth connection is not required.
Goodmans Product Information Helpline 0870 873 0080
3
Page 3
Important Safeguards (Continued)
Power Supply
CAUTION
CLASS 1 LASER PRODUCT
Use of Controls or adjustments or performance of procedures other than those specified herein
may result in hazardous radiation exposure.
LASER SAFETY
This unit employs a laser, only qualified service personnel should attempt repair.
DANGER:
CAUTION:
INVISIBLE LASER RADIATION WHEN OPEN AND
INTERLOCK FAILED OR DEFEATED. AVOID DIRECT
EXPOSURE TO BEAM.
HAZARDOUS LASER RADIATION WHEN OPEN AND
INTERLOCK DEFEATED.
CAUTION
CLEANING: Always disconnect unit from mains supply before attempting to clean it. Use soft
SOME DO'S AND DONT'S ON THE SAFE USE OF EQUIPMENT
This equipment has been designed and manufactured to meet European safety standards but
like any electrical equipment, caremust be taken if you are to obtain the best results and safety is
to be assured.
Do read the operating instructions before you attempt to use theequipment.
Do ensure that all electrical connections (Including the mains plug, extension leads and
interconnections between pieces of equipment) are properly made in accordance with the
manufacturer's instructions. Switch off and withdraw the mains plug when making or changing
connections.
Do consult your dealer if you are ever in doubt of the installation, operating, or safety of your
equipment.
Don't continue to operate theequipment if you are in any doubt about it working normally, or if it is
damaged in any way- switch off, withdraw themains plugandconsult your dealer.
Don't remove any fixed covers as this may expose dangerous voltages.
Don't leave equipment switched on when it is unattended unless it is specifically stated that it is
designed for unattended operation or has a standby mode. Switch off using the switch on the
equipment and makesure that your family knows how todo this. Special arrangements mayneed
to be made for infirm or handicapped people.
Don't listen to headphones at high volume, as such use canpermanentlydamage your hearing.
Don't obstruct the ventilation of the equiment, for example with curtains or soft furnishings.
Overheating will cause damage and shorten the life of the equipment.
Don't allow electrical equipment to be exposed to rain or moisture.
Above all
Never let anyone, especially children, push anythinginto holes, slots or any other opening as
this could result in a fatal electric shock.
Never guess or take chances with electrical equipment ofany kind.
It is better to be safe than sorry!
WARNING:
cloth moistened with soapy water, wipe gently. Do not use solvents or abrasive
materials.
TO REDUCE THE RISK OF FIRE OR ELECTRIC SHOCK, DO NOTEXPOSE THIS
APPLIANCE TO RAIN OR MOISTURE, DANGEROUS HIGH VOLTAGES ARE
PRESENT INSIDE THE ENCLOSURE, DO NOT OPEN THE CABINET, REFER
SERVICING TO QUALIFIED PERSONNEL ONLY.
Goodmans Product Information Helpline 0870 873 0080
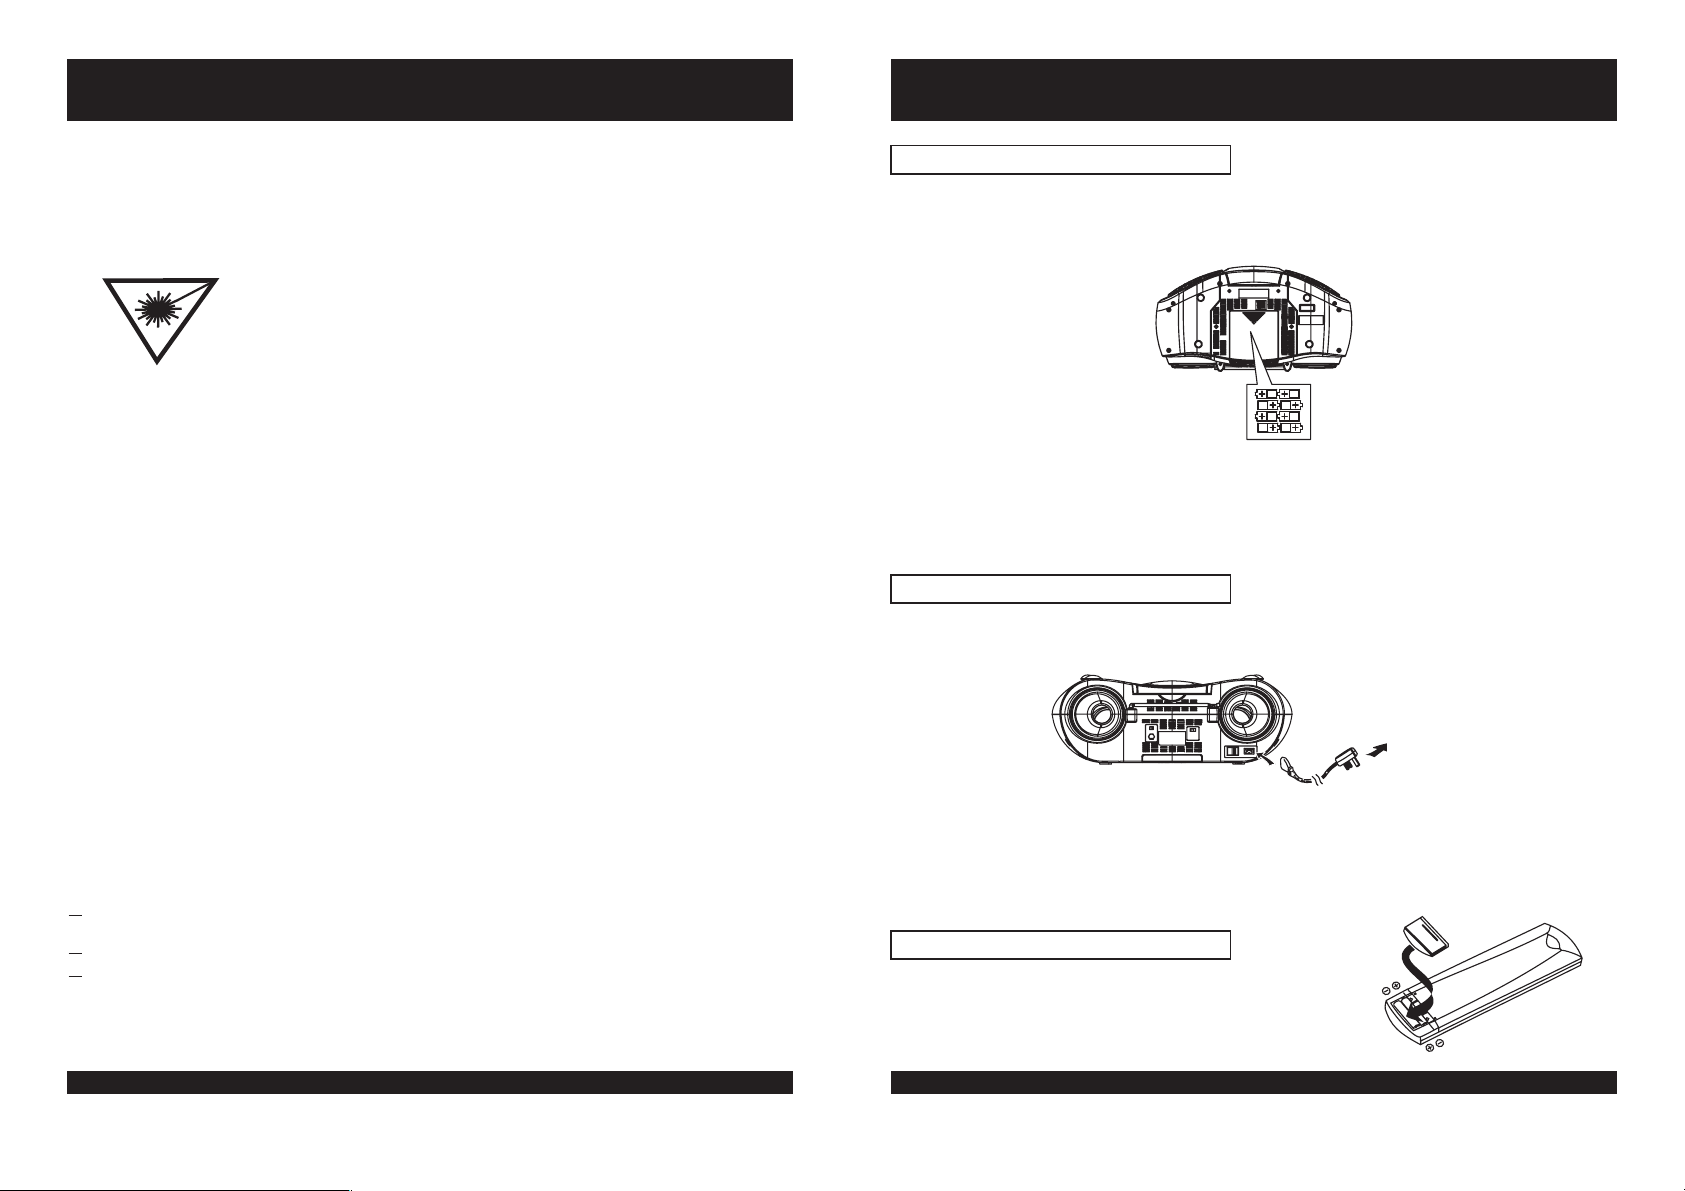
BATTERY OPERATION
Remove the battery compartment cover by gently pushing the clips downward and
outwards.
Install 8 x "C" size batteries (UM-2 or equivalent) and ensure the correct polarities are
observed.
Replace the battery compartment cover.
NOTE:
The batteries will only operate when the mains power lead is removed.
=
To avoid damage which may be result from leaking batteries, remove the batteries
=
when they become weak or when the unit is not to be used for a long period of time.
AC OPERATION
Connect the AC Cord to the AC socket at the back of the unit and insert the AC plug into a
standard household outlet.
AC OUTLET
NOTE:
When the AC line cord is connected to the AC socket of the unit, the batteries
will not operate. To operate the set on batteries, check that the AC plug is
detached from the AC socket of the unit.
NOTE:
If the AC plug of this unit does not fit in your AC outlet, a plug adaptor should be
used. Consult your local dealer on the right type of plug adaptor that is required.
REMOTE CONTROL
The remote control uses two "AAA" or "UM-4" batteries.
Goodmans Product Information Helpline 0870 873 0080
4
5
Page 4
Player Maintenance
Location of Controls
CLEANING THE CABINET
Wipe with a soft cloth. If the cabinet is very dirty, dampen the cloth with a weak solution of
neutral detergent and water, and then wipe clean.
CLEANING THE UNIT
To clean the unit, simply wipe off with a soft clean cloth moistened with plain lukewarm
water.
Warning: Remove mains plug from mains outlet socket before clean.
CLEANING THE LENS
A dirty lens will cause sound skipping and, if the lens is very dirty, the CD may not work.
Open the disc cover and clean the lens as follows:
DUST OR DRY PARTICLES
Using a camera lens brush/blower to blow on the lens couple times, then wipe it lightly with
the brush to remove dust and blow on the lens once more.
FINGER PRINTS
If the lens cannot be cleaned by using a brush/blower, use a dry cotton swab.
46 8101214
1 2 3 5 7 9 11 13 15 16
18 2022242628
23 25
171921
40
41 42 43 44 45 40
464748 49 50
27 29
30 32
313335 37
34
36
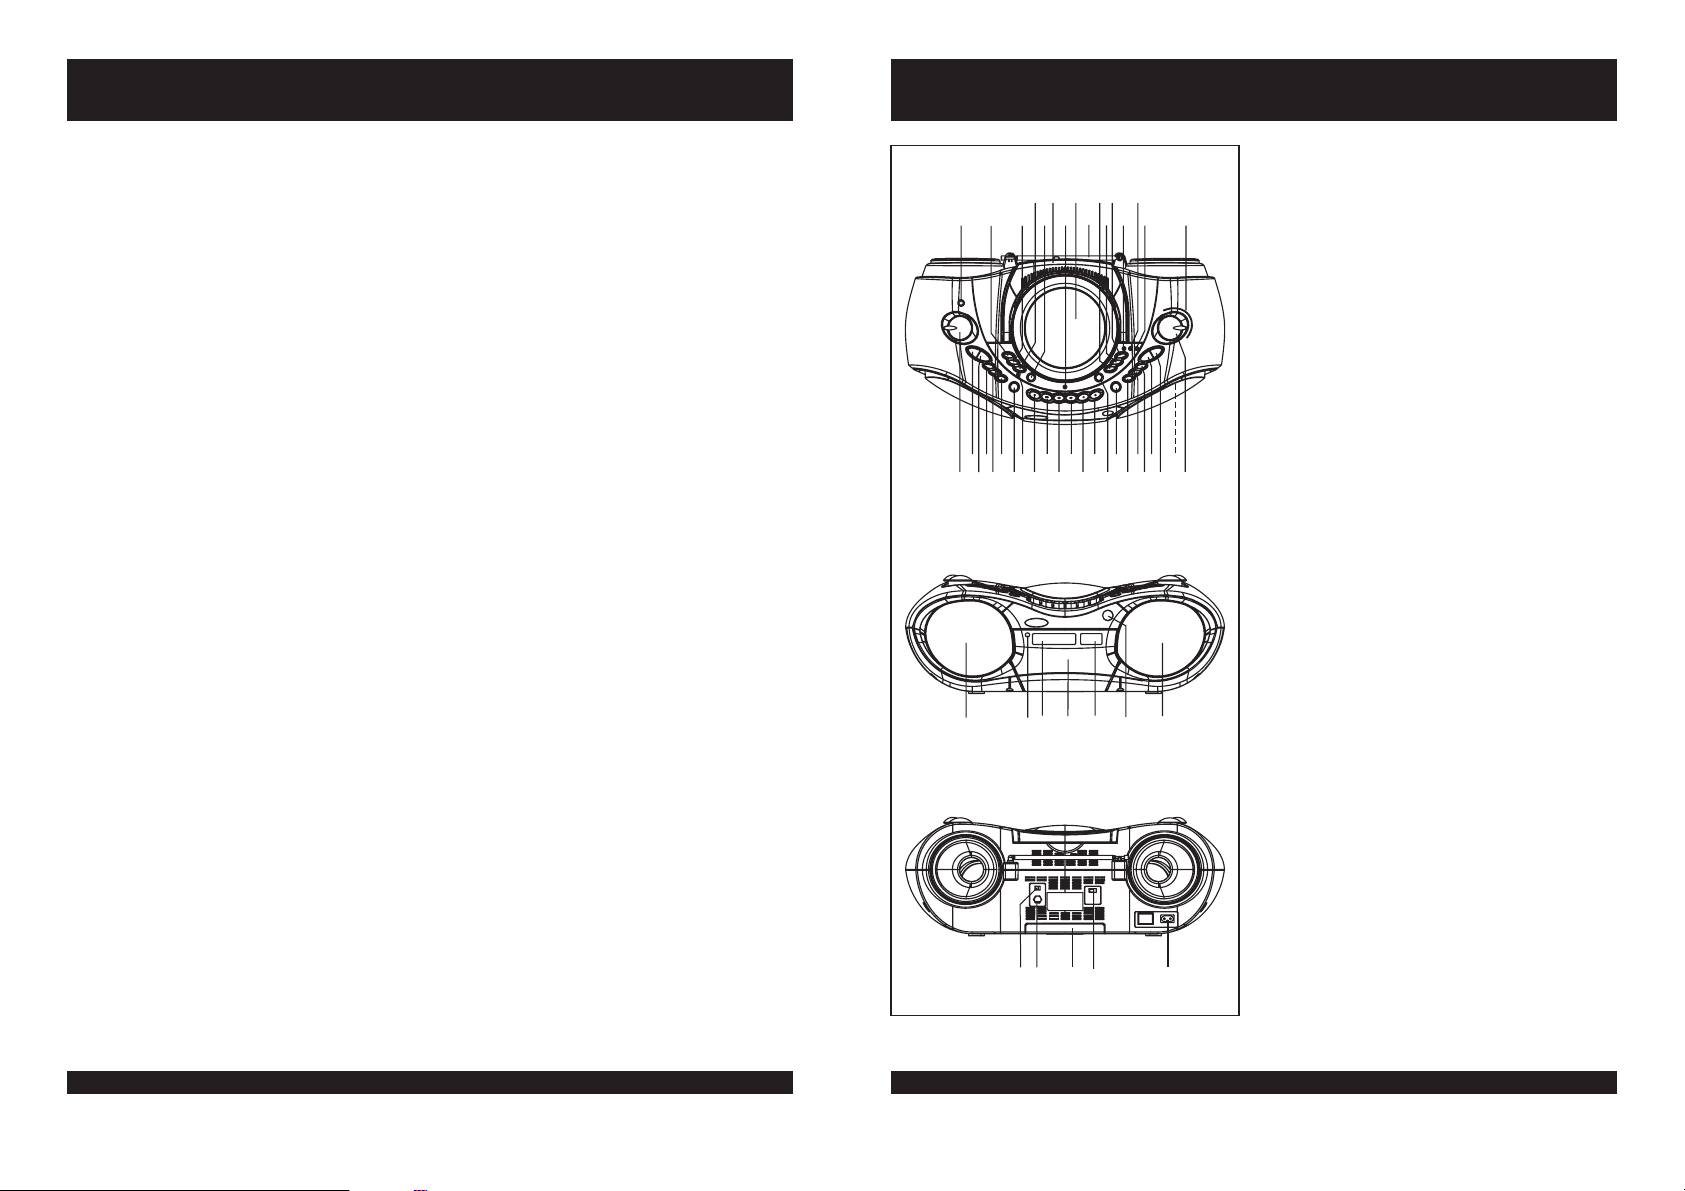
1. EARPHONE SOCKET
2. SETUP BUTTON
3. INFO BUTTON
4. AUTO-TUNE BUTTON
5. BASS BOOST BUTTON
6. FOLDING HANDLE
7. TAPE INDICATOR
8. CD DOOR
9. FM TELESCOPIC ROD AERIAL
10. CD REPEAT BUTTON
11. CD PROGRAM BUTTON
12. CD STOP BUTTON
13. MW INDICATOR
14. FM INDICATOR
15. FM STEREO INDICATOR
16. DIAL SCALE
17. VOLUME CONTROL
38
39
18. DAB UP BUTTON
19. DAB DOWN BUTTON
20. SELECT BUTTON
21. BAND BUTTON
22. RADIO BUTTON
23. DAB BUTTON
24. BASS BOOST INDICATOR
25. CASSETTE PAUSE KEY
26. CASSETTE STOP/EJECT KEY
27. CASSETTE FAST FORWARD KEY
28. CASSETTE REWIND KEY
29. CASSETTE PLAY KEY
30. CASSETTE RECORD KEY
31. CD DOOR OPEN BUTTON
32. POWER BUTTON
33. TAPE BUTTON
34. CD BUTTON
35. CD PLAY/PAUSE BUTTON
36. CD BACKWARD SKIP/SEARCH BUTTON
37. CD FORWARD SKIP/SEARCH BUTTON
38. BUILT-IN CONDENSER MICROPHONE
39. TUNING CONTROL
40. SPEAKERS
41. STAND BY INDICATOR
42. LCD FOR DAB INFORMATION
43. CASSETTE DOOR
44. LCD DISPLAY (FOR CD PLAYBACK)
45. REMOTE SENSOR
46. DAB ANT. INT/EXT SWITCH
47. DAB EXT ANT. SOCKET
48. BATTERY COMPARTMENT
49. FM ST./MONO SELECTOR
50. AC SOCKET
Goodmans Product Information Helpline 0870 873 0080
6
Goodmans Product Information Helpline 0870 873 0080
7
Page 5
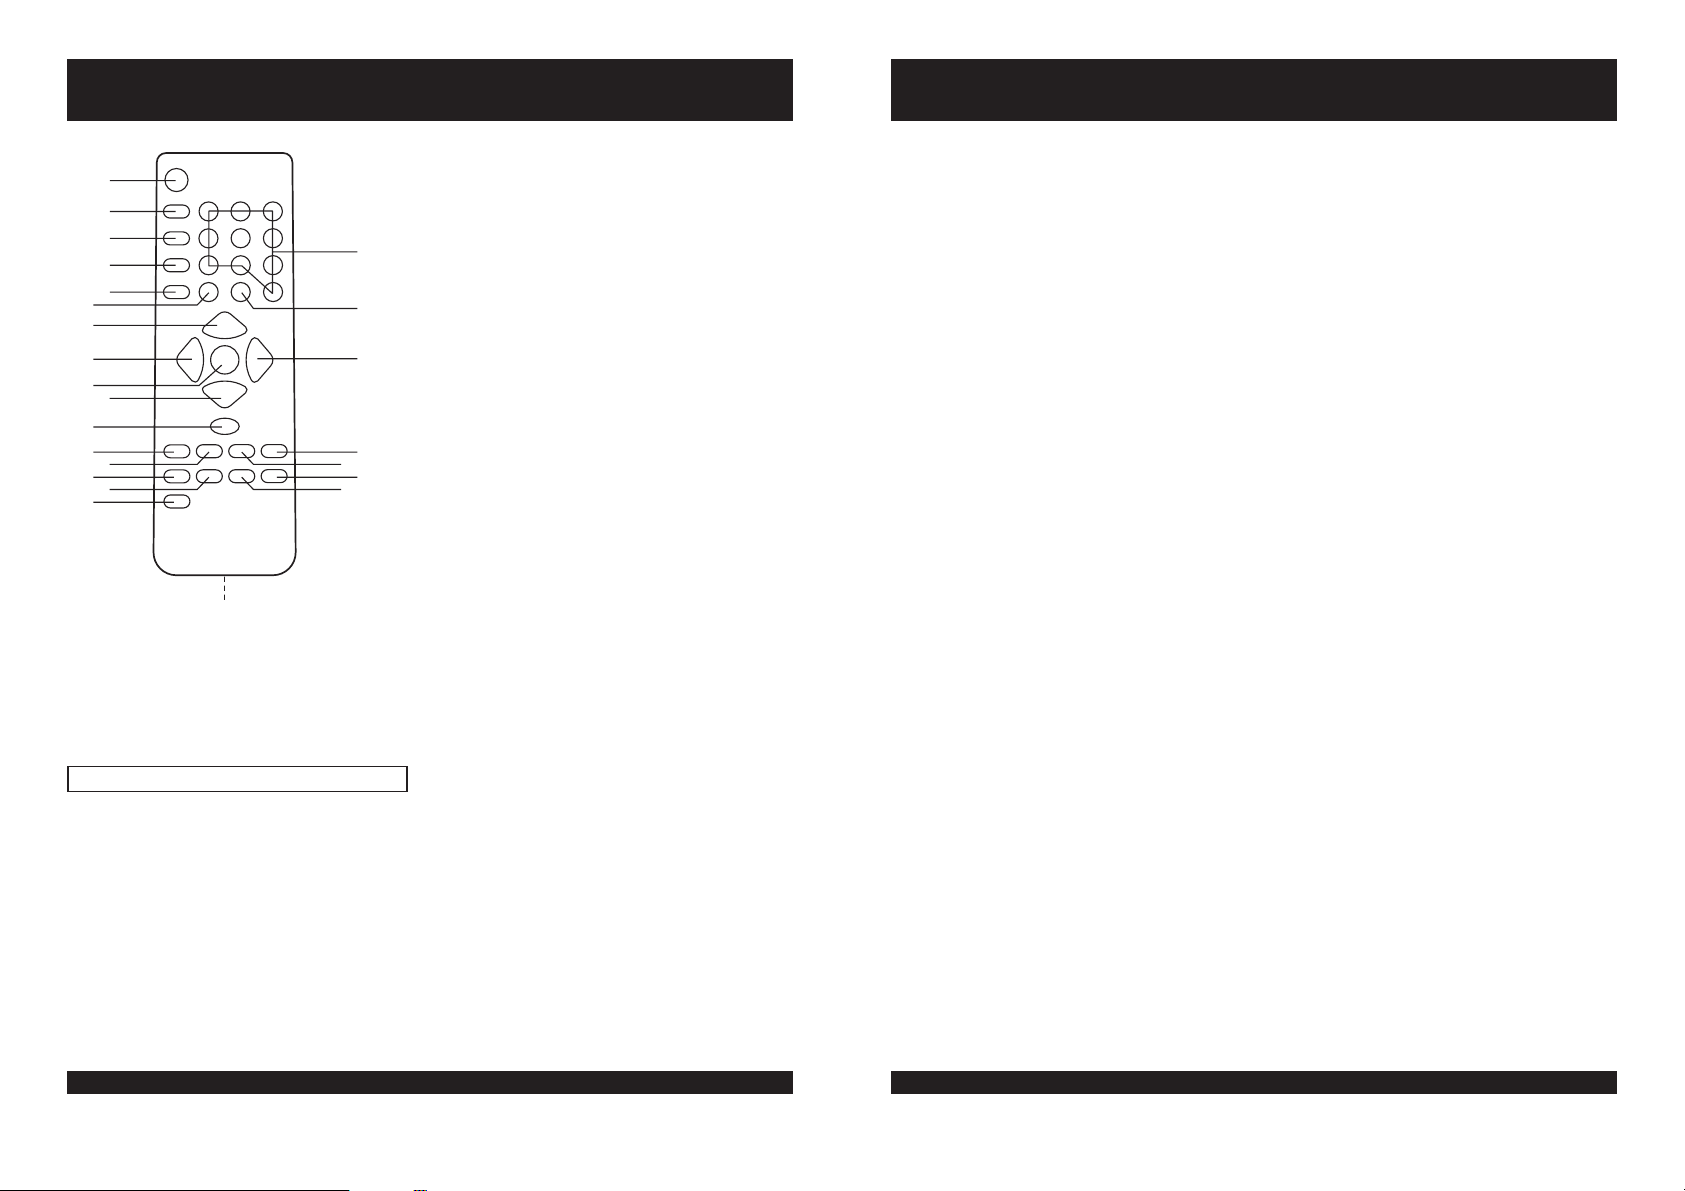
Location of Controls (Remote control)
Listening to the Radio
1. STAND BY BUTTON
1
2
3
4
5
6
7
8
9
10
11
12
13
14
15
16
24
23
22
21
20
19
18
17
2. TUNER BUTTON
3. CD BUTTON
4. DAB BUTTON
5. BAND BUTTON
6. TAPE BUTTON
7. VOLUME UP
8. DOWN
9. DAB SELECT
10. VOLUME DOWN BUTTON
11. DAB AUTO TUNE BUTTON
12. CD PLAY/PAUSE BUTTON
13. CD STOP BUTTON
14. CD REPEAT BUTTON
15. CD PROGRAM BUTTON
16. MUTE BUTTON
17. CD RANDOM BUTTON
18. DBBS BUTTON
19. CD SKIP DOWN/DAB SET UP BUTTON
20. CD SKIP UP BUTTON
21. UP BUTTON
22. DAB INFO BUTTON
23. NUMERIC BUTTONS
24. BATTERY COMPARTMENT(REAR)
BUTTON
BUTTON (DAB only)
BUTTON DAB only)
(DAB only)
(DAB only)
(DAB only)
REMOTE CONTROL OPERATION
The numeric buttons can only be used in the DAB mode. Please note pressing any of the
numeric buttons orthe INFO buttonduring CD playback will resultin unit malfunction.
Press Power button to turn the unit on after the power has been connected and then
press the Radio button or the TUNER key on the remote controller.
Select the desiredband with the BAND button.
Tune
to the desired station by rotating the TUNING control after locating a station
slowly turn the Tuning control to fine tune to the station to receive the best reception.
The built-in MW antenna and external FM TELESCOPIC ANTENNA are directional.
=
listening to an FM broadcast, fully extend the TELESCOPIC ANTENNA and
When
rotate it for the best reception.
=
For MW broadcast, rotate the whole set until the best reception is heard.
Adjust the volume level to a comfortable listening level.
To turnoff the radio, press thePOWERbutton to turn the unit to STAND BY mode.
NOTES:
=
If a particular FM (STEREO) station is weak, or you hear too much background
noise, slide the FM ST./FM selector to the FM (MONO) position. This will often result
in a much clearer reception.
= FM ST./FM selector
When the is in the FM STEREO position and a station is
broadcasting, the FM STEREO indicator will be lit.
STEREO HEADPHONE SOCKET
A stereo headphone socket has been provided on the top of the unit so that headphones can
be used to listen without disturbing others. To use this socket, plug in the
headphones/earphones (not supplied) and adjust the VOLUME control to a comfortable
listening level.
NOTE:
When external headphones/earphones are connected, the sound of the unit's
speakers will beautomatically muted.
Using the Remote control Correctly
Point the remote control at the REMOTE SENSOR located on the unit on the unit.
l
When there is a strong ambient light source, the performance of the REMOTE
l
SENSOR may be degraded, causing unreliable operation.
The recommended effective distance for remote operation is about 6 Metres.
l
Replace the two "AAA" or "UM-4" batteries when there is either no operation or
l
operation becomes erratic.
Goodmans Product Information Helpline 0870 873 0080
8
Goodmans Product Information Helpline 0870 873 0080
9
Page 6

Listening to a Compact Disc
COMPACT DISC OPERATION
HANDLING A DISC
Although built to withstand a the effects of dust, dirt and scratches, discs should be
=
treated with care and according to rules applicable to conventional analog discs.
Always protect a disc against scratches, dirt and dust etc. It is recommended that
=
during non-use periods the discs should be retained in the original case. If a disc is
treated with reasonable care, the only maintenance needed to retain the excellent
sound reproduction is to wipe it with a cloth as indicated below.
To handle a disc use only one of the two methods illustrated (Do not touch the
rainbow - coloured side).
To wipe a disc, use only a soft cloth. Do not use alcohol based liquids or
thinner which will damage the disc. The disc should always be wiped in a
straight line from the centre to the edge. It should never be wiped in a circular
motion.
Never place the disc on other equipment or near any heat source. Avoid
positions where the disc would be subjected to direct sunlight for long periods.
PLAYING A CD COMPACT DISC
Press CD button to select the CD function, the LCD will show an icon " ".
Ê
Press the CD DOOR OPEN BUTTON to open the CD Door..
Ë
Insert a CD with the side If the disc is upside down, the Display will show
Ì
" ").
Close the CD Door by gently pushing the Door down with your finger.
Í
The Display will show the total number of tracks (songs) on the CD.
Î
To start the music, press the CD Play/Pause Button (wait a few seconds for music to
Ï
start). The first track number "01" will appear in the Display, playback begins afterwards.
To pause playback, press the Play/Pause Button, the icon " " in the display will flash
Ð
to indicate you are in the Pause mode .
To resume, press the Play/Pause Button again, and the icon " " will be shown (not
Ñ
flashing).
To stop playback, press the CD Stop Button.
Ò
To turn the unit , press the power button, the standby indicator will illuminate.
Ó
NOTE:
Always stop the CD player by using the CD Stop Button before taking a disc out
of the compartment.
NOTE:
If you hit or move the CD during play, the music will stop for a second or two
and then start again. This is a normal phenomenon for all portable CD players
and is not a fault.
SKIPPING TRACKS (SKIP)
Ê
This function enables you to find the beginning of any track during playback. If the CD
Forward Search/Skip ( ) Button is pressed once, the on the disc will
be selected for each press of the button. The display will show the track or song
number.
Goodmans Product Information Helpline 0870 873 0080
LABEL UP.
off
NEXT TRACK
Listening to a Compact Disc (Continued)
Ë
If the CD Backward Search/Skip ( ) Button is pressed twice or more in rapid
succession, play will go one track per press.
Ì
Whilst in the pause mode, it is also possible to select the beginning of a track by using
the CD Forward Search/Skip ( ) Button and CD Backward Search/Skip ( ) Button
to reach the desired track. After selection, press Play.
Press and the CD Forward Search/Skip ( ) Button to search forward at a high
Í
HOLD
speed for a particular section of a track. Press and the CD Backward
Search/Skip ( ) Button to search backward. Release the button to resume normal
play when the required section is found.
TO PROGRAM TRACKS
Press the CD Stop Button during playback. The total number of tracks will be shown in
the display.
Press the CD Pro "00" and " PROGRAM" will flash in the display.
Select the desired track by pressing Backward or Forward Skip/Search Button
(or).
Press CD Program Button again to store the selected track in memory
Repeat steps and (up to 20 tracks may be programmed).
After all tracks have been programmed in order, press the CD Play/Pause Button to start
3 4
the programmed playback from the first programmed track, and "PROGRAM" will flash
to indicate you are in the Programmed playback mode.
TO CLEAR PROGRAM
Press the CD Stop Button twice during the programmed play to clear the program.
Open the CD compartment, the disc will stop rotating, and the program will be erased.
Turn off the power.
NOTE:
Programming can only be done when the disc is stopped. Pressing the Stop button
once cancels program playback, it can be restarted by pressing program button.
REPEAT PLAY SINGLE SONG
To repeat the song over and over again:
Press the Search/Skip Button during playback to select the song you want to repeat.
Ê
Press the Repeat Button.
Ë
"REPEAT" will show in the display.
Ì
The song selected will play over and over, until the Stop button is pressed. To cancel
Í
SAME
the repeat function, press Repeat Button twice.
REPEAT PLAY ALL SONGS
To repeat play on a disc and play them again and again, do the following.
Ê
Press Repeat Button twice during playback.
Ë
"ALL REPEAT" Indicator will show in the display.
Ì
All the songs on the CD will play in its original order and then start all over again. To
ALL SONGS
cancel the repeat function, press Repeat Button once.
RANDOM
PLAY
Press Random button on the remote controller when the disc is stopped, the unit will
select the tracks in a random order for playing immediately.
To cancel random playback press the CD Stop button.
Goodmans Product Information Helpline 0870 873 0080
BACK
HOLD
gram Button,
.
10
11
Page 7

Cassette Operation
Cassette Operation (Continued)
RECORD
Press the record button to make a recording from either a CD, radio stations, internal
microphone or DAB stations.
NOTE:
PLAY BUTTON
Press the PLAY button to start playing a cassette.
REWIND BUTTON
Press the REWIND button to quickly rewind a tape. Press STOP/EJECT to release the button
at the endof the tape.
FASTF. BUTTON
Press the FAST FORWARD button to quickly advance the tape. Press STOP/EJECT to
release the buttonat the endof the tape.
STOP/EJECT BUTTON
Press the STOP/EJECTbutton to cancela selection, i.e. press this button during cassette play
to stop thetape.
When the tapeis stopped, pressthe button to eject thecassette.
PAUSE
The cassette PAUSE button can be used to temporarily interrupt a recording or playback
and is useful for editing the content of the recorded tracks. Press the button once to pause
the recording or playback, press this button again to continue recording or playback.
NOTE:
AUTOMATIC STOP
The cassette mechanism has a built-in automatic stop. During playing/recording, the unit
will automatically stop when the end of the tape is detected.
When the RECORD button is pressed, the PLAY button will be depressed at the
same time. The record key will not go down if the cassette is protected; see
'Protecting recordings from being erased.'
In pause mode, the cassette motor is still on, therefore do not keep the unit in
pause mode for too long a time as it can cause damage to the cassette mechanism.
To stop the tape playing, press the STOP EJECTbutton. Press the button again to open
the cassette door and eject the tape.
CARE OF CASSETTE TAPES
TO HELP AVOID TANGLES
Loose ape may jam or get tangled in the cassette recorder.
t
With a hexagonal pencil or a similar tool, gently tu the pencil
to tighten the tape,asshown opposite.
If the spool feels tight when taking up slack tape as described
above, this may be du to ridges on the spool of tape. Tight
spools can lead to uneven playback sp d or tape tangling. In
most cases the ridges can be removed by fast winding the
cassette from one endtothe other and backagain.
Avoid the use of C120 tapes with this unit.
PROTECTING RECORDINGS FROM BEINGERASED.
To prevent recordings from being erased accidentally, break
out the tab(s) with a screwdriver. When the edge with the
exposed tape isfacing away fromyou, the tabthat pro ects the
side that is uppermostison your right, asshown opposite.
e
ee
/
rn
Side A
t
Ta b B
Side B
underneath
Ta b A
TO PLAY A CASSETTE TAPE
the
Open
I
nserta cassette with the exposed tape facing upwards and the full reel on the right
(unit plays from right to left) into the guides on the inside of the cassette door.
Close
Press the TAPE button to select TAPE operation
Press the cassette PLAY button tostartthe tape playing.
Adjust the VOLUME control to a comfortable listening level.
cassette door by pressing the cassette STOP/EJECT button.
the
cassette door.
Goodmans Product Information Helpline 0870 873 0080
12
Goodmans Product Information Helpline 0870 873 0080
13
Page 8

Cassette Operation (Continued)Cassette Operation (Continued)
To record on a protected cassette, seal the open slots
with adhesive tape.
Adhesive tape
AUTOMATIC LEVEL CONTROL (ALC)
This set has the latest Automatic Level Control circuitry, therefore, it is not necessary to
adjust the VOLUME control when recording. This circuit automatically records at the correct
level and prevents overloading.
NOTE:
TO RECORD FROM THE BUILT-IN RADIO
NOTE:
TO RECORD FROM COMPACT DISC
While recording you may adjust the VOLUME control as required without affecting
the recording operation.
Press the RADIO buttonto select the radio operationand tune to the desiredstation.
Load acassette into the cassettecompartment,with the full reelonthe right.
Press the cassette RECORD button until it locks in the down position PLAY button is
depressed at the sametime)and recording will start.
To
end the recording press the cassette STOP EJECT button. If this button is not
pressed the recording willstopautomatically when the endof the tape is reached.
To listen to your recording, press the TAPE button, press the cassette REWIND button
until the start point of the recordingis reached, then pressthe STOP button and the PLAY
button. Use the VOLUMEcontrolto adjust the playbacklevel.
On each end of the tape there is a tape leader and no recording will take place over
this portion of the tape. If you wish recording to take place as soon as the RECORD
button is pressed, ensure thattheleader is wound pasttherecord head.
Press the CD button to select CD operation.
Load a cassette into the cassette compartment with the full reel on the right.
Insert the compact disc from which you wish to record and close the CD door.
Press the cassette PAUSE button on thetapedeck.
Press the cassette RECORD and PLAY buttons so they lock in the down position (The
unit is now inrecordingstandby mode).
Start theCD playing by pressingtheCD PLAY PAUSE button.
Press the cassette PAUSE button again andthenrecording begins.
To end the recording, pressthe cassette STOP/EJECT button.
please
/
/()
(
TO RECORD FROM THE BUILT-IN MICROPHONE
MAINTENANCE
If the sound becomes muffled or in any case after every 15 hours of op ration, clean the
pinch roller, capstan, erase head and record play head by using a tape cleaning cassette
available from all goodaudiostores.
CAUTION
Never touch any of the parts described above with a metal object. Do not insert a cassette
until the cleaned partsarecompletely dry.
the CDSTOP( ) button andthen press theTape button.
Press
To listen to your recording, press the REWIND button to return to the point where the
recording started andthen press thePLAY button.
Press the Tape button
the cassette which you wish to record on into the guides on the cassette door
Load
(Full reel on the right hand side)
Press the cassette RECORD button and speak into the built-in microphone on the top
right of the unit.
Press the
Rewind the tape and then press the PLAY button to listen to your recording.
STOP EJECT button to end the recording.
.
.
/
e
/
Goodmans Product Information Helpline 0870 873 0080
14
Goodmans Product Information Helpline 0870 873 0080
15
Page 9

DAB Operation
DAB Operation (Continued)
GENERAL INTRODUCTION TO DAB OPERATION
Press the DAB button.
CONNECTING TO AN AERIAL
The prefitted telescopic aerial on the unit is used to receive digital radio signals. If the
telescopic aerial does not result in good reception, use the external wire DAB aerial .
1. Screw the aerial plug onto the Aerial connector on the rear of the unit.
2. For the best reception, use the built-in aerial supplied, extend the aerial fully. You may
have to experiment with different angles to find the best reception for particular services.
Just like FM reception, you may find that moving the radio around to find the best
location for reception near a window may provide better reception when inside.
TUNING FOR THE FIRST TIME
When you switch on your unit for the first time an auto-tuning process will be performed
automatically. A progress indicator on the display shows that auto-tuning is underway.
If stations are found during the auto-tuning
The stations will be stored in alphanumeric order and the first station on the list will be
selected and it will be heard.
If no stations are found during the auto-tuning
Stations no available will be shown on the display for a few seconds and then you see a
menu of options.
Use the Up and Down buttons to scroll through the following options and push it to select
that option.
ADJUSTING THE VOLUME
Once you have tuned your set as explained above you can adjust the volume using the
VOLUME control.
Channel
Displays the channel identifier and frequency for the station to which you are tuning in.
Mode
Displays the mode of the current service, Stereo or Mono and the data rate at which the
audio signal is being transmitted. This rate is set by the broadcaster to suit the type and
quality of material being transmitted.
Signal error rate
Displays the signal error rate for the signal to which you are tuned. As a guide values from
0 to 15 indicate good reception, 16 to 30 borderline reception and 31 or more poor
reception. This error rate can be improved by adjusting the aerial position using the Tuning
aid option .
GUIDE TO DIGITAL RADIO
This unit enables you to receive and listen to DAB radio programmes. Digital Audio
Broadcast (DAB) uses digital signals rather than traditional analogue signals, the result of
which enables near CD-quality audio and virtually interference-free reception. DAB also
enables broadcasters to transmit additional data along with the audio including other audio
channels, text and in the future , perhaps computer data and images.
Digital radio is broadcast as groups of data called ensembles or multiplexes. Each
multiplex can contain a number of stations (services) and each station contains a primary
services and can contain secondary services as illustrated in the following diagram.
Each multiplex is transmitted in a set frequency range and received by your unit for
decoding. Your unit enables you to receive multiplexes broadcast in frequency band III
(174-240 MHz) and store the services in each multiplex for you to access. The number of
multiplexes you receive will vary depending on your location. Band III is divided into 41
channels identified as 5A to 13F. Each channel can contain one multiplex . Channels
allocated to the UK Are in the range 11B to12D.
Multiplexes and stations have labels (names) which are used to identify them. Instead of
needing to know a particular frequency to listen to your favourite broadcast you simply
select the station name. Secondary services and additional data such as text containing
programme or multiplex information are also easily accessed using this unit.
Goodmans Product Information Helpline 0870 873 0080
16
Goodmans Product Information Helpline 0870 873 0080
17
Page 10

DAB Operation (Continued)DAB Operation (Continued)
DAB OPERATION
1. Press the DAB button to selectDAB operation.
2. Search DAB signals available by pressing the Auto Tune button.
3. If the reception is sufficient, the number of available stations will be shown on the LCD
display.
User Interface
This section details all the menus and structured sub menus the user can access via the
interface.
Each illustration shows the symbols, text and format of each menu displayed, reflecting what
will be displayed on the LCD. The LCD defines the character set shown and therefore this is
only an exampleof the textdisplayed.
General Behaviour
When navigating through menus, any list will cycle to the beginning once all the menus
have been scrolled through.
If a button has no specific function in a menu or mode then pressing it will exit the menu or
mode you are currently in.
KEY FUNCTION
INFO button
Pressing the INFO button changes the information displayed on the bottom line of the LCD
screen.
Continue to press the Info button to scroll through the options available.
Press Info
Scrolling DLS
Radio 1
Scrolling....DLS
Radio 1
Press Info
Press Info
Press Info
Audio at
all times
Program Type
Pop Music
Service Type
Radio 1
BBC National DAB
Time and Date
Radio 1
10:56 25-06-2002
Press Info
Power On and Tuning
On first power up or if a factory reset has been initiated, the display will show "DAB" while it is
scanning to find all the stations available. When the DAB services have been acquired the
screen will display"Now Tuning and tune to the firststation found inthe alphanumeric list.
If no stations can found, then Poor reception? Followed by no services available will be
displayed and the radio will present a menu that you scroll select through to help you find
services. For an explanationof the Tuning aid see theSetup section.
On subsequent power ups, the radio will show Now Tuning on the screen(see below) and will
acquire/tune to thelast listened tostation.
Welcome message
displayed at first power
on while receiver scan
for available multiplexes
Unsuccessful
Poor reception?
No services
available
5 seconds
Or Select
Tuning aid
Auto tune
"
First Power On OR factory Reset
DAB
Successful
Subsequent Power On
Now Tuning.....
(Play screen)
Classic
DLS scrolling ......
On first power up the first station
in the list will play
OR
last station listened to will play
Stations have
been found
Goodmans Product Information Helpline 0870 873 0080
18
Goodmans Product Information Helpline 0870 873 0080
19
Page 11

DAB Operation (Continued)DAB Operation (Continued)
Station Selection and Navigation
Selecting a station
Once you have tuned your unit you may select the digital radio station you want to listen by
using the Up and Down button. If you have assigned stations to presets you can also
select them directly by pressing the relevant numbered button(1-10).
1. The top line of the display shows the name of the currently selected station. Press the
Up and Down buttons to see the names of other stored stations on the bottom line of
the display. Stop when you find the station to which you want to listen.
2. Press the Select button to listen to the station you have selected. The display may
show 'Now tuning..' Briefly as it finds the new station.
If a station has one or more secondary services available the display will show next
'>>'
to the station name on the station list and they will appear after the primary service as
you press the Up and Down buttons.
A secondary service will display before the station name on the station list
'<<'
indicating that it belongs to the primary service before it in the list.
If the station has ' ?' Before its name the service is currently inactive or invalid. If you
select a station which has this symbol the unit tries to tune to that station. If still
unavailable 'Service not avail' or 'Service off-air' will be displayed and the unit will
attempt to tune to an alternative station. A flashing cursor will indicate that this is in
progress. If you want to try to manually tune to this station you have five seconds
during which to press the Up and Down buttons and the manual tuning bar will be
displayed so that you can adjust your aerial.
Classic FM
BBC5Live
Classic FM
BBCSprtx
AUTO TUNE
The AUTO button has two function.
1. If the button ispressed quickly (2 seconds orless ) the radio will rescan only UK Band III for
available stations.
A scanning screen appears and a progress bar is displayed. Audio is suspended. On
completion the radiowill tune andreturn to play the stationbeing listened to.
2. If thebutton is heldfor more than2 seconds or more thereis a factory reset.Press select to
initiate this function. If select is not pressed it will time out and return to playing the station
you were previouslylistening to.
Radio 1
Press Auto tune
for 2 seconds
or less
Auto tuning .....
Scrolling DLS
No Audio
Press Auto tune
for more then
2 seconds
Press SELECT to
Confirm reset...
Press Select
Auto tuning ...13..
Refer to factory reset section
Now Tuning....
Now Tuning.....
for function See Power on section
for first time for behavior
Classic FM
?Virgin
Service not
available
When scrolling through stations the following indicators may be seen. They can be seen
individually or as any combination together.
Radio 1
Classic
Heart icon denotes favourite station
Radio 1
?Classic
? Denotes station saved in list,
but not currently available
Radio 1
Classic 2
Number 2 denotes station stored in Preset 2
Goodmans Product Information Helpline 0870 873 0080
20
Tuning and Playing
Once the station list is available and playing, the station name will appear on the top line. On
the line belowa scrolling lineof text will be seencalled DLS.
Radio 1
Scrolling DLS
Pressing the Info button changes the information displayed on the bottom line. See the
INFO function for the options available.
Goodmans Product Information Helpline 0870 873 0080
21
Page 12

DAB Operation (Continued)DAB Operation (Continued)
SELECT button
The Select key has 2 functions.
In normal navigationit confirms thehighlighted .
When pressed in normal mode it will display the signal strength. The grey bars are the current
signal level and the central highlighted bar is the minimum signal required. Press Select to
cancel the signal leveldisplay.
selection
Play screen
Radio 1
Scrolling DLS
Press Select
Radio 1
SET UP
Pressing the Set up key will bring a menu that allows access using the UP and DOWN buttons
to a number of system settings. The menu structure showing the options accessible for this
can be seen on page 24. Press UP and DOWN buttons to locate a required option and press
select to access it. Use the UP and DOWN buttons and SELECT to navigate within the sub
menus.
The sub menus available are Station Order, Tuning aid, Dynamic range control, Software
version, Channel &Frequency and SignalError Rate.
Station order
Press Select
Tuning aid
Use Up/Down buttons to select a DABchannel. When a channel is selected theradio tunes to
this frequency. Once tuned, the signal strength will be displayed using the signal strength
meter. This function can be used to check for the best position for the antenna. As the antenna
is moved the indicator will fluctuate according to the change in signal strength. To exit this
menu press Select.
1. Press the UP and Down key to scroll through differentchannels and push the Up and Down
key to selectone.
the list includes all channels, UK Stations are in the range 11B to 12D. You see a
Note:
signal quality display. The empty block indicates the minimum required level for
reception and thesolid blocks indicatethe current level.
2. Move the aerial or radio whilst watching the display and to try to raise the current level to the
empty block or beyond. The display will change to show the multiplex name on the bottom
line of the display once a good signal is received and the multiplex will be added to the
service list.
3. Push the button to exit Tuning aid or press the Up and Down key to select another
channel.
DRC VALUE
DRC ( Dynamic Range Control ) enables adjustment of the dynamic range of the received
audio ( dependent on broadcast material). The DRC level of a broadcast is set by a
broadcaster and transmitted with the service. Changing this DRC value enables you to apply a
scaling factor tothis level.
When you select this option you see the current DRC value on the top line of the display and a
scroll list onthe bottom.
Press the Up and Down keys to scrollthrough the followingoptions and push the Up and Down
keys to selectone:
DRC 0 : DRC scalingis switched off.
DRC1/2: DRC scaling isset to 1/2 that sentwith the transmitted service.
DRC 1 : Applies the DRC scaling as sent with the transmitted service. This is the default
Setup
setting.
In use the radio creates a full list of the stations it can receive in all the locations it has been
used. Using thestation order functionthe way this list isdisplayed can be changed.
-- Alphanumeric;
-- Favourites. Identifies the 10 most listened to stations and places them at the top of the list.
Afavourite station is identified with a heart symbol when the stations are browsedin search
and select screen.
-- Tidy. Cut the list of stations to show only those in your location any station witha?infront of
the name willbe removed.
Goodmans Product Information Helpline 0870 873 0080
22
SW VERSION
This option displays the version number of the software installed in this unit. This option
can only be viewed, no adjustment is possible.
Goodmans Product Information Helpline 0870 873 0080
23
Page 13

DAB Operation (Continued)DAB Operation (Continued)
Radio 1
Scrolling DLS
Press Setup
Station Order
Tuning aid
Dynamic range
Sw version
Channel + freq
Sig error rate
0
Sig error rate
12B 225.6MHz
Channel + freq
U1. X
Sw version
Press Select
Fav station
Fav station
Alphanumeric
Tidy stations
Alphanumeric
Fav station
Alphanumeric
Tidy stations
11B 218.64MHz
11D 222.06MHz
Press Select
11D 222.06MHz
11D Digital 1
Press Select
Presets
Select the channel
you want to tune to
Current selecttion
Press
Up/Down or Select
Press
Up/Down or Select
Press
Up/Down
The empty block
shows the minium
signal level required
The level indicator
shows the current
signal level
PRESETS
There are 10DAB presets available(on the remote control ).
Presets are assignedin the followingway.
Listen to the station you would like to assign. Press and hold a Preset button (1-10) for two
seconds.
Alternatively the stationyou wish toassign can be displayed inthe second line of thedisplay
when you are browsing stations. Again press and hold the Preset button (1-10) for two
seconds. In bothcases a confirmationmessage will show that thepreset has been saved.
Once assigned to a station, the preset button can be pressed and the radio will tune to the
required station.
If you are browsing stations a preset will be shown by the number of the preset displayed at
the end ofthe line.
If a Preset button is pressed with no station assigned then it will be shown as empty. See
the diagram belowfor full details.
Press Preset key
Hold less than
2 secs
No Preset set
Radio 1
Scrolling DLS
OR
Radio 1
Classic
Preset available
Press Preset key
Holdover2secs
Press Preset key
Hold over 2 secs
Radio 1
Preset 3 saved
Radio 1
Preset 3 saved
DRC 1
DRC 0
DRC 1/2
Press
Up/Down or Select
DRC 1
Goodmans Product Information Helpline 0870 873 0080
24
Radio 1
Empty preset
Now Tuning .....
Stations have
been found
Radio 1
Scrolling DLS
Goodmans Product Information Helpline 0870 873 0080
25
Page 14

DAB Operation (Continued)
Product Specifications
FACTORY RESET
There is no dedicated factory reset button for the unit. Pressing and holding the Auto tune
button for more than 2 seconds will initiate a factory reset. A prompt screen will appear
asking to press select for reset. Pressing select will confirm this and starts the radio as if it
were first powered up.
Factory reset clears any settings and reboots the radio. Following a factory reset the radio will
power up with only the factory default settings available and will behave as if it has been
powered up forthe first time.
Factory Default Settings
--- No services in stations list
--- NO presets allocated
--- Service order is alphanumeric order
--- DRC value is 1
--- Display mode is scrolling DLS
Important notes:
The contents broadcast from the DAB stations can be recorded witha tape in the same way as
the ordinary radiostations and CDs.
PICK-UP
System
Laser diode
Properties
Error correction
AUDIO
D/A conversion
Frequency response
Wow and flutter
No. of channels
Output level
Speakers
RADIO
Receiving bands
Frequency range
Compact disc digital audio system
material: GaAIAs
Wavelength: =780nm
Emission Duration: continuous
Laser output: <44.6 W
Cross-interleave Reed-solomon code
1-bit DAC 8 times oversampling
20-20,000Hz (+1/-3 dB)
Below measurable limits
2 channels (stereo)
Earphone: 20mW x 2 (32 ) Main Unit 2 x 3W Rms
5W 4Ohm*2
MW/FM
MW 522-1620 KHz
FM 87.5 -108.0 MHz
Goodmans Product Information Helpline 0870 873 0080
26
GENERAL
Power requirements
Power consumption
Dimension
Weight
Goodmans Product Information Helpline 0870 873 0080
AC 230V/50Hz
22W
Approx. 504(L)X302(W)X221(H)mm
Approx. 3.380kg
27
 Loading...