

Page 1
COMPACT DISC PLAYER & CASSETTE RECORDER
WITH DAB, FM/MW RADIO
MODEL: GPS185DAB
Instruction Manual
Please Read these Instructions prior to first use and retain for future reference.
Goodmans Product Information Helpline 0870 873 0080
Page 2

Contents
What's in the Box.............................................................................................................1
Important Notes...............................................................................................................2
Important Safeguards..................................................................................................... 3-4
Power Supply................................................................................................................. 5
DBBS & EQ.................................................................................................................... 5
Player Maintenance....................................................................................................... 6
Location of Controls........................................................................................................7
Location of Controls (Remote Control)........................................................................... 8
Listening to the Radio..................................................................................................... 9
Listening to a Compact Disc
Cassette Operation
DAB Operation
Product Specifications
........................................................................................................ 12-13
............................................................................................................... 14-25
...........................................................................................10-11
.....................................................................................................26
What's in the Box
On unpacking the unit the following should be located within the packing.
GPS185DAB
1 x Main Unit
1 x Remote control
1 x Detachable mains power cord with 3 pin plug.
1 x Digital radio questionaries
1 x Digital one station leaflet
1 x Instruction Manual
1 x External wire aerial
Please retain all packaging materials as in the event of the product needing transportation
or return for service these will be needed.
Goodmans Product Information Helpline 0870 873 0080
1
Page 3

Important Notes
Your hearing is very important to you and to us so please take care when operating this
equipment. It is strongly recommended that you follow the listed guidelines in order to
prevent possible damage or loss of hearing:
ESTABLISH A SAFE SOUND LEVEL
Over time your hearing will adapt to continuous loud sounds and will give the
impression that the volume has in fact been reduced. What seems normal to you may
in fact be harmful. To guard against this set the
volume at a low level.
Slowly increase the level until you can hear comfortably and clearly and without
distortion.
Damage to your hearing is accumulative and is irreversible.
Any ringing or discomfort in the ears indicates that the volume is too loud.
Once you have established a comfortable listening level, DO NOT INCREASE THE
SOUND LEVEL FURTHER.
The following list of typical sound levels may assist you in recognising just how loud you
have set the volume level.
DECIBEL
Level dB Example
30dB Quiet library, soft whisper.
40 Living room, fridge freezer bedroom away from traffic.
50 Normal conversation, quiet office, light traffic.
60 Electric sewing machine,
70 Vacuum cleaner, hair dryer, noisy restaurant
BEFORE YOUR HEARING ADAPTS
THE FOLLOWING NOISE CAN BE HARMFUL UNDER CONSTANT EXPOSURE
80dB Average city traffic, alarm clock buzzer at 2 feet, food mixer.
90dB Motorcycle, heavy goods vehicle, petrol lawn mower.
100 Pneumatic drill, chain saw, garbage truck, discotec / night-club.
120 Rock band concert, thunderclap.
PERMANENT LOSS OF HEARING
140 Gunshot 2 feet away.
180 Rocket Launching pad.
THRESHOLD OF PAIN
Goodmans Product Information Helpline 0870 873 0080
2
Page 4
Important Safeguards
PRE FITTED MAINS PLUGS
For your convenience a mains plug has been fitted to this appliance. For your safety please
observe the following information.
1. Should the fuse inthe plug remove the plug from the wall socketand replace the fuse with a 3
Amp ASTAapproved to BS 1362 fuse.
2. Never use the plug without thefuse cover fitted. Replacement fuse covers are available from
your dealer or most electrical retail outlets.
3. If the cable of the mains plug is cut off the cable, rewire the replacement plug in accordance
with instruction given in this manual.
4. CAUTION: Under no circumstances should the discarded plug be inserted mains socket. To
prevent a shock hazard carefully dispose of the discarded plug. Do not leave the plug lying
around where children might see it.
WARNING:
To prevent fire or shock hazard do not expose this unittorain or moisture.
CAUTION: DANGEROUS VOLTAGES EXIST INSIDE THIS UNIT, DO NOT REMOVE COVER
(OR BACK). NO USER SERVICEABLE PARTS INSIDE. REFER SERVICING TO
QUALIFIED SERVICE PERSONNEL. DISCONNECT FROM MAINS SUPPLY
WHEN NOT IN USE.
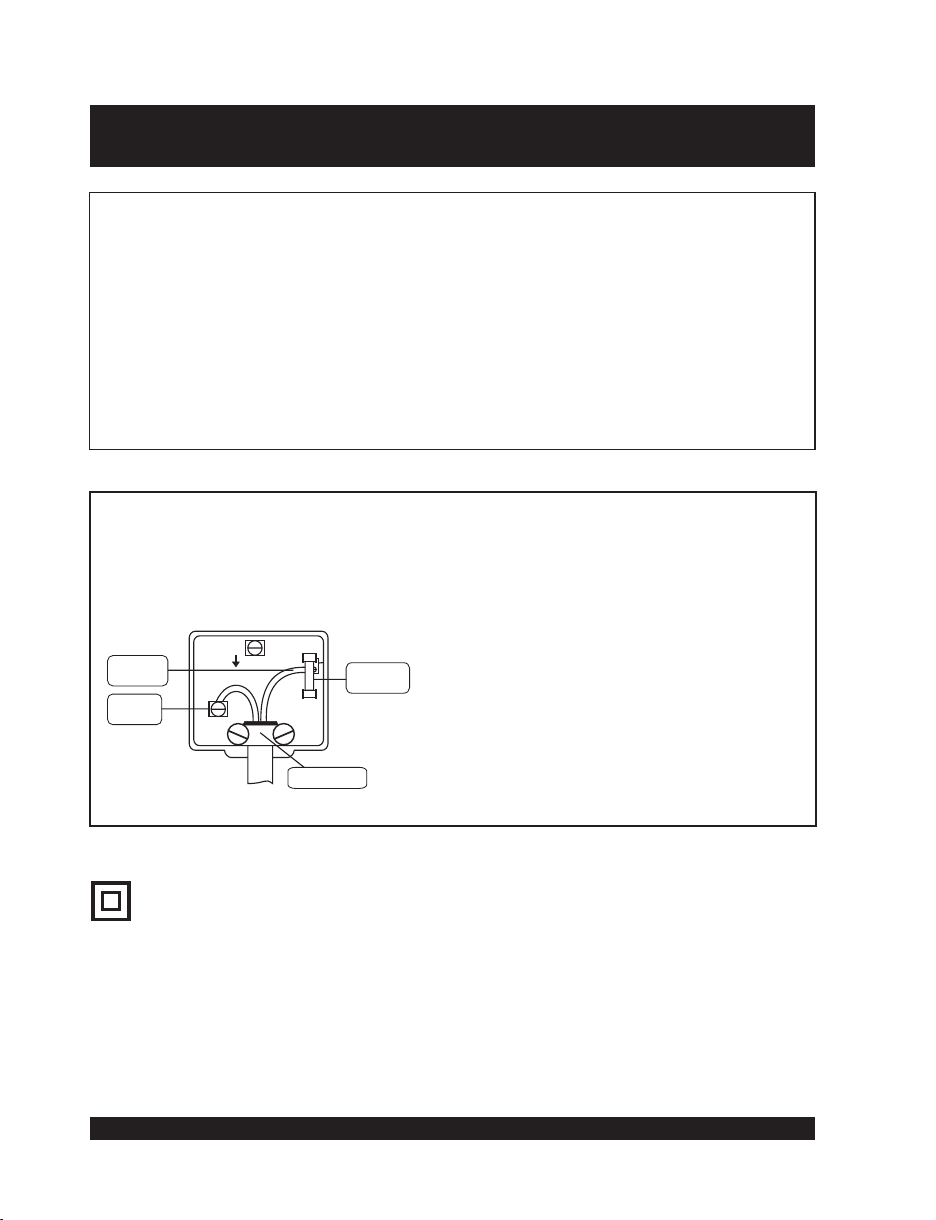
PLUG WIRING DETAILS
The wires in this mains lead are coloured in
accordance with the following wiring codes:
Blue................................................. Neutral
Brown................................................... Live
The wires in this mains lead must be
connected to the terminals in the plugs as
follows:
Blue Wire..................................... N or Black
BROWN
Live
BLUE
Neutral
E
BS 1362
FUSE
N
Brown Wire..................................... L or Red
Cord clamp
Only a 3 Amp fuse should be fitted in the plug
ora5Ampfuse at the distribution board.
WARNING: UNDER NO CIRCUMSTANCES MUST THE LIVE OR NEUTRAL WIRES BE
CONNECTED TO THE EARTH TERMINALIN A3-PIN MAINS PLUG.
This symbol means that this unit is double insulated.
An earth connection is not required.
Goodmans Product Information Helpline 0870 873 0080
3
Page 5

Important Safeguards (Continued)
CAUTION
CLASS 1 LASER PRODUCT
Use of Controls or adjustments or performance of procedures other than those specified herein
may result in hazardous radiation exposure.
LASER SAFETY
This unit employs a laser, only qualified service personnel should attempt repair.
DANGER:
CAUTION:
CAUTION
CLEANING: Always disconnect unit from mains supply before attempting to clean it. Use soft
SOME DO'S AND DONT'S ON THE SAFE USE OF EQUIPMENT
This equipment has been designed and manufactured to meet European safety standards but
like any electrical equipment, caremust be taken if you are to obtain the best results and safety is
to be assured.
Do read the operating instructions before you attempt to use theequipment.
Do ensure that all electrical connections (Including the mains plug, extension leads and
interconnections between pieces of equipment) are properly made in accordance with the
manufacturer's instructions. Switch off and withdraw the mains plug when making or changing
connections.
Do consult your dealer if you are ever in doubt of the installation, operating, or safety of your
equipment.
Don't continue to operate theequipment if you are in any doubt about it working normally, or if it is
damaged in any way- switch off, withdraw themains plugandconsult your dealer.
Don't remove any fixed covers as this may expose dangerous voltages.
Don't leave equipment switched on when it is unattended unless it is specifically stated that it is
designed for unattended operation or has a standby mode. Switch off using the switch on the
equipment and makesure that your family knows how todo this. Special arrangements mayneed
to be made for infirm or handicapped people.
Don't listen to headphones at high volume, as such use canpermanentlydamage your hearing.
Don't obstruct the ventilation of the equiment, for example with curtains or soft furnishings.
Overheating will cause damage and shorten the life of the equipment.
Don't allow electrical equipment to be exposed to rain or moisture.
Above all
Never let anyone, especially children, push anythinginto holes, slots or any other opening as
this could result in a fatal electric shock.
Never guess or take chances with electrical equipment ofany kind.
It is better to be safe than sorry!
WARNING:
cloth moistened with soapy water, wipe gently. Do not use solvents or abrasive
materials.
TO REDUCE THE RISK OF FIRE OR ELECTRIC SHOCK, DO NOTEXPOSE THIS
APPLIANCE TO RAIN OR MOISTURE, DANGEROUS HIGH VOLTAGES ARE
PRESENT INSIDE THE ENCLOSURE, DO NOT OPEN THE CABINET, REFER
SERVICING TO QUALIFIED PERSONNEL ONLY.
Goodmans Product Information Helpline 0870 873 0080
INVISIBLE LASER RADIATION WHEN OPEN AND
INTERLOCK FAILED OR DEFEATED. AVOID DIRECT
EXPOSURE TO BEAM.
HAZARDOUS LASER RADIATION WHEN OPEN AND
INTERLOCK DEFEATED.
4
Page 6
Power Supply
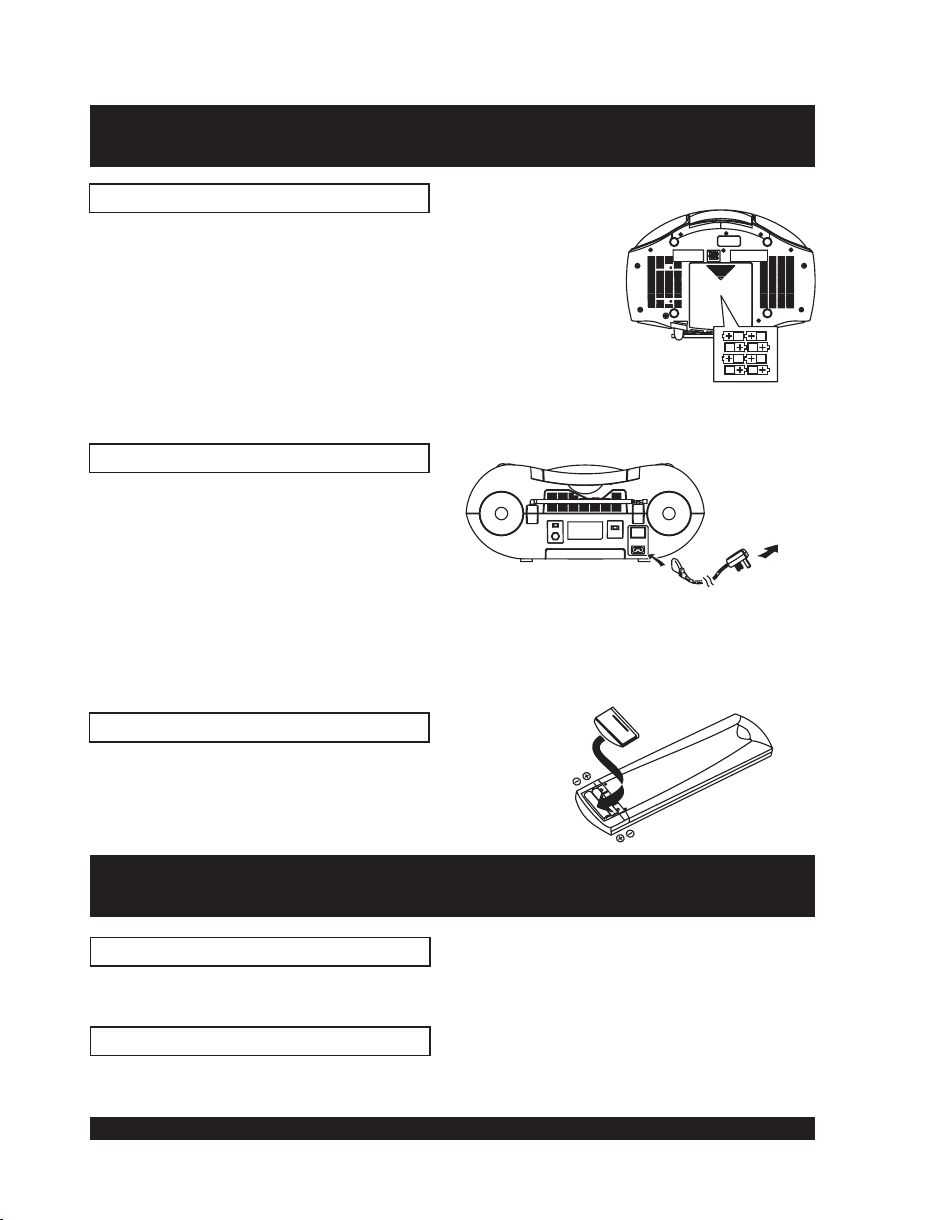
BATTERY OPERATION
Remove the battery compartment cover by gently
pushing the clips downward and outwards.
Install 8 x "C" size batteries (UM-2 or equivalent) and
ensure the correct polarities are observed.
Replace the battery compartment cover.
NOTE:
The batteries will only operate when the mains power
lead is removed.
To avoid damage which may be result from leaking batteries, remove the batteries
when they become weak or when the unit is not to be used for a long period of time.
AC OPERATION
Connect the AC Cord to the AC socket
at the back of the unit and insert the AC
plug into a standard household outlet.
AC OUTLET
NOTE:
NOTE:
The remote control uses two "AAA" or "UM-4" batteries.
When the AC line cord is connected to the AC socket of the unit, the batteries
will not operate. To operate the set on batteries, check that the AC plug is
detached from the AC socket of the unit.
If the AC plug of this unit does not fit in your AC outlet, a plug adaptor should be
used. Consult your local dealer on the right type of plug adaptor that is required.
REMOTE CONTROL
DBBS & EQ
BASS BOOST SYSTEM
Press the DBBS button to enjoy music with more Bass effect, the icon of Bass will be on in
the LCD. Press again this button to cancel Bass Effect.
EQ SOUND EFFECTS
Press the EQ button continuously to select among the preset EQ sound effects for music
enjoyment.
Goodmans Product Information Helpline 0870 873 0080
5
Page 7

Player Maintenance
CLEANING THE CABINET
Wipe with a soft cloth. If the cabinet is very dirty, dampen the cloth with a weak solution of
neutral detergent and water, and then wipe clean.
CLEANING THE UNIT
To clean the unit, simply wipe off with a soft clean cloth moistened with plain lukewarm
water.
Warning: Remove mains plug from mains outlet socket before clean.
CLEANING THE LENS
A dirty lens will cause sound skipping and, if the lens is very dirty, the CD may not work.
Open the disc cover and clean the lens as follows:
DUST OR DRY PARTICLES
Using a camera lens brush/blower to blow on the lens couple times, then wipe it lightly with
the brush to remove dust and blow on the lens once more.
FINGER PRINTS
If the lens cannot be cleaned by using a brush/blower, use a dry cotton swab.
Goodmans Product Information Helpline 0870 873 0080
6
Page 8
4
2
3
1
12
15 17 19
13
10 1114161820
28
29
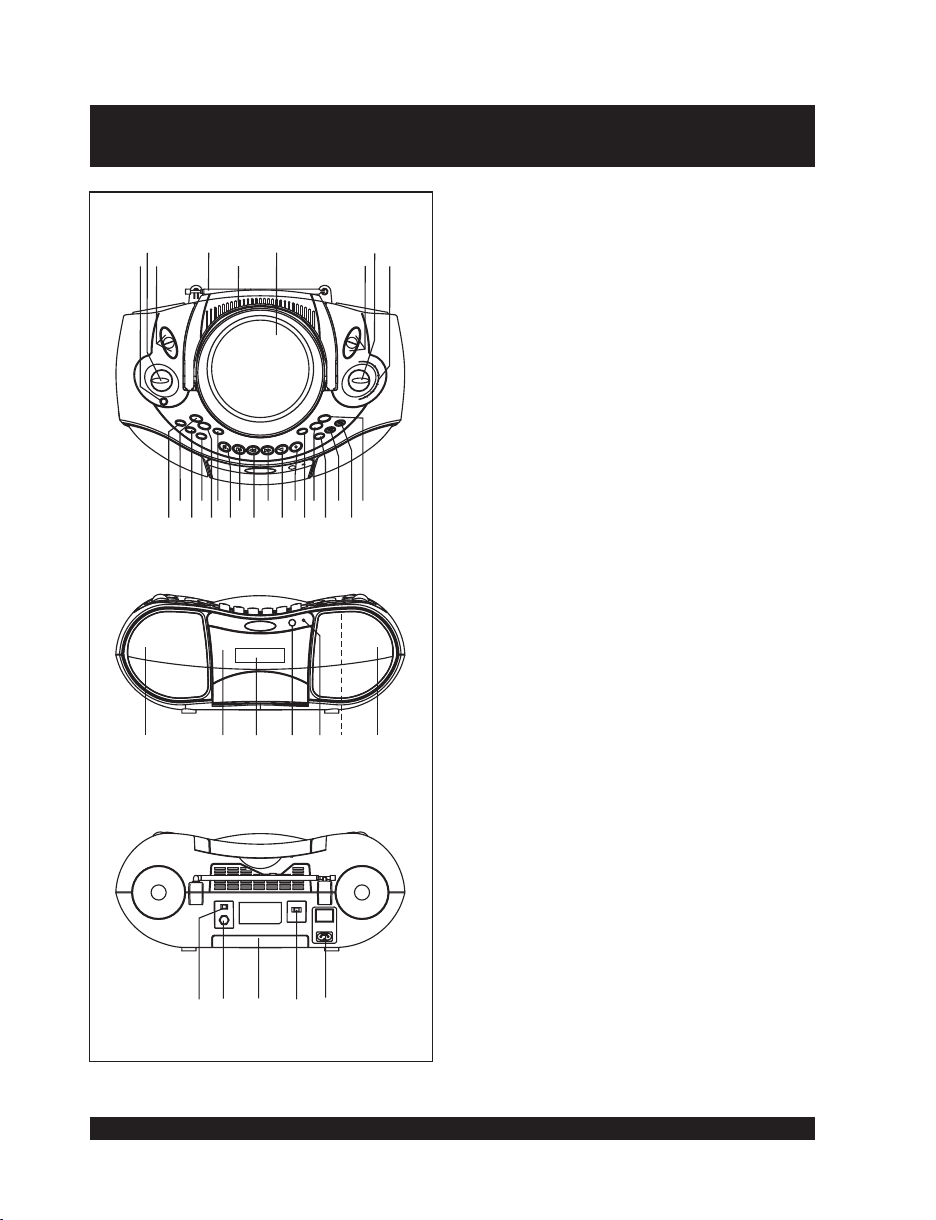
Location of Controls
68
5
21 23
22
30
31 32 33
25 27
24
79
26
28
1. EARPHONES SOCKET
2. VOLUME CONTROL
3. DAB&CD SELECT BUTTONS
FM/DAB TELESCOPIC AERIAL
4.
5. FOLDING HANDLE
6. CD DOOR
7. TAPE&RADIO SELECT BUTTONS
8. TUNING CONTROL
9. DIAL SCALE
10. MUTE BUTTON
11. EQ BUTTON
12. DBBS BUTTON
13. CD REPEAT&DAB SETUP BUTTON
14. CD PROGRAM&DAB PRESET BUTTON
15. CD RANDOM&DAB SELECT BUTTON
16. CASSETTE PAUSE BUTTON
17. CASSETTE STOP/EJECT BUTTON
18. CASSETTE FAST FORWARD BUTTON
19. CASSETTE REWIND BUTTON
20. CASSETTE PLAY BUTTON
21. CASSETTE RECORD BUTTON
22. CD DOOR OPEN BUTTON
23. CD STOP&RADIO BAND&DAB INFO,
BUTTON
24. STAND BY BUTTON
25. DAB DOWN&CD SKIP/SEARCH BACK
BUTTON
26. DAB UP&CD SKIP/SEARCH FORWARD
BUTTON
27. CD PLAY/PAUSE&DAB AUTO SCAN
BUTTON
28. SPEAKERS
29. CASSETTE DOOR
30. LCD DISPLAY
31. REMOTE SENSOR
32. STAND BY INDICATOR
33. BUILT-IN CONDENSER MICROPHONE
34. DAB EXTERNAL WIRE AERIAL
CONNECTOR
35. BATTERY COMPARTMENT
36. FM STEREO/MONO OUTPUT SELECTOR
37. AC SOCKET
38. INTERNAL&EXTERNAL DAB AERIAL
SELECTOR
38 34 35 36 37
Goodmans Product Information Helpline 0870 873 0080
7
Page 9

Location of Controls (Remote control)
1
2
3
4
5
6
7
8
9
10
11
12
13
14
20
19
18
15
16
2. TUNER BUTTON
3. CD BUTTON
4. DAB BUTTON
5. TAPE BUTTON
6. 10 BUTTON
+
7. VOLUME UP
8. DOWN/SKIP
BUTTON
BUTTON
9. CD PLAY/PAUSE&DAB AUTO SCAN
BUTTON
10. VOLUME DOWN BUTTON
11. CD STOP&RADIO BAND&DAB INFO
12. CD REPEAT&DAB SETUP BUTTON
13. CD RANDOM&CD SELECT BUTTON
14. EQ BUTTON
15.
DBBS BUTTON
16.
CD PROGRAM&DAB PRESET
BUTTON
17. BATTERY COMPARTMENT(REAR)
18. UP/SKIP FORWARD BUTTON
19. MUTE BUTTON
20. NUMERIC BUTTONS
1. STAND BY BUTTON
17
Using the Remote control Correctly
Point the remote control at the REMOTE SENSOR located on the unit on the unit.
When there is a strong ambient light source, the performance of the REMOTE
SENSOR may be degraded, causing unreliable operation.
The recommended effective distance for remote operation is about 6 Metres.
Replace the two "AAA" or "UM-4" batteries when there is either no operation or
operation becomes erratic.
Goodmans Product Information Helpline 0870 873 0080
8
Page 10

Listening to the Radio
Press STANDBY button to turn the unit on then press the Radio button or the TUNER
button on the remote controller.
Select the desired band with the BAND button. MW
display.
Tune
to the desired station by rotating the TUNING control after locating a station
slowly turn the Tuning control to fine tune to the station to the best reception.
The built-in MW aerial and external FM TELESCOPIC AERIAL are directional.
listening to an FM broadcast, fully extend the TELESCOPIC AERIAL and
When
rotate it for the best reception.
For MW broadcast, rotate the whole set until the best reception is heard.
Adjust the volume level to a comfortable listening level.
To turnoff the radio, press theSTANDBY button to turn the unitto STANDBYmode.
NOTES:
If a particular FM (STEREO) station is weak, or there is too much background noise,
slide the FM ST./FM selector to the FM (MONO) position. This will often result in a
much clearer reception.
When the is in the FM STEREO position and a station is
broadcasting, the FM STEREO indicator will be lit.
STEREO HEADPHONE SOCKET
A stereo headphone socket has been provided on the unit in order that headphones can be
used to listen without disturbing others. To use plug in the headphones/earphones (not
supplied) and adjustthe VOLUME controlto a comfortable listening level.
NOTE:
When external headphones/earphones are connected, the sound of the unit's
speakers will beautomatically muted.
FM ST./FM selector
tuner or FM tuner will show in the
achieve
Goodmans Product Information Helpline 0870 873 0080
9
Page 11

Listening to a Compact Disc
COMPACT DISC OPERATION
HANDLING A DISC
Although built to withstand a the effects of dust, dirt and scratches, discs should be
treated with care and according to rules applicable to conventional analog discs.
Always protect a disc against scratches, dirt and dust etc. It is recommended that
during non-use periods the discs should be retained in the original case. If a disc is
treated with reasonable care, the only maintenance needed to retain the excellent
sound reproduction is to wipe it with a cloth as indicated below.
To handle a disc use only one of the two methods illustrated (Do not touch the
rainbow - coloured side).
To wipe a disc, use only a soft cloth. Do not use alcohol based liquids or
thinner which will damage the disc. The disc should always be wiped in a
straight line from the centre to the edge. It should never be wiped in a circular
motion.
Never place the disc on other equipment or near any heat source. Avoid
positions where the disc would be subjected to direct sunlight for long periods.
PLAYING A CD COMPACT DISC
Press CD button to select the CD function, the LCD will show "No Disc".
Press the CD DOOR OPEN BUTTON to open the CD Door.
Insert a CD with the side If the disc is upside down, the Display will show
No Disc
" ").
Close the CD Door by gently pushing the Door down.
The Display will show the total number and time of tracks (songs) on the CD.
To start the music, press the CD Play/Pause Button (wait a few seconds for music to
start). The first track number "Tr 01" will appear in the Display, and playback will begin.
To pause playback, press the Play/Pause Button, the elapsed time of the current track
flashes in the display to indicate the unit is in the Pause mode .
To resume playback, press the Play/Pause Button again,
current track stops flashing and playback resumes.
To stop playback, press the CD Stop Button.
To turn the unit , press the standby button, the standby indicator will illuminate.
NOTE:
NOTE:
SKIPPING TRACKS (SKIP)
This function enables you to find the beginning of any track during playback. If the CD
Forward Skip ( ) Button is pressed once, the on the disc will be
selected for each press of the button. The display will show the track or song number.
Always stop the CD player by using the CD Stop Button before taking a disc out
of the compartment.
If you hit or move the CD during play, the music will stop for a second or two
and then start again. This is a normal phenomenon for all portable CD players
and is not a fault.
LABEL UP.
the elapsed time of the
off
NEXT TRACK
Goodmans Product Information Helpline 0870 873 0080
10
Page 12

Listening to a Compact Disc (Continued)
If the CD Backward Skip ( ) Button is pressed twice or more in rapid succession,
play will go one track per press.
Whilst in the pause mode, it is also possible to select the beginning of a track by using
the CD Forward Skip ( ) Button and CD Backward Skip ( ) Button to reach the
desired track. After selection, press Play.
TO PROGRAM TRACKS
Press the CD Stop Button during playback. The total number of tracks will be shown in
the display.
Press the CD Pro "Tr01 Pr-01" appears in the LCD together with a
flashing " PROG".
Select the desired track by pressing Backward or Forward Skip Button ( or ).
Press CD Program Button again to store the selected track in memory
Repeat steps and (up to 20 tracks may be programmed).
After all tracks have been programmed in order, press the CD Play/Pause Button to start
the programmed playback from the first programmed track, and "PROG" will show to
indicate the unit is in Programmed playback mode.
TO CLEAR A PROGRAM
Press the CD Stop Button twice during programmed playback to clear the program.
Open the CD door, the disc will stop rotating, and the program will be erased.
Unplug the unit.
NOTE:
REPEAT PLAY SINGLE SONG
To repeat the song over and over again:
Programming can only be done when the disc is stopped.
Press the Skip Button during playback to select the track to repeat.
Press the Repeat Button twice.
"REPEAT One" will show in the display.
The song selected will play over and over, until the Stop button is pressed. To cancel
the repeat function, press Repeat Button once.
BACK
gram Button,
.
3 4
SAME
REPEAT PLAY ALL SONGS
To repeat play on a disc and play them again and again, do the following.
Press Repeat Button once during playback.
"REPEAT ALL" Indicator will show in the display.
All the songs on the CD will play in its original order and then start all over again. To
cancel the repeat function, press Repeat Button twice.
RANDOM
Press Random button on the remote controller when the CD is in the STOP mode, the unit
will select the tracks in a random order for playing immediately.
To cancel random playback press the Random button again or press the CD Stop button.
ALL SONGS
PLAY
Goodmans Product Information Helpline 0870 873 0080
11
Page 13

Cassette Operation
CASSETTE TAPE SELECTION
1. The quality and condition of the cassette tapes used will have a direct effect on the
performance of this unit. Low quality tapes tend to stretch, and a stretched tape can
easily become entangled in the drive mechanism, causing major damage. Stretched
tapes will run at uneven speeds and will distort anything recorded on them.
2. Use only well known brands of tape.
3. Use of C-120 (120 minutes) cassettes are not recommended. The extreme thinness of
this tape may result in breakage or other problems.
4. Check to ensure there are no loose layers of tape visible through the cassette center
window. Tighten these loose layers with a pencil or ballpoint pen before inserting the
cassette into the unit.
NORMAL PLAYBACK
1. Press TAPE button.
2. Press the STOP/EJECT key to open the cassette compartment and insert a prerecorded tape with the exposed portion of the tape facing uppermost and the full spool
to the right. Gently push the door to close.
3. Press the PLAY key to start playback, adjusting the VOLUME to the desired level.
4. To briefly pause playback press the PAUSE key
playback
5. To advance or rewind the tape rapidly press the FAST FORWARD or REWIND keys.
6. To stop playback press the STOP/EJECT key, press again to EJECT the cassette.
NOTE:
.
When the cassette reaches its end during playback or recording, the mechanism
will stop and the keys will return to their normal position.
,
press again to resume normal
RECORDING FROM THE RADIO
1. Follow the instructions of RADIO OPERATION to tune to the desired station.
2. Ensure the RADIO button is pressed.
3. Load a blank cassette tape into the Deck. (Full spool to the right)
4. Locate the portion of the tape where recording is to start by using Rewind or Fast
Forward.
5. Press the Record and Play simultaneously. Both keys will remain in the down position.
6. The set is now recording from the Radio, the recording process will automatically stop
at the end of the tape.
7. To stop the recording manually, press the Stop/Eject Key.
NOTE:
To hear what has been recorded , Press TAPE button, then press the rewind key
to rewind the tape to the point where the recording was started, then press the
Play key to start playback. Adjust the volume control as required.
Goodmans Product Information Helpline 0870 873 0080
12
Page 14

Cassette Operation (Continued)
RECORDING FROM THE
BUILT- IN MICROPHONE
1. Press TAPE button.
2. Load a blank cassette tape into the Cassette Compartment with full spool to the right.
3. Press the Play and Record keys simultaneously. Both keys will remain in the down
position.
4. Speak or talk in front of the unit. It is now recording from the Built-In Microphone and the
recording process will automatically stop at the end of the tape.
5. To stop the recording manually, press the Stop/Eject.
6. To hear what has been recorded , press TAPE button, and then press the rewind key to
rewind the tape to the point where the recording was started, then press the Play key to
start playback. Adjust the volume control as required.
RECORDING FROM COMPACT DISC
1. Load a cassette tape into the cassette compartment.
2. Load a disc and close the CD Door.
3. Press CD button.
4. Press the Cassette Pause Key.
5. Press the Cassette Record and Play Keys for recording stand-by.
6. Start the CD playing by pressing the CD Play/Pause button.
7. Release the Cassette Pause Key to start recording.
8. Press the Cassette Stop/Eject Key to stop the recording.
9. To Hear what has been recorded , press TAPE button, and then press the rewind key to
rewind the tape to the point where the recording was started, then press the Play key to
start playback. Adjust the volume control as required.
RECORDING FROM DAB RADIO
1. Press DABbutton
2. Load the cassette tapeinto the Cassette Door (full reelon the right side).
3. Tune into the DAB station , press the Cassette RECORD Key and Cassette
PLAYKey both at thesame time. Bothkeys should remain depressed whenreleased.
4. The recording process willautomatically stop at the endof the tape.
5. To stop the recordingmanually, press theCassette STOP/EJECT Button.
6. When youwant to play the cassette tape after recording, press
Cassette REWIND Key, then press the CassettePLAY Key. Adjust the VOLUME Control as
required.
CLEANING THE TAPE HEADS
Clean the heads frequently to remove dust and tape residue. Dirt on the heads will impair
the sound quality of both recording and playback.
The simple method is to use a head-cleaning cassette, which is available at most audio
stores. Follow the instructions supplied with the cleaning cassette.
to be recorded
press TAPE button, andthen
Goodmans Product Information Helpline 0870 873 0080
13
Page 15

DAB Operation
DAB or Digital Audio Broadcasting represents a New age in broadcasting technology and
as with all new technologies it is significantly different to traditional Analogue FM/AM
broadcast methods. The new system no longer relies on the user tuning to a given
frequency but instead allows the DAB receiver to provide an active service list of all
available radio programmes/stations at the touch of one button.
IMPORTANT :
1. Press the STANDBY button on the front of the unit or on the remote control to switch
the unit ON the standby indicator will extinguish.
2. Press the DAB button, the LCD display will illuminate and will show welcome to DAB,
solid blocks will progress across the display from left to right and after around 10
seconds "now tuning" will show in the display and the first station on the service list will
be tuned to.
NOTE: At this stage and in the unlikely event that the display shows No station
a. No DAB service in the local area Check with the DRDB at
www.digitalradionow.co.uk or call the reception Helpline on 08707 747474
b. The unit needs relocating to a better location in order to get adequate reception to
help with this process a tuning aid can be accessed by pressing the select button
this will bring up a manual tuning aid which will show the available signal strength
for a given multiplex the incoming signal should exceed the outline box shown in
the display to ensure good uninterrupted reception. Move the unit around in the
location until an adequate signal is received.
c. In the event that the available signal is still not sufficient it may be necessary to
connect an external aerial to the socket on the rear of this unit. In this case please
ensure the aerial switch is set to the EXT position.
3. Assuming there is now a service list available the other stations on the list can be
located by using the UP and DOWN buttons to scroll the list and then to listen to station
shown on the bottom line of the display press the select button.
Before selecting the DAB function for the first time please ensure the DAB
Rod aerial is fully extended and upright.
available this indicates the unit has been unable to locate any available
stations this may be due to
Important Reminder for DAB Reception
Please be reminded that this unit is specifically designed for
reception of UK only DAB services restricted to Band 3 only it will
therefore receive DAB services in Europe which are broadcast
on L band.
NOT
Goodmans Product Information Helpline 0870 873 0080
14
Page 16

DAB Operation (Continued)
DAB Operation (Continued)
The additional functions of this unit in DAB mode are as follows.
TUNING FOR THE FIRST TIME
When you switch on your unit for the first time an auto-scanning process will be performed
automatically. A progress indicator on the display shows that auto-tuning is underway.
If stations are found during the auto-scanning
The stations will be stored in alphanumeric order and the first station on the list will be
selected and it will be heard.
If no stations are found during the auto-scanning
"No station available" will be shown on the display for a few seconds and then a menu of
options will be seen.
Use the Up and Down buttons to scroll through the options and press Select to choose
that option.
ADJUSTING THE VOLUME
Once the Radio is tuned the volume can be adjusted using the volume control.
CHANNEL
Displays the channel identifier and frequency for the station to which you are tuning in.
MODE
Displays the mode of the current service, Stereo or Mono and the data rate at which the
audio signal is being transmitted. This rate is set by the broadcaster to suit the type and
quality of material being transmitted.
SIGNAL ERROR RATE
Displays the signal error rate for the signal to which you are tuned. As a guide values from
0 to 15 indicate good reception, 16 to 30 borderline reception and 31 or more poor
reception. This error rate can be improved by adjusting the aerial position using the Tuning
aid option .
Goodmans Product Information Helpline 0870 873 0080
15
Page 17

DAB Operation (Continued)
GUIDE TO DIGITAL RADIO
This unit enables you to receive and listen to DAB radio programmes. Digital Audio
Broadcast (DAB) uses digital signals rather than traditional analogue signals, the result of
which enables near CD-quality audio and virtually interference-free reception. DAB also
enables broadcasters to transmit additional data along with the audio including other audio
channels, text and in the future , perhaps computer data and images.
Digital radio is broadcast as groups of data called ensembles or multiplexes. Each
multiplex can contain a number of stations (services) and each station contains a primary
services and can contain secondary services.
Each multiplex is transmitted in a set frequency range and received by the unit for
decoding. This unit enables in frequency band III
(174-240 MHz) and store the services in each multiplex for you to access. The number of
multiplexes you receive will vary depending on your location. Band III is divided into 41
channels identified as 5A to 13F. Each channel can contain one multiplex . Channels
allocated to the UK Are in the range 11B to12D.
Multiplexes and stations have labels (names) which are used to identify them. Instead of
needing to know a particular frequency to listen to a favourite
via the station name in the station list.
containing programme or multiplex information are also easily accessed using this unit.
DAB OPERATION
1. Press the DAB button to select DAB operation.
2. Search by pressing the Auto Scan button.
3. The number of available stations will be shown in the LCD display.
for available DAB stations
the reception of multiplex broadcasts
station it is simply selected
Secondary services and additional data such as text
USER INTERFACE
This section details all the menus and structured sub menus the user can access via the
interface.
Each illustration shows the symbols, text and format of each menu displayed, reflecting what
may be displayed on the LCD. The LCD defines the character set shown and therefore this is
only an exampleof the textdisplayed.
GENERAL BEHAVIOUR
When navigating through menus, any list will cycle to the beginning once all the menus
have been scrolled through.
If a button has no specific function in a menu or mode then pressing it will exit the menu or
mode currently selected.
Goodmans Product Information Helpline 0870 873 0080
16
Page 18

DAB Operation (Continued)
KEY FUNCTION
INFO BUTTON
Pressing the INFO button changes the information displayed on the bottom line of the LCD
screen.
Continue to press the INFO button to scroll through the options available.
Press Info
CLASSIC FM
How will that be?
DLS
Press Info
CLASSIC FM
Program Type
Classical music
Press Info
Ensemble Name
Time & Date
CLASSIC FM
Digital1 Network
Press Info
CLASSIC FM
12:00 06 - 05 - 2005
Non-Stop Audio
Press Info
CLASSIC FM
Frequency
12B 225.64Mhz
Press Info
CLASSIC FM
Bitrate
Mono/Stereo
128Kbps Stereo
Press Info
CLASSIC FM
Signal error
Signal error 2
Goodmans Product Information Helpline 0870 873 0080
17
Page 19

DAB Operation (Continued)
POWER ON AND TUNING
On first power up or if a factory reset has been initiated, the display will show
DAB" available stations. will briefly show in
while it is scans to find all DAB "Now Tuning"
the display the unit will tune to
If no stationsare found, amessage "Station not available" willbe displayed in the LCD.
On subsequent power ups, the radio will show Now Tuning on the screen(see below) and will
acquire/tune to thelast listened tostation.
and the first station found in the alphanumeric list.
First Power On OR factory Reset
Welcome message
displayed at first power
on while receiver scan
for available multiplexes
Unsuccessful
No stations
available
or SELECT
Manual Tune
Submenus
Autoscan local
Autoscan full
Language
Welcome to DAB
Successful
Subsequent Power On
Now Tuning.....
(Play screen)
Classic FM
DLS scrolling ......
The first station (when the unit is powered on
for the first time) in the list will play
OR
last station listened to will play
"welcome to
Stations have
been found
Goodmans Product Information Helpline 0870 873 0080
18
Page 20
DAB Operation (Continued)
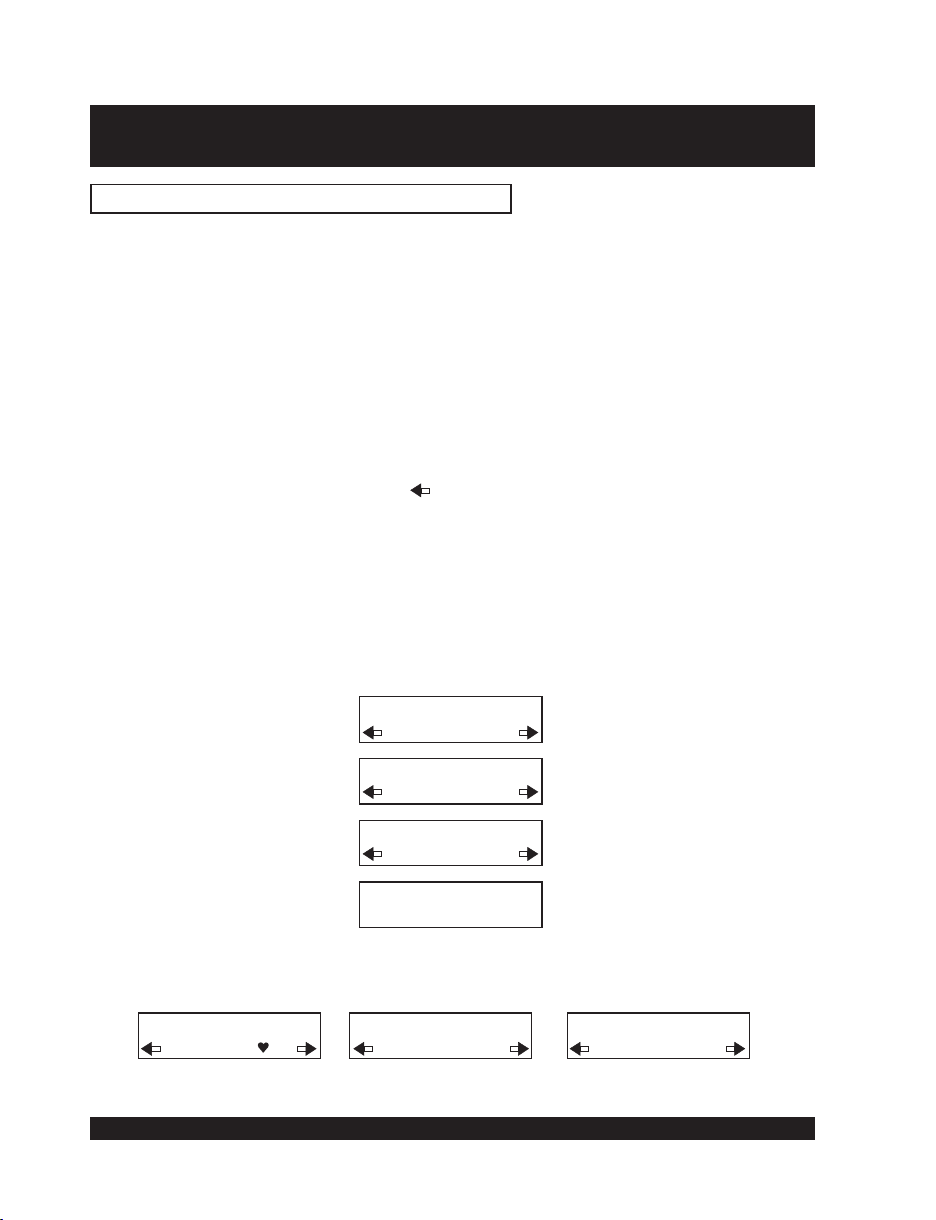
STATION SELECTION AND NAVIGATION
Selecting a station
his unit has been tuned a can be selected
Once t digital radio station by using the Up and
Down button . If
can be selected directly
1. The top line of the display shows the name of the currently selected station. Press the
Up and Down buttons to see the names of other stored stations on the bottom line of
the display. Stop when .
2. Press the Select button to listen to the selected station. The display may show 'Now
tuning..' Briefly as it finds the new station.
If a station has one or more secondary services available the display will show '>>'
next to the station name on the station list and they will appear after the primary
service as you press the Up and Down buttons.
A secondary service will display " " before the station name on the station list
indicating that it belongs to the primary service before it in the list.
If the station has ' ?' Before its name the service is currently inactive or invalid. If a
station which has this symbol the unit tries to tune to that station. If still
unavailable 'Service not avail' or 'Service off-air' will be displayed and the unit will
attempt to tune to an alternative station. A flashing cursor will indicate that this is in
progress. To try to manually tune to this station
during which to press the Up and Down buttons and the manual tuning bar will be
displayed .
followed by the select button stations have been assigned to presets they
by pressing the relevant numbered button(1-10).
when a required station is located
is selected
there is a maximum of 5 seconds
to enable adjustment of the aerial
Classic FM
BBC5Live
Classic FM
BBCSports
Classic FM
?Virgin
Station not
available
When scrolling through stations the following indicators may be seen. They can be seen
individually or as any combination together.
Classic FM
Classic
Heart icon denotes favourite station
Classic FM
?Classic
? Denotes station saved in list,
but not currently available
Classic FM
Classic 2
Number 2 denotes station stored in Preset 2
Goodmans Product Information Helpline 0870 873 0080
19
Page 21

DAB Operation (Continued)
AUTO SCAN
The AUTO button has two function.
1. If the button is pressed quickly (2 seconds or less ) the radio will rescan only UK Band III
(11Bto 12D)
A scanning screen appears and a progress bar is displayed. Audio is suspended. On
completion the radiowill tune andreturn to play the stationbeing listened to.
2. If the button is held for more than 2 seconds or more t
(5Ato 13F)
for available stations.
.
Press AUTO
for 2 seconds
or less
Scanning..........
Scanning ........ 13
he unit completes a full band III scan
Classic FM
Scrolling DLS
Press Auto tune
for more then
2 seconds
Scanning..........
No Audio
This full band Scanning takes a
longer time period.
Now Tuning....
Now Tuning.....
Goodmans Product Information Helpline 0870 873 0080
20
Page 22

DAB Operation (Continued)
TUNING AND PLAYING
Once the station list is available and playing, the station name will appear on the top line.
On the line below a scrolling line of text will be seen called DLS.
Pressing the Info button changes the information displayed on the bottom line. See the
INFO function for the options available.
SELECT BUTTON
The Select key has 2 functions.
In normal navigationit confirms thehighlighted selection.
When pressed in normal mode it will display the signal strength. The grey bars are the current
signal level and the central highlighted bar is the minimum signal required. Press Select to
cancel the signal leveldisplay.
Play screen
Classic FM
Scrolling DLS
Press Select
Classic FM
Press Select
Goodmans Product Information Helpline 0870 873 0080
21
Page 23

DAB Operation (Continued)
SET UP BUTTON
Pressing the Set up key will bring a menu that allows access using the UP and DOWN
buttons to a number of system settings. Press UP and DOWN buttons to locate a required
option and press select to access it. Use the UP and DOWN buttons and SELECT to
navigate within the sub menus.
The sub menusavailable are StationOrder, Manual Tune, DRC value,Language, SW Version.
Pressing and holding the set up button initiates a factory reset which requires the select
button to be pressed to confirm the action. All stations will be deleted from memory and
the unit will conduct a rescan on restart
STATION ORDER
In use the radio creates a full list of the stations it can receive in all the locations it has
been used. Using the station order function the way this list is displayed can be changed.
-- Alphanumeric.
the start of the list. For alphabetical order Aa-Zz, the station with the most preceding letter will
be placed at the start of the list [case insensitive]. For punctuation characters order, the station
with the lowestANSII character valuewill be put in theforemost front of the list.
-- Favourite.
service list ina small sub-group.This sub-group service list isin alphanumerical order.The
remaining stations arein their ownalphanumerical order.
-- Active.
service list ina sub-group. Thissub-group list is in alphanumeric.The remaining inactive
( invalid) servicesare placed onthe list after the validsub-group, in their own alphanumeric
order.
Prune
-- . Cut the list of stations to show only those in your location. Any station witha?in
front of thename will beremoved.
The services definedas the active(or valid) stations are savedat the top of the
For numerical order 0-9, the station with lowest number will be placed at
The services definedas the 10favourite stations are saved atthe top of the
LANGUAGE
This provides English as the only option.
SW VERSION
This option displays the version number of the software installed in this unit. This option
can only be viewed, no adjustment is possible.
Goodmans Product Information Helpline 0870 873 0080
22
Page 24

DAB Operation (Continued)
MANUAL TUNE
Use Up/Down buttons to select a DAB channel. When a channel is selected the radio
tunes to this frequency. Once tuned, the signal strength will be displayed using the signal
strength meter. This function can be used to check for the best position for the antenna. As
the antenna is moved the indicator will fluctuate according to the change in signal strength.
To exit this menu press Select.
1. Press the UP and Down key to scroll through different channels and press the
to select one.
Note:
the list includes all channels, UK Stations are in therange 11B to 12D.Asignal quality
display will be seen. The empty block indicates the minimum required level for
reception and thesolid blocks indicatethe current level.
2. Move the aerial or radio whilst watching thedisplay and to try to raise the current level to the
empty block or beyond. The display will change to show the multiplex name on the bottom
line of the display once a good signal is received and the multiplex will be added to the
service list.
3. Push the button to exit Scanning or press the Up and Down key to select another
channel.
DRC ( Dynamic Range Control ) enables adjustment of the dynamic range of the received
audio ( dependent on broadcast material). The DRC level of a broadcast is set by a
broadcaster and transmitted with the service. Changing this DRC value enables you to
apply a scaling factor to this level.
When you select this option you see the current DRC value on the top line of the display and a
scroll list onthe bottom.
Press the Up and Down keys to scroll through the following options and
button to choosethe required value
DRC 0 : DRC scaling isswitched off.
DRC1/2: DRC scaling isset to 1/2 that sentwith the transmitted service.
DRC 1 : Applies the DRC scaling as sent with the transmitted service. This is the default
Setup
DRC VALUE
:
setting.
select button
Press the select
Goodmans Product Information Helpline 0870 873 0080
23
Page 25

DAB Operation (Continued)
Classic FM
Scrolling DLS
Press Setup
Station Order
Manual Tune
DRC value
Language
Sw version
V 1.7.2-2
Sw version
English
English
Press Select
Fav station
Fav station
Alphanumeric
Active station
Prune station
Alphanumeric
Fav station
Alphanumeric
Prune stations
11B 218.64MHz
11D 222.06MHz
Press Select
11D 222.06MHz
11D Digital 1
Current selecttion
Press
Up/Down or Select
Press
Up/Down or Select
Press
Up/Down
Select the channel
you want to tune to
The empty block
shows the minium
signal level required
The level indicator
shows the current
signal level
Press Select
DRC 1
DRC 0
DRC 1/2
Press
Up/Down or Select
DRC 1
Goodmans Product Information Helpline 0870 873 0080
24
Page 26

DAB Operation (Continued)
PRESETS
There are 10 DAB presets available
Presets are assigned using the remote control as follows:.
Listen to thestation . Press andhold a Presetbutton (1-10) for two seconds.
Alternatively the station you wish to assign can be displayed in the second line of the
display when you are browsing stations. Again press and hold the Preset button (1-10) for
two seconds. In both cases a confirmation message will show that the preset has been
saved.
Once assigned to a station, the preset button can be pressed and the radio will tune to the
required station.
If you are browsing stations a preset will be shown by the number of the preset displayed at
the end ofthe line.
If a Preset button is pressed with no station assigned, then it will be shown as empty. See
the diagram belowfor full details.
to be stored
Press Preset key 3
No Preset set
Classic FM
Empty preset
Hold less than
2 secs
Classic FM
Scrolling DLS
OR
Classic FM
Classic
Preset available
Hold over 2 secs
Press Preset key 3
Hold over 2 secs
Now Tuning .....
Classic FM
Scrolling DLS
Classic FM
Preset 3 saved
Classic FM
Preset 3 saved
Stations have
been found
Goodmans Product Information Helpline 0870 873 0080
25
Page 27

DAB Operation (Continued)
Presets can also be made using the DAB controls on the main unit as follows:
Listen to thestation . Press Presetbutton briefly.
Use UP or DOWN buttonto select a preset memoryposition.
Press and hold Preset button, a message that show that the chosen station has been
saved appears onthe LCD.
If you are browsing stations a preset will be shown by the number of the preset displayed at
the end ofthe line.
To recall one of thepreset stations, press PRESET button briefly, then press t UPor DOWN
button. When the desired Preset appears, press SELECT button to begin tune to this
station.
to be stored
Classic FM
Hold less than
DLS Scrolling
2 secs
Classic FM
DLS Scrolling
Classic FM
CORE 2
Press and hold the PRESET
less than 2 secs
Press PresetPress Preset
Press and hold the
PRESET over 2 secs
Classic FM
Preset 2 Saved
Classic FM
Empty preset 1
Press UP/DOWN
Press and hold PRESET less than 2 secs
Press SELECT to confirm
Now Tuning .....
CORE
DLS Scrolling
Stations have
been found
Goodmans Product Information Helpline 0870 873 0080
26
Page 28

PICK-UP
System
Laser diode
Properties
Error correction
AUDIO
D/A conversion
Frequency response
Wow and flutter
No. of channels
Output level
RADIO
Receiving bands
Frequency range
Product Specifications
Compact disc digital audio system
material: GaAIAs
Wavelength: =780nm
Emission Duration: continuous
Laser output: <44.6 W
Cross-interleave Reed-solomon code
1-bit DAC 8 times oversampling
20-20,000Hz (+1/-3 dB)
Below measurable limits
2 channels (stereo)
Earphone: 20mW x 2 (32 ) Main Unit 2 x 3W Rms
MW/FM
MW 522-1620 KHz
FM 87.5 -108.0 MHz
GENERAL
Power requirements
Power consumption
Dimension
Weight
Goodmans Product Information Helpline 0870 873 0080
AC 230V/50Hz
16.4W
Approx. 344(L)X237.5(W)X136(H)mm
Approx. 2.44kg(without batteries)
27
 Loading...