

Page 1
STEREO CD/RADIO/CASSETTE RECORDER
WITH REMOTE CONTROL
GPS162R
Instruction Manual
For improvement purposes, specification and design are subject to change without notice.
Goodmans Product Information Helpline 0870 873 0080
www.goodmans.co.uk
Page 2
IMPORTANT SAFEGUARDS
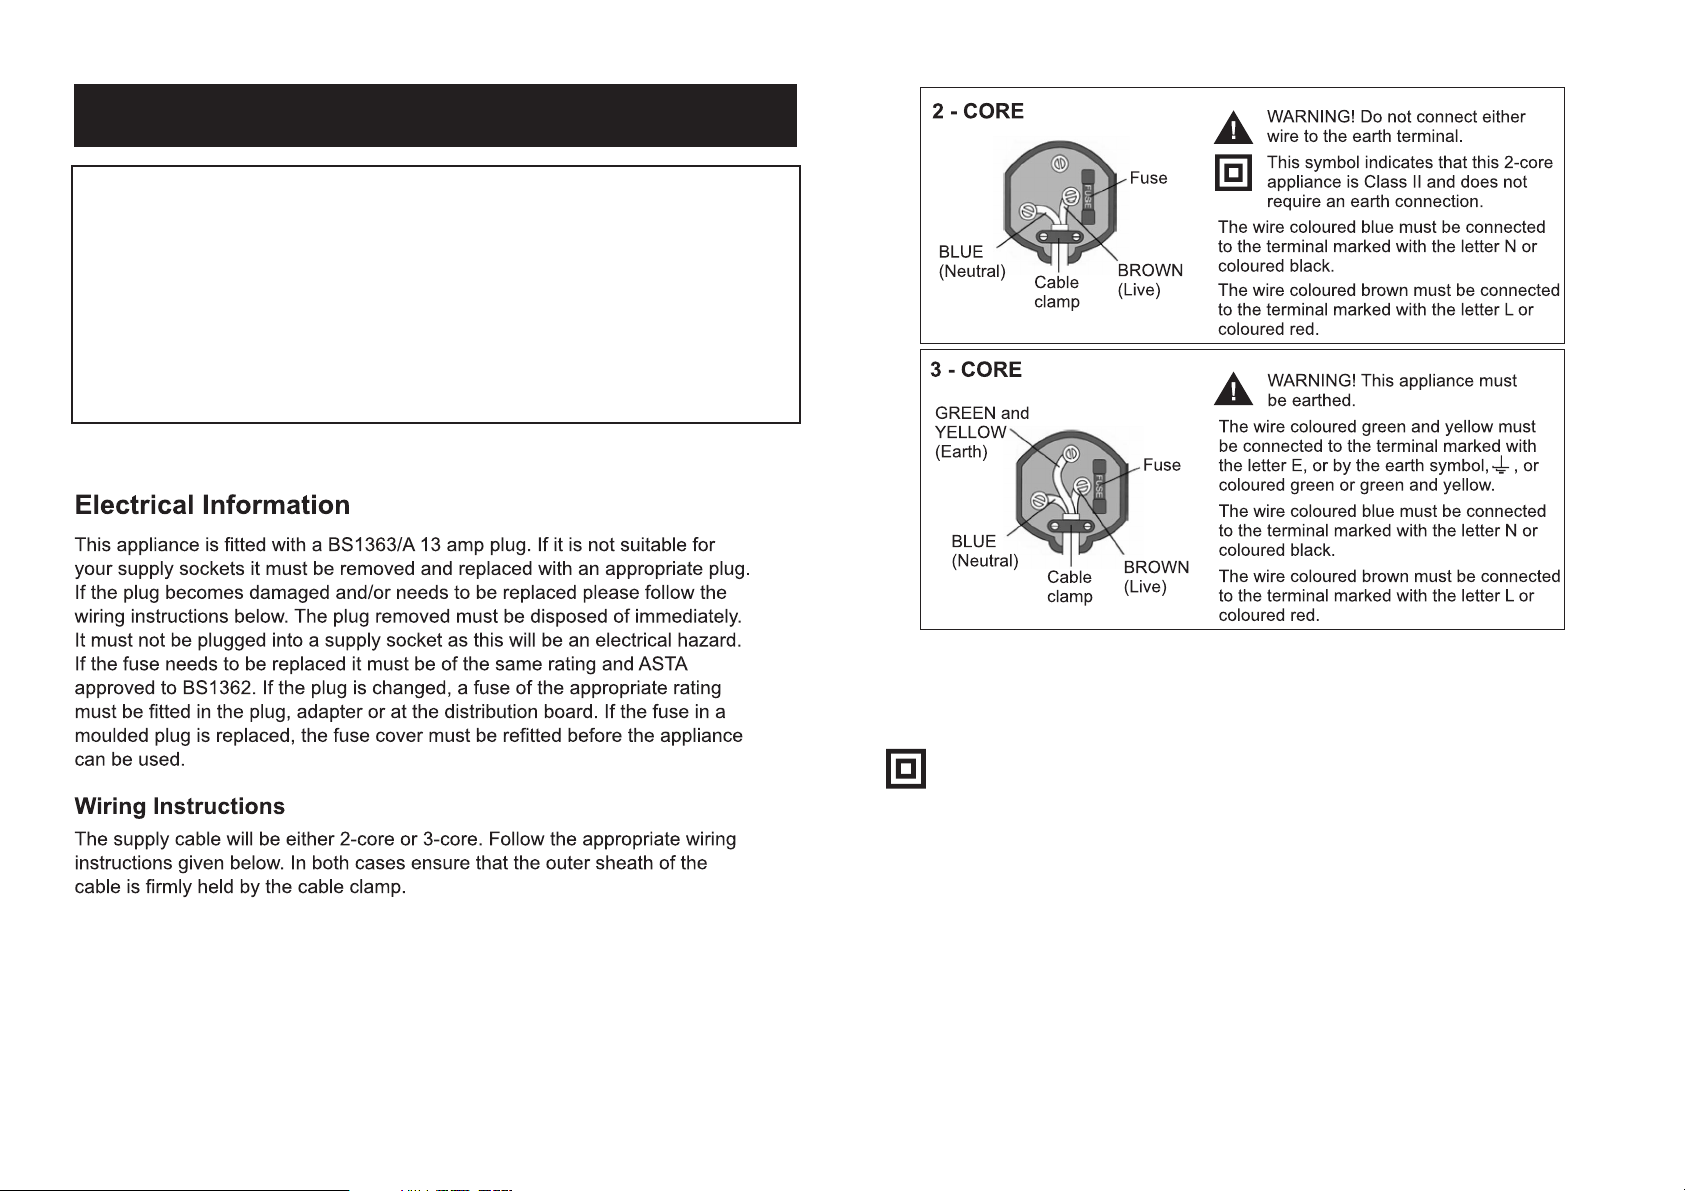
PRE FITTED MAINS PLUGS
For your convenience a mains plug has been fitted to this appliance. For your safety please
observe the following information.
1. Should the fuseinthe plug fail, remove the plugfrom the wall socket and replacethefuse with
a 3 Amp ASTAapproved to BS 1362 fuse.
2. Never use the plug without the fuse coverfitted. Replacement fuse covers are available from
your dealer or most electrical retail outlets.
3. If the mains plug is cut off the cable, rewire the replacement plug in accordance with
instruction given in this manual.
4. CAUTION: Under no circumstances should the discarded plug be inserted mains socket. To
prevent a shock hazard carefully dispose of the discarded plug. Do not leave the plug lying
around where children might see it.
WARNING:
To prevent fire or shock hazard do not expose this unit to rain or moisture.
WARNING: UNDER NO CIRCUMSTANCES MUST THE LIVE OR NEUTRAL WIRES BE
CONNECTED TO THE EARTHTERMINALINA3-PIN MAINS PLUG.
This symbol means that this unit is double insulated.
An earth connection is not required.
HELPLINE PHONE NUMBER 0870 873 0080
Page 3

CAUTION
CLASS 1 LASER PRODUCT
Use of Controls or adjustments or performance of procedures other than those specified herein
may result in hazardous radiation exposure.
LASER SAFETY
This unit employs a laser, only qualified service personnel should attempt repair.
DANGER:
CAUTION:
INVISIBLE LASER RADIATION WHEN OPEN AND
INTERLOCK FAILED OR DEFEATED. AVOID DIRECT
EXPOSURE TO BEAM.
HAZARDOUS LASER RADIATION WHEN OPEN AND
INTERLOCK DEFEATED.
CAUTION
CLEANING: Always disconnect unit from mains supply before attempting to clean it. Use soft
SOME DO'S AND DONT'S ON THE SAFE USE OF EQUIPMENT
This equipment has been designed and manufactured to meet European safety standards but
like any electrical equipment,care must be taken if youare to obtain the best results and safety is
to be assured.
Do read the operating instructions before you attempt to use the equipment.
Do ensure that all electrical connections (Including the mains plug, extension leads and
interconnections between pieces of equipment) are properly made in accordance with the
manufacturer's instructions. Switch off and withdraw the mains plug when making or changing
connections.
Do consult your dealer if you are ever in doubt of the installation, operating, or safety of your
equipment.
Don't continue to operatethe equipment if you are inany doubt about it workingnormally, or if it is
damaged in any way- switch off, withdraw the mains plug and consult your dealer.
Don't remove any fixed covers as this may expose dangerous voltages.
Don't leave equipment switched on when it is unattended unless it is specifically stated that it is
designed for unattended operation or has a standby mode. Switch off using the switch on the
equipment and made sure that your family knows how to do this. Special arrangements may need
to be made for infirm or handicapped people.
Don't listen to headphones at high volume, as such use can permanently damage your hearing.
Don't obstruct the ventilation of the equiment, for example with curtains or soft furnishings.
Overheating will cause damage and shorten the life of the equipment.
Don't allow electrical equipment to be exposed to rain or moisture.
Above all
Never let anyone, especiallychildren, push anything into holes,slots or any other openingas
this could result in a fatal electric shock.
Never guess or take chances with electrical equipmentofanykind.
It is better to be safe than sorry!
WARNING:
cloth moistened with soapy water, wipe gently. Do not use solvents or abrasive
materials.
TO REDUCE THE RISK OF FIRE OR ELECTRIC SHOCK, DO NOT EXPOSE THIS
APPLIANCE TO RAIN OR MOISTURE, DANGEROUS HIGH VOLTAGES ARE
PRESENT INSIDE THE ENCLOSURE, DO NOT OPEN THE CABINET, REFER
SERVICING TOQUALIFIEDPERSONNELONLY.
IMPORTANT NOTES
Your hearing is very important to you and to us so please take care when operating
this equipment. The followingguidelines are provided for your information.
ESTABLISH A SAFE SOUND LEVEL
Over time your hearing will adapt to continuous loud sounds and will give the
impression that the volume has in fact been reduced. What seems normal to
you may in fact be harmful. To guard against this
ADAPTS
Slowly increase the level until you can hear comfortably and clearly and without
set the volume at a low level.
distortion.
Damage to your hearing is accumulative and is irreversible.
Any ringing or discomfort in the ears indicates that the volume is too loud.
Remember listening for prolonged period of time at high volume levels will
harm your hearing.
Once you have established a comfortable listening level, DO NOT INCREASE
THE SOUND LEVEL FURTHER.
The following list of typical sound levels may assist you in recognizing just how
loud you have set the volume level.
DECIBEL
Level dB Example
30dB Quiet library, soft whisper.
40 Living room, fridge freezer bedroom away from traffic.
50 Normal conversation, quiet office, light traffic.
60 Electric sewing machine.
70 Vacuum cleaner, hair dryer, noisy restaurant.
THE FOLLOWING NOISE CAN BE HARMFUL UNDER CONSTANT EXPOSURE
80dB Average city traffic, alarm clock buzzer at 1 Metre, food mixer.
90 Motorcycle, heavy goods vehicle, petrol lawn mower.
100 Pneumatic drill, chain saw, garbage truck,
120 Rock band concert, thunderclap, fast train passing by.
140 Gunshot, jet plane taking off.
THRESHOLD OF PAIN
180 Rocket Launching pad.
BEFORE YOUR HEARING
discotec/night-club.
HELPLINE PHONE NUMBER 0870 873 0080
Page 4

TABLE OF CONTENTS
SAFETY PRECAUTIONS
1. POWER SOURCES
Power Sources....................................................1
Player Maintenance............................................ 2
Disc Cleaning, Power failure.................
Player Operation
Location of Controls............................................4
Radio operation...................................................5
Listening to a compact disc.................................. 6
Program play operation.......................................7
Repeat play operation........................................8
Automatic level control(ALC)...............................9
DBBS (bass boost) function..............................10
Listening with headphone/earphone 11
Cassettes............................................................12
To record from the built-in radio,
Microphone, compact disc.................................13
Remote control..................................................14
Product Specifications.......................................15
........... 3
(Not Supplied)....
WARNING
To prevent fire or shock hazard, do not
expose the unit to rain or moisture.
To avoid electrical shock, do not open the
cabinet. Refer servicing to qualified
personnel only.
1. As the laser beam used in this compact
disc player is harmful to the eyes, do not
attempt to disassemble the casing.
2. Stop operation immediately if any liquid or
solid object should fall into the cabinet.
Unplug the unit and have it checked by
qualified personnel.
3. Do not touch the lensorpoke at it. If you do,
you may damage the lens and the player
may not operate properly.
4. Do not put anything in the safety slot. If you
do, the laser diode will be ON when the lid is
still opened.
5. This u nit employs a laser. The use of
controls or adjustments or performance of
procedures other then those specified
herein may result in exposure to
hazardous radiation.
AC MAINS
Insert the plug of AC power cord into wall
outlet and the connector into the AC
supply socket on the rear of the unit.
Battery power will be disconnected
automatically.
2. PLAYER MAINTENANCE
CLEANING THE TAPE HEADS
Clean the heads frequently to remove dust
and tape residue. Dirt on the heads will
impair the sound quality of both recording
and playback.
The simple method is to use a headcleaning cassette, which is available at
most audio stores. Follow the instructions
supplied with the cleaning cassette.
BATTERY OPERATION
Remove the Battery Compartment Cover
and insert 8 pcs UM-2 (Size C ) batteries,
replace the cover.
NOTE:
ENSURE BATTERIES ARE
CORRECTLY INSTALLED
OBSERVING THE POLARITY AS
SHOWN.
: Old batteries may swell and leak.
NOTE
To avoid damage to your
instrument, remove the batteries
when the unit is to be stored for
long periods of time, or if the
batteries become exhausted (the
Power Indicator will be faded if the
batteries are exhausted). And if
radio sound is low or distorted,
your batteries probably need
replacing.
Page 5

3. DISC CLEANING, POWER FAILURE
4. LOCATION OF CONTROLS
Cleaning the Disc
1. To handle a disc use only one of the two
manners illustrated.
Do not touch the rainbow - coloured
Note
Side.
2. To wipe a disc, use only a soft cloth. Do
not use or
petroleum based products
thinner which will damage the disc. The
disc should always be wiped in a straight
line from the center to the edge. It should
never be wiped in a circular motion.
3. Never place the disc on other equipment
or near any heat source. Avoid positions
where the disc would be subjected to
direct sunlight for long periods.
Maintenance and care
1. Electronic products should never be
subjected to extreme temperatures nor
high humidity to ensure good performance
and a long life-time. The
portable stereo
should not be placed in bathing areas, or
around stoves and radiators, etc. Always
leave sufficient space around the unit for
ventilation.
2. If necessary, only clean the cabinet of the
unit with a soft dampened piece ofcloth(be
sure the AC power cord is unplugged from
the outlet) Never use a polish or a strong
detergent for cleaning since this can
damage the finish of the cabinet.
12 3 4
5
678910
23
32 33 34
11
121314
24
252627
15
28
29
1617181920
35
302331
1. FUNCTION SWITCH
2. HANDLE(FOLDING)
3. CD DOOR
4. BAND SWITCH
5. VOLUME CONTROL
6. PHONES SOCKET
7. BASS BOOST BUTTON
8. CD PLAY/PAUSE BUTTON
9. CD STOP BUTTON
10. CD REPEAT BUTTON
11. CASSETTE PAUSE BUTTON
12. CASSETTE STOP/EJECT BUTTON
13. CASSETTE FAST FORWARD BUTTON
22
21
14. CASSETTE REWIND BUTTON
15. CASSETTE PLAY BUTTON
16. CASSETTE RECORD BUTTON
17. CD DOOR OPEN BUTTON
18. CD SKIP/SEARCH DOWN BUTTON
19. CD SKIP/SEARCH UP BUTTON
20. CD PROGRAM BUTTON
21. RADIO TUNING CONTROL
22. DIAL SCALE
23. SPEAKERS
24. CASSETTE DOOR
25. POWER INDICATOR
26. PROGRAM INDICATOR
27. LED DISPLAY
28. PLAY/PAUSE INDICATOR
29. REPEAT INDICATOR
30. FM STEREO INDICATOR
31. BUILT-IN MIC
32. FM TELESCOPIC AERIAL
33. BATTERY COMPARTMENT
34. AC SOCKET
35. REMOTE SENSOR
1
2
3
4
5
FOR REMOTE HANDSET
1. CD PLAY/PAUSE BUTTON
2. CD SKIP BACKWARD BUTTON
3. BATTERY COMPARTMENT
4. CD SKIP FORWARD BUTTON
5. CD STOP BUTTON
Page 6

5. RADIO OPERATION
6. LISTENING TO A COMPACT DISC
1. Slide the Function Switch to RADIO
position.
2. Select the required wave band by
sliding the Band Switch (FM or MW).
3. Rotate the Tuning Control in the
appropriate direction until the desired
broadcasting station is received.
4. For FM reception, adjust the Telescopic
Aerial appropriately to obtain the best
reception. For MW reception, rotate the
unit to obtain the best reception.
5. Adjust the Volume Control as required.
6. If there is too much noise when
receiving FM stereo broadcasting,
adjust the Telescopic aerial.
NOTE:
FM Stereo Indicator illuminates
showing you are receiving a
stereo broadcast.
If there is too much noise (hiss)
when listening to a station in
stereo, move the band switch
from the FM ST. position to the
FM position, the broadcast will
then be received in mono.
For FM For MW
LISTENING TO A COMPACT DISC
1. Slide the Function Switch to CD
position.
2. Open the CD door by pressing Door
Open Button to the lower right of the
CD door.
3. Load the DISC with the label up.
n
Do not touch the playback side.
n
Centre the disc.
n
Do not touch the lens.
4. Close the lid, the disc will rotate and
the LED Display will show the disc's
total number of tracks.
5. Press the CD Play/Pause Button.
n
Press once to start playback from
the first track. CD Play/Pause
Indicator will illuminate.
n
Press again to pause playback, CD
Play/Pause Indicator will flash.
n
Press the CD Forward Skip/Search
Button ( ) to skip to the next track
on the disc.
n
Press the CD Backward Skip/Search
Button ( ) to skip to the beginning
of the track currently playing.
n
Press the CD Backward Skip/Search
Button ( ) again to skip to the
previous track.
n
Press and hold the CD Backward or
Forward Skip/Search Button
( or ) during playback to
search backwards or forwards at
high speed. When the desired
section of the track is found ,
release the button, normal playback
will resume.
Page 7

7. PROGRAMME PLAYBACK
8. REPEAT PLAY OPERATION
TO PROGRAM PLAY
1. Press the CD Stop Button during
playback. The total number of tracks
will be shown in the display.
2. Press the CD Program Button, "01"
and Program Indicator will flash in the
display.
3. Select the desired track by pressing
Backward or Forward Skip/Search
Button ( or ).
4. Press CD Program Button again to
store the track in memory
5. Repeat steps 3 and 4 (up to 20 tracks
can be stored in memory).
6. After all tracks have been programmed,
press the CD Play/Pause Button to
start the playback from the first
programmed track, the CD Play/Pause
Indicator will illuminate and, the
Program Indicator will stop flashing.
TO CLEAR PROGRAM
1. Press the CD Stop Button twice during
programmed playback to clear the
program.
2. With the unit in CD stop mode, press
the Door Open Button to open the CD
compartment, the program will be
erased.
.
X1
SINGLE REPEAT
1. Press the CD Repeat Button once
during playback. CD Repeat Indicator
will flash.
2. Press the CD Backward or Forward
Skip/Search Button ( or ) to select
the desired track.
3. The track selected will be played over
and over again until the CD Stop Button
is pressed.
4. To cancel press the Repeat Button
repeatedly until the Repeat Indicator is
exstinguished.
ALL TRACKS REPEAT
1. Press the CD Stop Button and total
track number appears in the display.
2. Press the CD Repeat Button twice, CD
Repeat Indicator will illuminate.
3. Press the CD Play/Pause Button, CD
Play/Pause Indicator w and
all tracks will be repeated continuously
until the CD Stop Button is pressed.
4. To cancel the repeat function, press the
repeat button until the repeat indicator
is extinguished.
ill illuminate,
Page 8

9. AUTOMATIC LEVEL CONTROL (ALC)
11. LISTENING WITH HEADPHONE/EARPHONE
(NOT SUPPLIED)
This product utilizes Automatic Level
Control circuitry, therefore, it is not
necessary to adjust the Volume Control
when recording. This circuit automatically
records at the correct level and prevents
over loading.
10. BASS (BASS BOOST) FUNCTION
To enhance the bass performance when
listening at low volume press the DBBS
button. Press the button again to switch
the function off.
NOTE: While recording the Volume
Control may be adjusted as
desired without affecting the
recording operation.
12. CASSETTE OPERATION
CASSETTE TAPE SELECTION
1. The quality and condition of the
cassette tapes used will have a direct
effect on the performance of this unit.
Low quality tapes tend to stretch, and
a stretched tape can easily become
entangled in the drive mechanism,
causing major damage. Stretched
tapes will run at uneven speeds and
will distort anything recorded on them.
2. Use only well known brands of tape.
3. Use of C-120 (120 minutes) cassettes
are not recommended. The extreme
thinness of this tape may result in
breakage or other problems.
4. Check to ensure there are no loose
layers of tape visible through the
cassette center window. Tighten these
loose layers with a pencil or ballpoint
pen before inserting the cassette into
the unit.
For private listening without disturbing
others, headphones/earphones can be
used, set the Volume Control to minimum
level, plug the headphone/earphone into
Phones socket, adjust the Volume Control
as required. When headphones are
connected the audio to the unit speakers
will be automatically muted.
CAUTION:
1. Slide the function selector to TAPE.
2. Press the STOP/EJECT key to open
the cassette compartment and insert a
pre-recorded tape with the exposed
portion of the tape facing uppermost
and the full spool to the right. Gently
push the door to close.
3. Press the PLAY key to start playback,
adjusting the VOLUME to the desired
level.
4. To briefly pause playback press the
PAUSE key
normal playback
5. To advance or rewind the tape rapidly
press the FAST FORWARD or
REWIND keys.
6.To stop playback press the
STOP/EJECT key, press again to
EJECT the cassette.
NOTE:
end during playback or recording, the
mechanism will stop and the keys will
return to their normal position.
Listening at high power for a
long periods could damage
your hearing.
NORMAL PLAYBACK
,
press again to resume
.
When the cassette reaches its
Page 9

13. TO RECORD FROM THE BUILT - IN RADIO,
MICROPHONE, COMPACT DISC
RECORD FROM THE RADIO
1. Follow the instructions of RADIO
OPERATION to tune to the desired
station.
2. Ensure the function switch is in the
radio position.
3. Load a blank cassette tape
Deck. (Full spool to the right)
4. Locate the portion of the tape where
recording is to start by using Rewind or
Fast Forward.
5. Press the Record and Play
simultaneously. Both keys will remain
in the down position.
6. The set is now recording from the
Radio, the recording process will
automatically stop at the end of the
tape.
7. To stop the recording manually, press
the Stop/Eject Key.
NOTE: To hear what has been
recorded , slide the function
switch to the TAPE position,
press the rewind key to
rewind the tape to the point
where the recording was
started, then press the Play
key to start playback. Adjust
the volume control as
required.
into the
RECORD FROM THE
BUILT - IN MICROPHONE
1. Slide the Function Switch to TAPE
position.
2. Load a blank cassette tape into the
Cassette Compartment with full
spool to the right.
3. Press the Play and Record keys
simultaneously. Both keys will remain in
the down position.
4. Speak or talk in front of the unit. You
are now recording from the Built-In
Microphone and the recording process
will automatically stop at the end of the
tape.
5. To stop the recording manually, press
the Stop/Eject.
6. To hear what has been recorded , slide
the function switch to the TAPE position,
press the rewind key to rewind the tape
to the point where the recording was
started, then press the Play key to start
playback. Adjust the volume control as
required.
RECORD FROM COMPACT DISC
1. Load a cassette tape into the cassette
compartment.
2. Load the disc and close the CD Door.
3. Slide the Function Switch to CD
position.
4. Press the Cassette Pause.
Page 10

5. Press the Cassette Record and Play
Keys for recording stand-by.
15. PRODUCT SPECIFICATIONS
6. Start the CD playing by pressing the
CD Play/Pause button.
7. Release the Cassette Pause Key to
start recording.
8. Press the Cassette Stop/Eject Key to
stop the recording.
9. To Hear what has been recorded , slide
the function switch to the TAPE
position, press the rewind key to
rewind the tape to the point where the
recording was started, then press the
Play key to start playback. Adjust the
volume control as required.
14. REMOTE CONTROL
REMOTE OPERATION
INSERTING BATTERIES
PICK-UP
System
Laser diode
Properties
Error correction
AUDIO
D/A conversion
Frequency response
Wow and flutter
No. of channels
Output level of earphones
Main speakers
RADIO
Receiving bands
Frequency range
Compact disc digital audio system
material: GaAIAs
Wavelength: 780nM
Emission duration: continuous
Laser output level 44.6uW
Cross-interleave Reed-solomon code
1-bit DAC 8 times oversampling
20-20,000Hz (+1/-3 dB)
Below measurable limits
2 channels (stereo)
20mW * 2
2.5W/8 Ohms * 2
MW/FM
MW 521 - 1602 KHz
FM 87.5 - 108 MHz
By using the remote controller, you can
operate the system in almost the same
way as with the controls of the main unit.
REMOTE CONTROL RANGE
Use the remote control within an angle of
o
30 at the left and right horizontally and
over distances up to about 3 meters.
1. Open the battery compartment cover.
2. Install 2pcs UM-4 (size AAA) batteries
into the battery Compartment matching
the polarity as shown in the battery
compartment.
3. Close the battery compartment lid.
NOTE:
Always remove batteries if the
remote controller is not going to
be used for a month or more.
Batteries left in the unit may
leak and cause damage.
GENERAL
Power requirements
Power consumption
Dimension
Weight
AC 230V/50Hz
12.5W
Approx. 344 (L) x 237.5 (W) x 136 (H) mm
Approx. 2.278kg(Without batteries)
Please note: Due to the continual improvement of our products, specifications are
subject to change without notice.
 Loading...