

Page 1
GPS103P
MW/FM RADIO CD PLAYER
INSTRUCTION MANUAL
Before operating this unit,
Please read this Owner's Manual carefully
Page 2
WARNING:
UNDER NO CIRCUMSTANCES MUST THE LIVE OR NEUTRAL WIRES BE
CONNECTED TO THE EARTH TERMINAL IN 3-PIN MAINS PLUG.
This symbol means that this unit is double insulated.
An earth connected is not required.
WARNING: TO REDUCE THE RISK OF FIRE OR ELECTRIC SHOCK. DO NOT EXPOSE
THIS APPLIANCE TO RAIN OR MOISTURE, DANGEROUS HIGH VOLTAGES
ARE PRESENT INSIDE THE ENCLOSED. DO NOT OPEN THE CABINET.
REFER SERVICING TO QUALIFIED PERSONNEL ONLY.
CAUTION:
WHEN OPERATING THIS UNIT ON 230V MAINS SUPPLY. PLEASE NOTE
THAT WHEN THE POWER SWITCH IS IN THE OFF MODE. THIS DOES NOT
DISCONNECT THE UNIT FROM THE MAINS SUPPLY. HOWEVER, PLEASE BE
ASSURED THAT IT IS PERFECTLY SAFE TO LEAVE THE UNIT CONNECTED TO THE
MAINS SUPPLY.
CAUTION
CLEANING:
H
Save the carton and packing materials: they will be useful if you ever have to transport
the unit.
Always disconnect the unit from mains supply before attempting to clean it.
Use soft cloth moistened with soapy water, wipe gently.
Do not use solvents or abrasive materials.
IMPORTANT SAFEGUARDS
PRE FITTED MAINS PLUGS
For your convenience a mains plug with a fuse has been fitted to this appliance. For your safety
please observe the following information.
1. Should the fuse fail in the plug remove the plug from the wall socket and replace the fuse
with a 3 Amp ASTA approved to BS 1362 fuse.
2. Never use the plug without the fuse cover fitted. Replacement fuse covers are available from
your dealer or most electrical retail outlets.
3. If the mains plug is cut off from the cable, rewire the replacement plug in accordance with the
instruction given in this manual.
4. CAUTION: Under no circumstances should the discarded plug be inserted into the mains
socket. To prevent a shock hazard carefully dispose of the discarded plug. Do not leave the
plug lying around where children might see it.
WARNING:
CAUTION:
BROWN
Live
BLUE
Neutral
To prevent fire or shock hazard do not expose this unit to rain or moisture.
DANGEROUS VOLTAGES EXIST INSIDE THIS UNIT. DO NOT REMOVE COVER
(OR BACK). NO USER SERVICEABLE PARTS INSIDE. REFER SERVICING TO
QUALIFIED SERVICE PERSONNEL. DISCONNECT FROM MAINS SUPPLY
WHEN NOT IN USE.
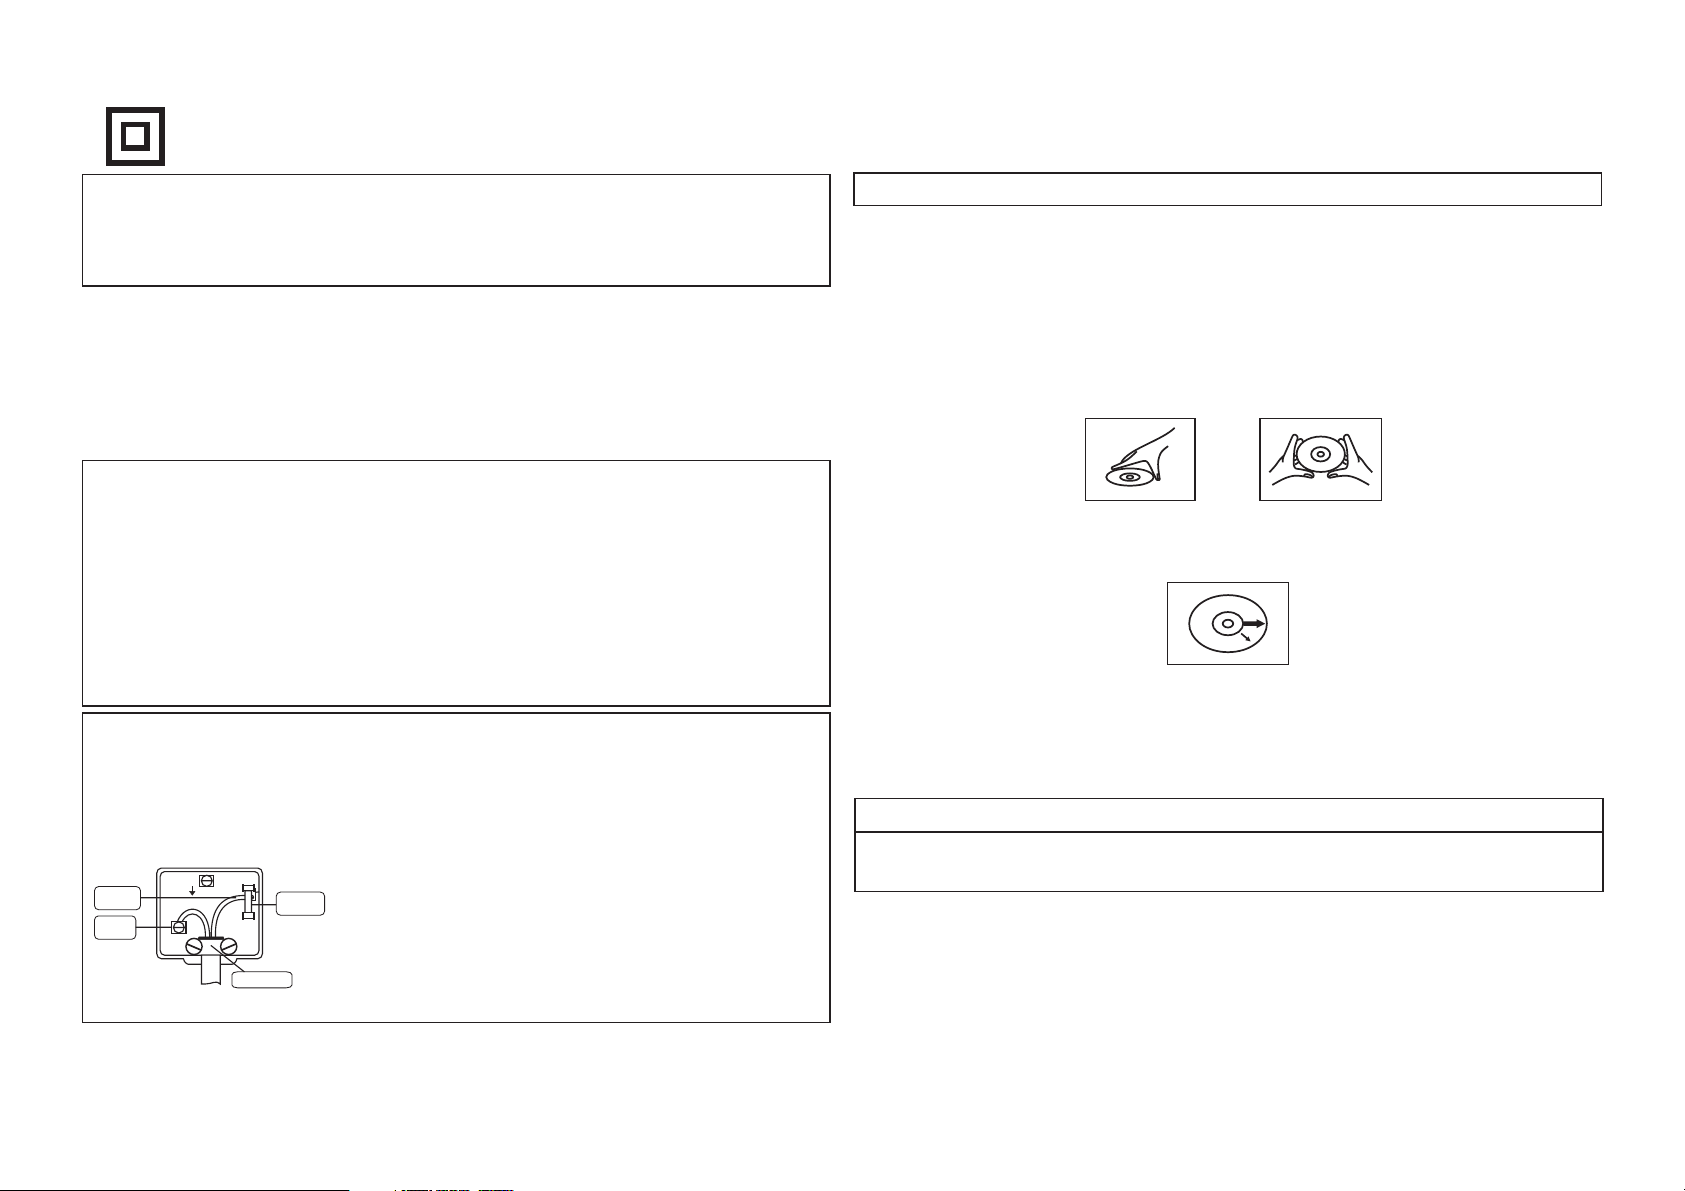
The wires in this mains lead are coloured in accordance with
MAINS
WIRING
Cord clamp
DETAILS
BS 1362
FUSE
E
N
the following wiring codes:
Blue ................................................... Neutral
Brown ................................................ Live
The wires in this mains lead must be connected to the
terminals in the plugs as follows:
Blue Wire ........................................... N or Black
Brown Wire ........................................ L or Red
Only a 3 Amp fuse should be fitted in the plug or a 5 Amp fuse
at the distribution bound.
CARE AND MAINTENANCE
CLEANING THE UNIT
(REMOVE MAINS PLUG FROM MAINS OUTLET SOCKET)
To clean the unit, simply wipe off with a soft clean cloth moistened with plain lukewarm water.
COMPACT DISC
Handling the disc
Although the music tracks in the disc are covered with a protective layer it is still advisable to treat the
disc carefully. Ensure that you always pick up discs by the edge, and put them back in their holders
immediately after using.
Cleaning the disc
Cleaning will not normally be necessary. However, should fingerprints, dust or dirt appear, you can wipe
them off with a soft, lint-tree cloth, wiping the disc in straight line from centre to edge.
COMPACT DISC PLAYER
The player mechanism is fitted with self-lubricating bearings, and must not be oiled or greased.
INTRODUCTION
Please read these instructions carefully before using this product and retain them in a
safe place for future reference.
Page 3

POWER SUPPLY
LOCATION OF CONTROLS
This Product can be powered by either 230V AC Mains supply or by 6 LR14 " C " size
Alkaline batteries.
AC OPERATION
Remove the AC cord which is packed inside the box.
Connect the cord to the AC input socket.
Connect the 3 pin mains plug to an AC mains socket.
BATTERY OPERATION
1. Insert 6 size batteries (not supplied) into the battery compartment
observing the correct polarity as indicated.
2. Ensure compartment cover is securely fitted.
3. Product will only function from batteries once AC cord is removed from the unit.
4. When replacing flat batteries, ensure all batteries are replaced at the same time with
the same type.
5. If the product is not to be used for an extended period of time the batteries should
be removed to prevent any possible damage to the product.
LR14 " C "
LASER SAFETY
This unit employs a laser, only qualified service personnel should attempt repair.
DANGER:
FAILED OR DEFEATED. AVOID DIRECT EXPOSURE TO BEAM.
INVISIBLE LASER RADIATION WHEN OPEN AND INTERLOCK
1. SPEAKERS
2. CD DOOR
3. PROGRAM/REPEAT BUTTON
4. BACKWARD SKIP/SEARCH BUTTON
5. POWER INDICATOR
6. STOP BUTTON
7. PLAY/PAUSE BUTTON
8. PLAY/PROGRAM INDICATOR
9. REPEAT INDICATOR
10. FORWARD SKIP/SEARCH BUTTON
11. RANDOM BUTTON
12. CD DOOR OPEN AREA
13. PHONES SOCKET
14. LED DISPLAY
15. TUNING CONTROL
16. DIAL SCALE
17. BAND SELECTOR
18. FUNCTION SELECTOR
19. HANDLE
20. BATTERY COMPARTMENT
21.
FM TELESCOPIC AERIAL
22. AC SOCKET
23. VOLUME CONTROL
24. FM STEREO INDICATOR
21
18
19
3
6
23
8
2
4
12
15
7
17
16
CAUTION:
HAZARDOUS LASER RADIATION WHEN OPEN AND
INTERLOCK DEFEATED.
WARNING: Please note that this unit does not have a separate power on/off
switch. To turn the unit on simply select which function you require CD/Radio.
After use turn the player off by moving the Function switch to the OFF
position.
24
5
1
20 22 13
11
14
910
1
Page 4

USING THE RADIO
USING THE CD PLAYER
1. Connect the unit to the power source. If FUNCTION selector is not at OFF position, the
POWER indicator will illuminate.
2. Slide the FUNCTION selector to RADIO position.
3. Select required wave band with BAND selector.
4. Tune to required station by rotating the TUNING control.
5. The built-in MW antenna and the FM t antenna are directional. When
receiving FM broadcast, extend the FM telescopic antenna in full length. The strongest
reception can be achieved by rotating the set for MW or telescopic antenna for FM.
If reception is noisy with high levels of hiss when listening with the band selector set to
FM ST. (stereo), please move the BAND selector to the FM (MONO) position.
6. Adjust the VOLUME control to
7. To turn off the radio, slide the FUNCTION selector to OFF position.
the desired volume level.
elescopic
USING THE CD PLAYER
LOADING A COMPACT DISC
1.
Lift and open the CD door by lifting the CD door at the open area.
2. Insert a disc with the label side facing upward.
3. Close the CD door by hand.
NOTE:
REMOVING A DISC
1. Make sure the CD is not playing. If it is, press the CD STOP button.
2. Lift and open the CD door by lifting the CD door at the open area.
3. Gently remove the disc.
4. Close the CD door by hand.
5. Replace the disc in its protective storage box.
Never touch the laser lens inside the CD compartment. If it ever gets dirty,
clean it with a CD cleaner disc.
NORMAL PLAY
1. Set the FUNCTION selector to the CD position, if a disc is already loaded into the CD
compartment, after approximately 5 seconds the total number of tracks will be shown
in the display.
2. To start playing, press the CD PLAY/PAUSE button (PLAY/PROGRAM indicator will
light). Track number 1 will be shown in the display and after a few seconds the track
will begin to play.
3. Adjust the VOLUME controlto the desiredvolume level.
4. To stop the disc temporarily, press the CD PLAY/PAUSE button, the number of the track
being played will flash. To resume play, press the CD PLAY/PAUSE button again, the track
number will stopflashing and play willcontinue.
5. To stopthe disc, press the CD STOP button, andPLAY/PROGRAMindicator will gooff.
6. To turnoff the CD,slide the FUNCTION selector to OFF position.
NOTES:
=
Never press the CD Door down during play, this may cause malfunction or damage the
disc. Always stop the CD player by using the CD STOP button before you take the disc
out of the compartment.
=
If you hit or move the CD during play, the music will stop for a second or two and then
start again. This is normal operation for portable CD players.
SKIPPING/SEARCHING TRACKS
1. This function enables you to find the beginning of any desired track during playback. If
the CD FORWARD SKIP/SEARCH ( ) button is pressed once or repeatedly, the
NEXT TRACK or one of the following tracks will be selected. The Display will show the
track or song number.
2. If the CD BACKWARD SKIP/SEARCH ( ) button is pressed twice or more in rapid
succession, play will go BACK one track per press.
3. When the set is in the PAUSE mode, it is also possible to select the beginning of a
certain track by using the CD FORWARD SKIP/SEARCH ( ) button and CD
BACKWARD SKIP/SEARCH ( ) button to reach the desired track. After selection,
press the CD PLAY/PAUSE button.
4. Press and hold the CD FORWARD SKIP/SEARCH ( ) button to search forward at a
high speed for a particular point. Press and hold the CD BACKWARD SKIP/SEARCH
( ) button to search backward. Release the button to resume normal play when the
point is found.
Page 5

USING THE CD PLAYER
REPEAT PLAY - SINGLE TRACK
To repeatthe SAME track over and over again,do the following:
1. During CD playing mode, press the SKIP/SEARCH button to select the track you like.
2. Press the PROGRAM/REPEAT button. The REPEAT indicator will be steadily on.
3. The track you selected will play over and over until you press the PROGRAM/REPEAT
button twice to
REPEAT PLAY - ALL TRACKS
To repeatplay ALL TRACKS on a disc over and over again, do the following.
1. During CD playing mode, press the PROGRAM/REPEAT button twice, and the REPEAT
indicator will flash on and off.
2. All the tracks on the CD will play in order and then start all over again.
3. Toend the repeat function,press PROGRAM/REPEAT button once.
4. Tostop play, press STOPbutton.
PROGRAMMED (MEMORY) PLAY
Up to 16 tracks can be programmed for disc play in the order you like or the same track
(song) can be repeated up to 16 times.
Programming can only be done during stop mode.NOTE:
PROGRAMMED (MEMORY) PLAYBACK
1. Press PROGRAM/REPEAT button during stop mode.
2. The display will show " " and the PLAY/PROGRAM indicator will
flash.
3. Press the SEARCH/SKIP buttons either or until the desired track shows on the
display.
4. Press the PROGRAM/REPEAT button. The first track will be stored and the display will
show " " and the PLAY/PROG indicator keeps flashing.
When the 11th track is programmed, the display shows . When more than 11
Note:
tracks are entered, the display will show and indicating 12, 13,
14, 15 and 16th track.
5. Repeat steps 3 and 4 until all the desired tracks are programmed.
6. When you finished programming, press PLAY/PAUSE button.
7. The display will show the track number being played, and the PLAY/PROGRAM
indicator
end the repeat function
P0
PI
PLAY
PROG.
RAM
track 4 will be first
to be programmed
,, ,
will keep flashing on and off during program play.
PLAY
PROG.
track 4 will be the first
programmed song to play
PLAY
PROG.
USING THE CD PLAYER
tracks
8. All will play inthe order you programmed.
9. During play, ifyou want tohear the next programmed track, press the SKIP/SEARCH button.
10. When all the programmed tracks have been played, playback ends and the
PLAY/PROGRAM indicator extinguishes. You can then do one of the following:
=
To play the program sequence again, press the PROGRAM/REPEAT button once
to enter the programming mode, then press the PLAY/PAUSE
=
Press the PROGRAM/REPEAT button repeatedly to show the existing program
number in order.
=
In the programming mode, you can edit the existing program.
=
Exit the program mode by pressing the CD STOP button.
11. To turn off the power, remember to slide FUNCTION switch to the off position.
THE CD MEMORY WILL BE ERASED UNDER THE FOLLOWING CONDITIONS:
=
If you open the CD door.
=
Moving the FUNCTION selector from CD to RADIO or OFF position.
=
The power is disconnected.
RANDOMPLAY
Tracks on the disc can be played in randomorder.
=
Press the RANDOM button during play, after the current track is finished, the unit will play
tracks in randomorder until all tracksare played.
=
In CD stop mode, pressingthe RANDOM button willstart random play.
NOTE:
During random play, the current track number and random symbol will flash to
indicate random play is in progress.(Please note the random indicator is shown
on the numberdisplay as moving lines)
=
During random play, press the RANDOM button again to cancel random function and
resume normal play.
Goodmans Product Information Helpline 0870 873 0080
button (once).
Page 6

PICK-UP
System
Laser diode
Properties
Error correction
AUDIO
D/A conversion
Frequency response
Wow and flutter
No. of channels
Output level
Speaker's Impedance
RADIO
Receiving bands
Frequency range
PRODUCT SPECIFICATIONS
Compact disc digital audio system
material: GaAIAs
Wavelength: =780nm
Emission Duration: continuous
Laser output: <44.6 W
Cross-interleave Reed-solomon code
1-bit DAC 8 times oversampling
20-20,000Hz (+1/-3 dB)
Below measurable limits
2 channels (stereo)
Earphone: 20mWX2 (32 )
2W 8 X2
MW/FM
MW 522-1620 KHz
FM 87.5 -108.0 MHz
GENERAL
Power requirements
Power consumption
Dimension
Weight
AC 230V/50Hz
13W
Approx.232.0(L)X223.0(W)X105.3(H) (mm)
Approx. 1.354kg
 Loading...