

Page 1
PERSONAL ENTERTAINMENT SYSTEM
USER GUIDE
GPDR 40
GOODMANS PRODUCT INFORMATION HELPLINE
0870 873 0080
82-176-00062
Page 2
En
This symbol on the product or in the instructions means that your electrical and
electronic equipment should be disposed at the end of its life separately from your
household waste. There are separate collection systems for recycling in the EU.
For more information, please contact the local authority or your retailer where you
purchased the product.
I
Page 3
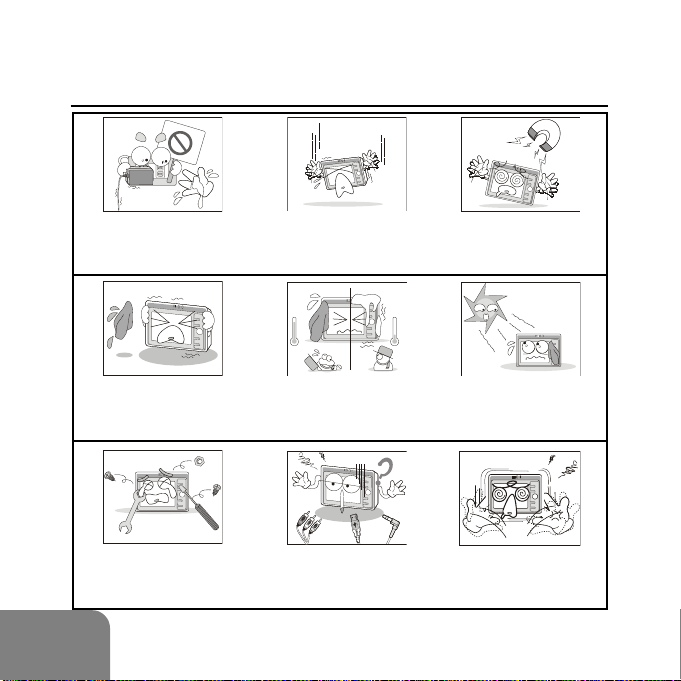
SAFETY INSTRUCTION
Do not plug/unplug the
power cord with wet
hands.
Do not clean the device
with wet cloth. Use only
dry and soft cloth.
Do not try to disas-
semble or repair the
device.
II
Do not drop the device.
Handle with care.
Do not subject the
device to low tempera-
tures or high humidity.
Always connect the
cables correctly.
Keep away from
magnetic sources.
Do not expose to direct
sunlight or extreme
heat.
Do not shake the
device violently while
operating.
Page 4

Important Battery Information
The battery used in this device may present a risk of fire or chemical
burn if mistreated.
Do not separately recharge, disassemble, heat above 60°C (140°F), or incinerate.
Use only the supplied charger. Use of a different charger may
present a risk of fire or explosion.
Should the battery become exhausted, recharge the unit using the
Supplied AC adapter as soon as possible. This unit has to be
recharged for at least 30 minutes before further operation. To fully
charge the unit will take approximately 3.5 hours.
Keep the unit away from children.
Copyright Caution
Copying CDs or loading music, video, or picture files for sale or other
business purposes is or may be a violation of copyright law.
Copyrighted materials, works of art, and/or presentations may
require authorization to be fully or partially recorded.
Please be aware of all such applicable laws concerning the
recording and use of such for your country.
HDD Formatting Caution
Do not use the formatting command on any PC to format this unit, use
only the format option accessible in the “Setup menu” (Please note this
function will not be available when connected to a PC). Ensure that the
unit is restarted to restore the system data and bootup files before
connecting the unit to a PC. Failure to do this may result in the unit
not functioning correctly.
III
Page 5
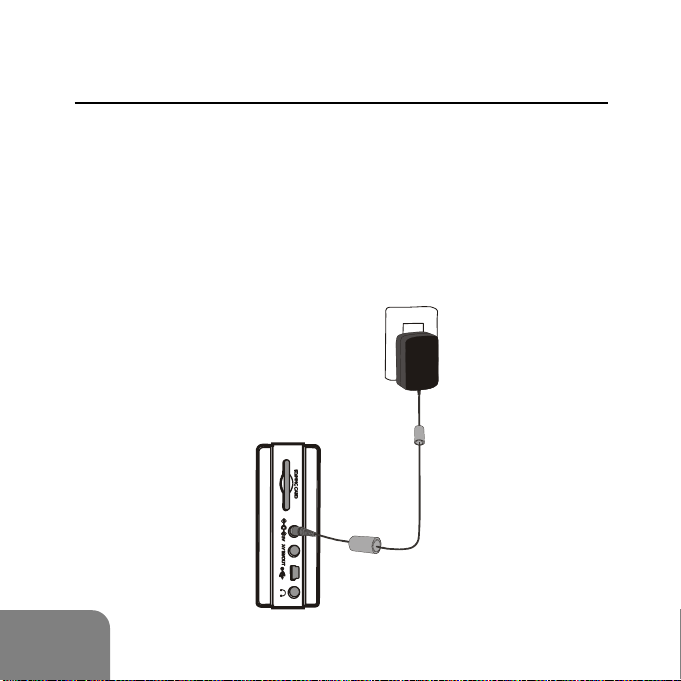
Battery Recharge
Before the GPDR40 is used for the first time, recharge the battery
for at least 3.5 hours BEFORE operation.
1. Plug one end of the power adapter to the DC IN socket of the
GPDR40, the other end in to the appropriate wall socket.
2. The red recharge indicator will illuminate.
3. When the power is fully recharged, the indicator will extinguish.
IV
Page 6
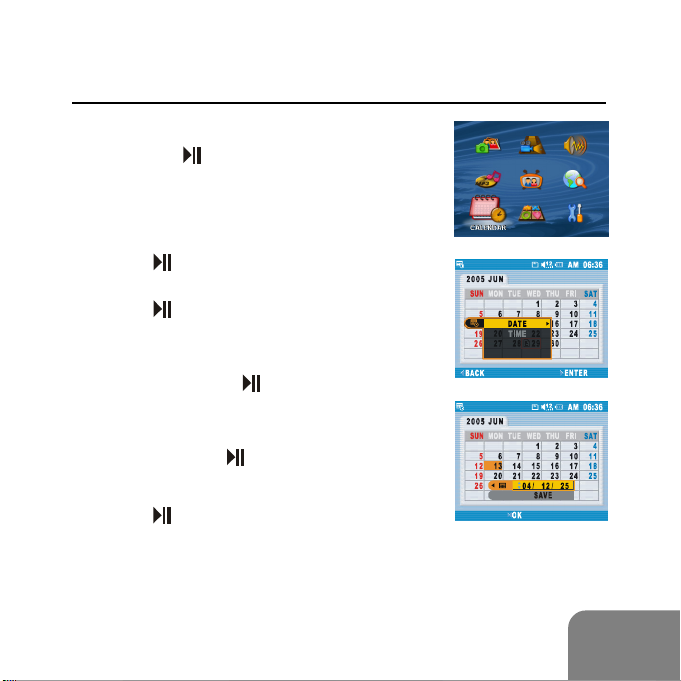
Date and Time Set Up
1. Use the joystick to highlight Calendar.
2. Press the
3. Press MENU / INFO button.
4. Press the joystick right to highlight DATE
and press the joystick right to enter.
5. Press
the joystick up / down to set the day.
Press / OK button to confirm and
continue.
6. Press the joystick up / down to set the
month and press / OK button to
confirm and continue.
7. Press the joystick up / down to set the
year and press
8. Press the joystick down to highlight SAVE.
9. Press
Note: The default date format is DD/MM/YY.
/ OK button.
/ OK to highlight DAY and press
/ OK button to confirm.
/ OK to save.
To change the format, go to SETUP
Menu.
V
Page 7

Table of Contents
SAFETY INSTRUCTION .................................................... II
IMPORTANT BATTERY INFORMATION ........................... III
COPYRIGHT CAUTION .................................................... III
HDD FORMATTING CAUTION ......................................... III
BATTERY RECHARGE ..................................................... IV
DATE&TIME SET UP ........................................................ V
OVERVIEW ....................................................................... 1
SOFTWARE INSTALLATION ............................................. 4
CONNECTING TO PC ........................................................ 6
Adding Files to the GPDR40 (Mass Storage)................... 6
Converting and Transferring Files ..................................... 9
PVR Console ................................................................ 13
BASIC FUNCTIONS ........................................................ 14
Photo Player ................................................................. 14
Photo Playback .................................................................... 14
Zoom .................................................................................... 15
VI
Page 8

Record Voice Clip for a Photo .............................................. 16
Playback/Delete the Voice Clip Attached to a Photo ........ 17
Slide Show Playback ........................................................ 19
Effects ............................................................................... 20
Memory Mix ....................................................................... 2 1
Video Player ............................................................... 22
Video Playback ................................................................. 22
Repeat Playback .............................................................. 24
Delete ............................................................................... 27
Voice Player................................................................ 29
Voice Playback .................................................................. 29
Record Voice Clip ............................................................. 3 0
Repeat Playback .............................................................. 3 1
Alarm ................................................................................ 35
Delete ............................................................................... 36
VII
Page 9

Music Player ............................................................... 37
Music Playback ................................................................. 37
Alarm ................................................................................ 38
AV Center ................................................................... 40
Record from External Equipment to the GPDR40 ........... 40
Timer Record.................................................................... 44
File Browser ................................................................ 47
Sort ................................................................................... 48
Rename............................................................................ 49
Create New Folder ........................................................... 50
Calendar ..................................................................... 52
Game .......................................................................... 53
TIC-TAC-TOE .................................................................... 53
PUZZLE ............................................................................ 54
MINESWEEPER ............................................................... 55
VIII
Page 10

OTHER FUNCTIONS ....................................................... 56
PVR Console .............................................................. 56
Change the Startup Screen .............................................. 56
Change the Startup Sound & Button Sound .................... 5 8
DPS Menu .................................................................. 60
DPS ................................................................................... 60
How to Print ...................................................................... 61
OSD Menu .................................................................... 66
Photo Player Menu ........................................................... 66
Video Player Menu ............................................................ 6 8
Voice Player Menu ............................................................ 69
Music Player Menu ........................................................... 71
AV Center Menu ................................................................ 72
File Browser Menu ........................................................... 73
Calendar Menu ................................................................. 75
Setup Menu ....................................................................... 76
Specifications ................................................................ 79
IX
Page 11
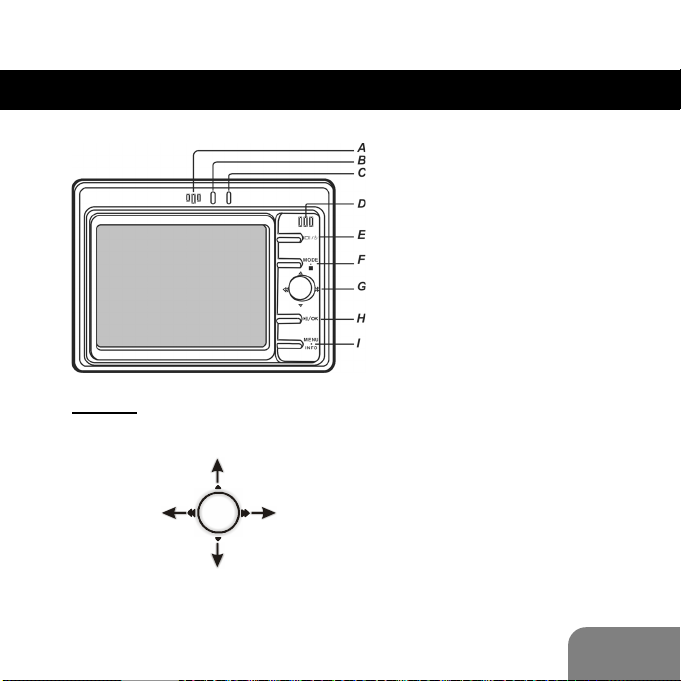
OVERVIEW
A. Microphone
B. Power indicator
C. Recharge indicator
D. Speaker
E. LCD / Power button
Press briefly to turn the
LCD Display on/off.
Joystick
Left
Press and hold for
approximately 3 seconds
Up
M
to power off.
F. Mode / Stop button
L
J
Right
G. Joystick
H. Play / OK button
K
I. Menu / Info button
Down
1
Page 12
P
ON
Q
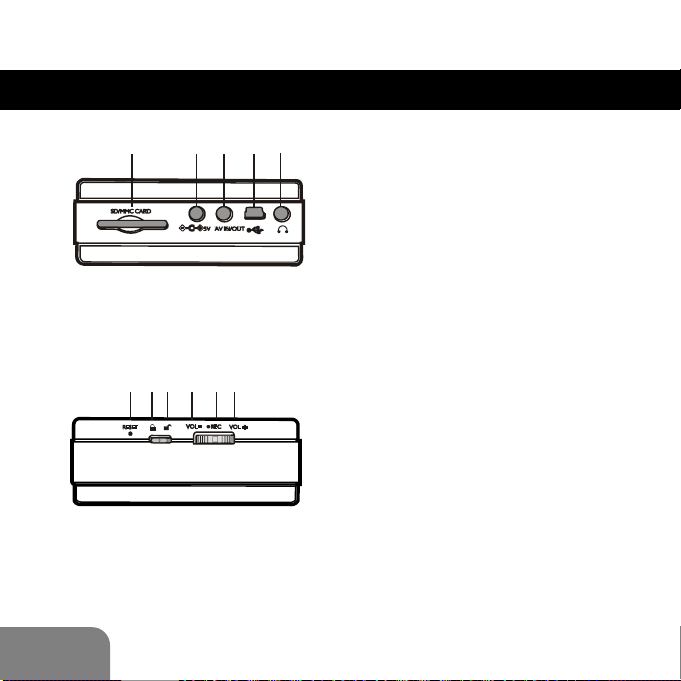
N. SD/MMC Card slot
R
O. DC IN socket
P. AV IN/OUT socket
Q. USB socket
R. Earphone socket
S. Reset
Press the button to shut down the
device in the unlikely event that no
buttons function. To power on after
resetting, press the POWER button.
UTS
VW
X
T. Lock
Slide the switch to this position to
activate the key lock.
U. Unlock
Slide the switch to this position to
release the key lock.
V. Volume-down
Scroll down to decrease the
volume.
W. Record
X. Volume-up
2
Scroll up to increase the volume.
Page 13
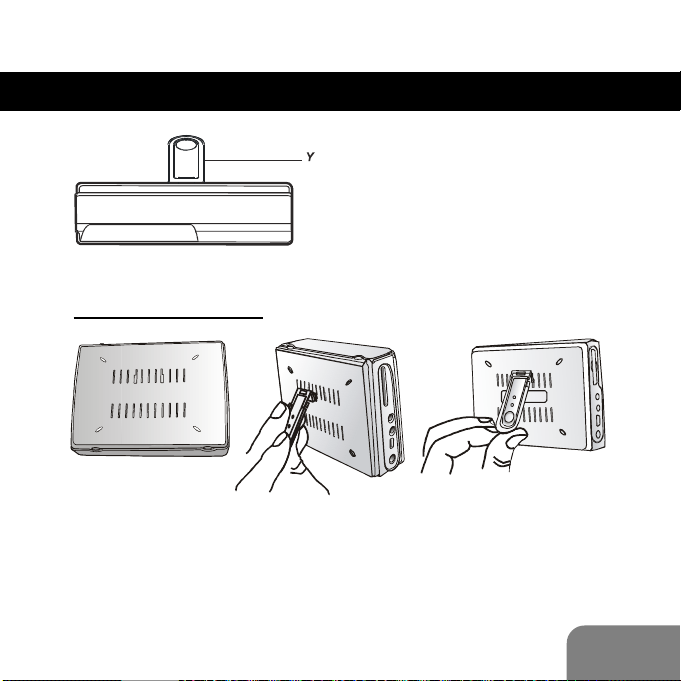
Installation of the Stand
Y. Stand
Turn over the
GPDR40
Align the tabs on
the stand with the
guide holes on
the GPDR40
Slide the stand
upwards into
place
3
Page 14
Software Installation
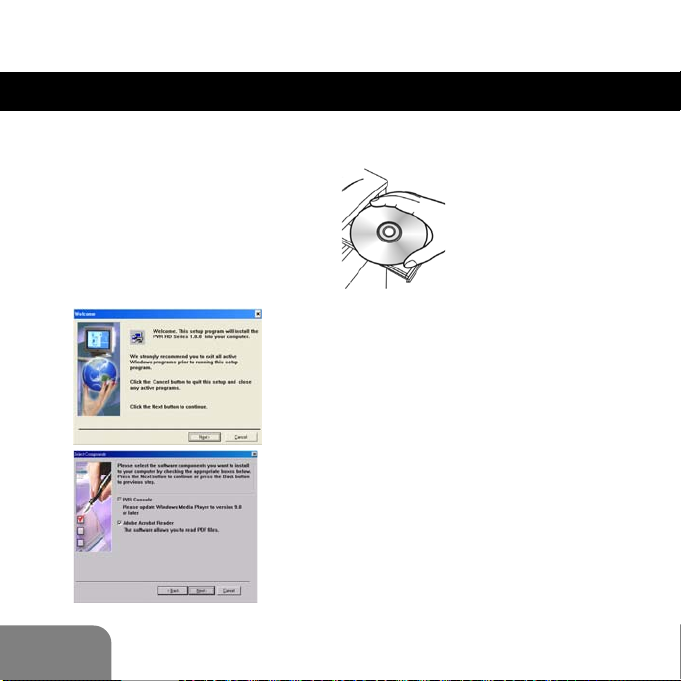
The bundled CD contains many useful software tools. Follow the
instructions below to complete the installation.
1. Insert the Installation CD into CDROM drive on a PC. The Select
Language dialog box appears.
2. Select your preferred language
and click “OK” to continue.
3. A Welcome dialog box appears.
Click “Next”.
4. The Select Components dialog
box appears. Select the software
to install by ticking and unticking
the relevant checkboxes and then
click “Next“.
4
Page 15
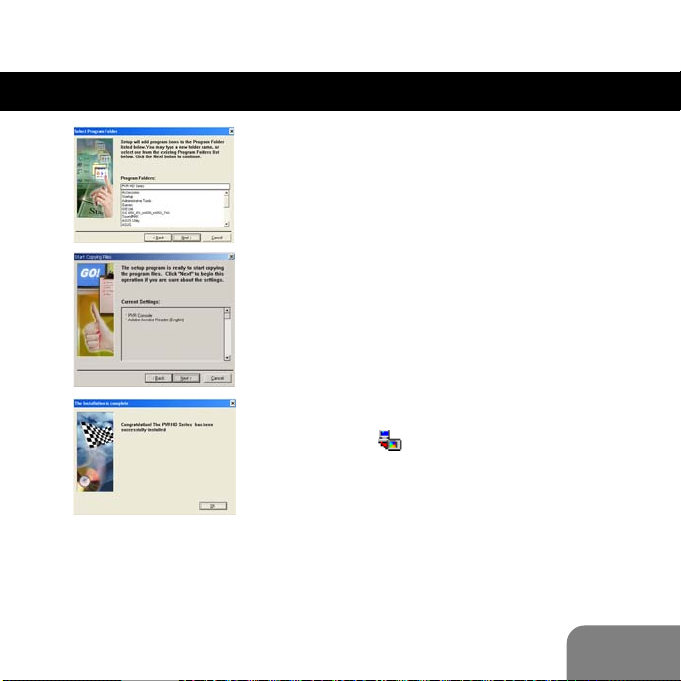
5. The Select Program Folder dialog
box appears. You can change the
folder name listed in the text box, or
simply click “Next” to continue.
6. The Start Copying Files dialog box
appears confirming that the listed
software will be installed. Click
“Next” to continue.
7. Follow the on-screen instructions to
continue and complete the installation.
8. When the installation is complete,
the icon
windows’ taskbar.
will be shown in the
5
Page 16
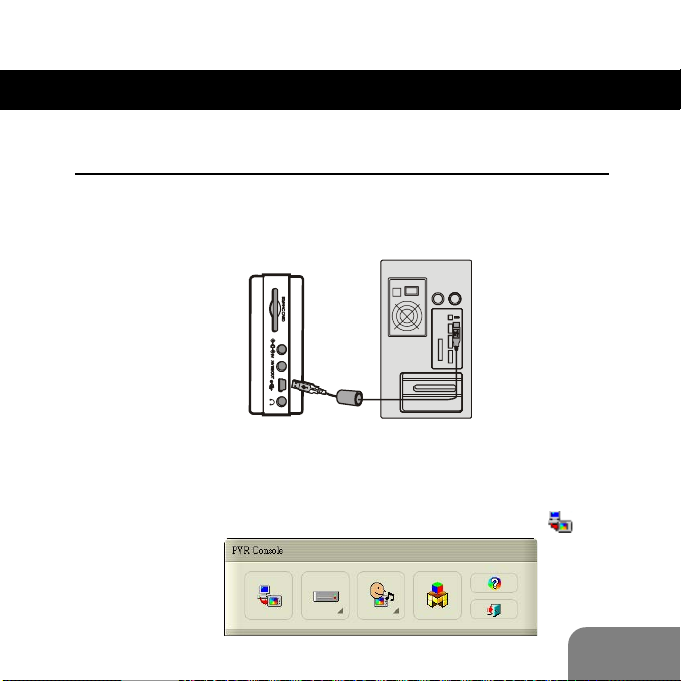
Connecting to PC
Note: Before connecting the unit to the PC, ensure that the
software has been installed.
Adding Files to the GPDR40 (Mass Storage)
Via PC USB port
To transfer or copy files to/from a personal computer:
z Locate the USB cable from the supplied accessories and plug
the large plug of the cable into an available USB socket on the
PC. Try to connect directly to the PC and avoid connecting via
passive USB hubs as this may cause transfer problems.
z Plug the smaller plug into the USB socket on the unit.
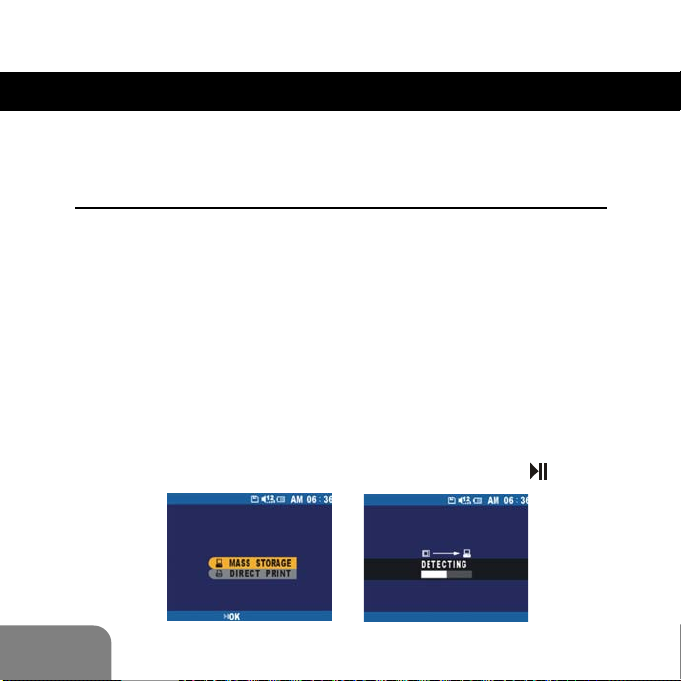
z Switch ON the unit.
Windows should now identify the unit and initialise the relevant
mass storage driver for it. A mode switch screen appears on
the GPDR40. Highlight “MASS STORAGE” and press
6
/ OK.
Page 17
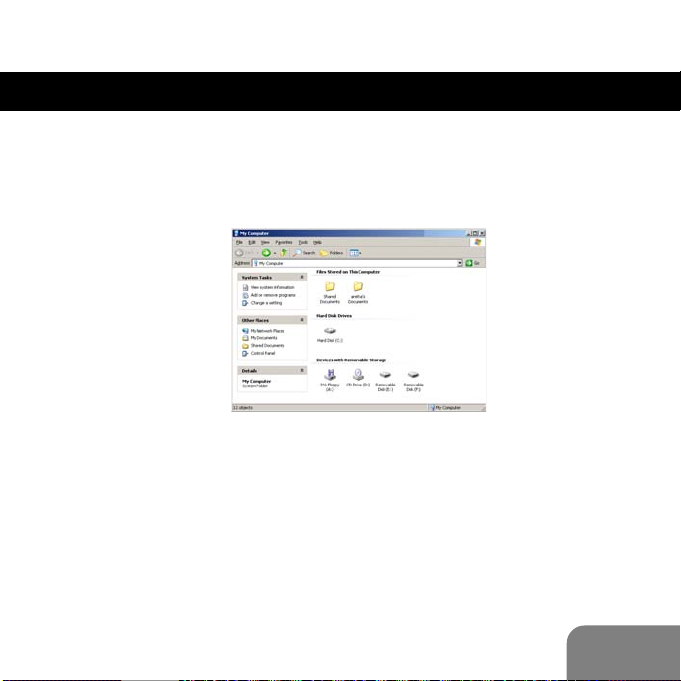
z Double click on “My Computer” icon, a window will open and
two removable drives will be shown (one for the unit and the
other for the SD/MMC card), typically designated E: and F: if
the computer has one hard drive or partition and one CD
ROM drive.
Note for Windows 2000 users: Windows 2000 will only support
one mass storage device from a single USB port. Therefore,
only one of the drives will be shown. To fix this problem, download service pack 4 from the following website:
http://www.microsoft.com/windows2000/downloads/servicepacks/.”
z The removable drives can be used in the same way as a
normal hard drive and any files can be dragged into the
drives to add them to the unit or the SD/MMC memory.
7
Page 18

Once the required files have been copied to the removable drives,
double click on the
icon in the system toolbar to stop or eject,
Windows will report when the drives have been safely stopped.
Remove the USB cable from the USB sockets on the unit and
computer.
8
Page 19
Converting and Transferring Files
1. Power on the GPDR40 and connect it to the computer with
theprovided USB cable. (For details on connection, see page
6)
2. After connecting the GPDR40 to the PC, the PVR Console
(Refer to Page 13 for more information) will be shown on the
computer. If it does not show, double click on the icon
the taskbar.
in
9
Page 20

3. Click on the
The following appears.
4. Click the Select Media button to choose the files.
icon to open MediaConverter application.
4
5
5. Click the Select Destination button and choose the destination where the converted files will be uploaded to. The “To
Folder” option will save the converted files to the folder list
below. The “To Device” will upload the converted files directly
to the Device. (Please note this option will only be available if
the GPDR40 is connected to the computer and powered on).
6. Click the Convert button to start the conversion.
10
6
Page 21
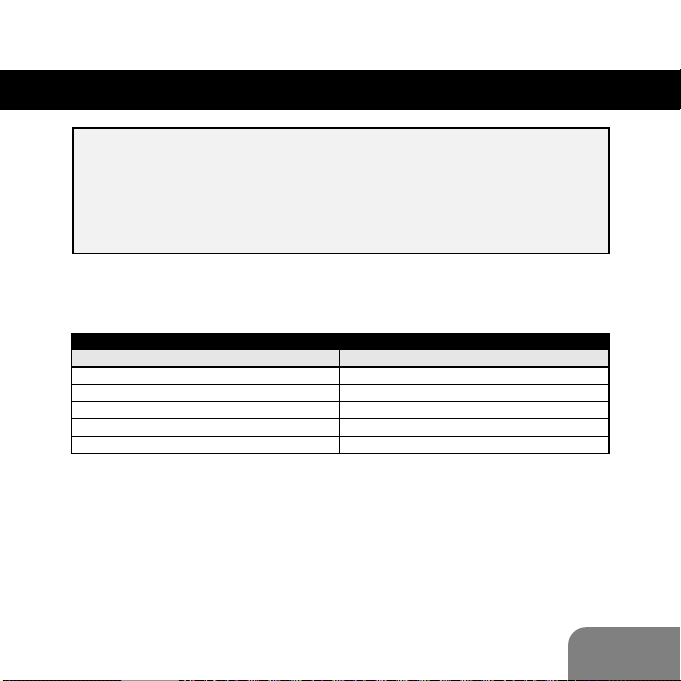
Note: Use only MediaConverter to convert and transfer video
files to the GPDR40. The source video can come from a
variety of different sources and in a number of different
formats. However MediaConverter does not support all
video formats or codecs.
File Type (Format) Extension File Name
MediaConverterTM Supported File Type
Windows M edia Audio and Video File Format .asf, wmv
Windows Audio a nd Video File Fo rmat .avi (DivX 3.x/4.0/5.0, Xvid, Motion JPEG AVI )
Audio File Format .mp3
Moving Picture Experts Group (MPEG) .mpeg, mpg, dat
IMAGE .bmp, tif, gif, png, jpg
11
Page 22

Important notice:
“If a file copied to the unit using the mass storage drag and
dropmethod does not playback or cannot be viewed, delete the
file from the unit and then convert it to a compatible format using
the file convertor. This tool will convert the file to a format that the
GPDR40 can recognise (When converting, please ensure that all
the required CODECs are installed before opening the file
converter tool. If the video file plays on the PC then the CODEC is
most likely already installed. If the file does not play then the
CODEC will have to be installed.) If the file still does not playback
after converting it with the file converter, it will not be possible to
play/view the file on the GPDR40.
12
Page 23
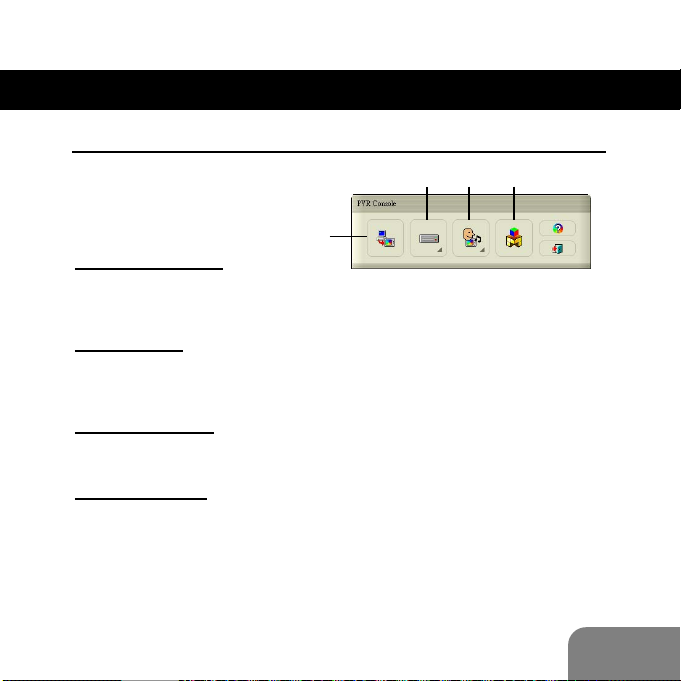
PVR Console
PVR Console consists of 4 applications.
A
A. MediaConverter
Convers multimedia files into playable formats on the GPDR40.
(See Page 10)
B. Disk Tools
Opens Microsoft’s Disk Checkup and Disk Defragmenter
programs for system diagnosis and defragmentation.
C. Personal Style
Changes the Startup Screen and Sound Effects for the GPDR40.
D. MAX Console
Opens MAX Console software for image editing and retouching.
Note: To allow the above applications to function correctly, please
download and install Media Player 9 from Microsoft’s website.
BC
D
13
Page 24
BASIC FUNCTIONS
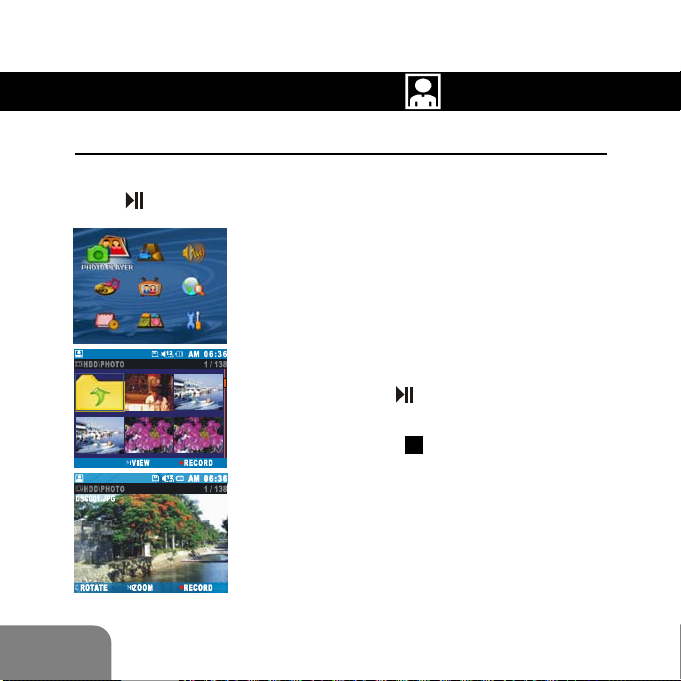
PHOTO PLAYER
Photo Playback
Select PHOTO PLAYER in the Main Menu using the joystick and
press
14
/ OK button to enter.
Thumbnail View (Default):
The photos will be displayed as
thumbnails with 6 to a page.
Single Photo View:
To view a single photo in full screen,
use the joystick to select the photo
and press
To return to Thumbnail View, press
the MODE /
/ OK button.
button.
Page 25
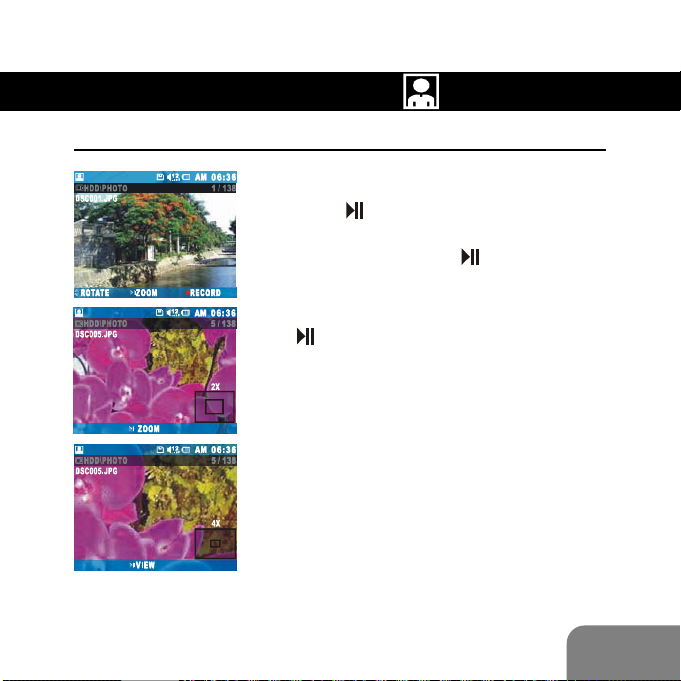
Zoom
PHOTO PLAYER
While viewing a photo as full screen,
press
photo will be magnified by 2X. To
magnify to 4x, press
again.
To return to normal viewing, press the
/ OK button. The selected
/ OK button
/ OK button again.
15
Page 26
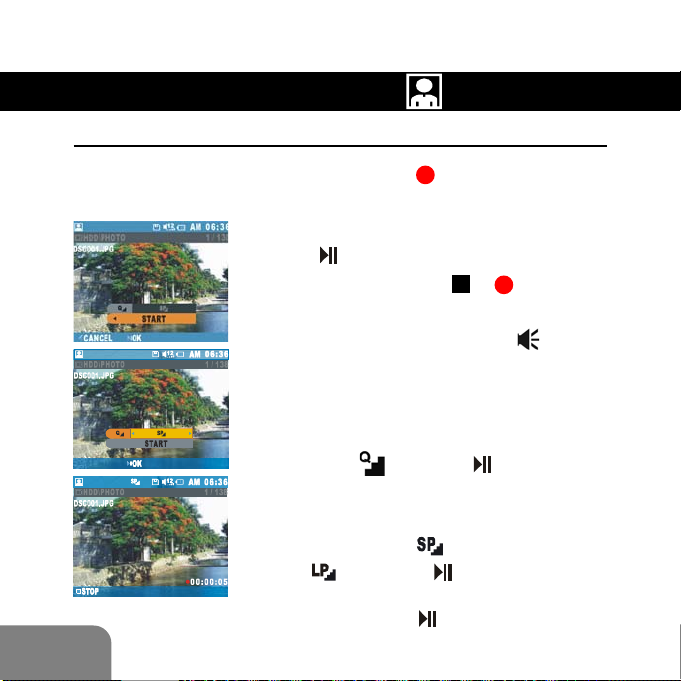
PHOTO PLAYER
Record Voice Clip for a Photo
While viewing a photo in full screen, press REC button to
record a voice clip.
The screen on the left appears. Simply
16
press
To stop, press MODE /
button.
When the recording is done, a
will appear on the right top of the photo.
Tip:
You can change the audio quality setting
before recording. Simply use the joystick
to highlight
enter.
To change the setting, use the joystick to
select the quality (
than
confirm. Highlight START using the
joystick and press
start recording with the new setting.
/ OK button to start recording.
or REC
and press / OK button to
is better quality
) and press / OK button to
/ OK button to
icon
Page 27
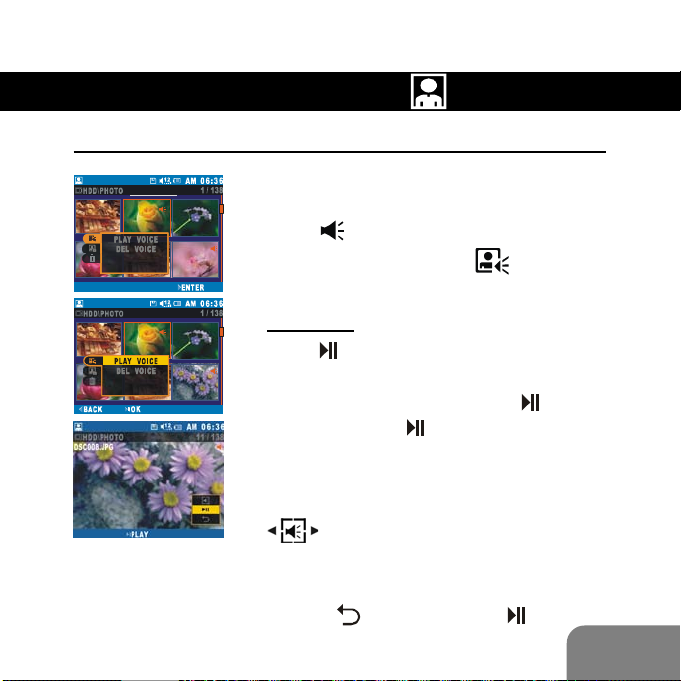
PHOTO PLAYER
Playback/Delete the Voice Clip Attached to a Photo
Select a photo from the Thumbnail View
with voice message attached as shown
by the
and scroll down to select
the joystick right to highlight PLAY VOICE.
Play Voice:
Press
sub-menu.
Use the joystick to highlight the
option and press
the voice clip.
To change the photo (only those with
voice clips will be shown), scroll up to
right / left to change.
To exit the voice playback sub-menu, high-
light the
icon. Press MENU / INFO button
icon. Press
/ OK button to display the voice
/ OK
/ OK button to play
icon and then press the joystick
option and press / OK.
17
Page 28

18
PHOTO PLAYER
Delete Voice:
Scroll down to select DEL VOICE and
press
voice clip sub-menu.
To select a different voice message to be
deleted, scroll up to
press the joystick left / right to select.
To delete the voice clip attached to the
currently displayed photo, highlight the
option and press / OK button.
When the voice message is deleted, the
/ OK button to enter the delete
icon and
icon will be removed from the photo.
Page 29

Slide Show Playback
Use the joystick to select the photo you
want to start the silde show with. Press
MENU / INFO button and scroll down to
select
enter the slide show sub-menu.
Tip:
You can change the interval and transition
effect setting. To change the interval,
scroll up to
to enter. Press the joystick up / down to
set the time each photo is shown and
press
To change the transition effect, scroll to
Use the joystick left / right to choose an
effect and press
PHOTO PLAYER
. Press the joystick right twice to
and press / OK button
/ OK button to confirm.
and press / OK to enter.
/ OK button to confirm.
19
Page 30

Effects
20
PHOTO PLAYER
While in Thumbnail View, use the joystick to
select the photo to apply effects to. Press
MENU / INFO button and scroll down to
Press the joystick right to enter the effects
sub-menu. Use the joystick up / down to
select the effect to apply.
.
Page 31

Memory Mix
PHOTO PLAYER
Use the joystick to select the photo to add
frames to. Press MENU / INFO button and
scroll down to select
right to highlight MEMORY MIX. Press
OK button to enter a frame sub-menu.
. Press the joystick
/
Scroll up to highlight
joystick left / right to change the photo to
apply the frame to. Scroll up to highlight
Use the joystick left / right to select the
frame to add to the photo. To save the
image as a new file, press
To exit the sub-menu, highlight
press
/ OK button.
and use the
/ OK button.
and
.
21
Page 32

VIDEO PLAYER
Video Playback
Select VIDEO PLAYER in the Main Menu and press OK button to enter.
Use the joystick to select a video and press
/ OK button to play. Use the joystick Up /
Down to scroll through files.
During Playback, press MODE /
stop playback, press the joystick right (
advance playback and press the joystick left
(
) to reverse playback.
Tip:
You can choose the point at which to start
playback of the selected video before playing.
Press MENU / INFO button
and scroll down to select
. Press the joystick
right twice to enter the
start time sub-menu.
Note: To turn off the power during video playing, first press
the STOP button to stop playback and then press the
power button to turn it off.
22
button to
) to
Page 33

VIDEO PLAYER
Set Start Time
The total video time will be shown on
the screen. Press
then press the joystick up / down to set
the hours. Press
then press the joystick up / down to set
the minutes. Press
then press the joystick up / down to set
the seconds.
/ OK button and
/ OK button and
/ OK button and
Finally, press
Press joystick up / down to highlight
“Start” and then press
again to start playback from the
selected point.
/ OK button to confirm.
/ OK button
23
Page 34

VIDEO PLAYER
Repeat Playback
Select VIDEO PLAYER in the Main Menu and press / OK button to
enter. Press MENU / INFO button and scroll down to select
from the menu.
Repeat Normal
Press the joystick right to highlight
MAL PLAYBACK from REPEAT menu. Press
/ OK button to confirm.
Playback will start with the selected video
and will play all videos until the last one.
Then playback will stop.
24
icon
NOR-
Page 35

Repeat One
VIDEO PLAYER
Select
Menu and press
Press the joystick up / down to highlight a
video file and press
the current selected video file repeatedly.
To return to normal playback, select
NORMAL PLAYBACK from the menu.
Repeat All
Select
Menu and press
Press the joystick up / down to highlight a
video file and press
playback all the video files continuously.
To return to normal playback, select
NORMAL PLAYBACK from the menu.
REPEAT ONE from REPEAT
/ OK button to confirm.
/ OK button to playback
REPEAT ALL from REPEAT
/ OK button to confirm.
/ OK button to start
25
Page 36

VIDEO PLAYER
Repeat A-B
Select
Menu and press
Press up / down on the joystick to select a
video and press
back.
REPEAT A-B from REPEAT
/ OK button to confirm.
/ OK button to start play-
26
During the playback, press
set point A and then press
again to set point B. The section between
points A & B will then be repeated.
To cancel A-B Repeat, press the
button again.
To return to normal playback, select
NORMAL PLAYBACK from the menu.
Cancel Repeat
To return to normal playback, select OFF
from REPEAT Menu and press
button to confirm.
/ OK button to
/ OK button
/ OK
/ OK
Page 37

Delete
VIDEO PLAYER
Press MENU / INFO button and press the
joystick down to select
on the left appears.
Delete One
Press the joystick right to highlight ONE, and
then press
highlight
to select the video file to delete. Scroll down
to highlight
delete the selected file.
/ OK button. Scroll up to
and use the joystick right / left
and press / OK button to
icon. The screen
27
Page 38

28
VIDEO PLAYER
Delete All
Use the joystick to highlight ALL, and then
press
shown on the screen for further confirma-
tion. Scroll up to highlight
OK button to delete all video files.
/ OK button. A message will be
and press /
Page 39

VOICE PLAYER
Voice Playback
Select VOICE PLAYER in the Main Menu and press / OK button to enter.
Press the joystick up / down to select an audio file and press
the joystick Up / Down to scroll through files.
/ OK button to play. Use
During Playback, press MODE /
stop playback, press the joystick right (
advance playback and press the joystick left
(
) to reverse playback.
Tip: If the audio file to play resides in the subfolder under the current AUDIO folder, press
the joystick up / down to highlight the sub-folder,
and then press
Note: To turn off the power during audio playing, first press
the STOP button to stop playback and then press the
power button to turn it off.
/ OK button to enter.
Note: To save power,
turn off the LCD display
by briefly pressing
button.
button to
) to
29
/
Page 40

VOICE PLAYER
Record Voice Clip
Select VOICE PLAYER in the Main Menu and press / OK button
to enter. Press
REC button.
Press
will be shown. Simply press
or
REC button. The screen on the left
REC button to start recording.
/ OK button
30
To stop, press MODE /
Tip:
You can change the audio quality setting
before recording.
Press the joystick up to highlight
press
To change the setting, press the joystick left
/ right to select one and press
button to confirm (
recording with the new setting.
/ OK button to enter.
). Finally, press / OK button to start
or REC button.
and
/ OK
is higher quality than
Page 41

Repeat Playback
VOICE PLAYER
Repeat Normal
Press MENU / INFO button and scroll
down to select
Press the joystick right to highlight
NORMAL PLAYBACK. Press / OK
button to confirm.
Playback will start with the selected song
and will play all songs until the last one.
Then playback will stop.
icon from the menu.
31
Page 42

Repeat One
VOICE PLAYER
32
Select
Menu and press
confirm.
Press the joystick up / down to highlight
an audio file and press
playback the current selected audio file
repeatedly.
To return to normal playback, select
NORMAL PLAYBACK from the menu.
Repeat All
Select
Menu and press
confirm. Press the joystick up / down to
highlight an audio file and press
button to start playback all the audio files
continuously.
To return to normal playback, select
NORMAL PLAYBACK from the menu.
REPEAT ONE from REPEAT
/ OK button to
/ OK button to
REPEAT ALL from REPEAT
/ OK button to
/ OK
Page 43

VOICE PLAYER
Repeat A-B
Select
Menu and press
Press up / down on the joystick to select
an audio file and press
start playback.
REPEAT A-B from REPEAT
/ OK button to confirm.
/ OK button to
During the playback, press
to set point A and then press
button again to set point B. The section
between points A & B will then be repeated.
To cancel A-B Repeat, press the
button again.
To return to normal playback, select
NORMAL PLAYBACK from the menu.
/ OK button
/ OK
/ OK
33
Page 44

Repeat Random
VOICE PLAYER
34
Select
REPEAT Menu and press
to confirm.
Press the joystick up / down to select an
audio file and press
start playback all the audio files in a
random order.
To return to normal playback, select
NORMAL PLAYBACK from the menu.
Please note that when using the joystick
up / down to change the tracks during
playback manually, the next / previous
song in the list will be chosen. This will
not be a random choice. Only at the end
of the song will a random choice be
made.
REPEAT RANDOM from
/ OK button
/ OK button to
Page 45

Alarm
VOICE PLAYER
Press the joystick up / down to select a
file (*.wav) you want to set as the ring
sound of the alarm. Press MENU / INFO
button and press the joystick down to
select
appears. Press the joystick right to
enable the function.
Time Set Up
Press the joystick right and then press
/ OK button to set the time the alarm
should turn on. After setting, highlight
SAVE and press
the function.
Note: Music Player also provides Alarm
function. The operation procedure is very
similiar to this one. You can choose
either to set alarm in Voice Player or in
Music Player. Only one setting (the latest)
will be used as the alarm.
icon. The screen on the left
/ OK button to enable
35
Page 46

Delete
36
VOICE PLAYER
Press MENU / INFO button and press the
joystick down to select
screen on the left appears.
Delete One
Press the joystick right to highlight ONE,
and then press
to highlight
left to select the audio file to delete. Scroll
down to highlight
button to delete the selected file.
Delete All
Press the joystick right to highlight ALL,
and then press
sage will be shown on the screen for
further confirmation. Scroll up to highlight
and press / OK button to delete all
audio files.
/ OK button. Scroll up
and use the joystick right /
/ OK button. A mes-
icon. The
and press / OK
Page 47

MUSIC PLAYER
Music Playback
Select MUSIC PLAYER in the Main Menu and press / OK button to enter.
Press the joystick up / down to select a MP3
file and press
To stop, press MODE / button.
Tip:
If the MP3 file you want to play resides in the
sub-folder under the current MUSIC folder,
press the joystick up / down to highlight the
sub-folder, and then press
enter.
Note: To turn off the power during music playing, first
press the STOP button to end the operation and then
press the power button to turn it off.
/ OK button to play.
/ OK button to
Note: To save power, you
may turn off the LCD dis-
play by pressing
button on the GPDR40.
/
37
Page 48

MUSIC PLAYER
Alarm
Select MUSIC PLAYER in the Main Menu and press / OK
button to enter.
Press the joystick up / down to select a
file (*.mp3) you want to set as the ring
sound of the alarm. Press MENU / INFO
button and scroll down to select
The screen on the left appears. Press the
joystick right to enable the function.
Turn on Time
Press the joystick right and then press
/ OK button to set up the time.
Note: Voice Player also provides Alarm
function. The operation procedure is very
similiar to this one. You can choose
either to set alarm in Voice Player or in
Music Player. Only one setting (the latest)
will be used as the alarm.
38
icon.
Page 49

MUSIC PLAYER
Press the joystick up / down to set AM or
PM and press
and continue. Press the joystick up / down
to set the hour and press
confirm and continue. Press the joystick up
/ down to set the minute and press
button to confirm and continue.
Press the joystick down to highlight SAVE
and press
setting.
/ OK button to confirm
/ OK button to
/ OK
/ OK button to save the
39
Page 50
AV CENTER
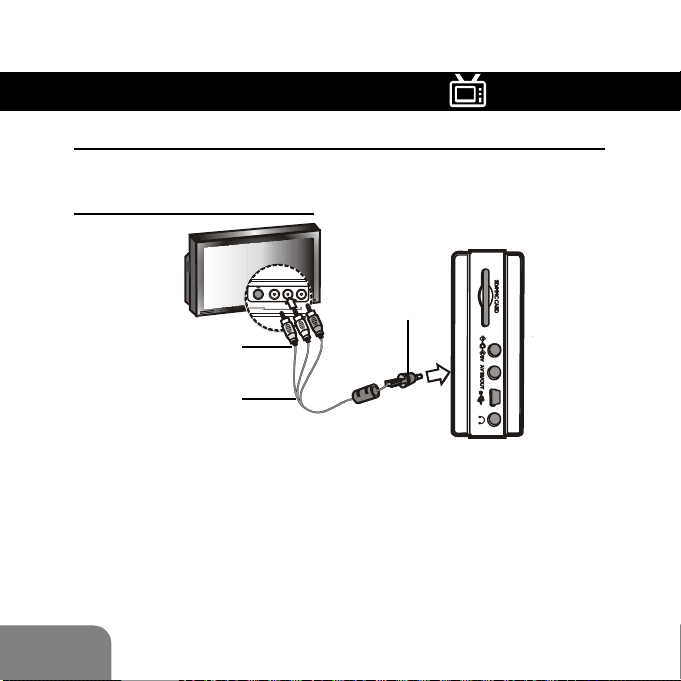
Record from External Equipment to the GPDR40
Whilst making connections, ensure that all equipment is turned off.
Connect to TV with RCA cable
Black
Connector
Yellow, Red&White
AV Connectors
AV Cable
1. Connect one end (black connector) of the provided AV cable to
the AV IN / OUT socket of the GPDR40.
2. Connect the other end (3-RCA audio&video connectors) to the
corresponding AV OUT connectors of the external equipment.
(For details of which sockets to use on the external equipment, please consult the instruction book of that equipment.)
3. Power on the TV and the GPDR40.
40
Page 51

AV CENTER
Connect to TV with SCART cable
RCA-toScart In
Plug
Black
Yellow, Red&White
AV Connectors
AV Cable
1. Connect one end (black connector) of the provided AV cable to
the AV IN / OUT socket of the GPDR40.
2. Connect the other end (3-RCA audio&video connectors) to
one end (3-RCA audio&video connectors) of the RCA-to-Scart
In plug. Connect SCART plug to the corresponding SCART
OUT connector of the external equipment. (For details of which
sockets to use on the external equipment, please consult the
instruction book of that equipment.)
3. Power on the TV and the GPDR40.
Please Note: Due to the limits of the file system used on the
GPDR40, the maximum time for one recording is limited to
4 hours. This limit is fixed for all recording qualities.
Connector
41
Page 52

42
AV CENTER
Set Up TV System
Select SETUP MENU in the Main Menu and
press / OK button to enter. Press the
joystick right to scroll to
and scroll down to select TV SYSTEM.
Press the joystick left / right to select the
correct TV system and press MODE /
button to return to the Main Menu.
Start Recording
Select AV CENTER in the Main Menu and
press
button and then press
REC button to start recording. To stop, press
MODE /
/ OK button to enter. Press REC
or REC button.
DISPLAY page
/ OK button or
Page 53

AV CENTER
To change video quality, press the joystick up
to select
Press the joystick left / right and press
OK button to confirm.
Tip:
An estimate of the time remaining will be
shown above the menu. Please ensure that
there is enough time remaining before
commencing recording.
Set the Recording Length
Press
length setting. “04:00” indicates maximum
time for recording. To set the recording
length, press the joystick up / down to set the
hours and then press
confirm and continue to the minutes setting.
Press
highlight START using the joystick and press
/ OK button to start recording.
and press / OK button to enter.
/
/ OK button again to enter time
/ OK button to
/ OK button to confirm and then
43
Page 54

Timer Record
AV CENTER
Enter AV Center. Press MENU / INFO button.
When setting a timer record event, please
ensure that enough time / space is available.
An estimation of the available time is shown
above the menu.
44
To enter
highlight
Change Record Quality
Press
setting. Press the joystick left / right to select
the required quality setting and press
button to confirm and continue.
est quality and
TIMER RECORD sub-menu,
and press the joystick right twice.
/ OK button to enter QUALITY
/ OK
is the high-
is the lowest quality.
Page 55

AV CENTER
Set Date
Use the joystick up / down to highlight
DATE. Press / OK button to enter DATE
setting. Press the joystick up / down to set day
and press
Press the joystick up / down to set the month
and press
Press the joystick up / down to set the day and
press
Set Start Time
Highlight
button to enter
the joystick up / down to set AM or PM and
press
the joystick up / down to set hour and press
/ OK button to move to MINUTE. Press the
joystick up / down buttons to set minute and
press
/ OK button to move to month.
/ OK button to move to year.
/ OK button to confirm and continue.
START TIME and press / OK
START TIME setting. Press
/ OK button to move to HOUR. Press
/ OK button to confirm and continue.
45
Page 56

46
AV CENTER
Set End Time
Press
setting. Press the joystick up / down to set
AM or PM and press
move to hour. Press the joystick up / down
to set hour and press
move to minute. Press the joystick up /
down to set minute and press
button to confirm and continue.
Scroll down and press
the above settings.
Note: If the internal battery will not last for
the full recording, please ensure that the
power adapter is connected.
/ OK button to enter END TIME
/ OK button to
/ OK button to
/ OK
/ OK button to save
Page 57

FILE BROWSER
Select FILE BROWSER in the Main Menu and press / OK
button to enter.
Press the joystick up / down to select HDD
(built-in hard disk drive) or SD card (external
memory) and press
Select a file
Press the joystick up / down to highlight the
folder or file and press the joystick right or
/ OK button to select. To cancel the
selection, press the joystick right or
button again.
Enter a folder
/ OK button to enter.
/ OK
To enter a folder, press
Select a folder
To select a folder, press the joystick right. To
unselect a folder, press the joystick right
again.
/ OK button.
47
Page 58
FILE BROWSER
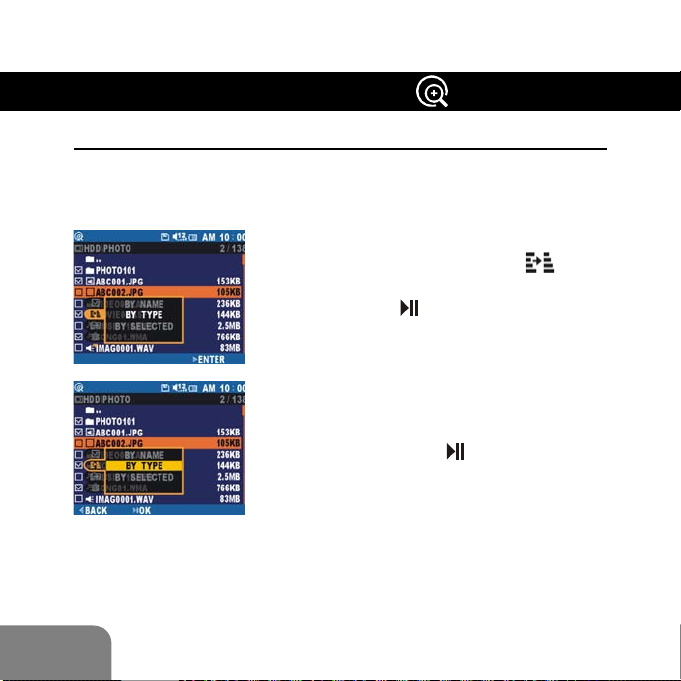
Sort
To organize the huge amount of files that can be stored in the
GPDR40, use this useful tool to help sorting the files in the folder
by NAME/TYPE/SELECTED.
Enter FILE BROWSER. Press MENU / INFO
icon.
48
button and scroll down to select
Press the joystick right to highlight BY
TYPE and press
The files will be sorted by different types
accordingly.
Instead of sorting files by TYPE. You may
arrange the files BY NAME or BY SE-
LECTED. Simply highlight BY NAME or BY
SELECTED and press
confirm.
The files will then be arranged based on
your setting.
/ OK button to confirm.
/ OK button to
Page 59

FILE BROWSER
Rename
To change the file name in the GPDR40, use this useful tool to
help.
Enter FILE BROWSER. Press the joystick up
/ down to highlight the file to be renamed and
press the joystick right to select.
Press MENU / INFO button and scroll
down to select
joystick right to highlight RENAME and
press
/ OK button to confirm. An onscreen keyboard (refer to Page 52 for
keyboard definition) will be shown on the
right side with the original filename
shown above.
Press the joystick up / down / left / right to
select the letters and press
|
to confirm.
“
After finishing renaming, select
the on-screen keyboard and press
OK button to finish.
icon. Press the
/ OK button
from
/
49
Page 60

FILE BROWSER
Create New Folder
To create a new folder in the PVR, use this useful tool.
Enter FILE BROWSER. Press MENU
button and scroll down to select
icon. Press the joystick right to highlight
50
NEW FOLDER and press
confirm.
An on-screen keyboard appears on the
right side with the folder name shown
above.
To keep the folder name, simply press
/ OK button to exit. To change the folder
|
“
name, press the joystick up / down / left /
right to select the letters and press
OK button to confirm.
After finishing renaming, select
the on-screen keyboard and press
OK button to finish.
/ OK button to
/
from
/
Page 61

On-Screen Keyboard
Filename bar
Digits area
FILE BROWSER
Letters area
Symbols area
Escape key
Space key
Enter key
Backspace key
51
Page 62

CALENDAR
Select CALENDAR in the Main Menu and press / OK button to
enter.
The Calendar appears. You will see TODAY
is highlighted in orange color.
Note: The Calendar appears with a monthly
display. To switch to clock view, press the
/ OK button. To return to the calendar, press
/ OK button again.
the
52
Page 63

GAME
Select GAME in the Main Menu and press OK button to enter.
Press the joystick left / right to select a
game you want to play and press
button to enter.
TIC-TAC-TOE
Complete three symbols of “
(horizontal, vertical, or diagonal) before
the GPDR40 gets three symbols of “X” in
a row.
How to Play
Use the directional buttons to select a
square and press
/ OK button to place
the symbol. For more information, please
refer to the Game Help on the GPDR40
accessible during play via the MENU/INFO
button.
?
” in a row
/ OK
53
Page 64

54
GAME
PUZZLE
Move all the pieces of the picture to the
correct position.
How to Play
Use the directional buttons to select the
picture and the level of difficulty you want
to play and press
For more information, please refer to the
Game Help on the GPDR40 accessible
during play via the MENU/INFO button.
?
/ OK button to start.
Page 65

GAME
MINESWEEPER
Mark all of the mines without setting off
any of the mines.
How to Play
Press the joystick up / down to select the
level of difficulty and press
to start the game. Use the directional
buttons to select a square in the Mine
Field and press
/ OK button to display
the contents or press
For more information, please refer to the
Game Help on the GPDR40 accessible
during play via the MENU/INFO button.
/ OK button
button to mark it.
?
55
Page 66

Other Functions
PVR CONSOLE
Change the Startup Screen
To change the Startup Screen, open the PVR Console and press
the
below screen appears.
56
Personal Style button and select Startup Screen. The
Preview
Window
Browse
Apply
Default
Delete
Exit
Page 67

PVR CONSOLE
Select an image from the Image List
There are 5 startup screen images provided in the Image List.
Select one from the list and press the
tranfer it to the GPDR40.
Import an image from your computer
Press the
or *.jpg), the file will then be imported into the Image List. Select it
from the list and press the
GPDR40.
Reminder: Please note that the startup image will be updated
after restarting.
Note: All the provided startup screen images are in 320 x 240
pixel size. If the image you import is not in this size, PVR Console
will adjust its size to fit the GPDR40 screen automatically.
BROWSE button to locate the image file (*.bmp
APPLY button to tranfer to the
APPLY button to
57
Page 68

PVR CONSOLE
Change the Startup Sound & Button Sound
To change the Startup Sound or Button Sound, open the PVR
Console and press the
Personal Style button and select
Sound Effect. The below screen will be shown.
Sound Event
Menu
Browse
Play
Stop
Apply
Default
Delete
Exit
58
Page 69

PVR CONSOLE
Select the sound from the Sound List
There are 5 sound effects provided for each startup sound and
button sound. To change them, first select either Startup Sound
or Button Sound from the Sound Event menu and follow the
instructions below.
Select a file from the Sound List and press the
button to transfer to the GPDR40. To preview the file before the
transfer, press
Import a sound from your computer
Press the
the file will then be imported into the Sound List. Select it from the
list and press the
GPDR40.
Note: The startup sound is 3 seconds long and the button sound
is 0.3 seconds long. If the sound files you import are longer than
this, PVR Console will cut off any content after these times.
button.
BROWSE button to locate the sound file (*.wav),
APPLY button to transfer to the
APPLY
59
Page 70

DPS MENU
DPS
The GPDR40 features a direct print solution. If you connect it to a
printer which supports DPS (Direct Print Services), then the
photos can be printed directly without attaching to a computer.
Use the DPS Menu to set up advanced print setting.
DPS Menu contains the following item:
60
PHOTO SET
PAPER SET
SELECT PHOTO BROWSE \ NONE
OPTIMAL ON \ OFF
COPIES 1~9
SIZE DEFAULT \ 4” X 6” \
PAPER DEFAULT \ PHOTO \
BORDER DEFAULT \ ON \OFF
5” X 7” \ 8.5” X 11”
FAST PHOTO
Page 71

DPS MENU
How to Print
1. Power on the GPDR40 and connect it to the printer with the
USB cable. The screen below appears.
2. Press the joystick down to select
press
/ OK button to enter DPS Menu.
DIRECT PRINT and
X
61
Page 72

DPS MENU
3. Press the joystick down to highlight SELECT PHOTO and
press
4. Press the joystick up / down / left / right to highlight the
photo(s) and press
the mark, highlight the photo and press
/ OK button to browse photos.
X
/ OK button to select them. To remove
/ OK button again.
5. When the selection is done, press MODE /
to DPS Menu and continue.
62
button to return
Page 73

DPS MENU
6. The number of the selected photos will show on the bottom
of the screen. Press the joystick down to highlight OPTIMAL,
a setting that will provide the most satisfactory print quality.
X
7. Press the joystick left / right to enable or disable the setting.
XX
Press the joystick down to continue.
8. Press the joystick left / right to select the number of copies
you want to print and press
/ OK button to confirm.
63
Page 74

DPS MENU
9. Press the joystick down and the joystick right to go to PAPER SET
page.
X
X
10. Press the joystick down to highlight SIZE and press the joystick
left / right to select the paper size.Press the joystick down to
continue.
Note: If you select “DEFAULT” in paper
size setting, then printer will select the
paper size automatically.
X
11. Press the joystick left / right to select the paper type and
press the joystick down to continue.
Note: If you select “DEFAULT” in paper
type setting, then printer will select the
paper type automatically.
X
64
Page 75

DPS MENU
Note: To print out the entire photo and
maintain 1:1 image proportion, it is
recommended to add borders to your
X
When you are satisfied with the above settings, press / OK
button to start printing. To cancel the printing, press MODE /
button anytime.
X
photo.
65
Page 76

OSD MENU
After powering on the GPDR40, a Main Menu containing 9
different task icons will be shown. Each task icon represents
each individual function. Each mode has its own menu accessed
via the MENU / INFO button. Please see the following summary of
the available menus.
PHOTO PLAYER MENU
Enter PHOTO PLAYER and press MENU / INFO button to open this
menu. The menu contains the following:
VIEW
LIST \ MULTIPLE \ SINGLE
PHOTO PLAYER MENU
Use the joysti ck to select a different photo.
ROTATE
EFFECTS
Use the joyst ick to rotate the phot o by 90° CW or
90° CCW.
Cancel and exit menu.
NORMAL / NEGATIVE ART / SEPIA / B&W / MOSAIC
66
MEMORY
MIX
Use the joysti ck to select a different photo.
Use the joystick to select frames.
Cancel and exit menu.
Page 77
OSD MENU
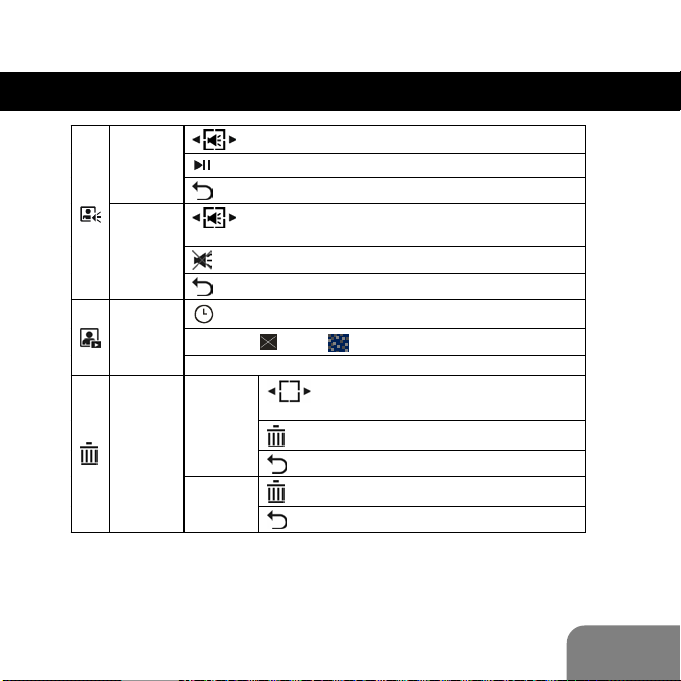
PHOTO PLAYER MENU
PLAY
VOICE
DELETE
VOICE
SLIDE
SHOW
DELETE
Use the joystick to select other photos with voice attached.
Press to play the selected voice clip.
Cancel and exit menu.
Use the joystick to select other photos with voice
attached.
Select this icon to delete the voice attached to the photo.
Cancel and exit menu.
Interval: 01~60 second(s)
Transiti on: NONE\ RANDOM and etc.
START
Use the joystick to select a photo for
deletion.
ONE
ALL
Select this icon to delete the selected photo.
Cancel and exit menu
Select this icon to delete all photos.
Cancel and exit menu.
67
Page 78

OSD MENU
VIDEO PLAYER MENU
Enter VIDEO PLAYER and press MENU / INFO button to open this
menu. The menu contains the following:
VIDEO PLAYER MENU
VIEW
REPEAT
START
TIME
LIST \ MULTIPLE \ SINGLE
OFF
NORMAL: Start playback from the current
selected one to the last for one time.
ONE: Repeat the selected video file
continuously.
ALL: Repeat all the video files continuously.
A-B: Repeat the video from point A to point B.
HH: MM: SS
Use the joystick to select a video
for deletion.
DELETE
ONE
ALL
Select this icon to delete the selected
video.
Cancel and exit menu.
Select this icon to delete all vide o files.
Cancel and exit menu.
68
Page 79

OSD MENU
VOICE PLAYER MENU
Enter VOICE PLAYER and press MENU / INFO button to open this
menu. The menu contains the following:
VOICE PLAYER MENU
NORMAL: Start playback from the current
REPEAT
VOICE
ALARM
selected one to the last for one time.
ONE: Repeat the selected audio file
continuously.
continuously.
B.
order.
ON Set up the time for alarm clock
OFF
ALL: Repeat all the audio files
A-B: Repeat the audio from point A to point
RANDOM: Repeat the audio in a random
69
Page 80

OSD MENU
VOICE PLAYER MENU
Use the joystick to select
audio for deletion.
70
DELETE
ONE
ALL
Select this icon to delete the
selected audio.
Cancel and exit menu.
Select this icon to delete all
audio files.
Cancel and exit menu.
Page 81

OSD MENU
MUSIC PLAYER MENU
MUSIC PLAYER MENU
Enter MUSIC PLAYER and press MENU / INFO button to open this
menu. The menu contains the following:
REPEAT
ALARM
DELETE
NORMAL: Start playback from the current selected
one to the last one for one time.
ONE: Repeat the selected music file continuously.
ALL: Repeat all the music files continuously.
A-B: Repeat the music from point A to point B.
RANDOM: Repeat the music in a random order.
ON Set up the time for alarm clock
OFF
Use the joystick to select music for
deletion.
ONE
Select this icon to delete the selected
music.
Cancel and exit menu.
ALL
Select this icon to delete all music files.
Cancel and exit menu.
71
Page 82

OSD MENU
AV CENTER MENU
Enter AV CENTER and press MENU / INFO button to open this
menu. The menu contains the following:
AV CENTER MENU
72
TIMER RECORD
RECORDING
TIME DISPLAY
ON
OFF
ELAPSED TIME
TIME REMAINING
QUALITY: \ \
DATE: YY / MM / DD
START TIME: AM/PM : HH : MM
END TIME: AM/PM : HH : MM
SAVE
Page 83

OSD MENU
FILE BROWSER MENU
Enter FILE BROWSER and press MENU / INFO button to open this
menu. The menu contains the following:
FILE BROWSER MENU
ALL
PHOTO
SELECT
SORT
COPY&MOVE
TYPE
NONE
BY NAME
BY TYPE
BY SELECTED
COPY TO
MOVE TO
VIDEO
AUDIO
MUSIC
73
Page 84

OSD MENU
ONE
FILE BROWSER MENU
Select this icon to delete the
selected file.
Cancel and exit menu.
74
DELETE
RENAME
NEW
FOLDER
SELECTED
Select this icon to delete all
the selected files.
Cancel and exit menu.
UNSELECTED
Select this icon to delete all
the unselected files.
Cancel and exit menu.
Select this icon to delete all
ALL
files.
Cancel and exit menu.
Highlight the file you want to rename and select this
icon to open a character list for renaming.
Select the icon to create a folder.
Page 85

OSD MENU
CALENDAR MENU
Enter CALENDAR and press MENU / INFO button to open this
menu. The menu contains the following:
CALENDAR MENU
DATE
TIME
DD/MM/YY
SAVE
AM/PM : HH : MM
SAVE
75
Page 86

OSD MENU
SETUP MENU
SETUP MENU
Select SETUP MENU from the main menu using the joystick and
press
POWER
DISPLAY
/ OK button to enter.
AUTO STAN DBY
30SEC/1MIN /1.5MIN/2 MIN/OFF
AUTO POWER OFF
1.5MIN/3 MIN/5MIN/ OFF
STARTUP SCRN
ON/OFF
DATE/TIME DISPLAY
DATE/TIME
LCD BRIGHTNESS: Press the joystick left / right to adjust
the brightness of the LCD screen.
VIDEO OUTPUT
INTERNAL LCD / EXTERNAL TV
TV SYSTEM
NTSC/PAL
Unit will go to Standby mode (LCD
will be switched off) after this time
when the GPDR40 is idle.
Unit will turn off after this time
when the GPDR40 is idle.
Upon startup, a screen will be
shown on the Unit Display. The
screen can be changed using the
PVR Console.
Select to display date or time in
the top right corner of the screen.
To output the screen via the AV
in/out socket, select EXTERNAL
TV.
Note: To return to the internal LCD
output from external TV, press
button.
Select the TV system according to
the country you are in.
UK Standard: PAL
76
Page 87

OSD MENU
VOLUME: Press the joystick left / right to adjust the volume.
SETUP MENU
SOUND
SYSTEM
STARTUP SOUND
ON/OFF
BUTTON SOUND
ON/OFF
LAST MEMORY
ON/OFF
DATE FORMAT
YY/MM/DD; MM/DD/YY; DD/MM/YY
LANGUAGE: Press the joystick left / right to select other
language.
RESTORE DEFAULT
YES/NO
FORMAT
Turn on / off the startup sound.
Turn on / off the butt on sounds.
Unit will automatically select the
last played file when entering a
mode.
Select the date format to be used
on the GPDR40.
Select to restore default of the unit.
Press / OK with
CARD/
HDD
highlighted to format
the card/HDD.
Cancel and return.
77
Page 88

Specifications
Product Function
Display
Hard Disk
Microphone
Speaker
TV System
DPS Support
Interface
Memory Card Slot
Hardware Playback
File Format
78
1. Digital Video Player, 2. Digital Video Recorder, 3. Digital
Photo Player, 4. MP3 Player, 5. USB Pocket Drive; 6.SD/MMC
Card Reader; 7. Digital Voice Recorder
3.6” Color TFT LCD
40 GB HDD
Built-in
Built-in
NTSC / PAL
Yes
AV In / AV Out / Earphone / DC-in / USB 2.0
SD / MMC
Video
Photo
Audio
ASF Compatible
JPEG Compatible
MP3, WAV Compatible
Page 89

Specifications
Power Source
Mass Storage
Dimensions
Weight
Internal
Internal
External
Rechargeable Li-ion Battery ( 1000 mAh) x 2
(Built-in Charger through Power Adapter)
Rechargeable Li-ion Battery
(Built-in Charger through Power Adapter)
Power Adapter
Windows 98SE / Me / 2000 / XP ; Mac OS 9.X
and 10.1 above
110x 80 x 30 mm (L x W x H)
290g
79
 Loading...