

Page 1
PERSONAL ENTERTAINMENT SYSTEM
USER GUIDE
GPDR 1
GOODMANS HELPLINE PHONE NUMBER
Warning:
In the event of return of this product, it will only be accepted by the retailer with the supplied
256Mb memory card
0870 873 0080
Page 2

GPDR 1 User Guide 3
Important Notes
CAUTION
Keep product out of direct sunlight. Exposure to direct sunlight or extreme heat may cause damage
or malfunction. To prevent re or shock hazard, do not expose to rain or moisture.
CAUTION WHILST DRIVING
Use of headphones whilst operating an automobile or moving vehicle is not recommended. Be
careful and attentive on the road. Stop operation of the device if you nd it disruptive or distracting
whilst driving.
CAUTION WHILST PLAYING BACK FILES
If your le can not be played on the device, check if the le format is supported. If yes, use the
included Multimedia Converter to convert it again. It is always recommended to convert video les
before uploading to the device for playing back.
CAUTION WHILST TRANSFERRING FILES
Power on the device and use the USB cable to connect it to the PC. The LED indicator will illuminate.
The device is now ready for le uploading. When the transmitting starts, the LED will flash. Do not
disconnect the USB cable during this period. Otherwise it may cause le loss or system instability.
BACK UP YOUR DATA
As with any device that has flash memory, you should back up the drive regularly.
IMPORTANT BATTERY INFORMATION
The battery used in this device may present a risk of re or chemical burn if mistreated. Do not
separately recharge, disassemble, heat above 60˚C (140˚F), or incinerate.
Do not attempt to open the device. No user serviceable parts inside.
Keep the device away from children. Do not disassemble or dispose product in re.
Use only the specied chargers which were packaged with the product. Use of another charger may
present a risk of re or explosion.
Keep charger plugged in to device for at least 3 hours before attempting to operate device if battery
is completely run down and is insufcient to power up device.
IMPORTANT RECORDING INFORMATION
We strongly recommend you to connect the power adapter when you are recording with the device.
It ensures sufcient power supply and prevents le damage from power shortage.
2 GPDR 1 User Guide
Page 3

Table of Contents
First Time Use >>------------------------------------------------------------------------- 4
Location of Controls >>----------------------------------------------------------------- 5
Connecting the Device to a PC or TV >>------------------------------------------ 7
Software Installation >>----------------------------------------------------------------- 8
Synchronizing Files between PC and GPDR 1 >>------------------------------ 9
Converting and Transferring Files >>-------------------------------------------- 9
Mass Storage Mode >>------------------------------------------------------------ 10
Disconnecting the GPDR 1 from your COMPUTER >>---------------------- 11
OSD Menu >>----------------------------------------------------------------------------- 13
A. Photo Player >>----------------------------------------------------------------- 14
B. Video Player >>------------------------------------------------------------------17
C. Audio Player >>-----------------------------------------------------------------20
D. MP3 Player >>------------------------------------------------------------------- 23
E. AV Recorder >>----------------------------------------------------------------- 25
F. Slide Show >>-------------------------------------------------------------------- 28
G. Calendar >>---------------------------------------------------------------------- 29
H. Game >>-------------------------------------------------------------------------- 32
I. Setup Menu >>------------------------------------------------------------------- 34
Direct Print >>----------------------------------------------------------------------------36
Specications >>------------------------------------------------------------------------39
GPDR 1 User Guide 3
Page 4

GPDR 1 User Guide 5
First Time Use
This multi-functional portable device enables you to:
• Play MPEG-4 videos
• View JPEG images
• Record digital videos
• Record digital audio
• Listen to MP3 les
• Use it as an USB Portable Disk
Check the pack for the following:
• CD Rom Installation & Application
Disc
• USB Cable
• AV Cable
• Earphone
• Li-on Battery
• AC Adapter
• Use it as a SD/MMC card reader
• Record TV show (MPEG 4
compatible ASF le format)
• Print photos directly without
attaching to a PC (DPS-ready)
• Use it as an alarm clock
• Carry Case
• 256MB MMC Card
• Scart to RCA Adapter
4 GPDR 1 User Guide
Page 5

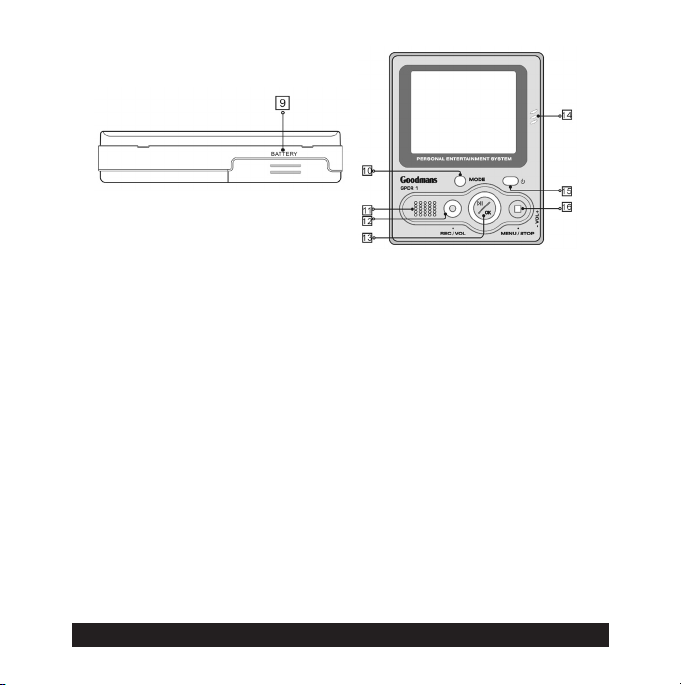
Location of Controls
1. Function Scroller
Play/Pause : Press the centre button of the scroller to start or pause play-
back in Video/Audio/MP3 Player Mode.
Note: The centre button of the scroller behaves the same as the OK button on the
GPDR 1 front panel.
Previous/Next : Scroll up/down and release the scroller to go to previous/
next item in Photo/Video/Audio/MP3 Player Mode.
F.Fwd/F.Bwd : Scroll up/down and hold the scroller to speed up the play-
back of advancing/reversing in Video/Audio/MP3 Player Mode.
Volume Up/Down : Press the button and then scroll up/down to adjust
the volume during playback in Video/Audio/MP3 Player mode.
2. Hold
Switch to / to lock/unlock the buttons (including the scroller) on the
GPDR 1.
3. DC IN jack
Power Supply : Connect the power adapter to DC IN socket whilst using GPDR 1.
Charge :
Connect the power adapter to DC IN socket to charge the battery.
GPDR 1 User Guide 5
Page 6
GPDR 1 User Guide 7
4. Strap Holder
5. AV IN socket
Connect the AV cable to this AV IN socket to enable the recording of
TV programmes.
6. Earphone socket
7. USB port
8. SD/MMC CARD slot
9. Battery Cover
10. Mode/INFO button
Press the Mode button to switch to different modes.
Press the Info button to turn on/off the information display whilst review-
ing a single photo or playng video/audio/MP3 les or recording TV
programmes.
11. Speaker
12. Record/Vol button
13. Play/Pause/OK button
14. Microphone
A built-in microphone for voice record.
15. Power button
16. Menu/Stop button
Use this button to call up the menu in each mode.
6 GPDR 1 User Guide
Page 7
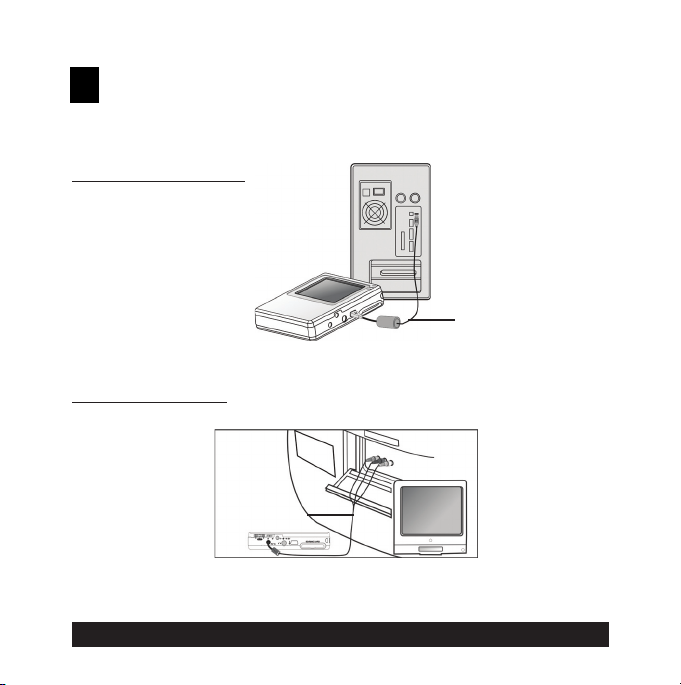
Connecting the Device to a PC or
TV
Connecting to a PC
USB Cable
Connecting to TV
AV Cable
Note: For TV or VCR without RCA output socket, use the supplied SCART
adapter plug.
GPDR 1 User Guide 7
Page 8
GPDR 1 User Guide 9
Software Installation
The installation CD bundled with the GPDR 1 contains all the necessary software and useful information (User Guide PDF) you need before
operating the device. Please follow the instructions below to complete the
software installation.
1. Insert the Installation CD into CD-ROM. The Select Language dialog
box appears.
2. Select your preferred language and click “OK”
to continue.
3. A Welcome dialog box appears. Click “Next”.
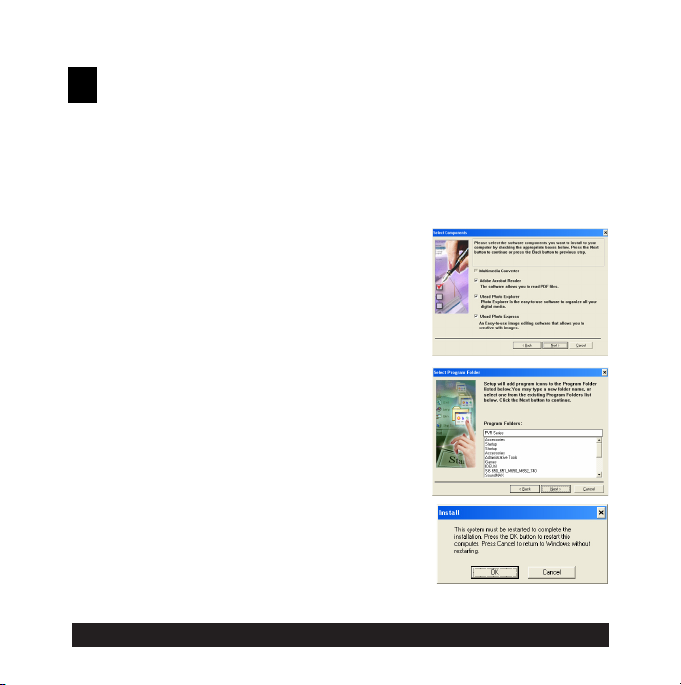
4. The Select Components dialog box appears.
Click and select the software to install and
then click “Next“.
5. The Select Program Folder dialog box appears advising that the setup program is about
to add a program icon to the system, you can
change the folder name listed in the text box,
or simply click “Next” to continue.
6. The Start Copying Files dialog box appears
conrming that the listed software will be
installed. Click “Next” to continue.
7. Follow the on-screen instructions to continue
and complete the installation.
8 GPDR 1 User Guide
Page 9
Synchronizing les between PC
and GPDR 1
Converting and Transferring Files
To synchronize the les between PC and the device, read and follow the
instructions below.
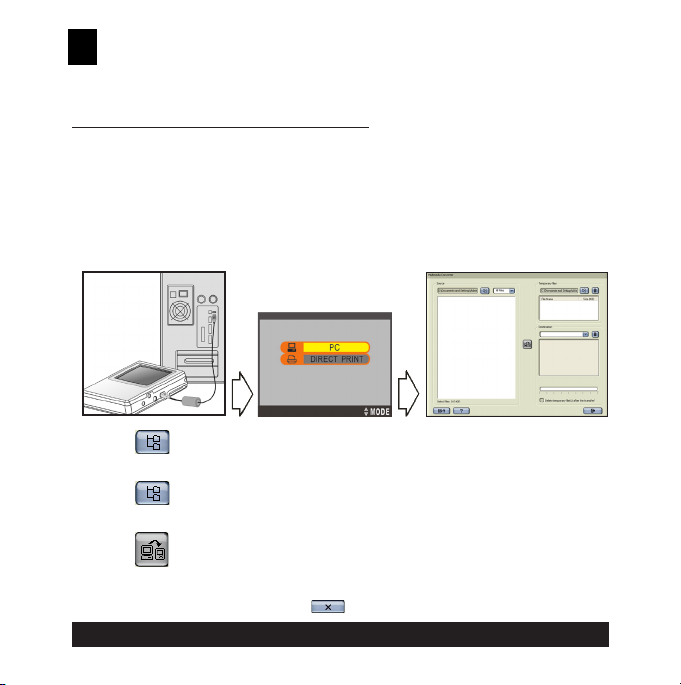
1. Power on the device and connect it to the computer with the provided
USB cable. The following appears. Then the Multimedia Converter dialog
box appears.
Connect to PC
Device Display
2. Press Browse button to select the path where the required les
reside. The les will be listed as thumbnails in the Source eld.
3. Press Browse button to select the path where any temporary les
will reside before uploading to the device.
4. Press Convert button. The conversion starts.
5. The Convert Progress dialog box appears listing the conversion detail.
To cancel the coversion, press button to stop.
GPDR 1 User Guide 9
PC Screen
Page 10
GPDR 1 User Guide 11
Note: To select les in the Source window, click on them, the icon border will change
from black to red. To select a number of les, hold down the shift or control key
whilst selecting with the mouse.
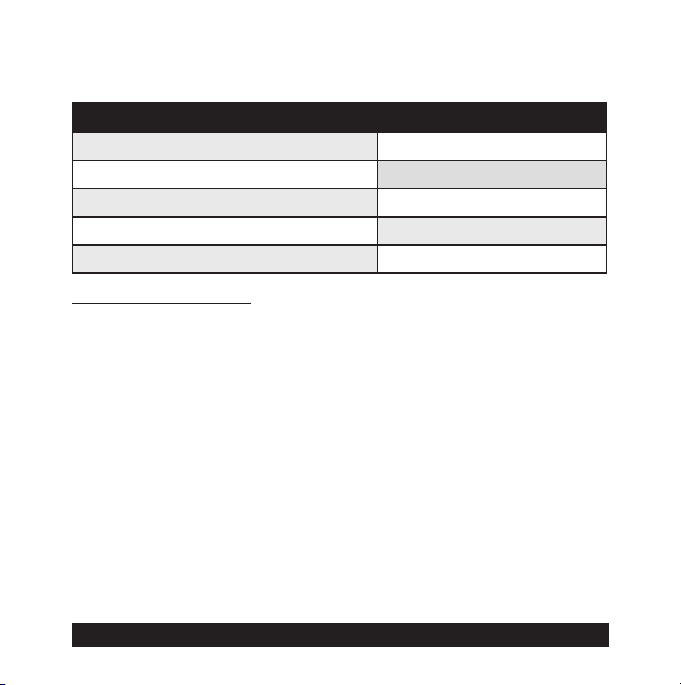
Multimedia Converter Supported File Type
File Type (Format) File Extension
Windows Media Audio and Video le format .asf, wav
Windows Audio and Video le format DivX AVI, Motion JPEG AVI only
Moving Picture Expert Group (MPEG) .mpeg, mpg, dat
MP3 .mp3
Image .bmp, jpg, tif
Mass Storage Mode
For PC Users
Connect the device to a computer, an extra disk drive (USB Portable Disk)
will appear. The device is now in Mass Storage Mode. In this mode, you
can copy, move or delete les (pictures) exactly the way you manipulate
les in Windows user interface.
Note: For playback purpose, all the les uploaded to the GPDR 1 must be converted
by Multimedia Converter rst. For le storage, use Mass Storage mode only.
For MAC Users
(Mac OS: 9.x and 10.1 above)
By connecting the device to a MAC computer (refer to the previous page),
it will automatically detect Mass Storage drive. You can easily manipulate
your les the way you do in MAC user interface.
Please note! The Multimedia Converter will not function on a MAC
computer, only Mass Storage mode can be used.
10 GPDR 1 User Guide
Page 11
Disconnecting the GPDR 1 from
your Computer
We strongly recommend to safely remove the device from your computer
when it is not in use. Complete the following before removing the USB
cable from the device or PC.
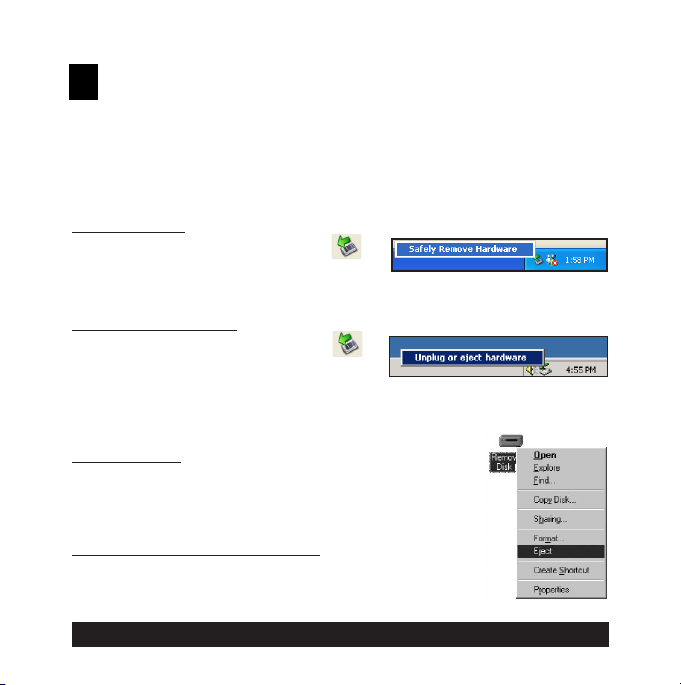
Windows XP
1. Click “Safely Remove Hardware” ( )
icon in the taskbar.
2. Select Safely remove USB Mass Storage Device from the menu.
Windows 2000/Me
1. Click “Unplug or Eject Hardware” ( )
icon in the taskbar.
2. Select “Stop USB Mass Storage Device”
from the menu (Windows 2000).
Select “Stop USB Disk” from the menu (Windows Me).
Windows 98
1. In My computer, right click on the removable disk cor-
responding to the device.
2. Select “Eject” from the menu.
Mac OS 9.x and 10.1 above
1. Select the device icon (shown as ‘NO_NAME’or
‘untitled’ drive) on the desktop.
2. Drag and drop the drive to the Trash.
GPDR 1 User Guide 11
Page 12
GPDR 1 User Guide 13
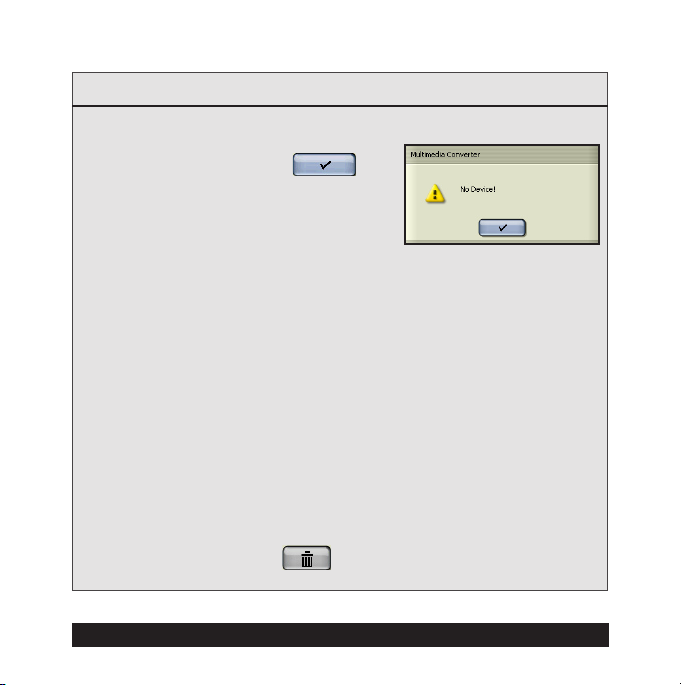
Notice:
• If the device is not connected to the PC when opening the Multimedia
Converter program, a “no device” dialog
box will appear, simply click to
continue. The program will launch and
all the converted le(s) will be saved and
placed in the temporary folder.
Once the device is connected to your PC,
the previously converted les will then automatically be uploaded to the
device.
• If you don’t want to keep the les on your pc for backup, check the op-
tion “delete temporary le(s) after the transfer?“, then the les saved in
the temporary les folder will be deleted after uploading to the device.
• The Destination window will be disabled if the device is not connected to
the PC.
If the device is connected to the PC, you will see 4 folders labeled
PHOTO, VIDEO, AUDIO and MP3 in this window. The folders are automatically built by the system. All the converted les will be sorted and
saved to these folders according to their type.
• To delete the les in stored in the device, select the le in the Destina-
tion window and then click .
12 GPDR 1 User Guide
Page 13

OSD Menu
Power on the GPDR 1, a startup screen appears, then the OSD (on-screen
display) menu comes up. The OSD menu contains 9 categories. Each of
them provides different functions for users to select.
Before operating the GPDR 1, some important points should be noted.
• For playback purpose, all the les (.asf/.jpg/.mp3/.wav) u
1
must be converted by Multimedia Converter. For le storage, use Mass
Storage mode only.
• The GPDR 1 has internal memory. To save les in the internal memory, do
not insert external memory card. If an external memory card is inserted in the
GPDR 1, only the external memory can be read.
•
For better playback speed and viewing quality, all the photos converted by Multimedia Converter will be resized to 640 x 480 pixels to t the GPDR 1 screen
size.
(The video recorded by GPDR 1 will be at the size of 320 x 240 pixels.)
• The GPDR 1 calendar can record the date up to the year 2036.
• The timer record and alarm clock setting can be preset for up to 24 hours.
• Only one song can be set for alarm clock music. If a song is selected in AU-
DIO menu and another song is selected in MP3 menu, the system will choose
the newest one for alarm clock music.
• It’s strongly recommended to turn off the LCD display and plug in the AC
adapter whilst using the GPDR 1 for timer record.
• To format the built-in memory, do not insert a memory card in the GPDR 1,
otherwise GPDR 1 will erase the data on the memory card instead.
GPDR 1 User Guide 13
ploaded to the GPDR
Page 14

GPDR 1 User Guide 15
A. Photo Player
To view photos, enter Photo Player function. Use this mode to review photos, record voice clip, add special effects to photos.
To enter the Photo Player function:
Press OK button or press the centre button of the scroller.
• Scroll up/down the scroller to select previous/next photo
• Press OK button to magnify/shrink the selected photo
• Press MENU button to enter the Photo Menu. To exit, press MENU
again
The Photo menu contains the following:
Display
MULTIPLE / SINGLE photo display
Press OK button to enter Display setting. Scroll up/down
to select the preferred setting and press the centre button of the scroller to conrm.
You may turn off the Information display whilst reviewing
a single photo by pressing Mode/INFO button.
14 GPDR 1 User Guide
Page 15

Attach Voice
Effects
Press the Menu button and use the scroller to select
the Attach Voice function. will show on the bottom of the screen. Scroll up/down to select the photo to
attach voice narration and press the RECORD button
to start recording. icon will then show on the top of
the screen. To stop recording, press STOP button.
When the recording completes, a icon will appear on
the photo to which the voice narration been attached.
To review the photo with voice narration, press MENU
button and scroll down to select and then press the
centre button. Scroll up/down to select the photo attached with voice narration and press
To return to a normal play without voice narration, press
MENU button again and scroll down to select and
then press the centre button to conrm.
NEG. ART/SEPIA/B&W/MOSAIC/NORMAL
Press the Menu button and use the scroller to select
the Effects function. Scroll up/down to select your preferred effect and then press the centre button to conrm.
The effect will then be applied to the selected photo and
it will be saved as another le (the original will be kept).
button to play.
GPDR 1 User Guide 15
Page 16

GPDR 1 User Guide 17
Information
Delete One
Delete All
ON/OFF
Press the Menu button and use the scroller to locate
the Information icon. Press the centre button to select it.
Scroll up/down to select either to enable or disable the
information display and then press the centre button of
the scroller to conrm.
When the information display is disabled, no indicators
or key instructions are shown on the screen (except lowbattery indicator) when viewing in single picture mode
Using the scroller select a photo to delete. Press
MENU button and scroll to “Delete One”. Press the centre button of the scroller to enter Delete One setting. A
message will prompt asking for conrmation of deletion,
press the centre button of the scroller to delete. Otherwise press STOP button to cancel deletion.
Press the Menu button and use the scroller to locate
the Delete All function. A message will prompt asking for
conrmation to delete all the photos in this folder, press
the centre button of the scroller to delete all. Otherwise
press STOP button to cancel deletion.
16 GPDR 1 User Guide
Page 17

B. Video Player
With this function you can review videos.
To enter the Video Player function:
Press the MODE button or use the scroller to highlight and then press
the centre button of the scroller to select.
• Use the scroller to select previous/next video
• Press
• Press button to stop playback
• Move and hold the scroller to speed up the playback of forwards or back-
wards. To return to normal playback, release the scroller.
• Use the scroller to go to previous/next video clip during playback.
• Press
• Press the
back. Press
• Press
The Video menu contains the following:
button to start video playback
button to pause the playing during playback
button and use the scroller to adjust the volume during play-
button again to complete the volume adjustment.
MENU button to enter the Video Menu. To exit the menu, press
MENU button again
GPDR 1 User Guide 17
Page 18

GPDR 1 User Guide 19
Display
Repeat
MULTIPLE / SINGLE video display
The steps are the same as they are in Photo menu,
please refer to “Display“ on Page 14.
Note: Only the rst frame will be displayed here.
NORMAL/ ONE/ ALL/ A-B
To repeat one: Scroll down and press the centre
button of the scroller to select the Repeat mode. Scroll
to “ONE“ and press the centre button of the scroller to
conrm. Press MENU button to exit.
Use the scroller to select a video le. Press the centre
button of the scroller to start playback. The selected video
le will then be played repeatedly until the STOP button
is pressed.
To return to normal playback, select NORMAL in Repeat
mode.
To repeat all: Scroll down and press the centre button
of the scroller to enter Repeat mode. Scroll to “ALL“ and
press the centre button of the scroller to select. Press
MENU button to exit. Press
All video les will be repeatedly played from the rst one
to the last continuously.
To return to normal playback, select NORMAL in Repeat
mode.
button to start playback.
18 GPDR 1 User Guide
Page 19

Information
Delete One
Delete All
To repeat A-B: Scroll down and press the centre button of the scroller to enter Repeat mode. Scroll to “A-B“
and press the centre button of the scroller to select. Press
MENU button to exit.
Scroll up/down to select a video to review. Press
button to start the playback. The
“SET A“, press the button to set the start point of the
repeat playback. The
press
video will be repeated playing back between point A and
B. To cancel the playback, press
ON/OFF
The use is the same as it is in Photo menu, please refer
to “Information“ on Page 16.
The use is the same as it is in Photo menu, please refer
to “Delete One“ on Page 16.
The use is the same as it is in Photo menu, please refer
to “Delete All“ on Page 16.
button again to set the end of the playback. The
will then be labeled “SET B“,
button will be labeled
to stop.
GPDR 1 User Guide 19
Page 20

GPDR 1 User Guide 21
C. Audio Player
Use this function to record/playback audio, choose an audio le for alarm
clock sound , add audio effects and so on.
To enter the Audio Player function:
Press the MODE button or use the scroller to highlight and then press
the centre button of the scroller to select.
• Use the scroller to select previous/next audio le
• Press
• Press button to stop playback
• Move and hold the scroller to speed up the playback of forwards or
backwards during playback. To return to normal playback, release the
scroller.
• Use the scroller to go to previous/next audio le during playback.
• Press
• Press
phone
• Press
back. Press
• Press
button to start audio playback
button to pause playback
button to start recording audio (.wav le) from the built-in micro-
button and use the scroller to adjust the volume during play-
button again to complete the volume adjustment.
MENU button to enter the Audio Menu. To exit the menu, press
MENU again
20 GPDR 1 User Guide
Page 21

The Audio menu contains the following:
Quality
Search
Repeat
LONG PLAY (LOW) / STANDARD PLAY (HIGH)
Press the centre button of the scroller to select Quality
setting. Scroll up/down to select the preferred setting and
press the centre button of the scroller to conrm.
Note: The higher the quality, the bigger the le size and the more
storage space it takes.
* 128 MB can store up to approximately 180 minutes on low
quality setting
* 128 MB can store up to approximately 90 minutes on high qual-
ity setting
Scroll down and press the centre button of the scroller to
select Search.
Press
each audio le in the current folder for 5 seconds.
The use is the same as it is in Video menu, please refer
to “Repeat“ on Page 18-19.
button, the search starts. The GPDR 1 will play
NORMAL/ ONE/ ALL/ A-B
GPDR 1 User Guide 21
Page 22

GPDR 1 User Guide 23
Alarm
Clock
EQ
Delete One
Delete All
Scroll up/down and press the centre button of the scroller
to select an audio le. Press MENU button and scroll
to Alarm Clock setting and then press the centre button of
the scroller to enter. Again, press the centre button of the
scroller to set the time. Scroll up/down to set the HOUR
and press the centre button of the scroller to conrm and
continue. Scroll up/down to set the MINUTE and press
the centre button of the scroller to conrm and continue.
Scroll up/down to set the SECOND and press the centre
button of the scroller to conrm.
Scroll down to SAVE and press the centre button of the
scroller to keep the setting.
Important Note: The Alarm feature will only function whilst the
device is switched on. If it is intended to use this as a wake up
alarm clock, then the power saving feature must be switched to
NEVER and the AC adapter must be connected at all times.
BASS/ROCK/JAZZ/CLASSIC/POP/NORMAL
Scroll down and press the centre button of the scroller
to enter EQ (equalizer) setting. Scroll up/down to select
the preferred setting and press the centre button of the
scroller to conrm the new EQ setting.
The use is the same as it is in Photo menu, please refer
to “Delete One“ on Page 16.
The use is the same as it is in Photo menu, please refer
to “Delete All“ on Page 16.
22 GPDR 1 User Guide
Page 23

D. MP3 Player
Use this function to listen to MP3 music, choose a song for alarm clock
sound , add audio effects and so on.
To enter the MP3 Player function:
Press the MODE button or use the scroller to highlight then press the
centre button of the scroller to select it.
• Use the scroller to select previous/next MP3 le
• Press
• Press button to stop playback
• Move and hold the scroller to speed up the playback of forwards or back-
wards during playback. To return to normal playback, release the scroller.
• Use the scroller to go to previous/next MP3 le during playback.
• Press
• Press
ing playback. Press
• Press
MENU again
The MP3 menu contains the following:
button to start playback
button to pause playback
button and scroll up/down the scroller to adjust the volume dur-
button again to complete the volume adjustment.
MENU button to enter the MP3 Menu. To exit the menu, press
GPDR 1 User Guide 23
Page 24

GPDR 1 User Guide 25
Alarm Clock
Search
Repeat
EQ
Delete One
Delete All
Press the centre button of the scroller to enter Alarm
Clock setting.
Press the centre button of the scroller to set the time.
Scroll up/down to set the HOUR and then press the centre button of the scroller to conrm and continue.
Scroll up/down to set the MINUTE and then press the
centre button of the scroller to conrm and continue.
Scroll up/down to set the SECOND and then press the
centre button of the scroller to conrm.
Scroll down to “SAVE” and press the centre button of the
scroller to keep the setting.
Important Note: The Alarm feature will only function whilst the
device is switched on. If it is intended to use this as a wake up
alarm clock, then the power saving feature must be switched to
NEVER and the AC adapter must be connected at all times.
The use is the same as it is in Audio menu, please refer
to “Search“ on Page 21.
NORMAL/ ONE/ ALL/ A-B
The use is the same as it is in Video menu, please refer
to “Repeat“ on Page 18-19.
BASS/ROCK/JAZZ/CLASSIC/POP/NORMAL
The use is the same as it is in Audio menu, please refer
to “EQ“ on Page 22.
The use is the same as it is in Photo menu, please refer
to “Delete One“ on Page 16.
The use is the same as it is in Photo menu, please refer
to “Delete All“ on Page 16.
24 GPDR 1 User Guide
Page 25

E. AV Recorder
With this function a favorite TV show can be recorded directly to the device
or a timed recording can be set.
To enter the AV Recorder function:
Press the MODE button or use the scroller to highlight and press the
centre button of the scroller to select.
• Press button to start recording
• Press button to stop recording
• Press MENU button to enter the AV Recorder Menu. To exit the menu,
press MENU again
The AV Recorder menu contains the following:
TIME
Timer
Record
Press the centre button of the scroller to enter Timer
Record setting.
Press the centre button of the scroller to set the time.
Scroll up/down to set the HOUR and press the centre button of the scroller to conrm and continue. Scroll up/down
to set the MINUTE and press the centre button of the
scroller to conrm and continue. Scroll up/down to set the
SECOND and press the centre button of the scroller to
conrm.
Note: For TV connection, please refer to “RECORD TV SHOW“ in
the Quick Guide.
GPDR 1 User Guide 25
Page 26

GPDR 1 User Guide 27
LENGTH
Scroll down to “ ” and press the centre button of the
scroller to set the recording time.
Scroll up/down to the HOUR and press the centre button
of the scroller to conrm and continue.
Scroll up/down to set the MINUTE and press the centre
button of the scroller to conrm and continue.
Scroll up/down to set the SECOND and press the centre
button of the scroller to conrm.
Scroll down to “SAVE” and press the centre button of the
scroller to save the setting.
Note: When the above setting is complete, a “ “ icon will
appear on the top of the LCD display. Meanwhilst the device is
awaiting timer record. Do not switch to other modes or power off
the device or the connected video source (TV) during this period,
otherwise the timer record will fail.
LONG PLAY (LOW) / STANDARD PLAY (HIGH)
Quality
The use is the same as it is in Audio menu, please refer
to “Quality“ on Page 21.
Note: The higher the quality, the bigger the le size and the more
storage space it takes.
* 128 MB can record up to approximately 60 minutes with low
quality setting (Depending on the video contents)
* 256 MB can record up to approximately 60 minutes with high
quality setting (Depending on the video contents)
26 GPDR 1 User Guide
Page 27

Information
LCD Off
ON/OFF
The use is the same as it is in Photo menu, please refer
to “Information“ on Page 16.
It is recommended to turn off the LCD display for powersaving during timer record. Whilst the GPDR 1 is waiting
to record a timed event, the blue LED will flash as a
reminder that a timed recording has been activated.
To turn off the LCD, scroll down and press the centre
button of the scroller to select LCD setting. A message
will prompt asking to turn off the LCD display will be seen,
press the centre button of the scroller to conrm. Otherwise press STOP button to cancel.
To turn on the LCD display, press any button or the
scroller (except the Power button).
GPDR 1 User Guide 27
Page 28

GPDR 1 User Guide 29
F. Slide Show
This function allows the review of photos as a slide show.
To enter the Slide Show function:
Press the MODE button or use the scroller to highlight and press the
centre of the scroller or press OK button to select.
• Use the scroller to select a photo as the beginning of the slide show
• Press
• Press button to stop slide show playback
• Press MENU button to enter the Slide Show Menu. To exit the menu,
press MENU again
The Slide Show menu contains the following:
Interval
Information
button to start the slide show
Press the centre button of the scroller to enter Interval
setting.
The default timing between slides is set to 5 seconds. To
change this setting, press the centre button of the scroller
and use the scroller to increase/decrease the time. When
the setting is done, press the centre button to conrm.
To save the new setting, scroll down to SAVE and press
the centre button of the scroller.
ON/OFF
The use is the same as it is in Photo menu, please refer
to “Information“ on Page 16.
28 GPDR 1 User Guide
Page 29

G. Calendar
This GPDR 1 includes an electronic calendar and clock.
To enter the Calendar function:
Press the MODE button or use the scroller to highlight and press the
centre button of the scroller to select. The calendar displays. To toggle
between calendar and clock view, press
To adjust the date and time settings, press MENU button. The Calendar
menu contains the following:
Calendar View Clock View
button.
GPDR 1 User Guide 29
Page 30

GPDR 1 User Guide 31
Date/Time
DATE
Press the centre button of the scroller to enter Date/Time
setting.
To change the date setting, press the centre of the scroller
or press OK button.
Step 1. Scroll up/down to change the YEAR and press the
centre button of the scroller to conrm and continue.
Step 2. Scroll up/down to change the MONTH and press
the centre button of the scroller to conrm and continue.
Step 3. Scroll up/down to change the DAY and press the
centre button of the scroller to conrm.
To save the changes made, scroll down to SAVE and
press the centre button of the scroller.
30 GPDR 1 User Guide
Page 31

TIME
To change the time setting, scroll down to TIME adjustiment, and press the centre button of the scroller.
Step 1. Scroll up/down to change the HOUR and press the
centre of the scroller or press OK button to conrm and
continue.
Step 2. Scroll up/down to change the MINUTE and press
the centre of the scroller or press OK button to conrm and
continue.
Step 3. Scroll up/down to change the SECOND and press
the centre of the scroller or press OK button to conrm.
To save the changes made, scroll down to SAVE and
press the centre button of the scroller.
To exit the menu, press MENU button.
GPDR 1 User Guide 31
Page 32

GPDR 1 User Guide 33
H. Game
There are 2 games available on the GPDR 1. They are Puzzle and Tic-TacToe.
To enter the Game function:
Press the MODE button or use the scroller to highlight and then press
the centre button of the scroller to select.
The screen on the left appears:
Press the centre button of the scroller to enter the TICTAC-TOE game or scroll down to select the PUZZLE
game.
TIC-TAC-TOE
• Scroll up/down and press the centre of the scroller or
press OK button to choose to start the game rst or let
the device go rst
• The rst player is “ ”. The other one is “ “
• Press the centre of the scroller or press OK button to start
• Select the square you want to place your symbol (“ ” or “ “) in by
scrolling up/down and then press the centre of the scroller or press OK to
conrm
• The rst player to complete a row of three square is the winner
• You can’t occupy a square that is already occupied
• To stop the game during play, press button at anytime
32 GPDR 1 User Guide
Page 33

PUZZLE
• Scroll up/down to select a numbered square you want to move with the
oating frame and then press the centre of the scroller or press OK button to conrm
• Players have to arrange all the numbered square in
sequence within 50 seconds
• Only the squares next to the oating frame can be
moved
• To stop the game during playing, press button at anytime
GPDR 1 User Guide 33
Page 34

GPDR 1 User Guide 35
I. Setup Menu
To enter the Setup Menu:
Press the MODE button or use the scroller to highlight and press the
centre button of the scroller to select.
The Setup Menu appears. Scroll up/down and press the centre button of
the scroller to select each item.
The Setup Menu contains the following:
STARTUP SOUND OFF/ON
STARTUP SCRN OFF/IMAGE
AUTO LCD OFF
* This setting is unprac-
ticable in AV Recorder
mode.
Scroll up/down to turn off/on the startup sound
and then press the centre button of the scroller
to conrm.
Scroll up/down to disable/enable startup
screen and then press the centre button of the
scroller to conrm.
30 Sec/1 Min/1.5 Min/2 Min/NEVER
Scroll up/down to set up the timing you want to
turn off the LCD display and press the centre
button of the scroller to conrm.
Note: The LCD display is preset to “AUTO LCD OFF“
after 30 seconds of non-opeartion.
34 GPDR 1 User Guide
Page 35

AUTO POWER OFF
* This setting is auto-
matically disabled in AV
Recorder mode.
BEEP
FORMAT
1.5 Min/3 Min/5Min/NEVER
Scroll up/down to set up the timing you want to
power off the GPDR 1 when it is not in use.
Press the centre button of the scroller to
conrm.
Note: The GPDR 1 is preset to “AUTO POWER OFF“
after 1.5 minutes of non-opeartion.
ON/OFF
Scroll up/down to turn the beep on/off, press
the centre button of the scroller to conrm.
When the format option is chosen, a message
will prompt to conrm format, press the centre
button of the scroller to conrm. Otherwise
press STOP button to cancel.
Important Note: If an external SD/MMC card is inserted, the device will format the card and all contents
will be lost.
GPDR 1 User Guide 35
Page 36

GPDR 1 User Guide 37
Direct Print
communicate with the printers. If you connect GPDR 1 to a printer which
supports DPS (Direct Print Services), then the photos stored in the GPDR 1
can be printed directly without attaching to a computer. It’s that easy!
Follow the steps below to print photos:
Step 1. Connecting to a printer
Power on the GPDR 1. Connect one end of the included
USB cable to the USB port of the GPDR 1, the other end to
the USB port of the printer.
Compatibility Note: Please note with some photo printers the message “No Support“
may be seen, in this case pictures may still be printed but no adjustment will be pos-
sible.
Direct Print provides a direct connect solution for this GPDR 1 to
Step 2. Selecting DIRECT PRINT
Upon connecting the GPDR 1 to a printer, a mode selection screen appears. Press the MODE button to enter
DIRECT PRINT.
Step 3. Selecting Photos
A message appears reminding you not to connect to PC.
Press the OK button to continue. The DPS menu appears.
Press the OK button to enter the SELECT PIC menu.
36 GPDR 1 User Guide
Page 37

Select Particular Photos
Press the OK button twice and scroll up/down to select the
photos then press the OK button to conrm. A printer icon
will appear on the selected photos. When the selection is
complete, press the button to return.
Select All Photos
Press the OK button and scroll down to ALL then press the
centre button of the scroller to conrm. All the photos will then be selected.
Step 4. Enhancing Photo Quality
Scroll down to OPTIMAL. The default is set to “OFF”. To
change the setting, press the centre button of the scroller
and scroll down to select “ON“. Press the centre button to
conrm.
Note: To skip this step, select CANCEL in the menu.
Step 5. Setting Copy Numbers
Scroll down to COPIES. The default setting is set to “1“. To
change the setting, press the centre button of the scroller
and scroll up to increase the copy number.
GPDR 1 User Guide 37
Page 38

GPDR 1 User Guide 39
Step 6-1. Setting Paper Size
Scroll down to PAPER SET. You can
change the paper size, paper type, and
border settings. To change the paper size
setting, press the centre button and use
the scroller to select the preferred size.
Press the centre button to conrm.
Step 6-2. Setting Paper Type
Scroll down to PAPER. To change the paper type, press
the centre button and use the scroller to select the pre-
ferred paper. Press the centre button to conrm.
Step 6.3. Setting Borders
Scroll down to BORDER. To change the border setting,
press the centre button and use the scroller to either add
a border, cancel a border or keep the photo in its original
format. Press the centre button to conrm.
Once satised with the PAPER settings, press button to return to DPS
menu.
Step 7. Printing...
Scroll down to PRINT. Press the OK button to start printing. To cancel the printing, press button at anytime.
38 GPDR 1 User Guide
Page 39

Specications
Product Function Digital Photo Player, Digital Video Player, Digital Video
Display 2.5” TFT LCD
Microphone Built-in
Speaker Built-in
TV System NTSC/PAL
DPS Support Yes
Audio Effects POP/Jazz/Classic/Bass/Rock
Interface USB/AV In/Earphone/DC-in
Memory Card Slot Up to 512 MB SD/MMC cards supported
Internal Memory Built-in 32MB
File Format ASF(video)/JPG(photo)/MP3/WAV(audio)
Power
Mass Storage
Dimensions 96 x 77 x 20 mm
Weight 110g (without battery)
* For playback purpose, all the les (.asf/.jpg/.mp3/.wav) uploaded to the GPDR 1
must be converted by Multimedia Converter. For le storage, use Mass Storage
mode only.
Recorder, Digital Voice Recorder, MP3 Player, Language
Learning Player, USB Portable Disk, SD/MMC Card
Reader
Rechargeable Li-ion Battery 1000 mAh x1 ; Power Adapter
Windows 98 SE/Me/2000/XP ;
Mac OS 9.X and 10.1 above (Mass Storage only)
GPDR 1 User Guide 39
 Loading...