

Page 1
Page 2

Contents
Contents
Contents............................................................... 2
Safety.................................................................... 4
Important................................................................ 4
The Global Positioning System........................... 4
Using Your Satellite Navigation System in
the Car..................................................................... 5
Prohibited Areas ................................................... 5
Battery .................................................................... 5
Getting Started ................................................... 6
In the Box................................................................ 6
Location of Controls............................................. 7
Charging the Battery............................................ 8
Raising the Antenna ............................................. 8
Assembling the Cradle ......................................... 9
Fitting GNAV12 to the cradle.............................. 9
Installing the Car Mount ...................................... 10
Switching On .......................................................... 10
Using the Stylus .................................................... 11
Settings................................................................... 11
Daylight Saving Time............................................ 12
GPS Receiver ......................................................... 12
External Antenna................................................... 13
Sidewheel................................................................ 13
Earphones ............................................................... 13
Switching Off.......................................................... 13
Planning Your First Journey............................ 14
Initial Setup ............................................................ 14
Navigate to an Address........................................ 15
Navigate to a Map Location ................................ 17
The Navigation Map .............................................. 18
Menu Icons.............................................................. 20
Map Symbols .......................................................... 20
Journey Completion ............................................. 20
Detailed Route Planning ................................... 21
The Navigation Menu............................................ 21
Address ................................................................... 21
Address Modes....................................................... 22
Address Actions .................................................... 23
My Places ................................................................ 23
My Favorites........................................................... 24
Favorite Actions .................................................... 25
Favorite Alerts....................................................... 27
History..................................................................... 27
History Actions...................................................... 28
Food, Fuel and Lodging ........................................ 29
2
www.goodmans.co.uk
Page 3

Search Near a Location ....................................... 31
Category Actions .................................................. 32
Map Options ........................................................... 33
2D/3D Mode ........................................................... 33
Day/Night Mode..................................................... 34
Avoid Roads ........................................................... 34
Free Map Browsing ............................................... 36
Settings................................................................... 37
Prompts................................................................... 38
Units of Measure ................................................... 38
GPS Signal .............................................................. 39
Route ....................................................................... 39
Map Settings .......................................................... 39
Quick Nav................................................................ 40
Select Map .............................................................. 41
Start Demo ............................................................. 42
Tutorial.................................................................... 42
About ....................................................................... 42
Help.......................................................................... 42
MP3 Player........................................................... 43
Care and Maintenance ....................................... 45
Troubleshooting .................................................... 45
Guarantee............................................................. 47
Customer Helpline: 0870 873 0080
Contents
3
Page 4

Safety
Safety
Important
Satellite signals are required for this product to
function in Navigation Mode.
There may be occasions within your home or building
when the signal strength is limited and Navigation
Mode may not be possible.
This is quite normal for products of this type.
Your car may have an athermic heat reflecting
windscreen or windscreen heating that prevents the
GPS receiver acquiring a valid signal. In these cases
you may have to use an external antenna (not
supplied).
The USB connector on the Satellite Navigation
System is for future use as the maps are pre-loaded.
The Global Positioning System
The Global Positioning System (GPS) is a satellite
based system that provides location and timing
information around the globe. GPS is operated and
controlled under the sole responsibility of the
Government of the United States of America, who are
responsible for its availability and accuracy. Any
changes in GPS availability and accuracy, or in
environmental conditions, may impact the operation
of your Satellite Navigation System.
4
www.goodmans.co.uk
Page 5
Using Your Satellite Navigation
System in the Car
When using your Satellite Navigation System while
driving it is essential that you drive with due care and
attention.
Never modify the settings or program your Satellite
Navigation System while driving.
Only look at the Satellite Navigation System map
when it is safe to do so.
Only follow the Satellite Navigation System
instructions when the road regulations allow you to
do so.
When mounting the Satellite Navigation System in
your car make sure that it does not obscure your view
or impede the operation of any driving controls.
Prohibited Areas
Do not operate your Satellite Navigation System in
hospitals or near any electrical medical equipment.
Do not operate your Satellite Navigation System in
aircraft.
Battery
Your Satellite Navigation System uses a Li-ion
battery. Do not use it in humid, wet or corrosive
environments. Do not operate or store your Satellite
Navigation System in high temperatures (>60
direct sun light. Do not store in a microwave or
pressurised container. Do not pierce or break the
battery casing.
Failure to follow these cautions may cause the
battery to leak acid, become hot, explode or ignite
and cause injury or damage.
If you come into contact with leaked battery acid
wash thoroughly and seek medical attention.
When your battery has reached the end of its
life;
Contact your local council regarding
available recycling or disposal options. Do
not dispose of electrical products in the
general waste.
o
C) or in
Safety
Customer Helpline: 0870 873 0080
5
Page 6

Getting Started
Getting Started
Please make sure that you read all of the information
contained within this user guide before contacting
the customer helpline.
If you experience any problems, please check the
Troubleshooting guide at the back of this user guide
before contacting the customer helpline.
In the Box
In the box you will find:
• GNAV12 Satellite Navigation System
• Protective Sleeve
• DC power lead with 12V car adapter
• Cradle and Car Mount
• User Guide
• Earphones
6
www.goodmans.co.uk
Page 7
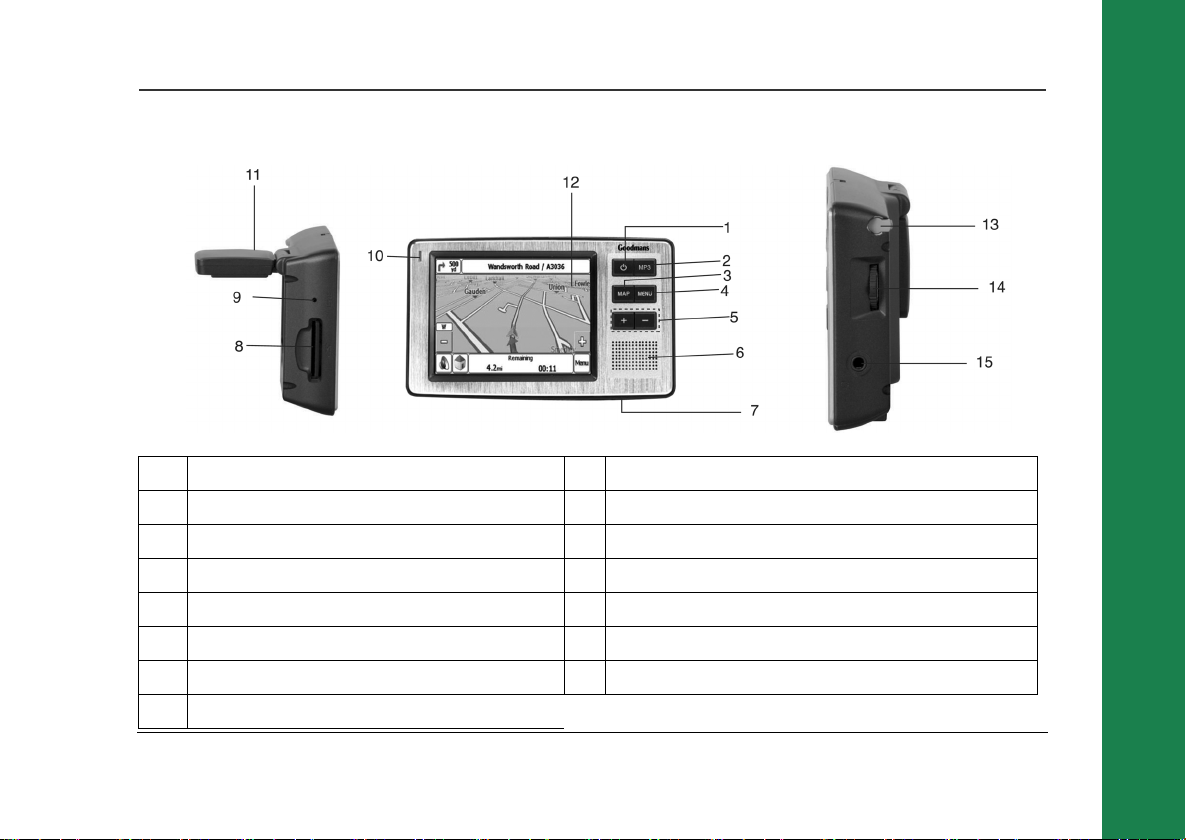
Location of Controls
1 Power button 9 Reset button
2 MP3 button 10 Charging indicator
3 Map button 11 GPS Antenna
4 Menu button 12 Touch Screen
5 Zoom in/out button 13 Stylus
6 Speaker 14 Adjustment button.
7 Charging socket 15 Headphone socket
8 SD Card slot (used by the MP3 player)
Customer Helpline: 0870 873 0080
Getting Started
7
Page 8
Getting Started
Charging the Battery
We recommend that when you use the Satellite
Navigation System in your car, that you always use
the 12V car accessory adapter in order to maintain
the battery level.
If the battery level is low, the GPS reception will be
reduced. In order to optimize signal reception, keep
the battery charged.
When in use in battery mode, recharge by connecting
the 12V car accessory adapter when the battery is
low.
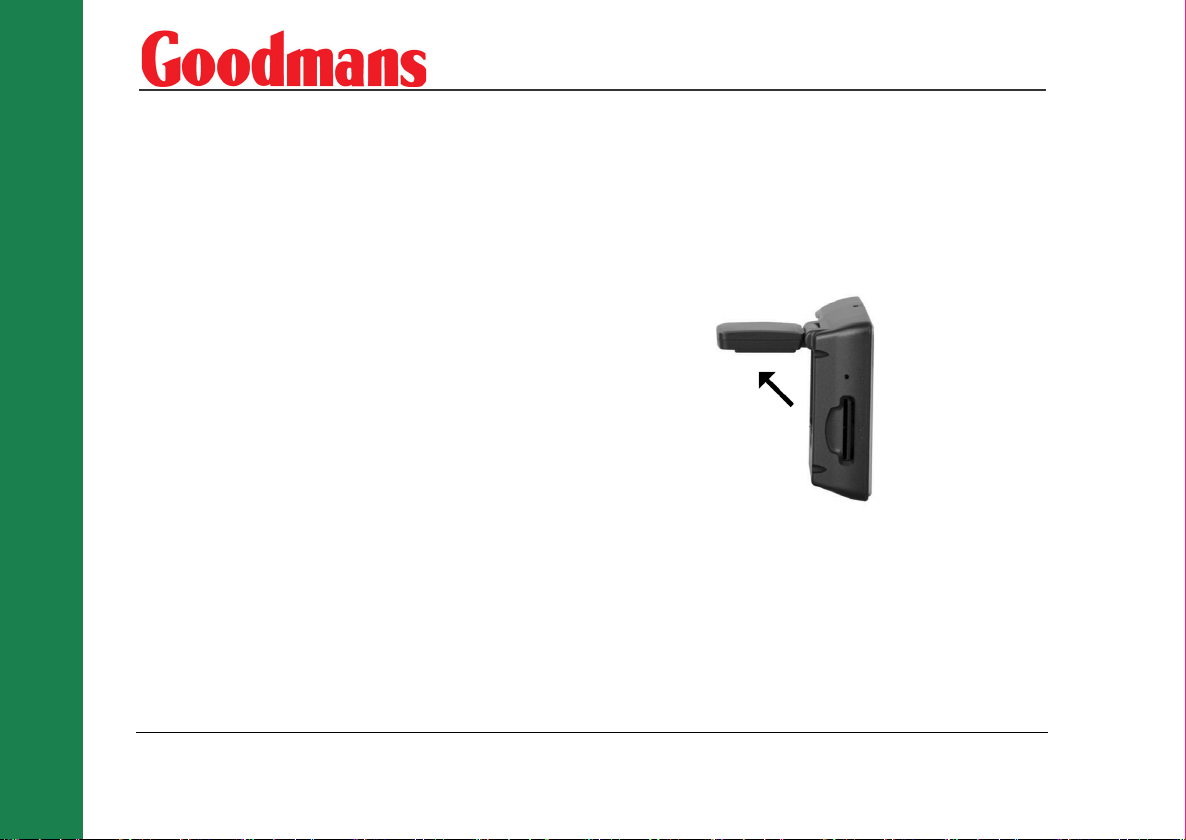
Raising the Antenna
The Antenna must be raised for the Satellite
Navigation System to receive satellite signals. The
Antenna must be raised before the Satellite
Navigation System is fitted to the cradle. Lift the GPS
antenna as shown.
In order to optimise signal reception, the antenna
should be as near horizontal as possible.
8
www.goodmans.co.uk
Page 9
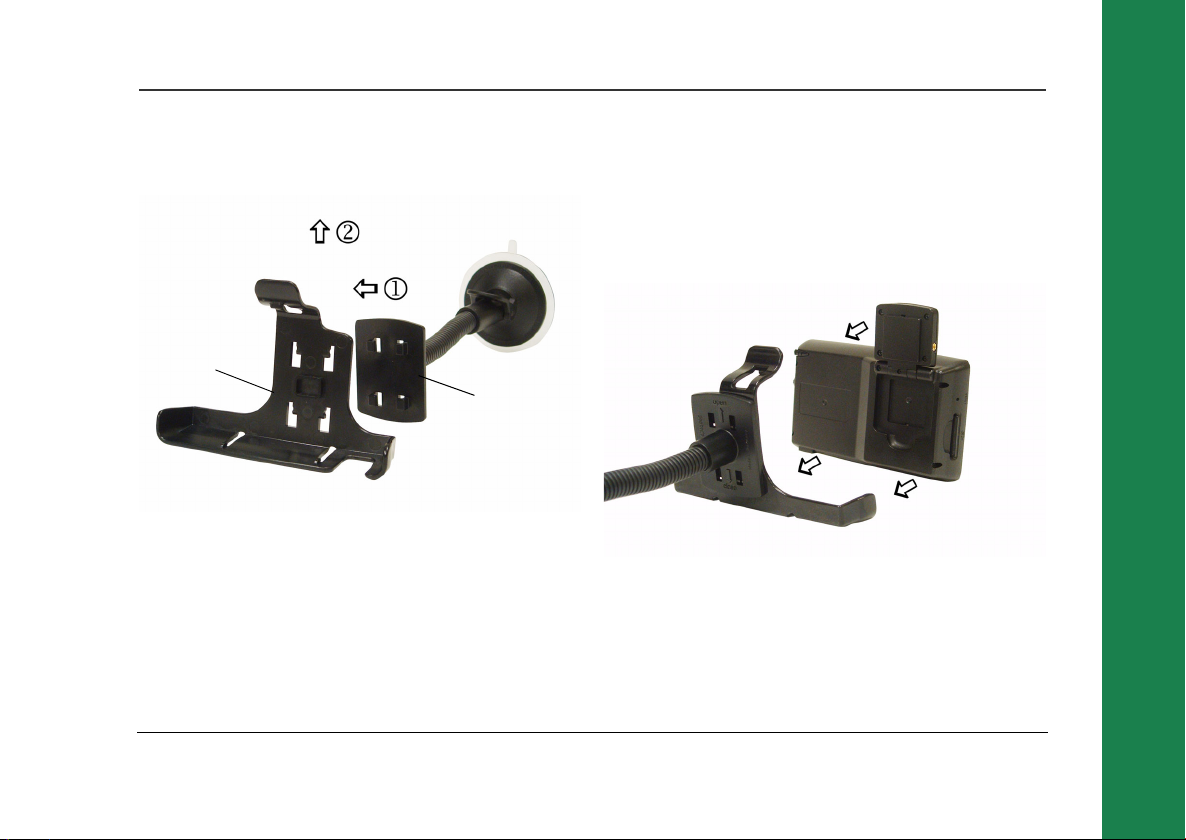
Assembling the Cradle
Assemble the cradle as shown below.
(a)
(b)
1. Locate the four holes (a) onto the lugs (b).
2. Push (b) upwards so that the two parts click together.
Fitting GNAV12 to the cradle
There are three lugs, one at the top and two at the
bottom. These fit into slots on the Satellite
Navigation System. Slide the bottom lugs into the
Satellite Navigation System then click the top lug into
the slot.
To remove the Satellite Navigation System from the
cradle, push the tab above the top lug. Pull the
Satellite Navigation System forward of the top lug
and then up to release it from the bottom lugs.
Getting Started
Customer Helpline: 0870 873 0080
9
Page 10
Getting Started
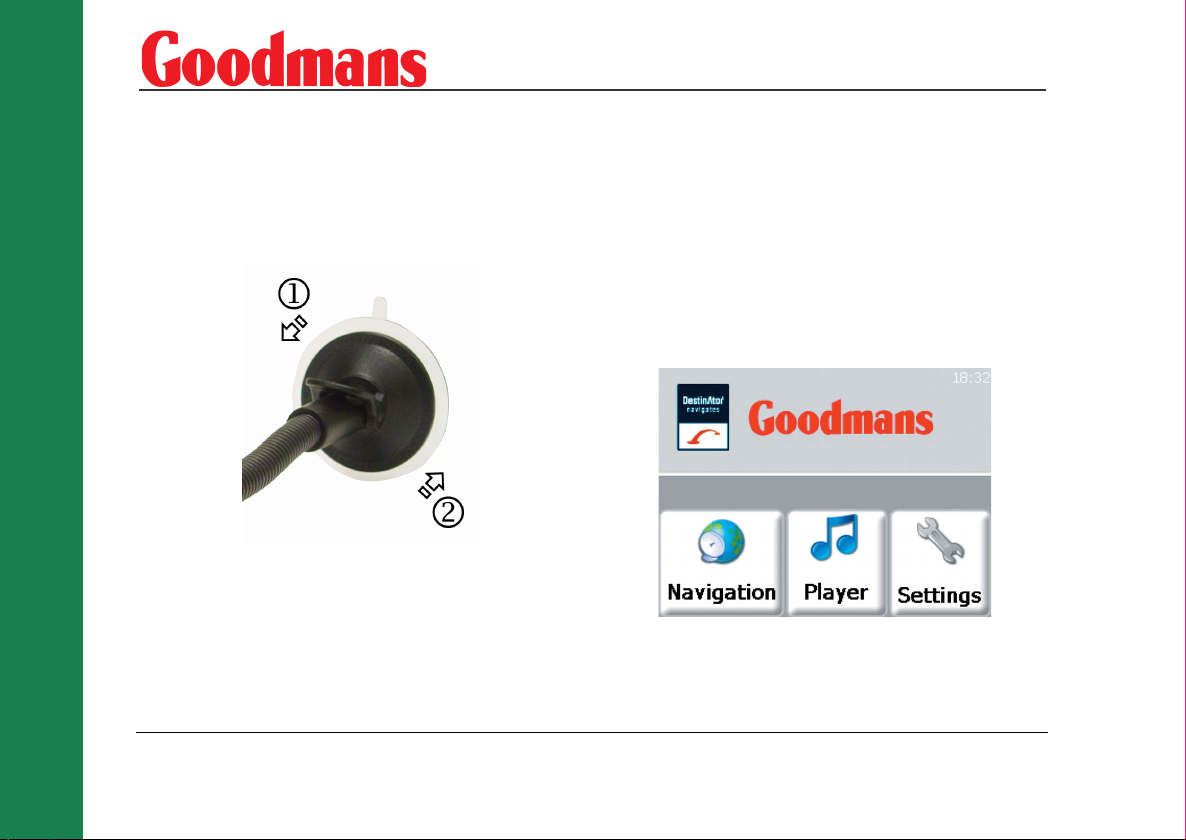
Installing the Car Mount
Switching On
10
Warning! The Satellite Navigation System must
be mounted in a location that does not obscure
the driver’s vision or impede use of the car’s
controls.
1. Pull the lever away from the suction pad.
2. Place the pad on the windscreen and push the lever towards the pad until it clicks into place.
3. Position the adjustable arm to suit.
www.goodmans.co.uk
Note: To reduce the chance of the Satellite
Navigation System freezing, ensure that the
ignition is switched on before the Satellite
Navigation System is switched on.
Press and hold down the Power On/Off button until
the Goodmans logo is displayed. The lights behind the
buttons will glow. The following screen will be
displayed.
Page 11
Using the Stylus
Slide the stylus out of the right side of the Satellite
Navigation System. The stylus is used to navigate
through the Satellite Navigation System menus.
Note: It is not necessary to press the stylus hard
on the screen.
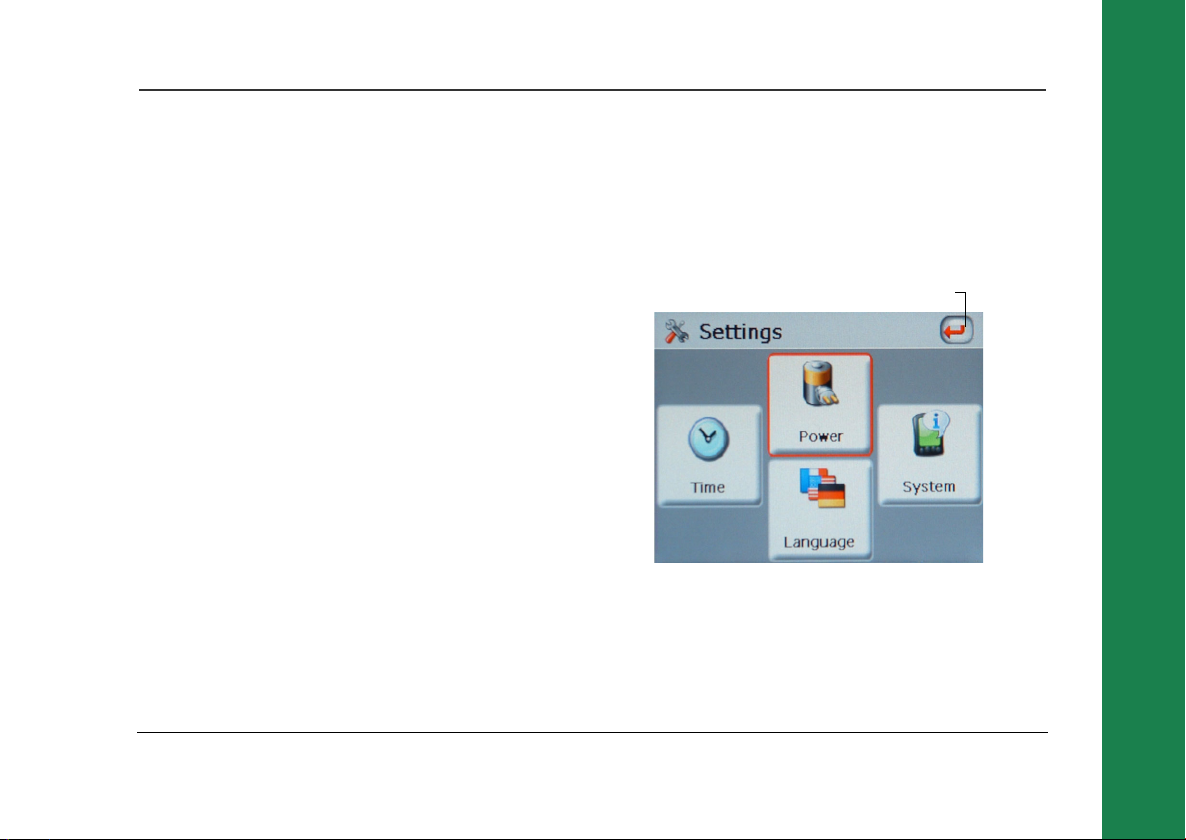
Settings
Note: You do not need to enter the Settings
menu before you start to navigate.
Tap the stylus on the Settings icon. The following
screen will be displayed.
Back Icon
Tap the Back icon at any time to go back to a previous
screen.
Note: It is possible to enter the Settings menu at
any time by pressing the Menu button to the
right side of the display.
Getting Started
Customer Helpline: 0870 873 0080
11
Page 12
Getting Started
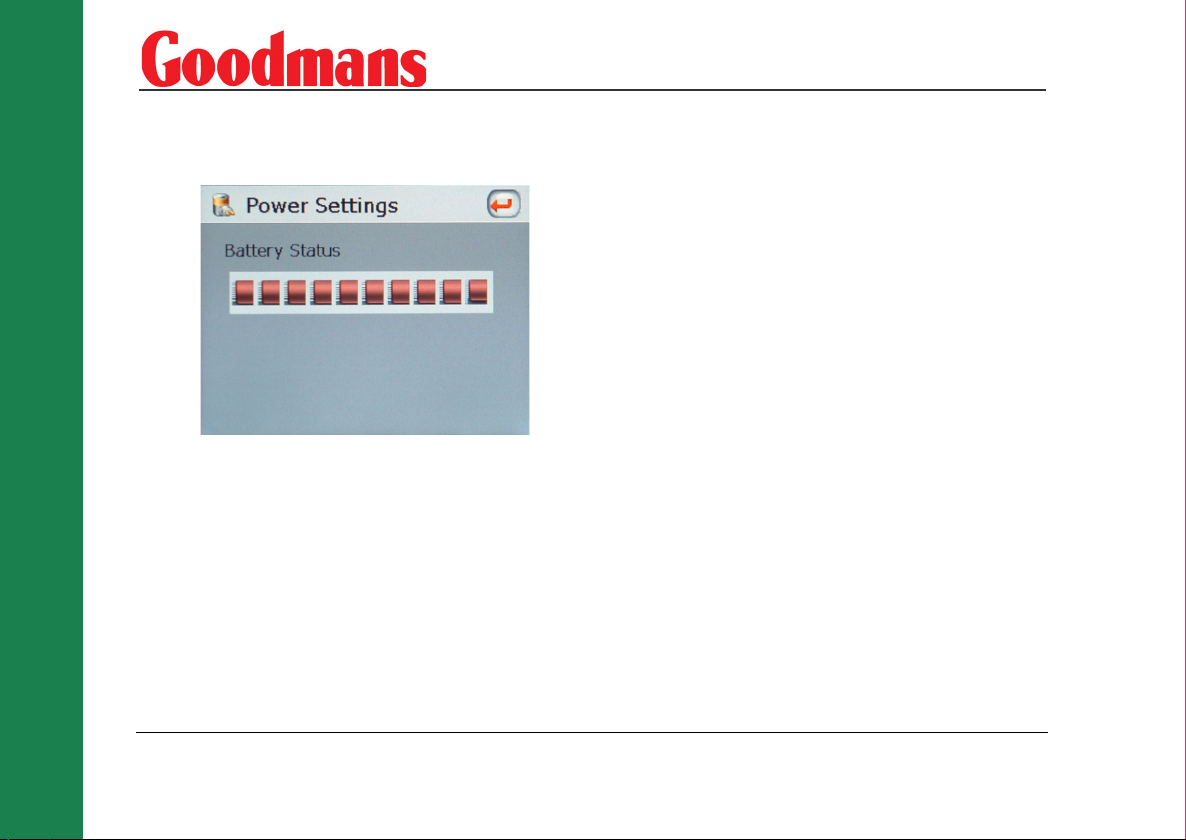
1. The Power icon displays the current battery charge level.
2. The Language icon is used to change the visual and audible languages of the Satellite Navigation System. The available languages are English, Spanish, German and French.
3. The System icon displays current hardware and software information for the Satellite Navigation System and also the current memory status.
4. The Time icon is used to select the Time Zone the Satellite Navigation System will be operated in.
Daylight Saving Time
The default time setting for the Satellite Navigation
System is Greenwich Mean Time. The Time Settings
screen contains the option to advance the clock by
one hour during daylight saving months (British
Summer Time). Tap the Set Daylight Saving icon to
advance the clock.
GPS Receiver
Note: : At least three GPS signals are required
for the Satellite Navigation System to operate.
Note: If the Satellite Navigation System is being
used for the first time, up to 10 minutes may be
required to find a signal.
Note: There may be occasions within your home
or building when the signal strength is limited
and navigation may not be possible. This is quite
normal of products of this type.
Note: Your car may have an athermic heat
reflecting windscreen or windscreen heating that
prevents the GPS receiver acquiring a valid
12
www.goodmans.co.uk
Page 13

signal. In these cases you may have to use an
external antenna (not supplied). See below.
You can view the number of satellite signals the
Satellite Navigation System is receiving and also the
strength of these signals (see page 39).
External Antenna
If the GPS receiver fails to acquire a valid signal when
mounted in your car it may be due to a heat reflecting
coating or heating elements in your windscreen.
In these cases an external antenna will be required
(not supplied).
Plug the external antenna into the socket on the left
side of the GPS antenna.You should now receive a
valid signal.
Sidewheel
The sidewheel is used to adjust the message volume
or the display brightness of the Satellite Navigation
System. Move the sidewheel to open the control box.
Move the sidewheel up to increase or down to
decrease the volume. If necessary, tap the Mute icon
with the stylus to turn off sound.
Use the stylus to select bright. Move the sidewheel up
to increase or down to decrease the display
brightness.
Earphones
The Satellite Navigation System can be used with
earphones (supplied).
Switching Off
Press and hold down the Power On/Off button until
the Satellite Navigation System switches off.
Getting Started
Customer Helpline: 0870 873 0080
13
Page 14

Planning Your First Journey
Planning Your First Journey
This section is designed to get you using your
Satellite Navigation System. The icons/buttons and
functions not mentioned in this section are described
fully in later sections.
Initial Setup
Your Satellite Navigation System navigation system
is supplied with the following default settings:
• To find the quickest route
• To travel by car
• Allows all types of roads including toll roads,
tunnels and ferries
• The distances will be in miles
• The audio and visual language is English
Making changes to these settings is described in a
later section.
Switch the Satellite Navigation System on and tap the
Navigation icon.
14
www.goodmans.co.uk
Page 15
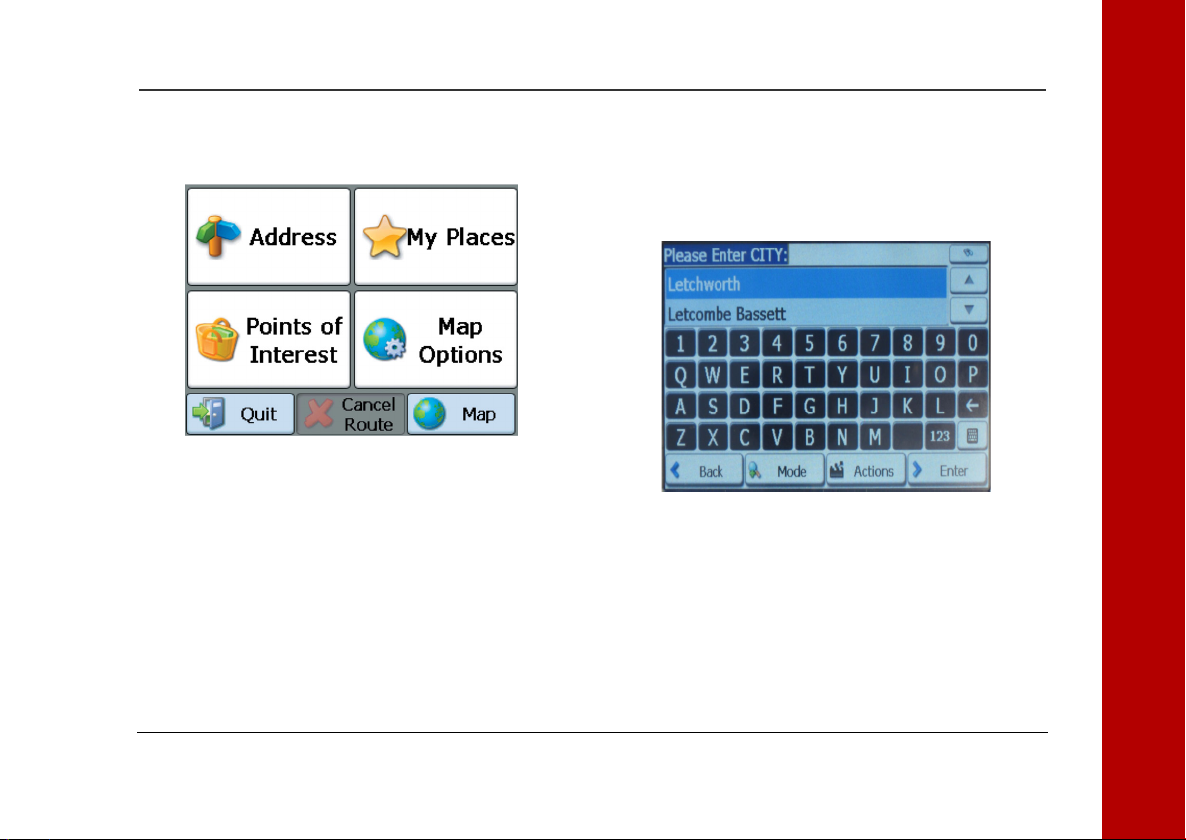
The Satellite Navigation System will display the
Navigation options.
Navigate to an Address
If you know the address that you wish to go to, tap the
Address icon. Read the information message and tap
OK. Tap the keypad to enter the destination city.
The Satellite Navigation System will automatically
search for the closest city for each letter entered.
To search through an alphabetical list of cities, use
the up and down arrows at the top right of the keypad.
Tap Enter.
Planning Your First Journey
Customer Helpline: 0870 873 0080
15
Page 16

Planning Your First Journey
Enter the street and, if necessary, the street number
within the city.
Tap Enter. The Satellite Navigation System will
display a 2D map. The chequered flag shows the
destination.
If the destination displayed is correct, tap Go!.
The Satellite Navigation System may take a few
seconds to display the route.
The map displayed will show a green flag indicating
the start point of the journey. The display will show
the direction you need to travel and you will be given
verbal prompts.
The details of the map are given on page 18.
16
www.goodmans.co.uk
Page 17

Note: If you are navigating a route that requires
you to make a number of manoeuvres, check the
map as there maybe insufficient time for all of
the voice commands.
Navigate to a Map Location
If you do not know the address of your destination
you can use the map. When the Navigation options
page is displayed tap the Map icon.
Note: If the Cancel Route icon is available at the
bottom of the screen, tap the icon to cancel any
existing routes. This option is only available
when the map is viewed in 2D mode (see
page 33).
Either, your current location will be displayed, or if
you cannot get a signal your last known destination
will be displayed.
You can move the map by placing the stylus on the
screen and dragging across. Using these operations,
locate your destination on the map. When the
destination is found, tap the display at the exact
location. Tap the Go There icon in the box that
appears.
The box also includes options to add to favorites and
set as origin. Add to favorites includes the address in
a list of favorite locations (see page 24). Set as origin
allows the selected address to be set as a route
starting point.
You can zoom the map in and out by placing the stylus
on the plus or minus symbols at each side of the
screen. It is also possible to zoom by tapping the plus
and minus keys at the right side of the display. The
scale of the map displayed is shown at the top right of
the display.
Planning Your First Journey
Customer Helpline: 0870 873 0080
17
Page 18

Planning Your First Journey
The Navigation Map
The diagram below shows the information available
during navigation. Voice messages will be given for
each turn during navigation of your chosen route.
Zoom Out
Volume
Map Scale
Quick Nav.
Direction Bar
GPS Information
Zoom In
Menu
The bottom bar displays GPS generated information
about your current speed and the altitude. Tap the
bar with the stylus to display the remaining distance
and time to the destination (during navigation only).
Tap the bar again to display the current street.
Tap the Volume icon to turn on or turn off sound. A
red cross over the icon will indicate the volume is
turned off.
Tap the Menu icon to return to the Navigation menu.
Tap the QuickNav icon to display the route to the
specified QuickNav location (see page 40).
The top directions bar gives information about the
selected route. The bearing for each section of the
route is displayed at the left of the bar. Tap the
directions bar to display a list of each turn required
for the journey. Tap the up and down arrows on the
right of the screen to highlight a specific turning.
Tap zoom in and zoom out to change the scale of the
map. The current scale is displayed at the top left of
the map.
18
www.goodmans.co.uk
Page 19

Tap Turn to show the specific turn on the map.
Use the prior and next icons to display other turns on
the journey. Tap the Back icon to return to the turn by
turn list.
Tap the Route icon to display an overview map of the
route. The overview map shows the entire route and
gives distance and time information.
Specific roads can be excluded from the Satellite
Navigation System route calculation. Highlight a
specific road and tap the avoid icon. The Satellite
Navigation System will then recalculate the route
without the selected road (see page 34).
Planning Your First Journey
Customer Helpline: 0870 873 0080
19
Page 20

Planning Your First Journey
Menu Icons
Map Symbols
20
The Map icon displays the Map
screen
The Cancel Route icon cancels
the current navigation
The Quit icon exits the
Satellite Navigation System
The More icon lets you move to
the next screen
The Back icon lets you move to
the previous screen
The Settings icon lets you
configure the Satellite
Navigation System
The Help icon displays
technical support information
The Done icon confirms the
displayed settings
www.goodmans.co.uk
Your current location
Your last known destination where the
GPS signal was reliable
The generated route
Your selected destination
The compass displays the travel direction
Journey Completion
The Satellite Navigation System will announce
journey completion when you reach your destination.
Tap the Menu icon to return to the Navigation menu.
Page 21

Detailed Route Planning
The Navigation Menu
When you enter the Satellite Navigation System, the
Navigation menu will be displayed as shown below.
Address
A basic guide through the Address menu is given in
the previous section. This section covers additional
functions available. The following icons are available
to enhance the search progress.
If the automatic search feature does not
find your specific address, use the find
icon to do a sub-search. This is
particularly useful when the name
consists of two or more words.
The Scroll icons let you move up or down
the list of address items.
The Hide/Display Keyboard icon lets you
extend or shorten the address list by
hiding or displaying the keyboard.
The select key icon lets you display
numeric characters.
Within the Select Numeric menu, the
Umlauts icon lets you select umlauts.
The Erase icon lets you delete the last
character in an address field.
Detailed Route Planning
Customer Helpline: 0870 873 0080
21
Page 22

Detailed Route Planning
Address Modes
To select a different method of searching for an
address, tap the Mode icon.
The available search formats are:
1. City-Street
City-Street is the default setting for the Satellite
Navigation System. City-Street displays the
following address screens: City, Street and
Address Number.
Note: It is also possible to navigate to a city or a
street only. When a city is selected, the first
entry within the street list is the city centre.
When a street is selected, the first entry within
the address number list is a street midpoint.
2. Street-City
Street-City displays the following address
screens: Street, City and Address Number. This
search is useful where an address is being
searched for in an area where there are many
cities and towns.
3. Cross Streets
This search displays the following address
screens: City, Street 1 and Street 2. This search is
useful for finding a destination where two streets
intersect.
4. Postal Code
Postal Code displays the following address
screens: Postal Code, Street and Address Number.
5. In Other Maps
This option opens up the Select Map screen (see
page 41).
22
www.goodmans.co.uk
Page 23

Address Actions
When an address has been specified within the search
screens, the Actions icon can be tapped to access the
following options:
3. Add to My Favorites
This will include the selected address in a list of
favorite locations (see page 24).
My Places
1. Set as Origin
This option allows the selected address to be set
as the route origin. This is useful when calculating
a route that starts at a different point than the
current location.
2. Show on Map
Displays the selected address on the map.
The My Places menu contains information about
favorite locations stored and also previous locations
visited.
Customer Helpline: 0870 873 0080
Detailed Route Planning
23
Page 24

Detailed Route Planning
24
The My Places screen also includes the Settings icon
(see page 37).
My Favorites
The locations stored in My Favorites have been
stored previously for quick retrieval. Tap the My
Favorites icon to display a list of location groups. All
the favorite locations are organised into these
groups.
www.goodmans.co.uk
Note: The My Favorites folder is the default
folder where all favorites are stored if not
assigned to a group.
To open a group, highlight a group with the stylus and
tap Enter, or, tap twice with the stylus.
A list of favorite locations will be displayed. Highlight
a location and tap Enter to view the favorite location
on the map.
Page 25

The Satellite Navigation System can calculate the
fastest journey or the shortest journey. Tap the
appropriate icon at the bottom of the screen. Tap Go!
to calculate a route to the location.
Favorite Actions
When the Favorites Group screen is displayed, tap the
Actions icon to display the following options.
1. The Add Group option opens up the keyboard. Enter the name of the group and tap Save. The new group will appear on the Favorite groups screen.
2. To edit a group, highlight the group and tap the Edit icon. The keyboard opens with the existing group name highlighted. The name of the group can now be changed. Tap Save to keep the changes.
Detailed Route Planning
Customer Helpline: 0870 873 0080
25
Page 26

Detailed Route Planning
3. To delete a group, highlight the group and tap the Delete icon. The My Favorites group cannot be deleted.
When the favorite locations screen is displayed, tap
the Actions icon to display the following options.
1. Set as Origin
This option allows the selected address to be set
as the route origin.
2. Show on Map
Displays the selected address on the map.
3. Edit Favorite Location
This option opens up the keyboard with the
existing location name highlighted. The name of
the location can now be changed. The location can
also be moved to a different favorites group by
tapping the left and right arrows.
4. Del. Favorite Location
This option is used to remove a location from the
list. A warning message is given before deletion.
Tap Yes to confirm deletion.
26
www.goodmans.co.uk
Page 27

Favorite Alerts
Alerts let you know that you are approaching a
favorite location. Tap the Alerts icon to set the
distances for a first and second alert. Four distance
options are available for each alert.
The distance options available are dependent on the
Unit of Measure set with the Map Options (see
page 38).
1. If the Satellite Navigation System displays in Miles the available alert distances are 110 yards, 550 yards, 0.6 miles and 1.2 miles.
2. If the Satellite Navigation System displays in Kilometres the available alert distances are 100 metres,
500 metres, 1 kilometre and 2 kilometres.
Note: Alert can be set for a group but not for an
individual location.
Alerts can be disabled for all groups by setting the
first Alert to Off. Alerts can be disabled for an
individual group by tapping the Hide Symbol on Map
icon. This will also stop the symbol being displayed at
the favorite location. To enable alerts and display the
symbol for a group, tap Show symbol on Map icon.
History
Detailed Route Planning
Customer Helpline: 0870 873 0080
27
Page 28

Detailed Route Planning
Tap the History menu to view a list of recently visited
locations.
Highlight a location and tap Show to view the location
on the map.
History Actions
When a location has been highlighted, tap the Actions
icon to show the following screen:
1. Set as Origin
This option allows the selected location to be set
as the route origin. This is useful when calculating
a route that starts at a different point than the
current location.
2. Add to My Favorites
This option will include the selected location in
the list of favorite locations (see page 24).
28
www.goodmans.co.uk
Page 29

3. Delete Item
This option will remove the highlighted location
from the History list. A warning message is
displayed before deletion. Tap Yes to confirm
deletion.
4. Clear List
This option will remove all locations from the
History list. A warning message is displayed
before deletion. Tap Yes to confirm deletion.
Food, Fuel and Lodging
The Food, Fuel and Lodging menu contains
information about useful and interesting locations to
visit. The locations are organised into numerous
categories.
Tap the Food, Fuel and Lodging icon to enter the
category list.
Tap More to view another screen of categories.
Detailed Route Planning
Customer Helpline: 0870 873 0080
29
Page 30

Detailed Route Planning
Tap More again to access a further list of locations.
Use the up and down arrows to scroll though the list.
Some categories are further divided into sub-
categories.
A category can also be searched by tapping the
Keyboard symbol and entering text in the POI
Category box. Tap Enter to accept the highlighted
category.
If the initial search returned no category results, tap
the Find icon to do a sub-search. The Find icon is at
the top right of the screen. This is particularly useful
when the category name consists of two or more
words.
When a category has been selected, the Satellite
Navigation System automatically displays the closest
result at the top of the list.
30
www.goodmans.co.uk
Page 31

Search Near a Location
Tap the Near icon to search for a category near a
certain location.
When the Near icon is tapped, the following options
are available.
1. Current Location
This option searches for a category around the
current location. This option is the default setting.
2. Destination
This option searches for a category around the
destination. This option is only available when a
destination has been entered. This option is
useful when travelling to a new location and little
is known about the area.
3. Other Address
This option searches for a category near a
specified location. When this option is tapped, the
keyboard opens and a location can be specified.
4. Search Radius
This option is used to specify the category
distance from the specified location.
The distance options available are dependent on
the Unit of Measure set with the Map Options (see
page 38).
If the Satellite Navigation System displays in
Miles the available alert distances are 3, 25, 50,
100 and 200.
If the Satellite Navigation System displays in
Kilometres the available alert distances are 5, 40,
80, 160 and 320.
If no radius is specified, the Satellite Navigation
System will search the whole map.
Detailed Route Planning
Customer Helpline: 0870 873 0080
31
Page 32

Detailed Route Planning
5. Show or Hide Symbol on Map
This option allows the selected category to be
shown or hidden on the map. When Hide symbol is
selected, a red line appears though the icon in the
category list. This means that the category
symbol does not appear on the map. To show a
category again, tap Show symbol on map.
Category Actions
When a location within Categories has been selected,
the Actions icon can be tapped to access the
following options:
1. Set as origin
This option allows the selected location to be set
as the route origin. This is useful when calculating
a route that starts at a different point than the
current location.
2. Show on Map
Displays the selected location on the map.
3. Add to My Favorites
This will include the selected address in a list of
favorite locations (see page 24).
4. Sort by ABC
Displays the list of locations in alphabetical order.
32
www.goodmans.co.uk
Page 33

Map Options
2D/3D Mode
The Map Options menu contains the following options:
Tap the 2D/3D Mode icon to change the display
between a 2D and a 3D display. The 2D map is
optmized for daytime viewing and will allow you to
use the pan and zoom functions.
Customer Helpline: 0870 873 0080
Detailed Route Planning
33
Page 34

Detailed Route Planning
Day/Night Mode
Tap the Day/Night Mode icon to change the display
between Day and Night mode. Night mode is
optimized for night driving or adverse weather
conditions.
Avoid Roads
Tap the Avoid Roads icon to specify certain roads to
be permanently excluded from your route
calculations.
Use this feature when you want to avoid congested
roads, unsafe roads or toll roads. The Avoid Roads
screen displays the Toll Roads and Avoid Roads
groups.
Tap the Actions icon to add, edit or delete avoid road
groups.
34
www.goodmans.co.uk
Page 35

1. Add Group
This option opens up the keyboard. Enter the
name of the group and tap Save. The new group
will appear on the Avoid Road Groups screen.
2. Edit Group
Highlight a group and tap the Edit icon. The
keyboard opens with the existing group name
highlighted. The name of the group can now be
changed. Tap Save to keep the changes.
3. Delete Group
Highlight the group and tap the Delete icon. The
highlighted group will be deleted. The Toll Roads
and My Roads to Avoid groups cannot be edited or
deleted.
When a group has been highlighted, tap the Allow/
Avoid icon to include or exclude all the roads
within that group from route calculations.
To open a group, highlight a group with the stylus
and tap Enter, or, tap twice.
If roads have been added to the group, they will be
displayed. Tap the Actions icon to display the
following options.
Detailed Route Planning
Customer Helpline: 0870 873 0080
35
Page 36

Detailed Route Planning
1. Add Road
This option opens up the keyboard. Enter the City
and the name of the street to avoid. When a street
has been selected, the keyboard screen will be
displayed. The road name can be edited. Tap the
left and right arrows to select which group the
road will be entered in. Tap Enter to display the
road on the map.
2. Edit Road
Highlight a road within the group and tap Edit
Road. This option opens up the keyboard with the
existing road name highlighted. The name of the
road can now be changed. The road can also be
moved to a different group by tapping the left and
right arrows.
3. Delete Item
Highlight a road within the group and tap Delete
Item. This option will remove the highlighted road
from the group.
4. Show on Map
Displays the selected road on the map. When a
road has been highlighted, tap the Allow/ Avoid
icon to include or exclude the road from route
calculations.
Free Map Browsing
Tap this icon to disconnect from the GPS receiver and
browse the map, without the GPS returning the
display to your current location.
36
www.goodmans.co.uk
Page 37

Note: Free map browsing is only available in 2D
mode.
You can move the map by placing the stylus on the
screen and dragging across. Tap the zoom in and
zoom out icons to change the scale of the map. Using
these operations locate your destination on the map.
When the destination is found, tap the display at the
exact location. The box that appears gives the options
to Go There, Add to My Favorites or Set as Origin. A
target symbol indicates the current set origin. To
navigate to a destination found on the free map, go to
map options and switch GPS back on.
The Map Options menu also contains the Settings
icon.
Settings
The Settings menu contains the following options.
Tap Prompts to select the type of voice and visual
notifications that are used by the Satellite Navigation
System whilst navigating.
Detailed Route Planning
Customer Helpline: 0870 873 0080
37
Page 38

Detailed Route Planning
Prompts
1. Speed Warning
This prompt warns you when your car exceeds the
speed limit. This prompt is not active unless
selected.
2. Route Recalculation
This prompt is activated when you deviate from
the calculated route.
3. Unreliable GPS Signal
This prompt warns that the GPS signal is too low
and unreliable for navigation.
4. Drive Carefully
This is a friendly reminder at the start of each
journey.
5. Symbols
Directional prompts are displayed in diagram
form, such as an arrow.
6. Text
Directional prompts are displayed in written form.
7. None
No directional prompts are displayed.
Units of Measure
Tap the Units of Measure icon to select the units of
measure used in all Satellite Navigation System
calculations.
1. Miles, Yards
2. Kilometres/hour
38
www.goodmans.co.uk
Page 39

GPS Signal
The Satellite Navigation System uses the GPS
receiver to get your location. Tap this icon to view the
number of satellites currently being used. A minimum
of 3 satellites are required for GPS navigation.
Current speed and altitude as well as the longitude
and latitude information for your current location is
also displayed.
Route
Tap the Route icon to change the way the Satellite
Navigation System calculates the route.
1. Quickest route
Quickest route is the default setting and selects
the route that takes the least time.
2. Shortest route
Shortest route selects the route that is the least
distance.
Map Settings
Tap the map settings icon to customize the map
display. The following options are available:
1. Forward is up
This option orients the map so that the forward
direction is always at the top of the display.
2. North is up
This option orients the map so that the north is
always at the top of the display.
Detailed Route Planning
Customer Helpline: 0870 873 0080
39
Page 40

Detailed Route Planning
3. Use Automatic Zoom
When this option is selected, the zoom is speed
dependent. The map zooms out at higher speeds,
displaying a larger map area, and zooms in at
lower speeds, displaying a smaller map area.
4. Use Larger Labels
This option increases the size of the street names
to make the map easier to read.
Quick Nav.
Tap the Quick Nav. icon to define the Quick Nav.
locations. When a Quick Nav. location is selected, you
can navigate to that location at any point by tapping
the Quick Nav. icon at the bottom of the map. The
following options are available:
1. To Predefined Address
Tap Set Address to enter the city, street and
address number for the Quick Nav. location.
2. To Nearest POI Category
Tap To Nearest POI Category to select a category
that will be used for Quick Navigation.
From the Settings menu, tap the More icon to view
the following options.
40
www.goodmans.co.uk
Page 41

Select Map
Tap the Select Map icon to change the currently
selected map used by the Satellite Navigation
System.
Map details and version numbers are given. Tap the
up and down arrows to highlight a different map. The
following options are available:
1. Refresh
This option refreshes the screen when a new
memory card is inserted into the device.
Detailed Route Planning
Customer Helpline: 0870 873 0080
41
Page 42

Detailed Route Planning
2. Delete
This option will delete the highlighted map. The
current map cannot be deleted.
3. Select
This option lets you designate a highlighted map
as the current map.
Start Demo
Tap the Start Demo icon to let the Satellite
Navigation System display a simulated route. Many of
the Satellite Navigation System navigational features
are disabled when the demo is running. Tap the Quit
Demo icon to end the demo.
Tuto rial
Tap the Tutorial icon to start the Satellite Navigation
System guided tour. Use the left and right arrows to
scroll through the tutorial display screens. End the
tutorial by tapping the Red Cross icon.
About
Tap the About icon to display Satellite Navigation
Systems version and copyright information.
Help
Tap the Help icon to display technical support
information.
42
www.goodmans.co.uk
Page 43

MP3 Player
The Satellite Navigation System can also be used for
playback of MP3 files.
The MP3 player can be accessed by tapping the MP3
icon on the opening screen or by pressing the MP3
button to the right side of the screen.
To use the MP3 player, files must be loaded onto a SD
card (not supplied).
The following screen will be displayed.
Home
Repeat
Up
Play
Close
Tap the up and down arrows to scroll through the list
of songs and albums.
Tap the Home icon to return the display to the Main
menu screen.
Tap the Repeat icon once to repeat the highlighted
track. Tap the Repeat icon again to repeat all the
tracks in the library. Tap the Repeat icon again to turn
off.
Tap the Up icon to navigate up from the current
folder.
Tap the Play icon to begin playback of the highlighted
track.
Tap the Close icon to close the MP3 player and return
to the initial screen.
MP3 Player
Customer Helpline: 0870 873 0080
43
Page 44

MP3 Player
The following window opens when a track has been
selected for playback.
44
Stop
Repeat
Up
Back
Forward
Tap the Skip Forward and Skip Back icons to skip to a
different track. Tap and hold the Skip icons to move
through the currently playing track.
Tap the Play icon to begin playback of the selected
track.
Tap the Stop icon to stop current playback.
Tap the Repeat icon once to repeat the current track.
Tap the Repeat icon again to repeat all the tracks due
for playback.
Tap the Up icon to close the player window.
Play
www.goodmans.co.uk
Page 45

Care and Maintenance
Warning! Do not leave your Satellite Navigation
System on display in your car, it will be stolen.
We recommend that you use LCD screen protection
sheets to keep your screen clean and clear of
scratches. These are available from most large
stationary suppliers and computer retailers.
If necessary wipe the casing with the soft cloth
provided to keep it clean.
Troubleshooting
The Satellite Navigation System will not switch on:
• The battery may be discharged. Connect the car
adapter.
The Satellite Navigation System cannot locate the
address:
• Make sure that the latest maps are installed on
the Satellite Navigation System.
• The address you enter has to match exactly the
location on the map. Try using the free map
function to find the location instead.
The Satellite Navigation System cannot find a GPS
signal:
Note: Satellite signals are required for the
Satellite Navigation System to function properly.
There may be occasions within your home or
building when the signal strength is limited and
navigation may not be possible. This is quite
normal for products of this type.
Your car may have an athermic heat reflecting
windscreen or windscreen heating that prevents
the GPS receiver acquiring a valid signal. In
these cases you may have to use an external
antenna (not supplied).
If the battery charge is at a low level, the GPS
reception will be reduced.
• If the Satellite Navigation System is being used
for the first time, up to 10 minutes may be
required to find a signal.
• Make sure that the GPS antenna is raised and as
horizontal as possible to optimize signal
reception.
Care and Maintenance
Customer Helpline: 0870 873 0080
45
Page 46

Care and Maintenance
• You may be in a location where the signal cannot
penetrate. Make sure that you are outside and not
under a metal roof or canopy.
• Try using an external antenna.
• The battery charge may be at a low level. Connect
the car adapter.
The Satellite Navigation System does not use the
most obvious route:
• This may be because there has been a new road
opened that is not in the map’s memory. If when
tracking the obvious route it looks like you are
travelling across country then the road is not in
the maps memory.
The Satellite Navigation System is on but will not
respond to commands:
• The software can sometimes take a few seconds
to respond.
• Try resetting the Satellite Navigation System. You
can use the stylus to press reset.
46
www.goodmans.co.uk
Page 47

Guarantee
This product is guaranteed for 12 months from the
date of original purchase. If any defect arises due to
faulty materials or workmanship, the unit will either
be replaced, a refund given or repaired free of charge
(where possible) during this period by the dealer from
whom you purchased the unit.
The guarantee is subject to the following provisions:
• The guarantee is only valid within the boundaries
of the country of purchase.
• The product must be correctly assembled and
operated in accordance with the instructions
contained in this booklet.
• The guarantee does not cover accidental damage,
misuse, or consumable items.
• The guarantee will be rendered invalid if the
product is resold or has been damaged by
inexpert repair.
• The manufacturer disclaims any liability for
incidental or consequential damages.
This guarantee is in addition to and does not diminish
your statutory, or legal rights.
If any items are missing call the Helpline on: 0870
873 0080
Spare parts: 0870 873 0080
Alternatively, visit our website:
www.goodmans.co.uk
Guarantee
Customer Helpline: 0870 873 0080
47
Page 48

GNAV12_Rev2_SEP06
 Loading...