

Page 1

GoldSEar
TVCR
OWNER'S MANUAL
Before connecting, operating, or adjusting this
product, please read this instruction booklet carefully
and completely.
Page 2

CONTENTS
Antenna Connections .................................................................................................................... 5
Connecting an Indoor Antenna ................................................................................................... 5
Connecting an Outdoor Antenna ................................................................................................ 5
Connecting a CATV Cable ......................................................................................................... 5
Description of Controls ................................................................................................................. 6
Using the TV's Front Panel Controls .......................................................................................... 6
Using the TV's Back Panel Controls .......................................................................................... 7
Using the Remote Control .......................................................................................................... 8
On-Screen Display ....................................................................................................................... 10
Basic TV Operation ...................................................................................................................... 11
Turning On the "IV .................................................................................................................... 11
Selecting the On-Screen Language ......................................................................................... 11
Selecting the Input Signal ........................................................................................................ 12
Memorizing Channels ............................................................................................................... 12
Selecting Channels .................................................................................................................. 14
Adjustingthe Volume ................................................................................................................ 14
Recalling the Current TV Mode ................................................................................................ 14
Picture Control ............................................................................................................................. 15
Closed Caption Function ............................................................................................................. 16
Using Closed Captions ............................................................................................................. 16
Using the Text Function ............................................................................................................ 17
Timer Functions ............................................................................................................................ 18
Setting the Current Time .......................................................................................................... 18
Setting the OFF TIMER ............................................................................................................ 19
Setting the ON TIMER .............................................................................................................. 19
AUTO OFF Function ................................................................................................................. 20
Setting the Sleep Timer ............................................................................................................ 20
Playback ........................................................................................................................................ 21
Playing Back a Prerecorded Cassette Tape ............................................................................. 21
Tracking Control ....................................................................................................................... 22
Rental Position ......................................................................................................................... 22
Auto Repeat Function ............................................................................................................... 23
Viewing TV Programs During Tape Playback ........................................................................... 23
Playback Variations ...................................................................................................................... 24
Variable Speed Playback ......................................................................................................... 24
Using CLOCK COUNT/REMAIN .............................................................................................. 25
Using Counter Memory Function .............................................................................................. 26
Recording ..................................................................................................................................... 27
Tape Selection ....................................................................................... .................................. 27
Recording TV Programs .......................................................................................................... 28
Program Timer Recording ........................................................................................................... 29
Setting the Program Timer ....................................................................................................... 29
Checking the Program Timer Settings ..................................................................................... 31
Changing or Cancelling the Program Timer Settings ............................................................... 32
Instant Timer Recording .............................................................................................................. 33
VHS Index Search System (VISS) .................................................................................... ...........34
Marking VISS Signals .............................................................................................................. 34
Playing Back from the VISS Point ............................................................................................ 34
Locating the Desired Program (VISS Search) ......................................................................... 34
Troubleshooting ........................................................................................................................... 35
In TV Reception ....................................................................................................................... 35
In VCR Operation ..................................................................................................................... 36
2
Page 3
FEATURES
Your new "rVCR has been designed and built to give you the very best in quality, features and
performance. To fully enjoy all the features and functions of your TVCR, we recommend you read
this Owners Manual carefully and thoroughly.
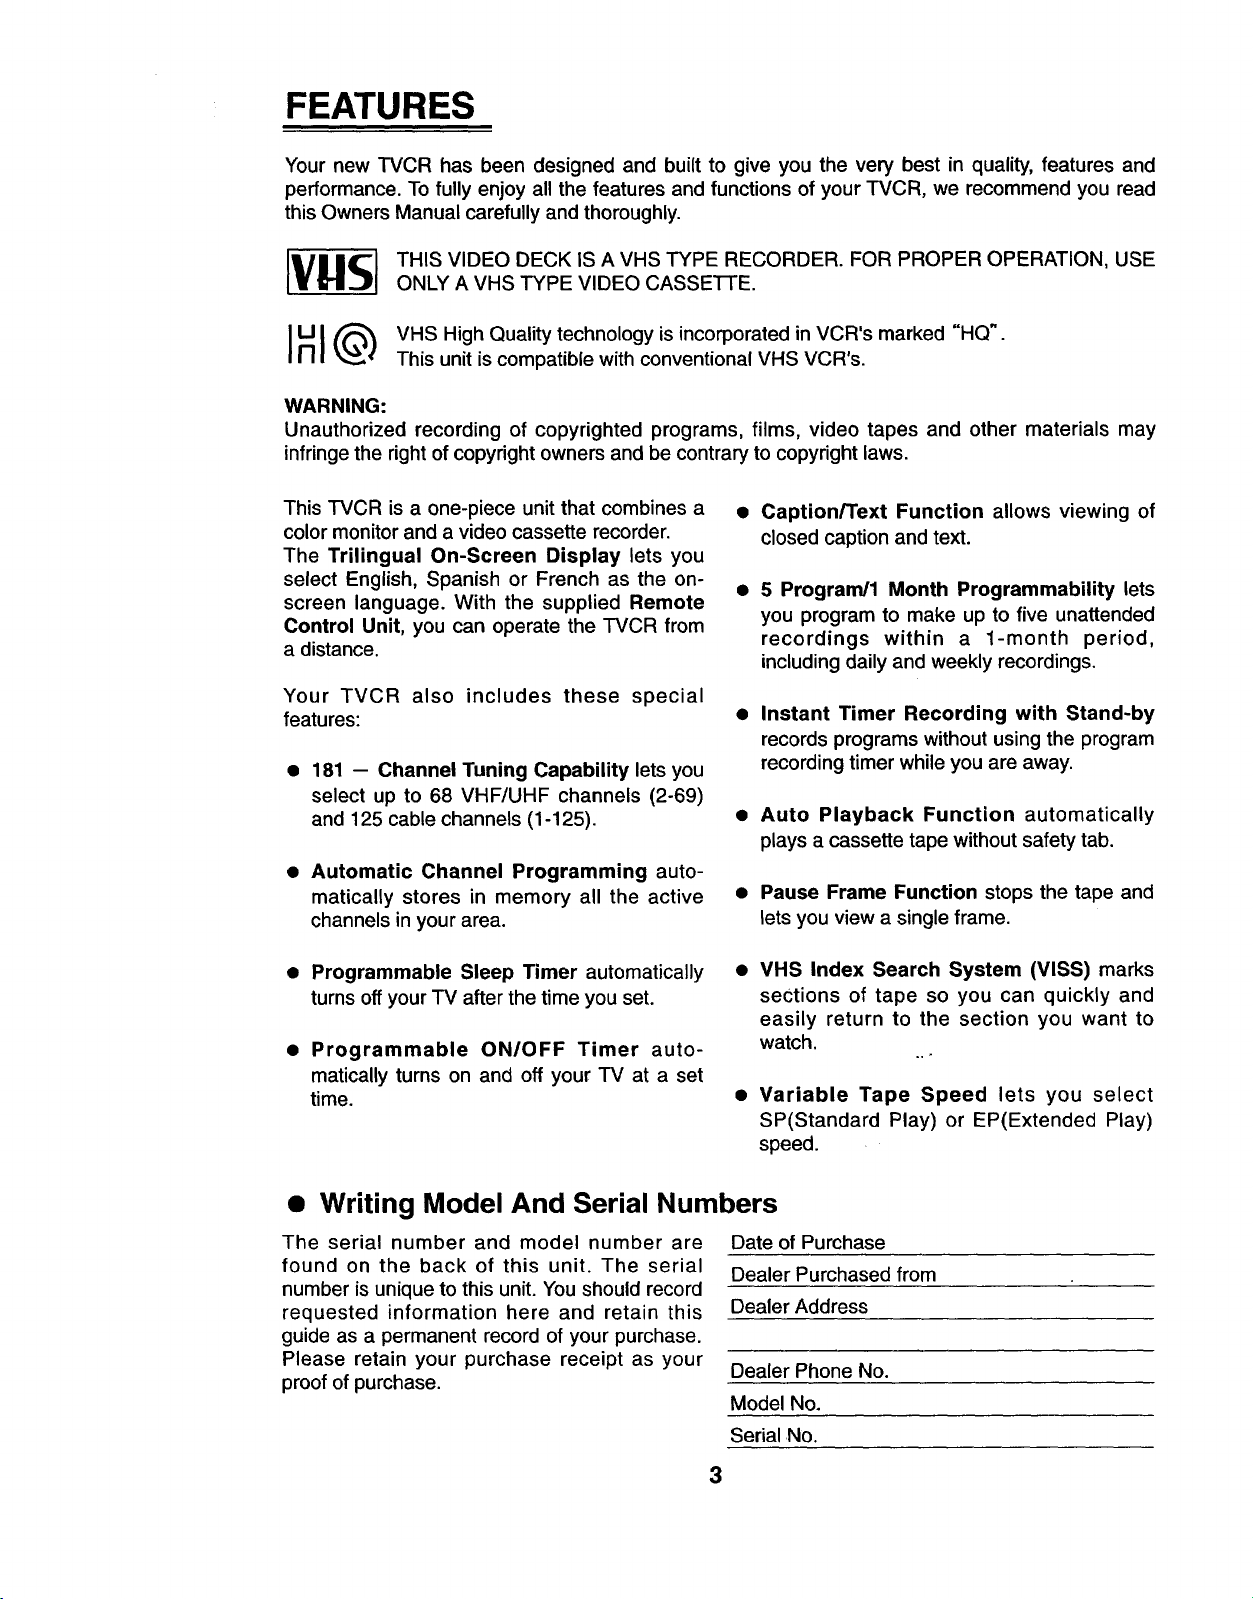
[VgS] ONLyTHISVIDEO DECK ISAAVHS TYPE VIDEoVHSTYPE RECORDER. FOR PROPEROPERATION,cASSETtE. USE
IHI_ VHS High Quality technology is incorporated in VCR's marked "HQ".
WARNING:
Unauthorized recording of copyrighted programs, films, video tapes and other materials may
infringe the right ofcopyright owners and be contrary to copyright laws.
This TVCR is a one-piece unit that combines a
color monitor and a video cassette recorder.
The Trilingual On-Screen Display lets you
select English, Spanish or French as the on-
screen language. With the supplied Remote
Control Unit, you can operate the TVCR from
a distance.
Your TVCR also includes these special
features:
• 181 -- Channel Tuning Capability lets you
select up to 68 VHF/UHF channels (2-69)
and 125 cable channels (1-125).
• Automatic Channel Programming auto-
matically stores in memory all the active
channels in your area.
This unit is compatible with conventional VHS VCR's.
• Caption/Text Function allows viewing of
closed caption and text.
5 Program/1 Month Programmability lets
you program to make up to five unattended
recordings within a 1-month period,
including daily and weekly recordings.
• Instant Timer Recording with Stand-by
records programs without using the program
recording timer while you are away.
• Auto Playback Function automatically
plays a cassette tape without safety tab.
• Pause Frame Function stops the tape and
lets you view a single frame.
• Programmable Sleep Timer automatically
turns off your TV after the time you set.
• Programmable ON/OFF Timer auto-
matically turns on and off your TV at a set
time.
• Writing Model And Serial Numbers
The serial number and model number are
found on the back of this unit. The serial
number is unique to this unit. You should record
requested information here and retain this
guide as a permanent record of your purchase.
Please retain your purchase receipt as your
proof of purchase.
Date of Purchase
Dealer Purchased from
Dealer Address
Dealer Phone No.
Model No.
Serial No.
3
VHS Index Search System (VISS) marks
sections of tape so you can quickly and
easily return to the section you want to
watch.
• Variable Tape Speed lets you select
SP(Standard Play) or EP(Extended Play)
speed.
H=,
Page 4
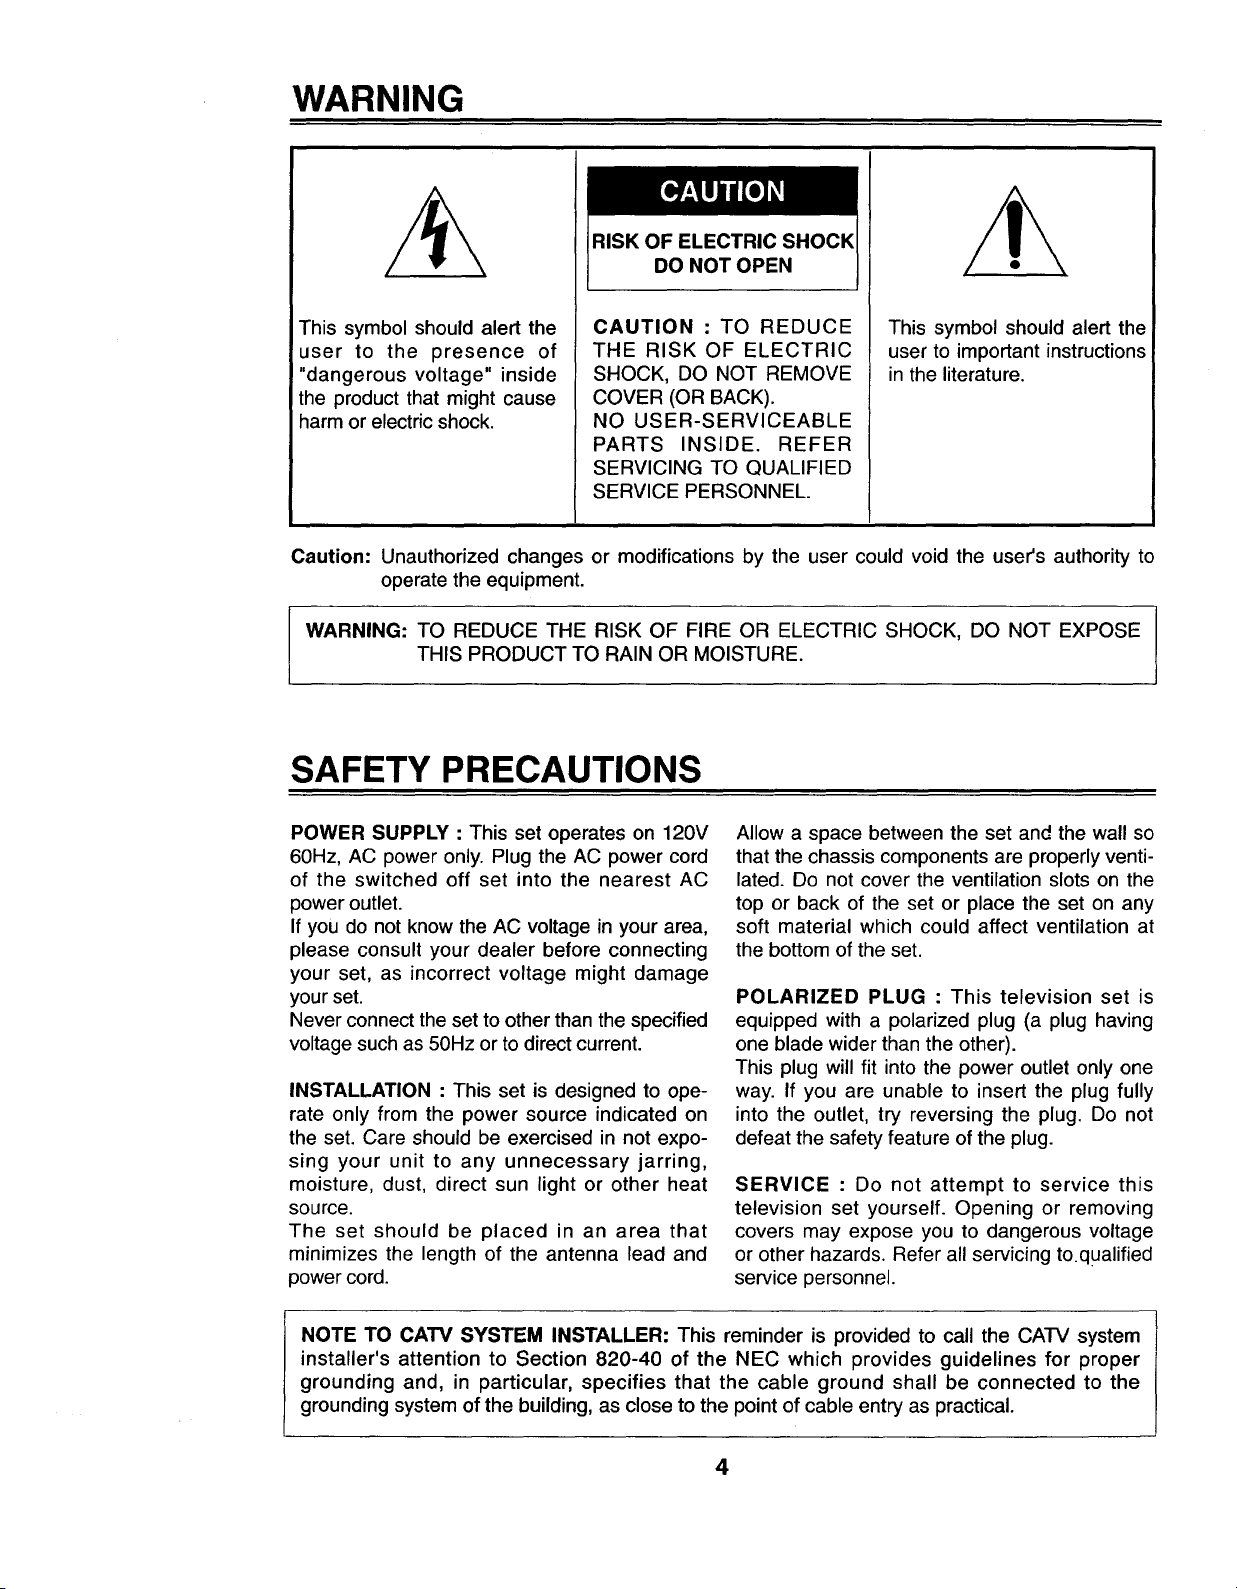
WARNING
DO NOT OPEN
This symbol should alert the
user to the presence of
"dangerous voltage" inside
the product that might cause
harm or electric shock.
Caution: Unauthorized changes or modifications by the user could void the user's authority to
operate the equipment.
WARNING: TO REDUCE THE RISK OF FIRE OR ELECTRIC SHOCK, DO NOT EXPOSE
THIS PRODUCT TO RAIN OR MOISTURE.
CAUTION : TO REDUCE
THE RISK OF ELECTRIC
SHOCK, DO NOT REMOVE
COVER (OR BACK).
NO USER-SERVICEABLE
PARTS INSIDE. REFER
SERVICING TO QUALIFIED
SERVICE PERSONNEL.
This symbol should alert the
user to important instructions
in the literature.
SAFETY PRECAUTIONS
POWER SUPPLY : This set operates on 120V
60Hz, AC power only. Plug the AC power cord
of the switched off set into the nearest AC
power outlet.
If you do not know the AC voltage in your area,
please consult your dealer before connecting
your set, as incorrect voltage might damage
your set.
Never connect the set to other than the specified
voltage such as 50Hz or to direct current.
INSTALLATION : This set is designed to ope-
rate only from the power source indicated on
the set. Care should be exercised in not expo-
sing your unit to any unnecessary jarring,
moisture, dust, direct sun light or other heat
source.
The set should be placed in an area that
minimizes the length of the antenna lead and
power cord.
Allow a space between the set and the wall so
that the chassis components are properly venti-
lated. Do not cover the ventilation slots on the
top or back of the set or place the set on any
soft material which could affect ventilation at
the bottom of the set.
POLARIZED PLUG : This television set is
equipped with a polarized plug (a plug having
one blade wider than the other).
This plug will fit into the power outlet only one
way. If you are unable to insert the plug fully
into the outlet, try reversing the plug. Do not
defeat the safety feature of the plug.
SERVICE : Do not attempt to service this
television set yourself. Opening or removing
covers may expose you to dangerous voltage
or other hazards. Refer all servicing to.qualified
service personnel.
NOTE TO CATV SYSTEM INSTALLER: This reminder is provided to call the CA'I-V system
installer's attention to Section 820-40 of the NEC which provides guidelines for proper
grounding and, in particular, specifies that the cable ground shall be connected to the
grounding system of the building, as close to the point of cable entry as practical.
4
Page 5
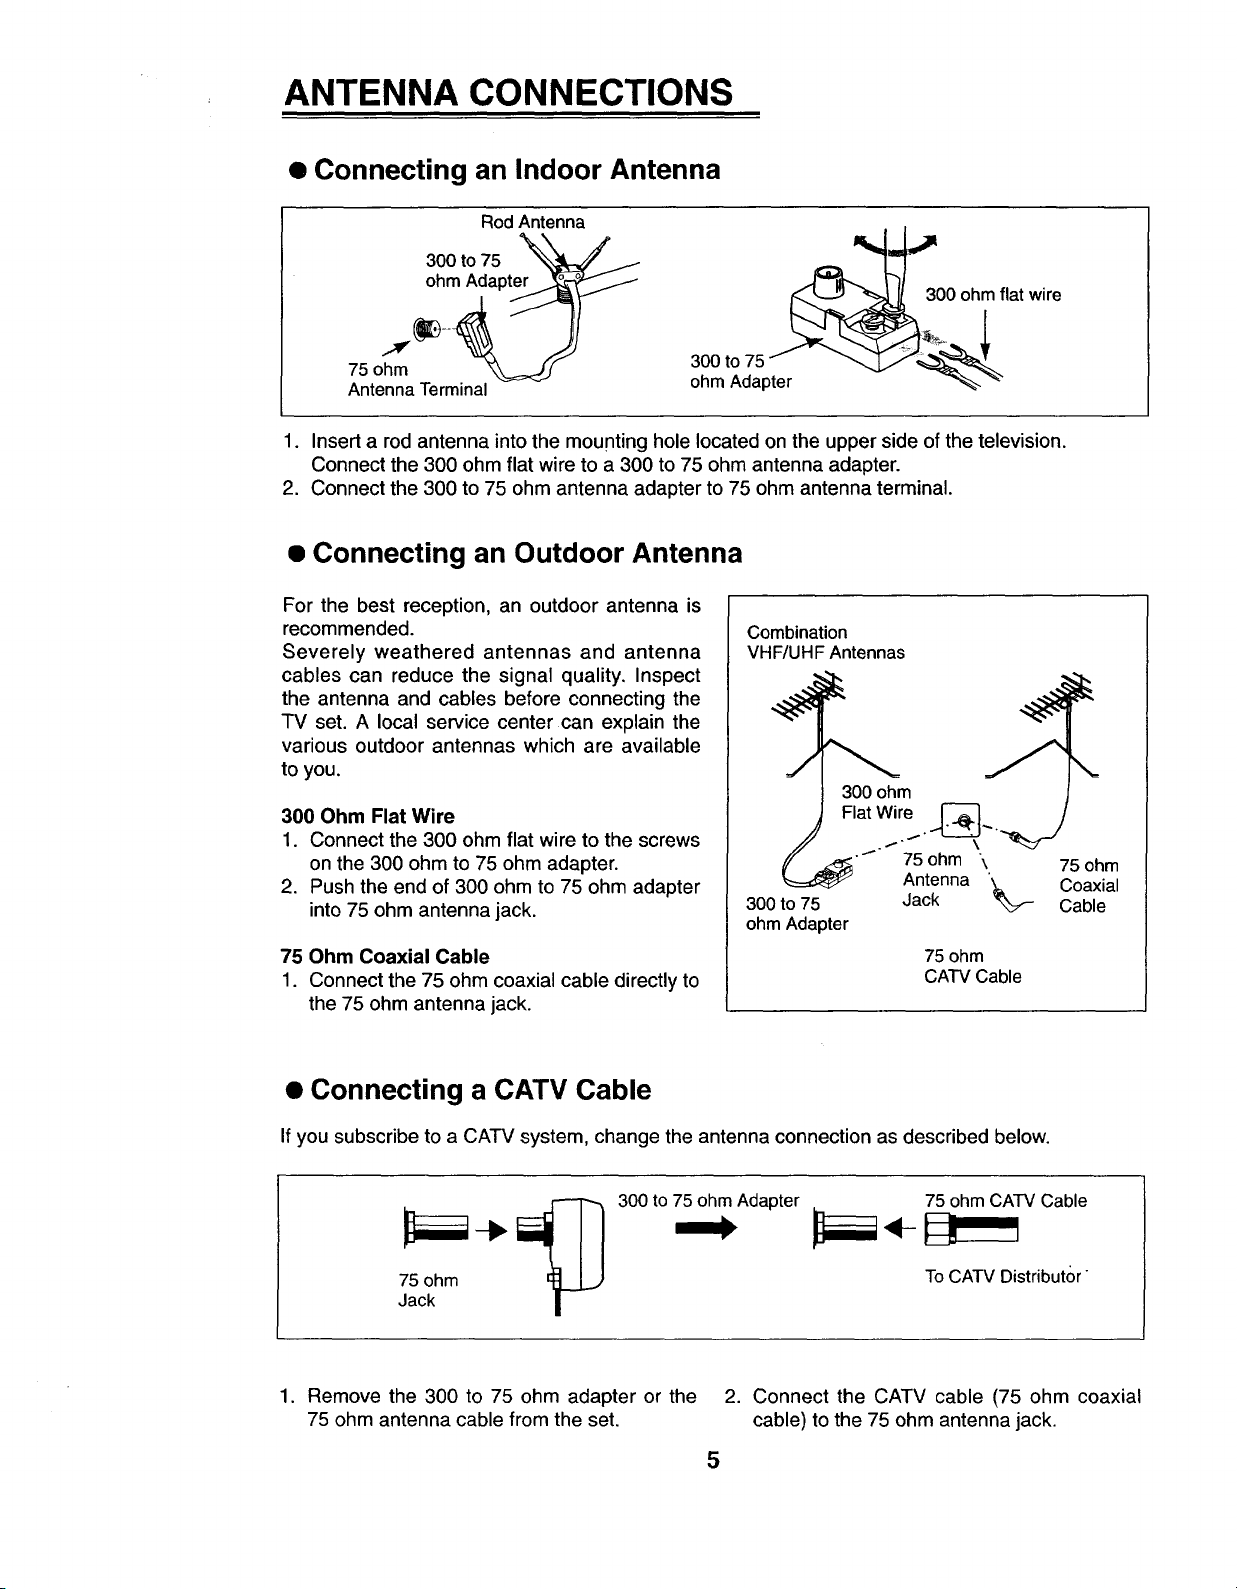
ANTENNA CONNECTIONS
• Connecting an Indoor Antenna
Rod Antenna
300 to 75
ohm Adapter
300 ohm flat wire
75 ohm
Antenna Terminal
1. Insert a rod antenna into the mounting hole located on the upper side of the television.
Connect the 300 ohm flat wire to a 300 to 75 ohm antenna adapter.
2. Connect the 300 to 75 ohm antenna adapter to 75 ohm antenna terminal.
ohm Adapter
• Connecting an Outdoor Antenna
For the best reception, an outdoor antenna is
recommended.
Severely weathered antennas and antenna
cables can reduce the signal quality. Inspect
the antenna and cables before connecting the
TV set. A local service center can explain the
various outdoor antennas which are available
to you.
300 Ohm Flat Wire
1. Connect the 300 ohm flat wire to the screws
on the 300 ohm to 75 ohm adapter.
2. Push the end of 300 ohm to 75 ohm adapter
into 75 ohm antenna jack.
75 Ohm Coaxial Cable
1. Connect the 75 ohm coaxial cable directly to
the 75 ohm antenna jack.
Combination
VH F/UHF Antennas
300 ohm
Flat Wire
...- \
300 to 75
ohm Adapter
75 ohm \ 75 ohm
Antenna _ Coaxial
Jack Cable
75 ohm
CATV Cable
• Connecting a CATV Cable
If you subscribe to a CATV system, change the antenna connection as described below.
300 to 75 ohm Adapter
1. Remove the 300 to 75 ohm adapter or the 2.
75 ohm antenna cable from the set.
5
Connect the CATV cable (75 ohm coaxial
cable) to the 75 ohm antenna jack.
75 ohm CATV Cable
To CATV Distributor
Page 6
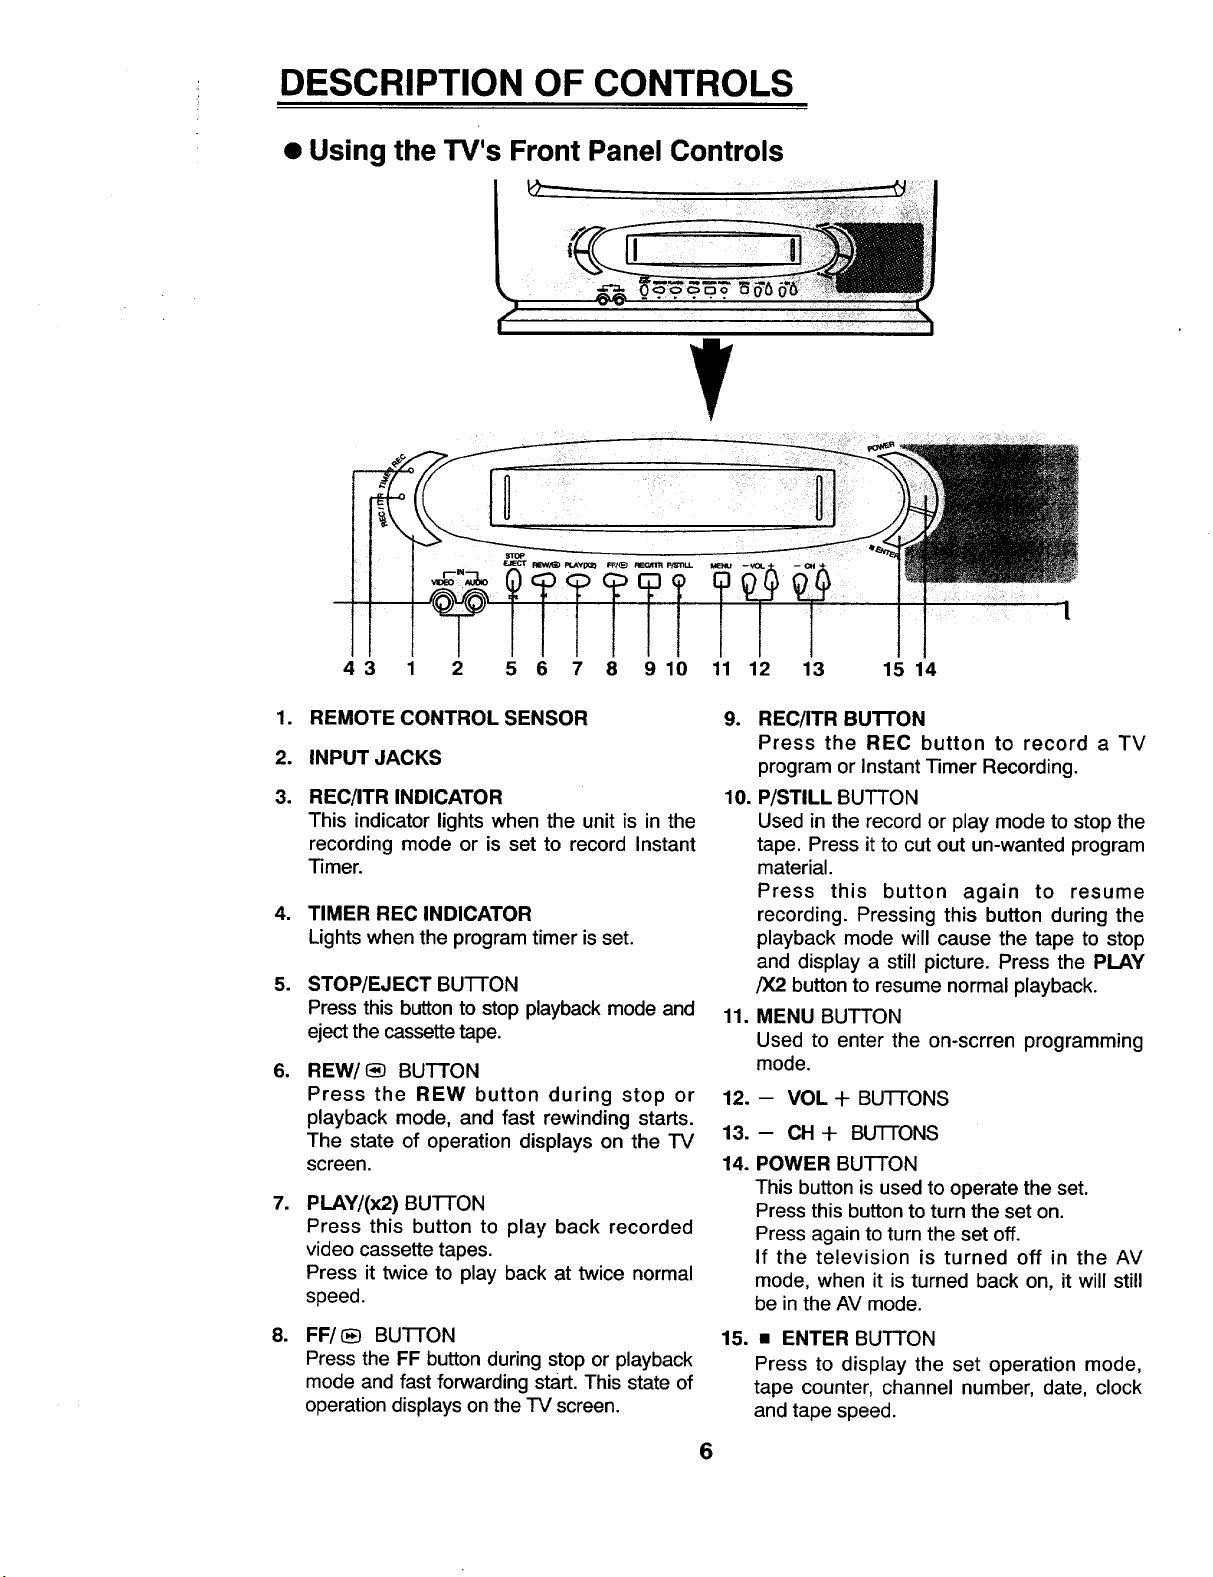
DESCRIPTION OF CONTROLS
• Using the TV's Front Panel Controls
|_ i "'
/
i
43 11 12 13 15 14
°
REMOTE CONTROL SENSOR
2.
INPUT JACKS
3.
REC/ITR INDICATOR
This indicator lights when the unit is in the
recording mode or is set to record Instant
Timer.
,
TIMER REC INDICATOR
Lights when the program timer is set.
.
STOP/EJECT BU'I-I-ON
Press this button to stop playback mode and
ejectthe cassettetape.
°
REW/(_ BUTTON
Press the REW button during stop or 12.
playback mode, and fast rewinding starts.
The state of operation displays on the "IV 13.
screen. 14.
°
PLAY/(x2)BU-I-FON
Press thisbutton to play back recorded
videocassettetapes.
Press it twice to play back at twice normal
speed.
°
FF/_ BUTFON
Press the FF button during stop or playback
mode and fast forwarding start. This state of
operation displays on the -IV screen.
9. REC/ITR Bu'n'ON
Press the REC button to record a TV
program or Instant Timer Recording.
10. P/STILL BUTTON
Used in the record or play mode to stop the
tape. Press itto cut out un-wanted program
material.
Press this button again to resume
recording. Pressing this button during the
playback mode will cause the tape to stop
and display a still picture. Press the PLAY
iX2 button to resume normal playback.
11. MENU BUTTON
Used to enter the on-scrren programming
mode.
-- VOL -I- BUTTONS
-- CH-I- BU-R-ONS
POWER BUTTON
This button is used to operate the set.
Press this button to turn the set on.
Press again to turnthe set off.
If the television is turned off in the AV
mode, when it is turned back on, it will still
be in the AV mode.
15.
• ENTER BUTTON
Press to display the set operation mode,
tape counter, channel number, date, clock
and tape speed.
6
Page 7
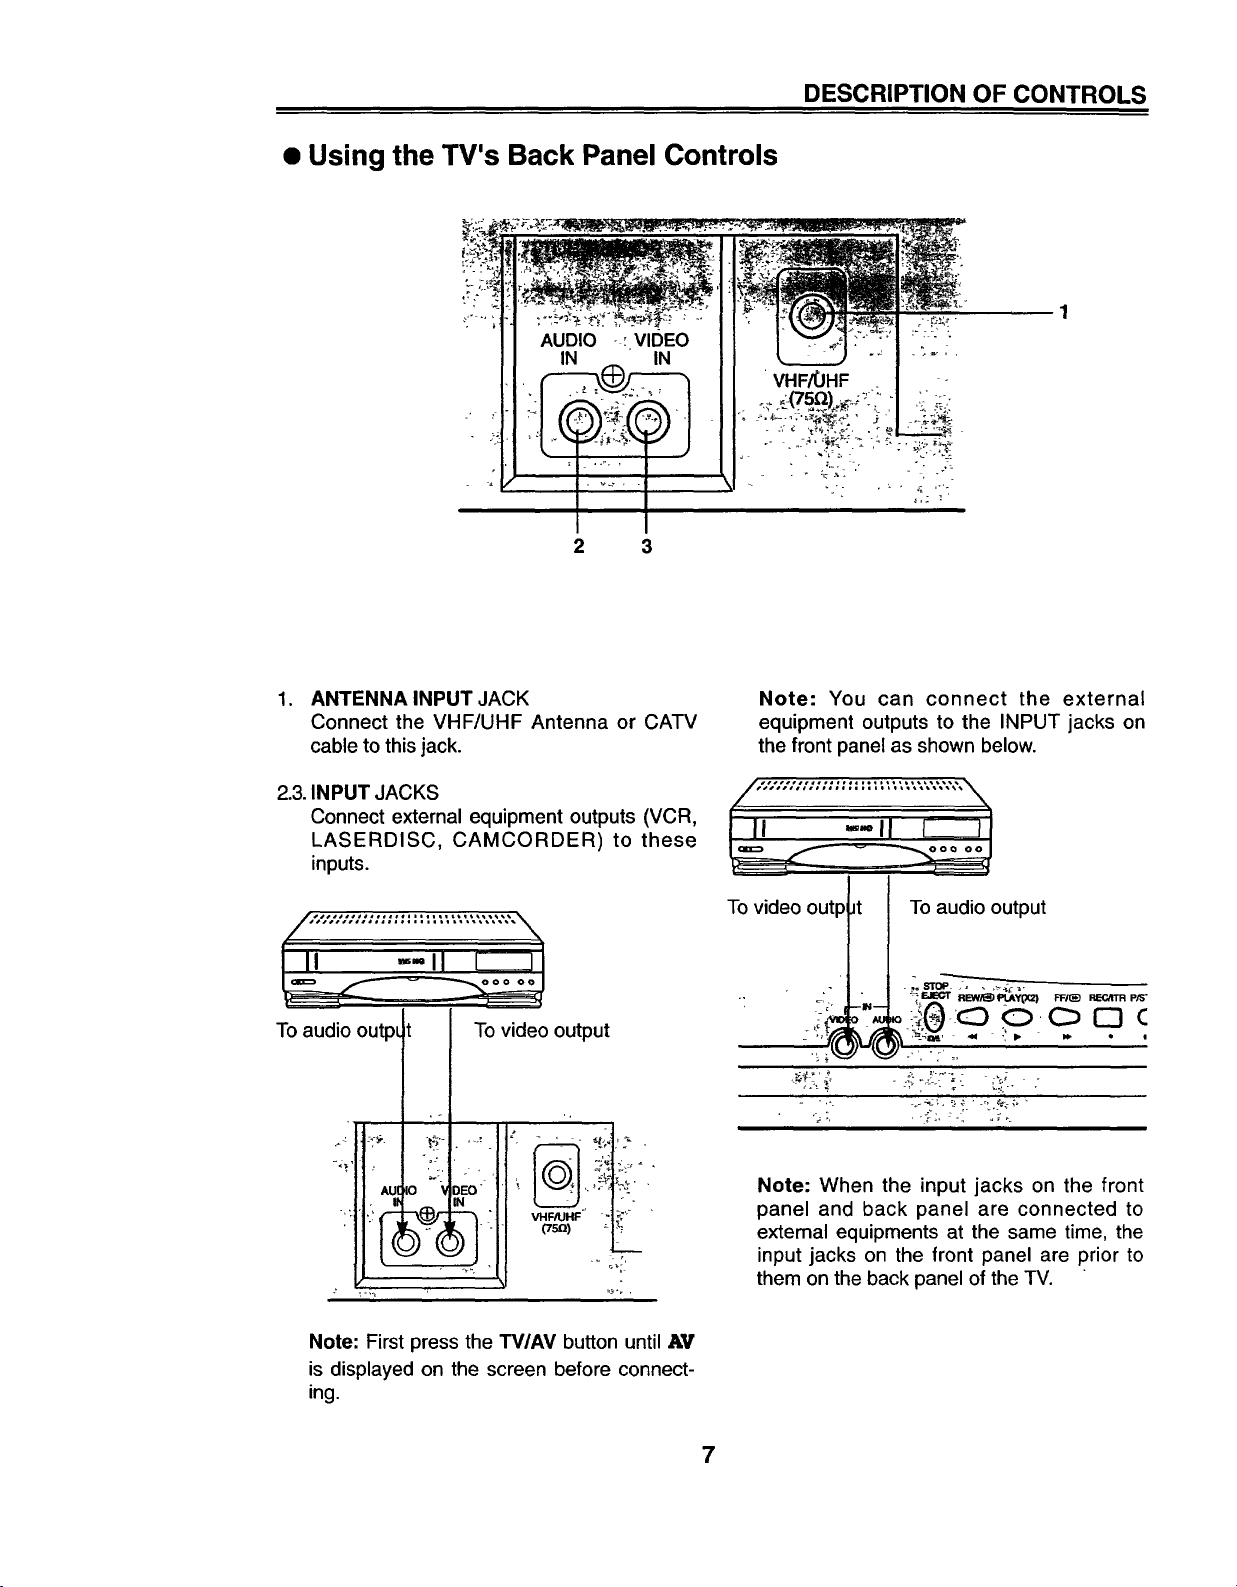
• Using the TV's Back Panel Controls
2 3
DESCRIPTIONOF CONTROLS
1. ANTENNA INPUT JACK
Connect the VHF/UHF Antenna or CATV
cable to this jack.
2.3. INPUT JACKS
Connect external equipment outputs (VCR,
LASERDISC, CAMCORDER) to these
inputs.
To audio._doutpL .. : eo___.,_....output_
"; . VHF/UHF _ _-'
Note: You can connect the external
equipment outputs to the INPUT jacks on
the front panel as shown below.
To video outp =t To audio output
-- " : I',F-J_OT IRBt#/I_ PI.Ay(X2} FF,. I_EC/Iff'R p,"
,-:j
_,,, --' =
Note: When the input jacks on the front
panel and back panel are connected to
external equipments at the same time, the
input jacks on the front panel are prior to
them on the back panel of the TV.
Note: First press the "rV/AV button until AV
is displayed on the screen before connect-
ing.
7
Page 8
DESCRIPTION OF CONTROLS
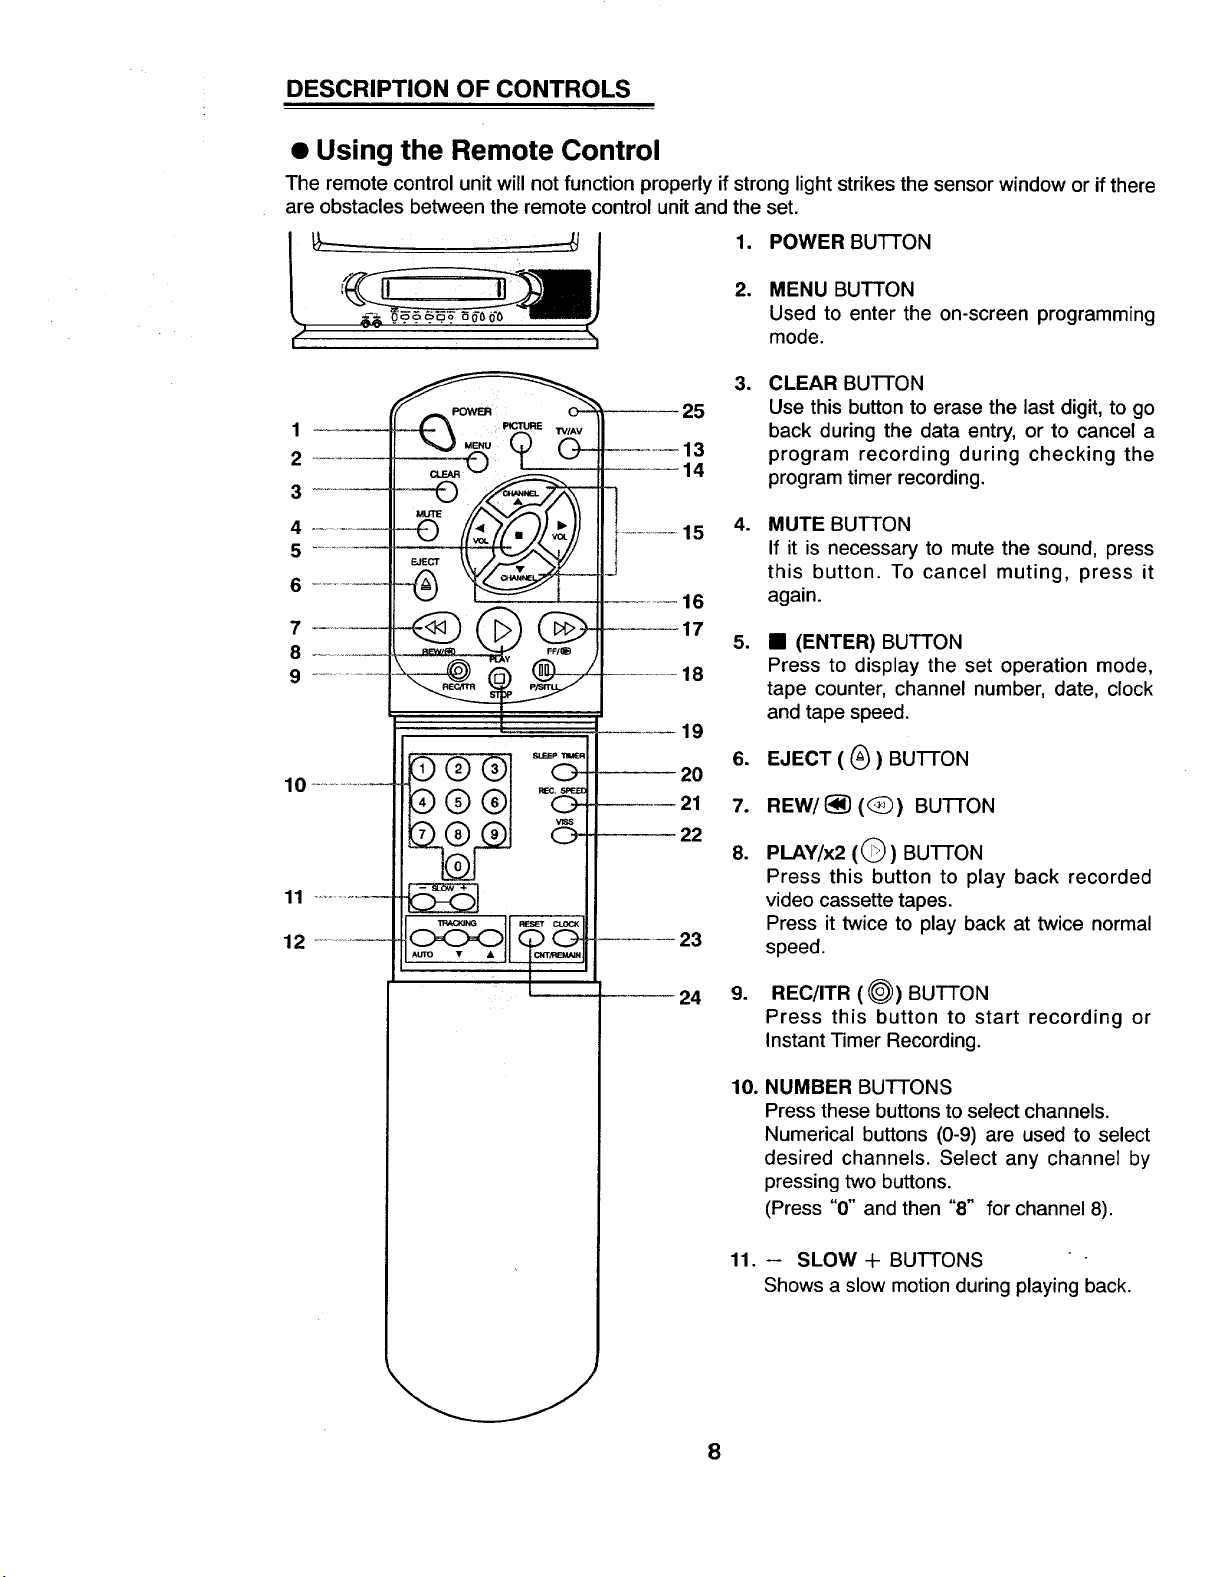
• Using the Remote Control
The remote control unit will not function properly if strong light strikes the sensor window or ifthere
are obstacles between the remote control unit and the set.
--_ 1. POWER BUTTON
2. MENU BUTTON
Used to enter the on-screen programming
mode.
.
CLEAR BU-I-I-ON
1
2
3
4
............
.................
7
8
...............
0 ..............
REC. SPE,E[
O-
----25
...... 13
--+---14
..................15
J
.... 16
----17
.............. 18
...... 19
20
21
22
23
Use this button to erase the last digit, to go
back during the data entry, or to cancel a
program recording during checking the
program timer recording.
°
MUTE BUTTON
If it is necessary to mute the sound, press
this button. To cancel muting, press it
again.
.
• (ENTER) BUTTON
Press to display the set operation mode,
tape counter, channel number, date, clock
and tape speed.
.
EJECT ( G ) BUTFON
7.
REW/I_) (<_) BUTTON
8.
PLAY/x2 ((_) BUTTON
Press this button to play back recorded
video cassette tapes.
Press it twice to play back at twice normal
speed.
---- 24
o
REC/ITR (@) BUTTON
Press this button to start recording or
Instant Timer Recording.
10.
NUMBER BUTTONS
Press these buttons to select channels.
Numerical buttons (0-9) are used to select
desired channels. Select any channel by
pressing two buttons.
(Press "0" and then "8" for channel 8).
11.
-- SLOW + BUTTONS
Shows a slow motion during playing back.
8
Page 9
DESCRIPTION OF CONTROLS
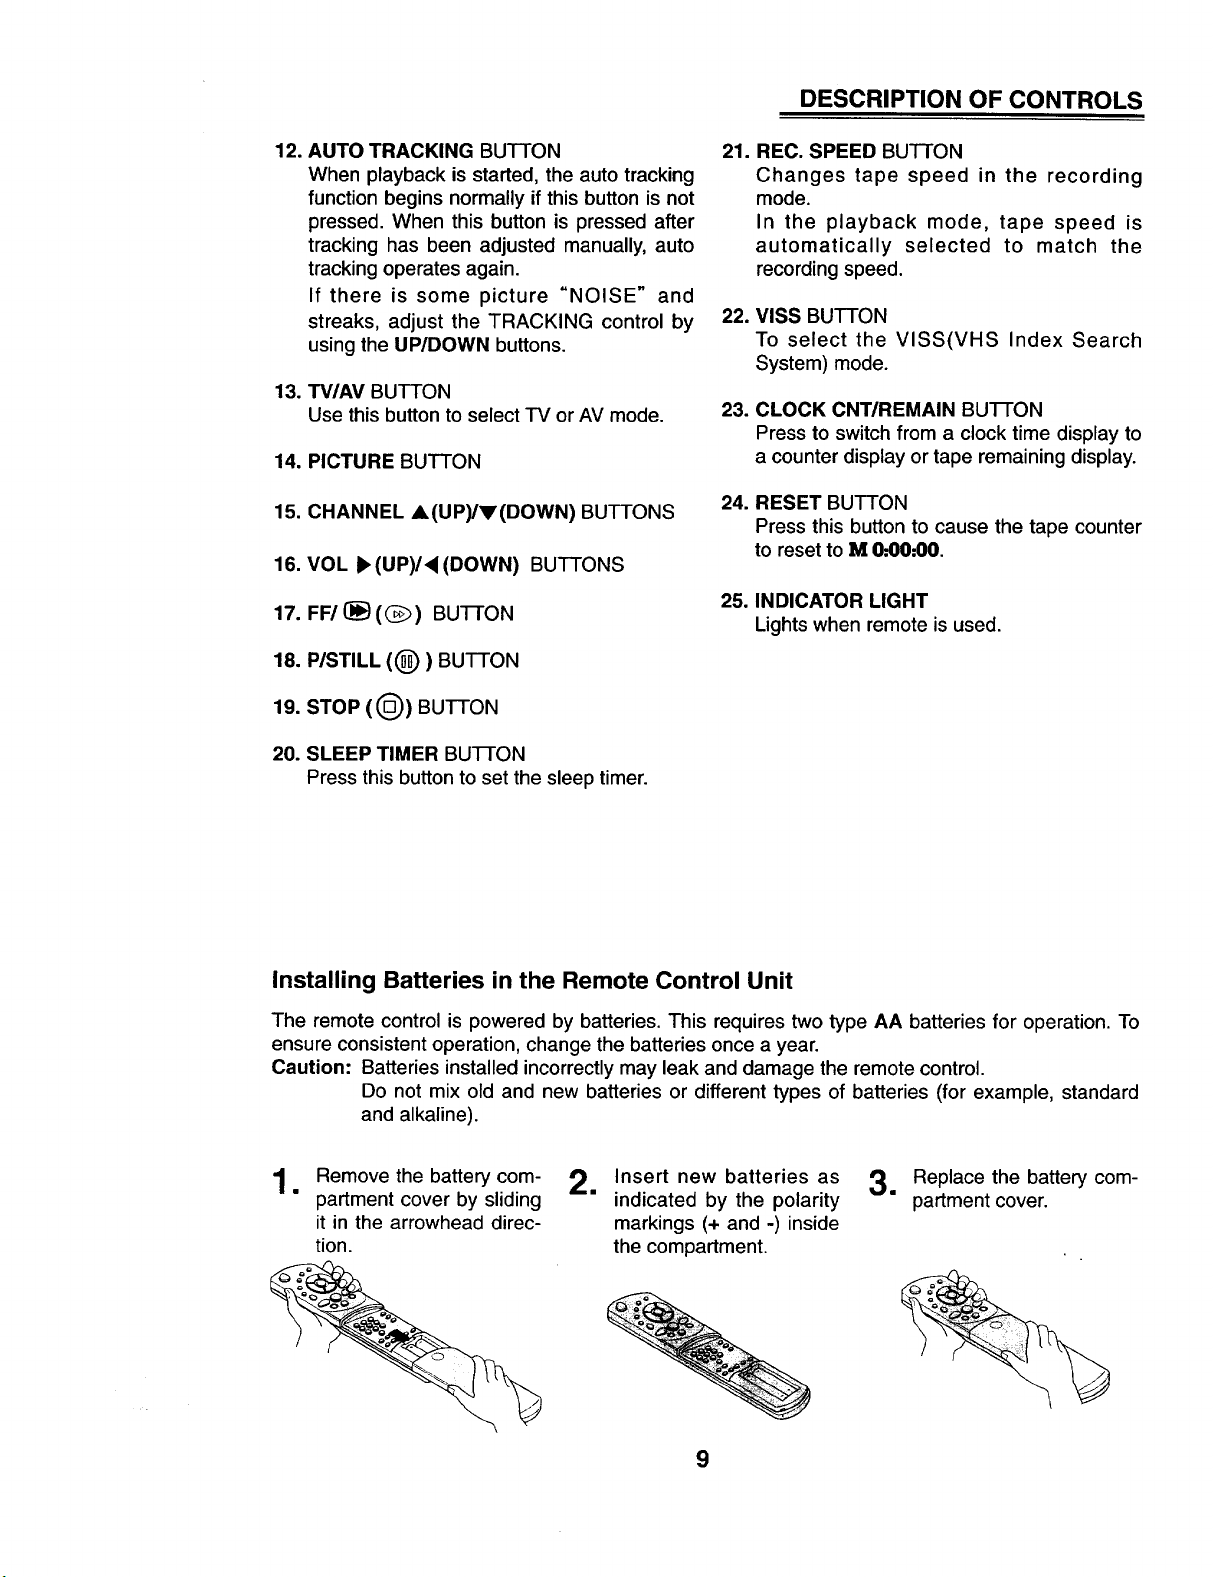
12. AUTO TRACKING BUTTON 21.
When playback is started, the auto tracking
function begins normally if this button is not
pressed. When this button is pressed after
tracking has been adjusted manually, auto
tracking operates again.
If there is some picture "NOISE" and
streaks, adjust the TRACKING control by 22.
using the UP/DOWN buttons.
13. TV/AV BUTTON
Use this button to select TV or AV mode.
14. PICTURE BUTTON
15. CHANNEL A(UP)/V(DOWN) BUTTONS
16. VOL _(UP)/,I(DOWN) BUTTONS
17. FF/(_((_) BUTFON
18. P/STILL ((_)) BUTTON
19. STOP ((_)) BUTTON
23.
24.
25. INDICATOR LIGHT
REC. SPEED BUTTON
Changes tape speed in the recording
mode.
In the playback mode, tape speed is
automatically selected to match the
recording speed,
MISS BUTTON
To select the VISS(VHS Index Search
System) mode.
CLOCK CNT/REMAIN BUTTON
Press to switch from a clock time display to
a counter display or tape remaining display.
RESET BUTTON
Press this button to cause the tape counter
to reset to M 0..00:00.
Lights when remote is used.
20. SLEEP TIMER BUTTON
Press this button to set the sleep timer.
Installing Batteries in the Remote Control Unit
The remote control is powered by batteries. This requires two type AA batteries for operation. To
ensure consistent operation, change the batteries once a year.
Caution: Batteries installed incorrectly may leak and damage the remote control.
Do not mix old and new batteries or different types of batteries (for example, standard
and alkaline).
1• Remove the battery com- 2. Insert new batteries as 3. Replace the battery com-
partment cover by sliding indicated by the polarity partment cover.
it in the arrowhead direc- markings (÷ and -) inside
tion. the compartment.
9
Page 10
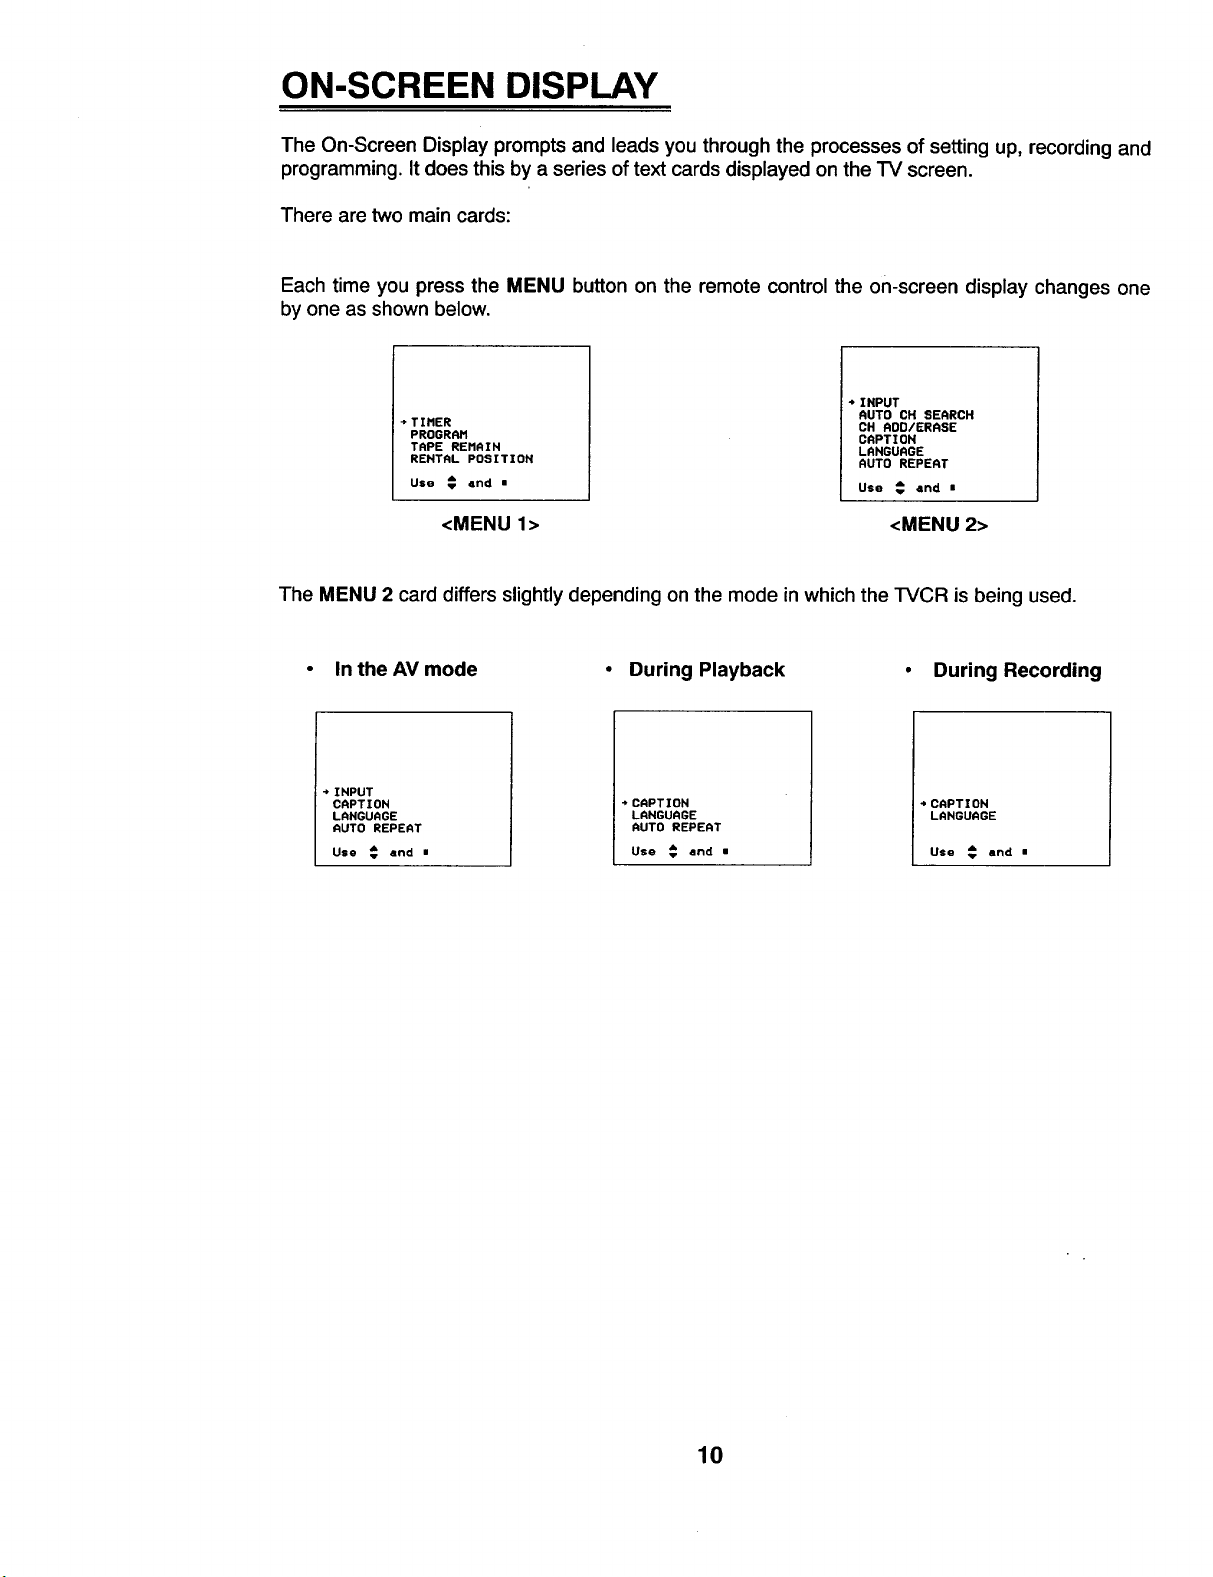
ON-SCREEN DISPLAY
The On-Screen Display prompts and leads you through the processes of setting up, recording and
programming. It does this by a series of text cards displayed on the "rv screen.
There are two main cards:
Each time you press the MENU button on the remote control the on-screen display changes one
by one as shown below.
4 INPUT
_TINER
PROGRAM
TAPE REMAIN
RENTAL POSITION
Use _ 4rid •
<MENU 1> <MENU 2>
The MENU 2 card differs slightly depending on the mode in which the TVCR is being used.
AUTO CH SEARCH
CH ROD/ERASE
CAPTION
LRNGURGE
AUTO REPEAT
Use _ 4rid •
• Inthe AV mode • During Playback • During Recording
INPUT
CAPTION
LANGUAGE
AUTO REPEAT
Use _ and i
CAPTION
LANGUAGE
AUTO REPEAT
Use _ and •
* CAPTION
LANGUAGE
Use _ and •
10
Page 11
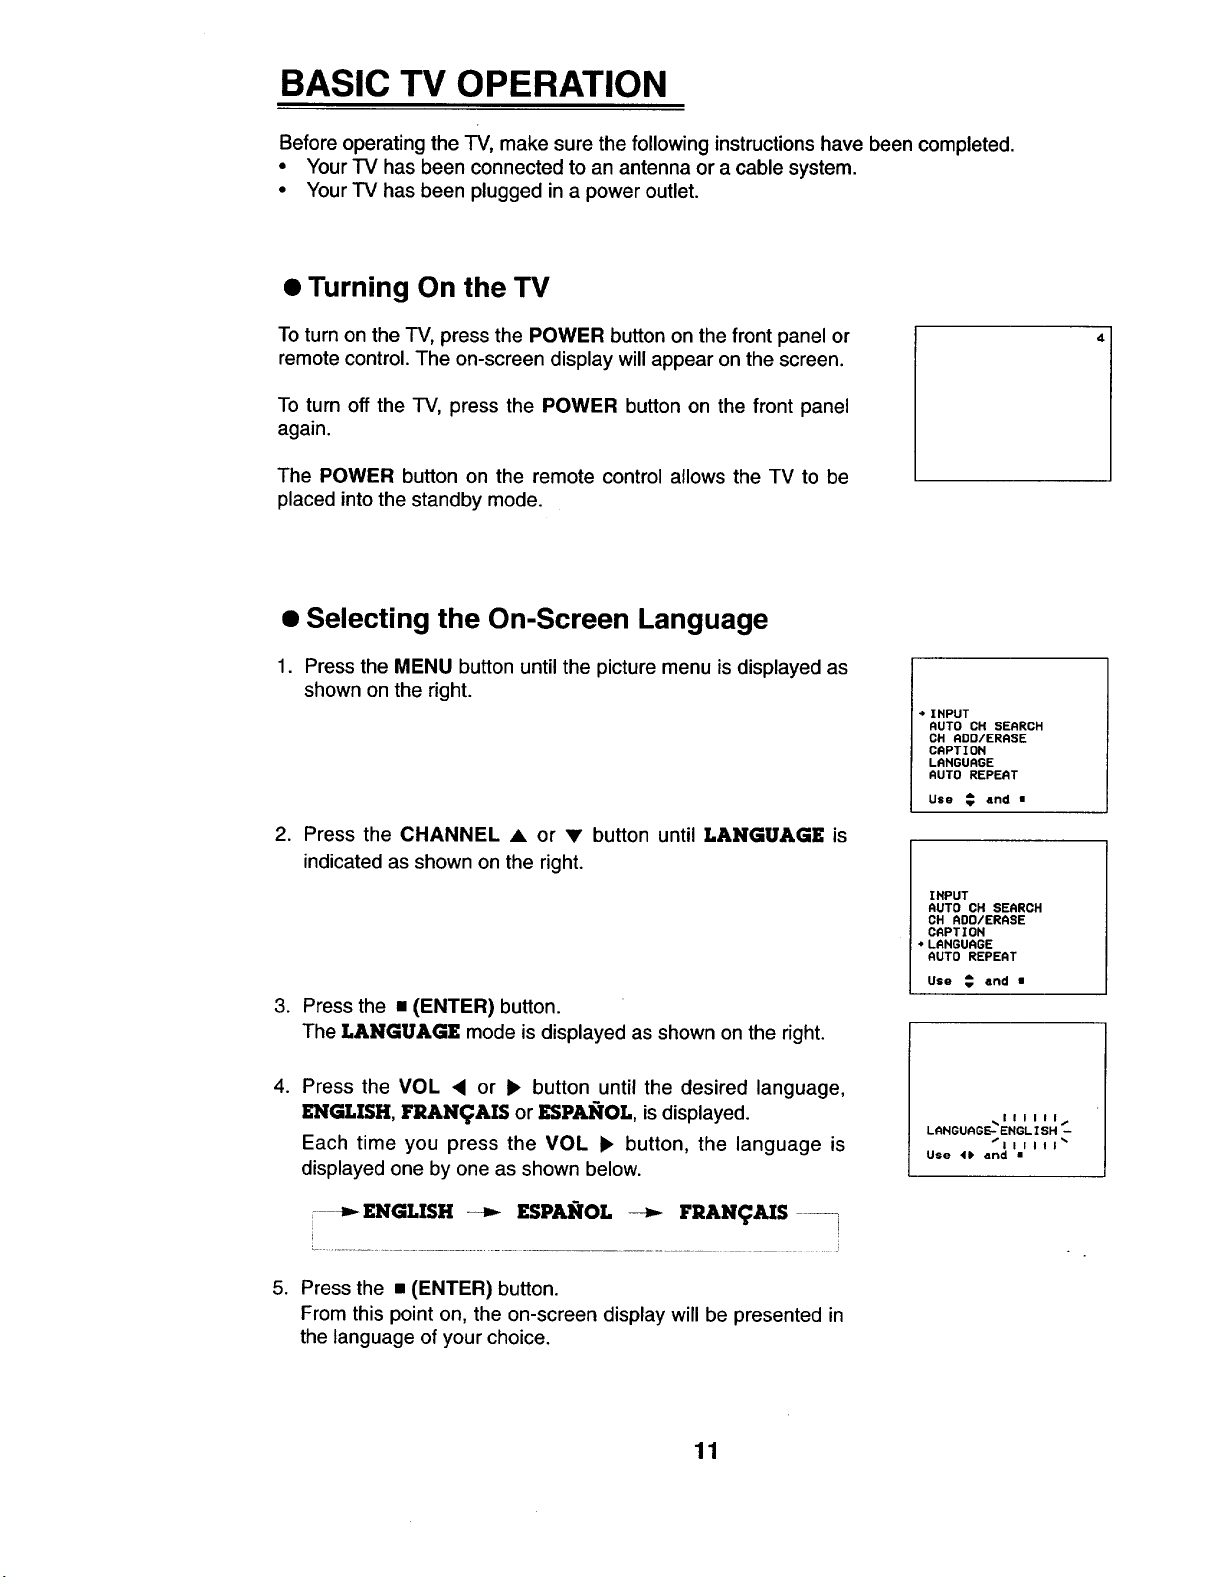
BASIC TV OPERATION
Before operating the TV, make sure the following instructions have been completed.
• Your TV has been connected to an antenna or a cable system.
• Your TV has been plugged in a power outlet.
• Turning On the TV
To turn on the TV, press the POWER button on the front panel or
remote control. The on-screen display will appear on the screen.
To turn off the TV, press the POWER button on the front panel
again.
The POWER button on the remote control allows the TV to be
placed into the standby mode.
• Selecting the On-Screen Language
1. Press the MENU button until the picture menu is displayed as
shown on the right.
2. Press the CHANNEL • or • button until LANGUAGE is
indicated as shown on the right.
3. Press the • (ENTER) button.
The LANGUAGE mode is displayed as shown on the right.
4. Press the VOL • or _ button until the desired language,
ENGLISH, FRAN(_AIS or ESPAI_OL, isdisplayed.
Each time you press the VOL I_ button, the language is
displayed one by one as shown below.
-='-ENGLISH--_ ESPAI_OL --_ FRAN(_AIS --
* INPUT
AUTO CH SEARCH
CH RDD/ERRSE
CAPTION
LRNGURGE
AUTO REPEAT
Use _ and •
INPUT
AUTO CN SEARCH
OH ADO/ERASE
CAPTION
*LRNGURGE
AUTO REPEAT
Use _ and •
LANGUAGE- ENGL I SH -
Use 41_ and •
._111111_.
"_111111 _
5. Press the • (ENTER) button.
From this point on, the on-screen display will be presented in
the language of your choice.
11
Page 12
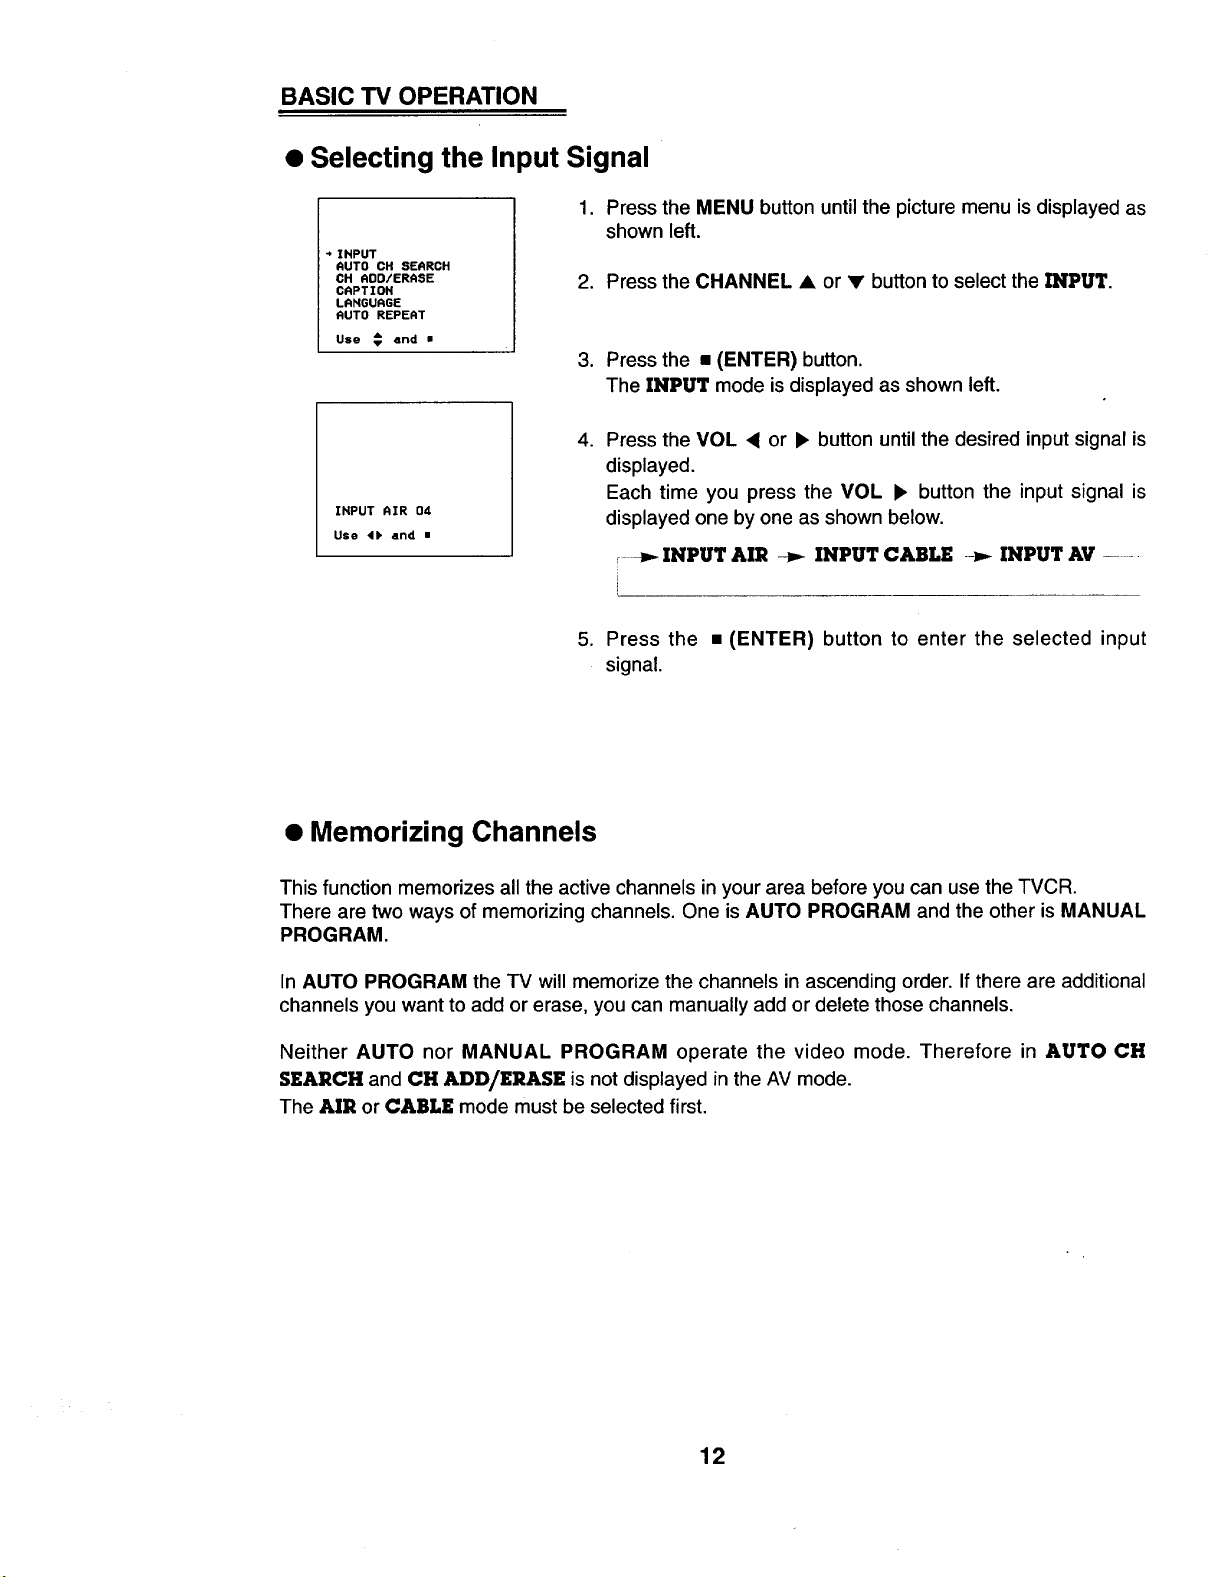
BASIC TV OPERATION
• Selecting the Input Signal
1. Press the MENU button until the picture menu is displayed as
shown left.
* INPUT
RUTO CH SERRCH
CH RDD/ERRSE
CRPTIOH
LRNGURGE
RUTO REPERT
Use _ and •
INPUT RIR 04
Use 4, and •
2. Press the CHANNEL • or • button to select the INPUT.
3. Press the • (ENTER) button.
The INPUT mode is displayed as shown left.
,
Press the VOL < or • button until the desired input signal is
displayed.
Each time you press the VOL • button the input signal is
displayed one by one as shown below.
i
5. Press the • (ENTER) button to enter the selected input
signal.
-_ INPUT AIR -_ INPUT CABLE -_,- INPUT AV ....
• Memorizing Channels
This function memorizes all the active channels in your area before you can use the TVCR.
There are two ways of memorizing channels. One is AUTO PROGRAM and the other is MANUAL
PROGRAM.
In AUTO PROGRAM the TV will memorize the channels in ascending order. If there are additional
channels you want to add or erase, you can manually add or delete those channels.
Neither AUTO nor MANUAL PROGRAM operate the video mode. Therefore in AUTO CH
SEARCH and CH ADD/ERASE is not displayed in the AV mode.
The AIR or CABLE mode must be selected first.
12
Page 13

BASIC TV OPERATION
Memorizing the Channels by AUTO PROGRAM
AUTO PROGRAM searches and memorizes all the active channels in your area.
,
Press the TV/AV button until a channel number is displayed
on the screen.
* INPUT
AUTO CH SEARCH
.
Press the MENU button until the picture menu is displayed as
shown right.
. Press the CHANNEL • or • button until AUTO CH
SEARCH is indicated as shown right.
,
Press the • (ENTER) button.
The AUTO PROGRAM starts now.
The numbers of the channels being searched appear on the
left lower side of screen.
CH ADD/ERASE
CAPTION
LANGUAGE
AUTO REPEAT
Use _ and •
INPUT
• RUTO CH SEARCH
CH ADDIERRSE
CAPTION
LANGUAGE
AUTO REPEAT
Use _ and •
AUTO CH SEARCH
AIR 02
Notes:
• To stop AUTO PROGRAM, press the • (ENTER) button.
Only the channels searched up to that time are memorized.
• To memorize the CATV channels by AUTO PROGRAM, select CABLE mode (refer
to "Selecting the Input Signal") and repeat above process 2-4.
Adding or Delecting Channels by MANUAL PROGRAM
1. Repeat above process 1-2.
2. Press the CHANNEL • or • button until CH ADD/ERASE
is indicated as shown right.
3. Press the • (ENTER) button.
The CH ADD/ERASE mode is displayed as shown right.
4. Select the channel number you want to add or erase with the
CHANNEL •/• buttons.
5. Press the VOL • or • button to select ADD or ERASE.
6. Press the • (ENTER) button.
INPUT
AUTO CH SEARCH
CH ADD/ERASE
CAPTION
LANGUAGE
AUTO REPEAT
Use _ and •
CH ADD/ERASE
AIR 25 ADD
Use 4P and •
13
Page 14

BASIC TV OPERATION
• Selecting Channels
G
_ii_iiii__,
_!ii?i_I
• Adjusting the Volume
VOLUME 20
m
MUTE
Press the CHANNEL ,&/V buttons to conveniently select the
channel higher or lower than the channel being viewed, or
NUMBER buttons to directly select the desired channel.
The selected channel number appears as shown left. After 3
seconds the channel number disappears.
Press the VOL • button to increase the volume level or VOL 4
button to decrease the volume level.
To mute the sound, press the MUTE button.
The word MOTE is displayed on the left lower side of the screen.
To restore the sound, press the MUTE button again or the VOL
4/• buttons.
• Recalling the Current TVCR Mode
ISTOP 30
SP
11/30/1995 THU IO:30AM
12:30RH
When you press the • (ENTER) button once, the current time,
operation mode, tape speed and channel number appear as
shown left.
Notes: •
The current time is displayed only when the current
time has been set in TIMER function.
If there is no tape in your TVCR the operation mode
is not displayed.
Press the • (ENTER) button again to view the current time.
14
Page 15

PICTURE CONTROL
This function allows you to manually adjust the picture level to your personal preference. If the
picture you set is not satisfactory, a factory preset picture can be selected.
1. Press the PICTURE button to select the desired picture
mode.
Each time you press this button, the picture modes appear on
the screen one by one as shown right.
!
• CONTRAST
To adjust the overall contrast and color level of the picture.
V
• BRIGHTNESS
To adjust the brightness level of black areas in the picture.
• COLOR
To adjust the intensity of the colors in the picture.
• TINT
To adjust the color of the flesh tones.
• SHARPNESS
To adjust the clarity for the clearest picture.
• APC ON/OFF
To let you decide if you want to use factory preset picture.
,
Press the VOL 4 or • button.
The level of selected picture mode is adjusted.
3. Press the • (ENTER) button.
I BRIGHTNESS 50
I COLOR 50
!
TINT 0
I I I
J
T
SHRRPNESS 50
7
RPC OH
I
t
I
15
Page 16

CLOSED CAPTION FUNCTION
Closed captioning is a process which converts the audio portion of a television program into written
words, which then appear on the television screen in a form similar to subtitles. Closed captions
allow viewers to read the dialogue and narration of television programs.
• Using Closed Captions
Captions are the subtitles of the dialogue and narration of
television programs. For prerecorded programs, program dialogue
can be arranged into captions in advance. It's possible to caption
a live program by using a process called "real-time captioning",
which creates captions instantly. Real-time captioning is normally
done by professional reporters using a machine shorthand system
_o]l_[o_ _:1
Caption Tips
and computer for translation into English.
Captioning is an effective system for the hearing-impaired, and it
can also aid in teaching language skills.
• The picture at left shows a typical caption.
• Not all TV broadcasts include closed caption signals.
• Sometimes TV stations broadcast two different caption signals on the same channel. By
selecting CC1 or CC2, you can choose which signal you view. CC1 is usually the signal with
the captions, while CC2 might show demonstration or programming information.
• Your TV might not receive caption signals normally in the following situations.
[] Poor reception conditions are encountered:
IGNITION:
Picture may flutter, drift, suffer from black spots or horizontal
streaking. Usually caused by interference from automobile
ignition systems, neon lamps, electrical drills and other
electrical appliances.
GHOSTS:
Ghosts are caused when the TV signal splits and follows two
paths. One is the direct path and the other is reflected off tall
buildings, hills or other objects. Changing the direction or
position of the antenna may improve reception.
SNOW:
Ifyour receiverislocatedat the weak, fringe area of a IV signal,
your picture may be marred by small dots. It may be necessary
to installa special antenna to improvethe picture.
[] An old, bad or illegally recorded
[] Strong, random signals from a car or airplane interfere with the TV signal.
[] The signal from the antenna is weak.
[] The program wasn't captioned when it was produced, transmitted or taped.
tape is played.
16
Page 17

CLOSED CAPTION FUNCTION
Operating the Caption
1. Press the MENU button untilthe menu isdisplayed as shown
on the right.
,
Press the CHANNEL A or • button until CAPTION is
indicated as shown on the right.
,
Press the • (ENTER) button.
The CAPTION mode is displayed.
.
Repeatedly press the VOL • or • to select CCI or CC2.
Each time you press the VOL • button, the caption mode is
displayed one by one as shown below.
INPUT
RUTO OH SERRCH
CH RDD/ERRSE
CAPTION
LRNGURGE
RUTO REPERT
use _ =rid •
INPUT
RUTO CH SERRCH
CH ADD/ERASE
CAPTION
LANGUAGE
AUTO REPEAT
Use _ 6rid •
CRPTION COl
Use 4b and •
_,-CAPTION OFF_,-_CAPTION CCI _ CAPTION CC2 -i
CAPTION TEXT 2 -.<-CAPTION TEXT 1 _--J
Note: To turn off captioning, select OFF.
5. Press the • (ENTER) button.
Note: This TV is programmed to remember which mode it was last set to, even if you switch the
POWER off.
• Using the Text Function
Text services give a wide variety of information on all kind of
subjects (ex. captioned program lists, weather forecasts, stock
exchange topics, news for hearing-impaired---) through the full
TV screen.
But not all stations offer text services, even though they might
offer captioning.
Operating the Text
1. Repeat the process 1-3 at page 17.
2. Repeatedly press the VOL • or • button to select TEXT 1
or TEXT 2.
3. Press the • (ENTER) button.
CAPTIOH TEXT1 -
/11111 _
Use 4_ and •
Note: In the event you receive a poor signal, an empty black box may appear and disappear, even
when the text mode is selected. This is normal function in such an event.
17
Page 18

TIMER FUNCTIONS
• Setting the Current Time
Before settingthe ON/OFF Time, first you should set the current time.
1. Press the MENU button on the remote control until the picture
menu is displayed as shown on the left.
TIMER
PROGRAM
TAPE REMAIN
RENTAL POSITION
Use _ and •
NZ=_qM
OFF Nz-.-_fl RUN
ON _==--##I 03 Rt,A_
_n'0 0FIFzNOLD
Use 4_) and •
"_ I;_T1E 12/29/1995 FRI
01:00_t
ON _:=_t 03 RUN
nUT0 0FF :l_l.g
Use 4_P and •
.t I)_TE 12/31/1_3
01:00_
OFF _:--_ RUN
1_4 _=--._'I 03 RIM
NJTO OFF:HOLD
2. Press the CHANNEL • or • button to select TIMER.
3. Press the • (ENTER) button.
The TIMER mode is displayed and DATE is indicated as
shown on the left.
.
Press the VOL • or • button to select the month option.
5.
Repeatedly press the CHANNEL • or • button to select the
month. The day of week automatically changes with the
month.
6. Press the VOL • or • button to select the date.option.
7. Repeatedly press the CHANNEL • or • button to select the
date. The day of week automatically changes with the date.
Use 4_ and •
-_ ORTE 12/30/1995 5AT
01:00RR
OFF I:--RR RUN
ON _l--_H 03
AUTO 0FT:H0_
Use • _ • and •
-0DRTE 12/30/1995 SAT
II:00PM
OFF -- :"_M RUN
054 N:"-P_ 03 RUN
RUTO 0_ :HOLO
Use 4 _ • and •
i_TE 12/30/1995 SAT
11:30PR
OFF --:--Nt RUN
ON --:--Nt 03 RUN
AUTO OFF:HOLD
Use 4 _ _ and •
8. Press the VOL • or • button to select the year option.
9. Repeatedly press the CHANNEL • or • button to select the
year. The day of week automatically changes with the year.
10.Press the VOL• or • button to select the hour option.
11.Repeatedly press the CHANNEL • or • button to select the
hour.
12.Press the VOL • or • button to select the minute option.
13.Repeatedly press the CHANNEL • or • button to select the
minute.
14.Press the • (ENTER) button twice.
18
Page 19

• Setting the OFF TIMER
This isthe function to automatically turn off your TV at a set time.
1. Press the MENU button on the remote control until the
picture menu is displayed as shown on the right.
2. Press the CHANNEL • or • button to select TIMER.
3. Press the • (ENTER) button.
The TIMER mode is displayed.
4. Press the CHANNEL • or • button to select OFF.
5. Press the VOL • or • button to select the hour option.
6. Repeatedly press the CHANNEL • or • button to select the
hour.
TIMER FUNCTIONS
TIMER
PROGRAM
TAPE REMAIN
RENTAL POSITION
Use _ 4nd •
DATE 12/30/1995 SAT
11:30_
"_ OFF m=_ RUN
(_1 _=-"RM 03 RUN
#MT0 OFF =HOL0
Use 4_) and •
ORTE 1213011995 SgT
11:30PII
OFF 12:00PR RUN
ON _:--RR 03 RUN
RUTO OFF=HOJD
7. Press the VOL • or • button to select the minute optiorl.
8. Press the CHANNEL • or • button to select the minute.
9. Press the VOL < or • button to select the RUN or HOLD
option.
10.Press the CHANNEL • or • button to select RUN or HOLD.
RUN means to perform the set timer.
HOLD means not to perform the set timer.
11.Press the • (ENTER) button twice.
• Setting the ON TIMER
This function automatically turns on your -IV at a set time.
1. Repeat the OFF TIMER process steps 1-3.
2. Press the CHANNEL • or • button to select ON.
3. Repeat the OFF TIMER process steps 5-8.
4. Press the VOL • or • button to select the channel number
position.
Use 4€• and •
B_TE 12/3011995 S_T
11:30PM
* OFF 12:30PIt RUN
0_1 _:--_1 03 RUN
RUTO OFF :HOLO
Use 4 €) and •
DATE 12/30/19S5 SRT
11 =30PM
OFF 12=30PM HOLD
OH _=_RR 03 RUN
RUTO OFF dtOLD
Use 4 € • and •
ORTE 12/30/1995 SAT
1l:30Pll
OFF 12:00P11 HOLD
4 ON _:--RH 03 RUN
RUTO OFF:HOLD
Use •€• and •
5. Repeatedly press the CHANNEL • or • button to select the
desired channel.
6. Repeat the OFF TIMER process steps 9-11,
19
DATE 12/30/]_5 S_T
11:30PM
OFF 12=OOPM HOLD
"_' ON 10:001_I 10 RUH
RUTO OFF:HOi.O
Use 4 _ • and •
Page 20

TIMER FUNCTIONS
• AUTO OFF Function
This function automatically turns off your "IV after 10 minutes when there are no broadcasts. If the
VCR is operating, the AUTO O]L_1' does not function.
1. In the TIMER mode, press the CHANNEL • or • button to
0tqTE 12/30/1995 S_qT
11=30PR
OFF 12=00PR HOLD
10=00_lq 10 RUN
" NTI'0 0FrtHOL0
Use 4_) and •
select AUTO OFF.
. Press the VOL • or I_ button to select the HOLD or RUN
option.
3. Press the CHANNEL • or • button to select RUN or HOLD.
4. Press the • (ENTER) button twice.
• Setting the Sleep Timer
This function automatically turns off your TV after the time you set.
SLEEP "--
Press the SLEEP TIMER button to select the desired sleep time.
Each time you press this button, the sleep time is displayed one
by one on the top right-hand corner of the screen as shown
below.
--_"_ ----='-180 -_ 120 _ 90 _ 60 -_ 30 -_ 20 -_ 10
Notes: • After 3 seconds, the selected sleep time will disappear and be operated automatically.
• To view the remaining sleep time, press the SLEEP TIMER button once and the
remaining sleep time will be displayed.
• To erase the sleep time, select the ST-_-EP--- mode by using the SLEEP TIMER button.
20
Page 21

PLAYBACK
• Playing Back a Prerecorded Cassette Tape
1. Insert a prerecorded cassette into the tape compartment. The
VCR automatically turns on.
: 30
2. Press the PLAY/x2 (_.)) button.
PLAY
The message AUTO TRACKING flashes for 4 seconds.
Do not select the tape speed for playback. This will be done
automatically.
IIIIIIIIIIII..
'tqUTO TRACKING -
"111|11111111"
3. Press the STOP/EJECT button on the front panel or
STOP ( @ ) on the remote control to stop playback.
STOP
Notes: • This unit has automatic rewind. At the very end of the tape, the set automatically stops
and rewinds the tape.
• To eject the cassette, press the EJECT (_) button on the remote control or
STOP/EJECT twice on the front panel.
You may prevent accidental erasing of a tape by removing the
safety tab on the back edge of the cassette. If you decide to
record on the tape again, cover the hole with cellophane tape.
• To prevent accidental erasure, break off the tab with a
screwdriver as shown on the right.
To record again, cover the hole with cellophane tape as
shown right.
21
Safety tab
tape
/J I Cellophane
Page 22

PLAYBACK
• Tracking Control
When playing back a tape recorded on another VCR, there might be some picture noise.
Trackingensuresthat the tape is correctlyalignedwiththe playback head. It only worksinthe "playback"
mode and itsprinciplepurposeis to minimize pictureshake.
It can be adjusted either automatically or manually.
Automatic Tracking Adjustment
lll{t|ll "_
When playback starts, the auto tracking automatically adjusts
the picture.
AUTO TRACKING flashes for 4 seconds.
If auto tracking does not work, the tracking was probably last
adjusted manually.
Manual Tracking Adjustment
When the playback picture proves to have streaks or snow during normal playback, adjust the
picture manually with the AUTO TRACKING V(DOWN)/A(UP) buttons.
Press either AUTO TRACKING v(DOWN) or a(UP) button to obtain the best possible picture.
When playing back a tape recorded on another VCR, the tracking condition is automatically
adjusted on this VCR.
Notes: • Auto tracking adjustment may be impossible when the recording condition of the tape ispoor.
• During auto tracking adjustment, streaks or noise may appear.
• Rental Position
When playing back rental tapes, there will be some picture noise. In the RENTAL POSITION ON
condition, the image details may be better defined thanks to the vertical enhancer.
TIMER
PROGRAM
TAPE REMAIN
RENTAL POSITION
Use _ and •
TIMER
PROGRAM
TAPE REMAIN
* RENTAL POSITION
Use _ and •
RENTAL POSITION
ON
Use 4_ and •
1. Press the MENU button on the remote control until the
picture menu isdisplayed as shown left.
2. Press the CHANNEL • or • button to select RENTAL
POSITION.
3. Press the • (ENTER) button.
The RENTAL POSITION mode is displayed.
4. Press the VOL • or • button to select ON or OFF.
5. Press the • (ENTER) button.
22
Page 23

• Auto Repeat Function
This function allows the tape to rewind to its beginning and play back automatically.
1. Press the MENU button until the picture menu is displayed as
shown on the right.
*CAPTZOH
LANGUAGE
AUTO REPEAT
Use € and •
2. Press the CHANNEL • or • button to select AUTO REPEAT.
CAPTION
LANGUAGE
AUTO REPEAT
,
Press the • (ENTER) button.
The AUTO REPEAT mode is displayed.
4. Press the VOL • or • button.
Each time you press the VOL • button, the message under
AUTO REPEAT changes one by one as shown below.
i...... _ OFF -_,-1 -_ 2 -._ 3 ... 7 _ 8 -_ 9 _ ENDLESS ......... i
Use _ a_d •
AUT_Ol _EPEAT
ENOLE_S
/1%
Us<) 411' and •
PLAYBACK
5. Press the • (ENTER) button.
The AUTO REPEAT function works as many times as you
have selected.
Note: To release the AUTO REPEAT function, select OFF.
• Viewing TV Programs During Tape Playback
While a tape is being played, you can switch to watching -IV broadcasts,
Press the STOP((_) button.
The TVCR returns to normal TV reception mode.
23
Page 24

PLAYBACK VARIATIONS
• Variable Speed Playback
You can enjoy playing back pictures in various speeds on the VCR.
Still Picture
STILL
During the playback mode, press the P/STILL ((_)) button.
To resume normal playback, press the PLAY/x2 ((_) button.
Notes: •
There willbe no sound and the picture may be unstable. This is normal.
If the VCR is left in the pause mode for more than 5 minutes, the TVCR re-enters the TV
reception mode automatically.
SLOW
Press the -- SLOW -t- buttons when trying to see a slow
motion. The message SLOW appears on the screen for about 5
seconds with a slow motion.
To Advance the Tape Rapidly
While the tape is being played back, pressing the FF/(_) button
will move the tape forward at high speed so you can see the
picture and choose where to stop.
CUE
FF
PLRYX2
When you do this, the messag.e CUE appears on the screen.
If you press the PLAY/X2 ( _ ) button,tthe VCR will return to
normal playback_.J.lfyou hold down the FF/L_ button for Jet Search,
release the FF/L_ button to resume playing tape automatically.
When tape is not being_p_.ayed back and the VCR is in the stop
mode, pressing the FF/_ button winds the tape forward at very
high speed without displaying the picture.
When you do this, the message FF appears on the screen.
You can stop the forward running of the tape at any time by
pressing the STOP (@) button.
If during the operation, the tape winds forward to the end, the
machine will automatically stop and then rewind the tape back to
the beginning again.
By pressing the PLAY/x2 ((_) button twice, the message
PLAYX2 will show. You can now run through a tape at twice
normal speed to find the exact place you want. Revert to normal
play speed by pressing the button once more.
To Rewind the Tape Rapidly
REUZEW If yOU press the REW/_ button while the tape is being played
back, you can play the tape backwards to find a particular spot.
When you do this, the message REVIEW appears on the screen
and the tape will be rewound at high speed.
At the end, the message_ STOP appears on the screen. If you
hold down the REW/_ button for Jet Search, release the
RE= REW/_ button to resume playing tape automatically..
When the tape is not being played back and the VCR is in the
stop mode, pressing the REW/(_) button winds the tape
backward at very high speed without displaying the picture.
When you do this, the message REW appears on the screen.
Notes: • When CUE or REVIEW mode is continued for 3 minutes, the tape will automatically
enter the playback mode.
• IfVCR is rewind mode, the VCR will continue to rewind the tape even ifthe power istumed off.
24
Page 25

PLAYBACK VARIATIONS
• Using CLOCK COUNT/REMAIN
This function allows the remaining tape time to be displayed during recording or playback while in
counter mode.
1. Press the MENU button on the remote control until the
picture menu is displayed as shown on the right.
TIMER
PROGRAM
TAPE REMAIN
RENTAL POSITION
Use _ and •
2. Press the CHANNEL • or • button to select TAPE
REMAIN
TIMER
PROGRAM
TAPE REMAIN
RENTAL POSITION
.
Press the • (ENTER) button.
The TAPE REMAIN mode is displayed as shown right.
4. Press the VOL • or b, button to select NORMAL or TI60
Use _ and •
T-160: Set to this position for using a T-160 or T-140 tape
only.
NOR: For the others, set to this position.
5. Press the • (ENTER) button.
6. Press the CLOCK CNT/REMAIN button.
The display switches each time the button is pressed.
• Counter changes to clock when the cassette is ejected.
• The tape counter shows the tape travel time in hours,
minutes and seconds during recording or playback.
The tape remaining time functions with "1"-20,30, 40, 60,
80, 90, 100, 120, 140, 160, and 180 tapes only.
TAPE REMAIN
NORMAL
Use 4) and •
V
V
IO:30AM
i
1:10:30
25
REM 1:30
Page 26

PLAYBACK VARIATIONS
• Using The Counter Memory Function
The counter memory makes it easy to return to a particular spot on the tape after recording or
playback.
The tape stops when the counter reaches M 0-00:00.
This feature can only be operated in the counter mode and is especially helpful when editing a
recording.
1. Press the CLOCK CNT/REMAIN button until the counter
mode is called up on the screen.
2. Press the [] (ENTER) button twice after the on-screen
display disappears.
M 1:10:30
H 0=00:00
I
3. Press the RESET button while the tape counter mode is still
displayed on the screen, at the point you want to return to.
The counter displays M 0:00:00.
.
Press the STOP (Q) button when you finish recording or
playing the tape.
°
Press the REW/I_) button.
The tape stops at M 0:00:00.
6. Press the PLAY/x2 ((_) button to play back the tape.
26
Page 27

RECORDING
• Tape Selection
The quality of tape you use greatly affects the record/playback quality and the life of the TVCR.
Use only cassette tapes that have the official VHS logo.
High-grade tapes give the best results, especially at the EP speed. They also have a better oxide
coating that helps prevent dirty video heads. Although T-160 tapes offer the longest recording time,
they contain thinner tape that is more likely to stretch or cause tape jams. We suggest that you use
T-120 or shorter tapes.
Recording in the SP or EP mode is possible with this unit. When recording, select the desired
recording mode (SP, EP) with the REC-SPEED button on the remote control. During playback, the
unit automatically detects the recording format, and then plays back the tape in the appropriate
mode.
The following chart shows the maximum recording times for T-60, T-120 and T-160 tapes at the
two recording speeds.
Speed T-60 T-120 T-160
SP 1 Hour 2 Hours 2 %Hours
(60 Minutes) (120 Minutes) (160 Minutes)
3 Hours 6 Hours 8 Hours
EP (180 Minutes) (360 Minutes) (480 Minutes)
27
Page 28

RECORDING
• Recording TV Programs
Caution
Television programs, films, video tapes and other materials may be copyrighted. Unauthorized
recording of such material may be contrary to the provisions of the copyright laws.
SP
RECORD
SP
U.MARK
°
Insert a cassette with the safety tab.
The TVCR turns on automatically (Auto power on).
,
Select the recording tape speed, SP or EP with the
REC.SPEED button.
,
Select the channel to be recorded with the CHANNEL A/W
or NUMBER buttons.
.
Press the REClITR (@) button on the remote control or
REC/ITR button on the unit. The recording mode then
V.MARK appear on the screen.
The REC/ITR indicator on the front panel lights.
To Stop Recording
Press the STOP (O) button.
Temporarily to Stop Recording at a Particular Point
Press the P/STILL ((_)) button to eliminate unwanted station breaks or program material while
recording a TV program.
REC. PAUSE appears on the screen.
To resume recording, press the P/STILL ((_) button again.
When the recording pause mode lasts for more than approximately 5 minutes, the unit enters the
stop mode.
Note: When the tape reaches its end, the tape rewinds to the beginning. The power will remain on.
28
Page 29

PROGRAM TIMER RECORDING
• Setting the Program Timer
You can preset up to five recordings up to one month in advance. The recordings can be preset
with the remote control while referring to the PROGPJ_M display on the screen.
Before you begin, check the following points.
• The date and clock must be set correctly.
• Make sure that the cassette tape is long enough to record all the programs.
• Make sure that the safety tab on the cassette is not broken off.
Recording from today to one month later
If today is August 31st, you can set the program timer to record a program broadcast between
today and September 30 (for 31 days). If today is January 31st, you can set the program timer to
record a program broadcast between today and February 28th (for 29 days). A leap year is
automatically considered.
1. Press the MENU button on the remote control until the
picture menu is displayed as shown on the right.
_TIMER
PROGRAM
TAPE REMAIN
RENTAL POSITION
Uso _ and •
2. Press the CHANNEL • or V button to select PROGRAM.
3. Pressthe • (ENTER) button.
The PROGRAM mode is displayed as shown on the right.
4. Press the VOL • or • button to select the DATE position.
5. Repeatedly press the CHANNEL • or • button to select the
date.
Each time you press the CHANNEL • button, the date
changes one by one as shown below, ifthe set date is31/WED.
31/THU --_ I/FRI --_ .... --_ 30/SAT
The CHANNEL • button displays the date one by one as
shown below, if the set date is 31/WED,
31/THU --_ EVERY DAY --_ EVERY SUN
EVERY SAT _ -.- _ EVERY MON
6. Press the VOL • or • button to select the hour option for
START.
TIMER
PROGRAM
TAPE REMAIN
RENTAL POSITION
Use _ and •
8/31/1995 THU IO=30AM
DATE ST_T STOP CH
_/_ -=---M -1--_ _ IltlO
Use 4 _ and •
8/31/1995 THU IO=30AM
DATE STN;tT STOP CH
Use • _ P and •
8/31/1995 THU IO:30AM
DATE START 5T[_° CR
7. Press the CHANNEL • or • button to select the hour for
START.
29
--/_ -=--_ -:--_ -- _JTO
--/-- -=--_ -:--_ -- #JTO
Page 30

PROGRAM TIMER RECORDING
8/31/1995 THU 10130AII
OAT1E START SlOP Ctl
"_ tO/SIT IOs31_ -s-.._- KqO
I/B-s--.M -_--fll-
_/-- -i--fM -_--/11 _ IER
Use 4_k and a
8/31/1995 THU IO:30RH
DATE START STOP CH
--/_ -s.-._ -I*-M _ In
Use 4_k and •
8/31/1995 THU lOz3ORH
O_ITE START STOP CH
IO/SAT 10:31_I 11:40¢1tB
_/N -s-.-_ -,--All B KIlO
Use 4 _ P and •
8. Press the VOL • or • button to select the minute option for
START.
9. Press the CHANNEL • or • button to select the minute for
START.
10.Press the VOL • or • button to select the hour option for
STOP.
11.Press the CHANNEL • or • button to select the hour for
STOP.
12.Press the VOL • or • button to select the minute option for
STOP.
13.Press the CHANNEL • or • button to select the minute for
STOP.
8/31/1985 THU IO:30RH
D_tTE START STOP CH
IO/SClT 10,31_11 11:40M 14 41R
_/_ -:'_ -:--41 _ Alto
Use 4_) and •
8/31/1995 THU IO:30f_H
D_TE START • STOP CH
"_ lO/eJT 10131_ I]s40_ 14 EP
--/-- -s---m -_--_11 _ ILTO
B/-- -s--f_l -s--_l _ AIR
Use 4_ and a
8/31/1985 THU lO:30AH
(lq_E ST_IRT STOP CH
IO/_T 10:31_/I IJ:d(lqt 14 EP
Use 4 _ • and •
14.Press the VOL • or • button to select the CH option.
15.Press the CHANNEL • or • button to select the desired
channel.
16.Press the VOL • or • button to select the tape speed
option.
17.Press the CHANNEL • or • button to select the desired
tape speed, SP, EP or AUTO.
18.Press the • (ENTER) button.
Note: To record another program, press the CHANNEL •
button to select the next item then repeat steps 4-18.
3O
Page 31

PROGRAM TIMER RECORDING
• Checking the Program Timer Settings
You can display all of the timer settings on the TVCR screen to check the settings
1. Press the MENU button on the remote control until the
picture menu is displayed as shown on the right.
TIMER
PROGRAM
TAPE REMAIN
RENTAL POSITION
Use _ and •
2. Press the CHANNEL • or • button to select PROGRAM.
TIMER
PROGRAM
TAPE REMAIN
RENTAL POSITION
Use _ and •
3. Press the • (ENTER) button.
The PROGRAM mode is displayed.
4. Press the • (ENTER) button again to return to the original
screen.
Notes: •
The REC. TIMER indicator will not light while your TVCR is ON even if you have already
programmed the Timer recording, but it will blink when it's near to the programmed start
time.
PROGRAMMED TIMER RECORDING will not start while your TVCR is ON even if it's
programmed start time.
During setting the program timer, when cassette tape is ejected, the REC TIMER
indicator blinks even if the power is turned off.
8/31/1995 THU IO:30AM
D_ITE STRRT STOP CH
IO/_T 10:31N5 il:dOR5 14 EP
12/101 8:00Pfl 9:00_ lO ff_
13/111E B:OOR4 SIOOR_ 10
I?._T 9zSORI 10:50RI $ SP
20/TLE 7:00RI 9JOOPM 3e EP
Use • _ k and •
31
Page 32

PROGRAM TIMER RECORDING
• Changing or Cancelling the Program Timer Settings
1. Press the MENU button on the remote control until the menu
isdisplayed as shown on the left.
TIMER
PROGRAM
TAPE REMAIN
RENTAL POSITION
USG _ and •
2. Press the CHANNEL • or • button to select PROGRAM.
TIMER
4 PROGRAM
TAPE REMAIN
RENTRL POSITION
Uso _ and •
8/31/1995 THU lO=30AM
OATE STRRT STOP 0t OP
* lOi_f IOs31M II:40PM 14
12/'f_ 8100_ S=00Rt 10 IIm
13/NE 8:00_ SeOORI 10 I_
I?/MT $:50Rt 10150P_ 8 SP
Use (_) and •
8/31/1995 THU IO=30AM
OCITE START STOP CH
10i_T 10=31M lls4ORt 14 EP
I2/R_ 8=00Rt 9=00m 10 II_
]3/_UE 8:00RI 9=00RI 10
17/_T 9150R_ IO:50PN B 5P
20/]UE ?=OORt 9=00RI 38 EP
Use 4_• and •
3. Press the • (ENTER) button.
The PROGRAM mode is displayed as shown on the left.
.
Press the CHANNEL • or • button to move the cursor to
the program you wish to change or cancel.
o
To change it, flash the item to be changed by pressing the
VOL • or • button and make the required changes by
pressing the CHANNEL • or • button.
To cancel it, move the cursor to the item to be cancelled by
pressing the CHANNEL • or • button, press the VOL •
button to select the ]BATE position then press the CLEAR
button.
6. Press the • (ENTER) button twice to return to the original
screen.
32
Page 33

INSTANT TIMER RECORDING
This function is convenient when, for example, you want to set the VCR to sta_rtrecording instantly
without going through the whole timer setting procedure.
Notes: • Make sure that the clock is set correctly before you activate Instant Rmer Recording.
• During Instant Timer Recording, you cannot change the channel on the TVCR.
1. Insert a cassette.
The TVCR automatically turns on.
2. Press the TVIAV button so that a channel number appears.
3. Press the REC-SPEED button to select the recording speed,
SP or EP.
.
Select the desired channel number with the NUMBER or
CHANNEL A/V buttons.
If you try to select the Cable TV channel, first select CABLE
in INPUT mode (refer to "Selecting the Input Signal" on
page 12).
.
Press the RECIITR (O) button twice to preset the recording
time which appears on the screen.
Each time you press the REC/ITR ( O ) button, the time
length advances in 30-minute increments up to 9 hours.
SP
.
Press the POWER button on the remote control to put into
standby mode.
The VCR starts recording, then stops at the preset time
period.
Notes: •
To extend the Instant Timer Recording time, press the REC/ITR (O) button to advance
the recordingtime in 30-minute increments,
To clear the InstantTimer Recording setting repeatedly press the REC/ITR (O) untilthe
display reads 0..00.
If the tape runs out during Instant Timer Recording, recording will stop and the tape will
be ejected.
To recall the Instant Timer Recording setting, press the REC/ITR ( O ) button once. The
recalled ITR setting automatically returns to the original screen after 15 seconds.
ITR
AIR 89
REC TIME 4:00
33
Page 34

VHS INDEX SEARCH SYSTEM(MISS)
MISS signal marks on the tape let you scan through the start of different programs or search for a
specific section of tape.
• Marking MISS Signals
Automatic VISS Mark
A MISS signal is automatically marked at the beginning of
recording.
• Playing Back from the VISS Point
The beginning of each program can be found and played back by using the VISS signals.
1. Insert a cassette with MISS signals.
2. Press the MISS button once during playback.
V_S O0 appears on the screen.
i_: ¸ i
_zss oo
Press either the REW/(_) or FF/(]_ button to start the MISS
.
scan.
The tape rewinds or rapidly advances to the next marked
signal.
The tape plays back for about 5 seconds, then rewinds or
rapidly advances to the next VISS signal. Each time VlSS
signal is detected and playback begins, the VISS scan
number (V.SCAN 04) appears.
U.SCAN 04
4. When the desired program is detected, press the
PLAY/x2 (C)) button.
Playback starts from that point.
• Locating the Desired Program (VISS Search)
A particular program can be located and played back by designating how many MISS signals
ahead or behind that program is from the current position.
1. Insert a cassette with MISS signals.
!_i! !
2. Press the MiSS button.
V]SS O0 appears.
UISS O0
U.SEARCH 03
.
Using the NUMBER buttons, enter the number of MISS
signals you want to skip.
For example, if the tape is at VISS 02 and you want to locate
VISS 05, press 0 3.
. Press either the REW/!_] or FF/(]_) button.
V.SEARCH 03 appears on the screen.
When the desired signal is found, playback begins
automatically.
34
Page 35

TROUBLESHOOTING
If you have a problem with the TVCR, first check the power cord connection, then go through the
following list.Should the difficultypersist, unplug the unit, and contact your GoldStar dealer or local
authodsed GoldStar service facility.
• In TV Reception
Symptoms
No picture or sound
Picture OK, sound poor
Sound OK, no picture
Picture weak or blurred
Picture rollsvertically
Ghosts (multiple images)
Wrong color or no color
Suggestions
• Make sure the unit is plugged into a working AC outlet.
• Check that POWER is set to ON.
• Check the antenna wires, connections and direction.
• Adjust the sound.
• Try another channel.
• Adjust the picture.
• Check the antenna wires, connections and direction.
• Adjust picture control.
• Check the antenna wires, connections and direction.
• Check the antenna wires, connections and direction.
• Install a directional antenna.
• Adjust color and hue controls.
No response to button
pressing
No response to remote
control
• Press the buttons carefully again. Unplug the set, then plug it
in and try again.
• Check the polarity (+ and --) of the batteries.
• Replace the batteries.
35
Page 36

TROUBLESHOOTING
• In VCR Operation
Symptoms
Cannot load video cassettes
No operation when buttons
are pressed
Auto play function doesn't
work or TV programs can't be
recorded
"13merrecording can't be
performed
there is no picture in
playback, or the playback
picture is noisy or contains
streaks
Suggestions
• Insert the cassette with the window side up and the safety tab
facing you.
• Check ifa video tape isalready inthe VCR.
• Cancel the recording.
• Make sure that the receiving channel of the set is properly
tuned.
• Make sure that the safety tab on the video cassette tape is
still intact.
• Check antenna wires, connections and direction.
Make sure the recording start/stop time is correct.
Reconnect the power plug to an AC outlet, and reset the
program recordings.
• Check that power is set to ON.
• Check that the video cassette tape has a recorded program.
• Check the tracking control (for noise streaks)
36
Page 37

MEMO
Page 38

MEMO
Page 39

Page 40

GOLDSTAR TVCR
LIMITED WARRANTY
LG Electronics U.S.A., Inc. will repair or at its option replace, without charge, your product which proves to be
defective in material or workmanship under normal use, during the warranty period listed below from the date
of original purchase. This warranty is good only to the original purchaser of the product during the warranty
period as long as it is in the U.S. including Alaska, Hawaii and U.S. Territories.
WARRANTY PERIOD
_MODEL # LABOR PARTS
1 Year 1 Year
CRT
2 Year
No other express warranty is applicable to this product. THE DURATION OF ANY IMPLIED WARRANTIES,
INCLUDING THE IMPLIED WARRANTY OF MERCHANTABILITY, IS LIMITED TO THE DURATION OF THE
EXPRESS WARRANTY HEREIN. LG ELECTRONICS U.S.A., INC. SHALL NOT BE LIABLE FOR THE
LOSS OF THE USE OF THE PRODUCT, INCONVENIENCE, LOSS OR ANY OTHER DAMAGES, DIRECT
OR CONSEQUENTIAL, ARISING OUT OF THE USE OF, OR INABILITY TO USE, THIS PRODUCT OR
FOR ANY BREACH OF ANY EXPRESS OR IMPLIED WARRANTY, INCLUDING THE IMPLIED WARRAN-
TY OF MERCHANTABILITY APPLICABLE TO THIS PRODUCT.
Some states do not allow the exclusion or limitation of incidental or consequential damages or limitations on
how long an implied warranty lasts; so these limitations or exclusions may not apply to you. This warranty
gives you specific legal rights and you may also have other rights which vary from state to state.
THE ABOVE WARRANTY DOES NOT APPLY :
• To damages or problems which result from delivery or improper installation.
• To damages or problems which result from misuse, abuse, accident, alteration, or incorrect electrical cur-
rent or voltage.
• To service calls, which do not involve defective workmanship or material, such as head cleaning and
explaining the operation of the unit.
Therefore these costs are paid by the consumer.
CUSTOMER ASSISTANCE NUMBERS :
HOW SERVICE IS H,_NDLED.
Call 1-800-243-0000, Option #1 24 hrs a day, 7 days
per week, please have your product type (Monitor,
TV, VCR) and ZiP code ready.
25" and above, In-home service
21" and under, carry-in service
To Prove Warranty Coverage:
To Obtain Product, Customer or
Service Assistance:
To Obtain Nearest Authorized
Service Center, Parts Distributor or
Sales Dealer:
P/N 3828VA0050D
482-652B
3840VB0001B
Retain your Sales Receipt to prove date of purchase.
Copy of your Sales Receipt must be submitted at the time
warranty service is provided.
Call 1-800-243-0000 (Mon-Fri 7am-7pm CST)
Push appropriate menu code.
Call 1-800-243-0000, Push option #1 24 hrs a day, 7 days per
week, please have your product type (Monitor, TV, VCR) and
ZIP code ready.
Printed in Korea
 Loading...