

Page 1
操作手冊
P/N. 920-012421-02
Rev. C, 06.2009
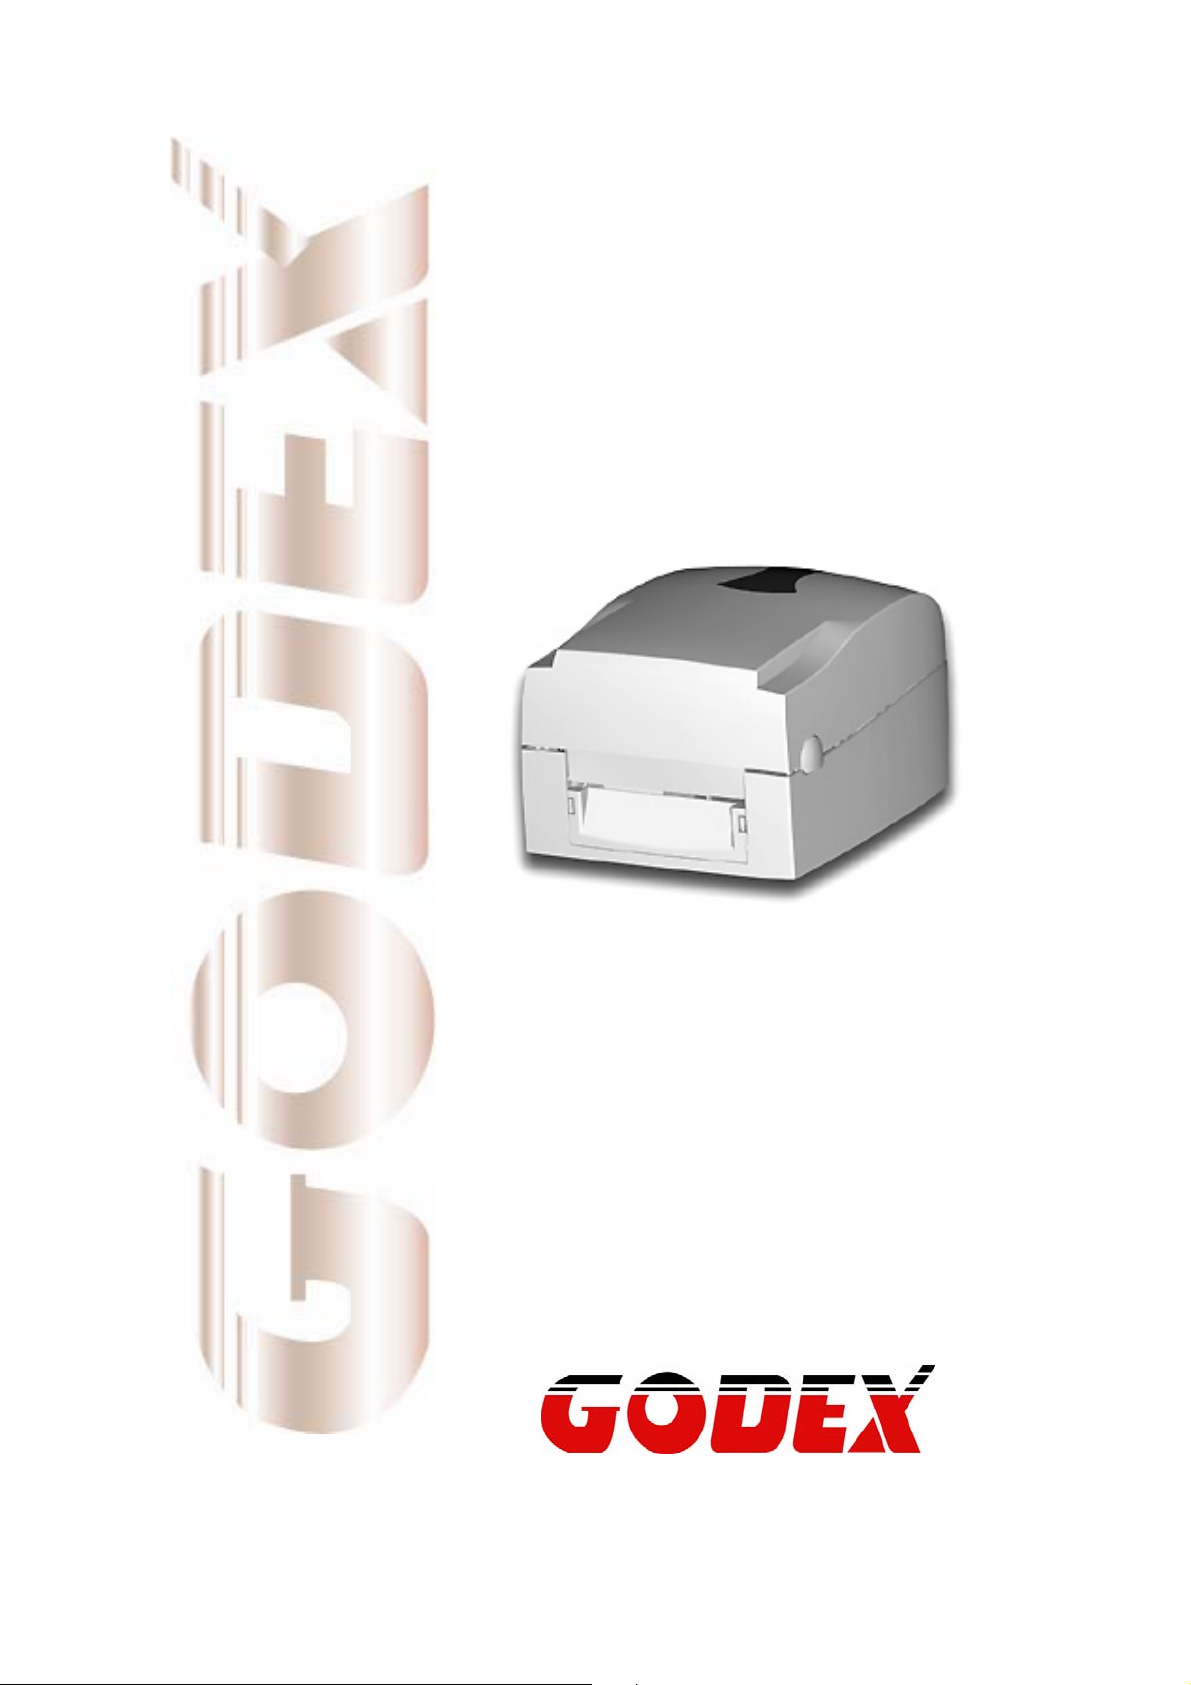
EZ-1000Plus
Page 2

FCC COMPLIANCE STATEMENT
FOR AMERICAN USERS
This equipment has been tested and found to comply with the limits for a CLASS A digital device,
pursuant to Part 15 of the FCC Rules. These limits are designed to provide reasonable
protection against harmful interference when the equipment is operated in a commercial
environment. This equipment generates, uses, and can radiate radio frequency energy and, if
not installed and used in accordance with the instructions, may cause harmful interference to
radio communications. Operation of this equipment in a residential area is likely to cause harmful
interference in which case the user will be required to correct the interference at own expense.
EMS AND EMI COMPLIANCE STATEMENT
FOR EUROPEAN USERS
This equipment has been tested and passed with the requirements relating to electromagnetic
compatibility based on the standards EN 55022:1998+A1:2000+A2:2003, CISPR 22 , Class A
EN 55024:1998+A1:2001+A2:2003, IEC 61000- 4 Series EN 61000-3-2 / 2000 & EN 61000-3-3 /
1995. The equipment also tested and passed in accordance with the European Standard
EN55022 for the both Radiated and Conducted emissions limits.
EZ PLUS SERIES
TO WHICH THIS DECLARATION RELATES
IS IN CONFORMITY WITH THE FOLLOWING STANDARDS
EN55022 : 1998,CLSPR 22, Class A / EN55024 : 1998IEC 61000-4 Serial / EN61000-3-2 : 2000
/ EN 6100-3-3 : 1995 / CFR 47, Part 15/CISPR 22 3rd Edition : 1997, Class A / ANSI C63.4 :
2001 / CNS 13438 / IEC60950-1 : 2001 / GB4943 : 2001 / GB9254 : 1998 / GB17625.1 : 2003
/EN60950-1 : 2001
CAUTION
Danger of explosion if battery is incorrectly replaced
Replace only with the equivalent type recommended by the manufacture.
Dispose of used batteries according to the manufacturer’s instructions.
Specifications are subject to change without notice.
EZ-1000Plus User’s Manual
1
Page 3

Safety Instructions
Bitte die Sicherheitshinweise sorgfältig lesen und für später aufheben.
1. Die Geräte nicht der Feuchtigkeit aussetzen.
2. Bevor Sie die Geräte ans Stromnetz anschließen, vergewissern Sie Sich, dass die
Spannung des Geräts mit der Netzspannung übereinstimmt.
3. Nehmen Sie das Gerät bei Überspannungen (Gewitter) vom Netz. Das Gerät könnte
sonst Schaden nehmen.
4. Sollte versehentlich Flüssigkeit in das Gerät gelangen, so ziehen sofort den
Netzstecker. Anderenfalls besteht die Gefahr eines lebensgefährlichen elektrischen
Schlags.
5. Wartungs- und Reparaturarbeiten dürfen aus Sicherheitsgründen nur von
autorisierten Personen durchgeführt werden.
6. Bei Wartungs- und Reparaturarbeiten müssen die Sicherheitsvorschriften der
zuständigen Berufsverbände und Behörden unbedingt eingehalten werden.
7. Bei Verletzungen unbedingt den Arzt aufsuchen und die gege benenfalls die
zuständigen Stellen benachrichtigen. Unterlassung kann zum Verlust der
Versicherungsleistungen führen.
EZ-1000Plus User’s Manual
2
Page 4

Safety Instructions
Please read the following instructions seriously.
1. Keep the equipment away from humidity.
2. Before you connect the equipment to the power outlet, please check the voltage of the
power source.
3. Disconnect the equipment from the voltage of the power source to prevent possible
transient over voltage damage.
4. Don’t pour any liquid to the equipment to avoid electrical shock.
5. ONLY qualified service personnel for safety reason should open equipment.
6. Don’t repair or adjust energized equipment alone under any circumstances. Some one
capable of providing first aid must always be present for your safety
7. Always obtain first aid or medical attention immediately after an injury. Never neglect
an injury, no matter how slight it seems.
EZ-1000Plus User’s Manual
3
Page 5

安全须知
请仔细阅读以下说明。
1. 本设备勿置于潮湿处。
2. 连接至电源前,请先检查电压。
3. 当设备不用时,请将电源线拔除避免电压不稳而造成伤害。
4. 勿将任何液体溅入设备中,避免线路短路。
5. 基于安全理由,只有受到专业训练的从业人员,才可以打开本设备。
6. 请勿自行调整或修理已通电的设备,以确保您的安全。
7. 如不小心受伤,请立刻找急救人员给予您适当的救护,千万别因伤势轻微而忽略自己的
伤势。
警告使用者:這是甲類的資訊產品,在居住的環境中使用時,可能會造成射頻干擾,在這種情況下,
使用者會被要求採取某些適當的對策.
EZ-1000Plus User’s Manual
4
Page 6

第 1 章 条形码机 ......................................................................6
1-1. 全机器材......................................................................................................................... 6
1-2. 产品规格......................................................................................................................... 6
1-3. 通讯端口规格.................................................................................................................. 8
1-4. 条形码机各部位介绍.....................................................................................................10
第 2 章 条形码机标准配备安装说明 ....................................12
2-1. 碳带安装 .......................................................................................................................12
2-2. 标签纸安装 ...................................................................................................................14
2-3. 纸滚动条心安装说明.....................................................................................................15
2-4. 吊牌安装说明................................................................................................................ 16
2-5. 计算机连结 ...................................................................................................................16
2-6. 驱动程序安装方式 ........................................................................................................17
第 3 章 条形码机选购装备 ....................................................19
3-1. 自动剥纸器安装方式.....................................................................................................19
3-2. 裁刀安装方式................................................................................................................ 22
3-3. 乙太网路卡安装方式.....................................................................................................24
3-4. 无线网卡安装方式 ........................................................................................................26
3-5. CF记忆卡及定时器转接卡安装......................................................................................29
3-6. CF记忆卡使用注意事项................................................................................................. 30
第 4 章 条码机设定 ................................................................31
4-1. FEED键操作.................................................................................................................. 31
4-2. LED讯息说明.................................................................................................................31
4-3. 标签纸自动侦测及定位 .................................................................................................31
4-4. 自我测试页 ...................................................................................................................32
4-5. 热感/热转列印模式切换 ................................................................................................32
4-6. 纸张侦测感应器切换.....................................................................................................33
4-7. 倾印模式 .......................................................................................................................33
4-8. 操作错误讯息................................................................................................................ 34
第 5 章 保养维謢与调校 ........................................................35
5-1. 印表头保养与清洁 ........................................................................................................35
5-2. 印表头平衡调校 ............................................................................................................35
5-3. 打印线调整 ...................................................................................................................36
5-4. 裁刀卡纸排除................................................................................................................ 36
5-5. 故障排除 .......................................................................................................................37
附录 ............................................................................................ 38
安规认证...............................................................................................................................38
EZ-1000Plus User’s Manual
5
Page 7
第 1 章 条形码机
1-1. 全机器材
打开包装箱后,请先清点所有器材,并检查是否有因运送所造成的损坏。
请保留所有包装材料,以备日后运送之用。
条形码标签印制机
电源线
电源供应器
USB传输线
测试用标签纸卷
碳带
碳带回收纸管
快速安装手册
CD (含QLabel标签编辑软件及使用手册)
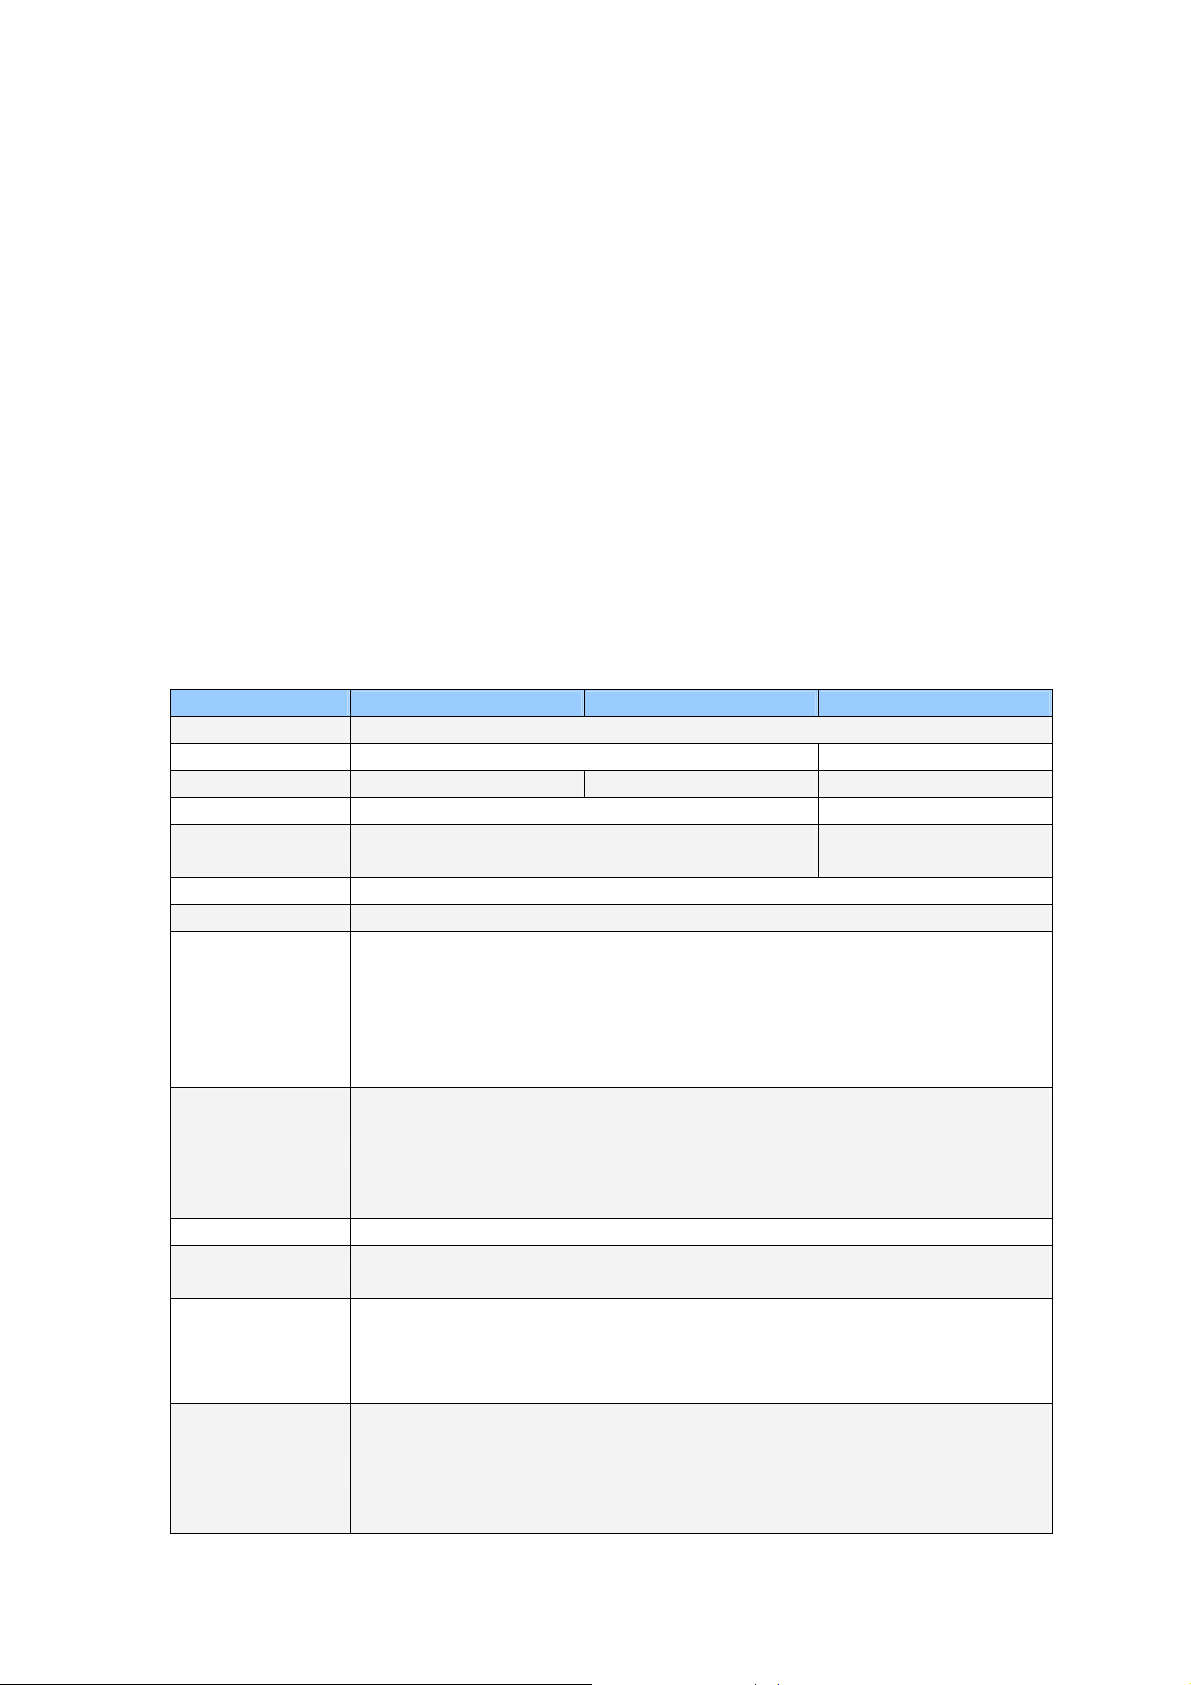
1-2. 产品规格
机种
EZ-1100Plus EZ-1200Plus EZ-1300Plus
列印模式 热感式/热转式两用
解析度
203 dpi (8 dot/mm) 300 dpi (12 dot/mm)
列印速度 4 IPS (100 mm/秒) 6 IPS (150 mm/秒) 4 IPS (100 mm/秒)
列印宽度 108 mm (4.25吋) 105.7 mm (4.16吋)
列印长度
Min. 10 mm (0.39吋);
Max. 1727 mm (68吋)
Min. 10 mm (0.39吋)
Max. 762 mm (30吋)
记忆体 4MB Flash(使用者可用容量为2MB); 8MB SDRAM
感应器形式 反射式感应器: 可移动式; 透光式感应器: 中置型固定式
纸张类型: 连续纸、间距标签纸、黑线标记纸或打孔纸等,标签长度可自动侦测
或手动命令强制控制。
纸张规格
纸张宽度: 25.4 mm (1吋) ~ 118 mm (4.64吋)
纸张厚度: 0.06 mm (0.003吋) ~ 0.25 mm (0.01吋)
纸卷外径: 最大直径127 mm (5吋)
纸卷轴芯: 25.4 mm (1吋) / 38.1 mm (1.5吋) / 76.2 mm (3吋)
材质: 一般蜡质型、混合型、抗刮树脂型
长度: 300 m (918呎)
碳带规格
宽度: 30 mm至110 mm (1.18吋至4.33吋)
最大外径: 68 mm (2.67吋)
轴芯: 25.4 mm (1吋)
程式语言
随机搭赠软体
EZPL (GEPE / EPL emulation firmware upgradable)
标签排版软体: QLabel IV(仅支援EZPL)
Driver & DLL: 支援Windows 2000, XP and Vista
Bitmap字体: 6, 8, 10, 12, 14, 18, 24, 30, 16X26 and OCR A & B
内建字体
Bitmap字体列印方向可旋转角度为0°, 90°, 180°, 270°,字体可单独旋转角度
为0°, 90°, 180°, 270°,并可水平或垂直放大8倍
向量字体(scalable font),可旋转角度为0°, 90°, 180°, 270°
可下载Bitmap字体,列印方向可旋转角度为0°, 90°, 180°, 270°,字体可单独
旋转角度为0°, 90°, 180°, 270°,并可水平或垂直放大8倍
下载字体
可下载亚洲字体,列印方向可旋转角度为0°, 90°, 180°, 270°,并可水平或
垂直放大8倍
可下载向量字体(scalable font),列印方向可旋转角度为0°, 90°, 180°, 270°
EZ-1000Plus User’s Manual
6
Page 8
1-D Bar codes:
Code 39, Code 93, Code 128 (subset A, B, C), UCC/EAN-128 K-Mart,
UCC/EAN-128, UPC A / E (add on 2 & 5), I 2 of 5, I 2 of 5 with Shipping Bearer
条码
码页
图形处理 预设支援单色PCX、BMP,其他图档类型可经软体控制支援
传输介面
控制面板
电源 100-240VAC, 50-60Hz (交直流自动转换电源供应器)
工作环境
湿度
安规
机体尺寸
机体重量 机体不含其他耗材或选购配备重量为2.72公斤(6磅)
选购项目
*
选购项目请洽询原购买单位。上述规格若有变动,均以实际出货为主;恕不另行通知。
以上所引用之商标版权均属原公司所有
Bars, EAN 8 / 13 (add on 2 & 5), Codabar, Post NET, EAN 128, DUN 14, HIBC,
MSI (1 Mod 10), Random Weight, Telepen, FIM, China Postal Code, RPS 128
and GS1 DataBar
2-D Bar codes:
PDF417, Datamatrix code, MaxiCode, QR code and Micro QR code
CODEPAGE 437, 850, 851, 852, 855, 857, 860, 861, 862, 863, 865, 866, 869,
737
WINDOWS 1250, 1251, 1252, 1253, 1254, 1255
Unicode (UTF8, UTF16)
Serial port: RS-232 (DB-9)
USB port: 预设为开启
Parallel port: Centronics 36-pin
二组双色LED指示灯: Ready, Status
一组多功能硬体控制键: FEED
操作温度: 41°F to 104°F (5°C to 40°C)
储存温度: -4°F to 122°F (-20°C to 50°C)
操作湿度: 30-85%, non-condensing.
储存湿度: 10-90%, non-condensing.
CE(EMC), FCC Class A, CB, cUL, CCC
长度: 285 mm (11.2吋)
高度: 171 mm (6.8吋)
宽度: 226 mm (8.9吋)
裁刀
自动剥纸器
外挂纸卷架(最大纸卷外径为10吋)
外接式正向/反向回卷器
CF Card及计时器转接卡(最大可支援容量为1GB)
内建Print Server的Ethernet网路连接埠(预设为关闭,须与USB埠择一使用)
内建Print Server的IEEE802.11 b/g无线网路模组(预设为关闭,须与USB埠择一
使用)
EZ-1000Plus User’s Manual
7
Page 9
1-3. 通讯端口规格
并列接口
Handshake :
Interface cable :
Pin out :
PIN NO. FUNCTION TRANSMITTER
1
2-9
10
11
12
13
14
15
16
17
18
19-30
31
32
33
34-35
36
DSTB 接于条形码机,BUSY 接于资料来源处 host
与IBM PC 兼容的并列传输埠连接线
如下表
/Strobe
Data 0-7
/Acknowledge
Busy
/Paper empty
/Select
/Auto-Linefeed
N/C
Signal Gnd
Chasis Gnd
+5V,max 500mA
Signal Gnd
/Initialize
/Error
Signal Ground
N/C
/Select-in
host / printer
host
printer
printer
printer
printer
host / printer
host
host / printer
printer
host / printer
串行接口
9600 baud rate、no parity、8 data bits、1 stop bit、XON/XOFF protocol 及
串行出厂设定值
RS232 HOUSING (9-pin to 9-pin)
DB9 SOCKET DB9 PLUG
--- 1 1
RXD 2 2
TXD 3 3
DTR 4 4
GND 5 5
DSR 6 6
RTS 7 7
CTS 8 8
RI 9 9
PC
【注意】:
parallel port 与 serial port
:
RTS/CTS。
+5V,max 500mA
PRINTER
总输出电流最大不能超过
TXD
RXD
N/C
GND
RTS
CTS
RTS
N/C
500mA。
USB界面
连结器型式
PIN NO. 1 2 3 4
: Type B
FUNCTION VBUS D- D+ GND
EZ-1000Plus User’s Manual
8
Page 10
内部接口
UART1 wafer Ethernet module
N.C
TXD
RXD
CTS
GND
RTS
E_MD
RTS
E_RST
+5V
GND
+5V
UART2 wafer Expansion module
+5V
CTS
TXD
RTS
RXD
GND
1
2
3
4
5
6
7
8
9
9
10
10
11
11
12
12
1
2
3
4
5
6
1
2
3
4
5
6
7
8
1
2
3
4
5
6
N.C
RXD
TXD
RTS
GND
CTS
E_MD
CTS
E_RST
+5V
GND
+5V
+5V
RTS
RXD
CTS
TXD
GND
EZ-1000Plus User’s Manual
9
Page 11
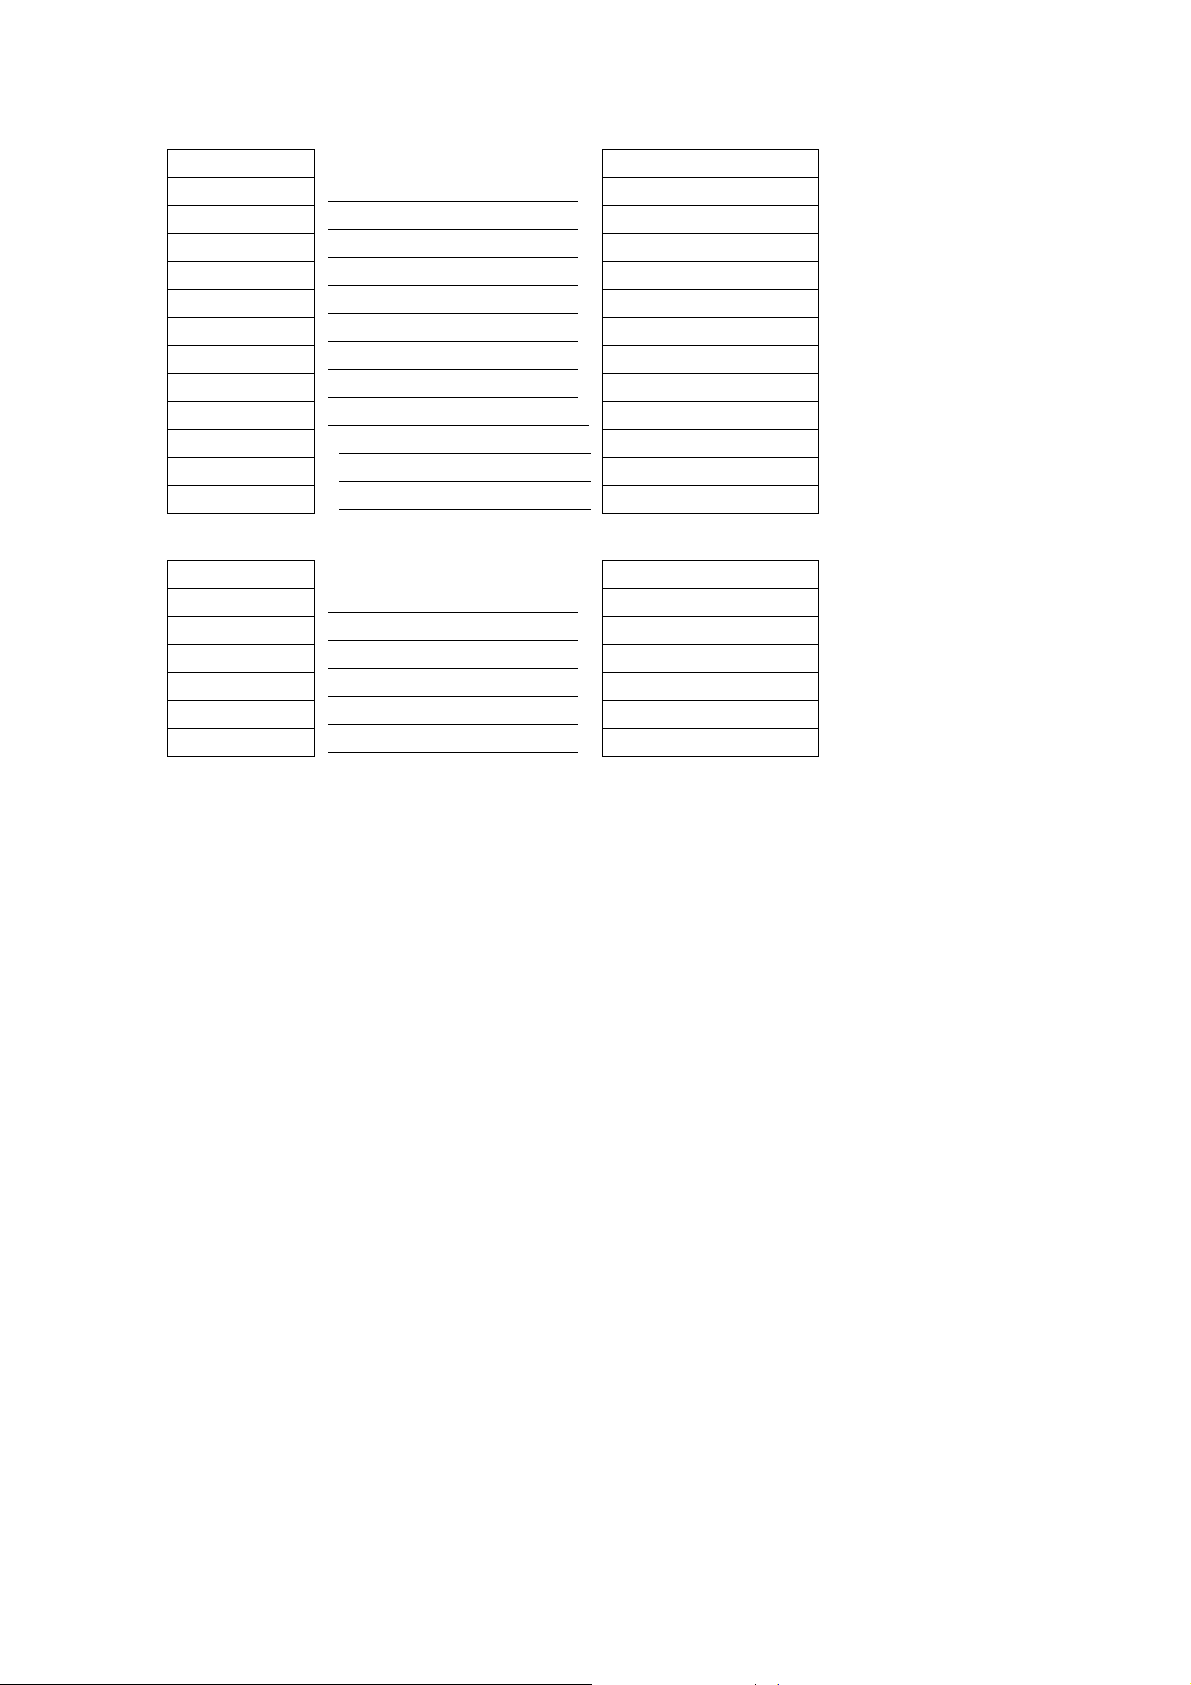
1-4. 条形码机各部位介绍
1
2
3
5
4
1.
上盖开启钮
2.
上盖
3.
纸滚动条心
4.
碳带回收轮
5.
打印机心
6.
碳带回收轴
7.
按键卡楯(左、右各一个)
8.
底座遮盖
1
2
3
6
7
8
4
1.
READY指示灯
2.
STATUS指示灯
3.
FEED键
4.
CF卡槽遮盖
5.
印表头压力调整旋钮
EZ-1000Plus User’s Manual
5
10
Page 12
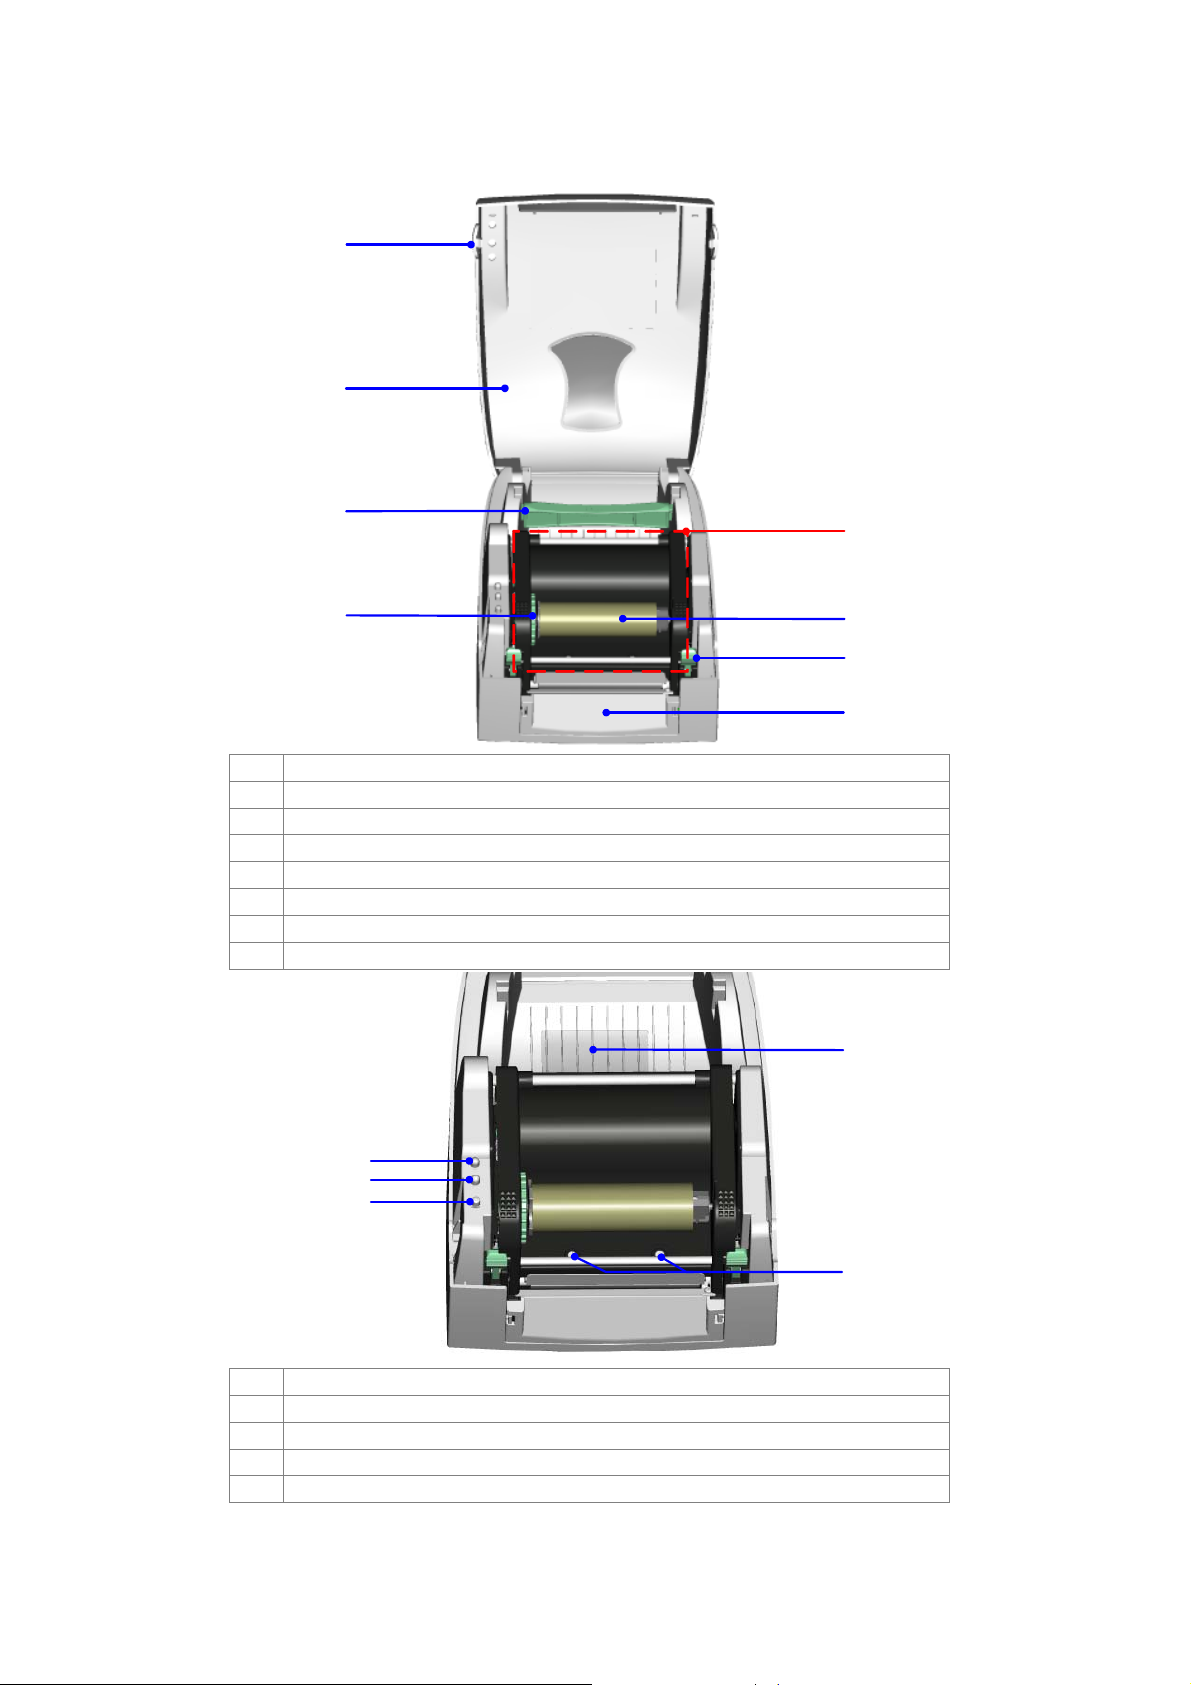
1
2
4
3
1.
碳带供应轴
2.
标签调整杆
3.
橡胶滚轮
4.
打印线调整钮
5.
纸张侦测器
1
2
1.
折迭纸进纸口
2.
电源开关
3.
网路线插孔(Option)
4.
USB接头
5.
并列埠
6.
串行埠(RS-232)
7.
电源插座
* 通讯传输端口的类型依所购买的配备而有不同
5
3
4
5
6
7
EZ-1000Plus User’s Manual
11
Page 13
第 2 章 条形码机标准配备安装说明
本条形码机打印方式有:
热转式: 打印时,须配加碳带,将内容转印于热转纸上。热转纸为一般纸质,也可搭配特殊碳
带打印于如卡纸、PVC等特殊材质之标签。这类纸张保存时间较长。
热感式: 打印时不须碳带,仅用热感纸即可。此类纸质类似传真纸,保存期限较短。
请先确定所要的打印模式,并于开机后进入设定模式 Setting Mode 设定即可。
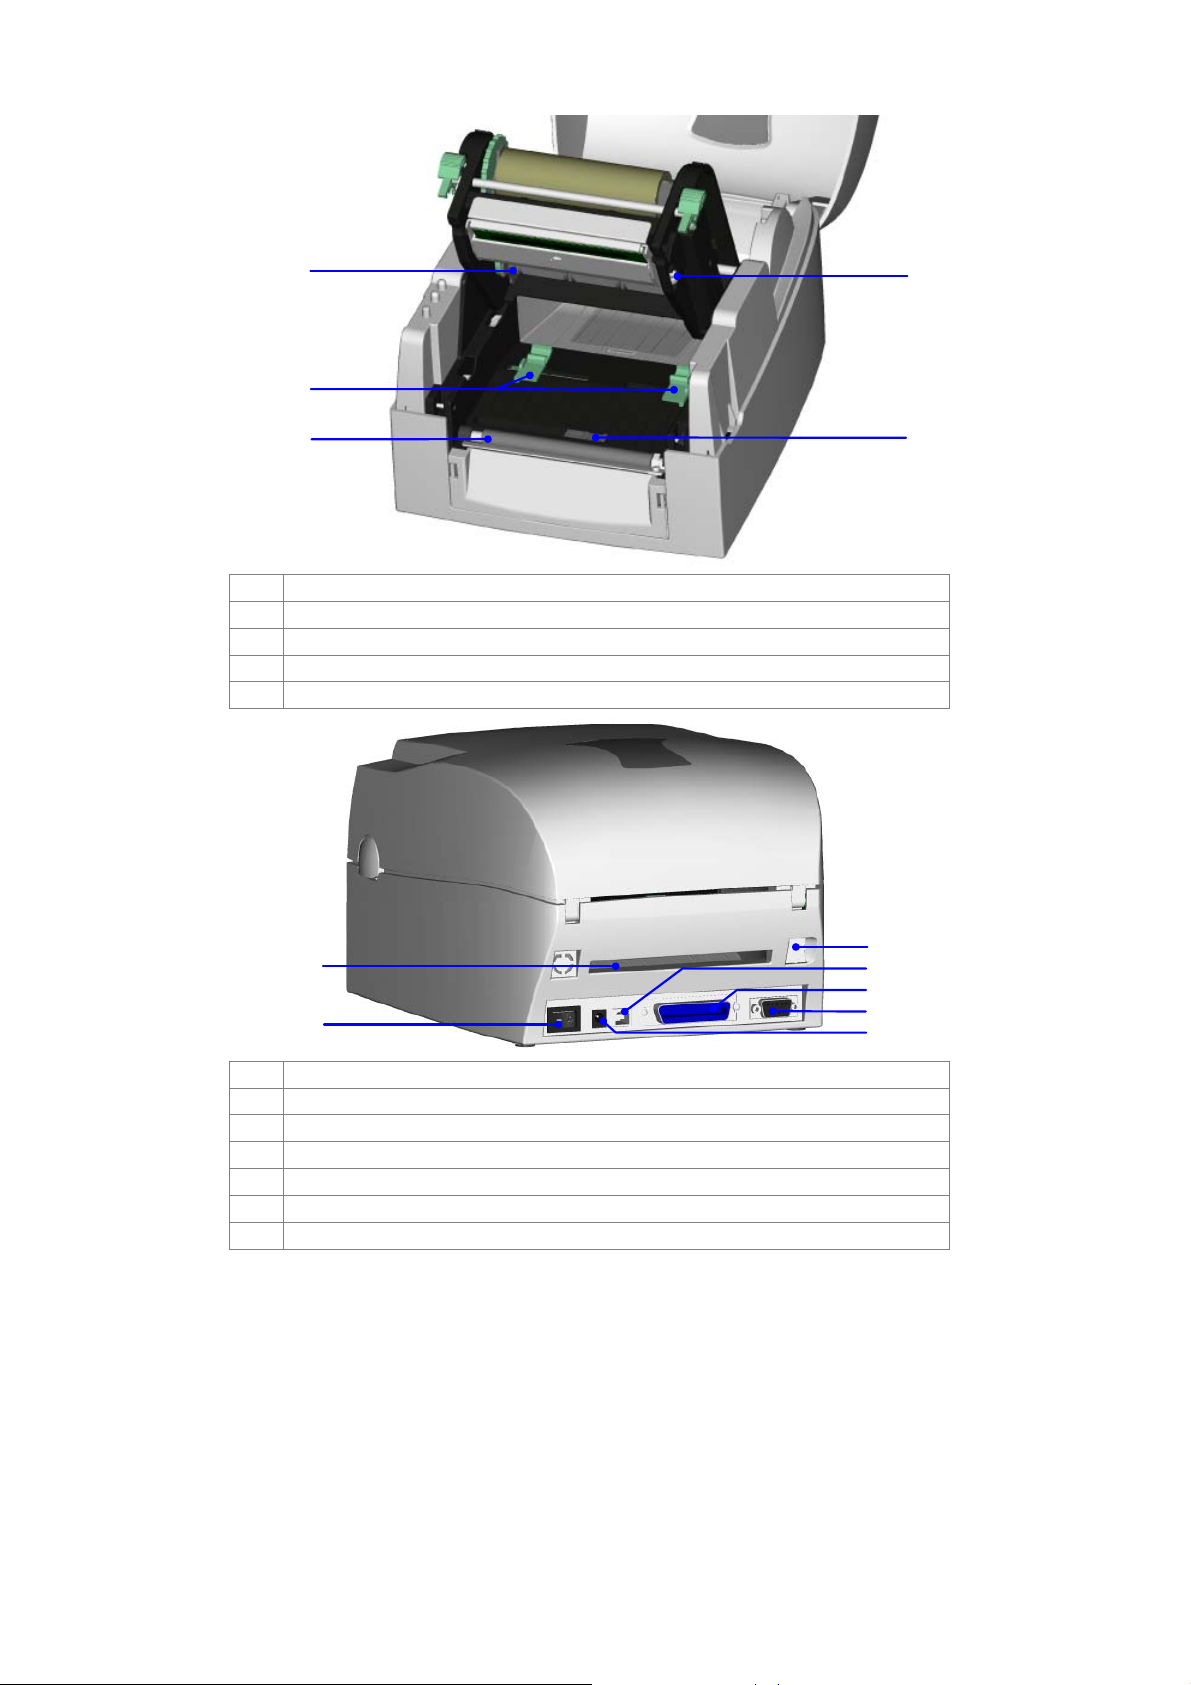
2-1. 碳带安装
1. 面对机器正面,按住上盖开
启钮掀起上盖。
2. 将碳带回收轴装在机心上方
(包含纸管),按住按键卡勾
机心向上掀开,使印表头向
上抬起。
3. 将新的碳带装入碳带供应
轴,并将碳带拉开。
EZ-1000Plus User’s Manual
12
Page 14

4. 将碳带由下往上拉至碳带回
收轴心固定。
5. 将碳带固定好后,往机体方
向卷入碳带。
6. 将机心压下固定后即完成碳
带安装。
EZ-1000Plus User’s Manual
13
Page 15

2-2. 标签纸安装
1. 面对机器正面,按住按键掀
起上盖。
2. 将标签放入纸滚动条心,确
认标签出纸方向。
3. 按住卡勾按键使机心向上掀
开,使印表头向上抬起。
4. 将标签由标签调整杆下方穿
过,用标签调整杆依标签宽
度大小固定标签两侧。
5. 将机心压下固定后即完成标
签安装。
EZ-1000Plus User’s Manual
14
Page 16

2-3. 纸滚动条心安装说明
(A) 1”纸滚动条心安装说明
(B) 1.5”纸滚动条心安装说明
(C) 3”纸滚动条心安装说明
EZ-1000Plus User’s Manual
15
Page 17

2-4. 吊牌安装说明
安装吊牌卡纸时,卡纸上之孔位须对齐SENSOR
箭头指示位置(如图说明),并用标签调整杆将吊
牌卡纸固定。
卡紙孔位
SENSOR
侦测位置
偵測器
2-5. 计算机连结
1. 确认条形码机电源开关是位于关闭的位置。
2. 将随机所附之电源线一端接于一般家用电源,另一端接于条形码机之电源插座。
3. 传输线一端接于条形码机之传输埠上,另一端接于计算机。传输线的类型视所购买的配备而有
所不同,请依实际的配件安装。
4. 在纸张及碳带装妥的情形下打开条形码机电源开关,等待条形码机之电源指示灯亮即可。
EZ-1000Plus User’s Manual
16
Page 18

2-6. 驱动程序安装方式
1. 将产品光碟置入光碟机里,
开启"Windows Drivers"档
案夹。
2. 点击条码机驱动程式安装图
示后开始进行安装。
3. 跟随安装视窗的指示进行安
装。
4. 在指定印表机连接埠时,根
据条码机实际安装的连接埠
选取连接埠选项。
5. 选取安装的条码机型号。
EZ-1000Plus User’s Manual
17
Page 19

6. 指定条码机名称。
7. 跟随安装视窗的指示完成
「印表机共用」及「列印测
试页」的设定。
8. 在印表机设定页确认所有安
装设定皆正确后按下「完成」
键。
9. 在开始复制之前会跳出提示
视窗,按下「继续安装」即
可开始复制驱动程式档案。
10. 当驱动程式档案复制结束之
后即可完成驱动程式安装,
在 Windows 控制台的「印表
机和传真」选项里即会新增
刚完成安装的条码机图示。
EZ-1000Plus User’s Manual
18
Page 20

第 3 章 条形码机选购装备
3-1. 自动剥纸器安装方式
1
剥纸器模块
2
螺丝(TAP 3*8)*2
【注意1】
剥纸器模块装置时,请先将电源开
关关闭。
【注意2】
最大剥纸宽度为
格建议厚度在
质基重为
佳之剥纸效果。
1. 面对机器正面,按住按键掀起
65g/m2 ± 6%
上盖。
110mm
0.06mm ± 10%
,背纸规
会得到最
,纸
1
2
2. 按住按键卡勾机心向上掀开,
使印表头向上抬起。
3. 按住底盖遮板两侧凸点(图面
箭头表示) 由上拉起将底盖
遮板拆下。
EZ-1000Plus User’s Manual
19
Page 21

4. 将剥纸模块上的线材插入转
接板组合插座上并确实扣合。
【注意】
转接板组合共有两个插座
﹙公座﹚,安装时请依选购模块上
之连接器插孔
5. 将模块左方先行安装于底座
之凹槽再将右方插入。
6. 扶住剥纸模块将两侧螺丝分
别锁上。
(
母座)安装。
7. 将标签由标签调整杆下方穿
过。
【注意】
建议配合剥纸使用时的标签尺寸
高度为
20mm
【建议】
以上。
加装脱纸模组装置时,停歇点设定
数值
(^E)
建议为9。
8. 安装标签后将第一张标签撕
下,将背纸穿入滚轮与撕纸钢
片之间。
EZ-1000Plus User’s Manual
20
Page 22

9. 依照右图所指示的方向,将标
签底纸穿过剥纸器模块。
10. 将机心压下固定并将剥纸器
模块扣合。
11. 将机心固定后,按住 FEED
键将标签定位即完成剥纸模
块安装。
EZ-1000Plus User’s Manual
21
Page 23

3-2. 裁刀安装方式
1
裁刀模块
2
螺丝(TAP 3*8)*2
【注意1】
安装裁刀模块装置时,请先将电
源开关关闭。
【注意2】
本裁刀不适用于有背胶之标签
纸,如裁切有背胶之标签将会污
染裁刀及减低使用上的安全性。
此裁刀最大裁切的宽度为
mm
纸质时
200g/m2
1. 面对机器正面,按住按键掀
,使用寿命在裁切
500,000
起上盖。
次,而在裁切
纸质时为
250,000
116
160g/m2
次。
【注意3】
建议配合裁刀使用时的标签尺寸高度为
1
2
30mm
以上。
2. 按住卡勾按键使机心向上掀
开,使印表头向上抬起。
3. 按住底盖遮板两侧凸点(图
面箭头表示) 由上拉起将底
盖遮板拆下。
4. 将裁刀模块上的线材插入转
接板组合插座上并确实扣
合。
【注意】
转接板组合共有两个插座
﹙公座﹚,安装时请依选购模块
上之连接器插孔(母座)安装。
EZ-1000Plus User’s Manual
22
Page 24

5. 将裁刀模块左方先行安装于
底座之凹槽再将右方插入。
6. 按住裁刀模块往下压将裁刀
模块扳开。
7. 扶住裁刀模块将两侧螺丝分
别锁上。
8. 将两边螺丝锁上后,将裁刀
模块往上锁合。
9. 将标签经由标签调整杆下方
穿过裁刀模块之后,再将机
心阖上。
【注意】
加装裁刀模组后,不建议以内卷
纸列印,以避免可能发生故障。
10. 按住 FEED 键将标签定位即
完成裁刀模块安装。
【建議】
加裝裁刀模組裝置時,停歇點設
定數值
(^E)
建議為30。
EZ-1000Plus User’s Manual
23
Page 25

3-3. 乙太网路卡安装方式
1
乙太网路缆线1.8M
2
通讯网路板支架
3
乙太网路模组
4
模组连接线
5
支架固定螺丝*2
6
模组固定螺丝*1
注意:
安装网路模组时请务必做好防静电措施。
1. 确定电源已关闭且将电源线自机器端拔除
后,将机器底部翻转至正面。
2. 卸下主机底部的两个螺丝。
3. 面对机器按住机器两旁的上盖开启钮以打开
上盖。
123
5
1
64
1
4. 将机器上盖及中盖参照右图一同拆下。
5. 切开主机背面预留孔的遮片。
6. 将模组锁在支架上。
2
2
EZ-1000Plus User’s Manual
24
Page 26
7. 把模组连接线上的束线带剪开后,将连接线
的一端先插入 Ethernet 模组上的连接插座。
注意:
在剪开束线带时请注意勿伤及模组连接线。
8. 将锁好支架的模组对准网路埠插孔安装在机
器上。
9. 把模组连接线的另一端如图示穿过主板上的
其他连接线后插入主板上的插座上。
注意:
在安装机器上盖及中盖前,请先整理机器内部的
线材,以避免锁合机器时压伤线材或造成无法锁
合的情况。
10. 锁上固定螺丝。
11. 模组安装完成后,再将机器中盖安装上去,
并且将背盖螺丝锁上即可完成整个安装程
序。
注意:
完成
Ethernet
「
^XSET,USBETHERNET,1
动
Ethernet
USB
埠连线功能即被取代,无法再使用。
模组安装后,请传送印表机命令
」至印表机,以启
模组功能。
Ethernet
模组功能启动后
EZ-1000Plus User’s Manual
25
Page 27

3-4. 无线网卡安装方式
1
乙太网路缆线1.8M
2
模组固定螺丝*1
3
支架固定螺丝*2
4
模组支架
5
WLAN无线网路模组
6
模组连接线
7
无线网路天线
8
天线固定螺帽
9
天线固定垫圈
10
天线固定垫片
11
天线支架
1. 确定电源已关闭且将电源线自机器端拔除
后,将机器底部翻转至正面。
2. 卸下机器底部的两个螺丝。
3. 面对机器按住机器两旁的上盖开启钮以打开
上盖。
1
1
4. 将机器上盖及中盖参照右图一同拆下。
5. 切开机器背面 Ethernet 预留孔的遮片。
2
2
EZ-1000Plus User’s Manual
26
Page 28

6. 将 WLAN 模组锁在支架上。
7. 把模组连接线上的束线带剪开后,将连接线
的一端先插入 WLAN 模组上的连接插座。
注意:
在剪开束线带时请注意勿伤及模组连接线。
8. 将锁好支架的 WLAN 模组对准网路埠插孔
安装在机器上。
9. 锁上固定螺丝。
10. 把模组连接线的另一端如图示穿过主板上的
其他连接线后插入主板上的插座上,并将天
线连接线参照图中的箭头方向整理放置。
注意:
在安装机器上盖及中盖前,请先整理机器内部的
线材,以避免锁合机器时压伤线材或造成无法锁
合的情况。
11. 切开机器背面天线预留孔的遮片。
EZ-1000Plus User’s Manual
27
Page 29

12. 将天线连接线接头穿过天线支架上的洞后,
再依图示放置在天线预留孔上。
13. 将天线固定垫片及天线固定垫圈依序置入天
线接头后再将天线固定螺帽锁上。
注意
:
建议使用尖嘴钳来锁入天线固定螺帽。
14. 将天线依箭头指示方向旋入天线接头上后固
定,天线亦可视使用情况改变角度。
15. 模组安装完成后,再将机器中盖安装上去,
并且将背盖螺丝锁上即可完成整个安装程
序。
注意
1:
完成
WLAN
模组安装后,请传送印表机命令
「
^XSET,USBETHERNET,1
动
Ethernet
USB
注意
请先以
后,即可开始使用
模组功能。
埠连线功能即被取代,无法再使用。
2:
Ethernet
连线完成无线网路的首次设定
WLAN
」至印表机,以启
Ethernet
模组功能启动后
模组的无线传输功能。
EZ-1000Plus User’s Manual
28
Page 30

3-5. CF记忆卡及定时器转接卡安装
1
CF Card转接卡(正面)
2
CF Card转接卡(背面)
【注意】
安装CF卡转接卡时,请先将电源
开关关闭。
1
2
1. 面对机器正面,按住上盖开启
钮掀起上盖。
2. 取下纸滚动条心。
3. 按住 CF 卡槽遮盖前ㄇ型按
键,向上扳开即可拆下卡槽
遮盖。
4. 将转接卡上的插孔和主机板
上的针脚对准之后,再将转
接卡安装于主机板上。
【注意】
安装时请务必确认转接卡孔位和
主机板针脚位置正确后再行安装,
以避免施压过大造成主机板上针
脚变形。
5. 将 CF 卡槽遮盖盖上后即完
EZ-1000Plus User’s Manual
成 CF 卡安装。
29
Page 31

3-6. CF记忆卡使用注意事项
EZ-1000Plus系列机型安装CF Card转接卡后,即具备读取CF记忆卡的能力,若机器内建的内存不
敷使用时,使用者可自行购买CF记忆卡做为扩充内存,以提供更多的标签、图案及各种中英文字
型下载时的储存空间。
在使用CF记忆卡做为扩充内存时,应注意下列事项:
1. 在插入或取出CF记忆卡前,请务必关闭条形码机电源。
2. 使用CF记忆卡做为条形码机扩充内存前,必须先把记忆卡格式化格式化为FAT16格式。
若条形码机侦测到插入的CF记忆卡不是FAT16格式时,条形码机会发出3声哔声,同时
Status灯号则会亮橘色灯。
3. 当条形码机显示未格式化的讯息时,若要进行格式化,只要按下FEED键,条形码机即
会将CF记忆卡格式化为FAT16格式,完成格式化后,LED灯即会转成绿色。若选择不
进行格式化,则只要打开条形码机上盖,机器即会进行正常的开机程序,开机程序完成
后再阖上上盖。
4. 完成格式化之后,记忆卡内会自动产生一个名为”Godex”的数据夹,此为条形码机存放
数据的指定路径,请勿任意更动。
5. EZ-1000Plus系列机型适用的CF记忆卡规格:
z Compact Flash Type I
z CF卡规范V1.4
z 容量为128MB ~ 1GB
z 档案格式为FAT16
EZ-1000Plus User’s Manual
30
Page 32

第 4 章 条码机设定
4-1. FEED键操作
按下FEED键时,条码机会依所使用纸张的类型将纸送出到指定的吐纸位置。当使用连续纸时,按
FEED键一次会送出固定长度的纸;若是使用标签纸时,按FEED键一次会送出一整张标签。在使
用标签纸时,若不能正确的定位,请依下节的说明进行纸张自动侦测。
4-
2. LED讯息说明
*
注意: 以下的功能描述仅适用于条码机韧体
将条码机关机后,持续按住FEED键并打开条码机电源,待红灯开始闪烁之后放开FEED键,条码
机即可进行纸张自动侦测及定位,定位完成之后随即印出一张自我测试页。关于各种设定状态的程
序及简述说明如下:
LED灯号 响声 状 态 说 明
G3.000
或之后的版本。
READY
STATUS X
READY
STATUS
绿
红(闪烁)
橘
X
3
正常状态
持续按住FEED键并打开条码机电源
自动侦测纸张
条码机可针对目前安装的纸张进行侦测
及定位,定位完成后条码机会自动印出
自我测试页,测试页内容说明请参照第
32页的说明。
4-3. 标签纸自动侦测及定位
条码机可自动侦测标签(黑线纸)并自动记录侦测结果,如此在列印时即无须再设定标签长度,而条
码机亦会感应每张标签(黑线纸)的位置。
1. 请先检查纸张是否已正确安装于条码机上。
2. 关闭电源,按住FEED键。
3. 打开电源(此时仍按住FEED键不放),等 待 LED指示灯闪红灯后放开FEED键,条码机即开始进
行标签纸自动侦测及定位,条码机会将自动侦测及定位的结果记录下来。
4. 完成自动测及定位后,条码机即会将侦测结果及条码机相关设定内容自动列印出一张自我测试
页。
EZ-1000Plus User’s Manual
31
Page 33

4-4. 自我测试页
条码机的自我测试页内容,可帮助使用者检查条码机本身是否正常无故障,自我测试页各项内容的
说明如下:
机种与F\W版本
串列埠
USB埠设定
测试图案
DRAM 安装数量
列印长度记忆体大小
标签储存于记忆体数量
图形储存于记忆体数量
字型储存于记忆体数量
亚洲字型储存于记忆体数量
资料库储存于记忆体数量
向量字型储存于记忆体数量
目前记忆体大小
目前机器速度,热度,左边界起印
目前标签宽度,长度与间距
裁刀,自动剥纸器,列印模式
纸张侦测感应器参数值
码页设定值
EZXXXX : VX.XXX
Serial port :96,N,8,1
int-usb sw setting: ext-USB
1 DRAM installed
Image buffer size : 1500K
000 FORM(S) IN MEMORY
000 GRAPHIC (S) IN MEMORY
000 FONT(S) IN MEMORY
000 ASIAN FONT(S) IN MEMORY
000 DATABASE(S) IN MEMORY
000 TTF(S) IN MEMORY
2048K BYTES FREE MEMORY
^S4 ^H10 ^R000 ~R200
^W10 ^Q48,3
Option : ^D0 ^O0 ^AD
Reflective Sensor AD: 639 754 928 (10)
Code Page: 850
4-5. 热感/热转列印模式切换
1. 在条码机可列印的状态下(LED显示灯号为绿色),透过QLabel IV的命令视窗或以WindowsTM
的HyperTerminal
2. 输入"^AD"命令至条码机,即可把列印模式设定为热感模式。
3. 输入"^AT"命令至条码机,即可把列印模式设定为热转模式,在热转模式下条码机必须安装碳
带,若无安装碳带即会引发「列印模式错误」的LED警示灯号。
EZ-1000Plus User’s Manual
TM
(超级终端机)透过RS-232连接埠传送下列EZPL控制命令至条码机:
语法
^An
n可为D或T
参数
当n = D时为Direct Thermal Mode; 热感模式
当n = T时为Thermal Transfer Mode; 热转模式
说明 此命令可设定条码机的列印模式为热感模式或热转模式
32
Page 34

4-6. 纸张侦测感应器切换
EZ-1000Plus系列条码机内建反射式及穿透式两种纸张侦测感应器,条码机预设为可自动切换适用
的感应器,但有时会因不同的使用条件,例如: 因标签材质特殊造成感应器无法分辨标签的间距、
使用背纸较厚的标签、背胶有颜色或是标签背面有图案等情况,有可能会造成感应器自动切换错误,
在这种情况下,使用者可以因应不同的列印需求手动切换至适用的感应器。
更改感应器设定的步骤如下:
1. 在条码机可列印的状态下(LED显示灯号为绿色),透过QLabel IV的命令视窗或以Windows
的HyperTerminal
TM
(超级终端机)透过RS-232连接埠传送下列EZPL控制命令至条码机:
语法
^Gn
n = 0, 关闭穿透式侦测感应器并开启反射式侦测感应器
参数
n = 1, 开启穿透式侦测器并关闭反射式侦测感应器
n = 2, Auto-mode自动模式
说明 此命令可变更条码机侦测感应器的设定
2. 输入"^G0"命令至条码机,可将感应器设定为只使用反射式侦测感应器。
3. 输入"^G1"命令至条码机,可将感应器设定为只使用穿透式侦测感应器。
4. 输入"^G2"命令至条码机,感应器设定为自动模式。
【注意】
当设定开启穿透式侦测器时,纸张侦测器必须移至中间。
TM
4-7. 倾印模式
若列印结果并不符合原先所设定的标签列印样式,此时建议可进入条码机的倾印模式,藉以检查条
码机与电脑间的传输是否有误。当条码机处于倾印模式时,如果接收到 8 行命令,条码机将不作
任何处理,而是直接印出这 8 行命令的内容,如此即可确认命令的接收是否无误。
倾印模式之测试步骤如下:
1. 确认条码机是在可列印的状态下(LED 显示灯号为绿色)。
2. 透过QLabel IV的命令视窗或以Windows
埠传送"~S,DUMP"命令至条码机,条码机即会自动列印”DUMP MODE BEGIN”的字样,如此
表示本条码机已处于倾印模式。
3. 送出任意命令至条码机,幷将列印结果与送出的命令相对照,检查内容是否相符。
4. 若要退出倾印模式,请按 FEED 键,此时条码机会自动印出”OUT OF DUMP MODE”的字样,
即表示恢复成正常待机状态,或者关机重开亦可离开倾印模式。
TM
的HyperTerminalTM (超级终端机)透过RS-232 连接
EZ-1000Plus User’s Manual
33
Page 35

4-8. 操作错误讯息
LED 讯息灯
Ready Status
红
(闪烁) 红 (闪烁)
红 连续2次4声
红 连续2次3声
红 连续2次2声
红 连续2次2声 纸张传送不正常
红 连续2次2声
红 连续2次2声
红 连续2次2声
哔 声 说 明 解 决 方 法
未关印表头或关闭不完
全。
无 印表头温度过高。
未安装碳带但机器出现错
误讯息。
碳带用尽或碳带供应轴不
动时。
侦测不到纸
纸张用尽 请更换纸张。
打印机会印出”Memory
full”,表示内存空间已满
打印机会印出”Filename
can not be found”,表示找
不到档案
打印机会印出”Filename
is repeated”,表示档名重
复
重新开启印表头并再度关上。
当印表头温度过热时,条形码机会自动
停止打印,待印表头温度降低后则会回
到待机状态,LED灯号亦会停止闪烁。
确认条形码机为热感模式。
更换新的碳带。
确认移动式侦测器位置标志的位置是否
于为正确的侦测位置,若仍是侦测不到
纸,请重做Auto Sensing。
可能原因有:卡纸 / 张掉落在滚轴之后
/ 找不到标签间距/黑线标记 / 黑线标纸
用完,请依实际的使用情况调整。
删除内存内不需要的数据。
请使用 ~X4 命令将所有档案打印出来,
再核对送到打印机的名称是否正确及存
在否。
更换档名之后再下载一次。
EZ-1000Plus User’s Manual
34
Page 36
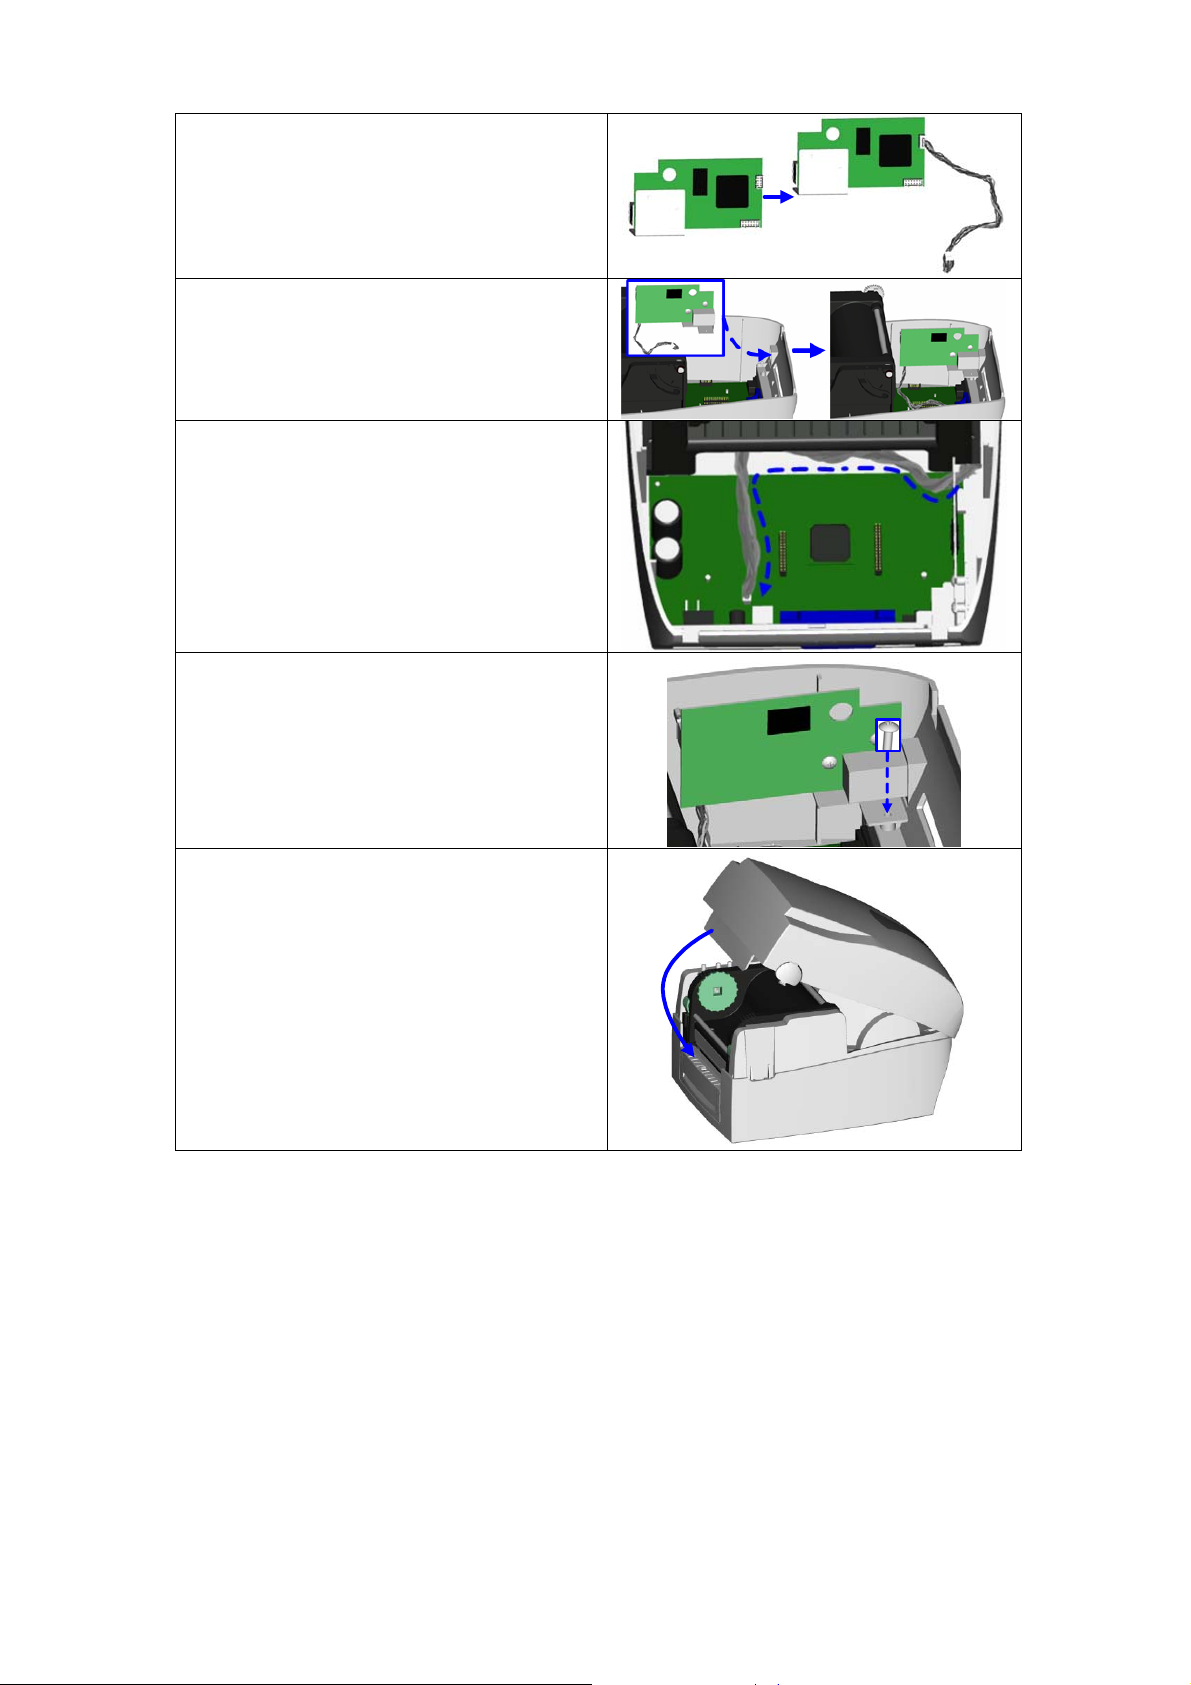
第 5 章 保养维謢与调校
5-1. 印表头保养与清洁
印表头可能会因灰尘附着、标签纸沾黏或
积碳等,而发生打印不清晰或断线 (即某
部份无法打印) 的状况。所以除了打印时
将上盖保持闭合外,所使用的纸张也要注
意是否有灰尘或其它污物附着,以保持打
印质量并可延长印表头使用寿命。印表头
的清理步骤如下:
1. 先关闭电源
2. 开启上盖
3. 取下碳带
4. 按住卡勾按键往向上掀开,使印表头
向上抬起
5. 若印表头(见附图中箭头所指之处)
附着有黏结之标签纸或其它污物,请
用酒精笔或软布料沾酒精清除。
【注意1】
建议每周清理印表头
【注意2】
清理印表头时,请注意清洁的软布上是否
有附着金属或坚硬物质,若使用不洁的软
布而造成印表头的损坏,则不在保固条件
内。
1
次。
5-2. 印表头平衡调校
印制不同纸质之标签,或使用材质不同之
碳带时,由于不同介质之影响,可能导致
打印质量左右不均匀,因而需要调整印表
头平衡。
1. 开启上盖。
2. 将印表头压力调整钮用一字起子轻
轻旋转调整。(请勿过于用力旋转,
易造成机器损坏)
3. 依实际打印不平均的位置,往+增加
压力,往-减低压力。
4. 印表头压力调整钮有定位功能设计,
当调整钮无法转动时,请勿再旋转易
造成机器损坏。
【注意】
机器出厂时已调整在最适当位置,非必
要时请勿任意调整。
+
-
+
-
EZ-1000Plus User’s Manual
35
Page 37

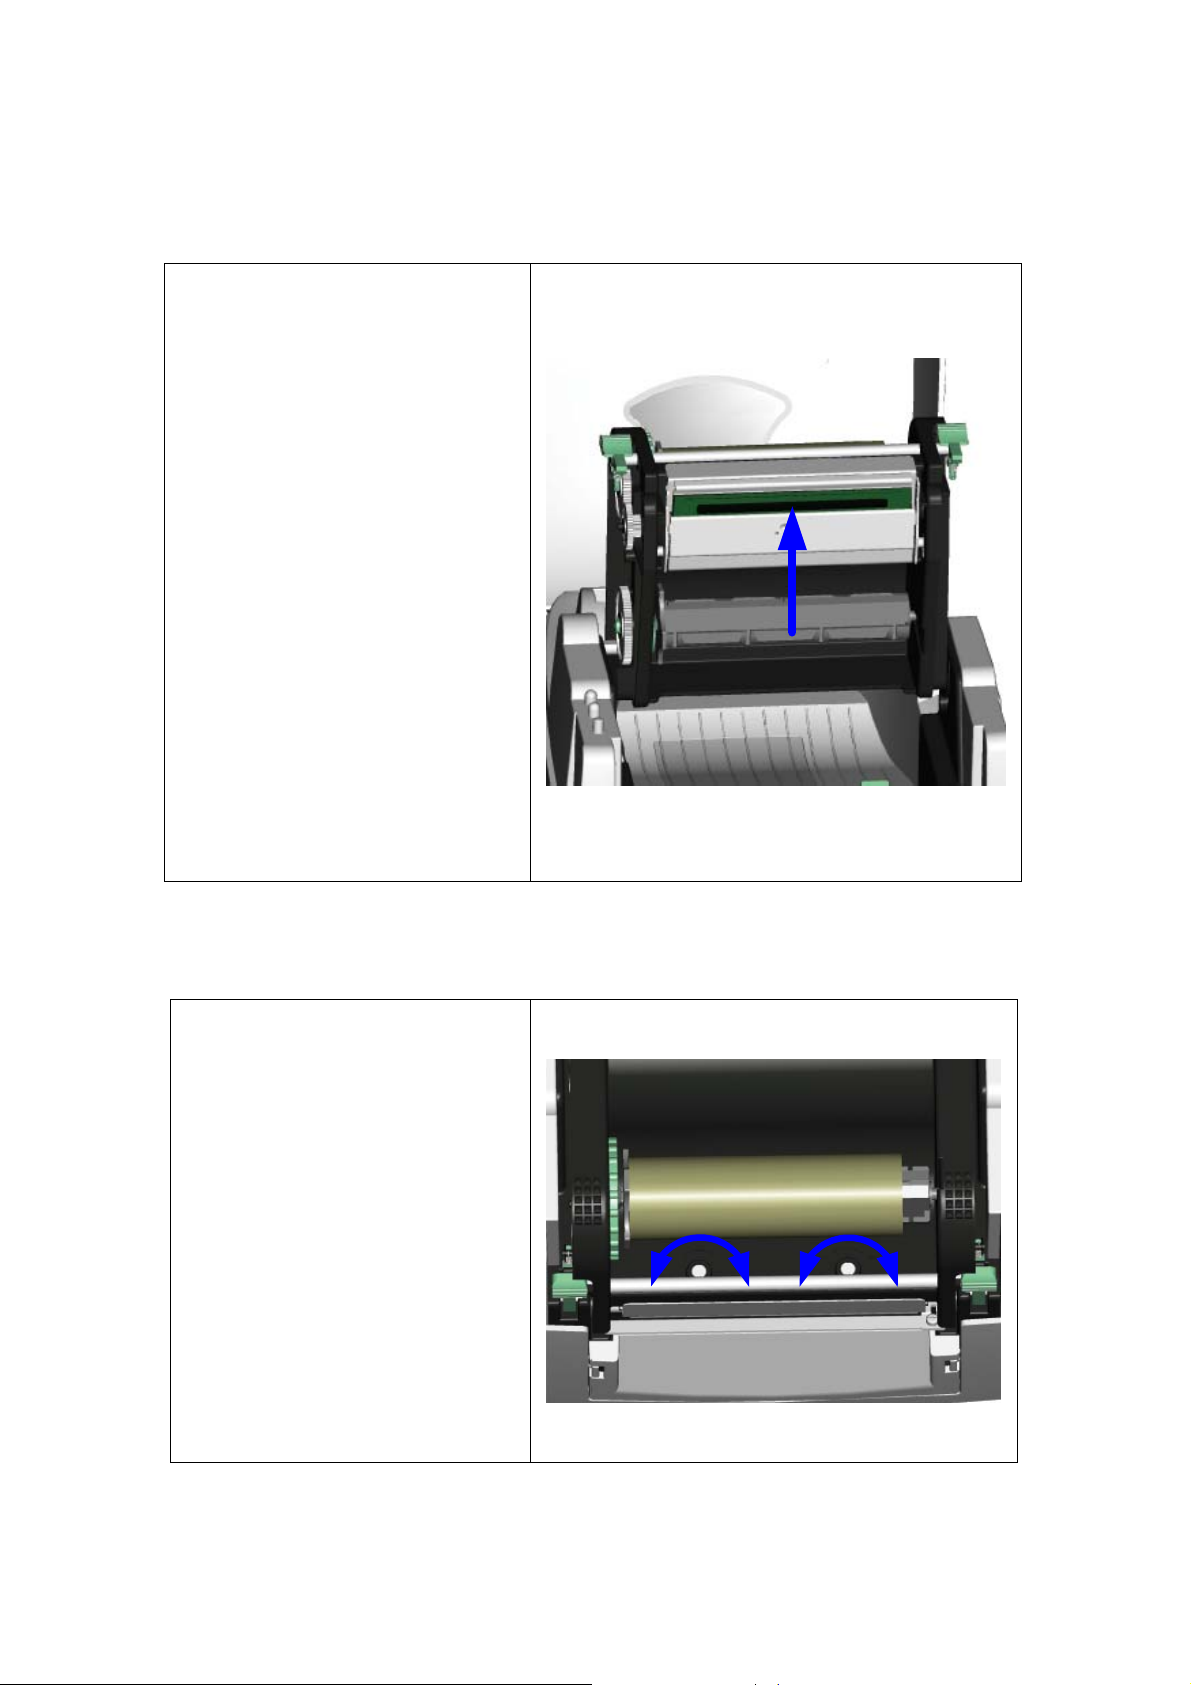
5-3. 打印线调整
调整印字头与标签纸接触的面,调整
打印的平衡度及质量。
1. 往箭头1方向转动,打印线往B方
向移动.
2. 往箭头2方向转动,打印线往A方
向移动.
【注意】
机器出厂时已调整在最适当位置,非
必要时请勿任意调整。
5-4. 裁刀卡纸排除
1. 裁刀侧边有如图中“A”所示之调整
孔。
2. 当卡纸而造成裁刀无法正常使用
时,先关闭电源,使用 3mm 六角
扳手插入”A”孔内,逆时针方向旋转
即可将闭合的刀刃打开。
3. 排除卡纸后,重新开启电源,此时
刀刃会自动回复到正确的位置。
【注意】
建议配合裁刀使用时的标签尺寸高
度为
30mm
以上。
A
1
2
B
A
EZ-1000Plus User’s Manual
36
Page 38

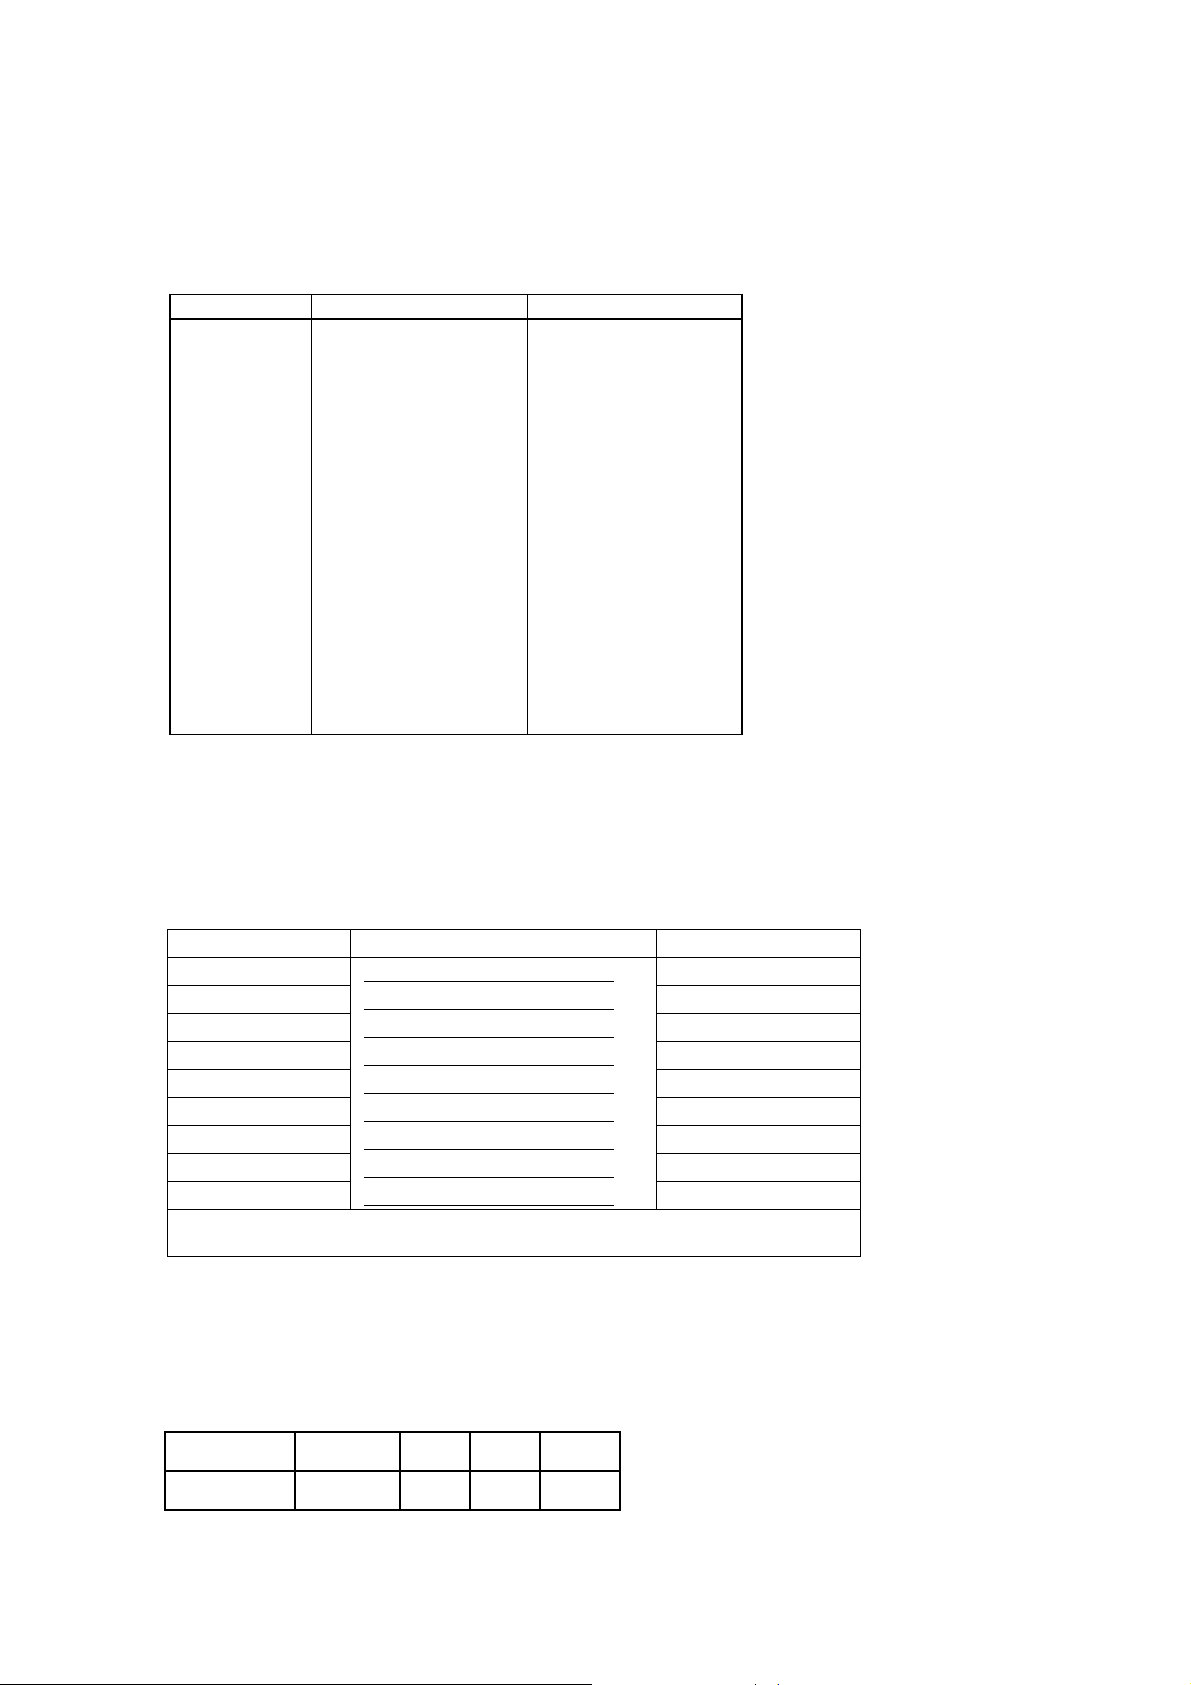
5-5. 故障排除
问 题 建 议 改 进 方 法
电源打开后LED无亮灯 检查电源线是否接妥。
机器停止打印并亮Error灯 检查应用软件之设定,或检查程序命令是否错误。
检查机器目前使用是否为正确的打印模式。
检查标签纸或碳带是否用完。
检查标签纸是否纠结。
检查印表头是否关闭(印表头组合件未压至定位)。
检查移动式侦测器是否被纸遮住或粘着。
检查是否裁刀不正常裁切或无动作(有加装裁刀时)。
条形码机开始打印,但标签上无
内容印出
打印时,标签有纠结现象 清除纠结之标签,如果印表头沾有黏着之标签,请用清洁卡、
打印时,标签上仅局部内容印出 检查标签纸或碳带是否黏着于印表头上。
打印时,标签上部份打印不完整 检查印表头是否有残胶、碳渣附着。
打印位置不符所望 检查移动式侦测器是否被纸张附着其上。
打印时,跳至次张标签 检查标签纸高度及间隔设定是否有误。
打印不清晰 检查打印明暗度设定是否不足。
使用裁刀时,标签纸割截不正 检查标签纸是否装置歪斜。
使用裁刀时,标签纸切不断 检查标签纸厚度是否超过0.2mm。
使用裁刀时,标签纸不出或割截
不规则
使用剥纸功能不佳 检查剥纸侦测器是否被灰尘蒙蔽或纸张附着其上。
【注意】若以上建议仍无法解决问题,请与经销商联系。
检查碳带是否正反面倒置,或是否适用。
选择正确的条形码机驱动程序。
选用正确的打印模式。
选用正确标签纸材质及碳带类型。打印类型。
酒精笔或柔软布料沾酒精,清除其残余黏胶。
检查是否应用软件有误。
检查是否边界起印点设定有误。
检查碳带是否打折不平整。
检查碳带供应轴之摩擦介质(橡胶滚轮)是否损坏需更换,如需
更换,请连系当地经销商。
检查电源供应是否正确。
使用内建命令~T检查印表头是否打印完整。
检查使用的耗材是否质量不佳 (建议使用科诚原厂所提供的
耗材)。
检查标签调整杆是否贴齐纸卷边缘。
检查移动式侦测器是否被纸张附着其上。
印表头是否有残胶、碳渣附着须清理。
碳带和标签不相配
检查裁刀是否闭合。
检查标签纸是否安装妥当。
EZ-1000Plus User’s Manual
37
Page 39

附录
安规认证
EZ-1000Plus User’s Manual
38
Page 40

EZ-1000Plus User’s Manual
39
Page 41

EZ-1000Plus User’s Manual
40
Page 42

EZ-1000Plus User’s Manual
41
Page 43

EZ-1000Plus User’s Manual
42
Page 44

EZ-1000Plus User’s Manual
43
Page 45

EZ-1000Plus User’s Manual
44
 Loading...