


GOCLEVER TAB I101
/Place photo here/
USER’S MANUAL
INSTRUKCJA OBSŁUGI
www.goclever.com

Declaration of Conformity
Hereby GOCLEVER Technology declares that the product complies with the essential requirements and other provisions of Directive
199/5/WE.
Environmental Protection
The device is subject to the WEEE Directive 2002/96/EC. The symbol next to mean that the product must be disposed of separately
and should be shipped to the appropriate collector. This allows you to limit pollution and the impact on human health.
Also like to inform that our company has the obligations under the Act on waste electronic equipment, including in his collection,
treatment, recovery and recycling is supported by KARAT ELECTRO-RECYCLING Ltd. If you have any questions or concerns you
can contact Karat call 056-623-80-91.
Responsibility
GOCLEVER Technology Company nor any of its licensors shall not be liable for any loss of data or profits, as well as for any other
consequential or indirect damages resulting from the use of equipment brand, in any case and the maximum permitted by law.
GOCLEVER Technology is not responsible for any problems related to the malfunctioning of the operating system and applications
operating under its control.
Changes
GOCLEVER Technology reserves the right to revise this document and the specifications of the device, without notice to you. These
features and images may vary depending on the services offered by the operator and software version of the device.
Before using
Remember that the battery is not charged. Opening or attempt to disassemble the outer casing of the device will void the warranty.
Google is a registered trademark, and Google Maps is a trademark of Google Inc.. in the United States and other countries. YouTube
is a trademark of Google Inc..
GOCLEVER Technology Company is not liable for technical or editorial errors or for omissions contained herein is not responsible for
incidental or consequential damages resulting from furnishing this material.
Information is presented in such a state in which you adopt them, and are not covered by any warranty. Subject to change without
notice. GOCLEVER Technology Company reserves the right to change the contents of this document without prior notice. The
manual describes basic functions of the device.
Security
Please refer to these guidelines. Failure to comply with them may cause danger to life or health or may be illegal. For further
information, please read the entire podręcznikiem.Urządzenie was designed to operate from battery and mains supply with the
charger. Using the device in a different way can be dangerous and will void the warranty.
Charging Battery
The unit should be connected only to a power source in accordance with the parameters set out in the specification. In case of doubt
as to the type of power source required, consult an authorized service provider or local power company. If the product is powered
from a battery or other sources, follow the instructions supplied with the product.
The impact of external factors and the electromagnetic field
The device is not waterproof. Make sure that it was always dry, protect from moisture. The device also must be protected against high
and low temperatures, dust, sand, do not expose it to shock, throw, as this may damage it or its components.
Do not use the device in a damp and very high or low temperatures.
Do not leave the device in the vehicle or in places where temperatures exceed 50 degrees Celsius.
Do not use the equipment on board aircraft and in areas where it is not allowed to use equipment that may emit an electromagnetic
field for example a hospital, petrol station, a warehouse of explosives violations of these rules may result in fire or explosion.
Do not use the device while driving.
Do not use the device near strong electromagnetic sources, such as microwave ovens, sound speakers, TV and radio.
Use only original manufacturer-approved accessories, or accessories that do not contain metals.
Service and Repair
For repair use the authorized service and qualified staff, any attempt to repair yourself, or by unauthorized service will void the
warranty.
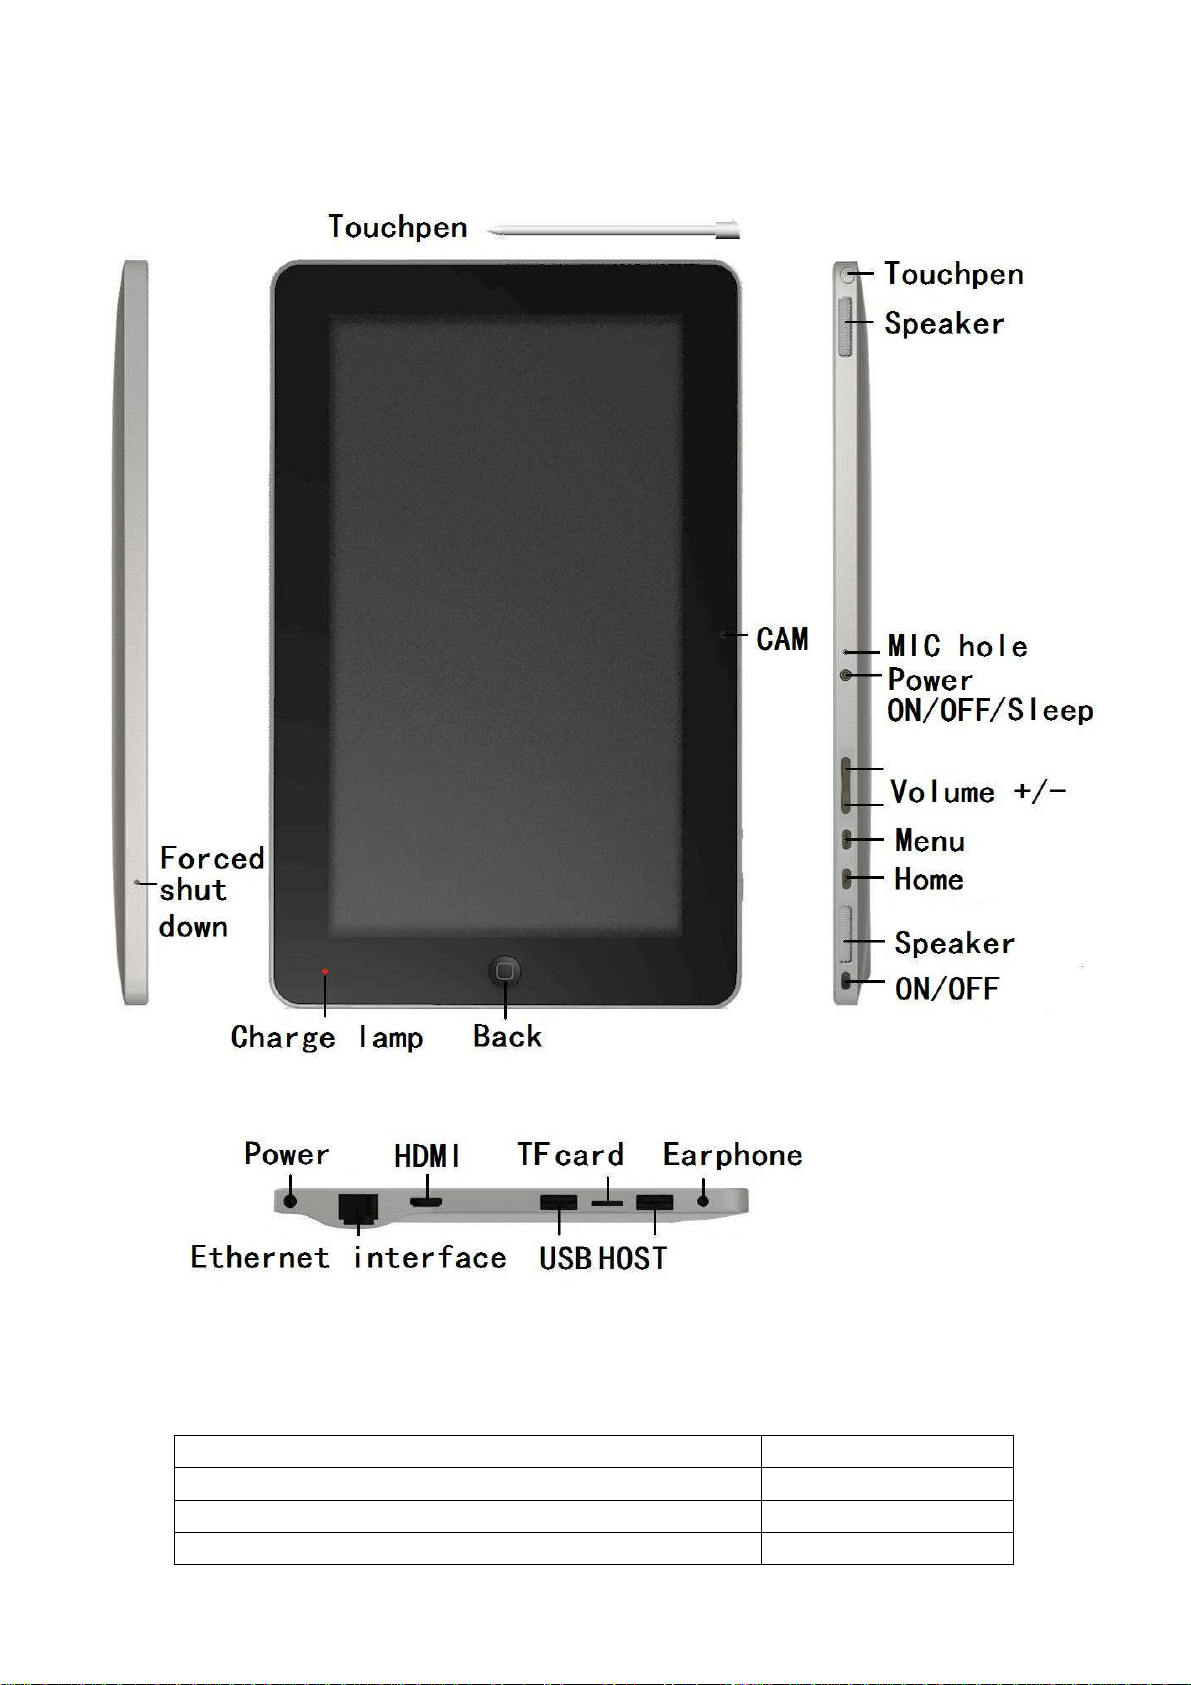
1. Visual Description
Refer to below picture:
2. Power management
2.1 Inbuilt battery
The unit build-in 2pcs 3800mAh 7.4V battery, working time for different status is below:
Working time for sleeping status 30 hours
Working time for only Wi-Fi working 5 hours
Working time for only playing multimedia 4 hours
Working time for only playing online Video 3 hours
2.2 Power adaptor and charging indicator
Power input is 9V/2A; Please don’t use other one with different specs.
Charging time, the charging indicator is red; charging full, indicator is turn off.
Charging time is 10 hours when the unit is shutdown state; the unit could be used normally, but
charging time will be longer.
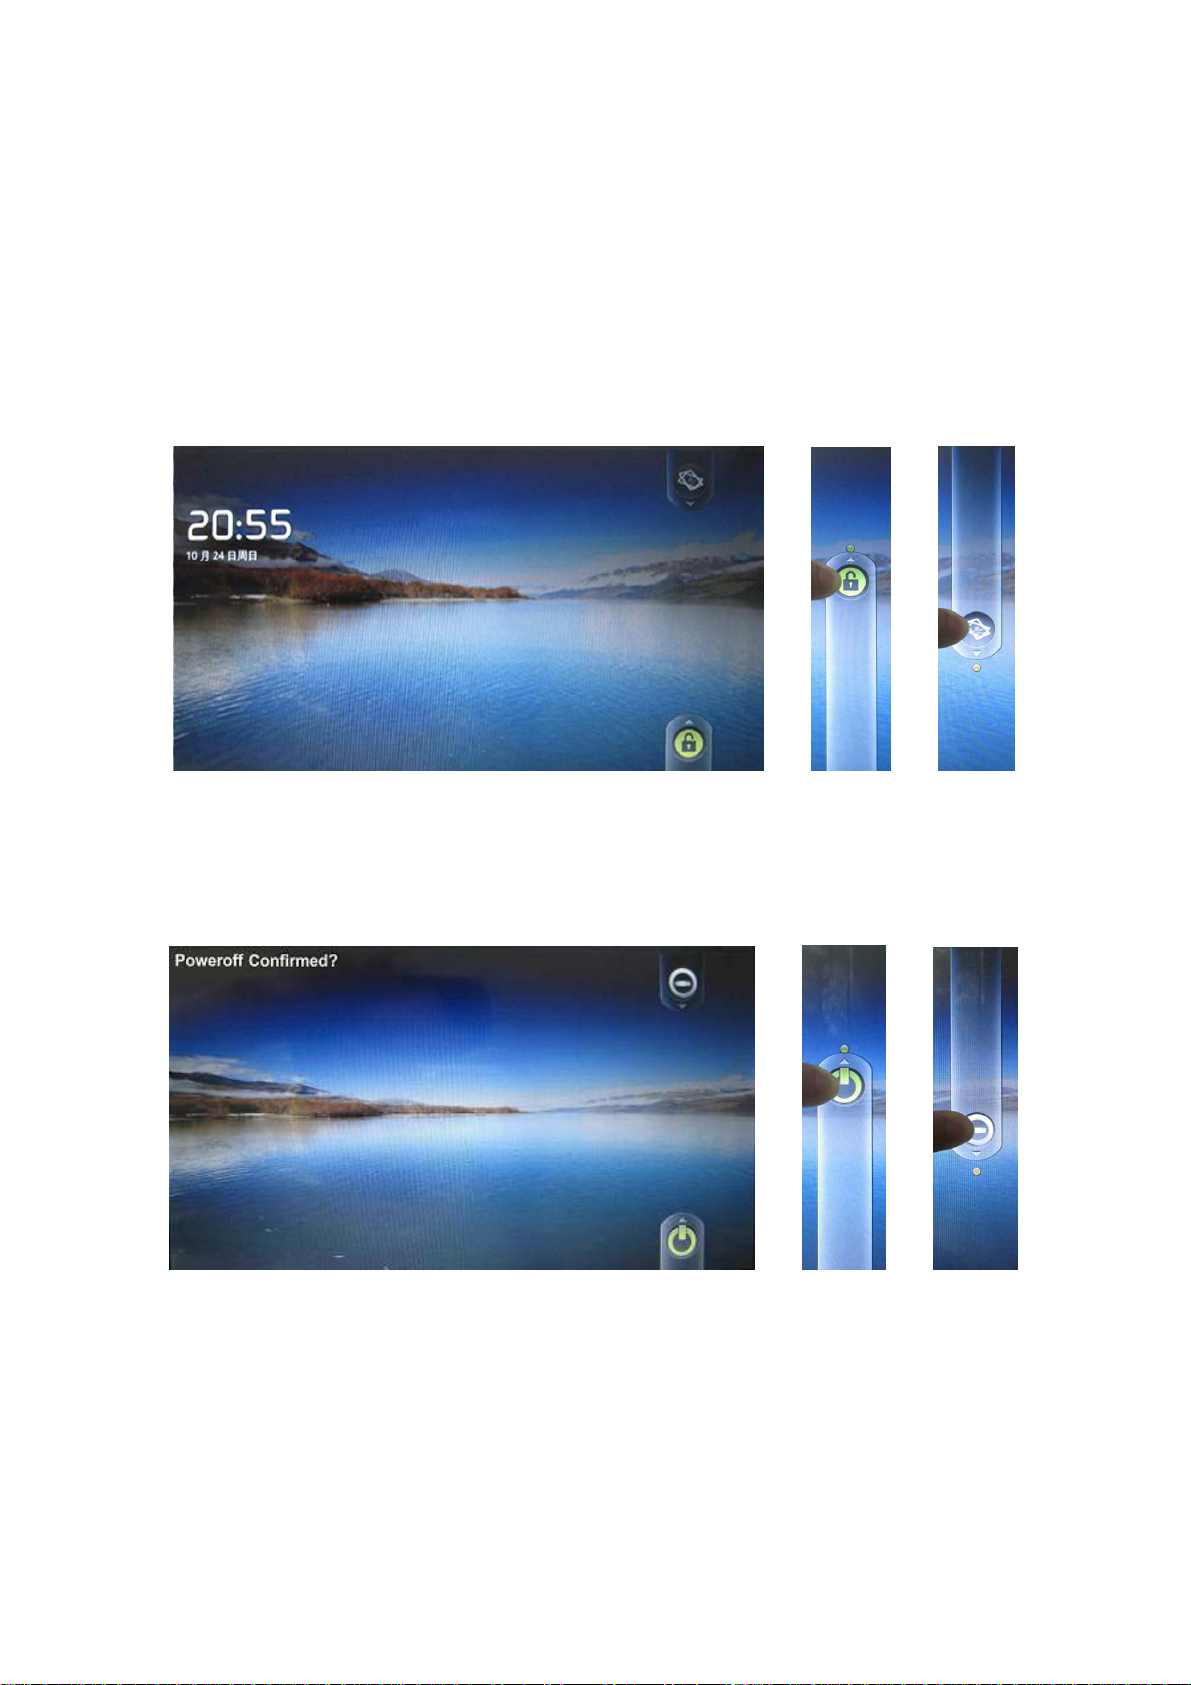
2.3 Power ON/OFF
Power ON: Ensure power is sufficient firstly. Long pressing the power button for 2s; when feeling
short shake, releasing power button. After system booting, the unit enter lock-screen image, as
below:
Pull the “Unlock icon” upward to green dot position to enter main menu; Pull the “Photo frame icon”
downward to green dot position to enter photo viewer.
Power OFF: Long pressing the power button for 4s. When feeling short shake, releasing power
button, the unit will enter confirmation of shutdown as below:
Pull the “Shutdown icon” upward to green dot to shutdown; Pull the “Cancel icon” to green dot to
cancel.
Sleeping: Short pressing power button for 1s, system enters sleeping state, the screen go black;
Short pressing power button for 1s to wake up. If low power when sleeping, the unit will wake up
and shutdown automatically.
Forced shutdown: Long pressing power button for 7s to force shutdown, or pressing the shutdown
button on the bottom of unit.

3. Inner and external storage
3.1 Classification of storage
The unit has 4 storage spaces: Inner storage 1, Inner storage 2, USB type external storage, TF
card.
Inner storage 1 is Android system file space with 2GB size and ender user couldn’t read it. The
application files installed by APK will be stored here.
Inner storage 2 is 8GB size named D disk in OI file management.
USB type storage and TF card support max up to 32GB named C/E/F disk
3.2 How to use storage
Insert storage to corresponding slot, “Preparing SD card/USB device” will show in left top of screen.
Run OI file management to read these storages.
Caution: Before removing the storage, ensure all of files in the storage have been closed.
Otherwise, it is possible to break this storage; meantime, the unit will close the running application
to protect system.
4. Shake function
“Haptic feedback” could be set in the settings/Sound and display.
5. Orientation
The unit support switch orientation automatically when rotating device.
6. Network
Wire-line network:Insert network cable to RJ45 port, corresponding icon will show in status bar on
the top of screen. The unit could get the IP automatically to connect network, or set IP manually.
Tap “ ” to enter static IP settings image.
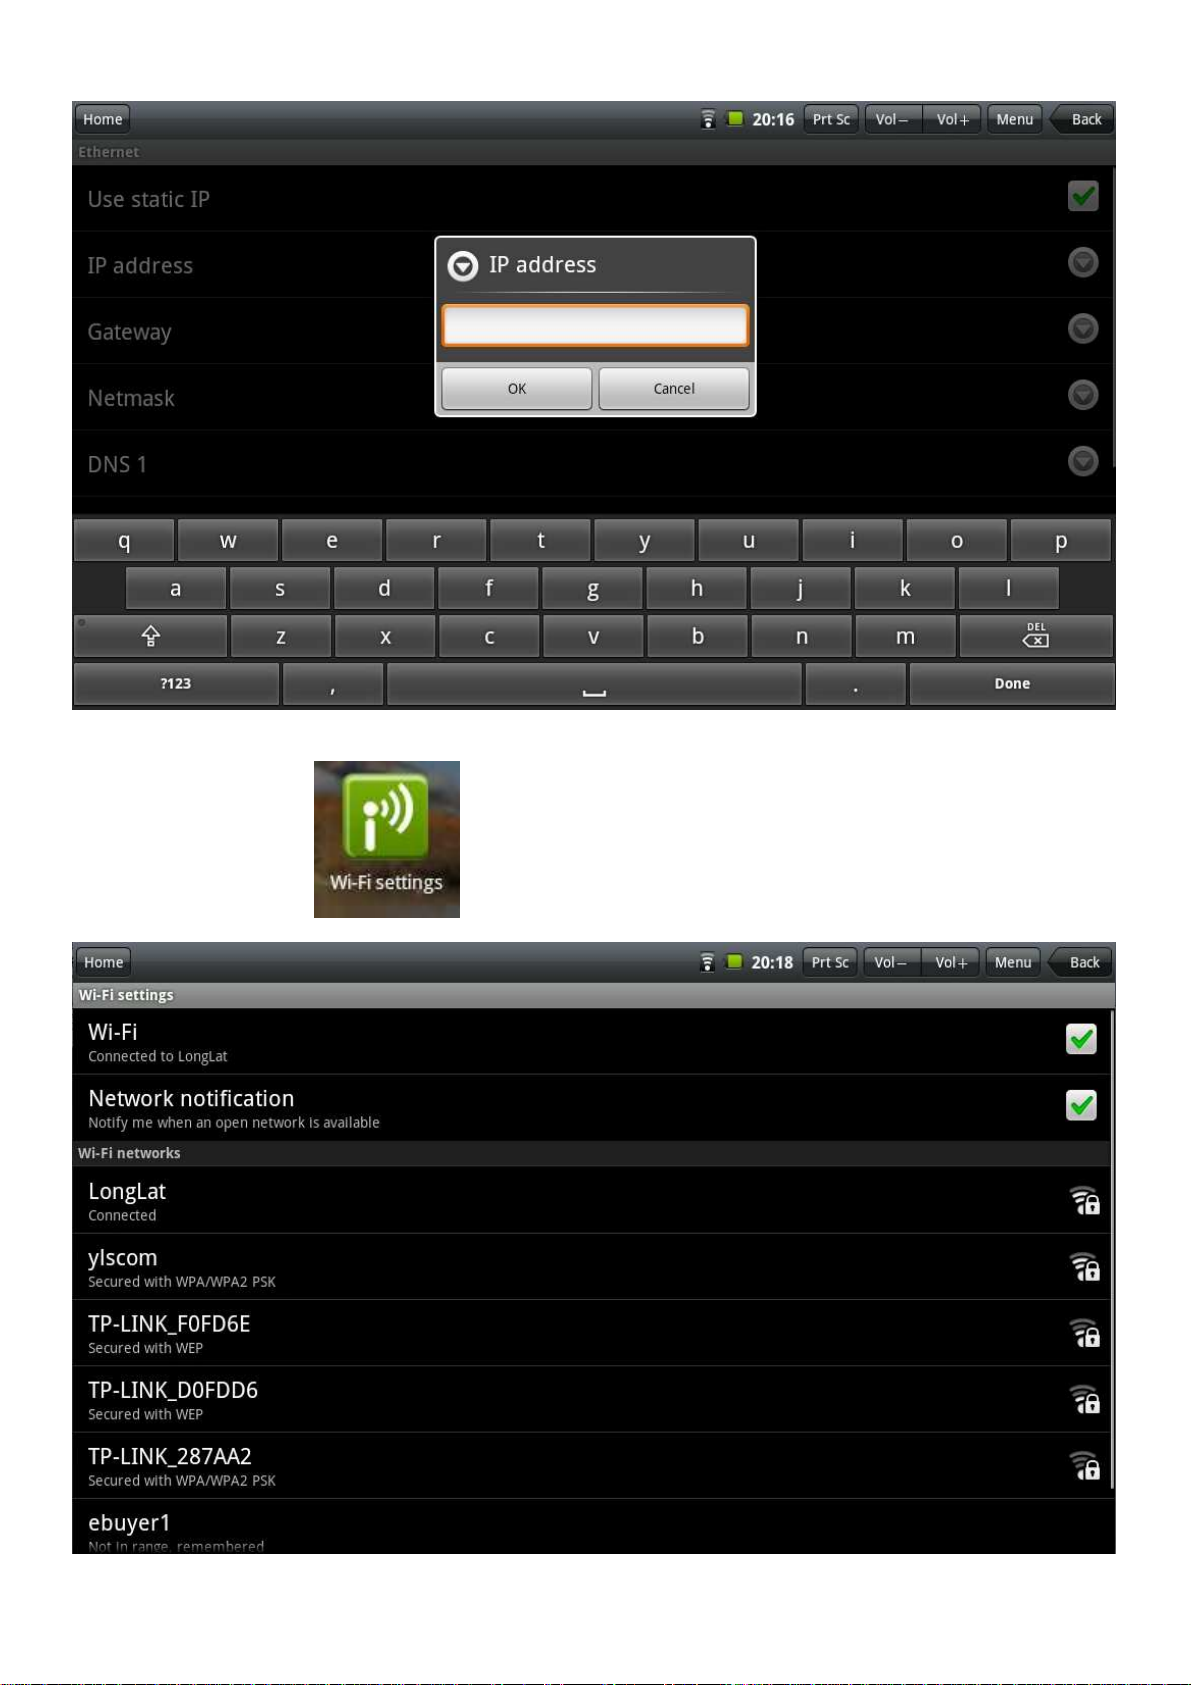
Wireless network: Tap“ ”to enter Wi-Fi setting image.
1. Turn on the Wi-Fi hardware button on the right top of unit;
2. Select “Wireless network” in the setting menu;
3. Click the check box of Wi-Fi to turn on.
4. Enter “Wi-Fi settings”, check all of AP which could be searched and select one.
5. If this AP is connected successfully before, the details will be saved; just tap “connect” in the pop
up window, selecting “forget” will remove AP details.
6. If AP is encrypted, please input password of AP;
7. The wireless network icon will show in status bar after successful connection;
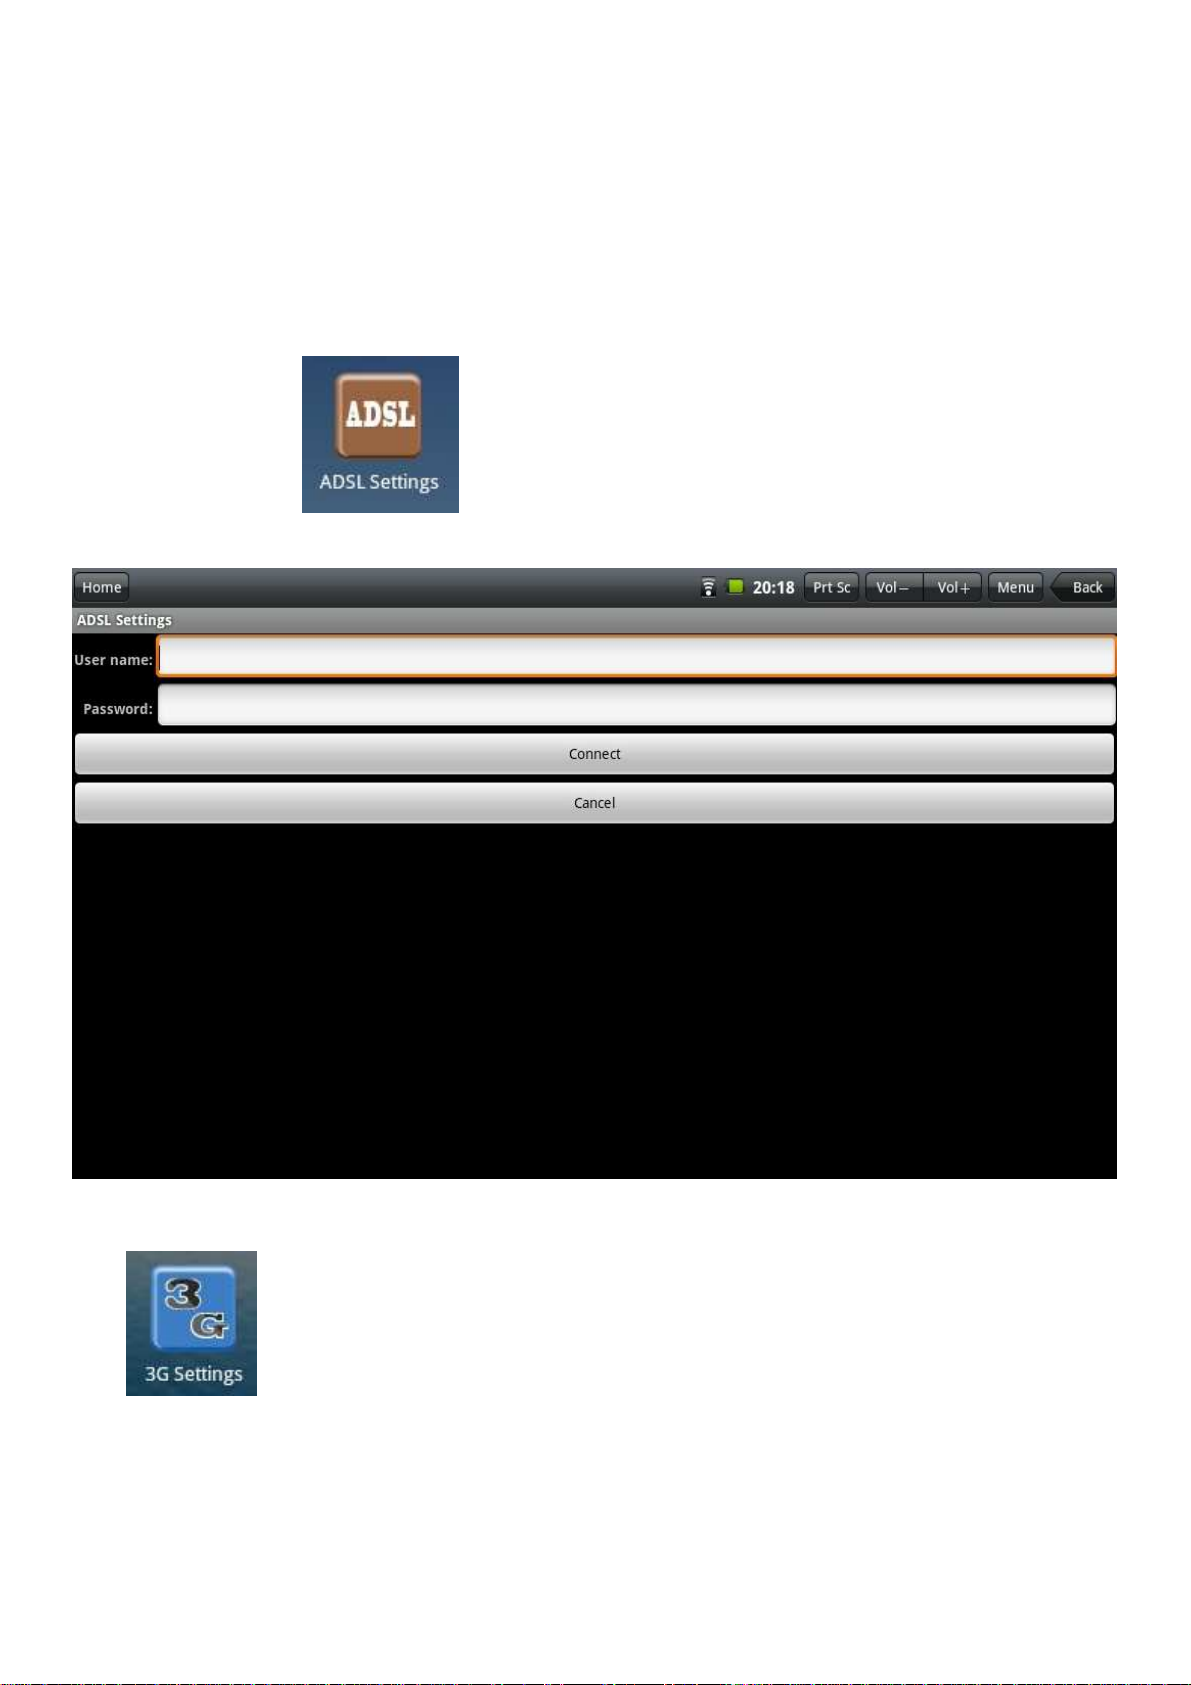
ADSL network: Tap “ ”to enter ADSL settings, input User name and Password to
connect with network.
3G network: First of all, please purchase a 3G dongle with wireless internet card from local telecom
operator. Connect this dongle to USB port, the indicator of dongle will light.
Tap “ ” to enter 3G network settings. Select checkbox of 3G networks, the 3G icon will
show in the status bar, connection is successfully.
7. Input operation
7.1 Keyboard input
When application need input text or digit, the touch soft keyboard will show in the screen.
Caution: The unit supports external USB keyboard, but some button in the keyboard maybe
couldn’t be used normally.
7.2 Touch screen input
Caution: Please don’t put object in the surface of touchscreen, maybe break it.
Long press and drag: Long press certain icon, which will turn light and could be drag to anywhere
of desktop.
The unit has touch pen to assist input.
7.3 External mouse input
Unit supports external mouse.
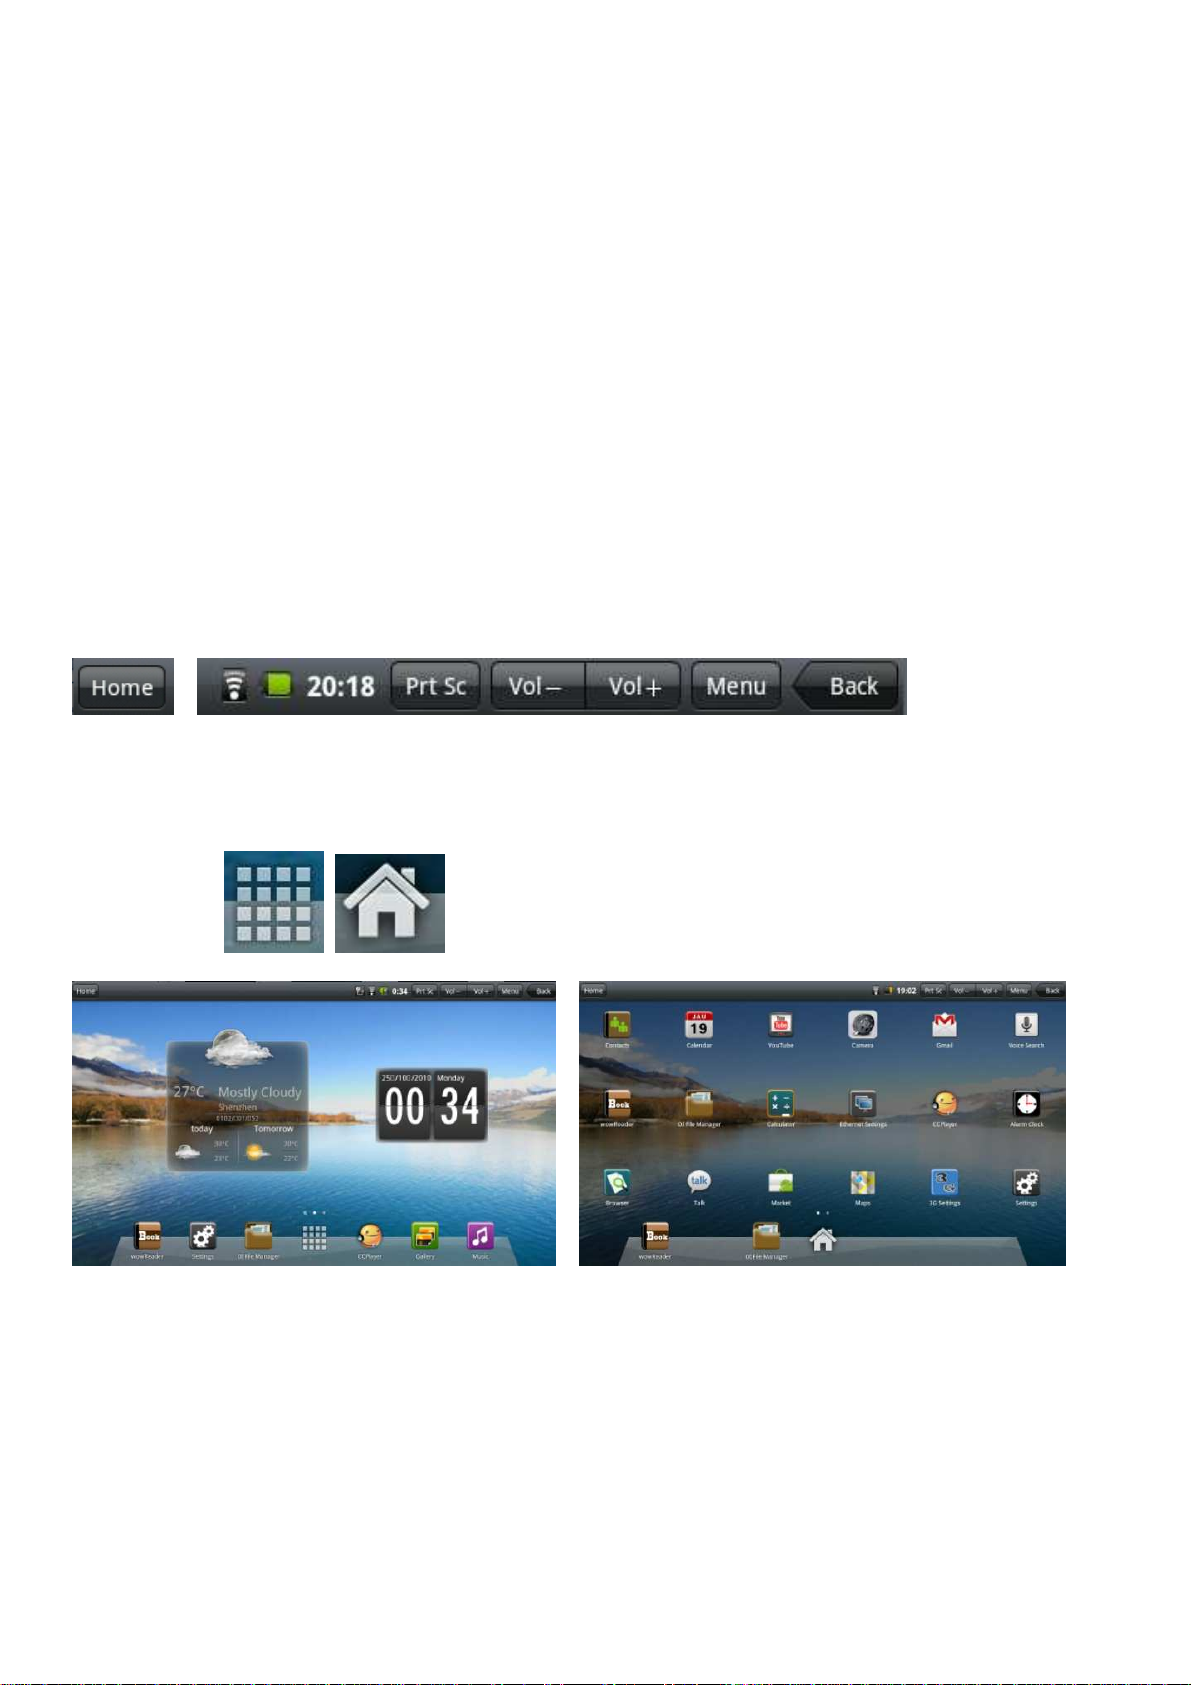
8. Desktop
8.1 Status bar and Quick bar
The top of screen is status bar, there are five software buttons: Home, Print screen, Vol-, Vol+,
Menu, Back; Some function status show here: 3G signal, Wi-Fi signal, Network status, battery
status, time etc…
The bottom is quick bar, there are 6 positions, End user could drag icon above to quick bar.
8.2 Main menu
There are two modes for main menu: “Desk Widget mode” and “Application mode”, switched by
center button .
Desk Widget mode Application mode
For “Desk Widget mode”, the icons could be drag to adjoining page; there are 3 continuous pages
in this mode.
“Application mode” is in like manner. There is 1GB free space for third part application to install. In
this case, the page is up to amount of application, no max limited.
8.3 Desktop settings
In Desk Widget mode, Press menu button, the shortcut menu will pop up. Menu includes: Add,
wallpaper, search, notifications, and system settings.
Add function could add shortcuts, widgets, gadgets.

Wallpaper function could select wallpaper from.
8.4 Notifications
Drag the status bar downward to get the notification image. Tap to back.
8.5 Desktop icon
Long pressing icon, this icon will turn light and could be drag to anywhere even quick bar. Also
could be drag to garbage in the quick bar to delete.
9. Website browser
Tap browser icon, type URL to connect to internet. Tap menu to open new window, bookmarks,
windows, refresh, forward, add bookmark, find on page, select text, page info, share page,
downloads, settings.
Download photo: long pressing the photo will popup the option menu, select save photo.
Caution: The file will be saved in the folder named download in the storage. Please delete the
history of download in time, otherwise, it maybe effect download speed or result in system
abnormal.
10. Application manager and installation
10.1 Install and uninstall
The extension of installable file in android system is .APK, which could be down load from internet
directly. Run OI file manager, find the APK file, click to enter installation image, follow installation
wizard to finish the progress. Return to main page, the icon of installed APK could be found in the
desktop.
10.2 Application manager
Tap settings, select applications, select manage applications option, all of application could be
found here. The application could be uninstall here.
10.3 Progress manager
Tap settings, select applications, select running service option, all of running application could be
found here. If certain application is no need now, it could be stop to release the memory space.
Attention: Not all application are compatible with the device. GOCLEVER Technology is not
responsible for compatibility of 3rd party applications installed on the device.
11. File manager
Tap OI file manager to enter file browser image, when 3 storages are insert into unit, the image
likes below:

Here D disk is inner storage.
11.1 New folder
Press menu button to add new folder to current directory.
11.2 Folder operation
Long pressing the folder, below option will popup:
11.3 File operation
Long pressing the icon of file, the below option will popup:

12. Typical application
12.1 Multimedia
Below player is preinstalled: CCPlayer audio/video player, Music, sound recorder, Gallery, Photo
Frame, YouTube.
Audio format supported as below:
avi/mp4/rmvb/rm/flv/mov/mpg/mpeg/mkv/asf/wmv/mpe/3gp/dat/vob/ts/tp/m4v;
Video format supported as below:
Mp3/wav/ac3/aac/ogg/ra/amr/m4a/wma.
12.2 Camera
Tap camera icon to enter operation image:
Tap to take the picture, the photo will be saved in DCIM/Camera folder; Drag the
switch in this icon upward to enter video from photo; Tap the right top icon to preview the

photo; tap to set white balance, color effect, picture size, picture quality.
12.3 HDMI
The unit support HDMI output to HDMI display device, such as TV set with HDMI port. The max
output resolution is 1080P.
1) Turn on the unit;
2) Connect unit with HDMI display device via HDMI cable, turn on the display device, HDMI
notification will show in the status bar;
3) play the video file in the unit;
4) Press menu button, the unit will shutdown the screen; the video will switch to HDMI display
device. This progress needs 5s.
5) There are 4 methods to return to unit:
a) When the video done, the display will be return automatically;
b) Press the menu button, the video will return to unit;
c) Disconnect the HDMI cable, the video will return;
d) Press back button, the video will return to unit.
12.4 GPS location
If location accurate is to street level, please click the checkbox of Use GPS satellites.
12.5 Calibration
Suggest make calibration regularly. The option could be found in setting image.
13. Important notes
13.1 Battery note
10” screen will consume large a lot of electricity. In order to extend battery endurance, please
reduce the use of below function:
1. Multimedia;
2. Bright display: reduce the brightness of screen in the settings/sound and display;
3. AP search: this option could be found in settings/wireless and networks/ Wi-Fi settings/ Network
notification;
4. Wi-Fi: switch off the Wi-Fi button.
13.2 Release memory
The application is run ever, this application must take memory. If too many applications run ever,
this will affect speed of unit. In this case, it is best to stop useless application in time to save
memory.
13.3 Forced shutdown
1. Long press power button for 7s, the unit will forced shutdown;
2. Press the reset button in the bottom of unit, the unit will forced shutdown.

13.4 Factory data reset
This option could be found in settings/Privacy/ Factory data reset.
Caution: select factory reset will format the inner storage 1. the Google account, data and setting of
system and application, application download etc. Please use with caution.
13.5 About save path
The photo and video took by camera function will be saved in /DCIM/Camera folder;
The picture took by print screen will be saved in /Screenshot folder;
The picture download from website will be saved in /download folder.
pay special attention:
The power input is 9V/2A, please no use other spec!

Deklaracja zgodności
Niniejszym GOCLEVER Technology oświadcza iż produkt jest zgodny z zasadniczymi wymogami
oraz pozostałymi postanowieniami Dyrektywy 199/5/WE.
Ochrona środowiska
Urządzenie podlega dyrektywie WEEE 2002/96/EC. Symbol obok oznacza, że produkt musi być
utylizowany oddzielnie i powinien być dostarczony do odpowiedniego punktu zbierającego odpady.
Pozwala to ograniczać zanieczyszczenie środowiska i pozytywnie wpływa na ludzkie zdrowie.
Informujemy ponadto, iż nasza firma w zakresie obowiązków wynikających z ustawy o zużytym
sprzęcie elektronicznym, w tym w zakresie jego zbierania, przetwarzania, odzysku i recyklingu jest
obsługiwana przez KARAT ELEKTRO-RECYKLING Sp.z o.o. W razie jakichkolwiek pytań lub
wątpliwości możecie się Państwo kontaktować z Karat pod numerem telefonu 056-623-80-91.
Odpowiedzialność
Firma GOCLEVER Technology ani żaden z jej licencjobiorców nie ponosi odpowiedzialności za
jakąkolwiek utratę danych lub zysków, jak również za żadne inne wtórne i pośrednie szkody
powstały w wyniku użytkowania urządzeń marki, w żadnym wypadku i maksymalnym
dopuszczalnym przez prawo zakresie. GOCLEVER Technology nie odpowiada za problemy
związane z nieprawidłowym działaniem systemu operacyjnego i aplikacji działających pod jego
kontrolą.
Zmiany
GOCLEVER Technology zastrzega sobie prawo do dokonywania zmian w niniejszym dokumencie
jak i specyfikacji urządzenia, bez konieczności informowania o tym użytkownika. Opisane funkcje
oraz obrazki mogą się różnić w zależności od usług oferowanych przez operatora jak i wersji
oprogramowania danego urządzenia.
Przed użyciem
Pamiętaj, że akumulator nie jest naładowany. Otwarcie lub próba rozebrania zewnętrznej obudowy
urządzenia powoduje utratę gwarancji.
Google jest zastrzeżonym znakiem towarowym, a Google Maps jest znakiem handlowym firmy
Google, Inc. w Stanach Zjednoczonych i innych krajach. YouTube jest znakiem towarowym firmy
Google, Inc.
Firma GOCLEVER Technology nie ponosi odpowiedzialności za błędy techniczne lub redakcyjne
ani za pominięcia w niniejszym tekście; nie ponosi również odpowiedzialności za szkody
przypadkowe lub następcze spowodowane korzystaniem z niniejszego materiału.
Informacje są przedstawione w takim stanie, w jakim przyjmuje je użytkownik, i nie są objęte żadną
gwarancją. Mogą ulec zmianie bez powiadomienia. Firma GOCLEVER Technology zastrzega
również prawo do zmiany zawartości niniejszego dokumentu bez uprzedniego powiadomienia. W
podręczniku zostały opisane tylko podstawowe funkcje urządzenia.
Bezpieczeństwo
Należy zapoznać się z tymi wytycznymi. Niezastosowanie się do nich może spowodować
powstanie zagrożenia życia lub zdrowia albo może być niezgodne z prawem. Aby uzyskać dalsze
informacje, należy zapoznać się z całym podręcznikiem.Urządzenie zostało stworzone do pracy
przy zasilaniu akumulatorowym jak i podłączeniu do sieci elektrycznej za pomocą ładowarki.
Korzystając z urządzenia w inny sposób może być niebezpieczne i spowoduje utratę gwarancji.
Ładowanie
Urządzenie należy podłączać tylko do źródeł zasilania zgodnych z parametrami określonymi w
specyfikacji. W przypadku w
ątpliwości co do typu wymaganego źródła zasilania należy
skonsultować się z autoryzowanym punktem usługowym lub lokalnym dostawcą energii
elektrycznej. Jeśli produkt zasilany jest z akumulatora lub innych źródeł, należy przestrzegać
instrukcji dołączonej do produktu.

Oddziaływanie czynników zewnętrznych oraz pola elektromagnetycznego
Urządzenie nie jest wodoodporne. Należy dopilnować, aby zawsze było suche, chronić przed
wilgocią. Urządzenie należy chronić również przed wysokimi oraz niskimi temperaturami,
zapyleniem, piaskiem, nie należy narażać go na wstrząsy, rzucać nim, gdyż może to spowodować
jego uszkodzenie, bądź jego elementów.
Nie korzystać z urządzenia w pomieszczeniach wilgotnych i w bardzo wysokich lub niskich
temperaturach.
Nie pozostawiaj urządzenia w pojazdach ani miejscach, w których temperatura może
przekroczyć 50 stopni Celsjusza.
Nie korzystaj urządzenia na pokładzie samolotu oraz w miejscach gdzie nie jest dozwolone
korzystanie z urządzeń mogących emitować pole elektromagnetyczne Np. szpital, stacja
benzynowa, magazyn materiałów wybuchowych; nieprzestrzeganie tych zasad może spowodować
pożar lub wybuch.
Nie korzystaj z urządzenia podczas prowadzenia samochodu.
Nie korzystaj z urządzenia w pobliżu źródeł silnego promieniowania elektromagnetycznego,
takich jak kuchenki mikrofalowe, głośniki, telewizory a nawet radia.
Stosować tylko oryginalne akcesoria zalecane przez producenta albo akcesoria, które nie
zawierają metali.
Serwis i naprawy
Do napraw korzystaj z autoryzowanego serwisu i wykwalifikowanego personelu, wszelkie próby
naprawy samodzielnej, bądź też przez nieautoryzowany serwis będzie skutkować utratą gwarancji.

1. Opis przycisków i gniazd.
Refer to below picture:
2. Zarządzanie energią
2.1 Wbudowana bateria
ądzenie posiada wbudowaną 2szt baterii 3800mAh, czas pracy na baterii zależy od
Urz
wykonywanych czynności na przykład:

Czas czuwania Do 30 godz
Czas pracy przy korzystaniu z Wi-Fi Do 5 godz.
Czas prasy przy oglądaniu filmów Do 4 godz.
Czas pracy przy oglądaniu fimów z internetu Do 3 godz.
2.2 Wskaźnik zasilania karty i opłat
Parametry zasilania to 9V/2A; Proszę nie używać innych parametrów zasilania.
Czas ładowania, wskaźnik ładowania na czerwono; ładowania pełne, wskaźnik jest wyłączony.
Czas ładowania wynosi 10 godzin, gdy urządzenie jest wyłączone. Podczas użwania czas
ładowania jest dłuższy.
2.3 Włączanie/Wyłączanie
Przycisk ON/OFF znajduję się z przodu urządzenia obok ekranu. Sprawdź, czy bateria jest
naładowana. Przytrzymaj przycisk on/off przez około 4 sekundy. Po uruchomieniu systemu,
jednostka wchodzi tryb blokady ekranu jak poniżej
Przeciągnij palcem ikonę do gory aby odblokować urządzenie.
Wyłączanie: Przyciśnij przycisk on/off przez około 4 sekundy aż poczujesz wibracje, wtedy zwolnij
przycisk, na ekranie pojawi się:
Przeci
stronę zielonej kropki aby anulować wyłączanie urządzenia.
ągnij ikonę w dół aż do zielonej kropki aby wyłączyć urządzenie. Przeciągnij ikonę anulacji w

Usypianie:
ekran zgaśnie; Krótkie naciśnięcie przycisku zasilania przez 1s aby wzbudzić. Jeśli niski stan baterii
urządzenie może się automatycznie wyłączyć.
Wyłączenie awaryjne: Przyciśnij przycisk on/off przez 7 sekund lub wcisnij przycisk Forced shut
down.
Krótkie naciśnięcie przycisku zasilania przez 1s, system przechodzi w stan uśpienia,
3. Wbudowana I zewnętrzna pamięć
3.1 Podział pamięci
Urządzenie obsługuje 3 rodzaje pamięci: pamięć wewnętrzna, pamięć zewnętrzna USB oraz karta
pamięci Micro SD.
3.2 Obsługa pamięci
Włóż pamięć do odpowiedniego gniazda, " Preparing SD card/USB device" pojawi się w lewym
górnym rogu ekranu. Uruchom ES Eksplorator plików do odczytu zawartości pamięci.
Pliki karty microSD można znaleźć pod folder o nazwie "sdcard", plik z urządzenia USB, można
znaleźć folderze o nazwie "scsi", plik wewnętrznej pamięci będzie można znaleźć w folderze o
nazwie "nand".
Uwaga: Przed wyjęciem pamięci, upewnij się, że wszystkich pliki tej pamięci zostały zamknięte.
4. Ustawienia sieci
Sieć przewodowa:Podłącz kabel sieci do portu RJ45, odpowiednia ikona pokaże status na górnej
listwie ekranu. Urządzenie może pobrać adres IP automatycznie lub możesz ustawić go ręcznie.
Wybierz “ ” aby wejść w ustawienia sieci.

Sieć bezprzewodowa: Wybierz “ ”, aby wejść w ustawienia sieci bezprzewodowej.

1. Włącz przycisk Wi-Fi w prawym górnym rogu;
2. Wybierz preferowaną sieć bedącą w zasięgu Sprawdź wszystkie AP, które mogą być
wyszukiwane i wybierz jedną.
5. Jeżeli AP jest połączony z powodzeniem naciśnij przycisk "connect " w wyskakującym okienku.
6. Jeżeli AP jest szyfrowany, proszę wprowadź hasło;
7. Ikona sieci bezprzewodowej pojawi się w pasku stanu, po podłączeniu;
ADSL: Wybierz “ ” aby wejść w ustawienia ADSL, wprowadź nazwe urzytkownika
oraz hasło aby połączyć się z siecią
3G: Prosimy kupić 3G dongle z bezprzewodową kartą internet od lokalnego operatora
telekomunikacyjnego. Podłącz adapter do portu USB, wskaźnik dongle zapali się.
Wybierz “ ” aby wejść w ustawienia sieci 3G.
Uwaga: urządzenie może nie obsługiwać wszystkie modemy USB 3G
5. Input operation
5.1 Klawiatura

Jeśli chcesz wprowadzić tekst, klawiatura pojawi się na ekranie.
Uwaga: urządzenie obsługuje zewnętrzną klawiaturę USB, ale niektóre przyciski na klawiaturze
mogą być obsługiwane niepoprawnie.
5.2 Ekran dotykowy
Uwaga: Proszę nie umieszczać obiektów na powierzchni ekranu dotykowego.
Przytrzymaj i przeciągnij: Długie naciśnięcie na niektóre ikony, pozwala na ich umieszczenie w
dowolnym miejscu na pulpicie.
.
5.3 External mouse input
Można podłączyć mysz zewnętrzną.
6. Pulpit
6.1 Pasek stanu
Na górze ekranu jest pasek stanu. Znajduje się tam 4 przyciski (ikony): Home, Vol-, Vol+, Back;
Oraz kilka ikon informacyjnych takich jak: Wi-Fi signal, stan baterii, zegar etc…
Listwa na dole ekranu zawiera 6 ikon szybkiego dostępu do ulubionych aplikacji
6.2 Main menu
Główny pulpit Lista programów
6.3 Desktop settings
Główny pulpit Lista programów
6.4 Powiadomienia
Przeciągnij pasek stanu w dół, aby uzyskać obraz powiadomienia.
6.5 Ikony pulpitu
Długie naciśnięcie ikony pozwala na przeciągnięcie jej do dowolnego miejsca. Ponadto można
przeciągnąć do śmieci i usunąć.
7. Przeglądarka internetowa
Kliknij ikonę przeglądarki, wpisz adres URL, aby połączyć się z internetem. Wybierz menu, aby
otworzyć nowe okno, odświerzyć oraz przewinąć do przodu.

8. Instalacja programów
8.1 Instalowanie i odinstalowywanie
Rozszerzenie plików instalowanych w systemie Android to. APK. Pliki APK można pobrać
bezpośrednio z Internetu. Uruchom EF eksplorator plików, znalejdź plik APK, kliknij aby wejść
rozpocząć instalację. Po zainstalowaniu ikona programu powinna pojawić się na liście
8.2 Application manager
Wybierz Settings -> Application -> Manage Applications. W tym miejscu można odinstalować
dowolną aplikację..
8.3 Zarządzanie zadaniami
Wybierz Settings -> Application -> running service option. W tym miejscu widać wszystkie
bierzące procesy. W razie potrzeby można wyłączyć zbędne procesy aby zwolnić pamięć
Uwaga: Niektóre programy mogą nie działać prawidłowo na tym urządzeniu. GOCLEVER
Technology nie odpowiada za prawidłowe działanie progranów innych firm.
9. Menadżer plików
Wybierz OI file manager to aby uruchomić przeglądarkę plików
10. Podstawowe aplikacje
10.1 Multimedia
Odtwarzacz Multimedialny oraz inne program są preinstalowane, m. in.: CCPlayer audio/video
player, Music, sound recorder, Gallery, Photo Frame, YouTube.

11. Kamera
Wybierz “Camera” aby uruchomić funkję kamery i aparatu.
Naciśnij aby zrobić zdjęcie. Przełącz przełącznik w gore aby wejść w funkję
kamery.
12. HDMI
Wybierz film który chcesz wyświetlić. Podłącz urządzenie do monitora poprzez kabel HDMI. Obraz z
tabletu powinien pojawić się również na ekranie wyświetlacza.
13. Uwaga
13.1 Bateria
Ekran LCD pochłania duże dużo energii. Można wydłużyć czas pracy baterii wyłączając
następujące funkcje:
1. Multimedia;
2. Jasny wyświetlacz: zmniejszyć jasność ekranu w ustawieniach / dźwięku i obrazu;
3. Szukaj AP: opcja ta znajduje się w settings / i sieci bezprzewodowej / Wi-Fi / zgłoszenie sieci;
4. Wi-Fi: wyłączyć opcję Wi-Fi.
13.2 Pamięć
Jeśli uruchomionych jest wiele programów urządzenie może wolniej pracować. Można zamknąć nie
potrzebne programy aby zwolnić pamięć.
13.3 Wyłączenie awaryjne
Przyciśnij przycisk on/off przez 15 sekund.
13.4 Przywrócenie ustawień fabrycznych
Ta funkcja jest dostępna w Settings/Privacy/Factory data Reset.
Uwaga: wybór ustawień fabrycznych spowoduje formatowanie pamięci wewnętrznej oraz usunięcie
wszystkich danych i doinstalowanych programów.
13.5 About save path
Zdjęcia i pliki wideo zapisane przez kamerę będą zapisywane w pamięci NAND / DCIM / Camera;
Zdjęcia pobrane ze strony internetowej zostaną zapisane w pamięci NAND / Download.

Manufacturer:
GOCLEVER TECHOLOGY CO., LTD.
BlockD,Century Holiday Plaza,
No 9030 Shen Nan Road,Nanshan district,
Shenzhen,China.Post Code:518053
深圳市南山区深南大道
9030
纪假日广场
号世
D座3105室
 Loading...