


T AB A93
OW NER’S MANUAL
T AB A93
INST RUKCJA OBSŁUG I
VISIT OUR WEBSITE
WW W.GOCLEVER.COM
TO SEE MOR E PRODUCTS TAB, NAVIO, DVR, DVB-T
Read th is manual before installation and use.

Contents /Spis treści
English |
3 |
Polski |
19 |
Warunki gwarancji |
34 |
2

English - Table of C ontents
Basic Introduction |
|
4 |
Quick Start |
|
4 |
Battery management and charging |
4 |
|
|
|
|
Boot and Shutdown |
4 |
|
|
|
|
Connect with PC |
6 |
|
|
|
|
Interface Introduction |
|
7 |
Bottom bar of the Interface |
7 |
|
|
|
|
The HOME Screen menu |
7 |
|
|
|
|
Desktop |
8 |
|
|
|
|
Basic Operation |
|
8 |
Date and time settin gs |
8 |
|
|
|
|
Display settings |
9 |
|
|
|
|
Wireless Connection |
10 |
|
|
|
|
Applications install and uninstall |
11 |
|
|
|
|
Browser |
12 |
|
|
|
|
Video player |
12 |
|
|
|
|
Photo Browser |
13 |
|
|
|
|
Camera |
14 |
|
|
|
|
Sound Recorder |
15 |
|
|
|
|
Market |
15 |
|
|
|
|
Frequently Asked Questions |
|
16 |
Important Safety Precautio |
ns |
17 |
|
|
|
3

Basic Introduction 
∙CPU: Allwinner A13 Cortex A8 1.0Ghz GPU Mali400
∙LCD Screen: 9 " 800 * 480 TFT LCD
∙Camera: Build-in 0.3M pixel camera
∙Operating System: Google Android 4.0
∙Network Connection: Built-in 802.11b/g/n wireless
∙Audio format: WMA, M P2, OGG, AAC, M4A, FLAC, APE, WAV
∙Video format: max 108 0p full HD video AVI,3GP, MP4, MPG, R M, RMVB, MOV,FLV, WMV,MKV)
∙Touch Panel: Capacitive Multi-touch 5-point
∙Language: supports m ultiple language
∙Ports: microUSB OTG, Earphone, micorSD,DC IN, Micprohone
∙Buttons: Back/Power/ Reset/Vol +/Vol -
4

Quick Start
Battery management and ch arging
Before using this device, please charge it fully. Put the charger adapter into the DC jack, the device will start to charge.
Tips
∙This device adopts built-in polymer battery. Only the specified charger should be used.
∙ when it is charging, th e icon of battery will be rolling.
∙when the charging fini sh, the battery icon will stop rolling.
∙If you do not use this d evice for a long time, please charge/release it once per month to avoid deep discharg e.
∙When it is power off b ecause of low battery, connect to the charger , the device will indicate “low power” or “charging”, please wait for a second until the machine can turn to the main interface once the power is enough.
∙The built-in polymer b attery should be charged regularly. The dam age caused by battery over-consuming is not included in the warranty.
Boot and Shutdown
Boot: Press and hold the power button, the system will enter the boot process System has been started, entering the An droid system:
5

The system enters the default home interface.
Shutdown: Press the power button, pop-up device options, select Power off, Click OK, you can safely shut down.
Connect with PC
By microUSB OTG interface o f the device, you can connect with PC by microUSB cable attached with the device. USB Data transferring is available. You can oper ate the files through the PC. When your d evice is connected successfully, to pull up the notification area of the status bar, can see the following icon
Then click USB connected to enter the next
6
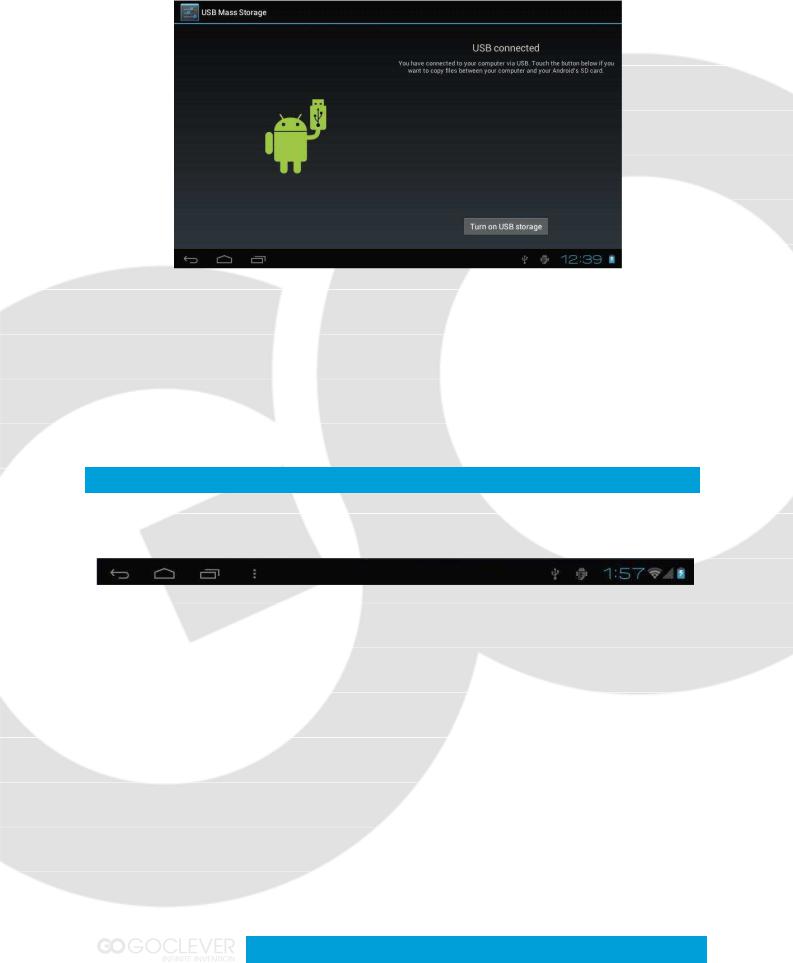
Click Turn on USB storage, t hen the device can transmission data with P C.
Note: The device also suppor ts the FAT32 format for external devices, for example U disk, Micro SD card to Transfer data.
Interface Introduction
Bottom bar of the Interface
A.WIFI signal status icon: If connected to the WIFI wireless network, the icon will be displayed
B.OTG connect icon: If the d evice connected to the PC, will show the OT G connected icon.
C.Time display: Display the time of the current system, which has been s et.
D.Battery status icon: Display s the current battery level and the charging status.
E.Home, Back, virtual button s
The HOME Screen menu
Press the menu icon on the device, it will display a home screen menu as following:
7

Wallpaper: Users can replace the wallpaper with you wishes.
Manage apps: It can quickly o pen a list of all applications.
System Settings: Fast access to system settings, user can choose “Wireless & networks”, “Display”, “Date & time” etc, f or personalized settings.
Desktop
When sliding around with your finger to switch the main screen, the de sktop fixed on the main screen, will not move. U ser could drag the application icon placed o n the desktop area in the main screen.
8

Basic Operation
Click the "Settings" icon in the main applications area, you can open the s ystem setting interface, as shown below.
Select the appropriate operation of the relevant items, such as: wireless a nd network, Display, date and time settings, about Device, etc
Date and time settings
Click "Date & time" to enter the Date and time settings interface:
Select to set the date, select the time zone, set the time, time format, date format and other information.
For example, choose to set the date, as follows:
9

Select +: that the increase of 1 unit, Select - : that the reduction of 1 unit.
Also you can choose the number, enter the input mode. Directly entering the desired number, then click “Done” to s et the Date.
Display settings
In the settings interface choos e "Display" to enter the display settings interface, select "Brightness", Pull the progres s bar to adjust the brightness, as below inter face.
10
Click Sleep, adjust the inactivity time of the device. You can press power k ey to activate the device. When display "Screen locked" interface, follow the prompts to unlo ck it.
Wireless Connection
Click the main menu "Settings" icon, go to "Settings" screen, click on "Wireless and networks" into the "Wireless and networks settings" interface. Turn on Wi-Fi switch, the WiFi module built-in the device will search AP lists automatic , click the s earched AP can be used, will pop up settings di alog, please follow the prompts to complet e the WIFI network links. Some encrypted network, need to enter a valid key. As shown below .
11

Applications install and uni nstall
Install applications
1. First you should select the Unknown sources which allow installation of non-Market apps.
2.Copy the APK installer soft ware to Micro SD or NAND FLASH.
3.Click APK Installer to find t he app directory, then Select applications to install. Users can "Android market" online installation, or download via the computer, or onlin e through the machine built-in browser to do wnload and install.
12
 Loading...