


TAB A972BK
OWNER’S MANUAL
TAB A972BK
INSTRUKCJA OBSŁUGI
VISIT OUR WEBSITE
WWW.GOCLEVER.COM
TO SEE MORE PRODUCTS TAB, NAVIO, DVR, DVB-T
Read this manual before installation and use.

2
Spis treści / Contents
English
3
Polski
17
3
Product Interface
4
Interface using instruction
5
Product Specification
6
Unlocking the Device
7
Camera
8
Home
9
Main Menu
10
Wi-Fi Setting
11
Web Browser
12
Browsing Picture and Video Files
12
File Manager
13
Music Player
14
Application Software Installation
15
Bluetooth connect
16
English
4
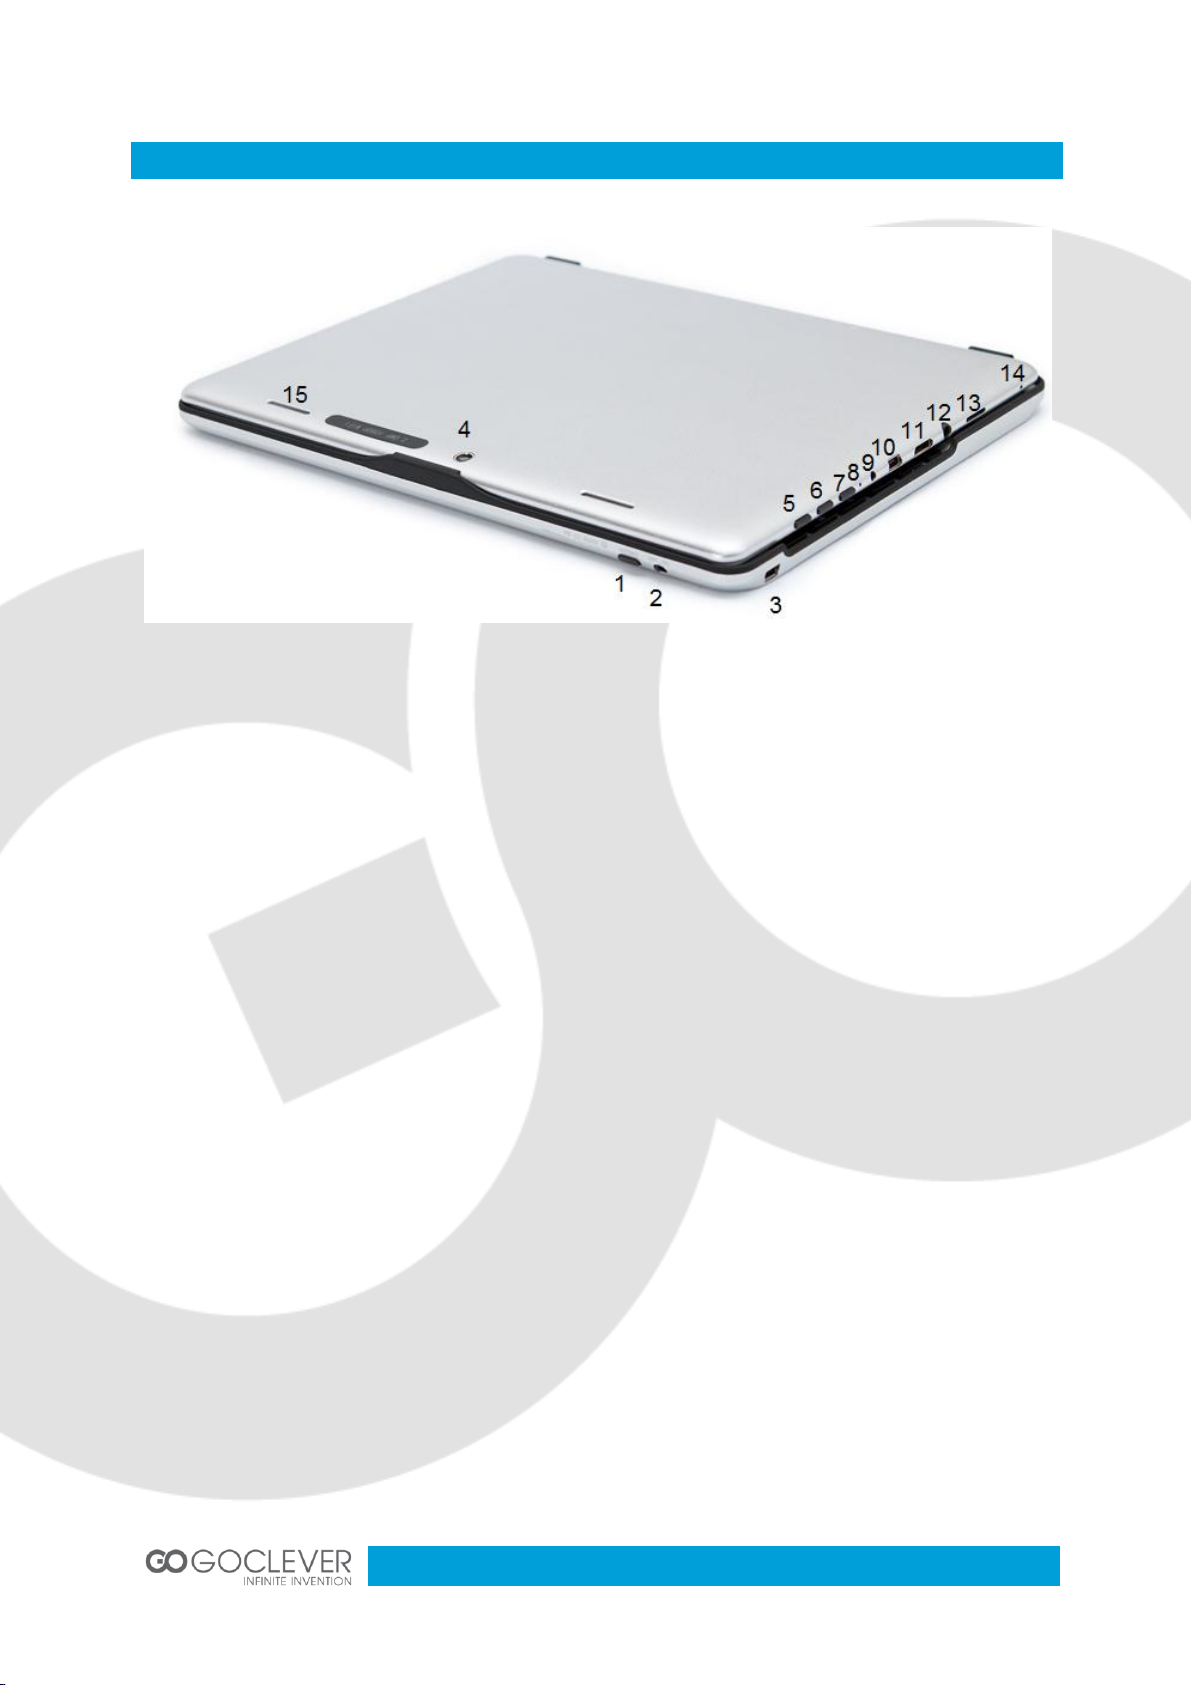
Product Interface
1. Connect keyboard
2. Power ON/OFF keyboard
3. miniUSB charge keyboard
4. Camera back 2Mpix
5. Power ON/OFF
6. Volume +
7. Volume -
8. Reset
9. DC-in port 5V
10. miniUSB OTG 2.0
11. miniHDMI 1.3
12. Audio out 3.5mm
13. microSD HC
14. Microphone
15. Speaker

5
Interface Using Instruction
Earphone jack: 3.5mm high durability, for using earphones.
Charging indicator: green icon will increase when charging.
Front Camera: for video chatting.
Power Key: to turn on or turn off your tab, press and hold it for 2 seconds; sleep your tab
by quickly pressing it and press it again to wake up the touch screen; press and hold it
for 4 seconds, the tab will be forced to close.
Microphone: for recording or internet phone.
Power (DC) Input: charge your tab with the matched adapter.
Micro 5 PIN USB Port: connect to PC to copy data or install applications.
Touch screen.
Speaker. By default is turned on. While using earphones the speaker will turn off
automatically
Micro SD Slot: support Max. 32GB Micro SD card
HDMI Port: connect it to a compatible TV or monitor for a clearer and even more
engaging experience.
Rear Camera: take photo or video recording.
Volume Key-: reduce the volume for video and music playing.
Volume Key+: increase the volume for video and music playing.
6
Product Specification
Operation System
Android 4.0
Processor (CPU)
ARM Cortex-A8 1GHz
RAM
1GB DDR3
ROM
Nand Flash 4GB/8GB/16GB (Optional)
LCD
9.7`1024*768 ,TFT Display
Touch panel
Capacitive Touch panel
2D/3D
ARM Mali400
Graphic
OpenGL ES2.0
Wi-Fi
Supports 802.11b/g/n standard, supports local WAPI wireless protocol
standard
3GExternal
CDMA2000 EVDO/ WCDMA and TDSCDMA .For optional 3G module to realize 3G communication.
microSD
expansion External MICRO SD slot, max. 32GB card.
USB
USB high speed 2.0 .Can be connected to the computer to copy files.
VPU
Maximum support hardware decoding 2160p.
Gravity
Built-in 3D gravity sensor, 360 degree rotation. Supports gravity sense
games.
Audio
AC'97 full-duplex codec, support AAC\ AMR\ MP3\ WMA \WAV \MIDI and
so on.
Video
WMV/ASF/MP4/3GP/AVI/MKV/VC-1/DIVX/MPEG-2/MPEG-4/H.263/ H.264
720P HD1080i
Game
Support several of entertainment games based on Android platform.
Web
Support many internet applications like web, social, video, chatting and so
on.
E-book
Assemble e-book tool to read based on Android platform.
Photo
Frame Built-in photo player, and take it as a photo frame or calendar.
Office
Support various of office software based on Android platform, to realize
office functions such as Word\Excel\PPT\PDF.
7
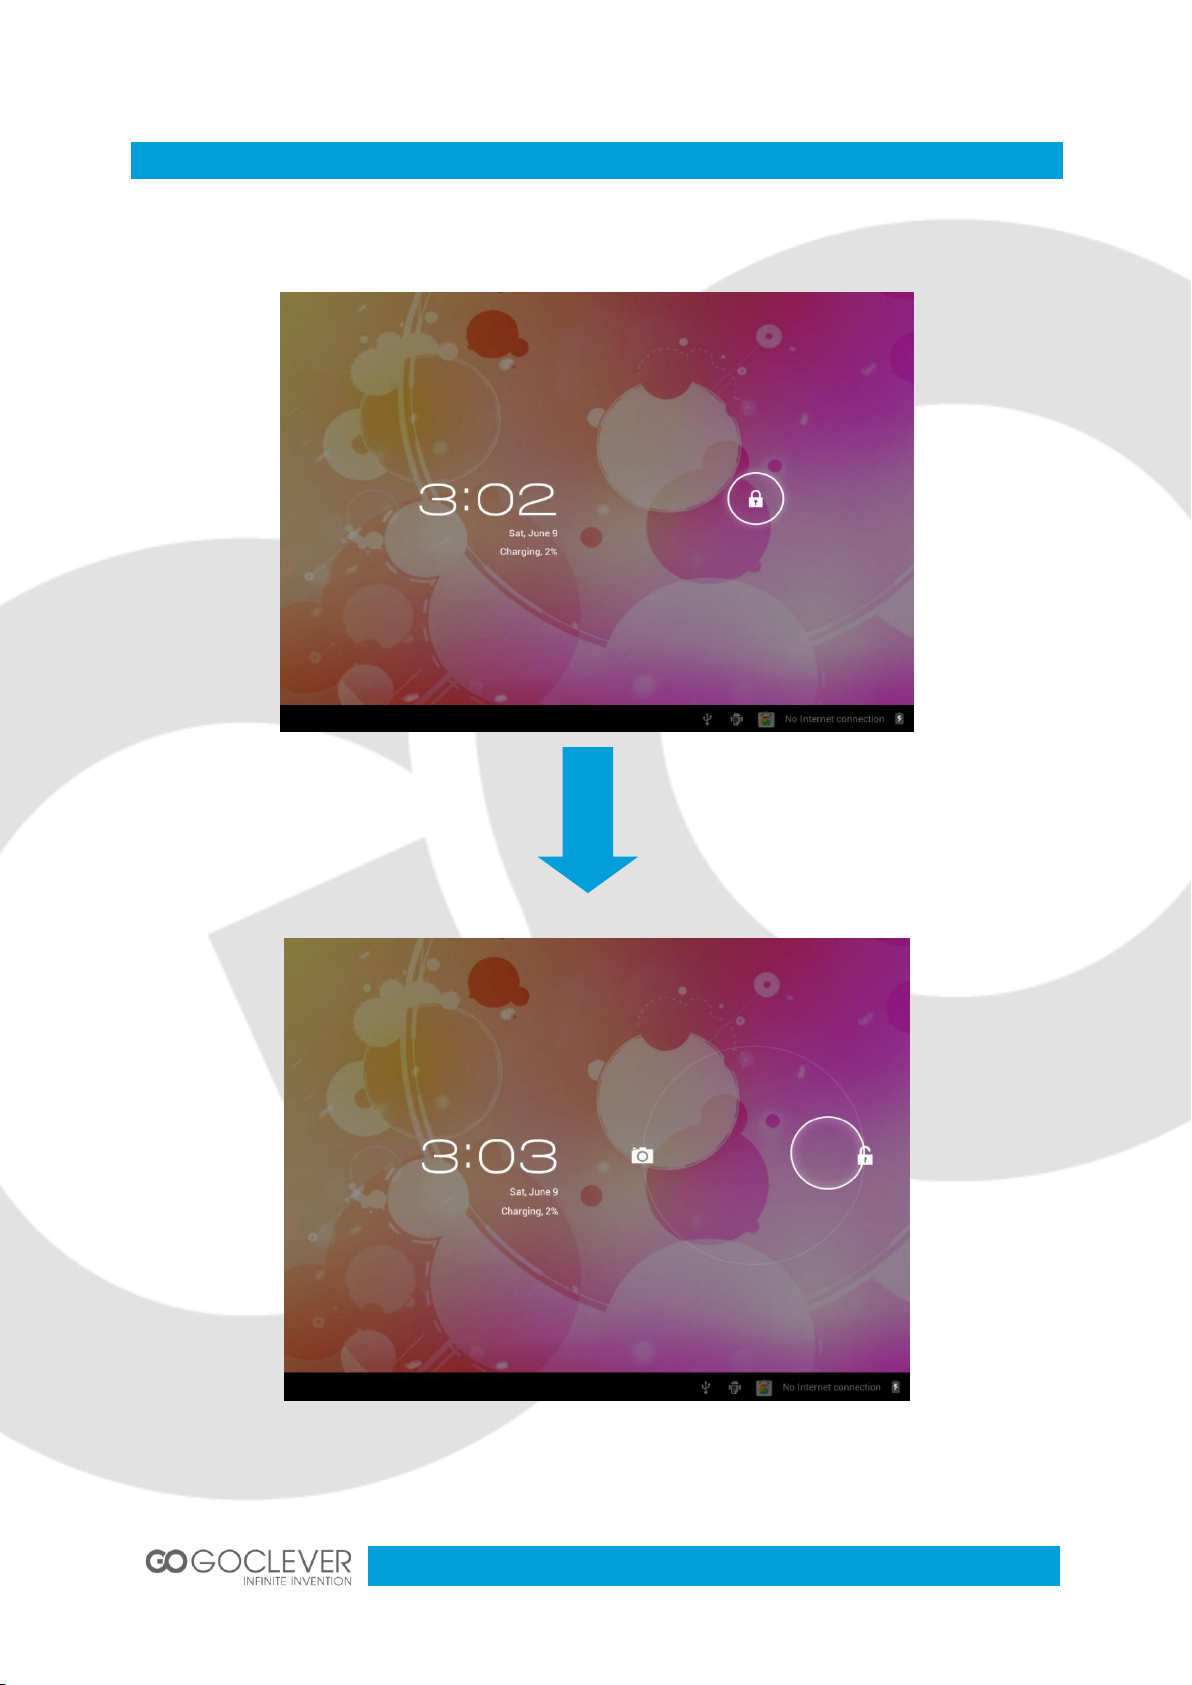
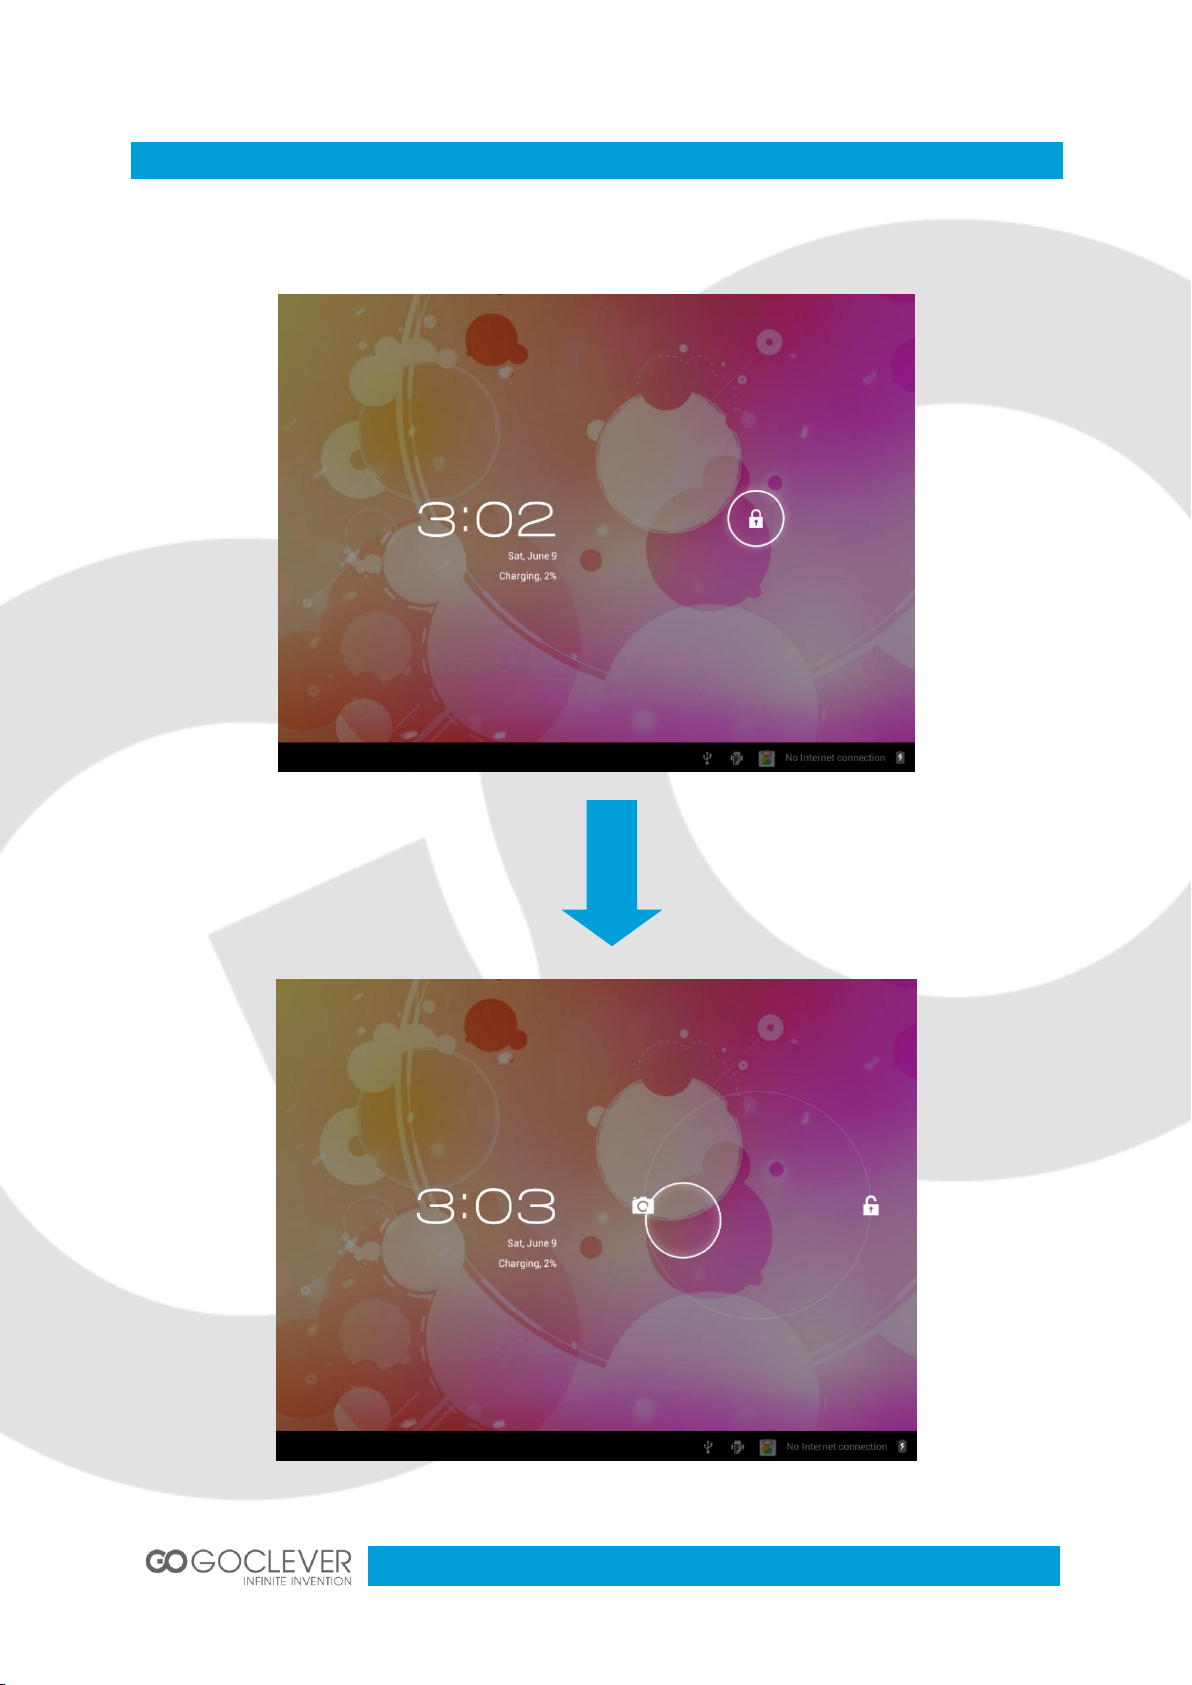
Unlocking the Device
Point the unlock key, slide the lock icon to the edge of the circle to unlock the device and
enter into main interface. You can change lock screen in the settings.
8
Camera
Point the unlock key, slide the lock icon to the edge of the camera icon to activate camera
mode. You can also access camera mode in the main interface.

9
Home
A. Back button.
B. Desktop button.
C. Last open.
D. Volume E. Volume +
F. Task notification bar.
G. USB connected. Select to transfer files with computer.
H. USB debugging connected. Select to disable USB
debugging.
I. Clock.
J. Wi-Fi signal.
K. Bluetooth state.
L. Battery state.
M. Search.
N. Desktop.
O. Menu (all applications).
To remove application shortcut from your desktop, simply touch and drag the icon to the
recycle bin (as picture shows)
10
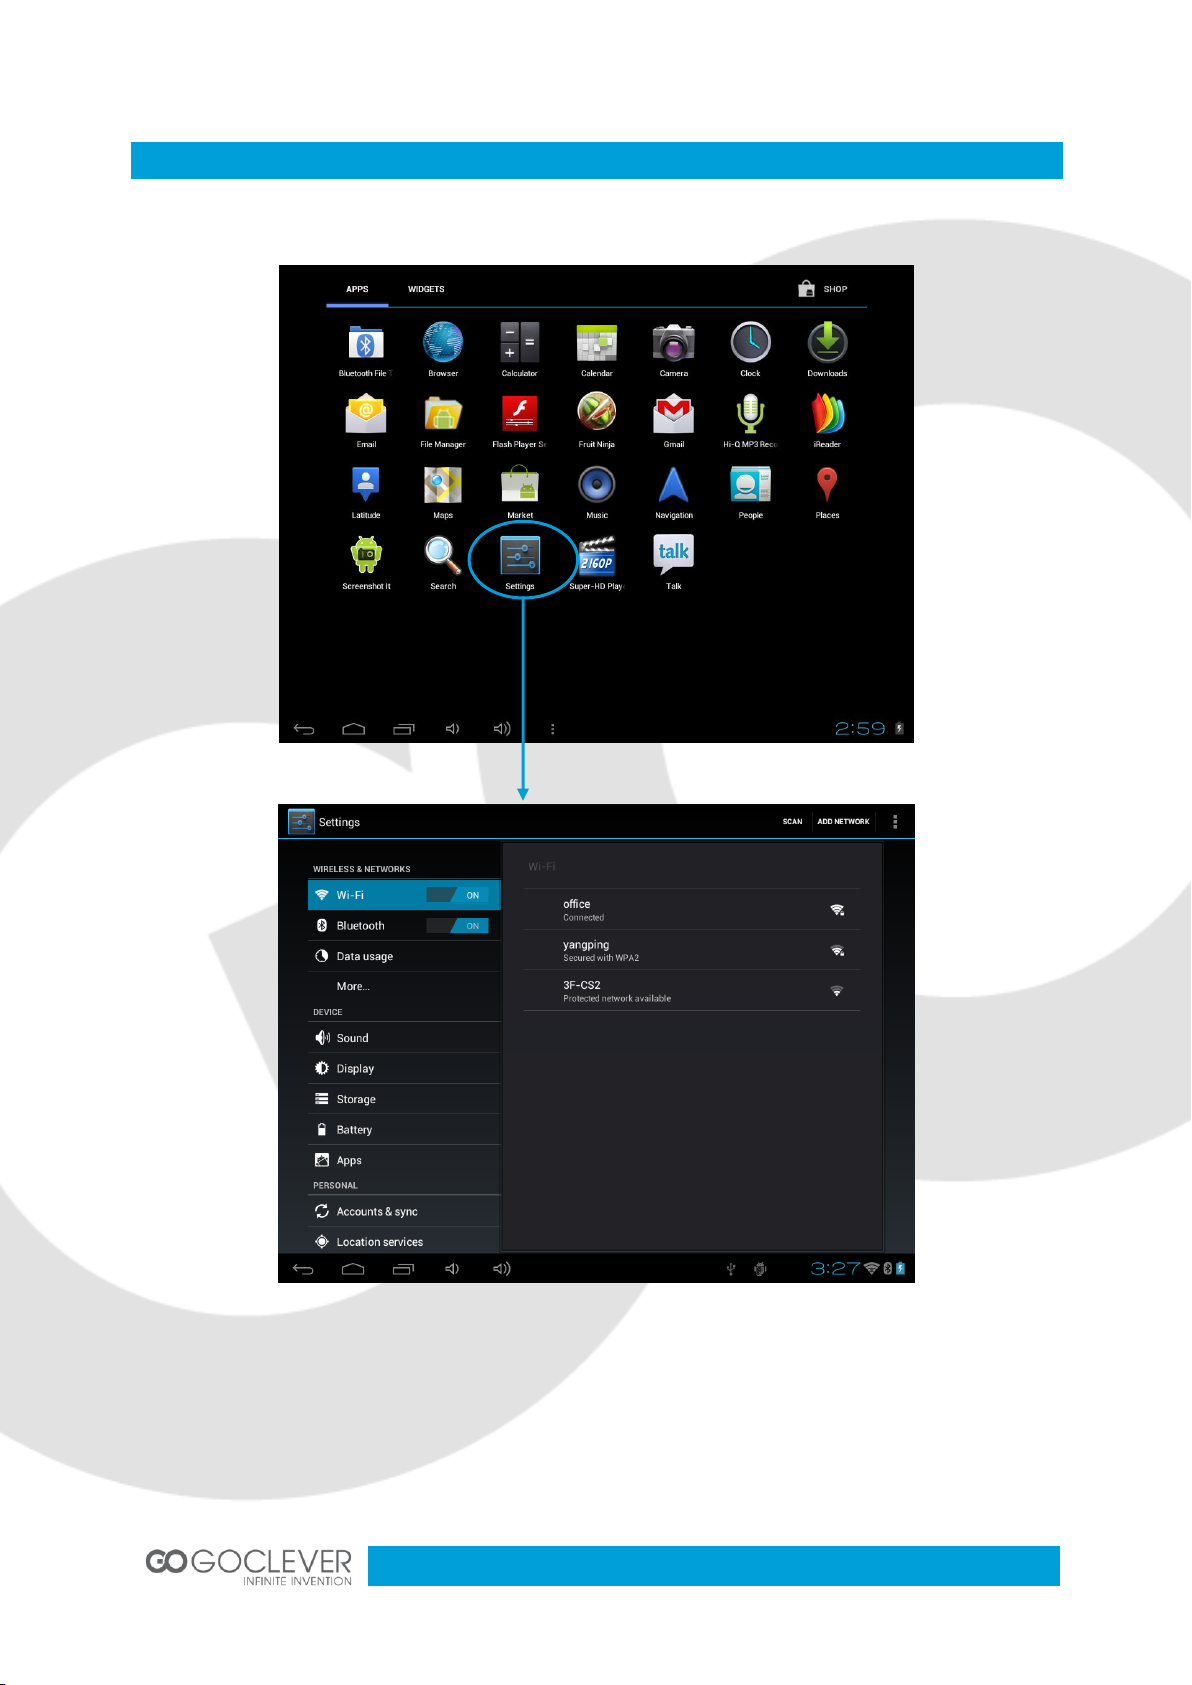
Main Menu
Click Settings icon to enter settings menu (as picture shows)
11
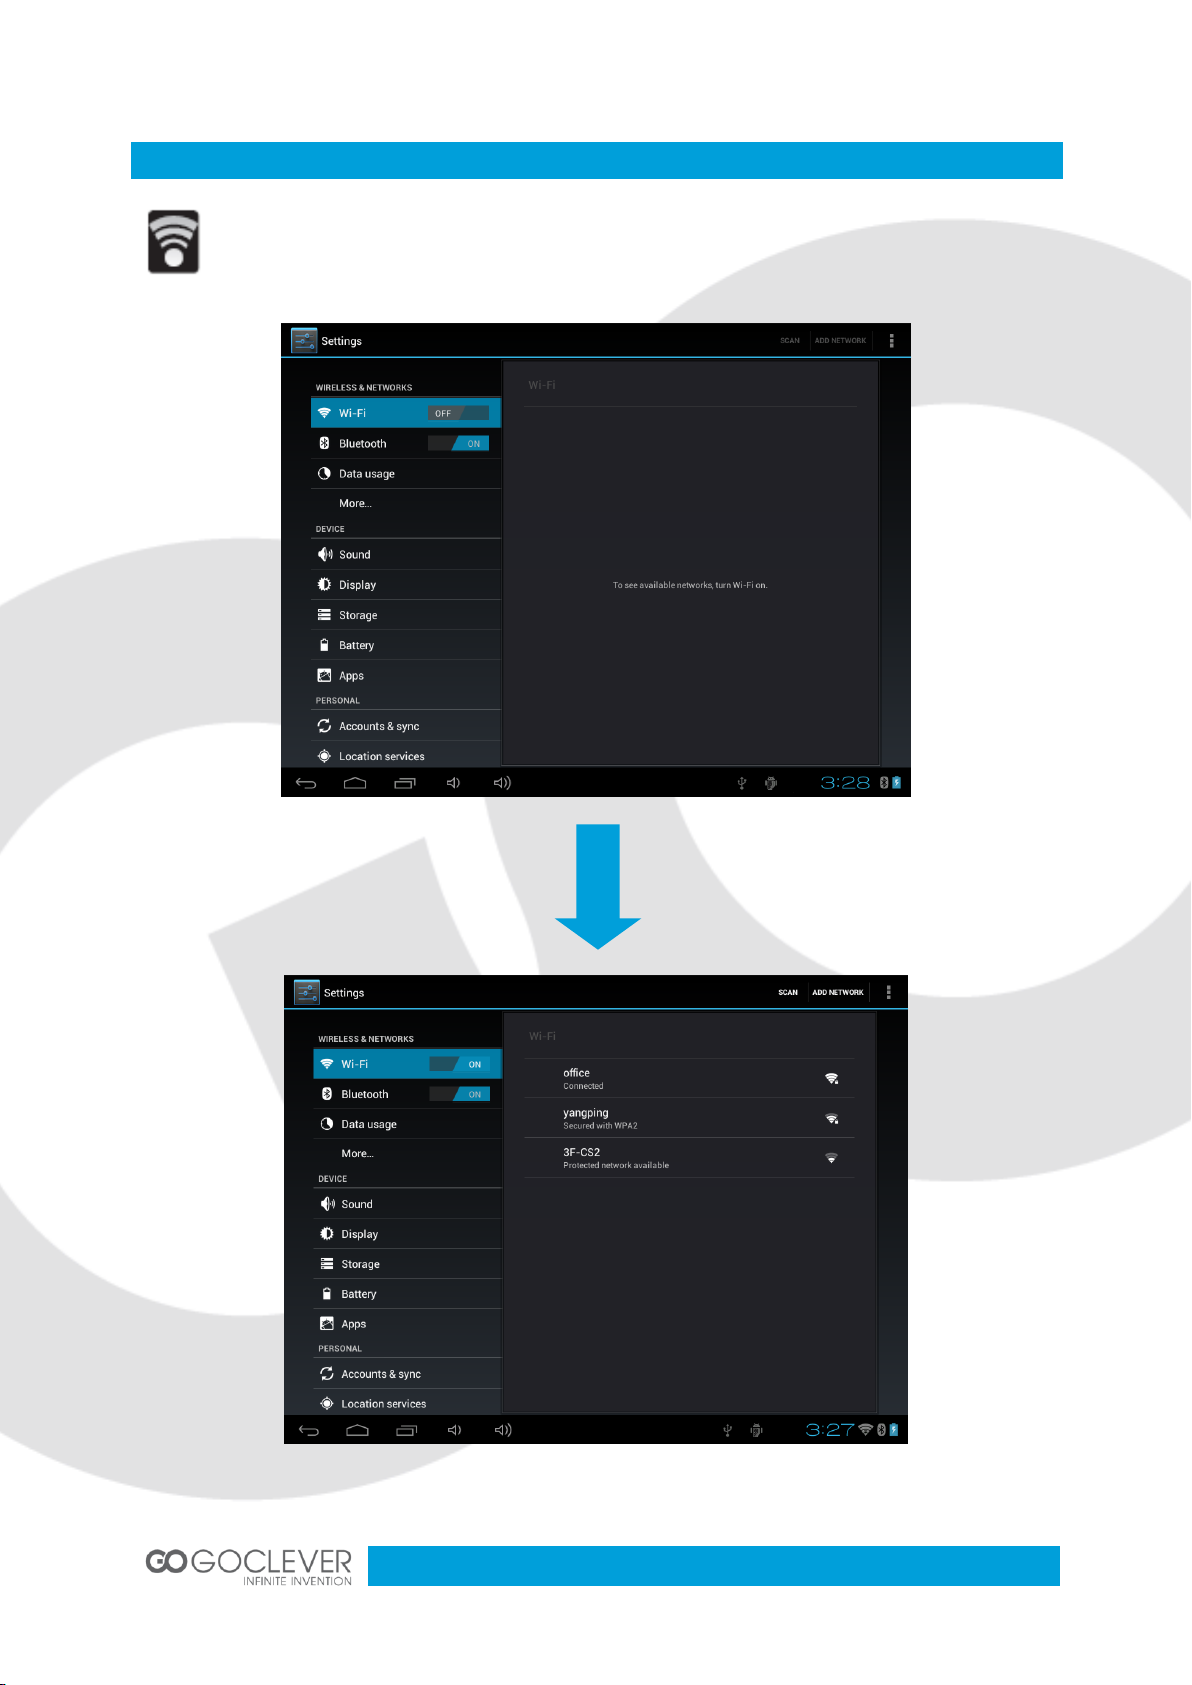
Wi-Fi Settings
When you see this icon on the taskbar, you are connected to the wireless network.
To connect to the wireless network, you have to click first option in the settings
menu. Then you can choose your wireless network from the list on the right side.

12
Web Browser
Browsing Picture and Video Files
If you already have Wi-Fi or 3G Internet connection, you can open a browser to visit
websites. You can zoom in and out website page by sliding two fingers in or out.
Click this icon to enter photo and video browsing interface. Click corresponding
photo or video file to play it.

13
File Manager
Click this icon to enter file management application.
Click the icon on the right upper corner to bring up the copy/paste/delete menu bar (see
picture below)

14
Music Player
Click this icon to enter music player interface.

15
Application Software Installation
To install android application, enter the Android Market or copy your .APK install file to
memory card. Enter File Manager and select .APK install file from your memory card. Click
the software icon to begin installation process (as picture shows)
Click install to prepare your application to be ready to run.

16
Bluetooth connect
To connect bluetooth keyboard:
1. Turn on keyboard bluetooth set to ON next press button connect
2. In Tablet go to Settings and turn on Bluetooth
3. Tablet will automatically search for Bluetooth devices
4. When tablet find keyboard tab on name this keyboard
5. Now enter on keyboard bluetooth PIN(tablet will display) and press enter to connect with
tablet.
TIP ! If you have problem with connect charger you Bluetooth keyboard first.

17
TAB A972BK
INSTRUKCJA OBSŁUGI
ODWIEDŹ NASZĄ STRONĘ
WWW.GOCLEVER.COM
ABY ZOBACZYĆ WIĘCEJ PRODUKTÓW TAB, NAVIO, DVR, DVB-T
Przed skorzystaniem z urządzenia zapoznaj się z niniejszą instrukcją obsługi
oraz zachowaj ją na przyszłość

18
Opis Urządzenia
19
Obsługa Urządzenia
20
Specyfikacja Urządzenia
21
Odblokowywanie ekranu
22
Aparat
23
Pulpit
24
Menu Główne
25
Ustawienia Wi-Fi
26
Przeglądarka Internetowa
27
Przeglądanie Obrazów i Plików Wideo
27
Menedżer Plików
28
Odtwarzacz Muzyk
29
Instalacja Aplikacji
30
Bluetooth połączenie
31
Polski

19
Opis Urządzenia
1. Tryb widoczny klawiatura Bluetooth
2. Włącznik klawiatury Bluetooth
3. miniUSB ładowanie klawiatury Bluetooth
4. Aparat 2Mpix
5. Włącznik
6. Głośność +
7. Głośność -
8. Reset
9 . Gniazdo ładowania 5V
10. miniUSB OTG 2.0
11. miniHDMI 1.3
12. Wyjście słuchawkowe
13. microSD HC
14. Mikrofon
15. Głośnik

20
Obsługa Urządzenia
Wejście słuchawkowe 3.5mm – umożliwia podłączanie słuchawek
Dioda wskazująca ładowanie baterii – zielone światło oznacza ładowanie baterii
Przednia kamera – umożliwia przeprowadzanie rozmów wideo
Przycisk zasilania – przytrzymaj przycisk przez 2 sekundy aby włączyć lub wyłączyć
urządzenie. Kliknij przycisk aby wyłączyć/włączyć ekran urządzenia. Przytrzymaj
przycisk przez 4 sekundy, aby wymusić zamknięcie system urządzenia.
Mikrofon – umożliwia nagrywanie dźwięku lub rozmowy internetowe
Wejście ładowarki – podłącz do wejścia ładowarkę dołączoną do zestawu, aby
naładować baterię.
Pięcio-pinowe wejście USB – port umożliwiający wymianę plików z komputerem.
Panel dotykowy
Głośnik – domyślnie jest włączony, podczas używania słuchawek głośnik zostanie
automatycznie wyciszony.
Port kart micro SD – urządzenie obsługuje karty pamięci o pojemności do 32 GB
Port HDMI – wejście umożliwiające podłączenie urządzenia do zewnętrznego
wyświetlacza (np. telewizora)
Tylna kamera – umożliwia nagrywanie materiału wideo lub wykonywanie zdjęć
Głośność “–“ - zmniejsz poziom głośności
Głośność “+” - zwiększ poziom głośności

21
Specyfikacja Urządzenia
System Operacyjny
Android 4.0
Procesor (CPU)
ARM Cortex-A8 1GHz
RAM
1GB DDR3
ROM
Nand Flash 4GB/8GB/16GB (Opcjonalnie)
LCD
Wyświetlacz TFT 9.7`1024*768
Panel dotykowy
Pojemnościowy panel dotykowy
2D/3D
ARM Mali400
Grafika
OpenGL ES2.0
Wi-Fi
Obsługa standard u 802.11b/g/n
Zewnętrzne 3G
CDMA2000 EVDO/ WCDMA i TDSCDMA. Moduł 3G opcjonalny.
Karta Pamięci
microSD
rozszerzenie zewnętrznej karty MICRO SD, maks. 32GB .
USB
mini USB 2.0
VPU
Maksymalne dekodowanie 2160p
Czujnik grawitacji
Wbudowany czujnik 3D. Obsługa gier wymagających czujnika grawitacji.
Audio
AC'97 full-duplex codec, obsługa AAC\ AMR\ MP3\ WMA \WAV \MIDI
Wideo
WMV/ASF/MP4/3GP/AVI/MKV/VC-1/DIVX/MPEG-2/MPEG-4/H.263/ H.264
720P HD1080i
Gry
Obsługa gier na platformę Android.
Sieć
Obsługa aplikacji sieciowych
E-book
Obsługa e-booków.
Fotografie
Możliwość wykonywania zdjęć (wraz z dodatkami np. ramką)
Narzędzia
Obsługa aplikacji na platform Android (np. aplikacji obsługujących format
plików doc/pdf/ppt)

22
Odblokowywanie Ekranu
Przyłóż palec do ikony odblokowania na ekranie, a następnie przeciągnij ją na krawędź koła.
W ten sposób uzyskasz dostęp do menu głównego. Ustawienia blokady ekranu mogą zostać
zmienione.

23
Aparat
Przyłóż palec do ikony odblokowania na ekranie, a następnie przeciągnij ją na ikonę aparatu.
W ten sposób uzyskasz szybki dostęp do aplikacji aparatu. Aparat możesz uruchomić
również z poziomu menu.

24
Pulpit
A. Przycisk powrotu.
B. Przycisk pulpitu.
C. Ostatnio uruchomione aplikacje.
D. Głośność E. Głośność +
F. Pasek powiadomień
G. Połączenie USB (kliknij, aby połączyć z komputerem)
H. Tryb debugowania USB. Kliknij, aby wyłączyć ten tryb.
I. Zegar
J. Sygnał Wi-Fi.
K. Status Bluetooth
L. Status Baterii.
M. Szukaj.
N. Pulpit.
O. Menu (wszystkie aplikacje).
Aby usunąć znajdujący się na pulpicie skrót do programu, dotknij jego ikony i przesuń ją do
kosza (patrz obrazek)

25
Menu Główne
Kliknij ikonę ustawień, aby przejść do menu ustawień (patrz obrazek)

26
Ustawienia Wi-Fi
Ikona oznaczająca trwające połączenie z siecią bezprzewodową. Aby połączyć się z
siecią bezprzewodową, kliknij pierwszą opcję w menu ustawień, a następnie wybierz
dostępną sieć z listy po prawej stronie.

27
Przeglądarka Internetowa
Przeglądanie Obrazów i Plików Wideo
Jeżeli połączyłeś urządzenie za pomocą Wi-Fi lub 3G z Internetem, możesz zacząć
korzystać z przeglądarki internetowej. Strony internetowe mogą być powiększane
lub pomniejszane za pomocą ruchu dwóch palców.
Kliknij tę ikonę, aby przejść do przeglądarki plików wideo oraz obrazów. Kliknij dany
element, aby go odtworzyć.

28
Menedżer plików
Kliknij tę ikonę, aby zarządzać plikami na urządzeniu oraz karcie pamięci.
Kliknij ikonę w górnym, prawym rogu ekranu, aby przywołać pasek opcji kopiowania,
wklejania oraz usuwania plików (patrz obrazek poniżej)

29
Odtwarzacz Muzyki
Kliknij tę ikonę, aby uruchomić odtwarzacz muzyki.

30
Instalacja Aplikacji
Aby zainstalować aplikację na urządzeniu, skorzystaj z Marketu Androida lub skopiuj
aplikację na kartę pamięci za pomocą komputera. uruchom menedżera plików i wybierz
skopiowaną aplikację .APK, aby rozpocząć instalację (patrz obrazek)
Kliknij przycisk instalacji, aby zainstalować aplikację na urządzeniu.

31
Bluetooth połączenie
Aby połączyć klawiaturę Bluetooth należy:
1. Włącz klawiaturę bluetooth i ustaw na on następnie wciśnij przycisk connect
2. Wejdź w Ustawienia tabletu następnie włącz Bluetooth.
3. Tablet automatycznie odszuka dostępne urządzenia Bluetooth
4. Dotknij na nazwę klawiatury aby się z nią połączyć.
5. Na klawiaturze bluetooth wprowadź PIN z ekranu tabletu następnie Enter.
UWAGA ! W przypadku nie wyszukania przez tablet klawiatury naładuj klawiaturę przed
użyciem.
Wskazówka. Aby było możliwe wprowadzanie polskich znaków przy pomocy klawiatury
bluetooth wybierz metodę wprowadzania tekstu Polski programisty.

32
Warunki gwarancji
1. GOCLEVER SP. Z O.O. z siedzibą w Zakrzewie ( 62-069 ) przy ul. Przemysłowej 18 zwany dalej
Gwarantem zapewnia, że urządzenie marki GOCLEVER, jest wolne od wad konstrukcyjnych i
materiałowych, które mogłyby naruszyć jego funkcjonalność, o ile przestrzegana była instrukcja
obsługi dostarczona przy zawarciu umowy.
2. Gwarancja obowiązuje wyłącznie na terytorium Polski.
3. Gwarant bezpłatnie usunie ewentualną niesprawność urządzenia, zgodnie z postanowieniami
niniejszej gwarancji pod warunkiem przedstawienia wypełnionej w dniu zakupu karty gwarancyjnej
wraz z kopią dowodu zakupu. Dokonywanie zmian i skreśleń w karcie gwarancyjnej przez osoby
nieupoważnione powoduje utratę uprawnień wynikających z niniejszej gwarancji.
4. Okres gwarancji na urządzenia GOCLEVER wynosi 12 miesiące, licząc od daty sprzedaży sprzętu,
jednak nie dłużej niż 15 miesięcy od daty produkcji umieszczonej na Produkcie.
5. Tryb przyjmowania produktów uszkodzonych w systemie DOOR to DOOR przysługuje nabywcy w
terminie 12 miesięcy od daty zakupu, jednak nie dłużej niż 15 miesięcy od daty produkcji. Po
przekroczeniu tych terminów użytkownik powinien przesłać uszkodzone urządzenie do punktu
serwisowego na własny koszt po wcześniejszym uzyskaniu numeru RMA zgodnie z procedurą
reklamacyjną. Natomiast koszt przesyłki do klienta po naprawie pokrywa Gwarant.
6. Okres gwarancji na akcesoria dołączone do urządzenia (np. pilot, kable itp.) wynosi 1 miesiąc od
daty sprzedaży z wyłączeniem uszkodzeń mechanicznych ( nie dotyczy gwarancja door-to-door )
7. Wady ujawnione w okresie gwarancji będą usuwane bezpłatnie w możliwie najkrótszym terminie nie
przekraczającym 21 dni roboczych od przyjęcia urządzenia na serwis. W przypadku konieczności
sprowadzenia części zamiennych z zagranicy, termin powyższy może ulec przedłużeniu o kolejne 30
dni.
8. Reklamujący zobowiązany jest zgłosić usterkę w Centralnym Serwisie Klienta pod numerem Tel. (
061 ) 84 88 767. W Przypadku nie zgłoszenia usterki i wysłania jej do gwaranta bez uzyskania numeru
reklamacyjnego przesyłka nie zostanie przyjęta na serwis.
9. Usterka musi być zgłoszona do serwisu nie później niż 14 dni od jej zaistnienia.
10. Nabywca zobowiązany jest dostarczyć produkt w oryginalnym opakowaniu, wraz ze wszystkimi
akcesoriami. Odpowiedzialność za uszkodzenia wynikające z użycia opakowania zastępczego ponosi
nabywca.
11. Sprzęt nie odebrany z serwisu w ciągu 3 miesięcy od ukończenia naprawy przepada na rzecz
serwisu.
12. W przypadku nieuzasadnionej reklamacji (reklamacji sprawnego urządzenia lub gdy uszkodzenie
powstało z winy klienta) zgłaszający reklamację zostanie obciążony kosztami ekspertyzy oraz
transportu.
14. Gwarancja nie obejmuje:
1. jakiegokolwiek używania sprzętu wykraczającego poza opis zakresu jego pracy;
2. roszczeń z tytułu parametrów technicznych urządzenia, o ile są one zgodne z podanymi przez
producenta w instrukcji obsługi lub innych dokumentach o charakterze normatywnym;
3. uszkodzeń powstałych z przyczyn zewnętrznych, np.: uszkodzeń mechanicznych, skutków zjawisk
atmosferycznych, zanieczyszczeń, zalań, przepięć, itp.
4. wadliwego działania nieautoryzowanego oprogramowania zainstalowanego na urządzeniu
15. W przypadku, gdy naprawa gwarancyjna wymaga wymiany części, element wymieniony pozostaje
własnością Gwaranta. Części użyte do wymiany mogą być innej marki o parametrach technicznych co
najmniej równoważnych.
16. Nabywca traci prawa gwarancyjne w przypadku zerwania plomb gwarancyjnych, tabliczki
znamionowej z numerem seryjnym lub stwierdzenia przez serwis producenta dokonywania
nieautoryzowanych napraw lub zmian systemowy bądź konstrukcyjnych urządzenia.
17. Gwarant może uchylić się od dotrzymania terminowości usługi gwarancyjnej, jeżeli zaistnieją
nieprzewidziane okoliczności o charakterze siły wyższej np.: klęska żywiołowa, niepokoje społeczne
itp.

33
Czechy
BOUNCER S.R.O.
SLAVONICKA 324
67531 Jemnice, Czech Republic
servis@goclever.cz
Serbia
ET Servis d.o.o. Beograd
Member of Logo d.o.o.
Group Bulevar kralja Aleksandra 261
11000 Beograd. Srbija
+381 11 2042 109,+381 11 2042 101
www.etservis.rs
servis@etseivis.rs
Ukraina
Service Center "KROK-TTC"
ul. Geroev Dnepra 2A
04212, Kiev, Ukraine
+380 800 504 504
info@krok-ttc.com
Chorwacja
PlayCom
Ulica grada Vukovara 249,10000 Zagreb
+385 01 5618 433,+385 01 6184 115,
+385 01 6184 115
Skype : PlayCom - HR
info@play.com.hr
www.playcom.hr
Rumunia
S.C. Cordon Electronics S.R.L.
Str. Spataru Preda nr. 12, sector 5
Bucuresti, Romania
+40 372324762, +40 213009905,
+40 721909190, +40 740209932
office@cordongroup.ro
www.cordongroup.ro
Słowenia
TopTime d.o.o.,
Litostrojska cesta 44f, Ljubljana
servis@toptime.s
i tel: +386 1 600 50 20
www.toptime.si
18. Gwarant nie odpowiada za szkody i straty powstałe w wyniku niemożności korzystania z
urządzenia będącego w naprawie.
19. Uprawnienia z tytułu gwarancji nie obejmują prawa kupującego do domagania się zwrotu
utraconych korzyści w związku z wadami urządzenia.
20. Gwarant nie odpowiada za szkody powstałe w wyniku utraty danych na nośnikach
magnetycznych.
21. Stosunek prawny pomiędzy nabywcą urządzenia i Gwarantem regulowany jest wyłącznie
postanowieniami niniejszej gwarancji. Dalej idące roszczenia odszkodowawcze są wyłączone chyba,
że wynikają one z bezwzględnie obowiązujących przepisów prawa.
22. Gwarancja niniejsza ma charakter uzupełniający w stosunku do uprawnień nabywcy
przysługujących wobec sprzedawcy. Gwarancja nie wyłącza, nie ogranicza ani nie zawiesza
uprawnień nabywcy wynikających z niezgodności towaru z umową.
Najszybszą metodą rozwiązywania wielu problemów jest kontakt przez zgłoszenie serwisowe
pod adresem:
www.AUTORMA.GOCLEVER.com
Centralny Serwis Klienta Funkcjonuje
od poniedziałku do piątku w godzinach: 9:00 – 16:30
tel. (061) 84 88 767.
Goclever Spo. z o.o.
ul. Przemysłowa 18
62-069 Zakrzewo, Polska
serwis@goclever.pl
Serwisy partnerskie:

34
DEALER’S NAME /STAMP
SIGNATURE
Date
Confirmed defect
made repairs
Service sign
and stamp
WARRANTY CARD
DATE SOLD: ...........................................................................................................................................
DATE MANUFACTURED: ......................................................................................................................
DEVICE MODEL: GOCLEVER TAB A972BK …..……………………………………………………………
SERIAL NUMBER: ..................................................................................................................................
.........................................................
Date and customer’s signature
Repairs history
 Loading...