


TAB
OWNER’S MANUAL
TAB
INSTRUKCJA OBSŁUGI
WWW.GOCLEVER.COM
TO SEE MORE PRODUCTS TAB, NAVIO, DVR, DVB
this manual before installation and use.
A93
A93
VISIT OUR WEBSITE
Read
-T

Spis treści
Contents /
English
Polski
Warunki gwarancji
3
19
34
2

Table of Contents
Battery management and charging
Bottom bar of the Interface
The HOME Screen menu
Date and time settings
Wireless Connection
Applications install and
Frequently Asked Questions
Important Safety Precautions
English -
Basic Introduction
Quick Start
Boot and Shutdown
Connect with PC
Interface Introduction
Desktop
Basic Operation
Display settings
Browser
Video player
Photo Browser
Camera
Sound Recorder
Market
uninstall
4
4
4
4
6
7
7
7
8
8
8
9
10
11
12
12
13
14
15
15
16
17
3
Cortex A8 1.
" 800 * 480 TFT LCD
.3M pixel camera
Operating System: Google Android 4.0
Network Connection: Built
MP2,
Video format: max 1080p full HD video
MOV,FLV, WMV,MKV)
Touch Panel: Capacitive Multi
multiple language
USB OTG, Earphone, micorSD,DC IN
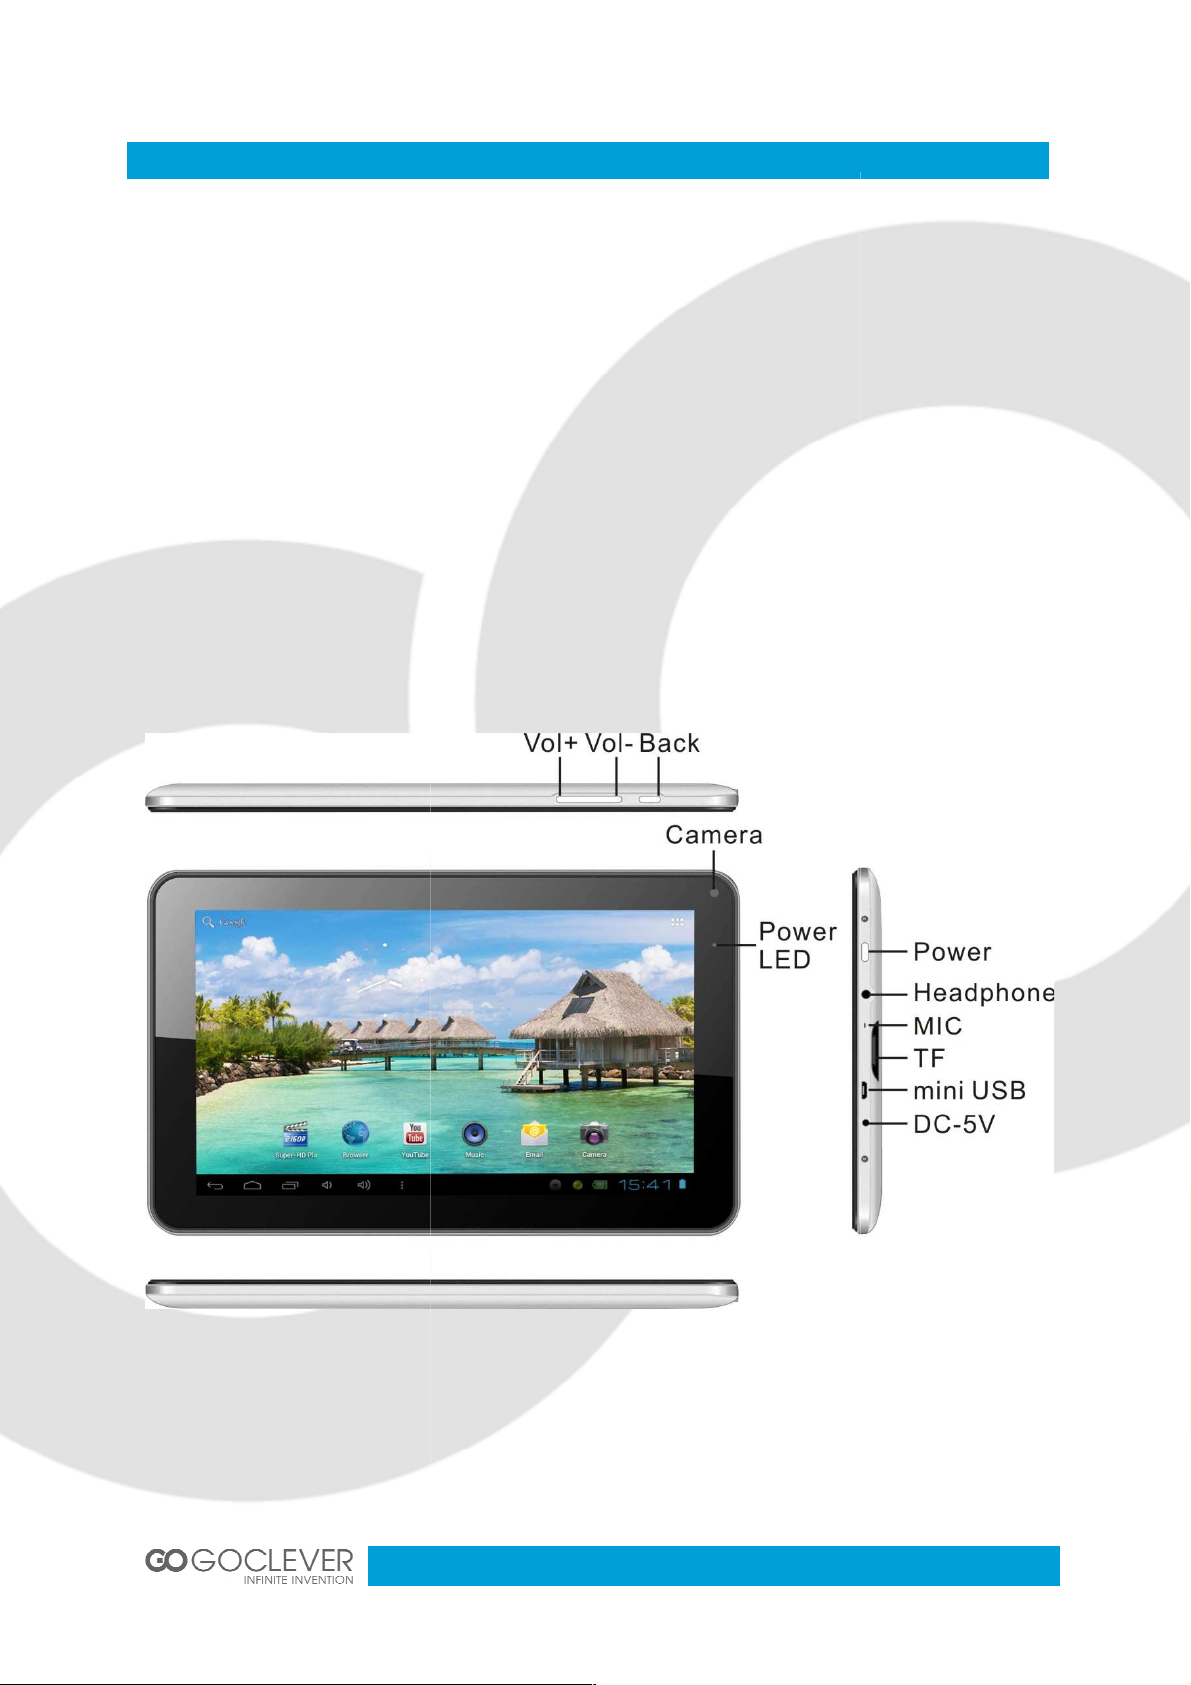
Power/Reset/Vol
P, MP4, MPG, RM, RMVB,
Basic Introduction
• CPU: Allwinner A13
• LCD Screen: 9
• Camera: Build-in 0
•
•
• Audio format: WMA,
•
•
• Language: supports
• Ports: micro
• Buttons: Back/
0Ghz GPU Mali400
-in 802.11b/g/n wireless
OGG, AAC, M4A, FLAC, APE, WAV
(AVI,3G
-touch 5-point
, Micprohone
+/Vol -
4

Battery management and charging
Before using this device, please charge it fully. Put the charger adapter into the DC jack, the
This device adopts built
when it is charging, the icon of battery will be rolling.
when the charging finish,
If you do not use this device for a long time, please charge/release it once per month
to avoid deep discharge.
because of low battery, connect to the charger, the device will
indicate “low power” or “charging”, please wait for a second until the machine can turn
to the main interface once the power is enough.
in polymer battery should be charged
consuming is not included in the warranty.
Boot: Press and hold the power button, the system will enter the boot process System has
been started, entering the Android system:
in polymer battery. Only the specified charger should be
regularly. The damage caused by
Quick Start
device will start to charge.
Tips
•
used.
•
•
•
• When it is power off
• The built-
battery over-
Boot and Shutdown
-
the battery icon will stop rolling.
5
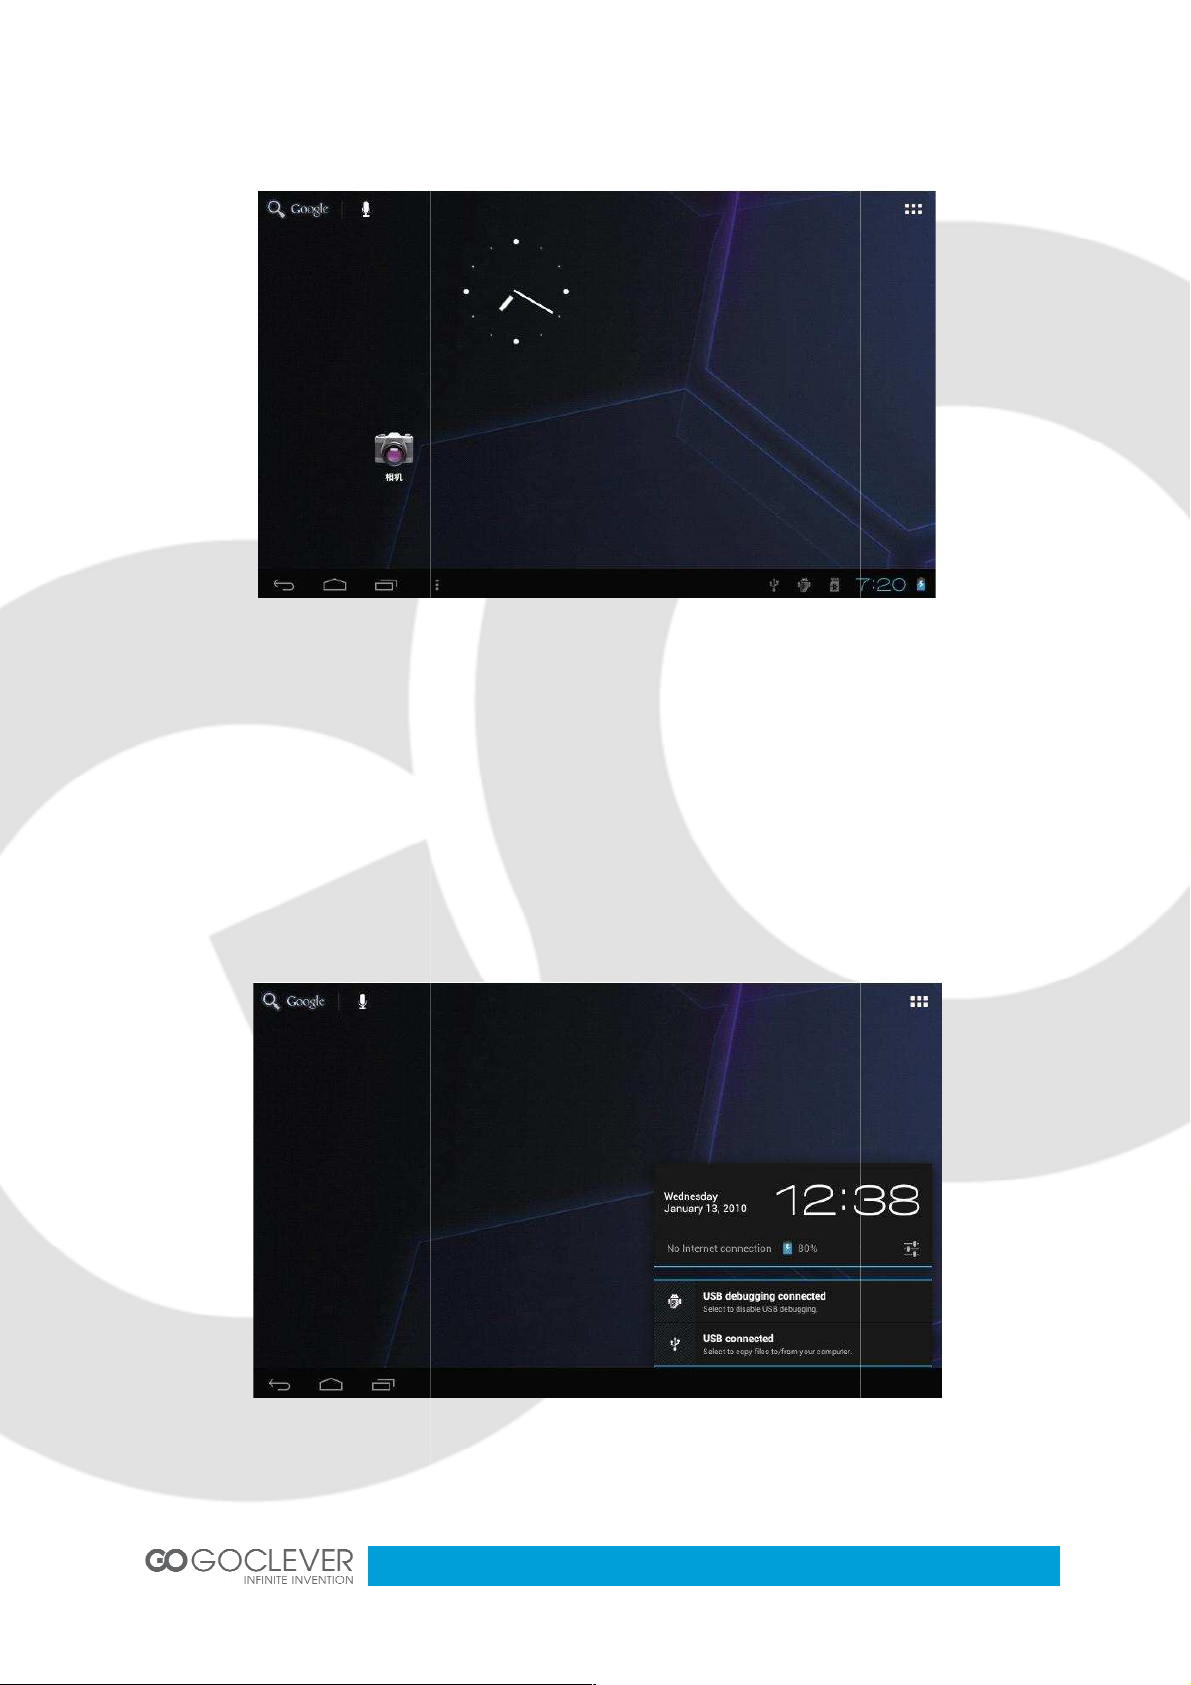
enters the default home interface.
: Press the power button, pop
interface of the device,
attached with the device. USB Data transferring is available. You can operate the files
through the PC. When your device is connected successfully, to pull up the notification area
of the status bar, can see the following icon
to enter the next
up device options, select Power off, Click OK, you
you can connect with PC by micro
The system
Shutdown
can safely shut down.
-
Connect with PC
By microUSB OTG
USB cable
Then click USB connected
6
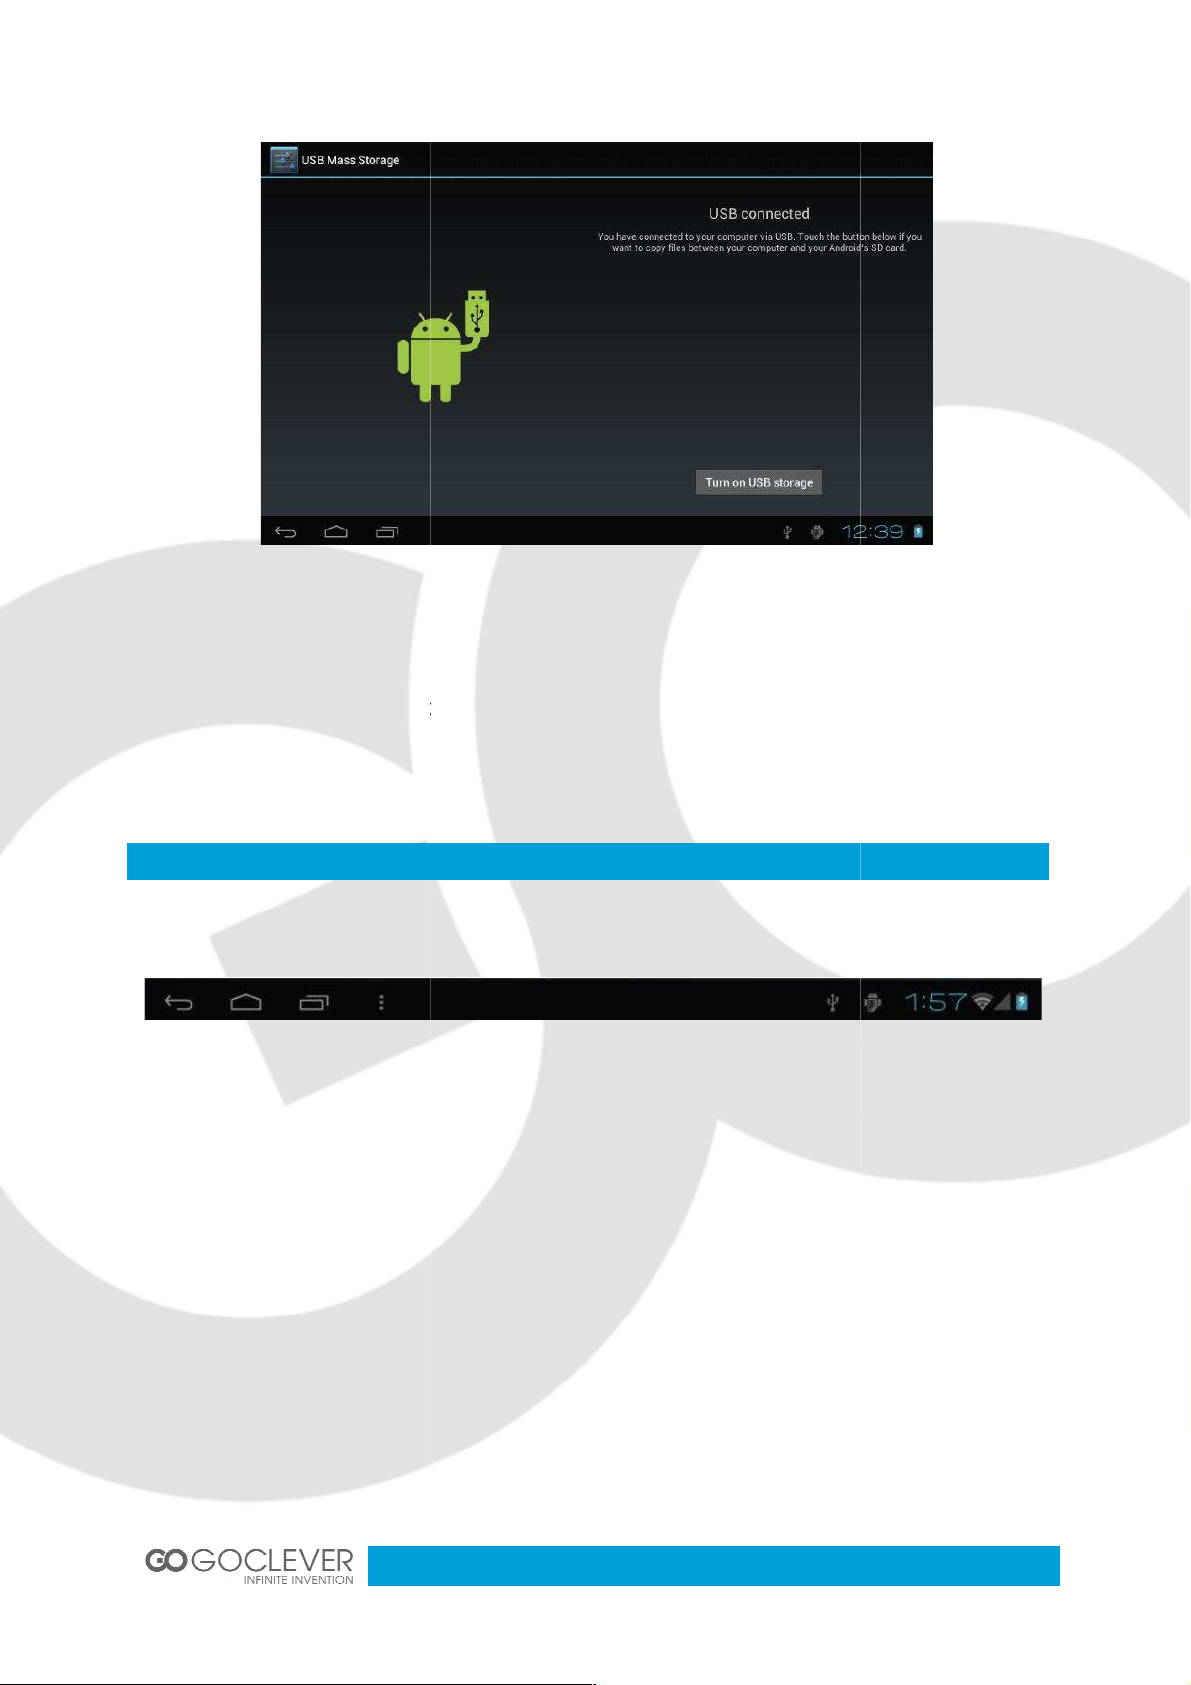
, then the device can transmission data with PC.
Note: The device also supports the FAT32 format for external devices, for example U disk,
Micro SD card to Transfer data.
Introduction
A. WIFI signal status icon: If connected to the WIFI wireless network, the icon will be
B. OTG connect icon: If the device connected to the PC, will show the OTG connected icon.
C. Time display: Display the time of t
D. Battery status icon: Displays the current battery level and the charging status.
Home, Back, virtual buttons
Press the menu icon on the device, it will display a home screen menu as
he current system, which has been set.
Click Turn on USB storage
Interface
Bottom bar of the Interface
displayed
E.
The HOME Screen menu
following:
7
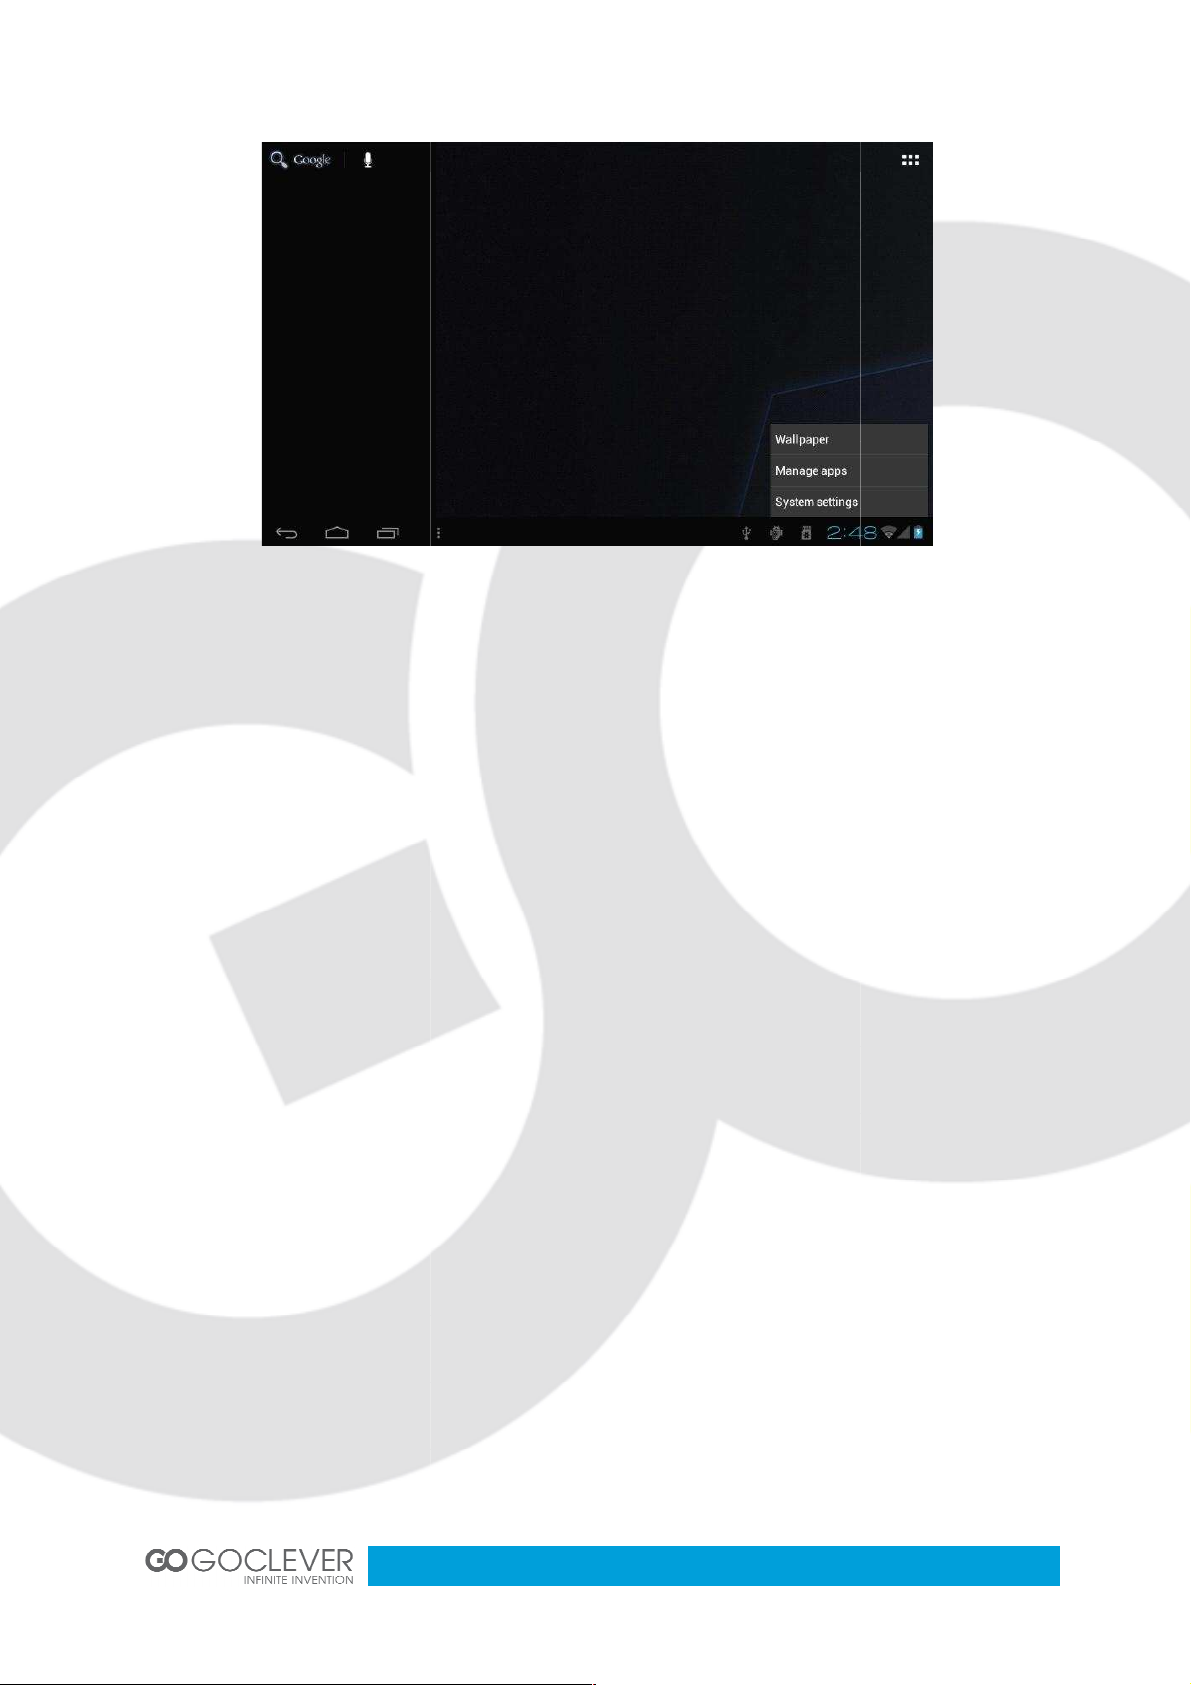
Wallpaper: Users can replace the wallpaper with you wishes.
Manage apps: It can quickly o
System Settings: Fast access to system settings, user can choose “Wireless & networks”,
or personalized settings.
When sliding around with your finger to switch the main screen, the desktop fixed on the
main screen, will not move. User could drag the application icon placed on the desktop area
“Display”, “Date & time” etc, f
Desktop
in the main screen.
pen a list of all applications.
8
in the main applications area, you can open the system
Select the appropriate operation of the relevant items, such as: wireless and network,
Display, date and time settings, about
Click "Date & time" to enter the Da
Select to set the date, select the time zone, set the time, time format, date format and other
For example, choose to set the date, as
Basic Operation
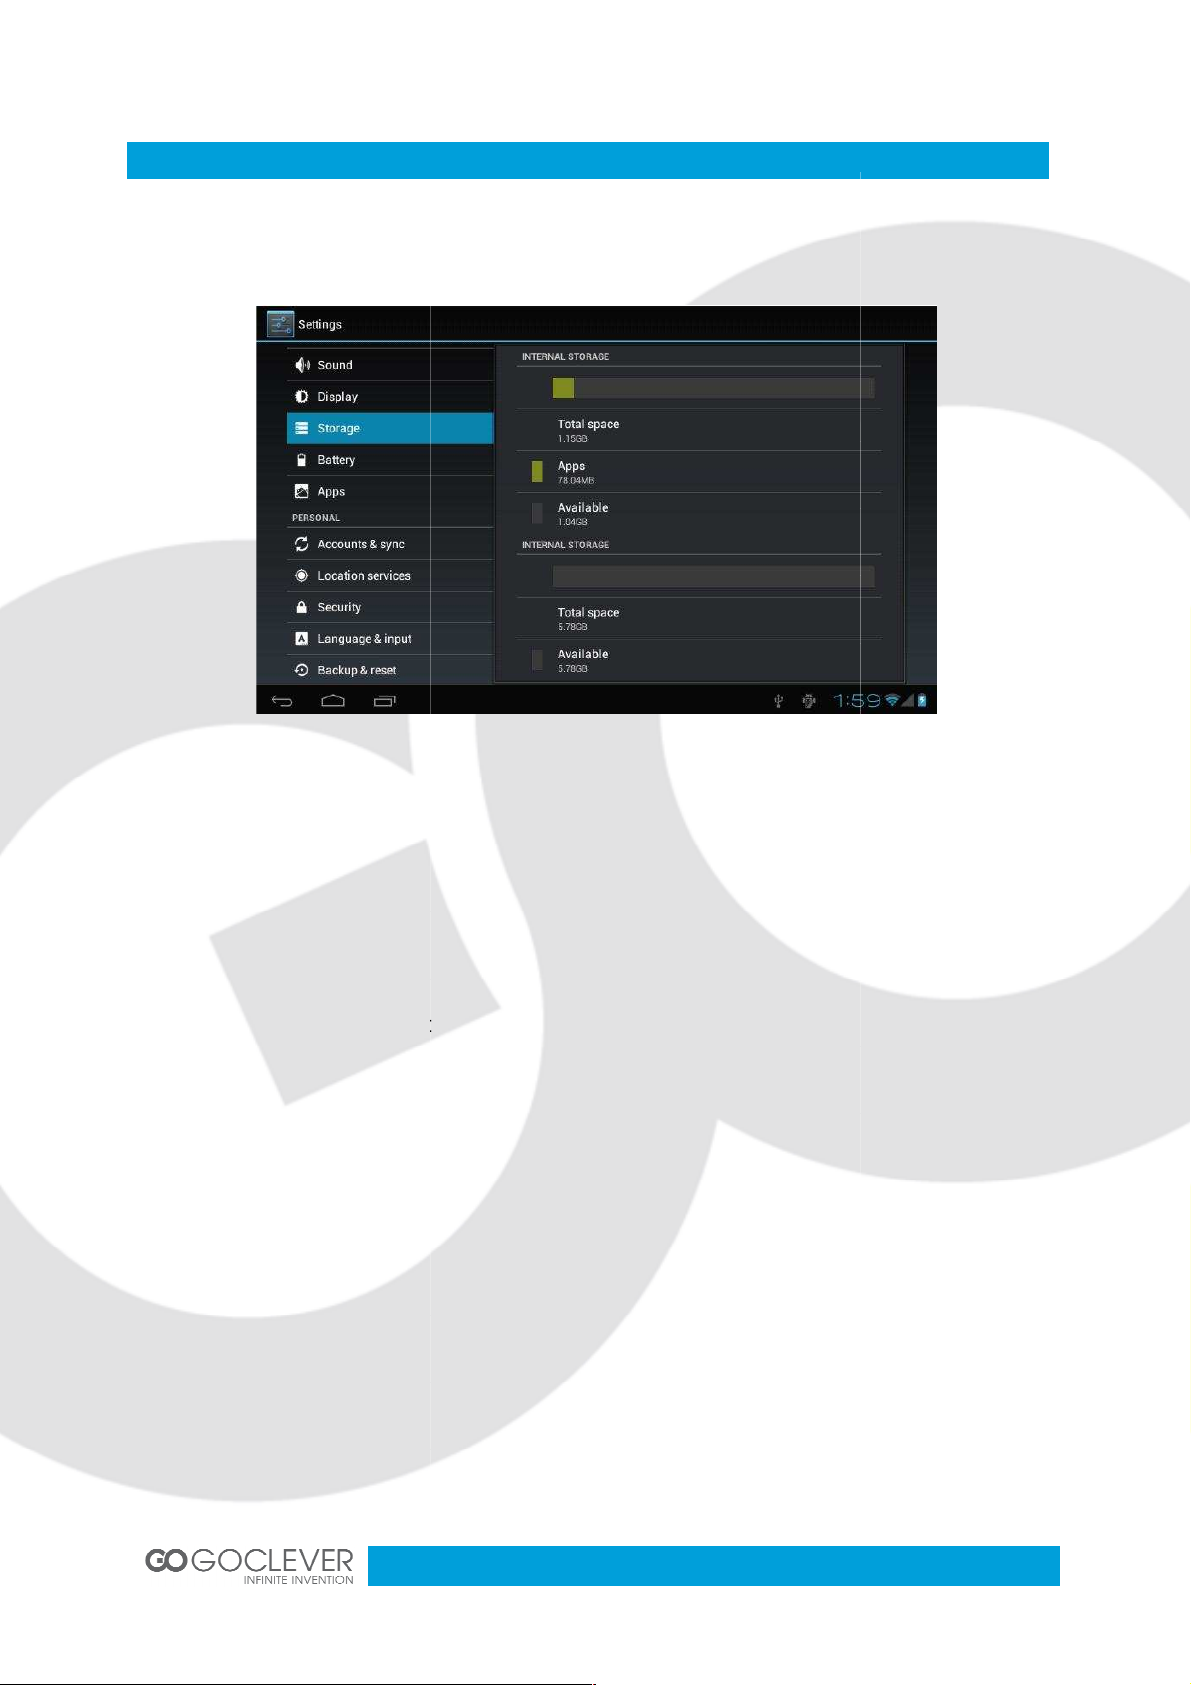
Click the "Settings" icon
interface, as shown below.
setting
Date and time settings
information.
Device, etc
te and time settings interface:
follows:
9
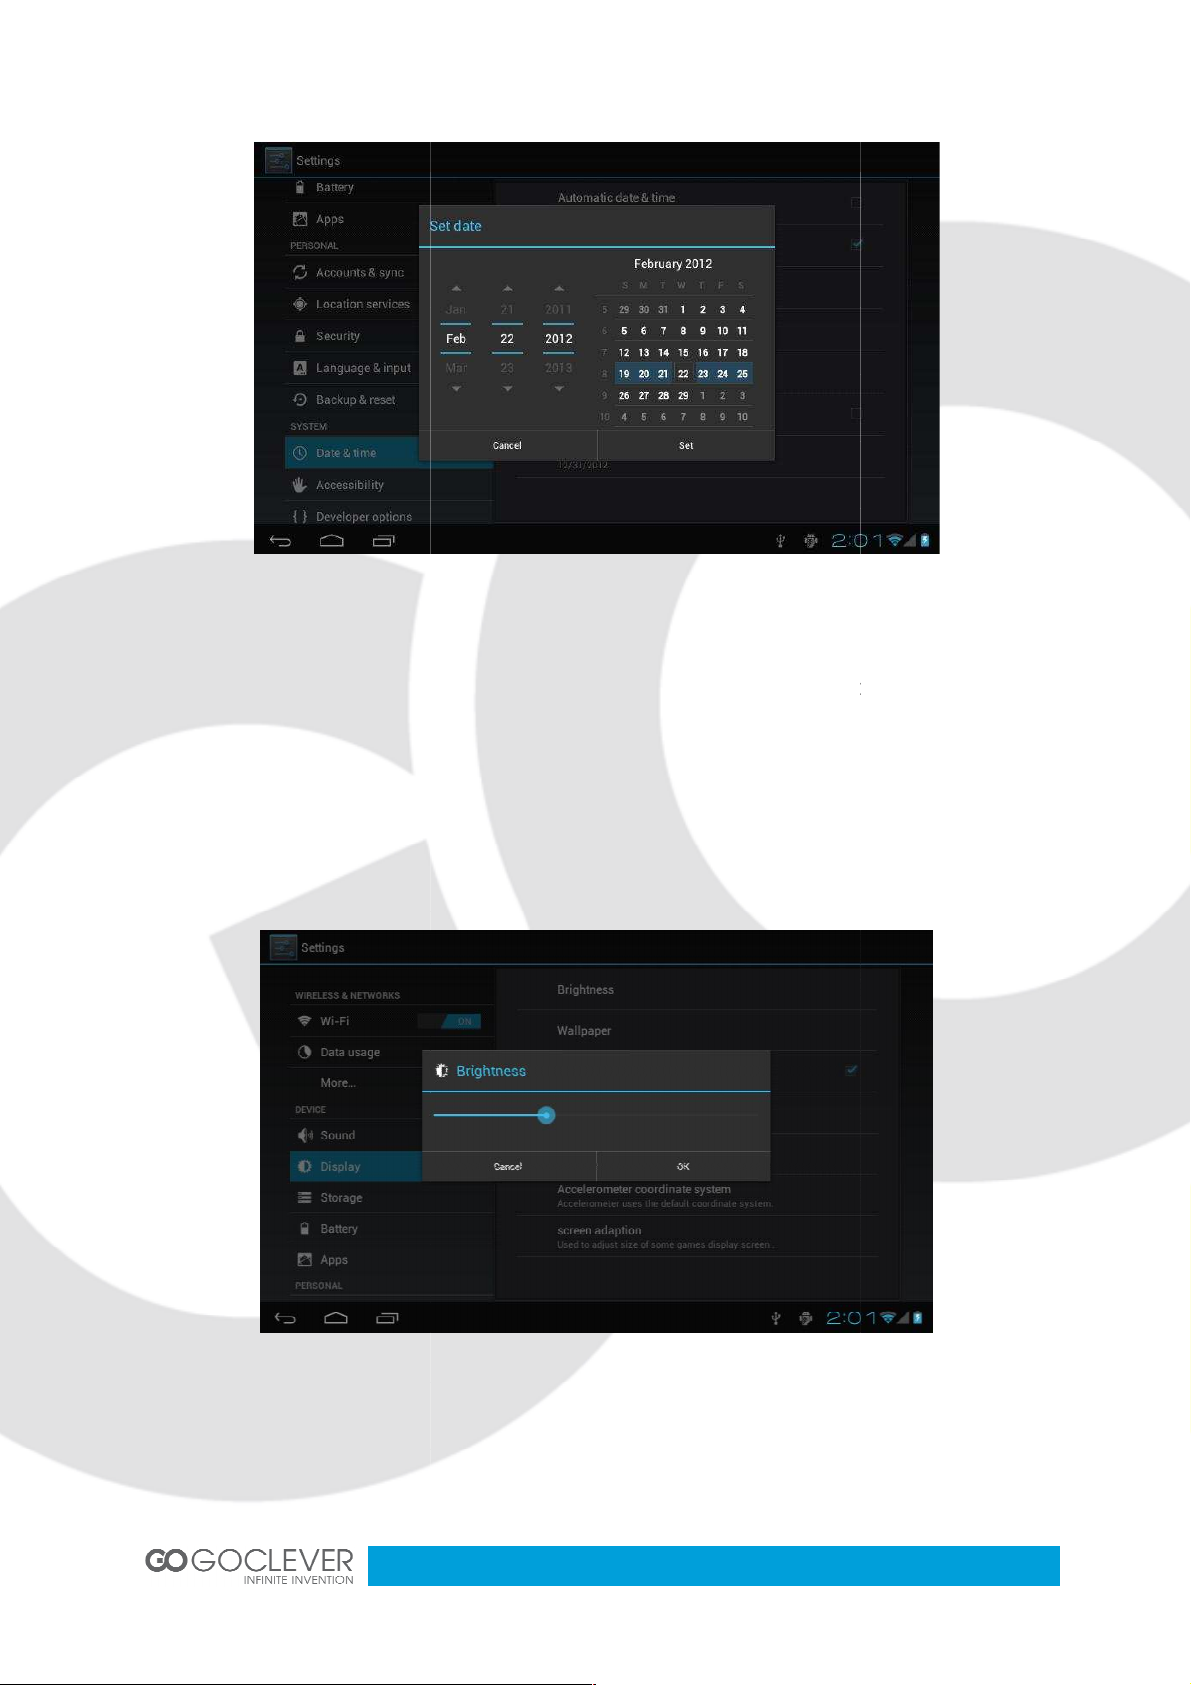
Select +: that the increase of 1 unit, Select
Also you can choose the number, enter the input mode. Directly entering the desired
number, then click “Done” to set the Date.
settings interface choose "Display" to enter the display settings interface, select
"Brightness", Pull the progress bar to adjust the brightness,
as below interface.
- : that the reduction of 1 unit.
Display settings
In the
10
Click Sleep, adjust the inactivity time of the device. You can press power key to
device. When display "Screen locked" interface, follow the prompts to unlock it.
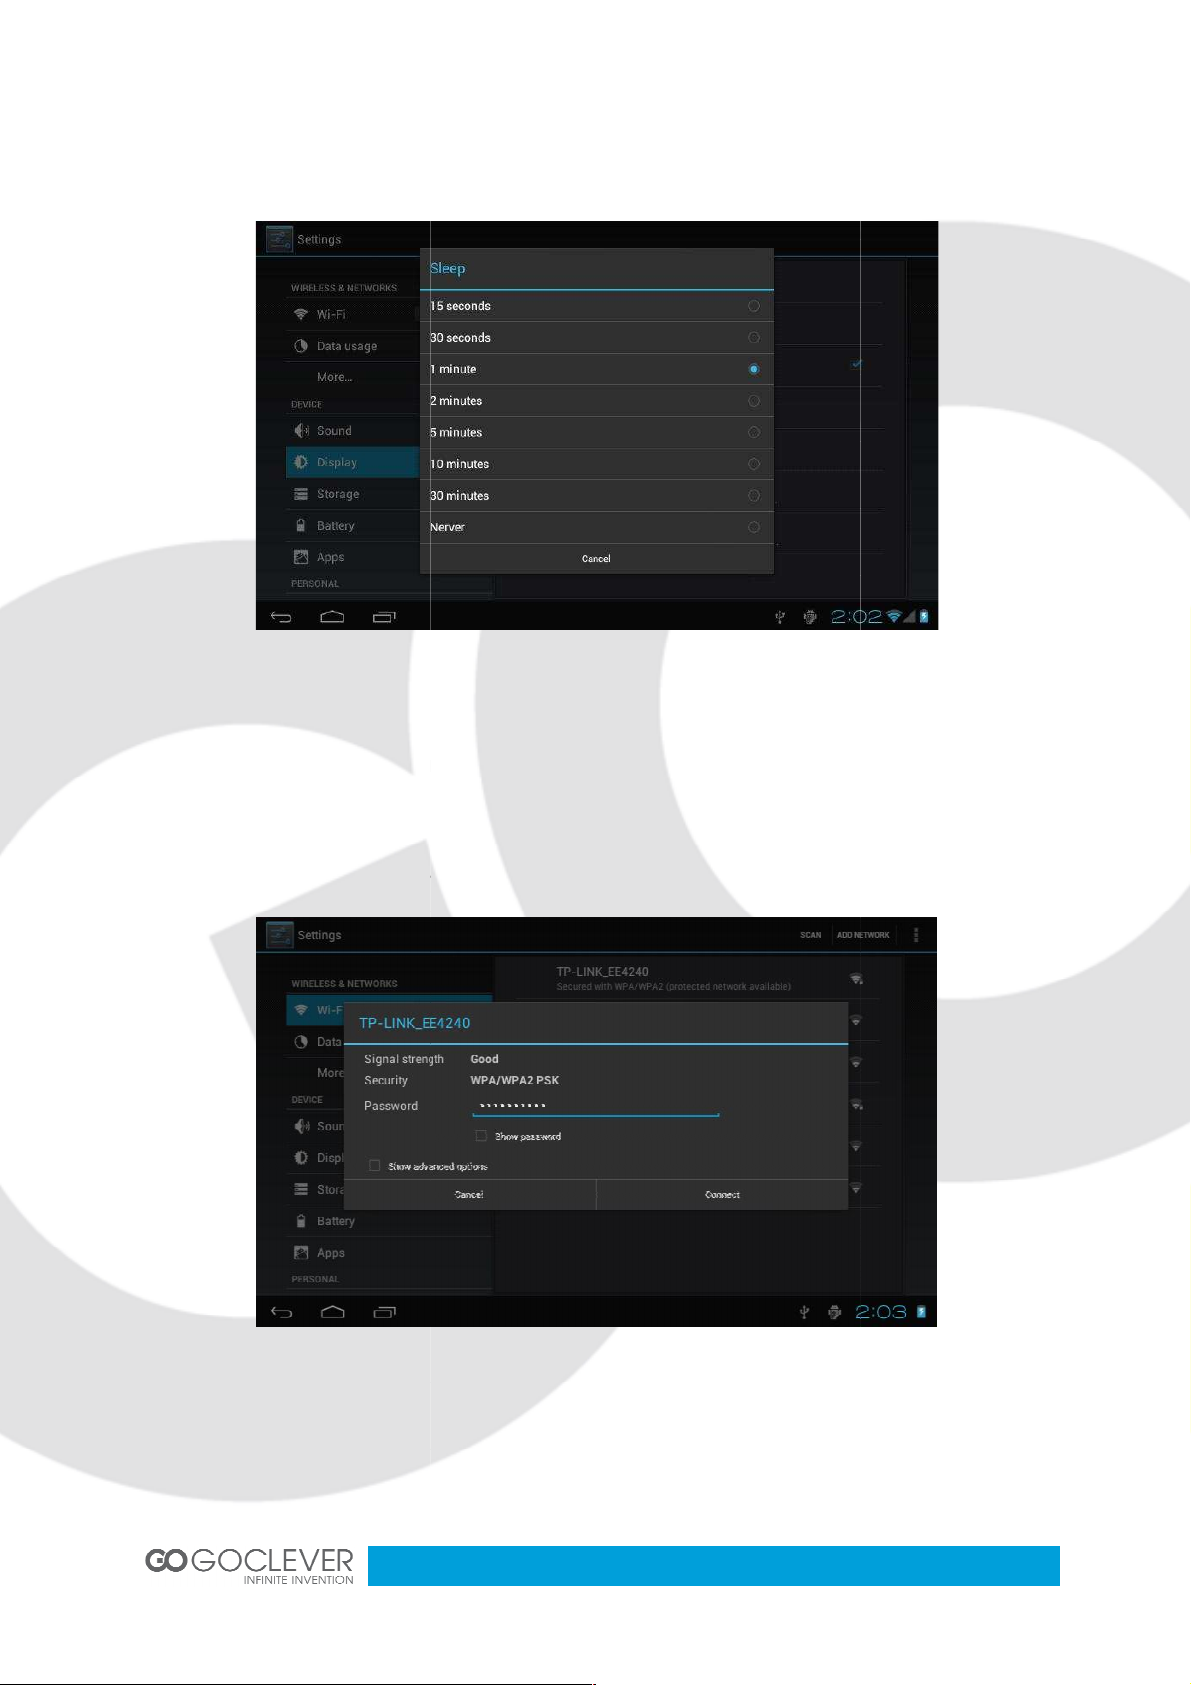
Click the main menu "Settings" icon, go to "Settings" screen, click on "Wireless and
networks" into the "Wireless and networks settings" i
in the device will search AP lists automatic , click the searched AP can be
used, will pop up settings dialog, please follow the prompts to complete the WIFI network
links. Some encrypted network, ne
nterface. Turn on Wi
ter a valid key. As shown below.
activate the
Wireless Connection
Fi module built-
ed to en
-Fi switch, the Wi-
11
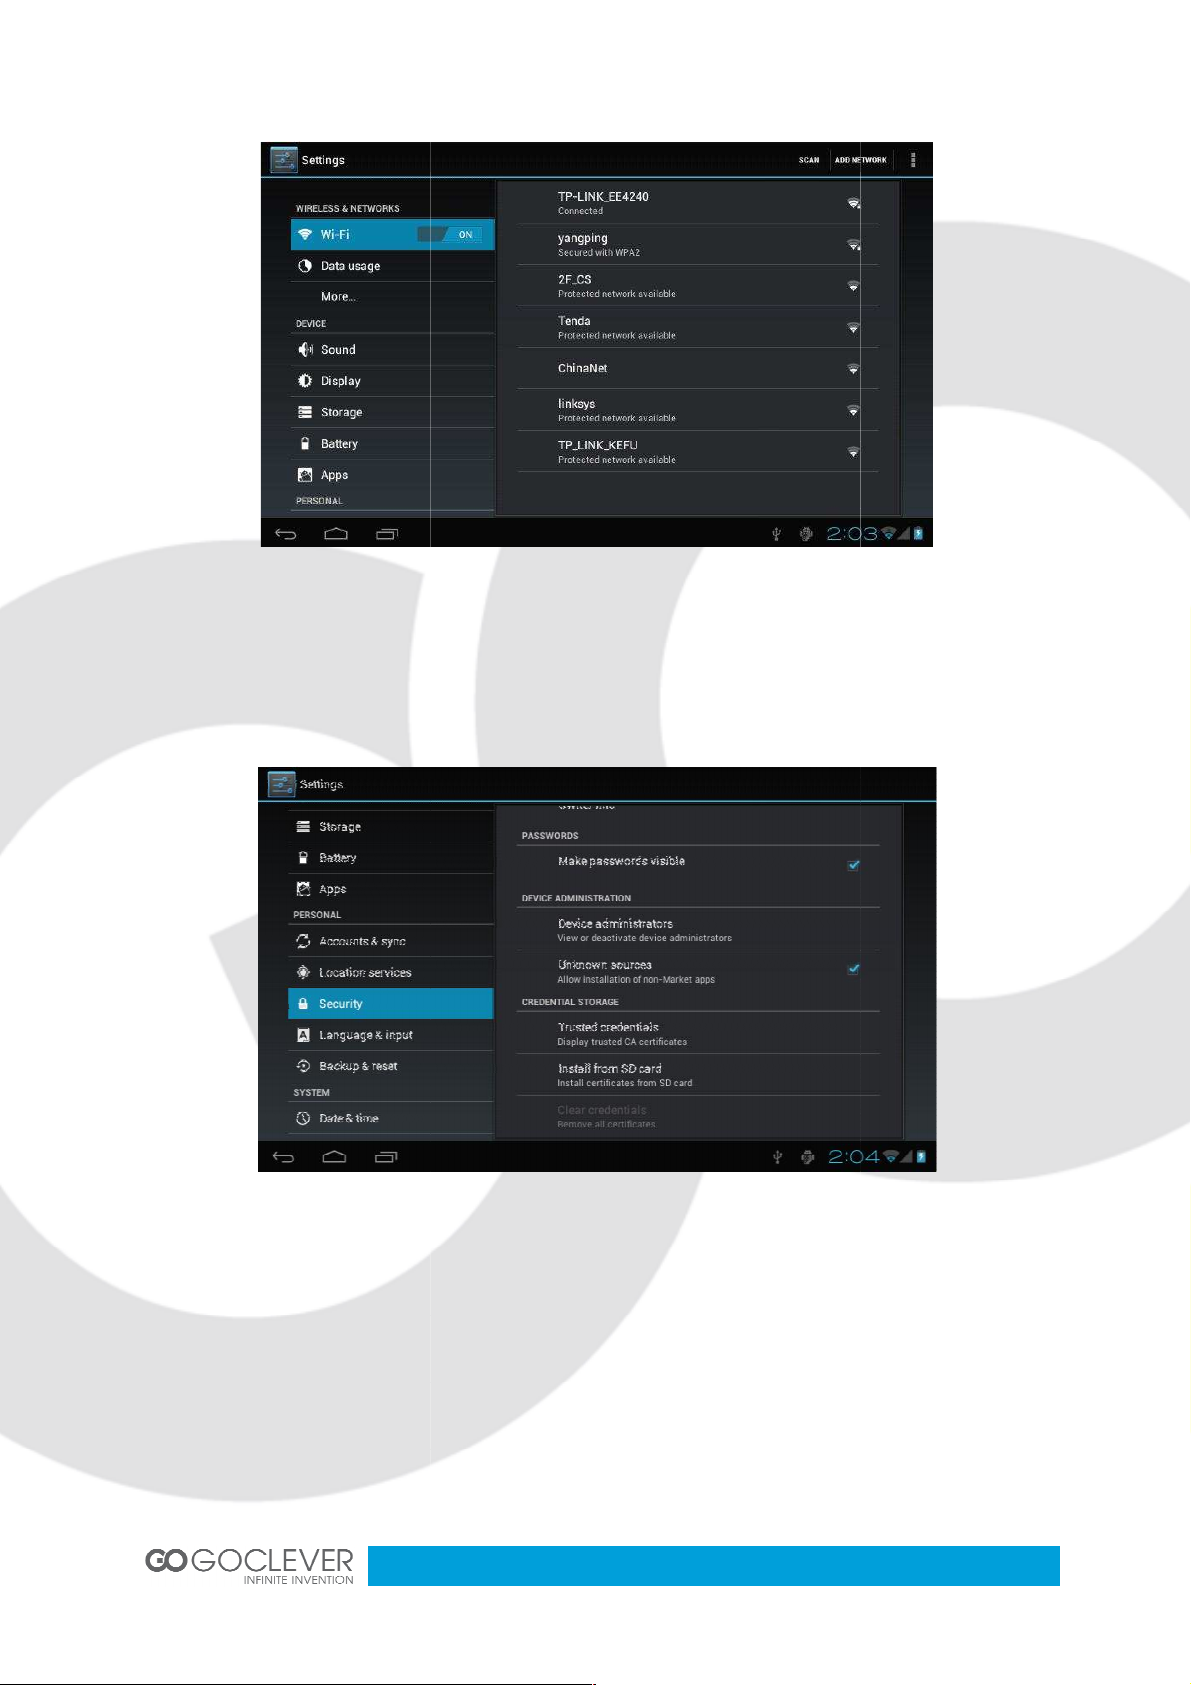
Applications install and uninstal
1. First you should select the Unknown sources which allow installation of non
2. Copy the APK installer software to Micro SD or NAND
Installer to find the app directory, then Select applications to install. Users can
"Android market" online installation, or download via the computer, or online through the
in browser to download and install.
l
Install applications
-Market apps.
FLASH.
3. Click APK
machine built-
12

Apps
been installed, click the applications which you need to uninstall
When the network connected, open the Web browser
the Web or through the main desktop search bar enter the URL, open the web page.
Online video: The product suppor
Local video: Click the Video Icon. The Player can loading new
automatically which stored in local disk or micro SD card, then select the videos to playback
enter the music player interface.
Downloaded,” select the appropriate application has
enter the URL, you can quic
ts HTML5 online video playback also Adobe Flash.
albums and photos
Click the music files you will enter
Uninstall applications
Click on the item "Settings –
Browser
–
.
kly browse
Video player
Music player
Click the music icon to
the player to play music
13

Play the previous music, long press to fast reverse
Click it to suspend
Play the next song, long press to
Display the present playing list
Select the random playing mode
Select the repeat playing mode
Play
Click “Gallery” to get into Photo Browser directly, there will list all the picture files and video
Photo Browser
files as shown below.
fast forward
14

Select a picture file and enter the picture playback interface, as shown below.
"delete"
ick the Camera icon
Click the camera shutter
"zoom", "narrow", "set" ,
You can select
etc.
Camera
Cl
in the applications menu
to take photos or videos
15

in the a
button to record. When it is completed, select
can find the records in folder in the file browser.
into the "Market" interface. I
ket, as shown below
button. At this point you
f you don’t have a Gmail account, create it.
Sound Recorder
Click the recorder icon
Select Record
pplications menu, as show below.
Stop
Market
Click the icon
“Accept” to enter mar
Select
.
16

Frequently Asked Questions
What Android OS version is on my Device?
cronym
side installation, you can also "Android market" online to
Can I use any of my personal email addresses to send/receive email?
A: The device supports POP3 and SMTP accounts. Some free email account
supported on mobile devices. Check with your email provider to see if you account is
Which media cards are compatible with my Device?
What type of music files can I play on my device?
WMA,MP2,OGG,AAC,M4A,FLAC,APE, WAV
What type of photo files can I view on my device?
A: JPG, JPEG, BMP , JPG and PNG.
What type of video files can I play on my device?
,
Can I play YouTube videos on my device?
A: Yes, you can. Tap the YouTube application icon to quick access videos.
cronym
WMV,MKV(max 1080p full HD
Android
Q:
A: 4.0
APK
Q: What is APK?
A: APK is Android Package A
Q: How to obtain the APK?
A: You can download via PC-
download and install.
Email
Q:
supported.
Q:
that Android installation package.
s are not
A: microSD cards.
Music
Q:
A:
Photos
Q:
Video
Q:
A: AVI,3GP,MP4,MPG
video)
Q:
RM,RMVB,MOV,FLV,
17

Fi adapter to connect to the Internet?
Fi adapter is built
Important Safety Precautions
Always follow these basic safety precautions when using your Tablet. This reduces
the risk of fire, electric shock, and injury.
Do not expose this product to rain or moisture.
Keep the device out of direct sunlight and heat sources.
Protect the power cord. Route power cords so that they are not likely to be walked on
or pinched by items placed on or against them. Pay particular attention to the point
where the cord attaches to
Only use the AC adapter included with the device. Using any other power adapter
Do not remove the cover. There are no user
Treat the screen gently. To clean fingerprints or du
abrasive cloth such as a camera lens cloth.
serviceable parts inside.
st from the screen, we recommend
Wi-Fi
Q: Do I need a Wi-
A: No. The Wi-
•
•
•
•
•
voids your warranty.
•
• Clean your Device
•
using a soft, non-
-in to the device.
the device.
-
18

TAB
INSTRUKCJA OBSŁUGI
ODWIEDŹ Ą Ę
WWW.GOCLEVER.COM
ABY ZOBACZYĆ WIĘ
skorzystaniem z urzą ę ą ą
oraz zachowaj ją ść
A93
-T
Przed
19

Spis Treści
Zarządzanie i ładowanie baterii
Uruchamianie i wyłącz
Dolny pasek interfejsu
i daty
Ustawienia wyświetlania
Połączenia bezprzewodowe
Instalacja i deinstalacja aplikacji
Rejestrator dźwięków
Najczęściej zadawane pytania (FAQ)
Ważne zasady dotyczące bezpieczeń
Polski –
Wprowadzenie
Szybki Start
Połączenie z PC
Interfejs
Ekran Home
Pulpit
Podstawowe funkcje
Ustawienia czasu
Przeglądarka
Odtwarzacz wideo
Przeglądarka zdjęć
Aparat
Market
anie urządzenia
20
20
20
20
22
23
23
23
24
24
24
25
26
27
28
28
29
30
30
31
32
33
20

Cortex A8 1.
" 800 * 480 TFT LCD
Aparat: Wbudowany 0.3MP
System operacyjny: Google Android 4.0
Połączenie sieciowe: Wbudowany moduł bezprzewodowy 802.11b/g/n
WMA,MP2,OGG,AAC,M4A ,FLAC,
Format plików wideo: max 1080p full HD wideo, AVI,
MKV
Ekran Dotykowy: Pojemnoś
Język: Obsługa wielu ję
Porty: microUSB OTG, Wyjś
Przycisk
APE, WAV
3GP, MP4, MPG, RM, RMVB,
Port ładowania, Mikrofon
–
Wprowadzenie
• CPU: Allwinner A13
• Ekran LCD: 9
•
•
•
• Format plików audio:
•
MOV, FLV, WMV,
•
•
•
• Przyciski: Wstecz/
0GHz GPU Mali400
Multi-touch 5-punktowy
słuchawkowe, micorSD,
Zasilania/Reset/Głośność +/Głośność
21

Zarządzanie i ładowanie baterii
Przed użyciem urządzenia, naładuj w pełni baterię
urządzeniu, aby rozpocząć ładowanie.
Urządzenie korzysta z wbudowanej baterii
tylko i wyłącznie oryginalnej ładowarki.
Podczas ładowania ikona stanu baterii bę ę ć
Gdy ładowanie dobiegnie koń ę ę
Jeżeli nie korzystasz z urzą
przynajmniej raz w miesią ż
Kiedy urządzenie wyłączy się
baterii, podłącz ładowarkę ż ą ę
systemu. W międzyczasie na ekranie powinna pojawić ę
lub niskim poziomie baterii.
Wbudowana bakteria polimerowa powinna być
produktu nie obejmuje uszkodzeń
Uruchamianie i wyłączanie urzą
Wciśnij i przytrzymaj przycisk zasilania. System zainicjuje
Podłącz kabel zasilający do gniazda w
polimerowej. Wskazane jest uż
dzenia przez długi czas, staraj się doładowywać ę
gotowe to uruchomienia
admiernego zużycia baterii.
proces
Szybki Start
Wskazówki
•
•
•
przesuwać.
•
•
baterii
•
Uruchamianie:
Ekran ładowania systemu:
bootowania.
22

System uruchomi podstawowy ekran:
Wciśnij przycisk
wyłączenia zasilania na ekranie, aby wyłą ć ą
ki interfejsowi microUSB OTG
osobistym za pomocą kabla USB
jak pokazano na obrazku poniż ą
Połączenie USB,
zasilania, aby przywołać okno wyboru akcji. Kliknij przycisk
możesz z łatwością połączyć urządzenie z komputerem
poprawnym połączeniu urządzenia z PC ujrzysz okno
Wyłączanie:
Połączenie z PC
Dzię
,
. Po
Kliknij przycisk
aby kontynuować
23

Włącz urządzenie magazynują
urządzeniem a komputerem osobistym.
Urządzenie obsługuję
Widoczna podczas połą
Widoczna tylko pod
Wyświetla aktualną ę
Wyświetla poziom naładowania baterii, informuje o procesie
wirtualne przyciski
, aby przywołać
plików pomię
(dla urządzeń takich jak pe
Kliknij
Uwaga:
czy karta pamięci)
Interfejs
Dolny pasek interfejsu
A. Ikona statusu sieci Wi-Fi:
B. Ikona połączenia USB:
C. Czas systemowy:
, aby uruchomić transfer
T32/NTFS
łącz połączenia z PC
ndrive
siecią Wi-Fi
D. Ikona stanu baterii:
ładowania.
E. Home, Wstecz,
Ekran Home
Wciśnij ikonę home
główny:
24

Użytkownik może dostosować ę ń
Szybki dostę
Szybki dostę ń ą
bezprzewodowe, ustawienia czasu i daty itd.
Ekranu głównego nie można przełą ć ą
zostać przeniesione za pomocą ść
Podstawowe funkcje
ustawień w menu
.
sieci
Ikony na pulpicie mogą
.
Tapeta:
Zarządzanie aplikacjami:
Ustawienia Systemowe:
Pulpit
Kliknij ikonę
jak
.
aplikacji, aby otworzyć menu ustawień:
25

Wybierz dany element z listy, aby przejść ń ś
, aby przejść ń
W tym menu możesz ustawić datę
Dla przykładu możesz wybrać nastę ą
strefę czasową, czas, format wyświetlania godziny i daty
czasu i daty)
Ustawienia czasu i daty
Kliknij opcję Data i Czas
oraz inne.
26

‘ odejmuje jednostkę
Aby ustawić datę i godzinę moż ż ąć ć
Kliknij Ustaw, aby zakończyć i zapisać
aby przywołać
ustawić jasność podświetlenia ekranu.
w którym za pomocą suwaka moż
‘+’ dodaje jednostkę, ’ –
Ustawienia wyświetlania
Kliknij przycisk Wyświetlacz,
bezpośrednio.
,
27

, aby ustawić
wstrzymania. Podczas hibernacji wciś ć
funkcjonowanie urządzenia. Aby odblokować ę ś
j ikonę ustawień w menu głównym, a nastę
Kliknij przycisk włą
wyszukiwanie dostępnych sieci.
wymagają ą
czas po jakim urządzenie przejdzie w tryb
Fi, aby rozpocząć
Kliknij na nazwę dostępnej sieci, aby rozpocząć
Kliknij przycisk Hibernacji
informacjami.
Połączenia bezprzewodowe
Klikni
bezprzewodowych.
konfigurację. Niektóre sieci
-
28

Instalacja i deinstalacja aplikacji
W ustawieniach zabezpieczeń
Skopiuj oprogramowanie instalatora APK na kratę
Kliknij instalator APK, aby wskazać ś ż ę
Możesz instalować aplikacje bezpoś ą ę
lub poprzez wbudowany instalator aplikacji
włącz możliwość instalacji aplikacji z nieznanych ź
nand flash
aplikacje,
Instalacja aplikacji
1.
2.
3.
online.
pamięci lub
Wybierz
.
aby zainstalować.
29

Aplikacje
Podczas połączenia z siecią uruchom przeglą ę
adres w pole wyszukiwania na e
Urządzenie obsługuje standard
Kliknij ikonę wideo.
multimedialnych z urządzenia magazynują
Kliknij ikonę muzyki, aby przejść
i wybierz aplikację, którą zamierzasz usunąć
res URL. Moż ż ć
kranie głównym, aby szybko otworzyć daną ę
umożliwiający odtwarzanie wideo w
Odtwarzacz umożliwia automatyczne wykrywanie
Deinstalacja aplikacji
Kliknij na Ustawienia –
Przeglądarka
– Pobrane
d
Odtwarzacz wideo
Wideo online:
sieci oraz Adobe Flash.
Własne wideo:
Odtwarzacz muzyki
ujrzysz okno odtwarzania:
HTML5
plików
30

Poprzedni utwór, przytrzymaj, aby przewinąć
Pauza
Nastę
Wyś ę
Włą
Włą ę
Uruchom odtwarzanie
Kliknij przycisk galerii, aby wejść ą ę ęć ą
uruchomi galerię ęć
Przeglądarka zdjęć
znajdujących się w pamięci:
utwór, przytrzymaj, aby przewinąć
31

Wybierz obraz, aby wyświetlić go w trybie pełnoekranowym. Moż ć
wyświetlania za pomocą przycisków lupy
Kliknij przycisk aparatu w menu głównym
migawki, aby wykonać ę
.
Aparat
Kliknij przycisk
32

Kliknij ikonę rejestratora dźwię ć ę
aby rozpocząć
Nagrany plik znajdziesz w folderze za
Jeżeli nie posiadasz konta Google, bę ć
pomocą przeglą
Rejestrator dźwięków
Wybierz przycisk Nagrywaj,
zakończyć nagrywanie.
Market
Kliknij ikonę marketu.
korzystać z marketu.
. Wybierz przycisk
Stop, aby
33

Najczęściej zadawane pytania (FAQ)
Jaką wersję Androida posiada moje urzą
cronym
APK?
Aplikacje możesz pobrać za pomocą ą
używać moich osobistych a
Urządzenie obsługuje standard POP3 i SMTP
pozwalają na korzystanie z nich na Twoim urzą ź
ane standardy.
Jakie karty pamięci są kompatybilne z moim urzą
Jakie formaty plików muzycznych mogę ć ą
WMA,MP2,OGG,AAC,M4A,FLAC,APE, WAV
graficznych
PNG.
wideo
,
Czy mogę oglądać wideo z serwisu YouTube
Uruchom aplikację YouTube, aby uzyskać ę
roida
resów Email, aby odbierać i wysyłać ę
Niektóre darmowe skrzynki pocztowe nie
(max 1080p full HD
Android
Q:
A: 4.0
APK
Q: Co to jest APK?
A: APK (Android Package A
Q: Gdzie mogę znaleźć
A:
komputer osobisty
Email
Q: Czy mogę
A:
pocztowa obsługuje d
Q:
?
) to plik instalacyjny aplikacji dla And
d
.
?
?
A: Karty microSD.
Muzyka
Q:
A:
Zdjęcia
Q: Jakie formaty plików
A: JPG, JPEG, BMP , JPG i
Wideo
Q: Jakie formaty plików
A: AVI,3GP,MP4,MPG
wideo)
Q:
A: Tak.
?
mogę odtwarzać na urządzeniu?
mogę odtwarzać na urządzeniu?
RM,RMVB,MOV,FLV,WMV,MKV
?
34

Czy potrzebuję adaptera Wi
Nie. Urządzenie posiada wbudowany moduł Wi
Ważne zasady dotyczą ń
poniż ą
sposobem zmniejszysz ryzyko wystą ż ż ą
Urządzenie nie może mieć ą ą
Trzymaj urządzenie z dala od ź ń
działaniem promieni słonecznych
Podłączając ładowarkę ć ę
, w których poruszają ę
Używaj tylko i wyłącznie oryginalnej ładowarki dołą ż
ych parametrach moż ć
zkręcaj urządzenia.
Dbaj o czystość urządzenia
Dbaj o ekran urządzenia. Aby usunąć ż ę
nieporowatej szmatki. Do tego celu nadaje się
obiektywu aparatu.
d bezpoś
Wi-Fi
Q:
A:
• Zawsze kieruj się
skaleczenia się.
•
•
•
miejscach
•
ładowarki o inn
• Nie ro
•
•
-Fi, aby połączyć się z internetem?
-Fi.
. Tym
.
cie
.
lub
35

1. GOCLEVER SP. Z O.O. z siedzibą
Gwarantem zapewnia, że urządzenie marki GOCLEVER, jest wolne od wad konstrukcyjnych i
materiałowych, które mogłyby naruszyć ść
obsługi dostarczona przy zawarciu umowy.
2. Gwarancja obowiązuje wyłącznie na terytorium Polski.
3. Gwarant bezpłatnie usunie ewentualną ść ą
niniejszej gwarancji pod warunkiem przedstawienia wypełnionej w dniu zakupu karty gwarancyjnej
wraz z kopią dowodu zakupu. Dokonywanie zmian i skreś ń
nieupoważnione powoduje utratę uprawnień ą
4. Okres gwarancji na urządzenia GOCLEVER wynosi 12 miesią ą ż ę
jednak nie dłużej niż 15 miesięcy od daty produkcji umieszc
5. Tryb przyjmowania produktów uszkodzonych w systemie DOOR to DOOR przysługuje nabywcy w
terminie 12 miesięcy od daty zakupu, jednak nie dłuż ż ę
przekroczeniu tych terminów uż
serwisowego na własny koszt po wcześ ą
reklamacyjną. Natomiast koszt przesyłki do klienta po naprawie pokrywa Gwarant.
6. Okres gwarancji na akcesoria dołą ą
daty sprzedaży z wyłączeniem uszkodzeń
7. Wady ujawnione w okresie gwarancji bę ą ż
przekraczającym 21 dni roboczych od przyję ą ś
sprowadzenia części zamiennych z zagranicy, termin powyż ż
8. Reklamujący zobowiązany jest zgłosić ę
061 ) 84 88 767. W Przypadku nie zgłoszenia usterki i wysłania jej do gwaranta bez uzyskania numeru
yłka nie zostanie przyję
9. Usterka musi być zgłoszona do serwisu nie póź ż
10. Nabywca zobowiązany jest dostarczyć
akcesoriami. Odpowiedzialność za uszkod
11. Sprzęt nie odebrany z serwisu w cią ę ń
12. W przypadku nieuzasadnionej reklamacji (reklamacji sprawnego urzą
powstało z winy klienta) zgłaszają ę ąż
1. jakiegokolwiek używania sprzę ą
2. roszczeń z tytułu parametrów
producenta w instrukcji obsługi lub innych dokumentach o charakterze normatywnym;
3. uszkodzeń powstałych z przyczyn zewnę ń
, zanieczyszczeń ń ęć
4. wadliwego działania nieautoryzowanego oprogramowania zainstalowanego na urzą
15. W przypadku, gdy naprawa gwarancyjna wymaga wymiany częś
własnością Gwaranta. Części użyte d
16. Nabywca traci prawa gwarancyjne w przypadku zerwania plomb gwarancyjnych, tabliczki
znamionowej z numerem seryjnym lub stwierdzenia przez serwis producenta dokonywania
nieautoryzowanych napraw lub zmian systemowy bą ź ą
17. Gwarant może uchylić się od dotrzymania terminowoś ż ą
nieprzewidziane okoliczności o charakterze siły wyż ę ż
069 ) przy ul. Przemysłowej 18 zwany dalej
rancyjnej przez osoby
esłać uszkodzone urzą
zenia (np. pilot, kable itp.) wynosi 1 miesią
ulec przedłuż
zenia wynikające z użycia opakowania zastę
technicznych urządzenia, o ile są one zgodne z podanymi przez
o wymiany mogą być innej marki o parametrach technicznych co
Warunki gwarancji
-
na była instrukcja
zonej na Produkcie.
dni.
reklamacyjnego przes
nabywca.
serwisu.
transportu.
14. Gwarancja nie obejmuje:
-to-door )
kodzenie
atmosferycznych
najmniej równoważnych.
itp.
iepokoje społeczne
36

18. Gwarant nie odpowiada za szkody i straty powstałe w wyniku niemoż ś
urządzenia będącego w naprawie.
19. Uprawnienia z tytułu gwarancji nie obejmują ą ę
w związku z wadami urzą
20. Gwarant nie odpowiada za szkody powstałe w wyniku utraty danych na noś
21. Stosunek prawny pomiędzy nabywcą ą ą
postanowieniami niniejszej gwarancji. Da
że wynikają one z bezwzględnie obowią ą
22. Gwarancja niniejsza ma charakter uzupełniają ń
przysługujących wobec sprzedawcy. Gwarancja nie wyłą
uprawnień nabywcy wynikających z niezgodnoś ą
Najszybszą metodą rozwiązywania wielu problemów jest kontakt przez zgłoszenie serwisowe
www.AUTORMA.GOCLEVER.com
Centralny Serwis Klienta
od poniedziałku do pią
Czechy
BOUNCER S.R.O.
SLAVONICKA 324
67531 Jemnice, Czech Republic
servis@goclever.cz
Ukraina
Service Center "KROK
ul. Geroev Dnepra 2A
04212, Kiev, Ukraine
504
ttc.com
Rumunia
S.C. Cordon Electronics S.R.L.
Str. Spataru Preda nr. 12, sector 5
Bucuresti, Romania
+40 372324762, +40 213009905,
+40 721909190, +40 740209932
office@cordongroup.ro
www.cordongroup.ro
lej idące roszczenia odszkodowawcze są ą
za, nie ogranicza ani nie zawiesza
16:30
Serbia
ET Servis d.o.o. Beograd
Member of Logo d.o.o.
Group Bulevar kralja Aleksandra 261
11000 Beograd. Srbija
+381 11 2042 109,+381 11 2042 101
www.etservis.rs
servis@etseivis.rs
Chorwacja
PlayCom
Ulica grada Vukovara 249,10000 Zagreb
+385 01 5618 433,+385 01 6184 115,
+385 01 6184 115
Skype : PlayCom
info@play.com.hr
www.playcom.hr
Słowenia
d.o.o.,
Litostrojska cesta 44f, Ljubljana
servis@toptime.s
i tel: +386 1 600 50 20
www.toptime.si
utraconych korzyści
magnetycznych.
pod adresem:
Funkcjonuje
tel. (061) 84 88 767.
Goclever Spo. z o.o.
ul. Przemysłowa 18
62-069 Zakrzewo, Polska
serwis@goclever.pl
Serwisy partnerskie:
–
+380 800 504
info@krok-
-TTC"
- HR
TopTime
37
 Loading...