

Page 1

GoClever TAB A73
USER’S MANUAL
INSTRUKCJA OBSŁUGI
www.goclever.com
Page 2

Declaration of Conformity
Hereby GOCLEVER Technology declares that the product
complies with the essential requirements and other
provisions of Directive 199/5/WE.
Environmental Protection
The device is subject to the WEEE Directive 2002/96/EC.
The symbol next to mean that the product must be
disposed of separately and should be shipped to the
appropriate collector. This allows you to limit pollution and
the impact on human health.
Also like to inform that our company has the obligations
under the Act on waste electronic equipment, including in
his collection, treatment, recovery and recycling is
supported by KARAT ELECTRO-RECYCLING Ltd. If you
have any questions or concerns you can contact Karat call
056-623-80-91.
Responsibility
GOCLEVER Technology Company nor any of its licensors
shall not be liable for any loss of data or profits, as well as
for any other consequential or indirect damages resulting
from the use of equipment brand, in any case and the
maximum permitted by law. GOCLEVER Technology is
not responsible for any problems related to the
malfunctioning of the operating system and applications
2
Page 3

operating under its control.
Changes
GOCLEVER Technology reserves the right to revise this
document and the specifications of the device, without
notice to you. These features and images may vary
depending on the services offered by the operator and
software version of the device.
Before using
Remember that the battery is not charged. Opening or
attempt to disassemble the outer casing of the device will
void the warranty.
Google is a registered trademark, and Google Maps is a
trademark of Google Inc.. in the United States and other
countries. YouTube is a trademark of Google Inc..
GOCLEVER Technology Company is not liable for
technical or editorial errors or for omissions contained
herein is not responsible for incidental or consequential
damages resulting from furnishing this material.
Information is presented in such a state in which you adopt
them, and are not covered by any warranty. Subject to
change without notice. GOCLEVER Technology Company
reserves the right to change the contents of this document
without prior notice. The manual describes basic functions
of the device.
3
Page 4

Security
Please refer to these guidelines. Failure to comply with
them may cause danger to life or health or may be illegal.
For further information, please read the entire manual.
Device was designed to operate from battery and mains
supply with the charger. Using the device in a different way
can be dangerous and will void the warranty.
Charging Battery
The unit should be connected only to a power source in
accordance with the parameters set out in the
specification. In case of doubt as to the type of power
source required, consult an authorized service provider or
local power company. If the product is powered from a
battery or other sources, follow the instructions supplied
with the product.
The impact of external factors and the electromagnetic
field
The device is not waterproof. Make sure that it was always
dry, protect from moisture. The device also must be
protected against high and low temperatures, dust, sand,
do not expose it to shock, throw, as this may damage it or
its components.
4
Page 5

Do not use the device in a damp and very high
•
or low temperatures.
Do not leave the device in the vehicle or in
•
places where temperatures exceed 50
degrees Celsius.
Do not use the equipment on board aircraft
•
and in areas where it is not allowed to use
equipment that may emit an electromagnetic
field for example a hospital, petrol station, a
warehouse of explosives violations of these
rules may result in fire or explosion.
Do not use the device while driving.
•
Do not use the device near strong
•
electromagnetic sources, such as microwave
ovens, sound speakers, TV and radio.
Use only original manufacturer-approved
•
accessories, or accessories that do not
contain metals.
Service and Repair
For repair use the authorized service and
qualified staff, any attempt to repair yourself,
or by unauthorized service will void the
warranty.
•
The tablet is non-water-proof.
5
Page 6

Content
Important Notice………………………………………2
Main functions…………………………………………8
Tablet description……………………………………9
1. Quick Start………………………………………11
1-1.Boot up/shut down………………………………11
1-2. How to improve the speed……………………12
1-3. Charging…………………………………………12
1-4.Connected to computer and data transfer…13
1-5.how to use touch panel…………………………13
1-6. G-sensor…………………………………………14
1-7. Introduction of main interface……………14
1-8.Additional functions……………………………17
1-9.Apk installing……………………………………18
1-10.Word type-in……………………………………19
1-11.OTG function……………………………………21
2. Internet…………………………………………21
2-1. Internet setting………………………………21
2-2. Browser ……………………………………………..23
2-3. Mail………… …… ………………………… 25
6
Page 7

2-4. I MS…… ……… ………… ……… ………… 26
3. Multimedia………… …………………………26
3-1. Music…………………………………………26
3-2. Video…………………………………………27
3-3. Recorder…………………………………………29
3-4. Camera……………………………………………29
4. S et ti n g… … …… … … … …… …… …… … … 3 0
5. Trouble shooting…………………………………32
6. Specification………………………………………34
Main funcitons
7
Page 8

●7” HD TFT capacitive screen 800*480.
●Support HDMI 2160P and 3D video.
●Support OTG to transfer data from USB flash drive,
mobile HDD via USB cable.
●Support Wi-Fi and other kinds of methods to connect
Internet.
●G-sensor to support the screen change from different
directions.
●Support vibration.
●Smart Google Android OS
●Numerous applications are available on the Android
market.
●The tablet can meet your requirements of business
and entertainment.
●Support MP3, M4A, WMA, APE, FLAC, AAC, MID,
WAV, AMR, OGG and other audio formats.
●Full HD video decoding (2160P, 1080P, 720P, 480P),
MKV, AVI, RM/RMVB, WMV, 3GP, MOV, MP4, ASF, MPG,
DAT, VOB, FLV and so on.
●Support pictures in JPG, JPEG, BMP, PNG and so on.
8
Page 9
●Support MicroSD (TF) card from 128MB to 32GB.
●Support personal setting to adjust the brightness,
booting up/shutting down volume, change wall paper and
so on.
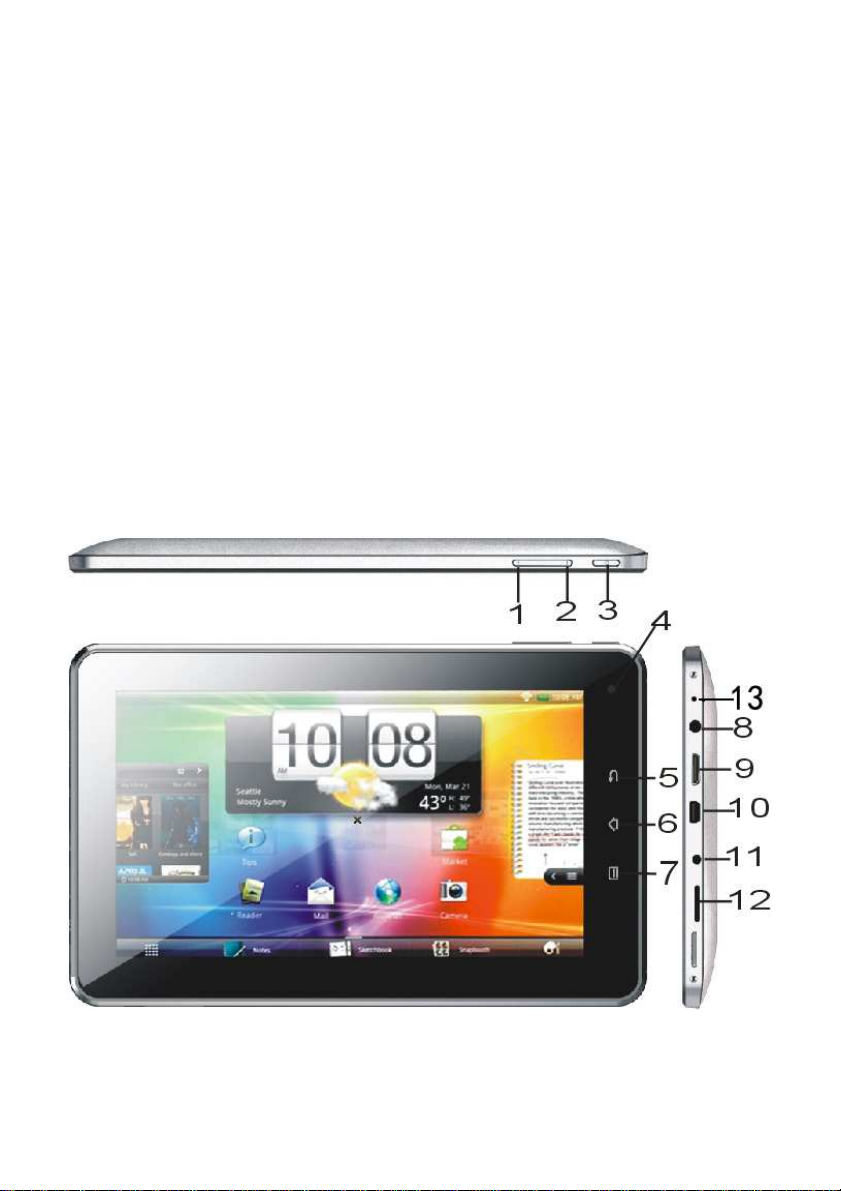
Outlook and buttons:
Front:
9
Page 10
Function definition:
1.“ ”:Volume +
2.“ ”:Volume -
3.“ ”: Power. When the tablet is working, press the
button for a bit long time, then there comes out the
window of shutting down options; press the button for a
short time, the screen and other function buttons will be
locked.
4.Front camera(optional);
5.“ ”:Back. Press the button to make the tablet go
back to last step.
6.“ ”:Home,Tap the button to go to the Home interface
from any interface, tap it for a long time to go to the
window of recently running applications.
7.“ ”:Menu. Press it to open the menu of the present
interface, it has the same function as “ ”; press it for a
short time to unlock the screen when the tablet is locked.
8. Earphone port;
9. HDMI port;
10. USB port;
11. DC charging port;
12 .TF slot;
13 . MIC hole
10
Page 11
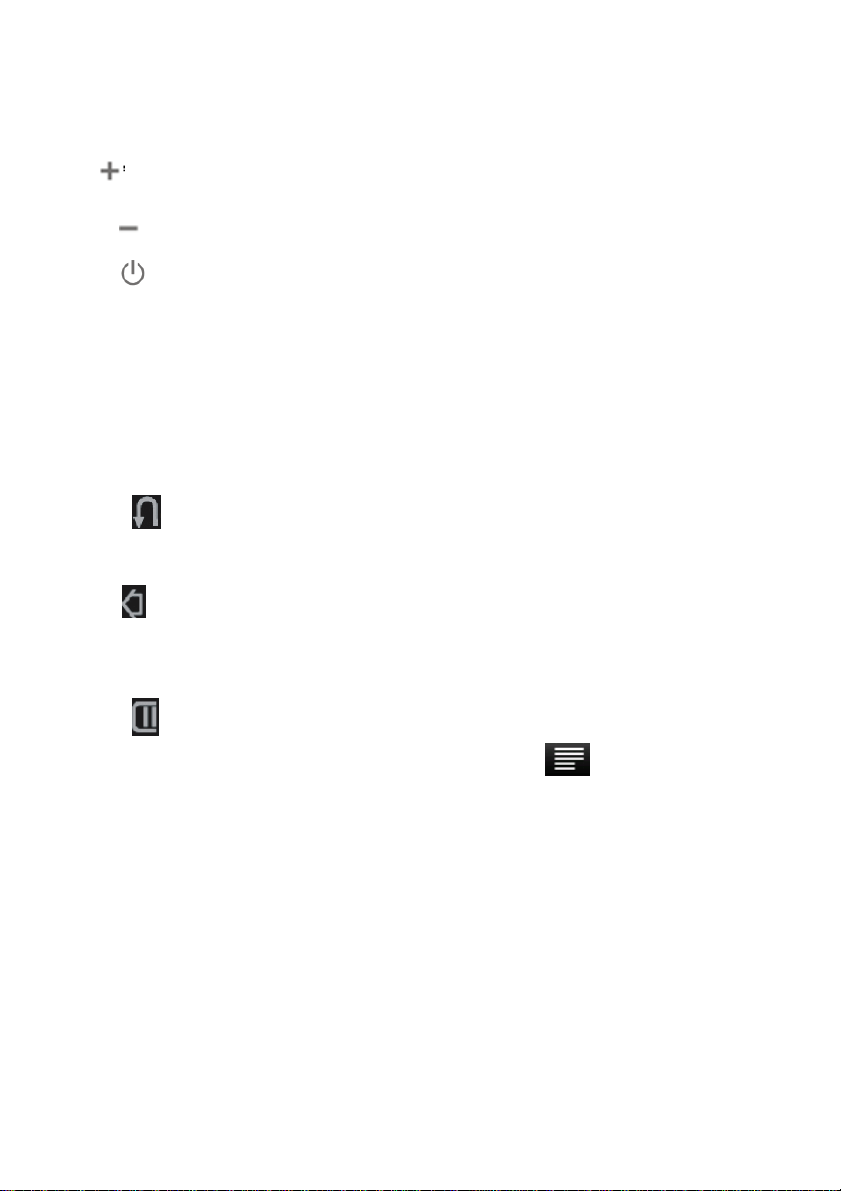
1. Quick Start
1-1....Boot up/Shut down and Unlock: When the device
is shut down, press “ ”for 3 seconds, then the tablet will
boot up. When LCD screen is locked, it may take 100
seconds to go to the system Home interface, click “ ”or
slide up, the screen will automatically unlock, as
following picture shows:
Energy-saving mode and locked mode: when device is in
the status of energy-saving mode and locked mode,
press“ ”to wake up the screen and the system will go to
the locked mode in one second, slide
Remark: in the energy-saving mode, the tablet will keep
on working, and the LCD screen will be black.
up to unlock.
11
Page 12

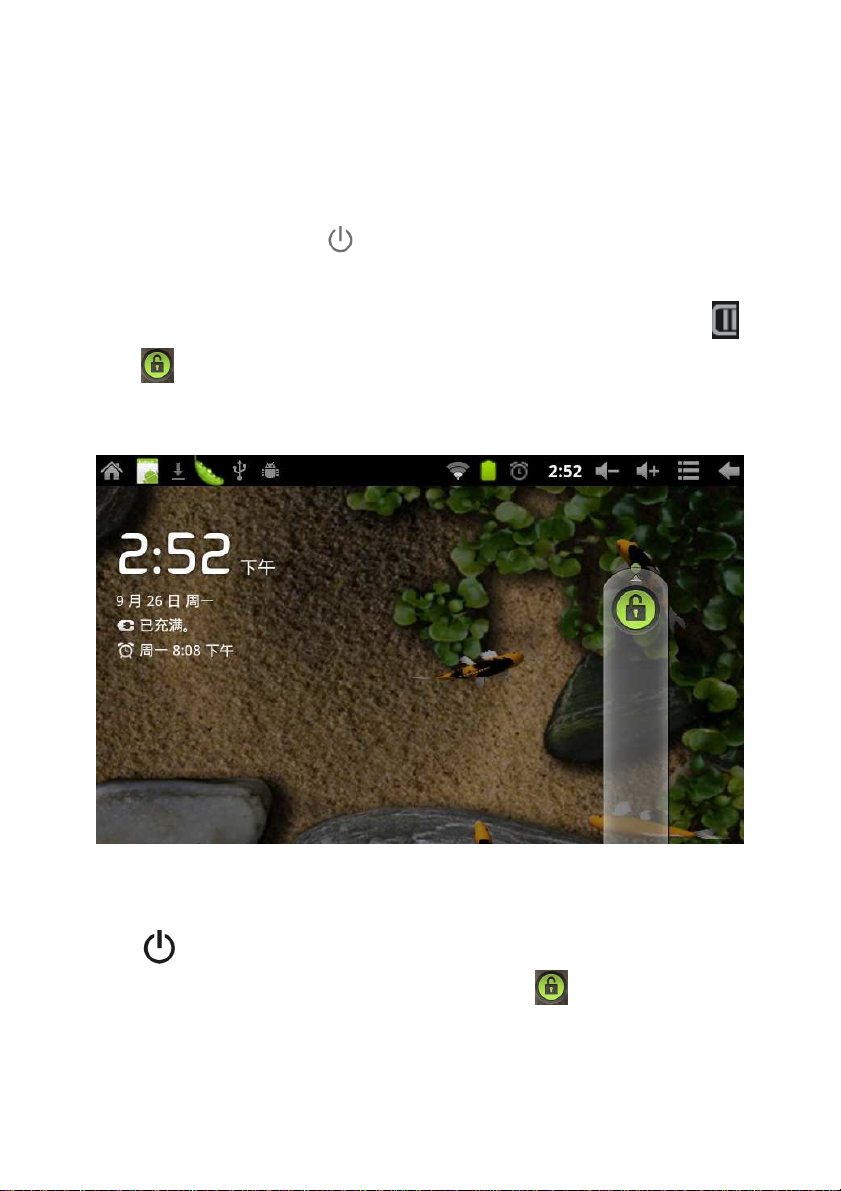
Shut down: when the tablet is working, press “ ”for 5
seconds, there will come out a window with power off
option, select Power off, the device will shut down. Click
“ ”to cancel the shutting down.
Remark: When the battery is low, the tablet will give
warning message and will automatically shut down if not
connected to power adaptor for charging. Please the
check the battery if the tablet cannot boot up.
1-2....How to improve the speed
After the tablet is working for a while, the
applications are closed from the screen, but the system
still keeps the applications running, then the whole tablet
will be slow to response. Please go the setting to stop the
running applications.
1-3....Charging
Charge the tablet with correct power adaptor. When being
charged, there is a bolt icon in the battery status; the
charging finishes, the battery icon will be full.
It is normal that the power adaptor and the device will be a
bit warm when being charged.
12
Page 13
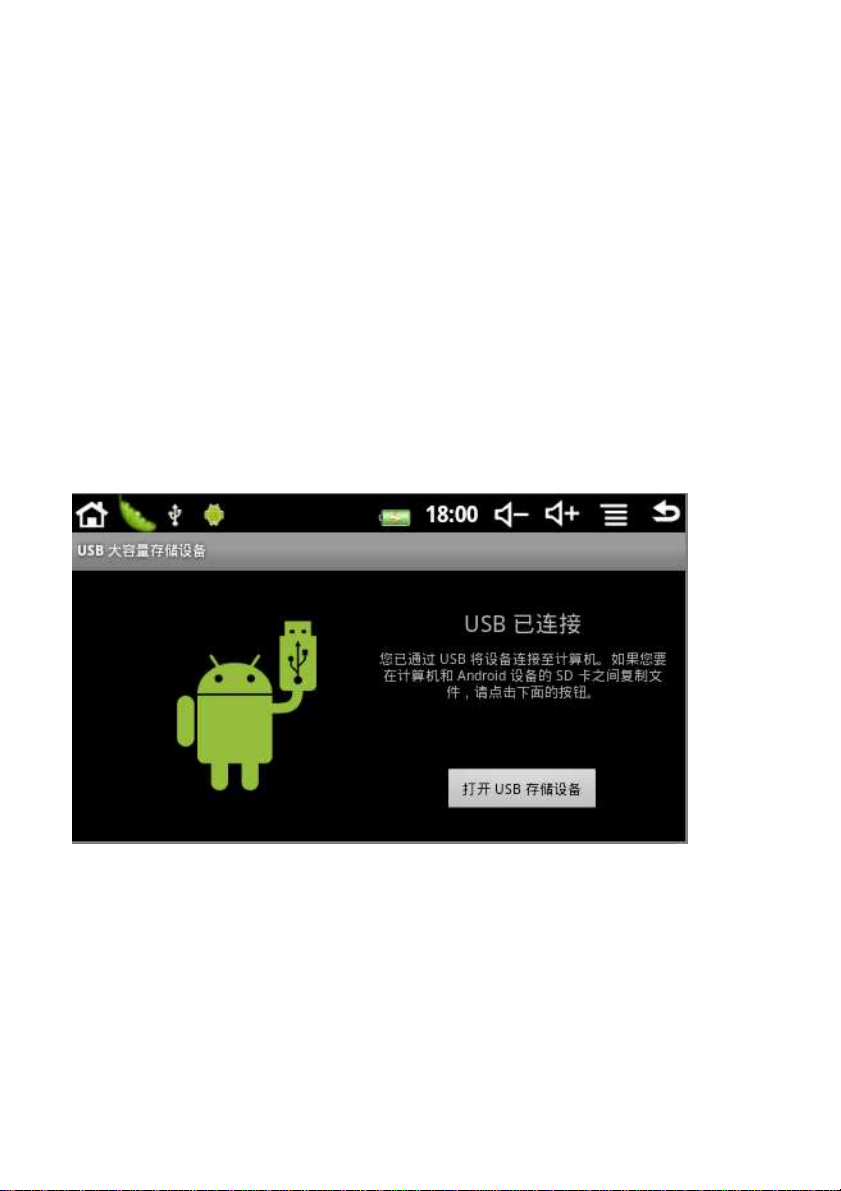
1-4....Connected to computer and data transfer
When connected to computer, the status bar in the top will
show that USB is connected. It is default the the tablet is
being charged when connected to computer. If you want
to connect to mobile HDD, please drag the status bar
down and there comes out the option of “USB connected”,
click the “turn on USB storage”, then the USB storage will
be shown in the computer. Click “Turn off the USB
storage”, the tablet will go back to the charging mode. As
picture shows:
1-5....how to use touch panel
You can browse the main screen, manage applications,
and control the tablet by tapping the touch the panel.
1-5-1.tap and select
13
Page 14

Just tap the screen when you want to type words via the
keyboard and select the applications.
1-5-2.Press
If you want to open the option list, just press the address
bar for a few seconds. Pressing a shortcut icon for a few
second can drag it to the main home screen.
1-5-3.Quick slide or slide
Quick slide or slide means to slide vertically or
horizontally with finger on the screen.
1-5-4.Drag
Before you drag the icon, please press it hard until the
icon is dragged to anywhere you like.
1-6....G-Sensor
The tablet has built-in G-Sensor. When the G-Sensor is
set to be on, the screen will turn 90°as the tablet is turned
90°around.
1-7....Introduction of main interface
When you press the power button for 5 seconds, the
tablet starts up, but the screen is locked, slide to unlock
icon up to unlock the screen to go to the main interface,
where you can check the status, change wall paper, add
small widgets, add apk shortcuts, start an application and
14
Page 15
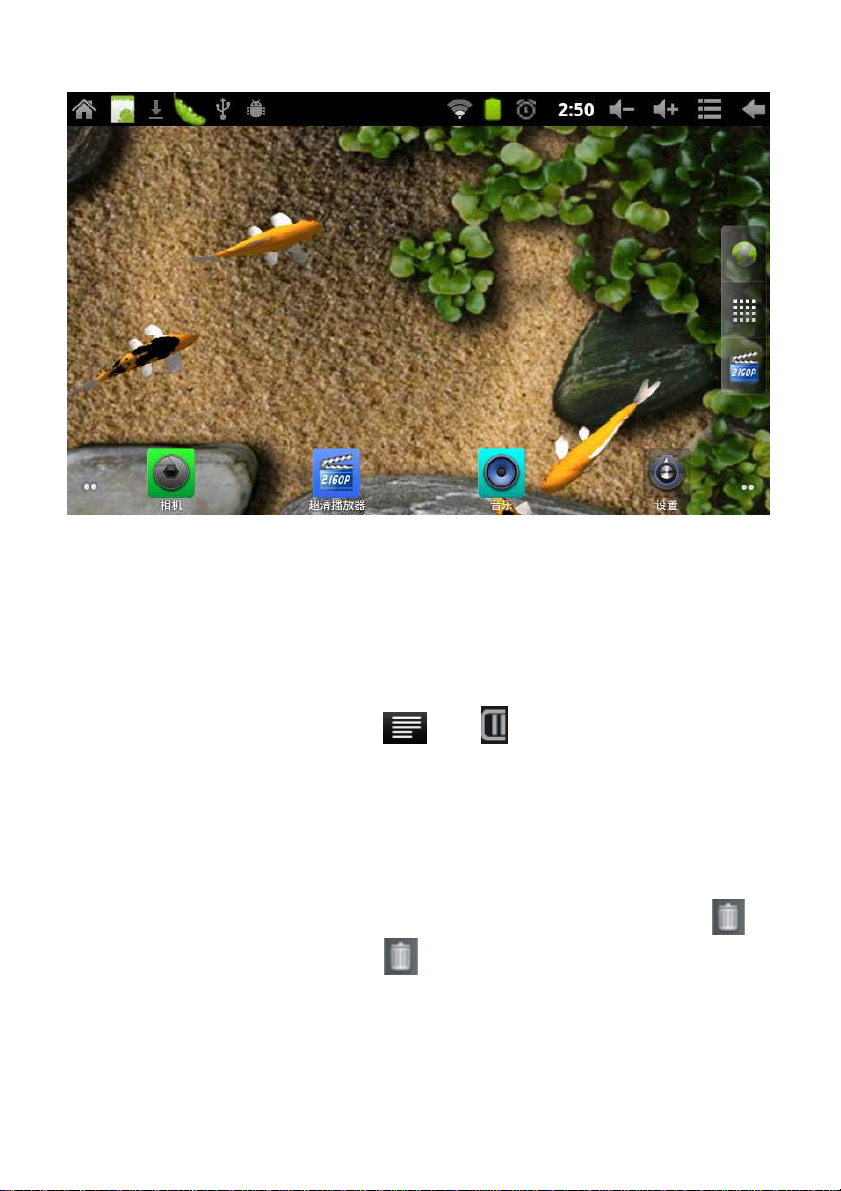
so on.
1-7-1.Status bar: Drag down the status bar to check
the notice and date information.
1-7-2.Volume: tap “-”“+”to tune the volume.
1-7-3.Menu: tap the or “ ”to open the menu.
●Add: this helps to add kinds of icons, widgets, files and
wall paper. You can also delete an icon from the main
interface by pressing the icon until there comes out ,
then dragging the icon to .
●Manage applications: you can check all the applications
in the device, and uninstall applications.
15
Page 16

●Wall paper: you can set any picture you prefer as the
wall paper.
●Search: you can type in the webpage address and
search.
● Notice: here you can check the system notices.
●Setting: click it to directly go to the system setting
interface.
1-7-4.Shortcut: click the button and the full function menu
will come out:
The window shows all the function icons of the tablet.
Click each one; the tablet will go the relative screen.
Following are brief introduction of the icons:
Apk installer: it helps to install new apk and manage
16
Page 17
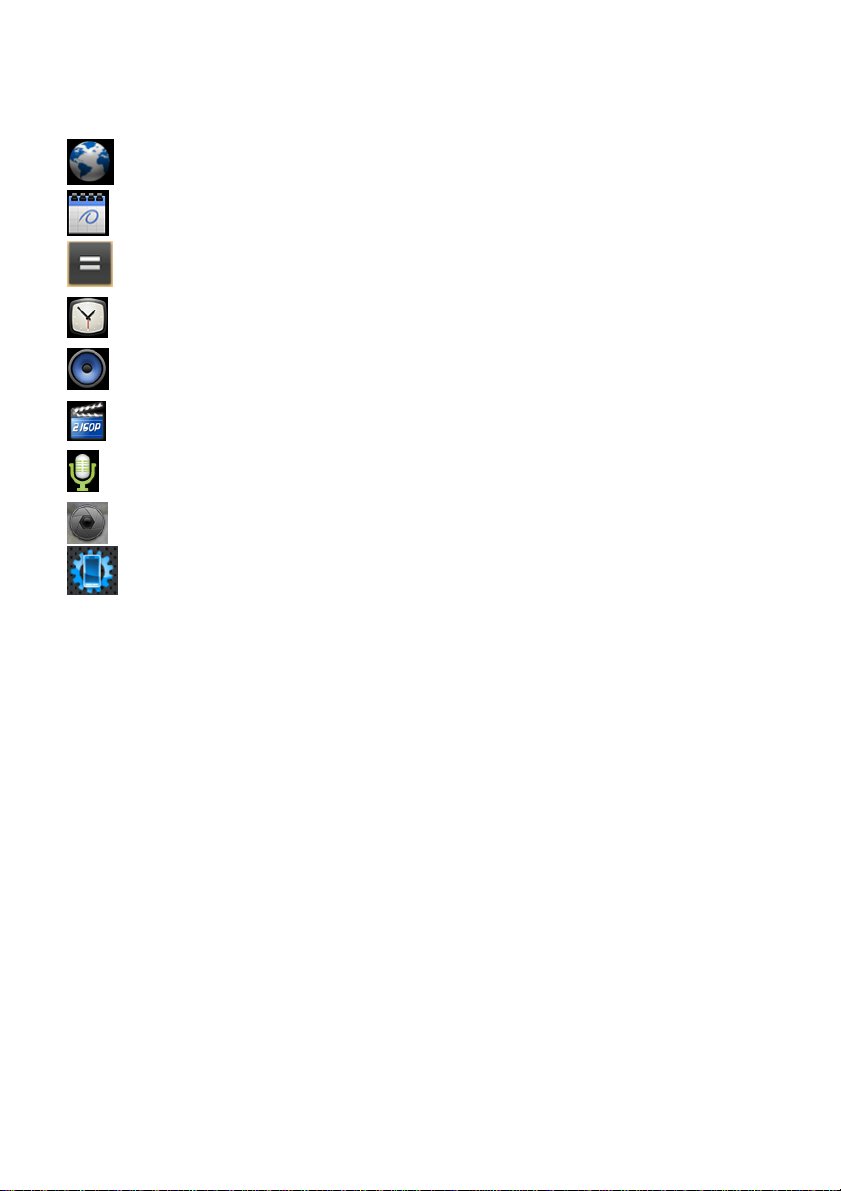
apk. Please refer to 1-9 Apk installing.
Browser: click it to browse webpage.
Calendar: check and set calendar.
Calculator
Alarm
Music player: please refer to 3-1 Music.
Video: please refer to 3-2 Video.
Sound Recorder: please refer to 3-3 Recoder.
Camera: please refer to 3-4 Camera.
Task manager: to manage and uninstall the
applications. When the tablet is slow to response, you can
use this function to stop some applications from the
system.
1-8....Additional functions
There are many small widgets in the device, tap the Menu
to select Add, then “small tools” and there comes out
following picture:
17
Page 18
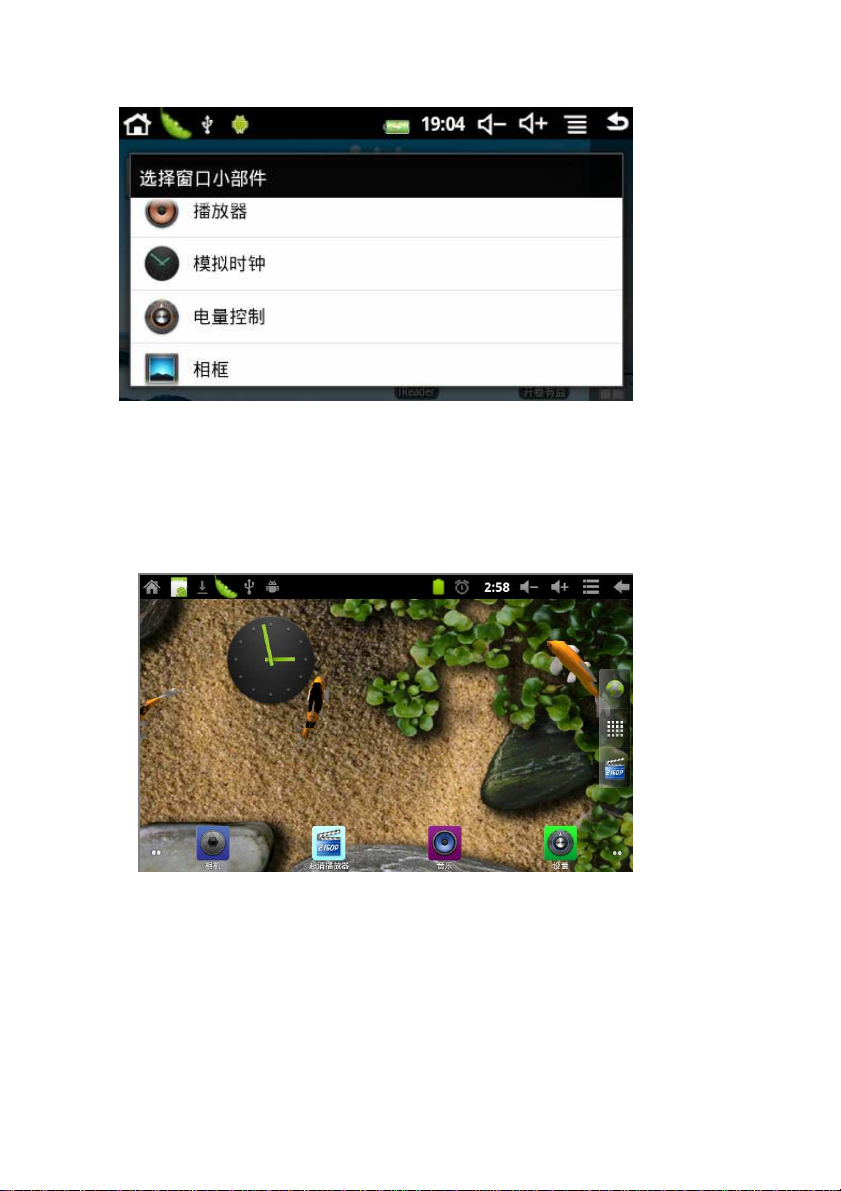
After the above widgets added, they will show up in the
home screen, for example, if the Analog Clock is added to
the small widgets, there will be the Analog Clock in the
home screen.
1-9....Apk installing
After the the 3rd party applications are downloaded from
the Android market or internet, you can install them as
you like.
18
Page 19

1-9-1.how to download the applications
Method 1: you can download the applications from
Internet, copy them to TF card, then put the card into the
tablet.
Method 2: you can download the applications from
Android Market to TF card,
1-9-2.Apk installing
Method 1: Click the shortcut in the main screen to select
“APK installer”, then select “Installer” to go to the directory
of the TF card, select the apk you want to install, then the
installing will automatically start.
Method 2: Click the short cut in the main screen, select
“ES file manager” to go to the directory of SD card, then
select the apk you want to install, then the installing will
automatically start.
1-9-3.apk uninstalling
Click the short cut in the main screen, select “APK
installer”, then select “Manager” to go to the application
list, select the apk you want to uninstall, confirm ok to
uninstall the apk.
1-10....Word type-in
When you start an apk or type in words, there will be
19
Page 20

keyboard on the screen. The keyboard has following
methods for typing in:
● Android keyboard
● Google pinyin input method
1-10-1.select type-in method
According to the setting, the Android keyboard will come
out.
1. Click the Menu in the home screen, then select
Setting.
2. Select language and keyboard.
3. The installed type-in methods will be listed in the
area of language and keyboard setting.
4. Click the box behind the type-in method you need.
1-10-2.how to use and shift the type-in method
1.In the word type-in interface, press the area of text
editing until the menu comes out, then select the “type-in
methods”
2.Select the type-in method you need.
Android keyboard
20
Page 21
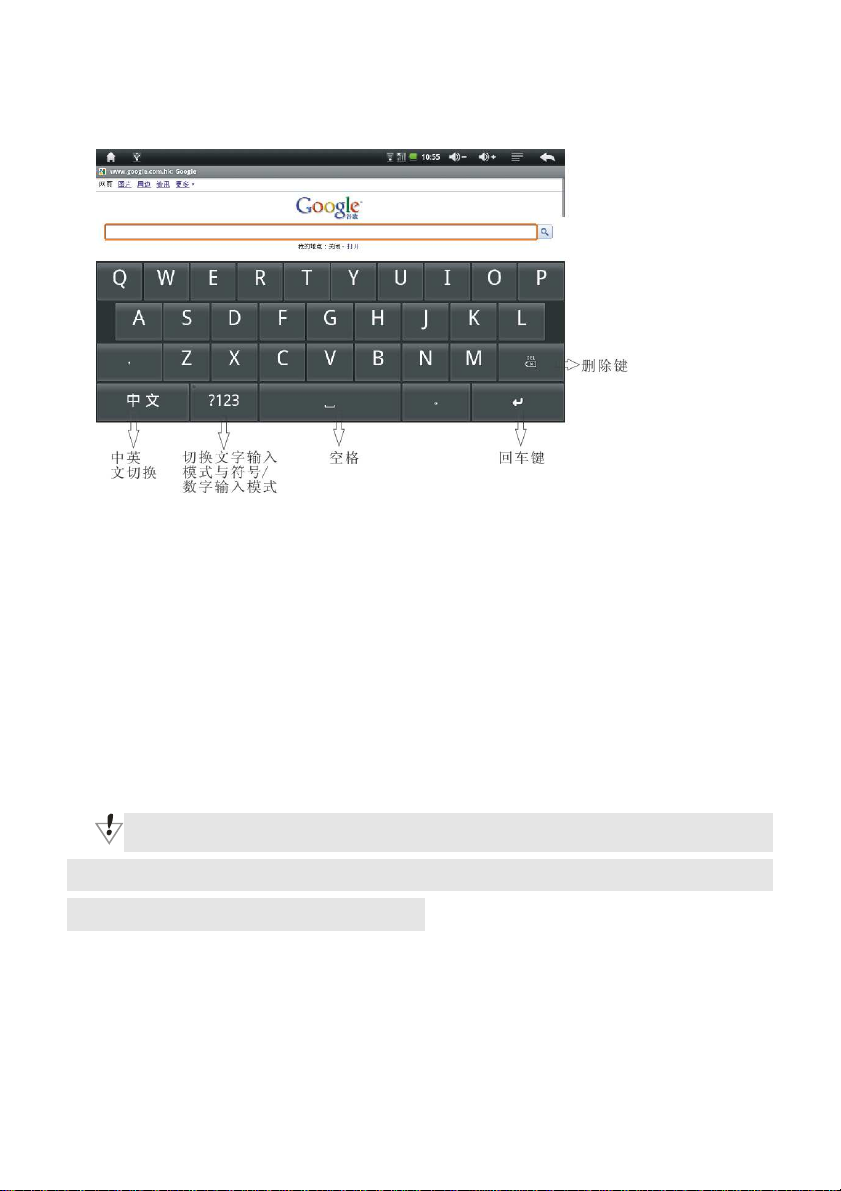
Google pinyin type-in screen
1-11....OTG
The tablet can support OTG to connect USB flash drive,
some MP3, MP4, HDD and other devices.
The tablet can detect a device when connected to it vis
OTG-USB cable.
You can browse and manage the files in the USB folder in
the directory root.
Please do not use OTG when the battery is low and
DC adaptor is not connected, otherwise the device will
shut down due to low battery.
2. Internet
2-1....Internet setting
21
Page 22

Click the shortcut in the home screen, select
“Setting—Wireless and network” to go to the internet
setting interface:
2-1-2.... WiFi connecting
In the interface of “Wireless and network”, select “WiFi
setting” to go to the WiFi setting interface and click the
box behind WiFi.
WiFi will automatically detect available accesses and list
them out. Click the WiFi access you want to connect, type
22
Page 23

in password to connect WiFi.
The tablet will consume another 1/4 more energy.
To save energy, please close WiFi if you don’t use it.
2-1-3....3G dongle connecting
The tablet can support external 3G dongle to surf Internet.
The tablet can automatically detect and connect the
proper dongle when it is plugged in.
2-2. Webpage browsing
After the network is connected, you can browse the
webpages.
Click the shortcut button in the main home screen and
select “Browser” , then click Menu to type in the web page
address. You can view other parts of the web page by
sliding your finger. There will be a button to zoom in/out
the page for convenient browsing.
23
Page 24

2-2-1....Bookmark
● Webpage bookmark
If you want to add a bookmark to the current page, click
Menu, then Bookmark to add bookmark.
● Open a bookmark
Click Menu, and then bookmark to open the webpage
which is marked.
● Edit bookmark
Click Menu, then Bookmark, press a bookmark to open
the menu. Select Edit Bookmark to edit.
2-2-2.... Open a new webpage
● Open a new webpage
Click Menu, then New page to open a new webpage.
● Shift webpages
Click Menu, then Pages to shift to the page you want to
browse.
2-2-3.... Change the browser homepage
Click Menu, then More to select Setting to set the
homepage.
2-2-4.... Set browser
Click Menu, then More to select Setting to set the
24
Page 25

browser.
2-3. Mail
The Mail apk helps to receive and send mails. The apk
has guidance to set the mail box. It supports Yahoo,
Gmail, Hotmail and other mail service.
Tips: please check you network is available and time is
correct before setting the mail box.
2-3-1.... Guidance for mail box setting
Click the Mail icon in the main home screen to start
guidance. Click Next to type in your mail ID and password,
then Next to check your mail box type is POP3 or IMAP,
then Next to check whether your mail server is available
and set the name when you use the mail box. If the mail
box is available, the inbox will be automatically opened.
25
Page 26

2-3-2.... Receive and send mails
Click Mail to go to the inbox and read new mails.
In the inbox, click Menu to select Write new mail. Then
you can write and send an email from the tablet just like
on a computer.
Tips: if you have more than one mail ID and want to send
an email from one box, just click the mail ID before you
click the Menu to write the mail.
2-3-3.... Delete mail ID
In the inbox, click Menu to select and press the Account,
then there comes out the menu list, click Delete account.
2-4. IMS
You can install some IMS applications to talk with
friends.
3. Multimedia
3-1. Music
Click the Music icon to go to the music files list:
26
Page 27

Music files are listed according to different artists.
sorted by albums
all songs
list of newly added songs
Click a song to play as follow shows:
“ / ”: Last/next song, click the progress bar to move
fast forward/fast back.
“ / ”: play/ pause
“ ”: shuffle play
“ ”: play in circle
“ ”: repeat
3-2. Video
Click the Video icon to go to the list of video files. Press a
27
Page 28

video file until there comes out a delete menu in the
bottom, click to delete the file. Select one video file to
play:
/ ”: Volume+/ “ / ”:Last/next video, click the progress bar to
move fast forward/fast back.
/ ”: play/ pause
“ ”: Back
3-2-1.HDMI output
Connect the tablet to HD TV with HDMI cable; the display
will be shifted to TV.
Tips: please do not plug in and out the HDMI cable too
frequently when the HDMI is working.
28
Page 29

3-3. Sound recorder
Click the sound recorder icon to open the interface of
sound recording:
Click “ ”to start the recording and click “ ”when
recording finishes. The file is saved as
recordingxxxxx.mp3 in the Recordings files in the
directory root. You can play them just like play music.
3-4....Camera
Click the Camera icon to take pictures.
3-4-1. Take pictures:
Click “ ”to take a picture. The pictures will be named as
date-month-date-hour-minute-second.jpg and saved in
DCIM/Camera. Click “
”to browse all the pictures.
29
Page 30

3-4-2. Record a video
Click “ ”to record a video, click “ ”to start and
“ ”to stop(if you set the time for recording, it will stop
when time is out and the video will be automatically
saved.). The videos will be named as
date-month-date-hour-minute-second.3gp and saved in
DCIM/Camera. Click “ ”to browse all the videos.
Click “ ”to go back the main home interface.
4. Setting
Click setting to open the setting menu: Wireless and
network, Sound, Display, Location and security,
Applications, Privacy, Storage, Language and keyboard,
Date and time, About device.
30
Page 31

4-1. Wireless and network: here you can set the device
connected with network, please refer to 2-1 Internet
setting
4-2. Sound: here you can set volume, tone, operation
sound and screen locked sound.
4-3. Display: auto-rotate screen, Animation, brightness,
screen timeout.
4-4. Location and security: you can set to show My
location, the picture of locked screen, whether to show the
password when you type it in.
4-5. Applications: you can set to allow the 3rd party
applications, Manage/Uninstall the applications, check
and manage the running applications.
4-6. Privacy: set to show “My location, Backup my data
and Factory reset”
4-6. Storage: to check MicroSD card or available
memory of the device, unmount SD card and format SD
card.
4-7. Language and keyboard: select language and area,
type-in method setting
4-8. Date and time: set date, time, time zone and time
showing mode.
4-9. About device: to check the status of the device and
battery, legal information, model and firmware version
31
Page 32

number.
5. Trouble shooting
1. It is slow to boot up the 1st time.
●The 1st time to boot up the tablet may take 2-3
minutes after the firmware is update or after resetting to
the factory data.
2. Cannot connect WiFi or the WiFi signal is weak.
●Please check the WiFi router is working.
●Please check the WiFi ID and password are
correct.
●Please check the built-in WiFi antenna is
blocked by something.
●Please check you are in the proper range of the
WiFi router and there no wall or blockade between the
tablet and the router.
3. Files cannot be copied.
- Please check the tablet is correctly connected to
computer.
- Please check the tablet has enough memory for new
files.
- Please check the USB cable is working.
4. no sound in the earphone
- Please check the volume is not 0.
32
Page 33

- Please the earphone is correctly connected. If the
audio file is damaged, there may be noise or mute.
5. System cannot run normally.
- Some 3rd party applications may be the reason that
the system cannot run normally. You can restart the
system or uninstall the 3rd party apk.
6. fail to set mail box or register applications
●Please check there is available network.
●Please check you set the mail box in the right way.
●Please set the system time synchronized with your
local time.
●Please stop some applications in the task manager
to ensure the tablet can work fast.
7. why the storage information is not the same as that
in the Specification?
·The system and some applications will up some memory,
so the available memory for users will be less than the
real memory of the tablet.
33
Page 34

6. Specification
Size 194mm*122mm*13 mm
Screen 7” TFT capacitive screen 800*480
USB USB 2.0
CPU Allwinner A10 1GHz
RAM 512M DDR3
CPU and
memory
Network Wi-Fi IEEE802.11b/g/n
Power
Audio
Memory 4GB
MicroSD card
(TF)
OS Android 2.3.4
Battery 3.7V 3000mAh
Adaptor DC 5V,1.5A
earphone (L)7mW+(R)7mW(32
MP3 32K bps – 320K bps
WMA 16K bps –320K bps
Frequency
response
SNR >=85dB
Distortion <0.6%
128MB~32GB
ohm)
20Hz to 20KHz +/-3dB
MP3, M4A, WMA, APE, FLAC, AAC, MID,
WAV, AMR, OGG and so on.
34
Page 35

Full HD decoding(2160P, 1080P, 720P,
480P); MKV, AVI, RM/RMVB, WMV, 3GP,
Video
Picture JPG, JPEG, BMP and so on
Working
condition
Languag
e
Compatib
le OP
MOV, MP4, ASF, MPG, DAT, OB, FLV and
so on
0 ---40°C
Simplified Chinese, tradition Chinese,
English and so on
Windows2K/XP/Vista/Windows7/Linux2.4/M
AC OS 10.4
35
Page 36

Deklaracja zgodności
Niniejszym GOCLEVER Technology oświadcza iż
produkt jest zgodny z zasadniczymi wymogami oraz
pozostałymi postanowieniami Dyrektywy 199/5/WE.
Ochrona środowiska
Urządzenie podlega dyrektywie WEEE 2002/96/EC.
Symbol obok oznacza, że produkt musi być utylizowany
oddzielnie i powinien być dostarczony do odpowiedniego
punktu zbierającego odpady. Pozwala to ograniczać
zanieczyszczenie środowiska i pozytywnie wpływa na
ludzkie zdrowie. Informujemy ponadto, iż nasza firma w
zakresie obowiązków wynikających z ustawy o zużytym
sprzęcie elektronicznym, w tym w zakresie jego zbierania,
przetwarzania, odzysku i recyklingu jest obsługiwana
przez KARAT ELEKTRO-RECYKLING Sp.z o.o. W razie
jakichkolwiek pytań lub wątpliwości możecie się Państwo
kontaktować z Karat pod numerem telefonu
056-623-80-91.
Odpowiedzialność
Firma GOCLEVER Technology ani żaden z jej
licencjobiorców nie ponosi odpowiedzialności za
jakąkolwiek utratę danych lub zysków, jak również za
żadne inne wtórne i pośrednie szkody powstały w wyniku
użytkowania urządzeń marki, w żadnym wypadku i
36
Page 37

maksymalnym dopuszczalnym przez prawo zakresie.
GOCLEVER Technology nie odpowiada za problemy
związane z nieprawidłowym działaniem systemu
operacyjnego i aplikacji działających pod jego kontrolą.
Zmiany
GOCLEVER Technology zastrzega sobie prawo do
dokonywania zmian w niniejszym dokumencie jak i
specyfikacji urządzenia, bez konieczności informowania o
tym użytkownika. Opisane funkcje oraz obrazki mogą się
różnić w zależności od usług oferowanych przez
operatora jak i wersji oprogramowania danego
urządzenia.
Przed użyciem
Pamiętaj, że akumulator nie jest naładowany. Otwarcie
lub próba rozebrania zewnętrznej obudowy urządzenia
powoduje utratę gwarancji.
Google jest zastrzeżonym znakiem towarowym, a Google
Maps jest znakiem handlowym firmy Google, Inc. w
Stanach Zjednoczonych i innych krajach. YouTube jest
znakiem towarowym firmy Google, Inc.
Firma GOCLEVER Technology nie ponosi
odpowiedzialności za błędy techniczne lub redakcyjne ani
za pominięcia w niniejszym tekście; nie ponosi również
odpowiedzialności za szkody przypadkowe lub następcze
37
Page 38

spowodowane korzystaniem z niniejszego materiału.
Informacje są przedstawione w takim stanie, w jakim
przyjmuje je użytkownik, i nie są objęte żadną gwarancją.
Mogą ulec zmianie bez powiadomienia. Firma
GOCLEVER Technology zastrzega również prawo do
zmiany zawartości niniejszego dokumentu bez
uprzedniego powiadomienia. W podręczniku zostały
opisane tylko podstawowe funkcje urządzenia.
Bezpieczeństwo
Należy zapoznać się z tymi wytycznymi. Niezastosowanie
się do nich może spowodować powstanie zagrożenia
życia lub zdrowia albo może być niezgodne z prawem.
Aby uzyskać dalsze informacje, należy zapoznać się z
całym podręcznikiem. Urządzenie zostało stworzone do
pracy przy zasilaniu akumulatorowym jak i podłączeniu do
sieci elektrycznej za pomocą ładowarki. Korzystając z
urządzenia w inny sposób może być niebezpieczne i
spowoduje utratę gwarancji.
Ładowanie
Urządzenie należy podłączać tylko do źródeł zasilania
zgodnych z parametrami określonymi w specyfikacji. W
przypadku wątpliwości co do typu wymaganego źródła
zasilania należy skonsultować się z autoryzowanym
punktem usługowym lub lokalnym dostawcą energii
38
Page 39

elektrycznej. Jeśli produkt zasilany jest z akumulatora lub
innych źródeł, należy przestrzegać instrukcji dołączonej
do produktu.
Oddziaływanie czynników zewnętrznych oraz pola
elektromagnetycznego
Urządzenie nie jest wodoodporne. Należy dopilnować,
aby zawsze było suche, chronić przed wilgocią.
Urządzenie należy chronić również przed wysokimi oraz
niskimi temperaturami, zapyleniem, piaskiem, nie należy
narażać go na wstrząsy, rzucać nim, gdyż może to
spowodować jego uszkodzenie, bądź jego elementów.
- Nie korzystać z urządzenia w pomieszczeniach
wilgotnych i w bardzo wysokich lub niskich
temperaturach.
- Nie pozostawiaj urządzenia w pojazdach ani miejscach,
w których temperatura może przekroczyć 50 stopni
Celsjusza.
- Nie korzystaj urządzenia na pokładzie samolotu oraz w
miejscach gdzie nie jest dozwolone korzystanie z
urządzeń mogących emitować pole elektromagnetyczne
Np. szpital, stacja benzynowa, magazyn materiałów
wybuchowych; nieprzestrzeganie tych zasad może
spowodować pożar lub wybuch.
- Nie korzystaj z urządzenia podczas prowadzenia
39
Page 40

samochodu.
- Nie korzystaj z urządzenia w pobliżu źródeł silnego
promieniowania elektromagnetycznego, takich jak
kuchenki mikrofalowe, głośniki, telewizory a nawet radia.
- Stosować tylko oryginalne akcesoria zalecane przez
producenta albo akcesoria, które nie zawierają metali.
Serwis i naprawy
Do napraw korzystaj z autoryzowanego serwisu i
wykwalifikowanego personelu, wszelkie próby naprawy
samodzielnej, bądź też przez nieautoryzowany serwis
będzie skutkować utratą gwarancji.
Tablet nie jest wodoodporny.
40
Page 41

Spis treści
Ważne informacje………………………………………36
Główne funkcje……………………………………………..43
Wygląd urządzenia……………………………………44
1.Wprowadzenie………………………………………45
1-1.Włą czanie……………………………………45
1-2. Jak zwiększyć szybkość działania………………46
1-3. Ładowanie……………………………………………47
1-4.Podłącznie pod komputer………………….…47
1-5.Jak uzywać ekran dotykowy…………………………48
1-6. G-sensor…………………………………………49
1-7. Okno główne…………………………………..……49
1-8.Dodatkowe funkcje………………………………52
1-9.Instalowanie aplikacji……………………………53
1-10.Wprowadzanie tekstu………………………………54
1-11.USB 2.0 OTG…………………………………………55
2. Internet…………………………………………56
2-1. Internet ustawienia…………………………………56
2-2. Przeglądanie stron…………………………………57
2-3. Poczta…………………………………………59
41
Page 42

2-4.Komunikatory…………………………………………60
3. Multimedia……………………………………..……60
3-1. Muzyka……..………………………………………61
3-2. Wideo…………………………………………62
3-3. Rejestrator…………………………………………63
3-4. Kamera……………………………………………63
4. Ustawienia…………………………………..………64
5. Rozwiązywanie problemów………………………….…65
6. Specyfikacja………………………………………67
42
Page 43

Główne funkcje
●7” ekran pojemnościowy LCD 800*480.
●Obsługa HDMI 2160P oraz 3D wideo.
●Obsługa OTG kopiowanie danych USB flash,
przenośny dysk twardy USB.
●Obłsuga WiFi.
●G-sensor zmiana orientacji ekranu w zależności od
położenia.
●Obsługa wibracji.
●System Android OS
●Tysiące aplikacji dostępnych w Android Makret.
●Urządzenie do rozrywki oraz pracy.
●Obsługa MP3, M4A, WMA, APE, FLAC, AAC, MID,
WAV, AMR, OGG.
●Full HD wideo obłsuga (2160P, 1080P, 720P, 480P),
MKV, AVI, RM/RMVB, WMV, 3GP, MOV, MP4, ASF, MPG,
DAT, VOB, FLV.
●Obsługa zdjęć JPG, JPEG, BMP, PNG.
●Obsługa MicroSD kart od 128MB do 32GB.
●Presonalizacja urzadzenia zmiana podświetlenia,
głośności, tapety itd.
43
Page 44

Wygląd, porty oraz przyciski:
1.“ ”:Głośniej
2.“ ”:Ciszej
3.“ ”: Włącznik. Kiedy urządzenie jest właczone wciśnij
i przytrzymaj,a by wyświetlić opcje wyłączenia, wciśnij
aby zablokować ekran
4.Przednia kamera(opcja);
5.“ ”:Cofnij. Użyj tego guzika aby cofnąc jedno okno.
6.“ ”:Home,Użyj tego guzika aby wyświetlić okno
główne lub szybko wyjść z aplikacji.
7.“
”:Menu. Uyżyj tego guzika aby wyświetlić opcje
44
Page 45

okna lub ekranowego “ ” wciśnij przycisk kiedy ekran
jest zablokowany aby odblokować ekran.
8. Wyjście audio 3.5 mm;
9. Wyjście HDMI 1.4;
10. port USB OTG 2.0;
11. gniazdo ładowania 2.5 mm 5V 2A;
12 .czyntik karty micro SD;
13 . mikrofon.
1. Wprowadzenie
1-1....Włączanie: kiedy urządzenie jest wyłączone wiśnij
“ ” około 3 sekund, aby włączyć. Kiedy ekran jest
zablokowany użyj “ ” lub przeciągnij aby
osblokować ekran jak widać na zdjęciu:
45
Page 46

Oszczędzanie energii blokowanie ekranu: kidey
urządzenie jest w trybie oszczędzania energii i ma
zablokowany ekran, wciśnij “ ” włącznik aby powrócić z
wygaszenia ekranu przeciądnij aby odblokować
ekran.
Uwaga: w trybie wygaszenia urządzenie cały czas działa
tylko ekran urządzenia jest wyłączony.
Wyłączanie: kiedy urządzenie jest włączone wciśnij
włącznik “ ”około 5 sekund aby wyświetlić okno wyboru
trybu wyłączenia, wybierz „Wyłącz” następnie „OK.”.
Dotknij “ ”aby anulowac wyłączanie.
Uwaga: Kiedy bateria ma niski poziom naładowania,
tablet wyświetli ostrzeżenie o niskim stanie bateri i jeśli
nie zostanie podłączona ładowarka automatycznie się
wyłączy. Naładuj baterię urządzenia jeśli bez ładowarki
nie chce się uruchomić.
1-2....Jak zwiększć szybkość działania
Urządzenie podczas pracy gdy jest włączone,
większość aplikacji po wyjściu zostaje w tle jako
uruchomione procesy, powoduje to większe obciążenie
pamięci RAM oraz wolniejszą pracę urządzenia. Wejdź w
ustawienia -> aplikacje i zakończ nie używane.
46
Page 47

1-3....Ładowanie
Ładuj urządzenie wyłącznie oryginalną ładowarką lub o
tych samych parametrach. Kiedy jest urządzenie
ładowane na ikonie baterii widoczny Pier „piorun”; kiedy
zostanie naładowana do pełna ikona bateri cała będzie
zielona.Podczas ładowania urządzenie jak i ładowarka
mogą się nagrzewać to normalne zjawisko.
1-4....Podłączenie pod komputer
Kidey podłączysz urzadzenie pod komputer, na pasku
powidomien pojawi się ikona. Urządzenie domyślnie
ładuje się z portu USB komputera. Aby połączyć
urządzenie z komputerem po podłączeniu kabla USB z
paska pwiadomień wybierz “Połączenie prze USB”,
dotknij “Włącz nośnik USB”, komputer powinien wykryć
nową pamięć wymienną. Dotknij “Wyłącz nosnik USB”,
tablet powróci do trybu ładowania z portu USB komputera.
Okno powiadomienia USB przedstawiono na zdjęciu:
47
Page 48

1-5....Jak używać ekran dotykowy
Możesz przglądać okno główne, zarządzać aplikacjami,
kontolować urzadzenie zmieniać opcje przy użyciu ekranu
dotykowego.
1-5-1.Dotknij i wybierz
Dotknij ekranu w polach teksowych aby wyświetlić
klawiaturę ekranową, aby zmienić opcje włą czyć
aplikacje.
1-5-2.Przytrzymaj
Jeśli chcesz wyświetlić listę opcji, przytrzymaj kilka
sekund. Przytrzymując ikone aplikacji w zakładce aplikacji
możesz utworzyć skrót do aplikacji w oknie głównym.
1-5-3.Przesuwanie po ekranie
Przesuń palcem po ekranie pionowo lub poziome aby
48
Page 49

przsuwać obrazy lub strony.
1-5-4.Przeciągnij
Przed przeciągnięciem ikony, dotknij i przytrzymaj na
ikonie i przesuń ją w żądane miejsce.
1-6....G-Sensor
Tablet posiada wbudowany czujnik położenia w
zależności od orientacji urządzenia ekran automatyczne
się dostosuje.
1-7....Okno główne
Wsiśnij i przytrzymaj włącznik około 5 sekund, aby
włączyć, ekran jednak będzie zablokowany, przeciągnij
ikonę „kłódki” aby odblokować ekran.
49
Page 50

1-7-1. Pasek powiadomień: przesuń pasek na dół
ekranu aby wyświetlić powiadomienia.
1-7-2.Głośność dotknij “-”“+”aby sterować głośnością.
1-7-3.Menu: Dotknij lub “ ”aby wyświetlić menu.
●Dodaj: skróty, widżety, foldery oraz tapety. Aby usunąć
ikonę lub widżet przytrzymaj na ikonie pojawi się kosz
,przesuń ikonę na ikonę kosza .
●Zarządzaj aplikacjami: możesz sprawdzić listę
zainstalowanych aplikacji oraz nimi zarządzać.
●Tapeta: możesz wybrać tapetę okna głównego.
●Szukaj: wpisz adres strony lub zapytanie dla
przeglądarki.
● Powiadomienia: tutaj możesz odczytać powiadomienia
Android.
●Ustawienia: wybierz aby wyświetlić listę dostępnych
ustawień urządzenia.
50
Page 51

1-7-4.Skróty: dotknij ikony z prawej storny aby wyświetlić
listę aplikacji:
Okno to zawiera listę dostępnych aplikacji w urządzeniu.
Dotknij ikony aby uruchomić aplikację. Opis fabrycznych
aplikacji:
Apk installer: aplikacja umożliwa instalację aplikacji
zobacz punkt 1-9 instalowanie aplikacji.
Internet: dotknij aby uruchomić przeglądarkę.
Kalendarz: dotknij aby włączyć kalendarz.
Kalkulator
Zegar
51
Page 52

Muzyka: punkt 3-1 Muzyka.
Wideo: puknt 3-2 Wideo.
Rejestrator dźwięku: punkt 3-3 Rejestrator.
Kamera: punkt 3-4 Kamera.
Task manager: zarządzaj procesami oraz aplikacjami
aby zwiększyć ilość ostępnej pamięci operacyjnej.
1-8....Dodatkowe funkcje
Urządzenie posiada wbudowane Widżety aby je dodać
wciśnij „Menu” następnie „Dodaj”, teraz „Widżety” z listy
wybierz który ma zostać dodany:
Poniżej pokazano przykład dodania „Widżet” zegar
analogowy, został on wyświetlony na oknie głownym po
dadaniu. Przeciagnij na „kosz” aby usunąć zegar.
52
Page 53

1-9....Instalowanie aplikacji
Dodatkowe aplikacje można pobierać przy pomocy
Android Market lub bezpośrednio z internetu.
1-9-1.Jak zainstalować aplikacje
Przykład 1: pobierz aplikację z Internetu zapisz na
karcie SD, włóż kartę do tabletu.
Przykład 2: wyszukaj i pobierz aplikację przy pomocy
Android Market oraz zainstaluj,
1-9-2.Instalacja
Przykład 1: Uruchom aplikację “APK installer”, wybierz
“Installer” wybierz aplikację z listy oraz zainstaluj.
Przykład 2: Uruchom aplikację “ES file manager” oszukaj
na karcie pliki instalacyjne apk alikacji, dotknij ikony aby
automatycznie zainstalować aplikację.
1-9-3.Odinstaluj aplikację
53
Page 54

Oszukaj i uruchom aplikaję “APK installer”, wybierz
“Manager” oszukaj na liście aplikację która chcesz
usunąć, następnie wybierz odinstaluj oraz potwierdź czy
napewno.
1-10....Wprowadzanie tekstu
Po uruchomieniu dowolnej aplikacji lub wybraniu pola
tekstowego zostanie wyświetlona klawiatura ekranowa.
Domyślnie zainstalowano dwie kalwiatury:
● Android keyboard
● Google pinyin metoda wprowadzania
1-10-1.Wybór metody wprowadzania
W zależności od wybranej domyślnie, aby to zmienić
1. Wybierz „Ustawienia”.
2. Wybierz Język i klawiatura.
3. Wybierz domyślną klawiaturę.
1-10-2.Jak zmienić metodę wprowadznia podczas
edycji tekstu
1.W oknie tekstowym dotknij i przytrzymaj wyświetli
się okno „Metoda wprowadzania”
2.Wybierz preferowaną klawiaturę ekranową.
54
Page 55

Klawiatura Android
Google pinyin metoda wprowadzania
1-11....USB 2.0 OTG
Tablet obsługuje pamięci flash, dyski USB, urządzenia
HID jak mysz oraz klawiatura, modemy 3G.
55
Page 56

Tablet rozpoznaje urządzenia podłączone na kablu
USB-OTG.
Możesz zarządzać plikami na podłączonej pamięci.
Uwaga nie podłączaj urządzeń USB bez ładowarki
jeżeli poziom baterii jest niski spowoduje to bardzo
szybkie rozładowanie baterii.
2. Internet
2-1....Internet ustawienia
Wybierz „Ustawienia” -> “Sieci zwykłe i bezprzewodowe”
aby skonfigurować połączenie:
2-1-2.... WiFi połączenie
Wybierz teraz “Ustawienia Wi-Fi”,aby wyświetlić okno
koniguracji Wi-Fi, włącz kartę Wi-Fi urządzenie wyszuka
listę dostępnyh sieci
56
Page 57

Dotknij na wybranej sieci oraz wprowadź hasło jeśli sieć
jest zabezpieczona
Karta Wi-Fi zwiększa życie bateri o 1/4. Aby
wydłużyć czas pracy na baterii wyłącz kartę Wi-Fi gdy jej
nie używasz.
2-1-3....Modemy 3G
Tablet osługuje modemy 3G do transmisji danych. Jeśli
modem zostanie rozpoznany urządzenie automatycznie
skonfiguruje modem do pracy.
2-2. Przeglądanie stron
Po uzyskaniu dostępu do Internetu możesz przeglądać
strony internetowe.Uruchom aplikację “Internet” ,
wprowadź adres strony która ma zostać wyświetlona. Po
wszytaniu strony możesz ją przsuwać. Przeglądarka
wyświetli ikony + i – do powiększania lub pomniejszania
storny. Stronę można również pwiększyć „szczypiąc”
ekran
57
Page 58

2-2-1....Zakładki
● Dodawanie zakładek
Jeśli chcesz dodać stronę do zakładek po wyświetleniu,
wybierz „menu” następnie dodaj do zakładek.
● Otwierzanie zakładek
Wybierz menu następnie zakładki aby wyświetlić listę
zkaładek.
● Edytuj zkaładkę
Wybierz menu następnie zakładki aby wyświetlić listę
zakładek, przytrzym na składce z menu wybierz „Edytuj
zakładkę”.
2-2-2.... Otwieranie nowej strony
● Aby otworzyć nową stronę
58
Page 59

Wciśnij „menu” następnie wybierz „Nowe okno”.
● Przełączanie mię dzy stronami
Wciśnij „menu” następnie wybierz „Okna” teraz wybierz
okno które ma zostać wyświetlone.
2-2-3.... Zmiana storny startowej
Wciśnij „menu” następnie „więcej” potem „ustawienia”
teraz odszukaj i wybierz „Ustaw stronę główną”
2-2-4.... Ustawienia przeglądarki
Wciśnij „menu” następnie „wiecej” potem „ustawienia”.
2-3. Poczta
Poczta(Gmail) pozwala odbierać i wysysłać wiadomości.
Aplikacja ma wbudowany przewodnik po uruchomeiniu.
Uwaga: Upewnij się że masz dostęp do internetu.
59
Page 60

2-3-1.... Skrócony opis konfiguracji
Uruchom aplikację aby rozpocząć konfigurację.
Wprowadź nazwę skrzynki pocztowej oraz hasło do
skrzynki pocztowej, wprowadź ustawienia serwerów
poczty przychodzącej i wychodzącej jeśli nie zostaną
automatycznie wykryte. Po porwanej konfiguracji zostanie
wyświetlone okno odebranej poczty.
2-3-2.... Odbieranie i wysyłanie poczty
Dotknij na wiadomości w skrzynce aby ją otworzyć.
W skrzynce wybierz „menu” następnie „Utwórz”. Teraz
możesz napisać wiadomość i wysłać zupełnie jak na
komputerze.
2-3-3.... Kasowanie konta
W skrzynce wybierz „menu” nastę pnie „konta”, z listy
wybierz konto któr ma zostać skasowane.
2-4. Komunikatory
Możesz korzystać z kompnikatorów w celu szybszej
komunikacji z przyjaciółmi.
3. Multimedia
60
Page 61

3-1. Muzyka
Uruchom aplikację muzyka aby wyświelić listę utworów:
Pliki posortowane po nazwach artystów.
Pliki posostowane po nazwach albumów
Wszystkie dostępne
Lista ostatnio dodanych
Dotknij piosenki aby ją odtworzyć:
“ / ”: Poprzednia/następna, przesuń pasek w przód
lub tył aby przewijać piosenkę.
“ / ”: odtwórz/ pauza
“ ”: losowe odtwarzanie
“
”: odtwarzaj w kółko
“ ”: powtarzaj
61
Page 62

3-2. Wideo
Uruchom aplikację „Galeria” aby wyświetlić listę filmów.
Dotknij wybranego filmu aby go odtworzyć:
/ ”: Głośność + oraz “ / ”: Poprzedni/następny plik, przesuń pasek
postepu w przód lub w tył aby przewinąć fragment.
/ ”: Odtwarzaj/ pauza
“ ”: Cofnij
3-2-1. wyjście HDMI
Podłączkabel HDMI obraz zostanie automatycznie
wyświetlony na telewizorza.
Uwaga: Unikaj sytuacji częstego podłączania i odłączania
kabla HDMI podczas działania urządzenia.
62
Page 63

3-3. Rejestrator
Włącz rejestrator dźwięku aby nagrywać:
Dotknij “ ”aby rozpocząć nagrywanie dotknij “ ”aby
zakończyć nagrywanie. Plik zostanie zapisany jako
recordingxxxxx.mp3 na karcie SD. Plik zostanie
autmatycznie dodany do listy w odtwarzaczu.
3-4....Kamera
Uruchom aplikację kamera.
3-4-1. Wykoanie zdjęcia:
Dotknij “ ”aby wykonać zdjęcia. Pliki będą zapisane
pod nazwą
rok-miesiąc-dzień-godzina-minuta-sekunda.jpg w
DCIM/Camera. Dotknij “
”aby przeglądać zdjęcia.
63
Page 64

3-4-2. Filmy
Dotknij “ ”aby włączyć tryb kamery wideo, dotknij
“ ”by właczyć nagrywanie oraz “ ” aby zakończyć
nagrywanie. Nazwa zapisanego pliku to
rok-miesiąc-dzień-godzina-minuta-sekunda.3gp w
DCIM/Camera. Dotknij “ ”aby wyświetlić pliki.
Dotknij “ ”aby wyjść z aplikacji.
4. Ustawienia
Dotknij „ustawienia” aby wyświetlić listę opcji: „Sieci
zwykłe i bezprzewodowe”, „Dźwięk”, „Wyświetlacz”,
„Lokalizacja i zabezpieczenia”, „Aplikacje”, „Konta i
synchronizacja”, „Język i klawiatura”, „Data i godzina”.
4-1. Sieci zwykłe i bezprzewodowe: tutaj ustawisz
dostęp urządzenia do internetu, punkt 2-1 Internet
64
Page 65

ustawienia
4-2. Dźwięk: tutaj skonfigurujesz głośność, dźwięki
powiadomień.
4-3. Wyświetlacz: autoobracanie ekranu, animacje,
jasność ekranu, wygaszenie ekranu.
4-4. Lokalizacja i zebezpieczenia: możesz włączyć
lokalizację, ustawić blokadę ekranu, włączyć wyświetlanie
haseł podczas wpisywania.
4-5. Aplikacje: zarządzenie aplikacjami oraz procesami
urządzenia.
4-6. Prywatność: reset do fabrycznych, kopia danych.
4-6. Pamięć: tutaj sprawdzić ilość dostępnej pamięci w
urządzeniu oraz na karcie
4-7. Język i klawiatura: wybierz język oraz metodę
wprowadzania tekstu.
4-8. Data i godzina: ustaw datę i czas oraz strefę
czasową.
4-9. Urządzenie: informacje o urządzeniu
5. Rozwiązywanie problemów
1. Wolne pierwsze uruchomienie.
● pierwsze uruchomienie około 2-3 minut może
wystąpić po przywróceniu urządzenia do ustawień
fabrycznych.
65
Page 66

2. Brak połączenia z Wi-Fi lub sygnał za słaby.
●Sprawdź czy punkt dostępowy działa.
●Sprawdź nazwę oraz hasło dodanej sieci
●Sprawdź czy wbudowanej anteny urządzenia
coś nie przysłania.
●Upwenij się że znajdujesz się w zasięgu sieci
Wi-Fi swojego punktu dostępowego.
3. Pliki nie mogą być kopiowane.
- Sprawdź czy prawidłowo podłączyłeś tablet pod
komputer.
- Upewnij się że masz wystarczającą ilość wolnego
miejsca w urządzeniu.
- Sprawdź kabel USB czy nie jest uszkodzony.
4. Brak dźwięku w słuchawkach
- Srawdź czy głośność nie jest na poziomie 0.
- Sprawdź czy prawidłowo podłączyłeś słuchawki lub
czy nie są mechanicznie uszkodzone.
5. Brak możliwości wysłania wiadomości pocztą
●Upewnij się że masz dostęp do internetu.
●Upewnij się że prawidłowo dodałeś konto.
●Ustaw właściwą strefę czasową.
●Zakończ nie używane procesy w tle.
66
Page 67

6. Specyfikacja
Wymiary 194mm*122mm*13 mm
Ekran 7” TFT ekran pojemnościowy 800*480
USB USB 2.0 OTG
CPU Allwinner A10 1GHz
Procesor
oraz
pamięć
Sieć Wi-Fi IEEE802.11b/g/n
Zasilanie
Muzyka
RAM 512M DDR3
Pamięć 4 GB
MicroSD
karta
System Android 2.3.4
Bateria 3.7V 3000mAh
Ładowarka DC 5V,1.5A
Wyjście audio (L)7mW+(R)7mW(32
MP3 32K bps – 320K bps
WMA 16K bps –320K bps
Frequency
response
SNR >=85dB
128MB~32GB
ohm)
20Hz to 20KHz +/-3dB
Distortion <0.6%
MP3, M4A, WMA, APE, FLAC, AAC, MID,
WAV, AMR, OGG and so on.
67
Page 68

Full HD decoding(2160P, 1080P, 720P,
480P); MKV, AVI, RM/RMVB, WMV, 3GP,
Wideo
Zdjecia JPG, JPEG, BMP and so on
Temperat
ura pracy
Języki
Systemy
kompatyb
ilne
MOV, MP4, ASF, MPG, DAT, OB, FLV and
so on
0 ---40°C
Simplified Chinese, tradition Chinese,
English and so on
Windows2K/XP/Vista/Windows7/Linux2.4/M
AC OS 10.4
68
 Loading...