

Goclever R103 Owner's Manual

OWNER’S MANUAL
INSTRUKCJA OBSŁUGI
WWW.GOCLEVER.COM
TO SEE MORE PRODUCTS TAB, NAVIO, DVR, DVB
Read this
R103
R103
VISIT OUR WEBSITE
manual before installation and use.
-T

Contents /
Spis treści
English
Polski
Warunki gwarancji
2
3
21
40

English -
Table of Contents
Appearance
Quick Start
Input
Desktop
Basic Operations
Applications
Tips and Other Information
Customize settings
Using HDMI
Troubleshooting
Disposal / Recycling Information
3
4
5
7
7
9
12
17
17
19
20
21
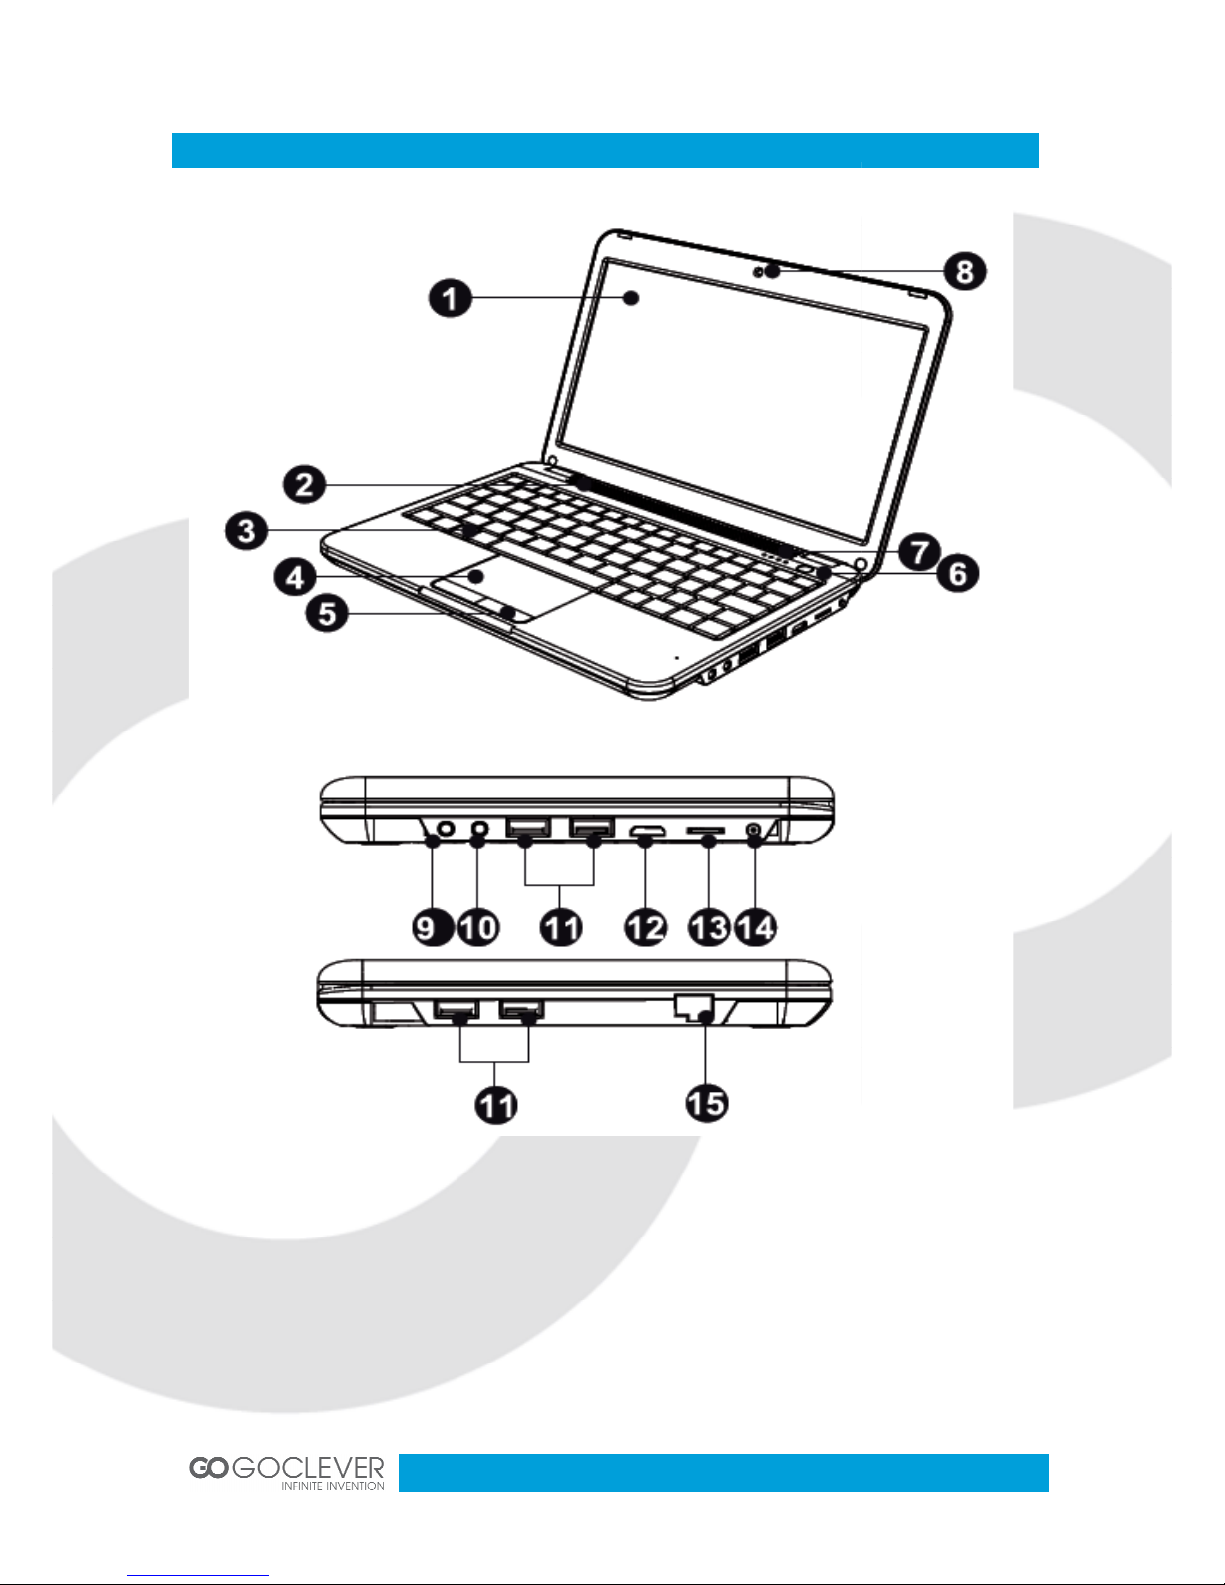
Appearance
1. LCD
2. Stereo
3. Keyboard
4. Touch panel
5. Mouse button
6. Power key
7. Status indicator light
8. Camera
9. Microphone port
10. Earphone port
11. USB port
12. HDMI port
13. microSD card
14. DC input
15. Ethernet network port
4

Quick Start
Battery management and charging
Before using this device, please
device will start to charge.
Tips
•
This device adopts built
used.
•
when it is charging, the icon of battery will
• when the chargi
ng finish, t
•
If you do not use this device for a long time, please charge/release it once per month
to avoid deep discharge.
•
For longer battery life, you may wish to change to the functions below.
o
Reduce the Brightness:
Brightness
o
Wireless Network search: Click Menu
Connect to Wireless Network
o
Switch OFF the WIFI
Using a SD card
Inserting SD card: insert the
Micro SD Card into the slot provided, when inserted you will get
on screen message displaying “preparing SD card.”
Vi
ewing the files in the SD card: t
‘Explorer’ from the home screen, and then select “SD
Removing the SD card: c
lose all open files stored on the Micro SD Card.
Click the menu, and select Setup
(Screen will display “Removed SD card”.)
Press the card gently, allowing it to project out of
Note: i
nsert the Micro SD card correctly, as damage may occur to either data stored on the
card or the card itself.
We recommend only using branded Micro SD cards.
charge it fully. Put the charger adapter into the DC jack, the
-
in polymer battery. Only the specified charger should be
be red.
he battery icon will turn green.
Click Menu
→ Settings → Display (display setting) →
→ Settings → Wireless Network →
→ WIFI Setting → Notification
o view the files stored on the Micro SD card, choose
Card ”
→ SD card memory → SD card→ Uninstall SD card.
the slot.
5

Hot plug of SD card and external flash disk
If the Micro SD Card and / or exter
browsing or executing files stored on the device) without first uninstalling the device (as
above), the data stored on the external device or the external device itself may become
damaged. The progra
m accessing the data on the Micro SD or flash disk may exit to stop
corruption of data stored on the tablet.
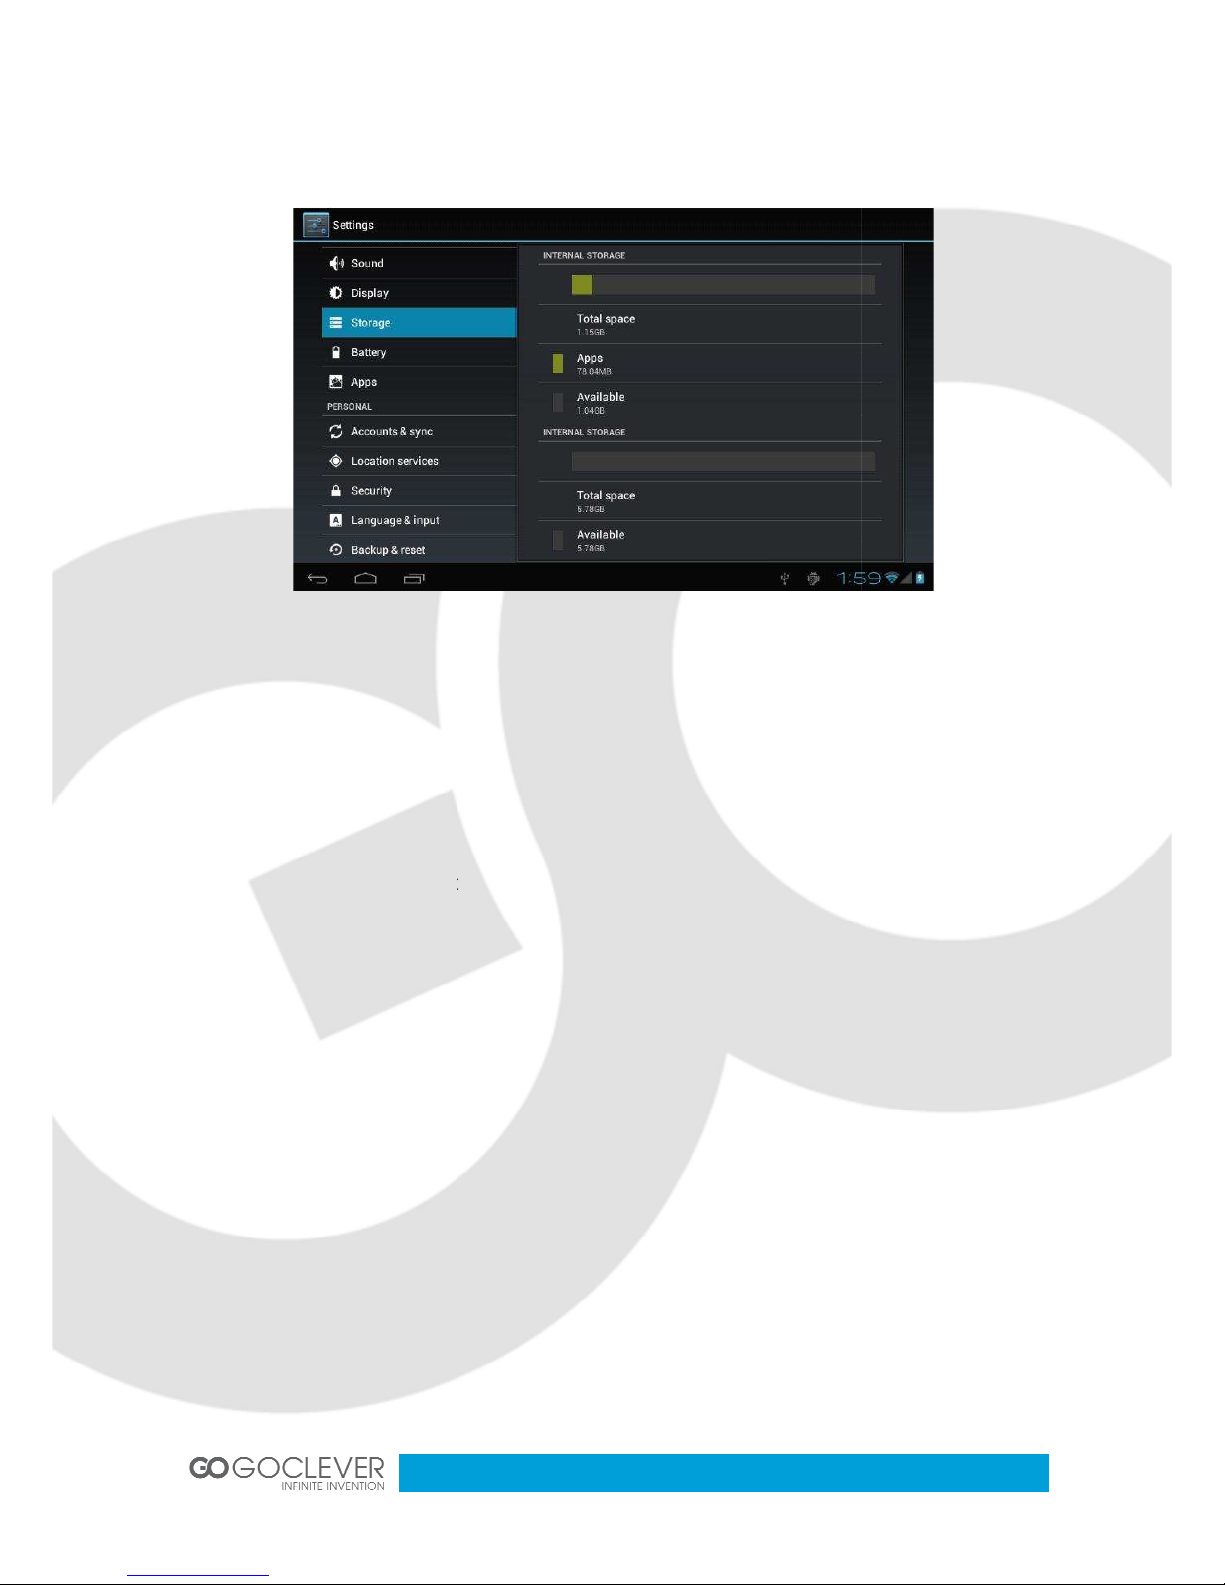
Storage space
The Netbook has three areas of storage: Internal Memory, Flash Disk and Micro SD Card.
•
The folders on the internal memory are unabl
storing system files. Capacity: 1GB)
•
Micro SD card folders are displayed as “SD Card 1”
•
(The capacity is dependent on card size used. Max. Capacity: 32GB)
•
Flash disk folders are displayed as “Flash Disk 1” or “Flash Dis
dependent on flash
size used.)
Boot and Shutdown
Power On: To switch the unit on, press the power switch for approx. two seconds,. Once the
system has booted up, it will enter screen
unlocking
icon to enter the main interface
Power Off: Press the power switch for four seconds, a window will appear for confirmation.
Click the power-
off icon, and the device will turn off.
Sleep mode: Press the power switch for one second, and the system will ente
in which the LCD screen will turn black. In this mode, you can press Power key to wake up
the system. Once woken up, the system enters the screen
energy, if there is insufficient battery power whilst in the slee
down.
External network cable
External network cable: t
o use a network cable, insert it to the Ethernet port. Once
connected and logged on, the Netbook
settings can be set manually if required.
nal flash disk is removed whilst in use (either playing,
e to be accessed directly. (Used for
k
2” (Capacity
-
locking interface, where you can move up the
.
-
locking interface. To conserve
p mode, the system will power
will obtain an IP (network) address automatically. IP
6
r sleep mode,
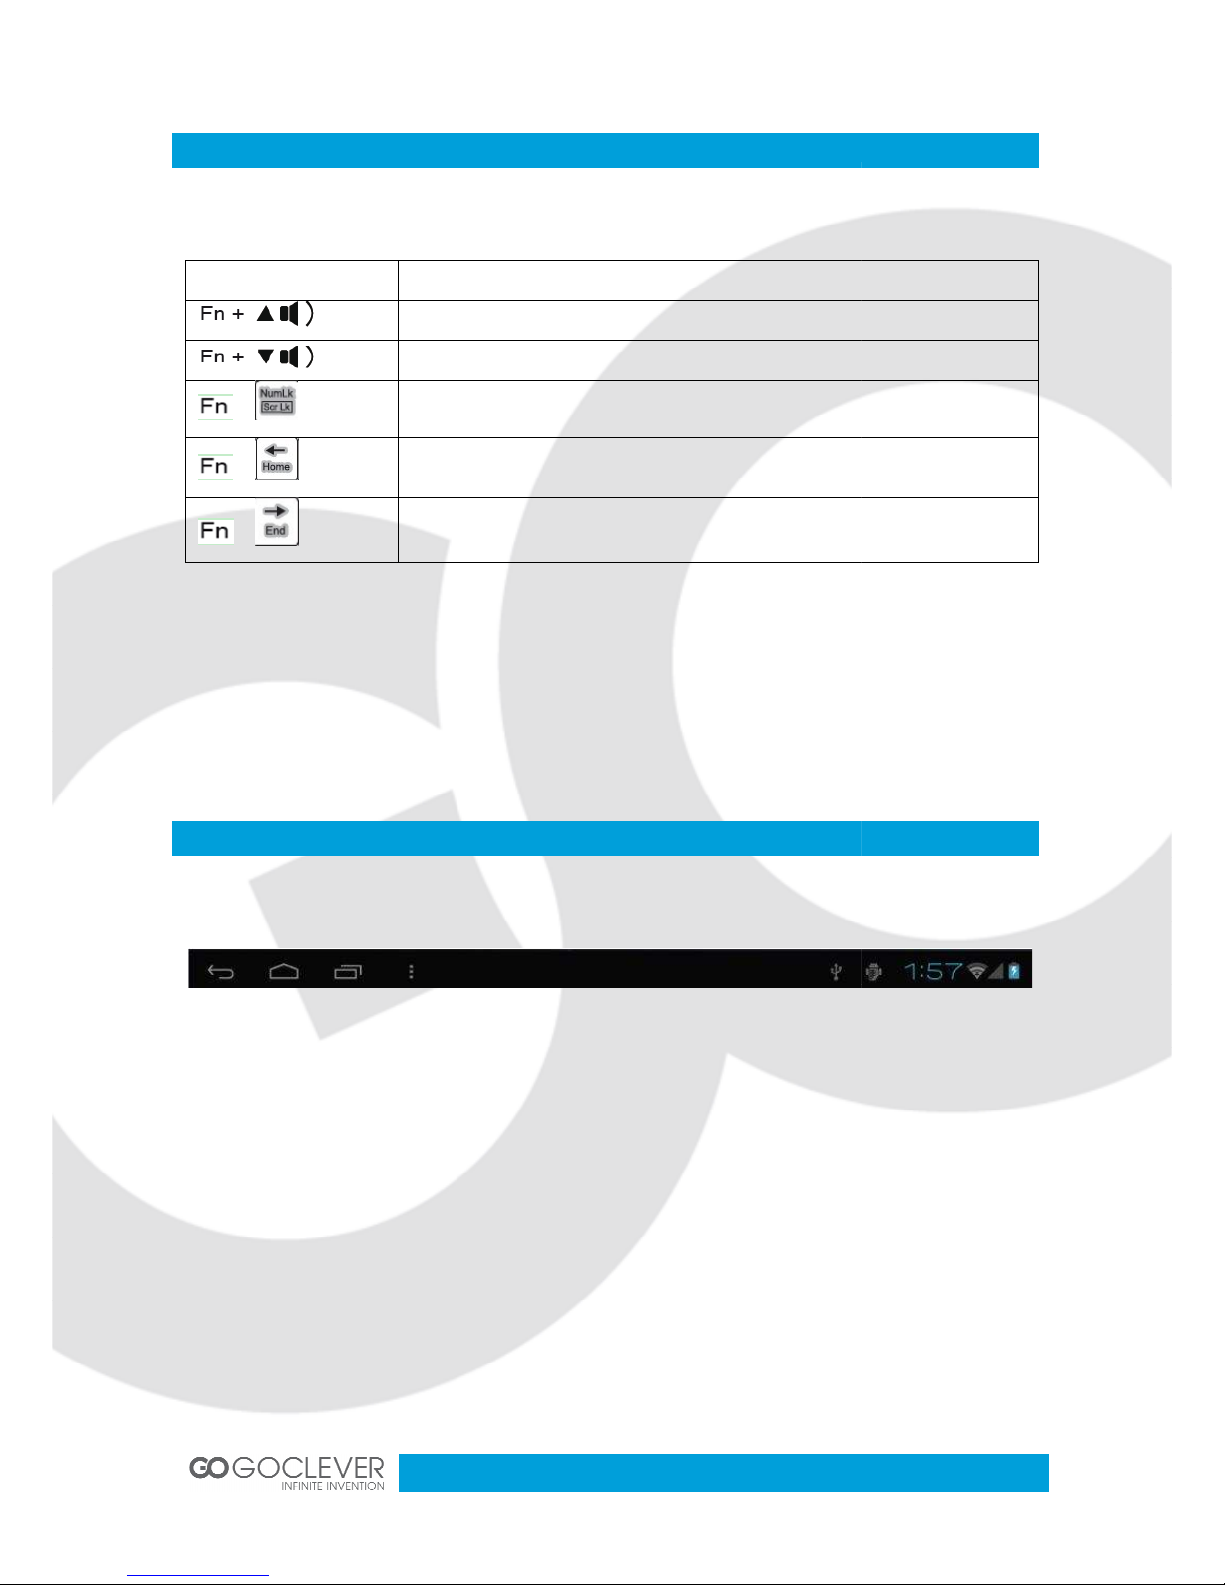
Input
Keyboard
Key
Description
Increase the volume
Decreases the volume
+
Enable / disable the keypad
+
Return to the Home screen (desktop
+
Turn on / off the screen
Touchpad
The Netbook is including a
touchpad
clicking, selecting, dragging, and sliding or for right click menus.
Desktop
Bottom bar of the Interface
A. WIFI signal status icon: If connected to the WIFI wireless network, the icon will be
displayed
B
. Time display: Display the time of the current system, which has been set.
C
. Battery status icon: Displays the current battery level and the charging stat
D
. Menu, Home, Back, virtual buttons
The HOME Screen menu
Press the menu icon on the device, it will display a home screen menu as
Gadgets / Widgets)
. You can use the touchpad
for operations such as
7
us.
following:

Wallpaper: Users can replace the wallpaper with you wishes.
Manage apps: It can quickly o
System Settings: Fast access to system settings, user can choose “Wireless & networks”,
“Display”, “Date & time” etc, for personalized settings.
Desktop
When sliding around with your finger to switch the main screen, the desktop fixed on
main screen, will not move. User could drag the application icon placed on the desktop area
in the main screen.
To enter the interface of application icons, click the
shown below:
Basic Operation
pen a list of all applications.
button
at the shortcut bar, as
8
the
Click the "Settings" icon
in the main applications area, you can open the system
interface, as shown below.
Select the appropriate operation of the relevant items, such as: wireless and network,
Display, date and time settings, about Device, etc
Date and time settings
Click "Date & time" to enter the Da
Select to set the date, select the time zone, set the time, time format, date format and other
information.
For example, choose to set the date, as follows:
te and time settings interface:
9
setting
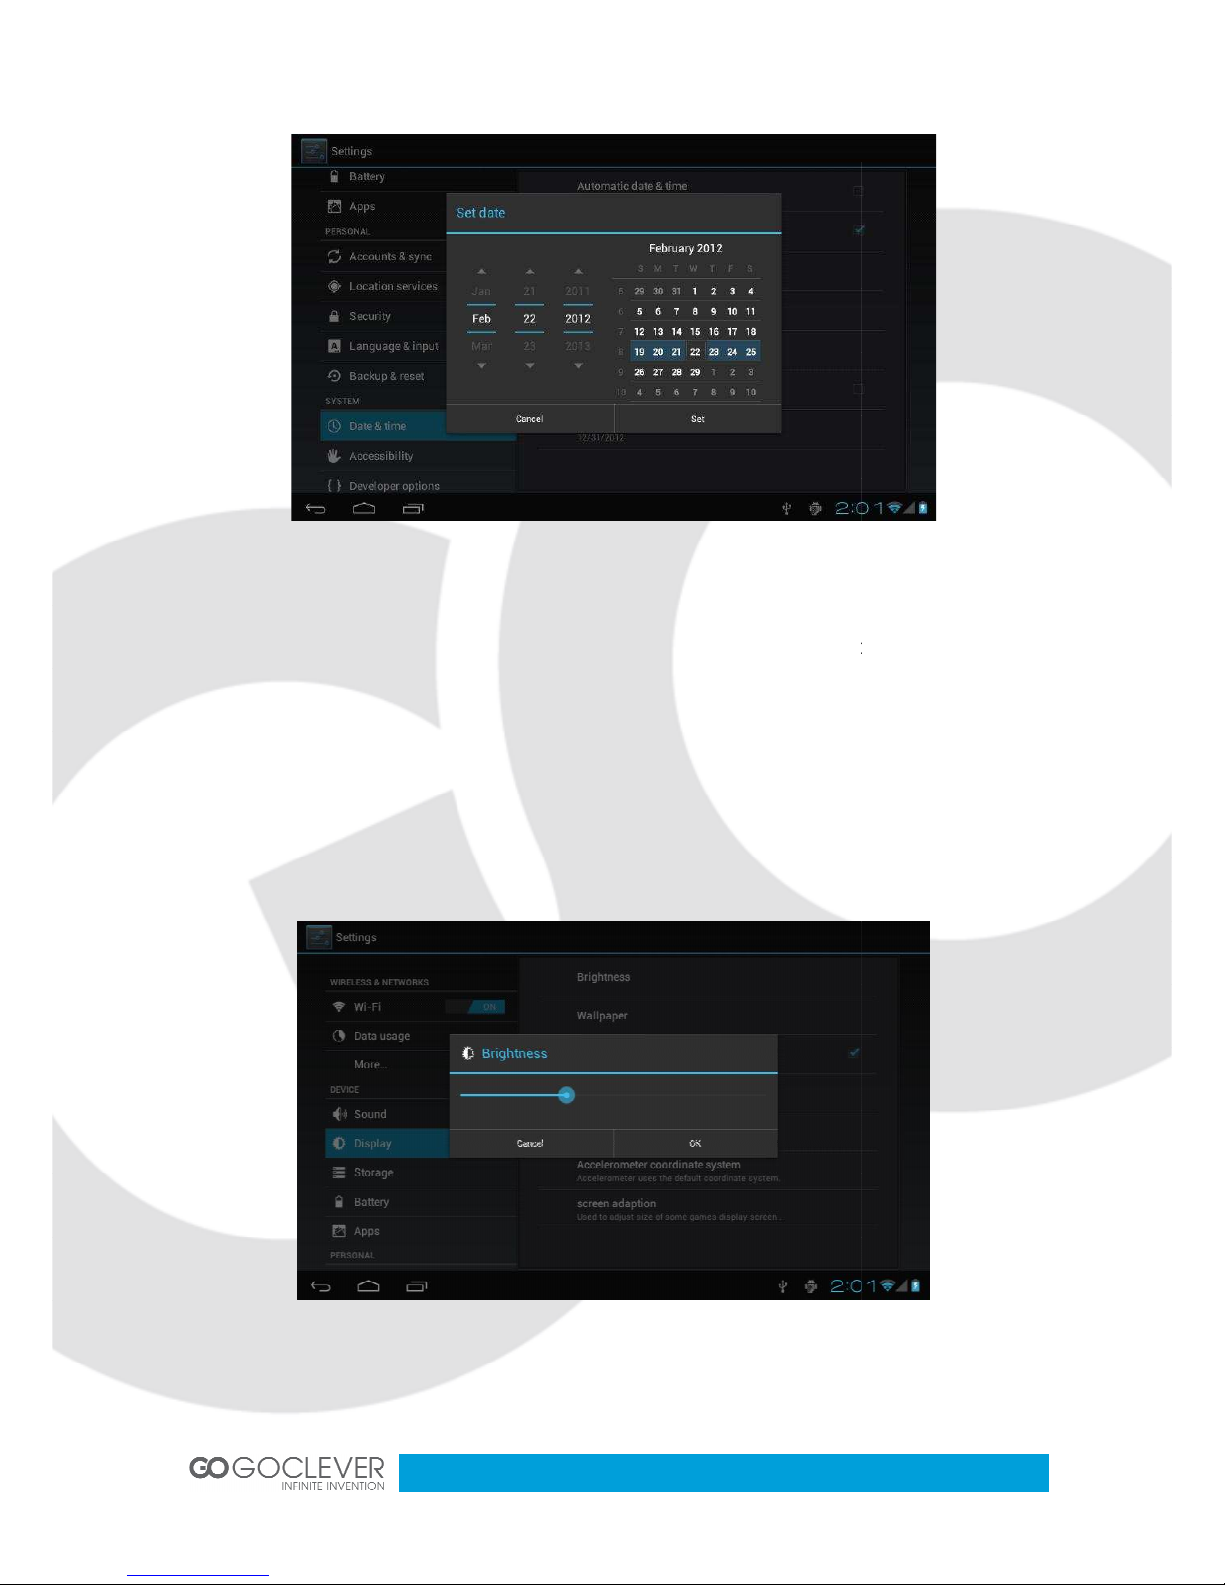
Select +:
that the increase of 1 unit, Select
Also you can choose the number, enter the input mode. Directly entering the desired
number, then click “Done” to set the Date.
Display settings
In the settings interface choose
"Brightness", Pull the progress bar to adjust the brightness,
- : that the reduction of 1 unit.
"Display" to enter the display settings interface, select
as below interface.
10
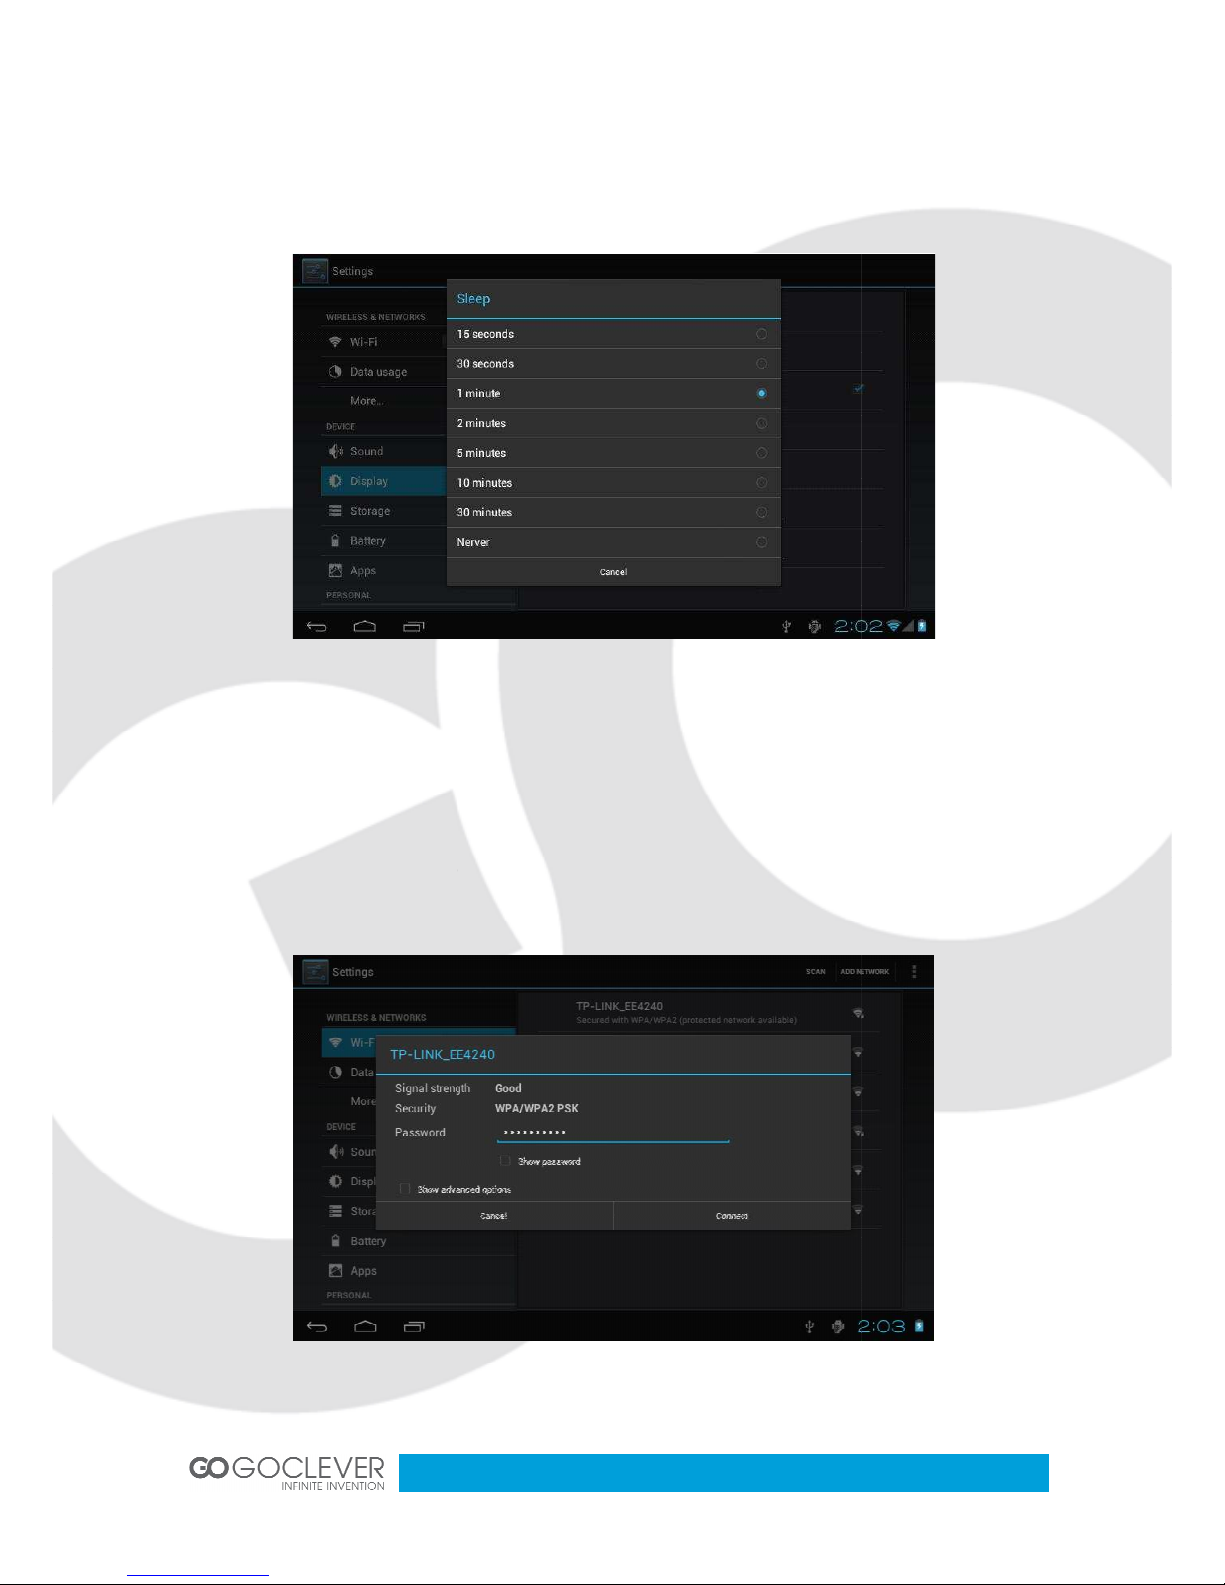
Click Sleep, adjust the inactivity time of the device. You can press power key to activate the
device. When di
splay "Screen locked" interface, follow the prompts to unlock it.
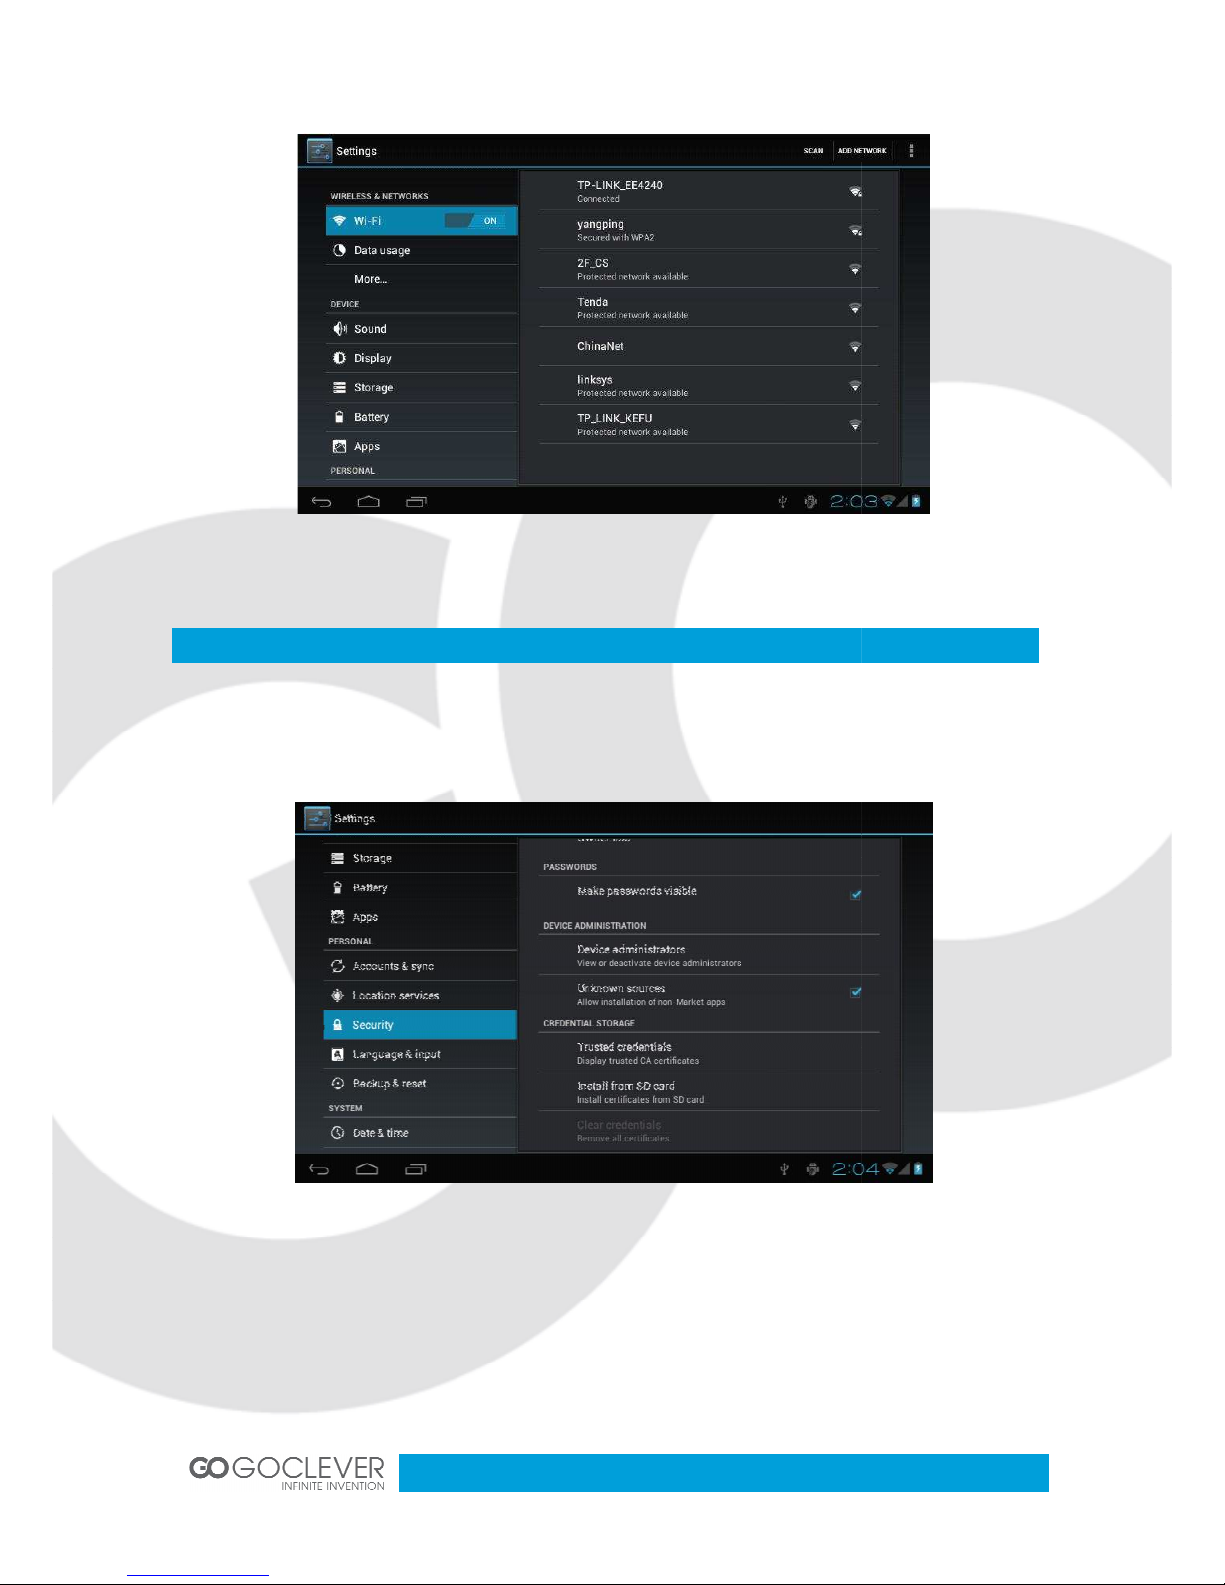
Wireless Connection
Click the main menu "Settings" icon, go to "Settings" screen, click on "Wireless and
networks" into the "Wireless and networks settings" interface. Turn on Wi
Fi module built-
in the device will search AP lists automatic , click the searched AP can be
used, will pop up settings dialog, please follow the prompts to complete the WIFI network
links. Some encrypted network, need to en
ter a valid key.
As shown below.
11
-Fi switch, the Wi-
Applications
Install applications
1. First you should select the Unknown sources which allow installation of non
2. Copy the APK installer software to Micro SD or NAND FLASH.
3. Click APK
Installer to find the app directory, then Select applications to install. Users can
"Android market" online installation, or download via the computer, or online through the
machine built-
in browser to download and install.
12
-Market apps.

Uninstall applications
Click on the item "Settings –
Apps
been installed, click the applications which you need to uninstall
Browser
When the network connected, open the Web browser
the Web or
through the main desktop search bar enter the URL, open the web page.
Video player
Online video: The product suppor
Local video: Click the Video Icon. The Player can loading new albums and photos
automatically which
stored in local disk or micro SD card, then select the videos to playback
Music player
Click the music icon to
enter the music player interface.
the player to play music
–
Downloaded,” select the appropriate application has
.
enter the URL, you can quickly b
ts HTML5 online video playback.
Click the music files you will enter
13
rowse
 Loading...