

GME TX675TP User Manual

2 watt UHF CB handheld radio
INSTRUCTION MANUAL

Contents
SAFETY INFORMATION.........................2
IMPORTANT INFORMATION
CONCERNING UHF CB RADIO .............. 3
Possible issues ................................ 3
Emergency channels ....................... 4
Telemetry channels ......................... 4
IMPORTANT ADVICE............................. 4
SUPPLIED WITH .................................... 4
OPTIONAL ACCESSORIES ...................... 5
FEATURES ............................................ 5
CONTROLS ........................................... 6
LCD ICONS ......................................... 7
CHARGING THE BATTERY ..................... 8
To remove the battery pack............. 8
To refit the battery pack .................. 8
Charging the battery pack .............. 8
Charging the TX675 single unit .......9
In-vehicle charging ......................... 9
Charging the TX675 twin pack ....... 9
BATTERY USAGE .................................. 10
Battery low alert ............................. 10
Conserving battery power............... 10
Standby mode ................................. 10
Using CTCSS/DCS ........................... 10
Scanning ......................................... 10
Low transmit power settings ........... 10
GENERAL OPERATION .......................... 11
Power on/off ................................... 11
Adjusting the volume ......................11
Display lighting ............................... 11
Receiving signals ............................ 11
Transmitting ................................... 11
Selecting channels .......................... 11
Squelch ........................................... 12
Keypad Lock ................................... 12
Duplex operation ............................ 12
SCANNING .......................................... 13
To add or remove scan channels ..... 13
To scan ........................................... 13
Scanning features ........................... 13
CTCSS, DCS AND SILENT MODE ............ 14
MENU .................................................. 14
Using the menu .............................. 15
Duplex mode selection.................... 15
CTCSS and DCS code selection ....... 15
Transmitter power ........................... 16
VOX settings ................................... 17
Squelch level setting ....................... 17
Roger Beep tone ............................. 17
Button Beep.................................... 18
Call Alarm selection ........................ 18
Dual Watch ..................................... 18
Dual Watch operation ..................... 19
CTCSS TONE FREQUENCIES .................. 19
DSC TONE CHART.................................20
UHF CB OPERATING FREQUENCIES ...... 21
SPECIFICATIONS ..................................22
SC CONTRACT WARRANTY AGAINST
DEFECTS .............................................. 23
sAFetY InFoRMAtIon
The TX675 is a radio transmitting device.
• When transmitting, keep the antenna more than 25 mm from any part of the
head or body.
• Do not transmit near electrical blasting equipment or in explosive atmospheres.
• Do not allow children to operate a radio transmitter unsupervised.
PAGE 2 INSTRUCTION MANUAL TX675

IMPoRtAnt InFoRMAtIon ConCeRnInG
UHF CB RADIo
The use of the Citizen Band radio ser vice is licensed in Australia by the ACMA
Radiocommunications (Citizens Band radio Stations) Class Licence and in
New Zealand by the Ministry of Economic Development New Zealand (MED).
A General User Radio Licence for Citizens Band radio and operation is subject
to conditions contained in those licences.
The class licence for users and equipment operating in the CB/PRS 477 MHz
band has been amended. This radio meets the new 80 channel standard.
In simple terms the same amount of spectrum is available; however, radio
transceivers can now operate in a narrower bandwidth and hence use less
spectrum. These radios are generally referred to as narrowband or 12.5 kHz
radios. By using 12.5 kHz channel spacing instead of 25 kHz, the 40 channels
originally allocated can now be expanded to 80 channels thereby doubling the
channel capacity and relieving congestion in the UHF CB/PRS band.
Original 40 channel wideband radios will continue to operate on the original
40 channels, however they will not be able to converse on the newer channels
41 – 80. The newer narrowband radios will be able to converse with all older
40 channel wideband radios on all channels 1 – 40 as well as the newer channels
allocated from 41 – 80.
The mixing of narrowband and wideband radios in the same spec trum can
cause some possible operating issues of interference and varying levels of
received volume.
POSSIBLE ISSUES
When a new narrowband radio receives a transmission from an older wideband
radio the speech may sound loud and distorted – simply adjust your radio volume
for best performance.
When an older wideband radio receives a signal from a new narrowband radio,
the speech may sound quiet – simply adjust your radio volume for
best performance.
Depending on how close your receiving radio is to another transmitting radio,
there can be interference from the transmitting radio if it is using a channel
adjacent to the channel you are listening to. Simply try going up or down a few
channels from the currently selected channel.
The above situations are not a fault of the radio but a symptom of operating
wideband and narrowband radios in the same bandwidth. This possible
interference will decrease over time as the population of wideband radios ages
and decreases.
Further information and updates are available from the Australian
Communications and Media Authority (ACMA) at www.acma.gov.au and the
Ministry of Economic Development (MED), Radio Spectrum Management at:
www.rsm.govt.nz
TX675 INSTRUCTION MANUAL PAGE 3

EMERGENCY CHANNELS
The ACMA has allocated channels 5/35 for emergency use only. Channel 5 is the
primary Simplex Emergency Channel. Where a channel 5 repeater is available,
you should select Duplex on channel 5.
NOTE: Channel 35 is the input channel for the channel 5 repeater therefore
channel 35 should also not be used for anything other than emergency
transmissions.
TELEMETRY CHANNELS
ACMA regulations have allocated channels 22 and 23 for telemetry-only
applications and have prohibited the transmission of speech on these channels.
Consequently the radio has a transmit-inhibit applied to channels 22 and 23.
In the event that additional telemetry/telecommand channels are approved by
the ACMA, these channels shall be added to those currently listed where voice
transmission is inhibited. Currently, transmissions on channels 61, 62 and 63 are
also inhibited and these channels are reserved for future allocation.
IMPoRtAnt ADVICe
READ ALL INSTRUCTIONS carefully
and completely before operating your
radio and retain this manual for future
reference.
• NEVER connect the radio to a power
source other than the supplied
batter y. This may damage your radio.
• DO NOT place your radio in front of a
vehicle airbag.
• DO NOT use your radio with a
damaged antenna.
• DO NOT attempt to modify your
radio in any way.
• ALWAYS charge your radio at normal
room temperature.
• ALWAYS switch of f your radio where
notices restrict the use of two– way
radio or mobile telephones.
• ON LY use GME approved
rechargeable battery packs with the
supplied charger.
• AVOID storing or charging your radio
in direct sunlight.
• AVOID storing or using your radio
where tem peratures are b elow -20°C or
above +60°C.
sUPPlIeD wItH
TX675
• TX675 radio
• Belt clip
• Li-ion battery pack (1600 mAh)
• AC adaptor
• USB/Micro USB lead
• Instruc tion manual
PAGE 4 INSTRUCTION MANUAL TX675
TX675TP
• 2 x TX675 radios
• 2 x Li-ion battery packs (1600 mAh)
• 2 x belt clips
• Twin desktop charger
• AC adaptor
• 12V vehicle charger
• USB/Micro USB lead
• Instruc tion manual

oPtIonAl ACCessoRIes
• Twin desktop charger (BCD017)
• USB 12V vehicle charger (BCV010)
• Leather carry case (LC008)
• Ear microphone (HS009)
• Speaker microphone (MC007)
• Clear acoustic tube and lapel microphone (HS010)
FeAtURes
TRANSMIT (TX)
2.0/0.5 watt RF power: Selectable transmitter power allows you to conserve
batter y power when transmitting in close range by using the Low Power setting.
Individually programmable Duplex function: User selectable for only those
individual channels in your area that have repeaters, leaving others free for use as
extra simplex channels.
RECEIVE (RX)
†
channels 477 MHz UHF CB
80
Power Save feature:
Conserves battery power by sleeping during periods of inactivity.
Calling Tone and Roger Beep: Alerts you to incoming calls.
Signal receive indicator
SCANNING AND MEMORY FUNCTIONS
Microprocessor controlled frequency synthesiser:
Allows user programmable control of scanning, channel memories and
selected feature options.
Programmable scan function: Scans up to 80 UHF CB channels.
Dual Watch: Monitors two channels simultaneously.
PRIVACY FUNCTIONS
CTCSS & DCS: A built-in Continuous Tone Coded Squelch System and a Digital
Coded Squelch option provide quiet channel operation.
PHYSICAL PROPERTIES
Flexible antenna
Rugged construction
USER CONTROLS AND INTERFACE
Keypad Lock: Prevents accidental button presses.
Backlit LCD: For night viewing.
†
Refer to Page 3. Important information concerning UHF CB radio.
TX675 INSTRUCTION MANUAL PAGE 5
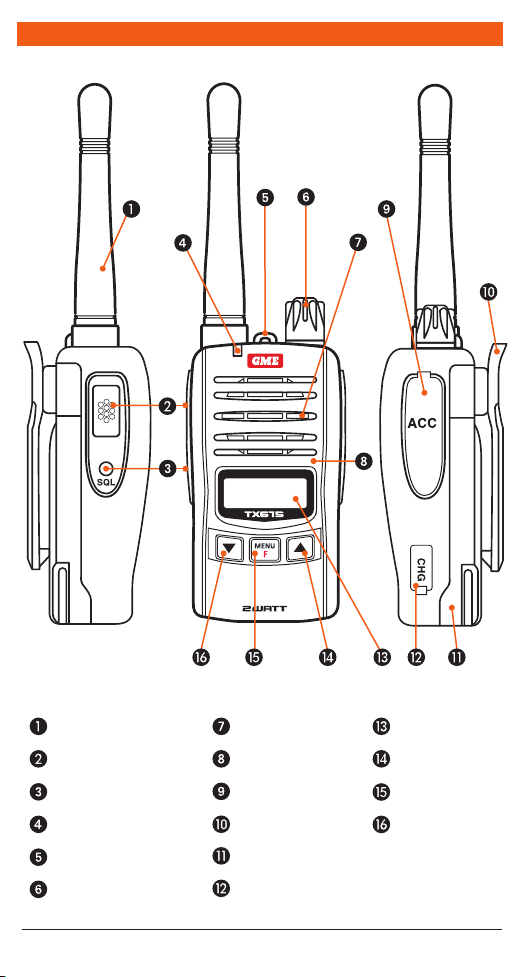
ContRols
Antenna
PTT (Push to Talk)
Squelch/Silent Key
Indicator LED
Lanyard mount
Volume control
PAGE 6 INSTRUCTION MANUAL TX675
Speaker
Microphone
Accessory jack
Belt clip
Battery
USB charge socket
LCD
Channel up key
Menu/Function key
Channel down key
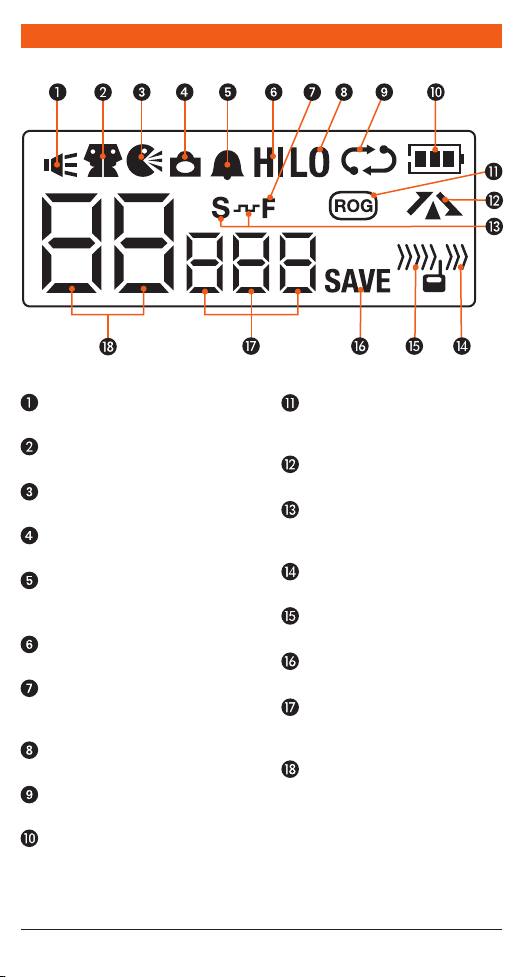
lCD ICons
Monitor icon: Appears when
the Squelch is open.
Dual Watch icon: Appears when
Dual Watch is ac tive.
VOX icon: Appears when VOX
mode is active.
Key Lock icon: Appears when
the keypad is locked.
Button Beep icon:
Appears when button
confirmation tones are on.
High Power icon: Appears
when High TX power is selected.
Function icon: Appears when
the function ‘F’ key is pressed to
activate secondary functions.
Low Power icon: Appears when
Low TX power is selected.
Scan icon: Flashes when radio
Roger Beep icon:
Appears when the Roger Beep
tones are active.
Duplex icon: Appears on
channels where Duplex is enabled.
CTCSS/DCS Silent icon:
Indicates a CTCSS or DCS tone has
been set in the menu.
Transmit icon:
Appears when transmitting.
Receive icon:
Appears when receiving signals.
Power Save icon: Appears
when the radio is sleeping.
CTCSS/DCS display: Displays
the selected CTCSS or DCS tone
when Silent mode is active.
Channel display: Displays the
selected channel in use.
is scanning.
Battery icon: Displays batter y
charge level.
TX675 INSTRUCTION MANUAL PAGE 7
CHARGInG tHe BAtteRY
The TX675 is powered by a 3.7V Li-ion battery pack. The battery pack should be fully
charged before being used for the first time or if you have not used the radio for some
time. This will ensure maximum capacity is available.
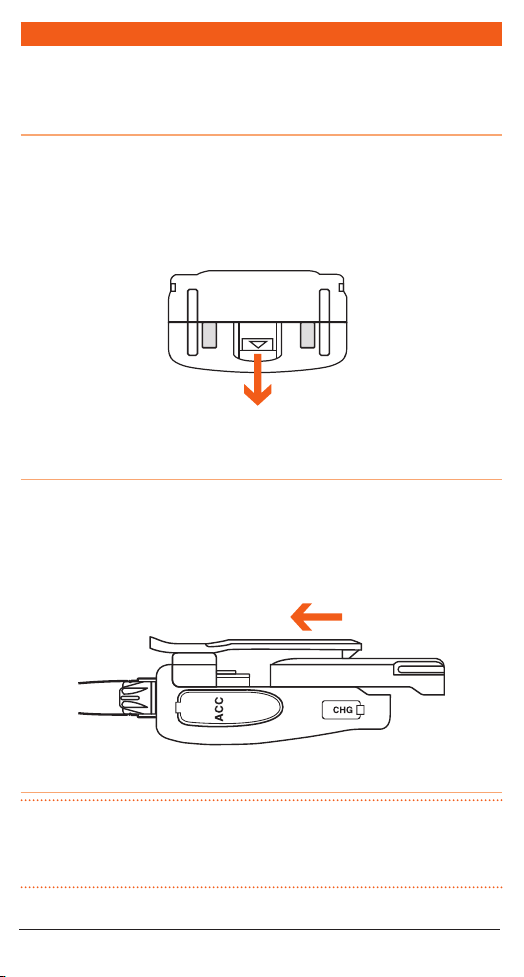
TO REMOVE THE BATTERY PACK
1. Ensure that your radio is switched off.
2. Hold the radio upside-down.
3. Using your fingernail, slide the battery catch towards the front of the radio to
release the battery then slide the battery towards you. The battery pack should
separate from the radio.
Pull to release
TO REFIT THE BATTERY PACK
1. Ensure that your radio is switched off.
2. Align the slots in the battery pack with the battery guides on the back of the radio.
3. Slide the batter y pack upwards as far as it will go until it ‘clicks’.
Slide to lock battery
CHARGING THE BATTERY PACK
NOTE: While the battery is charging, the indicator LED on the radio will light RED
and the battery icon on the display will animate to show the batter y is charging. Once
the battery is fully charged, the radio’s indicator LED will change to GREEN and the
batter y icon will show the full charge state.
PAGE 8 INSTRUCTION MANUAL TX675
 Loading...