

GME TX650 User Manual
TX650
COMPACT
UHF RADIOS
I N S T R U C T I O N M A N U A L

PA GE 2 IN ST RUCT IO N MA NUAL TX 65 0
CONTENTS
SAFETY INFORMATION . . . . . . . . . . . . . . . . . . . . . . . . . . . . . . . . . . . . . . . . . .2
IMPORTANT . . . . . . . . . . . . . . . . . . . . . . . . . . . . . . . . . . . . . . . . . . . . . . . . . . 3
EQUIPMENT AND ACCESSORIES SUPPLIED . . . . . . . . . . . . . . . . . . . . . . . . . . . 3
BATTERIES AND CHARGING . . . . . . . . . . . . . . . . . . . . . . . . . . . . . . . . . . . . . . 4
CONTROLS . . . . . . . . . . . . . . . . . . . . . . . . . . . . . . . . . . . . . . . . . . . . . . . . . . .4
CONTROL DESCRIPTIONS . . . . . . . . . . . . . . . . . . . . . . . . . . . . . . . . . . . . . . . . 6
BASIC RADIO OPERATION . . . . . . . . . . . . . . . . . . . . . . . . . . . . . . . . . . . . . . . . 8
TROUBLESHOOTING . . . . . . . . . . . . . . . . . . . . . . . . . . . . . . . . . . . . . . . . . . .15
OPERA
TING FREQUENCIES . . . . . . . . . . . . . . . . . . . . . . . . . . . . . . . . . . . . . . 16
CTCSS . . . . . . . . . . . . . . . . . . . . . . . . . . . . . . . . . . . . . . . . . . . . . . . . . . . . . . 17
TECHNICAL SPECI
W
ARRANTY . . . . . . . . . . . . . . . . . . . . . . . . . . . . . . . . . . . . . . . . . . . . . . . . .19
FICATIONS . . . . . . . . . . . . . . . . . . . . . . . . . . . . . . . . . . . . .18
WARNING: SAFETY INFORMATION
The TX650 is a radio transmitting device.
• When transmitting, keep the antenna more than 25 mm from any part
of the head or body.
•
Do not transmit near electrical blasting equipment or in explosive
atmospheres.
•
Do not allow children to operate a radio transmitter unsupervised.

IMPORTANT
READ ALL INSTRUCTIONS carefully and completely before operating your radio
and retain this manual for future reference.
NEVER connect the radio to a power source other than the supplied battery.
This may damage your product.
DO NOT place your radio in front of a vehicle airbag.
DO NOT use your radio with a damaged antenna.
DO NOT attempt to modify your radio in any way.
ALWAYS charge your radio at normal room temperature.
ALWAYS switch off your radio where notices restrict the use of two-way radio
or mobile telephones.
ALWAYS replace the accessory jack cover (if applicable) when the jack is not
in use.
ONLY use GME approved rechargeable batteries with the supplied charger.
AVOID exposing your radio to water. It is not waterproof.
AVOID storing or charging your radio in direct sunlight.
AVOID storing or using your r
or above + 60°C.
adio where temperatures are below - 20°C
EQUIPMENT AND ACCESSORIES
• 2 x TX650 radio (with internal battery)
• Instruction Manual
• Smart Twin Charger with Adaptor
• 2 x Ear Microphone
• 2 x Neck Lanyard
TX 65 0 IN ST RUCT IO N MA NUAL PA GE 3
PA GE 4 IN ST RUCT IO N MA NUAL TX 65 0
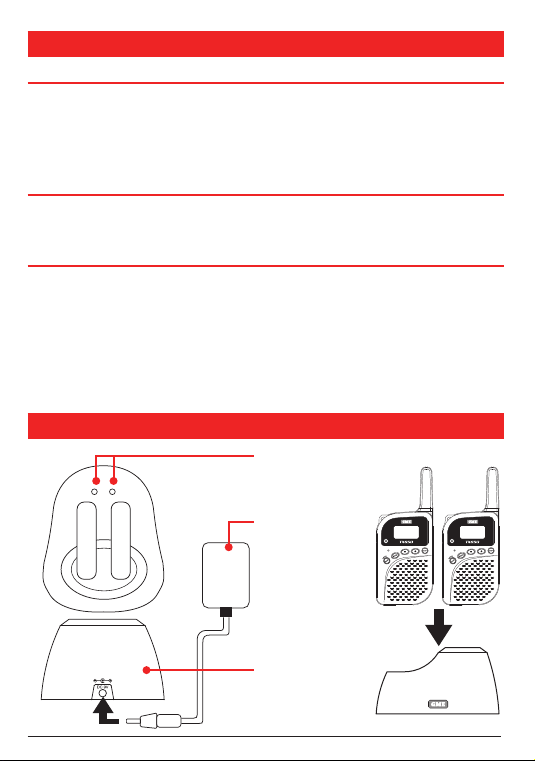
BATTERIES AND CHARGING
FITTING THE BATTERIES
The TX650 uses an internal Lithium Ion battery which has been pre-installed.
For remov
al or replacement please contact your local Dealer. Unauthorised
attempts to remove or replace the battery will void your warranty and may
damage your radio.
CHARGER INSTALLATION
Connect the power adaptor to the mains power supply and connect the adaptor’s
power plug to the charger cradle. The LED’s will not be lit.
TTERY CHARGING
BA
Insert your radios in the charging compartment until they click into place.
The charger LED’s will light RED and the radios will start charging. If the LEDs
do not light RED or they blink in RED and GREEN, remove and refit the radios
into the cradle again until the LEDs light RED.
he charging time for a fully discharged battery is typically 12 to 15 hours.
T
When the battery is fully charged the charger LED’s will light green.
CONTROLS
LEDs
Power Adaptor
• Input: 240 V AC
• Output: 9 V DC
Charging Cradle
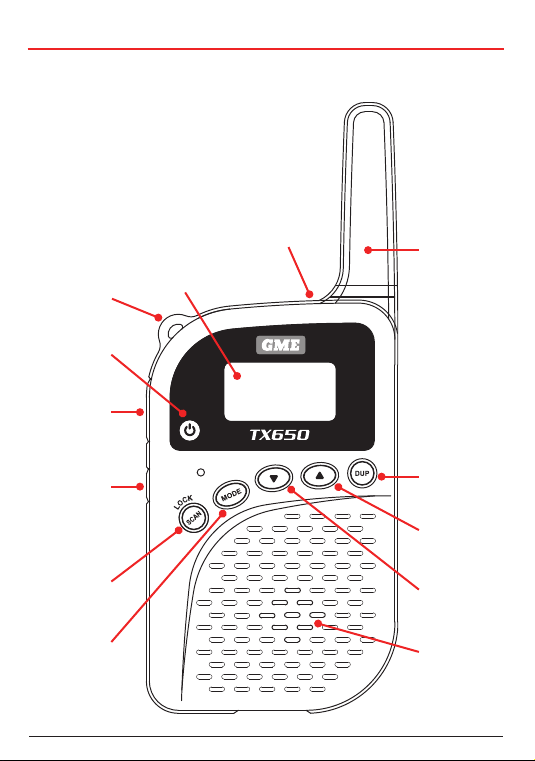
RADIO CONTROLS
Earphone Jack
Neck Lanyard
Attachment
Power On / Off
-To-Talk
Push
(PTT)
Monitor / Lamp
Scan / Lock
Mode
TX 65 0 IN ST RUCT IO N MA NUAL PA GE 5
LCD
Antenna
Duplex
Volume Up/
Mode Adjust
Volume Down/
Mode Adjust
Speaker
PA GE 6 IN ST RUCT IO N MA NUAL TX 65 0
3!6%
$50
#4#
$7 ()
21
161514131211
3 4 5 7 8 9
10
6
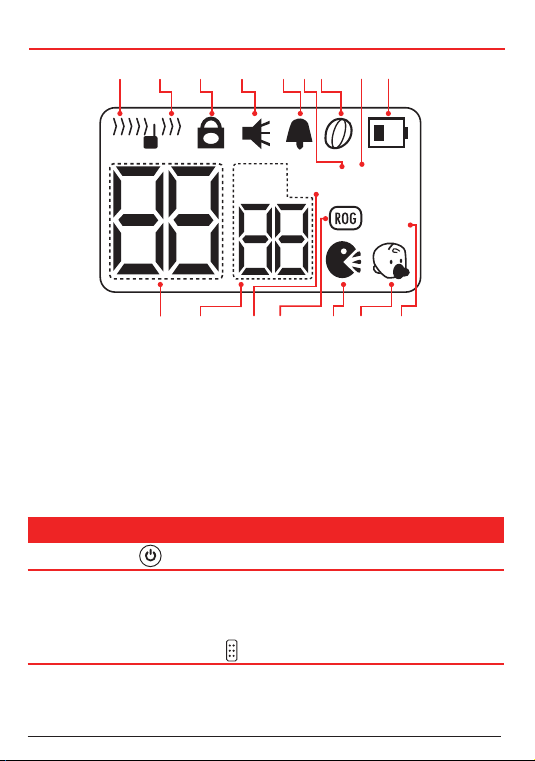
LCD DISPLAY
1. Receiving/Busy Icon
2. Transmit Icon
3. Lock Icon
4. Monitor Icon
5. Key Tone Icon
6. Hi Transmit Power Icon
7. Scan Icon
8. Power Save Icon
9. Battery Warning Icon
10. Channel Display
11. CTCSS Code Icon/Display
12. Dual Watch Icon
13. Roger Beep Icon
14. VOX Icon
15. Room Monitor Icon
16. Duplex Icon
CONTROL DESCRIPTIONS
POWER BUTTON
Press and hold the P
confirmation tone to indicate the radio is on. To turn the radio off, press and hold
the POWER button for about 2 seconds.
PUSH-TO-TALK (PTT) BUTTON
Press and hold this button to speak (transmit). Release the button to listen
You can only communicate with other UHF CB radios when their
(receive).
channel and CTCSS code settings are the same as yours.
OWER button for about 2 seconds. You will hear a
 Loading...